1
Deploying Oracle® Application Server 10g on
Dell PowerEdge™ Servers with Linux
By Larry Pedigo
January 2007
Deploying Oracle Application Server 10g on
Dell PowerEdge Servers with Linux
Contents
Page
Executive Overview
Introduction – Oracle Application Server 10g
Oracle Application Server Key Components
J2EE and Web Cache Tier
Portal and Wireless Tier
Business Intelligence and Forms Tier
Infrastructure Tier
Other Components
Oracle Application Server Release 2 Features
Oracle Application Server Release 3 Features
Choosing Oracle Application Server
Deploying Oracle Application Server 10g
Choosing the Number of Tiers
An Enterprise Deployment Scenario
Advantages of Running Oracle Application Server on
Dell Platforms
Dell Hardware Sizing Recommendations
Linux OS Installation – Preparing the System for
Oracle Application Server
Minimum System Requirements
OS Selection
Basic OS Installation
Post-Installation OS Configuration
Oracle Application Server Metadata
Repository Configuration
Configuring the Dell Hardware
Configuring Basic Networking
Installing and Configuring the Dell/EMC® SAN
Verifying that the SAN is Ready for Oracle
Installing and Configuring Application Servers
Installation Process – Three-tier Topology
4
6
6
7
8
8
9
10
10
11
12
13
13
17
20
20
21
21
23
23
25
29
30
30
32
33
35
35
Installing the Infrastructure Tier and the Metadata
Page 2 of 59
Repository Together
Installing the Metadata Repository in an Existing Database
Installing the Portal/Wireless Tier
Installing the Business Intelligence and Forms Tier
Post-Installation Oracle Application Server Configuration
Configuring Oracle Application Server
Environment Variables
Checking Oracle Application Server Ports
Accessing the Oracle Applications Server Welcome Page
35
37
42
44
45
46
46
47
48
48
51
Oracle Application Server Administration
Starting and Stopping Oracle Application Server
Administering Oracle Application Server Components
Monitoring the Application Server with Application
Server Control
Dell/Oracle Best Practices for Oracle Application Server
Summary
References
53
56
56
58
Page 3 of 59
Executive Overview
Over the past ten years, one of the most significant trends in corporate IT has been the
emergence of the Application Platform Suite (APS). An Application Platform Suite
provides the infrastructure for corporations to develop and deploy their own applications,
as well as deploying third-party applications. The main enabling technology for
Application Platform Suites is Java™ 2 Enterprise Edition software. J2EE provides not
only powerful software tools for Enterprise development, but also provides
comprehensive standards to help ensure inter-operability of all deployed applications.
While object-oriented data models are at the heart of J2EE implementations, it is possible
to map an object-oriented model to a traditional relational model. This is more than an
academic exercise, since the bulk of corporate data is currently stored in relational
databases. This is not likely to change soon, since relational databases provide the
performance, security, and high availability characteristics that corporations demand for
storing persistent data. Fortunately, the combination of J2EE-enabled Application
Platform Suites and persistent relational database stores has proven to be remarkably
flexible and robust, and is now considered the standard platform for application
development and deployment.
Therefore, it should be no surprise that one of the leading APS is offered by the leading
database vendor, Oracle® Corporation. Oracle Application Server (OracleAS) 10g
Enterprise Edition offers the advantage of tight integration with Oracle Database 10g.
Moreover, Oracle Application Server 10g Enterprise Edition provides a comprehensive
solution for developing, integrating, and deploying a corporation’s applications, portals,
and Web sites. The robust architecture of Oracle Application Server Enterprise Edition is
designed to provide outstanding J2EE performance and to support a broad spectrum of
applications. Major categories of Oracle Application Server applications include
Business Intelligence, portal applications, wireless applications, identity management,
and business integration tools. Not only does Oracle Application Server provide a
platform for developing new categories of applications, it also offers a consolidated
framework for deploying legacy Oracle applications, such as Forms and Reports. In
addition, Oracle Application Server middleware forms the core of Oracle’s Fusion
strategy for integrating diverse Enterprise applications.
Of course, deploying Enterprise class applications with Oracle Application Server
software requires Enterprise class hardware. Dell PowerEdge Servers and Dell/EMC®
Enterprise Storage provide a robust, scalable platform for deploying Oracle Application
Server 10g applications. In addition, Dell Hardware and Software solutions lead the
market in providing value for the Enterprise Infrastructure, on a cost effective basis. Dell
engineering works directly with Oracle Corporation to provide tested and validated
solutions. This benefits customers by providing a “risk-free” installation experience.
One of the more important benefits that this whitepaper provides is in discussing the
architectural options for Oracle Application Server 10g. Oracle Application Server can
be deployed in a variety of different topologies allowing individual components to be
distributed across multiple servers, or to be duplicated in a clustered configuration. This
provides benefits both in terms of application performance and High Availability. Due to
this flexibility, Administrators are faced with a large number of architectural and
Page 4 of 59
deployment decisions for an Oracle Application Server 10g implementation. This paper
will examine a variety of deployment options including two-tier, three-tier, and multi-tier
topologies. An example architecture for an Enterprise Business Intelligence/Forms
topology will also be discussed.
The main focus of this whitepaper is to provide a step-by-step deployment guide for
installing Oracle Application Server 10g on the Red Hat Linux Operating System with
Dell PowerEdge Servers and Dell/EMC storage. The example installation utilizes a
three-tier model with the following components:
• Client tier
• Portal/Business Intelligence tier
• Infrastructure/Data tier
This topology has the advantages of relatively simple installation and maintenance, along
with reasonable performance.
Detailed installation instructions for the following commonly deployed Oracle
Application Server modules are discussed:
• Oracle Containers for J2EE (OC4J)
• OracleAS Web Cache
• Oracle Identity Management (single sign-on, OID)
• Oracle Forms Services
• Oracle Reports Services
• OracleAS Portal
Of course, these examples cannot possibly cover all of the available topologies or
deployment options. However, this whitepaper will cover the core installation and
administration techniques that are required for most Oracle Application Server
deployments.
Page 5 of 59
Introduction – Oracle Application Server 10g
Overview
Oracle Application Server 10g is a layered product. It consists of multiple interdependent
software modules, logically grouped into tiers. The various software tiers can be
installed together on a single server, or can be installed in a distributed fashion across
multiple severs. The basic software tiers offered by Oracle Application Server include
the following:
• J2EE and Web Cache tier
• Portal and Wireless tier
• Business Intelligence and Forms tier
• Infrastructure tier
In order to understand the key features of Oracle Application Server, it is important to
understand that the underlying technology is constantly evolving and the software
modules are being frequently upgraded by Oracle. At any given time, there may be
multiple versions of Oracle Application Server software available for installation. The
version (or versions) that a business may choose to install will depend on the mix of
components that they wish to deploy. At the time this whitepaper was written (January
2007), there were two major releases available for Oracle Application Server: Oracle
Application Server 10g Release 2 and Oracle Application Server 10g Release 3. The
following sections will introduce the key features of each software version, and strategies
for deploying both versions, where appropriate.
Oracle Application Server Key Components
Despite the name, Oracle Application Server 10g does not offer much in the way of prepackaged applications. This is in contrast to Oracle E-Business Suite 11i which offers
applications targeted at specific financial and business processes. Instead of providing
functionally-focused applications, Oracle Application Server 10g provides an integrated
development platform, which corporations can use to develop their own business function
specific applications.
Nevertheless, some of Oracle’s legacy development tools are so familiar to customers
that they are considered “applications” in their own right. This is certainly the case with
Oracle Application Server 10g Forms Services and Reports Services, which replace the
classic, client-heavy Oracle Forms and Oracle Reports with thin-client versions.
The following sections describe the individual components of Oracle Application Server.
The component listing is organized by tiers. This is significant, since components within
a tier are most commonly installed together.
Page 6 of 59
J2EE and Web Cache Tier
The J2EE and Web Cache tier contains the core components that are necessary to develop
and deploy Enterprise Java applications. Following is a description of the key
components.
Oracle HTTP Server – provides the underlying deployment platform for a variety of
programming languages and technologies. Oracle HTTP Server is based on the timetested technology of the Apache HTTP Server, with significant enhancements in the areas
of load balancing, administration, and configuration. Oracle HTTP Server can serve as
either a forward or reverse proxy server, it can also be configured to host static and
dynamic pages over the web, and it can even host entire web-based applications.
Oracle Application Server Containers for J2EE (OC4J) – Oracle Application Server
Containers for J2EE (OC4J) provides a certified implementation of the industry standard
J2EE specification (either 1.3 or 1.4, depending on the version installed). Oracle
Application Server is entirely written in Java and runs on a Java Virtual Machine (JVM).
OC4J adds value because it is lightweight, scalable, and runs faster than many other J2EE
implementations. OC4J supports a wide variety of Java-based APIs, including:
• Java Server Pages (JSP)
• Java Servlet
• Enterprise JavaBeans
• Java Database Connectivity (JDBC)
• Java Transaction API (JTA)
• Java Message Services (JMS)
• JavaMail
• JavaBeans Activation Framework
• Java API for XML (JAXP)
• J2EE Connector Architecture
• Java Authentication and Authorization Services (JAAS)
OracleAS Web Cache – Oracle AS Web Cache is a state-of-the-art Web caching and
proxy server solution that provides server acceleration and load balancing for both static
and dynamic Web content. In addition, OracleAS Web Cache offers many advanced
features, including intelligent caching, page assembly, compression features, and Edge
Side Includes (ESI).
Oracle TopLink – Oracle Application Server TopLink is a tool that simplifies the
otherwise demanding task of mapping Java objects to Oracle relational database models.
This tool allows developers that are comfortable with Java programming techniques to
extend programming for persistent objects into the relational realm, without requiring
knowledge of SQL and PL/SQL syntax. Oracle Application Server TopLink can be used
to greatly reduce the time required to build high-performance J2EE applications.
Oracle JDeveloper – Oracle JDeveloper is an integrated set of tools to enable rapid J2EE
and XML development. JDeveloper offers a full suite of wizards, editors, visual design
tools, and deployment tools. Many developers have found the fast Java debugger, the
Java profiler, and the CodeCoach tools to be superior to any similar tools on the market.
Page 7 of 59
These tools allow developers to easily build high-quality, standard J2EE components,
including applets, JavaBeans, JavaServer pages, servlets, and Enterprise JavaBeans.
Portal and Wireless Tier
The Portal and Wireless tier is a middle tier that is built over a base of Oracle HTTP
server and OC4J components. The unique components for this tier include:
Oracle Portal – Unlike the average portal building toolset, Oracle Application Server
does not require extensive programming or complicated maintenance routines. In fact,
Oracle Instant Portal allows those new to this field to build simple portals with little to no
programming. Oracle Instant Portal also provides a framework for self-service content
management and publishing, as well as deploying, publishing, and consuming Web
services.
Oracle Application Server Wireless (Oracle Wireless) – Oracle Wireless allows
corporations to develop and deploy wireless applications that can deliver content to any
device on any wireless network, regardless of the protocol. Oracle Wireless provides
e-mail and location-based services, as well as full support for XML and J2EE standards.
This enables developers to build enterprise-class wireless applications that can be
seamlessly deployed across the corporation.
Business Intelligence and Forms Tier
Oracle Business Intelligence Suite is a comprehensive suite of enterprise business
intelligence (BI) products that provide a rich set of tools for analyzing corporate data.
Like the Portal and Wireless tier, the Business Intelligence and Forms tier is a middle tier
that is built over a base of Oracle HTTP server and OC4J components. The components
for this tier include:
Oracle Business Intelligence Discoverer – OracleBI Discoverer is a business
intelligence tool that allows non-technical users to analyze corporate data through
intuitive interfaces. This integrated business intelligence solution includes capabilities
for ad-hoc queries, reporting, analysis, and Web-publishing. OracleBI Discoverer can be
used to access a wide variety of data sources, including multidimensional OLAP
databases, data marts, data warehouses, or online transaction processing systems.
Oracle Application Server Personalization – OracleAS Personalization provides web
users with a customized experience by offering recommendations based on real-time
analysis of user history and user profiles. OracleAS Personalization is beneficial to Web
stores, application hosting environments, business call centers, and any business with a
web-based customer interface.
Oracle Application Server Reports Services – OracleAS Reports Services provides
tools to develop and deploy high-quality, dynamically generated reports, while
supporting large user communities. Any data source can be used to build reports, and
any format is supported. It also includes Oracle Reports Developer, which uses servlets
and JSP to support complex data models and diverse deployment environments.
Page 8 of 59
Oracle Application Server Forms Services – OracleAS Forms Services enables
corporations to develop and deploy forms based applications, similar in functionality to
the classic Oracle Forms. One of the key differences is that instead of a heavy client
deployment, Forms applications are deployed to Java clients in a Web environment.
OracleAS Forms Services automatically optimizes performance, and scalability is
enhanced by automatic load-balancing across all available Forms servers. OracleAS
Server Forms Services consists of four components:
• Forms Servlet: When a user starts a Forms application, the Forms Servlet is used
to establish the initial connection. The client session receives the HTML file that
contains the Forms Client applet.
• Forms Client Applet: A Java applet that runs in the client browser. It provides the
user interface for the Forms Runtime Process.
• Forms Listener Servlet: A servlet running in the OC4J servlet container. It
manages the both the Forms Runtime Process and network connections to the
Forms Runtime process.
• Forms Runtime Process: A process that runs in an Oracle Application Server
instance. The runtime process maintains the connection between the Forms Client
applet and the database.
Infrastructure Tier
The infrastructure tier consists of components that store and distribute the product metadata and security information that is required to run Oracle applications. The
infrastructure tier contains the following components:
Oracle Application Server Metadata Repository – OracleAS Metadata Repository is
an information store for data that describes each installed Oracle Application Server
component (including infrastructure components). This metadata enables both
infrastructure and middle tier instances to optimally manage their components. OracleAS
Metadata Repository can be installed into a new or existing Oracle Enterprise Edition
database.
Oracle Identity Management – Oracle Identity Manager provides central control of all
user accounts and access privileges for enterprise IT resources. Oracle Identity
Management includes the following components:
• Oracle Internet Directory – Oracle Internet Directory is the Oracle
implementation of Lightweight Directory Access Protocol (LDAP), version 3.
All users are created and managed via OID, providing centralized authentication
for the enterprise.
• Single Sign-On (SSO) – Single sign-on (SSO) allows application users
(or application components requiring authentication) to log in once and gain
access to all applications managed by OracleAS.
• Delegated Administration Service – Delegated Administration Services uses
proxies to assign administrative privileges to trusted users and administrators.
• Directory Integration Platform – Directory Integration and Provisioning is used to
synchronize Oracle Internet Directory and external directories and repositories,
such as third-party LDAP implementations.
• Oracle Application Server Certificate Authority – The OracleAS Certificate
authority manages and publishes X.509v3 certificates. OracleAS Certificate
Page 9 of 59
Authority supports PKI-based (strong) authentication methods and provides
assertion services.
Other Components
There are several other optional components that may be important in some cases,
depending on corporate business requirements. These components include:
Oracle Integration – Oracle Integration provides a true Service-Oriented Architecture
(SOA) that can be used to build an enterprise infrastructure for application-to-application
communication. Even though the applications may be dissimilar in many ways, Oracle
Integration makes use of standards-based tools to communicate between heterogeneous
platforms.
Oracle BPEL Process Manager – Oracle BPEL utilizes cutting-edge technology to
provide methods for assembling a set of discrete services into an end-to-end process flow
that closely emulates natural Business processes. Oracle BPEL Process Manager offers
substantially reduced cost and effort for designing Enterprise applications containing
mission-critical business logic.
Oracle Business Activity Monitoring – Oracle Business Activity Monitoring (Oracle
BAM) provides a comprehensive set of tools for building interactive dashboards and
related business alert mechanisms. Oracle BAM provides crucial aid for business
executives and operations managers that need to make decisions based on real-time data.
Oracle Enterprise Manager – Oracle Enterprise Manager 10g Grid Control is the
primary tool offered by Oracle for monitoring and managing everything in the Oracle
environment, including Oracle databases, Oracle Application Server, and Oracle
Collaboration Suite. Grid Control offers comprehensive management and monitoring
capabilities, including automatic monitoring for all targets.
Oracle Application Server 10g Release 2 Features
Oracle Application Server 10g Release 2 is a full featured release, integrating all software
modules. Therefore, it is entirely possible to build an Enterprise OracleAS
implementation with just Release 2 components.
At the most basic level, OracleAS Release 2 is composed of middle tier components and
infrastructure tier components. (See the detailed descriptions in the previous section.)
The middle tier components include the following install types and components:
• J2EE and Web Cache – this install type includes the following components:
o Oracle HTTP Server
o Oracle Application Server Containers for J2EE (OC4J)
o OracleAS Web Cache
o Oracle JDeveloper (optional)
o Oracle TopLink (optional)
• Portal and Wireless – this install type includes all of the J2EE and Web Cache
components, plus the following components:
o OracleAS Portal
Page 10 of 59
•
o OracleAS Wireless
Business Intelligence and Forms – this install type includes all of the J2EE and
Web Cache components, the Portal and Wireless components, and the following
components:
o OracleAS Personalization
o OracleBI Discoverer – includes the following components:
OracleBI Discoverer Plus
OracleBI Discoverer Viewer
OracleBI Discoverer Portlet Provider
o OracleAS Reports Services
o OracleAS Forms Services
The Infrastructure tier components include:
• OracleAS Metadata Repository – optionally integrated with a corporate Oracle
database
• Oracle Identity Management Components
OracleAS Release 2 features flexible, expandable implementation options. Middle tier
components may be distributed across multiple servers. This can be done to improve
performance or for management convenience. The group that contains these distributed
components is called an OracleAS Farm. An OracleAS Farm shares a common Metadata repository. Another option is to duplicate or “clone” an Application Server to one or
more copies. This forms an OracleAS Cluster. OracleAS Clusters are used to implement
High Availability architectures, as well as to improve performance.
Oracle Application Server 10g Release 3 Features
Oracle Application Server 10g Release 3 (10.1.3) is a focused release, centered on J2EE
Applications. This release features the following middle tier components:
• Oracle HTTP Server
• Oracle Containers for J2EE (OC4J)
• Oracle Enterprise Manager 10g Application Server Control
• Oracle Process Manager and Application Server
There are several improvements in the J2EE implementation. The new version of OC4J
containers meets the J2EE 1.4 specification. There is also a new version of Application
Server Control that is based on the Java Management Extensions (JMX) technology.
Oracle Process Manager and Notification Server (OPMN) performs an enhanced role,
including improved clustering capabilities. OC4J also includes a new, more flexible
method for grouping OC4J instances that is different from the Release 2 Farms/Clusters
model. The new OC4J grouping method facilitates the deployment and management of
J2EE applications across a cluster topology.
At the time of this whitepaper (January 2007 no software modules other than those listed
above were supported by OracleAS Release 3. Specifically, the following modules are
not supported:
• Portal and Wireless middle tier
• Business Intelligence and Forms middle tier
Page 11 of 59
•
Infrastructure tier
Choosing Oracle Application Server Releases
Since OracleAS 10.1.3 is not a complete replacement for OracleAS 10.1.2,
Administrators attempting either an upgrade or a fresh install may be confused by the
options presented by the two versions. Fortunately, the decisions required are not as
difficult to make as it first may appear. Depending on your requirements, it is fairly easy
to make some general recommendations.
First of all, it is important to understand that OracleAS 10.1.3 can work with certain
10.1.2 components. It is possible to redeploy 100% 10.1.2 J2EE applications under
10.1.3 (in fact, this is encouraged). It is also possible to use 10.1.2 Web Cache as a
reverse proxy for either 10.1.2 or 10.1.3. The 10.1.2 version of Oracle Identity
Management can also be used with 10.1.3. Finally, OracleAS Portal version 10.1.2 (or
version 10.1.4) can be used to publish OracleAS 10.1.3 content. (Note that Portal still
requires the presence of a 10.1.2 version of OC4J.)
Given these facts, if you wish to install or upgrade OracleAS, answering some simple
questions will help you to determine the correct path. After examining the list of
supported 10.1.3 components listed above, will you need to install any OracleAS
components that do not appear in the 10.1.3 list? If the answer is no, you can start by
performing a clean install of 10.1.3.
If the answer is yes, you will need to first install the 10.1.2 version of the components.
For middle tier components, this implies that a 10.1.2 version of Oracle HTTP server and
OC4J must also be installed. Note that the “compatible” list just discussed requires a
layer of 10.1.2 components. Even if you have 100% Java applications that you wish to
redeploy under 10.1.3, you may find it convenient to first install under 10.1.2. Therefore,
the general case is that you should start by performing a full install under 10.1.2.
Do you need to install 10.1.3 at all? The answer is yes if you have “home grown” J2EE
applications that you wish to deploy or redeploy with the latest and most advanced
architecture (applications typically developed with JDeveloper and TopLink). If your
main goal is to utilize applications generated through Forms Services, Report Services, or
Portal, version 10.1.3 may not add much value for you.
Note that if you do install 10.1.3, it is not truly an “upgrade”. Rather, it is the installation
of independent products, which can interoperate in certain cases.
Since the majority of those installing Oracle Application Server will need to install
OracleAS 10.1.2, that will be the focus of this whitepaper. Those wishing to upgrade
their J2EE components are encouraged to refer to the “Oracle Application Server
Upgrade and Compatibility Guide 10g Release 3 (10.1.3)”.
Page 12 of 59
Deploying Oracle Application Server 10g
Deploying Oracle Application Server10g isn’t quite as simple as picking a server and
placing a CD in the media tray. Rather, a number of decisions have to be made up front
that will influence how OracleAS is deployed. The first decision is to choose the
architectural model. This can include the choice of one-tier, two-tier, three-tier, or multitier options. Of course, the success of the implementation will also depend on the choice
of servers. Dell PowerEdge servers offer flexible options for OracleAS deployment,
whether you choose to deploy a few powerful servers or a distributed architecture over
several smaller (but fast) servers. The performance of the OracleAS implementation is
largely determined by the decisions made in the planning stage, so planning the OracleAS
deployment should not be taken lightly.
Choosing the Number of Tiers
By design, Oracle Application Server 10g offers a large variety of deployment options.
At the simplest level, it is possible to install all OracleAS components on a single server.
This is often done for small installations or test servers. In this scenario, the J2EE, Web
Cache, Infrastructure, and Portal/Business Intelligence/Forms applications are all
installed on the same server. This is essentially a “two-tier” installation, since all
OracleAS components are installed in a single server-side tier (in fact, on a single
machine), and the client web browsers and applets are the client-side tier.
It should be noted that this does not necessarily include the corporate database, which is
frequently accessed by Oracle Applications. The only OracleAS-specific database
component is the Metadata Repository. By default, this is installed in a small stand-alone
database on the OracleAS server, along with the rest of the Infrastructure components.
The actual corporate data accessed by applications (i.e. financial data, transaction
histories, etc.) is stored in a pre-existing database, which is usually located on a separate
server, and is accessed remotely via the network. For performance reasons, it is
recommended to separate OracleAS components from the production corporate database.
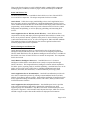
An example of a basic two-tier implementation is illustrated in Figure 1.
Figure 1. Basic Two-Tier OracleAS Deployment Topology
Page 13 of 59
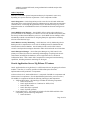
An improvement to the two-tier model is to install the Metadata Repository component
into the pre-existing corporate database with the “Repository Creation Assistant” tool.
This splits the Metadata Repository from the other Infrastructure components, but it
removes the need to host a small database on the OracleAS server. Even in a two-tier
model, separating the Metadata repository out from the other components improves
performance. An example of a two-tier implementation with metadata hosted in the
corporate database is shown in Figure 2.
Figure 2. Improved Two-Tier OracleAS Deployment Topology
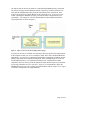
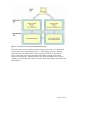
If at least two servers are available for OracleAS, a three-tier model can be implemented.
In the simplest scenario, one server contains the J2EE, Web Cache, and Portal/BI/Forms
applications. A second server contains the Infrastructure components, including securityrelated components such as Identity Management, OID, and Single Sign On, as well as
the Metadata Repository. The separation of Infrastructure components from other
components increases security (with an optional firewall) and also improves performance
by lowering contention for server resources. Again, it is recommended to deploy the
Metadata Repository into a pre-existing corporate database with the “Repca” tool. Figure
3 illustrates a simple three-tier implementation.
Page 14 of 59
Figure 3. Basic Three-Tier Deployment Topology
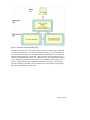
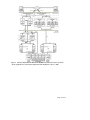
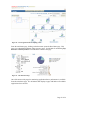
With three OracleAS servers, the components in the three-tier model can be distributed
for improved performance. An example is illustrated in Figure 4. The first middle tier
server hosts the Portal/Wireless components and the second middle tier server hosts the
Business Intelligence/Forms components. J2EE and Web Cache components are also
installed on both middle tier servers. The Infrastructure tier is implemented on the third
server. Splitting the components across three servers minimizes contention for server
resources, while still allowing coordination between the components. This topology
provides reasonable performance with a minimal server count, and this is the topology
utilized in the installation example below.
Page 15 of 59
Figure 4. Preferred Three-Tier OracleAS Deployment Topology
With four or more servers, a simple multi-tier topology can be built. An example with
five OracleAS servers is illustrated in Figure 5. This topology places two OracleAS
clustered servers with J2EE and Web Cache components “in front” of the other two
servers, intercepting user requests and input, and caching frequently accessed web
content for rapid response. Behind the Web Cache, the second and third servers hosts
“middle tier” components such as Portal, Wireless, Business Intelligence applications and
Forms/Reports.
Page 16 of 59
Figure 5. Basic Multi-Tier OracleAS Deployment Topology
An Enterprise Deployment Scenario
There are a couple of good reasons why it may be desirable to consider more complex
deployment models. The more advanced topologies require more than three servers and
potentially more than three tiers. One reason to utilize a multi-server, multi-tier model is
scalability. Oracle active-active clustering techniques can be used to increase
performance as you add servers. Another important reason to use a multi-server, multitier model is to achieve high availability. Even if the three server topology is sufficient to
meet your performance requirements, it offers little protection in case of server or
component failure. Each server is a potential point of failure for your applications, since
there is no redundancy. Fortunately, Oracle clustering addresses this issue as well,
providing redundancy and failover capability in case of server failure.
The architecture illustrated in Figure 6 is an Enterprise class, multi-tier topology for
Oracle Application Server. This features a variety of techniques for providing scalability,
load balancing, and high availability. One technique is to distribute components across
multiple servers. The set of distributed applications is considered an OracleAS Farm.
Page 17 of 59
The key step that coordinates the members of a farm is registration of all member
components with a common Metadata Repository.
In addition, OracleAS Cluster technology (based upon OC4J containers) is used to
“clone” application servers. These OracleAS clusters have built-in failover capabilities.
Load balancing is provided by the use of load balancing routers. These routers must be
capable of load balancing a variety of protocols, including TCP/IP, http, and LDAP.
The Infrastructure tier is split into three parts. The Single Sign On and Delegated
Administration Services are placed in a clustered middle tier setting. For additional
security, the middle tier is separated via a firewall from the remaining Infrastructure tier
components, which include Oracle Internet Directory and the Metadata Repository. The
Metadata Repository and the corporate database components are implemented within
Oracle Real Application Clusters. For the highest level of security, the Metadata
Repository for Applications and Security are placed on separate Real Application
Clusters.
Most real world deployments will not be this complex, or include this many servers.
However, all of the basic techniques for implementing an Enterprise class deployment are
illustrated. For Further information, see the Oracle document “Oracle Application Server
Enterprise Deployment Guide 10g Release 2 (10.1.2)”.
Page 18 of 59
Figure 6. Enterprise Deployment Architecture for MyBIF.com (courtesy of Oracle Corporation,
“Oracle Application Server Enterprise Deployment Guide 10g Release 2 (10.1.2)”, 2006)
Page 19 of 59
Advantages of Running OracleAS on Dell PowerEdge Servers
One of the key decisions in planning an Oracle Application Server deployment is the
choice of hardware. By choosing Dell hardware, you can be confident that your
deployment will be a success. Dell PowerEdge Servers and Dell/EMC Enterprise
Storage provide a robust, scalable platform for deploying Oracle Application Server 10g
applications. Dell offers three server classes that are appropriate for implementing
Oracle Application Server:
• A 1U rack server with two processor sockets (currently the PowerEdge 1950)
• A 2U rack server with two processor sockets (currently the PowerEdge 2950)
• 4U rack servers with four processor sockets (currently the PowerEdge 6850 and
PowerEdge 6950)
Equivalent tower servers are also available.
Figure 7. Preferred Dell PowerEdge Servers for Oracle Application Server
Dell PowerEdge servers utilize state-of-the-art processing architectures. In addition, Dell
offers powerful “lights out” Enterprise monitoring tools, including Open Manage
software and Digital Remote Access Cards.
Dell works closely with Oracle to help ensure maximum compatibility for their enterprise
software. Oracle’s engineering teams rely on Dell platforms and Linux to help architect
their scaleable grid technologies. Oracle Enterprise Manager enables the monitoring of
all Dell servers without the need for an external console. For the database tier, Dell
offers Tested and Validated Configurations that can greatly reduce the complexity and
time for deployment (see www.dell.com/oracle).
Dell Hardware Sizing Recommendations
In general, Dell servers with at least two processor sockets are recommended for
OracleAS. For performance purposes, at least two processors are required to perform the
CPU-intensive operations that OracleAS typically features. Internal disks in a RAID 1 or
RAID 5 configuration are required, with at least 32 GB of available space. These disks
can be Serial Attached SCSI or Serial ATA. Optionally, external Fibre Channel disk
storage may be used for supplemental storage (not recommended for the boot partition).
At least two network ports are required, preferably on two separate Network Interface
cards.
The “entry level” servers for OracleAS are servers in the Dell PowerEdge 1950 series.
These are 1U rack servers, with dual processor sockets and two expansion slots. These
servers are designed to function as web servers or small application servers. In the three
Page 20 of 59
tier configuration detailed above, a PowerEdge 1950 is ideal for a stand-alone J2EE
server or one or more servers utilizing Web Cache as a front-end for a set of application
servers. In the Enterprise topology, PowerEdge 1950 servers are ideal for clustered J2EE
and Web Cache servers.
Dell PowerEdge 2950 servers are useful for a wide variety of OracleAS roles. These are
2U rack servers with two processor sockets and three expansion slots. These servers are
ideal for the middle or infrastructure tiers. They may also be used as Corporate Database
/ Metadata Repository servers for small-medium size databases.
Dell PowerEdge 6850 and PowerEdge 6950 servers are 4U rack servers, with four
processor sockets and seven expansion slots. This server class is typically used for large
corporate databases. In some cases, these servers can be used as a powerful middle tier
or infrastructure tier servers. However, it is generally preferred to use multiple
PowerEdge 2950 servers to “scale out” middle/infrastructure tiers to enable load
balancing and redundancy.
Linux OS Installation – Preparing the System for
Oracle Application Server
Installing the Linux Operating System to prepare for an OracleAS implementation need
not be a daunting task. The Linux OS installation process can be broken down to five
basic steps:
1.
2.
3.
4.
5.
Meeting the minimum hardware requirements
Choose the correct OS version
Basic OS installation
Post-installation configuration
Configuration for the Metadata Repository
Minimum System Requirements
Before beginning the installation process, it is important to configure the hardware to
meet or exceed the minimum system requirements for Oracle Application Server.
Ideally, the requirements should be checked before the Linux Operating System is
installed, or even before the hardware is ordered from Dell. However, it is not
uncommon that an existing server is re-purposed, or the OS is installed before all of the
requirements are fully checked. For these reasons, it is useful to know how to confirm
that the requirements have been met by issuing commands from the Linux command line,
so relevant OS commands will be listed below.
The easiest requirement to meet is the requirement for processors. At minimum
OracleAS requires at least one 300 MHz processor. Dell recommends at least two
processors. In fact, all of the recommended Dell systems listed above support two
sockets (single core or dual core), with speeds at 1.6 GHz and above. To check processor
speeds in Linux, use the following command:
# cat /proc/cpuinfo | grep MHz
Page 21 of 59
To install and manage OracleAS, a monitor is recommended, whether locally attached or
networked through a KVM. The monitor should support at last a 256 color display. If
problems are encountered with a monitor, they are more commonly the fault of improper
driver settings at the OS level, rather than an actual hardware restriction. To verify the
performance of a monitor (or more specifically, the monitor driver) in Linux, issue the
following command:
# /usr/X11R6/bin/xdpyinfo (check for a depth of at least 8 bits per pixel)
Oracle Application Server can require a substantial amount of memory, depending on the
modules that are installed on a specific server. The memory required is cumulative, so if
you install all modules on the same server, you may need as much as 3.5 GB of RAM/
Keep in mind that you should reserve approximately 1 GB for the OS. Table 1 shows the
memory required per tier:
OracleAS Tier
J2EE and Web Cache
Portal and Wireless
Business Intelligence and Forms
OracleAS Infrastructure
Memory Required
512 MB
1 GB
1 GB
1 GB
Table 1
To verify the RAM available in Linux, use the following command:
# grep MemTotal /proc/meminfo
OracleAS also requires a certain amount of disk space for each component, as well as
disk space for temporary storage and OS swap space. In general, each server in an
OracleAS cluster will have its own copy of data on disk, the contents of which are locally
managed. The disk space may be local to the server or on an external SAN or NAS
device. Only a couple of cases require disks shared between nodes – Oracle Failover
Clusters (not covered here), and the Metadata Repository, if it is stored in a Real
Application Cluster Database. In these two cases, the disk must be on an external SAN
or NAS device. Table 2 shows the disk requirements:
Page 22 of 59
OracleAS Tier or OS
Component
J2EE and Web Cache
Portal and Wireless
Business Intelligence and Forms
OracleAS Infrastructure
/tmp
Swap Space
Disk Requirement
900 MB
1.2 GB
2 GB
3.7 GB
400 MB
512 MB
Table 2
To check free disk space, use the following Linux command:
# df -h
To check temp space, use the following Linux command:
# df -k /tmp
To check swap space, use the following Linux command:
# grep SwapTotal /proc/meminfo
OS Selection
For the purposes of this paper, it is assumed that you will be installing the Red Hat
Enterprise Linux distribution of Linux. Dell strongly advises that the Advanced Server
(AS) edition be utilized as opposed to the Enterprise Server (ES) edition. Dell performs
Oracle testing using Red Hat AS, which is fully supported by Dell Support.
Another choice to make is the exact version of Red Hat Enterprise Linux AS to install.
Both versions 3.0 or 4.0 of the OS are supported for either OracleAS versions 10.1.2 or
10.1.3. Red Hat Enterprise Linux version 4.0 is clearly preferred due to numerous new
features and improvements. However, some sites may still be using version 3.0 for their
databases or other applications. If version 3.0 is chosen, Update 3 or higher is supported.
For version 4.0, Update 1.0 or higher is supported.
Finally, the choice of a 32-bit OS or a 64-bit OS should be considered. The 32-bit
version of Linux is referred to as the “x86” kernel. The 64-bit version of Linux is
referred to as the “x86_64” kernel. Installing the 32-bit version of OracleAS is fully
supported on the x86 version of Linux. Currently, Oracle does not provide a 64-bit
version of Oracle Application Server for the EM64T platform. It is possible to install the
32-bit version of Oracle Application Server on the x86_64 version of Linux. This
requires some care in setting up the installation and runtime environments.
Basic OS Installation
The actual OS installation is not that difficult. In fact, there are three different wizarddriven installation packages to choose from:
1. The Dell “Oracle Database 10g – Linux Deployment” CDs. These CD ISO
images are a free download from Dell, located at
http://www.dell.com/content/topics/global.aspx/solutions/en/oracle_solution?c=us
&cs=555&l=en&s=biz&~section=005 Choose the “Oracle Database 10g
Page 23 of 59
Validated Configuration” link. Choose the correct Red Hat version, and you may
then download two CD ISO images and documentation. These CDs are designed
for preparing the operating system for an Oracle Database 10g database install,
but they work for preparing for an Oracle Application 10g install, as well. To
start the Linux installation, boot from the first CD. At the menu, choose option 4
to select “Red Hat Enterprise Linux 4 AS for Oracle Database (x86_64)”. You
will be prompted to insert each of the Red Hat CDs. The server will then reboot
to complete the OS install. You will be prompted for input for user preferences,
etc. You then need to insert the second CD, mount the CD, and run the install
script. You may then run a set of shell scripts to complete the Oracle setup.
Refer to the Linux Deployment guide for detailed instructions. Using this
installation method means that most of the post-installation steps listed below for
preparing for OracleAS will be performed by the Dell scripts.
2. The Dell “Installation and Server Management” CD. This CD automates the
installation of Red Hat Enterprise Linux AS. The CD is shipped with Dell
PowerEdge servers, or can be downloaded from http://support.dell.com . Like the
Dell Oracle Deployment CDs, this CD allows the operating system to deliver
additional software or customization specific to PowerEdge systems, including
correct device drivers for detected hardware components. To use this CD, first
disconnect any USB devices attached to your server. Next, insert the Installation
and Server Management CD into your CD drive and reboot your system. Follow
the directions on the screen and the instructions in the documentation that came
with your CD. Because this installation method is automatic and installs
“Typical” packages, you will need to augment the OS with additional packages
and configuration, as detailed below.
3. A custom install directly from the Red Hat Installation CDs. To perform a
custom installation using the Red Hat CDs, insert the Installation CD 1 into your
CD drive and reboot your system. A Welcome screen appears that gives you
several choices for the type of installation to perform. Press <Enter> at the boot:
prompt to select Graphical Installation Mode. You may get a message that the
operating system cannot detect any disks in the system during the installation
process. If so, use a device driver diskette for your storage controller. You may
then download the latest device driver diskette image for your controller from the
Dell Support website at http://support.dell.com , and follow the instructions for
using the diskette. Review the notes on the left-hand side of the screen as you
proceed through the installation. Also, review the Installation Guide on the Red
Hat Documentation CD. If you are installing or reinstalling Red Hat Enterprise
Linux on a system with a Dell utility partition, at the appropriate prompt, select
“Install boot loader on first sector of boot partition”. Performing this action
maintains the ability to boot to the utility partition because the system does not
overwrite the master boot record. If you are not sure if you have a utility
partition, view the existing partitions with Disk Druid in the installer. The utility
partition is located on either the /dev/sda1 or /dev/hda1 partition. Choose either
the “Everything” set of installation packages or the “Advanced Server” set of
application packages. In either case, you will need to install additional RPM
packages after the OS install, either from the CDs or from the Red Hat website at
http://rhn.redhat.com .
Page 24 of 59
Post-Installation OS Configuration
After the Red Hat Enterprise Linux AS operating system is installed; there are several
post-installation steps that are required to prepare your servers for OracleAS installation.
The first step is to check which version of the OS is installed (3.0 or 4.0), especially if
you did not perform the OS installation yourself. To check the OS version, use the
command:
# cat /etc/issue
It is important to install the required Red Hat update version, as listed above for Red Hat
3.0 and 4.0. If the wrong version is installed, you will need to either re-install with the
correct CD or upgrade your OS to the EXACT version listed above (DO NOT use the
Red Hat tool “uptodate” to get the latest updates). To check the update version:
# cat /etc/redhat-release
It is also necessary to check the version of OS packages installed against the list of
OracleAS requirements. To check for the version (or existence) of individual packages,
use the following command:
# rpm -q package_name
If a required package is found to be missing, it can be installed with the following
command:
# rpm -ivh package_name
If a required package is installed, but the version of the package is too low, the problem
can be resolved by locating or downloading the correct version, and upgrading with the
following command:
# rpm -ivh package_name
In some cases, Oracle requires that a 32-bit package be installed, even if you are working
with a 64-bit OS. To install 32-bit packages on a 64-bit system, you may need to use the
–force option and the --nodeps option of the rpm utility:
# rpm -ivh --force --nodeps package_name
It is important to keep in mind that if OracleAS is installed on a 64-bit Red Hat, you will
need to use a 32-bit shell emulation for installation purposes and for any subsequent
OracleAS sessions. You can place the following command in the .bash_profile
environment file for each OracleAS server user:
# linux32 bash
You should also make sure that the packages that you install match the architecture of the
OracleAS requirements. To check the architecture of an installed package:
# rpm -q package_name --queryformat "%{arch}\n" (should be i686 for Intel)
The following rpms are required (same version or higher) for Red Hat Enterprise Linux
AS/ES 3.0 x86 (32-bit):
• glibc-2.3.2-95.27
• glibc-common-2.3.2-95.27
• binutils-2.14.90.0.4-35
Page 25 of 59
•
•
•
•
•
•
•
•
•
•
•
•
•
compat-glibc-7.x-2.2.4.32.6
compat-libstdc++-7.3-2.96.128
compat-libstdc++-devel-7.3-2.96.128
gcc-3.2.3-42
gcc-c++-3.2.3-42
libstdc++-3.2.3-42
libstdc++-devel-3.2.3-42
openmotif21-2.1.30-8
pdksh-5.2.14-21
setarch-1.3-1
make-3.79.1-17
gnome-libs-1.4.1.2.90-34.1
sysstat-4.0.7-4.EL3.3compat-db-4.0.14-5
The following rpms are required (same version or higher) for Red Hat Enterprise Linux
AS/ES 3.0 x86_64 (64-bit):
• glibc-2.3.2-95.27.x86_64.rpm
• glibc-3.2.3-95.27.i686.rpm (32-bit)
• glibc-devel-3.2.3-95.27.x86_64.rpm
• glibc-devel-3.2.3-95.27.i386.rpm (32-bit)
• gcc-3.2.3-20.x86_64.rpm
• libgcc-3.2.3-20.x86_64.rpm
• libgcc-3.2.3-20.i386.rpm (32-bit)
• setarch-1.3-1.x86_64.rpm
• pdksh-5.2.14-21.x86_64.rpm
• openmotif21-2.1.30-8.i386.rpm
• compat-glibc-7.x-2.2.4.32.5.i386.rpm (32-bit)
• compat-gcc-7.3-2.96.122.i386.rpm
• sysstat-4.0.7-4.x86_64.rpm
• gnome-libs-1.4.1.2.90-34.1.i386.rpm (32-bit)
• compat-db-4.0.14-5.1.i386.rpm (32-bit)
The following rpms are required (same version or higher) for Red Hat Enterprise Linux
AS/ES 4.0 x86 (32-bit):
• glibc-2.3.4-2.9
• glibc-common-2.3.4-2.9
• binutils-2.15.92.0.2-13
• compat-libstdc++-296-2.96-132.7.2
• gcc-3.4.3-22.1
• gcc-c++-3.4.3-22.1
• libstdc++-3.4.3-22.1
• libstdc++-devel-3.4.3-22.1
• openmotif21-2.1.30-11.RHEL4.4
• pdksh-5.2.14-30
• setarch-1.6-1
• make-3.80-5
• gnome-libs-1.4.1.2.90-44.1
Page 26 of 59
•
•
•
•
sysstat-5.0.5-1
compat-db-4.1.25-9
control-center-2.8.0-12
xscreensaver-4.18-5.rhel4.2
The following rpms are required (same version or higher) for Red Hat Enterprise Linux
AS/ES 4.0 x86_64 (64-bit):
• binutils-2.15.92.0.2-13.x86_64.rpm
• compat-db-4.1.25-9.i386.rpm (32-bit)
• compat-db-4.1.25-9.x86_64.rpm
• control-center-2.8.0-12.x86_64.rpm
• gcc-3.4.3-22.1.x86_64.rpm
• gcc-c++-3.4.3-22.1.x86_64.rpm
• glibc-2.3.4-2.9.i686.rpm (32-bit)
• glibc-2.3.4-2.9.x86_64.rpm
• glibc-common-2.3.4-2.9.x86_64.rpm
• gnome-libs-1.4.1.2.90-44.1.x86_64.rpm
• libstdc++-3.4.3-22.1.i386.rpm (32-bit)
• libstdc++-3.4.3-22.1.x86_64.rpm
• libstdc++-devel-3.4.3-22.1.i386.rpm (32-bit)
• libstdc++-devel-3.4.3-22.1.x86_64.rpm
• make-3.80-5.x86_64.rpm
• pdksh-5.2.14-30.x86_64.rpm
• sysstat-5.0.5-1.x86_64.rpm
• xscreensaver-4.18-5.rhel4.2.x86_64.rpm
• setarch-1.6-1.x86_64
• openmotif21-2.1.30-11.RHEL4.4.i386.rpm (32-bit)
For all Red Hat kernels, add the following lines to /etc/security/limits.conf:
*
hard nofile 65536
*
soft nproc 2047
*
hard nproc 16384
*
soft
nofile 2048
*
hard nofile 65536
If it does not already exist, add the following line to the /etc/pam.d/login file:
session
required
/lib/security/pam_limits.so
Of course, a user account and appropriate groups are required before Oracle software can
be installed. The following commands (run as root) will set up the oracle user, as well as
the oinstall and dba groups (the dba group is only required for the Metadata Repository
server):
# groupadd -g 701 dba
# groupadd -g 700 oinstall
# useradd -c "Oracle software owner" -u 700 -g oinstall -G dba oracle
# passwd oracle password
Page 27 of 59
Directories for Oracle software installation should be created before installation. Use the
following commands to create the directories, set ownership, and set permissions:
# mkdir /opt/oracle
# mkdir /opt/oracle/oraInventory
# mkdir /opt/oracle/product
# mkdir /opt/oracle/product/10.1.2
# mkdir /data
# mkdir /data/db
# chown –R oracle.oinstall /opt/oracle
# chown –R oracle.dba /data/db
# chmod –R 775 /opt/oracle /data/db
By default, the oracle user utilizes the bash shell as the login shell. The following entries
in the file /home/oracle/.bash_profile set up the oracle user’s environment:
export TMP=/tmp
export TMPDIR=/tmp
if [ $USER = "oracle" ]; then
if [ $SHELL = "/bin/ksh" ]; then
ulimit -p 16384
ulimit -n 65536
else
ulimit -u 16384 -n 65536
if
if
Note that environment variables such as ORACLE_HOME are not set for the Oracle
install. Additional environment variables can be set after the install.
Oracle will use default port numbers for the OracleAS install. However, there may be
some conflicts with reserved ports in the /etc/services file. These conflicts typically
involve services that you will not use anyway, such as Linux LDAP services. If possible,
comment out any entries for ports 389, 636, and 1521 in the /etc/services file. If you
wish to use alternate ports, or any custom port numbers, create a file named staticports.ini
with the following format:
# J2EE and Web Cache
Oracle HTTP Server port = port_num
Oracle HTTP Server Listen port = port_num
Oracle HTTP Server SSL port = port_num
Oracle HTTP Server Listen (SSL) port = port_num
Oracle HTTP Server Diagnostic port = port_num
Java Object Cache port = port_num
DCM Java Object Cache port = port_num
DCM Discovery port = port_num
Oracle Notification Server Request port = port_num
Oracle Notification Server Local port = port_num
Oracle Notification Server Remote port = port_num
Application Server Control port = port_num
Application Server Control RMI port = port_num
Oracle Management Agent port = port_num
Page 28 of 59
Web Cache HTTP Listen port = port_num
Web Cache HTTP Listen (SSL) port = port_num
Web Cache Administration port = port_num
Web Cache Invalidation port = port_num
Web Cache Statistics port = port_num
Log Loader port = port_num
ASG port = port_num
# Business Intelligence and Forms
Reports Services SQL*Net port = port_num
Reports Services discoveryService port = port_num
Reports Services bridge port = port_num
# Infrastructure
Oracle Internet Directory port = port_num
Oracle Internet Directory (SSL) port = port_num
Oracle Certificate Authority SSL Server Authentication port = port_num
Oracle Certificate Authority SSL Mutual Authentication port = port_num
Ultra Search HTTP port number = port_num
Configuration for the Metadata Repository
For any server that will host the OracleAS Metadata Repository, there are special
requirements for Red Hat kernel parameters. The Metadata Repository is an actual
Oracle database, and has the same requirements as any Oracle database on Red Hat
Linux. This includes kernel parameters for shared memory, semaphores, and network
parameters. You can check the current kernel parameter settings with the following
commands:
# /sbin/sysctl -a | grep sem (semmsl, semmns, semopm, and semmni)
# /sbin/sysctl -a | grep shm (shmall, shmmax, and semmni)
# /sbin/sysctl -a | grep msg (msgmax, msgmnb, and msgmni)
# /sbin/sysctl -a | grep file-max (file-max)
# /sbin/sysctl -a | grep ip_local_port_range (ip_local_port_range)
If you need to make any changes, you should place the required entries in the
/etc/sysctl.conf file. This will make the changes persist through reboots. The following
entries are required:
kernel.shmall = 2097152
kernel.shmmax = 2147483648
kernel.shmmni = 4096
# semaphores: semmsl, semmns, semopm, semmni
kernel.sem = 256 32000 100 142
fs.file-max = 131072
net.ipv4.ip_local_port_range = 10000 65000
kernel.msgmni = 2878
kernel.msgmax = 8192
kernel.msgmnb = 65535
Page 29 of 59
All of the changes in /etc/sysctl.conf will automatically become effective at the next boot.
To make the changes effective immediately, simply issue the command:
# sysctl -p
Configuring the Dell Hardware
Following OS configuration, there are several steps that need to be performed to
configure the Dell hardware. These include installing and configuring Dell
PowerConnect™ network switches, configuring networking on the servers, and
configuring external storage. Installing Dell network switches is among the easiest tasks.
If you use default settings, a Dell PowerConnect switch can be up and running almost as
soon as you power it up. However, if you wish to configure advanced options such as
Virtual LANs, you must perform some switch configuration steps. In addition, the more
advanced PowerConnect switches are “Managed” switches that offer a management
interface for ongoing management via the network. To configure switches, Dell offers a
web interface and command line options, which can be implemented via a serial cable or
a network interface. Configuring switch options is beyond the scope of this whitepaper,
but more information and manuals can be found at http://support.dell.com .
External storage is not required for OracleAS, but it is not uncommon to store the
Metadata Repository on external storage. In fact, if the Metadata Repository has been
installed into an existing Real Application Cluster database, external storage will be used.
This is because RAC requires shared external storage. Dell has partnered with EMC to
offer the Clariion Fibre Channel Storage Array series for external storage. An outline of
the steps to set up a Storage Area Network (SAN) is detailed below.
Configuring Basic Networking
Once you have installed Dell PowerConnect switches and have connected network cables
between the switch (or switches) to the server NICs, it is time to configure basic
networking on each server. The following steps describe how to configure basic
networking within Red Hat Linux:
1. Log in as root.
2. Edit the network device file /etc/sysconfig/network-scripts/ifcfg-eth#, where # is
the number of the network device, and configure the file as follows:
DEVICE=eth0
ONBOOT=yes
IPADDR=<Public IP Address>
NETMASK=<Subnet mask>
GATEWAY=<Gateway address>
BOOTPROTO=static
HWADDR=<MAC Address>
SLAVE=no
3. Edit the /etc/sysconfig/network file, and, if necessary, replace
localhost.localdomain with the fully qualified public node name For example, the
line for node 1 would be as follows:
Page 30 of 59
HOSTNAME=node1.domain.com
4. Type: service network restart
5. Type ifconfig to verify that the IP addresses are set correctly.
6. To check your network configuration, ping each public IP address from a client
on the LAN outside the cluster.
7. Connect to each node to verify that the public network is functioning and type ssh
<public IP> to verify that ssh is working.
8. On each node, modify the /etc/hosts file by adding the following lines (where
FQN is the fully qualified hostname and shortname is the hostname without the
domain).
127.0.0.1 localhost.localdomain localhost
<IP web cache node> <FQN web cache node> <shortname web cache node>
<IP applications node> <FQN applications node> <shortname applications
node>
<IP infrastructure node> <FQN infrastructure node> <shortname
infrastructure node>
<IP database node> <FQN database node> <shortname database node>
9. On each node, modify the /etc/resolv.conf file by adding the following lines.
nameserver <Primary DNS server address>
nameserver <Secondary DNS server address>
domain <your domain name>
10. Issue the command:
route add default gw <Gateway address>
One of the motivations for installing the Enterprise OracleAS topology is to configure
high availability, with no single points of failure. By default, a server network cable from
a server to a switch represents a single point of failure. If the switch fails, the network
cable fails, or the NIC fails, network communication will cease and applications will
become unavailable. To avoid these failure scenarios, a common practice is to
implement network bonding. Network bonding utilizes at least two network ports per
server, which are bonded together as a single logical port. The ports are connected to two
different switches, which are connected together (or “trunked”). This provides
redundancy and (optional) load balancing. If a cable is disconnected, the network bond
will fail over to the other port, and service will continue.
The following steps illustrate how to setup network bonding:
1. Log in as root.
2. Add the following line to the /etc/modprobe.conf file (or /etc/modules.conf file
for Red Hat 3.0):
alias bond0 bonding
3. For high availability, edit the /etc/modprobe.conf file and set the option for link
monitoring. The default value for miimon is 0, which disables link monitoring.
Change the value to 100 milliseconds initially, and adjust it as needed to improve
performance. Type:
options bonding miimon=100 mode=1
4. In the /etc/sysconfig/network-scripts/ directory, create or edit the ifcfg-bond0
configuration file. For example, using sample network parameters, the file would
appear as follows:
DEVICE=bond0
Page 31 of 59
IPADDR=172.168.0.10
NETMASK=255.255.255.0
NETWORK=172.168.0.0
BROADCAST=172.168.0.255
GATEWAY=172.168.0.1
ONBOOT=yes
BOOTPROTO=none
USERCTL=no
5. The entries for NETMASK, NETWORK, BROADCAST, and GATEWAY are
optional. DEVICE=bondn is the required name for the bond, where n specifies the
bond number. IPADDR is the private IP address. To use bond0 as a virtual
device, you must specify which devices will be bonded as slaves.
6. For each device that is a bond member, perform the following steps:
7. In the directory /etc/sysconfig/network-scripts/, edit the ifcfg-ethn files containing
the following lines (where ethn is the name of a port participating in a bond):
DEVICE=ethn
HWADDR=<MAC ADDRESS>
ONBOOT=yes
TYPE=Ethernet
USERCTL=no
MASTER=bond0
SLAVE=yes
BOOTPROTO=none
8. Type service network restart and ignore any warnings.
9. On each node, type ifconfig to verify that the private interface is functioning. The
private IP address for the node should be assigned to the private interface bond0.
10. When the private IP addresses are set up on every node, ping each IP address
from one node to ensure that the private network is functioning.
11. Type ssh <private IP> to connect to each node and verify that the private
network and ssh are functioning correctly.
Installing and Configuring the Dell|EMC SAN
Preparing external Dell|EMC SAN storage for use with Oracle is accomplished in three
phases:
• Preparing the Clariion storage array.
• Preparing the Fibre Channel switches.
• Preparing the host-based storage drivers
The following steps provide an overview of the major tasks required to set up a
functioning SAN. However, the actual process is fairly detailed, and is best performed
by a Dell Consultant or after attending Dell’s SAN training.
1. Initial hardware setup – this includes placing hardware in racks, connecting cables
between components, and powering up the storage array.
2. Install Host Bus Adapters in the PowerEdge servers
a. Two HBAs are required for high availability.
b. Both PCI-Express and PCI-X versions are available
Page 32 of 59
3.
4.
5.
6.
7.
c. Be sure to use slots with the same PCI version and bus speed for both
HBAs on each cluster server (there is a diagram of slots on the top inside
cover of the servers).
Initialize the CXx00 array – This involves accessing the storage array through a
serial connection or cross-over cable, and setting key parameters, such as the IP
addresses for the management interface for each storage processor. In addition,
any required array based software is installed or upgraded at this time.
Install host based software –
a. Qlogic/Emulex HBA drivers - In addition to installing the correct version
of the HBA driver, it is important to update the Qlogic or Emulex system
BIOS to the currently supported level.
b. Navisphere™ Agent – this host-based agent will be used to register
connected hosts with the storage array.
c. PowerPath™ – this software is used to configure failover and load
balancing between fibre channel connections on a given server.
Configure Fibre Channel switches – this step involves connecting to the switches
via a serial or web interface.
a. The IP address for the switch is entered. Initial configuration is
performed, in preparation for zoning.
b. Perform Zoning on Fibre Channel switches – This step is performed on the
network via a web interface. Zoning is the process of mapping servers to
the storage array and granting specific access right to servers.
Configure storage with Navisphere – these are the key steps for organizing and
presenting storage to the servers. Included are:
a. Create RAID groups from sets of disks
b. Subdivide the RAID groups into logical disk units called LUNs
c. Create a storage group that includes the servers and LUNs for the Oracle
RAC system. The components of this storage group will be allowed to
connect to each other.
Access storage through each server in the cluster – all servers should now have
the same view of the shared external storage. PowerPath software adds value by
managing multiple connections to the storage array per server for path failover
and load balancing.
Verifying that the SAN is Ready for Oracle
Once the RAID Groups, LUNs, and Storage Groups have been prepared on the Clariion
array; and zoning has been performed on the Fibre Channel switch; simply connecting
the fiber cable to the HBAs should allow the servers to see storage. One of the key tools
to view the storage configuration is the command:
# less /proc/partitions
This command allows you to scroll through a list of storage devices visible to the server
(hit “q” to exit). At first you will see a list of physical devices, in the form of /dev/sda,
where “a” is one or more letters. This list may be as many as four times as big as the
actual number of physical LUNs configured on the server. Each possible pathway to a
given physical disk through a separate HBA port and switch port counts as a separate
device. Ultimately, this view of disks would not work for connecting to Oracle without
further configuration (Oracle would suffer from “double vision” in its view of the disks).
Page 33 of 59
Once PowerPath software is configured, new logical disk devices of the form
/dev/emcpowera are added to the end of the list. These logical devices correspond oneto-one to the actual physical LUNs. Do not be alarmed if the emcpower logical devices
do not show up immediately after installing PowerPath. Often, you have to reboot each
server to see the logical disk devices. To confirm the mapping of /dev/sda physical
devices to /dev/emcpowera logical devices, issue the following command as the root
user:
# powermt display dev=all
At this point, it is necessary to create at least one OS partition on each of the LUNs. The
command to create partitions is “fdisk”. A typical session with fdisk to create a single
partition on a LUN would proceed like the following:
# fdisk /dev/emcpowera
p (to create a primary partition)
1 (to create partition 1)
<return> (to accept the first block as the start of the partition)
<return> (to accept the final block as the end of the partition)
w (to write the partition header to the disk)
Following the creation of partitions, the disks need to be formatted with file systems (or
the equivalent). Oracle is actually rather flexible, allowing disks to be formatted with
standard Linux file systems, the Oracle Cluster File System, Oracle Automatic Storage
Management Disk Group format, or simply left as raw disk devices. The last four
options are most appropriate for working with Oracle Real Application Cluster databases
(configuring Oracle RAC is beyond the scope of this whitepaper). It is usually most
appropriate to configure external storage designated for OracleAS servers with a Linux
file system. The following command formats a partition as a Linux ext3 file system with
a large number of potential files and a label to mount the file system with:
# mke2fs –j –N 5000000 –L /myfilesystem /dev/emcpowera1
Create a mount point for the file system by creating an empty directory with the
command:
# mkdir /myfilesystem
To mount the file system at boot time, place a line in the /etc/fstab file with syntax similar
to the following:
LABEL=/myfilesystem
/myfilesystem
ext3 defaults
00
To test the mount immediately, issue the command:
# mount –t ext3 /dev/emcpowera1 /myfilesystem
Use the following commands to confirm the file systems:
# mount
# df –h
The SAN should now be configured to work with OracleAS.
Page 34 of 59
Installing and Configuring Oracle Application
Server
The following sections describe basic installation procedures for a three-tier OracleAS
topology. In addition, post-installation procedures for several OracleAS components are
described.
Installation Process – Three-tier Topology
In this topology, one server will be reserved for Portal components, the second server is
reserved for Business Intelligence/Forms components, and the third server is reserved for
the Infrastructure tier. Ideally, these three servers will be Dell PowerEdge 2950 servers.
The fourth server is a database server that contains the corporate data that the OracleAS
components will interact with. If possible, you are encouraged to install the Metadata
Repository in an existing database on the fourth server with the “Repca” tool. The
Metadata Repository can also be installed in an Oracle Real Application Cluster database.
Ideally, the database server (or servers) consists of one or more Dell PowerEdge 2950 or
6x50 servers.
The following installation order should be used if you wish to install the Oracle Metadata
Repository with the other Infrastructure components.
1. Install the Infrastructure tier and Metadata Repository.
2. Install the Portal tier.
3. Install the BI/Forms tier.
If you wish to install the Metadata Repository into an existing database, the following
installation order should be used:
1. Install the Repca tool.
2. Install the Metadata Repository schema in an existing database.
3. Install other Infrastructure tier components.
4. Install the Portal tier.
5. Install the BI/Forms tier.
The following sections give examples of both approaches.
Installing the Infrastructure tier and the Metadata Repository Together
Use the following steps to install all Infrastructure components on one server, including
Oracle Internet Directory and the Metadata Repository:
1. Login as the root user at the console, or use the “su” command to become the root
user.
# su
2. Place the CD or DVD in the media tray. The automount directory should be
located by one of the two following commands:
# ls /mnt/cdrom
# ls /media/cdrom
Page 35 of 59
If the CD or DVD is not mounted, issue the following commands (one should
work):
# mount /dev/cdrom /media/cdrom
# mount /dev/cdrom /mnt/cdrom
3. Setup X-Windows access:
# xhost +
4. Log in as the oracle user:
# su - oracle
5. Set the DISPLAY environment variable to your current location:
# export DISPLAY=hostname:0.0
6. From the current directory, launch the installer (do not launch from the CD or
DVD mountpoint):
CD:
# mountpoint/1012disk1/runInstaller
DVD:
# mountpoint/application_server/runInstaller
7. In the Welcome screen, click Next.
8. In the Specify inventory directory and credentials screen, enter the following:
a. Enter the full path of the inventory directory – enter a full path to the
oracle inventory directory, i.e.
/opt/oracle/oraInventory
b. Specify Operating System group name – enter the group name that will
have write permissions to the inventory directory, i.e.
oinstall
c. Click Next.
9. Run orainstRoot.sh dialog – when prompted, open another command window and
run the orainstRoot.sh script in the Inventory directory as the root user. When
finished, click Continue.
10. In the Specify File Locations screen, enter the following:
a. Name – enter a name to identify the new Oracle software home directory,
i.e.
OH_INFRA
b. Path – Enter the full path to the new Oracle software home. Oracle will
create the directory, if necessary. Example:
/opt/oracle/product/10.1.2/oraInfra
c. Click Next.
11. In the Select a Product to Install screen, select OracleAS Infrastructure and
click Next.
12. In the Select Installation Type screen, select Identity Management and
OracleAS Metadata Repository and click Next.
13. In the Product-specific Pre-Requisite Checks screen, check for warnings
regarding pre-requisites not met. If you need to change something, it is best to
exit, fix the problem, and restart the installation. Click Next when ready.
14. In the Confirm Pre-Installation Requirement screen, check that you have met all
listed requirements, and check all of the checkboxes. When finished, click Next.
15. In the Select Configuration Options screen, select the following:
a. Select Oracle Internet Directory
b. Select OracleAS Single Sign-On
c. Select OracleAS Delegated Administration Services
d. Select OracleAS Directory Integration and Provisioning
Page 36 of 59
e. Do not select OracleAS Certificate Authority
f. Do not select High Availability and Replication.
g. Click Next.
16. In the Specify Port Configuration Options screen, select Automatic and click
Next.
17. In the Specify Namespace in Internet Directory screen, select Suggested
Namespace and click Next.
18. In the Specify Database Configuration Options screen, enter the following:
a. Global Database Name – enter the fully qualified name for your database,
usually a database name followed by your internet domain, i.e.
mydb.mycompany.com
b. SID – enter the system identifier, or the short form of the database name
(the first part of the global database name), i.e.
mydb
c. Select Database Character Set – select the default character set for the
database.
d. Database File Location – enter the path to store database files under. The
path must already exist with write permissions for the oracle user. The
installer will create a subdirectory with the SID name, i.e.
/data/db/mydb
e. Click Next.
19. In the Specify Database Schema Passwords screen, enter the passwords for the
administrative database users. Click Next when finished.
20. In the Specify Instance Name and ias_admin Password screen, enter the
following:
a. Instance Name – enter a name for this Infrastructure instance, i.e.
infra
b. ias_admin Password and Confirm Password – enter the ias_admin user
password.
c. Click Next.
21. In the Summary screen, verify the selections and click Install. The installation
now proceeds.
22. When the Run root.sh dialog appears, open a command window as the root user
and run the root.sh script in the Oracle Home directory. After finishing the script,
click OK.
23. The Configuration Assistants screen appears automatically and shows the
progress of the Configuration Assistants.
24. When the End of Installation screen appears, click Exit to finish the installation.
Installing the Metadata Repository in an Existing Database
This approach is an alternative to the previous installation method. The first step in this
method is to install the Metadata Creation Repository Assistant on the database server:
1. Login as the root user at the console, or use the “su” command to become the root
user.
# su
2. Place the CD or DVD in the media tray. The automount directory should be
located by one of the two following commands:
# ls /mnt/cdrom
# ls /media/cdrom
Page 37 of 59
If the CD or DVD is not mounted, issue the following commands (one should
work):
# mount /dev/cdrom /media/cdrom
# mount /dev/cdrom /mnt/cdrom
3. Setup X-Windows access:
# xhost +
4. Log in as the oracle user:
# su - oracle
5. Set the DISPLAY environment variable to your current location:
# export DISPLAY=hostname:0.0
6. From the current directory, launch the installer:
CD:
# mountpoint/runInstaller
DVD:
# mountpoint/repca/runInstaller
7. In the Welcome screen, click Next.
8. In the Specify File Locations screen, enter the following:
a. Name – enter a name for this repca installation, i.e.
repca_10_2_0
b. Destination Path – enter the fully qualified path of a new Oracle Home for
the Repository Creation Assistant, i.e.
/opt/oracle/product/10.2.0/repca_1
c. Click Next.
9. In the Language Selection screen, choose any languages that you want to install
for the Repository Creation Assistant. Move the languages to the Selected
Languages box. English and the OS default language are always included. Click
Next.
10. In the Launch Repository Creation Assistant screen, choose Yes if you want to
run repca immediately after finishing the installation. Otherwise, click No. It is
recommended to click No, so that you can verify pre-installation requirements
before running repca. Click Next when finished.
11. In the Summary screen, click Install to start the installation.
12. In the Configuration Assistants screen, the installer will launch the Repository
Creation Assistant, if you chose to run this assistant.
13. In the End of Installation screen, select Exit to exit the installer.
Before running the Repository Creation Assistant, there are several pre-requisites that
have to be met for the existing database. The full list can be found at: http://downloadwest.oracle.com/docs/cd/B14099_19/sol.1012/repca.1012/repca/toc.htm, and all prerequisites can be tested for and prepared for manually, using the commands in the
referenced manual. In addition, a shortcut is available for testing requirement
compliance. You can run the prerequisite check tool:
# ORACLE_HOME/repca/prereq/DBPrereqChecker –DBHOST dbhost –DBPORT
dbport –DBNAME dbname –SYSPWD syspassword [-LOGDIR logdir] [-Help]
Where ORACLE_HOME is the Oracle Home directory just installed, the dbhost is the
database hostname, the dbport is the port on which the database port is listening (usually
1521), syspassword is the SYS user password for the database, and logdir is an optional
Page 38 of 59
log file directory. You may run the prerequisite checker several times, correcting any
problems noted after each run.
After successfully running the prerequisite checker, the Repository Creation Assistant
can be run. The details of the installation depend on the type of database (standalone,
Oracle RAC) and the storage option chosen (file system, raw, CFS, ASM). The
following example assumes that ASM Disk Groups are utilized:
1. Make sure the database is running and the listener associated with the database is
running.
2. Set the NLS_LANG environment variable for the oracle session:
# export NLS_LANG=american_america.us7ascii
3. Launch repca from the repca Oracle Home directory:
# cd Repca_Oracle_Home
# runRepca
4. In the Welcome screen, click Next.
5. In the Specify Oracle Home screen, enter the following:
a. Oracle Home – Enter the full path of the Oracle Home for the database,
i.e.
/opt/oracle/product/10.2.0/db_1
b. Log File Directory – enter the full path where the log files for the
Repository Creation Assistant are to be written.
c. Click Next.
6. In the Select Operation screen, select Load if you want to load the database
without registering with the Oracle Internet Directory. Since you don’t have an
OID yet, choose this option. Otherwise, choose the Load and Register option.
Click Next.
7. In the Specify Database Connection Information Screen, enter the following
information:
a. SYS Password – enter the SYS password for the database
b. Single Node Instance or Real Application Cluster Database – choose the
appropriate option, then enter information for the following fields:
i. Hostname – enter the short hostname or the fully qualified
hostname (for RAC, enter hostname:port for the first node)
ii. Port – for a Single Node Instance, enter the listener port here
iii. Service Name – enter the service name for the database connection
(use the global service name for RAC)
c. Click Next.
8. In the Specify Storage Options screen, select Automatic Storage Management
(ASM).
9. In the Select Disk Group screen, select the disk group that you want to use to
install the Repository on. Click Next.
10. In the Specify Tablespace Information screen, choose the appropriate Size for
each tablespace (large or small, depending on the anticipated load). Click Next.
11. If the SYSTEM and UNDO tablespaces are set to autoextend, you may see the
Warning: Check Disk Space screen appear. Check that the respective tablespaces
have adequate disk space available.
12. Specify Oracle Internet Directory Configuration – this screen and the next two
screens appear only if you chose the Load and Register option earlier.
Page 39 of 59
a. Internet Directory Hostname - enter the hostname or fully qualified
hostname of the computer that is running Oracle Internet Directory.
b. Internet Directory Port - enter the port number for Oracle Internet
Directory.
c. Use SSL to Connect to Oracle Internet Directory for Registration
Purposes - select this option if you want perform registration by
connecting to the Oracle Internet Directory using SSL.
d. Click Next.
13. Specify Login for Oracle Internet Directory - enter the Username and Password to
log in to Oracle Internet Directory. The user must belong to the iASAdmins
group. You can use simple names (i.e., myuser) or the user's DN (i.e.,
cn=orcladmin).
14. In the Specify Oracle Context screen, enter the location in Oracle Internet
Directory where you want to register the OracleAS Metadata Repository.
a. Root Oracle Context (cn=OracleContext) - Select this option to register
OracleAS Metadata Repository in the root Oracle context.
b. Custom Oracle Context - Select this option to register OracleAS
Metadata Repository in a specific realm in Oracle Internet Directory.
Enter the DN of the realm in the provided field
c. Click Next.
15. When the Loading Repository screen is displayed, the schemas are created and
the tablespaces are populated.
16. When the Success screen is displayed, click OK to exit the Repository Creation
Assistant.
After installing the Repository in a database, there are a couple of post-installation steps
that may need to be performed:
1. Update the Database_Oracle_Home/network/admin/sqlnet.ora file to use LDAP
to connect to the ORASSO_PS schema:
NAMES.DIRECTORY_PATH= (LDAP, TNSNAMES, ONAMES,
HOSTNAME)
2. If you installed the Metadata Repository in a 9.0.6 database, you will have to
create an Oracle Ultra Search instance. See the “Oracle Ultra Search
Administrators Guide” for more information.
The last major step in this procedure is to install Oracle Identity Management and OID
while referencing the existing Metadata Repository:
1. Login as the root user at the console, or use the “su” command to become the root
user.
# su
2. Place the CD or DVD in the media tray. The automount directory should be
located by one of the two following commands:
# ls /mnt/cdrom
# ls /media/cdrom
If the CD or DVD is not mounted, issue the following commands (one should
work):
# mount /dev/cdrom /media/cdrom
# mount /dev/cdrom /mnt/cdrom
3. Setup X-Windows access:
Page 40 of 59
# xhost +
4. Log in as the oracle user:
# su - oracle
5. Set the DISPLAY environment variable to your current location:
# export DISPLAY=hostname:0.0
6. From the current directory, launch the installer (do not launch from the CD or
DVD mountpoint):
CD:
# mountpoint/1012disk1/runInstaller
DVD:
# mountpoint/application_server/runInstaller
7. In the Welcome screen, click Next.
8. In the Specify inventory directory and credentials screen, enter the following:
a. Enter the full path of the inventory directory – enter a full path to the
oracle inventory directory, i.e.
/opt/oracle/oraInventory
b. Specify Operating System group name – enter the group name that will
have write permissions to the inventory directory, i.e.
oinstall
c. Click Next.
9. Run orainstRoot.sh dialog – when prompted, open another command window and
run the orainstRoot.sh script in the Inventory directory as the root user. When
finished, click Continue.
10. In the Specify File Locations screen, enter the following:
a. Name – enter a name to identify the new Oracle software home directory,
i.e.
OH_INFRA
b. Path – Enter the full path to the new Oracle software home. Oracle will
create the directory, if necessary. Example:
/opt/oracle/oraInfra
c. Click Next.
11. In the Select a Product to Install screen, select OracleAS Infrastructure and
click Next.
12. In the Select Installation Type screen, select Oracle Identity Management and
click Next.
13. In the Product-specific Pre-Requisite Checks screen, check for warnings
regarding pre-requisites not met. If you need to change something, it is best to
exit, fix the problem, and restart the installation. Click Next when ready.
14. In the Confirm Pre-Installation Requirement screen, check that you have met all
listed requirements, and check all of the checkboxes. When finished, click Next.
15. In the Select Configuration Options screen, select the following:
a. Select Oracle Internet Directory
b. Select OracleAS Single Sign-On
c. Select OracleAS Delegated Administration Services
d. Select OracleAS Directory Integration and Provisioning
e. Do not select OracleAS Certificate Authority
f. Do not select High Availability and Replication.
g. Click Next.
16. In the Specify Port Configuration Options screen, select Automatic and click
Next.
Page 41 of 59
17. In the Specify Repository screen, enter the following to identify the existing
Metadata Repository:
a. Username – Enter a username with DBA privileges to log into the
Repository database
b. Password – enter the DBA user’s password
c. Hostname and Port – enter the hostname and Listener port for the
database, i.e. host:port.
d. Service Name – enter the fully qualified service name used to connect to
the database, i.e. mydb.mycompany.com
e. Click Next.
18. In the Specify Namespace in Internet Directory screen, select Suggested
Namespace and click Next.
19. In the Specify Instance Name and ias_admin Password screen, enter the
following:
a. Instance Name – enter a name for this Infrastructure instance, i.e.
Infra
b. ias_admin Password and Confirm Password – enter the ias_admin user
password.
c. Click Next.
20. In the Summary screen, verify the selections and click Install. The installation
now proceeds.
21. When the Run root.sh dialog appears, open a command window as the root user
and run the root.sh script in the Oracle Home directory. After finishing the script,
click OK.
22. The Configuration Assistants screen appears automatically and shows the
progress of the Configuration Assistants.
23. When the End of Installation screen appears, click Exit to finish the installation.
Installing the Portal/Wireless Tier
To install the Portal/Wireless tier, use the following procedure:
1. Follow the instructions above to launch the installer (do not launch from the CD
or DVD mountpoint):
CD:
# mountpoint/1012disk1/runInstaller
DVD:
# mountpoint/application_server/runInstaller
2. In the Welcome screen, click Next.
3. In the Specify inventory directory and credentials screen, enter the following
a. Enter the full path of the inventory directory – enter a full path to the
oracle inventory directory, i.e./opt/oracle/oraInventory
b. Specify Operating System group name – enter the group name that will
have write permissions to the inventory directory, i.e. oinstall
Click Next.
4. Run orainstRoot.sh dialog – when prompted, open another command window and
run the orainstRoot.sh script in the Inventory directory as the root user. When
finished, click Continue.
5. In the Specify File Locations screen, enter the following:
Page 42 of 59
a. Name – enter a name to identify the new Oracle software home directory,
i.e.OH_PORTAL
b. Path – Enter the full path to the new Oracle software home. Oracle will
create the directory, if necessary. Example:
c. opt/oracle/product/10.1.2/oraPortal
d. Click Next.
6. In the Select a Product to Install screen, select Oracle Application Server 10g
and click Next.
7. In the Select Installation Type screen, select Oracle Portal and Wireless and
click Next.
8. In the Product-specific Pre-Requisite Checks screen, check for warnings
regarding pre-requisites not met. If you need to change something, it is best to
exit, fix the problem, and restart the installation. Click Next when ready.
9. In the Confirm Pre-Installation Requirement screen, check that you have met all
listed requirements, and check all of the checkboxes. When finished, click Next.
10. In the Select Configuration Options screen, select the following:
a. Select Oracle Application Server Portal
b. Select Oracle Application Server Wireless
c. Click Next.
11. In the Specify Port Configuration Options screen, select Automatic and click
Next.
12. In the next screen, enter information for connecting to the previously installed
Oracle Internet Directory:
a. In the Register with Oracle Internet Directory screen:
i. Hostname – enter the hostname of the Infrastructure server where
OID is configured.
ii. Port – enter the port that the Oracle Internet Directory listens on.
The port number can be found in the
ORACLE_HOME/install/portlist.ini file (where ORACLE_HOME
is the home for OracleAS).
iii. If you select the Use Only SSL Connections with this Oracle
Internet Directory option, the port number used above should be
read from the “Oracle Internet Directory (SSL)” entry in the
portlist.ini file.
iv. Click Next.
b. In the Specify OID Login screen, enter the following:
i. Username – enter the Oracle Administrative user, orcladmin.
ii. Password – enter the same password as the ias_admin user in the
Infrastructure tier.
iii. Click Next.
13. In the Select Oracle Application Server 10g Metadata Repository screen, select
the Metadata Repository that is appropriate for this Portal instance.
14. In the Specify Instance Name and ias_admin Password screen, enter the
following:
a. Instance Name – enter a name for this Portal instance, i.e.
Portal
b. ias_admin Password and Confirm Password – enter the ias_admin user
password.
c. Click Next.
Page 43 of 59
15. In the Summary screen, verify the selections and click Install. The installation
now proceeds.
16. When the Run root.sh dialog appears, open a command window as the root user
and run the root.sh script in this instance’s Oracle Home directory. After finishing
the script, click OK.
17. The Configuration Assistants screen appears automatically and shows the
progress of the Configuration Assistants.
18. When the End of Installation screen appears, click Exit to finish the installation.
Installing the Business Intelligence and Forms Tier
To install the Business Intelligence and Forms tier, use the following procedure:
19. Follow the instructions above to launch the installer (do not launch from the CD
or DVD mountpoint):
CD:
# mountpoint/1012disk1/runInstaller
DVD:
# mountpoint/application_server/runInstaller
20. In the Welcome screen, click Next.
21. In the Specify inventory directory and credentials screen, enter the following
a. Enter the full path of the inventory directory – enter a full path to the
oracle inventory directory, i.e./opt/oracle/product/10.1.2/oraInventory
b. Specify Operating System group name – enter the group name that will
have write permissions to the inventory directory, i.e. oinstall
Click Next.
22. Run orainstRoot.sh dialog – when prompted, open another command window and
run the orainstRoot.sh script in the Inventory directory as the root user. When
finished, click Continue.
23. In the Specify File Locations screen, enter the following:
a. Name – enter a name to identify the new Oracle software home directory,
i.e.OH_FORMS
b. Path – Enter the full path to the new Oracle software home. Oracle will
create the directory, if necessary. Example:
c. opt/oracle/oraForms
d. Click Next.
24. In the Select a Product to Install screen, select Oracle Application Server 10g
and click Next.
25. In the Select Installation Type screen, select Business Intelligence and Forms
and click Next.
26. In the Product-specific Pre-Requisite Checks screen, check for warnings
regarding pre-requisites not met. If you need to change something, it is best to
exit, fix the problem, and restart the installation. Click Next when ready.
27. In the Confirm Pre-Installation Requirement screen, check that you have met all
listed requirements, and check all of the checkboxes. When finished, click Next.
28. In the Select Configuration Options screen, select the following:
a. Select Oracle Business Intelligence Discoverer
b. Select Oracle Application Server Personalization
c. Select Oracle Application Server Reports Services
Page 44 of 59
d. Select Oracle Application Server Forms Services
e. Click Next.
29. In the Specify Port Configuration Options screen, select Automatic and click
Next.
30. In the next screen, enter information for connecting to the previously installed
Oracle Internet Directory:
a. In the Register with Oracle Internet Directory screen:
i. Hostname – enter the hostname of the Infrastructure server where
OID is configured.
ii. Port – enter the port that the Oracle Internet Directory listens on.
The port number can be found in the
ORACLE_HOME/install/portlist.ini file (where ORACLE_HOME
is the home for OracleAS).
iii. If you select the Use Only SSL Connections with this Oracle
Internet Directory option, the port number used above should be
read from the “Oracle Internet Directory (SSL)” entry in the
portlist.ini file.
iv. Click Next.
b. In the Specify OID Login screen, enter the following:
i. Username – enter the Oracle Administrative user, orcladmin.
ii. Password – enter the same password as the ias_admin user in the
Infrastructure tier.
iii. Click Next.
31. In the Select Oracle Application Server 10g Metadata Repository screen, select
the Metadata Repository that is appropriate for this BI/Forms instance.
32. In the Provide Outgoing Mail Server Information screen, enter the outgoing mail
server (SMTP) to be used with Reports Services.
33. In the Specify Instance Name and ias_admin Password screen, enter the
following:
a. Instance Name – enter a name for this BI/Forms instance, i.e.
Forms
b. ias_admin Password and Confirm Password – enter the ias_admin user
password.
c. Click Next.
34. In the Summary screen, verify the selections and click Install. The installation
now proceeds.
35. When the Run root.sh dialog appears, open a command window as the root user
and run the root.sh script in this instance’s Oracle Home directory. After finishing
the script, click OK.
36. The Configuration Assistants screen appears automatically and shows the
progress of the Configuration Assistants.
37. When the End of Installation screen appears, click Exit to finish the installation.
Post Installation Oracle Application Server Configuration
There are a few steps that should be completed shortly after installation. These include
setting environment variables for accessing Oracle Application Server, identifying
OracleAS ports, and accessing the OracleAS Welcome page.
Page 45 of 59
Configuring OracleAS Environment Variables
Before attempting any OracleAS administration, the default environment variables for the
Oracle OS user need to be setup. Edit the /home/oracle/.bash_profile file. The final
result should appear as follows (leaving previous settings in place).
export ORACLE_HOME=/opt/oracle/product/10.1.2/db_1
PATH=$PATH:$ORACLE_HOME/bin:$ORACLE_HOME/dcm/bin:$ORACLE_
HOME/opmn/bin
export LD_LIBRARY_PATH=$ORACLE_HOME/lib:$LD_LIBRARY_PATH
export PATH
export TMP=/tmp
export TMPDIR=/tmp
if [ $USER = "oracle" ]; then
if [ $SHELL = "/bin/ksh" ]; then
ulimit -p 16384
ulimit -n 65536
else
ulimit -u 16384 -n 65536
if
if
Note that the ORACLE_HOME environment variable can only be set to point to the
software home for one OracleAS product. If you have multiple homes (such as Forms
and Portal), you may have to manually override the default variable when managing the
other products. Also note that the DISPLAY environment variable is not set by default.
For Oracle Application Server 10g, only a few tools such as oidadman require that
DISPLAY be set. The DISPLAY variable can be set manually, if needed.
Checking OracleAS Ports
Before you can administer OracleAS, you will need to know the port numbers for each
component. You should also cross-check the /etc/services file to make sure that there are
no conflicts with reserved ports. Port information is located in the file
$ORACLE_HOME/install/portlist.ini. Note that there will be a different portlist.ini file
for each unique ORACLE_HOME.
The following is an example of a portlist.ini file:
;OracleAS Components reserve the following ports at install time.
;As a post installation step, you can reconfigure a component to use a different port.
;Those changes will not be visible in this file.
[System]
Host Name = host1.mycompany.com
[Ports]
Oracle HTTP Server port = 7777
Oracle HTTP Server Listen port = 7778
Page 46 of 59
Oracle HTTP Server SSL port = 4443
Oracle HTTP Server Listen (SSL) port = 8250
Oracle HTTP Server Diagnostic port = 7200
Application Server Control RMI port = 1850
Oracle Notification Server Request port = 6003
Oracle Notification Server Local port = 6100
Oracle Notification Server Remote port = 6200
Log Loader port = 44000
Java Object Cache port = 7000
DCM Discovery port = 7101
Application Server Control port = 1156
Enterprise Manager Agent port = 1830
Web Cache HTTP Listen port = 7777
Web Cache HTTP Listen (SSL) port = 8250
Web Cache Administration port = 9400
Web Cache Invalidation port = 9401
Web Cache Statistics port = 9402
<End of Example>
Accessing the OracleAS Welcome Page
The following URL is the default for accessing the OracleAS Welcome Page:
http://hostname.domain:7777
If the default port was not used, the actual URL is listed in the file:
$ORACLE_HOME/install/setupinfo.txt
The OracleAS Welcome page provides access to a variety of resources:
• Information about New Features in Oracle Application Server 10g
• A “Quick Tour” of Oracle Application Server 10g
• A link to the Oracle Application Server 10g documentation library
• Release Notes for the Linux platform
• Demonstrations and code samples for Oracle Application Server 10g
• A link to the Oracle Enterprise Manager 10g Application Server Control Console
Figure 8 shows an example OracleAS welcome page.
Page 47 of 59
Figure 8. OracleAS Welcome Page
Administering Oracle Application Server
There are a variety of tools for managing Oracle Application Server. These include
command line tools and web based tools. All of the Oracle Application Server 10g tools
are fully integrated within the Oracle Grid Control framework. These tools can be used
to perform administrative tasks such as starting and stopping components, configuring
components, and monitoring OracleAS resources.
Starting and Stopping OracleAS
Command line tools are often used for starting and stopping OracleAS instances or
individual components. The tool that should be used depends on the intended scope of
your start or stop command. To start or stop an entire OracleAS instance, the
runstartupconsole.sh command. To start or stop individual components, the opmnctl
command should be used.
The syntax used to start and stop instances depends on what instances are installed on an
individual host. The following commands run from the middle tier Oracle Home, and
they start and stop both the middle tier instance and the infrastructure instance, if they are
installed on the same host:
$ORACLE_HOME/bin/runstartupconsole.sh start all
$ORACLE_HOME/bin/runstartupconsole.sh stop all
Page 48 of 59
These commands start and stop the following in the Oracle Home for the Infrastructure:
• The Metadata Repository Instance
• The Net Listener
• OracleAS Instance processes for Oracle Identity Management, Oracle Internet
Directory, OC4J_Security, DCM, and OPMN
• Enterprise Manager Database Control and Application Server Control Console
These commands start and stop the following in the Oracle Home for the middle tier:
• OPMN and all of the processes that OPMN manages, including: DCM, Oracle
HTTP Server, OC4J instances, OracleAS Web Cache, OracleAS Forms Services,
and OracleAS Reports Services
• Enterprise Manager Application Server Control Console
If you want to start or stop both the infrastructure tier and the middle tier, without
affecting Enterprise Manager, you can run the following commands from the middle tier
Oracle Home. (Remember, this is only for the case where the middle tier and
infrastructure tier are installed on the same host.)
$ORACLE_HOME/bin/runstartupconsole.sh start allas
$ORACLE_HOME/bin/runstartupconsole.sh stop allas
If you want to start or stop only the Enterprise Manager, but not start the middle tier or
the infrastructure tier, you can run the following commands from the middle tier Oracle
Home. (Remember, this is only for the case where the middle tier and Infrastructure tier
are installed on the same host.)
$ORACLE_HOME/bin/runstartupconsole.sh start allem
$ORACLE_HOME/bin/runstartupconsole.sh stop allem
If you have implemented a three-tier architecture, the Infrastructure instance will be
located on a different server than the Middle tier instance. In this scenario, you can stop
or start the Infrastructure instance by issuing the following commands from the
Infrastructure Oracle Home:
$ORACLE_HOME/bin/runstartupconsole.sh start
$ORACLE_HOME/bin/runstartupconsole.sh stop
These commands start and stop the following in the Oracle Home for the Infrastructure:
• The Metadata Repository Instance
• The Net Listener
• OracleAS Instance processes for Oracle Identity Management, Oracle Internet
Directory, OC4J_Security, DCM, and OPMN
• Enterprise Manager Database Control and Application Server Control Console
The Metadata repository can sometimes be slow to shutdown. If this is the case, use the
following commands from the ORACLE_HOME directory for the Metadata repository
instance:
# su – oracle
# $ORACLE_HOME/bin/sqlplus “/ as sysdba”
SQL> shutdown immediate;
SQL> exit
Page 49 of 59
Similar to the above, if the Middle tier is located on a different server than the
Infrastructure tier, you can issue the following commands from the middle tier Oracle
Home to start and stop the instance:
$ORACLE_HOME/bin/runstartupconsole.sh start
$ORACLE_HOME/bin/runstartupconsole.sh stop
These commands start and stop the following in the Oracle Home for the middle tier:
• OPMN and all of the processes that OPMN manages, including: DCM, Oracle
HTTP Server, OC4J instances, OracleAS Web Cache, OracleAS Forms Services,
and OracleAS Reports Services
• Enterprise Manager Application Server Control Console
The opmnctl command can be used to start, stop, or restart individual OracleAS
components.
$ORACLE_HOME/bin/opmnctl startproc ias-component=component
$ORACLE_HOME/bin/opmnctl stopproc ias-component=component
$ORACLE_HOME/bin/opmnctl restartproc ias-component=component
The opmnctl command can also be used to start, stop, or restart the sub-processes of a
component:
$ORACLE_HOME/bin/opmnctl startproc process-type=process
$ORACLE_HOME/bin/opmnctl stopproc process-type=process
$ORACLE_HOME/bin/opmnctl restartproc process-type=process
You can start or stop most opmn managed processes with the following commands:
$ORACLE_HOME/bin/opmnctl startall
$ORACLE_HOME/bin/opmnctl stopall
The startall command does not automatically start the Log Loader component. Instead,
you have to use the component level syntax:
$ORACLE_HOME/bin/opmnctl startproc ias-component=LogLoader
In a multi-tier, multi-server deployment, OracleAS instances have to be started and
stopped in a particular sequence. Regardless of how many servers are involved, start up
OracleAS instances in the following order:
1. Start any Infrastructure instances that contain only a Metadata Repository
instance. You do not need to use opmnctl to start any processes, and you do not
need to start Application Server Console.
2. Start any Infrastructure instance that contains Oracle Internet Directory. If the
same server contains an OID instance and a Metadata Repository instance, start
the Metadata Repository instance first.
3. Start OracleAS middle-tier Clusters. If there are multiple clusters, start them in
any order.
4. Start other middle-tier instances.
Stop the instances in the following order:
1. Stop OracleAS middle-tier Clusters.
2. Stop other middle-tier instances.
Page 50 of 59
3. Stop any Infrastructure instances that contain only a Metadata Repository
instance.
4. Stop any Infrastructure instance that contains Oracle Internet Directory. If the
same server contains an OID instance and a Metadata Repository instance, stop
the Metadata Repository instance first.
The Application Server Control Console can also be used to start, stop, and restart
components:
1. From the OracleAS Welcome page, click the link to the Application Server
Control Console home page.
2. On the Application Server Control Console home page, scroll to the System
Components section.
3. In the Select column, choose the components you want to start, stop, or restart.
4. Click the Start, Stop, or Restart button on the top right of the System
Components section.
You can also use the Start All or Stop All buttons, but neither works for the Log Loader
component. You have to use the component level buttons to start and stop Log Loader.
You can also enable or disable components from the Application Server Control Console
home page by clicking on the Enable/Disable Components link. On the page that is
displayed, components or groups of components can be enabled or disabled. Disabled
components are not started with the other instance components and are not listed in the
System Components list.
Additional component level controls are available on the individual component home
pages.
Administering OracleAS Components
Each OracleAS component has its own administration tools. Most of these are available
as web pages. There are also a few key command line administration tools. One
example of a command line administration tool is the opmnctl command, introduced
above. It is used to administer Oracle Process Manager and Notification Server, which is
used to manage and monitor most components. The opmnctl command can be used to
get the status of all components on your OracleAS server, as shown in the example
below.
# $ORACLE_HOME/bin/opmnctl status
Processes in Instance: mid.myhost.myco.com
------------------+--------------------+--------+--------ias-component
| process-type
|
pid | status
------------------+--------------------+--------+--------LogLoader
| logloaderd
|
N/A | Down
dcm-daemon
| dcm-daemon
|
2787 | Alive
DSA
| DSA
|
N/A | Down
OC4J
| home
|
2964 | Alive
OC4J
| OC4J_BI_Forms
|
2965 | Alive
Page 51 of 59
OC4J
| OC4J_Portal
WebCache
| WebCache
WebCache
| WebCacheAdmin
HTTP_Server
| HTTP_Server
Discoverer
| ServicesStatus
Discoverer
| PreferenceServer
wireless
| performance_server
wireless
| messaging_server
wireless
| OC4J_Wireless
| 2987 | Alive
|
|
|
|
|
|
|
|
2967
2958
2959
2961
2960
2963
2985
2986
|
|
|
|
|
|
|
|
Alive
Alive
Alive
Alive
Alive
Alive
Alive
Alive
Another command line tool is dcmctl, which is used with Distributed Configuration
Management. DCM can be used to save and restore configuration information, manage
OracleAS Farms and Clusters, and deploy new applications. If you begin changing your
application environment after installation, and then wish to revert to your original
configuration, you can use the following command:
# $ORACLE_HOME/bin/dcmctl restoreInstance
To manage the Oracle HTTP Server, you can connect to the following URL:
http://hostname.domain:7778
You will see the Application Server home page. From here, click the link for
Application Server Logins to login to the Application Server Control Console. From
this home page, click on HTTP Server to begin managing Oracle HTTP Server.
You can manage Web Cache in a similar way. You can access the Application Server
Home page with the following URL:
http://hostname.domain:7777
From here, click the link for Application Server Logins to login to the Application
Server Control Console. From this home page, click on Web Cache to begin managing
OracleAS Web Cache.
Another method for configuring Web Cache is to use the OracleAS Web Cache Manager.
The Web Cache Manager can be accessed from the following URL (Check the portlist.ini
file for the correct port):
http://hostname.domain:9400/webcacheadmin
You can login to webcache as either ias_admin or administrator. The password for both
is the ias_admin password entry that you set during installation.
You can manage Portal with the following URL. Use the Web Cache port number:
http://hostname.domain:7777/pls/portal
Login as the user Portal. The password is the original ias_admin password (even if you
changed the password after installation).
To manage Forms Services, use the following URL. Use the Web Cache port number:
http://hostname.domain:7777/forms/frmservlet
Login with the oracladmin user with the oracladmin password.
Page 52 of 59
To manage Reports Services, use the following URL. Use the Web Cache port number:
http://hostname.domain:7777/reports/rwservlet/getserverinfo
Login with the oracladmin user with the oracladmin password.
Oracle Internet Directory is administered with the following command line tool:
# $ORACLE_HOME/bin/oidadmin
To access the OracleAS Single Sign-On Administration pages, use the following URL:
http://hostname.domain:7777/pls/orasso
Use the ias_admin login and password.
Monitoring the Application Server with Application Server
Control
The Application Server Control Console component of Oracle Enterprise Manager is one
of the primary tools for managing and monitoring Oracle Application Server 10g. The
Application Server Control Console home page can be accessed one of two ways:
1. Use the port number for Application Server Control that was assigned at
installation time. The port is listed in the file:
$ORACLE_HOME/install/setupinfo.txt
Use the URL:
http://hostname.domain:port
2. Access Application Server Control from the OracleAS Welcome Page. On the
Welcome page, click Logon to the Oracle Enterprise Manager 10g
Application Server Control Console. Use the ias_admin user name and
password.
The Application Server Control Console provides a top-level overview of the status of
the Application Server. You can drill down to get more detailed information about
specific components, and you can start and stop any combination of components and
processes. The following links are available:
• Logs – use this link to access Oracle Application Server Logs and the Oracle
Application Server Log Repository.
• Topology – presents a graphical view of the OPMN hierarchy.
• J2EE Applications – lists deployed OC4J applications.
• Ports – lists all of the ports currently in use, and allows you to change them.
• Infrastructure – allows you to configure Identity Management, Grid Control
Management, and OracleAS Farm Repository Management.
• Backup/Recovery – assists you in backing up and recovering Instance data.
• Enable/Disable Components – allows you to temporarily disable components for
maintenance purposes.
• Create OC4J Instance – allows you to create new instances of selected
components.
• System Components – allows you to choose components to manage, or link to
the component home pages
Page 53 of 59
•
•
Process Management –allows you to monitor OPMN managed processes and
sub-processes
All Metrics – links to a page with all performance metrics
Figure 9. The Application Server Control Console home page
The Topology link presents a page with a graphical view of OPMN, which is particularly
useful for OracleAS Farms. Drill-down is available, with enhanced performance
monitoring and management control at the component level.
Page 54 of 59
Figure 10. Oracle Application Server Topology View
From the main home page, clicking on the host name opens the Host Home page. This
page gives a detailed breakdown of host resource usage. Useful links for monitoring Top
Processes and Filesystems are included at the bottom of the page.
Figure 11. The Host Home Page
One of the most useful pages for monitoring Application Server performance is available
from the main home page. The All Metrics link displays a page with links to all available
Application Server metrics.
Page 55 of 59
Figure 12. The All Metrics Page
Dell/Oracle Best Practices for OracleAS
The following are some Best Practices for deploying Oracle Application Server 10g with
Dell hardware:
1. It is a best practice to distribute functions in middle tiers across OracleAS Farms.
For example, you could place J2EE and Web Cache components on one server,
Forms and Reports on a second server, and Portal and Wireless applications on a
third server. What makes all of these distributed components an OracleAS Farm
is that they share a common Metadata Repository. The main benefit of utilizing
OracleAS Farms is that load is distributed across more servers, so that higher total
throughput can be achieved.
2. It is also a best practice to achieve scalability of individual functions or sets of
functions in middle tiers through OracleAS clustering (or “cloning”).
3. When both OracleAS Farms and Clusters are implemented, this implies that
multiple servers will be used for middle tiers. It is a best practice to use multiple
small to medium servers to “scale out” middle tiers, rather than a few large
servers with several CPUs to “scale up.” This will tend to lead to more Dell
PowerEdge 2950 and 1950 servers for middle tiers, as opposed to Dell
PowerEdge 6850 and PowerEdge 6950 servers.
Page 56 of 59
4. It is a best practice to use the Repository Creation Assistant to install the Oracle
Metadata Repository in an existing Oracle Database.
5. To achieve scalability for the Infrastructure/Data tier, it is a best practice to host
the Metadata Repository/Corporate Database on Oracle Real Application
Clusters. This configuration provides high availability and enhanced database
performance. Database servers that are commonly used include Dell PowerEdge
2950 servers for small and medium size databases, or PowerEdge
6850/PowerEdge 6950 servers for large databases.
6. To achieve load balancing across OracleAS Clusters and RAC clusters, load
balancing routers must be used. Software load balancers, such as Web Cache can
balance TCP/IP and http load, but cannot handle LDAP load balancing. For this
reason, dedicated hardware load balancers such as F5 Networks BIG-IP routers
are required.
7. Dell/EMC Clariion shared storage is required for Oracle RAC databases, but is
optional for middle tier servers.
8. For security purposes, a firewall between the outside world and middle tier
servers is strongly recommended. A firewall between middle tier components and
Infrastructure components is desirable for Enterprise deployments.
Summary
Application Servers that implement Java 2 Enterprise Edition standards have become one
of the leading method for deploying Enterprise applications.. All Application Servers
must interface with Corporate Databases. Oracle Application Server 10g has a distinct
advantage over other J2EE Application Servers, due to tight integration with Oracle
Enterprise Edition databases and Oracle Grid Control.
Dell PowerEdge Servers and Dell/EMC Clariion SAN storage provide a flexible and
reliable platform for deploying Oracle Application Server 10g. Dell PowerEdge Servers
offer the power that is necessary to drive processing intensive applications, and offer
attractive price/performance ratios All of the dual socket Dell PowerEdge servers are
appropriate for OracleAS implementations, with the choice of servers depending on the
deployment topology and the total load.
In this whitepaper, a “blueprint” was provided for a three-tier Oracle Application Server
10g deployment on the Red Hat Linux Operating System. Step-by-step installation
instructions were provided for the following components:
• Oracle Application Server Containers for J2EE (OC4J)
• Oracle Application Server Web Cache
• Oracle Identity Management (single sign-on, OID)
• Oracle Forms Services
• Oracle Reports Services
• Oracle Portal
The options available for expanding to a multi-tier Enterprise deployment topology were
also discussed. Dell/Oracle Best Practices for implementing a scalable, highly available
middle tier were provided to guide Administrators in successfully implementing Oracle
Application Server 10g on Dell PowerEdge servers.
Page 57 of 59
Formatted: Font: Times
Formatted: Font: Times, Font color:
Auto
References
“Dell Server Solutions"; 2006, Dell Corporation; http://www.dell.com/servers
“Dell Storage Solutions"; Dell Corporation, 2006; http://www.dell.com/storage
“Oracle Application Server 10g Administration Handbook”; Authors: John Garmany, Jr.,
Donald K. Burleson; Oracle Press, McGraw-Hill/Osborne; 1st edition (2004); ISBN 007-222958-6
“Oracle Application Server Administrator’s Guide, 10g Release 2 (10.1.2)”, Part No.
B13995-07; Contributing Authors: Helen Grembowicz, Kevin Hwang, Peter LaQuerre,
Mary Beth Roeser, Deborah Steiner, Harry Schaefer; Contributors: Megan Ginter,
Pavana Jain, Kai Li, Thomas Van Raalte, Andrew Salt, Pavi Sandhu; Oracle Corporation,
February, 2006
“Oracle Application Server Concepts, 10g Release 2 (10.1.2)”, Part No. B13994-02;
Primary Author: Theresa R. Bandy; Contributing Authors: Deanna Bradshaw, Vimmy
Raj, Mark Kennedy, Chuck Murray, Deborah Steiner, Jacques-Antoine Dube, Joseph
Garcia, Lypp-Tek Khoo-Ellis, Kai Li, Julia Pond, Thomas Van Raalte, Andy
Page, Frank Rovitto, Orlando Cordero, Marcie Caccamo; Contributers: Pavana Jain,
Valarie Moore, John Lang, David Saslav, Janga Aliminati, Nicole Haba, Mike
Donohue, Steve Button; Oracle Corporation, July, 2005
“Oracle Application Server Enterprise Deployment Guide, 10g Release 2 (10.1.2)”, Part
No. B13998-05; Primary Author: Julia Pond; Contributing Authors: Janga Aliminati,
Peter Lubbers, Greg Sowa, Tim Willard; Contributors: Senthil Arunagirinathan, Rachel
Chan, Orlando Cordero, Eileen He, Pavana Jain, Pushkar Kapasi, Rajiv Maheshwari,
Mark Nelson, Lei Oh, Ted Regan, Theresa Bandy, Malai Stalin, Yaqing Wang; Oracle
Corporation, May, 2006
“Oracle Application Server High Availability Guide, 10g Release 2 (10.1.2)”, Part No.
B14003-04; Oracle Corporation, March, 2006
“Oracle Application Server Installation Guide10g Release 2 (10.1.2) for Linux x86”, Part
No. B19310-03; Primary Author: Preeti Shukla; Contributors: Janelle Simmons, Saurabh
Pandey, Abhay Singh, Shashidhara Varamballi, Sriram Nagaraja Rao, Prashanth Joshi,
Lyju Vadassery; Oracle Corporation, September, 2005
“Oracle Application Server Metadata Repository Creation Assistant User's Guide10g
Release 2 (10.1.2) for UNIX”, Part No. B14129-03; Oracle Corporation, August, 2005
“Oracle Application Server Quick Administration Guide10g Release 2 (10.1.2)”, Part No.
B14126-02; Primary Author: Helen Grimbowicz; Contributing Authors: Mary Beth
Roeser, Pavana Jain, Lypp-Tek Khoo-Ellis, Peter LaQuerre, Theresa Bandy, Andrew
Salt, Thomas Van Raalte, Pavi Sandhu; Oracle Corporation, July, 2005
Page 58 of 59
“Oracle Application Server Quick Installation Guide
10g Release 2 (10.1.2) for Linux x86”, Part No. B19311-01; Oracle Corporation, August,
2005
“Oracle Application Server Release Notes10g Release 2 (10.1.2) for Linux x86”, Part No.
B19312-06; Oracle Corporation, May, 2006
“Oracle Application Server Upgrade and Compatibility Guide10g Release 2 (10.1.2) for
UNIX”, Part No. B14090-05; Primary Author: Peter LaQuerre; Contributing Authors:
Ashfaque Ahammad, Satheesh Amilineni, John Bellemore, Jane Bielawa, Kamalendu
Biswas, Fermin Castro, Jaya Chaudhary, Chung Cheng, Will Chin, Eric Deslauriers,
Saheli Dey, Paul Dickson, Bob Donat, Chenggang Duan, Jay Feenan, Joe Garcia, Mark
Gizejewski, Nick Greenhalgh, Elizabeth Hanks, Susan Highmoor, Clara Jaeckel,
Maneesh Joshi, Mark Kennedy, Sam Lee, Shaun Lin, Jeremy Lizt, Peter Lubbers, Sunil
Marya, Shashi Mohan, Valarie Moore, Oscar Naim, Bill Norcott, Lei Oh, Vinodkumar
Panurangan, Julia Pond, Shane Potter, Tony Quan, Mike Rubino, Pavi Sandhu, Charlie
Shapiro, Jianping Shi, Cheryl Smith, Debbie Steiner, Naseer Syed, Jeff Tang, Parthiban
Thilagar, Deepak Thomas, Amit Tripathi, Olaf van der Geest, Satishkumar Venkatasamy,
Manoj Verma, Richard Wang, David Ward, Liujin Yu; Oracle Corporation, January,
2006
“Oracle Database 10g Extended Memory Technology (EM64T) Enterprise Edition Linux Deployment Guide Version 2.1.1”; Dell Corporation, September, 2006;
http://support.dell.com/support/edocs/software/appora10/linEM64T/multlang/34546A01.
pdf
“Oracle Ultra Search Administrators Guide 10g Release 2 (10.1.2)”, Part No. B14041-01;
Primary Author: Michele Cyran; Contributors: Sandeepan Banerjee, Stefan Buchta,
Chung-Ho Chen, Will Chin, Jack Chung, Ray Hachem, Cindy Hsin, Caroline Johnston,
Hassan Karraby, Yasuhiro Matsuda, Colin McGregor, Valarie Moore, Visar Nimani,
Steve Yang; Oracle Corporation, November, 2004
“Red Hat Enterprise Linux (Version 4) for Intel x86 and EM64T Installation Instructions
and Important Information”; Dell Corporation, 2006;
http://support.dell.com/support/edocs/software/osrhel4/multlang/inst/MC774A02.pdf
Page 59 of 59