1
,ach|ne number
IQVB425
operating
guide
/
warranty
RECORD
YOURRODELNUMBER
|
(Noe,whiteyoucanseeit)
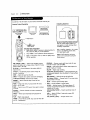
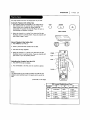
The mode[ and serial numberof your new VCRare located
on the back of the VCRcabinet. For your future convenience,
we suggest that you recordthese numbershere:
MODELNO.
SERIAL NO.
WARNING:
TO REDUCETHE RISK OFELECTRICSHOCKDO NOTREMOVECOVER(OR RACK).NOUSERSERVICEABLE
PARTSINSIDE. REFER
SERVICINGTO QUALIFIEDSERVICEPERSONNEL.
The Eghtning flash with arrowheadsymbol within an equilateral triangle, is intended to alert the user to the presence
of uninsutatod "dangerous voltage" within the product'senclosurethat may be of sufficient magnitude to constitute a
risk of electric shock to persons.
The exclamation point within an equilateral triangle is intended to alert the user to the presence of important
operating and maintenance (servicing) instructions in the Literature accompanying the appliance.
WARNING:
TO REDUCE
THERISKOF FIREOR ELECTRIC
SHOCK,DONOTEXPOSE
THISAPPLIANCE
TORAINORMOISTURE.
I
|
POWER CORD POLARIZATION:
CAUTION: To Prevent ELectricShock, match wide blade of plug to wide slot, fully insert.
ATTENTION: Pour _viter tes chocs_tectfiques, introduire la tame ta plus large de la fiche dans ta borne eorrespendante
de ta prise et pousser jusqu'au fond.
NOTE TO CABLE/TV INSTALLER:
This reminder is provided to call the cable TV system installers attention to Article 820-40 of the National ELectricCode
(U.S.A.). The code provides guidelinesfor proper grounding and, in particular, specifies that the came ground shall be
connected to the grounding system of the building, as closeto the point of the cable entry as practical
REGULATORY INFORMATION:
This equipment has been tested and found to comply with the Limitsfor a Class B digital device, pursuant to Part 15
of the FCCRules. These Emits are designed to provide reasonable protection against harmfol interference when the
equipment is operated in a residential installation. This equipment generates, uses and can radiate radio frequency
energy and, if not installed and used in accordancewith the instruction manual may cause harmfo[ interference to
radio communications.However,there is no guaranteethat interference will not occur in a particular installation. If this
equipment does cause harmful interference to radio or television reception, which can be determined by turning
the equipment off and on, the user is encouragedto.try to correct the interference by one or more of the following
measures: • Reorient or relocate the receiving antenna.
• Increase the separation between the equipment and receiver.
• Connect the equipment into an outlet on a circuit different from that to which the receiveris
connected.
• Consult the dealer or an experienced radio/rv technician for help.
CAUTION:
Do not attempt to modiEj this product in any way without written authorization from Zenith Electronics
Corporation. Unauthorized modification could void the user'sauthority to operate this product.
This class R digital apparatus meets all requirements of the Canadian Interference-Causing
Regulations.
Equipment
"Ce appareil num_rlque de ta class b respecte routes Les exigences du R_gul.ement sur le materiel
Canada."
Zenith is a trademark of ZEC© Copyright Zenith ELectronics Corporation 1999
broui|ller
du
I
SAFETY T]PS
I
PAGE
These simple precautions will help ensure that you get many years of safe enjoyment from your new product.
1.
2,
Read Instructions
11. Power Sources
Read all of the safety and operating instructions before
Operate product only from type of power source
operaUng the product.
indicated on marking Label. If you are not sure of the
type of power supply to your home, consult your
Retain ZnstrncUons
Keep all safety and operating instructions for future
reference.
3.
Heed Warnings
FoLLowwarnings on the product and in the opemUng
guide.
4.
FoLLow
Instructions
FoLLow
artopemUnganduseinstructions.
5.
CLeaning
Unplugthis productfrom the wall outlet before
cleaning.Donot useLiquidcleanersor aerosolcleaners.
Usea dampcloth for cleaning,
6.
7.
Attachments
Donot use attachmentsnot recommended
by product
manufacturer
asthey may causehazards.
Water and Moisture
Do not use this product near water--for example, near
a bathtub, wash bowl, sink, or Laundrytub, in a wet
basement, or near a swimming pool.
8.
Accessodes
serious injury to a chltd or adult, and serious damage
to the product. Use only with a cart, stand, tripod,
bracket, or table recommended by the manufacturer or
sold with the product. Any mounting of product should
follow manufacturer's instructions and should use a
mounting accessory recommendedby manufacturer+
Transporting Product
Move product and cart combinations
with care. Quick stops, excessive
force, and uneven surfaces may cause
product and cart combination to
overturn.
12. Line-Cord Polarization
Product is equipped with a polarized alternatingcurrent Une plug (a plug having one bLadewider than
the other). As a safety feature, this plug wilt fit into
power outlet only one way. If you're unable to insert
plug fully into outlet, try reversing the plug. If plug
still fails to fit, contact an electrician to repLace your
obsolete outlet. Do not defeat safety purpose of
polarized plug.
13. Power-Cord Protection
Route power-supply cords so
they are not Ukeiy to be
walked on or pinched by items
placed upon or against them,
paying particular attention to
cords at plugs, convenience
receptacles, and the point
whqre they exit from product.
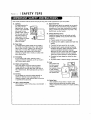
14. Outdoor Antenna Grounding
Do not place product on an unstable cart, stand,
tripod, bracket, or table. Product may fat[+ causing
9.
product dealer or Local power company. For products
intended to operate flora battery power or other
sources, refer to manual.
®
If an outside antenna or cable system is connected to
this product, be sure antenna or cable system is
grounded so as to provide some protection against
voltage surgesand built-up static charges. A_c[e 810
of the National ELectricalCode (USA), ANSI/NFPA 70
provides information on grounding of mast and
supporting structure, grounding of Lead-in wife to an
antenna discharge unit connection to grounding
electrodes, and requirementsfor grounding electrode.
( See Fig. 1 below. )
Fig. 1
+
_
Ground
Clamp
10. Ventilation
Slots and openings in cabinet must not be blocked or
covered. They are provided for ventiLation, to ensure
reliable operation, and to protect from overheating.
Never block openings by placing product on a bed,
sofa, rug, or other simiLar sun'ace. Do not place product
in bui[t-ln installation such as a bookcase or rack
unless proper ventilation is provided or manufacturer's
instructions have been adhered to.
Antenna Lead-ln Wire
Antenna Discharge Unit
NECSection 810-20
•
•
ELectricSer_ce
__m,
Equipment
Grounding Conductors
NECSection 810-?1
OUnding
Ground Clamps
NECArtZSO, Part H
NEC: National ELectricalCode
Antennagrounding per NECCode,ANSI/NFPA70
3
I SAFETY TIPS
These simpte precautions WIU heLpensure that you get many years of safe enjoyment from your new product.
25. Lightning
For added protection for
this product during a
Lightning storm, or when
product is [eft unattended
and unused for tong
periods of time, unptug it
from the watt out[e[ and
disconnect antenna or
cabte system. This wiLt
prevent damage to product
due to ttghtning and
power Linesurges.
16. Power lines
An outside antenna system should not be tocated in
the vicinity of overhead power tines or other etectric
Light or power circuits, or where it can fat[ into such
power tines or circuits. When instaffing an outside
antenna system, take extreme care to keep from
touching such power lines or circuits, as contact with
them might he fatal
17. Overtoadtng
Do not overload watt outtets, extension cords or
integra[ convenience receptac[es, as this can resutt in
risk of fire or electric shock.
18. Object and Liquid Entry
Never push objects of any kind into this product
through openings, as they may touch dangerous
vottage points or short-out parts that coutd resuLt in
fire or etectric shock. Never split Liquidof any kind on
product.
21. Replacement Parts
When reptacement part(s) are required, be sure service
technician has used replacement part(s) specified by
manufacturer or have same characteristics as originaL
part(s). Unauthorized substitutions may resuLtin fire,
etectric shock, or other hazards.
22. Damage Requiring Service
Unptug this product from the watt outtet and refer
servicing to quaUfied service personnet under these
conditions:
a. If power-supply cord or pLugis damaged.
h. If liquid has been spilted or objects have fallen into
product.
c. If product has been exposedto rain or water.
d. If product doesn't operate normaLlyby foLtowing
handbook instructions. AdJust onty those controLs
covered by handbook instructions; improper
adjustment of other controLsmay resutt in damage
and often requires extensive work by a qua[tried
technician to restore product to normat operation.
o. If product has been dropped or cabinet has been
damaged.
f. If product exhibits a distinct change in performance.
23. Heat
Keep product away
from heat sources
such as radiators,
heat registers, stoves,
or other products
(incLudingamp[triers)
that produce heat.
19. Servidng
Do not attempt to service this product yoursetf, as
opening or removing covers may expose you to
dangerous voltage or other hazards. Refer atLservicing
to qualified service personneL.
20. Wait or CettlngMounting
Mount productto waLL
or ceiLingontyas recommended•
by manufacturer.
24. Safety Check
Upon comptetion of any service or repairs to this
product, ask service technician to perform safety
checks to determine that product is in proper operating
condition.
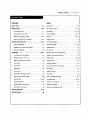
INSTALLATION
INSTALLATION ..........................
VCR Features Chart ........................
Connections for Your VCR ..................
Before you operate your VCR ...............
Setup for VCRPEus+®C
3 recording ...........
CONTROLSAND DISPLAYS..................
2-4
6-16
6
7-8
g-12
Audio Menu ..............................
Auto ChanneL Search ......................
Connections ...........................
5
11, 25
7-8, 27
12, 25
CrockSet .............................
11, 23
13-16
Features Chart .............................
17-19
Front Panel Diagram ........................
17
Instant Recording ........................
Message Center Front Panel Display ............
18
Language Menu ............................
VCRStatus Displays ......................
lg
Main Menus ...............................
20-35
26
ChanneLAdd/DeE ........................
Front Pane[ Diagram ......................
OPERATION ...........................
PAGE
INDEX
CONTENTS
SAFETYTIPS .............................
I
6
17
33-33
25
9
Message Center Front Panel DispLay...............
18
22
The Buttons on Your Remote ................
20
PLayback 3og-ShuttLe operation .................
Programmingyour remote ..................
21
PLayingTapes ...........................
Playback 3og-Shuttie operation ...............
22
Remote Control ............................
CLockMenu ............................
23
Safety Information .........................
Timer Menu ............................
24
Setup for VCR PLus+®C
3 recording ..............
Setup Menu ...........................
25
Setup Menu ..............................
25
Audio Menu ...........................
26
SpeakEZ Function ..........................
10
Watching TV Through the VCR................
27
Timer Menu ..............................
24
CameorderConnected to VCR ...............
". 28
Timer-ControLLedRecording ....................
34
29-30
20
2-4
13-16
Playing Tapes ........................
2g-30
Troublashooting .........................
Instant Recording .....................
31-33
VCR Plus+®C3 recording .......................
35
36-38
Recording WhiLeYou're Away ................
34 °
VCRStatus Displays .........................
lg
VCR PLus+®C
3 recording ....................
35
Watching TV through the VCR ..................
27
TROUBLESHOOTING......................
SPECIFICATIONS...........................
36-38
39
PAGE
6
I XNSTALLATION
Thispageshowsthe featuresof yourVCRandthe differencesbetweenthe models.
FEATURES
VCRP[us+®C
3 RecordingSystem
Auto SetupSystem(CLock& Tuner)
SpeakEZFunction (English/Spanish)
4-Heads (SpecialVideo Effects)
FuEL
Load/QuickStart
Auto Head CLeaner
HTS Hi-Fi Stereo AudioSystem
Frontand RearStereo Audio/Video(A/V) 3acks
RemoteControlMBR425Z
Auto/Manual BandSelect
Auto/Manual ChannelSearch
181 ChannelCapability(CATV& TV)
RecordSpeedsSF/EP
PLaybackSpeedsSP/LP/EP
Auto PLaybackSystem
Auto/Manual Digital Tracking
Instant Recording
Timer-ControlledRecording
Auto PLaybackTapeSpeedAdjust
Forward/ReverseSlow-MotionVideo (4-head VCR);Variable1/10 to 1/32
CtearPause/StillVideo
Real-TimeTape Counter
High Speed Rewind(Lessthan 70 secondswith T-120 tape)
Speed Search
CMSkip
EngEsh/Spanish/French
Menus
1-Year,8-Event Timer
MessageCenterFront Pane[Display
Auto CLockSet System
Hook-upCable(VCRto W)
EnergySaving
VCR design and specifications are subject to change wi'_hout prior notice.
INSTALLATION
I
PAGE
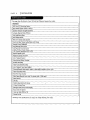
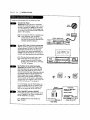
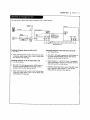
Requiredconnections for yourVCR.
Connections Without a CabLe Box
Antenna
FLatWire
(300 ohm)
Back PaneLof Stereo VCR
Adaptor
(Not pro
OR
OR
CabLeTV
Wail3ack
Back Panel of Typical I_/
%%
VHF/L_F_CATV
Thiscableis provided
with yourVCR.
Turn
beforeoffmaking
power any
or unplug
connections.
VCR
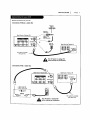
ConnectionsWith
a CabLe Box
Back Panel of Typical TV
Back PaneLof Stereo VCR _
Back Panel of
Typical CabLeBox
CaMeTv
WaLl 3ack
This cable is provided
with your VCR.
_L
Turn
power any
or unplug
VCR
beforeoffmaking
connecUons.
7
PAGE
I
8
INSTALLATION
OpUona[ connections for your VCR.
Audio/Video
(A/V)
Connections
to TV
Use A/V connections for a better picture.
Back Pane[ of Stereo VCR
VHFIUHFICATV
OUT
,_Tum
or unptug VCR
off power
before ma_ng
afly conflect_ofl$.
A/V cab|e is not provlded with VCR.
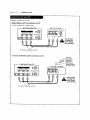
Accessory Audio/Video (A/V) Connections to VCR
Accessory
Component:
AnotherVCR,
Camcorder,
VideoCamera,
SatelliteReceiver,
(__
Back Pane[ of Stereo VCR
3ack pane[ of Accessory
Laser Disc Player
VHF/UHF/CATV
,_Tum or unplugVCR
off power
beforema_ng
any connections.
A/V cable is not provided with VCR.
INSTALLATION
I
PAGE
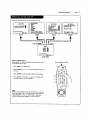
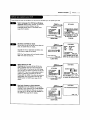
Things you must do before you can operate your VCR.
CLOCK MENU
AUTO CLOCK SET(ON): []
MANUALCLOCK SET :N
Pressnumber
keys
QUIT=exit
PROGRAM k'l
MONTH
DAY
START
STOP
CHANNEL
SPEED
REPEAT
11-8) tO select program
ENTER to adjust program
CLOCK
SETUP MENU
CH. ADD!DEL:
SOURCE:
AUTO PROGRAM:
ON-SCREENDISPLAY:
LANGUAGESELECT:
Press NUMBER (1,
RECORD:STEREO
Press number keys
QUIT = exN
Press number keys
then ENTER
QUiT = exit
SETUP
AUDIO
TIMER
f
AUDIO MENU
SpeakEZ;ON NON mOFF
PLAYBACK:HI-R
2, 3,
4) button
SpukEZ
ITMER :
SETUP
CLOCK ::_
AUmO :
Pressnumberkeys
QUIT= exit
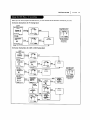
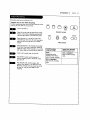
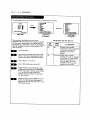
MAIN MENU
How to Access Menus
Menu operation is easy--just foLlowthe instructions
at the bottom of the menu.
shown
1. Press MENU to see main menu.
2. Press NUMBER(1, 2, 3, or 4) to see desired sub menu to
be used.
3. Press NUMBERto choose desired option to be changed.
4. Press QUIT/CC to exit menu, or wait a few minutes and
the VCR returns to normal operation.
Note:
Perform menu operations with the VCR and _/on, and tune
the TV to channet 3 or 4. The VCR must also be in the VCR
mode of operation. Pressthe W/VCR button repeatedly
untiL VCRindicator light appears in the fTont paneL.
Point remote toward VCR
+
g
PAGE
10
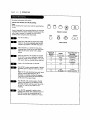
I INSTALLATION
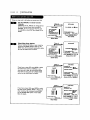
Things you must do before you can operate yOUTVCR.
Connect
the Power
(Required) Plug your VCRinto an unswitched
120 Vac, 60 Hz household power outlet. Turn on
SWITCH
WALL
the VCRby pressing the POWERon the remote
or on the VCR'sfront panel. While plugged into
an AC o_let,the VCR consumes 3W of eLectTical
power in OFF condition.
_
OUTLET
POWER
Do not plug
the VCRinto
o switched
outlet.
Otherwise,
when the
power is power
switched oj_, the VCRturns o_. You may
then hove to reset the time and date, and
IYPICALZENITH VCR
_
reprogram operational/eotures.
Set your VCR's Clock and Tuner automaUcal[y
After you connect an antenna (or cable company).
and you plug your VCRinto a 120 Vac, 60 Hz
power outlet, the VERwilt set the clock and
place channels into memory automaUcaLLy.The
"SEARCH" messagewit[ blink for 2-5 minutes in
the VCR'sfront panel display during auto setting.
[_]
The
auto
clock
set works
only in are
areas
where
Data
Service
(DS) signals
provided along with normal W signals,
Ifthereisnot channelthatismernodzed,
"No DATA"will appear.
B
Set PosiUon of the CH3/CH4
Switch
(Required) The CH3/CH4 switch on the VCR's
back panel determines which channel the VCR
uses to send video signals to your TV. The IV
must be tuned to the same channel you set with
the CH3/CH4 switchto see tape playbackand
statusdisplays
from the VER. To determine
which videochannelprovides
the bestpictur6
foryour system,trythe switchinEH3 position
and tune your TV to channel3;then trythe CH4
position
and tune your TV to channel4.
For a test display, pressthe TV/VCR button on
remote repeatedly until the VCR indicator Eght
appearsin the VCR'sfrontpar_ldisplay.
Press
MENU on the remote to see the main menu.
Select SpeakEZ Function (On/Off)
A voicetells youhowto usethe featuresin the
menusif SpeakEZis ON,(ONis recommended.)
Seethe AUDIOMenufor details.
P_ess 6,
ADD_ MEHU
v
Spe_EZ:ON lION _IOFF
PLAYBACK:
HI.FI
SpeakE2
RECORD:
STEREO
Tg/_g
SEep
CLOCK
AUDIO
Press numberkeys
then ENTER QUIT= exit
w
[_
SpeokEZ_unctions with ENGLISHand
SPANISH.
PreSsnumberkeys
QUIT=exit
MAIN MENU
Press NUMBER (1 or 2) to
choose ON or OFF
I
INSTALLATION
PAGE
11
Some things you must do and others you may want to do before you can operate your VCR.
Select Language for VCR Menus/Displays
(Optional) Select EngLish,Spanish, or French for
VCR menus and status displays. See the
LANGUAGESELECToption on the SETUPmenu
(page 25) for details.
Press 5.
I
D
SETUPMENU
LANGUAGE
SELECT
: ENGUS:BENGLI6H IqESPA_IOL
FRANGAIS
Pressnumberkeys
thenENTER
QUIT= exit
CH. ADD/DEL;
SOURCE:
ON-SCREEN
DISPLAY:
AUTOPROGRAM:
LANGUAGE
SELECT:
W
Set Date and Ttme for Clock
Set the clock in the VCRto the current date and
time. See CLOCKMenu for details.
Pressnumberkeys
QUIT: exit
Press NUMBER (1, 2, or 3)
to select the desired
SETUPMENU
language
Press 2.
D
I
CLOCKMENU
MONTH
DAY
YEAR
TIME
CLOCKMENU
YourVCRaLsohason Auto-Clock
Setfeature. See
CLOCK
Menuon poge23 for detaiLs.
SE11Jp MENU
AUTOCLOCKSET(ON):
[]
MANUAL
CLOCKSET :N
[] JANUARY
I FRI
1999
12:00AM
Pressnumberkeys
thenENTER
QUIT= exU
_The
Timer has
feature
the Clock
beenwill
set.not function unless
Press NUMBER (0-9) then
ENTER to set date and tlme
Press numhef keys
QUIT = exit
CLOCK MENU
B
Select Source for VCR
(Optional) Set the source of the VCRfor the
type of program signal you have connected to
the ANT IN jack on the back of the VCR. Choose
TV if you have an antenna connected to the VCR.
ChooseCATVif you have a cabLesystem (with or
w_thout a cabLe box) connected to the VCR.
ChooseAUXl (or AUX2) if you have an accessory
Audlo/Video (A/V) connected to the VCR. See'
SOURCEoption on SETUPmenu (page 25) for
details.
B
Use Auto
Press 3.
SETUpMENU
CH. ADD/DEL:
SOURCE:
ON*SCREEN
DISPLAy:
AUTOPROGRAM:
LANGUAGE
SELECT:
Pressnumberkeys
QUIT= exit
SOURCE:
TUNER(TV)
CATV
gAT_xI
HAUX2
Pressnumberkeys
• then ENTER
QUIT= exit
Press NUMBER (1, 2, 3 or 4)
to select the desired source
SETUPMENU
Press 1.
Program to Find Channels
(Required) Use AUTO PROGRAMto find active
channels in your broadcast area. AUTO PROGRAM
SETUPMENU
r
I
I
SETUP MENU
AUTO PROGRAM:
SEARCHIN(
SETUpMENU
stores the active channels that you can access
by using the CH (V/A).
See AUTO PROGRAMon
the SETUPMenu (page 25) for details.
CH. AOU_EL:
SOURCE:
O_CREEN
DISPLAY:
AUTOPROGRAM:
M
LANGUAGE
SELECT:
Press number keys
QUIT= exN
SETUPMENU
QUIT : exit
,_
PAGE
12
I INSTALLATION
Things you may want to do before you operate your VCR.
Use CH. ADD/DEL
Channels
to Create
Favorite
Press 2.
SETUP MENU
I
(Optional) Use CH. ADD/DEL to change the |ist
of active channels found when using AUTO
PROGRAM,so you can list your favorites. See
CH. ADD/DEL: CH. []
SETUP MENU
CH. ADD/DEL on the SETUPMenu (page 25) for
details.
CH. ADD/eEL:
SOURCE:
ON-SCREENDISPLAY:
AUTO PROGRAM:
LANGUAGESELECT:
Press number keys
then ENTER
QUIT = exit
Press NUMBER (0-9)
then ENTER
Press number keys
%
ADD
QUIT = exit
SETUP MENU
Select Other
Press 4.
Menu Options
I
Show or hide the VCRstatus on your screen by
using the ON-SCREENDISPLAYoption on the
SETUPMENU
)D
SETUPMENU
SETUPmenu. We recommend keeping this option
ON. See the SETUPmenu for details.
ON-SCREEN
DISPLAy:
ON
DON mOFF
CH, ADD/DEL:
SOURCE:
ON-SCREENDISPLAY:
AUTO PROGRAM:
LANGUAGE SELECT:
Press
numl_
keys
then ENTER
QUIT
: exit
Press NUMBER (1 or 2) to
choose ON or OFF
Press number keys
QUIT = exR
SETUP MENU
Press 4.
If you have a stereo VCR, press ENTERto se{ecL
AUDIOMENU
SpeakEZ:
ON
PLAYBACK:
HI-R mHkFI
[] NORMAL
RECORD:
STEREO
SpeakEZ
the audio format (HI-FI or NORMAL)to use
when you pray a tape. We recommend seLLing
this option to HI-FI. See the PLAYBACKMODE
TIMER
SETUP
CLOCK
AUDIO
option on the AUDIO Menu for details.
I_
Pressnumberkeys
then ENTER
QUIT= exit
Press NUMBER (1 or 2) to
choose HI-FI or NORMAl.
rmmber _mys
QUIT = exit
MAIN MENU
Press 4.
)l
If you have a stereo VCR, press ENTERto select
the audio format (STEREO,MONOor SAP) to use
when recording. We recommend using STEREO.
See the RECORDMODEoption on the AUDIO
Menu for details.
AUDIOMENU
SpeekEZ:
ON
PLAYBACK:
HI-FI
SpeakEZ
TIMER
SETUP
CLOCK
AUDIO
Press number keys
QUIT = exit
MAIN
MENU
RECORD:
STEREO_s_TI;O
Pressnumber keys
then ENTER
QUiT= exit
Press NUMBER (1, 2 or 3)
to choose STEREO,NON0,
or SAP
INSTALLATION
I
PAGE
13
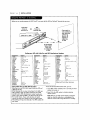
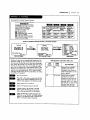
Before you can record programs with VCRPtus+®C3, you must teLLthis VCRthe PlusCodeTM channels for your area.
Introduction
Channel
These PlusCodeTM channeLsmust be mapped to the active
channels you found using AUTO CHANNELon the SETUP
menu. An example of channel mapping and a blank
worksheet are provided for your convenience. Checkthe TV
schedule in your Local newspaper for the published
PtusCodeTM channels.
Mapping
Your VCR
PREPARATION (Already Done)
See "Before You Operate Your VCR".
1. Set Date and Time for CLock.
2. Select Tuning Band for VCR.
3. Use Auto Channel to find channels.
PRELIMINARY STEPS
Note: The C3 system provides cabLe-box channel control for
most cable boxes.
1. Turn on VCR, TV, and cable box (if used).
2. Select TV (or CAW) for SOURCEon SETUPmenu.
3. Obtain Listing of PtusCode channels.
CHANNEL MAPPING
1. Complete Channel Mapping Worksheet.
2. Determine the 'MFR"number for your cabte box or DBS
(if used) from the tLst of Cable Box/DBS "MFR'
(Manufacturer) Numbers provided on the next page.
3. Press VCR+on remote and follow all on-screen
instructions. Enter channels with Numbers. Use AD3
(Lea/Right) to erase (some models).
Example of Compteted Worksheet
Worksheet with Channels Found
via Auto Channel
Channel
found Network
or
viaAutoChannel
StationID
(TVCh/CableCh)
2
5
CBS
NBC
7
9
ABC
WB
11
PB$
2O
PBS
26
WSNS
50
WPWR
Published List of PlusCode TM
Channels
Published
PlusCede
TM
Channel
(VCR+Ch)
÷
÷
Completed Worksheet for Channel Mspping
Channel
found
viaAtaoChannelNetwork
or
(TVCWCab_e
Ch Staho_lID
2
CBS
5
7
NBC
ABC
Published
PlusCode
TM
Channel
(VCR+Ch)
2
5
6
60
HSN
9
WB
66
WGBO
11
20
PBS
PBS
23
WFBT
WSNS
4
50
60
WPWR
HSN
42
--
66
WGBO
46
VCR PLus+, C' and PlusCode are registered trademarks of Gemstar
Development Corporation. The VCRPLus+system is manufactured under
Licensefrom Gemstar 0eve[opment Corporation.
8
11& 19
20
--
PlusCodes
Ch.2:WBBM ICBS)
Ch.5:WMAQ (NBC)
Ch.7:WLS LABC)
Ch.9:WGN (WB)
Ch.11:WTTW (PBS)
Ch.20:WYCC (PBS)
Ch.26:WCIU (Ind)
Ch.32:WFLD (Fox)
Ch.38:WCFC (Ind.)
Ch.44:WSNS (Tel.)
Ch,50:WPWR (UPN)
Ch.66:WGBO (Uni.)
2
5
6
8
11&19
20
26
32
3
4
42
46
PAGE
I
14
INSTALLATION
Before you can record programs with VCRP[us+®C3, you must tel[ this VCRthe PiusCodeTM channeLsfor your area.
CabLeBox
Tunesto
Channel19
OR
DBS
Tunesto
Channel 200
CLearpath to
waiL,window or
any reflective
surfaceto
bounce IR
signals to
CabLeBox
or DBS
IR (Infrared)
SignalPath
from VCR
to CabLeBox
or DBS
Testing your VCR with CaMe Box and DBS Manufacturer Numbers
Manufacturer
ARCHER
NumbeJs
1.5, 6, 37, 49
Manufacturer
Numbers
Manufacturer
SONYDBS
Numbers
63
CABLETENNA
1,37,49
NSC
NEE
27, 31,
31, 33
33
27,
SPRUCER
14, 15, 62
CABLEVIEW
4, 25, 3s, 37, 41, 49
OAK
10, 38
27, 32, 35, 37
CENTURy
37, 40, 46, 56
OAKSIGMA
10, 38
STANDARD
COMPONENTS
CITXZEN
4, 25, 3S, 37, 41, 49
PA/4ASONIC
14, 1S, 62
CURTXS
8, 9, 42, 47
PANASONIC
DBS
61
STARGATE
SYLVANIA
4, 6, ZS, 27, 33, 35, 37, 41, 4g
17
OIAMOND
1, 37, 49
pHILIPS
7, 11, 18, 20, El, 3g
TEI(NIKA
5S
EAGLE
EASTERN
11, 18, 19, 22, 33, 4S. 48
24
PIONEER
5, 6
PULSER
4, 25, 55, 37, 41, 49
GCBRAND
GEMINI
4, 2S, 35, 37, 41, 49
4
OUF_T
S, 6
RADIOSHACK
37, 40, 46, 56
GENERALELECTRIC
1, 44
RCA
14. 15, 62
GENERAL
INSTRUMENTS
], Z, 3, 4, Zg, 43, 51,
53, 54, 58
RCADBS
62
REALISTIC
37, 40, 46. 56
HAi4LIN
12, ]3, 24,34
RECOTON
37, 40, 46, 56
HITACHI
26
TELECAPTION
5?
TELEVtEW
6, 27, 3_, 35
I"EXSCAN
16. 17
TOCOM
TOSHIBA
1, _9, 30, 35, 52
30
UNIDEN OBS1
59
UNIOEN DBS1
60
UNIKA
1, 37, 49
12, 13. 24, 34
24
UNIVERSAL
3S, 36, 37. 41, 49
VIDEOWAY
?, ZO. 39
V_EWSTAR
VID TECH
11, 18, 19, 22.33, 45, 48
50
VIDTEK
5O
ZENITH
7, 20, 3g
I ,_XSCO
4
REGAL
REGENCY
! JERROLD
MACOM
1, 2, 3, 4, Zg, 43, 51, 53, 54, $8
Z6
REMBRANDT
1, 27, 32, 3S, 37, 49
SAMSUNG
5, 6, 27. 33, 35
SCZENTLFIC
kTLANTA
8, 9, 4Z, 47
SIGNAL
22
SHERITECH
23
SL MARX
6, 27, 33, 35
S.L MARX
35, 16, 37, 41, 49
MAGNAVOX
2Z
MAGNAVOX
DBS1
59
MAGNAVOXDBS2
60
MATSUSHITA
14, 15, 62
t4OV]ETIkiE
27, 32, 3S. 37
NOVAVXS[ON
8, 9, 42, 47
Note: Use 9g for aLLother cable boxes.
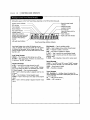
Using Cable Box and DBS 'MFR" Numbers
If none of the Usted MFR numbers work, you can:
Before you can use VCR+, you'LLneed to test your VCRand
cable box the way:
While fo[Lowlngthe on-screen instructions for CH MAP. you
wii[ be asked to enter the output channel of your cable
1. Try aLLMFR numbersavailable, from 1-63 until you find a
number that works; or
box/DBS and its MFR (Manufacturer) number. Locate your
brand of your cable box/DBS in the above list and use the
first number shown. If your cable box does not seLect
channeL19 while you're testing, try the next MFR number.
Keep testing untl( you have tried a[[ of the NFR numbersfor
your brand.
2. Enter gg for the MFR number to disable cabLe-box
channel control
Note: With gg, your VCRcannot remotely control the
cable box. Keep the cable box on and presetect the
cabLe-boxchannel when using VCR P[us+®C_ recording.
INSTALLATION
I
PAGE
15
Beforeyou canrecord programswlth VCRPtus+®C
3,you must tell this VCRthe PtusCode channelsfor your area.
TM
On-Screen Instructions for TV Tuning Band
START
Press VCR+ on remote
Press 0000 to show
Double Map Screen
c_ ..p _=p:
_ Map Rm4t.e:
::
r_'v_r _OUlT,
I J;=l
IT
T_Ch
B za nw/,_t
_
QU
i_
Ig _ld_ml
ourt,mnt
2-Setup_
_'_CA_
0
V_RF_t_
Channel mapping a
Tv tlu la, a_ _ _ Tv
secondPtusCode
TM
Channelfor
TVchannel 3.
s_upm
1-Yes
V_q_
T
I
On-Screen Instructions
for CA_/or
DBSTuning Band
START
PressVCR+on remote
E=._.J
i"_
Quit
2-Setup-_
Press
0_00
Ooub[e
-* _
QUIT
Channel
second
ENTER
"=°
.-'_*'--'==
-
ENTER
QUIT
Channel
-
!
QUIT
:::
OUIT
map "rig
PLus_de
for Cable
channel
,_,_
.--_%.,
Screen
-1
1-Yes _"
:
to show
Nap
.,,.,,.,,..
T
3.
a
TM
PAGE
16
I ZNSTALLATZON
Beforeyoucan recordprogramswith VCRPlus÷®C
_,youmusttell this VCRthe PlusCede channelsforyourarea.
TM
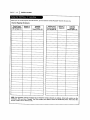
Channel Mapping Worksheets
Channel found
via Auto Channel
(TV Ch/Cable Ch)
Network or
Station ID
Published
PtusCode'_
Channel (VCR+ Ch)
Channel found
via Auto Channel
(TV Ch/Cabte Ch)
Network or
Station (D
Published
PlusCodeTM
Channel (VCE+ Ch)
NOTE:Two PlusCode channel numbers may be listed for certain networks or stations. Enter both numbers on the
worksheet. After you have "mapped" the first number, press0000 to showthe Double Map menu. Then enter the
second number next to the first one.
TM
CONTROLS AND DISPLAYS
I
PAGE
17
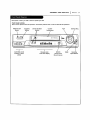
Descriptions of items you need to know to operate your VCR.
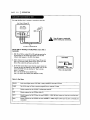
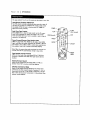
Front Pane| Controls
These controls perform basic VCRoperations. The Remote performs basic as wei[ as advanced VCRoperations.
POWEROn/Off
Stop/Eject
Channe[ Up/Down
Cassette
Button
Selector
Setector
Compartment
SHUffLE Ring
/
7
/
Audio/Video (A/V)
AuxlilaTy In 3acks
Messagecenter
Front Pane[ Display
(AUX2)
PLAY
REC/ITR
(Instant Timer
Record) Setector
PAUSE
Recording
Speed Setector
PAGE
18
I CONTROLS AND DISPLAYS
nformation appears in the Front Pane[ DispLaydepending on the VCRfunction being used.
Counter memory indlcator
RemainlngtapeLength
indicator
VCRindicator
Timerindicator
Audio
program) indicator
Recordindicator
Tape speed indicator
Cassette indictor
\
x
Lights when pla_ng back the
Hi-Hsound.
Lights white a cassette is
inserted, flashes varying its speed
according to the tape operation,
and flashes white ejecting a
cassette
ht audio [eve[ indicator
Leffaudio {eveIindicator
Front Pane[ Display shows which VCRfunction you are
using. For examp[e, when you pressSP/EP, SP or EP appears
to indicate the tape speed. As you change channels, the
channet numbers appear. The current time shows even white
theVCR isoff.
indicator
REW (Rewind) -- Tape is rewinding rapidly.
SLOW -- Tape is praying at slow-motion forward speed.
STILL --
PLaybackis haLted on one frame,
STOP -- Tape rewind or playback is stopped.
R, PLAY -- Tape is reversing at normal p_aybackspeed.
Auto Setup Message
SEARCH-- This messagewiLLbunk during auto setting.
No DATA-- After auto setting, if there is not channel that
is memorled, "No DATA"wiLLappear.
REV.X3 -- Tape is reversing at three (X3) times normal
playback speed.
R. SLOW -- Tape is p[aylng at stow-motion
reverse speed.
Record Message
Ptayback
Messages
A.TRK -- Tape tracking is being adjusted from VCR.
ALARM -- Turn VCROn and OFFto erase "ALARM" message.
If it is not erased, take VCRto an authorized repair center.
ALARM -- Turn VCROn and OFFto erase "ALARM"message.
If it is not erased, take VCRto an authorized repair center.
PAUSE--
Record mode is hatted.
STOP -- Recording is stopped.
FF (Fast Forward) -- Tape is advancing rapidly.
CUE -- Tape is advancing rapidly in playback mode for visuaL search.
PLAY -- Tape is playing at norma[ ptayback speed.
PLAYX2 -- Tape is advancing at twice (X2) normal playback
speed.
REV -- Tape is reversing rapidly in playback mode for vlsua[
search.
Tuner Messages
AUX_ (Aux_tlen]_) -- AuxiUary channel is setected for
viewing equipment connected to Audio/Video jacks on front
or rear of the VCR.
CH _ -- VCR tuned to Channel.
HELLO -- VCRis turned on.
CONTROLS AND DISPLAYS
I
PAGE
lg
On-ScreendispLaysteLLyou the status of the tape inserted and VCRfunctions.
[
Current mode of operation
(STOP,PAUSE,RECORD,PLAY,etc.)
and audio format of tape, where
PLay-HI-F1 or NORMAL(Nodisplay)
PLAY HI-F!
-SP
Tape Speed
VCR CH
11
STISAP
EP-Extended PLay
LP=Long PLay
SP-Standard PLay
Current CH (ChanneL)selected by
using tuner in VCR
--Audiofurmat
VCRtuner:
by
STEREO,MONOor ST/SAP
15 MON
7:17 AM
Current date, day, and time__
M-1:35:45 - --
TypicalVCRStatusDisplayon TV
Reat-Ume tape counter
M = Counter Memorj is active
- - Tape is rewound past index
mark.
1:35:45 135 =
45 -
M-1:35:45
Tape Time Remaining
Disp|ay
The VCRStatus DispLayappears on the TV when a VCR
function starts, Like when you change a channel or select a
different VCRmode. For example, pressing STOPwhile the
VCRis in PLAYmode shows STOPin the display. PressENTER
on the remote at any time (except Special Effects PLayback
mode; SLOW,STILL etc.) to see the Status DispLay.
Length of tape (in Ume)
1 hour
35 minutes
45 seconds
REM 1:3_
TapeCounterPosition
VCR Status
of _gnaLreceived
VCR Status
DispLay OpUons
When the Status DispLayappears, press ENTERrepeatedly to
see abbreviated dispLays,as foLLows:
•
t.
Press ENTERto see Status DispLay.
2. Press ENTERa second time to show only the tape
counter position.
Note:
Zf the VCRStatus DispLaydoes not appear on the 1_/screen,
check the ON-SCREENDTSPLAYoption on the SETUPmenu.
3. PressENTER
a third timeto showonlythe tape Ume
remaining.
SeLect ONto see the display. See "Setup Menu" section for
details.
4. PressENTERrepeatedly untit aLLdisplays are removed.
PAGE
20
I OPERATION
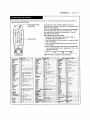
A quick list of all the buttons on your remote control and what they do,
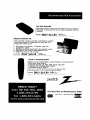
]nstaLUngBatteries
RemoteControt Operation
Select DVD Mode,
aim at Zenith DVD
L
SeLect
W Mode,
aimat _/
Select VCR Mode,
aimat VCR
I
SelectCBLDBS)Mode,
a rnat cabe boxor Des
÷
e sure to install the batteries provided
with this remote. Match positive (+)
and negative (-) with markings shown
CBL
in battery compartment.
_'__'__*_
( _
Selecting Mode of Operation
1. SUdeVCR/CBL (DBS)/IV selector to desired position for
VCR, cable box lOBS), IV, or DVD operation.
2.
Press POWERto turn On/Off the selected equipment.
3.
Refer to instructions
After installing batteries, the remote
resets to the following brand codes:
TV - 100, CABLE- 300
Note: All VCRoperations and menu
with TV, cabLe box (DBS) and/or
options con be accessedby using the
remote control.
DVD for operation.
AIM lAD,lUST) (_l/Ib) -- Adjusts tape playback tracking
while in VCRmode. Use to change status of Zenith TV menu
options while in TV mode.
CH (Y/A)
-- Channel Selectors. Also selects AUX A/V
input channel.
PROGRAM-- Programsremote with brand codes for your
brand of TV and/or cable box (DBS).
QU]T/CC -- Exits menu system. Selects closed caption for
Zenith TV while in IV mode.
REC/ITR -- Begins tape recording.
CM SKIP -- Fast forwards picture search through 30
seconds of recording,
REV [] FWD (Reverse/Forward) -- Rotate Shuttle Ring for
variable-speed playback. Move Oog Wheel for frame-by-frame
E3ECT--
Ejects the tape from the VCR.
playback.
ENTER--
Programs menu options and shows VCRdisplay_.
REW (Rewind) --
F FWD (Fast Forward)--Advances tape rapidly.
MEMORY-- Returns real-time tape counter to zero
(M 0:00:00),
MENU -- Shows main menu. Accesses Zenith IV menus
while in the TV mode.
MUTE -- Pressto turn off TV sound. Press again to restore
TV sound.
Rewindstape to the beginning.
SEL (Select) (Y/_,)
-- Chooses Zenith IV on-screen menu
options white in IV mode.
SP/EP --
Choosestape recording speed.
STOP -- Cancels playback or record modes.
TV/VCR -- Switches source of TV picture between TV
channel and VCRchannel selection. VCRfunctions are
available in VCR mode.
Numbers -- Chooseschannels and enters programming
information.
VER/CBL(DBS)/TV/DVD
remote.
PAUSE -record.
VER+ -- Begins VCRPlus+® setup and accessesVCR
Ptus+®C_ recording.
PLAY--
Pausestape temporarily during playback or
Begins tape playback.
POWER-- TurnsVCR On and Off. ALso turns VCRTimer Off
and On, if programmed.
VOL (Volume)
(,/A)
-- Selects operational mode of
-- Changesvolume of IV.
OPERATION
I
PAGE
21
Your remote control operates the common features of most, but not aLL,models and brands of IR (infrared) controLLedTVs,
cable converters (DBS) and DVO.
-VCR/CBL(DBS)/TV/DVD
Mode SeLector
Some functions
ofyour particutar
equipment may not be
controLLed
by thisremote.In such cases,use the original
remote
controlforyourequipment.
Ifyou areusingZenithproducts,
the remote comes programmed
forthe most commonLy used codes.Forotherbrands-- orif
your remote fails
to controlyour Zenithproduct-- you wiLL
have to programthe remote.
FoLLowthese steps for each product:
1. Locate the three-digit code for your brand and type of
equipment in the code tables below.
®®®©
®®®_
--Program
Button
2. SLide VCR/CBL(DBS)/TV/DVD to choose TV or cable box COBS)
mode of operation.
3. Press and boLdPROGRAMwhile entering the brand code for
your equipment.
0
"PCBrand Name
ADMIRAL
4. Enter the three-digit brand code and then release PROGRAM.
If your equipment does not work, repeat steps 3 and 4, or try
a different brand code.
5. Write down the code that operates your equipment.
, CATV
TI/Codes b_ Brand
Codes
AHARK
_
110.
113.
144,
151,
TV Brand Name
PORTLAND
152
131
_/Codes _
Codes
Brand
L RADIOSHACK..
................
3ERROLD
323, 324, 325, 326, 327, 329
!27128...........................................................
.............................................................................
110_ 111_ 189 ................
..........................................................
Rc_
.......
[t_,+38,_4,_
KALEVISION
334
...............................................................................................
J [_+_
...................................................................
RE_I_TIC .................................................................................
CENTURION
OT_EN
_(_I_
_ON_[_O...................
DAEWDO
N
DVD __
CabLeConverter Codes by Brand
Cable D_oder
Codes
Brand Name
131
QUASAR
.......................
AOC.......................................
_1_.......................
BROKSONIC
, DBS_
Note: DVD mode is operated only with Zenith DVD.
140
143
110
130 ...........................................................................
+ !s8
SAM_S_PG........................... _
111
lZ9
_15
2_9 =_31 ....
NSC
18811,_?11148..11_:491%50 ..........
SIGNATURE 2000
102, 113,
130, 131,
114,
139
115,
122,
...............
306 307 310 33+ 337 33s
33Z
(_A_K .............
.s_8_.....................................
_6 +F_...............
3(_1, 321,
322
...........
_N-'_P-N'L_
................_13_
31s 3zo
13% ...........................................................
148
,_,_
.M=A§I_A_08
.................
129 ....
PARAGON
300
PIONEER
318
F*L=I_8_.8
.......................
RCA
336
318
319
.
_'_8_ .................., ._!8_._:_.
o...........................................................
_
r.....................................................
•.....................................................................
, _.................................................................................
_SHEe
+_z__8...........................................................
SOUND"ESI"_N
............188
......................................................................
R[G_ .............................
30+
....
FUNAI
153
358 ................................................................
SYLVANIA
106, 107, 115, 121, 1Z2, 130,
SAP_SUNG ........................
318, 327+ 334
GENERAL ELECTRIC
10_,
118,
SCIEN_FICATLANTA
317, 335.
347
354
318'
327
318_3201
327
.....................
........
127, 128,
133, 144,
151
133, 158
...................
.....................................................................................................
SYMPHONIC
153,154
................
SLMARX
HITACHI
3C
PENNEY
3VE
_
119
........................................................
102, 131
115, 13Z
la4, 130, 133
109
..........................
141 .....................................
_31 ..................................................................
TATUN_
328
.............................
TEKNIKA
110,
113,
TELERENT
.123,
+v ........
_is.i+o
._++_+_
.....................................
_x ....................i_
MAGNAVOX
100, 106,
12Z, 130,
ZENITH
107,
231,
_09,
133,
114, 115,
158
...................................................
" .....................................
_AaES7
F............................
113 .......................
MA
_mTZ...........................
!o3_11_..........................
MEMORE(
113
.........................................................................
100,
CI5_
121
f_tbie
OKoder
ALLEGRO
ARCHER
351
CABLEVIEW
336
OTtZEN
.........
CURTISMATHES
.NEC
................................
:IS,
13o
.p+_N.r_(+N.].=C...............
PHILCO
HONEER
104
122
127
tZ+
133
163
....+_z_
134
.................................................
J
ii_ii_iiiii
S=TANDAROCOMPON_NT_
334
STARGATE
318, 327,
_;_i;
........
328
];;i;;7;[][i;;[[;i_
]_;[_);(......................
101
Codes b_Brand
3Sl 3s2
Ua_yER_A_
........
336
336
'
EAGLE
115, 121 12R 1:_8 _:}1 .150. ,, j
131
158
II_I_I_E_RI
Co_s
Brand Name
.p_LM.+mUB_S_L...
103,113311_.A+
_ .......................
MONTGOMERY
WARD103,113,
11+,11+,111,
129,
+38 i+31.!.+ @
....
Converter
122, 131,
__
GEMINI
I G{NERALEtECTRIC
i GENERALINSTRUMEN1
GOBRAND
317
ZENITH
HT-2_
D_ IrandName
300
DBS Codes_
Codes
Brand
306,307,310
302,327,328,333
353
RCA
350
++_+
...................
+++
DVDCodesbyBrand
324,326,327,328
1336
dE%':
"d"- I::T;tD,
PAGE
22
I OPERATION
PLayback,log-ShuttLe Operation (For Special Video Effects)
441_
a. Slow
KeysUsedfor
Spedat Effects
II STILt(Pause)
I_k_
m_mb
PLAy for normal
PLayback speed
PAUSE for StiLL
Ringfor variable
PlAyback
Searchin
the
SLowto 3et
Speed
direction chosen
@@@©
ShuttLeRing
®SS©
0
MOveJog Wheel for frameby-frame tape ptayback-forwardor reve_l_eiMOVe
Wheel a ,smaLL
umountfor
0
one frame.
Jog Wheelfor
frame-by-flame
ShuttLeRingfor
vadabiespeed
ShuttLe Ring OperaUon
3og Wheel0peraUon
11 Press PAUSEfor playback STILL mode.
1. Press PAUSEfor playback STILL mode.
2. Rotate shuttLe ring toward FORWARDto advance the
2. Move jog wheel with finger toward FWD to advance tape
tape, or toward REVERSEto reverse the tape. How far
you rotate and hold the shuttle ring determines the
speed at which the tape moves.
frame-by-frame, or toward REVto reverse tape frame-byframe. Movement of the jog wheel one "cLick" moves the
tape by one frame. How "fast _ you move the jog wheel
determines how fast the frame-by-frame movement
3. ReLeasethe shuttle ring to return to STILL mode.
OCCURS.
4. PressPLAYto return to normal playback speed.
Notes:
3. PressPLAYto return to normal pLaybackspeed.
Notes:
•
The SHUTTLE ringon yourVCR has same functionasthe
SHU_LE ringon the remote controL.
• DuringSTOP mode, rotateand releasetheShuttLeringto
•
rewindorfastforwardthe tape.
• The ShuttLeringmay be used whilein both PLAy and
STILLmodes. When the Ring isreleased,
PLAY wiLL
resume at normal playbackspeed.
• Some ofthe speedsgiveninthe pictorial
above arenot
indicated
inthe VCR StatusDispLayshown on the l_/.
• Some video"noise"may be presentin REV (Reverse)
mode.
• Tapes recordedatSP (StandardPLay)speed have better
qualityspecialeffects
than tapes recordedat EP
(Extendedplay)speed.
•
Dog wheel cannot be used forspecialvideoeffects
while
the VCR isinplaymode.
• Tapes recordedatSP (StandardPLay)speed have better
quaLityspecialeffects
than tapesrecordedat EP
(ExtendedPLay)speed.
OPERATION
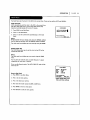
The Clock Menu sets the clock in the VCRto the current time. There are two options AUTOand MANUAL.
Auto Clock Set
AUTOautomaticaLLysets the clock in the VCRto the current time
and date. AUTO works only in areas where Data Service (DS)
signals are provided along with normaL TV signals.
1. PressMENU to see Main Menu.
2.
Press 1 to see (Lock Menu.
3.
Press1 to set the current time automaticaL_ on the CLock
Menu.
CLOCK MENU
AUTO CLOCK SET(ON):[]
MANUALCLOCK SET :N
Pro. number
keys
OUrT: exit
Notes:
We recommend that you set the cLock using the MANUALmethod
the first time you use your VCR. See MANUAL option for detaiLs.
The dock must be set before you can record by using the TIMER.
Manual. Crock Set
The CLOCKMenu allows you to set the clock in the VCRto the
current date and time.
Notes:
The dock must be set before you can record, using the TLMER
menu.
You may have to reset the clock and other features if a power
outage Lastsfor more than 3 seconds.
Ifyou usethe Manua[ option.The AUTO CLOCK SET mode wiLLbe
turnedto OFF
CLOCK MENU
How to Set C!.ock
I. PressMENU to seeMain Menu.
2, PressI to see clockoptions.
3. Press2 to adjustyour options.
4. First
insertthe month number (5-MAY,6_JUNE etc).
5. PressENTER to move to nextoption.
6. PressQUIT/CC to exitthe menu system.
MONTH
DAY
YEAR
"riME
[] JANUARY
1 FRI
19_e
12.00 AM
Pressnumbwkeys
thenENTER
OUIT: exit
Typical CLOCKMenu wfi
date and Ume settings
I
PAGE
23
PAGE
24
I
OPERATION
TheTIMERMenuteLLs
theVCR whentorecord
a programon a dayand ata timeyou specify.
You canspecify
eightdifferent
eventstobe recorded
ina one-year
period.
SpeJkEZ
Press 2
TIMER
SETUP
CLOCK
AUDIO
Press numberkeys
QUIT = exit
PROGRAM[]
MONTH:
DAY
START
STOP
CHANNEL:
SPEED :
REPEAT:
(1-8) toselectprogram
ENTERto adjustprogram
Month ofRecordin
• ENTER to adjust program
Number
[]
When highlighted, pressNUMBER(1-8) to
choose program Number.
Day ofRecording
StartTime of
REPEAT OPTIONS
Stop Time of
ONCE -- Records once.
WEEKLY-- Recordsonce each week.
Channelof
DAILY --
Speed of Recordinc
Frequency
mmm
• PROGRAM []
MONTH :
DAY
START
STOP
CHANNEL :
SPEED
:
REPEAT:
(1-8) to select program
PressQUIT/CC
t
Recordsone time each day,
Monday - Friday.
CHANNEL OPTIONS
To seLect an AUX channel, select the next
highest or towest channel programmed in
the VCR with the CH (Y/&).
Timer will be on
when VCR Is off
How to Use Timer
I. Choose TIMER menu asdescribedin "How to AccessMenus"
on page 9.
2. When the TIMER menu isdispiayedon screen,pressthe
ENTER button to selectthe correctmonth, then pressthe
SPEEDOPTIONS (SP or EP)
TheSPmodedetermineshow muchtapeis
Leftand switchesspeedfromSPto EP,if
necessary,
to complete recordingthe
program.Therewilt besomepictureand
sounddistortionat the pointof the speed
change.
AM/PM OPTIONS
PressI ForAM
Press2 forPM
ENTER buttonagainto move the nextoptionorsetting.
3. When you have enteredallofthe settings
to your
satisfaction,
pressQUIT/ECto exitthe menu system.
Note:
Set the VCRin TIMER mode by pressingPOWERto turn off the VER.
The TIMERindicator Light appearsin the front pane[ of the VEIL
YoucannotPressingPOWER
operatethe VCR
manually
while it is
recording.
Stopsthe
recording.
TO Erase a Program
1. ChooseTIMERmenuas describedin "How to AccessMenus"
on pageg.
2. PressNUMBER(I-8)to setectdesiredPROGRAM
to be erased.
3. Press0 to erasethe program.
4. PressQUIT/EEto exit the menusystem.
PROGRAM []
MON_t
7 JULY
DAY
20 TUE
START
11:16 AM
STOP
11:46 AM
CHANNEL : 2OTV
SPEED
: EP
REPEAT: ONCE
(1-8) to select program
TO erase press 10)
Press 0 to erase program
FoLLow
_}._these
steps
OPERATION
I
PAGE
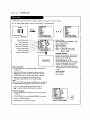
25
The SETUP Menu customizesthe VCR'soperationforyour particular
needs.
SETUP MENU
Choose SETUP Menu as describedin
"How to AccessMenus" on page g.
AUTO PROGRAM:
CH. ADD/DEL:
SOURCE:
ON-SCREEN DISPLAy:
LANGUAGE SELECT:
[]
[]
[]
[]
[]
Press number keys
QUIT = exit
AUTO PROGRAM
CH. ADD/DEL
FindsaLLactivechannelsand storesthem inthe VCR'smemory foraccessby CH (V/A). Press
I to beginsearch.
Editsthe channelsfound by AUTO PROGRAM. Use number keysfollowedby ENTER to selact
the channeito be edited(e.g.,
to ADD channel3,press3 then ENTER).PressENTER to ADO
or DEL (DeLete) channeLsto create your own Listof favorite channeLs.
SOURCE
SeLectsTV, CATV,AUX1, or AUX2 as the source of the program to watch or record. Choose TV if
you have an antenna connected to the VCR. Choose CATVif you have a cable system (with or
without a cable box) connected to the VCR. Choose AUX1 if you want to see the program from
accesso_j equipment, such as a camcorder,connected to the Audio/Vldeo (A/V) IN jacks on
the VCR rear paneL. Choose AUX2 if you want to see the program from accessonJequipment,
such as a camcorder, connected to the Audio/Video (A/V) IN jacks on the VCRfront paneL.
ON-SCREENDISPLAY
SeLectswhether or not you see VCRStatus DispLayson the TV.
LANGUAGESELECT
SeLectsEngLish,Spanish or French for VCRmenus and displays on the IV.
PAGE
26
I
OPERATION
The AUDIO Menu specifies the audio format to be used when recording or pLaying a tape.
Audio menu's PLAYBACKand RECORDoptions are avaltabLeonly with stereo VCRs,)
The AUDIO Menu indicates the audio
format used when recording or playing
a tape. Choose AUDIO Menu as
described in "How to AccessMenus" on
AUDIO MENU
SpeekEZ:ON {ION BOFF
PLAYBACK: HI-FI
RECORD: STEREO
page g.
Press ENTER (and repeat) to choose
items in the menu (some models).
SpeakEZ
Press number keys
• then ENTER
QUIT = exit •
TurnsSpeakEZON or OFE
A voice teLlsyou how to use the features you select in the menus if SpeakEZis ON. (ON is
recommended.)
PLAYBACK
SeLectsHI-FI or NORMALfor tape playback.
HI-FI (High FideLity) provides stereo sound, if present on the tape, to the Left and right VCR
AUDIO output jacks on the back of the VCR.
NORMALprovides monauraL sound, regardLessof the audio format present on the tape.
RECORD
Se|ect the STEREO,MONO,or SAP for recording a program.
STEREOrecords sound from the Left and right audio tracks in stereophonic format.
MONO(MonauraL) recordssound in monauraLformat even if the program is in stereo.
SAPrecords the Second Audio Program (SAP) track, if present, in addition to the stereo audio
tracks. SAPusua|ty contains audio in another language.
OPERATION
I
PAGE
Z7
This page shows a typical video system and explains how to select channels.
All-Channel,
Zenith TV
Antenfla
Cable 1"€
W_k--
Direct £ab_
Or
ZenithStereoVCR
),_-
VHF-UHF
I
CHANNEL
13_]4
C_E
Cable
Box
I
0_'I_
VH F/U HE/DAle/
Cable- TV
System_
IN
_
H
IN
I
VCROutput
to Wwhen
AUDIOVIDEO
(Channel
3 or4
OUT
OUT
VCRis on and _//_CR
VIDEO
IN
AUDIO
IN
OUT
CH4
Box
(Cab_
Output
to VCR
SeLecting Channels when the VCR is OFF
1. TurnTVon.
Selecting Channels at the VCR when VCR Is ON
1. TurnTVandVCRon.
2. Select channel you'd like to watch at the TV. If you have
a cable box, select channel 3 or 4 at the TV. Select cable
box channels at the cable box.
2. Place VCR inVCR mode by pressing
the TV/VCR buttonon
the remote controlrepeatedly
untilthe VCR indicator
Selecting Channels at the TV when VCR is ON
1. TurnTVandVCRon.
3. Select channels 3 or 4 at the TV. If your TV Lsequipped
with A/V input jacks, check your TV operating manual to
appearsin the frontpanelofthe VCR.
select A/V source for a better picture.
2. Place VCRin W mode by pressing the TV/VCR button on
the remote control repeatedly until the VCRindicator
disappearsfrom thefrontpanelofthe VCR.
4. Select the channel you'd Liketo watch at the VCR. If you
have a cablebox,selectchannel3 or4 atthe VCR.
Selectcablebox channelsatthe cablebox.
3. Select channel you'd Liketo watch at the 1V. If you have
a cable box, select channel 3 or 4 at the TV. Select cable
box channels at the cable box.
PAGE
28
I OPERATION
This page describes how to connect a camcorderto your VCR.
FrontPanelof StereoVCR
Mo_
_k
•
If
•
Turn
power any
or unpLug
VCR
beforeoffmaking
connections,
*
A/Vcableis notYovlded
withVCR.
SeLectAUX for Viewing an Audio/Video source Like a
Camcorder
1. With _/and VCRon, p|ace VCR in VCRmode by pressing the
I_//VCR button on the remote (and repeat) unlit the VCR
indicator Light appears in the VCR'sfront paneL.
SETUP MENU
2. SeLectchannel 3 (or 4) on the "iV. Note: If your TV has A/V
jacks, you may get a better picture if you connect your VCR
there. (Then, select the A/V source on the TV.)
SOURCE: TUNER (TV)
CATV
gAT_x'I BAUXE
3, At the VCR, Channel Down Lowerthan the Lowestchannel (or
Channel Up above the highest) to select "AUX2+. You can aLso
choose the SETUPmenu as described in "How to Access
Press number keys
then ENTER
QUIT = exit
Press 4 to select AUX2
Menus." on page g.
Press 3 for the SETUPmenu's SOURCEitem.
Press 4 for AUX2, then ENTER.(Press QUIT/CC to exit.)
Items
in the Menu
SOURCE
Showsthe program source--W,
CATV,or AUXTsetected for the VCRto receive.
TUNER
The VCRis using its Tuner to receive programs from an antenna or cabLe.
TV
SeLects programs for the VCRfrom a rooftop-type
CATV
SeLectsprograms for the VCRfrom CabLeW.
AUXE
SeLectsprograms for the VCRfrom the rear R-AUDIO-L--VIDEO IN jacks (where you may have connected your
camcorder).
AUX2
SeLectsprograms for the VCRfrom the front R-AUDIO-L--VIDEO TNjacks (where you may have connected your
camcorder).
antenna.
I
OPERATION
PAGE
29
This page explains the basics of playing tapes in your VCR.
Automatic
Playback (No Safety Tab)
1. Tape playback begins automatically, if the safety tab has
been removed from the cassette case. For example, most
rental movies have no safety tab. Simply insert the
©
power
prerecorded VHScassette into the VCR. Power wilt turn on
automatically and playback will begin.
stop/ej_
VCR's Controls
2. Select the channel 3 or 4 at the TV or select the TV'sAUX
(Auxiliary) source to see the picture, if you are using the A/V
jacks. Refer to page 7 and 8.
Manual Playback (Has Safety
1. Press POWERto turn VCRon.
Tab)
Cassette
Safety Tab
Shown in
Place
2. Insert a prerecorded VHS cassette into the VCR.
_
r_l
_
|
_,
}
3. Press PLAYto begin playback.
4. SeLectthe channel 3 or 4 at the 1_/or select the W's AUX
(Auxiliary) source to see the picture, if you are using the A/V
jacks. Refer to your TV operating manual.
Unloading the Cassette from the VCR
1. PressSTOPif the tapeis playing,
2. PressSTOP/F2ECTat the VCR until the cassette is eJected.
Note:
ThisVCRrecordsonLyin SPandEPspeeds.YourVCRsetsthe
playbackspeedautomaticaLLy
to the speedusedto recordthe
tape,
(Continued on next page)
VHS Cassette Playback/Record
•
Cassette
SP
LP
Length I (Standard Play) (Long Play)
30 Minutes
1 Hour
T-30
EP
(Extended Play)
1 Hour,
30 Minutes
1 Hour
2 Hours
3 Hours
2 Hours
4 Hours
6 Hours
2 Hours,
40 Minutes
5 Hours,
20 Minutes
8 Hours
TT:°l°2o
T-160
Times
PAGE
30
I OPERATION
Thispage explainshow to use the remote to playtapes on yourVCR.
Auto/Manua[ TrackingAdjustment
Your VCRadjusts tracking automaticalLy when you play a tape. If
the tape was recorded on a different VCR, streaks (video noise)
may appear.WhiLethe tapeisplaying,
pressAO3 (,ll/l_)
to
adjustthe tracking
manuaL[y.
Real-Time Tape Counter
Press ENTERtwice to keep the tape counter on the TV screen.
Press ENTERrepeatedty to remove all displays. The counter
resets to 0:00:00 when you inserL a cassette or when a tape is
rewound to its beginning.
Pause/Fo_waTd/Reverse
SLow-Motion Video
(WhiLein pLaymode) Press PAUSEfor stilLvideo. Press PAUSE
again, and follow on-screen instructions for Forwardor Reverse
POWER
F FWD
(Fast
Forward)
pLAy--
--
REW(Rewind) J
STOP
PAUSEj
®®®©
ENTERj
--CM
SKIP
slow motion. Press F FWD or REWto contrei siow speed during
stow motion. Press PLAYto resume normaL tape pLaying.
Note: When the reverse slow mode continues for more than 30
seconds, the VCRwilt automatically change to play mode.
_AD3UST
Tape Rewind
and Fast Forward
(WhiLein Stop mode) Pressand reLeaseREWor F FWD (Fast
Forward), as desired, PressSTOPwhen tape reaches desired
location.
Reverse/Forward
Search
(WhiLe in Pray mode) Press and re[ease REWor F FWD, as
desired. Press pLAyto resume normal tape playing,
CM Skip (Commercial Skip)
(Whilein playmode) Pressing
CM SKIP on the remote skips
commercLaLaor other program materiaL, Pressing 1, 2, 3, or 4
times skips 30, 60, gO, or 120 seconds, respectively. CM SKIP
skips a full 120 secondsof commerciaLs in a few seconds, then
resumes normal pLayback.
(_ill,)
OPERATIOH
I
PAGE
31
Recording what you are watching on TV.
OptionsYou
Can Use White Recording
Instant recording tets you record unlit you reach the end of
tape or you press STOPto stop recording.
Turn lV and VCRon.
©G©®
rec/=tr
Remote'sControls
Place VCRin VCRmode by pressing the TV/VCR
button on the remote repeatedly unU[ the VCR
indicator light appears in the VCRfront panel,
B
m
m
power
sp/ep
Select channel 3 or 4 at the TV. If you have
connected your VCRto the TV's A/V input jacks,
select the A/V source at the W for a better
picture.
reczitr
stop/eject
VCR'sControls
Select the channel to be watched and recorded
at the VCR.If you have a cable box, select the
cable box output channel (usually 3 or 4) at the
VCR.Select cable box channels at the cable box.
Insert a VHS cassette tape into the VCR.
press SP/EP to select recording speed, if
desired, Recording speed is always SP, unless
you setect EP,
Press REE/ITR untlt recording beglns. REE
indicator light appears in the VCR front paneL.
Recording continues untit you reach the end of
the tape, or until you press STOPto stop
recording.
Instant Recording
unUtendof tape)
InstantTimerRecording
(Presetrecording
times)
PAUSE-
STOPor STOP/E3ECT
-
_Aomentarilypauses
Stopsand exits recorc_ng
mode.
recording. PressPAUSE
again to resume TecoTdlng.
_OP or STOP/E3ECT
Stopsandexitsrecording
mode.
PAGE 32
I OPERATION
Recording using preset time periods.
Preset Time Periods for ITR Recording.
Note:
Preset recording Ume counts down until the recording time
lS over.
rec/_r
Instant (attended) Timer Recording (ITR) l.ets you record for
a specific preset time period, instead of recording until the
end of tape is reached. For exampl.e, you can record a
30-minute show using the preset time period.
Remote'sControl.s
power
sp/ep
recMr
stop/eject
Turn TVand VCR on.
VCR'sConbob
PLaceVCRin VCRmode by pressing the TV/VCR
button on the remote repeatedLy untiL the VCR
indicator Light appears in the VCRfront paneL.
Setect channe| 3 or 4 at the W, Ifyou have
connected your VCRto the TV'sA/V input jacks,
select the A/V source at the TV for a better
picture.
Preset Time For
_EC/_
DJsptay
'1 (Press)
2
Current Time
cabLebox output channel (usuaLLy3 or 4) at the
VCR. Selectcablebox channelsatthe cablebox,
3
1:00
1 hours
4
_:30
1 hour and
30 minutes
Inserta VHS cassette
tape intothe VCR,
5
2:00
SeLectthe channel, to be watched and recorded
at the VCR.If you have a cabl.e box, select the
PressSP/EP to sel.ect
recoTdingspeed,ifdesired.
Recordingspeed isaLwaysSP,unlessyou seLect
EP.
Note:The SP mode determineshow much tapeis
Leftand switchesspeed from SP to EP,if
necessanj,
to compLeterecording
the program.
There wiLLbe some pictureand sound distoff,ion
atthe pointofthe speed change.
PressREC/ITRuntiLrecording
begins_The RE(:
indicator
Lightappearsinthe VCR frontpanel..
Recordingcontinuesuntil.you
reachthe end of •
the tape,or unti{you pressSTOP to step
recording.
m
presses of
PressREC/ITRrepeatedly
to selecta p_eset
recording
time period.Each subsequentpressof
REC/ITRincreases
the recording
time by 30
minutesuntiLyou reacha maximum of 4 hours.
g
10
0:30
4:00
No displ.ay
Reconlin9
UnU[ end oftape
30 ml.nutes
2 hours
4 hours
no'rmaL
recording
OPERATION
J
PAGE
33
Recording one show white watching another.
Note:
If you have a cable box connected to your VCR,you cannot
record one show and watch another.
Choosethe show you wish to record using the VCR'schannel
selector. Choosethe show you wish to watch using the W's
channel selector.
TurnW andVCRon.
PlaceVCRin VCRmodebypressingthe TV/VCR
buttonon the remote repeatedlyuntil,the VCR
indicatorlight appearsin the VCRfrontpane[.
Remote's Controls
power
©
sp/ep
recJitr
© Q
stop!eJect
cZ)
VCR's Controls
Select channel 3 or 4 at the TV. If you have
connected your VCRto the TV'sA/V input jacks,
select the A_/source at the TV for a better
picture.
Select the channel to be watched and recorded
D
at. the VCR. ]:f you have a cable box, select the
cable box output channel (usually 3 or 4) at the
VCR. Select cable box channels at the cable box.
Tnsert a VHS cassette tape into the VCR.
PressSP/EP to select recording speed, if desired.
Recording speed is always SP, unless you select
EP.
Press REC/ITR until recording begins. REC
indicator Ught appears in the VCRfront panel.
Recording continues unU[ you reach the end of
the tape, or until you press STOPto stop
recording.
PLaceVCRin TV mode by pressingthe W/VCR
button on remote to turn off VCRindicator tight
in the VCR front panel.
Select the show you wish to watch using the
TV's channel selector.
Note:
To return to the show you're recording, select channel 3 or 4
at the TV. PLace_:_eVCRin the VCR mode by pressing the
TV/VCR button on the remote to show the VCRindicator
Ught in the VCR'sfront panel.
OptionsYou CanUseWMte Recording
Instant Rocord|ng
Jnti[ end of tape)
PAUSEMomentarily pauses recording. Press PAUSE again to
resume recording.
STOP or STOP/E3ECTStops and exits recording mode.
PAGE
34
I OPERATION
This page explains how to use the Timer so that you can record while you are away.
SpeakEZ
Press 2
TIMER
SETUp
CLOCK
A_mIO
I
Press number keys
OUIT =ex8
• PROGRAM []
MONTH:
DAY
START
STOP
CHANNEL :
SPEED
:
REPEAT:
(1-8) _ sstect program
• ENTER 1o adjust program
MAIN MENU
TIMER
can schedule up to eight different events into the PROGRAM
TIMER for recording, as tong as no events overlap in the
same time period.
TurnWand
• ENTER to adjust program
MENU
for Program
Timer-controUed recording Lets you record shows
unattended. Pick a day and time up to one year in advance.
The show may be recorded once or on multiple days. You
mmm
TIMER
1
Selectchannel3 or4 at theIV.
Inserta VHS cassette
tape intothe VCR.
Program events to be recorded with the Timer
by foLlowingthe procedure in the TIMER MENU
section. If you have a cable box, select channel
3 or 4 (ar the VCR) as the channet to be
recorded. Keep your cabLe box on when using
the Timer to record.
Enable the Timer by pressing POWERto turn off
the VER.The TIMER indicatoT light appears in
the VCRfront panel to indicate the VCRis in the
TIMER recording mode.
MENU
for Program
8
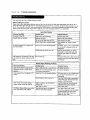
VCR 0perat|on with Timer Off or On
VCR
POWER
On
TIMER
STATUS
Off
VCR OPERATION
Disables Timer-controlled
recording if an event is scheduled
in the Timer. Art other V_.R
operations can he used as
desired.
VCRon.
PLaceVCRin VCRmodeby pressingthe IV/VCR
button on the remoterepeatedlyuntil the VCR
indicatortight appearsin the VCRfront panel
r PROGRAM []
MONTH :
DAY
START
STOP
CHANNEL :
SPEED
:
REPEAT:
(1-8) to select program
Off
On (or set)
Enables Timer-controlled
recording if an event is scheduled
in the Timer.You cannot operate
the VER manuallywhi[eitisin
TimerSetmode. Ifyou have
scheduledthe Timer,you'll
be
recording
at a Later
time.
OPERATION
I
PAGE
35
Recording
WithPLusCode
TNprogram Numbers.
MIDNIGHT
mmlm
12:00(_
In the Heat of the _ght
Lana'sinherited homeplaysan
important part in a mob-re[atad
real estate scarn(Part 2 of 2)
In the Heat of the Night Paid ProLake Winahatchie (Part 2 gmmmlng
of 2) 52228
44808
Tonight
Charllo Rose 16112
73624
I Tonight (R) 23624
(6o
rains)
52228
I LaurenHutton
and... GabfietLe
L.Hutton
989402
Reece.(30 mlns.)989402
(_ I LoveLucy"Drafted"Lucyand
Ethel think their husbandshavebeen
draf_cl.
(30mins.)529044
Love Lucy
529044
Paid Prograrnmlng
51686
FatI_ In
France79082
i Paid Prog
! 273353
Paid Prog
147599
Paid Prog
886976
Love Lacy
813995
Paid Prog
770841
Paid Prog
426518
SampleTVScheduLeShowingVCRPLus+
• P[usCode Number
TM
VCR PLUS
VCR+ program:
Ch I_m__p
Setup: B
Ch Map Review: []
_,
Pluscode
Press 3.
r
Pte_l numberkeys
QUIT = exit
press numberkeys
thenENTER
OUIT : exit
VCR PLUS MENU
VCRPlusCode Entry
VCROperationwith Timer Off or On
ing,and your VCR does the rest.Itturnson atthe proper
time,selects
the channelto be recorded,
and startsrecording,You can recorda show once,oron a daiLyor weekly
basis.
You can scheduleup to eightdifferent
shows inthe
VCR P[us+C3 recording
system,as Longas no show overlaps
anotherin the same time period.The C'system provides
cabLe-boxchannelcontrolformost cableboxes,See "Setup
forVCR PLus+C_ Recording"
Tumivand VCRon.
PLaceVCR inVCR mode by pressing
the TV/VER
button on the remote repeatedly
untiltheVCR
indicator
[ightappearsin theVCR frontpanel
SeLectchanneL 3 or 4 atthe TV.
Inserta VHS cassettetapeintotheVCR.
Program events to be recorded in the VCR
Ptus+C3 system by foLLowing the procedure
shown when you pressVCR+ on the remote.
EnabLethe VCR PLus+C
Jtimer by pressing the
POWERto turn off the VCR. The TIMER indicator
appears in the VCRfront panel to indicate the
VCRis in the timer mode of recording.
TIMER MENU
TM
VCR PLus+C_tapesforyou automaticaLLy.
SimpLyenterthe
PtusCode
TM number foryourfavorite
show from the IV list-
W
Enter PiusCode
Enter Pluscode
from "iV listing
(Use W to erase)
PROGRAM 1
MONTH
7 JULY
DAY
27M ON
START
11:16AM
STOP
11:46AM
CHANNEL:2OTV
SPEED
:EP DEp RSF
REPEAT : ONCE
Prese numkerkeys
tkeBENTER
QUIT:ex8
VCR
POWER
On
TIMER
STATUS
off
VCR OPERATION
DisabLestimer-contmt[ed
recording if an event is
ScheduLedin the Timer. ALL
other VCR operations can be
used as desired.
off
On (or set)
EnabLestimer-controt|ed
recording if an event is
scheduled in the Timer. You
cannot be operate the VCR
manuaLLywhile it is in Timer
Set mode. If you have scheduLedthe Timer, you'LLbe
recording at a Later time.
PAGE
36
I TROUBLESHOOTING
Somequickandeasytips to fixingprobLems
yourseLf.
Before CalUng for Service
Please refer to this chart before caLlingfor service. First, turn on the TV and VCR.SeLect appropriate input for the TV to
receive the video signal from the VCR. You wiLLprobably use the Antenna In connection to the TV. SeLectchannel 3 or 4 at
the TV. PLacethe VCRin the VCR mode by pressing the TV/VCR button on the remote repeatedly until VCRindicator Light
appears in the VCRfront paneL.If you have a cable box, turn it on and select channeL3 or 4 at the VCR.
Operating Prob&ems
ObservedCondition
PossibLe Cause
ProbableSolution
Nopowerto the VCR.
Power cord is not connected.
Connectpowercord.
Remotedoesnotfunction.
Batteries are weak.
Rep|acewith newbatteries.
No picture appears on TV screen from
any VCRfunction.
You are too far away from the VCR.
Hove dosertothe
Remote may be at an awkward angLe.
Avoid hoWing the remote at sharp
ang_.
Source for TV is not selected property.
Set INPUT source on 1V to Audio/Video
To, or tune TV to Channel 3 or 4, as
appropriate.
W/VCR mode for VCRis set to W.
Press the TV/VCR button on remote
repeatedLyto choose VCR mode. VCR
indicator Ught appears in VCRfront
)and.
VCRfeatures do not function. VCRdoes VCR is Locked up.
not respondto remote functions or VCR
keys.
Playin 9 Tapes (Ptayback)
VCR.
Disconnect VCR power cord for three (3)
minutes. Reset clock and other features
as necessary.
Problems
Observed Condition
Possible Cause
Probable Solution
Tape wiLLnot rewind or fast forward.
Tape is fuLLyrewound or is at its end.
No action necessary.
Mechanical sound is audlb|e during
pLayback,
Note: This is normal operating sound
from internal mechanisms.
No action necessary.
Tape playback does not appear on TV
screen.
Source for TV is not seLectedproperLy.
Set Input source on IV to Audio/Video
In, or tune TV to ChanneL 3 or 4, as
appropriate.
TV/VCR mode for VCRis set to TV.
Pressthe W/VCR button repeatedly to
choose VCRmode. VCRindicator Light
appears in VCR front paneL.
Tape is a rentaLor was recorded on
another VER.
Use ADJ (</1_) for manua| tracking
adjustment whiLetape is playing.
Tape heads are dirty.
CLeanvideo heads,
Video "noise" (ho_zonta[ streaks)
appear during norma| tape pLaying.
VCRStatus DispLayflickers when using
STILL video during tape playback.
Tape tracking needs to be adjusted
whiLe in sLow-motion playback.
FromSTILL video mode, enable
sLow-motion pLayback.Use AD3 (</1_)
to adjust tracking for best picture.
Return to PLAYmode, then press
PAUSEfor STILL video.
TROUBLESHOOTING
I
PAGE
37
Some quick and easy tips to fixing problems yourself.
Channel Tuning ProbLems
Observed CondiUon
PossibLe Cause
Probable Solution
Some channels are skipped over when
using CH (V/A).
Those channels were deleted with the
CH. ADD/DEL option.
Use CH. ADD/DEL to restore channels.
See SETUPMenu on page 25 for details.
Picture and sound are weak or missing.
Antenna or cables are Loose.
Tighten connections or replace cabLe.
Wrong SOURCEoption is being used.
Try aLLSOURCEoptions. See SETUP
menu on page 25 for details.
RecordingProbLems
ObservedCondition
PossibLeCause
Probable Solution
Camcorderimageis not shown.
Camcorderis off.
Turncamcorderon and operate
properLy.
Camcorder
image via A/V input to VCR
is not shownon TVscreen.
VCRSOURCEis not set to AUX.
Timerrecordingis not possibLe.
CLockin VCR is not set to correct Ume.
UseCH (V/A) to select AUXA/V
mputchanneL.
Setclockto correctUme.SeeCLOCK
menu on page23.
VCRis on which disables timer.
TurnVCRoff to enabletimer. TIMER
indicator Lightappearsin the VCRfront
_anel.
Timer has been programmed
incorrectly.
Reprogram
Timer.SeeTIMERmenu on
page24.
TIMER indicator Light does not appear
after programming timer.
ReprogramTimerandturn VCRoff to
enabletimer.
TLMER
indicatorUghtappearsafterVCR VCRis in Timer Recording mode.
is turnedoff.
Thisis the normalindication that the
VCRis in TIMERmode.
VCR Plus+®C' Recording ProbLems
Observed Condition
Possible Cause
Probable SoLuUon
VCRrecords program on different chartne[ than channeL specified,
Channel Mapping was not performed or
is incorrect.
Channel map the VCRfor your area.
See "Setup for VCRPLus+®C
3 Recording"
section.
Recorded wrong channel or no channel
with cab[e box.
VCR does not control cable box.
Useproper'MFR'numberfor cable box.
See"Setup for VCRPLus+®C
3 Recording"
section.
CabLebox is not tuned to channel you
wanted to record.
Tune cable box to channeLyou want to
record. Keep cabLe box turned on.
CabLebox is not turned on.
Turn on cable box and keep it on.
VCRis not tuned to cable box output
channel 3 or 4.
Tune VCRto cable box output channeL.
PAGE
38
I TROUBLESHOOTING
Some quick and easy tips to fixing problems yourseLf.
Stereo Audio Record and/or
PLayback Problems
Obsewed Condition
Possible Cause
Probable Solution
Stereo is not present.
TV is not Stereo-compatible.
No action is possible.
Program is not in stereo format.
No action is possible.
VCRA/V Out jacks are not connected
to TV A/V In jacks.
Make A/V connections. Stereo is
available only via A/V output from
VCR.
VCR Audio_Video Out is not selected
Select AUX or A/V source as _/input.
for viewing at the TV.
VCRAUDIO RECORDmode is set to SAP
or MONAURAL.
Set VCRAUDIO RECORDmode to
Stereo. See AUDIO Menu on page Z6.
Moisture Condensation
Moisture condensation can occur:
In locations where moisture condensation may occur:
• When the video recorderis moved from a cold place to a
warm place.
• Keep the power cord plugged into an AC outlet and
POWEROn. This will help prevent condensation.
• Under extremely humid conditions.
• When condensation has occurred, wait a few hoursfor the
VCRto dnj before using it.
Magnetic
Field from Other Equipment
Keep the VCR and videotapes away from strong magnetic fields, such as those produced by a vacuum cleaner, refrigerator, or
air conditioner.
Video Head CLeaning
Your VCRautomatically cleans the heads as it is used. However, after Longperiods of use, your video heads may become
clogged with accumulated dirt, causing distortion. When this occurs, use a do-it-yourself wet-type head cleaning cassette
available from your Zenith dealer.
Caution:
Do not use a dpj-type head-cleaning system. It may seriously damage the VCRand cassettes used in the VCR.Snow, streaking
in picture, and horizontal pulling indicate the need lot professional video head cleaning. See your Zenith approved service
center for cleaning.
Cabinet Cleaning
CLeanthe outsidesurfacesof the VCRwith a soft Lint-freecloth as required.Usecarenot to scratchthe VCRduringcleaning.
SPECIFICATIONS
GENERAL
Head System
PowerSource
Power Consumption
nimensions
Operating Temperature
Operating Humidity
Timer
Weight
Tape Speed
Tape Width
Maximum RecordingTime
(WxHxD)
(SP)
(LP)
(EP)
(SP)
(EP)
Rewind Time
TUNER
Antenna
VHF Output Signal
Channel Coverage
(UHF)
(VHF)
(VHF)
(UHF)
(CAW)
VIDEO
Video Signal System
Supplied Accessory
75 ohms
75 ohms
Channel3 or4
2-13
14-69
1-125(4A,A-W,w+1~W+84, A-S~A-1)
EIAStandard(525 Lines,60 fields)
NTSCtype colorslgnai
1.0 Vp-p 75 ohmsunbalanced
1.0 Vp-p 75 ohmsunbalanced
Morethan43 dB (SPmode)
Input
Output
Stgna& to Noise Ratio
AUDIO
FM audio
FrequencyRange
Dynamic Range
Channel Separation
Conventional audio
Input
Output
S/N Ratio
FrequencyRange
Four head
A£ 120V, fiOHz
Approx,22 Watts
430 x 93 x Z78 mm (16,9" x 3,7" x 10,6")
5 °C~35 °C (41 °F_95 °F)
Lessthan 80% RH
12-hour displaytype with AM, PM
Approx.4.1 kg (9 ibs)
33.35 mm/sec
16.67 mm/sec
11.12 mm/sec
12.7 mm
2 HOURS (T-IZO)
6 HOURS (T-120)
8 HOURS (T-160)
Lessthan70 seconds(T-120)
20Hzto 20kHz
Morethan83 dB
Mom than55 dB
(LINE)
(LINE)-
-6.0dBm morethan47 kohms
-6.0dBm Lessthan1.5kohms
Morethan43 dB (SPmode)
200 Hz _;olOkHz (SPmode)
Hook-upCabLe(VCRto TV)(1)
Batteries
(2)
RemoteControl
(I)
* Designs
and specifications
aresubject
to changewithoutnotice.
* Weightanddimensions
shown areapproximate.
I
PAGE
3g
VHS TAPE REWINDER
Most repair work on VCRsand Camcorders is due to excessive
rewindinq. Protong the Life of your video equipment with our
rewinder r
[zE.,olONLY $14.99
_,_,:.;5
WIRELESS INTERCOM SET
Kids watching movies in another room? Baby in another
room as you watch TV? Keep tabs on them _th our
inexpenslveintercomset.
• FM wireless two stations, 3 channels, ptug into
standard AC outtets
• ReLativeLy noiseless transmission for excellent sound
• Upgrades to four stations with additiona[ set
• Umts watt mount or set on tabte
A,ol,8, ONLY $49.99
"°""
SHI_NG
_
IIANOLII_41
ZENITH B FUNCTION REMOTE
Broken or Lost remote? Need a second remote or more functions?
Order direct from Zenith!!
• Operates TV, VCR, CD, DVD, DlVX, DSS & Cable Box
• Operates PIP and Most Screen Menus
• Extended Range & MOREl!!
Orders I year or more after product purchase may receive upgraded models.
Other Remotes with 3, 4, S & 7 Functions AvaiLabLeUpon Request
z_.s2sONLY $1g.99
_""
SHIPPING 81 IIANBLING
zenith
Use Your Visa or MasterCard
to Order
PLEASEALLOW3 - 4 WEEKSFORDELIVERY
l
VISA
NOTES
I
PAGE
41
PAGE 42
I NOTES
NOTESI PAGE 43
VIDEOCASSETTE
RECORDER
ORPLAYER
Welcomeinto the Zenithfamily! Webelievethat you wiLlbe pleasedwith your newZenith EntertainmentMachine.PLeaseread
this warrantycarofugy,it is a "HMITEDWARRAN_f"
as defined underFederalLaw.This wananty gives youspedfic Legalrights,
and youmayaLsohaveother rghts that varj from stale to state within the U.S.A.
ZENETH'S
RESPONSIBILITY
S_ice LaboT
Parts
Duringa periodof 90 daysfromeffectivewarrantydate,Zenithwill provideservicelaborby a Zenithauthorzodse_ce center
when neededas determinedbyZenith, as a resultof manufacturingdefects.
New or remanuidctured replacements for foctoly-pe f_-_Live parts wit[ be supplied by a Zenith authorized service center for one
year from effective warranty date.
Such _epLecement parts are warranted for the remaining portion of the original warranty
period,
Not Covered
Thiswarrantycoversmanufacturingdefectsanddoesnot coverinstaLLation,
adjustmentof customercontroLs
in the home,
instatlatidn or repairof homeantennasystems,cable converLe_or cabla company-suppLLed
equipment; it aLsodoesnot cover
dama9
e due to misuse,abuse,negligence,actsof GOdor other causesbeyondthe controlof Zenith. Anyalteration of the
producta_er manufacture voidsthis warrantyin its enltrety.
OWNER'S RESPONSIBILITY
Effective WarrantyDate
Wanantybeginson the date of orlgthaLconsumerpurchase.Foryour convenidnce,keepthe deaidfsdated big of salaor a
deliveryticketas evidenceof the purchasedate.
Operati_3 Guide
Readyour OperatingGuidecarefuLLy
so that you wiLLunderstandthe operationof your set and howto adjustthe customer
contxoL_
Camj-In Service
Thevideoproduct must be taken to a U.S.or CanadianZenith authorizedseeAcecenterfor wanantysenate and mustbe picked
up by the owne_
W Set Performar_e
It is the ownersresbonsibilitT/to maintainthe W receiverwith whichthe video productis used,andthe asso¢iatnd
antenna
system,in properoperatingcondition..
Important
ProductReglatration--Please
fig out andmail your productRegistration Lard.It is imperativethat Zenith knowhowto reach
youpromptly if we should discovera safetyproblemthat couldaffect you.
Warrantysenrice
Forwarrantyse_ideinformation, contactanyZenith authorizedservicecenter.Partsandser_ce labor that areZenlth's
responsibility
(see above)wigLbe provided without charge.OtherseMce is at the ownersexpense.If you haveany problamin
obtainingsatisfactorgwanantysemite,cagL
or wnte the Zenith ResponseCente_Youmust provide the modidnumber,serial
numberand date of purchaseor date of odginal instaRetion. Beforeyouaskfor warrantyservice,read_MafotenanceAnd
Troubidsbooltn9
_ in _ur operatingguide. Youmight avoida sen,icecaLL.
THISWARRANTYISIN LIEUOFANY OTHERWARRANTY,EXPRESSOR IMPLIED,
INCLUDING
WITHOUTLIMITATION,
ANY
WARRANTYOF MERCHANTABILI'W
OR FITNESS
FORA PARTICULAR
PURPOSE,
AND ZENITHSHALLNOTBE LIABLEFORANY
CONSEQUENTIAL,
INDIRECT,
OR INCIDENTAL
DAMAGESOFANY KIND,INCLUDINGLOSTREVENUESOR PROFITS
IN
CONNECTION
WITHTHE PRODUCT.
Customer
Service
Zenith National Response Center
201 James Record Road, Building #3
Huntsville, AL 35824
Phone: (256) 772-1515
Fax: (256) 774-4070
emaih customer.service@zenit
h.com
ZENITH ELECTRONICS
CORPORATION
t000 MILWAUKEE AVENUE
GLENVIEW, ILLINOIS 60025-2493
Zenith Part No. 206-3522
GS# 3835RM0031U
Printed in Korea
Issue 0