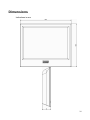
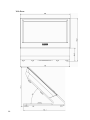
1
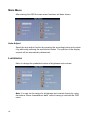
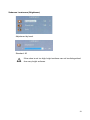
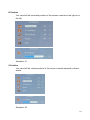
BA80 8.4" TFT LCD Monitor Operating Manual We would like to know your opinion on this publication. Please send us a copy of this page if you have any constructive criticism. We would like to thank you in advance for your comments. With kind regards, Your opinion: Wincor Nixdorf International GmbH Documentation RD HWD01 Rohrdamm 7 D-13629 Berlin E-Mail: [email protected] Order No.: 01750215139C BA80 8.4” (21,3 cm) TFT LCD Monitor Operating Manual Edition December 2011 All brand and product names mentioned in this document are trademarks of their respective owners. Copyright © Wincor Nixdorf International GmbH, 2011 The reproduction, transmission or use of this document or its contents is not permitted without express authority. Offenders will be liable for damages. All rights, including rights created by patent grant or registration of a utility model or design, are reserved. Delivery subject to availability; technical modifications possible. Contents Contents ......................................................................................................... 6 Manufacturer’s Declaration and Approval ................................................... 1 General Authorization ...................................................................................... 1 FCC-Class A Declaration ................................................................................. 1 Tested Safety................................................................................................... 1 User Information .............................................................................................. 2 Safety Instructions ........................................................................................... 2 Cleaning the BA80 ........................................................................................... 3 Warranty .......................................................................................................... 3 Recycling ......................................................................................................... 4 Introduction .................................................................................................... 5 Advantages at a Glance................................................................................... 5 Unpacking and checking the Delivery Unit....................................................... 6 BA80 Components ......................................................................................... 7 Screen Module................................................................................................. 7 Dual Display Holder (optional) ......................................................................... 8 Mounting the Tube Adapter.............................................................................. 9 Installing the Base.......................................................................................... 10 Table Mounting.......................................................................................... 13 Ergonomical Adjustment of the BA80............................................................. 14 Installation .................................................................................................... 15 Connecting the VGA cable............................................................................. 15 DC12V INPUT................................................................................................ 15 Push Buttons at the Bottom Side ................................................................... 16 Status LED Information .................................................................................. 16 On Screen Display (OSD) ............................................................................ 17 Menu Buttons ................................................................................................. 17 Main Menu ..................................................................................................... 18 Auto Adjust ................................................................................................ 18 Luminance ..................................................................................................... 18 Submenu Luminance (Brightness) ............................................................ 19 Submenu Luminance (Contrast)................................................................ 20 Geometry................................................................................................... 20 H.Position .................................................................................................. 21 V.Position .................................................................................................. 21 Pixel Clock................................................................................................. 22 Phase ........................................................................................................ 22 Color.......................................................................................................... 23 User Preset ............................................................................................... 23 OSD ............................................................................................................... 24 H.Position .................................................................................................. 24 V.Position .................................................................................................. 25 OSD Timeout............................................................................................. 25 Language....................................................................................................... 26 Recall............................................................................................................. 26 Color Recall............................................................................................... 27 Recall All ................................................................................................... 27 Miscellaneous ................................................................................................ 28 Sharpness ................................................................................................. 28 Display Information.................................................................................... 29 EXIT............................................................................................................... 29 Technical Data ............................................................................................. 30 Dimensions .................................................................................................. 31 Manufacturer’s Declaration and Approval General Authorization This device fulfills the requirements of Electromagnetic Compatibility (EEC) standards, 2004/108/EC. Therefore, you will find the CE mark on the device or packaging. FCC-Class A Declaration This equipment has been tested and found to comply with the limits for a Class A digital device, pursuant to part 15 of the FCC Rules. These limits are designed to provide reasonable protection against harmful inter-ference when the equipment is operated in a commercial environment. This equipment generates, uses, and can radiate radio frequency energy and, if not installed and used in accordance with the instruction manual, may cause harmful interference to radio communications. Operation of this equipment in a residential area is likely to cause harmful interference in which case the user will be required to correct the interference at his own expense. Modifications not authorized by the manufacturer may void users authority to operate this device. This class A digital apparatus complies with Canadian ICES-003. Cet appareil numerique de la classe A est conforme à la norme NMB-003 du Canada. Tested Safety The BA80 has been awarded the symbol of CCC (China Compulsory Certification). The BA80 has also received the BSMI (Bureau of Standards, Metrology and Inspection) symbol. Additionally, the BA80 has also been awarded to cULand UL- symbol. 1 User Information Wincor Nixdorf (WN) does not accept responsibility for radio and TV interference and faults that care caused by unauthorized changes that have been made to the devices. Furthermore, cables or other devices that have not been approved by WN may not be connected to the device. The user is responsible for any faults and interference that are caused as a result. Repair work on the devices should only carried out by authorized and specially trained personnel. Improper repairs will lead to the loss of any guarantee and liability claims. Extension boards with electro statically endangered components can be identified with this label. A certain room lighting is required, if the BA80 is also to be used as an office terminal. Daylight has proved to be the best.The brightness of the surrounding area and brightness of the display screen should approximate. Safety Instructions This device conforms to the corresponding safety regulations for information technology devices, including electronic office machines for use in the office environment. 2 If the device is moved from a cold environment to a warmer room where it is to be operated, condensation could occur. The device must be completely dry before being put into operation. Therefore an acclimatization time of at least two hours should be accounted for. Lay all cables and supply lines so that nobody can tread on them or trip over them. Data cables should neither be connected nor removed during electrical storms. Protect the device from vibrations, dust, moisture and heat, and only transport the device in its original packaging (to protect it against impact and blows). Take care to ensure that no foreign objects (e.g. paper clips) or liquids can get into the inside of the device, as this could cause electrical shocks or short circuits. In case of emergencies (e.g. damaged housing, liquid or foreign objects getting into the device), the device should be switched off immediately, the mains plug of the BEETLE or the BA80 should be removed, and the Wincor Nixdorf customer service should be contacted. If the LCD display element is broken and the liquid crystal solution leaks out of the display and onto your hands, clothing etc, wash your hands or clothing immediately with soap or alcohol, holding them under running water for at least 15 minutes. If the liquid comes into contact with your eyes, please consult a doctor immediately. Generally you should connect IT-devices only to power supply systems with separately guided protective earth conductor (PE), known as TN-S networks. Do not use PEN conductors! Please also observe the recommendations of the norm DIN VDE 0100, part 540, Appendix C2, as well as EN50174-2, §5.4.3. Cleaning the BA80 Always turn off the system before cleaning. The glass surface of your Touch Screen should be cleaned with a mild, abrasive-free, commercially available glass cleaning product. All pH-neutral materials (pH 6 to 8) are good for cleaning. Cleaners with pH values 9 to 10 are not recommended. Cleaning with water and isopropyl alcohol is possible as well. Do not use solvents containing acetic acid. Use a soft, fine-meshed cloth to clean the surface. Dampen the cloth slightly and then clean the screen. A wrong maintenance may cause damages to the screen, which are not covered by guarantee or warranty. Warranty Generally, Wincor Nixdorf guarantees a limited warranty engagement for twelve months beginning with the date of delivery. This warranty engagement covers all those damages that occur despite a normal use of the product. Damages because of improper or insufficient maintenance, improper use of the product or unauthorized modifications of the product, inadequate location or surroundings 3 will not be covered by the warranty. All parts of the product which are subject to wear and tear (e.g. backlight of the LED) are not included in the warranty engagement. Please order spare parts at the Wincor Nixdorf customer service. Recycling Environmental protection does not begin when the time has come to dispose of the BA80; it begins with the manufacturer. This product was designed according to our internal norm “Environmental conscious product design and development”. The BA80 is manufactured without the use of CFCs and CCHS and is produced mainly from reusable components and materials. The processed plastics can, for the most part, be recycled. Even the precious metals can be recovered, thus saving energy and costly raw materials. Please do not stick labels onto plastic case parts. This would help us to reuse components and material. At present, there are still some parts that are not reusable. Wincor Nixdorf guarantees the environmentally safe disposal of these parts in a Recycling Centre, which is certified pursuant to ISO 9001. So don’t simply throw your BA80 on the scrap heap when it has served its time, but take advantage of the environmentally smart up-to-date recycling methods! Please contact your competent branch or the Recycling Centre Paderborn (for European countries) for information on how to return and re-use devices and disposable materials under the following fax number: Fax. +49 (0) 5251 8-26709 Or send us an email to: [email protected] We look forward to your fax or message. 4 Introduction The ergonomic and user friendly flat-panel display BA80 can be applied in all trade market segments like specialist retailers, departmental stores, selfservice stores, petrol stations or in restaurants. There is indeed a great deal of scope for implementing a BA80. They can be used, for example, as: an ordering terminal an information terminal a lottery terminal a point-of-sale terminal a training terminal. The low-energy, flicker-free and low radiation colour monitor of the BA80 is an Active-Matrix-Display in TFT-technology (Thin Film Transistor). Therefore, it is especial y suited for multimedia applications as it offers brilliant colour representation, a better contrast ratio and a high display speed. The screens can be installed directly on the cashier’s desk. Advantages at a Glance Low foot print Energy-saving-mode Flickerfree and free from radiation Very good contrast ratio, adjustable loudness, sharpness, width, phase, colour temperature and brightness via OSD menu LCD TFT-Technology Simple installation via plug and play feature Mounting VESA 75 & 75 standard 5 Unpacking and checking the Delivery Unit Unpack the parts and check to see whether the delivery matches the information on the delivery note. The delivery comprises of the respective screen module and a standard VGA cable (1,8 m). VGA cables of 3 m or 5 m length, cables for connecting DVI-I and VGA and the required controller and data cables can be ordered separately. If damage has occurred during shipping or if the package contents do not match the delivery note, promptly inform your Wincor Nixdorf sales outlet. 6 BA80 Components Screen Module The screen module represents the main unit of the BA80. It comprises of a TFT-LCD colour screen. The TFT LCD flat screen is an VGA 8.4” (21,3 cm) that is flicker-free and free of radiation and has only a low heat emission. The BA80 has a native resolution of 800 x 600 pixels. WARNING: If the display element is damaged and the liquid crystal solution leaks out onto your hands or clothing, please wash your hands or clothing immediately under running water for at least 15 minutes, using soap or alcohol. If the liquid comes into contact with your eyes, consult a medical doctor immediately. 7 Dual Display Holder (optional) The Dual Display Holder offers the possibility to mount a customer display to the rear side of a cashier display. This option needs little space so that you can use your workplace in an optimized way. The holder is screwed to a main display (BA82 or BA83) via a hanging (VESA), while the main display is placed on a foot. The second display (here the BA80) is to be hinged and fixed with screws (see installation manual BA8x, «Dual Display Holder»). BA82/BA80 8 Mounting the Tube Adapter Take the tube adapter out of the cardboard box and lput it next to the display. For the mounting you need a Phillips head screwdriver for fixing and loosening/removing the screws. Loosen four screws at the rear side of the BA80 and put them aside. Mount the tube adapter on the rear side of the BA80 and fix it with the previously removed screws. 9 Put the display with the adapter on the preinstalled tube (1) and fix it with the screw (2). Installing the Base Take the base and the screen out of the packaging. For installation you do not need any tool to loosen and tighten the screws! To loosen the screws, you may use a coin. Screws Base (Top View) 10 Back Panel Remove the four screws at the rear side of the BA80. Move the bezel out of the guidance of the screen element. Plug the connector cables. Slide the bezel on again. Install the back panel with four of the delivered screws. 11 Set the BA80 with back panel on the base and fix them with the 2 remaining screws. Mind the cable laying. If you are operating the BA80 with a base the handling of the OSD menu buttons (cf. page 17) might be difficult. So, set your preferred OSD values either before mounting the base or remove the BA80 from the base, thus having easy access to the menu buttons. 12 Table Mounting There are two holes in the BA80 stand (see arrows). The holes can be used to fix the stand on the footprint with appropriated screws. We recommend using screws with a diameter of 4.0 to 5.0 mm. Make sure that the screw type is suitable for the footprint material. Useful applications may be: Determine a certain position e.g. above a cable aperture in the table. Secure the display stand against “theft by passing”. Protect the install position on a tilted foot print. 13 Ergonomical Adjustment of the BA80 Please observe the following when setting up your terminal workplace: Avoid direct glaring and reflective glaring. For this display a special luminous environment is recommended. Install the device with a viewing direction that is parallel to the windows. Avoid reflective glaring caused by electric light sources. Permitted range of vision 0° 40° 30° 30° Preferred range of vision 14 Position the screen within a preferred and permitted range of vision, so that you or your customers can look vertically into the screen. Installation Connecting the VGA cable Plug the VGA cable connector into the VGA jack of the PC/POS. Secure it by tightening the screws. PC/POS VGA Jack Plug the opposite cable connector into the VGA jack of the BA80. Bottom side BA80 DC12V INPUT VGA Connector DC12V INPUT Use the “DC 12V INPUT” cable connection for the power supply of the BA80 via a PSU or via a POS system. You can order Power Supply Units and the appropriate cables at Wincor Nixdorf. Use only Power Supply Units approved by Wincor Nixdorf. The BA80 can also be connected to a DVI-I interface. The appropriate cable (DVI-I to VGA) can be ordered separately from Wincor Nixdorf. 15 Push Buttons at the Bottom Side Auto Menu (Monitor button) Status LED Information Find the LED is at the bottom side of the monitor. LED Function Power ON Power OFF No signal 16 Power On/Off- button Display LED is on LED is off The light goes on for 2 seconds and off for one second alternately On Screen Display (OSD) The menu of the On Screen Display offers the opportunity to change the preset values of the monitor such as brightness, color settings or language to a user defined definition and store them. Via menu buttons you can navigate and select. Menu Buttons At the bottom side of the display you will find 5 buttons for using the OSD menu. Move forward Move back On/Off Menu/select Auto Switch on the display by pressing the ON/OFF button. Pressing the menu button will activate the OSD. To start a selected function or a submenu option press the menu/select button. There are two ways to exit the OSD menu: via the menu function “exit” or wait for the OSD timeout. The adjustments will be saved in each way. Without user’s activity the OSD menu automatically terminates after a predefined period (see OSD timeout). 17 Main Menu After starting the OSD the main menu functions will been shown. Auto Adjust Select the auto adjust function by pressing the according button and confirm it by aditionally pressing the menu/select button. The position of the display content will be automatically determined. Luminance Menu to change the predefined values of brightness and contrast. Note: You can set the values for brightness and contrast directly by using the buttons “Move forward/Move back” without having to activate the OSD menu. 18 Submenu Luminance (Brightness) Adjustment by hand. Standard: 90 If the value is set too high, bright surfaces can not be distinguished from very bright surfaces. 19 Submenu Luminance (Contrast) Adjustment by hand Standard: 90 If the contrast is set too low, the maximum brightness will not be achieved. If contrast is set too high, bright colors can not be distinguished. Geometry Menu to change the predefined values of screen content position, the pixel clock and the phase. Changes of the ex works values may lead to a poorer display presentation. 20 H.Position You can shift the horizontal position of the screen contents to the right or to the left. Standard: 51 V.Position You can shift the vertical position of the screen contents upwards or downwards. Standard: 50 21 Pixel Clock Menu for adjusting the pixel frequency of the video converter analogue to the lock rate of the video input. Standard: 49 Phase Menu for the adjustment of the exact sampling time within the pixel. Standard: 83 22 Color Chose a convenient and ideal display presentation with the settings of the luminance together with the settings for the color. There are three defined settings for the color temperature (measured in Kelvin, K). Choose the value 9300 K for an environment with neon light or daylight. With very bright, “white” light the temperature 6500K is recommended. The value 5800K equates direct sunlight. User Preset You have a a free choice of the color presentation mixed from the user defined RGB colors (red, green, blue). 23 OSD The OSD menu gives you the opportunity to set the screen location of the OSD frame and the displaying duration time. H.Position Adjust OSD frame’s horizontal location Adjustment by hand. 24 V.Position Adjust OSD frame’s vertical location Adjustment by hand. OSD Timeout For adjusting the time interval (1 to 60 seconds) for displaying the OSD. With time elapsed OSD will be closed automatically. Adjustment by hand. 25 Language The OSD can be displayed in seven different languages. The default setting is “English”. There is a choice between a traditional or a simplified Chinese font. Take your choice. Recall This menu together with the two submenus can recall the ex works settings. 26 Color Recall The menu initializes the colour settings to the default values. Recall All With this menu you can simultaneously initialize all settings to the default values. 27 Miscellaneous Menu to adjust the display sharpness and to call up display information. Sharpness Sharpness preserves the eyes. An optimal display presentation must have a efficient sharpness to avoid eyes overstress and a fast eyestrain. Choose a value convenient for yourself. The pre-set value “3” has proved to be easy for the eyes. 28 Display Information Find here information about the installed display solution (pixel) and the refresh rate (Hz). EXIT This function immediately ends the OSD. When time elapsed the predefined OSD time interval the OSD will be closed automatically. 29 Technical Data Model BA80 Cabinet color Light Grey or Black Display size 8.4" Dimensions (W x H x D in mm) 200 x 180 x 36.4 Active Area 170.4 * 127.8 mm Optimal Resolution 800 * 600 Color Arrangement RGB-stripe Brightness typ. 200 cd/m² Contrast Ratio 600:1 Response Time 8 ms (typical) Viewing Angle 130 degrees (V) Input Video Format VGA Input Video signal connector D-Sub 15 pins Power consumption 6W Frequencies Power Supply Operating Temperature Humidity 30 150 degrees (H) Horizontal : 37.9 kHz Vertical : 60 Hz DC 12V +/- 10% 5℃~40℃ Operating: 5%~85% Weight 750g Approvals CE, FCC,BSMI,CCC,UL Wall Mount VESA 75 * 75 mm Dimensions Indications in mm 31 With Base 32 With Tube Adapter 33 Wincor Nixdorf International GmbH D-33094 Paderborn Order No.: 01750215139C