1
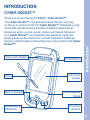
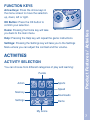
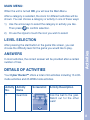
Cyber Rocket
TM
© 2008 VTech
Printed in China
91-002312-000
To learn more about the Cyber Rocket™ and other VTech® toys, visit www.vtechkids.com
CYBER ROCKET™ USER’S MANUAL
TABLE OF CONTENTS
SECTION 1 INTRODUCTION
CHAPTER 1 CYBER ROCKET™
CHAPTER 2 INCLUDED IN THE PACKAGE
SECTION 3 PRODUCT FEATURES
CHAPTER 1 THE UNIT
CHAPTER 2 ACTIVITIES
SECTION 4 DETAILS OF ACTIVITIES
SECTION 5 CHAPTER 1 CHAPTER 2
CHAPTER 3 CHAPTER 4 Internet connectivity
Software Installation
Account Registration
Logging In
Features in Planet VTech
SECTION 6
CHAPTER 1
CHAPTER 2
CHAPTER 3
Cyber Rocket™ Headquarters
Connecting to Cyber Rocket™ Headquarters
Navigating Around
Starting Games
SECTION 7
CHAPTER 1 CHAPTER 2 CHAPTER 3 CARE AND MAINTENANCE
CARE AND MAINTENANCE
TROUBLESHOOTING
TECHNICAL SUPPORT
SECTION 8 OTHER INFO
Contents
SECTION 2 SET-UP
CHAPTER 1 GETTING STARTED
CHAPTER 2 USING THE STYLUS
2
INTRODUCTION
CYBER ROCKET™
Thank you for purchasing the VTech® Cyber Rocket™.
Time Limit Indicator
Stylus
Built-in Speaker
Arrow Keys &
OK Button
On/Off Button
Introduction
Your Cyber Rocket™ is a hand-held device that you can play
on-the-go or connect to the PC! Cyber Rocket™ challenges young
minds with 40 brain-training activities in different categories as
diverse as action, puzzle, sports, memory and speed. Moreover,
your Cyber Rocket™ can download new games and play twoplayer games via the internet for a virtual competition challenge.
Explore unlimited games and learning fun on the internet with Cyber
Rocket™!
LCD Touch
Screen
Interchangeable
Frame
3 Function
Buttons
3
-
Cyber Rocket™
3 interchangeable frames
2 styluses
A protective lid
A CD-ROM with PC connection software
USB connection cable
Wrist strap
2 Instruction manuals
Planet Vtech membership card
WARNING: All packing materials such as tape, plastic sheets,
wire ties and tags are not part of this toy and should be
discarded for your child’s safety.
SET-UP
GETTING STARTED
Before playing for the first time, please insert 3 new “AAA” sized
alkaline batteries. (The “AAA” sized batteries included in the unit are
for demo purposes only and are not long life batteries.)
Before playing, please make sure the plastic strip is removed
from the bottom of the unit.
Introduction / Set-up
INCLUDED IN THIS PACKAGE
BATTERY
BATTERY INSTALLATION
Cyber Rocket™ operates on 3 “AAA”
sized batteries.
1. Make sure the unit is turned OFF.
2. Locate the battery cover on the
bottom of the unit and open it.
4
3. Insert 3 new “AAA” sized batteries as illustrated.
4. Close the battery cover.
NOTE: For best performance, replace with new alkaline batteries.
RECHARGEABLE BATTERIES ARE NOT RECOMMENDED
BATTERY NOTICE
- Install batteries correctly observing the polarity (+, -) signs to avoid
leakage.
- Do not mix batteries of different types: alkaline, standard (carbonzinc) or rechargeable (nickel-cadmium).
- Remove the batteries from the equipment when the unit will not be
used for an extended period of time.
- Always remove exhausted batteries from the equipment.
- Do not dispose of batteries in fire.
- Do not attempt to recharge ordinary batteries.
- The supply terminals are not to be short-circuited.
- Only batteries of the same and equivalent type as recommended
are to be used.
Battery Notice
- Do not mix old and new batteries.
WE DO NOT RECOMMEND THE USE OF RECHARGEABLE
BATTERIES.
Notice: If the Cyber RocketTM is on, a low battery status will be
indicated by a voice over: “Low battery, please change the
batteries.”
5
WRIST STRAP
WRIST STRAP INSTALLATION
Attach the wrist strap by inserting the
loop through the tab on the back of the
Cyber Rocket™.
USING THE STYLUS
POSITION OF THE STYLUS
Product Features
The stylus is located at the back of your
Cyber Rocket™. You can take the
stylus out by pulling on the stylus head.
USING THE STYLUS
To select and play games, simply touch
one end of the stylus to the Cyber
Rocket™ screen. You can also move
objects in the games by dragging the
stylus across the screen.
PRODUCT FEATURES
THE UNIT
TURNING THE UNIT ON AND OFF
Press and hold to turn the unit ON. Press and hold
to turn the unit OFF.
again
POWER SAVING
To save power, we recommend that you turn off the unit when
finished playing. Remove the batteries if your Cyber Rocket™
will not be used for an extended period of time.
6
FUNCTION KEYS
Arrow Keys: Press the Arrow keys in
the menu screen to move the selection
up, down, left or right.
Home: Pressing the Home key will take
you back to the main menu.
Help: Pressing the Help key will repeat the game instructions.
Settings: Pressing the Settings key will take you to the Settings
Menu where you can adjust the contrast and the volume.
ACTIVITIES
ACTIVITY SELECTION
You can choose from different categories of play and learning:
Puzzle
Action
Sports
Speed
Memory
Product Features / Activities
OK Button: Press the OK button to
confirm your selection.
Downloads
Settings
Demo
My Score
7
MAIN MENU:
When the unit is turned ON, you will see the Main Menu.
After a category is selected, the icons for different activities will be
shown. You can choose a category or activity in one of these ways:
1) Use the arrow keys to select the category or activity you like.
Then press
to confirm selection.
2) Or use the stylus to touch the icon you wish to select.
LEVEL SELECTION
ANSWERS
In most activities, the correct answer will be provided after a certain
number of tries.
DETAILS OF ACTIVITIES
Activities
After pressing the start button in the game title screen, you can
choose the difficulty level for the game you would like to play.
Your Cyber Rocket™ offers a total of 40 activities including 15 LCDmode activities and 25 WEB-mode activities.
Activity Activity
No.
Name
1
Goal Kick
Screenshot
Activity Description
Kick the ball to the goal.
Watch out for the other
team!
8
Find 10
Link the numbers in a line
that add up to 10 within the
time limit. The numbers
can be in a row, column or
diagonal.
3
Pipe
Connection
Click on the parts of the
tunnel to rotate them. Try to
build the correct path to help
the alien find its friends.
4
Ladder
Climb
Link the roads so that
the robot can avoid the
obstacles and collect
points.
5
Alien Maze
Guide the alien out of the
maze while avoiding the
obstacles.
6
Obstacle
Course
Steer the car and dodge the
obstacles. Try to complete
the race as fast as you
can!
7
Motion
Memory
Click a window to open
the shade. Match the two
objects that are performing
the same movement or
making the same sound.
Activities
2
9
Dance
Contest
Remember the steps that
the robot dances and
repeat the steps by clicking
the arrows.
9
Picture
Pairs
Click on the picture that
matches the alien.
10
Speedy
Sequence
Click on the correct shape
and fill in the missing
sequence.
11
Treasure
Catch
Bounce the ball to the
opponent and get as many
points as possible!
12
Alien Path
Help the alien find its
rocketship by placing
blocks in front of it to
change its direction.
13
Flash Math
Answer the question as
fast as you can!
Activities
8
10
True or
False Math
Answer the true or false
questions while playing the
mini games.
15
Letter Hunt
Remember the word
displayed and find the
correct missing letter to
complete the word.
Internet connectivity features
Minimum System Requirements
Hardware Requirements:
CPU: Pentium® 4, 1 GHz or above
Memory: 256MB
Video Adaptor: Graphic card with 1024 x 768 at 16 or 32 bit color
Monitor Resolution: 1024 x 768
USB 1.1 or higher
100MB Hard disk space
Windows® compatible sound card and speakers
Note: Home internet connection required for online access
Note: USB hubs are not supported
Software Requirements:
Microsoft® Windows® 2000(SP4), XP or Windows Vista® Operating
System
Internet Explorer® version 6 or above
Adobe® Flash® Player 9 (To acquire the latest version of Flash player,
please visit www.adobe.com)
Activities / Internet Connectivity Features
14
11
THIS PRODUCT IS NOT ENDORSED OR SPONSORED BY ADOBE
SYSTEMS INCORPORATED, PUBLISHER OF FLASH.
1. Software Installation
Installing from CD-ROM:
- Insert the CD-ROM that comes with your Cyber
Rocket™ and follow on-screen instructions to
proceed with software installation.
- If the installation program does not initiate
automatically when you insert the CD, you
can start the installation manually by doing
the following:
1. Double click on “My Computer” (located on your desktop).
2. Find the CD-ROM drive that has the Cyber Rocket™
installation CD
3. Right click on the drive and choose “Explore”
Internet Connectivity Features
Note: Windows ® 98/Windows ® ME/Windows ® NT are not
supported
Microsoft, Windows® is a registered trademark of Microsoft Corporation
in the United States and other countries. Adobe®, the Adobe logo,
Flash® are either registered trademarks or trademarks of Adobe
Systems Incorporated in the United States and/or other countries.
Intel®, Pentium® are trademarks of Intel Corporation in the United
States and other countries. All other trademarks are the property of
their respective owners.
4.Locate and run “Setup.exe” on the explorer to begin the installation
process.
12
2. Account Registration
Alternatively, you can open your
internet browser and enter the following
URL: www.planetvtech.com
- Click on the “Sign In” button and follow the on-screen instructions
to proceed with the account registration process.
3. Logging In
- After account registration, you can go to www.planetvtech.com
anytime and click the “Sign in” button to login using your screen
name and password.
4. Features in Planet VTech
There are many fun activities and features to be found in Planet
VTech.
5. Accessing Parents’ Center
You can track your child’s progress online and edit your account
information via the online Parents’ Center. To access the Parents’
Center, please navigate to www.planetvtech.com, click the Parents’
Center button and login to your account.
Internet Connectivity Features
- Once you have successfully installed the software, locate the USB cord on
your product and plug the device into
your computer’s USB port. This will take
you automatically to the Planet Vtech
web site.
13
Cyber Rocket™ Headquarters
- Install the Cyber Rocket™ PC program. The first time you connect
the Cyber Rocket™ to the PC, you will be taken to the login
page of Planet VTech. Login to play games at Cyber Rocket™
Headquarters, or explore Planet VTech and find other exciting
games and surprises!
- Once you have successfully logged in, you will be taken to the
Entrance of Cyber Rocket™ Headquarters
Entrance of Cyber Rocket™ Headquarters
- You can also type the web site into your browser’s URL to go to
Planet VTech directly:
http:// www.planetvtech.com
Note: In order to play games at Planet VTech, your PC must be
connected to the internet.
Cyber Rocket™ Headquarters
Chapter 1: Connecting to Cyber Rocket™
Headquarters
Note: The web site screenshots in this manual may be different from
those seen on the actual web site.
14
Chapter 2: Navigating Around
Lobby Area
Enter Downloads
Area
Exit to Planet
VTech
Downloads Area
Download New
Games to Console
Enter Store
Area
Enter Online
Games Area
Exit to Lobby
Area
- You can download additional activities to your Cyber Rocket™ for
free at Cyber Rocket™ Headquarters.
- Click on the area shown above to download new games.
Store Area
Cyber Rocket™ Headquarters
Play Sample
Mini-Games
Console Game
Rankings
- You can purchase Cyber Rocket™ related items with your V.Points
15
by clicking on the area shown above.
- You can also view your Cyber Rocket™ game scores and rank by
clicking on the area shown above.
Launch Online
Games Selection
Menu
View Online
Games Ranking
Online Tour Guide
Should you have any questions on Planet VTech, look for avatars
with names beginning with “Tour Guide”. They will be able to help
you out!
Chapter 3. Starting Online Games
(head-to-head)
- You can also play online games with other Cyber Rocket™
users.
Online Game
Station
- Click on the online game station to go to the online games selection
screen.
Cyber Rocket™ Headquarters
Online Games Area
16
- Click on the head-to-head game you want to play.
Create a Room
Find a Game
about to Begin
From the list, you can:
- Choose to join an existing room by clicking on the room button.
- Create your own room for others to join by clicking on the “Create
Room” button.
- Click the “Quick Match” button to join a room that is ready to begin
a game.
Cyber Rocket™ Headquarters
- Pick a category for a list of online games
17
Joining an Existing Room
Maximum Number
of Players Allowed
Minimum Number of
Players Required
Exit this Room
- If you join an existing room, you will wait for the host to start the game.
You may also click the “Leave Room” button to exit the room.
Creating a Room for Others to Join
Minimum Number
of Players Required
- Wait for other players to join or click “Start Game” to start the game
with current players. Click the “Leave Room” button to stop hosting
the room.
Cyber Rocket™ Headquarters
Players Currently
in the Room
18
CARE & MAINTENANCE
1. Keep your Cyber Rocket™ clean by wiping it with a slightly damp cloth. Never use solvents or abrasives.
2. Keep it out of direct sunlight and away from direct sources of heat.
3. Remove the batteries when not using it for an extended period of time.
4. Avoid dropping it. NEVER try to dismantle it.
A very small percentage of the public, due to an existing condition,
may experience epileptic seizures or momentary loss of consciousness
when viewing certain types of flashing colors or patterns, especially
on television and PC.
While the Cyber Rocket™ does not contribute to any additional
risks, we do recommend that parents supervise their children while
they play games. If your child experiences dizziness, altered vision,
disorientation, or convulsions, discontinue use immediately and consult
your physician.
Please note that focusing on a screen at close range and handling
a keyboard for a prolonged period of time may cause fatigue or
discomfort. We recommend that children take a 15-minute break for
every hour of play.
Care & Maintenance
5. Always keep Cyber Rocket™ away from water.
WARNING:
19
TROUBLESHOOTING
1. If your Cyber Rocket™ stops working or does not turn on:
- Check your batteries. Make sure the batteries are fresh and properly
installed.
- Insert the tip of a paper clip (or a similar object without a sharp tip)
into the small hole at the back of the unit labeled “Reset.”
NOTE: After resetting, default settings will be restored.
2. If when pressing, nothing happens:
- If you have inserted batteries, check to see that they are aligned
correctly.
3. If the LCD screen is frozen and not responding to any input:
- Use the tip of a paper clip (or a similar object without a sharp tip) to
gently press the Reset button.
4. If the PC does not auto-launch to Cyber RocketTM Headquarters after plugging in the Cyber RocketTM:
-Make sure that the software included on the installation CD was
properly installed onto the PC.
Troubleshooting
- If you are still having problems, visit our website at
www.vtechkids.com for troubleshooting tips.
- Check the USB connection. Make sure the cable ends are connected
correctly.
5. If the PC can not access www.planetvtech.com or failed to load:
-Make sure you have the latest version of Adobe Flash Player® and
make sure your firewall or router is properly set up to accept the
incoming connection on Port 3030.
6. If Windows pop-up for formatting disk.
- Click cancel to abort the action.
20
TECHNICAL SUPPORT
A support representative will be happy to assist you. Before requesting
support, please be ready to provide or include the information below:
- The name of your product or model number (the model number is
typically located on the back or bottom of your product).
- The actual problem you are experiencing.
- The actions you took right before the problem occurred.
Internet: www.vtechkids.com
Phone: 1-800-521-2010 in the U.S. or 1-877-352-8697 in Canada
OTHER INFO
DISCLAIMER AND LIMITATION OF LIABILITY
VTech Electronics North America, L.L.C. and its suppliers assume
no responsibility for any damage or loss resulting from the use of this
handbook.
VTech Electronics North America, L.L.C. and its suppliers assume
no responsibility for any loss or claims by third parties that may arise
through the use of this software.
VTech Electronics North America, L.L.C. and its suppliers assume no
responsibility for any damage or loss caused by deletion of data as a
result of malfunction, dead battery, or repairs. Be sure to make backup
copies of important data on other media to protect against data loss.
Technical Support / Other Info
If you have a problem that cannot be solved by using this manual, we
encourage you to visit us online or contact our Consumer Services
Department with any problems and/or suggestions that you might
have.
Company: VTech Electronics North America, L.L.C.
Address: 1155 West Dundee Rd., Suite 130, Arlington Heights, IL
60004 USA
Phone: 1-800-521-2010 in the U.S. or 1-877-352-8697 in Canada
21
Copyright 2007 VTech Electronics North America, L.L.C. All Rights
Reserved. VTech® and the VTech logo are registered trademarks of
VTech . Cyber Rocket™ is trademark of VTech Electronics North
America, L.L.C. All other trademarks are property of their respective
owners
Important Note / Copyright Notice
COPYRIGHT NOTICES:
22
NOTE:
This equipment has been tested and found to comply with the limits
for a Class B digital device, pursuant to Part 15 of the FCC Rules.
These limits are designed to provide reasonable protection against
harmful interference in a residential installation. This equipment
generates, uses and can radiate radio frequency energy and, if not
installed and used in accordance with the instructions, may cause
harmful interference to radio communications. However, there is no
guarantee that interference will not occur in a particular installation. If
this equipment does cause harmful interference to radio or television
reception, which can be determined by turning the equipment off and
on, the user is encouraged to try to correct the interference by one or
more of the following measures:
- Reorient or relocate the receiving antenna.
- Connect the equipment into an outlet on a circuit different from that
to which the receiver is connected.
- Consult the dealer or an experienced radio/TV technician for help.
Note
- Increase the separation between the equipment and receiver.
CAUTION: Changes or modifications not expressly approved by the
party responsible for compliance could void the user’s authority to
operate the equipment.
THIS DEVICE COMPLIES WITH PART 15 OF THE FCC
RULES. OPERATION IS SUBJECT TO THE FOLLOWING TWO
CONDITIONS: (1) THIS DEVICE MAY NOT CAUSE HARMFUL
INTERFERENCE, AND (2) THIS DEVICE MUST ACCEPT ANY
INTERFERENCE RECEIVED, INCLUDING INTERFERENCE
THAT MAY CAUSE UNDESIRED OPERATION.
THIS CLASS B DIGITAL APPARATUS COMPLIES WITH
CANADIAN ICES-003.
CET APPAREIL NUMÉRIQUE DE LA CLASSE B EST
CONFORME À LA NORME NMB-003 DU CANADA.
23