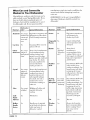
1
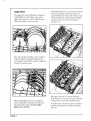
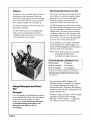
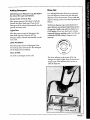
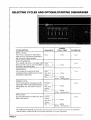
OWNER'S MANUAL
TABLE
OF CONTENTS
Page
For
Future
Reference
Consumer
Safety
Publications
Instructions
Using
• Preparing
• Loading
• Using
Selecting
Special
Dishes
1
..............................................................................
Detergent
Cycles
and
• Energy
Saving
• What
..................................................................
and Rinse
Aid .........................................................
Options/Starting
Dishwasher
.............................
..................................................................................
................................................................................
Tips .............................................................................
Can and Cannot
• Maintaining
• Changing
You Call
Be Washed
the Dishwasher
.....................................................
..............................................................
Panels ..................................................................................
For
3-7
3
.................................................................................
Tips ...................................................................................................
Conditions
2
........................................................................
Your Dishwasher
• Water
Warranty
..............................................................................
is Essential
• For Best Results
Before
1
......................................................................................
Your Dishwasher
• Hot Water
................................................................................
Service
.....................................................................
.......................................................................................................
3
3-5
6-7
8-9
10-13
10
10-11
11
12
13
13
14-15
16
FOR FUTURE
REFERENCE
For future reference
Congratulations on your choice of a Maytag
Jetelean _"dishwasher. As you use ),our new
dishwasher we know you will appreeiate the
many features that provide unsurpassed
cleaning and eapaeity 'along with energy
efficiency arid dependability,
On the following pages you will find a wealth
manual after recording the model number and
serial number of this dishwasher in the spaces
provided. This information
can be found on the
data pIate located on the upper left comer of the
tub opening.
of
information regarding all aspects of your
beautiful new dishwasher. By lbllowing these
instructions
excellent
we suggest you retain this
Model Number
1
Serial Number
]
carefully; you will be able to achieve
results with your dishwasher.
Should
you have any questions about using your Maytag
dishwasher, contact us. Be sure to prm4de the
model number
of your dishwasher.
MAYTAG CONSUMER
SQUARE
to
you
Square,
Newton,
from Maytag at the prices indicated. Send your
to: Maytag Consumer Education,. One
IA 50"208. Allow 6-8 weeks for delivery.
Innovative
Ideas for Today's Kitchens
Applimlee
Buying Guides ..............................................................
Washer
with installer
PUBLICATIONS
For additional information order the following booklets
name, address, booklet title, form number and payment
Dependability
- Check
INSTRUCTIONS
on page 2 before
start to use this dishwasher.
(515) 791-8911
(Mon.-Ffi., 8 am-5 pm CST)
CONSUMER
WARNING
make sure appliance
has been
grounded
to avoid possible
electrical
shock. Be sure you read the
IMPORTANT
PERSONAL
SAFETY
EDUCATION
ONE DEPENDABILITY
NEWTON,
IOWA 50208
I
-- "22PR .....................................
$I.00
50¢ EACH
-- 211YG
Dryer -- 212YG
Dishwasher
Electric
213YG
Range -- 214YG
Gas Range -- 215YG
Refrigerator
-- 276YG
PAGE
IMPORTANT
Products
PERSONAL
with a (_
the Underwriters'
SAFETY
label have been listed with
Laboratories,
INSTRUCTIONS
.
Inc. - those with
Association.
other equipment
Nevertheless,
your dishwasher,
including
completion
hazard. When
using
follow basic precautions,
,
designed
electrical
attempting
power to dishwasher
to service.
4. To avoid electrical
must be attached
power is applied
the installation
grounding
before
electrical
to the dishwasher.
instructions
6. Children
for proper
rated, protected
and
supply- circuit to avoid electrical
certain
be produced
conditions,
hydrogen
gas may
in a hot water system that has
Hydrogen
gas is explosive,
If the hot water
system has not been used for such a period,
water
and let the
flow from each for several minutes,
gas. As the gas is flammable,
hydrogen
do not smoke or
use an open flame during this process.
12. Do not wash plastic items unless marked
to
operate, or play in, with, or around
dishwasher.
this
sharp or pointed
should be located with the handles
"dishwasher
plastic items not so marked,
items
up. Also,
13. Do not tamper
14. Always remove
load sharp items so they are not likely to
compartment
damage
dishwasher
the door seal,
SAVE
safe" or the equivalent.
manufacturer's
the risk of injury" when loading
items to be washed,
PAGE 2
Keep
out of the reach of children,
turn on all hot water lancets
Refer to
should never be permitted
To reduce
or hand
in your dishwasher.
This will release any accumulated
to a properly
sized power
overload.
,
and the front
procedures.
5. Connect
detergent,
Never
not been used for two weeks or more.
shock hazard, the sides
and back must be enclosed,
panels
dishwasher.
dish racks of the dishwasher.
only for its intended
11. Under
before
detergent
these products
using the
and rinse additives
for an automatic
10. Do not sit, stand on or abuse the door or
2. Use the dishwasher
function.
3. Disconnect
of a qyete. It may be hot.
Use only detergents
washing
before
of the tub during or at the
use soap, laundry
the following:
1, Read all instructions
dishwasher.
element
as with any
using electricity, and moving
parts, there is a potential
not to touch the heating
on the bottom
a CSA tag have been listed with Canadian
Standards
Be careful
THESE
INSTRUCTIONS
For
check the
recommendations.
with controls.
the door to the washing
when removing
an old
from service or discarding
it.
USING
YOUR
Hot Water
DISHWASHER
is Essential
Loading
For good cleaning and drying results, hot water
is necessary. The water should be 120°-140°E If,
for any reason, the temperatnre
of the water
being delivered by the water heater is below
120°F, select the Temp Boost Sensor option to
have your dishwasher
thermostat
a wide variety
With experience,
best arrangement
General
is
person
setting.
Before starting the dishwasher, turn on the hot
water faucet and let it run until the water is hot.
Preparing
dishes;
the number and type of articles used will vary,
daily. Your dishwasher is designed to be flexible
dishwasher,
run into a glass in tile sink until it is as hot as
raise the water heater
have identical
of dishes and
utensils. The following instmctions and pictures
will help you become familiar with your
To check water temperature,
turn on the hot
water faucet nearest the dishwasher. Let water
below 120°F (49°C), have a qualified
Seldom wil! households
and accommodate
heat the water.
possible, then check with a candy or meat
thermometer.
If the temperature
at the faucet
Your Dishwasher
you will learn the
for },our particular
needs,
Recommendations
Place all items on racks so they are separated
and face the center to insure the water spray
will reach the soiled surfaces, Do not allow
items to extend
out of the racks.
Ma.ke sure the movement
of the upper
and
lower spray arms is not blocked by items
hanging below the lower rack or tail articles
the upper rack.
Dishes
* It is not necessary to rinse dishes before
placing them in your Maytag dishwasher.
Simply serape offbones and large pieces of
food. The food disposer in your dishwasher
can handle a variety of items such as pits, fruit
seeds, popcorn and toothpicks. These items
will be chopped into small pieces during drain
and removed with the drain water. If hard
items get into the dishwasher module, you
may hem" chopping noises during drain. These
sounds are normal.
Insure
in
the free flow of water to the detergent
cup by not blocking
it with large items.
Larger, flat, lightweight items (such as plastic
covers) may be wedged next to the silveIware
basket or along the sides and back of the racks.
The wash tower rises through the center of the
lower rack dnring the cycle. For the best
cleaning results, avoid blocking it or loading
tai! articles next to it.
• Foods that have been burned onto cooking
utensils will need to be scraped or soaked.
• Certain foods, such as mustard, mayonnaise,
lemon juice, vinegar, salt or dressings may
cruise stainless steel flatware to rust and pit if
allowed to remain in contact with the surface
for a period of time. Therefore, it is best to
rinse these food soils off stainless steel flatware
unless the dishwasher is to be operated soon
after loading.
• If your dishwasher drains into a food waste
disposer, make certain the disposer is
completely
empty before
dishwasher
to provide
starting the
for proper
draining.
PAGE 3
Upper
Rack
The upper rack of your dishwasher is designed
_itb flexibility, in mind. Glasses, cups, small
plates, bowls, pans, etc. can be loaded in many
different positions to suit your needs.
The hinged shelf car_be used to stack two levels
of cups, juice glasses, and other short items.
Load small diameter items under shelf so water
will reach upper tier. When the shelf is folded
up, this area can be used for taller glasses,
stemware, etc.
The rack is designed so dishes can be centered
behind a single fine and held in plac_ by the
ra&_ support wires. Dishes can also be !oaded at
an angle to maximize space.
When loading glassware, leave a small space
between each piece so they do not touch each
other during the wash cycle. Do not place
glasses over the tines.
PAGE 4
The upper rack may be removed if desired.
Push inward on the front of the rack rail ends to
unsnap. Remove rail ends and pull out rack.
To replace rack: reinsert rack, place rail ends in
position and snap fronts into place by pushing
outward.
Lower
Rack
The convertible
comer
Large dinner
pines
and other
dishes may be
placed in any convenient
location
rack but soiled
center.
should
surfaces
in the lower
face
the
bowl tines in the
can be folded to provide
right rear
either narrow
or
wide sparing. This allows flexible loading of a
variety of articles such as servSng bowls, plates,
pans or casserole
dishes.
Tall items such as bakeware and large platters
should be loaded on the left side of this raek.
Thin items (cookie
be plaeed behind
sheets, pizza pans, etc.) may
the folding shelf. With the
shelf down, lavo levels of glasses and cups can be
!oaded. For best washabilit3_, do _ot place a W
items in the short tines when the shelf is being
used.
Small items such as plates, saucers
bowls may be loaded
the wash tower.
in the elevated
or shallow
area behind
PAGE 5
Recommended
Flatware
Put flatware in the removable
silverware
basket,
mixing knives, forks and spoons. To prevent
them from nesting together,
place some handles
up and some down. However,
sharp or pointed
items should be loaded with the handles
The silverware
of loading
basket
may be removed
up.
for ease
section for small, lightweight
articles such as measuring
of detergent
to Use
to use depends
cups and spoons,
on the
water hardness (measured in grains per gallon-gpg) and the amount of soil on the dishes.
Generally
increased
detergent
for harder
Too little detergent
ainounts should be
water and heavier soil.
can result
in poor cleaning,
hard water filming and spotting,
Overuse of detergent (especially
or unloading.
Use the covered
The amount
Amount
and poor drying,
in chemically
softened water) can cause permanent
etching
(cloudiness) of glassware. For detergents with
small plastic items, baby" spoons, etc. Lower the
low phosphate
cover to keep these items in place.
level may have to be increased. The phosphate
content is shown on the side of the box.
content
A basic guideline
(8.7% or less) tile usage
is one teaspoon
for each grain of water hardness
of detergent
(gpg). Use a
minimum of three teaspoons (one tablespoon)
soft water. Refer to the chart below.
NOTE:
When
in
using an ultra or concentrated
dishwashing
detergent
manufacturer's
follow
suggested
amounts.
WATER HARDNESS*
DETERGENT
Soft (0-3 gains)
3 teaspoons
Medium (4-9 grains)
4-9 teaspoons
Hard (lO-:tg_grains)
I
USE
10-12 teaspoons
*Your local water utility can tell you the exact degree of
hardness of your water supply. In rural areas, your state
university extension service earl tell you how to test your
water hardness.
For water hardness of I3-14 grains, add
additional detergent (1 teaspoon for each grain
Using
Aid
Detergent
and Rinse
for an automatic
or liquid detergent
dishwasher.
designed
Use fresh detergent
and store it in a cool, dry place (not under
kitchen sink). Never use laundry
detergent
or hand dishwashing
detergent
in your
dishwasher
as it will cause severe
oversudsing.
PAGE 6
oftbe
main wash
portion of the cycle. (Open door, add detergent
to bottom of tub, close door and dishwasher will
continue
Detergent
Use only a powder
over i2) at the beginning
lfwater
through
cycle.)
is 15 grains or harder, it will be virtually
impossible to get good results with any
dishwasher. The only sotntion is a mechanical
water
softener
to improye
water quality,
Adding
Add Detergent
You Select
Normal
Rinse
Detergent
to Dispenser
the Cycle
Cycle
Cup Just
Before
and Options.
Aid
Your Maytag dishwasher
or Pots & Pans
improves
filming.
Detergent
T° £fll, turn dispenser
will be released
automatically
an automatic
drying results and reduces
Place proper amount of detergent in both tile
Prewash and Main Wash cups. Close the lid.
prewash
features
rinse aid dispenser, located near the detergent
dispenser on the door interior. Using a rinse aid
into the
and main wash.
spotting
and
cap counterclockwise
to
open. Remove cap and pour liquid rinse aid into
the opening. Replace cap and turn clockwise to
Light!China
Place the proper amount of detergent in the
Main Wash cup only: Close the lid. The
detergent will be released
main wash.
automatically
into the
LESS setting. If you have hard water or desire
improved drying or spotting results, turn the cap
toward the MORE setting to dispense
rinse aid.
more
Quick Wash/Fdnse
Place the proper
Prewash
amount of detergent
in the
cup only. Close the lid. The detergent
will be dispensed
immediately.
X?OVEs%)9,
z'"
/
in the center
of the cap
Rinse & Hold
Do NOT use detergent
in this cycle.
The clearindicator
changes from dark to light when the reservoir
nearly empty. This indicates that it is time to
is
reN1 the dispenser,
PAGE 7
SELECTING
CYCLES
AND
CYCLE SETTING
OPTIONS/STARTING
DISHWASHER
APPROX.
CYCLE TIME
WATER USE
Rinse
7 Mira
2 Gal.
Wash
2 Rinses
17 Min.
SEQUENCE
RINSE & HOLD:
Use to rinse a relatively few soiled dishes
which are to be held until the dishwasher is
full. Turn knob to Rinse & Hold.
QUICK WASH/RINSE:
Use to quickly wash dusty or very lightly-soiled
dishes you wish to store or reuse immediately.
Turn knob to Quick Wash/Rinse.
5 Gal.
LIGHT/CHINA:
Use for china and crystal and for loads
containing medimn to light amounts of soil.
Turn knob to Light/China.
7 Gal.
Rinse
Main Wash
41 Min,
2 Rinses
Dr),
35 Min.
76 Min. ÷ Heating
NORMAL
CYCLE:
Delay °
...............
Use for washing loads containing normally
soiled dishes. This would include dishloads
with problem soils. Turn knob to Normal
Cycle.
PreWash
Rinse
Main Wash
9 Gal.
49 Min.
2 Rinses
Dr?,
35 Min.
84 Min. + Heating Delay °
POTS & PANS:
Use for loads with heavy or dried soils. Turn
knob to Pots & Pans.
PreWash
2 Rinses
Main Was|t
2 Rinses
DR
1! GaI.
64 Min.
,35 Min.
99 Min. + Heating Delw _
*The TEMP BOOST SENSOR may extend the main wash to heat the water to proper temperatnre.
DELAY indicator will light when the cycle is being extended due to low water temperatures,
PAG E 8
The HEATING
Delay
Options
Temp
Boost
Sensor
If for any reason the ineoming water
temperature
is below 1o,9,0°I?,press the On
button to assure the water is heated to proper
temperature
for best cleaning and drying
results. The dial will pause at the 4_ to extend
the main wash and the Heating De!_ light _411
turn on.
Press tile Off button
Sensor.
Heated
RINSE
Rinse
to eaneel the Temp
To Start
Dishwasher
After loading set the dial to the desired
Press button for desired options.
NOTE:
cycle.
Run the water from the hot water tap to
clear the line of cold water before
starting.
and
Dry Options
Press the Sani button to turn the heating
element on during all rinses. The Sani option
helps maintain water temperature
and improve
drying results.
Press the Normal button
element
You can delay the start of the Pots & Pans cycle
up to six hours. To set up a delay, turn the dial to
the number of hours you would like the Pots &
Pans cycle dekiyed.
Boost
TEMP
The heating
Start
if Sani is not desired.
will be off in aI1 rinses.
FAN DRY
Press the Heat button to turn the heating
element on during the fan dry, period. This
option improves d_ng results.
Press the Air button to turn the heating element
off during the fan dry period. Towel drying may
be necessary.
NOTE: Temp Boost Sensor, Rinse Ternp and
Fan DU options can be used separately
or together.
Press the door until it latches. The cycle vAll
begin with a drain prior to fill and the On
indicator will light.
Indicator
Lights
When Delay Start is seleeted the Delay Start
light glows until the eyete begins. The On light
indicates that the dishwasher
is operating. At
the end of the dry phase Clean will remain lit
until the dial has been advanced to the _. The
tteating Delay, light indicates that the main
wash is being extended to heat the water to
proper temperature.
Adding
a Forgotten
Item
For best eleaning, the forgotten
added early in the cycle.
1. Unlatch
drculating
item should be
the door and _v, it until tile sound of
water stops.
2. Open the door and add the item.
3. Pause before latching the door. The cycle wil!
continue at the point it was interrupted.
PAGE 9
SPECIAL
TIPS
Water
Conditions
Hard Water
Deposit
For Best Results
If an unusual
• Hot Water is a Must
water, a lime film or deposit
Hot water dissolves and activates
dishwasher.
to page 3 for more information.
For proper
Detergent
soiI removal,
and to prevent
good drying results,
filming, etching
and sporing,
an adequate amount of detergent
used. We recommend
I teaspoon
per grain of water hardness
3 teaspoons.
of calcium is in the
may eventually
build up on the dishes and interior
the
dishwashing detergent, dissolves grease on
dishes and helps dry- glasses spot-free. Make
certain all loads are washed in hot water. Refer
Use Enough
amount
must be
of detergent
with a minimum
"cloudy" glasses.
To determine ff the film on the glasses is
due to hard water, soak a glass
approximately
5 minutes in undiluted
white vinegar. Rinse and dry. If film is
removed, R is due to hard water (if not
removed, see Soft Water Etching).
To correct:
of
1. Increase
the amount
according
Refer to pages 6-7 on adding
of detergent
to the degree
of water
Use a Rinse Aid
2. Check the water temperature
Using a rinse aid improves drying results and
reduces sporing and filming. See page 7 for
3, Use a rinse aid to improve
instructions
To remove
on using a rinse aid.
Load the Dishwasher
hardiaess
action of the water
get adequate
1. Remove
wash action, carefully ibltow the instructions
for loading the dishwasher (pages 3-6). Make
scouring
sure nothing
extends
above or below the racks
with the movement
of the upper
or lower spray arms.
Select the Proper
Cycle
the sheeting
(see page 7).
fihn from dishwasher
interior,
try
Select Heat Dry
drying select Heat Dry.
of
with a damp cloth and a mild
powder.
2. Start empty dishwasher on Rinse & Hold
cycle. During fill, open door and add 1/2
cup white vinegar to water. Allow
dishwasher to complete cycle. Do not
use detergent. Follow with a regular
detergent
The cycle needed depends on the amount
food soil. See page 8 for cycle descriptions.
For improved
(see page 3).
one of the following:
Properly
To insure that all soiled surfaces
PAGE 10
used
(see page 6).
detergent.
to interfere
surface of
You may first notice this as
wash.
• Soft Water Etching
.
If the cloud), film is not removed
or eroded.
on Rinse & Hold or
rinse portion of the cycle. During fill, open
the door and add 1/2 cup RoVer Rust
Remover to the water. Allow the
after soaking
in vinegar (previous procedure),
then the
condition is etching. This permanent
film
occurs in unusual conditions under which the
surface of the glass is pitted
Start empty dishwasher
dishwasher
to complete
the cycle.
3. Follow with a detergent
It is
wash.
permanent.
The only permanent
In the beginning
special filters which can remove
identified
stages, etching
by a "rainbow"
look
may be
shades
manganese
of blue,
solution is to install
iron mad
from the water.
purple, brown or pink may be seen when the
glass is held at an angle to the light. In
advanced
appears
stages the surface
frosted,
spotted
of the glassware
or cloudy.
Certain types of glassware will etch in any
dishwasher with the combination of soft water
(especially" mechanically softened), an
excessive amount of detergent, heat and
prerinsing.
There
is no relationship
Energy
1. Wash full loads, Running a half-filled
dishwasher uses the same amount of
electricity
machine.
to the cost
of water hardness
to the
good washing
(see page 6).
Load correctly
3_
2. Lower the water temperature
3. Do not manually
loading
prerinse
in dishwasher.
(see page 3).
Prerinsing
prior to
hand rinsing.
for best washing
Use the Light!China
all food soil aggravates
results.
cycle when dishes are
lightly soiled. It uses less hot water and energy
than other eyries.
• Rust
Fan dry dishes (without heat) when you don't
need a rapid drying eyrie, Allow longer drying
times (overnight).
.
Sometimes the dishes or the interior of the
dishwasher may turn a brown, red or black
color if iron or manganese is in the water. To
remove discoloration from dishwasher interior,
dishes and glassware (no metal items):
1. Select a rust removing
RoVer Rust Remover.
results without
Incorrect loading may cause poor washing and
the need to prewash all or part of the load.
dishes before
.
loading to remove
etching.
and hot water as a full), loaded
Do not pre-rinse normally soiled dishes.
Select the correct cycle for the load and use
the recommended
amount of detergent
for
.
To prevent:
degree
Tips
You can help save energy if you:
or quality of the glass.
1. Adjust the amount of detergent
Saving
compound, such as
It is available from
Maytag Parts Distributors
No. 57961.
.
Use your dishwasher during off-peak hours.
Local utilities recommend
this to avoid hea D •
usage of energy at certain
with your utility company
rates exist.
times of day. Check
to see if off-peak
by using Part
PAGE
1
What Can and Cannot
Be
Washed
in Your Dishwasher
Most tableware,
coo_vare
and silverware
manufacturer,
simply test-wash a small item for
several weeks heft)re attempting to wash an
entire set.
can be
safely washed in your Maytag dishwasher. If you
have any doubts about a particular piece of
dishware, check x_4th the manufaetm'er
to see if
it is dishwasher safe. If you cannot reach the
REMEMBER:
It is the user's responsibility to
determine if dishware should be washed in a
dishwasher.
Dishwasher
Dishwasher
Material
Safe?
Aluminum
High water temperature and
Yes, except
anodized alu- detergents may affect finish.
minum and
Cheek cleaning instructions.
some cookware.
Cast Iron
No
Special Information
Material
Safe?
Special Information
Pewter
No
Iligh water temperatures
and detergent may
discolor or pit finish.
Disposable
Plastics
No
Cannot x_4thstandhigh
water temperatures and
detergents.
Yes
Always cheek
mannfacturer's
recommendation
Seasoning will be removed,
and iron will rest.
Plastics
Chlna/
Stoneware
Yes, except
antique or
hand-painted
china.
Always check manufacturer's
recommendation before
(If labeled
"dishwasher
washing. Antique handpainted or over the-glaze
patterns rnav fade. Gold leaf
may discolor. If in doubt,
test-wash a small item fbr
sever'J weeks before
safe")
washing. Plastics vary in
their capacity to _\dthstand
high water temperatures
and detergents.
Stainless
Steel
Yes
Run a Rinse & Hoht Cycle
(select models) if not
washing immediately. Pro
longed contact with foods
containing salt, vinegar,
milk products or fruit juice
could damage finish.
Sterling
Silver or
Yes, except
those with
Run a Rinse & Hold Cycle
(select models) if not
Silverplate
commercial
"darkening".
washing immediately. Prolonged eontact with food
containing salt, acid or
sulfide (eggs, mayonnaise
and seafood) could dam-
washing an entire set.
Crystal
Yes, except
antique or
lightweight
delicate
custal.
Always cheek manut;acturer's
recommendation before
;washing. Some types of
leaded eustal may etch
with repeated washings.
[f in doubt, test-wash a
small item for several
weeks before washing an
entire set.
Glass
GoldPlated
Flatware
Hollow-
Handle
Knives
Yes, except
milkglass.
No
Milkglass will yellow with
repeated dishwasher
washing.
age finish. Commercial
"darkening" may be
removed by detergent.
Will discolor.
_Tin
No
Handles mac be attached
to the blade with adhesives
which may loosen if
dishx_lsher washed.
Wooden
Items
No
May rust.
No
Always check manufac
turer's recommendation
before washing. Wood
Ilia}' warp,
discolor.
PAGE 12
before
crack
or
Maintaining
the Dishwasher
The interior
is normally
Occasionally
check the bottom
self-cleaning.
of the dishwasher
tub and clean out pieces of food which
collect there.
may
To Change
A. Remove three screws holding the metal trim
strip on one side of the door. Take note of
how the trim comes off_
g.
Periodically clean the bottom edge of the
dishwasher door liner. Food and liquids drip
onto this area when the dishwasher is loaded.
If you notice
an odor in your dishwasher,
detergent,
especially
probably' eliminate
a lemon scented
one, will
C.
daily to remove
D.
panels.
Arrange
panels
so the desired
and
color is
Place door panels (notched side up) behind
the metal trim at the bottom of the door. Bow
the panels so they' fit behind
the eontroI
panel at the top.
E.
any food soil that
Slide the panels under the side metal trim
which was not removed. To do this, it will be
necessary' to compress
the colored panels.
may cause an odor.
To remove
remove
facing out.
the smell of the rinse additive may, be strong.
Purchase a fresh package and see if it is better.
Hold feature
to clear the flange
on the trim strip which was not removed
the odor. In some instaames
Last!); if the dishwasher is run only every couple
of days, an odor may develop. Use the Rinse &
Grasping the lower part of the door panels,
bow panels out carefully, at the bottom while
sliding panels far enough
it may
be due to a strong "chemical" or chlorine odor
from the dishwasher detergent, Using a different
Panels:
the backing behind
an odor, try one of the following:
F. Reinstall the metal trim which was removed
1. Place baking soda in both sides of the
detergent dispenser. Select Light/China and
let the water circulate for about 10 minutes.
Stop the dishwasher by unlatching the door
and let stand overnight. Then, restart the
dishwasher by latching the door and let it
complete the cycle.
eadiec To do this, start by inserting the tip
end of the trim strip behind the control
panel. Align the holes and replace the three
SCFe_Vs.
G_
The lower access panel is held by four screws
(two above the panel and two below). With
these removed,
2. Select the Light/China cycle and let the
dishwasher fill with water. Then open the
door and pour one cup of chlorine bleach into
the bottom of the dishwasher. Latch the door
and let the dishwasher
complete
the cycle.
the panel may be removed
make it easy to change panel colors.
H.
With the lower access panel removed,
remove the )fouJ:screws along the bottom of
_ 100"5_&, trim which holds the
par 1e 1a' na_lm
panels. Once the desired
Clean the control
panel and front panel with a
soft damp cloth and liquid spray cleaner.
use any, abrasive
Changing
powders
or cleaning
Do not
panel is fac.ing out,
repIaee the trim, and reinstall
the dishwasher.
the pane1 to
pads.
Use care when changing panels to be certain you
are not injured on sharp edges and that the
Panels
Your Maytag dishwasher
to
panels are not damaged.
comes wSth reversible
panel inserts which are pre-assembled
at the
If yon have any
questions concerning changing
your local Maytag Dealer.
panels, contact
factory: This enables you to select the color you
want before your dishwasher is installed or
choose another color at a later date.
PAGE 13
BEFORE YOU CALL FOR SERVICE
Check
these
Leaves
food
points
hot water is entering
• Use a rinse aid such as Jet-Dry
Refer to
page 3.
• Turn on hot water at kitchen
the dishwasher
Crystal Clear.
sink before
to be certain that
• Use the amount of detergent
not caked. Store detergent
nothing blocking
recommended
detergent
that is
in cool, dry place.
properly
with
the path of the wash arms,
spray nozzle or detergent
• Check for improper Ioading and do not
overload. Dishes should not nest together.
• Plastic items have a porous
required.
• Glasses, cups, etc., with concave bottoms
will hold water.
dispenser.
• When using Quick Wash/Rinse
(select
models), towel drying is required.
Stains
or discolors
• Cheek to make sure glasses are not loaded
• Iron deposits
glassware
cloudy
• Check the water temperature.
Avoid
high or low temperatures.
Refer
to page 3.
• Use a rinse aid such as Jet-Dry" or Cascade
Crystal Clear.
in the water can leave a yellow
or brown film on dishes. You may desire to
have a special filter installed
in the water
supply line, or periodically use RoVer Rust
Remover (see Water Conditions).
Cycle
stays
takes
loading
for more
them
too long - (Heating
Delay
light
on)
• Temp Boost option has been selected
which will extend the cycle to heat water
thermostatically.
Refer to page 9.
• Cheek to see that the water
at least 120°F.
"Clean"
• Do not pre-rinse dishes before
into the dishwasher.
PAGE 14
utensils can leave marks when
or spotted
• Adjust the detergent
amount to your water
hardness as described on page 6. Avoid
overuse or underuse of detergent.
• Refer to Water Conditions
dishes
they rub against other things. Load properly.
over prongs.
* On convertible models make certain the hot
water faucet is turned on.
information.
surface and tend
to hold water. Towel drying may be
• Aluminum
extremely
to water
to
• Check for nesting of dishes that prevents
water from reaching all surfaces.
Leaves
use according
if
cycle for soil level of dish load.
• Be sure dishes are loaded
center
page 3.
• Increase detergent
hardness.
for your water hardness, and be sure it is put
in the dispenser as directed previously:
• Use fresh high phosphate
Refer to
• Select Temp Boost and Sani Rinse options
available.
the first wash cycle.
water conditions it may be necessary
install a mechanical water softener.
or Cascade
• Check the water temperature.
• Select Ternp Boost option if available.
• Check water hardness. For extreme hard
• Select proper
not dry properly
• Be sure the Heat Dry option is selected.
soil on dishes
• Check the water temperature.
running
Does
if your dishwasher...
light remains
• On timer
temperature
on (select
is
models)
models turn dial slightly clockwise
to the Q.
• On touch
control models Clean stays lit until
the door has been open longer than 30
seconds.
DISHWASHER
WARRANTY
Full One Year Warrmi_'
Any part which fails in normal home use during the first );ear after the date of corigina[retail purchase, will he repaired or
replaced free of charge.
Limited Two Year Warranty
Any part which fails ill normal home use during the second year from the date of'original retail purchase, will be repaired or
replaced free of charge for the part itself, with the owner pa)4ng all other costs, including labor.
Limited Five Year Warranty on Jetelean
System and Solid State Controls
An), parts of the Jetclean system including the complete power module assembly-, center spray nozzle, spray arms, top wash
arm hose, motor, AND---on Computer Touch Control Models only any microprocessor and touch pad assembiies which Jail
in normal home use during the second through the fifth year from the date of original retail purchase, will be repaired or
replaced free of charge fhr the part itself, with the o'_er paying all other costs, including labor.
Limited
Five Year Warranty Against Rust
Should any of the parts listed below rest during tire five year period starting from the date of original retail purchase, repair or
replacement will be made free of charge during the first ).ear. After the first and through the fi_th year, repair or replacement
will be made free of charge for the part itself; with the owner pa)4ng all other costs, including labor. Parts covered by, this
warranty' are the exterior cabinet and front panels of convei_ble models; the exterior front panels of built in models, and
NyIon ooated racks (available on select models).
FULL TWENTY Year Warranty
Against
Leaks on Dishwasher
Tub and Door Liner
Should a water leak develop in the tub or door liner in normal home nse during the TWENTY YEAIl period starting from the
date of original retail purchase, repair or replacement of the tub and/or door Iiner will be made FttEE OF CHARGE.
These full warranties and the limited warranties apply when the appliance is located in the United States or Canada.
Appliances located dsewbere aJ_ covered by the limited warranties only, which include parts which fail during the first year.
Canadian Residents
This warranty covers only"those appliances installed in Canada that have been listed with Canadian Standards Association
unless tile appliances are brought into Canada due to transfer of residence from the United States to Canada.
This Warranty gives you specific legal rights, and you may also have other rights which vary from state to state.
TO RECEIVE
WARRANTY SEBVICE
To locate an authorized ser,_'ice compa_y in your area _.,untact the Maytag dealer from whom your appliance was purchased; or
call Maytag Customer Service. Should you not receive satisl_actoD, warranty, service, call or write:
Maytag Customer Service
240 Edwards St. S.E.
Cleveland, TN 37311
US
1-800-688-9900
CANADA
1-800-688-2002
When contacting Maytag Customer Service be sure to provide the model and serial nuru_yer of your appliance, the narne and
address of the dealer from whom you purchased the appliance arid the date of purchase.
"_g0 0 ra ¢-',.
Should you still have a problem, write to: Major Appliance Consumer Action _,
20 North Wacker Drive, Chicago,
Illinois 60606. MACAP is an industry sponsored but independent group of consumer experts who receive and act on
complaints from applianee owners.
NOTE: When _ting about an unsolved selwice problem, please include the following information:
(a) Your name, address and telephone number;
(b) Model mamber and serial nmnber (tbund on tile upper left t_rner of the tub opening) of your appliance;
(c) Name and address of your dealer mad date the applimlce w,'tsbought;
(d) A clear description of the problem you are ha_ing;
(e) grater hardness, detergent brand and amount, water temperature, and cycle used.