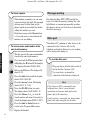
1
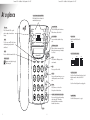
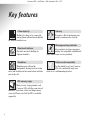
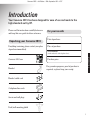
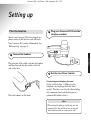
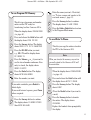
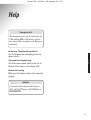
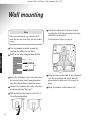
Converse 2015 ~ 4th Edition ~ 10th September ’02 ~ 4517
E
A S IC R E
H
P
RC 15 ATU
U
0
E
P
T E2 YF
U S ERS O P R K .
M
U NV ID C WO
O
Y CO AP O
A R T
R
FO
This product is intended for connection
to analogue public switched telephone
networks and private switchboards in the
United Kingdom.
Converse 2015
Corded Data Telephone
User
Guide
Converse 2015 ~ 4th Edition ~ 10th September ’02 ~ 4517
Please open this page for an ‘At a glance’
guide to your Converse 2015
Converse 2015 ~ 4th Edition ~ 10th September ’02 ~ 4517
At a glance
Converse 2015 ~ 4th Edition ~ 10th September ’02 ~ 4517
One touch memory buttons (M1-M8)
Each button dials a stored name and
number with just one press.
In use phone light
PIC socket
M5
M1
M2
M6
In use data light
M3
Used to access some BT Select Services
and when using your phone with a
switchboard.
M8
M4
Redial
ls
Converse 2015
Redial
R
Pause
AB
DE
ld
Ho
3
4
5
6
PQ
TU
WX
8
9
I
YZ
V
RS
7
Switch between Hi, Med and Lo.
Ringer
Hi Med Lo
Line 1 & Line 2/Data sockets
Line 2
Pause
Lets you insert a dialling pause into a
stored number.
Line 1
Data
Hold
cy
cre
Secrecy
Stops your caller from hearing you, so you
can talk privately to someone else in the
room.
O
MN
L
JK
GH
Ringer volume
Lets you put a caller on hold.
Se
2
Mes
F
C
1
e
m
lu
Vo
ndsfree
Ha
0
Volume
2
Line 1/Line 2 switch
Set to Line 1 if one telephone line is plugged in. (A
single line must be connected to the Line 1
socket)
Set to Line 2 if two telephone lines are plugged in.
Lets you increase or decrease the
loudspeaker or handset volume.
Handsfree and Handsfree indicator light
Lets you use the loudspeaker for making
and receiving calls. The handsfree
indicator light will come on when the
handsfree feature is in use.
Keypad
1
es
sag
Inductive coupler
Improves sound quality for people
with hearing aids.
Flashes to indicate an incoming call. Also
flashes when a new message is waiting to
be collected.
Cal
Press to redial the last number called.
Comes on when the data line is being
used.
Calls/Messages light
Dat
a
Recall
M7
Line
Lets you insert the PIC to copy the
phone’s settings or download new
settings.
Comes on when the phone line is in use.
Flashes when a caller is on hold.
Ring/MW1/MW2
Sets the calls/messages mode, see page 8.
Converse 2015 ~ 4th Edition ~ 10th September ’02 ~ 4517
In this guide
Note
Please note that there is a detailed Index at the back of this guide, see page 25.
At a glance
1
Key features
4
Introduction
Using the Converse 2015 PIC
13
PIC program controls
13
Program mode
13
5
Fast transfer from PIC to phone
16
Unpacking your Converse 2015
5
PIC additional functions
17
For your records
5
Safety information
6
General information
19
Setting up
7
Using your Converse 2015
9
Making and receiving calls
9
Hold
10
Secrecy
10
Handsfree
10
Volume
10
Using the one-touch memory
11
Message waiting
12
Data port
12
Guarantee
19
Switchboard compatibility
20
Help
21
Wall mounting
22
Index
25
Hints and tips boxes
In this user guide, we have included helpful
tips and useful notes. They are shown in a
white box like this.
3
Converse 2015 ~ 4th Edition ~ 10th September ’02 ~ 4517
Key features
2 line capacity
Enables two lines to be connected,
one for phone calls and one exclusively
for Internet and data use.
Secrecy
Prevents a caller from hearing you
speak to someone else close by.
Message waiting indicator
One-touch buttons
Provides one-touch dialling for
8 phone numbers.
Handsfree
Handsfree puts calls on the
loudspeaker, leaving you free to take
notes and for others in the room to hear and take
part in the call.
PIC memory copy
Makes it easy to programme each
Converse 2015 with the same stored
numbers. Saves time, effort and helps ensure
accuracy. Please note that the PIC is available
separately.
4
Lets you know you have messages
waiting (for compatible switchboards
only, consult your service provider).
Desk or wall mountable
Use the plinth to set your Converse
2015 at a comfortable angle on a
desk or as a wall-mounting bracket.
Converse 2015 ~ 4th Edition ~ 10th September ’02 ~ 4517
Introduction
Your Converse 2015 has been designed for ease of use and made to the
high standards set by BT.
Please read the instructions carefully before use
and keep this user guide for future reference.
For your records
Date of purchase:
Unpacking your Converse 2015
If anything is missing, please contact your place
of purchase immediately.
Place of purchase:
Serial number
(on the underside of the telephone base):
M5
M1
M2
M6
M7
▲
Line
M3
Date
M8
M4
INTRODUCTION
▲
Calls
Converse 2015
R
1
2
Mess
Pause
AB
3
S
GH
I
5
TU
6
WX
YZ
RS
V
8
y
rec
ec
MN
O
PQ
7
JK
L
4
ages
ld
Ho
DE
F
Redial
C
Converse 2015 base
9
e
lum
Vo
Purchase price:
e
ndsfre
Ha
0
Handset
For guarantee purposes, proof of purchase is
required, so please keep your receipt.
Handset coiled cord
2 telephone line cords
Screws and wall plugs
Desk/wall mounting plinth
5
Converse 2015 ~ 4th Edition ~ 10th September ’02 ~ 4517
Safety information
General
Do not open the Converse 2015. This could
expose you to high voltages or other risks.
Contact the Helpline for all repairs.
Cleaning
Simply clean your Converse 2015 with a damp
(not wet) cloth, or an antistatic wipe.
Never use household polish as this may
damage the product.
INTRODUCTION
Never use a dry cloth as this may cause
static shock.
Environmental
Do not expose to direct sunlight.
We recommend that you do not place the
product on antique/veneered wood to avoid
damage.
Do not stand your product on carpets or
other surfaces which generate fibres, or place
it in locations preventing free flow of air over
its surfaces.
Do not submerge any part of your product
in water and do not use it in damp or humid
conditions, such as in bathrooms.
Do not expose your product to fire, explosive
or other hazardous conditions.
6
Converse 2015 ~ 4th Edition ~ 10th September ’02 ~ 4517
Setting up
Plan the location
2 Plug your Converse 2015 into the
telephone sockets
Situate your Converse 2015 close enough to a
phone socket so that the line cord will reach.
Your Converse 2015 can be wall-mounted. See
‘Wall-mounting’, on page 22.
1 Connect the handset
SETTING UP
Plug one end of the coiled cord into the handset
and the other end into the socket on the left
side of the base
3 Set the Line1/Line 2 switch
If connecting one telephone line cord:
Place the handset on the hook.
Set the switch to Line 1. (Make sure the
telephone cord is plugged into the Line 1
socket). This line is used for all calls including
data communications and the data port is
automatically linked to Line 1.
Note
When using the data port with only one line
connected, the line will be in use so you will
not be able to make or receive voice calls.
7
Converse 2015 ~ 4th Edition ~ 10th September ’02 ~ 4517
If connecting two telephone line cords:
Set the switch to Line 2. The line cord connected
to Line 1 is used for calls. The line cord
connected to Line 2 for data communications and
the data port is automatically linked to Line 2.
5 Desk mounting
If preferred, you can attach the desk/wall mount
to the base of your phone to raise it up at a
convenient angle.
4 Set the Ring/MW1/MW2 switch
If your switchboard provides compatible
signalling (dc voltage switching) to indicate
message waiting you will need to move the
switch to either MW1 or MW2 to enable the
indication.
SETTING UP
Ring Message Waiting is switched off.
The Calls/Messages light indicates
incoming calls only.
To wall mount, see page 22.
MW1 Message Waiting is switched on.
The Calls/Message light will indicate both
incoming calls and when the switchboard
has taken a voice message for you. For
voice messages the lamp will flash or be
permanently on, depending on the type of
switchboard it is connected to.
MW2 Message waiting is switched on. This
setting provides the same indication as
MW1 but should only be used if MW1
results in a permanently ON light without
any voice messages waiting. This setting
corrects some line conditions.
8
Helpline
If you have any difficulties setting up or using
your Converse 2015, please call the BT Converse
2015 Helpline on 0845 050 1331.
Your Converse 2015 is now ready for use
Converse 2015 ~ 4th Edition ~ 10th September ’02 ~ 4517
Using your Converse 2015
Making and receiving calls
To answer a call
When the phone rings
To make a call
Pick up the handset.
Pick up the handset.
ndsfree
Ha
Or
Or
ndsfree
Ha
Press the Handsfree button.
Press the Handsfree button.
USING YOUR PHONE
Dial the number.
To redial the last number
To dial a number under a one-touch
button (M1-M8)
Pick up the handset.
ndsfree
Ha
Pick up the handset.
Or
ndsfree
Ha
Press the Handsfree button.
Or
Press the Handsfree button.
Press the one touch button (M1-M8)
that holds the number you want. The
display shows the stored name and the
number is dialled.
To end a call
Redial
Press the Redial button. The display
shows LNR then the number being
dialled.
Note
The redial store will only hold a maximum
of 32 digits. If this is exceeded the store will
empty and no numbers are held.
Replace the handset.
ndsfree
Ha
Or
Press the Handsfree button again.
9
Converse 2015 ~ 4th Edition ~ 10th September ’02 ~ 4517
Hold
Handsfree
To place a call on hold
During a conversation:
ld
Ho
Press the Hold button. The display
shows HOLD and the Line light flashes.
Handsfree allows you to talk to your caller
without holding the handset and enables other
people in the room to take part in your
conversation.
To use handsfree
During a call, or to make a call:
The call is now on hold.
ndsfree
Ha
ndsfree
Ha
Press the Handsfree button to speak to
your caller again.
USING YOUR PHONE
Whilst a call is on hold it can be taken
on another telephone on the same line.
When it is taken the Converse 2015 will
release the line.
Secrecy
You can prevent your caller from hearing you
while you talk to someone else in the room.
Press the Handsfree button to switch
handsfree ON.
The handsfree indicator light will
come on.
ndsfree
Ha
To switch handsfree OFF, press the
Handsfree button again.
Volume
To adjust the ringer volume
You can set the ringer volume switch
on the back of the phone to Hi, Med
or Low.
To use the secrecy function
Se
During a conversation:
cy
cre
Press the Secrecy button. The display
shows MUTE.
To adjust the handset and
handsfree volume
Se
Your caller cannot hear you.
10
cy
cre
Press Secrecy to speak to your caller
again.
e
m
lu
Vo
Press the + and – buttons during a call
to adjust handset or speaker volume.
Using the one-touch memory
Se
Converse 2015 ~ 4th Edition ~ 10th September ’02 ~ 4517
cy
cre
To store a name and number in the
one-touch memory
Enter the name you want using the
letters on the keypad.
This lets you store entries in the
one touch memory under the M1-M8
buttons.
For example to enter the name ANNE:
AB
C
2
Press and hold the # button and whilst
still holding the # button lift the handset.
6
The display will show PROGRAM MODE.
6
Release the # button. The display will
show NO PIC.
3
O
Press the M1-M8 button you want to
store the number under. The display
shows PHONE MEMORY: M1.
e
m
lu
Vo
Press the Redial button. The display
shows ENTER NEW NUMBER.
Se
Se
Redial
1
cy
cre
ld
Ho
USING YOUR PHONE
Redial
Press three times to enter E.
Each time you press the button the
letter alternates between capital and
lower case.
Press the Secrecy button. The display
shows PRESS M1 TO M8 TO CHANGE
MEM.
Press the Volume + or – if you want to
see the stored number and name.
If no entry is stored, the display shows
MEMORY IS EMPTY.
Press three times to enter N
DE
F
e
m
lu
Vo
Press three times to enter N
MN
O
cy
cre
Press once to enter A.
MN
Continue to press and release the
Hold button until the display shows
PROG PHONE MEM.
ld
Ho
Press the Secrecy button to confirm.
The display shows M1 NUMBER STORED
then ENTER NEW NAME.
Press 1 to enter other characters e.g.
&, (, ).
If you make a mistake press the Redial
button to delete the last character.
Press Volume + or – to move the
cursor to the place you want.
Press the Secrecy button to confirm.
The display shows M1 NAME STORED.
Press the Hold or Redial button to
return to the Program Mode menu.
Replace the handset.
Enter the number you want.
If you make a mistake, press Redial to
delete digits.
If you need to insert a pause, press Pause
where required.
11
Converse 2015 ~ 4th Edition ~ 10th September ’02 ~ 4517
To store a pause
When dialling a number, you can enter
a pause between the digits. For example
you may need to allow time for the
phone to pick up an outside line before
calling the number you want.
Each time you press the Pause button
a 2.5-second pause is inserted into the
number you are dialling.
To view a name and number in the
one-touch memory
Message waiting
Providing the Ring/MW1/MW2 switch has
been set to indicate message waiting, the calls
light flashes or remains permanently on when
the phone is not in use to let the user know that
they have messages.
Data port
This allows a PC, palmtop or other device to be
connected via the Converse 2015 to the
telephone network for Internet access, sending
and receiving data, faxing etc.
USING YOUR PHONE
This lets you view the name and numbers
stored in the one-touch memory.
Press and hold the # button and whilst
still holding the # button lift the handset.
The display will show PROGRAM MODE.
Release the # button. The display will
show NO PIC.
Se
ld
Ho
cy
cre
Press the Hold button until the display
shows READ PHONE MEM.
Press the Secrecy button. The display
shows SELECT M1 TO M8.
Press the M1-M8 button you want.
The display shows PHONE MEMORY M1.
e
m
lu
Vo
ld
Ho
Press the Volume + or – to view the
stored number and name. If no entry is
stored, the display shows MEMORY IS EMPTY.
Press the Hold or Redial button to
return to the Program Mode menu.
Replace the handset.
12
To use the data port
Plug your device into the data socket at
the back of the Converse 2015.
Use your device as normal for
connection to the Internet, faxing etc.
Note
If the Converse 2015 is connected to two
telephone lines, Line 2 is used for data
connection and you can make and receive
phone calls at the same time.
If only one line is connected, you cannot make
phone calls while using the line for data.
Converse 2015 ~ 4th Edition ~ 10th September ’02 ~ 4517
Using the Converse 2015 PIC
The PIC (Programmable Input Chip) is used to
copy names and numbers stored in the one-touch
memories to other Converse 2015 telephones.
Note
The PIC is available separately from your
Converse 2015 supplier.
When you have a PIC inserted in the socket
you will not be able to make or receive calls.
PIC program controls
Buttons on your Converse 2015 let you control
functions on the PIC.
Button
PIC function
HOLD
Menu
REDIAL
Cancel
#
Used with handset to start program mode
M1-M8
Read memory data/change data
SECRECY
OK
VOL + -
Scroll
KEYPAD
Number and name entry
Program mode lets you use all the
programmable settings of the Converse 2015.
The Program Mode menu is:
• Set PIC password – helps prevent unauthorised
use of the PIC.
• Read phone memory – display entries stored
in the one touch M1-M8 buttons.
• Read PIC memory – display entries stored in
the PIC memory.
• Program phone memory – add/change data
stored in the M1-M8 buttons.
• Program PIC memory – add/change data
stored in the PIC memory.
• Write to phone – copy entire PIC memory
into the phone.
• Write to PIC – copy entries from the phone
into the PIC.
USING YOUR PIC
IMPORTANT
Program mode
Note
When in Program mode you will notice that
the Line indicator lights up. This reminds you
that the line is busy to incoming calls. You may
also notice that the Line indicator dims while
you are in Program mode. This is quite normal
and is because the telephone exchange has not
received any dialled numbers from you.
13
Converse 2015 ~ 4th Edition ~ 10th September ’02 ~ 4517
To access the Program Mode
Insert the PIC into the socket on the
top of the Converse 2015.
IMPORTANT
If you make a mistake entering the 4-digit PIN,
try again.
You can try three times. If you still do not enter
the correct PIN you should replace the handset
and start again.
To view the Read PIC Memory
Press and hold down the # button and
lift the handset. Display shows PROGRAM
MODE.
This lets you view the names and
numbers you have stored in the
one-touch memory using the PIC.
Release the # button.
When the display shows PROGRAM MODE
(see opposite, “To access the Program
Mode”).
USING YOUR PIC
Either the PIC has no data
The display shows ENTER NEW PIN.
ld
Ho
Press the Secrecy button. The display
shows ENTER AGAIN.
Se
Se
Enter the 4-digit PIN you want to set.
cy
cre
cy
cre
Se
Enter the 4-digit PIN again.
cy
cre
Press the Secrecy button to confirm.
The display shows PROGRAM MODE.
Display shows ENTER PIN.
Se
Enter the 4-digit PIN.
Se
ld
Ho
14
cy
cre
e
m
lu
Vo
Press the Secrecy button to confirm.
The display shows PROGRAM MODE.
You can now keep pressing and
releasing the Hold button to move
through the menu options. When the
option you want is displayed, press the
Secrecy button to enter that menu.
Press the Secrecy button. The display
shows SELECT P1 TO P8.
Press the M1-M8 button to display
the entries stored, e.g., M1= P1 and the
display shows PIC MEMORY P1.
Or the PIC contains data
cy
cre
Press and release the Hold button until
the display shows READ PIC MEM.
ld
Ho
Press the Volume + or – to view the
stored number and name. If no entry is
stored, the display shows MEMORY
IS EMPTY.
Press the Hold or Redial button to return
to the Program Mode menu.
Converse 2015 ~ 4th Edition ~ 10th September ’02 ~ 4517
Enter the name you want. (For details,
see “To store a name and number in the
one-touch memory”, page 11).
This lets you store name and number
entries on the PIC ready for
transferring to other Converse 2015s.
Se
To use Program PIC Memory
cy
cre
ld
Ho
When the display shows PROGRAM MODE
(see page 14).
Se
ld
Ho
Press and release the Hold button until
the display shows PROG PIC MEM.
cy
cre
Press the Secrecy button. The display
shows PRESS P1 TO P8 TO CHANGE MEM.
This lets you copy the entries stored in
the PIC to the Converse 2015.
Note
When you transfer the memory, any entries
currently stored in the Converse 2015 will
be overwritten.
Press the Volume + or – if you want to
see the stored number and name. If no
entry is stored, the display shows
MEMORY IS EMPTY.
Press the Redial button. The display
shows ENTER NEW NUMBER.
If you make a mistake, press Redial to
delete digits.
If you need to insert a pause, press Pause
where required.
When the display shows PROGRAM MODE
(see page 14).
ld
Ho
Se
Enter the number you want.
cy
cre
Redial
Se
ld
Ho
cy
cre
Press the Secrecy button to confirm.
The display shows P1 NUMBER STORED
then ENTER NEW NAME.
USING YOUR PIC
Redial
Press the Hold or Redial button to return
to the Program Mode menu.
To use Write To Phone
Press the M1-M8 button you want.
e.g., M1= P1 and the display shows
PIC MEMORY P1.
e
m
lu
Vo
Press the Secrecy button to confirm.
The display shows P1 NAME STORED.
Press and release the Hold button until
the display shows WRITE TO PHONE.
Press the Secrecy button. The display
shows SURE?
(Press the Redial button if you want to
cancel.)
Press the Secrecy button to transfer
the entries. The display shows
UPLOADING.
Replace the handset when prompted by
the display.
15
Converse 2015 ~ 4th Edition ~ 10th September ’02 ~ 4517
To use Write to PIC
This lets you copy the entries from a
Converse 2015 into the PIC.
Note
When you transfer the memory, any entries
currently stored in the PIC will be overwritten.
When the display shows PROGRAM MODE
(see page 14).
Se
USING YOUR PIC
ld
Ho
cy
cre
Se
Redial
cy
cre
Once your PIC contains the entries you want,
it is easy to transfer them to any number of
Converse 2015s.
It takes just 5 seconds to transfer the memory.
If a blank PIC is used by mistake, it will not
affect any current numbers stored on the phone.
To transfer entries
Press and release the Hold button until
the display shows WRITE TO PIC.
Remove the plastic cover from the
one-touch buttons.
Press the Secrecy button. The display
shows SURE?
Insert the pre-programmed PIC into
the PIC socket.
(Press the Redial button if you want to
cancel.)
Lift the handset. The display shows
UPLOADING.
Press the Secrecy button to transfer
the entries. The display shows
DOWNLOADING.
When the transfer is finished, display
shows REPLACE HANDSET AND REMOVE PIC.
Replace the handset when prompted by
the display.
16
Fast transfer from PIC to phone
Replace the handset. Remove the PIC
and replace the plastic cover. Your one
touch entries are stored in the M1-M8
buttons.
Converse 2015 ~ 4th Edition ~ 10th September ’02 ~ 4517
PIC additional functions
To delete the phone’s memory
To delete the PIC memory
M4
Redial
GH
I
4
ndsfree
Ha
Insert the PIC into the PIC socket on
the Converse 2015.
Press and hold the M4, Redial and
4 buttons.
Now press the Handsfree button. The
display shows ERASE PIC MODE.
Release the buttons.
Press the Handsfree button when
prompted by the display and remove
the now blank PIC.
This will delete last number redial, all one
touch entries and any other settings you
have stored such as volume.
M2
Pause
MN
Press and hold the M2, Pause and
6 buttons.
6
ndsfree
Ha
Now press the Handsfree button.
The display shows ERASE ALL MEMORY.
USING YOUR PIC
If a blank PIC is inserted, the display
shows NO/BLANKED PIC.
Note
O
The display shows ERASING PIC.
ndsfree
Ha
You can do this with or without a PIC
inserted into the Converse 2015.
Release the buttons.
ndsfree
Ha
Press the Handsfree button when
prompted by the display and remove
the PIC.
The Converse 2015 has now been reset
to its factory default settings.
17
Converse 2015 ~ 4th Edition ~ 10th September ’02 ~ 4517
To perform the PIC read write test/
To test your PIC
R
Insert the PIC into the PIC socket on
the Converse 2015.
JK
Press and hold the M3, R, and 5 buttons.
M3
L
5
ndsfree
Ha
Now press the Handsfree button.
The display shows PIC RW TEST MODE.
Release the buttons.
USING YOUR PIC
The phone copies entries to the PIC
memory, reads them back and then
erases them from the PIC. If the PIC
is OK, the display shows PASS PIC RW
TEST.
ndsfree
Ha
18
Press the Handsfree button when
prompted by the display and remove
the now blank PIC.
Converse 2015 ~ 4th Edition ~ 10th September ’02 ~ 4517
General information
Guarantee
Your Converse 2015 is guaranteed for a period
of 12 months from the date of purchase.
If you experience difficulty using the product,
prior to returning your product, please read the
‘Help’ section beginning on page 21, or contact
the BT Converse 2015 Helpline for assistance:
0845 050 1331, 9am to 5.30pm, Monday to
Friday.
In the unlikely event of a defect occurring,
please follow the Helpline’s instructions for
replacement or repair.
Outside of the 12 month guarantee period:
• The guarantee shall only apply to defects that
occur within the 12 month guarantee period.
If your product needs repair after the guarantee
period has ended, the repair must meet the
approval requirements for connection to the
telephone network. We recommend that you
contact BT’s approved repair agent TecLogic on
01672 564444 or a local qualified repairer.
• The equipment is returned to BT or its agent
as instructed.
Instruction for returning the product
The conditions of this guarantee are:
• This guarantee does not cover buttons and
any faults or defects caused by accidents,
misuse, fair wear and tear, neglect, storm
damage, tampering with the equipment, or
any attempt at adjustment or repair other
than through approved agents.
• This guarantee does not affect your statutory
rights.
GENERAL INFORMATION
Subject to the terms listed below the guarantee
will provide for the repair of, or at BT’s or its
agent’s discretion, the option to replace the
Converse 2015, or any component thereof, (other
than the batteries), which is identified as faulty
or below standard, or as a result of inferior
workmanship or materials. Products over 28 days
old may be replaced with a refurbished product.
Within the 12 month guarantee period:
If the Helpline/repair line is unable to remedy
your problem they will ask you to return the
product. Where possible, pack the product in its
original packaging. (Please note that we cannot
take responsibility for goods damaged in
transit.) Please obtain and keep proof of posting
from the Post Office.
19
Converse 2015 ~ 4th Edition ~ 10th September ’02 ~ 4517
Technical information
How many phones can you have?
All items of telephone equipment have a
Ringer Equivalence Number (REN), which is
used to calculate the number of items which
may be connected to any one telephone line.
The Converse 2015 has a REN of 1. Any other
instrument provided by BT may be assumed
to have a REN of 1 unless otherwise stated.
A total REN of 4 is allowed.
GENERAL INFORMATION
Switchboard compatibility
Generally this telephone may be connected to
switchboards which support tone and pulse
signalling and timed break recall. In the event
of any difficulties, please consult your
switchboard service provider.
20
Converse 2015 ~ 4th Edition ~ 10th September ’02 ~ 4517
Help
Emergency calls
The emergency services can be contacted in the
UK by dialling 999 or 112 which is valid in
any country that is a member of the European
community.
No dial tone. The phone will not dial out
Are the telephone line cords plugged into the
phone sockets?
HELP
You cannot hear the phone ring
Check the ringer volume switch at the rear of
the base. If necessary set the volume to Hi.
Handset isn’t working
Make sure the handset coiled cord is connected
properly.
Helpline
If you need further help with your Converse
2015, call the BT Converse 2015 Helpline on
0845 050 1331.
21
Converse 2015 ~ 4th Edition ~ 10th September ’02 ~ 4517
Wall mounting
6
Note
Before you wall-mount your Converse 2015
check that you are not drilling into any hidden
wiring
Use the template provided to mark the
positions for drilling the two holes.
2
Drill the two holes using an 8mm drill bit.
WALL MOUNTING
1
Wall plug
Wall
22
Attach the wall mount to the base by first
inserting the hook then pressing in the clips
until they lock into place.
If desk mounted, please see page 8.
Screw
86mm
3
Insert the wall plugs if necessary then insert
the screws leaving about 8mm protruding
from the wall on which to hang the phone.
4
Connect the telephone line cords to the base
as shown in Setting Up, page 7.
5
Pull out and turn the handset catch 180° to
the wall mount position.
7
Hang the holes on the back of the wall mount
over the screwheads and gently slide the
phone down to make sure it is securely in
place.
8
Hang the handset on the handset clip.
Converse 2015 ~ 4th Edition ~ 10th September ’02 ~ 4517
Wall mounting template
Cut out this page and place the template on
the wall.
86mm
The location of the screws is indicated by the
centres of the crossed lines.
23
Converse 2015 ~ 4th Edition ~ 10th September ’02 ~ 4517
24
Converse 2015 ~ 4th Edition ~ 10th September ’02 ~ 4517
Index
Answer a call
9
1
9
9
10
10
9
9
9
10
6
12
8
9
19
7
10
21
8
10
1-2
7
7
9
9
12
9
11
12
12
Pause
PIC
access program mode
delete memory
fast transfer to phone
program controls
program mode
program PIC memory
read PIC memory
write to phone
write to PIC
PIC additional functions
delete PIC memory
delete phone memory
test PIC
Redial
Returning product
Ringer volume
Safety information
Secrecy
Setting up
Switchboard compatibility
Telephone socket
Telephone line cord
Unpacking
Volume
handsfree
handset
ringer
Wall mounting
Wall mounting template
12
14
17
16
13
13
15
14
15
16
17
17
18
9
19
10
6
10
7
20
7
7
5
INDEX
At a glance
Calls
answer
end
handsfree
hold
make
receive
redial
secrecy
Cleaning
Data port
Desk mounting
End a call
Guarantee
Handset – connect
Handsfree
Help
Helpline
Hold
Indicator lights
Location of product
Line 1/Line 2 switch
M1-M8 one touch buttons
Make a call
Message waiting
One-touch memory
dial a number
store a number
store a pause
view a number
10
10
10
22
23
25
Converse 2015 ~ 4th Edition ~ 10th September ’02 ~ 4517
26
Converse 2015 ~ 4th Edition ~ 10th September ’02 ~ 4517
Declaration of Conformity
Application of Council Directive(s):
1999/5/EC
Standard(s) to which Conformity is Declared:
EN60950:1992 INC. AMENDMENTS A1:1993, A2:1993,
A3:1995, A4:1997, A11:1997
EN55022:1998, EN55024:1998
Name of manufacturer:
Kingtronics Industrial Co., Ltd.
Century Centre
44-46 Hung To Road
Kwun Tong
Kowloon
Hong Kong
Type of Equipment: Basic Corded Telephone
Model No. : Converse 2015
I, the undersigned, hereby declare that the equipment
specified above conforms to the above Directive(s) and
Standard(s).
Place : Hong Kong
Date : 27th March 2002
William Tsang
Assistant to the Director
Converse 2015 ~ 4th Edition ~ 10th September ’02 ~ 4517
Offices worldwide
The Telecommunications services described in this publication
are subject to availability and may be modified from time to time.
Services and equipment are provided subject to British
Telecommunications plc’s respective standard conditions of contract.
Nothing in this publication forms any part of any contract.
TouchtoneTM is a registered trade mark of
British Telecommunications plc in the UK.
© British Telecommunications plc 2002.
Registered Office: 81 Newgate Street, London EC1A 7AJ.
Registered in England No. 1800000.
Converse 2015 Issue 1 (9/02) 4
Designed by The Art & Design Partnership Limited.
Printed in China