1
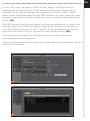
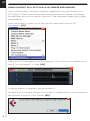
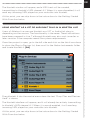
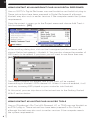
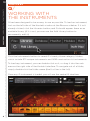
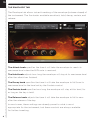
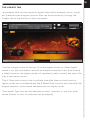
USER MANUAL
Produced by Vir2 Instruments
Vir2 Instruments / is an
international team of sound
designers, musicians, and
programmers, who specialize in
creating the world’s most
advanced virtual instrument
libraries. Vir2 is producing the
instruments that shape the
sound of modern music.
29033 Avenue Sherman, Suite 201
Valencia, CA 91355
Phone: 661.295.0761
Web: www.vir2.com
USER MANUAL
TABLE OF CONTENTS
00
Q/
TABLE OF
CONTENTS
CHAPTER 01
01
INTRODUCTION TO THE LIBRARY
CHAPTER 02: REQUIREMENTS AND INSTALLATION
03
SYSTEM REQUIREMENTS
03
INSTALLING
04
UPDATING
04
AUTHORIZING
CHAPTER 03: USING KONTAKT
05HOW TO ACCESS THE Q
LIBRARY FROM KONTAKT
05
USING KONTAKT IN STANDALONE MODE
07USING KONTAKT AS A VST PLUG-IN IN CUBASE AND NUENDO
08USING KONTAKT AS A VST OR AUDIOUNIT PLUG-IN IN ABLETON
LIVE
09USING KONTAKT AS AN AUDIOUNIT PLUG-IN IN LOGIC PRO,
LOGIC STUDIO, LOGIC EXPRESS, ETC.
10
USING KONTAKT IN GARAGEBAND
11 USING KONTAKT AS AN AUDIOUNIT PLUG-IN IN DIGITAL
PERFORMER
11 USING KONTAKT AS AN RTAS PLUG-IN IN PRO TOOLS
Q
12 USING KONTAKT AS A PLUG-IN IN ANOTHER HOST
CHAPTER 04: WORKING WITH THE INSTRUMENTS
14
THE FX TAB
15
the envelope tab
16
The legato tab
17
the layer control tab
17
keyboard mapping
19loops and construction kits mapping
10morphstruments
CHAPTER 08: TECH SUPPORT, ETC.
17 TECH SUPPORT
17 THE FULL VERSION OF KONTAKT 4
17 LICENSE AGREEMENT
18 CREDITS
00
CHAPTER 01 / INTRODUCTION TO THE LIBRARY
01
CHAPTER 01
Q/
INTRODUCTION
TO THE
LIBRARY
In a world...in a land...coming to studios near you: Vir2
Instruments’ Q, a massive sound design and scoring
instruments library designed for the unique needs of
television, film, game, and media composers and music
producers who want to add a fresh and previously
unheard dimension to their sonic palette.
Q (as in, cue, or, if you prefer, as in the master spy’s gadget man),
contains almost two thousand patches and 16GB of sample material
including cinematically thunderous drums, percussion, winds, vocals,
ethnic instruments, metallic textures, glass, guitar, toy, ambient
atmospheres, synth landscapes, and trailer-ready effects. The library
includes both playable melodic pitched instruments and
multisampled one-shot percussion and effects. A large collection of
epic percussion loops which automatically sync to tempo and are
playable both whole and by the slice, are also included.
The collection is divided up into twenty-three main category folders:
Ambient Chordal Pads, Cymbals, Gongs, Rolls, and Effects, Drums
and Percussion, Granular Orchestra, Guitars, Hong Kong Cinema,
Horns and Winds, Impacts and Low Drums, Loops and Construction
Kits, Metallic and Glass Melodies, Middle Eastern, Morphstruments,
Q
Multilayer Dreamscapes, Multilayer Drones, Mystery, Pedal Steel
02
Ambiences, Pulp Surfer, Sound Effects, Stylistic Phrases, Tempo
Textures, Toys and Character Keyboards, Voices, and Western.
Q’s easy-to-use interface provides one-click effecting of the library,
including the famed EZRoom convolution, delay, chorus, filters,
chorusing, flanging, and more. Other advanced functions include a
special legato mode for melodic instruments, and crossfade controls
for multilayered instruments.
While everything in Q is mapped in Kontakt format ready to play
from a MIDI controller, as a bonus many of Q’s one-shot effects
(such as booms, whooshes, metal scrapes and hits, and special
sound effects) are also available on the disc in open 24-bit WAV
format, allowing instant drag-and-drop into a film mix.
Q is powered by the industry-leading Kontakt 4 engine. It is
compatible with VST, AudioUnit, and RTAS (Pro Tools 7 & 8) plug-in
formats allowing it to work seamlessly within any major sequencer,
in addition to standalone use on both an Intel Mac and PC.
CHAPTER 02 / REQUIREMENTS AND INSTALLATION
03
CHAPTER 02
Q/
REQUIREMENTS
AND
INSTALLATION
SYSTEM REQUIREMENTS
For Mac users, Q requires OS 10.5.x or greater, an Intel Core Duo 1.66GHz or
higher, a DVD drive, and 4GB of RAM.
For Windows users, Q requires Windows XP (SP2, 32-bit), Windows Vista
(32/64 bit), or Windows 7 (32/64 bit), a Pentium or Athlon 1.4GHz or faster,
a DVD drive, and 2GB of RAM.
The library requires approximately 9GB of disk space.
INSTALLING
The installation of Q consists of two separate steps: the installation of the
Kontakt engine, and the installation of the Q library.
Insert the installation disc into your computer, and you will see the installers
for both components. It doesn’t matter which is installed first. Run each of
the installers and they will guide you through the installation process.
The Kontakt installer will install the Kontakt engine, its standalone
application, all of its plug-in versions, and the Service Center authorizer
program. We recommend the Easy Install and that the install locations for
each component are left at their default settings.
The Q library is approximately 9GB in size, and its installer will prompt you
for the location in which you wish to install it. It can be installed on any
available hard drive. For speed reasons, we recommend it be installed on
Q
internal or eSATA drives. Firewire can also be acceptable. External USB
04
drives may give somewhat less optimized performance. We also recommend
7200 or 10,000rpm drives regardless of the interface used.
UPDATING
After installation, please make sure that you are fully updated to the most
recent versions of the three components that make up the Q package: the
library (which contains all the patch information and programming), the
engine (which is powered by Kontakt), and the authorizer (Service Center).
It is possible that any of these components may have a more recent version
than shipped in your physical package, so you should check for updates to
each of these three. You can do this by visiting the vir2.com web site and
checking the Support area.
AUTHORIZING
After you’ve completed installation, Q will be working in demo mode,
meaning it will only work for 15 minutes at a time. To fully authorize it,
launch Service Center (found in the Applications folder on a Mac, or the
Program Files folder on Windows) and follow its instructions. You will be
prompted to enter your e-mail address and password that make up your
Native Instruments account, or will be given an option to create an account
if you don’t already have one. Once inside the Service Center, it will give
you a list of all the Native Instruments and NI-powered products on your
hard drive and give you the option to activate them. You are allowed to
install and use Q on up to two computers simultaneously.
Service Center will guide you through the process for either online (instant)
activation, or offline activation if the computer on which you installed Q
does not have direct access to the internet.
CHAPTER 03 / USING KONTAKT
05
CHAPTER 03
Q/
USING
KONTAKT
HOW TO ACCESS THE Q LIBRARY FROM KONTAKT
Q ships as a Kontakt-powered library, and Q is opened from within Kontakt,
which can be run either as a standalone application, or as a plug-in hosted
by any major sequencer on either Macintosh or Windows platforms. All these
versions are installed by the Easy Install option of the installer.
Users who don’t own a sequencer, or would like to simply boot up and be
able to play Q, can go to their Applications folder (Mac) or Program Files
folder (Windows) to launch Native Instruments > Kontakt.
Users who wish to use Q for sequencing or recording, or wish to play it
multitimbrally, should use it in plug-in mode within a host sequencer. Kontakt
supports the VST, AudioUnit, and RTAS plug-in formats. Any host sequencer
that supports these plug-in formats properly will be able to use Kontakt.
Instructions vary slightly from sequencer to sequencer, but the general
procedure is to instantiate Kontakt as a virtual instrument plug-in, then load
an Q instrument in Kontakt, then route a MIDI track to Kontakt so it can be
triggered and recorded.
The following instructions will help standalone and plug-in users get up and
running quickly with a basic track of Q.
USING KONTAKT IN STANDALONE MODE
The standalone Kontakt application can be found in the Applications >
Kontakt 4 folder for Mac users, or Program Files > Native Instruments >
Kontakt 4 for Windows users.
Q
After launching the Kontakt application for the first time, you will be
presented with a dialog box to set up your audio and MIDI settings. Settings
will vary for each user according to the specific setup, but the important
thing is to route the audio to a valid audio device, and to set the buffer
reasonably low for good latency performance. We recommend 256 samples
06
or less. The lower the latency slider, the less latency (the split second
between the physical playing of the note and the sound coming out of
Kontakt) will be, but the harder the computer will have to work. Typical
useful values range between 128 and 256, however very fast computers may
be able to handle lower values, while very slow computers may need higher
values. [01]
The MIDI page of the Options dialog box must be configured in order to let
Kontakt know which MIDI device(s) to respond to. Kontakt will respond to
up to four MIDI input ports (A, B, C, and D), so we recommend you switch
one MIDI source on to Port A, as shown in the graphic below. [02]
More detailed information on the setup options can be found in the
accompanying Kontakt manual.
Once you have completed Kontakt setup, jump ahead to the Getting Started
with Q section below.
01
02
07
USING KONTAKT AS A VST PLUG-IN IN CUBASE AND NUENDO
Users of Steinberg’s Cubase or Nuendo sequencers can use Kontakt as a
VST plug-in. These instructions have been prepared in Cubase 5, although
Kontakt may also work in earlier versions if the computer meets the system
requirements.
Once the project is open, go to the Devices menu and choose VST
Instruments: [01]
01
When the VST Instruments window appears, click in the first available slot in
which “no instrument” is listed. [02]
02
A popup menu will appear; choose Kontakt 4.
An alert box will appear asking if you want to create a MIDI track assigned to
the Kontakt 4 plug-in. Click Create. [03]
Q
03
08
The Kontakt window will appear, and a MIDI track will be created,
transmitting to Kontakt’s MIDI channel A-1. When it is record-enabled, it will
send any incoming MIDI played on your controller into Kontakt.
At this point, you can skip down in the instructions to the Getting Started
With Q section below.
USING KONTAKT AS A VST OR AUDIOUNIT PLUG-IN IN ABLETON LIVE
Users of Ableton Live can use Kontakt as a VST or AudioUnit plug-in,
depending on the version. The functionality is the same. These instructions
have been prepared in Live 7, although Kontakt may also work in earlier or
later versions if the computer meets the system requirements.
Once the project is open, go to the left side and click on the third icon down
to show the Plug-in Devices list, then scroll to the Native Instruments folder
and locate Kontakt 4: [04]
04
Drag Kontakt 4 into the central area where the text “Drop Files and Devices
Here” is shown.
The Kontakt interface will appear, and it will already be actively transmitting
to Kontakt’s MIDI channel A-1. When it is record-enabled, it will send any
incoming MIDI played on your controller into Kontakt.
At this point, you can skip down in the instructions to the Getting Started
With Q section below.
09
USING KONTAKT AS AN AUDIOUNIT PLUG-IN IN LOGIC PRO, LOGIC
STUDIO, LOGIC EXPRESS, ETC.
Users of Apple’s Logic can use Kontakt as an AudioUnit plug-in. These
instructions have been prepared in Logic Pro 8, although Kontakt may also
work in earlier versions if the computer meets the system requirements.
Once inside your Logic project, go to the Track mini-menu (in the central
area of your screen) and choose Track > New... [01]
01
The New Tracks dialog box will appear. Make sure Software Instrument is
selected, then click Create. [02]
02
03
The new instrument track will be created. On the left side of the screen you
will see the channel strip for that channel, including a fader, pan knob, and
various insert slots. Locate the blank slot just below the letters “I/O” and
above the output pair: [03]
Click there, and a list of available instrument plug-ins will appear. Choose AU
Instruments > Native Instruments > Kontakt 4 > Stereo. [04]
Q
04
10
The Kontakt window will appear, and a MIDI track will be created,
transmitting to Kontakt’s MIDI channel A-1. When it is record-enabled, it will
send any incoming MIDI played on your controller into Kontakt.
At this point, you can skip down in the instructions to the Getting Started
With Q section below.
USING KONTAKT IN GARAGEBAND
Users of Apple’s GarageBand can use Kontakt as an AudioUnit plug-in. These
instructions have been prepared in GarageBand 5 (which shipped with iLife ‘09),
although Kontakt may also work in earlier versions if the computer meets the system
requirements.
Once inside your GarageBand project, go to the Track menu and choose New Track.
[05]
05
06
A window with three choices will appear. Choose Software Instrument, then click
Choose. [06] On the right side of the interface, the Browse tab will be showing. Switch
to the Edit tab. [07] The Sound Generator will default to Piano. Click on Piano, and a
popup menu will appear. Choose Audio Unit Modules > Kontakt 4. [08]
07
Note:
EQ
you
08
Once
to
09
the
GarageBand may default to inserting
effects, such as a compressor and a visual
on on this track. This will color the sound. If
don’t want these effects used, you can
remove them.
Kontakt 4 is selected, the icon will change
the AudioUnit icon (the ball with the sound
waves radiating outward). Double-click on
icon to bring up the Kontakt window. [09]
The
Kontakt window will appear, and a MIDI
track
will be created, transmitting to Kontakt’s
MIDI
channel A-1. When it is record-enabled, it will
send any incoming MIDI played on your controller into Kontakt.
At this point, you can skip down in the instructions to the Getting Started With Q
section below.
11
USING KONTAKT AS AN AUDIOUNIT PLUG-IN IN DIGITAL PERFORMER
Users of MOTU’s Digital Performer can use Kontakt as an AudioUnit plug-in.
These instructions have been prepared in Digital Performer 6, although
Kontakt may also work in earlier versions if the computer meets the system
requirements.
Once the project is open, go to the Project menu and choose Add Track >
Add Instruments... [01]
01
In the resulting dialog box, click on the Unassigned pulldown menu, and
choose Native Instruments > Kontakt 4. You can also change the number of
MIDI tracks to be added, if you know you will want to use more than one.
[02]
02
The Kontakt window will appear, and a MIDI track will be created,
transmitting to Kontakt’s MIDI channel A-1. When it is record-enabled, it will
send any incoming MIDI played on your controller into Kontakt.
At this point, you can skip down in the instructions to the Getting Started
With Q section below.
USING KONTAKT AS AN RTAS PLUG-IN IN PRO TOOLS
Q
Users of Digidesign’s Pro Tools (M-Powered, LE, or TDM) can use Kontakt as
an RTAS plug-in. These instructions have been prepared in Pro Tools 8,
although Kontakt may also work in earlier versions if the computer meets
the system requirements.
12
Once the project is open, go to the Track menu and choose New... [03]
03
In the dialog box that appears, choose the appropriate options, such as the
following: create 1 new stereo Instrument Track in samples. Then click Create.
[04] 04
Go to the Mix window and look at the channel strip for the instrument. At the
very top is an area for Inserts A-E. [05]
Click on the first of the five slots, and navigate through the popup menu to
choose multichannel plug-in > Instrument > Kontakt 4. [06]
06
05
The Kontakt window will appear. At this point, you can skip down in the
instructions to the Getting Started With Q section below.
USING KONTAKT AS A PLUG-IN IN ANOTHER HOST
There are too many host programs to cover here in detail, but any modern
sequencer that properly supports the VST, AudioUnit, or RTAS standards
should be able to use Kontakt properly, and load Q within it. Consult the
manual for your specific host to find out how to instantiate the Kontakt
virtual instrument.
CHAPTER 04 / WORKING WITH THE INSTRUMENTS
13
CHAPTER 04
Q/
WORKING WITH
THE INSTRUMENTS
Q has been designed to be as easy to use as possible. To load an instrument,
look on the left side of the Kontakt window at the Browser sidebar. If it isn’t
already clicked, click the Libraries button, and Q should appear there as an
available library. (If it is not, you can use the Add Library button to
permanently add it.)
Click the Instruments button to reveal Q’s twenty-three category folders,
which include 372 unique instruments and 1459 construction kit instruments.
To load any instrument, you can double-click on it, or drag it into the rack
area on the right side of the Kontakt interface. To navigate out of a folder,
simply double-click the folder name (the first line in the list).
Q
Once any Q instrument is loaded, you will see the central Q interface:
14
THE FX TAB
This main effects (FX) interface offers instant access to ten different
effects that are all available to each instrument in Q. Click the circle above
any effect to activate it, and click on the square box for any effect to display
its parameters.
(Note: clicking on the square box for an effect does not automatically
activate the effect.)
In the upper right-hand corner of the Q instrument is a pulldown menu
which, by default, reads “Pitchbend 2 ST” which means that the pitch bend
wheel will bend the pitch by two semitones (half steps). This can be
adjusted from one to 12 semitones (half steps), and applies automatically in
both directions.
In the lower left corner of the interface are some tabs (which will vary
depending on what features are offered in the specific instrument that is
loaded). The FX tab is always the default, and is available in all Kontakt
instruments. In the following section, we’ll describe the other tabs that may
appear in various instruments.
15
THE ENVELOPE TAB
The Envelope tab allows instant tweaking of the envelope (volume shape) of
the instrument. The five knobs available are attack, hold, decay, sustain, and
release.
The Attack knob specifies the time it will take the envelope to reach its
maximum level when the MIDI note is received.
The Hold knob adjusts how long the envelope will stay at its maximum level
after the attack has finished.
The Decay knob specifies the time it will take the envelope to fall from its
maximum level to the level set by the Sustain control.
The Sustain knob specifies how long the envelope will stay at this level, for
as long as the key is held.
The Release knob adjusts the time it will take the envelope to fall to zero
after the release of the key.
In most cases, these settings are already preset to what is most
appropriate for the instrument, but these controls are always available
Q
for further tweaking.
16
THE LEGATO TAB
Instruments that can be played in legato fashion (for example, horns, winds,
etc.) feature special legato options that can be accessed by clicking the
Legato tab at the bottom of the instrument.
Use the orange switch at the top to switch legato mode on. When legato
mode is on, the instrument can only be played monophonically (one note at
a time), however, the legato mode will seamlessly help connect the notes the
way a real player would.
The X-Time knob controls the crossfade time (the time in which the two
legato notes are crossfaded) and the P-Bend knob controls the time that the
engine smooths a pitch bend between the two legato notes.
The Legato Type can also be adjusted in cents, intervals, or put into glide
mode (similar to how a trombone can be played).
17
THE LAYER CONTROL TAB
The Layer Control tab appears in any Multilayer instrument in Q, for example,
the Multilayer Dreamscapes and the Multilayer Drones. These instruments
were all created with anywhere from two to several different layers, some of
which are pitched and some of which are unpitched. Layer Control allows
you quick access to the volume, pan, tuning, and envelope of each layer
within each instrument. Only as many knobs will appear as there are layers in
the given instrument.
KEYBOARD MAPPING
Almost every patch in Q has a designation after it (Spread, Zone, Menu, etc.)
in brackets which specifies how the instrument has been mapped. Loops
and Construction Kit instruments also have their own standardized mapping,
which we’ll discuss below.
Instruments with a [Spread] designation are spread across the entire
keyboard, but their original pitch is centered on C3 (middle C). In this way,
you can play the original pitch or can pitch the instrument up or down easily.
Q
Instruments with a [Menu] designation mean that there are many different
and unusual sounds in this instrument, and you will find them each mapped
18
starting at C1 (two octaves below middle C) and going up chromatically. This
was used for instruments that feature collections of sounds, for example,
Cartoon Comedy SFX (in the Sound Effects folder) includes dozens of
unique one-shot cartoon sound effects.
Instruments with a [Chrom] designation are mapped chromatically on the
keyboard, and are pitch-centered to their actual sounding pitch. In each
case, we took liberties with the mapping. If an instrument couldn’t physically
play every pitch, we used pitch-stretching to make sure every chromatic key
was covered. We also chose to stretch the lowest sample across the entire
bottom of the keyboard, and the highest sample to the very top of the
keyboard. In some cases, this results in less-than-desirable results at the
extremes of the keyboard, however, we chose to allow this in order to give
maximum flexibility in playing each instrument, without requiring you to
hunt around the keyboard for the true playable range of each instrument,
and allowing you to judge aurally whether an extremely range for the
instrument is musically useful.
Instruments with a [Zone] designation are set up in octave zones. Fans of
our other products World Impact: Global Percussion and Elite Orchestral
Percussion will recognize this mapping system. This system is used for
instruments that may have several articulations available, for example, the
Chinese Battle Drum (inside Hong Kong Cinema). This drum was sampled
two different ways: hits and clicks. Hits are available in the C1-B1 octave, and
clicks are available in the next octave (C2-B2). Within each octave, the
samples are not pitch-stretched, which enables you to play any keys in that
octave to alternate strikes, the way a drummer playing with one stick in each
hand would.
Instruments with [MW] in the title indicate that the mod wheel should be
used in order to control some important aspect (often crossfading) within
the instrument.
Instruments with no designation in brackets, such as Ambient Chordal Pads,
play chromatically across the keyboard in a traditional fashion.
19
LOOPS AND CONSTRUCTION KITS MAPPING
One folder in the Q library contains a large quantity of loops and
construction kit material, presented in three different formats and mapping:
Construction Kits Time Machine, Individual Loops Beat Machine, and
Individual Loops Time Machine. All of the material in these folders was
recorded to a click, and has been designed to tempo-sync with your host
sequencer or Kontakt’s MasterKontrol tempo.
There are 39 different construction kits, which are families of loop material. If
you go inside the Construction Kit Time Machine folder and load up the first
file (Construction Kit 01), you will find 21 loops that make up this
construction kit, and they have been mapped from C1 (two octaves below
middle C) and go up chromatically. Each can be triggered at any time, and
all loops tempo-sync. Construction Kits can be thought of as suites of loops.
Within the 39 construction kits are a total of 710 individual loops. These
individual loops can be found in the two Individual Loops folders, and are
available in either Beat Machine or Time Machine mode.
The Time Machine versions of the individual loops are mapped across the
entire keyboard, with the original loop playing at middle C (C3). In this way,
you can play the original loop at C3, or you can play a pitched-down version
by playing keys below C3, or a pitched-up version by playing keys above C3.
No matter where you play the loop, it will tempo-sync to the host tempo or
to MasterKontrol. Time-stretching and pitch-stretching does introduce sonic
artifacts that get worse the further you get from the original, so extreme
stretching of either may not be musically useful.
The Beat Machine versions of the individual loops employ a different
approach to the loops. Each loop contains slice markers at every hit point
within the loop, and the engine will trigger the slice markers at the scaled
time location as it scales the loop from its original tempo to the host tempo
or MasterKontrol tempo. In every Beat Machine version of the loops, the
original complete loop is found on C1 (two octaves below middle C). Playing
this loop will result in this scaled, sliced version of the loop. The scaling often
works well at tempos at or above the original tempo of the loop, but if the
host tempo or MasterKontrol tempo is below the tempo of the original loop,
Q
there will be gaps between slices. From C#1 up, each individual slice of the
20
loop has been mapped chromatically going up. This enables you to play
each slice of the loop in any order you want, assembling a new loop from the
component parts of the original loop.
MORPHSTRUMENTS
The Morphstruments (MW) folder features a number of hybrid instruments
which are morphs between two other instruments in Q. For example, The
Bamboo Fluted Flugelhorn is a morph between a bamboo flute and a
flugelhorn. Use the mod wheel to adjust the morphing between the two
included instruments.
CHAPTER 05 / TECH SUPPORT, ETC.
21
CHAPTER 05
Q/
TECH
SUPPORT,
ETC.
TECH SUPPORT
Vir2 Instruments stands behind its products and is committed to helping you
get the most out of using them. Please check the Support area of the www.
vir2.com web site if you encounter any difficulties in using the product. You
may also e-mail [email protected].
Before getting in touch with Vir2 Instruments regarding problems with the
product, make sure you are running the latest versions of the library, engine,
and Service Center. We are continuously updating and improving the
product, so it is possible that there are more recent updates available that
were released after the physical manufacturing of your installation disc.
THE FULL VERSION OF KONTAKT 4
Q ships with Kontakt 4 running in library mode, meaning it is fully able to
play back the Q library and access the parameters detailed in this manual.
Registered owners of Q are eligible for a special crossgrade discount to the
full version of Kontakt 4, which enables users to create their own libraries,
import libraries in non-Kontakt formats, and access numerous deep editing
features.
Visit www.nativeinstruments.com for details on the Kontakt crossgrade.
LICENSE AGREEMENT
Q
The samples contained herein are licensed, not sold to you, the individual
end user, by Vir2 Instruments. This non-exclusive, non-transferable license is
granted only to the individual end user who has purchased an unopened,
new, and lawfully made copy of this product from a dealer or distributor
authorized by Vir2 Instruments. All samples remain the property of Vir2
Instruments and are licensed only for use in the creation of a live or recorded
22
performance that includes the licensed samples as part of a derivative
musical work created by the licensed end user. This license expressly forbids
resale, rental, loan, gift, or transfer of these samples in any format or via any
medium, except as part of a derivative musical work. The samples may not
be included, whether unmodified or as part of a derivative work, in any
sample library product. Any unlicensed usage will be prosecuted to the
maximum extent possible under the law.
CREDITS
Produced by: Vir2 Instruments
Recording and Sound Design: Steve Sechi, Ric Viers (sound effects), Har-El
Schaschal (ney, duduk, zurna), Kostas Varotsis (prepared piano and piano
effects), Orestis Zafeiropoulos (cello), Sissy Makropoulou (harp), Flora Tzini
(soprano), Andreas Farmakis (orchestral percussion), Patty Sechi (ethereal
voices), Beledo Gudari (ambient guitar), Tony Sarno (dobro), Danny
Pickering (trumpet), Ernie Albert (guitar), Tom Camp (harmonica, gu-zheng,
pedal steel pads and atmospheres), Chris Marrone (acoustic bass), Jennifer
Corsaro (drums), Gilad Dobrecky (percussion).
Programming: David Das, Chris Peck, and Steven Bolar
Scripting: Benjamin Stelzer
Cover Design: Ricardo Juarez
Layout: Jody Friedericks
Manual: David Das
Special thanks to the beta test team, who provided invaluable input to the
product, and to the Native Instruments team, especially Dan Santucci, Nicki
Marinic, Johannes Mai, Markus Krieg, Wolfgang Schneider, Frank Elting, and
Rembert Gantke.
All specifications subject to change.
4
© 2010 Vir2 Instruments.
Q
All trademarks used are property of their respective owners.
Specifications subject to change.