1
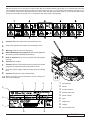
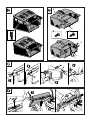
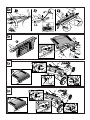
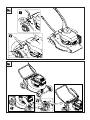
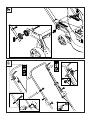
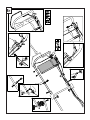
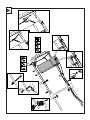
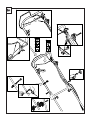
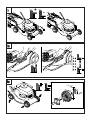
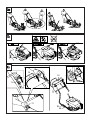
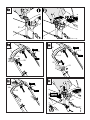
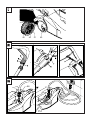
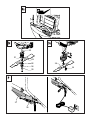
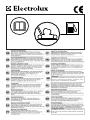
SK
PRÍRUČKA
DÔLEŽITÉ UPOZORNENIE: Než začnete prístroj používať,
pozorne si prečítajte túto príručku. Príručku si ponechajte, neskôr ju môžete znovu potrebovať
SL
KNJIŽICA Z NAVODILI
POMEMBNA NAVODILA: Pozorno preberite navodila.
Dobro jih morate razumeti, preden začnete uporabljati
to orodje.
Questo manuale è stato redatto per essere utilizzato
con diversi modelli di rasaerba con forme ed equipaggiamenti differenti.
This manual has been prepared for use with different
models of lawn mowers having different shapes and
equipment..
Ez a kézikönyv, azért lett létrehozva, hogy segítségre legyen a különböző formájú és felszerelésű
elektromos fűnyíró gépeknél.
Diese Bedienungsanleitung wurde für verschiedene
Rasenmäher geschrieben.
Ce manuel a été préparé pour usage avec modèle
différent de formes de la tondeuse et matériel
Deze handleiding is samengesteld voor het gebruik van verschillende modellen grasmaaimachines van verschillende
afmetingen en met verschillende accessoires
Obsah této příručky lze použít pro různé typy
sekaček na trávu, lišících se tvarem i vybavením.
SK
Denne instruksjonsboken er utformet for å dekke flere gressklippere med forskjellig utseende og utstyrr.
Tätä opasta on muutettu, jotta sitä voidaan käyttää
eri ruohonleikkurimallien kanssa, joiden muodot ja
varusteet eroavat toisistaan.
Książeczka ta została opracowana do wykorzystania dla różnych modeli kosiarek do trawy o
różnych formach i wyposażeniu.
Denna bruksanvisning är skriven för olika modeller
av elektriska gräsklippare med olika utseende och
utrustning.
Данное руководство было подготовлено для
использования с различными моделями газонокосилок,
имеющими разные формы и оборудование.
Denne Brugsanvisning omhandler flere forskellige
modeller af plæneklippere, med forskellige former
og udstyr.
See kasutusjuhend on koostatud kasutamiseks
muruniidukite eri mudelitega, millel võib olla erinev
kuju ja varustus
Este manual ha sido hecho para el utilizo de todas
las tipologias de cortadora de hierba con características distintas
Este manual foi redigido para ser utilizado em
diversos modelos de corta relvas com forma e
equipamento diferentes
Na základe programu neustáleho zlepšovania produktov si výrobný závod vyhradzuje bez predchádzajúceho upozornenia právo na zmenu technických
parametrov uvedených v tejto príručke.
Táto príručka slúži pre rôzne modely kosačiek na trávu
rozličných tvarov a s rôznym príslušenstvom.
Instrukcija buvo paruošta įvairių vejapjovės modelių
vartojimui, kurios tūri įvairias forma ir įrengimus.
SL
Proizvajalec si pridržuje pravico do spremembe karakteristik in podatkov v tem priročniku v katerem koli
trenutku brez predhodnega obvestila.
Ta priročnik je namenjen za uporabo različnih modelov motorne kosilnice različnih oblik in opreme
We wish to thank you for choosing our lawn mower. We are confident that the high quality of our machine will meet with
your satisfaction and appreciation and that your lawn mower will give you long-lasting service.Before starting to use
your machine, make sure to read with care this manual, which has been purposely drawn up to provide you with all the
necessary information for proper use, in compliance with basic safety requirements.
1
Caution! Read the instruction manual before use.
2
Keep other people well away from the danger area!
3
Warning: Risk of hand and feet injury.
4
Risk of breathing in toxic gases! Do not use the appliance
in closed or poorly ventilated environments.
5
Risk of explosion! Do not top up with fuel with engine
running.
6
Caution! Hot surface
7
Caution! Switch off the engine and disconnect the spark
plug before undertaking any maintenance work.
8
Keep the power supply cable well away from the cutting
tool.
9
Caution! Shelter from rain and humidity.
10
Before carrying out any operations on the cutting tool,
disconnect the plug
1
3
5
4
2
6
7
8
1
2
3
4
5
6
7
8
9
Manufacturer
Model
Product number
Maintenance lever
Serial number
Type
Engine info
Weight
Sound power level
9
ENGLISH - 1
SAFETY RULES
Training
a)Anyone who is not aware of the instructions for use
shall not use the lawn mower. Do not allow children
or anyone who has not understood these instructions
to use the lawn mower. A minimum age for using the
machine can be fixed by local regulations.
b)The operator is responsible for the safety of other
people in the working area. Keep children and domestic animals at a safe distance when the lawn
mower is in use.
c)This machine is to be used exclusively for cutting
natural grass. Never use the mower for other purposes
(e.g., for flattening out bumps in the ground, such as
mole-hills or ant- hills).
d)Work only when there is sufficient light.
e)Before mowing, remove all foreign objects from the
lawn which may be thrown by the machine. While
mowing, stay alert for any foreign objects which may
have been missed.
Setting up and operating the lawn mower
a)When mowing, wear strong footwear (boots or heavy
shoes) and long trousers.
b)Before you start mowing, make sure that the blade
and blade fixing screw are securely fastened.
If the blade is damaged, it must be replaced.
c)Turn off the engine, wait until the blade has stopped
and remove the spark plug cap before:
transporting, lifting or moving the machine away from
the working area;
carrying out maintenance or cleaning, or when carrying out any operation on the blade;
adjusting the cutting height;
eaving the machine unattended.
Caution! The blade starts turning as soon as the engine
is started
d)Caution! The fuel is highly inflammable:
Store fuel in containers specifically designed for this
purpose.
Refuel outdoors only and do not smoke while refuelling.
Fill up the fuel tank before starting the engine. Under
no circumstances open the fuel tank cap or add petrol
when the engine is running or when it is still hot.
If the petrol has overflowed, do not under any circumstances start up the engine.Move the mower away
from the area where fuel has bean spilt and avoid
any source of possible ignition until the petrol fumes
have dissipated.
Replace the fuel tank cap and tighten it down firmly.
e)Do not operate the engine in a confined space where
dangerous carbon monoxide fumes can collect..
f) When mowing, never run; you must always walk.
g)Exercise extreme caution when turning or when
pulling the lawn mower towards you.
h)Particular precautions must be taken when mowing
on slopes or downhill stretches:
Use appropriate antislip footwear.
Always be sure of your footing.
Mow across the face of slopes, never up or down.
Take great care when changing direction.
Do not mow on excessively steep slopes.
ENGLISH - 2
i)Never use the lawn mower unless the guards and safety devices (e.g. deflector, grass catcher) are securely
in position and in good condition.
j)Ensure that the grass catcher and deflector are correctly located. failure to do so may result in foreign
objects being ejected by the blade.
k)For reasons of safety, the engine must never exceed
the speed. (r.p.m.) indicated on the label.
l) Take care when starting the engine and be sure to
follow the user instructions. Never place your hands or
feet undern11eath the deck or into the rear discharge
chute while the engine is running.
m) Never lift the rear of the mower while starting the
engine or during normal operation.
n) If the blade happens to hit any obstacle, stop the
engine at once and remove the spark plug cap. Then
get an expert to examine the blade.
Maintenance and storage
a)Make sure that all nuts, bolts, and screws are kept
well tightened to keep the mower in a safe operating
condition.
b)Never leave the machine with fuel in the tank within
an enclosed area where the fuel vapours could reach
naked flames or sparks.
c)Allow the engine to cool before storing in any enclosure.
d)Keep the engine, silencer, battery compartment and
petrol tank free from grass, leaves and excess lubricant, in order to reduce the danger of fire.
e)Frequently check the grass catcher for wear or
deterioration
f)For safety reasons, be sure to replace worn-out or
damaged parts in due time.
g)If the fuel tank has to be drained, it is essential that
this be done outdoor.
h)Assemble the blades following the corresponding
instructions and use only blades bearing the maker’s
name or the trademark of the manufacturer or supplier
and marked with the reference number.
i)To protect hands during disassembly or assembly of
the blades, it is absolutely essential to wear suitable
protective gloves.
VERSION WITH MOTOR TOUCH-N-MOW
j) Unload the Touch-N-Mow system and remove the
safety key before making any cleaning or maintenance
operation.
k)Make sure that the Touch-N-Mow system is unloaded
and the key is in lock position before transporting
the machine.
l) In case of failure of the Touch-N-Mow start up system,
do not try and repair it but request the intervention of
an authorized Assistance Centre.
m) Remove the safety key to avoid any accidental
start up.
n) Always remove the safety key when the machine
is not used.
o) Always store the key in a safe place available to
adults only.
p) Before removing the safety key, make sure that it is
in LOCK & REMOVE position.
DESCRIPTION
1
2
3
4
5
6
7
8
9
10
11
12
13
Upper handles
Lower handles
Fastening knobs for upper handles
Grass catcher
Oil filler cap
Oil drain plug
Deck
Adjusting levers for cutting height
Spark plug
Fuel cap
Engine start-grip
Rear deflector
Throttle lever
14
15
16
17
18
19
20
21
22
23
24
25
Engine stop lever
Reduction gear
Console
Ignition key
Clutch lever
Blade engagement lever
Handle advance speed
Touch-N-Mow key
Touch-N-Mow handle
Fuel-enrichment pump
Auto throttle
Push button
ASSEMBLY OF GRASS CATCHER
ASSEMBLY DEFLECTOR (if not already assembly)
Assembly deflector ,only for the models with this equipment (Fig.CVII)
ASSEMBLY LOWER HANDLES
ASSEMBLY UPPER HANDLES
ASSEMBLY WHEEL (if not already assembly)
ADJUSTMENT OF HANDLES
(for the models where it is included only)
MULCHING CAP INSERTION (for the models where it is included only)
To cut the grass with the mulching system (no grass collection), lift the rear deflector panel and insert the cap
by fixing it with the spring as shown in the figure.
ADJUSTMENT OF CUTTING HEIGHT
SAFETY PRECAUTIONS
Always operate with the deflector or grasscatcher in the correct position.
Always stop the engine before removing the grasscatcher or adjusting the height of cut.
Never place your hands or feet underneath the deck or into the grass discharge chute while
the engine is running.
Before mowing, remove all foreign objects from the lawn
which may be thrown by the machine. While mowing,
stay alert for any foreign objects which may have been
missed.
Never lift the rear of the mower while starting the engine
or during normal operation.
Never place your hands or feet underneath the deck or into
the rear discharge chute while the engine is running.
ENGLISH - 3
OPERATION
ENGINE ADJUSTMENTS (Fig.KI)
Refer to the engine manufacturer’s maintenance manual.
CAUTION:- 0.6l Oil must be added to the
engine before use
STARTING THE ENGINE (Fig.KII)
Once the machine has been set up properly, start the
engine as follows:
a) Engines with choke system:
when the engine is cold, position the accelerator lever
(Fig.KIII - pos.13) on START
b)Operate the engine stop lever (14) to prepare the
engine for start, keep lever pressed against handle
while starting and using the machine (it operates the
engine brake).
c) Engines with primer system:
Press the fuel-enrichment pump (23) located on the
carburettor 3 or 4 times position the accelerator lever
(13) on MAX.
For further information and explanations, read carefully
the user instruction manual of the engine.
d) Start engine.
MANUAL STARTING: (While holding the engine stop
lever (14)).
Hold the engine start-grip (11) and pull the starter rope
gently until you feel the resistance caused by compression. Return the starter rope slowly then pull the handle
firmly towards you to its full extent.
ELECTRICAL STARTING: (While holding the engine
stop lever (14)).
Insert the plug (G) in the socket (H) on the engine.
Turn the ignition key (17) or push the button (25) ,only
for the models with this equipment
CAUTION: The blade starts turning as soon
as the engine is started.
Keep the engine stop lever (14) depressed during machine
operation. When the lever is released, the engine stops.
When leaving the machine for any period of time always
remove the push button (25).
Remove the push button by turning until the key and
keyway line up, and then pull out.
Fit in reverse order
MOWING (Fig.KIII)
To cut the grass, push the lawn mower manually or insert
the automatic advance gear.
Before proceeding with the coupling of the automatic feed,
choose the speed by means of the change lever (20) (for
the models where it is included only).
Change the speed with the clutch disengaged.
There are 3 speed settings.
1°~ 0,6 m/s
2°~ 0,9 m/s
3°~ 1,2m/s
How to insert automatic advance: Lift up the clutch
handle (18) and keep it pressed in position.
CAUTION: Engage the gear only when the
engine is running.
How to disengage advance: Release the clutch handle.
VERSION AUTO THROTTLE (Fig.KIV)
- The Automatic throttle increases the engine speed to
maximum when you engage the self drive.
- This is to ensure you have maximum engine speed
when you mow but a lower speed and quieter when
not mowing. It also provides a soft start to the self drive
mode.
- In order to mow in the push mode but at maximum engine speed - then you can fit the override lever which is
supplied with the product.
You should only fit this lever if you wish to override the
Automatic
throttle system and have maximum engine speed when
in the push mode and the drive mode.
- Fit the lever to the side of the handle as shown so that
when the lever is pushed forward the throttle cable is
tightened and the throttle is at maximum.
VERSION WITH BLADE BRAKE (Fig.KV)
With engine running, pull the handle (14) towards the bar
and keep depressed. Push the blade engagement lever
(19) forward to make the blade rotate.
WARNING! When the handle (14) is released
the blade stops while the motor continues
running.
MOWING
To cut the grass, push the lawn mower manually or insert
the automatic advance gear.
Before proceeding with the coupling of the automatic feed,
choose the speed by means of the change lever (20) (for
the models where it is included only).
Change the speed with the clutch disengaged. There are
3 speed settings.
1°~ 0,6 m/s
2°~ 0,9 m/s
3°~ 1,2m/s
How to insert automatic advance: Lift up the clutch
handle (18) and keep it pressed in position.
CAUTION: Engage the gear only when the
engine is running.
How to disengage advance: Release the clutch handle.
ENGLISH - 4
VERSION WITH MOTOR TOUCH-N-MOW (Fig.KVI ÷
KX)
Motor start up
LOADING THE TOUCH-N-MOW SYSTEM
To load the start up system for the first time and whenever
the device is disabled, proceed as follows:
1 - Insert the Touch-N-Mow key (21) (provided with the
machine)
2 - Rotate the key (21) to “RUN” position
Press the pump (Primer) (23) 3 or 4 times.
1 - Act on the safety lever (14) and keep it pressed against
the handgrip.
2 - Push the Touch-N-Mow start up lever forward (22).
Start up the motor by holding the engine start grip (11)
and pulling it effortlessly until reaching the resistance
caused by compression, release the handle and pull
vigorously. If necessary, repeat the operation if the motor
does not start.
- Keep the safety lever (14) pressed during operation; if
released, the motor will stop.
CUT
To cut the grass, manually push the machine or engage
the automatic drive.
To engage the automatic drive, act on the clutch handle
(18) and keep it pressed against the handgrip.
Caution:engage only with operating motor.
To disengage the automatic drive, release the clutch
handle (18).
After the cut, first release the clutch handle (18) then the
safety lever (14) and a noise caused by the reloading of
the Touch-N-Mow system will be heard.
After switching off, take the Touch-N-Mow key (21) to LOCK
& REMOVE position to lock the system.
Remove the key from upwards.
After cutting the grass, always remove the key and store it in
a safe place available to the authorized operators only.
Start up with Touch-N-Mow
Make sure that no person or object is near the machine and
all protection devices are installed and operating.
Remain behind the handgrip in the position required for
use.
- Insert the key (21) and rotate it to RUN position.
- Act on the safety lever (14) ) and keep it pressed against
the handgrip.
- Push the Touch-N-Mow start lever (22) forward and check
the motor start up.
Caution: if the motor does not start, it means
that the Touch-N-Mow start up system has
been unloaded. If so, proceed to load it as
described in the relevant section.
Important: Should the motor stop due to lack of gasoline,
excessively high grass, or any reason other than the normal stop procedures, the Touch-N-Mow start up system will
not reload and it will be necessary to repeat the previously
described operations in order to load the system.
Unloading the Touch-N-Mow system
Prior to any cleaning or transport operation, the start up
system shall be unloaded.
For this operation, proceed as follows:
- Disconnect the spark plug cable.
- Act on the safety lever (14) ) and keep it pressed against
the handgrip.
- Push the Touch-N-Mow lever (22) forward.
- The motor will run but it will not start as the spark plug
cable is disconnected.
- Turn the Touch-N-Mow key (21) to LOCK & REMOVE
position.
- Remove the key (21).
Caution: Without the Touch-N-Mow key in RUN
position or with the key in LOCK & REMOVE
position, the motor will not start!.
AUTOMATIC ADVANCEMENT (for self-propelled versions only)
Periodically check the automatic advance assembly and make sure to keep it clean. In particular,
the pinion (24) and the gear (25) must be kept
perfectly clean.
To carry out this check, you must remove the wheel (26)
by unscrewing the screw (27).
ADJUSTMENT OF CLUTCH CABLE (for self-propelled versions only)
Important: If, when you press the clutch lever, the automatic advance gear does not engage, the clutch cable
should be adjusted by inserting the spring (P) in one of the subsequent holes in the plate (R) or in the hole
“S” .
ENGLISH - 5
MAINTENANCE
Caution! Switch off the motor and disconnect
the spark plug before undertaking any maintenance work.
For a four stroke engine, check the oil level and change
the oil when dirty. For further explanation, see ENGINE
INSTRUCTION BOOK.
Frequently check the mower and ensure that all grass
deposits are removed from beneath the deck.
Never clean the mower by pouring water over it: this may
seriously damage the electric start system.
Take care, the exhaust muffler may be very hot.
Frequently remove the wheel screws clean whith petroleum and oil before replacing. Ball bearings must be
greased before remounting.
Frequently check the blade for damage.
The lawn mower must be checked by a SERVICE
DEALER.
Cleaning under the bodywork
With machine at a standstill and off.
- Attach fitting (28) on the deck to the water supply tap.
Turn on the tap.
- start up the motor (blade in rotation), allowing it to
warm up for a few minutes.
- at the end of cleaning switch off the motor, turn off the
tap, detach the tube from the deck connection.
VERSION WITH TOUCH-N-MOW
After a garaging period of the machine, it is advisable
to lubricate the clutch point shown in fig. NII to facilitate
the spring loading procedure.
BLADE
To remove the blade (29) unscrew the screw
(30).
Check the conditions of the blade-support (31), the
washer (32), the key (33) and the washer (34) and
replace any parts which are damaged.
When reassembling, make sure that the key (33) is correctly seated in the shaft and that the cutting edges face
in the direction of the engine rotation. The blade screw
(30) must be torqued to 5,34 Kgm (52,4 Nm).
.
VERSION WITH BLADE BRAKE
To remove the blade (35) unscrew the two screws
(36).
Check the condition of the blade and replace any parts
that are damaged, re-assemble using two screws (36)
which must be torqued to 5,34 Kgm (52,4Nm).
KIT ELECTRIC STARTING
Before starting the motor for the first time, you
are advised to keep the battery on charge for 2
to 3 hours.
If the battery proves to be low during starting, charge it
for 24 hours.
When starting, don’t keep trying to start for more than
5 seconds.
BATTERY DISPOSAL
Those batteries marked with a “crossed out
waste disposal bin” and bearing the chemical
symbol Pb (battery containing lead) are not to
be disposed in domestic waste bins.
Pb
BATTERY MAINTENANCE
IMPORTANT
For correct battery maintenance (37), especially in preparation for a long period of inactivity, and for recharging, it
is not necessary to remove it from its casing, but to simply
proceed as follows:
1) Remove contact (38).
2) Store the battery in a fresh and dry place.
3) Recharge the battery before use at room temperature
for 24-36 hours.
4) Restore the contact (38) before use
ENGLISH - 6
Pb
The user is legally obliged to take the used
batteries to special collection points or to return
them to the retailer.
GUARANTEE AND GUARANTEE POLICY
If any part is found to be defective due to faulty manufacture
within the guarantee period, Electrolux Outdoor Products,
through its Authorised Service Repairers will effect the
repair or replacement to the customer free of charge
providing:
a) The fault is reported directly to the Authorised Repairer.
b) Proof of purchase is provided.
c) The fault is not caused by misuse, neglect or faulty
adjustment by the user.
d) The failure has not occurred through fair wear and
tear.
e) The machine has not been serviced or repaired, taken
apart or tampered with by any person not authorised by
Electrolux Outdoor
Products.
f) The machine has not been used for hire.
g) The machine is owned by the original purchaser.
h) The machine has not been used commercially.
This guarantee is additional to, and in no way diminishes
the customers statutory rights.
Failures due to the following are not covered, therefore
it is important that you read the instructions contained in
this Operator’s Manual and understand how to operate
and maintain your machine:
Failures not covered by guarantee
- Replacing worn or damaged blades
- Failures as a result of not reporting an initial fault.
- Failures as a result of sudden impact.
- Failures as a result of not using the product in accordance
with the instructions and recommendations contained in
this Operator’s Manual.
- Machines used for hire are not covered by this guarantee.
- The following items listed are considered as wearing parts and their life is dependent on regular maintenance and
are, therefore not normally subject to a valid warranty
claim: Blades, Electric Mains cable, Belt
- CAUTION!
Electrolux Outdoor Products does not accept liability
under the warranty for defects caused in whole or part,
directly or indirectly by the fitting of replacement parts
or additional parts that are not either manufactured or
approved by Electrolux Outdoor Products, or by the
machine having been modified in any way.
EC DECLARATION OF CONFORMITY
I, the undersigned Ing.Marcolini Gastone, of Electrolux Outdoor Products Italy Spa, Via Como 72, 23868 Valmadrera
(LC). Certify that the Lawnmower:Category .................................................................Petrol Wheeled Rotary
Make .......................................................................Electrolux Outdoor Products
Conforms to the specifications of Directive 2000/14/EEC
I, the undersigned Ing.Marcolini Gastone, of Electrolux Outdoor Products Italy Spa, Via Como 72, 23868 Valmadrera
(LC) Certify that a sample of the above product has been tested using directive 81/1051/EEC as a guide. The maximum
A-weighted sound pressure level recorded at operator position under free field
semi anechoic chamber conditions was :I, the undersigned Ing.Marcolini Gastone, of Electrolux Outdoor Products Italy Spa, Via Como 72, 23868 Valmadrera
(LC) Certify that a sample of the above product has been tested using ISO 5349 as a guide. The maximum weighted
root mean square value of vibration recorded at operator’s hand position was:Type of Cutting Device ............................................Rotary Blade
Identification of Series. ...........................................See Product Rating Label
Conformity Assesment Procedure ..........................ANNEX VI
Notified Body ..........................................................NEMKO Spa
Other Directives:-....................................................98/37/EEC, 89/336/EEC
& applicable standards:- ......................................... EN836:1997, EN ISO14982:1998
Type ...............................................................................A
Version............................................................. .............B
Width of cut ......... .........................................................C
Guaranteed sound power level ......................................D
Measured sound power level .........................................E
Sound pressure livel at the ear ......................................F
Vibration of the handle...................................................G
Technical Manager
Electrolux Outdoor Product Italy spa
Via Como 72 - 23868 Valmadrera (LC)
ENGLISH - 7
14 18
20
1
18
13
1
14
13
BATTER
Y
19
17
13
16
16
3
22
1
14
18
3
11
21
2
4
12
10
23
9
8
8
15
5
6
8
7
X
X
X
Y
Y
Y
X4
MAX
+
-
14
25
14
14
14
17
11
G
H
13
20
18
13
18
14
13
18
19
13
20
21
18
18
13
13
14
14
22
22
11
13
18
14
21
26
25
28
27
24
33
31
29
32
35
34
36
30
BATT
BATT
ERY
37
38
ERY
A
400
A
460
A
500
B
CV-CC-CT
B
CV-CC-SP-SC-SLCL-SK
B
CV-SV-SK-KM-MSST-MT
C
40 cm
C
46 cm
C
46 cm
D
96 dB (A)
D
96 dB (A)
D
96 dB (A)
E
95 dB (A)
E
95 dB (A)
E
95 dB (A)
F
81 dB (A)
F
84 dB (A)
F
84 dB (A)
5 m/s
G
5 m/s2
A
546
A
548
B
CV-CC-CA-CT-SP-SNSC-CL-SL-SK-ST-SXKC-KM-MC-MK-ML-MT
B
CV-SB-SV-SK
2
G
5 m/s
A
540
B
G
CV-SP
2
C
40 cm
C
46 cm
C
47 cm
D
96 dB (A)
D
96 dB (A)
D
100 dB (A)
E
95 dB (A)
E
95 dB (A)
E
98 dB (A)
F
81 dB (A)
F
84 dB (A)
F
84 dB (A)
2
G
5 m/s
G
5 m/s
G
5 m/s2
A
550
A
553
A
650
B
3B-3H-3K-3M-3V-SBSK-SN-ST-SV-HM-KMMK-MS-MT
B
SV-3V-3B-3K-MS-3H3W-HM-ST-MS-MT-ML
B
CE-CF-CV-CC-SPSC-CL-SL
C
53 cm
C
53 cm
C
50,2 cm
D
100 dB (A)
D
100 dB (A)
D
100 dB (A)
E
98 dB (A)
E
98 dB (A)
E
98 dB (A)
F
84 dB (A)
F
84 dB (A)
F
84 dB (A)
5 m/s2
2
2
2
5 m/s
G
5 m/s
G
A
653
A
940
A
946
B
CL-CV-CC-ML-SC-SNSK-SL-SP-ST-SX-KCMC-MS-MT-KM-ML
B
CV-CC-CT-EV-EC
B
CV-CC-CA-CT-SP-SNSC-CL-SL-SK-ST-SXKC-KM-MC-MK-ML-MT
G
C
53 cm
C
40 cm
C
46 cm
D
100 dB (A)
D
96 dB (A)
D
96 dB (A)
E
98 dB (A)
E
95 dB (A)
E
95 dB (A)
F
87 dB (A)
F
81 dB (A)
F
84 dB (A)
G
5 m/s2
G
2
5 m/s
G
2
5 m/s
A
651
A
951
A
530
B
CV-CC-CA-CT-SP-SNSC-CL-SL-SK-ST-SXKC-KM-MC-MK-ML-MT
B
CV-CC-CA-CT-SP-SNSC-CL-SL-SK-ST-SXKC-KM-MC-MK-ML-MT
B
3B-3H-3K-3M-3V-SBSK-SN-ST-SV-HMKM-MK-MS-MT
C
51 cm
C
51 cm
C
51 cm
D
100 dB (A)
D
100 dB (A)
D
100 dB (A)
E
98 dB (A)
E
98 dB (A)
E
98 dB (A)
F
84 dB (A)
F
84 dB (A)
F
84 dB (A)
G
5 m/s2
G
5 m/s2
G
5 m/s2
A
730
A
930
A
640
B
B
3B-3H-3K-3M-3V-SBSK-SN-ST-SV-HM-KMMK-MS-MT
3B-3H-3K-3M-3V-SBSK-SN-ST-SV-HMKM-MK-MS-MT
B
CV-CC-CT
C
51 cm
C
51 cm
C
40 cm
D
100 dB (A)
D
100 dB (A)
D
96 dB (A)
E
98 dB (A)
E
98 dB (A)
E
95 dB (A)
F
84 dB (A)
F
84 dB (A)
F
81 dB (A)
G
5 m/s2
2
G
5 m/s
A
646
B
CV-CC-SP-SC-SLCL-SK
C
46 cm
D
96 dB (A)
E
95 dB (A)
F
81 dB (A)
G
5 m/s2
G
2
5 m/s
www.electrolux.com
BELGIQUE/BELGIË
Electrolux Outdoor Products
Tel: 02 363 0311, Fax: 02 363 0391
NORGE
Electrolux Outdoor Products
Tel: 69 10 47 90
CESKÁ REPUBLIKA
Electrolux, spol. s.r.o., oz Electrolux Outdoor Products,
Na Kr°ec°ku 365, Praha 10 - Horní Me°cholupy
Tel: 02/7487 0164, Info-linka: 0800/110 220
Internet: www.partner-flymo.cz E-mail: [email protected]
NEDERLAND
Electrolux Outdoor Products BV
Tel: 0172-468322, Fax: 0172-468219
DANMARK
Electrolux Outdoor Products, Flymo/Partner A/S,
Lundtoftegårdsvej 93A, DK 2800 Kgs.Lyngby
Tel: 45 877577, www.flymo-partner.dk
DEUTSCHLAND
Electrolux Outdoor Products
Tel: 097 21 7640, Fax:097 21 764202
ÖSTERREICH
HUSQVARNA Zentralwerkstätte, Industriezeile 36,
4020 LINZ,
Tel: 0732 770101-60, Fax: 0732 795922
POLSKA
Electrolux Poland Sp. z.o.o. Husqvarna,
01-612 Warszawa Myslowicka 10/2
Tel:- (22) 8332949
SLOVENIJA
HUSQVARNA-Ges.m.b.H. Nfg. KG, Industriezeile 36,
4020 LINZ,
Tel: 0732 77 01 01-0, Fax: 0732 77 01 01.40
Internet: www.husqvarna.at E-mail: [email protected]
ESTONIA
Electrolux Estonia Ltd (Electrolux Eesti AS)
Tel: (372) 6650010
FRANCE/SPAIN/PORTUGAL
Electrolux Outdoor Products
Tel 01 46 67 8141, Fax 01 43 34 2491
SLOVENSKA
Electrolux Slovakia s.r.o.,
Borova Sihot 211, 033 01 Lipt. Hradok
Tel: 044 522 14 19, Fax: 044 522 14 18,
www.flymo-partner.sk
FINLAND SUOMI
Electrolux Outdoor Products Finland
Tel: + 358 9 39611, Fax: + 358 9 3961 2644
ITALIA
Electrolux Outdoor Products Italia Spa
Via Como 72 - 32868 VALMADRERA (LC)
Numero verde : 8 0 0 - 017829 Fax : 0341-5816701
SCHWEIZ/SUISSE/SUIZZERA
Flymo Schweiz/Suisse/Suizzera
Tel 062 889 93 50 / 889 94 25,
Fax 062 889 93 60 / 889 94 35
SVERIGE
Electrolux Outdoor Products, Sverige
Tel: 036 – 14 67 00, Fax: 036 – 14 60 70
IRELAND
Electrolux outdoor products
Tel: 01 4565222, Fax: 01 4568551
UNITED KINGDOM
Electrolux Outdoor Products United Kingdom
Tel: 01325 300303, Fax: 01325 310339
MAGYARORSZÁG
Electrolux Lehel Kft
Tel: 00 36 1 251 41 47
ELECTROLUX OUTDOOR PRODUCTS ITALY S.P.A.
Headquarters:
Factory:
Via Como 72 - 32868 - VALMADRERA (LC) - ITALY- Tel. +39 0341 203111 - Fax +39 0341 581671
Web site: www.electrolux.com/mcculloch
Via Unione 2\4 - 20015 - PARABIAGO ( MI ) - ITALY - Tel. +39 0331 498011 - Fax +39 0331 558538
Our policy of continuous improvement means that the specification of products may be altered from time to time without prior notice.
Electrolux Outdoor Products manufacture products for a number of well know brands under various registered patents,
designs and trademarks in several countries Electrolux Outdoor Products Italy
The Electrolux Group.The world's No.1 choice.
The Electrolux Group is the world's largest producer of powered appliances for kitchen, cleaning and outdoor use. More
than 55 million Electrolux Group products (such as refrigerators, cookers, washing machines, vacuum cleaners, chain
saws and lawn mowers) are sold each year to a value of approx. USD 14 billion in more than 150 countries around
the world.
COD. 99991703 - 531213397
ED.11/2004
Q.TY 10000
PRINTED IN ITALY