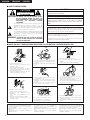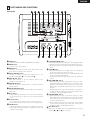
1
PORTABLE IC RECORDER
DN-F20R
INPUT
SELECTOR
MIC
LOW CUT
MIC
LIMITER
MIC LINE
OFF ON
OFF ON
MIC
ATTENUATOR
-20dB
-R
0
ENTER
STOP
REW
FWD
REC LEVEL
KEY HOLD
REC
PLAY/PAUSE
L / MONO - MIC
MODE
TIME
IN - LINE - OUT
OPERATING INSTRUCTIONS
MODE D’EMPLOI
INSTRUCCIONES DE OPERACIÓN
PORTABLE IC RECORDER DN-F20R
FOR ENGLISH READERS
PAGE
2
~ PAGE
33
POUR LES LECTEURS FRANCAIS
PAGE
2, 34 ~ PAGE
63
PARA LECTORES DE ESPAÑOL
PAGINA 2, 64 ~ PAGINA 93
“SERIAL NO.
PLEASE RECORD UNIT SERIAL NUMBER ATTACHED TO THE REAR OF THE
CABINET FOR FUTURE REFERENCE”
ENGLISH
FRANÇAIS
ESPAÑOL
2 SAFETY PRECAUTIONS
CAUTION
CAUTION
TO PREVENT ELECTRIC SHOCK, MATCH WIDE BLADE OF PLUG
TO WIDE SLOT, FULLY INSERT.
RISK OF ELECTRIC SHOCK
DO NOT OPEN
CAUTION:
TO REDUCE THE RISK OF ELECTRIC SHOCK,
DO NOT REMOVE COVER (OR BACK). NO
USER-SERVICEABLE PARTS INSIDE. REFER
SERVICING
TO
QUALIFIED
SERVICE
PERSONNEL.
The lightning flash with arrowhead symbol, within an
equilateral triangle, is intended to alert the user to the
presence of uninsulated “dangerous voltage” within the
product’s enclosure that may be of sufficient magnitude to
constitute a risk of electric shock to persons.
The exclamation point within an equilateral triangle is intended
to alert the user to the presence of important operating and
maintenance (servicing) instructions in the literature
accompanying the appliance.
WARNING: TO REDUCE THE RISK OF FIRE OR ELECTRIC
SHOCK, DO NOT EXPOSE THIS APPLIANCE
TO RAIN OR MOISTURE.
ATTENTION
POUR ÉVITER LES CHOCS ÉLECTRIQUES, INTERODUIRE LA
LAME LA PLUS LARGE DE LA FICHE DANS LA BORNE
CORRESPONDANTE DE LA PRISE ET POUSSER JUSQU’ AU
FOND.
This device complies with Part 15 of the FCC Rules. Operation is subject to
the following two conditions: (1) This device may not cause harmful
interference, and (2) this device must accept any interference received,
including interference that may cause undesired operation.
This Class A digital apparatus meets all requirements of the Canadian
Interference-Causing Equipment Regulations.
Cet appareil numérique de la classe A respecte toutes les exigences du
Règlement sur le matériel brouilleur du Canada.
2 NOTE ON USE / OBSERVATIONS RELATIVES A L’UTILISATION / NOTAS SOBRE EL USO
• Avoid high temperatures.
Allow for sufficient heat dispersion when
installed on a rack.
• Eviter des températures élevées.
Tenir compte d’une dispersion de chaleur
suffisante lors de l’installation sur une étagère.
• Evite altas temperaturas.
Permite la suficiente dispersión del calor
cuando está instalado en la consola.
• Keep the set free from moisture, water, and dust.
• Protéger l’appareil contre l’humidité, l’eau et la
poussière.
• Mantenga el equipo libre de humedad, agua y
polvo.
• Unplug the power cord when not using the set
for long periods of time.
• Débrancher le cordon d’alimentation lorsque
l’appareil n’est pas utilisé pendant de longues
périodes.
• Desconecte el cordón de energía cuando no
utilice el equipo por mucho tiempo.
• Handle the power cord carefully.
Hold the plug when unplugging the cord.
• Manipuler le cordon d’alimentation avec
précaution.
Tenir la prise lors du débranchement du
cordon.
• Maneje el cordón de energía con cuidado.
Sostenga el enchufe cuando desconecte el
cordón de energía.
• DECLARATION OF CONFORMITY
We declare under our sole responsibility that this product,
to which this declaration relates, is in conformity with the
following standards:
EN60950, EN55013, EN55020, EN61000-3-2 and
EN61000-3-3.
Following the provisions of 73/23/EEC, 89/336/EEC and
93/68/EEC Directive.
2
• Do not let foreign objects in the set.
• Ne pas laisser des objets étrangers dans
l’appareil.
• No deje objetos extraños dentro del equipo.
• Do not let insecticides, benzene, and thinner
come in contact with the set.
• Ne pas mettre en contact des insecticides, du
benzène et un diluant avec l’appareil.
• No permita el contacto de insecticidas, gasolina y
diluyentes con el equipo.
• Do not obstruct the ventilation holes.
• Ne pas obstruer les trous d’aération.
• No obstruya los orificios de ventilación.
• Never disassemble or modify the set in any way.
• Ne jamais démonter ou modifier l’appareil d’une
manière ou d’une autre.
• Nunca desarme o modifique el equipo de ninguna
manera.
• DECLARATION DE CONFORMITE
• DECLARACIÓN DE CONFORMIDAD
* (For sets with ventilation holes)
Nous déclarons sous notre seule responsabilité que
l’appareil, auquel se réfère cette déclaration, est
conforme aux standards suivants:
EN60950, EN55013, EN55020, EN61000-3-2 et EN610003-3.
D’après les dispositions de la Directive 73/23/EEC,
89/336/EEC et 93/68/EEC.
Declaramos bajo nuestra exclusiva responsabilidad que
este producto al que hace referencia esta declaración,
está conforme con los siguientes estándares:
EN60950, EN55013, EN55020, EN61000-3-2 y EN610003-3.
Siguiendo las provisiones de las Directivas 73/23/EEC,
89/336/EEC y 93/68/EEC.
SAFETY INSTRUCTIONS
12.
Power-Cord Protection – Power-supply cords should be
routed so that they are not likely to be walked on or
pinched by items placed upon or against them, paying
particular attention to cords at plugs, convenience
receptacles, and the point where they exit from the
appliance.
Heed Warnings – All warnings on the appliance and in the
operating instructions should be adhered to.
14.
Cleaning – The appliance should be cleaned only as
recommended by the manufacturer.
4.
Follow Instructions – All operating and use instructions
should be followed.
15.
Power Lines – An outdoor antenna should be located away
from power lines.
5.
Water and Moisture – The appliance should not be used
near water – for example, near a bathtub, washbowl,
kitchen sink, laundry tub, in a wet basement, or near a
swimming pool, and the like.
16.
6.
Carts and Stands – The appliance should be used only with
a cart or stand that is recommended by the manufacturer.
6A.
An appliance and cart
combination should be
moved with care.
Quick stops, excessive
force, and uneven
surfaces may cause
the appliance and cart
combination to overturn.
Outdoor Antenna Grounding – If an outside antenna is
connected to the receiver, be sure the antenna system is
grounded so as to provide some protection against voltage
surges and built-up static charges. Article 810 of the
National Electrical Code, ANSI/NFPA 70, provides
information with regard to proper grounding of the mast
and supporting structure, grounding of the lead-in wire to
an antenna-discharge unit, size of grounding conductors,
location of antenna-discharge unit, connection to grounding
electrodes, and requirements for the grounding electrode.
See Figure A.
17.
Nonuse Periods – The power cord of the appliance should
be unplugged from the outlet when left unused for a long
period of time.
1.
Read Instructions – All the safety and operating
instructions should be read before the appliance is
operated.
2.
Retain Instructions – The safety and operating instructions
should be retained for future reference.
3.
7.
Wall or Ceiling Mounting – The appliance should be
mounted to a wall or ceiling only as recommended by the
manufacturer.
18.
Object and Liquid Entry – Care should be taken so that
objects do not fall and liquids are not spilled into the
enclosure through openings.
8.
Ventilation – The appliance should be situated so that its
location or position does not interfere with its proper
ventilation. For example, the appliance should not be
situated on a bed, sofa, rug, or similar surface that may
block the ventilation openings; or, placed in a built-in
installation, such as a bookcase or cabinet that may impede
the flow of air through the ventilation openings.
19.
9.
Heat – The appliance should be situated away from heat
sources such as radiators, heat registers, stoves, or other
appliances (including amplifiers) that produce heat.
Damage Requiring Service – The appliance should be
serviced by qualified service personnel when:
A. The power-supply cord or the plug has been damaged;
or
B. Objects have fallen, or liquid has been spilled into the
appliance; or
C. The appliance has been exposed to rain; or
D. The appliance does not appear to operate normally or
exhibits a marked change in performance; or
E. The appliance has been dropped, or the enclosure
damaged.
10.
Power Sources – The appliance should be connected to a
power supply only of the type described in the operating
instructions or as marked on the appliance.
20.
11.
Grounding or Polarization – Precautions should be taken so
that the grounding or polarization means of an appliance is
not defeated.
Servicing – The user should not attempt to service the
appliance beyond that described in the operating
instructions. All other servicing should be referred to
qualified service personnel.
FIGURE A
EXAMPLE OF ANTENNA GROUNDING
AS PER NATIONAL
ELECTRICAL CODE
ANTENNA
LEAD IN
WIRE
GROUND
CLAMP
ANTENNA
DISCHARGE UNIT
(NEC SECTION 810-20)
ELECTRIC
SERVICE
EQUIPMENT
GROUNDING CONDUCTORS
(NEC SECTION 810-21)
GROUND CLAMPS
POWER SERVICE GROUNDING
ELECTRODE SYSTEM
(NEC ART 250, PART H)
NEC - NATIONAL ELECTRICAL CODE
3
ENGLISH
TABLE OF CONTENTS
z
x
c
v
b
n
m
Features.......................................................................................4
Power supply...........................................................................5, 6
IC memory cards.....................................................................7~9
Preset mode ........................................................................10, 11
Setting the internal clock ...........................................................12
Part Names and Functions ..................................................13~15
Playback...............................................................................16, 17
,
.
⁄0
⁄1
⁄2
⁄3
Recording ............................................................................18~23
Editing and erasing files ......................................................24~26
Other operations..................................................................27, 28
Troubleshooting ...................................................................29~31
Parallel remote jack ...................................................................32
Specifications.............................................................................33
2 ACCESSORIES
Check that the following parts are included in addition to the main unit:
q Operating instructions ..............................................................1
w Warranty ( for North America model only ) ..............................1
e Soft cover .................................................................................1
(North America and Canada models)
r Strap .........................................................................................1
t AC adaptor (AA-24)...................................................................1
y AC cord.....................................................................................1
(Europe and Asia models)
(U.K. model)
1 FEATURES
1. The DN-F20R uses IC memory cards as the recording medium,
achieving a highly reliable design with no moving mechanisms.
2. The set uses the MPEG format, an international standard for high
compression and high sound quality.
(*1) Using an ATA adaptor for insertion into PCMCIA slots.
3. The DN-F20R is also compatible with linear PCM recording (WAVE
file recording).
7. The audio quality (recording bit rate) can be selected according to
the application so that cards can be used efficiently.
4. The set is equipped with XLR microphone input terminals.
8. The DN-F20R uses LR6 (AA size) alkaline batteries that can easily
be found when traveling.
5. Despite being equipped with XLR terminals, the DN-F20R is a
small A5 size, so it is easy to carry around.
4
6. IC memory cards containing recorded sources are recorded in
DOS (16 bit FAT) file format, so they can be edited on PC systems
(*1).
ENGLISH
2 POWER SUPPLY
2 The DN-F20R can be powered using commercially available batteries or the included AC adaptor.
About batteries
[1] Battery type
[2] Inserting the batteries
Use LR6 (AA size) alkaline batteries in the DN-F20R.
Do not use manganese batteries, as they may generate heat.
1
Battery usage time
• The set will operate approximately 4 hours on new batteries
with one memory card and in the normal recording mode.
• When the battery power gets low, the battery mark
appears on the display window.
Once the battery mark appears, the set can used for about 10
more minutes. Replace the batteries with new ones soon.
Open the lid of the battery compartment.
• Slide the lever on the set’s bottom panel in the direction of
arrow q, then remove the battery compartment lid in the
direction of arrow w.
q
w
The usage times are rough guides, and may be longer or
shorter depending on the temperature and the type of battery.
Be sure to turn off the set’s power and unplug the AC adaptor
before replacing the batteries.
If the set detects that the battery power is low within several
minutes after the power is turned on, the power may turn off
immediately.
Cautions on batteries
• Use LR6 (AA size) alkaline batteries in the DN-F20R.
• Be sure to insert the batteries in the proper direction, following
the < and > marks indicated in the battery compartment.
• To avoid damage or leakage of fluid:
• Do not use new batteries together with used batteries or use
different types of batteries together.
• Do not short-circuit, take apart, heat or dispose of batteries in
flames.
• Remove the batteries when you do not plan to use the set for
long periods of time.
• Remove spent batteries from the set immediately.
• Should the batteries leak, carefully wipe off the fluid from inside
the battery compartment, then insert new batteries.
• If a battery’s alkaline fluid should leak and get in your eyes or on
your skin or clothes, this could cause blindness or injury. If this
should happen, rinse thoroughly with clean water and consult a
physician immediately.
2
Insert the batteries.
• Insert the LR6 (AA size) alkaline batteries (6 batteries) in
the directions indicated by the marks in the battery
compartment.
3
Close the lid.
• Slide the lever in the direction of arrow q, then set the
battery compartment lid back in its original position.
q
5
ENGLISH
AC adaptor
Connecting the AC adaptor
1
Cautions on using the AC adaptor
Turn the set’s power switch off.
POWER
OFF ON
Check that the display is off.
2
Plug the AC cord’s FEMALE PLUG into the AC input side of
the AC adaptor.
Example: North America model
3
Plug the AC adaptor’s DC plug into the set’s DC jack.
DC IN
PARALLEL
REMOTE
PHONES
MONITOR
VOL.
MIN
4
POWER
OFF ON
MAX
Plug the AC cord into a power outlet.
Example: North America model
AUTO POWER OFF function is not available when the set is
operated with the AC adaptor.
6
• Only use the included AC adaptor.
• Be sure to turn the set’s power switch off when connecting or
disconnecting the AC adaptor.
• The set or the IC memory card could be damaged if the set’s
power is turned on when the AC adaptor is connected or
disconnected.
ENGLISH
3 IC MEMORY CARDS
Cards to be used (recording media)
2 The DN-F20R uses IC memory cards as the recording medium. Denon IC memory cards are sold separately.
2 In addition to Denon IC memory cards, we also recommend the following SanDisk Compact Flash™ (*1) cards:
SanDisk
Model
SDCFB-32
SDCFB-40
SDCFB-48
SDCFB-64
SDCFB-80
Note
Capacity
132MB
140MB
148MB
164MB
180MB
(*1) Compact Flash™ is a registered trademark of SanDisk.
The above table is valid as of February, 2000. Some cards
may no longer be produced or sold.
• The DN-F20R accesses (reads and writes) large amounts of
audio data on the IC memory card in real time.
In order to process this data, the IC memory card itself must
offer sufficiently high access speed.
If cards other than Denon IC memory cards or the
recommended Compact Flash cards are used, it may happen
that the IC memory card’s access speed is too slow, in which
case recordings may randomly stop or normal recording may
not be possible. Also, the set may not be able to properly
identify cards other than the recommended Compact Flash
cards.
Recording time
The recordable time on the DN-F20R depends on the card capacity and recording bit rate.
A formula for roughly calculating the recording time and examples are provided below.
2 Calculating the recording time (approximate)
Card capacity (MB) x 1024 (kByte) x 8 (bit) = Card capacity (kbit)
Card capacity (kbit) ÷ Recording bit rate (kbps) ÷ Number of channels = Recording time (sec)
Recording time (sec) ÷ 60 = Recording time (min)
Example: With a 32 MB card
Recording mode
LINEAR PCM
MPEG1*1
MPEG2*2
Recording bit rate
768 kbps, STEREO (=2ch)
768 kbps, MONO (=1ch)
128 kbps, STEREO (=2ch)
128 kbps, MONO (=1ch)
64 kbps, STEREO (=2ch)
64 kbps, MONO (=1ch)
Approx. recording time
2.8 min
5.6 min
17 min
34 min
34 min
68 min
Formula
32 x 1024
32 x 1024
32 x 1024
32 x 1024
32 x 1024
32 x 1024
x
x
x
x
x
x
8
8
8
8
8
8
÷
÷
÷
÷
÷
÷
768 ÷ 2 ÷ 60 = 2.8
768 ÷ 1 ÷ 60 = 5.6
128 ÷ 2 ÷ 60 = 17
128 ÷ 1 ÷ 60 = 34
64 ÷ 2 ÷ 60 = 34
64 ÷ 1 ÷ 60 = 68
*1 ISO/IEC 11172-3 MPEG1 Layer2 16bit Fs = 48kHz
*2 ISO/IEC 13813-3 MPEG2 Layer2 16bit Fs = 24kHz
The recording time may decrease if small files of about 10 kB or less in size are created.
Formatting
2 Format type
The DN-F20R is only compatible with the 16-bit FAT format. Attempting to use cards formatted in the 12-bit FAT format will result in card
errors. If this happens, format the card on the DN-F20R (note that when this is done any data on the card is deleted). The set automatically
formats cards in the 16-bit FAT format. Also note that when 12-bit FAT cards are formatted in 16-bit FAT format on the DN-F20R, some PC
applications may no longer be able to recognize them.
2 Cluster size
The cluster size is the smallest unit of data when writing on IC memory cards.
The cluster size may change when cards are formatted on PCs or any devices other than the DN-F20R.
To ensure proper recording, the set carefully checks not only the card’s own access speed but also the cluster size. Changing the cluster size
may result in card errors, even when using a recommended card. If this happens, format the card on the DN-F20R.
2 Double recording (1 & 2 REC card mode)
Even higher speed is required for double recording, so be sure to use recommended IC memory cards of the same maker, the same model
(capacity) and the same cluster size for double recording.
As long as the cards’ manufacturer and cluster size are the same, recording may be possible even if the models (capacities) are different.
If recording is not possible, either the recording will stop or an error message will be displayed when recording starts.
7
ENGLISH
Directories and file organization
2 When the set’s power is turned on or a card is inserted, the set checks the card. If the standard directories listed below are not in the IC
memory card’s root directory at this time, they are created automatically.
2 The default directory is “MPGLANG1”. Use the “•” and “ª” buttons to select the directory. When recording, the files are automatically
given names consisting of the last digit of the directory name and a number from 001 to 999.
Standard directory names
MPGLANG0
MPGLANG1
MPGLANG2
MPGLANG3
MPGLANG4
MPGLANG5
MPGLANG6
MPGLANG7
MPGLANG8
MPGLANG9
This unit’s display
DIR0
DIR1
DIR2
DIR3
DIR4
DIR5
DIR6
DIR7
DIR8
DIR9
Automatically given audio file names
0001.mpg (or 0001.wav) ~ 0999.mpg (or
1001.mpg (or 1001.wav) ~ 1999.mpg (or
2001.mpg (or 2001.wav) ~ 2999.mpg (or
3001.mpg (or 3001.wav) ~ 3999.mpg (or
4001.mpg (or 4001.wav) ~ 4999.mpg (or
5001.mpg (or 5001.wav) ~ 5999.mpg (or
6001.mpg (or 6001.wav) ~ 6999.mpg (or
7001.mpg (or 7001.wav) ~ 7999.mpg (or
8001.mpg (or 8001.wav) ~ 8999.mpg (or
9001.mpg (or 9001.wav) ~ 9999.mpg (or
0999.wav)
1999.wav)
2999.wav)
3999.wav)
4999.wav)
5999.wav)
6999.wav)
7999.wav)
8999.wav)
9999.wav)
If there are over 999 files or a file named “x999.mpg” (or “x999.wav”) in a directory, it is no longer possible to record in that directory.
Audio files in directories other than the ones listed above are not recognized by the set.
Audio file names are given the extension “mpg” for MPEG files, “wav” for linear PCM files.
The automatically given audio file names can be changed. (See page 24.)
A maximum of 255 directories and files can be created in the root directory. An error results if the above directories cannot be created in
the root directory.
8
ENGLISH
Loading memory cards
1
Removing memory cards
Open the card slot cover.
• Press on the upper left corner of the cover to unlock and
open it.
1
Open the card slot cover.
• Press on the upper left corner of the cover to unlock and
open it.
1 2
-60
-40
-30
-20
-12
-6
TOTAL
S
-60
-40
-30
-20
BLE IC
DER
RECOR
BLE IC
PORTA
Be sure to insert the cards in the proper direction.
-2
0 OVER
TOTAL
ST
R
DN-F20R
Insert the memory card.
• The upper card slot is slot 1, the lower card slot is slot 2.
-6
PUSH
R
PORTA
-12
SLOT1:
IN
CARD
PUSH
2
1 2
0 OVER
-2
2
DER DN
RECOR
-F20R
Lift the eject lever.
• Lift the eject lever on the left side of the card slot to be
removed.
1 2
1 2
-60
-40
-30
-20
-12
-6
-2
0 OVER
-60
TOTAL
-40
CARD
S
-30
-20
-12
-6
-2
0 OVER
TOTAL
ST
SLOT1:
IN
R
R
3
3
Lower the eject lever by pushing it to the leftr.
Press the eject lever.
• When pressed, the card is pushed out. Grasp the card and
remove it.
1 2
1 2
-60
-40
CARD
-30
-20
-12
-6
-2
0 OVER
IN
-60
TOTAL
-40
-30
-20
-12
-6
-2
0 OVER
TOTAL
S
S
SLOT1:
R
R
4
Close the card slot cover.
• The cover locks when it is pushed in.
Cautions on loading and ejecting cards
1 2
-60
-40
CARD
-30
IN
-20
-12
-6
-2
0 OVER
TOTAL
SLOT1:
S
R
Cautions on handling IC memory cards
• Do not disassemble or modify cards.
• Do not touch the terminals with your fingers or with metal
objects.
• Do not bend, drop or subject to shock.
• Avoid heat and moisture.
• Do not use misshapen cards. Doing so may damage the card
slot.
• Never remove a card from a slot while the slot’s access mark
“
” is lit on the display window. Removing the card while
the mark is lit may damage the set or the card.
• Do not load or eject cards while “HELLO” is displayed on the
display window after the power is turned on.
• It is not possible to close the card slot cover when the eject
lever is raised. Trying to force it will result in damage. Be sure
to lower the eject lever by pushing it to the left before closing
the card slot cover.
• Be sure to load cards securely so that they do not fall out due
to vibrations, etc.
• If possible, only load or eject cards when the power is off.
• If you must eject a card while the power on, check that the slot
is not in use before doing so.
• Even after turning the power off, wait until the display turns
completely off before loading or ejecting cards.
9
ENGLISH
4 PRESET MODE
2 Before using the set, preset the various options according to the inteded usage.
The preset settings are stored in the memory even when the power is turned off.
Preset items
1. REC FORM: Recording mode (compression/decompression and stereo/mono) settings
LINEAR 48kHz STEREO / LINEAR 48kHz MONO / *MPEG 48kHz (Hi) STEREO / MPEG 48kHz (Hi) MONO / MPEG 24kHz (Lo) STEREO /
MPEG 24kHz (Lo) MONO
2. REC BIT RATE: Bit rate setting for file recording
24kHz = 16k / 24k / 32k / 40k / 48k / *64k
48kHz = 64k / *128k
3. FILE SORT: File sorting order (file name/date recorded, ascending or descending) setting
*FILE NAME <UP> / FILE NAME <DOWN> / FILE DATE <UP> / FILE DATE <DOWN>
4. DATE/TIME ADJ: Internal clock date and time setting
1999/01/01 ~ *2000/01/01 ~ 2098/12/31
5. REC CARD MODE: Card recording method (relay recording or double recording) setting
*1→2 or 2→1 REC / 1&2 REC
6. PLAY MODE: Play mode setting
*CONTINUOUS PLAY / SINGLE PLAY
7. AUTO POWER OFF: Auto power off time setting (Valid only in battery operation.)
OFF / 1min / *5min / 10min
8. BACK LIGHT TIMER: Back light time setting
CONTINUOUS / 5sec / *10sec
9. MODE LOCK: Mode setting lock or unlock
LOCK / *UNLOCK
(*) Default setting
Preset operations
2 The preset options can only be set in the stop mode.
Use the following buttons for preset operations:
INPUT
SELECTOR
MIC
LOW CUT
MIC
LIMITER
MIC LINE
OFF ON
OFF ON
MIC
ATTENUATOR
-20dB
ENTER
PLAY/PAUSE
STOP
REW
FWD
REC LEVEL
KEY HOLD
REC
PORTABLE IC RECORDER DN-F20R
L / MONO - MIC
MODE
TIME
ENTER button
• Press this button while a preset item is displayed to set the preset
value selection mode.
• Press this button while in the preset value selection mode to set the
item to the selected value and turn off the preset mode.
-R
0
IN - LINE - OUT
MODE button
• The preset mode is set when this button is pressed in the stop mode.
• When pressed in the preset mode, preset mode is canceled.
• and ª buttons
• Press these buttons while a preset item is displayed to move to the
previous or next item.
• Press these buttons while in the preset value selection mode to
select the preset value.
REW (8/6) and FWD (7/9) buttons
• Use these buttons when setting the bit rate and internal clock.
10
ENGLISH
2 Set the preset items according to your usage purpose using the button operational flow chart described below.
Press the MODE button to cancel the preset mode.
STOP mode
LINEAR 48kHz STEREO
MODE
•
ENTER
ª
LINEAR 48kHz MONO
REC FORM
•
24kHz=16kbps
REW
•
FWD
•
FWD
REW
•
FWD
REW
ENTER
•
ª
MPEG 24kHz MONO
FWD
ENTER
24kHz=48kbps
REW
FWD
48kHz=64kbps
ª
24kHz=56kbps
•
ª
MPEG 24kHz STEREO
24kHz=40kbps
REC BIT RATE
ª
MPEG 48kHz MONO
24kHz=32kbps
ª
ª
MPEG 48kHz STEREO
24kHz=24kbps
REW
ENTER
REW
ª
REW
FWD
48kHz=128kbps
•
24kHz=64kbps
FILE NAME <UP>
ENTER
ENTER
FWD
FILE SORT
•
ENTER
ª
FILE NAME <DOWN>
•
ª
•
(See page 12.)
DATE/TIME ADJ
•
ª
FILE DATE <UP>
•
ENTER
REC CARD MODE
1/2 or 2/1
•
ª
FILE DATE <DOWN>
ª
ENTER
ª
1&2
•
ª
ENTER
PLAY MODE
SINGLE PLAY
•
ENTER
ª
CONTINUOUS PLAY
•
ª
FILE NAME EDIT * 1
•
ª
FILE ERASE * 1
•
(See page 24.)
(See page 25.)
ª
DIR ERASE *
1
(See page 26.)
OFF
•
•
ª
ENTER
AUTO POWER OFF
ª
1min
•
ENTER
ª
5min
•
ª
CARD FORMAT
•
•
*1
ª
10min
(See page 26.)
CONTINUOUS
ª
ENTER
•
ª
•
•
ª
MAKE INDEX FILE *
•
ENTER
5sec
BACK LIGHT TIMER
ª
10sec
1
(See page 28.)
ª
MODE LOCK * 2
LOCK
ENTER
•
ENTER
ª
UNLOCK
*1
*2
Some selections may not be possible depending on whether cards are loaded, whether files are present, and other conditions.
The “MODE LOCK” setting is provided so that modes cannot be changed accidentally. When “LOCK” is set for “MODE LOCK”, it is
not possible to set other modes by pressing the MODE button unless “MODE LOCK” is set back to “UNLOCK”.
11
ENGLISH
5 SETTING THE INTERNAL CLOCK
2 The DN-F20R is equipped with a internal clock function for managing the dates and times at which files are recorded. Be sure to set the clock
before using the set for the first time.
2 The DN-F20R is equipped with a battery for backing up the internal clock. If the date and time display flashes every time the power is turned
on, the internal battery is worn down. Have it replaced by your store authorized DENON servicing agent.
Setting the internal clock
MIC
LOW CUT
MIC
LIMITER
MIC LINE
OFF ON
OFF ON
0
-20dB
ENTER
KEY HOLD
REC
Select the data setting mode.
• Press the ª button 3 times to display “MODE:DATE/TIME
ADJ”.
PLAY/PAUSE
L / MONO - MIC
MODE
TIME
2
MIC
ATTENUATOR
-R
1
INPUT
SELECTOR
IN - LINE - OUT
3, 13
MODE
STOP
REW
FWD
REC LEVEL
1
2, 5, 7, 9, 11
In the stop mode, press the MODE button.
• The preset mode is set.
PORTABLE IC RECORDER DN-F20R
4, 6, 8, 10, 12
3
Press the ENTER button.
• The year display (4 digits) flashes, and the setting change
mode is set.
9
Press the ª button.
• The hour display (2 digits) starts flashing.
Flashes
Flashes
ENTER
4
Set the year.
• Press the FWD button to move one year forward. (*1)
• Press the REW button to move one year backward. (*1)
REW
10
Set the hours.
• Press the FWD button to move one hour forward. (*1)
• Press the REW button to move one hour backward. (*1)
REW
FWD
The hour can be set between 0
and 23.
FWD
The year can be set between 1999
and 2098.
5
Press the ª button.
• The month display (2 digits) starts flashing.
11
Press the ª button.
• The minute display (2 digits) starts flashing.
Flashes
Flashes
6
Set the month.
• Press the FWD button to move one month forward. (*1)
• Press the REW button to move one month backward. (*1)
REW
12
Set the minutes.
• Press the FWD button to move one minute forward. (*1)
• Press the REW button to move one minute backward. (*1)
REW
The month can be set between 1
and 12.
7
Press the ª button.
• The day display (2 digits) starts flashing.
FWD
The minute can be set between 0
and 59.
FWD
13
Press the ENTER button.
• The set date and hour are entered and the stop mode is
set.
Flashes
ENTER
8
Set the day.
• Press the FWD button to move one day forward. (*1)
• Press the REW button to move one day backward. (*1)
REW
FWD
The day can be set between 1 and
31 (or 28, 29 or 30, depending on
the year and month).
12
When the ENTER button is
pressed, the seconds are reset to
00.
(*1) The value changes continuously when the button is held down.
ENGLISH
6 PART NAMES AND FUNCTIONS
Front panel
q TIME button
Use this to switch the TOTAL time/REMAIN time display.
w ENTER button
Use this to enter mode settings.
e MODE button
Use this to set the preset mode. When pressed while in the
preset mode, the preset mode is canceled.
r INPUT SELECTOR switch
Use this to set the recording input signal source to the
microphone input (MIC) @6 or line input (LINE) @7.
t MIC LOW CUT switch
When this is turned on, the low frequency portion of the
microphone input signal is cut.
y MIC LIMITER switch
When this is turned on, distortion due to excessive microphone
input is reduced.
u MIC ATTENUATOR switch
Use this to set the microphone gain according to the microphone
being used.
i • (up) button
• In the stop mode, press this to move to the previous directory.
• In the preset mode, use this to move to the previous preset
item.
o ª (down) button
• In the stop mode, press this to move to the next directory.
• In the preset mode, use this to move to the next preset item.
!0 REC (4) button
• When pressed in the stop mode, the record pause mode is set.
• When pressed during recording or record pause mode, the file
number is incremented.
!1 PLAY/PAUSE (1/3) button
• When pressed in the stop or play pause mode, playback starts.
• When pressed in the play mode, the play pause mode is set.
• When pressed in the record pause mode, the recording mode
is set.
!2 STOP (2) button
• When pressed, play or record (play pause or record pause)
mode is canceled and the stop mode is set.
• When pressed in the stop mode, the current date and time and
the file sorting order are displayed.
• When pressed in the file name change mode, the character is
erased.
!3 REW (8/6) button
• When pressed in the play or play pause mode, the card is
played (paused) from the beginning of the current file or the
beginning of the previous file according to the sorting order.
When held in, the manual search mode is set in the reverse
direction.
• When pressed in the stop mode, the position moves back to
the previous file according to the sorting order. When held in,
the position moves back 10 files at a time.
!4 FWD (7/9) button
• When pressed in the play or play pause mode, the card is
played (paused) from the beginning of the next file according
to the sorting order. When held in, the manual search mode is
set in the forward direction.
• When pressed in the stop mode, the position moves forward
to the next file according to the sorting order. When held in,
the position moves forward 10 files at a time.
!5 KEY HOLD switch
When set to the HOLD side, the operating buttons are locked.
Switches r to u, and !9 are not locked.
13
ENGLISH
Front side
Left side
Right side
!6 Card slot cover
Press the upper left corner of the cover (marked “PUSH”) to
open it.
@6 MIC input connector
These are XLR type connectors for microphone signal input.
Pin layout: 1 – Ground (G)
2 – Hot (H)
3 – Cold (C)
!7 LCD display
!8 CARD button
Use this to select the current card.
Use less than 600Ω/ohms impedance microphone.
!9 LIGHT button
@7
@0 DC IN terminal
@8 LINE OUT terminals
Use this to turn the LCD’s back light on (or off).
This is the DC input terminal for using the included AC adaptor.
Only use the included AC adaptor. Using other
adaptors may result in fire or electric shock.
LINE IN terminals
These are input terminals for connecting line signals.
These are output terminals for connecting line signals.
Turn the power switch “OFF” state before
connecting or disconnecting the each terminal.
@1 PARALLEL REMOTE input terminal
Use this input terminal to connect external control signals.
@2 PHONES output terminal
When headphones are plugged in, the set’s monitor speaker
turns off.
@3 MONITOR VOL. control
Use this to adjust the volume of the monitor speaker and
headphones.
@4 POWER ON/OFF switch
Use this switch to turn on the set’s power.
@5 REC LEVEL control
Use this to adjust the recording level.
The outer control is for the left channel, the inner control for the
right channel.
14
Cautions on using the POWER OFF/ON switch
• “HELLO” appears on the display window after the power is
turned on. The set is being initialized while this is displayed.
Doing not load or eject cards or perform any operations at this
time.
• When the set’s power is turned off, final processing is
performed on the card. Do not eject cards, disconnect the AC
adaptor or remove the batteries at this time. If the final
processing is not performed, the data will not be properly
written on the card and the card may be damaged.
• Even when the power switch is OFF, a very small current will
flow inside the unit.
When the unit will not be in use for a long period, be sure to
remove the batteries and disconnect the AC cord from the
outlet.
ENGLISH
Display
@9
#0
-60
-40
-30
-20
-12
#1 #2 #3 #4 #5
-6
-2
0 OVER
1 CARD IN ERROR SLOT1: 4 REC 1 3
2 CARD IN ERROR SLOT2: 4 REC 1 3
1 2
1&2
2 1
TOTAL
REMAIN
#6
@9 Card slot indicators
“
” lights when the card slot is being accessed.
Never remove cards while the “
” mark is lit.
When a card is loaded, “CARD IN” lights.
“CARD ERROR” lights if there is an error with the loaded card.
“SLOT1” or “SLOT2” lights to indicate the current slot (the slot
for which operations are currently being performed).
“4 REC 1” lights when the current slot is set to the recording
mode, “4 REC 3” lights when it is set to the record pause
mode, “1” lights when it is in the play mode, and “3” lights
when it is in the play pause mode.
#0 Level meter display
This indicates the recording input or playback output level. The
peak level is held.
24K
44.1K
48K
LINEAR
MONO
STEREO
SINGLE
CONT.
PROG.
REPEAT
#7 #8
#4 Battery mark
The battery mark
lights when the battery power gets low.
#5 LINEAR indicator
This lights when in the linear PCM (non-compression) mode.
#6 Character display
Directory names, file names, the card status, time information,
messages, etc., are displayed here.
#7 SINGLE and CONT. indicators
SINGLE : Single file play mode
CONT.
: Continuous play mode
#8 MONO and STEREO indicators
MONO : Monaural recording (play) mode
STEREO : Stereo recording (play) mode
#1 TOTAL/REMAIN indicators
“TOTAL” lights when the total (elapsed) time is displayed.
“REMAIN” lights when the remaining time is displayed.
#2 Recording mode indicators
1a2 : Continuous recording from slot 1 to 2
1&2 : Double recording to slots 1 and 2
2a1 : Continuous recording from slot 2 to 1
#3 24K/48K indicators
These indicate the current recording or playback sampling
frequency.
In the stop mode, they indicate the preset sampling frequency.
In the linear PCM mode, “48K” is lit.
Current
• With this set, the slot, directory and file for which the various
operations are currently being performed are referred to as the
current slot, current directory and current file.
15
ENGLISH
7 PLAYBACK
MIC
ATTENUATOR
0
-20dB
PHONES
ENTER
STOP
REW
TIME
FWD
4
PLAY/PAUSE
3
Insert a card in a card slot.
• Be sure to insert the card in the proper direction. (See page
9.)
1
-20dB
ENTER
KEY HOLD
STOP
REW
FWD
During playback, press the STOP button.
• Playback stops.
The stop mode is set automatically
once file playback has ended (in the
continuous play mode, once all the
files have been played).
Turn on the power.
• Set the POWER switch on the left side to “ON” to turn on
the set’s power.
If the power was turned off with
the auto power off function, first
set the POWER switch to the
“OFF” side, then set it back to
“ON”.
• The card is checked automatically and the current file is
displayed.
Directory name/file name
Adjusting the volume of the headphones
or monitor speaker
Bit rate
DC IN
PHONES
MIC
LOW CUT
MIC
LIMITER
MIC LINE
OFF ON
OFF ON
MIC
ATTENUATOR
0
-20dB
MODE
MAX
MONITOR
VOL.
MIN
TIME
ENTER
KEY HOLD
REC
POWER
OFF ON
3
1
Select the file to be played.
• If you wish to play a file other than the one that is currently
displayed, select the directory containing the file, then
select the file.
INPUT
SELECTOR
PLAY/PAUSE
L / MONO - MIC
Current date and time
-R
PARALLEL
REMOTE
Total file time
IN - LINE - OUT
POWER
OFF ON
0
1
3
STOP
2
MIC
ATTENUATOR
PORTABLE IC RECORDER DN-F20R
PORTABLE IC RECORDER DN-F20R
1
OFF ON
STOP
REW
FWD
REC LEVEL
POWER
OFF ON
PLAY/PAUSE
MIC
LIMITER
OFF ON
REC
KEY HOLD
REC LEVEL
MAX
MONITOR
VOL.
MIN
TIME
REC
MIC
LOW CUT
MIC LINE
MODE
L / MONO - MIC
MODE
INPUT
SELECTOR
-R
OFF ON
L / MONO - MIC
MIC
LIMITER
OFF ON
-R
PARALLEL
REMOTE
MIC
LOW CUT
MIC LINE
REC LEVEL
DC IN
2
INPUT
SELECTOR
IN - LINE - OUT
Stopping playback
IN - LINE - OUT
Starting playback
PORTABLE IC RECORDER DN-F20R
• Press the • button to move to the
previous directory.
• Press the ª button to move to the
next directory.
REW
4
FWD
• Press the FWD button to move to
the next file.
• Press the REW button to move to
the previous file.
Press the PLAY/PAUSE button.
• Playback starts.
1
Turn the MONITOR VOL. control on the left side to adjust the
volume.
• Turning the control in the clockwise direction increases the
volume and turning it in the counterclockwise direction
decreases the volume.
MONITOR
VOL.
MIN
MAX
PLAY/PAUSE
The monitor speaker is turned off when headphones are plugged
into the PHONES jack.
When using headphones, be careful not to turn the
volume up too high. Listening over headphones for
extended periods of time at high volumes can have
adverse effects on your hearing.
16
ENGLISH
Stopping playback temporarily
During playback, press the PLAY/PAUSE button.
• Playback is paused.
INPUT
SELECTOR
MIC
LOW CUT
MIC
LIMITER
MIC LINE
OFF ON
OFF ON
IN - LINE - OUT
1
[Pause]
MIC
ATTENUATOR
PLAY/PAUSE
-20dB
-R
0
L / MONO - MIC
MODE
ENTER
TIME
PLAY/PAUSE
STOP
REW
REC LEVEL
KEY HOLD
REC
FWD
PORTABLE IC RECORDER DN-F20R
To resume playback from the position at which it was paused,
press the PLAY/PAUSE button again.
1
If the time set for the auto power off function is reached while in
the pause mode, the pause mode is canceled and the power turns
off.
Searching for a specific position within a file
[Manual search]
2 Use this function to skip forward (or backward) through a file to find the desired position.
This function comes in handy for finding the desired position within long files.
[1] Forward search
MIC
ATTENUATOR
-20dB
-R
0
ENTER
PLAY/PAUSE
STOP
REW
MIC
LIMITER
OFF ON
OFF ON
FWD
0
-20dB
KEY HOLD
PLAY/PAUSE
STOP
REW
FWD
PORTABLE IC RECORDER DN-F20R
PORTABLE IC RECORDER DN-F20R
1
1
1
MIC
ATTENUATOR
ENTER
TIME
REC
KEY HOLD
REC LEVEL
TIME
REC
MIC
LOW CUT
MIC LINE
MODE
L / MONO - MIC
MODE
INPUT
SELECTOR
IN - LINE - OUT
OFF ON
-R
MIC
LIMITER
OFF ON
L / MONO - MIC
MIC
LOW CUT
MIC LINE
REC LEVEL
INPUT
SELECTOR
IN - LINE - OUT
[2] Reverse search
During playback, press and hold in the FWD (7/9)
button.
• Normal playback resumes from the
FWD
point at which the button is
released.
1
During playback, press and hold in the REW (8/6)
button.
• Normal playback resumes from the
REW
point at which the button is
released.
Press and hold in the REW
(8/6) button.
Press and hold in the FWD (7/9) button.
File 4
File 2
File 3
File 5
File 6
File 4
Playback Skip Skip Skip Skip Skip Skip
Skip Skip Skip Skip Skip Skip
In the single mode, searching stops automatically when
the end of the current file is reached.
In the continuous mode, searching stops automatically
when the end of the last searchable file is reached.
In the single mode, normal playback begins when the
button is released at the beginning of the current file.
In the continuous mode, normal playback begins when the
button is released at the beginning of the first searchable
file.
To search forward without listening to the sound, press and
hold in the FWD (7/9) button while in the pause mode.
Manual searching in the pause mode is faster than manual
searching in the play mode. The pause mode is set at the position
at which the button is released.
In the single mode, the pause mode is set when the end of the
current file is reached.
In the continuous mode, the pause mode is set when the end of
the last searchable file is reached.
To search backward without listening to the sound, press and
hold in the REW (8/6) button while in the pause mode.
Manual searching in the pause mode is faster than manual
searching in the play mode. The pause mode is set at the position
at which the button is released.
In the single mode, the pause mode is set when the button is
released at the beginning of the current file.
In the continuous mode, the pause mode is set when the button
is released at the beginning of the first searchable file.
17
ENGLISH
8 RECORDING
2 Pay attention to the remaining time when recording on a partially recorded card. We recommend backing up the partially recorded card
beforehand using a PC system (not included), etc.
2 If you wish to record on an already recorded card from which you will erase unnecessary files, erase the unnecessary files first. (See pages
25 and 26.)
Starting recording
The DN-F20R offers two types of recording onto IC memory cards: normal (relay: 1/2 or 2/1) recording and double (1 & 2) recording. Set the
card recording mode beforehand in the preset mode.
/2 or 2/
/1) recording
2 Normal (relay: 1/
This is the normal recording mode. The sound is recorded onto either the card in slot 1 or the one in slot 2. When the end of the recordable
time on the card in slot 1 is reached during recording and a card is loaded in slot 2, recording continues (relays) on the card in slot 2.
Slot 1 (or 2) card full
Start of recording
Slot 1 (or 2)
REC
STOP
Slot 2 (or 1)
STOP
REC
For relay recording, load the card in the other slot at least 30 seconds before the recordable time on the card currently being recorded is
up. If the next card is loaded when there is little recordable time remaining on the card currently being recorded, the set may not have
enough time to check the card, in which case recording will not be relayed and the stop mode will be set.
If recording is not possible on the card in the next slot, recording stops once the recordable time on the card currently being recorded is
up. Recording is not possible if there is no remaining recordable time on the card or if the card already contains the maximum number of
files. A message is displayed in the dot matrix section if recording is not possible.
Relay recording is only possible in the same directories on the cards in slots 1 and 2. Relay recording is not possible if that directory on
the card in the next slot already contains the maximum number of files.
2 Double (1 & 2) recording
In this mode, the cards in slots 1 and 2 are recorded simultaneously. Use this mode to make backups of audio files as you record.
If audio files are already recorded on one of the cards, recording stops once that card is full.
Start of recording
Slot 1 (or 2)
Slot 2 (or 1)
Slot 1 (or 2) card full
REC
Slot 2 (or 1) card full
STOP
REC
STOP
When the recording mode is set to double (1 & 2) recording, recording is performed with the same file names in the same directories of
the cards in slots 1 and 2. Recording will not start unless recordable cards are loaded in both slots. To record on one card only, preset the
recording mode to normal recording.
With double recording, the cards are accessed at high speed, so be sure to use recommended IC memory cards of the same make, the
same model (capacity) and the same cluster size (even when the cluster size has been changed on a PC, etc.).
As long as the cards’ manufacturer and cluster size are the same, recording may be possible even if the models (capacities) are different.
If recording is not possible, either recording will stop or an error message will be displayed when recording starts.
18
ENGLISH
MIC
LIMITER
OFF ON
OFF ON
MIC
ATTENUATOR
0
ENTER
2, 4
KEY HOLD
REC
PLAY/PAUSE
4
-20dB
MODE
TIME
-R
MIC
LOW CUT
MIC LINE
STOP
REW
FWD
REC LEVEL
1
INPUT
SELECTOR
L / MONO - MIC
3, 5
IN - LINE - OUT
2 Setting the card recording mode
PORTABLE IC RECORDER DN-F20R
1
In the stop mode, press the MODE button.
• The preset mode is set.
MODE
2
Select the card recording mode.
• Press the ª button to display “REC CARD MODE”.
3
Press the ENTER button.
• The card recording mode menu is set.
ENTER
4
Select the card recording mode.
• Use the • and ª buttons to select normal or double
recording.
When double recording is
selected.
5
Press the ENTER button.
• The setting is entered and the stop mode is set.
ENTER
If “MODE LOCK” is set to “LOCK”, set it to “UNLOCK” before
setting the card recording mode.
19
ENGLISH
Recording formats (compression/decompression and stereo/mono)
The DN-F20R offers a choice of three recording compression/decompression formats (linear PCM, MPEG1 Layer 2, and MPEG2 Layer 2 LSF –
see below) and the choice of stereo or monaural recording.
2 Linear PCM
Recording is performed without compression, with a sampling frequency of 48 kHz and a quantization bit number of 16 bits.
This recording format offers the maximum sound quality possible on the DN-F20R, but the quantity of data per unit time is large, so it uses
up much card space.
Because the quantity of data per unit time is large, the card access speed must be high. Recording in linear PCM may not be possible on
IC memory cards with small cluster sizes and capacities of 16 MB or less. If recording is not possible, either recording will stop or an error
message will be displayed when recording starts.
2 MPEG1 Layer 2
Recording is performed with a sampling frequency of 48 kHz and a quantization bit number of 16 bits, but with compression, so that the
quantity of data is about 1/6 to 1/12 that of linear PCM recordings.
With this mode, the card space can be used efficiently.
2 MPEG2 Layer 2 LSF (Low Sampling Frequency)
Recording is performed with a sampling frequency of 24 kHz, a quantization bit number of 16 bits, and compression achieving a data quantity
of between about 1/12 to 1/48 that of linear PCM recordings.
Because the quantity of data per unit time is small, the frequency response is set to about 11 kHz, reducing the frequency band of the
compressed data to maintain sound quality. With this mode, the card space can be used at its highest efficiency.
2 Stereo/monaural
Stereo or monaural recording can be selected for all three compression/decompression formats. With monaural recording, the file size is half
that of stereo recordings.
2 Setting the recording format (compression/decompression and stereo/mono)
MIC
LOW CUT
MIC
LIMITER
MIC LINE
OFF ON
OFF ON
TIME
2
3
PLAY/PAUSE
3
3
-20dB
ENTER
KEY HOLD
STOP
REW
FWD
PORTABLE IC RECORDER DN-F20R
4
ENTER
0
MODE
REC
Press the ENTER button.
• The recording format mode is set.
MIC
ATTENUATOR
-R
1
INPUT
SELECTOR
L / MONO - MIC
2, 4
MODE
IN - LINE - OUT
In the stop mode, press the MODE button.
• The preset mode is set.
REC LEVEL
1
Press the ENTER button.
• The selection is stored and the stop mode is set.
Select the recording format.
• Use the • and ª buttons to select the recording format.
ENTER
When MPEG1 Layer 2 stereo is
selected.
20
If “MODE LOCK” is set to “LOCK”, set it to “UNLOCK” before
setting the card recording mode.
ENGLISH
Recording bit rates
With the DN-F20R, the bit rate can be selected as described below for the different recording compression/decompression formats.
2 Linear PCM
The bit rate is fixed to 768 kbps per channel.
2 MPEG1 Layer 2
The bit rate can be set to either 128 kbps or 64 kbps per channel.
Lowering the bit rate lowers the sound quality, but also reduces the file size.
2 MPEG2 Layer 2 LSF (Low Sampling Frequency)
The bit rate can be set to either 64 kbps, 56 kbps, 48 kbps, 40 kbps, 32 kbps, 24 kbps or 16 kbps per channel.
Lowering the bit rate lowers the sound quality, but also reduces the file size.
1
INPUT
SELECTOR
MIC
LOW CUT
MIC
LIMITER
MIC LINE
OFF ON
OFF ON
0
TIME
PLAY/PAUSE
Select the recording bit rate setting mode.
• Press the ª button to display “RECORDING BIT RATE”.
The currently set recording bit rate is displayed.
5
2, 5
-20dB
MODE
ENTER
KEY HOLD
REC
2
MIC
ATTENUATOR
-R
3, 7
MODE
L / MONO - MIC
In the stop mode, press the MODE button.
• The preset mode is set.
STOP
REW
FWD
REC LEVEL
1
IN - LINE - OUT
2 Setting the recording bit rate
PORTABLE IC RECORDER DN-F20R
4, 6
3
6
Press the ENTER button.
• The 24 kHz mode is set.
Select the 48 kHz recording bit rate.
• Use the REW and FWD buttons to select the bit rate.
REW
ENTER
4
When 64 kbps is selected.
Select the 24 kHz recording bit rate.
• Use the REW and FWD buttons to select the bit rate.
REW
7
Press the ENTER button.
• The selections are stored and the stop mode is set.
FWD
When 48 kbps is selected.
5
FWD
Set the 48 kHz mode.
• Use the • and ª buttons.
ENTER
If “MODE LOCK” is set to “LOCK”, set it to “UNLOCK” before
setting the card recording mode.
21
ENGLISH
Starting recording
1
INPUT
SELECTOR
MIC
LOW CUT
MIC
LIMITER
MIC LINE
OFF ON
OFF ON
IN - LINE - OUT
2
MIC
ATTENUATOR
L / MONO - MIC
MODE
ENTER
TIME
• Press the • button to move to the
previous directory.
• Press the ª button to move to the
next directory.
-20dB
-R
0
Select the directory into which you want to record.
• To record in a directory other than the one currently
displayed, select the desired directory as follows:
2
KEY HOLD
REC
PLAY/PAUSE
STOP
REW
REC LEVEL
3
FWD
PORTABLE IC RECORDER DN-F20R
3
4
1
Press the REC button.
• The file name is incremented and the recording pause
mode is set.
REC
Select the input source.
• Use the INPUT SELECTOR switch to select “MIC” or
“LINE”.
Directory number/file name
INPUT
SELECTOR
Recording time
Bit rate
Line input
Microphone input
MIC LINE
Set the time display to “REMAIN” to display the remaining
recordable time. (See page 27.)
• When “MIC” is selected, set the MIC LOW CUT, MIC
LIMITER and MIC ATTENUATOR switches according to the
source signal and the type of microphone being used.
MIC
LOW CUT
MIC
LIMITER
MIC
ATTENUATOR
4
Press the PLAY/PAUSE button.
• Recording starts.
PLAY/PAUSE
OFF ON
OFF ON
0
-20dB
• If there is much low frequency noise in the background due
to wind, etc., set the MIC LOW CUT switch to “ON” to cut
out the low frequency portion.
• When the MIC LIMITER is set to “ON”, distortion due to
excessive microphone input is reduced.
• If the microphone sensitivity is high and the sound is hard
to adjust using the REC LEVEL control, set the MIC
ATTENUATOR switch to “-20dB”.
• When you use only one microphone, plug the microphone
to the L/MONO input terminal and set to “MONO” in the
“REC FORM” preset mode.
When the REC button is pressed during recording, the file name is
incremented and recording continues.
The input signal can be monitored by headphones or LINE OUT
while in the record or record pause modes.
MIC
LOW CUT
MIC
LIMITER
MIC LINE
OFF ON
OFF ON
MIC
ATTENUATOR
1:G
2:H
3:C
INPUT
SELECTOR
-20dB
-R
0
MAX
22
R
STOP
REW
FWD
R
MAX
KEY HOLD
L
PLAY/PAUSE
PORTABLE IC RECORDER DN-F20R
L
ENTER
MIN
TIME
REC
The outer control is for the left
channel, the inner control for the
right channel.
L / MONO - MIC
MODE
MIN
IN - LINE - OUT
L
Watching the level meter display, turn the REC LEVEL control
on the right side to adjust the recording level.
• Turning the control in the clockwise direction increases the
recording level and turning it in the counterclockwise
direction decreases the recording level.
REC LEVEL
1
R
Adjusting the recording level
1
ENGLISH
In the recording mode, press the STOP button.
• Recording stops.
INPUT
SELECTOR
MIC
LOW CUT
MIC
LIMITER
MIC LINE
OFF ON
OFF ON
MIC
ATTENUATOR
0
-20dB
-R
STOP
TIME
L / MONO - MIC
MODE
Recording cannot be stopped
within 0.5 seconds after it was
started.
ENTER
KEY HOLD
REC
PLAY/PAUSE
STOP
REW
FWD
REC LEVEL
1
IN - LINE - OUT
Stopping recording
PORTABLE IC RECORDER DN-F20R
1
During recording, press the PLAY/PAUSE button.
• Recording is paused.
MIC
LOW CUT
MIC
LIMITER
MIC LINE
OFF ON
OFF ON
MIC
ATTENUATOR
0
-20dB
-R
PLAY/PAUSE
INPUT
SELECTOR
TIME
ENTER
KEY HOLD
REC
PLAY/PAUSE
L / MONO - MIC
MODE
STOP
REW
FWD
REC LEVEL
1
[Recording pause]
IN - LINE - OUT
Stopping recording temporarily
PORTABLE IC RECORDER DN-F20R
To resume recording from the position at which it was paused,
press the PLAY/PAUSE button again.
When the REC button is pressed while in the recording pause
mode, the file name is incremented and recording resumes.
1
Cautions on recording
• The maximum number of files that can be recorded in a single
directory is 999.
• The files are automatically given names (numbers) one number
above the highest file number in the current directory. Because
of this, it is no longer possible to record in a directory if there is a
file named “x999.mpg” (or “x999.wav”) in that directory, even if
there are fewer than 999 files in the directory. If this happens,
either change the file name or move to a different directory.
• When the REC button is pressed, the file name (number) is
incremented to one number above the current file’s name. File
names above x999 are not incremented.
• With relay recording, the relay operation is given priority when
switching slots, so buttons may not work temporarily while
switching slots.
• The auto power off function does not work in the recording or
recording pause mode. Be careful with the batteries. Recording
consumes much battery power. We recommend stopping or
turning off the power whenever possible.
• The monitor speaker is turned off in the record and record pause
modes. (The input signal can be monitored over the headphones
or LINE OUT.)
• If “REC FORM” is set to “MONO” in the preset mode, only the
input from L channel is effective.
23
ENGLISH
9 EDITING AND ERASING FILES
2 Recorded file names can be changed, and files can be divided.
2 Recorded files you do not need can be erased.
2 Memory cards can be formatted for use on the DN-F20R.
In the stop mode, press the MODE button.
• The preset mode is set.
2
INPUT
SELECTOR
MIC
LOW CUT
MIC
LIMITER
MIC LINE
OFF ON
OFF ON
MIC
ATTENUATOR
0
TIME
ENTER
3, 6
KEY HOLD
REC
PLAY/PAUSE
7
-20dB
MODE
MODE
-R
4, 8
L / MONO - MIC
Select the file to be edited.
• Select the file. (See page 16.)
STOP
REW
FWD
REC LEVEL
1
2
IN - LINE - OUT
Changing file names
PORTABLE IC RECORDER DN-F20R
3
Select the file name editing mode.
• Press the ª button to display “MODE:FILE NAME EDIT”.
7
File name
4
7
5
Repeat steps 5 and 6 to input the new file name.
• The file name can contain up to 8 characters.
• Press the • button to move the cursor back to the left.
Press the ENTER button.
• The file name change mode is set.
• When the STOP button is pressed, the character at the
cursor position is cleared.
≠ Flashing (cursor position)
ENTER
STOP
Upper line: Name of file before
change
Lower line: Name of file during
change
5
Input the new file name.
• Use the FWD and REW buttons to select the character
(letter or symbol) to be input.
REW
FWD
The selected character at the
position of the cursor flashes.
• The characters (letters and symbols) shown below can be
used for file names. The displayed character changes in
order each time the FWD or REW button is pressed.
FWD /
, REW
6
Move the cursor to the next position.
• When the button is pressed, the cursor moves to the right.
≠ Flashing (cursor position)
24
8
When the STOP button pressed
while selecting characters, the
character currently being selected
is cleared and the character that
was set before a new character
was selected reappears.
Press the ENTER button.
• The changed file name is entered and the preset mode is
canceled.
ENTER
If the file name has been cleared or if there is already
another file with that name in that directory, “CAN’T
NAME CHANGE” is displayed for 2 seconds and the file
name change mode is canceled.
ENGLISH
4, 6
MIC
LOW CUT
MIC
LIMITER
MIC LINE
OFF ON
OFF ON
MIC
ATTENUATOR
0
4, 5
INPUT
SELECTOR
MIC
LOW CUT
MIC
LIMITER
MIC LINE
OFF ON
OFF ON
TIME
TIME
ENTER
FWD
REC LEVEL
REW
PLAY/PAUSE
3
KEY HOLD
REC
STOP
-20dB
MODE
KEY HOLD
REC
0
-R
2
L / MONO - MIC
ENTER
STOP
REW
FWD
PORTABLE IC RECORDER DN-F20R
REC LEVEL
L / MONO - MIC
MODE
PLAY/PAUSE
MIC
ATTENUATOR
-20dB
-R
3
INPUT
SELECTOR
IN - LINE - OUT
Erasing files
IN - LINE - OUT
Dividing files
PORTABLE IC RECORDER DN-F20R
5
1
2
3
Select the file to be divided.
• Select the file. (See page 16.)
Find the position at which you want to divide the file.
• Use the manual search function (see page 17) to find the
position at which you want to divide the file, then set the
pause mode at that position.
In the pause mode, press the MODE button.
• The file dividing mode is set.
1
2
Select the file to be erased.
• Select the file. (See page 16.)
In the stop mode, press the MODE button.
• The preset mode is set.
MODE
3
Select the file erase mode.
• Press the ª button to display “MODE:FILE ERASE”.
MODE
Name of file to be erased
4
Press the ENTER button.
• A 4-second section of the file starting from the position at
which the pause mode is set is played repeatedly.
4
Press the ENTER button.
• The file erase mode is set.
Flashing
ENTER
ENTER
5
If you want to change the file divide position:
• Use the FWD and REW buttons to move the position. The
4-second section is played repeatedly.
REW
FWD
The divide position moves forward
when the FWD button is pressed,
backward when the REW button
is pressed.
• When the button is pressed, the position moves forward or
backward by 0.048 seconds (for a sampling frequency of 24
kHz).
When the sampling frequency is set to 48 kHz, the
position moves by 0.024 seconds.
• The position can be moved ±255 steps.
6
Press the ENTER button.
• The divide position is entered.
The set returns to the pause mode
after dividing is completed.
5
Press the ENTER button.
• The file is erased and the preset mode is canceled.
Press the MODE button if you do
not want to erase the file.
ENTER
Precautions concerning file division
• When a file is divided, the first file keeps the current file name,
and the second file is given a name (number) one number
above the highest file number in the current directory.
• If the MODE button is pressed before pressing the ENTER
button to divide the file, the divide mode is canceled and the
stop mode is set.
• When the STOP button is pressed while the 4-second section
is being played repeatedly, the divide mode is canceled.
• It may not be possible to divide a file if the size of the divided
file is too small or if there is not enough space left on the card.
ENTER
25
ENGLISH
OFF ON
OFF ON
-20dB
-R
0
ENTER
2
STOP
REW
FWD
3
MIC
LOW CUT
MIC
LIMITER
MIC LINE
OFF ON
OFF ON
MIC
ATTENUATOR
0
-20dB
ENTER
TIME
PLAY/PAUSE
3
KEY HOLD
REC
PORTABLE IC RECORDER DN-F20R
1
2
INPUT
SELECTOR
MODE
KEY HOLD
REC
PLAY/PAUSE
L / MONO - MIC
MODE
TIME
4, 5
IN - LINE - OUT
MIC LINE
MIC
ATTENUATOR
-R
MIC
LIMITER
L / MONO - MIC
MIC
LOW CUT
REC LEVEL
2
INPUT
SELECTOR
IN - LINE - OUT
4, 5
Reformatting memory cards
STOP
REW
FWD
REC LEVEL
Erasing all the files in a directory
PORTABLE IC RECORDER DN-F20R
Select the directory whose files you want to erase.
• Select the directory. (See page 16.)
1
Insert the card to be formatted in the card slot.
• Be sure to insert the card in the proper direction.
(See page 9.)
• When 2 cards have been inserted, use the CARD button to
select the card that is to be formatted. (See page 27.)
2
In the stop mode, press the MODE button.
• The preset mode is set.
In the stop mode, press the MODE button.
• The preset mode is set.
MODE
MODE
3
Select the directory erase mode.
• Press the ª button to display “MODE:DIR ERASE”.
3
4
Press the ENTER button.
• The file erase mode is set.
Slot number
4
ENTER
5
Select the card format mode.
• Press the ª button to display “MODE:CARD FORMAT”.
Press the ENTER button.
• The card format mode is set.
Directory number
Press the ENTER button.
• All the files in the directory are erased and the preset mode
is canceled.
Press the MODE button if you do
not want to erase the files.
ENTER
5
Press the ENTER button.
• The card is reformatted and the preset mode is canceled.
ENTER
Press the MODE button if you do
not want to format the card.
ENTER
Cautions on file editing operations
• The DN-F20R stores files in DOS format. Because of this, files
cannot be given the following names, which are reserved for
DOS: CON, AUX, COM1, COM2, COM3, COM4, LPT1, LPT2,
LPT3, PRN, NUL.
• The DN-F20R is compatible with DOS 8.3 formats (file names
of up to 8 capital letters, period, extensions of up to 3 capital
letters). It does not support small letters or the long file names
available for Windows 95™ (*1) or later. When creating files or
changing file names on a Windows 95™ (*1) system, do not use
small letters in the file names or extensions or use files names
consisting of more than 8 letters or extensions with more than
3 letters.
(*1) Windows 95™ is a registered trademark of the Microsoft
Corporation.
26
ENGLISH
10 OTHER OPERATIONS
INPUT
SELECTOR
MIC
LOW CUT
MIC
LIMITER
MIC LINE
OFF ON
OFF ON
Switching the current card
IN - LINE - OUT
Checking the date and time
MIC
ATTENUATOR
-20dB
-R
0
L / MONO - MIC
MODE
ENTER
TIME
KEY HOLD
PLAY/PAUSE
STOP
REW
1
REC LEVEL
REC
FWD
PORTABLE IC RECORDER DN-F20R
Press the CARD button.
• The current card switches between “SLOT1” and
“SLOT2” each time the button is pressed.
CARD
1
1
In the stop mode, press the STOP button.
• The current date and time are displayed for 5 seconds.
It is not possible to switch the current card unless cards
are loaded in both slots.
STOP
A simultaneous display of the FILE
SORT order, which was set with
the preset mode setting, is
provided.
Turning on the back light
INPUT
SELECTOR
MIC
LOW CUT
MIC
LIMITER
MIC LINE
OFF ON
OFF ON
MIC
ATTENUATOR
TIME
L / MONO - MIC
MODE
1
1
-20dB
-R
0
IN - LINE - OUT
Switching the time display
ENTER
Press the LIGHT button.
• The display’s back light turns on.
The back light turns off automatically once the preset time
is up.
KEY HOLD
REC
STOP
REW
FWD
REC LEVEL
LIGHT
PLAY/PAUSE
The back light also lights when
buttons are operated.
PORTABLE IC RECORDER DN-F20R
1
Press the TIME button.
• The time display switches between the elapsed time
(“TOTAL”) and remaining time (“REMAIN”) each time the
button is pressed.
TIME
• If “BACK LIGHT TIMER” is set to “CONTINUOUS” in the
preset mode (see page 10), press the LIGHT button again
to turn off the back light.
Please see “Audio file time
displays” below for details of the
display contents.
Audio file time displays
Stop mode (STOP)
Play and pause modes
(PLAY/PAUSE)
Recording and recording pause
modes (REC and REC PAUSE)
TOTAL time display
Total time of current file
Not displayed if there is no file
Elapsed time of current file
REMAIN time display
Remaining time on card calculated according to the currently set
recording mode and recording bit rate
Remaining time of current file
Elapsed time of file currently
being recorded
Remaining time on card calculated according to the currently set
recording mode and recording bit rate
27
ENGLISH
Creating index files
3, 4
1
INPUT
SELECTOR
MIC
LOW CUT
MIC
LIMITER
MIC LINE
OFF ON
OFF ON
3
Press the ENTER button.
• A message for confirming that you want to make an index
file for the card in the current slot appears.
-20dB
ENTER
TIME
2
0
MODE
PLAY/PAUSE
2
KEY HOLD
REC
Select the index file create mode.
• Press the ª button to display “INDEX FILE MAKE”.
MIC
ATTENUATOR
-R
MODE
L / MONO - MIC
In the stop mode, press the MODE button.
• The preset mode is set.
STOP
REW
FWD
REC LEVEL
1
IN - LINE - OUT
The DN-F20R is equipped with a function for creating and storing separate files, listing the audio files on the IC memory card. This function comes
in handy for creating tables of the audio files recorded on IC memory cards using spreadsheet programs on PC systems, etc.
With the DN-F20R, these files are called “index files”.
Index files are stored in CVS format. They include the directory names, file names, file recording dates, file sizes, etc.
PORTABLE IC RECORDER DN-F20R
Notes
ENTER
4
When the current slot is SLOT1
Press the ENTER button.
• The index file is created and the stop mode is set.
ENTER
Press the MODE button if you do not want to make the
index file.
28
• It is not possible to view the index file or its contents on the
DN-F20R.
• Files recorded or deleted after creating the index file are not
reflected in the index. If you wish to reflect these files, create
a new index file.
• Index files can only be created for audio files located within the
standard DN-F20R IC memory card directories.
• The index file is only created for the card in the current slot. To
create index files for the cards in both slots, first create an index
file for one card, then use the CARD button to switch the
current slot and create an index file for the other card.
• It may not be possible to create index files if there is not enough
space left on the card or if there is a card error.
• If there are many audio files, it may take 30 seconds or more to
create the index file. Never turn the power off or remove the
card while the index file is being created.
ENGLISH
11 TROUBLESHOOTING
Messages
The following lists and describes the main messages shown on the character display during various operations.
Warning message
(n*1 = 1, 2, 1&2)
Description
OFF
PLEASE WAIT!
This is displayed while the power is being turned off, then clears once the power turns off.
Never unplug the AC adaptor or remove the batteries while this message is displayed.
SLOTn*1:CARD CHECK NOW!
This is displayed while the card is being checked.
Never eject the card while this message is displayed.
CAN’T NAME CHANGE!
The file name cannot be changed to the file name you have set.
This is displayed when a file with the same name already exists.
DOS RESERVED NAME!
The file name cannot be changed to the file name you have set.
This is displayed when a name reserved for DOS or an otherwise improper name is set.
CAN’T REC PAUSE!
The recording pause mode cannot be set.
This is displayed when the recording pause mode cannot be set, for example during the relay
operation or directly after recording starts.
DIR END!
End of directories (there are no more directories in the direction in which you are trying to move).
DIRn*2 \NO FILE! (n*2 = 0 ~ 9)
There are no files in the current directory (one of directories 0 to 9).
FILE END!
End or beginning of files.
This is displayed when there are no more files in the direction in which you are trying to move during
file searching, etc.
INDEX FILE MAKE NOW!
This is displayed while an index for the card in the current slot is being created.
Never eject the card while this message is displayed.
SLOTn*1:NO CARD!
There is no card in that slot.
SLOTn*1:FILE FULL!
The current directory on the card in that slot already contains the maximum number of files.
SLOTn*1:CARD FULL!
The card in that slot is already full to capacity.
SLOTn*1:DIR CHANGE!
Change the directory for that slot.
UNDIVIDED POINT!
Due to system restrictions, it is not possible to divide the file at that point.
DIFFERENT CARD
CAN’T 1&2 REC!
Double recording is not possible because the cards are of different types or formats or have different
cluster sizes.
29
ENGLISH
Error messages
If there is an error while using the set, an error message consisting of a number (ERROR = (error number)) appears on the display. This number
indicates the type of error.
The error numbers are 4-digit numbers. Their meanings are described below.
If an error arises, it is necessary to take some sort of action, such as turning the power off then back on, formatting the card (note that this will
erase any data on the card), replacing the card, etc.
Sometimes the error can be resolved by ejecting the card.
The message may differ according to the situation.
Description of errors
2 left digits
2 right digits
Error no.
Description
Error no.
Description
01 to 09
Card-related errors
01 to 03, 30 to 59,
A0 to B9
Card access errors
10 to 79
Errors arising during operation
04
Directory already contains the maximum number of files
80 to 99
System errors
05
File type error
06
Card full error
07
Decoding error
08 and 09
Data errors
10 and 70 to 99
Microprocessor errors
11 and 12
File over errors
60 to 69
Memory card errors
C0 to E9
Memory card format errors
Specific 4-digit errors
30
Error no.
Description
0304
Standard DN-F20R directories cannot be created.
If many files and directories (a total of over 255) are stored in the root directory using a PC, etc., the DN-F20R cannot create
the directories it requires. If this happens, reduce the number of files using a PC, etc.
0411 and 0412
An error is generated when:
• there are 1000 or more audio files in the current directory of that card.
• there are a total of over 1023 files, including non-audio files.
If this happens, reduce the number of files using a PC, etc.
xx05
File type error. (xx = any numbers)
The FAT or specific files on the card are damaged.
Either erase the files or reformat the card.
2506
The index file cannot be created due to insufficient card space.
Make extra space by erasing some files, etc.
8810
The card has been ejected while it was being accessed.
If this message appears each time the power is turned on, the card is damaged.
Reformat the card. Note that in some cases the card becomes unusable when this error is generated.
ENGLISH
Before assuming there is a malfunction
Check the following before assuming there is a malfunction with the set.
When a pertinent item cannot be found in this table, the problem may be due to a fault with this unit. Switch off the power, disconnect the power
plug from the outlet, remove the batteries, and contact your store of purchase.
Symptom
Possible cause/things to check
Solution
• Batteries are worn.
• Replace the batteries.
• AC adaptor is not securely connected.
• Check the connection.
• Power has been turned off with the auto power off
• Press the power switch again.
• Power is off.
• Turn the power back on.
• KEY HOLD switch is turned on.
• Turn the KEY HOLD switch off.
• Card has been ejected while it was being accessed.
• Turn the power off then back on.
Card error message is
displayed.
• Card is not of the recommended type.
• Use a card of the recommended type.
• Format is not compatible.
• Card data is damaged.
• Format the card on the DN-F20R.
Current file cannot be played.
• File is damaged.
• Either format the card on the DN-F20R (note
that this will erase any data on the card) or
erase the file using a PC, etc.
Power does not turn on.
Buttons do not operate.
• File format is not compatible with the DN-F20R.
Files with bit rates or compression/decompression
formats other than the ones usable on the DN-F20R
cannot be played, even if they have the extension
“MPG” or “WAV”.
• File is too small.
It may not be possible to play short files.
• Card is not of the recommended type.
• Use a card of the recommended type.
• Other cause.
• Check the notes in the “Recording” section
once again.
Linear PCM recording is not
possible.
• In some cases Linear PCM recording is not possible
due insufficient speed of the card itself.
• Change the presetting to “MPEG”.
• Use a different card.
Power turns off during
recording.
• Batteries are worn.
The power turns off automatically several minutes
after the battery warning mark appears.
• Replace the batteries.
Sound of microphone cannot
be recorded.
• INPUT SELECTOR switch is set to “LINE”.
• Set the INPUT SELECTOR switch to “MIC”.
• REC LEVEL control is set to the minimum.
• Raise the recording level.
• The microphone is not properly connected.
• Connect the microphone properly.
Recording is not possible.
No sound is produced from
speaker.
• Recording or recording pause mode is set.
The speaker is turned off while in record and record
pause modes.
• MONITOR VOL. control is set to the minimum.
• Raise the monitor volume.
31
ENGLISH
12 PARALLEL REMOTE JACK
The DN-F20R is equipped with a parallel remote jack.
Denon does not offer any optional products for use with this parallel remote jack.
Below is a circuit diagram for reference purposes.
NOTES:
• Denon accepts no responsibility whatsoever for any damages or infringements of patents or other rights resulting from the use of the circuit
below. This does not sanction patents or other rights of Denon or third parties.
• It is strictly forbidden to reprint or reproduce the following circuit diagram in part or in whole.
As shown above, it is possible to create the same functions as the buttons on the DN-F20R by using a ø2.5 plug and external circuit.
Resistance error – Within 5%.
Be sure to leave channel 2 open.
Never apply external voltage. Doing so will result in malfunction.
Normal operation is not possible when transistors, etc., are used instead of switches due to the circuit resistance.
Insurate the circuit so that it cannot be touched directly. Use a structure that protects the circuit from static electricity, which will cause
malfunction.
Do not operate the switches at the same time as the buttons on the set.
32
ENGLISH
13 SPECIFICATIONS
Memory cards used
Compact Flash Memory Card (CF Card)/Type 1 (t = 3.3mm)
Audio recording formats
ISO/IEC 11172-3 MPEG1 layer 2 (fs = 48 kHz, 64, 128 kbps/ch)
ISO/IEC 13813-3 MPEG2 layer 2 (fs = 24 kHz, 16~64 kbps/ch)
Linear (no compression)
Quantization bits
16 bits
Sampling frequencies
48 kHz/24 kHz
Distortion
Below 0.1% (1 kHz, 0dB sine wave playback, using LPF)
S/N ratio
80 dB or more (using LPF and IHF-A filter)
Channel separation
70 dB or more (stereo, 1 kHz, 0dB sine wave playback, using LPF)
Frequency response
20 to 20 kHz
20 to 10 kHz
: 0 ±3 dB (fs = 48 kHz)
: 0 ±3 dB (fs = 24 kHz)
Inputs
Microphone input
Line input
: -68 dBm (0.3 mV)
: -13 dBm (180 mV)
Outputs
Line output
: 1.4 Vrms (10 kΩ/ohms : 1 kHz, 0 dB)
Headphones output : 1.0 Vrms (33 Ω/ohms : 1 kHz, -6 dB)
Continuous recording time
Approx. 4 hours (using alkaline batteries, normal recording with one CF card)
External dimensions
210 mm (width) x 45 mm (height) x 161 mm (depth)
(8-17/64” x 1-49/64” x 6-11/32”)
Mass
800 g (main unit only) (not including IC memory cards or batteries)
(1 lbs 12 oz)
Power supply
Batteries
AC adaptor (AA-24)
: LR6 (AA size) alkaline battery x 6
: Input AC 120V, 60 Hz (North America model)
Input AC 230V, 50 Hz (Europe and Asia model)
Input AC 240V, 50Hz (U.K. model)
Current consumption
DC 7V 400 mA
: During recording (back light off) with AC adaptor AA-24
Environmental conditions
Surrounding
Surrounding
Surrounding
Surrounding
temperature during operation
humidity during operation
temperature during storage
humidity during operation
:
:
:
:
5 to 35°C
40 to 80% (no condensation)
-20 to 60°C
20 to 90% (no condensation)
* For purposes of improvement, specifications and design are subject to change without notice.
33
DENON SERVICE NETWORK/
•
•
•
•
•
•
•
•
•
Please contact one of our overseas service centers, listed below, for follow-up service consultation.
Wenden Sie sich für anfallende Wartungs-bzw. Reparaturarbeiten bitte an eine der folgend aufgeführten Kundendienststellen.
Adressez-vous à nos centres de service d’outre-mer indiqués ci-dessous, pour le service aprèsvente.
Per il servizio dopo vendita rivolgete Vi al nostro centro di servizio estero appropriato della lista seguente.
Para consultas de servicio porfavor dírigirse a cualquiera de nuestros centros de servicio en el extranjero, enlistados abajo.
Neem kontakt op met één van onze reparatie-inrichtingen in het buitenland, waarvan hier een lijst volgt, voor na-service.
Ta kontakt med nedan angivna servicecentraler för rådfrågning om servicearbeten efter försäljningen.
Favor contactar um de nossos centros de serviços internacionais, abaixo listados, para consulta de serviços de acompanhamento.
Australia
Austria
Belgium
Canada
China
Czecho
Denmark
Finland
France
F.R. Germany
Greece
Hong Kong
Hungary
Iceland
Indonesia
Italy
Korea
Malaysia
Mexico
Netherlands
New Zealand
Norway
Poland
Portugal
Singapore
South Africa
Spain
Sweden
Switzerland
Taiwan R.O.C.
Thailand
United
Kingdom & Eire
U.S.A.
*
*
*
*
*
*
*
*
*
AWA Audio Products Pty Ltd. 67 O’Riordan Street, Alexandria NSW 2015, Australia
Tel: (02) 9669-3477 Fax: (02) 9578-0140
Digital-Professional-Audio Vertriebsges.m.b.H., 1170 Wien, Rupertusplatz 3
Tel: 0222-4501006~9, Fax: 0222-457679
Transtel-Sabima P.V.B.A. Harmoniestraat 13, 2018 Antwerpen 1, België Tel: 03-237-3607
Denon Canada Inc. 17 Denison Street, Markham Ontario, Canada L3R 1B5 Tel: 905-475-4085 Fax: 905-475-4159
Shanghai Denon Products Service Co., Ltd. Room 1504, A Building 527 Huaihai Zhong Road,
Shanghai 200020, P.R.C. Tel: 86-21-5306-2078 Fax: 86-21-5306-0620
EUROSTAR OSTORAVA s.r.o. areal Vodni stavby Praha a.s., budova A2 Dobronicka 635,148 00 Praha 4 Czech Rep.
Tel: 02-6111-2901 Fax: 02-6111-2904
Hifi Klubben A/S Dali Alle 1, 9610 Noerager, Denmark Tel: 45-96 72 10 00 Fax: 45-96 72 10 14
Suomen Hi-Fi Klubi OY Nylandsgatan 4-6, Helsingfors Tel: 0644401
Denon France S.A. 3 Boulevard Ney, 75018 Paris Tel: 44-89-68-69
Denon Electronic GmbH An der Landwehr 19, 41334 Nettetal Tel: +49 2157 12 08 78 Fax: +49 2157 12 08 13
KINOTECHNIKI LTD. 14, PYRGOU STR. 166 75, GLYFADA ATHENS Tel: 01-96-01-071 Fax: 01-96-01-72
DENON ASIA COMPANY LTD. 18/F No.79 Chatham Road South, Tsimshatsui Kowloon, Hong Kong
Tel: 852-2516-6862, Fax: 852-2516-5940
InfoVox Ltd. Terez krt. 31, 1067 Budapest Hungary Tel / Fax: 01-302-2515
Japis Ltd. Brautarholt 2, P.O.Box 396, 121 Reykjavik, Iceland Tel: 354-58009-800 Fax: 354-5800-888
PT Autoaccindo Jaya. Cideng Barat No. 7 Jakarta, Indonesia Tel: 633-2730
Audiodelta S.r.l.19 Via Pietro Calvi 20129 Milan Italy
Tel: 39-02-5411-6008 / 39-02-5412-8253 Fax: 39-02-5518-1961
DAIYOUNG Industrial Co., Ltd. 1027-5, Bangbae-dong, Seocho-gu, Seoul 137-060 Korea
Tel: 82-2-588-3960 Fax: 82-2-586-3721
HWEE SENG (ELECTRONICS) SDN BHD. 13-1, Jalan Raja Laut, 50350 Kuala Lumpur Malaysia
Tel: 60-3443-1193 Fax: 60-3441-0563
Labrador, S.A. de C.V. Zamora No. 154 Col. Condesa 06140 Mexico, D.F. Tel: 286 55 09 Fax: 286 34 62
Penhold B.V. Poppenbouwing 58, NL-4191 NZ Geldermalsen, Netherland Tel: 31-345-588 080 Fax: 31-345-588 085
Avalon Audio Corpn. Limited 630B Great South Road Ellerslie Auckland, New Zealand Tel: 64-9-579-1280 Fax: 64-9-579-3350
Hi-Fi Klubben AS Sandakerveien 64 0483 Oslo Tel: 47 22 79 66 66 Fax: 47 22 79 66 67
HORN DISTRIBUTION S.A. Ulica Kurantow 34, 02-873 Warszawa Poland
Tel: +48 22 649 30 71 Fax: +48 22 649 31 99
Videoacustica Qta. Do Paizinho-Armazém 5-Estrada De Circunvalação-Apart. 3127 1303 Lisboa Codex
Tel: (01)417-00-04/00-96 Fax: (01)418-80-93
Hwee Seng (Electronics) Pte Ltd. 81 Genting Lane #02-02, Everich Industrial Building Singapore 349566
Tel: 65-746-3355 Fax: 65-743-1704
TELEMEDIA (PTY) LTD 17 Ninth Avenue, Rivonia Sandton 2146, P.O.BOX 783515 Repablic of South Africa
Tel: (011)803 3353/4 Fax: (011)803-2534
Gaplasa S.A.AV. Ing. Conde de Torroja, 25, 28022 Madrid Tel: 91-329-29-60 Fax: 91-329-16-75
Sveriges Hi-Fi Klubb Box 5116, S-402 23 Göteborg Tel: 031-200040
Diethelm & Co., AG. Grindelstrasse 5, 8303 Bassersdorf Tel: 01-306-1611 Fax: 01-306-1690
Taiwan Kolin Co., Ltd. 10th Fl., 86, Sec. 1, Chung-king S. Rd., Taipei, Taiwan R.O.C.
Tel: 886-2-2314-1459 Fax: 886-2-2314-8521
Mahajak Development Co., Ltd. 46 Mahajak Building, Sukhumvit Soi 3 (Nana-Nua) Klongtoey, Bangkok
Thailand. 10110 Tel: 66-2-256-0020 Fax: 66-2-253-1696
Hayden Laboratories Ltd. Hayden House, Chiltern Hill, Chalfont St Peter,
Gerrards Cross, Bucks, SL9 9UG Tel: 01753-888447 Fax: 01753-880109
DENON ELECTRONICS, a Division of Denon Corporation (U.S.A.) 222 New Road Parsippany,
NJ07054, U.S.A., Tel: 973-396-7499, Fax: 888-544-8434
If there is no service center in your local area, consult the outlet where the equipment was purchased.
Falls sich in Ihrer Nähe keine Kundendienststelle befindet, wenden Sie sich an das Geschäft, wo das Gerät gekauft wurde.
S’il n’y a aucun centre de service dans votre région, consultez votre revendeur.
Se nella Vostra zona non c’è il centro di servizio, rivolgete Vi al negozio dove avete acquistato l’apparecchio.
Si no hay centros de servicio en su área local, consulte en donde haya comprado su equipo.
Als er in uw streek geen reparatie-inrichting is, neemt u kontakt op met de vestiging waar u de apparatuur gekocht heeft.
Saknas servicecentral i närheten där du bor, bör kontakt tas medåterförsäljaren för apparaten.
Se não existir um centro de serviços em sua área local, consulte o estabelecimento onde o equipamento foi adquirido.
G91117
14-14, AKASAKA 4-CHOME, MINATO-KU, TOKYO 107-8011, JAPAN
Telephone: (03) 3584-8111
Cable: NIPPON COLUMBIA TOKYO Telex: JAPANOLA J22591
Printed in Japan 511 3595 009