1
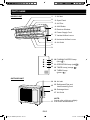
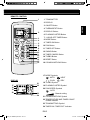
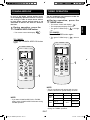
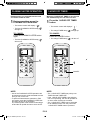
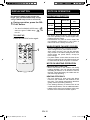
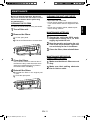
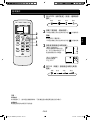
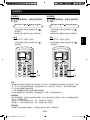
OPERATION MANUAL ENGLISH SPLIT TYPE ROOM AIR CONDITIONER ۮ綗ᚊٴ⢄䠧揰⹐ ᚊ⹐ INDOOR UNIT Ĺ⛢ ́㽡揅⟆⤥ ᚊᆦ⹐ OUTDOOR UNIT AY-AP9NRH AE-A9NRH AY-AP12NRH AE-A12NRH ⿾ⷣ掂䇂恀傢Ŕ5JCTR⫏⤵䗰䇂ⷣ뺔 2NCUOCENWUVGTŔ5JCTR⫏⤵䗰䇂拞 رⷣⅾⷣ뺔 Device of this mark is a trademark of Sharp Corporation. Plasmacluster is a registered trademark or a trademark of Sharp Corporation. OM_AY-AP9NRH_EN.indd 1 4/17/12 12:54:05 PM OM_AY-AP9NRH_EN.indd 2 4/17/12 12:54:06 PM ENGLISH Please read this manual carefully before using the product. This manual should be kept in a safe place for handy reference. CONTENTS SAFETY PRECAUTIONS ........................... EN-1 PARTS NAME............................................. EN-2 USING THE REMOTE CONTROL ............. EN-4 AUXILIARY MODE ..................................... EN-4 TIPS ON SAVING ENERGY ....................... EN-4 BASIC OPERATION ................................... EN-5 ADJUSTING THE AIR FLOW DIRECTION ....... EN-6 COANDA AIRFLOW ................................... EN-7 TURBO OPERATION ................................. EN-7 PLASMACLUSTER OPERATION .............. EN-8 1-HOUR OFF TIMER ................................. EN-8 TIMER OPERATION .................................. EN-9 DISPLAY BUTTON ..................................... EN-10 NOTE ON OPERATION ............................. EN-10 MAINTENANCE ......................................... EN-11 BEFORE CALLING FOR SERVICE ........... EN-12 SAFETY PRECAUTIONS WARNINGS • Do not pull or deform the power supply cord. Pulling and misuse of the power supply cord can result in damage to the unit and cause electric shock. • Be careful not to expose your body directly to the outlet air for a long time. It may affect your physical conditions. • When using the air conditioner for infants, children, elderly, bedridden, or disabled people make sure the room temperature is suitable for those in the room. • Never insert objects into the unit. Inserting objects can result in injury due to the high speed rotation of internal fans. • Ground the air conditioner without fail. Do not connect the grounding wire to gas pipe, water pipe, lightning rod or telephone grounding wire. Incomplete grounding may cause electric shock. • If anything is abnormal with the air conditioner (ex. a burning smell), stop the operation immediately and turn the circuit breaker OFF. • The appliance shall be installed in accordance with national wiring regulations. Improper cable connection can cause the power supply cord, plug and the electrical outlet to overheat and cause fire. • If the supply cord is damaged, it must be replaced by the manufacturer or its service agent or a similarly qualified person in order to avoid a hazard. Use only the manufacturespecified power cord for replacement. CAUTIONS • Open a window or door periodically to ventilate the room, especially when using gas appliances. Insufficient ventilation may cause oxygen shortage. • Do not operate the buttons with wet hand. It may cause electric shock. • For safety, turn the circuit breaker off when not using the unit for an extended period of time. • Check the outdoor unit mounting rack periodically for wear and to make sure it is firmly in place. • Do not put anything on the outdoor unit nor step on it. The object or the person may fall down or drop, causing injury. • This unit is designed for residential use. Do not use for other applications such as in a kennel or greenhouse to raise animals or grow plants. • Do not place a vessel with water on the unit. If water penetrates into the unit, electrical insulations may deteriorate and cause electric shock. • Do not block the air inlets nor outlets of the unit. It may cause insufficient performance or troubles. • Be sure to stop the operation and turn the circuit breaker off before performing any maintenance or cleaning. A fan is rotating inside the unit and you may get injured. • This appliance is not intended for use by persons (including children) with reduced physical, sensory or mental capabilities, or lack of experience and knowledge, unless they have been given supervision or instruction concerning use of the appliance by a person responsible for their safety. Children should be supervised to ensure that they do not play with the appliance. • Make sure to connect the air conditioner to power supply of the rated voltage and frequency. Use of a power supply with improper voltage and frequency can result in equipment damage and possible fire. • Do not install the unit in a place where inflammable gas may leak. It may cause fire. Install the unit in a place with minimal dust, fumes and moisture in the air. • Arrange the drain hose to ensure smooth drainage. Insufficient drainage may cause wetting of the room, furniture etc. • Make sure a leak breaker or a circuit breaker is installed, depending on the installation location, to avoid electrical shock. ENGLISH • • • • • • • • • • • • • • • • • Do not splash or pour water directly on the unit. Water can cause electric shock or equipment damage. • Do not attempt to install/remove/repair the unit by yourself. Incorrect work will cause electric shock, water leak, fire etc. Consult your dealer or other qualified service personnel for the installation/removal/repair of the unit. EN-1 OM_AY-AP9NRH_EN.indd Sec1:1 4/17/12 12:54:06 PM PARTS NAME INDOOR UNIT 1 1 Air Inlet 2 3 2 Open Panel 4 3 Air Filter 4 AUX Button 5 Receiver Window 6 Power Supply Cord 5 7 Vertical Airflow Louvre 6 8 Horizontal Airflow Louvre 7 9 Air Outlet 8 9 10 10 PLASMACLUSTER Lamp (blue ) 11 12 11 OPERATION Lamp (red ) 13 12 TIMER Lamp (orange ) 13 TURBO Lamp ) (green OUTDOOR UNIT 14 14 Air Inlet 15 16 15 Refrigerant Pipe and Interconnecting Cord 16 Drainage Hose 17 Air Outlet NOTE: Actual units might vary slightly 17 from those shown above. EN-2 OM_AY-AP9NRH_EN.indd Sec1:2 4/17/12 12:54:08 PM REMOTE CONTROL 1 1 TRANSMITTER 2 DISPLAY 3 ON/OFF Button ENGLISH 4 THERMOSTAT Button 2 3 4 5 6 7 8 9 10 11 12 13 14 15 16 5 DISPLAY Button 6 PLASMACLUSTER Button 7 1-HOUR OFF TIMER Button 8 MODE Button 9 TIMER ON Button 10 FAN Button 11 TIMER OFF Button 12 SWING Button 13 TIMER CANCEL Button 14 TURBO Button 15 RESET Button 16 COANDA AIRFLOW Button 17 MODE Symbols DISPLAY 17 21 22 18 19 20 : AUTO : HEAT : COOL : DRY 18 TURBO Symbol 19 PLASMACLUSTER Symbol 20 FAN SPEED Symbols : AUTO 23 24 : Manual setting 21 COANDA AIRFLOW Symbol 22 TEMPERATURE AND TIMER COUNT DOWN Indicator 23 TRANSMITTING Symbol 24 TIMER ON / TIMER OFF Indicator EN-3 OM_AY-AP9NRH_EN.indd Sec1:3 4/17/12 12:54:09 PM AUXILIARY MODE USING THE REMOTE CONTROL LOADING BATTERIES Use this mode when the remote control is not available. the battery cover. 1 Remove Insert two batteries. (AAA(R03)) 2 the battery cover. 3 Reinstall Press the RESET button using a 4 thin stick. TO TURN ON Press the AUX button. Make sure the (+) and (-) polarities are correctly aligned. • The red OPERATION lamp ( ) will light and the unit will start operating in the AUTO mode. • The fan speed and temperature setting are set to AUTO. TO TURN OFF Press the AUX button again. Battery cover • The red OPERATION lamp ( ) will turn off. AUX RESET button NOTE: • The battery life is approximately 1 year in normal use. • When replacing the batteries, always change both and use the same type. • If you will not be using the unit for a long time, remove the batteries from the remote control. TIPS ON SAVING ENERGY HOW TO USE THE REMOTE CONTROL Point the remote control towards the receiver window and press the desired button. The unit generates a beep when it receives the signal. • Make sure nothing, such as curtains, block the signal receiver window. • The signal effective distance is 7 m. Below are some simple ways to save energy when you use your air conditioner. Set the proper temperature • Setting to higher or lower then necessary temperature point will result in increased power consumption. Block direct sunlight and prevent drafts • Blocking direct sunlight during cooling operation will reduce power consumption. • Close the windows and doors during cooling and heating operations. Receiver window 7m Keep filter clean to ensure the most efficient operation CAUTION: • Do not expose the receiver window to direct sunlight. This may adversely affect its operation. • Use of certain fluorescent lamp in the same room may interfere with transmission of the signal. • Do not leave the remote control in direct sunlight or near a heater. Protect the remote control from moisture and shock. Disconnect the power cord when the unit is not used for an extended period of time • The indoor unit still consumes a small amount of power when it is not operating. EN-4 OM_AY-AP9NRH_EN.indd Sec1:4 4/17/12 12:54:10 PM BASIC OPERATION the MODE button to select the 1 Press operation mode. AUTO HEAT COOL DRY 2 3 1 4 • The red OPERATION lamp ( ) will light up. ENGLISH the ON/OFF button to start 2 Press operation. TO TURN OFF Press the ON/OFF button again. • The red OPERATION lamp ( ) will turn off. the THERMOSTAT button to 3 Press set the desired temperature. (AUTO/DRY mode) The temperature can be changed up to ±2 °C the automatically set of temperature. (COOL/HEAT mode) The temperature setting range: 18-32°C. the FAN button to set the 4 Press desired fan speed. AUTO LOW MED HIGH NOTE: AUTO MODE In the AUTO mode, the temperature setting and mode are automatically selected according to the room temperature when the unit is turned on. DRY MODE The fan speed is preset to AUTO and cannot be changed. EN-5 OM_AY-AP9NRH_EN.indd Sec1:5 4/17/12 12:54:11 PM ADJUSTING THE AIR FLOW DIRECTION VERTICAL AIR FLOW DIRECTION HORIZONTAL AIR FLOW DIRECTION 1 Press the SWING button. the SWING button again 2 Press to stop at the desired position. Hold the horizontal airflow louvre levers and adjust the air flow direction. • The vertical airflow louvre will swing. 1 2 Louvre levers CAUTION: Adjustment range COOL and DRY modes HEAT mode • Never attempt to adjust the vertical airflow louvre manually. • Manual adjustment of the vertical airflow louvre can cause the unit to malfunction. • When the vertical adjustment louvre is positioned at the lowest position in the COOL or DRY mode for an extended period of time, condensation may result. EN-6 OM_AY-AP9NRH_EN.indd Sec1:6 4/17/12 12:54:12 PM TURBO OPERATION COANDA AIRFLOW In cool or dry mode, vertical airflow louvre is set obliquely upward to deliver cool air to the ceiling in order to avoid direct airflow. In heat mode, vertical airflow louvre is set downward to deliver the warm air down to the floor. The air conditioner will operate to make the room cool or heat rapidly. During operation, press the 1 TURBO button. operation, press the 1 During COANDA AIRFLOW button. • The remote control will display “ ”. TO CANCEL Press the TURBO button again. • The green TURBO lamp ( off. TO CANCEL Press the COANDA AIRFLOW button again. ENGLISH • The remote control will display “ ”. • The temperature display will go off. • The green TURBO lamp ( ) will light up. ) will turn 1 1 NOTE: • The air conditioner will operate with the temperature and the fan speed setting as below. Mode NOTE: COOL DRY • If you want COANDA AIRFLOW in TURBO mode, press COANDA AIRFLOW button during TURBO operation. HEAT Temperature Fan speed Start up 15°C Extra high After 30 minutes 18°C High Start up After 30 minutes 32°C Extra high High • You can not set the temperature or fan speed during the TURBO operation. EN-7 OM_AY-AP9NRH_EN.indd Sec1:7 4/17/12 12:54:13 PM PLASMACLUSTER OPERATION 1-HOUR OFF TIMER Plasmacluster ions released into the room can reduce airborne mold. When the 1-HOUR OFF TIMER is set, the unit will automatically turn off after one hour. operation, press the 1 During PLASMACLUSTER button. the 1-HOUR OFF TIMER 1 Press button. • The remote control will display “ ”. • The blue PLASMACLUSTER lamp ( will light up. • The remote control will displays “ ) • The orange TIMER lamp ( TO CANCEL Press the PLASMACLUSTER button again. • The blue PLASMACLUSTER lamp ( will turn off. ”. ) will light up. TO CANCEL Press the CANCEL button. • The orange TIMER lamp ( ) 1 ) will turn off. 1 CANCEL NOTE: NOTE: • Use of the PLASMACLUSTER operation will be memorized, and it will be activated the next time you turn on the unit. • To perform Plasmacluster operation in FAN only mode, press the PLASMACLUSTER button when the unit is not operating. The mode symbol of the remote control will go off and the fan speed cannot be set to AUTO. • The 1-HOUR OFF TIMER has priority over TIMER ON and TIMER OFF. • If the 1-HOUR OFF TIMER is set while the unit is not operating, the unit will operate for an hour at the formerly set condition. • The 1-HOUR OFF TIMER can be extended for an additional hour from the point when 1-HOUR OFF TIMER button is pressed. EN-8 OM_AY-AP9NRH_EN.indd Sec1:8 4/17/12 12:54:14 PM TIMER OPERATION TIMER OFF TIMER ON the TIMER OFF button and the TIMER ON button and 1 Press 1 Press set the time as desired. set the time as desired. 0.5h 1.0h 1.5h 10h 11h 0.5h 12h 1.0h 1.5h 10h 11h 12h • The orange TIMER lamp ( ) will light up. • The time setting will count down to show the remaining time. TO CANCEL TO CANCEL Press the CANCEL button. Press the CANCEL button. • The orange TIMER lamp ( ENGLISH • The orange TIMER lamp ( ) will light up. • The time setting will count down to show the remaining time. ) will turn off. • The orange TIMER lamp ( ) will turn off. 1 1 CANCEL CANCEL NOTE: • Timer duration can be set from a minimum half an hour to a maximum of 12 hours. Up to 9.5 hours, you can set in half-hour increments, and from 10 to 12 hours, in 1-hour increments. • The TIMER OFF and TIMER ON can not be set together. • The 1-HOUR OFF TIMER has priority over TIMER ON and TIMER OFF. • When the temperature is set during timer setting, the temperature will show in the display for 5 seconds and then return to the timer display. TIMER OFF • When the TIMER OFF is set, the temperature setting is automatically adjusted to prevent the room from becoming excessively cold or warm , for example while you sleep. (Auto Sleep function) COOL mode: One hour after the timer is set, the temperature setting rises by 1 °C. HEAT mode: One hour after the timer is set, the temperature setting drops by 3 °C. TIMER ON • The unit will turn on prior to the set time to allow the room to reach the desired temperature. (Awaking function) EN-9 OM_AY-AP9NRH_EN.indd Sec1:9 4/17/12 12:54:15 PM NOTE ON OPERATION DISPLAY BUTTON OPERATING CONDITION Use when the lamps on the unit are too bright. (The red OPERATION lamp and the orange TIMER lamp cannot be turned off.) operation, press the DIS1 During PLAY button. • The blue PLASMACLUSTER lamp ( and/or the green TURBO lamp ( turn off. COOLING ) ) will TO LIGHT UP Press the DISPLAY button again. HEATING INDOOR TEMP. OUTDOOR TEMP. Upper limit 32 ˚C 43 ˚C Lower limit 21 ˚C 21 ˚C Upper limit 27 ˚C 24 ˚C Lower limit – –7 ˚C • The built-in protective device may prevent the unit from operating when used at higher temperature than this range. • Condensation may form on the air outlet if the unit operates continuously in the COOL or DRY mode when humidity is over 80 %. WHEN POWER FAILURE OCCURS 1 • This air conditioner has a memory function to store settings when a power failure occurs. After power recovery, the unit will automatically re-start in the same settings which were active before the power failure, except for timer settings. • If a power failure occurs while the timer is set, the timer setting will be cancelled and will not be retrieved even after the power is restored. NOTE ON HEATING OPERATION DEFROSTING FUNCTION • When frost forms on the outdoor unit during heating operation, the unit operate automatic defrosting for about 5 to 10 minutes to remove the frost. During defrosting, the inside and outside fans stop operating. HEATING EFFICIENCY • The unit employs a heat pump that draws heat from the outside air and releases it into the room. The outside temperature therefore greatly affects the heating efficiency. • If the heating efficiency is reduced due to low outside temperatures, use an additional heater. • It takes time to warm up and heat the entire room because of the forced air circulation system. EN-10 OM_AY-AP9NRH_EN.indd Sec1:10 4/17/12 12:54:16 PM MAINTENANCE Be sure to stop the operation, disconnect the power cord from the wall outlet and turn off the circuit breaker before performing any maintenance. CLEANING THE FILTERS 1 Turn off the unit. 2 Remove the filters. • Wipe them with a soft cloth. • Do not directly splash or pour water on them. It can cause electric shock or equipment damage. • Do not use hot water, thinner, abrasive powders or strong solvents. MAINTENANCE AFTER AIR CONDITIONER SEASON 1 Lift the open panel. 2 Pull the air filters down to remove them. ENGLISH The filters should be cleaned every two weeks. CLEANING THE UNIT AND THE REMOTE CONTROL Operate the unit in the COOL mode, 1 oughly temperature setting 32˚C, to thordry inside the unit. Stop the operation and unplug the unit. 2 Turn off the circuit breaker, if you have one exclusively for the air conditioner. 3 Clean the filters, then reinstall them. MAINTENANCE BEFORE AIR CONDITIONER SEASON 3 Clean the filters. Make sure that the air filters are not 1 dirty. Make sure that nothing obstructs 2 the air inlet or outlet. Use a vacuum cleaner to remove dust. If the filters are dirty, wash them with warm water and a mild detergent. Dry filters in the shade before reinstalling. 4 Reinstall the filters. 1 Reinstall the filters in the original positions. 2 Close the open panel. EN-11 OM_AY-AP9NRH_EN.indd Sec1:11 4/17/12 12:54:17 PM BEFORE CALLING FOR SERVICE The following conditions do not denote equipment malfunctions. Check the following points before calling for service. Unit does not operate The unit does not operate • The unit will not operate if it is turned on immediately after it is turned off. The unit will not operate immediately after the mode is changed. This is to protect the unit. Wait 3 minutes before operating the unit. • Check if the circuit breaker has tripped or the fuse has blown. Unit does not send out warm air • Check the filters. If dirty, clean them. • Check the outdoor unit to make sure nothing is blocking the air inlet or outlet. • Check the thermostat is proper setting. • Make sure windows and doors are closed tightly. • In heating operation, the indoor fan may not start for 2 to 5 minutes after the unit is turned on to prevent cold air from blowing out of the unit. • The unit is defrosting. Wait for 5 to 10 minutes. Odors • Carpet and furniture odors that entered into the unit may be sent out from the unit. Cracking noise • This sound is generated by the friction of the unit expanding or connecting due to a temperature change. A low buzzing noise The unit does not cool (or heat) the room effectively The unit does not receive the remote control signal • Check whether the remote control batteries have become old and weak. • Try to send the signal again with the remote control pointed properly towards the unit’s signal receiver window. • Check whether the remote control batteries are installed properly. • This is a sound of the unit generating Plasmacluster ions. Swishing noise • The soft, swishing noise is the sound of the refrigerant flowing inside the unit. Please call for service when the red lamp, the orange lamp and/or the green lamp on the unit blink. Mist seen at indoor air outlet • In cooling operation, this is caused by the difference between the room air temperature and the air discharged. Water vapour • In heating operation, water vapour may flow out of the outdoor unit during defrosting. Odor emitted from the air outlet • This is the smell of ozone generated from the Plasmacluster Ion generator. The ozone concentration is very small, posing no adverse effect on your health. The ozone discharged into the air rapidly decomposes, and its density in the room will not increase. EN-12 OM_AY-AP9NRH_EN.indd Sec1:12 4/17/12 12:54:18 PM Ĺ⛢ ́㽡ٴ⢄䠧揰⹐şݓ搈Ȟ䲱畝斐⿾́㽡揅⟆⤥뺔搈ᝍ⥷揅⟆⤥ᘃ♷✺ᙔ ໄ✴ȵ͛盅쩪⩰畝뺔 䉢熣 ᙔ礤瘋⏝✼ 教 sď憔⊈∎ⅾ⑱ᅓ睛㒼丒뺔⊈∎掷㽡睛㒼丒ৠ ⑱ᅓ⹐අ뺕IJ哸扗睛뺔 s㉏Ίď憔斷横綗甃쩪甬䉫⏕墫ۛ稄稄뺔 沓ⷳৠ印⤵ᶄ礈ὁ䇂ћᰗ뺔 sٴ⢄䠧揰⹐㽡✺ᮤל뺓ל䣼뺓甃凄뺓䁖Ǿⅾӧ ぅǾᅦ쩪뺕搈䔕ᙷᚊ㓨⟶ਤ浆뺔 s۰ࡧ∵ɓˇ㫹Ɍ␕ٴ⢄䠧揰⹐뺔์ؗ温 稄⇑綟沢洂欭뺕␕㫹Ɍᚶ⟎᳓哸াӧ뺔 sࠪḇ́ٴ⢄䠧揰⹐⏕ໄ뺔ď憔ᝍ⏕ໄ丒唛㥋ㄶ 䨓뺓ㅐ䨓뺓浽睗濭ⅾ睛捌⏕ໄ丒沬⏕뺔ďᙚ 䇂⏕ໄ⤵哸扗睛뺔 s⨐ٴ⢄䠧揰⹐ۛ㵊㿈ᬷ쥼̓㨂㣬ㄶઔ쥽뺕 䣊पы⿼洂欭뺕IJ疨甝✱棻අ뺔 s⹐අ礗̫㥏ຐᚯʷ丒憫ᙷ泊弱ᙔ恀뺔丒棻沬⏕ ď㿑ৠ印⤵哸睛㒼丒뺓␕祗প␕洉㧍뺕᳓ 哸㟟㟶뺔 s嚌睛㒼丒⑱ᅓ뺕礗㽭㽒㽕ⅾࠪ⥂ؗȱ㵕 ⅾ禤ʩ䇂ᝏⲽǾᅦ泊弱⤟␣뺕ȵה䆺㽒Ίᆦ뺔 ⤟␣쩪ḇ礗́㽡㽒㽕⋟ᙷ䇂睛㒼丒뺔 ㉏Ί sᙷ쩪⇦甠䡢ⅾ甓뺕́↿甬沖稄뺕㿑́㽡㥋ㄶඅ ؘ쩪⤟⿾뺔沖稄ď梦⤵哸偍ㄽ뺔 s搈ࡧົ⇜㛗쩪▶ː⋢瀽뺕ਤৠ哸扗睛뺔 s㡓ƪᙔ桉憧뺕甃⥤ď́㽡ٴ⢄䠧揰⹐쩪뺕 疨甝✱棻අ뺔 sᙷ⥤⺹⩰ᚊᆦ⹐䳚ᙔ恀⨴⟶ਤ䕥⑱পᙔ恀⟶ਤ 䠇뺔 s搈ࡧ∵ɓˇ⧎憑♷ົᚊᆦ⹐䳚Č뺕Ŷďৠ楍椨 ⹐䳚뺔沓ⷳ⤵́㫹ɌⅾǾ⎧č̌ⅾ棉ϙ뺕哸 াӧ뺔 s⥷ٴ⢄䠧揰⹐⟶ᝏ㡓ˁᙌ㽡沉减拂扵뺔ď憔ː ؗȠ㽡沉뺕̓✺㮙唤ⅾ噹䦓ໄ✴ː窤竄ࠤ 㫹ⅾ⫨Ⱗ㫹ş㽡뺔 sď憔∵恀⤽ㅐ䇂ᚶඅ♷ົ⹐䳚Č뺔⨐ㅐ㕧泊 ⹐䳚뺕睛䳼严⤵忠⑱ᅓ뺕IJ哸扗睛뺔 sď憔၃ႇ⹐䳚䇂泊稄ۛ稄뺔沓ⷳ⤵Ȳٴ ⢄䠧揰⹐ď印ɖ䆺⑂Ẍ印ⅾ᳓哸⚀皮뺔 s·竄ⅾ㏫㊋ٴ⢄䠧揰⹐쩪뺕ࠪḇы⿼洂欭뺕IJ 疨⎧✱棻අ뺔稄⇑ົ⹐䳚温洂欭뺕⤵᳓哸⑱ӧ뺔 s癒矹ᶽܧ䉏敼Ǿⅾ期朲ؗᙔǾᅦ䇂浆㿑䉏䌓 ⅾ⋟뺕ਤ⹐⥷ď浆横綗ᙳ印ⅾḅ⡝印ߓ 江ࢊ凄뺕ⅾ偍Ť▶ː䵽糟䏣攽䇂Ǿᅦ쥼ࡰ⊻ ל䣼쥽́㽡뺔 ᮤלাܧ䉏䌓뺕ȵ䔕·Ƞϗďȵ⿾⹐අː㡓 㳔ؘ뺔 s䔕ᙷ́ٴ⢄䠧揰⹐唛禇ᙷ睛ᅁ祫㲨䇂睛㒼沬 ⏕뺔́㽡ď浆㿑睛ᅁ祫㲨䇂睛㒼⤵⑱ᅓ⹐අ ⅾ沥ⅶ㟟㟶뺔 sď憔∵ٴ⢄䠧揰⹐ᙔ恀ົ⟎㧪ㄶ綗ৠ印㈘㖕䇂 ໄ✴뺕沓ⷳ⤵᳓桉㟟㟶뺔 搈ᝍٴ⢄䠧揰⹐ᙔ恀ົ䠧ㄶĹ㟤Ⴌ뺓㤸瞟㛗 ㄶ⤱䇂ໄ✴뺔 s搈ᙔ恀⎶ㅐ檃䨓뺕ȵ䔕·⎶ㅐ⢚礕뺔⎶ㅐďን 쨂ᚶ⟎Ჹ㛗↿甬Ӄؘ䦓뺔 sḇ礗⫤●ᙔ恀ʽ傢拂傢㖕睛✱棻අⅾ睛㒼✱棻 අ뺕ȵ瘋⿼扗睛뺔 Ĺ⛢ sᙔ礤瘋⏝✼%0 s৻温ɖਅ䞧%0 s洢⏙අ▶ː%0 s櫐ߤ甠疨ⷱ%0 s䩂䊀印㒼䇂✴㈰%0 s⥷▶ː%0 sㄶ㋊✴ਊ䇂揰⛅%0 sᰗ洖ㄶ㋊%0 sḻ沢▶ː%0 s2%+ ▶ː%0 sĀ쩪疨⹐ᙷ쩪අ%0 sᙷ쩪අ▶ː%0 s秄䗨⋢瀽%0 s▶ː㉏Ίư礔%0 s·竄%0 s䶴Οş㉏ݓΊşư礔%0 sď憔∵ㅐ䉫⏕㘅㞰ົ⹐䳚Č뺔ㅐۮৠ哸扗睛 ⅾ⹐අ⑱ᅓ뺔 s۰ࡧഇ挵哨弱ᙔ恀 ⊄癒 Ο㵕ٴ⢄䠧揰⹐뺔 ď⿽䔕䇂▶ː⤵哸扗睛뺓㖕ㅐ뺓㟟㟶䦓뺔 ⤽疨ᙔ恀 ⊄癒 Ο㵕䇂ொ禆뺕搈ਊ䵽焥ⅾ ؗȠ⫧䇂䶴ΟǾନ⩰挭뺔 CN-1 OM_AY-AP9NRH_HK.indd Sec1:1 4/17/12 12:54:51 PM ৻温ɖਅ䞧 ᚊ⹐䳚 1 1 泊稄쥼䠧ㄶ쥽 2 3 2 砂⧡ 4 3 皢Ⴌ䶿 4 櫐ߤ甠疨⋢瀽 #7: 5 尣⏕♫අ 6 睛㒼丒 5 7 ༷䉫ㄶ㋊稄⧡ 6 8 ㅐᮔㄶ㋊稄⧡ 7 9 ۛ稄쥼䠧ㄶ쥽 8 9 10 1 0 2%+ ⋟䗨㧲쥼嬤嗨 쥽 11 11 ▶ː⋟䗨㧲쥼䱔嗨 쥽 12 13 12 ᙷ쩪අ⋟䗨㧲쥼⹆嗨 쥽 13 ḻ沢⋟䗨㧲쥼䶙嗨 쥽 ᚊᆦ⹐䳚 14 14 泊稄쥼䠧ㄶ쥽 15 15 ٴᑲ滢䨓᳓丒 16 ⎶ㅐ檃䨓 16 17 ۛ稄쥼䠧ㄶ쥽 ㉏Ί쟝 ⹐䳚ᜒ㫹ৠ印唛Čຣ⇁䗨㾺⤽ď 뺔 17 CN-2 OM_AY-AP9NRH_HK.indd Sec1:2 4/17/12 12:54:53 PM 洢⏙අ 1 1 尣Ӣ汣අ 2 秄䗨අ 3 甠疨⋢瀽 4 㓨᯳⋢瀽 2 5 6 7 8 9 10 11 12 13 14 15 16 6 2%+ ⋢瀽 7 Ā쩪疨⹐ᙷ쩪අ⋢瀽 8 ⷱ拂ᙷ⋢瀽 /1&' 9 ᙷ쩪甠⹐⋢瀽 Ĺ⛢ 3 4 5 秄䗨⋢瀽 &+52.#; 10 稄沢⋢瀽 (#0 11 ᙷ쩪疨⹐⋢瀽 12 稄☃⋢瀽 59+0) 13 ᙷ쩪අঽ㌪⋢瀽 %#0%'. 14 ḻ沢▶ː⋢瀽 15 濜拂⋢瀽 4'5'6 16 ᰗ洖ㄶ㋊⋢瀽 17 ⷱ䥥尣 秄䗨අ 17 21 22 18 19 20 즎哨ࠤ 즎悀㧍 즎悀ٴ 즎≷㛗 18 ḻ沢▶ː䥥尣 19 2%+ ⷣ抖 20 稄沢䥥尣 23 24 즎哨ࠤ 즎⇜ࠤ拂ᙷ 21 ᰗ洖ㄶ㋊䥥尣 22 㓨᯳পᙷ쩪අϙ⛍扵쩪⋟䗨අ 23 尣Ӣ汣අ䥥尣 24 甠疨⹐ᙷ쩪අ䥥尣 CN-3 OM_AY-AP9NRH_HK.indd Sec1:3 4/17/12 12:54:55 PM 櫐ߤ甠疨ⷱ 洢⏙අ▶ː ď印́㽡洢⏙අ좹뺕ৠܟ㽡⿾櫐ߤ甠疨ⷱ뺔 恀Č睛ㆋ ⇦甠睛ㆋࢣ奱뺔 1 ♷⨎睛ㆋ뺔 ### 4 2 3 奱ቃ睛ㆋࢣ奱뺔 4 ܟ㽡ᮤ⯈⋢4'5'6쟋濜拂쟌⋢瀽뺔 甠⹐ ⋢#7:쟋櫐ߤ甠疨쟌⋢瀽뺔 sŊ⹐Č䇂䱔嗨▶ː⋟䗨㧲 ᝍ⤵菴ǩ뺕IJ ⤵ົ哨ࠤⷱč甠ዠ▶ː뺔 s汣稄沢᯳㓨᯳⤵忠拂ᙷ㡓哨ࠤ뺔 䔕·㓆⿽ প期 Ⳍ뺔 疨⹐ ⋢ضĀ⾗#7:쟋櫐ߤ甠疨쟌⋢瀽뺔 sٴ⢄䠧揰⹐Č䇂䱔嗨▶ː⋟䗨㧲 㔙뺔 ᝍ⤵㥻 睛ㆋࢣ奱 #7: 쥼櫐ߤ甠疨쥽 ⋢瀽 濜拂⋢瀽 4'5'6 ㉏Ί쟝 sົ⿽䔕́㽡şὯ㈔č뺕睛ㆋᅼઠ䱑㡓Āᮖ뺔 s⤟␣睛ㆋ쩪뺕ࠪḇ⤟␣⨎䉱ག尣䇂✤睛ㆋ뺔 s甃⥤ď́㽡洢⏙අ쩪뺕搈ঽۛ恇砂䇂睛ㆋ뺔 䩂䊀印㒼䇂✴㈰ ˇ́㽡洢⏙අ ᝍ洢⏙අ㓆ٴ⢄䠧揰⹐䇂尣⏕♫අᶭ뺕⋢ᾯ 憔▶ː䇂⋢瀽뺔ٴ⢄䠧揰⹐⏕♫ܧ尣좹⤵䆺ۛ 劖뺔 s䔕ᙷ洢⏙අٴ⢄䠧揰⹐ş甬㇖⤽䡢䬉ⅾؗȠ 㫹Ɍ瘘▴뺔 s洢⏙අৠົ眱Ŋ⹐䭧쭅泊弱▶ː뺔 č砂⟶́㽡ٴ⢄䠧揰⹐좹䩂䊀印㒼䇂ᮨ䞣✴㈰뺔 拂ᙷ浆㿑䇂㓨᯳ s ⨐㓨᯳拂ᙷ洉綟ⅾ洉ˀ뺕㡓洖哸ḇ礗䇂㓨 ᯳菴⤵哸⤟ᆪ䇂睛ߓ㌪凢뺔 搈ࡧ斷癸䉫ᝉ泊ᚊⅾȲٴㄶ㋊ᇈ s悀▶ٴː쩪嚌浽ה癸䉫ᝉৠȵ瘯ˀ凢睛濞뺔 sົ悀ٴⅾ悀㧍▶ː洉䝮Ĺ搈疨甝甓䡢뺔 ·좢皢Ⴌ䶿㏫㘌뺕ȵ䔕·⤱⤽⚃䇂▶ː 尣⏕♫අ 䭧 ⨐甃좹甬ď́㽡Ŋ⹐뺕⊚⎧睛㒼丒뺔 sप ́ٴ⢄䠧揰⹐ы⿼洂欭뺕ᚊ⹐䳚Ŷ憔㌪凢 濞睛ߓ뺔 ㉏Ί쟝 s۰ࡧȲ尣⏕♫අাᴚ㡣䇂癸㥏ᝉ뺕ਤ⤵ᶄ 礈⿽ᬷ▶ː뺔 sĀ↿甬́㽡᬴⤽ḻ沢桉ࠤ恀傢䇂䨓ৠ印⤵ᶄ 礈尣䇂Ӣ汣뺔 s۰ࡧᝍ洢⏙අ♷ົা癸㥏ᝉş쭅ⅾ⢄ㄶ恀傢 ❃涘뺔浽ה洢⏙අা㘴ⅾাܧ䔇╮뺔 CN-4 OM_AY-AP9NRH_HK.indd Sec1:4 4/17/12 12:54:59 PM ⥷▶ː 1 ⋢/1&'쟋ⷱ拂ᙷ쟌⋢瀽뺕浫▯▶ː ⷱ뺔 哨ࠤ 悀㧍 悀ٴ ≷㛗 sٴ⢄䠧揰⹐Č䇂䱔嗨▶ː⋟䗨㧲 ᝍ⤵菴ǩ뺔 疨⹐ ⋢⾗ض甠疨⋢瀽뺔 sٴ⢄䠧揰⹐Č䇂䱔嗨▶ː⋟䗨㧲 ᝍ⤵㥻㔙뺔 Ĺ⛢ 2 3 1 4 2 ⋢甠疨⋢瀽뺕甠ዠ▶ː뺔 3 ⋢㓨᯳⋢瀽拂ᙷ⇁睠㓨᯳뺔 쥼哨ࠤ≷㛗ⷱ쥽 ٴ⢄䠧揰⹐⤵哨ࠤ拂ᙷ㓨 ᯳뺕Ǜৠȵჰߘⅾ㐆°% 䇂㓨᯳䩇ຕːۛ揰⛅뺔 쥼悀ٴ悀㧍ⷱ쥽 㓨᯳拂ᙷ䩇ຕ즎 哶°% 4 ⋢(#0쟋稄沢쟌⋢瀽拂ᙷ⇁睠ş稄⇑ 沢᯳뺔 哨ࠤ ˀ沢 Ĺ沢 綟沢 ㉏Ί쟝 哨ࠤⷱ ົ哨ࠤⷱč뺕㿑ٴ⢄䠧揰⹐甠௧쩪뺕ৠ⫤●ᚊ㓨哨ࠤ浫▯㓨᯳拂ᙷⷱ뺔 ≷㛗ⷱ 稄⇑沢᯳礤拂㡓哨ࠤ减ď印♰斥뺔 CN-5 OM_AY-AP9NRH_HK.indd Sec1:5 4/17/12 12:55:01 PM ㄶ㋊✴ਊ䇂揰⛅ ༷䉫ㄶ㋊✴ਊ ㅐᮔㄶ㋊✴ਊ 1 ⋢Āč洢⏙අČ䇂59+0)쟋稄☃쟌 ⋢瀽뺔 ́㽡ㅐᮔㄶ㋊稄⧡▶今⭇揰䩂ㄶ㋊✴ਊ뺔 s༷䉫ㄶ㋊稄⧡ᝍ⤵☃ࠤ뺔 2 㿑༷䉫ㄶ㋊稄⧡☃ࠤ⇁ܧ睠ʽ 傢좹뺕⋢ضĀ⾗ 59+0)쟋稄☃쟌 ⋢瀽뺔 稄⧡▶今⭇ 1 2 ㉏Ί쟝 s۰ࡧ㽡⇜揰⛅༷䉫ㄶ㋊稄⧡뺔 s⇜ࠤ揰⛅༷䉫ㄶ㋊稄⧡⤵哸拂ұᇈ矓뺔 sົ悀ٴⅾ≷㛗ⷱč甃쩪甬ᝍ༷䉫ㄶ㋊稄⧡ 揰⛅哶⤱čʽ傢뺕⤵哸ڰٴ뺔 揰⛅䩇ຕ 悀ٴ≷㛗ⷱ 悀㧍ⷱ CN-6 OM_AY-AP9NRH_HK.indd Sec1:6 4/17/12 12:55:03 PM ḻ沢▶ː ᰗ洖ㄶ㋊ ົ悀ٴⅾ≷㛗ⷱĹ뺕༷䉫ㄶ㋊稄⧡ᝍਊ✉Č ✴☃ࠤ뺕ٴㄶ⥢ᆿ噄⧡汣뺕ȵ瘋⿼毺砂汣稄뺔 ົ悀㧍ⷱĹ뺕༷䉫ㄶ㋊稄⧡ᝍਊč✴☃ࠤ뺕 ⢄ㄶ⥢ໄ⧡汣뺔 1 1 ▶ː⥤甬⋢ḻ沢▶ː⋢瀽뺔 s洢⏙අᝍ⤵秄䗨q r뺔 s㓨᯳秄䗨ᝍ⤵㌪ᇈ뺔 sٴ⢄䠧揰⹐Č䇂ḻ沢▶ː⋟䗨㧲 ⤵菴ǩ뺔 ▶ː좹뺕⋢ᰗ洖ㄶ㋊⋢瀽뺔 s洢⏙අᝍ⤵秄䗨q ́㽡ḻ沢▶ː뺕ٴ⢄䠧揰⹐ᝍ印ḻ沢́↿甬斥㍷ ⅾ斥⢄뺔 r뺔 ᝍ ঽ㌪ ⋢ضĀ⾗ḻ沢▶ː⋢瀽뺔 ঽ㌪ ⋢⾗ضᰗ洖ㄶ㋊⋢瀽뺔 sٴ⢄䠧揰⹐Č䇂ḻ沢▶ː⋟䗨㧲 ⤵㥻㔙뺔 ᝍ Ĺ⛢ 1 1 ㉏Ί쟝 ㉏Ί쟝 s⨐ὁᾯ斷ᰗ洖ㄶ㋊쭅✺ḻ沢▶ːⷱ뺕搈ົ ḻ沢▶ː㭺※č⋢ᰗ洖ㄶ㋊⋢瀽뺔 sٴ⢄䠧揰⹐ᝍ⤵ȵč܂㓨᯳稄沢拂ᙷ▶ː뺔 ⷱ 悀ٴ ≷㛗 悀㧍 㓨᯳ 稄沢 甠⹐쩪 쀓 % 桠綟沢 ۮ獢ᶭ 쀓 % 綟沢 甠⹐쩪 ۮ獢ᶭ 쀓 % 桠綟沢 綟沢 sົḻ沢▶ːⷱč뺕ὁᝍď印拂ᙷ㓨᯳ⅾ稄沢뺔 CN-7 OM_AY-AP9NRH_HK.indd Sec1:7 4/17/12 12:55:04 PM 2%+ ▶ː Ā좹疨⹐ᙷ좹අ ົᚊ忠濚♷ۛ̌䇂 2%+ ⿽期眱ᗸৠ㐆䠧ㄶĹ 䇂睯埗뺔 㿑拂ᙷቃĀ좹疨⹐ᙷ좹අ좹뺕ٴ⢄䠧揰⹐ᝍ⤵ ົĀύ좹ᶭ哨ࠤы⿼洂欭뺔 1 ົ▶ː좹⋢Āč 2%+ ⋢瀽뺔 1 ⋢Ā좹ᙷ좹疨⹐⋢瀽뺔 s洢⏙අᝍ⤵秄䗨q r뺔 sٴ⢄䠧揰⹐Č䇂嬤嗨 2%+ ⋟䗨㧲 ⤵菴ǩ뺔 s洢⏙අČᝍ⤵秄䗨q ᝍ r뺔 sٴ⢄䠧揰⹐Č䇂⹆嗨ᙷ쩪අ⋟䗨㧲 ᝍ⤵菴ǩ뺔 ঽ㌪ ⋢ضĀč 2%+ ⋢瀽뺔 sٴ⢄䠧揰⹐Č䇂嬤嗨 2%+ ⋟䗨㧲 ⤵㥻㔙뺔 ঽ㌪ ᝍ ⋢%#0%'.쥼ঽ㌪쥽⋢瀽뺔 sٴ⢄䠧揰⹐Č䇂⹆嗨ᙷ쩪අ⋟䗨㧲 ᝍ⤵㥻㔙뺔 1 1 ঽ㌪ ㉏Ί쟝 ㉏Ί쟝 s2%+ ▶ːᝍ⤵忠抖⃢桉̌뺕㿑ὁčĀ⾗௧ࠤٴ ⢄䠧揰⹐쩪뺕2%+ ▶ːᝍ⤵⾗ض௧ࠤ뺔 sົٴ⢄䠧揰⹐ы⿼洂欭쩪⋢č 2%+ ⋢瀽뺕浫▯ (#0쥼稄沢쥽ⷱş 2%+ 洂ː뺔 洢⏙අČ䇂ⷱ䥥尣ᝍ⤵㥻㔙뺕减稄沢ď印拂 ᙷ㡓哨ࠤ뺔 sĀ 쩪ᙷ쩪疨⹐拂ᙷ֗ᙷ✺쩪甠⹐唛ᙷ쩪疨 ⹐뺔 s㿑 拂ᙷĀ쩪ᙷ쩪疨⹐减ٴ⢄䠧揰⹐ďົ▶ː 쩪뺕ٴ⢄䠧揰⹐ᝍȵݓ拂ᙷ䇂⭷Ɍ洂欭Ā 쩪뺔 ś 㽡Ā쩪ᙷ쩪疨⹐拂ᙷ뺕ৠ́ٴ⢄䠧揰⹐哨 ⋢čĀ쩪ᙷ쩪疨⹐⋢瀽ş쩪桉Ნ甃洂弱Āύ 쩪뺔 CN-8 OM_AY-AP9NRH_HK.indd Sec1:8 4/17/12 12:55:06 PM ᙷ좹අ▶ː ᙷ좹疨⹐ ᙷ좹甠⹐ ⋢ᙷ좹疨⹐⋢瀽뺕㤇ᶭ拂ᙷ睠憔䇂 1 좹甬뺔 1 ⋢ᙷ좹甠⹐⋢瀽뺕㤇ᶭ拂ᙷ睠憔䇂 좹甬뺔 0.5h 1.0h 1.5h 10h 11h 0.5h 12h sٴ⢄䠧揰⹐Č䇂⹆嗨ᙷ쩪අ⋟䗨㧲 ᝍ⤵菴ǩ뺔 1.0h 1.5h 10h 11h 12h sٴ⢄䠧揰⹐Č䇂⹆嗨ᙷ쩪අ⋟䗨㧲 ᝍ⤵菴ǩ뺔 s쩪甬拂ᙷ⤵ːϙ⛍扵쩪IJ秄䗨짭竢쩪甬뺔 ঽ㌪ ঽ㌪ ⋢%#0%'.쥼ঽ㌪쥽⋢瀽뺔 ⋢%#0%'.쥼ঽ㌪쥽⋢瀽뺔 sٴ⢄䠧揰⹐Č䇂⹆嗨ᙷ쩪අ⋟䗨㧲 ᝍ⤵㥻㔙뺔 sٴ⢄䠧揰⹐Č䇂⹆嗨ᙷ쩪අ⋟䗨㧲 ᝍ⤵㥻㔙뺔 Ĺ⛢ s쩪甬拂ᙷ⤵ːϙ⛍扵쩪IJ秄䗨짭竢쩪甬뺔 1 1 ঽ㌪ ঽ㌪ ㉏Ί쟝 sᙷ쩪අ䇂拂ᙷ쩪甬ৠ᷈⤱䏮࣯ύ쩪哶⤱甃ύ쩪뺔嚌ᙷ쩪අ䇂拂ᙷ쩪甬甃᯳✺ⅾ䦓✺ύ 쩪뺕ৠȵȵ࣯ύ쩪㡓ౠʽ揰⛅즏嚌拂ᙷ쩪甬㡓哶ύ쩪뺕印ȵύ쩪㡓ౠʽ揰⛅뺔 sďৠ쩪拂ᙷ疨⹐প甠⹐ᙷ쩪අ뺔 sĀ쩪ᙷ쩪疨⹐拂ᙷ֗ᙷ✺쩪甠⹐唛ᙷ쩪疨⹐뺔 sົᙷ쩪甠⹐䇂Ὧ㈔č拂ᙷ㓨᯳쩪뺕㓨᯳З⤵秄䗨 䜛獢뺕㤇ᶭờᷕ쩪甬秄䗨뺔 ᙷ좹疨⹐ s拂ᙷᙷ쩪疨⹐쩪뺕㓨᯳拂ᙷ⤵哨ࠤ泊弱揰⛅뺕ȵ瘋⿼ᚊ㓨᯳洉ٴⅾ洉㧍뺕瘋⿼ົὁ䌎懰⥤甬㓨᯳ 洉ˀ뺔쥼哨ࠤ䌎䊭ߗ印쥽 悀ⷱٴ즎ົ拂ᙷᙷ쩪අşᶭ䇂Ā쩪뺕㓨᯳⤵࣬綟♀ㄗ᯳뺔 悀㧍ⷱ즎ົ拂ᙷᙷ쩪අşᶭ䇂Ā쩪뺕㓨᯳⤵č瘯♀ㄗ᯳뺔 ᙷ좹甠⹐ sŊ⹐⤵ົ拂ᙷ䇂쩪甬şݓ甠⹐뺕ȵ·쩓ᚊ㓨᯳洖哶⇁睠뺔쥼ఽ潥ߗ印쥽 CN-9 OM_AY-AP9NRH_HK.indd Sec1:9 4/17/12 12:55:08 PM ▶ː㉏Ίư礔 秄䗨⋢瀽 㿑拂ұČ䇂⋟䗨㧲洉ǩ좹́㽡뺔쟋ďৠ疨甝䱔嗨 ▶ː⋟䗨㧲প⹆嗨ᙷ좹අ⋟䗨㧲뺔쟌 1 ▶ː㹶Ⴢ ▶ː⥤甬⋢č秄䗨⋢瀽뺔 sٴ⢄䠧揰⹐Č䇂嬤嗨 2%+ ⋟䗨㧲 ⅾ䶙嗨ḻ沢▶ː⋟䗨㧲 悀ٴ প ᝍ⤵㥻㔙뺔 悀㧍 甠௧⋟䗨㧲 ⋢⾗ضč秄䗨⋢瀽뺔 ᚊ㓨᯳ ᚊᆦ㓨᯳ Č瘴 °% °% č瘴 °% °% Č瘴 °% °% č瘴 t °% s傢䇂·敼恀傢ৠ瘋⿼Ŋ⹐ົ綟✺ؗ拂ᙷ㓨᯳ 䩇ຕ䇂㓨᯳č洂弱뺔 s㿑ٴㄶ⹐ົ㛗᯳桠洉 䇂Ὧ㈔č쩓侇ົ悀ٴ ⅾ≷㛗ⷱč洂欭뺕ົۛ稄쭅ৠ印⤵ڰ剡ㅐ 㴞뺔 ы睛 1 s ٴㄶ⹐⤽ؘ抖⃢ߗ印뺕睛㒼Ĺ✱쩪印ᆱ֦ᘃ拂 ᙷ뺔 ờ̧ᷕ睛ᶭ뺕癒ᙷ쩪අ拂ᙷᆦ뺕Ŋ⹐ᝍ哨ࠤȵ ✱睛ݓ䇂䉱拂ᙷ濜✤洂ː뺔 sы 睛ݓ拂ᙷ䇂ᙷ쩪ߗ印ᝍᇈ⚃뺕IJěप้́ᷕ ̧睛Ǜď⤵ờᷕ뺔 悀㧍▶ː㉏Ίư礔 癒瞎ߗ印 s悀㧍▶ː쩪⨐ᚊᆦ⹐䳚䳲瞎뺕⹐䳚ញ⤵哨ࠤ 甠௧癒瞎ߗ印哶ۮ獢뺕嬝ȵ癒瞎뺔癒瞎⥤ 甬뺕温ᆦ温稄⇑⤵ы⿼洂欭뺔 悀㧍⚃印 s⥷⹐㽡㧍㉢ੁᚊᆦ䠧ㄶ뺕IJ濚♷↿甬ş뺔 ์⿾뺕ᚊᆦ㓨᯳悀㧍⚃印⤽墫Ⳍᆼᶄ礈뺔 s ⨐悀㧍⚃印์ᚊᆦ㓨᯳檳ᯓ减⤽⇁č瘯뺕搈 弱́㽡⢄쫆뺔 s㽭✺⏎㽡ᴚܲㄶ㋊䰾䴷뺕์⿾睠噄ČĀDž쩪甬 ́⛅ύ↿甬斥⢄뺔 CN-10 OM_AY-AP9NRH_HK.indd Sec1:10 4/17/12 12:55:10 PM ·竄 ົ泊弱·竄şݓ뺕䔕·ы⿼ٴ⢄䠧揰⹐▶ː뺕 ᝍ睛㒼丒᷈㪼ᄥ䇂␕Č⊚ۛ疨⎧✱棻අ뺔 ㏫㊋皢Ⴌ䶿 皢Ⴌ䶿ェ泇㏫㘌Ā⾗뺔 1 疨⎧Ŋ⹐뺔 2ঽۛ皢Ⴌ䶿뺔 ㏫㘌Ŋ⹐洢⏙අ s㽡檃◢⊼Ɲ㎻뺔 sď憔∵ㅐ䉫⏕㘅㞰ົ⹐䳚Č뺔ㅐۮৠ哸扗睛 ⅾ⹐අ⑱ᅓ뺔 s۰ࡧ́㽡㧍ㅐ뺓䝚濚߂뺓䐧䕥䮋ⅾ㡣Ẍ㓺߂뺔 ٴ⢄䠧揰⹐ᘐ䩂ᶭ䇂·竄 㓨᯳拂ᙷ㡓 1 ᝍ䠧揰⹐拂ᙷ㡓悀ⷱٴ % ȵȲ拂ұ温ᷳᯓƝ㪬뺔 2 ы⿼▶ː뺕⊚ۛŊ⹐䇂␕祗뺔嚌́㽡ٴㄶ⹐ ᝏ㽡✱棻අ뺕ᝍؗ疨⎧뺔 3 ᝍ皢Ⴌ䶿㏫㊋Ɲ㎻ᶭض濜✤恀Č뺔 ° 1⑀桉砂⧡뺔 2ᝍ皢Ⴌ䶿ᶝč⊈প⊄č뺔 Ĺ⛢ ٴㄶ⹐ᘐ䩂ݓ䇂·竄 3㏫㊋皢Ⴌ䶿뺔 㽡ੁႬ⹐ੁ癒㟤Ⴌ뺔嚌皢Ⴌ䶿ᇁ經뺕㽡⢄ㅐ 㓨䇂㏫㘌߂㊋Ɲ㎻뺔ᝍ皢Ⴌ䶿♷✺癤㍷ 쭅⡢Ɲᶭض濜✤恀Č뺔 1 䔕ᙷ皢Ⴌ䶿㏫㊋Ɲ㎻뺔 2 䔕ᙷ泊稄ۛ稄㇖忠ɓˇ㫹Ɍ瘘 ႇ뺔 4 ⾗ضᙔ恀皢Ⴌ䶿뺔 1ົ०ዠʽ傢⾗ضᙔ恀皢Ⴌ䶿뺔 2疨Č砂⧡뺔 CN-11 OM_AY-AP9NRH_HK.indd Sec1:11 4/17/12 12:55:12 PM 䶴Οş㉏ݓΊşư礔 ȵčư礔ď៤✺⹐අ⚀皮뺔 ົዱ抔䶴Οş⩰⺹ݓč৻܂ư礔뺔 Ŋ⹐ď印洂欭 Ŋ⹐ᙚď印洂欭좹 sŊ ⹐ົݦ疨甝ᶭ䣊प甠௧䇂Ὧ㈔čď⤵洂欭뺔 Ŋ⹐ົ斥⤟洂弱ⷱşᶭď洂欭뺔沓⟶㡓ƪ· 敼Ŋ⹐뺔搈䦓쨺ۮ獢뺕盅ᶭ甠௧Ŋ⹐▶ː뺔 s⺹⩰·盈䴹⟶ਤ㦕✱뺔 Ŋ⹐IJ㇖⤽㽕㽒⢄ㄶ sົ 悀㧍▶ː쩪뺕ᚊ稄⇑ৠ印ົŊ⹐甠௧şᶭ 䇂哶ۮ獢⢦ы洂欭뺕ȵ瘋⿼ٴ䠧ㄶ᷈Ŋ ⹐Ĺۛ뺔 sŊ⹐⿽ົ癒瞎뺔搈䦓쨺哶ۮ獢뺔 s⺹⩰皢Ⴌ䶿뺔嚌䆺㵊經ㆌ뺕搈ߘȵ㏫㊋뺔 s⺹⩰ᚊᆦ⹐䳚뺕䔕ᙷ泊稄ⅾۛ稄㇖忠ɓˇ 㫹Ɍ瘘ႇ뺔 s⺹⩰㓨᯳⟶ਤ拂ᙷን㿑뺔 s䔕掄甓䡢䵽疨䷱뺔 ㄶઔ Ŋ⹐㣣㈰⏕♫洢⏙අ尣좹 s㕧 Ŋ⹐䇂ໄポᚯؘ䇂ㄶઔৠ印⤵䵽Ŋ⹐ ۛ뺔 s⺹⩰洢⏙අ䇂睛ㆋ⟶ਤ斥唟ⅾ斥ᴌ뺔 sᝍ洢⏙අ㓆Ŋ⹐Č䇂尣⏕♫අض濜✤▶ː Ā⾗뺔 s⺹⩰洢⏙අ䇂睛ㆋ⿽期Ⳍ⟶ਤ恀ን뺔 殖௵劖 sŊ ⹐ৠ印⤵䆺ۛ殖௵劖礈뺕沓⟶㽭✺㓨᯳䇂斥 ࢊ沥ⅶŊ⹐砂⧡ؗȠ温Ɍ呸㗑ⅾ♫仄减䆺ۛ 䇂劖礈뺔 䆺ۛˀ㇆䇂ಲಲ劖 Ŋ⹐⥵印⤽⚃ໄ́↿甬斥㍷쟋斥⢄쟌뺔 ⨐Ŋ⹐Č䇂䱔嗨⋟䗨㧲뺓⹆嗨⋟䗨㧲প ⅾ䶙嗨⋟䗨㧲甗㩛뺕搈哸睛䶴Ο⥂ࠪĹḅ뺔 s㿑Ŋ⹐濚♷ۛ 2%+ 쩪⤵䆺ۛˀ㇆䇂ಲಲ劖뺔 櫑ᷞ劖礈 s⩚ᴌ뺓櫑ᷞ䇂劖礈⟶߂ږٴ㋊ࠤ䇂劖磮뺔 ᚊۛ稄⤽瞟ㄶ sົ悀▶ٴː쩪뺕㽭✺ᚊㄶ㓨唛Ŋ⹐ㄶ㓨ď뺕 ົۛ稄⤽쩪⤵䆺㵊瞟ㄶ뺔 ㅐ奋ㄶ sົ 悀㧍▶ː쩪뺕ㅐ奋ㄶৠ印⤵ົ癒瞎⥤甬㋊ۛ ᚊᆦ⹐䳚뺔 ۛ稄䆺ۛㄶઔ s㽕㽒අ悀沥 2%+ 쩪⤵㽕㽒ᷞ濞哫ㄽㄶઔ뺔哫ㄽ 䇂㚺᯳矹ᬷˀ뺕ὁ䇂ћᰗď⤵沥ⅶɓˇď嗤 ᶄ礈뺔 濚♷ܧ䠧ㄶĹ䇂哫ㄽ⤵毨沢ۮ戮뺕⇁ȵď⤵␓ 綟↿甬䇂哫ㄽ㚺᯳뺔 CN-12 OM_AY-AP9NRH_HK.indd Sec1:12 4/17/12 12:55:14 PM OM_AY-AP9NRH_HK.indd Sec1:13 4/17/12 12:55:16 PM SHARP CORPORATION OM_AY-AP9NRH_HK.indd Sec1:14 4/17/12 12:55:17 PM