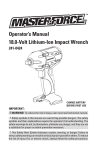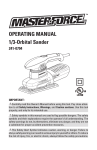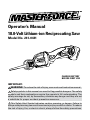
1
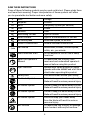
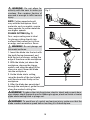
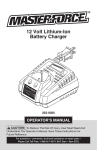
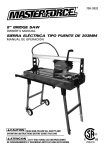
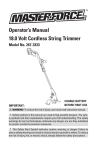
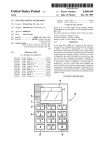
Operator’s Manual
18.0-Volt Lithium-ion Reciprocating Saw
Model No. 241-0431
CHARGE BATTERY
BEFORE FIRST USE
IMPORTANT :
WARNING! To reduce the risk of injury, user must read instruction manual.
Safety symbols in this manual are used to flag possible dangers. The safety
symbols and their explanations require the operator’s full understanding. The
safety warnings do not, by themselves, eliminate any danger and they are not
a substitute for proper accident prevention measures.
This Safety Alert Symbol indicates caution, warning, or danger. Failure to
obey a safety warning can result in serious injury to yourself or others. To reduce
the risk of injury, fire, or electric shock, always follow the safety precautions.
TABLE OF CONTENTS
Safety Symbols................................................................................................ Page 3
Safety Instructions......................................................................................... Page 5
Description....................................................................................................... Page 10
Assembly.......................................................................................................... Page 11
Operation.......................................................................................................... Page 12
Maintenance................................................................................................... Page 17
Troubleshooting............................................................................................... Page 18
Warranty........................................................................................................... Page 19
INTRODUCTION
SAVE THESE INSTRUCTIONS!
This saw has many features for making its use more pleasant and enjoyable.
Safety, performance, and dependability have been given top priority in the
design of this product, making it easy to maintain and operate.
2
SAFETY SYMBOLS
The purpose of safety symbols is to attract your attention to possible dangers.
The safety symbols and the explanations with them deserve your careful
attention and understanding. The symbol warnings do not, by themselves,
eliminate any danger. The instructions and warning they give are no
substitutes for proper accident prevention measures.
WARNING! Be sure to read and understand all safety instructions in this
manual, including all safety alert symbols such as “DANGER,” ”WARNING”
and “CAUTION,” before using this tool. Failure to following all instructions
listed below may result in electric shock, fire and/or serious personal injury.
SYMBOL
SIGNAL
MEANING
Indicates an imminently hazardous situation
DANGER! which, if not avoided, will result in death or
serious injury.
Indicates a potentially hazardous situation
WARNING! which, if not avoided, could result in death or
serious injury.
Indicates a potentially hazardous situation
CAUTION! which, if not avoided, could result in minor or
moderate injury.
(Without Safety Alert Symbol) Indicates a
NOTE:
situation that may result in property damage.
WARNING! To ensure safety and reliability, all repairs should be performed
by a qualified service technician at an Authorized Service Center.
WARNING! The operation of any power tool can
result in foreign objects being thrown into your eyes,
which can result in severe eye damage. Before
beginning power tool operation, always wear safety
goggles or safety glasses with side shields and a
full-face shield when needed. We recommend a
Wide Vision Safety Mask for use over eyeglasses or
standard safety glasses with side shields. Always
use eye protection which is marked to comply with
ANSI Z87.1
3
SAVE THESE INSTRUCTIONS
Some of these following symbols may be used on this tool. Please study them
and learn their meaning. Proper interpretation of these symbols will allow
you to operate the tool better and more safely.
V
A
Hz
W
min
.../min
Volts
Amperes
Hertz
Watt
Minutes
Alternating Current
Voltage
Current
Frequency (cycles per second)
Power
Time
Type of current
Direct Current
No Load Speed
Type or a characteristic of current
Rotational speed, at no load
Class II Construction
Double-insulated construction
Per Minute
Revolutions, strokes, surface speed,
orbits, etc., per minute
Do not expose to rain or use in damp
locations.
Wet Conditions Alert
Read The Operator’s
Manual
Eye Protection
Safety Alert
To reduce the risk of injury, user
must read and understand operator’s
manual before using this product.
Always wear safety goggles or safety
glasses with side shields and a full face
shield when operating this product.
Precautions that involve your safety.
No Hands Symbol
Failure to keep your hands away from the
blade will result in serious personal injury.
No Hands Symbol
Failure to keep your hands away from the
blade will result in serious personal injury.
No Hands Symbol
Failure to keep your hands away from the
blade will result in serious personal injury.
No Hands Symbol
Failure to keep your hands away
from the blade will result in serious
personal injury.
To reduce the risk of injury or damage,
avoid contact with any hot surface.
Hot Surface
4
SAFETY INSTRUCTIONS
GENRAL SAFETY RULES
WARNING! Read all safety warnings and instructions. Failure to follow the
warnings and instructions may result in electric shock, fire and / or serious
injury.
Save all warnings and instructions for future reference.
The term power tool in the warnings refers to your mains-operated (corded)
power tool or battery-operated (cordless) power tool.
Work area safety
eep work area clean and well lit. Cluttered or dark areas invite
K
accidents.
o not operate power tools in explosive atmospheres, such as in the
D
presence of flammable liquids, gases or dust. Power tools create sparks
which may ignite the dust or fumes.
eep children and bystanders away while operating a power tool.
K
Distractions can cause you to lose control.
Electrical safety
ower tool plugs must match the outlet. Never modify the plug in any
P
way. Do not use any adapter plugs with earthed (grounded) power tools.
Unmodified plugs and matching outlets will reduce risk of electric shock.
void body contact with earthed or grounded surfaces such as pipes,
A
radiators, ranges and refrigerators. There is an increased risk of electric
shock if your body is earthed or grounded.
o not expose power tools to rain or wet conditions. Water entering a
D
power tool will increase the risk of electric shock.
o not abuse the cord. Never use the cord for carrying, pulling or
D
unplugging the power tool. Keep cord away from heat, oil, sharp edges
or moving parts. Damaged or entangled cords increase the risk of electric
shock.
hen operating a power tool outdoors, use an extension cord suitable
W
for outdoor use. Use of a cord suitable for outdoor use reduces the risk of
electric shock.
I f operating a power tool in a damp location is unavoidable, use a
residual current device (RCD) protected supply. Use of an RCD reduces
the risk of electric shock.
5
Personal safety
tay alert, watch what you are doing and use common sense when
S
operating a power tool. Do not use tool while tired or under the influence
of drugs, alcohol, or medication. A moment of inattention while operating
power tools may result in serious personal injury.
se personal protective equipment. Always wear eye protection. Protective
U
equipment such as dust mask, non-skid safety shoes, hard hat, or hearing
protection used for appropriate conditions will reduce personal injuries.
revent unintentional starting. Ensure that the switch is in the OFF
P
position before connecting to power source and/or battery pack,
picking up or carrying the tool. Carrying power tools with your finger
on the switch or energizing power tools that have the switch on invites
accidents.
emove any adjusting key or wrench before turning the power tool on.
R
A wrench or a key left attached to a rotating part of the power tool may
result in personal injury.
o not overreach. Keep proper footing and balance at all times. This
D
enables better control of the power tool in unexpected situations.
ress properly. Do not wear loose clothing or jewelry. Keep your hair,
D
clothing and gloves away from moving parts. Loose clothes, jewelry or
long hair can be caught in moving parts.
I f devices are provided for the connection of dust extraction and
collection facilities, ensure these are connected and properly used. Use
of these devices can reduce dust-related hazards.
Power tool use and care
o not force the power tool. Use the correct power tool for your
D
application. The correct power tool will do the job better and more safely
at the rate for which it was designed.
o not use the power tool if the switch does not turn it on and off. Any
D
power tool that cannot be controlled with the switch is dangerous and
must be repaired.
isconnect the plug from the power source and/or the battery pack from
D
the power tool before making any adjustments, changing accessories, or
storing power tools. Such preventive safety measures reduce the risk of
starting the power tool accidentally.
tore idle power tools out of the reach of children and do not allow persons
S
unfamiliar with the power tool or these instructions to operate the power
tool. Power tools are dangerous in the hands of untrained users.
aintain power tools. Check for misalignment or binding of moving
M
parts, breakage of parts and any other condition that may affect the
power tool’s operation. If damaged, have the power tool repaired before
use. Many accidents are caused by poorly maintained power tools.
6
eep cutting tools sharp and clean. Properly maintained cutting tools with
K
sharp cutting edges are less likely to bind and are easier to control.
se the power tool, accessories, bits, etc. in accordance with these
U
instructions, taking into account the working conditions and the work to
be performed. Use of the power tool for operations different from those
intended could result in a hazardous situation.
Battery tool use and care
echarge only with the charger specified by the manufacturer. A charger
R
that is suitable for one type of battery pack may create a risk of fire when
used with another battery pack.
se power tools only with specifically designated battery packs. Use of
U
any other battery packs may create a risk of injury and fire.
hen battery pack is not in use, keep it away from other metal objects,
W
like paper clips, coins, keys, nails, screws or other small metal objects
that can make a connection from one terminal to another. Shorting the
battery terminals together may cause burns or a fire.
nder abusive conditions, liquid may be ejected from the battery;
U
avoid contact. If contact accidentally occurs, flush with water. If liquid
contacts eyes, additionally seek medical help. Liquid ejected from the
battery may cause irritation or burns.
Service
ave your power tool serviced by a qualified repair person using only
H
identical replacement parts. This will ensure that the safety of the power
tool is maintained
SPECIFIC SAFETY RULES FOR RECIPROCATING SAW
U
se only with the batteries and charger listed below.
Battery pack
252-8024
252-8028
252-8032
Charger
252-8036
WARNING! Hold power tool by its insulated gripping surfaces when performing an operation where the cutting tool may contact hidden wiring or its
own cord. Contact with a “live” wire will make exposed metal parts of the tool
“live” and shock the operator.
se clamps or another practical way to secure and support the
U
workpiece to a stable platform. Holding the work by hand or against your
body leaves it unstable and may lead to loss of control.
7
now your power tool. Read the operator’s manual carefully. Learn the
K
applications and limitations, as well as the specific potential hazards
related to this tool. Following this rule will reduce the risk of electric
shock, fire, or serious injury.
rotect your lungs. Wear a face or dust mask if the operation is dusty.
P
Following this rule will reduce the risk of serious personal injury.
rotect your hearing. Wear hearing protection during extended periods
P
of operation. Following this rule will reduce the risk of serious personal
injury.
I f you are not thoroughly familiar with the operation of a reciprocating
saw, obtain advice from a qualified person.
When servicing, use only identical replacement parts.
void cutting nails and staples when operating with the wood blade.
A
Inspect the workpiece carefully and remove all nails and staples before
operation.
ake sure that the blade always extends beyond the shoe and the
M
workpiece throughout the stroke. Blades may shatter if they strike the
workpiece or shoe.
Do not cut an oversized workpiece.
heck for proper clearance beyond the workpiece before cutting, so that
C
the blade will not strike the floor, workbench, etc.
ake sure that the blade is not contacting the workpiece before the
M
switch is turned on.
Keep the saw blades clean and sharp.
se only correct blades. Always use blades recommended for the
U
workpiece material.
Do not leave the tool running. Operate the tool only when hand-held.
lways release the switch to “OFF” and wait for the tool to come to a
A
complete stop before removing the blade from the workpiece.
eep the handle dry, clean, and free from oil and grease. Always use a
K
clean cloth when cleaning. Do not use solvents, brake fluids, gasoline or
other petroleum products to clean the tool; they may damage plastic parts.
o not operate this tool in a gaseous or explosive environment or near
D
explosive materials.
ever force the tool. Apply firm pressure against the saw’s pivot shoe for
N
the sawing operation; too little or too much pressure could cause jumping
or vibration and may break the blade.
ever operate the saw without the pivot shoe in position. The spindle may
N
strike against the workpiece and damage the reciprocating mechanism.
8
o not touch the blade or the workpiece immediately after the sawing
D
operation. They may be extremely hot and could burn your skin.
o not reach underneath the workpiece. The proximity of the blade to your
D
hand is hidden from your sight.
9
DESCRIPTION
KNOW YOUR RECIPROCATING SAW (Fig. 1)
Before attempting to use this reciprocating saw, familiarize yourself with all of its
operating features and safety requirements.
Fig. 1
Tool-less blade-clamp lever
Lock-off button
Saw blade
Variable-speed trigger switch
LED worklight
Shoe assembly
PRODUCT SPECIFICATIONS
Motor
18V DC
Switch
Variable speed
No load Speed:
0-3500 SPM
Blade stroke
1/2” (12.7mm)
Weight (without battery)
3lbs 1oz
Battery voltage
18.0V DC
Charger Input
120-Volts, 60 Hz AC only
WARNING! The safe use of this product requires an understanding of the
information on the tool and in this operator’s manual, as well as knowledge of
the project you are attempting. Before use of this product, familiarize yourself
with all operating features and safety rules.
TOOL-LESS BLADE CHANGE SYSTEM
The saw has a blade clamp design that does not require the use of a tool
(blade wrench) when installing or removing the blade.
VARIABLE-SPEED TRIGGER SWITCH
The variable-speed trigger switch delivers higher speed with increased
trigger pressure and lower speed with decreased trigger pressure.
10
LED WORKLIGHT
LED worklight illuminates the cutting area.
ELECTRIC BRAKE
To stop the reciprocating saw, release the trigger switch and allow the tool to
come to a complete stop. The electric brake quickly stops the blade action.
This feature engages automatically when you release the trigger switch.
ASSEMBLY
WARNING! If any part is broken or missing, do not attempt to plug in the
power cord, attach the battery, or operate the saw until the broken or missing
part is replaced. Failure to do so could result in possible serious injury.
WARNING! Do not attempt to modify this saw or create accessories not recommended for use with this saw. Any such alteration or modification is misuse
and could result in a hazardous condition leading to possible serious injury.
WARNING! To prevent accidental starting that could cause serious personal
injury, always remove the battery pack from the saw when assembling parts.
UNPACKING
This product has been shipped completely assembled.
arefully remove the tool and any accessories from the box. Make sure
C
that all items listed in the packing list are included.
I nspect the tool carefully to make sure that no breakage or damage
occurred during shipping.
o not discard the packing material until you have carefully inspected and
D
satisfactorily operated the tool.
PACKING LIST
Reciprocating saw, 2pc wood cutting blades, Operator’s manual.
11
OPERATION
TO ATTACH BATTERY PACK (Fig. 2)
CAUTION: When placing the battery pack on the tool, be sure that the
raised rib on the battery pack aligns
with the groove on the saw and the
latches snap into place properly. Improper assembly of the battery pack
can cause damage to internal components.
Fig. 2
ATTACH
DETACH
1. L ock the trigger switch in the
“OFF” position.
2. A
lign the raised rib on the battery pack with the grooves on the bottom of
the saw, and then attach the battery pack to the saw.
NOTE: Make sure that the latch on the battery pack snaps into place and the
battery pack is secured to the tool before beginning operation.
TO DETACH BATTERY PACK (Fig. 2)
1. L ock the trigger switch in the “OFF” position.
2. D
epress the battery release buttons located on the front of the battery
pack to release the battery pack.
3. P
ull the battery forward to remove from the tool.
VARIABLE SPEED TRIGGER SWITCH (fig. 3)
Your reciprocating saw is equipped
Lock-off
with a trigger switch to turn the saw Fig. 3
button
on and off and to control the speed.
1. T o start the saw, depress the
lock-off button and then squeeze
trigger switch.
2. T o stop the saw, release the
trigger switch and allow it to
return to the “OFF” position.
Trigger
switch
3. T o vary the speed, simply
increase or decrease the
pressure on the trigger switch. The more tightly the trigger switch is
squeezed, the higher the speed.
LED WORKLIGHT (Fig. 4)
Your reciprocating saw has a built-in LED worklight for illuminating the
cutting area. To activate the LED worklight, squeeze the lock-off button and
depress the trigger switch to start the saw.
12
BLADE SELECTION
Fig. 4
In order to obtain the best
performance from the saw, it is
important to select the correct blade
for the particular application and type
of material to be cut.
Blades with fewer teeth, such as
those with 10 teeth per inch (TPI),
are typically used for cutting wood,
while blades with more teeth are
LED worklight
better for cutting metal or plastic.
We recommend 14 TPI for plastics
Fig. 5
and soft metals and 18 TPI for hard
metals.
INSTALLING A SAW BLADE (Fig. 5)
1. R
emove the battery pack from the
saw.
2. R
otate the blade clamp
counterclockwise and hold it
open.
Blade clamp
Blade
3. Insert saw blade until it is fully
seated, and release the blade clamp to secure the blade in position.
REMOVING THE SAW BLADE (Fig. 5)
1. R
emove the battery pack from the saw.
2. R
otate the blade clamp counterclockwise and hold it open.
3. R
emove the saw blade from the blade clamp.
WARNING! The saw blade may be hot after use. Allow the blade to cool or
wear gloves when removing a blade.
13
General cutting (Fig. 6a and 6b)
WARNING! Before attaching
the battery pack on the tool, always
check to determine that the switch
performs properly and returns to the
“OFF” position when released.
WARNING! Hold the tool only by
the plastic handle and the insulated
grip area to help prevent electrical
shock. When sawing into walls or
floors you may encounter electrical
wiring. Sawing into a “live” wire will
cause electric shock.
Fig. 6a
Fig. 6b
1. M
ake sure that the workpiece is
firmly clamped.
2. U
se the appropriate type and
size of blade for the workpiece
material and size.
3. C
heck for clearance behind the
workpiece so that the blade will
not impact another surface.
4. M
ark the line of cut clearly. If
cutting metal, apply cutting oil on
the line.
5. H
old the saw firmly with one hand on the insulated gripping surface. Do
not use two hands with this saw (Figs 6a and 6b).
6. D
epress the lock-off button and trigger switch to start the saw and bring
it to the maximum desired cutting speed before applying the blade to the
workpiece.
7. W
ith the shoe firmly on the workpiece, apply the blade to the workpiece
and begin the cut.
8. D
o not force the tool. Place the shoe firmly on the workpiece while
cutting. Use only enough steady pressure on the blade to keep the saw
cutting.
9. R
educe pressure as the blade comes to the end of the cut.
10. Allow the saw to come to a complete stop before removing the blade from
the workpiece.
11. If sawing fiberglass, plaster, wallboard, or spackling compound, clean
the saw motor vents frequently with a vacuum or compressed air. These
materials are highly abrasive and may accelerate the wear on motor
bearings and brushes.
14
WARNING! Do not allow familiarity with the saw to make you
careless. One careless fraction of
asecond is enough to inflict serious
injury.
Fig. 7
NOTE: Cutting speeds should
vary with the workpiece. Hard
materials, such as metals, require
lower speeds; for softer materials
use higher speeds.
PLUNGE CUTTING (Fig. 7)
Your reciprocating saw is ideal
for plunge cutting directly into
surfaces that cannot be cut from
an edge, such as walls or floors.
WARNING! Do not plunge cut
into metal surfaces.
1. Insert the blade into the tool with
the teeth facing downward, and
hold the tool as shown, resting the
edge of the shoe on the workpiece.
2. With the blade just above the
workpiece, depress the trigger
switch, and using the edge of the
shoe as a pivot, lower the blade
into the workpiece.
3. As the blade starts cutting,
raise the handle of the tool slowly
until the shoe rests firmly on the
workpiece.
4. After the blade has penetrated
through the workpiece, guide the saw
along the marked cutting line.
WARNING! To reduce the risk of explosion, electric shock and property damage, always check the work area for hidden gas pipes, electrical wires or water
pipes when making blind or plunge cut.
WARNING! To avoid loss of control and serious injury, make sure that the
blade reaches maximum speed before touching it to the workpiece.
15
METAL CUTTING
The saw can be used to cut metals, such as sheet steel, pipe, steel rods,
aluminum, brass, and copper. Be careful not to twist or bend the saw blade.
Do not force.
The use of cutting oil is recommended when cutting soft metals and steel.
Cutting oil will keep the blade cool, increase cutting action, and prolong
blade life.
WARNING! Never use gasoline, because normal sparking could ignite the
fumes.
1. S
ecurely clamp the workpiece in position, and make the cut close to the
clamping point in order to minimize vibration of the work being cut.
2. W
hen cutting conduit pipe or angle iron, clamp the work in a vise, if
possible, and cut close to the vise.
3. T o cut thin sheet material, “sandwich” the material between pieces of
hardboard or plywood, and clamp the layers together in order to reduce
vibration and tearing of the material.
16
MAINTENANCE
GENERAL MAINTENANCE
WARNING! For your safety, always turn off switch and remove battery pack
before performing any maintenance or cleaning.
The tool may be cleaned most effectively with compressed dry air. Always
wear safety goggles when cleaning tools with compressed air.
WARNING! When servicing, use only identical MASTERFORCE replacement
parts. Use of any other parts may create a hazard or cause product damage.
To ensure safety and reliability, all repairs should be performed by a qualified
service technician at an Authorized Service Center.
It has been found that electric tools are subject to accelerated wear and
possible premature failure when they are used to work on fiber glass,
wallboard, spackling compounds or plaster. The chips and grindings from
these materials are highly abrasive to electrical tool parts, such as bearings,
brushes, commutators, etc. Consequently, it is not recommended that
this tool be used for extended work on any fiberglass material, wallboard,
spackling compound or plaster. During any use on these materials, it is
extremely important that the tool is cleaned frequently by blowing with an air
jet.
WARNING! Do not at any time let brake fluids, gasoline, petroleum-based
products, penetrating oils, etc. come in contact with plastic parts. Chemicals
can damage, weaken or destroy plastic, which may result in serious personal
injury.
Periodic maintenance allows for long life and trouble-free operation. A
cleaning, and maintenance schedule should be maintained. As a common
preventive maintenance practice, follow these recommended steps:
hen work has been completed, clean the tool to allow smooth
W
functioning of the tool over time.
Use clean damp cloths to wipe the tool.
Check the state of all electrical cables.
eep the motor air openings free from oil, grease and sawdust or
K
woodchips, and store tool in a dry place.
e certain that all moving parts are well lubricated, particularly after
B
lengthy exposure to damp and/or dirty conditions.
LUBRICATION
All of the bearings in this tool are lubricated with a sufficient amount of highgrade lubricant for the life of the tool under normal operating conditions.
Therefore, no further lubrication is required.
17
TROUBLE SHOOTING
PROBLEM
The saw does not work
Blade cannot be
removed
Cutting is difficult.
CAUSE
No battery pack
attached
Battery pack is
exhausted
Saw dust in the slot
Saw is damaged
18
SOLUTION
Attach a battery pack
Charge the battery pack
Clean the clamp slot
with brush
Replace the saw
WARRANTY
3-MONTH MONEY BACK GUARANTEE:
This MASTERFORCE™ brand power tool carries our 3-Month Money Back
Guarantee. If you are not completely satisfied with your MASTERFORCE™
brand power tool for any reason within three (3) months from the date of
purchase, return the tool with your original receipt to any
retail
store, and we will provide you a refund – no questions asked.
3-YEAR LIMITED WARRANTY:
This MASTERFORCE™ brand power tool carries our famous No Hassle
3-Year Limited Warranty to the original purchaser. If the tool fails within
three (3) years from the date of purchase, simply bring this tool and its sale
receipt back to your nearest
retail store for a free equivalent
replacement within those three years. Notwithstanding the foregoing, this
limited warranty does not cover any damage that has resulted from abuse or
misuse of the Merchandise. This warranty: (1) excludes expendable parts
including but not limited to blades, belts, bits, light bulbs, and/or batteries;
(2) shall be void if this tool is used for commercial and/or rental purposes;
and (3) does not cover any losses, injuries to persons/property or costs. This
warranty does give you specific legal rights and you may have other rights,
which vary from state to state. Be careful, tools are dangerous if improperly
used or maintained. Seller’s employees are not qualified to advise you on
the use of this Merchandise. Any oral representation(s) made will not be
binding on seller or its employees. The rights under this limited warranty
are to the original purchaser of the Merchandise and may not be transferred
to any subsequent owner. This limited warranty is in lieu of all warranties,
expressed or implied including warranties or merchantability and fitness for
a particular purpose. Seller shall not be liable for any special, incidental, or
consequential damages. The sole exclusive remedy against the seller will be
for the replacement of any defects as provided herein, as long as the seller
is willing or able to replace this product or is willing to refund the purchase
price as provided above. For insurance purposes, seller is not allowed to
demonstrate any of these power tools for you.
For questions / comments, technical assistance or repair parts –
Please Call Toll Free at: 1-866-917-4374 (M-F 8am – 6pm)
SAVE YOUR RECEIPTS. THIS WARRANTY IS VOID WITHOUT THEM.
19