1
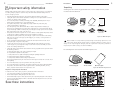
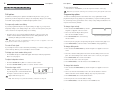
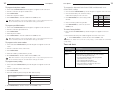
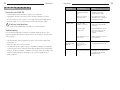
MAX™ EX
Installation & Operation Manual
ii
Table of Contents
Table of Contents
Introduction . . . . . . . . . . . . . . . . . . . . . . . . . . . . . . . . . . . . . . . . . . . . . . . . . . . . . . . .1
Service and support . . . . . . . . . . . . . . . . . . . . . . . . . . . . . . . . . . . . . . . . . . . . . . . . . . . . . . . . . .1
Product returns . . . . . . . . . . . . . . . . . . . . . . . . . . . . . . . . . . . . . . . . . . . . . . . . . . . . . . . . . . . . . .1
Important safety information . . . . . . . . . . . . . . . . . . . . . . . . . . . . . . . . . . . . . . . . . . . . . . . . . . . .2
Unpacking . . . . . . . . . . . . . . . . . . . . . . . . . . . . . . . . . . . . . . . . . . . . . . . . . . . . . . . . . . . . . . . . . .3
Getting Started . . . . . . . . . . . . . . . . . . . . . . . . . . . . . . . . . . . . . . . . . . . . . . . . . . . . . .4
Connecting your conferencing phone . . . . . . . . . . . . . . . . . . . . . . . . . . . . . . . . . . . . . . . . . . . . . . .4
Connecting additional MAX EX phones . . . . . . . . . . . . . . . . . . . . . . . . . . . . . . . . . . . . . . . . . . . .4
Connecting to a digital phone line . . . . . . . . . . . . . . . . . . . . . . . . . . . . . . . . . . . . . . . . . . . . . . . . .5
Using your MAX EX conferencing phone . . . . . . . . . . . . . . . . . . . . . . . . . . . . . . . . . . . . . . . . . . .6
User Options . . . . . . . . . . . . . . . . . . . . . . . . . . . . . . . . . . . . . . . . . . . . . . . . . . . . . . . .8
1
Introduction
Introduction
Thank you for purchasing the ClearOne MAX™ EX expandable conferencing phone.
MAX EX provides premium, full-duplex audio to small conference rooms as a single unit
and to larger rooms as an expanded system. Up to four MAX EX units can be linked,
expanding not only microphone coverage but loudspeaker coverage and control access as
well.This creates even distribution of sound for a more natural communications experience.
Setting up the MAX EX conferencing phone is extremely easy and requires only three
connections: power, telephone line and the base unit to the conferencing phone. And, the
familiar keypad design ensures users will be comfortable using the phone, reducing the
need for training and support.
• Expandable. MAX EX is ideal for conference rooms and provides complete microphone and loudspeaker coverage and easy access to controls.
Call features . . . . . . . . . . . . . . . . . . . . . . . . . . . . . . . . . . . . . . . . . . . . . . . . . . . . . . . . . . . . . . . .8
Programming features . . . . . . . . . . . . . . . . . . . . . . . . . . . . . . . . . . . . . . . . . . . . . . . . . . . . . . . . .9
Tones and alerts . . . . . . . . . . . . . . . . . . . . . . . . . . . . . . . . . . . . . . . . . . . . . . . . . . . . . . . . . . . . . .11
• Superior Audio. The clear, full sound of the MAX EX facilitates more natural
interaction among participants.
Maintenance . . . . . . . . . . . . . . . . . . . . . . . . . . . . . . . . . . . . . . . . . . . . . . . . . . . . . . . .12
Service and support
Caring for your MAX EX . . . . . . . . . . . . . . . . . . . . . . . . . . . . . . . . . . . . . . . . . . . . . . . . . . . . . . .12
Electrical considerations . . . . . . . . . . . . . . . . . . . . . . . . . . . . . . . . . . . . . . . . . . . . . . . . . . . . . . .12
Troubleshooting . . . . . . . . . . . . . . . . . . . . . . . . . . . . . . . . . . . . . . . . . . . . . . . . . . . . . . . . . . . . . .12
Appendix . . . . . . . . . . . . . . . . . . . . . . . . . . . . . . . . . . . . . . . . . . . . . . . . . . . . . . . . . . .14
Specifications . . . . . . . . . . . . . . . . . . . . . . . . . . . . . . . . . . . . . . . . . . . . . . . . . . . . . . . . . . . . . . . .14
Compliance . . . . . . . . . . . . . . . . . . . . . . . . . . . . . . . . . . . . . . . . . . . . . . . . . . . . . . . . . . . . . . . . .15
Warranty . . . . . . . . . . . . . . . . . . . . . . . . . . . . . . . . . . . . . . . . . . . . . . . . . . . . . . . . . . . . . . . . . . .17
• Easy to Use. The intuitive, user friendly controls are simple to operate.
If you need additional information on how to set up or operate your MAX EX
conferencing phone, please contact us. We welcome and encourage your comments so we
can continue to improve our products and better meet your needs.
Technical Support
Tel:
Fax:
E-mail:
Web:
1-800-283-5936(USA) or 1-801-974-3760
1-801-977-0087
[email protected]
www.clearone.com
Sales and Customer Service
Tel:
1-800-945-7730 (USA) or 1-801-975-7200
Fax:
1-800-933-5107 (USA) or 1-801-977-0087
E-mail: [email protected]
Product returns
MAX EX Installation and Operation Manual
ClearOne Part No. 800-158-015 September 2006 (Rev. 3.1)
U.S. Patent No. D499,392.
All product returns require a return materials authorization (RMA) number. Please
contact ClearOne Technical Support before attempting to return your product. Make sure
you return all the items that shipped with your product.
© 2005 ClearOne Communications Inc. All rights reserved. No part of this document may be reproduced in any form or
by any means without written permission from ClearOne Communications. ClearOne Communications reserves specific
privileges. Information in this document is subject to change without notice.
Technical Services Group ~ 1-800-283-5936 (USA) ~ 1-801-974-3760
2
Introduction
Important safety information
Read the safety instructions before first use of this product.This conferencing phone is not designed
for making emergency telephone calls when the power fails. Make alternative arrangements for
access to emergency services.
• Read and understand all instructions and follow all warnings marked on the product.
• Unplug this product from the wall outlet before cleaning. Do not use liquid cleaners or aerosol
cleaners. Use a damp cloth for cleaning.
• Do not use this product near water, for example, near a bathtub, washbowl, kitchen sink, or
laundry tub, in a wet basement, or near a swimming pool.
• Do not place this product on an unstable cart, stand, or table. The product may fall,
causing serious damage to the product.
• Slots and openings in the cabinet and the back or bottom are provided for ventilation, to
protect it from overheating, these openings must not be blocked or covered. Never push objects
of any kind through cabinet slots as they may touch dangerous voltage points or short out parts
that could result in a risk of fire or electric shock.
• This product should never be placed near or over a radiator or heat register.This product should
not be placed in a built-in installation unless proper ventilation is provided.
• This product should be operated only from the type of power source indicated on the marking
label. If you are not sure of the type of power supply in your location, consult your dealer or
local power company.
• Do not overload wall outlets and extension cords as this can result in fire risk or electric shock.
• Never spill liquid of any kind on the product.
• To reduce the risk of electric shock, do not disassemble this product. Opening or removing
covers may expose you to dangerous voltages or other risks. Incorrect reassembly can cause
electric shock during subsequent use.
• Unplug this product from the wall outlet and refer servicing to qualified service personnel under
the following conditions:
a. When the power supply cord or plug is damaged or frayed.
b. If liquid has been spilled into the product.
c. If the product does not operate normally by following the operating instructions.
d. If the product has been dropped or damaged.
e. If the product exhibits a distinct change in performance.
• Avoid using a telephone during an electrical storm. There may be a remote risk of electric shock
from lightning.
• Do not use this product to report a gas leak in the vicinity of the leak.
• Do not use this product near intensive care medical equipment or by persons with pacemakers.
• This product can interfere with electrical equipment such as answering machines, TV sets,
radios, computers and microwave ovens if placed too close.
Telephone wiring and jack information
To reduce the risk of fire or injury to persons, read and follow these instructions:
• Use caution when installing or modifying telephone lines.
• Never install telephone wiring during an electrical storm.
• Never install telephone jacks in wet locations unless jack is specifically designed for wet locations.
• Never touch uninsulated telephone wires or terminals unless the telephone line is disconnected
at the network interface.
Save these instructions
3
Introduction
Unpacking
Carefully place the conferencing pod and base unit on a level surface. Ensure you have
received all items shown below.
Conferencing pod
25' Cat. 5 cable
Base unit
Quick start guide
Compliance and
safety sheet
Telephone cable
Manual on CD
Power Cord
Figure 1a. MAX EX parts
Note: ClearOne is not responsible for product damage incurred during shipment. You must
make claims directly with the carrier. Inspect your shipment carefully for obvious signs of
damage. If the shipment appears damaged, retain the original boxes and packing material for
inspection by the carrier. Contact your carrier immediately.
The following items are included in the MAX Expansion Kit.
Conferencing pod
12' Cat. 5 cable
Quick start guide
Figure 1b. MAX EX Expansion kit
4
Getting Started
5
Getting Started
Connecting to a digital phone line
Getting Started
WARNING! Do not connect the conference phone directly to a digital (PBX) line, PERMANENT DAMAGE MAY RESULT.
Connecting your conferencing phone
If you have digital (PBX) telephone service, you need to run an analog extension from the
PBX (recommended for best performance) or use a digital-to-analog telephone line converter. For more information, contact ClearOne Technical Support.
To Link In
Rear of conferencing pod
25' Cat. 5 cable
Phone Jack
Electrical
Outlet
To Link Out
RJ-11
telephone
cable
Rear of base unit
Digital, PBX,
or Multi-line phone
AC Adapter
Figure 2. Connecting MAX EX
KONEXX KONFERENCE
Digital-to-Analog
Converter
1. Connect the Cat. 5 cable from the Link Out jack on the base unit to the Link In
jack on the conferencing pod.
2. Connect the base unit to the telephone jack using the RJ-11 telephone cable.
3. Connect the power cord to the base unit and plug it directly into an electrical outlet.
Base Unit
Handset
Figure 4. Connecting the base unit to digital-to-analog converter
1. Connect one end of the telephone cable into the phone jack on the back of the
base unit and the other end into the digital-to-analog converter.
Connecting additional MAX EX phones
2. Connect the converter's power adapter into an electrical outlet.
3. Connect a second telephone cable from the converter to a digital or PBX phone.
Consult the converter user manual for more information.
4. Plug the base unit into an electrical outlet and connect to the pod.
From Link Out
25' Cat. 5 cable
To Link In
12' Cat. 5 cable
To Link In
To Link Out on Base Unit
Figure 3. Connecting additional units
1. Connect the 12' Cat. 5 cable to the Link Out jack on the first phone and the Link
In jack on the second phone.
2. Continue linking up to three additional MAX EX phones in the same fashion. A
total of four units may be connected.
6
Getting Started
7
Getting Started
Using your MAX EX conferencing phone
To access your service center
To make a call
• While in Standby mode, press and hold the 0 key for 2 seconds. This feature must
be programmed before use. See page 10.
1. Press the ON/OFF key. You will hear a dial tone.
2. Dial the number as you would on a standard
phone. The number appears on the LCD
screen.
To store a number in the phonebook
Figure 5. Dialing screen
1. Enter the phone number you want to store
while conferencing pod is in Standby mode.
Note: You can also predial the number while in Standby (inactive) mode and press the
ON/OFF key to connect the call. Press and hold the pound key (#) to enter a pause in the
dialing string.
2. Press and hold the PHONEBOOK/EDIT key
until the Phonebook and Program icons
appear on the LCD screen.
To answer a call
3. Assign a Phonebook location (0–9) by pressing the corresponding number key.
• Press any key (except the star key (*),
MUTE, VOLUME UP. or VOLUME DOWN) on
the keypad to answer the call. When there is
an incoming call, the phone rings and the
LEDs on the phone and the phone icon on
the LCD screen flash.
Figure
7. Adding
entries
Phonebook
andPhonebook
Program icons
4. Press PHONEBOOK again to save the entry.
You will hear a confirmation tone.
Figure 6. Incoming call
To end a call
• Press the ON/OFF key. This will disconnect the call and return the phone to
Standby mode.
To redial a number
1. Press the ON/OFF key. You will hear a dial tone.
2. Press REDIAL to dial the last number called.
Note: You can also press REDIAL while in Standby mode to display the last number called.
To connect the call, press the ON/OFF key.
To adjust ringer volume
• While the phone is ringing, press VOLUME UP or VOLUME DOWN.
• While the phone is inactive, press VOLUME UP or VOLUME DOWN. The ringer
melody will play once at the new level.
To mute the call
• While on a call, press MUTE to mute the microphones (loudspeakers are not muted).
• Press again to unmute.
To access your speed dial number
• Press the SPEED DIAL key. This feature must be programmed before use. See page
10.
5. To exit Phonebook Edit mode before saving
the entry, press CLEAR.
Note: You can easily add the last number you dialed to the Phonebook. Simply press REDIAL to
display the phone number and follow steps 2–5. Press & hold the “1” key to enter a hyphen or the
“*” key to enter a space in the number.
To make a call using the Phonebook
1. Press PHONEBOOK.
2. Press the number key (0-9) that corresponds with the speed dial location.
The stored number will appear on the LCD screen.
3. Press ON/OFF to dial the number.
Note: You can also press the ON/OFF button to get a dial tone before entering the Phonebook.This
will cause the number to dial as soon as you select the speed dial location.
8
User Options
9
User Options
To mute during ringing
User Options
•
Press the star (*) or the MUTE key to mute the ringer for the duration of the ringing.
Note:This only mutes the current ring. Once a new call comes in, the ringer will not be muted.
Call options
Programming options
In addition to the basic phone operations described in the previous section, you can
perform any of the following functions during a call: temporarily change to tone dialing,
send a flash signal, display phone number and adjust speaker volume.
To allow for individual preferences and enhance ease of use, eight features can be
programmed: ringer melody, dialing mode, flash duration, local phone number, speed dial
for conferencing services, speed dial for service center, country setting and AGC/ALC. You
may also restore factory defaults.
To temporarily enable tone dialing
If you have programmed the phone to use pulse dialing (see page 9), you may need to
temporarily change to tone dialing during a call to access voicemail systems, enter passcodes or extensions.To temporarily change to tone dialing:
• Press the star (*) key. A special character appears on the LCD screen. All
numbers entered after this character will use tone dialing. When the call is
finished, the dialing mode will revert to pulse.
Note: When more than 18 characters are entered, a scroll icon appears on the LCD
display and the numbers scroll from right to left.
To change ringer melody
1. Press and hold the REDIAL/PROG key until the
Program icon appears on the LCD screen.
2. Press 1 to enter the Ringer Melody menu.
There are five available melodies.
Figure 9. Programming options
3. Press REDIAL/PROG. The current melody
selection flashes.
4. Press keys 1–5 to play the corresponding melody. The selected melody plays once.
5. Press REDIAL/PROG to save the selection. Press CLEAR to exit programming.
To send a Flash signal
If your telephone service includes call transfer, call waiting, or conference calling, you can
use the Flash key. Refer to your local telephone service for details.
To display your local number during a call
To change dialing mode
1. Press and hold the REDIAL/PROG key until the Program icon appears on the LCD
screen.
2. Press 2 to enter the Dialing Mode menu. There are two dialing modes: tone and
pulse. The current dialing mode is shown on the screen (T for tone, P for pulse).
• Press CLEAR. The phone number will appear. This feature must be programmed
before use. See page 10.
3. Press REDIAL/PROG. The current mode flashes.
To adjust loudspeaker volume
4. Press 1 to select tone or 2 to select pulse.
• Press the VOLUME UP key while on a call to increase volume.
5. Press REDIAL/PROG to save the selection. Press CLEAR to exit.
• Press the VOLUME DOWN key while on a call to decrease volume.
To change flash duration
To turn the ringer on/off
1. Press and hold the REDIAL/PROG key until the Program icon appears on the LCD
screen.
• While in standby, press and hold the star (*)
key. The Ringer Off icon will illuminate when
the ringer is turned off. The icon will not
appear when the ringer is on.
Figure 8. Ringer Off icon.
Note: When the ringer is off, LEDs will still flash to indicate an incoming call.
2. Press 3 to enter the Flash Duration menu. The current duration is shown in
milliseconds. There are five duration settings: 600, 300, 150, 100 and 80.
3. Press REDIAL/PROG. The current duration flashes.
4. Press keys 1–5 to select a new duration setting.
5. Press REDIAL/PROG to save the selection. Press CLEAR to exit.
10
User Options
To program local phone number
11
User Options
1. Press and hold REDIAL/PROG until the Program icon appears on the LCD screen.
To program the Automatic Gain Control (AGC) and Automatic Level
Control (ALC) settings
2. Press 4 to enter the user phone number menu.
1. Press and hold the REDIAL/PROG key until the Program icon appears on the LCD screen.
3. Press REDIAL/PROG.
2. Press and hold the 8 key.The current AGC setting
number will be displayed on the LCD screen.
3. Enter the local phone number.
4. Press REDIAL/PROG to save the number. Press CLEAR to exit.
Note: Press & hold the “1” key to enter a hyphen or the “*” key to enter a space in the number. Use CLEAR to delete the old number before entering a new number.
To program speed dial number
1. Press and hold REDIAL/PROG until the Program icon appears on the LCD screen.
3. Press REDIAL/PROG.The current setting number
will flash.
4. Enter a new setting number using the table.
5. Press REDIAL/PROG to confirm selection. Press
CLEAR to exit.
Setting Speaker
AGC
Microphone
ALC
1
2
3
On
On
Off
On
Off
On
4
Off
Off
2. Press 5 to enter the Speed Dial menu.
To restore factory defaults
3. Press REDIAL/PROG.
4. Enter the phone number.
1. Press and hold the REDIAL/PROG key until the Program icon appears on the LCD
screen.
5. Press REDIAL/PROG to save the number. Press CLEAR to exit.
2. Press and hold the 9 key. The number 8 appears across the LCD screen.
Note: Press & hold the “1” key to enter a hyphen or the “*” key to enter a space in the number. Use CLEAR to delete the old number before entering a new number.
To program service center number
1. Press and hold the REDIAL/PROG key until the Program icon appears on the LCD
screen.
2. Press 6 to enter the service center menu.
3. Press REDIAL/PROG.
4. Enter the number you want the 0 key to dial.
5. Press REDIAL/PROG to save the number. Press CLEAR to exit.
Note: Press & hold the “1” key to enter a hyphen or the “*” key to enter a space in the number. Use CLEAR to delete the old number before entering a new number.
To program country setting
1. Press and hold the REDIAL/PROG key until the Program icon appears on the LCD
screen.
2. Press 7 to enter the service center menu.
3. Press REDIAL/PROG.
4. Press the number key that corresponds with desired country.
1 = US/Canada/China/Japan/
Mexico/Singapore
4 = South Africa
2 = Europe CTR21
6 = New Zealand
3 = Australia
7 = South Korea
5 = Brazil
5. Press REDIAL/PROG to save the selection. Press CLEAR to exit.
3. Press REDIAL/PROG to confirm selection. Press CLEAR to exit.
Note: The feature will not reset the country setting. It will maintain the user-defined
country setting.
Tones and alerts
Tone/Alert
Description
Confirmation
A tone will play upon successful programming entry.
Reject
A tone will play if you attempt to do any of the following:
• enter an invalid programming entry
• use a speed dial key that has not been programmed
(speed dial or service center)
• enter a 45th digit when predialing
• enter a 17th digit for user phone number
• enter a 31st digit for speed dial key (One-Touch
Conferencing or service center)
12
Maintenance
Maintenance
Caring for your MAX EX
If you hear
It could be that
Try this
No dial tone
Base unit is not
connected to telephone
jack.
Connect the base unit to the
telephone jack using the
supplied telephone cable.
You are not using an
analog phone line.
Check that you are using an
analog phone line. Consult your
IT department for help.
You have a bad
telephone connection.
Place the call again to see if
another line provides a better
connection.
You have a bad
telephone line.
Plug a working phone into the
phone jack. If the line is still
noisy, call your telephone
company.
The other party's room
is too noisy.
Ask the other party to turn off
noisy equipment.
Calls can come
in, but you can't
dial out.
The dialing mode (tone
or pulse) is set
incorrectly for your
service.
See page 10 for instructions
on changing the dialing mode.
Poor audio
The equipment on the
far end is of lesser quality.
The equipment should be upgraded.
Participants can try sitting closer
to equipment and eliminate
background noises.
• Follow all warnings and instructions marked on your MAX EX.
• Unplug base unit and conferencing pod from the wall outlet before cleaning.
• Do not use liquid or aerosol cleaners. Use a damp cloth moistened with water to
clean the outside of your conferencing pod or base unit and power supply.
! Electrical considerations
13
Maintenance
Static or noise
• Use only the power adapter that comes with your conferencing phone.
Troubleshooting
If you are having trouble with your MAX EX, it might be improperly set up or other
equipment might be malfunctioning.To begin, check for the following or consult the chart
on the next page:
• The MAX EX base unit is plugged into the proper volt electrical outlet and its
power light is on.
• Make sure cables are securely connected.
• The equipment the other party is using is comparable in quality to your MAX EX
conferencing phone and is working properly. While the MAX EX works with speakerphones, cell phones, handsets or installed conferencing systems, the quality of the
conference will be impacted if the party you are conferencing with has poor
quality equipment.
14
Appendix
Appendix
15
Compliance
Appendix
FCC Part 15/ICES-003 Compliance
Specifications
DIMENSIONS (W x D x H)
Phone section: 10.5" x 10.5" x 3"
(26.7 cm x 26.7 cm x 7.6 cm)
Base unit: 4.25" x 5.5" x 2.5"
(10.8 cm x 14 cm x 6.4 cm)
WEIGHT
Phone section: 2.7 lb (1.2 kg)
Base unit: .6 lb (0.27 kg)
Shipping: 10 lb (4.5 kg)
ENVIRONMENTAL
Operating Temperature: 0–50° C
(32–122° F)
Storage temperature: 5–70° C
(41–158° F)
Operating Humidity: 15 to 80%
Storage humidity: 10 to 90%
POWER
Base unit:
Auto-adjusting power module;
100–240VAC; 50/60 Hz
TELEPHONE CONNECTION
Analog PBX or PSTN line
RJ-11C/CA11A, –12dBm nominal
RECORD OUTPUT
Connector: 2.5 mm mono audio
jack
Impedance: <1000 ohm
Bandwidth: 200Hz–3.3kHz
Dynamic Range: 60dB
THD <.01%
Operation is subject to the following two conditions: (1) This device may not cause interference, and
(2) This device must accept any interference including interference that may cause undesired
operation of the device.
ECHO CANCELLATION
Tail Time: 128 mS x 3
Changes or modifications not expressly approved by ClearOne Communications could void the user's
authority to operate the equipment.
NOISE CANCELLATION
Dynamic noise cancellation
FCC Part 68 Compliance
CERTIFICATIONS
FCC Part 15/ICES-003 Class A
FCC Part 68/IC CS-03
CE
UL, C-UL Certified
US:FBIMT01B910158015 Ringer Equivalence Number (REN): 0.1B(ac)
This equipment complies with Part 68 of FCC Rules and Technical Requirements for Telephone
Terminal Equipment published by ACTA. The marking on the base unit of this equipment contains,
among other information, the US number and ringer Equivalence Number (REN) for this equipment.
If requested, this information must be provided to your telephone company.
WARRANTY
2 Years
The REN is used to determine the quantity of devices, which may be connected to the telephone line.
Excessive RENs on the telephone line may result in the devices not ringing in response to an incoming call. In most, but not all areas, the sum of the RENs should not exceed five (5.0).To be certain
of the number of devices that may be connected to the line, as determined by the total RENs, contact
the telephone company to obtain the maximum RENs for the calling area.
MODELS
MAX EX*
MAX EX Expansion Kit*
If this equipment causes harm to the telephone network, the telephone company will notify you in
advance that temporary discontinuance of service may be required. If advance notice is not practical,
the telephone company will notify the customer as soon as possible. Also, you will be advised of your
right to file a complaint with the FCC if you believe it is necessary.
The telephone company may make changes in its facilities, equipment, operations, or procedures that
could affect the operation of the equipment. If this happens, the telephone company will provide
advance notice for you to make the necessary modifications in order to maintain uninterrupted service.
KEYPAD
Alphanumeric standard keypad
LOUDSPEAKER VOLUME
90 dBspl A weighted @ 1 ft
Bandwidth: 200Hz - 3.3kHz
This equipment has been tested and found to comply with the limits for a Class A digital device,
pursuant to Part 15 of the FCC rules and Industry Canada ICES-003.These limits are designed to
provide reasonable protection against harmful interference when the equipment is operated in a
commercial environment.This equipment generates, uses, and can radiate radio frequency energy and,
if not installed and used in accordance with the instruction manual, may cause harmful interference to
radio communications. Operation of this equipment in a residential area is likely to cause harmful
interference, in which case the user will be required to correct the interference at his/her own expense.
Notice
*Call your sales representative for part numbers
A plug and jack used to connect this equipment to the premises wiring and telephone network must
comply with the applicable FCC Part 68 Rules and Requirements adopted by the ACTA. A compliant telephone cord and modular plug is provided with this product. It is designed to be connected to
a compatible modular jack that is also compliant. See installation instructions for details.
If you experience problems with this equipment, contact ClearOne Communications, 5225 Wiley Post
Way, Salt Lake City, Utah 84116, or by phone at (801) 975-7200 for repair and warranty information. If the trouble is causing harm to the telephone network, the telephone company may request you
remove the equipment from the network until the problem is resolved.
No user serviceable parts are contained in this product. If damage or malfunction occurs, contact
ClearOne Communications for instructions on its repair or return.
This equipment cannot be used on telephone company provided coin service. Connection to Party
Line Service is subject to state tariffs.
16
Appendix
IC Compliance
IC: 1970A-158015
Ringer Equivalence Number (REN): 0.1B(ac)
Notice
The term "IC" before the certification/registration number signifies that Industry of Canada technical
specifications were met.
This certification means that the equipment meets certain telecommunications network protective
operational and safety requirements.The Department does not guarantee the equipment will operate
to the user's satisfaction.
The REN is used to determine the quantity of devices, which may be connected to the telephone line.
Excessive RENs on the telephone line may result in the devices not ringing in response to an
incoming call. In most, but not all areas, the sum of the RENs should not exceed five (5.0).To be
certain of the number of devices that may be connected to the line, as determined by the total RENs,
contact the telephone company to obtain the maximum RENs for the calling area.
Before installing this equipment, users should ensure that it is permissible to be connected to the
facilities of the local telecommunications company.The equipment must also be installed using an
acceptable method of connection. In some cases, the companies inside wiring associated with a single
line individual service may be extended by means of a certified connector assembly (telephone extension cord).The customer should be aware that compliance with the above conditions may not prevent
degradation of service in some situations.
Repairs to certified equipment should be made by an authorized Canadian maintenance facility
designated by ClearOne Communications. Any repairs or alterations made by the user to this
equipment, or equipment malfunctions, may give the telecommunications company cause to request
the user to disconnect the equipment.
Users should ensure for their own protection that the electrical ground connections of the power
utility, telephone lines and internal metallic water pipe system, if present, are connected together.This
precaution may be particularly important in rural areas.
European Compliance
This equipment has been approved in accordance with Council Directive 1999/5/EC "Radio
Equipment and Telecommunications Equipment"
See the enclosed Declaration of Conformity (DOC) that is enclosed with the equipment for full
details. Compliance of the equipment with the Directive is attested by the application of the CE mark
on the equipment.
Appendix
17