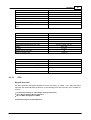
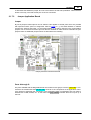
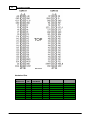
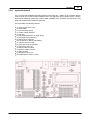
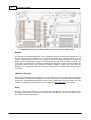
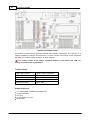
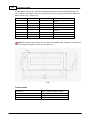
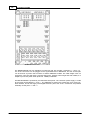
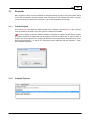
1
C-Control Pro IDE
© 2013 Conrad Electronic
I
C-Control Pro IDE
Table of Contents
2
Part 1 Important Notes
1 Introduction
................................................................................................................................... 2
2 Reading
...................................................................................................................................
this operating manual
2
3 Handling
................................................................................................................................... 2
4 Intended
...................................................................................................................................
use
3
5 Warranty
...................................................................................................................................
and Liability
3
6 Service
................................................................................................................................... 4
7 Open
...................................................................................................................................
Source
4
8 Demo
...................................................................................................................................
Programs
4
9 History
................................................................................................................................... 5
12
Part 2 Hardware
1 ...................................................................................................................................
Mega Series
12
1.1...................................................................................................................................
Installation
12
1.2...................................................................................................................................
Firmware
16
1.3...................................................................................................................................
Mega32 Module
17
1.4...................................................................................................................................
Mega128 Module
23
1.5...................................................................................................................................
Mega128 CAN Module
30
1.6...................................................................................................................................
Mega32 Application Board
40
1.7...................................................................................................................................
Mega128 Application Board
50
1.8...................................................................................................................................
Mega32 Projectboard
59
1.9...................................................................................................................................
Mega128 Projectboard
61
2 ...................................................................................................................................
AVR32Bit
63
2.1...................................................................................................................................
Installation
63
2.2...................................................................................................................................
Firmware
65
2.3...................................................................................................................................
Module
67
2.4...................................................................................................................................
Applicationboard
82
2.5...................................................................................................................................
Mainboard
95
2.6
...................................................................................................................................
UNIT-BUS Exp. Board
101
2.7
...................................................................................................................................
LCD1602 Board
103
2.8
...................................................................................................................................
Port-Ext-Board
108
2.9
...................................................................................................................................
REL4-Board
111
2.10
...................................................................................................................................
RELBUS-Board
116
2.11
...................................................................................................................................
UNIT-BUS Ext-Board
121
2.12
...................................................................................................................................
USB-Board
124
© 2013 Conrad Electronic
Inhalt
II
3...................................................................................................................................
LCD Matrix
127
Part 3 IDE
129
1...................................................................................................................................
Projects
130
1.1
...................................................................................................................................
Create Projects
130
1.2
...................................................................................................................................
Compile Projects
130
1.3
...................................................................................................................................
Project Management
131
1.4
...................................................................................................................................
Project Options
133
1.5
...................................................................................................................................
Library Management
134
1.6
...................................................................................................................................
Thread Options
135
1.7
...................................................................................................................................
Todo Liste
136
2...................................................................................................................................
Editor
136
2.1
...................................................................................................................................
Editor Functions
139
2.2
...................................................................................................................................
Print Preview
140
2.3
...................................................................................................................................
Keyboard Shortcuts
141
2.4
...................................................................................................................................
Regular Expressions
143
3...................................................................................................................................
C-Control Hardware
144
3.1
...................................................................................................................................
Interface Selection
144
3.2
...................................................................................................................................
Start Program
145
3.3
...................................................................................................................................
C-Control Configuration
145
3.4
...................................................................................................................................
Search Ethernet
146
3.5
...................................................................................................................................
Outputs
147
3.6
...................................................................................................................................
PIN Functions
148
3.7
...................................................................................................................................
Version Check
148
4...................................................................................................................................
Debugger
149
4.1
...................................................................................................................................
Breakpoints
150
4.2
...................................................................................................................................
Variable Watch Window
150
4.3
...................................................................................................................................
Array Window
152
5...................................................................................................................................
Tools
153
5.1
...................................................................................................................................
Syntax Highlighting
154
5.2
...................................................................................................................................
Editor Settings
156
5.3
...................................................................................................................................
IDE Settings
158
6...................................................................................................................................
Windows
163
7...................................................................................................................................
Help
164
Part 4 Compiler
167
1...................................................................................................................................
General Features
167
1.1
...................................................................................................................................
Preprocessor
167
1.2
...................................................................................................................................
Pragma Instructions
169
1.3
...................................................................................................................................
Map File
169
© 2013 Conrad Electronic
III
C-Control Pro IDE
2...................................................................................................................................
CompactC
170
2.1
...................................................................................................................................
Program
170
2.2
...................................................................................................................................
Instructions
171
2.3
...................................................................................................................................
Data Types
173
2.4
...................................................................................................................................
Variables
174
2.5
...................................................................................................................................
Operators
178
2.6
...................................................................................................................................
Control Structures
181
2.7
...................................................................................................................................
Functions
187
2.8
...................................................................................................................................
Tabellen
189
3...................................................................................................................................
BASIC
192
3.1
...................................................................................................................................
Program
192
3.2
...................................................................................................................................
Instructions
193
3.3
...................................................................................................................................
Data Types
194
3.4
...................................................................................................................................
Variables
195
3.5
...................................................................................................................................
Operators
200
3.6
...................................................................................................................................
Control Structures
202
3.7
...................................................................................................................................
Functions
208
3.8
...................................................................................................................................
Tables
210
4...................................................................................................................................
Assembler
212
4.1
...................................................................................................................................
An Example
212
4.2
...................................................................................................................................
Data Access
214
4.3
...................................................................................................................................
Guideline
216
5...................................................................................................................................
ASCII Table
217
Part 5 Libraries
223
1...................................................................................................................................
Internal Functions
223
2...................................................................................................................................
General
223
2.1
...................................................................................................................................
AbsDelay
223
2.2
...................................................................................................................................
ForceBootloader (AVR32Bit)
224
2.3
...................................................................................................................................
Sleep (Mega)
224
3...................................................................................................................................
Analog-Comparator
225
3.1
...................................................................................................................................
Mega
225
3.2
...................................................................................................................................
AVR32Bit
226
4...................................................................................................................................
Analog-Digital-Converter
229
4.1
...................................................................................................................................
Mega
229
4.2
...................................................................................................................................
AVR32Bit
233
5...................................................................................................................................
CAN Bus
237
5.1
...................................................................................................................................
CAN Examples
240
5.2
...................................................................................................................................
CAN_Exit
241
5.3
...................................................................................................................................
CAN_GetInfo
241
© 2013 Conrad Electronic
Inhalt
IV
5.4
...................................................................................................................................
CAN_Init
242
5.5
...................................................................................................................................
CAN_Receive
243
5.6
...................................................................................................................................
CAN_MObSend
243
5.7
...................................................................................................................................
CAN_SetChan (AVR32Bit)
244
5.8
...................................................................................................................................
CAN_SetMOb
244
6...................................................................................................................................
Clock
245
6.1
...................................................................................................................................
Clock_GetVal
245
6.2
...................................................................................................................................
Clock_SetDate
246
6.3
...................................................................................................................................
Clock_SetTime
247
7...................................................................................................................................
DCF 77
247
7.1
...................................................................................................................................
DCF_FRAME
249
7.2
...................................................................................................................................
DCF_INIT
249
7.3
...................................................................................................................................
DCF_PULS
250
7.4
...................................................................................................................................
DCF_START
250
7.5
...................................................................................................................................
DCF_SYNC
250
8...................................................................................................................................
Debug
251
8.1
...................................................................................................................................
Msg_WriteChar
251
8.2
...................................................................................................................................
Msg_WriteFloat
251
8.3
...................................................................................................................................
Msg_WriteHex
252
8.4
...................................................................................................................................
Msg_WriteInt
252
8.5
...................................................................................................................................
Msg_WriteText
253
8.6
...................................................................................................................................
Msg_WriteWord
253
9...................................................................................................................................
Direct Access (Mega)
253
9.1
...................................................................................................................................
DirAcc_Read
254
9.2
...................................................................................................................................
DirAcc_Write
254
10
...................................................................................................................................
EEPROM
254
10.1
...................................................................................................................................
EEPROM_Read
255
10.2
...................................................................................................................................
EEPROM_ReadWord
255
10.3
...................................................................................................................................
EEPROM_ReadFloat
256
10.4
...................................................................................................................................
EEPROM_Write
256
10.5
...................................................................................................................................
EEPROM_WriteWord
257
10.6
...................................................................................................................................
EEPROM_WriteFloat
257
11
...................................................................................................................................
Ethernet (AVR32Bit)
258
11.1
...................................................................................................................................
Ethernet Activation
258
11.2
...................................................................................................................................
TCP/IP Programming
259
11.3
...................................................................................................................................
UDP Programming
261
11.4
...................................................................................................................................
ETH_ConnectTCP
262
11.5
...................................................................................................................................
ETH_CheckReceiveBuf
263
11.6
...................................................................................................................................
ETH_CloseListenTCP
264
© 2013 Conrad Electronic
V
C-Control Pro IDE
11.7
...................................................................................................................................
ETH_CloseListenUDP
264
11.8
...................................................................................................................................
ETH_DisconnectTCP
264
11.9
...................................................................................................................................
ETH_GetIPInfo
265
11.10
...................................................................................................................................
ETH_GetStateTCP
265
11.11
...................................................................................................................................
ETH_ListenTCP
266
11.12
...................................................................................................................................
ETH_ListenUDP
267
11.13
...................................................................................................................................
ETH_ReceiveData
267
11.14
...................................................................................................................................
ETH_SendTCP
267
11.15
...................................................................................................................................
ETH_SendUDP
268
11.16
...................................................................................................................................
ETH_SetConnBuf
268
12
...................................................................................................................................
I2C
269
12.1
...................................................................................................................................
Mega
269
12.2
...................................................................................................................................
AVR32Bit
273
13
...................................................................................................................................
Interrupt
277
13.1
...................................................................................................................................
Ext_IntEnable
278
13.2
...................................................................................................................................
Ext_IntDisable
279
13.3
...................................................................................................................................
Irq_GetCount
279
13.4
...................................................................................................................................
Irq_SetVect
280
13.5
...................................................................................................................................
IRQ Example
280
14
...................................................................................................................................
Keyboard (Mega)
281
14.1
...................................................................................................................................
Key_Init
281
14.2
...................................................................................................................................
Key_Scan
282
14.3
...................................................................................................................................
Key_TranslateKey
282
15
...................................................................................................................................
LCD
283
15.1
...................................................................................................................................
Internal Functions
283
15.2
...................................................................................................................................
LCD_ClearLCD
284
15.3
...................................................................................................................................
LCD_CursorOff
285
15.4
...................................................................................................................................
LCD_CursorOn
285
15.5
...................................................................................................................................
LCD_CursorPos
286
15.6
...................................................................................................................................
LCD_Init
286
15.7
...................................................................................................................................
LCD_Locate
287
15.8
...................................................................................................................................
LCD_SetDispAddr (AVR32Bit)
287
15.9
...................................................................................................................................
LCD_WriteChar
288
15.10
...................................................................................................................................
LCD_WriteFloat
288
15.11
...................................................................................................................................
LCD_WriteRegister
288
15.12
...................................................................................................................................
LCD_WriteText
289
15.13
...................................................................................................................................
LCD_WriteWord
289
16
...................................................................................................................................
Math
290
16.1
...................................................................................................................................
Floating Point
290
© 2013 Conrad Electronic
Inhalt
VI
16.2
...................................................................................................................................
Integer
297
17
...................................................................................................................................
OneWire
298
17.1
...................................................................................................................................
Onewire_Read
298
17.2
...................................................................................................................................
Onewire_Reset
299
17.3
...................................................................................................................................
Onewire_Write
299
17.4
...................................................................................................................................
Onewire Example
299
18
...................................................................................................................................
Port
301
18.1
...................................................................................................................................
Port_Attribute
302
18.2
...................................................................................................................................
Port_DataDir (Mega)
303
18.3
...................................................................................................................................
Port_DataDirBit (Mega)
303
18.4
...................................................................................................................................
Port_Read (Mega)
304
18.5
...................................................................................................................................
Port_ReadBit
304
18.6
...................................................................................................................................
Port_ToggleBit
305
18.7
...................................................................................................................................
Port_Toggle (Mega)
305
18.8
...................................................................................................................................
Port_Write (Mega)
306
18.9
...................................................................................................................................
Port_WriteBit
306
18.10
...................................................................................................................................
Port Table
307
18.11
...................................................................................................................................
Port Example (Mega)
309
18.12
...................................................................................................................................
Port Example (AVR32Bit)
310
19
...................................................................................................................................
RC5
311
19.1
...................................................................................................................................
RC5_Init
314
19.2
...................................................................................................................................
RC5_Read
315
19.3
...................................................................................................................................
RC5_Write
315
20
...................................................................................................................................
RS232
316
20.1
...................................................................................................................................
Divider (Mega)
316
20.2
...................................................................................................................................
Serial_Disable
318
20.3
...................................................................................................................................
Serial_Init (Mega)
318
20.4
...................................................................................................................................
Serial_Init (AVR32)
319
20.5
...................................................................................................................................
Serial_Init_IRQ (Mega)
320
20.6
...................................................................................................................................
Serial_Init_IRQ (AVR32)
321
20.7
...................................................................................................................................
Serial_IRQ_Info
322
20.8
...................................................................................................................................
Serial_Read (Mega)
323
20.9
...................................................................................................................................
Serial_ReadExt
323
20.10
...................................................................................................................................
Serial_Write
324
20.11
...................................................................................................................................
Serial_WriteText
324
20.12
...................................................................................................................................
Serial Example
325
20.13
...................................................................................................................................
Serial Example (IRQ)
325
21
...................................................................................................................................
SDCard
325
21.1
...................................................................................................................................
FAT Support
328
© 2013 Conrad Electronic
VII
C-Control Pro IDE
21.2
...................................................................................................................................
SDC Return Values
328
21.3
...................................................................................................................................
SDC_FClose
328
21.4
...................................................................................................................................
SDC_FOpen
329
21.5
...................................................................................................................................
SDC_FRead
330
21.6
...................................................................................................................................
SDC_FSeek
330
21.7
...................................................................................................................................
SDC_FSetDateTime
331
21.8
...................................................................................................................................
SDC_FStat
331
21.9
...................................................................................................................................
SDC_FSync
332
21.10
...................................................................................................................................
SDC_FTruncate
333
21.11
...................................................................................................................................
SDC_FWrite
333
21.12
...................................................................................................................................
SDC_GetFree
334
21.13
...................................................................................................................................
SDC_Init
334
21.14
...................................................................................................................................
SDC_MkDir
335
21.15
...................................................................................................................................
SDC_Rename
335
21.16
...................................................................................................................................
SDC_Unlink
336
21.17
...................................................................................................................................
SD card Example
336
22
...................................................................................................................................
Servo
337
22.1
...................................................................................................................................
Servo_Init
338
22.2
...................................................................................................................................
Servo_Set
339
22.3
...................................................................................................................................
Servo Example
339
23
...................................................................................................................................
SPI
340
23.1
...................................................................................................................................
Mega
340
23.2
...................................................................................................................................
AVR32Bit
343
24
...................................................................................................................................
Strings
346
24.1
...................................................................................................................................
Str_Comp
346
24.2
...................................................................................................................................
Str_Copy
347
24.3
...................................................................................................................................
Str_Fill
347
24.4
...................................................................................................................................
Str_Isalnum
348
24.5
...................................................................................................................................
Str_Isalpha
348
24.6
...................................................................................................................................
Str_Len
349
24.7
...................................................................................................................................
Str_Printf
349
24.8
...................................................................................................................................
Str_ReadFloat
350
24.9
...................................................................................................................................
Str_ReadInt
350
24.10
...................................................................................................................................
Str_ReadNum
351
24.11
...................................................................................................................................
Str_Substr
351
24.12
...................................................................................................................................
Str_WriteFloat
352
24.13
...................................................................................................................................
Str_WriteInt
352
24.14
...................................................................................................................................
Str_WriteWord
353
24.15
...................................................................................................................................
Str_Printf Example
354
© 2013 Conrad Electronic
Inhalt
VIII
25
...................................................................................................................................
Threads
354
25.1
...................................................................................................................................
Thread_Cycles
356
25.2
...................................................................................................................................
Thread_Delay
357
25.3
...................................................................................................................................
Thread_Info
357
25.4
...................................................................................................................................
Thread_Kill
358
25.5
...................................................................................................................................
Thread_Lock
358
25.6
...................................................................................................................................
Thread_MemFree
358
25.7
...................................................................................................................................
Thread_Resume
359
25.8
...................................................................................................................................
Thread_Signal
359
25.9
...................................................................................................................................
Thread_Start
360
25.10
...................................................................................................................................
Thread_Wait
360
25.11
...................................................................................................................................
Thread Example
361
25.12
...................................................................................................................................
Thread Example 2
361
26
...................................................................................................................................
Timer
362
26.1
...................................................................................................................................
Mega
362
26.2
...................................................................................................................................
AVR32Bit
387
27
...................................................................................................................................
Webserver (AVR32Bit)
395
27.1
...................................................................................................................................
Webserver Hints
396
27.2
...................................................................................................................................
WEB_GetRequest
397
27.3
...................................................................................................................................
WEB_GetFileHash
398
27.4
...................................................................................................................................
WEB_ReleaseRequest
398
27.5
...................................................................................................................................
WEB_SetDynVar
398
27.6
...................................................................................................................................
WEB_StartServer
400
27.7
...................................................................................................................................
WEB_StopServer
400
Part 6 FAQ
403
1...................................................................................................................................
General
403
2...................................................................................................................................
Mega
404
3...................................................................................................................................
AVR32Bit
405
© 2013 Conrad Electronic
Part
1
Important Notes
1
2
Important Notes
This chapter deals with important information's to warranty, support and operation of the C-ControlPro hardware and software.
1.1
Introduction
The C-Control Pro Systems are based on the Atmel AVR32 and the Atmel Mega Series (Mega 32,
Mega 128, AT90CAN) resp. These Microcontrollers are used in large numbers in a broad variety of
devices from entertainment electronics through household appliances to various application facilities
in the industries. There the controller takes charge of important control tasks. C-Control Pro offers
this highly sophisticated technology to solve your controlling problems. You can acquire analog
measuring values and switch positions and provide corresponding switching signals dependent on
these input conditions, e. g. for Relais and servo motors. In conjunction with a DCF-77 radio antenna
C-Control Pro can receive the time with atomic accuracy and thus take over precise time switch
functions. Various hardware interfaces and bus systems allow the cross linking of C-Control Pro with
sensors, actors and other control systems. We want to provide a broad user range with our technology. From our former work in C-Control service we know that also customers without any experience in electronics and programming but eager to learn are interested in C-Control. If you happen to
belong to this user group please allow us to give you the following advice:
C-Control Pro is only of limited use for the entry into programming of micro computers and electronic
circuit technique! We presuppose that you have at least a basic knowledge in a higher programming
language such as BASIC, PASCAL, C, C++ or Java. Furthermore we presume that you are used to
operating a PC under one of the Microsoft operating systems (2000/XP/Vista/Win7/Win8) . You
should further be experienced in working with soldering irons, multimeters and electronic components. We have made every effort to formulate all descriptions as simple as possible. Unfortunately
we were not able to do without the use of technical terms and expressions in an operating manual to
the themes involved here. If need be please see the appropriate technical literature.
1.2
Reading this operating manual
Please read this operating manual thoroughly prior to putting the C-Control Pro Unit into operation.
While several chapters are only of interest for the understanding of the deeper coherence's, others
contain important information's whose non-compliance may lead to malfunctions or even damages.
Chapters and paragraphs containing important themes are marked by a symbol.
Please read the entire manual prior to putting the unit into operation since it contains important
notes for correct operation. In case of damages to material or personnel caused by improper handling or non-compliance to this operating manual the warranty claim will expire! We will further not
take liability for consequential damages.
1.3
Handling
The C-Control Pro Unit contains sensitive components. These can be destroyed by electrostatic
discharges! Please observe the general rules on handling electronic components. Please organize
your working bench professionally. Ground your body prior to any work being done, e. g. by touching a grounded and conducting object (e. g. heating radiator). Avoid touching the connection pins
of the C-Control Pro Unit.
© 2013 Conrad Electronic
3
1.4
C-Control Pro IDE
Intended use
The C-Control Pro Unit is an electronic device in the sense of an integrated circuit. It serves the
programmable controlling of electric and electronic equipment. Construction and operation of this
equipment must be in conformance with the valid European licensing principles (CE).
The C-Control Pro must not be galvanically connected to voltages exceeding the directed Extra
Low Protective Voltage. Coupling to systems with higher voltages must exclusively be performed
by use of components having VDE qualification. In doing so the directed air and leakage paths
must be observed as well as sufficient precautions for protection against touching dangerous
voltages must be taken.
The PCB of the C-Control Pro Unit carries electronic components with high frequency clock signals and steep pulse slopes. Improper use of the unit may lead to the radiation of electro-magnetic
interference signals. The adoption of proper measures (e. g. the use of chokes, limiting resistors,
blocking capacitors and shielding's) to ensure the observance of legally directed maximum values
lies in the responsibility of the user.
The maximum allowable length of connected wire lines is without additional precautions appr. 0.25
Meters (Exception: Serial Interface). Under influence of strong electro-magnetic alternating fields
or interference pulses the function of the C-Control Pro Unit can be detracted. If need be a reset or
a restart of the system may become necessary.
During connection of external sub-assemblies the maximum admissible current and voltage values of
the particular pins must be observed. The connection of too high a voltage, a voltage of wrong polarity or an excessive current load may lead to immediate damage of the unit. Please keep the C-Control Pro Unit away from spray water or condensation dampness. Observe the safe operating temperature range in Item Technical Data in the attachment.
1.5
Warranty and Liability
For the C-Control Pro Unit Conrad Electronic grants a warranty period of 24 months from the date
of billing. Within this time period faulty units will be replaced free of charge if the fault provable originates in faulty production or loss on goods in transit.
The software in the operating system of the Microcontroller as well as the PC software on CDROM is shipped in the form as is. Conrad Electronic can not guarantee that the performance features of this software will satisfy individual requirements and that this software will operate free of
faults and interruptions. Conrad Electronic can further not be held liable for damages occurring directly by or consequently to the use of the C-Control Pro Unit. The use of the C-Control Pro Unit in
systems directly or indirectly serving medical, health or life saving objectives is not authorized.
In case the C-Control Pro Unit incl. software does not satisfy your demands or if you do not agree
to our warranty and liability conditions you are to make use of our 14 days money back guarantee.
Please return the unit without use marks, in the undamaged original packaging and incl. all accessories within this time-limit to our address for refund or clearing of the value of goods!
© 2013 Conrad Electronic
Important Notes
1.6
4
Service
Conrad Electronic provides you with a team of experienced service technicians. If you have any
question with regard to our C-Control Pro Unit you can reach our Technical Service by letter, telefax or e-mail.
By letter
Conrad Electronic SE
Technical Inquiry
Klaus-Conrad-Straße 2
D-92530 Wernberg-Köblitz
Fax-Nr.:
E-Mail:
09604 / 40-8848
[email protected]
Please preferably use e-mail communication. If there is a problem possibly provide us with a
sketch of your connection diagram in form of an attached picture file (jpg format) as well as the
program source code reduced to the part referring to your problem (max. 20 lines). Further information's and current software for download please find on the C-Control homepage under www.ccontrol.de.
1.7
Open Source
When C-Control Pro was designed also open source software has come into operation:
ANTLR 2.73
Inno Setup 5.5.2
GPP (Generic Preprocessor)
avra-1.2.3a Assembler
http://www.antlr.org
http://www.jrsoftware.org
http://www.nothingisreal.com/gpp
http://avra.sourceforge.net/
In accordance with the rules of "LESSER GPL" (www.gnu.org/copyleft/lesser) during installation of
the IDE also the original source code of the avra assembler, the generic pre-processor as well as the
source text of the modified version is supplied, which is used with C-Control Pro. Both source texts
are found in a ZIP file in the "GNU" sub-directory.
1.8
Demo Programs
You will find the actual demo programs in "C:\Documents and Settings\All Users\Documents\C-Control Pro Demos" (XP and earlier) or in "C:\Users\Public\Public Documents\C-Control Pro Demos" directory (Vista and later). The current demos are stored in the folder "Demos Ver 2.31". The old demo
programs are thus not overwritten.
There is an entry Demo Programs in the Help menu of the IDE that will open an Explorer window
at the point where the demo programs are stored. Can also be opened with Open Demos directly
from the Project menu.
Please do not save your own programs in the area of the demo programs! Reinstalling the IDE
will overwrite the files there.
© 2013 Conrad Electronic
5
1.9
C-Control Pro IDE
History
Version 2.31 from 09/20/2013
New Features
AVR32 support
Ethernet Support (AVR32Bit)
Webserver (AVR32Bit)
Tab Interface for Editor
new Communication routines
direct access to COM Port in Toolbar
turn on/off COM Ports in Toolbar
Error Corrections
Documentation Update
Partly wrong incrementation of Clock Variable in Interrupt context
corrected error in type recognition of constants
fixed error in Onewire_Read
wrong definitions PORT_ON and PORT_OFF corrected
Version 2.13 from 04/04/2011
New Features
overhauled all demo programs
Error Corrections
Documentation Update
error check in Linker improved
corrected register usage in Mega32 interpreter
all fields in project options are now correctly initialized
corrected wrong behavior with setting PIN Codes
Expressions like "a[fun(2)]=b" work again
Version 2.12 from 01/06/2011
New Features
32-Bit Integer (only Mega128)
new multithreading with time slices
#thread parameter syntax in source
SD card support
CAN-Bus Support (only C-Control Pro 128 CAN)
direct access to Flash Arrays
Array Tooltips in Debugger
IDE Style changeable
Vista and Win7 Theme support
ask for transfer at program start option
increased serial speed for module communication
VT100 Emulation for Terminal
rand(), srand() randomize functions
Error Corrections
Documentation update
Translation errors fixed
© 2013 Conrad Electronic
Important Notes
Floats in tables now work
Corrected negative values in tables
Fixed constant expressions in parentheses
Corrected function calls made in return statements
"#pragma Warn" is now "'#pragma Warning"
Wrong editor undo after save fixed
Fixed bug in Serial_IRQ_Info
Fixed bug in serial program transfer
Problem in Servo-Routines corrected
External Interrupt Acknowledge now in correct order
Wrong upper limit at some TimerXTime() functions fixed
Clear all Breakpoints now works every time
Fixed problem crossing 64kb boundary
Fixed stopping program in debugger >64kb code
round() now works correctly
Problem in BASIC For-loops fixed
Version 2.01 from 06/27/2009
New Features
Added Search Function into Editor popupmenu
Error Corrections
Documentation update
Error at "unused Code Optimizer" corrected
Fixed internal handling of data crossing 64kb boundary
Fixed error when starting programs from Tools menu
Corrected translation bugs in Search dialog
Line offset fixed in Project Search
Timeout in I2C Routines
Fixed error message "...tbSetRowCount:new count too small"
Version 2.00 from 05/14/2009
New Features
Assembler Support
Enhanced Search Functions in the Editor
New configurable GUI
Todo List
switchable Compiler Warnings
Program Transfer of Bytecode without Project
extended Program Info
Fast Transfer if Interpreter already on Module
Enhanced Auto-Completion of Keywords and Function Names
Function Parameter help
unused Code Optimizer
Peephole Optimizer
Support for predefined Arrays in Flash Memory
Realtime Array Index check
Optimized Array Access
better verification of constant array indices
call functions with string constants
Enter binary numbers with 0b....
© 2013 Conrad Electronic
6
7
C-Control Pro IDE
Addition und Subtraction of Pointers
Optimized Port OUT, PIN and DDR Access
Direct Atmel Register Access
Formatted String Output with Str_Printf()
convert ASCII strings in numerical values
++/-- for BASIC
Port toggle functions
RC5 Send and Receive Routines
Software Clock (Time & Date) with Quartz correction factor
Servo Routines
mathematical Round
Atmel Mega Sleep Function
Error Corrections
Initialization Timer_T0FRQ corrected
Initialization Timer_T0PWM corrected
Initialization Timer_T1FRQ corrected
Initialization Timer_T1FRQX corrected
Initialization Timer_T1PWM corrected
Initialization Timer_T1PWMX corrected
Initialization Timer_T1PWMXY corrected
Initialization Timer_T3FRQ corrected
Refresh for Array Window corrected
Desktop Reset corrected
Module Reset corrected
Bug in Debugfiles >30000 Bytes corrected
Bug in conditional valuation in CompactC fixed
Bug in Timer_Disable() fixed
Version 1.72 from 10/22/2008
New Features
added SPI functions
RP6 AutoConnect
Error Corrections
improved quality of serial transfers
Version 1.71 from 06/25/2008
New Features
new Editor in IDE
Editor shows all defined function names
Editor supports code folding
Simple serial Terminal
Pulldownmenu to start your own programs (Tool Quickstart)
Syntaxhighlighting of all standard library functions
Configuration of Syntaxhighlighting
Extension of Select .. Case in BASIC
Automatic case correction for keywords and library function names
Simple automatic lookup for keywords and library function names
OneWire Library Functions
Comments of Blocks in BASIC with /* , */
© 2013 Conrad Electronic
Important Notes
8
New FTDI driver
Error Corrections
Global For-Loop counter variables in BASIC work now correct
Char variables work now correct with negative numbers
"u" after an integer now defines unsigned number
Project names now can contain special characters
Thread_Wait() now supports thread parameter
return command in CompactC without return parameter was working wrong
Corrected swapped error messages when called functions with pointers
Corrected error message at assignment, when function had no return parameter
Nested switch/Select statements are working now
Very long switch/Select statements are functioning properly now
Better Error recovery when selected COM Port already in use
No longer a crash if very huge amounts of faulty data where transferred over USB or COM Port
"Exit" in BASIC For-Loops is working now
Compiler error corrected in declaration of array variables
Version 1.63 from 12/21/2007
Error Corrections
Documentation update
Version 1.62 from 12/08/2007
New Features
Vista Compatibility
Error Corrections
Brackets are working correctly
The compiler is no longer crashing when variable names are not known
There were sometimes incorrect syntax errors when opening some brace levels and a missing
operand
"Exit" don't worked correctly in BASIC For-Next loops
The array window could only be opened 16 times, even when some array windows were closed
Renamed the Text "Compiler" to "Compiler Defaults" in the Options Menu
Version 1.60 from 03/04/2007
New Features
English language version of IDE - switchable at runtime
English language Compiler messages
English language version of help files and manual
printing of source code from the IDE
Print preview of source code
Thread_Wait() extended with thread parameter
ADC_Set() got a speedup
DoubleClock mode can be activated in serial functions
Error Corrections
ExtIntEnable() was only working correct with IRQ 0 and 4
Serial_Init() und Serial_Init_IRQ() got wrongly a byte as divider instead of a word
EPROM_WriteFloat und EEPROM_ReadFloat() sometimes worked incorrect
© 2013 Conrad Electronic
9
C-Control Pro IDE
Thread_Kill() worked erroneous when called from the main thread
read accesses from globally defined floating point arrays were faulty
The second serial interface was not working correctly
EEPROM write accesses that used illegal addresses could overwrite reserved data in
EEPROM
There was a chance with a very low probability that the LCD display content could get corrupted
Version 1.50 from 11/08/2005
New Features
IDE Support for Mega128
Improved Cache Algorithm during IDE access to Transit Time Data in the Debugger
New Library Routines for Timer 3 (Mega128)
Programs using the extended (>64kb) Address Space (Mega128)
Supporting the external 64kb SRAM
Supporting the external Interrupts 3 - 7 (Mega128)
Routines for the 2. Serial Interface (Mega128)
Mathematical Functions (Mega128)
Display of Memory Volume when Interpreter is started
Internal RAM check for recognition when Global Variables too large for Main Memory
Interner RAM check for recognition when Thread Configuration too large for Main Memory
Transit Time Check if Stack Limits have been violated
Source Files can be moved up and down in the Project Hierarchy
Warning when Strings too long are assigned
On demand the Compiler creates a Map File describing the volume of all Program Variables
New Address model for Global Variables (the same Program runs at different RAM Volumes)
Interrupt Routines for Serial Interface (up to 256 Byte Receiver Buffer / 256 Byte Transmitter
Buffer)
Fixed wired IRQ Routines to allow Periode Measurement of small time intervals
Recursions are now usable without limits
Arrays of any size can now be displayed in a separate Window in the Debugger
Strings (character arrays) are now shown as Tooltip in the Debugger
SPI can be switched off in order to use the pins for I/O
The Serial Interface can be switched off in order to use the pins for I/O
The Hex value is now additionally shown as Tooltip in the Debugger
New Function Thread_MemFree()
Additional EEPROM Routines for Word and Floating Point access
Time Measurement with Timer_TickCount()
#pragma Commands to create Errors or Warnings
Pre-defined Symbol in Pre-Prozessor: __DATE__, __TIME__ __FILE__, __FUNCTION__,
__LINE__
Version Number in Splashscreen
Extended Documentation
Interactive Graphics at "Jumper Application Board" in Help File
New Demo Programs
Ctrl-F1 starts Context Help
Error Corrections
An Error is created if the Return Command is missing at the end of a function
Breakpoint Marks have not always been deleted
Limits at EEPROM Access can now be checked closer (internal overflow seized)
In the Debugger a single step can no longer depose the next command too early
© 2013 Conrad Electronic
Important Notes
Version 1.39 from 06/09/2005
New Features
BASIC Support
CompactC and BASIC can be mixed in a project
Extended Documentation
Loop Optimizing for For - Next in BASIC
ThreadInfo Function
New Demo Programs
Error Corrections
Compiler does no longer break down at German Umlauts (ä, ö, ü)
Internal Byte Code of command StoreRel32XT corrected
Offset in String Table improved
Version 1.28 from 04/26/2005
Initial Version
© 2013 Conrad Electronic
10
Part
2
Hardware
2
12
Hardware
This chapter gives a description of the hardware coming into operation with the C-Control Pro series.
The Modules C-Control Pro Mega32 and C-Control Pro Mega128 will be described. Further chapters
will comment on construction and function of the accompanying application boards and LCD modules as well as the keyboard.
2.1
Mega Series
2.1.1
Installation
In this chapter the installation of hardware and software of the C-Control Pro Mega is described.
2.1.1.1
Software
To get the current development software, sample programs, the manual and useful information,
please visit: www.c-control.de The manual is also available as a help file in the development environment of the C-Control PRO IDE and the PDF file is in the installation folder of the C-Control Pro in
the "Manual" directory.
Direct IDE Download Link: http://www.c-control-pro.de/updates/C-ControlSetup.exe
For the time of software and USB driver installations the user must be registered as administrator. During normal operation of C-Control Pro this is not necessary.
At the beginning of the installation first select the language in which the installation should take
place. After that you can choose whether you want to install C-Control Pro into the standard path or
whether you want to specify your own target directory. At the end of the installation process you will
be asked if an icon should be created on your desktop.
When the installation process is completed you can choose whether you want to see the "ReadMe"
file, have the shortform introduction displayed or directly start the C-Control Pro design platform.
2.1.1.2
Hardware
Important Note on Inserting/ Retrieving a Mega Module
For the connection between Module and Application Board high quality connectors have been used
in order to ensure intimate contacts. Mounting and dismounting of a Module should only take place
during power-down condition (switched off voltage) since otherwise damages may occur to Application Board and/ or Module resp. Because of the high number of contacts (40/ 64 Pins) considerable
force may be necessary to insert/ retrieve the Module. When inserting it must be ensured that the
Module is pressed into the socket evenly, i. e. not out of line. To do this the Module should be
placed onto an even surface. Mount the Module Mega32 in the correct orientation observing the
marking for Pin 1. The label inscription will then point towards the control elements on the Applica-
© 2013 Conrad Electronic
13
C-Control Pro IDE
tion Board
Mounting Orientation of Module MEGA32
The connector of Module Mega32 has been designed in such a way that faulty insertion of the Module is not possible. The dismounting of the Module is performed by carefully lifting it from the socket
by use of a suitable tool. In order to avoid bending the contacts the lifting of the Module should take
place from various sides.
2.1.1.3
USB and serial
Installation of the USB Drivers
Please connect the Application Board to an appropriate power supply. A Standard 9V/ 250mA Mains
Plug-in Power Supply will be sufficient. The polarity does not matter since it is automatically corrected by means of diodes. Depending on additionally used components it may later become necessary to use a power supply with higher output. Establish a connection between the Application
Board and your PC by use of a USB cable. Switch on the Application Board.
Driver and Software of the C-Control Pro environment support no Windows Operating System before Windows 2000.
If the Application Board is connected for the first time then there will be no driver for the FTDI chip.
The following window will then be shown under Windows XP.
© 2013 Conrad Electronic
Hardware
From here select "Install software from a list or other source" and click "Next"..
© 2013 Conrad Electronic
14
15
C-Control Pro IDE
Then type in the path to the driver’s directory. If the software has been installed to "C:\Programs" it
will be path "C:\Programs\C-Control-Pro\FTDI USB Driver".
© 2013 Conrad Electronic
Hardware
16
The message "C-Control Pro USB Device has not passed the Windows Logo Test ...." will normally
appear. This does not mean that the driver has failed during the Windows Logo Test. It merely
means that the driver has not taken part in the (quite costly) Redmond Test.
Here click "Continue Installation". The USB driver should then be installed after a few seconds.
In the PC software click on IDE in menu Options and select the area Interfaces. Here select the
communication port "USB0".
The FTDI driver supports 32 bit and 64 bit operating systems. The specific drivers are located in
the "FTDI USB Driver\i386" and "FTDI USB Driver\amd64".
Serial Connection
Due to the slow transmitting speed of the serial interface the USB connection should preferably be
used. If however due to hardware grounds the USB interface is not available then the Bootloader can
be switched into the Serial Mode.
To do this the key SW1 has to be kept pressed during power-up of the Application Board. After this
the Serial Bootloader Mode will be activated.
Select in the IDE the correct COM Interface.
2.1.2
Firmware
The operating system of C-Control Pro consists of the following components:
Bootloader
Interpreter
Bootloader
The Bootloader is available at any time. It serves the serial or USB communication with the IDE. By
use of command line commands the Interpreter and the user program can be transferred from the PC
to the Atmel Risc Chip. If a program is compiled and transferred to the Mega Chip the current Interpreter is also transferred at the same time.
If instead of the USB interface a serial connection should be set up from the IDE to the C-Control Pro module then the push button SW1 (Port M32:D.2 and M128:E.4 resp. at low level) must be
held pressed during power-up of the module. In this mode any communication will be directed
through the serial interface. This is useful when the module has already been incorporated into the
hardware application and the application board is thus not available. The serial communication however is considerably slower than the USB connection. In serial mode the USB pins are not used and
are thus available to the user for other tasks.
Since SW1 initiates the serial Bootloader during module start there should be no signal on Port
M32:D.2 and M128:E.4, resp. during power-up of the application since these ports are also usable
as outputs.
© 2013 Conrad Electronic
17
C-Control Pro IDE
SPI Switch Off (only Mega128)
A signal on the SPI interface during switch on can activate USB communication. In order to avoid
this PortG.4 (LED 2) can be set LOW during switch on. The SPI interface will then not be activated.
The SPI interface can also be manually be switched off by the Interpreter later on using SPI_Disable
().
Interpreter
The Interpreter consists of the following components:
Bytecode Interpreter
Multithreading Support
Interrupt Processing
User Functions
RAM and EEPROM Interface
In general the Interpreter processes the bytecode generated by the Compiler. Further most library
functions are integrated into it in order to allow access of the bytecode program to e. g. the hardware
ports. The RAM and EEPROM Interfaces are used by the IDE’s Debugger to get access to the variables when the Debugger is stopped at any Breakpoint.
Autostart
If no USB interface is connected and if SW1 has not been pressed during power-up in order to reach
the serial Bootloader mode then the Bytecode (if available) is started in the Interpreter. This means
that in case that the module is inserted into a hardware application the mere connection of the operating voltage will suffice to automatically start the user program.
A signal on Mega32: INT_0 resp. mega128: INT_4 when the C-Control Pro module is turned on,
can disrupt the startup behavior. Corresponding to the pin assignment of M32 and M128 the pin
INT_0 (resp. INT_4) are the same pin as SW1. When SW1 is pressed when the module is turned on,
this will lead to the activation of the serial bootloader mode, and the program is not started automatically.
2.1.3
Mega32 Module
Module Memory
The C-Control Pro Module provides 32kB FLASH, 1kB EEPROM and 2kB SRAM. A supplementary
EEPROM with an 8kB memory depth is mounted on the application board. The latter can be addressed by an I2C interface.
Note: Detailed information can be found in the IC manufacturer’s PDF files on the C-Control Pro Software CD-ROM.
ADC-Reference Voltage Generation
The Micro Controller is equipped with an analog-to-digital converter with a 10 Bit resolution. This
© 2013 Conrad Electronic
Hardware
18
means that measured voltages can be represented by integral numbers from 0 through 1023. The reference voltage for the lower limit is GND level, i. e. 0V. The reference voltage for the upper limit can
be selected by the user:
5V Operating Voltage (VCC)
Internal Reference Voltage of 2.56V
External Reference Voltage e. g. 4,096V generated by a Reference Voltage IC.
If x is a digital measuring value then the corresponding voltage value u is computed as follows:
u = x * Reference Voltage / 1024
Clock Generation
Clock generation takes place by a 14.7456MHz Quartz Oscillator. All time dependent actions within
the controller are derived from this clock frequency.
Reset
A Reset initiates the return of the Micro Controller system to a defined starting condition. In gerneral
the C-Control Pro Module knows two reset sources:
Power-On-Reset: is automatically executed after switch on of the operating voltage.
Hardware-Reset: is executed when the Module’s RESET (Pin 9) is pulled to "low" and released
again by e. g. shortly pressing the connected reset key RESET1 (SW3).
A "Brown-Out-Detection" avoids that the Controller can enter undefined conditions in case of dropping operating voltages.
Digital Ports (PortA, PortB, PortC, PortD)
The C-Control Pro Module provides four digital ports at 8 pins each. To the digital ports it is possible
to connect e. g. pushbuttons with pull-up resistors, digital IC’s, opto couples or driver circuits for relais. The ports can be addressed either separatly, i.e. pin by pin or byte by byte. Each pin can either
be input or output.
Never connect two ports directly together which should simultaneously work as outputs!
Digital input pins are high-impedance or wired to internal pull-up resistors and transform an applied
voltage signal into a logical value. For this it is required that the voltage signal is within the limits
defined for TTL and CMOS IC’s high or low levels. During further processing in the program the logical values on the respective input ports are represented as 0 ("low") or 1 ("high"). Pins will take on
the values 0 or 1, Bytes from 0 to 255. Output ports are able to give out digital voltage signals by use
of an internal driver circuit. Connected circuits can draw (at high level) or feed (at low level) a specific
current from or to the ports.
Pay attention to the maximum admissable load current for a single port or for all ports in total.
Exceeding the maximal values may lead to destruction of the C-Control Pro Module. After a reset
each port is initially configured as input port. By certain commands the direction of data transport
can be toggled.
© 2013 Conrad Electronic
19
C-Control Pro IDE
It is important to closely study the pin assignment of M32 and M128 prior to programming since
important functions of the program design (e. g. the USB interface of the application board) will apply
to specific ports. If these ports are re-programmed or if the matching jumpers on the application
board are no longer set then it may happen that the design platform can no longer transfer any programs to the C-Control Pro. Timer inputs and outputs, A/D converter, I2C as well as serial interface
are also connected to various port pins.
PLM-Ports
There are two timers available for PLM. These are Timer_0 with 8 bits and Timer_1 with 16 bits.
They can be used for D/A conversion, to control servo motors in pattern making and to output audio
frequencies. A pulse length modulated signal has a period of N so called "Ticks". The duration of one
tick is the time base. If the output value of a PLM port is set to X then the port will hold high level for
X ticks of one period and will then for the balance of the period drop to low level. For programming of
the PLM channels see Timer.
The PLM channels for Timer_0 and Timer_1 have independent time base and period length. In applications for pulse width modulated digital to analog conversion the time base and period length are
set once and then only the output value is varied. According to their electrical properties the PLM
ports are digital ports. Please observe the technical boundary conditions for digital ports (max. current).
Technical Data Module
Note: Detailed information can be found in the IC manufacturer’s PDF files on the C-Control Pro Software CD-ROM.
All voltage specifications apply to direct current (DC).
© 2013 Conrad Electronic
Hardware
20
Environmental Conditions
Range of admissable ambient temperature
Range of admissable ambient relative humidity
Power Supply
0°C … 70°C
20% … 60%
Range of admissable supply voltage
Power reqirement of the module without external
loads
4,5V … 5,5V
appr. 20mA
Clock
Clock Frequency (Quartz Oscillator)
Mechanics
Overall measurements less pins, appr.
Weight
Pin pitch
Number of pins (two rows)
Distance between rows
14.7456MHz
53 mm x 21mm x 8 mm
appr. 90g
2.54mm
40
15.24mm
Ports
Max. adimissable current from digital ports
Admissable current total on digital ports
Admissable input voltage on port pins (digital and
A/D)
Internal pull-up resistors (disconnectable)
2.1.3.1
± 20 mA
200mA
–0.5V ... 5.5V
20 - 50 kOhm
CPU
Mega32 Overview
The Micro Controller ATmega32 originates from the AVR family by ATMEL. It is a low-power Micro
Controller with Advanced RISC Architecture. In the following see a short summary of its hardware resources:
131 Powerful Instructions – Most Single-clock Cycle Execution
32 x 8 General Purpose Working Registers
Up to 16 MIPS Throughput at 16 MHz
Nonvolatile Program and Data Memories
© 2013 Conrad Electronic
21
C-Control Pro IDE
32K Bytes of In-System Self-Programmable Flash
Endurance: 10,000 Write/Erase Cycles
In-System Programming by On-chip Boot Program
1024 Bytes EEPROM
2K Byte Internal SRAM
Peripheral Features:
Two 8-bit Timer/Counters with Separate Prescalers and Compare Modes
One 16-bit Timer/Counter with Separate Prescaler, Compare Mode, and Capture Mode
Four PWM Channels
8-channel, 10-bit ADC
8 Single-ended Channels
2 Differential Channels with Programmable Gain at 1x, 10x, or 200x
Byte-oriented Two-wire Serial Interface (I2C)
Programmable Serial USART
On-chip Analog Comparator
External and Internal Interrupt Sources
32 Programmable I/O Lines
40-pin DIP
Operating Voltages 4.5 - 5.5V
2.1.3.2
Pin Assignment
PortA through PortD are for direct pin functions (e. g. Port_WriteBit) counted from 0 through 31, see
"PortBit".
Pin Assignment for Application Board Mega32
M32
PIN
1
2
3
Port
Port
PortBit
Name
PB0
PB1
PB2
PortB.0
PortB.1
PortB.2
8
9
10
T0
T1
INT2/AIN0
4
PB3
PortB.3
11
OT0/AIN1
5
6
7
8
9
10
11
12
13
14
15
16
17
18
19
PB4
PB5
PB6
PB7
PortB.4
PortB.5
PortB.6
PortB.7
12
13
14
15
PD0
PD1
PD2
PD3
PD4
PD5
PortD.0
PortD.1
PortD.2
PortD.3
PortD.4
PortD.5
24
25
26
27
28
29
RESET
VCC
GND
XTAL2
XTAL1
RXD
TXD
INT0
INT1
OT1B
OT1A
Layout
Remarks
SS
MOSI
MISO
SCK
Input Timer/Counter0
Input Timer/Counter1
(+)Analog Comparator, external Interrupt2
(-)Analog Comparator, Output
Timer0
USB-Communication
USB-Communication
USB-Communication
USB-Communication
EXT-RXD
EXT-TXD
EXT-T1
EXT-T2
EXT-A1
EXT-A2
Oscillator : 14,7456MHz
Oscillator : 14,7456MHz
RS232, serial Interface
RS232, serial Interface
SW1 (Taster1); external Interrupt0
SW2 (Taster2); external Interrupt1
Output B Timer1
Output A Timer1
© 2013 Conrad Electronic
Hardware
20
PD6
PortD.6
30
ICP
LED1
21
22
23
24
25
26
27
28
29
30
31
32
33
34
35
PD7
PC0
PC1
PC2
PC3
PC4
PC5
PC6
PC7
PortD.7
PortC.0
PortC.1
PortC.2
PortC.3
PortC.4
PortC.5
PortC.6
PortC.7
31
16
17
18
19
20
21
22
23
SCL
SDA
LED2
EXT-SCL
EXT-SDA
7
6
5
AVCC
GND
AREF
ADC7
ADC6
ADC5
PA7
PA6
PA5
PortA.7
PortA.6
PortA.5
RX_BUSY
TX_REQ
KEY_EN
36
PA4
PortA.4
4
ADC4
LCD_EN
37
PA3
PortA.3
3
ADC3
EXT_SCK
38
PA2
PortA.2
2
ADC2
EXT_DATA
39
40
PA1
PA0
PortA.1
PortA.0
1
0
ADC1
ADC0
© 2013 Conrad Electronic
22
LED; Input Capture Pin for Pulse/
Period Measurement
LED
I2C-Interface
I2C-Interface
ADC7 Input; USB-Communication
ADC6 Input; USB-Communication
ADC5 Input; LCD/Keyboard Interface
ADC4 Input; LCD/Keyboard Interface
ADC3 Input; LCD/Keyboard Interface
ADC2 Input; LCD/Keyboard Interface
ADC1 Input
ADC0 Input
D
C
B
1
SCHUTZHAUBE-DIL40
*
X1
R1
20K
*
VCC
GND
VCC
C3
10NF/16V
*
D1
BAS70
*
GND
X1
40
41
42
43
44
1
2
3
9
10
11
12
13
14
15
16
PB0
PB1
PB2
PB3
PB4
PB5
PB6
PB7
PD0
PD1
PD2
PD3
PD4
PD5
PD6
PD7
4
2
AGND
PA0 (ADC0)
PA1 (ADC1)
PA2 (ADC2)
PA3 (ADC3)
PA4 (ADC4)
RESET
PA5 (ADC5)
PA6 (ADC6)
PB0 (XCK/T0) PA7 (ADC7)
PB1 (T1)
PB2 (AIN0/INT2)
PB3 (AIN1/OC0)
PB4 (SS)
PB5 (MOSI)
PC0 (SCL)
PB6 (MISO)
PC1 (SDA)
PB7 (SCK)
PC2 (TCK)
PC3 (TMS)
PC4 (TDO)
PD0 (RXD)
PC5 (TDI)
PD1 (TXD) PC6 (TOSC1)
PD2 (INT0) PC7 (TOSC2)
PD3 (INT1)
PD4 (OC1B)
PD5 (OC1A)
PD6 (ICP)
PD7 (OC2)
Q1
Q-S-HC49-16MHZ
*
X2 7
X2
X1 8
22PF/50V
RESET
*
C2
22PF/50V
*
C1
GND
2
GND GND GND
6
GND
VCC
18
GND
A
1
38
5
17
VCC
VCC
VCC
27
29
AVCC
AREF
28
AGND
2.1.4
GND
PA0
PA1
PA2
PA3
PA4
PA5
PA6
PA7
PC0
PC1
PC2
PC3
PC4
PC5
PC6
PC7
37
36
35
34
33
32
31
30
19
20
21
22
23
24
25
26
IC1
IC-S-ATMEGA32-16AI
*
AVCC
AREF
C4
100NF/50V
3
GND
VCC
L1
BLM21A 102SPT
3
GND
Date:
File:
A4
Size
Title
X1
X2
PD0
PD1
PD2
PD3
PD4
PD5
PD6
PB0
PB1
PB2
PB3
PB4
PB5
PB6
PB7
RESET
Number
40
39
38
37
36
35
34
33
32
31
30
29
28
27
26
25
24
23
22
21
ATMega 32
CCprof
SOCKEL-DIL40
*
1
2
3
4
5
6
7
8
9
10
11
12
13
14
15
16
17
18
19
20
S1
40
39
38
37
36
35
34
33
32
31
30
29
28
27
26
25
24
23
22
21
AVCC
PC7
PC6
PC5
PC4
PC3
PC2
PC1
PC0
PD7
PA0
PA1
PA2
PA3
PA4
PA5
PA6
PA7
AREF
GND
Revision
1A
4
05.08.2004
Sheet of 1/1
C:\Altium2004\..\Atmega32-Dil40.schdoc Drawn By: Hainzlmaier
1
2
3
4
5
6
7
8
9
10
11
12
13
14
15
16
17
18
19
20
4
D
C
B
A
2.1.3.3
39
23
C-Control Pro IDE
Connection Diagram
Mega128 Module
Pin Layout of the Module
The Mega128 Module is shipped on 4 dual row (2x8) square pins. For hardware application the cor-
© 2013 Conrad Electronic
Hardware
24
responding socket strips must be organized in the following pitch format:
In the graph the socket strip X1-X4 and then the first two pins of the socket strip can be seen. Pin 1
of strip X1 corresponds to terminal X1_1 (see Mega128 Pinzuordnung).
Module Memory
The C-Control Pro 128 Module provides 128kB FLASH, 4kB EEPROM and 4kB SRAM. A supplementary EEPROM with an 8kB memory depth and an SRAM with a 64kB memory depth is mounted
on the application board. The EEPROM can be addressed by an I2C interface.
Note: Detailed information can be found in the IC manufacturer’s PDF files on the C-Control Pro Software CD-ROM.
ADC Reference Voltage Generation
The Micro Controller is equipped with an analog-to-digital converter with a 10 Bit resolution. This
means that measured voltages can be represented by integral numbers from 0 through 1023. The reference voltage for the lower limit is GND level, i. e. 0V. The reference voltage for the upper limit can
be selected by the user:
5V Operating Voltage (VCC)
Internal Reference Voltage of 2.56V
External Reference Voltage e. g. 4.096V generated by a Reference Voltage IC.
If x is a digital measuring value then the corresponding voltage value u is computed as follows:
u = x * Reference Voltage / 1024
© 2013 Conrad Electronic
25
C-Control Pro IDE
Clock Generation
Clock generation takes place by a 14.7456MHz Quartz Oscillator. All time dependent actions within
the controller are derived from this clock frequency.
Reset
A Reset initiates the return of the Micro Controller system to a defined starting condition. In gerneral
the C-Control Pro Module knows two reset sources:
Power-On-Reset: is automatically executed after the operating voltage is switched on.
Hardware-Reset: is executed when the Module’s RESET (X2_3) is pulled to "low" and released
again by e. g. shortly pressing the connected Reset push button RESET1 (SW3).
A "Brown-Out-Detection" avoids that the Controller can enter undefined conditions in case of dropping operating voltages.
Digital Ports (PortA, PortB, PortC, PortD, PortE, PortF, PortG)
The C-Control Pro Module provides 6 digital ports at 8 pins each and one digital port with 5 pins. To
the digital ports it is possible to connect e. g. push buttons with pull-up resistors, digital IC’s, opto
couples or driver circuits for relais. The ports can be addressed either separatly, i.e. pin by pin or
byte by byte. Each pin can either be input or output.
Note: Never connect two ports directly together which should simultaneously work as outputs!
Digital input pins are high-impedance or wired to internal pull-up resistors and transform an applied
voltage signal into a logical value. For this it is required that the voltage signal is within the limits
defined for TTL and CMOS ICs high or low levels. During further processing in the program the logical
values on the respective input ports are represented as 0 ("low") oder -1 ("high). Pins will take on the
values 0 or 1, Bytes from 0 to 255. Output ports are able to give out digital voltage signals by use of
an internal driver circuit. Connected circuits can draw (at high level) or feed (at low level) a specific
current from or to the ports.
Pay attention to the Maximum Admissible Load Current for a single port or for all ports in total.
Exceeding the maximal values may lead to destruction of the C-Control Pro Module. After a reset
each port is initially configured as input port. By certain commands the direction of data transport
can be toggled.
It is important to closely study the pin assignment of M32 and M128 prior to programming since
important functions of the program design (e. g. the USB interface of the application board) will apply
to specific ports. If these ports are re-programmed or if the matching jumpers on the application
board are no longer set then it may happen that the design platform can no longer transfer any programs to the C-Control Pro. Timer inputs and outputs, A/D converter, I2C as well as serial interface
are also connected to various port pins.
PLM Ports
There are three timers available for PLM. These are Timer_0 with 8 bits and Timer_1 as well as
© 2013 Conrad Electronic
Hardware
26
Timer_3 with 16 bits each. They can be used for D/A conversion, to control servo motors in pattern
making and to output audio frequencies. A pulse length modulated signal has a period of N so called
"Ticks". The duration of one tick is the time base. If the output value of a PLM port is set to X then
the port will hold high level for X ticks of one period and will then for the balance of the period drop to
low level. For programming of the PLM channels see Timer.
The PLM channels for Timer_0, Timer_1 and Timer_3 have independent time base and period length.
In applications for pulse width modulated digital to analog conversion the time base and period length
are set once and then only the output value is varied. According to their electrical properties the PLM
ports are digital ports. Please observe the technical boundary conditions for digital ports (max. current).
Technical Data Module
Note: Detailed information can be found in the IC manufacturer’s PDF files on the C-Control Pro Software CD-ROM.
All voltage specifications apply to direct current (DC).
Environmental Conditions
Range of admissible ambient temperature
Range of admissible relative ambient humidity
Power Supply
0°C … 70°C
20% … 60%
Range of admissible operating voltage
Power consumption of the module without external loads
4.5V … 5.5V
appr. 20mA
Clock
Clock Frequency (Quartz Oscillator)
Mechanics
Overall measurements less pins, appr.
Weight
Pin pitch
Number of pins (two rows)
© 2013 Conrad Electronic
14.7456MHz
40 mm x 40mm x 8 mm
appr. 90g
2.54mm
64
27
C-Control Pro IDE
Ports
Max. admissible current from digital ports
Admissible current total on digital ports
Admissible input voltage on port pins (digital and
A/D)
Internal pull-up resistors (disconnectable)
2.1.4.1
± 20 mA
200mA
–0.5V ... 5.5V
20 - 50 kOhm
CPU
The Micro Controller Atmega128 originates from the AVR family by ATMEL. It is a low-power Micro
Controller with Advanced RISC Architecture. In the following see a short summary of its hardware resources:
133 Powerful Instructions – Most Single Clock Cycle Execution
32 x 8 General Purpose Working Registers + Peripheral Control Registers
Fully Static Operation
Up to 16 MIPS Throughput at 16 MHz
On-chip 2-cycle Multiplier
Nonvolatile Program and Data Memories
128K Bytes of In-System Reprogrammable Flash
Endurance: 10,000 Write/Erase Cycles
Optional Boot Code Section with Independent Lock Bits
In-System Programming by On-chip Boot Program
True Read-While-Write Operation
4K Bytes EEPROM
Endurance: 100,000 Write/Erase Cycles
4K Bytes Internal SRAM
Up to 64K Bytes Optional External Memory Space
Programming Lock for Software Security
SPI Interface for In-System Programming
JTAG (IEEE std. 1149.1 Compliant) Interface
Boundary-scan Capabilities According to the JTAG Standard
Extensive On-chip Debug Support
Programming of Flash, EEPROM, Fuses and Lock Bits through the JTAG Interface
Peripheral Features
Two 8-bit Timer/Counters with Separate Prescalers and Compare Modes
Two Expanded 16-bit Timer/Counters with Separate Prescaler, Compare Mode and
Capture Mode
Real Time Counter with Separate Oscillator
Two 8-bit PWM Channels
6 PWM Channels with Programmable Resolution from 2 to 16 Bits
Output Compare Modulator
8-channel, 10-bit ADC
8 Single-ended Channels
© 2013 Conrad Electronic
Hardware
28
7 Differential Channels
2 Differential Channels with Programmable Gain at 1x, 10x, or 200x
Byte-oriented Two-wire Serial Interface
Dual Programmable Serial USARTs
Master/Slave SPI Serial Interface
Programmable Watchdog Timer with On-chip Oscillator
On-chip Analog Comparator
Special Microcontroller Features
Power-on Reset and Programmable Brown-out Detection
Internal Calibrated RC Oscillator
External and Internal Interrupt Sources
Six Sleep Modes: Idle, ADC Noise Reduction, Power-save, Power-down, Standby,
and Extended Standby
Software Selectable Clock Frequency
ATmega103 Compatibility Mode Selected by a Fuse
Global Pull-up Disable
I/O and Packages
53 Programmable I/O Lines
64-lead TQFP and 64-pad MLF
Operating Voltages
2.7 - 5.5V for ATmega128L
4.5 - 5.5V for ATmega128
2.1.4.2
Pin Assignment
PortA through PortG are for direct pin functions (e. g. Port_WriteBit) counted from 0 through 52, see
"PortBit".
Pin Assignment for Application Board Mega128
Module M128 Port Port PortBit Name1
#
1
PEN
X1_16
2
PE0
4
32
RXD0
X1_15
3
PE1
4
33
TXD0
X1_14
4
PE2
4
34
AIN0
X1_13
5
PE3
4
35
AIN1
X1_12
6
PE4
4
36
INT4
X1_11
7
PE5
4
37
INT5
X1_10
8
PE6
4
38
INT6
X1_9
9
PE7
4
39
INT7
X1_8
10
PB0
1
8
SS
X1_7
11
PB1
1
9
SCK
X1_6
12
PB2
1
10
MOSI
X1_5
13
PB3
1
11
MISO
X1_4
14
PB4
1
12
OC0
X1_3
15
PB5
1
13
OC1A
X1_2
16
PB6
1
14
OC1B
X1_1
17
PB7
1
15
OC1C
X2_5
18
PG3
6
51
TOSC2
© 2013 Conrad Electronic
Name2
Internal
PDI
PDO
XCK0
OC3A
OC3B
OC3C
T3
IC3
EXT-RXD0
EXT-TXD0
OC2
EXT-T1
TX-REQ
EXT-T2
EXT-DATA
RX-BUSY
EXT-A1
EXT-A2
EXT-SCK
LED1
Remarks
prog. Enable
RS232
RS232
Analog Comparator
Analog Comparator
Switch 1
SPI_TX_REQ
Switch 2 / Input Timer 3
LCD_Interface
SPI
SPI
SPI
SPI
SPI_RX_BUSY
DAC1
DAC2
LCD_Interface
LED
29
C-Control Pro IDE
X2_6
X2_3
X4_10
X4_12
PG4
X2_9
X2_10
X2_11
X2_12
X2_13
19
20
21
22
23
24
25
26
27
28
29
6
52
PD0
PD1
PD2
PD3
PD4
3
3
3
3
3
24
25
26
27
28
TOSC1
RESET
VCC
GND
XTAL2
XTAL1
INT0
INT1
INT2
INT3
IC1
X2_14
X2_15
X2_16
30
31
32
PD5
PD6
PD7
3
3
3
29
30
31
XCK1
T1
T2
X2_7
X2_8
X4_8
X4_7
X4_6
X4_5
X4_4
X4_3
X4_2
X4_1
X2_4
X3_16
X3_15
X3_14
X3_13
X3_12
X3_11
X3_10
X3_9
X4_10
X4_12
X3_8
X3_7
33
34
35
36
37
38
39
40
41
42
43
44
45
46
47
48
49
50
51
52
53
54
55
PG0
PG1
PC0
PC1
PC2
PC3
PC4
PC5
PC6
PC7
PG2
PA7
PA6
PA5
PA4
PA3
PA2
PA1
PA0
6
6
2
2
2
2
2
2
2
2
6
0
0
0
0
0
0
0
0
48
49
16
17
18
19
20
21
22
23
50
7
6
5
4
3
2
1
0
PF7
PF6
5
5
47
46
WR
RD
A8
A9
A10
A11
A12
A13
A14
A15
ALE
AD7
AD6
AD5
AD4
AD3
AD2
AD1
AD0
VCC
GND
ADC7
ADC6
X3_6
56
PF5
5
45
ADC5
X3_5
57
PF4
5
44
ADC4
X3_4
X3_3
X3_2
X3_1
X4_11
X4_12
X4_9
58
59
60
61
62
63
64
PF3
PF2
PF1
PF0
5
5
5
5
43
42
41
40
ADC3
ADC2
ADC1
ADC0
AREF
GND
AVCC
LED2
SCL
SDA
RXD1
TXD1
A16
EXT-SCL
EXT-SDA
EXT-RXD1
EXT-TXD1
LCD-E
KEY-E
LED
Oscillator
Oscillator
I2C
I2C
RS232
RS232
IC Timer 1, SRAM bank select
LCD_Interface
Input Timer 1
LCD_Interface / Input
Timer 2
WR SRAM
RD SRAM
ADR SRAM
ADR SRAM
ADR SRAM
ADR SRAM
ADR SRAM
ADR SRAM
ADR SRAM
ADR SRAM
Latch
A/D SRAM
A/D SRAM
A/D SRAM
A/D SRAM
A/D SRAM
A/D SRAM
A/D SRAM
A/D SRAM
TDI-JTAG
TDOJTAG
TMSJTAG
TCKJTAG
© 2013 Conrad Electronic
Hardware
2.1.4.3
30
Connection Diagram
14
16
15
14
13
12
9
8
7
6
5
4
3
2
1
15
11
16
10
X3
The shown connection diagram shows the planned C-Control Pro Module with CAN Bus interface. This Module has not been built. Inside the C-Control Pro 128 Module is working a Mega 128
processor, and not a AT90CAN128 like shown in this diagram. Therefore there is also no ATA6660
CAN-Bus Transceiver inside the C-Control Module.
IC1
PE0
PF0
PE1
PF1
PE2
PE3
PE5
8
8
PE6
9
7
6
10
11
5
12
4
13
3
14
15
2
16
1
17
X1
25
9
26
10
27
28
11
29
12
30
PE4
PE7
PB0
59
58
57
PF5
56
PF6
55
PF7
PA0
54
51
PA1
PB2
PA2
PB3
PA3
PB4
PA4
PB5
PA5
PB6
PA6
PB7
PA7
PD0
PC7
PD1
PC6
PD2
PC5
PD3
PC4
39
PD4
PC3
38
PD5
PC2
37
PD6
PC1
36
PD7
PC0
31
14
32
15
33
PG0
16
34
PG1
43
7
PG2
18
PG3
8
19
20
60
PF4
PB1
13
4
61
50
49
48
47
46
45
44
X4
1
42
41
2
40
3
4
5
6
35
7
8
23
XTAL2
24
XTAL1
PG4
21
VCC
RESET
52
VCC
2
62
53
GND
GND
3
AVCC
AREF
5
6
Vdd
C1
b0805j
Vdd
9
L1
12
b0805_spule
13
14
22pF
b0805j
64 63
11
10
C2
22
GND
AREF
AVCC
22pF
Q1
7
PF3
1
9
PF2
quarz_smu3
6
2
10
16MHz
5
100nF
4
b0805j
3
11
C6
2
12
AT90CAN128
13
GND
15
GND
GND
16
1
GND
C4
Vdd
AREF
AVCC
100nF
3
BAS70
D1
b0805j
Vdd
20k
R1
X2
b0805j
GND
ATA6660
0R
8
GND
2
62R
Project:
MEGA128V2
PCB-Design:
MEGA128 MODUL 2/3
R4
b0805j
GND
b0805j
5
R3
VREF
IC2
schäffel electronic gmbh
b0805j
6
62R
7
CANL
R2
CANH
RXD
b0805j
TXD
4
10nF
GND
1
C5
10nF
b0805j
C3
Vcc
GND
10mm
GND
2.1.5
Sheet 1
of 1
Mega128 CAN Module
Pin Layout of the Module
The Mega128 CAN Module is shipped on 4 dual row (2x8) square pins. For hardware application the
corresponding socket strips must be organized in the following pitch format:
© 2013 Conrad Electronic
31
C-Control Pro IDE
In the graph the socket strip X1-X4 and then the first two pins of the socket strip can be seen. Pin 1
of strip X1 corresponds to terminal X1_1 (see Mega128 Pinzuordnung).
To enable the simultaneous access of the CAN Bus and the LCD-Display with the C-Control
Mega128 CAN Module, the connections PD5 and PF7 were exchanged! At the C-Control Mega128
CAN pin PD5 is connected with X3_8 and PF7 is connected with X2_14!
Module Memory
The C-Control Pro 128 Module provides 128kB FLASH, 4kB EEPROM and 4kB SRAM. A supplementary EEPROM with an 8kB memory depth and an SRAM with a 64kB memory depth is mounted
on the application board. The EEPROM can be addressed by an I2C interface.
Note: Detailed information can be found in the IC manufacturer’s PDF files on the C-Control Pro Software CD-ROM.
ADC Reference Voltage Generation
The Micro Controller is equipped with an analog-to-digital converter with a 10 Bit resolution. This
means that measured voltages can be represented by integral numbers from 0 through 1023. The reference voltage for the lower limit is GND level, i. e. 0V. The reference voltage for the upper limit can
be selected by the user:
5V Operating Voltage (VCC)
Internal Reference Voltage of 2.56V
External Reference Voltage e. g. 4.096V generated by a Reference Voltage IC.
If x is a digital measuring value then the corresponding voltage value u is computed as follows:
u = x * Reference Voltage / 1024
© 2013 Conrad Electronic
Hardware
32
Clock Generation
Clock generation takes place by a 16MHz Quartz Oscillator. All time dependent actions within the
controller are derived from this clock frequency.
Reset
A Reset initiates the return of the Micro Controller system to a defined starting condition. In gerneral
the C-Control Pro Module knows two reset sources:
Power-On-Reset: is automatically executed after the operating voltage is switched on.
Hardware-Reset: is executed when the Module’s RESET (X2_3) is pulled to "low" and released
again by e. g. shortly pressing the connected Reset push button RESET1 (SW3).
A "Brown-Out-Detection" avoids that the Controller can enter undefined conditions in case of dropping operating voltages.
Digital Ports (PortA, PortB, PortC, PortD, PortE, PortF, PortG)
The C-Control Pro Module provides 6 digital ports at 8 pins each and one digital port with 5 pins. To
the digital ports it is possible to connect e. g. push buttons with pull-up resistors, digital IC’s, opto
couples or driver circuits for relais. The ports can be addressed either separatly, i.e. pin by pin or
byte by byte. Each pin can either be input or output.
Note: Never connect two ports directly together which should simultaneously work as outputs!
Digital input pins are high-impedance or wired to internal pull-up resistors and transform an applied
voltage signal into a logical value. For this it is required that the voltage signal is within the limits
defined for TTL and CMOS ICs high or low levels. During further processing in the program the logical
values on the respective input ports are represented as 0 ("low") oder -1 ("high). Pins will take on the
values 0 or 1, Bytes from 0 to 255. Output ports are able to give out digital voltage signals by use of
an internal driver circuit. Connected circuits can draw (at high level) or feed (at low level) a specific
current from or to the ports.
Pay attention to the Maximum Admissible Load Current for a single port or for all ports in total.
Exceeding the maximal values may lead to destruction of the C-Control Pro Module. After a reset
each port is initially configured as input port. By certain commands the direction of data transport
can be toggled.
It is important to closely study the pin assignment of M32 and M128 prior to programming since
important functions of the program design (e. g. the USB interface of the application board) will apply
to specific ports. If these ports are re-programmed or if the matching jumpers on the application
board are no longer set then it may happen that the design platform can no longer transfer any programs to the C-Control Pro. Timer inputs and outputs, A/D converter, I2C as well as serial interface
are also connected to various port pins.
PLM Ports
© 2013 Conrad Electronic
33
C-Control Pro IDE
There are three timers available for PLM. These are Timer_0 with 8 bits and Timer_1 as well as
Timer_3 with 16 bits each. They can be used for D/A conversion, to control servo motors in pattern
making and to output audio frequencies. A pulse length modulated signal has a period of N so called
"Ticks". The duration of one tick is the time base. If the output value of a PLM port is set to X then
the port will hold high level for X ticks of one period and will then for the balance of the period drop to
low level. For programming of the PLM channels see Timer.
The PLM channels for Timer_0, Timer_1 and Timer_3 have independent time base and period length.
In applications for pulse width modulated digital to analog conversion the time base and period length
are set once and then only the output value is varied. According to their electrical properties the PLM
ports are digital ports. Please observe the technical boundary conditions for digital ports (max. current).
Technical Data Module
Note: Detailed information can be found in the IC manufacturer’s PDF files on the C-Control Pro Software CD-ROM.
All voltage specifications apply to direct current (DC).
Environmental Conditions
Range of admissible ambient temperature
Range of admissible relative ambient humidity
Power Supply
0°C … 70°C
20% … 60%
Range of admissible operating voltage
Power consumption of the module without external loads
4.5V … 5.5V
appr. 20mA
Clock
Clock Frequency (Quartz Oscillator)
Mechanics
Overall measurements less pins, appr.
Weight
Pin pitch
Number of pins (two rows)
16MHz
40 mm x 40mm x 8 mm
appr. 90g
2.54mm
64
© 2013 Conrad Electronic
Hardware
34
Ports
Max. admissible current from digital ports
Admissible current total on digital ports
Admissible input voltage on port pins (digital and
A/D)
Internal pull-up resistors (disconnectable)
2.1.5.1
± 20 mA
200mA
–0.5V ... 5.5V
20 - 50 kOhm
CPU
AT90CAN Overview
The Micro Controller AT90CAN originates from the AVR family by ATMEL. It is a low-power Micro
Controller with Advanced RISC Architecture. In the following see a short summary of its hardware resources:
Advanced RISC Architecture
133 Powerful Instructions – Most Single Clock Cycle Execution
32 x 8 General Purpose Working Registers + Peripheral Control Registers
Fully Static Operation
Up to 16 MIPS Throughput at 16 MHz
On-chip 2-cycle Multiplier
Non volatile Program and Data Memories
32K/64K/128K Bytes of In-System Reprogrammable Flash (AT90CAN32/64/128)
• Endurance: 10,000 Write/Erase Cycles
Optional Boot Code Section with Independent Lock Bits
• Selectable Boot Size: 1K Bytes, 2K Bytes, 4K Bytes or 8K Bytes
• In-System Programming by On-Chip Boot Program (CAN, UART, ...)
• True Read-While-Write Operation
1K/2K/4K Bytes EEPROM (Endurance: 100,000 Write/Erase Cycles) (AT90CAN32/64/128)
2K/4K/4K Bytes Internal SRAM (AT90CAN32/64/128)
Up to 64K Bytes Optional External Memory Space
Programming Lock for Software Security
JTAG (IEEE std. 1149.1 Compliant) Interface
Boundary-scan Capabilities According to the JTAG Standard
Programming Flash (Hardware ISP), EEPROM, Lock & Fuse Bits
Extensive On-chip Debug Support
CAN Controller 2.0A & 2.0B - ISO 16845 Certified (1)
15 Full Message Objects with Separate Identifier Tags and Masks
Transmit, Receive, Automatic Reply and Frame Buffer Receive Modes
1Mbits/s Maximum Transfer Rate at 8 MHz
Time stamping, TTC & Listening Mode (Spying or Autobaud)
Peripheral Features
Programmable Watchdog Timer with On-chip Oscillator
8-bit Synchronous Timer/Counter-0
© 2013 Conrad Electronic
35
C-Control Pro IDE
• 10-bit Prescaler
• External Event Counter
• Output Compare or 8-bit PWM Output
8-bit Asynchronous Timer/Counter-2
• 10-bit Prescaler
• External Event Counter
• Output Compare or 8-Bit PWM Output
• 32Khz Oscillator for RTC Operation
Dual 16-bit Synchronous Timer/Counters-1 & 3
• 10-bit Prescaler
• Input Capture with Noise Canceler
• External Event Counter
• 3-Output Compare or 16-Bit PWM Output
• Output Compare Modulation
8-channel, 10-bit SAR ADC
• 8 Single-ended Channels
• 7 Differential Channels
• 2 Differential Channels With Programmable Gain at 1x, 10x, or 200x
On-chip Analog Comparator
Byte-oriented Two-wire Serial Interface
Dual Programmable Serial USART
Master/Slave SPI Serial Interface
• Programming Flash (Hardware ISP)
Special Microcontroller Features
Power-on Reset and Programmable Brown-out Detection
Internal Calibrated RC Oscillator
8 External Interrupt Sources
5 Sleep Modes: Idle, ADC Noise Reduction, Power-save, Power-down & Standby
Software Selectable Clock Frequency
Global Pull-up Disable
I/O and Packages
53 Programmable I/O Lines
64-lead TQFP and 64-lead QFN
Operating Voltages: 2.7 - 5.5V
Operating temperature: Industrial (-40°C to +85°C)
Maximum Frequency: 8 MHz at 2.7V, 16 MHz at 4.5V
2.1.5.2
Pin Assignment
PortA through PortG are for direct pin functions (e. g. Port_WriteBit) counted from 0 through 52, see
"PortBit".
To enable the simultaneous access of the CAN Bus and the LCD-Display with the C-Control
Mega128 CAN Module, the connections PD5 and PF7 were exchanged! At the C-Control Mega128
CAN pin PD5 is connected with X3_8 and PF7 is connected with X2_14!
© 2013 Conrad Electronic
Hardware
36
Pin Assignment for Application Board Mega128 CAN
Module M128 Port Port PortBit
#
1
X1_16
2
PE0
4
32
X1_15
3
PE1
4
33
X1_14
4
PE2
4
34
X1_13
5
PE3
4
35
X1_12
6
PE4
4
36
X1_11
7
PE5
4
37
X1_10
8
PE6
4
38
X1_9
9
PE7
4
39
X1_8
10
PB0
1
8
X1_7
11
PB1
1
9
X1_6
12
PB2
1
10
X1_5
13
PB3
1
11
X1_4
14
PB4
1
12
X1_3
15
PB5
1
13
X1_2
16
PB6
1
14
X1_1
17
PB7
1
15
X2_5
18
PG3
6
51
X2_6
19
PG4
6
52
X2_3
20
X4_10
21
X4_12
22
23
24
X2_9
25
PD0
3
24
X2_10
26
PD1
3
25
X2_11
27
PD2
3
26
X2_12
28
PD3
3
27
X2_13
29
PD4
3
28
Name1
PEN
RXD0
TXD0
AIN0
AIN1
INT4
INT5
INT6
INT7
SS
SCK
MOSI
MISO
OC0
OC1A
OC1B
OC1C
TOSC2
TOSC1
RESET
VCC
GND
XTAL2
XTAL1
INT0
INT1
INT2
INT3
IC1
X3_8
X2_15
X2_16
30
31
32
PD5
PD6
PD7
3
3
3
29
30
31
XCK1
T1
T2
X2_7
X2_8
X4_8
X4_7
X4_6
X4_5
X4_4
X4_3
X4_2
X4_1
X2_4
X3_16
X3_15
X3_14
33
34
35
36
37
38
39
40
41
42
43
44
45
46
PG0
PG1
PC0
PC1
PC2
PC3
PC4
PC5
PC6
PC7
PG2
PA7
PA6
PA5
6
6
2
2
2
2
2
2
2
2
6
0
0
0
48
49
16
17
18
19
20
21
22
23
50
7
6
5
WR
RD
A8
A9
A10
A11
A12
A13
A14
A15
ALE
AD7
AD6
AD5
© 2013 Conrad Electronic
Name2
Internal
PDI
PDO
XCK0
OC3A
OC3B
OC3C
T3
IC3
EXT-RXD0
EXT-TXD0
OC2
EXT-T1
TX-REQ
EXT-T2
EXT-DATA
RX-BUSY
EXT-A1
EXT-A2
EXT-SCK
LED1
LED2
SCL
SDA
RXD1
TXD1
A16
EXT-SCL
EXT-SDA
EXT-RXD1
EXT-TXD1
TXCAN
RXCAN
LCD-E
KEY-E
Remarks
prog. Enable
RS232
RS232
Analog Comparator
Analog Comparator
Switch 1
SPI_TX_REQ
Switch 2 / Input Timer 3
LCD_Interface
SPI
SPI
SPI
SPI
SPI_RX_BUSY
DAC1
DAC2
LCD_Interface
LED
LED
Oscillator
Oscillator
I2C
I2C
RS232
RS232
IC Timer 1, SRAM bank select
LCD_Interface
Input Timer 1
LCD_Interface / Input
Timer 2
WR SRAM
RD SRAM
ADR SRAM
ADR SRAM
ADR SRAM
ADR SRAM
ADR SRAM
ADR SRAM
ADR SRAM
ADR SRAM
Latch
A/D SRAM
A/D SRAM
A/D SRAM
37
C-Control Pro IDE
X3_13
X3_12
X3_11
X3_10
X3_9
X4_10
X4_12
X2_14
47
48
49
50
51
52
53
54
PA4
PA3
PA2
PA1
PA0
0
0
0
0
0
4
3
2
1
0
PF7
5
47
AD4
AD3
AD2
AD1
AD0
VCC
GND
ADC7
X3_7
55
PF6
5
46
ADC6
X3_6
56
PF5
5
45
ADC5
X3_5
57
PF4
5
44
ADC4
X3_4
X3_3
X3_2
X3_1
X4_11
X4_12
X4_9
X4_13
X4_14
58
59
60
61
62
63
64
PF3
PF2
PF1
PF0
5
5
5
5
43
42
41
40
ADC3
ADC2
ADC1
ADC0
AREF
GND
AVCC
CAN-L
CAN-H
A/D SRAM
A/D SRAM
A/D SRAM
A/D SRAM
A/D SRAM
TDI-JTAG
in CAN Modul exchanged
with X3_8
TDOJTAG
TMSJTAG
TCKJTAG
© 2013 Conrad Electronic
Hardware
2.1.5.3
38
Connection Diagram
The connection diagram shows the new C-Control Pro Mega128 CAN module with CAN bus.
© 2013 Conrad Electronic
39
C-Control Pro IDE
© 2013 Conrad Electronic
Hardware
2.1.6
40
Mega32 Application Board
USB
The "C-Control Pro Application Board MEGA 32" (Conrad Item no. 198245) provides a USB interface
for the program’s loading and debugging. Because of the high data rate of this interface data transmission times are considerably shorter compared to the serial interface. Communication takes place
through a USB Controller by FTDI and an AVR Mega8 Controller. The Mega8 provides its own Reset
push button (SW5). During USB operation the status of the interface is indicated by two light emitting diodes (LD4 red, LD5 green). When only the green LED lights up the USB interface is ready for
operation. During data transmission both LED’s will light up. This also applies to the Debug mode.
Flashing of the red LED indicates an error condition. Is a program started in the Interpreter, the red
LED is turned on during the runtime. For USB communication the SPI interface of Mega32 is used
(PortB.4 through PortB.7, PortA.6, PortA.7), which must be connected by their respective jumpers.
Note: Detailed information on the Mega32 can be found in the IC manufacturer’s PDF files on the CControl Pro Software CD-ROM.
On-Off Switch
The switch SW4 is located on the front of the application board and serves the power-up (On) or
power-down (Off) of the voltage supply.
Light Emitting Diodes (LED)
There are 5 light emitting diodes (LEDs). The LD3 (green) is located on the front below the DC terminals and lights up when supply voltage is applied. LD4 and LD5 indicate the status of the USB interface (see Section USB). The green LEDs LD1 and LD2 are located next to the four push buttons
and are freely available to the user. They are connected to VCC through a dropping resistor. By
means of jumpers LD1 can be connected to PortD.6 and LD2 to PortD.7. The LEDs will light up
when the corresponding pin port is low (GND).
Push Buttons
There are four push buttons provided for. SW3 (RESET1) will initiate a reset with Mega32 while SW3
(RESET2) will do the same with Mega8. The push buttons SW1 and SW2 are freely available to the
user. Through jumpers SW1 can be connected to PortD.2 and accordingly SW2 to PortD.3. There is
the possibility to connect switches SW1/2 to either GND or VCC. The possibilities to choose from
are determined by JP1 and JP2 resp. In order to have a defined level at the input port while the push
button is open the corresponding pull-up should be switched on (see Section Digitalports).
Pressing SW1 during power-up of the board will activate the Serial Bootloader Mode.
LCD
An LCD module can be plugged onto the application board. It displays 2 lines at 8 characters each.
In general also differently organized displays can be operated through this interface. Each character
© 2013 Conrad Electronic
41
C-Control Pro IDE
consists of a monochrome matrix of 5x7 pixels. A flashing cursor below any one of the characters
will indicate the current output position. The operating system provides a simple software interface
for output on the display. This display is connected to connector X14 (16 poles, double row). By
means of a mechanical protection a faulty connection and thus the confusing of poles is avoided.
The LCD module used is of type Hantronix HDM08216L-3. Further information can be found on the
Hantronix Webseite http://www.hantronix.com and in the data sheet list on the CD-ROM.
The display is operated in the 4-Bit data mode. Data bits are set to the EXT-Data output, and then
clocked into the 74HC164 shift register with triggering EXT-SCK. When LCD-E is set, the 4 Bits are
applied to the display.
LCD Contrast (LCD ADJ)
Direct frontal view will allow best readability of the LCD characters. If necessary the contrast must be
trivially re-adjusted. The contrast can be adjusted by means of potentiometer PT1.
Keyboard
For user inputs a 12 character keyboard (0..9,*,#) is provided (X15: 13 pole connector). The keyboard
is organized 1 out of 12, i. e. there is one line assigned to each key. The keyboard information is
read-in serially through a shift register. If no keyboard is used the 12 inputs can be used as additional digital inputs. The keyboard uses a 13 pole terminal (single row) and is plugged to X15 in such
a way that the keys will point towards the application board.
With activating the PL (parallel load - KEY-E) input of the 74HC165 all 12 keyboard wires are transferred in the 74HC165 shift register. After that all information bits are latched to Q7 with triggering of
CP (clock input - EXT-SCK). There they can be read with the EXT-Data Port. Since one 74HC165
holds only 8 Bit information, Q7 of the 1st 74HC165 is connected with DS of the 2nd 74HC165.
I2C Interface
Through this interface serial data can be transmitted at high speed. To do this only two signal lines
are necessary. Data transmission takes place according to the I2C protocol. To effectively use this
interface special functions are provided (see Software Description I2C).
I2C SCL
I2C SDA
I2C Bus Clock Line
I2C Bus Data Line
PortC.0
PortC.1
Power Supply (POWER, 5 Volts, GND)
Power is provided to the application board by means of a 9V/ 250mA Mains Plug-in Power Supply.
Depending on additionally used components it may later become necessary to use a power supply
with higher power rating. A fixed voltage control generates an internally stabilized 5V supply voltage.
This voltage is provided to all circuit components on the application board. Due to the power reserve
of the Plug-In Power Supply this voltage can also be used to power external ICs.
Please observe the Maximum Drawable Current. Exceeding this current may lead to immediate
destruction! Because of the relativelly high current consumption of the application board in the vicin-
© 2013 Conrad Electronic
Hardware
42
ity of 125mA it is not recommended for use in devices consistently battery operated. Please see the
note on short time breakdowns of the power supply (see Reset Characteristics).
If you turn the application board to a position where the interface connectors (USB and serial)
show to the upper side, the leftmost column on the breadboard is GND and the rightmost column is
VCC.
Serial Interfaces
The Micro Controller Atmega32 contains in its hardware an asynchronous serial interface according
to RS232 standards. The format (Data Bits, Parity Bit, Stop Bit) can be determined during initialization of the interface. The application board contains a high value level conversion IC to transform the
digital bit streams to Non Return Zero Signals in accordance with the RS232 standards (positive
voltage for low bits, negative voltage for high bits). The level conversion IC makes use of an improved
protection against voltage transients. Voltage transients can in electro-magnetically loaded surroundings (e. g. in industrial applications) be induced in the interface cables and thus destroy connected
electrical circuits. By means of jumpers the data lines RxD and TxD can be connected to the Controller PortD.0 and PortD.1. During quiescent condition (no active data transmission) a negative
voltage of several volts can be measured on Pin TxD against GND. RxD is of high impedance. The 9
pole SUB-D socket of the application board carries RxD on Pin 3 and TxD on Pin 2. Pin 5 is the
GND connection. No handshake signals are being used for serial data transmission.
The cable with connection to the NRZ Pins TxD, RxD and RTS may have a length of up to 10
meters. It is recommended to use shielded standard cables. When using longer lines or non-shielded cables interferences may detract correct data transmission. Only use cables of which the pin
assignments are known.
Never connect the serial transmission outputs of two devices directly together! Transmission
outputs can usually be identified by their negative output voltage in quiescent condition.
© 2013 Conrad Electronic
43
C-Control Pro IDE
Testing Interfaces
The 4 pole pin strip X16 is to be used for testing purposes only and will not necessarily be armed
with components of any kind on every application board. For the user this pin strip is of no importance.
One further testing interface is the 6 pole pin strip (two rows at 3 pins each) at JP4. This pin strip too
is only meant for internal use and may likely no longer be fitted with components in future board
series.
Technical Data Application Board
Note: Detailed information's can be found in the IC manufacturer’s PDF files on the C-Control Pro
Software CD-ROM.
All voltage specifications are referring to direct current (DC).
Mechanics
Overall measurements, appr.
Pin pitch wiring field
Environmental Conditions
Range of admissible ambient temperature
Range of admissible relative ambient humidity
160 mm x 100 mm
2.54 mm
0°C … 70°C
20% … 60%
Power Supply
Range of admissibly operating voltage
Power consumption without external loads
Max. admissibly permanent current from a stabilized 5V power supply
2.1.6.1
8V … 24V
appr. 125mA
200mA
Jumper Application Board
Jumper
By use of jumpers certain options can be selected. This applies to several ports which are provided
with special functions (see Pin Assignment Table for M32). E. g. the serial interface is relized
through Pins PortD.0 and PortD.1. If the serial interface is not being used then the corresponding
jumpers can be removed and these pins will then be available for other functions. Besides the port
jumpers there are additional jumpers which are described in the following.
Ports A through D
The ports available with the Mega32 Module are inscribed in this graph. Here the right side is con-
© 2013 Conrad Electronic
Hardware
44
nected to the module while the left side connects to the components of the application board. If any
jumper is pulled then the connection to the application board is suspended. This may lead to obstructions of USB, RS232, etc. on the board.
JP1 and JP2
These jumpers are assigned to push buttons SW1 and SW2. There is the possibility to operate the
push button against both GND or VCC. In the basic setting the push buttons are switching to GND.
Jumperpositions at delivery
JP4
JP4 serves to toggle the operating voltage (Mains Plug-In Power Supply or USB). The application
board should be operated using Plug-In Power Supply and voltage control (Shipping Condition). The
maximum current to be drawn from the USB interface is lower than from the Plug-In Power Supply.
Exceeding this current can lead to damage on the USB interface of the computer.
© 2013 Conrad Electronic
45
C-Control Pro IDE
JP6
When using the displays the LED back lighting can be switched off by use of JP6.
PAD3
PAD3 (to the right of the module, below the blue inscription) is required as ADC_VREF_EXT for functions ADC_Set and ADC_SetInt.
© 2013 Conrad Electronic
RESET
VCC
H2
H3
TL36W000050
D3
1N4007
H4
6
5
GND
VCC
SCL
SDA
IC2
D4
1N4007
7
1
2
3
40
39
38
37
36
35
34
33
32
31
30
29
28
27
26
25
24
23
22
21
GND
VCC
GND
C6
100NF/50V
GND
VIN VOUT
IC3
LM78M05
JP4
1
2
3
JUMPER 3
C7
10NF/50V
GND
1
L1
VCC
GND
3
GND
GND
VCC
GND
PAD2
PAD1
C13
10UF/35V
VREG
C9
100NF/50V
C15
100NF/50V
VUSB
LD3
GND
LD2
LD1
R3
390E
VCC
R2
390E
VCC
R1
390E
VCC
C32
100NF/50V
LED1
LED2
GND
BLM21A 102SPT
AREF
PAD3
AREF
C14
100NF/50V
VCC
AVCC
AREF
C12
100UF/35V
PC7
PC6
PC5
PC4
PC3
PC2
PC1
PC0
PD7
GND
PA0
PA1
PA2
PA3
PA4
PA5
PA6
PA7
GND
AT24C64AN
40
39
38
37
36
35
34
33
32
31
30
29
28
27
26
25
24
23
22
21
D2
1N4007
A0
A1
A2
WP
GND
VIN
SOCKEL-DIL40
1
2
3
4
5
6
7
8
9
10
11
12
13
14
15
16
17
18
19
20
S1
D1
1N4007
1
2
3
4
5
6
7
8
9
10
11
12
13
14
15
16
17
18
19
20
EXT-SCL
EXT-SDA
GND
X1
X2
PD0
PD1
PD2
PD3
PD4
PD5
PD6
PB0
PB1
PB2
PB3
PB4
PB5
PB6
PB7
RESET
R29
4K7
VCC
EXT-T2
M-HOLE-3.5 M-HOLE-3.5 M-HOLE-3.5 M-HOLE-3.5
H1
1
2
3
SW4
R28
4K7
VCC
SW2
JP2
2
3
3
1
4
2
1
SW-D-B-6810
JUMPER 3
SW3
SW-D-B-6810 GND
GND
NG-DC10A
X11
GND
VCC
3
4
2
1
8
VCC
GND
4
EXT-T1
+
SW1
JP1
2
3
3
1
4
2
1
SW-D-B-6810
JUMPER 3
GND
2
VCC
+
GND
TX-REQ
RX-BUSY
SSMOSI
MISO
SCK
EXT-A2
EXT-A1
TX-REQ
RX-BUSY
SSMOSI
MISO
SCK
U_SpiUsb
SpiUsb.Sch
EXT-DATA
EXT-SCK
LCD-E
KEY-E
U_DispKey
DispKey.sch
C11
10NF/50V
10K
R5
10K
R4
EXT-DATA
EXT-SCK
LCD-E
KEY-E
GND
C10
10NF/50V
ANA2
ANA1
12
EXT-RXD
EXT-RXD
EXT-TXD
EXT-T1
EXT-T2
EXT-A1
EXT-A2
LED1
LED2
EXT-SCL
EXT-SDA
SSMOSI
MISO
SCK
EXT-DATA
EXT-SCK
LCD-E
KEY-E
TX-REQ
RX-BUSY
9
10
11
EXT-TXD
R2OUT
T2IN
R1OUT
T1IN
C1-
C1+
1
2
3
4
5
6
7
8
X6
X5
1
2
3
4
5
6
7
8
1
2
3
4
5
6
7
8
X4
1
2
3
4
5
6
7
8
X3
1
2
3
4
5
6
7
8
X2
C1
PD0
PD1
PD2
PD3
PD4
PD5
PD6
PD7
PC0
PC1
PC2
PC3
PC4
PC5
PC6
PC7
PB0
PB1
PB2
PB3
PB4
PB5
PB6
PB7
PA0
PA1
PA2
PA3
PA4
PA5
PA6
PA7
R2IN
T2OUT
R1IN
T1OUT
C2-
C2+
V-
GND
RXD
13
8
7
TXD
14
5
X1C
Date:
File:
A3
Size
Title
1
3
5
7
9
11
13
15
17
19
21
23
25
27
29
31
33
35
37
39
41
43
45
47
49
51
53
55
57
59
61
63
X17
2
4
6
8
10
12
14
16
18
20
22
24
26
28
30
32
34
36
38
40
42
44
46
48
50
52
54
56
58
60
62
64
GND
01.12.2004
C:\Altium2004\..\Board.sch
ATMEGA 32
Application Board
Number
Sheet of
Drawn By:
1/3
Pixner
Revision
SUB-D9-AG-FEMALE
JP5
A1
A2
A3
A4
A5
A6
A7
A8
A9
A10
A11
A12
A13
A14
A15
A16
A17
A18
A19
A20
A21
A22
A23
A24
A25
A26
A27
A28
A29
A30
A31
A32
X1A
5
9
4
8
3
7
2
6
1
S-VG64-ABCS-BSL-GG-32X2S-VG64-ABC
*
*
C1
C2
C3
C4
C5
C6
C7
C8
C9
C10
C11
C12
C13
C14
C15
C16
C17
C18
C19
C20
C21
C22
C23
C24
C25
C26
C27
C28
C29
C30
C31
C32
TXD
C5
100NF/50V
RXD
4
C3
100NF/50V
6
MAX202
100NF/50V
GND
1
2
X9
1
2
3
4
X10
1
2
3
4
5
6
X7
C4
100NF/50V
3
1
C2
IC1
100NF/50V
2
V+
VCC
16
VCC
GND
© 2013 Conrad Electronic
15
2A
2.1.6.2
GND
Hardware
46
Connection Diagram
KEY-E
LCD-E
EXT-SCK
EXT-DATA
KEY-E
LCD-E
R23
1K
GND
GND
8
EXT-SCK
7
9
15
1
2
10
7
9
15
1
2
10
9
1
2
EXT-DATA
VCC
Q7
Q7
CE
PL
CP
DS
IC9
Q7
Q7
CE
PL
CP
DS
IC8
VCC
D0
D1
D2
D3
D4
D5
D6
D7
3
4
5
6
10
11
12
13
GND
74HC165
D0
D1
D2
D3
D4
D5
D6
D7
KEY03
KEY06
KEY09
KEY02
GND
KEY02
KEY09
KEY06
KEY03
KEY12
KEY05
KEY01
VCC
KEY11
KEY04
KEY10
KEY08
KEY07
11
12
13
14
3
4
5
6
KEY08
KEY10
KEY04
KEY11
KEY07
KEY01
KEY05
KEY12
GND
74HC165
D0
D1
D2
D3
D4
D5
D6
D7
11
12
13
14
3
4
5
6
74HC164
GND
MR
CP
DSA
DSB
IC7
VCC
14
VCC
GND
7
16
VCC
GND
8
16
VCC
GND
8
4K7
R41
4K7
R40
4K7
R39
4K7
R38
4K7
R37
4K7
R36
4K7
R35
4K7
R34
4K7
R33
4K7
R32
4K7
R31
4K7
R30
1K
R22
1K
R21
1K
R20
GND
GND
GND
GND
GND
GND
GND
GND
GND
GND
GND
GND
LCD-D4
LCD-D5
LCD-D6
LCD-RS
LCD-RW
LCD-D7
GND
GND
VCC
2
4
6
8
10
12
14
16
GND
VCC
13X1
1
2
3
4
5
6
7
8
9
10
11
12
13
X15
Date:
File:
A4
Size
Title
C29
100NF/50V
GND
VCC
GND
C30
100NF/50V
ATMEGA 32
C31
100NF/50V
01.12.2004
C:\Altium2004\..\DispKey.sch
Number
JP6
JUMPER 2
GND
VCC
Application Board
GND
T1
BC846C
LCD-BL
R25
4K7
VCC
LCD-D5
LCD-D7
LCD-RS
LCD-E
VCC
S-STW-G-8X2
1
3
5
7
9
11
13
15
X14
C28
100NF/50V
KEY11
KEY07
KEY04
KEY01
KEY10
KEY08
KEY05
KEY02
KEY12
KEY09
KEY06
KEY03
VCC
LCD-D4
LCD-D6
LCD-RW
PT1
10K/0.5W
R24
10E
VCC
21
Sheet of 2/3
Drawn By: Pixner
Revision
2A
47
C-Control Pro IDE
© 2013 Conrad Electronic
4X1
1
2
3
4
X16
0E
R11
27E
GND
XF1
2K2
R19
XF2
33PF/16V
C27
28
Q2
6.0MHZ
27
4
5
GND
1
2
3
4
31
EECS 32
1
EESK
EEDATA 2
RES_FT
8
7
C23 33NF/16V
6
R17 1K5
33PF/16V
C26
R15 R16
C33
100NF/50V
GND
GND
RXD-USB
TXD-USB
GND
VCC
GND
VCC
GND
VUSB VCC
D-USB-B-61729
1
2
3
4
5
X12
IC4
10K
R6
93C46
CS VCC
SK DC
DI ORG
DO GND
IC6
TEST
EECS
EESK
EEDATA
XTOUT
XTIN
RESET
RSTOUT
USBDM
USBDP
3V3OUT
8
7
6
5
R10
0E
30
3
VCC
R14
470E
AVCC
AGND
VCC
VCC
GND
RD
WR
D0
D1
D2
D3
D4
D5
D6
D7
GND
VCC
MISO
SCK
RESET-
MOSI
TXERXESIWU
PWREN
14
12
11
10
PAD-C70/40
PAD-C70/40
PAD9
PAD-C70/40
PAD8
PAD-C70/40
PAD7
PAD-C70/40
PAD6
PAD-C70/40
PAD5
GND
VCC
MISO
SCK
RESET-
MOSI
RDWR
16
15
PAD4
PWREN
SI/WU
D0
D1
D2
D3
D4
D5
D6
D7
25
24
23
22
21
20
19
18
100NF/50V
GND
GND
GND
C17
100NF/50V
C18
100NF/50V
C20
GND
C16
100NF/50V
TXE
RXF
FT245BM
GND GND GND
29
13
VCCIO
26
VCC
GND
9
VCC
GND
17
PAD-S-70
PAD-S-70
PAD15
PAD-S-70
PAD14
PAD-S-70
PAD13
PAD-S-70
PAD12
GND
VCC
MISO
SCK
RESET-
MOSI
LD4
3MM
R8
390E
VCC
PAD-S-70
PAD11
PAD10
LD5
3MM
R7
390E
VCC
PAD-S-70
PAD-S-70
PAD21
PAD-S-70
PAD20
PAD-S-70
PAD19
PAD-S-70
PAD18
PAD-S-70
PAD17
PAD16
LD6
3MM
R9
390E
VCC
GND
D5
LL4148
GND
Date:
File:
A4
Size
Title
VCC
33PF/16V
C25
33PF/16V
C24
R13 0E
R12 0E
R27 0E
R26 0E
R42 0E
C22
100NF/16V
R18
22K
VCC
GND
GND
PWREN
SIWU
RES_FT
RES_FT
12
13
14
15
16
17
30
31
32
1
2
9
10
11
SSMOSI
MISO
SCK
RXD-USB
TXD-USB
RX-BUSY
TX-REQ
TXERXED6
D7
AGND
AREF
ATMEGA 32
SCK
MISO
MOSI
SS-
RX-BUSY
TX-REQ
2A
D0
D1
D2
D3
D4
D5
GND
Revision
Sheet of 3/3
Drawn By: Pixner
SCK
MISO
MOSI
SS-
RX-BUSY
TX-REQ
GNDGND
23
24
25
26
27
28
19
22
21
20
18
GND
C21
100NF/50V
AVCC
GND
C19
100NF/50V
PB0 (ICP)
PB1 (OC1A) PC0 (ADC0)
PB2 (OC1B/SS) PC1 (ADC1)
PB3 (MOSI/OC2)PC2 (ADC2)
PB4 (MISO) PC3 (ADC3)
PB5 (SCK)PC4 (ADC4/SDA)
PC5 (ADC5/SCL)
PD0 (RXD)
ADC6
PD1 (TXD)
ADC7
PD2 (INT0)
PD3 (INT1)
PD4 (XCK/T0)
PD5 (T1)
PD6 (AIN0)
PD7 (AIN1)
RESET/PC6
X2/PB7
01.12.2004
C:\Altium2004\..\SpiUsb.Sch
Number
Application Board
SW5
SW-D-B-6810
RESET-
29
RESET-
X1/PB6
IC5
ATMEGA8L-8AC
8
7
XA2
Q1
11.0592MHZ
XA1
VCC VCC
4
VCC
VCC
3
4
2
1
GND
6
VCC
GND
3
© 2013 Conrad Electronic
5
VCC
Hardware
48
49
2.1.6.3
C-Control Pro IDE
Component Parts Plan
© 2013 Conrad Electronic
Hardware
2.1.7
50
Mega128 Application Board
USB
The "C-Control Pro Application Board MEGA 128" (Conrad Item no. 198258) provides a USB interface for the program’s loading and debugging. Because of the high data rate of this interface data
transmission times are considerably shorter compared to the serial interface. Communication
takes place through a USB Controller by FTDI and an AVR Mega8 Controller. The Mega8 provides
its own Reset push button (SW5). During USB operation the status of the interface is indicated by
two light emitting diodes (LD4 red, LD5 green). When only the green LED lights up the USB interface is ready for operation. During data transmission both LEDs will light up. This also applies to
the Debug mode. Flashing of the red LED indicates an error condition. Is a program started in the
Interpreter, the red LED is turned on during the runtime. For USB communication the SPI interface
of Mega128 is used (PortB.0 through PortB.4, PortE.5), which must be connected by their respective jumpers.
Note: Detailed information on the Mega8 can be found in the IC manufacturer’s PDF files on the CControl Pro Software CD-ROM.
On-Off Switch
The switch SW4 is located on the front of the application board and serves the power-up (On) or
power-down (Off) of the voltage supply.
Light Emitting Diodes (LED)
There are 5 light emitting diodes (LEDs). The LD3 (green) is located on the front below the DC terminals and lights up when supply voltage is applied. LD4 and LD5 indicate the status of the USB interface (see Section USB). The green LEDs LD1 and LD2 are located next to the four push buttons
and are freely available to the user. They are connected to VCC through a dropping resistor. By
means of jumpers LD1 can be connected to PortG.3 and LD2 to PortG.4. The LEDs will light up
when the corresponding pin port is low (GND).
Push Buttons
There are four push buttons provided for. SW3 (RESET1) will initiate a reset with Mega128 while
SW5 (RESET2) will do the same with Mega8. The push button SW1 and SW2 are freely available to
the user. Through jumpers SW1 can be connected to PortE.4 and accordingly SW2 to PortE.6.
There is the possibility to connect switches SW1/2 to either GND or VCC. The possibilities to
choose from are determined by JP1 and JP2 resp. In order to have a defined level at the input port
while the push button is open the corresponding pull-up should be switched on (see Section Digitalports).
Pressing SW1 during power-up of the board will activate the Serial Bootloader Mode.
LCD
© 2013 Conrad Electronic
51
C-Control Pro IDE
An LCD module can be plugged onto the application board. It displays 2 lines at 8 characters each.
In general also differently organized displays can be operated through this interface. Each character
consists of a monochrome matrix of 5x7 pixels. A flashing cursor below any one of the characters
will indicate the current output position. The operating system provides a simple software interface
for output on the display. This display is connected to connector X14 (16 poles, double row). By
means of a mechanical protection a faulty connection and thus the confusing of poles is avoided.
The LCD module used is of type Hantronix HDM08216L-3. Further information can be found on the
Hantronix Webseite http://www.hantronix.com and in the data sheet list on the CD-ROM.
The display is operated in the 4-Bit data mode. Data bits are set to the EXT-Data output, and then
clocked into the 74HC164 shift register with triggering EXT-SCK. When LCD-E is set, the 4 Bits are
applied to the display.
LCD Contrast (LCD ADJ)
Direct frontal view will allow best readability of the LCD characters. If necessary the contrast must be
trivially re-adjusted. The contrast can be adjusted by means of potentiometer PT1.
Keyboard
For user inputs a 12 character keyboard (0..9,*,#) is provided (X15: 13 pole connector). The keyboard
is organized 1 out of 12, i. e. there is one line assigned to each key. The keyboard information is
read-in serially through a shift register. If no keyboard is used the 12 inputs can be used as additional digital inputs. The keyboard uses a 13 pole terminal (single row) and is plugged to X15 in such
a way that the keys will point towards the application board.
With activating the PL (parallel load - KEY-E) input of the 74HC165 all 12 keyboard wires are transferred in the 74HC165 shift register. After that all information bits are latched to Q7 with triggering of
CP (clock input - EXT-SCK). There they can be read with the EXT-Data Port. Since one 74HC165
holds only 8 Bit information, Q7 of the 1st 74HC165 is connected with DS of the 2nd 74HC165.
SRAM
The application board holds an SRAM chip (K6X1008C2D) made by Samsung. By using this the
available SRAM memory is extended to 64kByte. Mentioned SRAM uses Ports A, C and partly
G for triggering. If the SRAM is not used then it can be de-activated by JP7 and then these
ports become available to the user.
To deactivate the SRAM the jumper JP7 has to be moved to the left side (orientation: serial interface shows to the left), such that the left pins of JP7 are connected.
Even though the used RAM chip has a capacity of 128kb only 64kb can be used for reason
of the memory model.
© 2013 Conrad Electronic
Hardware
52
I2C Interface
Through this interface serial data can be transmitted at high speed. To do this only two signal lines
are necessary. Data transmission takes place according to the I2C protocol. To effectively use this
interface special functions are provided (see Software Description I2C).
I2C SCL
I2C SDA
I2C Bus Clock Line
I2C Bus Data Line
PortD.0
PortD.1
Power Supply (POWER, 5 Volt, GND)
Power is provided to the application board by means of a 9V/ 250mA Mains Plug-in Power Supply.
Depending on additionally used components it may later become necessary to use a power supply
with higher power rating. A fixed voltage control generates an internally stabilized 5V supply voltage.
This voltage is provided to all circuit components on the application board. Due to the power reserve
of the Plug-In Power Supply this voltage can also be used to power external ICs.
Please observe the Maximum Drawable Current. Exceeding this current may lead to immediate
destruction! Because of the relativelly high current consumption of the application board in the vicinity of 125mA it is not recommended for use in devices consistently battery operated. Please see the
note on short time breakdowns of the power supply (see Reset Characteristics).
If you turn the application board to a position where the interface connectors (USB and serial)
show to the upper side, the leftmost column on the breadboard is GND and the rightmost column is
VCC.
Serial Interfaces
The Micro Controller Atmega128 contains in its hardware two asynchronous serial interfaces according to RS232 standards. The format (Data Bits, Parity Bit, Stop Bit) can be determined during initialization of the interface. The application board contains a high value level conversion IC for both interfaces to transform the digital bit streams to Non Return Zero Signals in accordance with the RS232
standards (positive voltage for low bits, negative voltage for high bits). The level conversion IC makes
use of an improved protection against voltage transients. Voltage transients can in electro-magnetically loaded surroundings (e. g. in industrial applications) be induced in the interface cables and thus
destroy connected electrical circuits. By means of jumpers the data lines RxD0 (PortE.0), TxD0
(PortE.1) and RxD1 (PortD.2), TxD1 (PortD.3) can through the Controller be connected to the level
converter. During quiescent condition (no active data transmission) a negative voltage of several volts
can be measured on Pin TxD against GND. RxD is of high impedance. The 9 pole SUB-D socket of
the application board carries RxD0 on Pin 3 and TxD0 on Pin 2. Pin 5 is the GND connection. No
handshake signals are being used for serial data transmission. The second serial interface is lead to
a 3 pole pin strip. Here RxD1 occupies Pin 2, TxD1 occupies Pin 1 while Pin 3 is GND.
The cable with connection to the NRZ Pins TxD, RxD and RTS may have a length of up to 10
meters. It is recommended to use shielded standard cables. When using longer lines or non-shielded cables interferences may detract correct data transmission. Only use cables of which the pin
assignments are known.
© 2013 Conrad Electronic
53
C-Control Pro IDE
Never connect the serial transmission outputs of two devices directly together! Transmission outputs can usually be identified by their negative output voltage in quiescent condition.
Testing Interfaces
The 4 pole pin strip X16 is to be used for testing purposes only and will not necessarily be armed
with components of any kind on every application board. For the user this pin strip is of no importance.
One further testing interface is the 6 pole pin strip (two rows at 3 pins each) at the lower right next
to JP4. This pin strip too is only meant for internal use and may likely no longer be fitted with components in future board series.
Technical Data Application Board
Note: Detailed information's can be found in the IC manufacturer’s PDF files on the C-Control Pro
Software CD-ROM.
All voltage specifications are referring to direct current (DC).
Mechanics
Overall measurements, appr.
Pin pitch wiring field
Environmental Conditions
Range of admissible ambient temperature
Range of admissible relative ambient humidity
160 mm x 100 mm
2.54 mm
0°C … 70°C
20% … 60%
Power Supply
Range of admissibly operating voltage
Power consumption without external loads
Max. admissibly permanent current from a stabilized 5V power supply
2.1.7.1
8V … 24V
appr. 125mA
200mA
External RAM
The Application Board of Mega128 carries external RAM. This RAM is automatically recognized by
the Interpreter and used for the program to be carried out. For this reason a program memory of
appr. 63848 Bytes rather than appr. 2665 Bytes is available. For this it is not necessary to newly
compile the program.
If the SRAM is not needed it can be deactivated by JP7 and the ports will be free for other uses.
© 2013 Conrad Electronic
Hardware
54
To deactivate the SRAM the jumper JP7 has to be moved to the left side (orientation: serial interface
shows to the left), such that the left pins of JP7 are connected.
2.1.7.2
Jumper Application Board
Jumper
By use of jumpers certain options can be selected. This applies to several ports which are provided
with special functions (see Pin Assignment Table for M128). E. g. the serial interface is realized
through Pins PortE.0 and PortE.1. If the serial interface is not being used then the corresponding
jumpers can be removed and these pins will then be available for other functions. Besides the port
jumpers there are additional jumpers which are described in the following.
Jum perpositionen im Auslieferzustand
Ports A through G
The ports available with the Mega128 Module are inscribed in this graph. Here the yellow side is connected to the module while the light blue side connects to the components of the application board.
If any jumper is pulled then the connection to the application board is suspended. This may lead to
obstructions of USB, RS232, etc. on the board. The gray marking indicates the first Pin (Pin 0) of
the Port.
© 2013 Conrad Electronic
55
C-Control Pro IDE
JP1 and JP2
These jumpers are assigned to push buttons SW1 and SW2. There is the possibility to operate the
push button against both GND or VCC. In the basic setting the push buttons are switching to GND.
JP4
JP4 serves to toggle the operating voltage (Mains Plug-In Power Supply or USB). The application
board should be operated using Plug-In Power Supply and voltage control (Shipping Condition). The
maximum current to be drawn from the USB interface is lower than from the Plug-In Power Supply.
Exceeding this current can lead to damage on the USB interface of the computer.
JP6
When using the displays the LED back lighting can be switched off by use of JP6.
JP7
If the SRAM on the application board is not needed it can be de-activated by use of JP7. These ports
will then be available to the user.
To deactivate the SRAM the jumper has to be moved to the left side (orientation: serial interface
shows to the left), such that the left pins of JP7 are connected.
J4
To jumper J4 the second serial interface of the Mega128 is connected through a level converter.
Pin 1 (left, gray)
Pin 2 (center)
Pin 3 (right)
TxD
RxD
GND
PAD3
PAD3 (to the right of the module) is required as ADC_VREF_EXT for functions ADC_Set and
ADC_SetInt.
© 2013 Conrad Electronic
Hardware
Connection Diagram
MOD3
X6 X6A
13
4
14
3
15
2
16
1
MOD4
4
12
5
13
6
14
7
15
8
16
11
7
9
8
PG0
PG1
PG2
PG3
PG4
4
5
6
7
8
3
b0805j
GND
4
1
5
2
47k
EXT-A2
b0805j
3
3
4
4
BLM21A
GND
C6
VCC
VUSB
100nF
C32
b0805j
10nF
b0805j
3
GND
4
X5A
1
1
2
2
3
3
4
4
5
5
6
6
7
7
EXT-RXD0
EXT-TXD0
EXT-T1
TX-REQ
EXT-T2
EXT-DATA
8
X2
1
1
PA0
PA1
PA2
PA3
PA4
PA5
PA6
PA7
2
3
4
5
6
7
8
2
3
4
5
6
7
8
Project:
MEGA128app_V2
PCB-Design:
MEGA Appl.-Board
b0805j
+
C15
10uF
2
-
C13
b0805j
100nF
+
C14
100uF
e03c165
-
1N4007
$plname
D4
$plname
1N4007
G
100nF
3
O
e01d5x11s
1N4007
78xx
7805
I
2
D3
RX-BUSY
EXT-A1
EXT-A2
EXT-SCK
schäffel electronic gmbh
VREG
$plname
$plname
D2
$plname
IC3
1
C12
21
1N4007
D1
VIN
3
3
PC0
PC1
PC2
PC3
PC4
PC5
PC6
PC7
2
X11
2
7
X4
GND
JP4
1
taster1
1
6
8
AREF
GND
16
1
5
8
PE6
PE7
VCC
VCC
AVCC
1
SW4
SSSCK
MOSI
MISO
2
b0805_spule
VCC
C7
15
X3B
1
2
X5
R5
GND
CANL
CANH
VREF
14
KEY-E
1
PE0
PE1
PE2
PE3
PE4
PE5
EXT-A1
L1
2
LED1
LED2
R4
TP
PAD2
12
3
LCD-E
PB0
PB1
PB2
PB3
PB4
PB5
PB6
PB7
X8A
b0805j
5
6
8
2
47k
4
RESET
7
8
1
10
13
6
7
X8
3
C10
11
5
6
X3A
TP
PAD1
$plname
3
RESET
2
PC7
PC6
PC5
PC4
PC3
PC2
PC1
PC0
AREF
AVCC
2
10
4
5
EXT-SCL
EXT-SDA
EXT-RXD1
EXT-TXD1
TP
PAD_GND
1
9
390R
R3
b0805j
390R
R2
TP
SW3
MOD2
PAD3
AREF
4
100nF
5
3
b0805j
12
2
3
2
C9
6
GND
LED1
LED2
1
2
X3
b0805j
11
X7
1
1
PF0
PF1
PF2
PF3
PF4
PF5
PF6
PF7
100nF
7
MOSI
b0805j
10
6
100nF
9
8
4
5
C11
9
3
GND
b0805j
8
2
RESET-
100nF
10
MISO
SCK
1
LD3
7
$splname
6
11
LD2
5
12
390R
4
13
b0805j
14
$splname
3
PD0
PD1
PD2
PD3
PD4
PD5
PD6
PD7
VCC
XP
R1
15
PD0
PD1
PD2
PD3
PD4
PD5
PD6
PD7
PG0
PG1
PG2
PG3
PG4
VCC
PF0
PF1
PF2
PF3
PF4
PF5
PF6
PF7
PA0
PA1
PA2
PA3
PA4
PA5
PA6
PA7
2
LD1
1
16
$splname
MOD1
PE0
PE1
PE2
PE3
PE4
PE5
PE6
PE7
PB0
PB1
PB2
PB3
PB4
PB5
PB6
PB7
1
2.1.7.3
56
GND
10mm
GND
5
1k
6
b0805j
LCD-D5
1
A0
2
A1
3
A2
Vss
LCD-D4
12
KEY-E
13
GND
R28
4k7
b0805j
LCD-D4
LCD-D6
9
10
11
12
13
14
15
16
LCD-RS
LCD-E
LCD-D5
LCD-D7
4k7
b0805j
KEY5
1
R36
4k7
3
7
2
6
1
3
VCC
8
$plname
9
11
12
4k7
8
7
10
b0805j
R25
4k7
R52
b0805j
4k7
R51
b0805j
4k7
R50
b0805j
b0805j
9
RXD0
TXD0
6
100nF
R35
JP5
4
b0805j
KEY1
5
GND
C31
$plname
74HC165
5
b0805j
b0805j
2
$plname
100nF
4k7
7
GND
GND
EXT-T2
1
4
C30
R34
SW2
3
100nF
4k7
GND
EXT-T1
b0805j
R33
b0805j
KEY7
4k7
R49
4k7
b0805j
KEY11
2
C29
6
1
KEY11
KEY7
KEY4
KEY1
KEY10
KEY8
KEY5
KEY2
KEY12
KEY9
KEY6
KEY3
b0805j
5
X15
R32
100nF
4
KEY4
1
$plname
3
12
2
sot23
2
VCC
4k7
b0805j
1
BC846C
SW1
R31
2
KEY10
JP2
KEY8
KEY10
KEY4
KEY11
KEY7
KEY1
KEY5
KEY12
JP6
2
T1
GND
1
GND
11
3
3D
2D
2D
8
1
2
10
14
IC9
SRG8
G1[SHIFT]
C2[LOAD]
C3/ 1 1
1
6
7
VCC
1
4k7
b0805j
2
R30
C28
KEY8
JP1
1
15
13
9
4
5
3
3D
2D
2D
3
VCC
74HC164
IC8
SRG8
G1[SHIFT]
C2[LOAD]
1
C3/ 1
1
2
GND
$plname
b0805j
EXT-SCL
b0805j
LCD-RW
1
5
SDA
4
1k
11
1k
IC2
24Cxx
R22
10
R23
6
SCL
b0805j
LCD-D6
R21
VCC
X14
10R
b0805j
4
b0805j
$val
R24
(WP)
of 4
GND
pot0s
EXT-SDA
1k
3
& 1D
2
PT1
8
7
1
EXT-DATA
VCC
10k
Vcc
R20
EXT-SCK
VCC
4k7
8
VCC
LCD-D7
LCD-RW
LCD-RS
SRG8
R
C1/
9
R29
IC7
VCC
Sheet 1
13
b0805j
15
KEY12
2
R37
GND
4k7
b0805j
10
KEY3
KEY6
KEY9
KEY2
11
12
13
14
KEY3
R38
schäffel electronic gmbh
4k7
b0805j
KEY6
R39
Project:
MEGA128app_V2
PCB-Design:
MEGA Appl.-Board
4k7
3
b0805j
4
KEY9
R40
5
4k7
9
6
b0805j
7
$plname
74HC165
KEY2
GND
R41
4k7
b0805j
© 2013 Conrad Electronic
GND
10mm
Sheet 2
of 4
57
C-Control Pro IDE
VCC
b0805j
390R
R9
b0805j
390R
R8
b0805j
390R
0R
b0805j
SIWU
LD6
$splname
LD4
R27
0R
0R
b0805j
b0805j
2
GND
$splname
$splname
LD5
4
3
R7
X16
2
1
LL4148
RES_FT
R13
sod80
D5
R42
VCC
VCC
b0805j
22k
R18
VCC
7
5
R17
27R
b0805j
27
XTIN
b0805j
Q2
33pF
12
2
EEDATA
GND
R19
2
17
D6
D7
PB3
PB4
PB5
VCC
AREF
AGND
21
GND
PC0
23
PD1
PC1
24
32
PD2
PC2
25
PD0
1
PD3
2
PC3
26
PD4
9
PD5
PC4
27
PD6
PC5
28
10
11
PD7
D0
D1
D2
D3
D4
D5
5
GND
11
SI/WU
9
20
31
30
RX-BUSY
TX-REQ
SIWU
10
PWREN
PWREN
schäffel electronic gmbh
17
Project:
mega128app_v2
PCB-Design:
MEGA Appl.-Board
GND
b0805j
DO
93LC46B
100nF
DI
10k
16
6
SK
4
b0805j
15
GND
C33
b0805j
2k2
1
14
RXF
VCC
VCC
C18
b0805j
b0805j
TXE
EESK
VDD
3
VCC
PB2
3
EECS
CS
2
PB1
14
15
XTOUT
TEST
b0805j
PB0
13
VCC
18
16
RD-
1
29
R6
D7
32
31
1
18
28
b0805j
GND
8
19
D6
WR
C27
VCC
20
D5
1
33pF
$plname
6MHz
2
C26
21
D4
RESET
FT245BM
4
RES_FT
b0805j
22
D3
b0805j
0R
23
D2
1k5
R11
24
D1
0R
D0
D1
D2
D3
D4
D5
D6
D7
25
D0
RSTOUT
GND
VCC
USBDP
5
GND
GND
USBDM
R26
RES_FT
12
ATMEGA8L-8AC
R16
8
SSMOSI
MISO
SCK
b0805j
GND
AVCC
RESET
RESET-
0R
6
GND
33nF
b0805j
GND
13
XTAL2
GND
b0805j
AGND
4
3
VCCIO
3V3OUT
VCC
6
VCC
30 26
IC4
C23
27R
3
100nF
b0805j
470R
b0805j
b0805j
4
XTAL1
29
R12
b0805j
100nF
R15
2
7
33pF
PWREN
100nF
b0805j
IC5
GND b0805j
C20
C19
VCC
100nF
GND
8
b0805j
AVCC
1
R10
100nF
GND
X12
C25
0R
R14
C16
VUSB
100nF
GND
b0805j
VCC
Q1
GND
$plname
33pF
C17
GND
C21
11.0592MHz
$plname
C24
VCC
1
SW5
b0805j
C22
100nF
RESET-
IC6
5
GND
10mm
GND
Sheet 3
of 4
IC11
29
PG0
PG1
24
22
3
30
2
IC10
PG2
11
PA0
PA1
PA2
PA3
PA4
PA5
PA6
PA7
2
EN
C1
VCC
OE
CS1
JP7
32
VCC
CS2
16
GND
R48
1
1
GND
0R
GND
b0805j
19
12
3
18
11
14
4
17
10
15
5
16
9
17
6
15
8
18
7
14
7
19
8
13
6
20
9
12
5
21
1D
A0
I/O1
I/O8
$plname
PC0
PC1
PC2
PC3
PC4
PC5
PC6
PC7
PA0
PA1
PA2
PA3
PA4
PA5
PA6
PA7
J2
1
2
3
4
5
27
7
26
9
J3
74HC573
13
23
1
GND
WE
25
2
VCC
6
8
10
R44
4
$val
28
GND
b0805j
3
31
2
A16
CANH
CMOS SRAM
128kx8
1
R46
J1
6
K6X1008C2D
PD4
2
CANL
0R
7
3
8
b0805j
4
R47
9
5
0R
GND
GND
C2
100nF
b0805j
16
100nF
C1
b0805j
100nF
C4
b0805j
J4
GND
$val
b0805j
R43
GND
1
TXD1
RXD1
IC1
MAX202
b0805j
VCC
$val
xsubd9bs
R45
b0805j
2
3
b0805j
3
4
5
GND
Vcc
V+
2
V-
6
b0805j
$val
T1IN
T1OUT
14
10
T2IN
T2OUT
7
12
R1OUT
R2OUT
R1IN
GND
100nF
C3
11
9
EXT-TXD1
EXT-RXD1
VSS
C1+
C1C2+
C2-
R2IN
13
8
GND
GND
schäffel electronic gmbh
Project:
mega128app_v2
PCB-Design:
MEGA Appl.-Board
TXD0
RXD0
TXD1
RXD1
15
EXT-TXD0
EXT-RXD0
100nF
C5
1
GND
10mm
Sheet 4
of 4
© 2013 Conrad Electronic
Hardware
2.1.7.4
Component Parts Plan
© 2013 Conrad Electronic
58
59
2.1.8
C-Control Pro IDE
Mega32 Projectboard
The C-Control Projectboard PRO32 (Conrad Item no. 197287) provides a economic alternative to the
application board MEGA32 (Conrad-Order no. 198 245). Compared to the C-Control Pro application
board, it's range of functions is significantly limited, and is used mainly for own hardware developments related to the MEGA32 UNIT. The Projectboard includes the most important components
needed to operate the MEGA32 UNIT. Furthermore, the Projectboard features a power supply (USB /
AC adapter), a interface converter (RS232) and a large prototype area available for own development.
By default, the Projectboard is designed for programming via RS232. Optionally, the RS232-USB
converter (Conrad-Order no. 197 257) can be used for programming the MEGA32 UNIT via USB. In
this case the programming is done via the serial connection of the MEGA32 UNIT (UART), so the
program transfer is not as fast as the USB transfer on the application board MEGA32.
The MEGA32 UNIT is so plugged that the signature of the UNIT is readable, if the programming
and power connectors show out to you.
In the baseline condition with no-USB-RS232 converters the jumpers J4/J3 are put like shown in
the figure.
When using the RS232-USB converter (not included), the jumper must be reconnected to USB.
The jumper J2 is used to select the supply voltage. With the jumper set to "network", the clamps
J11 are used for the power supply (stabilized DC power supply or power adapter min. 100mA, depending on application). If the jumper J2 is replugged to USB, the board can be operated via the
USB power supply of the computer.
Attention! A maximum current of 100mA through USB should not be exceeded!
The switch S3 and the power supply pin headers JP7/JP5 and the pins for Vcc / GND on the pro-
© 2013 Conrad Electronic
Hardware
60
totype area are no longer energized when using USB operation. This supply is used only for test
applications, when there is no external power supply available.
The appropriate COM port (serial port) must be selected in the C-Control Pro IDE software. Also
the programming via USB is made through the serial interface of the C-Control PRO32 UNIT. Prior
to that check, when necessary, the Windows device manager, which COM ports are available, or
which was installed by the RS232-USB converter.
If the I2C bus is used, the jumper JP2 and JP1 have to be inserted, if you provide no external pullup resistors by your own.
The bus unit is used to connect I2C-bus expansion modules of the CC1-family and can be used for
custom applications. The interface layout can be found in the figure.
The ports of the MEGA32 UNIT are passed out on headers J1, J5, J6 and J7.
Before you can transfer a program in the unit, the key (BOOT / STOP) must be pressed, to switch
the C-Control PRO32 into programming mode.
When the voltage is supplied, the user program stored in the memory of the C-Control MEGA32 is
started automatically. This program can be stopped with the (BOOT/STOP ) button. Then the CControl PRO32 is in BOOT mode, which is required for program transmission.
The program start can be triggered via the IDE or on the button (RESET / START).
When using Msg_Write... to output variables, it is advisable to use the software start from the IDE.
Technical data
Operating voltage: 8 - 16V DC
Current consumption without load and without external USB-RS232 Converter: about 40mA
Max continuous current from the stabilized 5V voltage: 100mA (without cooling)
Prototype area: 2.54 mm
Range of the permissible ambient temperature: 0 ° C to 70 ° C
Admissible relative humidity environment .. 20-60% non-condensing
Dimensions: 60 * 100 * 21mm (including MEGA32 UNIT)
© 2013 Conrad Electronic
61
2.1.9
C-Control Pro IDE
Mega128 Projectboard
The "C-Control PRO 128 Projectboard" (Conrad Item no. 197313) provides a economic alternative to
the "Application-Board MEGA128" (Conrad-Order no. 198258). Compared to the C-Control Pro application board, it's range of functions is significantly limited, and is used mainly for own hardware
developments related to the "MEGA128 UNIT" and the "MEGA128CAN UNIT". The Projectboard also
offers a connector "J3", which provides the CAN bus interface of the "MEGA128CAN". On the Projectboard the "MEGA128" or the "MEGA128CAN" can optionally be used. The Projectboard PRO
128 includes the most important components needed to operate the "MEGA128 UNIT". Furthermore,
the Projectboard features a power supply (USB/AC adapter), a interface converter (RS232) and a
large prototype area available for your own development. By default, the Project Board is designed
for programming via RS232. Optionally, the RS232-USB converter (Conrad-Order no. 197257) can be
used for programming the "MEGA128 UNIT" via USB. In this case the programming is done via the
serial connection of the "MEGA128 UNIT" (UART), so the program transfer is not as fast as the USB
transfer on the "Application-Board MEGA128".
The "MEGA128 UNIT" is so plugged that the signature of the UNIT is readable, if the (RESET/RUN
& BOOT/STOP) button shows to you.
In the baseline condition with no-USB-RS232 converters the jumpers JP4/JP5 are put like shown
in the figure.
When using the RS232-USB converter (not included), the jumper must be reconnected to USB.
The jumper J2 is used to select the supply voltage. With the jumper set to "network", the clamps
J11 are used for the power supply (stabilized DC power supply or power adapter min. 100mA, depending on application). If the jumper J2 is replugged to USB, the board can be operated via the
USB power supply of the computer.
© 2013 Conrad Electronic
Hardware
62
Attention! A maximum current of 100mA through USB should not be exceeded!
The switch S3 and the power supply pin headers J17/J18 and the pins for Vcc / GND on the prototype area are no longer energized when using USB operation. This supply is used only for test applications, when there is no external power supply available.
The appropriate COM port (serial port) must be selected in the C-Control Pro IDE software. Also
the programming via USB is made through the serial interface of the C-Control "MEGA128 UNIT".
Prior to that check, when necessary, the Windows device manager, which COM ports are available, or which was installed by the RS232-USB converter.
If the I2C bus is used, the jumper JP2 and JP1 have to be inserted, if you provide no external pullup resistors by your own.
The bus unit is used to connect I2C-bus expansion modules of the CC1-family and can be used for
custom applications. The interface layout can be found in the figure.
The ports of the "MEGA128 UNIT" are passed out on headers J1, J2, J5, J6, J7, J14 and J15.
For more information on the exact characteristics of the ports, see the documentation/help file
in the C-Control Pro software.
Before you can transfer a program in the unit, the button (BOOT/STOP) must be pressed, to
switch the "MEGA128 UNIT" into programming mode.
When the voltage is supplied, the user program stored in the memory of the "MEGA128 UNIT" is
started automatically. This program can be stopped with the (BOOT/STOP) button. Then the
"MEGA128 UNIT" is in BOOT mode, which is required for program transmission.
The program start can be triggered via the IDE or on the button (RESET/START).
When using Msg_Write... to output variables, it is advisable to use the software start from the IDE.
Technical data
Operating voltage: 8 - 16V DC
Current consumption without load and without external RS232-USB converter: 50 mA
© 2013 Conrad Electronic
63
C-Control Pro IDE
Max continuous current from the stabilized 5V voltage: 100 mA (without cooling)
Prototype area: 2.54 mm
Range of the permissible ambient temperature: 0 ° C to +70 ° C
Admissible relative humidity environment .. 20 - 60% non-condensing
Dimensions: 160 x 100 x 23 mm (including "MEGA128 UNIT" or "MEGA128CAN UNIT)
2.2
AVR32Bit
2.2.1
Installation
In this chapter the installation of hardware and software of the C-Control Pro AVR32Bit is described.
On delivery, the Autostart jumper is set. Please remove, otherwise no program transfer is possible.
2.2.1.1
Software
To get the current development software, sample programs, the manual and useful information,
please visit: www.c-control.de The manual is also available as a help file in the development environment of the C-Control PRO IDE and the PDF file is in the installation folder of the C-Control Pro in
the "Manual" directory.
Direct IDE Download Link: http://www.c-control-pro.de/updates/C-ControlSetup.exe
For the time of software and USB driver installations the user must be registered as administrator. During normal operation of the C-Control Pro this is not necessary.
At the beginning of the installation first select the language in which the installation should take
place. After that you can choose whether you want to install C-Control Pro into the standard path or
whether you want to specify your own target directory. At the end of the installation process you will
be asked if an icon should be created on your desktop.
When the installation process is completed you can choose whether you want to see the "ReadMe"
file, have the shortform introduction displayed or directly start the C-Control Pro design platform.
MAC Address
To avoid connection problems, the MAC address should be set to a new value in the C-Control Configuration before switching on the Ethernet support. To this end, its own MAC address is generated
and supplied on a label for each C-Control Pro AVR32Bit. This label is located on the bottom of the
UNIT.
See figure:
© 2013 Conrad Electronic
Hardware
2.2.1.2
64
USB
Driver Installation
Now connect the Unit with the supplied mini-USB cable to the PC (the cable is enclosed the Applicationboard or Mainboard). The PC is trying to install a driver for a "C-Control Pro AVR32"
device. You can find the appropriate driver in the directory USB Driver\ AVR32 USB Driver in the installation directory of the C-Control Pro IDE.
If all the connections are made, start the IDE.
In the IDE the corresponding COM port (virtual serial port) must be selected. Check first in the windows device manager, which was the assigned COM port number (see illustration).
Picture device manager Comport
Drivers and software for the C-Control Pro do not support Windows operating system before
Windows 2000.
Press the reset button on the C-Control PRO AVR32Bit UNIT. In the output of the IDE should now
appear the following message:
C-Control PRO IDE output after successful
installation of the UNIT
© 2013 Conrad Electronic
65
C-Control Pro IDE
Now you can already transfer a program to the Unit. The demo programs can be found if you click in
the IDE under "Help" on "Demo Programs".
2.2.2
Firmware
The operating system of the C-Control Pro consists of the following components:
Bootloader
Interpreter
Bootloader
The boot loader is always available. It starts the interpreter or performs an upload when a new version of the interpreter is available.
A power-on reset (turn power switch off and on) module brings the AVR32Bit always first in the
boot loader (if the Autostart-Jumper is not set). This is a safety feature to always allow access,
even if the interpreter should work incorrectly. In this state the UNIT can always be brought to its
original condition with a "Reset Module".
Pressing the reset button brings the module directly from the bootloader in the firmware when a
valid interpreter is loaded. As a result, the number of USB driver interruptions are minimized during
normal development.
Interpreter
The interpreter consists of several components:
Bytecode Interpreter
Multithreading support
Interrupt processing
User functions
RAM and EEPROM interface
In the main, the interpreter executes the byte code that was generated by the compiler. Further,
most library functions are integrated in interpreter so that the byte code program can e.g. access
hardware ports. The RAM and EEPROM interface is used by the IDE debugger to get access to variables when the debugger has stopped at a breakpoint.
2.2.2.1
Autostart
Autostart
If the Autostart Jumper is set (J1 on AVR32Bit UNIT), the user program is started directly after a reset or a power on. Since the Autostart-Jumper bridges the connection to the Start/Stop button permanently, the Start/Stop button has no effect if the jumper is set.
© 2013 Conrad Electronic
Hardware
66
The library function ForceBootloader(), as well as a change in the "C-Control Configuration"
AVR32Bit Unit options lead to an internal reset, where the Autostart behavior is ignored. This is done
on purpose in order to make remote maintenance possible. In this case the user program can also
be launched from the IDE, or a pressure on the reset button triggers Autostart again.
On delivery, the Autostart jumper is set. Please remove, otherwise no program transfer is possible.
Remote Maintenance
To service an application with the AVR32Bit from afar, the application can use ForceBootloader() to
jump into the bootloader. If the Autostart-Jumper is set, an update of the application would again
start the program. You can prevent this, if you activate the Disable Autostart option in the C-Control
configuration after a ForceBootloader. When the application update and the desired option changes
are done, set Disable Autostart to off and restart the application from the IDE.
2.2.2.2
USB Troubleshooting
The USB Support C-Pro AVR32Bit Control is executed by the microcontroller itself, and not by an
external chip, like e.g. on the C-Control Pro Mega Applicationboard. This is problematic as far as the
Windows operating system does not always process interruptions of the USB system correctly. You
will notice this in everyday life, when sometimes a USB device (stick, hard disk or USB-to-serial
converter) only works when you plug it in a second time. To counteract this, several measures have
been taken to minimize the number of USB restarts:
The C-Control Pro AVR32Bit unit stays as long as possible in the firmware and seldom jumps to
the bootloader like the C-Control Pro Mega Units.
You can use the Start/Stop button to stop the Unit without having to perform a reset.
Pressing the reset button skips the USB initialization in the boot loader, and starts the firmware
directly. Only a power-on reset leaves the AVR32Bit module in the bootloader (if the AutostartJumper is not set).
In rare cases, it may happen that the unit is not detected at power-on. This can be seen in the
Windows device manager, if there C-Control AVR32Bit COM port does not appear when you turn on
the unit. Please detach from the USB Hub (if any) and replug in, or if that does not help, perform a
restart of Windows. Then the C-Control Pro Unit is recognized again.
If the user program is started directly by a Autostart, no message "Interpreter started" is issued.
The reason is that the USB subsystem needs up to 2 seconds to activate the virtual COM port.
Since the user program starts running immediately, all the outputs of the first 2 seconds are lost.
Also debug messages are not visible in this time with an active Autostart. A start of the program
through the start button when the unit is in bootloader (e.g. after a power-on reset), behaves like a
Autostart. Therefore, there are also no outputs in the first 2 seconds.
IDE does not respond
During the execution of programs on the AVR32Bit, overwriting foreign memory can have an impact
to the IDE. In this case, the USB CDC protocol is no longer performed error-free by the AVR32, and
the virtual COM port on the PC can get into a blocking state, that will the IDE only allow to accept
data with delays (timeouts) . The IDE then no longer works properly. In normal case the IDE can be
get out of this situation by pressing the reset button on the AVR32Bit module, but sometimes it just
helps to quit the IDE with the Windows Task Manager.
© 2013 Conrad Electronic
67
2.2.3
C-Control Pro IDE
Module
The C-Control Pro AVR32Bit UNIT (Conrad Order No.: 192573) is currently the fastest microcontroller unit of the C-Control Pro family (Atmel AT32UC3C1512C). The unit is equipped with a powerful
AVR32 32-bit DSP microcontroller with FPU (Floating Point Unit) for the calculation of floating point
numbers. This microcontroller has been specially designed for industrial and automotive applications, thus meeting a high standard of performance and reliability. The C-Control Pro AVR32Bit UNIT
has already a wealth of facilities to peripheral, a web server, CAN-, µ SD-, USB interface and much
more is included for programming and debugging on this small unit.
To operate the UNIT you only need a stabilized 3.3V / 200mA power supply and a mini-USB cable to
the Unit to connect to your PC. The easiest way to do this for development purposes is with the optional application board (Conrad Order No.: 192587). This board is specifically designed for the development of hardware and software and provides already a variety of additional peripherals.
For rapid prototyping and small series also the AVR32Bit Mainboard (Conrad Order No.: 192702)
can be used. This board can be expanded with additional boards depending on the application.
The programming of the AVR32Bit UNIT is made in the for several years proven and constantly improved C-Control Pro development environment in Basic, CompactC and graphically.
The Unit provides the following features:
Powerful 32-bit microcontroller (91MIPS internal) 66 MHz clock
512 KB high-speed FLASH (160 KB reserved for interpreter)
64 KB high-speed SRAM (14 KB reserved for interpreter)
1x CAN bus (2.0A & 2.0B) with CAN driver + jumper enabled terminator
2x SPI interfaces
1x I2C (TWI)
2x voltage reference input for ADC
1x 16-channel 12-bit ADC
1x USB interface (Mini USB) for programming and debugging
3x USART interface (serial interface)
1x External I2C EEPROM 512 Kbit
1x Real Time Clock (RTC) with 32.768 kHz clock crystal
1x LAN interface (external LAN port)
1x µ SD card holder (supports SDHC)
1x reference voltage input for DAC
2x Analog comparator
1x 4-channel 20-bit PWM Controller
2x 16-bit timer with 3 channels
7x interrupt inputs
57x digital inputs outputs (depending on the use of the other functions)
Jumper selectable Autostart option
Start-stop button
Reset button
2 pin connectors, each with 2x23 pins in pitch 2.54mm
Pinout in pitch 2.54mm, also ideal for breadboards
© 2013 Conrad Electronic
Hardware
Scheme of the AVR32Bit Unit
Picture UNIT (view from above)
Picture UNIT (view from below)
© 2013 Conrad Electronic
68
69
C-Control Pro IDE
Jumper:
J1: enables Autostart of user application
J2: enables CAN 120Ohm terminator
Pin layout of the Module
Picture UNIT Pinout
For a port list, see the chapter Pin Assignment.
Power Supply
The CON X1 Unit pins 3.3V and GND must be connected to a stabilized supply voltage. The four
© 2013 Conrad Electronic
Hardware
70
3.3V and the GND pins are connected to each other! The "POWER" LED indicates that the Unit is
receiving power.
The C-Control PRO UNIT has no inverse polarity protection, so the UNIT is destroyed by
reversed polarity of the power supply!
Picture UNIT Power
Supply
USB
Through the mini-USB connector, the C-Control Pro AVR32Bit module is connected to the PC. The
USB port is used for programming and debugging of user software. All C-Control Pro UNIT's have a
debugger. The debugger can set breakpoints and variables can be monitored and analyzed at
runtime.
The module is not supplied with power via USB!
Reset
A reset causes the return of the micro-controller system in an initial state. The C-Control Pro Module
AVR32Bit knows basically three sources of reset:
Power-on reset: Executed automatically after switching on the operating voltage. The UNIT is then
again in bootloader mode. It can be reset or a new module is transferred to the interpreter unit.
Brown-out Reset: Automatically runs when the core voltage is less than 1.65V. This prevents the
controller unit to get in undefined states at a drop of the supply voltage. If the voltage is significantly higher again, then the module starts anew.
Hardware reset: Executed when the RESET button of the module is pressed.
Start/Stop Button
With the start/stop button, the program will start. In a renewed pressure, the program is stopped. A
stop with this is preferable to the reset button, as with a reset, the USB subsystem is started again
from scratch and the connection is renegotiated. Is the Autostart Jumper (J1) is inserted, the application is started directly after a reset and the start/stop button remains without effect.
Autostart
© 2013 Conrad Electronic
71
C-Control Pro IDE
If the Autostart Jumper (J1) is inserted, the user program immediately restarts after a reset.
On delivery, the Autostart jumper is set. Please remove, otherwise no program transfer is possible.
Clock Generation
The clock generation of the microcontroller is performed by a 12 MHz quartz crystal. In the controller
the 12 MHz are clocked up to 66Mhz with a PLL-oscillator. All timings of the controller, as well as
the 48Mhz of the USB subsystem are derived from this clock.
Real-Time Clock
The C-Control Pro AVR32Bit Unit has a separate oscillator with a 32.768 kHz clock crystal. This
precise quartz watch can be set and read by software. This clock is ideal for applications such as
time-accurate timers, etc.
Digital Ports
The C-Control Pro AVR32Bit module has 57 digital inputs and outputs that can be used with special
functions such as PWM, ADC, etc. depending on the configuration. You can connect the digital inputs/outputs to for e.g. buttons with pull-up/pull-down resistors, digital ICs, optocouplers or driver circuits that are connected to relays. The pins are addressed individually, bitwise in each port. Each
pin can be either input or output.
Never connect two pins that are configured as outputs at the same time. This can destroy the C-Control Pro AVR32Bit UNIT!
Digital input pins are high impedance or connected with an internal pull-up/pull-down resistors and
lead an applied voltage signal to a logical value. The prerequisite is that the signal voltage is within
the specified range for low or high level. In the further processing of the program, the logical values of
individual input pins are represented as 0 ("low"), or 1 ("high"). Output ports can output digital voltage
signals via an internal driver circuit. Connected circuits can draw a certain current of the ports (at
high level) or supply in these (at low level).
Never connect a voltage greater than 3.6V to one of the pins of the C-Control Pro
AVR32Bit UNIT!
Note the maximum load current for a single port and for all ports in total. Exceeding the maximum
values can lead to the destruction of the C-Control Pro AVR32Bit module. After a reset each pin is
initially configured as input. Use certain functions to change the data direction.
© 2013 Conrad Electronic
Hardware
72
Since the outputs of the AVR32Bit Unit can not be overly stressed, a small driver stage should always (see picture) be used downstream. In the example an LED is driven, according to consumer a
corresponding FET or transistor must be used. This circuit is used for loads up to 100mA. For inductive loads a freewheeling diode must be connected in parallel to the load.
With the C-Control Pro AVR32Bit UNIT pins are no longer configured with
"Port_DataDir" or "Port_DataDirBit"! Since the AVR32Bit UNIT offers more options to configure the pins, here the function "Port_Attribute" is introduced.
It is important to study the pin assignment of the AVR32Bit before programming, since
important functions of the program development (eg, LAN, USB) are on certain pins.
ADC Reference Voltage
The microcontroller has an Analog-to-Digital converter with a selectable resolution of 8/10/12 bits.
This means that measured voltages can be represented as whole numbers from -2048 to 2048, since
the AD-converter always works differential. In addition, an ADC preamplifier gain of 1, 2, 4, 8, 16, 32,
64 can be set by software.
© 2013 Conrad Electronic
73
C-Control Pro IDE
The following reference voltage sources are available:
0,6 * VDDANA internal (0,6 * 3.3V = 1,98V)
internal reference voltage of 1V
two external reference voltage inputs, e.g. 2.048V generated by reference-voltage-IC
If "x" is a digital measurement value, calculate the corresponding voltage value "u" as follows:
The resolution depends on the configuration of the ADC.
Resolution
8 Bit
10 Bit
12 Bit
Maximal Value
-128 to +127
-512 to +511
-2048 to +2047
Formula for calculating the present ADC voltage:
u = x * reference voltage / resolution
CAN Terminating Resistor
Jumper (J2) enables the CAN bus 120 ohm termination resistorus. For more information on CANBUS and its properties, see the chapter CAN bus!
LAN
On pins VCC2 (+3.3 V), GND, RD, RD +, RD, TD +, LED_L and LEDA the connections for the LAN
port are lead through. On the Applicationboard or Mainboard a LAN socket is already present, which
is hardwired to the connectors of the UNIT. In their own applications, where the UNIT is used "stand
alone", the user can retrofit an Ethernet jack himself like shown in the below diagram.
© 2013 Conrad Electronic
Hardware
74
Technical Data
power supply VCC
3 to 3.6V Nominal 3.3V / >200mA (stabilized)
maximum voltage at the pins
-0.3V to 3.6V
maximum voltage at all pins (sum)
120mA
RPULLUP I/O
5 to 26 kOhm
RPULLDOWN I/O
2 to 16 kOhm
input Low-level voltage I/O
0.3 * VCC
input high-level voltage I/O
0.7 * VCC
output low-level voltage I/O
-3.5 to -14mA dependent on configuration(1)
output high-level voltage I/O
3.5 to 14mA dependent on configuration(1)
deviation RTC
+/- 20ppm
environmental temperature (Ta)
0 to 70°C
dimensions
60x40x8mm (without pin connectors)
weight
approx. 18g
(1)
-3.5/ 3.5mA and Pins are: PB02 (P57), PC04 (P34), PC05 (P35), PC06 (P33).
-7/ 7mA and -14/ 14mA able Pins are: PB06 (P7), PB21 (P29), PD02 (SPI0-SCK).
The remaining pins PAxx, PBxx, PCxx, PDxx work with -3.5/3.5 mA resp. -7/ 7mA. The pin
© 2013 Conrad Electronic
75
C-Control Pro IDE
output driver strength is programmable with the Port_Attribute() function.
2.2.3.1
Pin Assignment
Port A through Port D are for direct pin functions (e. g. Port_WriteBit) counted from 0 through 127,
see "PortBit".
Pin Assignment for C-Control Pro AVR32Bit Unit and Application Board
C-Control C-Control
AVR32
Unit Name Module Pin Port Name
TQFP
100
GPIO
Function1
Function2
P1
X1.09
PA00
1
0
CAN1-TX
P2
X1.10
PA01
2
1
CAN1-RX
P3
X1.11
PA02
3
2
P4
X1.12
PA03
4
3
P5
X1.13
PB04
7
36
SPI1-MOSI
P6
X1.14
PB05
8
37
SPI1-MISO
P7
X1.15
PB06
9
38
SPI1-SCK
P8
X1.16
PA16
22
16
P9
X1.17
PA04
10
4
ADC0
P10
X1.18
PA05
11
5
ADC1
P11
X1.19
PA06
12
6
ADC2
AC1AP1
P12
X1.20
PA07
13
7
ADC3
P13
X1.21
PA08
14
8
ADC4
AC1AN1
Ext Int2
AC1BP1
P14
X1.22
PA09
15
9
ADC5
P15
X1.23
PA10
16
10
ADC6
Ext Int4
P16
X1.24
PA11
17
11
ADC7
ADCREF1
P17
X1.25
PA19
25
19
ADC8
P18
X1.26
PA20
28
20
ADC9
P19
X1.27
PA21
29
21
ADC10
P20
X1.28
PA22
30
22
ADC11
AC0AN0
P21
X1.29
PA23
31
23
ADC12
AC0BP0
P22
X1.30
PA24
32
24
ADC13
P23
X1.31
PA25
33
25
ADC14
P24
X1.32
PA13
19
13
ADC15
P25
X1.33
PA12
18
12
AC1AP0
P26
X1.34
PA14
20
14
AC1BP0
P27
X1.35
PA15
21
15
Appl. Board
Function
Ext Int1
ADCREF0
AC0AP0
AC1AN0
© 2013 Conrad Electronic
Hardware
P28
X1.36
PB20
43
52
TIMER0-B
P29
X1.37
PB21
44
53
COUNTA-1
P30
X1.38
PB22
45
54
TIMER2-A
P31
P32
P33
P34
P35
P36
P37
P38
P39
P40
P41
P42
P43
P44
P45
P46
P47
P48
P49
P50
P51
X1.39
X2.42
X2.41
X2.18
X2.17
X2.40
X2.39
X2.38
X2.37
X2.36
X2.35
X2.34
X2.33
X2.32
X2.31
X2.30
X2.29
X2.28
X2.27
X2.26
X2.25
PB23
PC01
PC06
PC04
PC05
PC17
PC18
PC15
PC16
PC19
PC20
PC12
PC11
PC13
PC14
PC21
PC22
PC23
PC24
PC31
PD07
46
50
57
55
56
65
66
63
64
67
68
60
59
61
62
69
70
71
72
73
78
55
65
70
68
69
81
82
79
80
83
84
76
75
77
78
85
86
87
88
95
103
TIMER2-B
TIMER5-A
COUNTA-2
SDA (I2C)
SCL (I2C)
USART3-TX
USART3-RX
USART0-RX
USART0-TX
P52
P53
P54
P55
P56
P57
---
X2.24
X2.23
X2.22
X2.21
X2.20
X2.19
X1.43
PD08
PD21
PD22
PD23
PB19
PB02
PD03
79
88
89
90
42
99
77
104
117
118
119
51
34
99
© 2013 Conrad Electronic
COUNTA-0
76
Ext Int3
PWMH_0
PWML_0
PWMH_1
PWML_1
PWML_2
PWMH_2
PWML_3
PWMH_3
Ext Int7
PORT_T1
PORT_T2
PORT_T3
PORT_T4
PORT_T5
PORT_LED1
PORT_LED2
TIMER1-B
USART4-TX
USART4-RX
COUNTB-2
TIMER4-A
TIMER0-A
TIMER3-A
Ext Int5
Ext Int6
77
C-Control Pro IDE
UNIT Pinout
Hardwired Pins
C-Control
Module Pin
TQFP
100
AVR32
Port Name
X1.05, X1.06
X1.07, X1.08
5
6
23
24
27
26
37
38
VDDIO1
GNDIO1
ADCVREFP
ADCVREFN
VDDANA
GNDANA
GNDPLL
VDDIN_5
GPIO
Function
I/O
3,3V
GND
REF
REF
3,3V
GND
GND
3,3V
© 2013 Conrad Electronic
Hardware
39
40
41
53
54
82
83
VDDIN_33
VDDCORE
GNDCORE
VDDIO2
GNDIO2
VDDIO3
GNDIO
96
97
47
48
PB00
PB01
PB30
PB31
X2.03
X2.02
X2.01
34
35
36
VBUS
DM
DP
X2.43
100
PB03
X2.44
98
Reset_n
58
PC07
71
SD card
Card-Detect
74
75
76
49
PD00
PD01
PD02
PC00
96
97
98
64
SPI
SPI
SPI
SD-Card
SPI0-MOSI
SPI0-MISO
SPI0-SCK
SPI0-NPCS[1]
93
95
51
52
84
86
85
87
91
92
94
PD28
PD30
PC02
PC03
PD11
PD13
PD12
PD14
PD24
PD27
PD29
124
126
66
67
107
109
108
110
120
123
125
MAC
MAC
MAC
MAC
MAC
MAC
MAC
MAC
MAC
MAC
MAC
MACB_CRS
MACB_TX_EN
MACB_MDC
MACB_MDIO
MACB_TXD[0]
MACB_RXD[0]
MACB_TXD[1]
MACB_RXD[1]
POWER_DOWN
MACB_RX_ER
MACB_TX_CLK
80
81
PD09
PD10
105
106
CAN
CAN
CAN0_RX
CAN0_TX
CAN Driver
CAN0_LO
X1.42
X1.40
X1.41
X1.45
© 2013 Conrad Electronic
3,3V
3,3V
GND
3,3V
GND
3,3V
GND
32
33
62
63
RTC
RTC
System Clock
System Clock
Xin32
Xout32
Xin0
Xout0
USB-Debug
USB-Debug
USB-Debug
35
Start-Button
Reset-Button
78
79
C-Control Pro IDE
X1.46
CAN Driver
CAN0_HI
X2.07
X2.08
X2.09
X2.10
X2.11
X2.12
X2.13, X2.14
X2.15
PHY
PHY
PHY
PHY
PHY
PHY
PHY
PHY
LAN_RDLAN_RD+
LAN_TDLAN_TD+
LAN_LED_LNK
LAN_LED_ACT
+3.3V (LAN_CT)
LAN_GND
© 2013 Conrad Electronic
Hardware
2.2.3.2
Connection Diagram
© 2013 Conrad Electronic
80
81
C-Control Pro IDE
© 2013 Conrad Electronic
Hardware
2.2.4
82
Applicationboard
The C-Control PRO AVR32Bit Applicationboard (Conrad Order No.: 192587) is the standard development board for the C-Control PRO AVR32Bit UNIT. The application board contains all the components that are needed to operate the C-Control PRO AVR32Bit UNIT. In addition, the board has a very
good and comprehensive peripheral equipment.
The board offers the following features:
1x power supply (3.3V & 5V)
1x on/off switch
1x LAN connector (RJ45)
1x 2.048V voltage reference
1x CAN port
1x Dual Power MOS-FET (2x Open Drain)
1x directional keys (5 buttons)
2x analog sensor (trimmer)
2x16 character LC display (blue/white)
1x contrast control for LCD
8x LED's with driver for signaling
1x power relay (24V/ 7A)
1x USB to UART converter
1x RS232 to UART converter
1x audio amplifier
1x UNIT-Bus (3.3V to 5V)
2x breadboard for custom circuitry
Applicationboard w ith Com ponent m arkings
© 2013 Conrad Electronic
83
C-Control Pro IDE
Installation / Commissioning
The C-Control PRO AVR32Bit UNIT is attached that the mini-USB socket of the Unit shows in the
direction of the on/off switch (see mark on Applicationboard).
In base condition, the jumper (JP1 to JP7) for LED1, LED2 and keyboard are not plugged.
The power supply of the Applicationboard occurs via a stabilized power supply or a laboratory
power supply with an output voltage of 7.5V and a minimum current of 500mA.
Install the C-Control PRO Development Environment "IDE" (Integrated Development Environment).
See installation software.
Install the USB driver.
Power Supply
The Applicationboard is powered by a stabilized plug-in or laboratory power supply (7.5 V/500mA).
Depending on the additional circuitry of the application motherboards it may be necessary later to
use a mains adapter with a higher power. Two fixed voltage regulators on the application board generate the stabilized internal supply voltage of 3.3V and 5V. The two LEDs LED9 and LED10 indicate
the functionality of the power supply. All circuit components on the application board are supplied
with these voltages (see diagram). On the board, some ports are available to allow you to tap out the
different voltages. Make sure that the two voltage regulators are not getting too hot when using custom circuitry with higher loads. For larger loads, it is recommended to feed them externally!
The mass between external circuitry (power supply) and the Applicationboard must be the same!
The cooling surface of the voltage regulator is warm to hot during operation, depending on the
connected consumer!
On/Off Switch
The switch S6 is located at the back, next to the power supply socket of the Applicationboard and is
used to turn on/off the main power supply.
Jumper
The jumper JP1 to JP5 connect the buttons of the keyboard to the pins of the UNIT (T1 = P41, P42 =
T2, T3 = P43, P44 = T4, T5 = P45). The jumpers JP6 and JP7 connect the LEDs LED1 and LED2 to
the pins of the UNIT (P48 = LED1, LED2 = P49). See also Pin Assignment in AVR32Bit Module
chapter.
LC-Display
The LCD display is used to represent variables and characters. It is controlled via the I2C bus. A port
expander (PCA8574) is available on the application board, which is responsible for communication
between UNIT and LCD display over the I2C bus. The display is operated in 4-bit mode. Port P46 is
responsible to turn the backlight on/off. The operating system provides a simple software interface for
outputs to the display. The small circuit for driving the LCD can easily be applied to your own circuits. It will support most "standard dot matrix" LCD's. (see connection diagram and LCD data
sheet).
© 2013 Conrad Electronic
Hardware
84
Connection Diagram cutout of I2C-LCD
LC-Display contrast control
The best visibility of the LCD character arises in frontal view. If necessary, the contrast needs to be
adjusted. The contrast can be set with the trimmer R19 ("Contrast" to the left of the LCD screen).
UNIT-BUS Pin Configuration
I2C and UNIT-Bus
The pins on the socket connector Y23 (Block 4) are permanently connected to the pins P34 (SDA)
and P35 (SCL). At the pins on the socket connector Y8 (4 pin) a free UART interface can be assigned to the UNIT-bus. The UNIT-bus levels the 3.3V of the UNIT to 5V and 5V signals to 3.3V (bidirectional level shifter). C-Control I peripheral like I2C modules and other 5V circuitry can be connected to this bus.
© 2013 Conrad Electronic
85
C-Control Pro IDE
Exam plel connect LED3 and LED4 to P32 and P33
LED's
The pins of the connector strips Y10 (10 pin) are permanently connected to the LED's LED1 to
LED8. The LED's are driven via a high impedance FET (about 100K). So that the port can also be
used for other purposes, and the LED's signal the port status in addition. The jumpers JP6 and JP7
wire the first two LED's LED1, LED2 to the pins of the UNIT P48 and P49.
Reference Voltage
The pins on the socket connector Y14 provide a stable reference voltage for the ADC (Analog Digital
Converter). They can be connected to the ADCREFx inputs of the UNIT. This allows you to provide a
stable external reference voltage to the ADC.
© 2013 Conrad Electronic
Hardware
86
Exam ple connect reference voltage to ADCREF0
CAN Bus
At clamp J6 the CAN bus (CAN0) is led out of the UNIT and can be used directly. It must be followed
by no driver, since it is a driver already available on the UNIT.
Audio Amplifier
At the pins on the socket connector Y22 a PWM signal can be connected directly from the UNIT to
the audio output. Headphones, small speakers (min. 8 Ohms) or an active speaker can be connected to the jack. Please note that the audio can be very noisy depending on the signal, and improper
use can lead to hearing damage!
Analog Sensor
The pins on the socket connector Y9 (4 pin) are connected to the trimmer P1 and P2. The trimmers
are connected as a variable voltage divider and fed from the 2.048V reference voltage. Thus, an output voltage can be set between 0 and 2.048V. The outputs of the female connector can be connected directly to the analog inputs of the UNIT.
© 2013 Conrad Electronic
87
C-Control Pro IDE
Exam ple connect trim m er to ADC0 and ADC1 w ith external reference voltage 2.048V
Keypad
For user inputs a 5-button keypad (key cross) is available. The pins on the socket connector Y11 (6
pin) are connected to the switches T1 to T5. Through the jumper JP1 to JP5 the buttons T1 to T5
can be connected directly to the pins of the UNIT (P41 to P45). If another assignment is desired, the
jumper must be removed and the button are connected via jump wire from the socket connector Y11
to the UNIT. The switches are connected to the application board with 47 kOhm pull-up resistors. No
pull-up/down resistors need to be activated in software. Reading a switch in the idle state (not
pressed), a "1" is detected on the port, because of the 3.3V that is carried to the pin though the pullup resistor.
LAN Port / Ethernet
The LAN port can be directly connected with an FTP cable to a switch or router. With the Ethernet
interface of the C-Control PRO AVR32Bit a web server can easily be implemented (see Examples).
Furthermore, via the Ethernet bootloader the UNIT can be programmed across the network. The LAN
connector is permanently connected to the pins of UNIT (see pin assignment in the manual).
Relay
The pins on the socket connector Y13 are connected to the relay K1. The relay is switched by an
FET driver, and the "REL" connector of Y13 can be connected directly to a port of the UNIT. The relay is used to switch smaller loads.
© 2013 Conrad Electronic
Hardware
88
Exam ple connect Relay to P54
FET driver
The pins of the socket strip Y15 are connected to the open-drain FET driver. Hereby ohmic consumers (max. 12VDC / 2A) can be controlled directly. The OUTPUT CTRL pins can be connected
directly to a port on the UNIT. It can also be used to control PWM signals. At pin header Y18 opendrain outputs are ready for usage. These outputs are connected to the consumers - power supply
(+).
When switching inductive loads, a free-wheeling diode must be attached to the opendrain outputs. The diode hast to be attached as close as possible to the the consumer.
© 2013 Conrad Electronic
89
C-Control Pro IDE
Exam ple FET driver w ith load controlled by P53
USB to UART Converter
The pins on the socket connector Y5 (4 pin) are connected to the UART to USB converter (Silabs
CP2104). At the USB connector (type B) the board is connected to the PC. The converter is used for
serial data output from the Unit to the PC.
Install the driver first before making a connection.
The drivers for the converter module can be found at:
http://www.silabs.com/PROducts/mcu/Pages/USBtoUARTBridgeVCPDrivers.aspx
http://www.silabs.com
© 2013 Conrad Electronic
Hardware
90
Exam ple connect USB-UART converter to UART0
RS232 to UART Converter
The pins on the socket connector Y6 (4 pin) are connected to the RS232 converter (MAX3232). At
the 9-pin SUB-D connector the board is connected to the PC or a RS232 device. The converter is
used to convert the 3.3V of the UNIT to the standard level of the RS232 serial interface (+/-12V).
Through this interface data can be send data to a PC or a another RS232 device (e.g. meter).
© 2013 Conrad Electronic
91
C-Control Pro IDE
Exam ple connect RS232 to UART0
This product complies with the applicable national and European requirements. The "I2C bus" is a
registered trademark of Philips Semiconductors. All other company and product names mentioned
are trademarks of their respective owners. All rights reserved.
The cooling surface at the voltage regulators (between on/off switch and LAN connector) becomes hot during operation!
Technical Data
power supply external
7,5VDC / 500mA (stabilized)
power supply internal
3.3V and 5V
environmental temperature
0 to 60°C
dimensions
190x110mm
weight without UNIT
approx. 160g
Scope of delivery
1x C-Control PRO AVR32Bit Applicationboard
1x Mini-USB cable
7x jumper
1m wire wrap for jumpers
Quick Guide
© 2013 Conrad Electronic
Hardware
© 2013 Conrad Electronic
92
93
2.2.4.1
C-Control Pro IDE
Connection Diagram
© 2013 Conrad Electronic
Hardware
© 2013 Conrad Electronic
94
95
2.2.5
C-Control Pro IDE
Mainboard
The C-Control PRO AVR32Bit Mainboard (Conrad Order No.: 192702) is a compact experimental
and development board for the C-Control PRO AVR32Bit UNIT. The C-Control PRO AVR32Bit Mainboard contains all the components required for the operation of the C-Control PRO AVR32Bit UNIT.
In addition, the board has a good basic set of peripherals.
Mainboard Overview
© 2013 Conrad Electronic
Hardware
96
The board offers the following features:
1x
1x
1x
1x
2x
1x
1x
1x
2x
1x
power supply (3.3V & 5V)
LAN connector (RJ45)
2.048V external reference voltage
signal generator (Buzzer)
CAN connector
LCD-PORT for connection to the I2C LCD's (Conrad Order No.: 192602)
I2C-BUS connector
1-Wire connector
I/O-PORT with 26 pins
UNIT-Bus (3.3V to 5V) for various sensors and actors
Installation / Commissioning
The C-Control PRO AVR32Bit UNIT is attached so that the mini-USB socket corresponds to the
marking (USB CON) on the Mainboard.
In the baseline condition, the jumper (JP1, JP2 and JP3) are not plugged.
The power supply of the Applicationboard occurs via a stabilized power supply or a laboratory
power supply with an output voltage of 7.5V and a minimum current of 500mA.
Install the C-Control PRO Development Environment "IDE" (Integrated Development Environment).
See installation software.
Install the USB driver.
Power Supply
The Applicationboard is powered by a stabilized plug-in or laboratory power supply (7.5 V/500mA).
Depending on the additional circuitry of the application motherboards it may be necessary later to
use a mains adapter with a higher power. Two fixed voltage regulators on the application board generate the stabilized internal supply voltage of 3.3V and 5V. The two LED's +3.3V and +5V indicate
the functionality of the power supply. All circuit components on the application board are supplied
with these voltages (see diagram). On the board, some ports are available to allow you to tap out the
different voltages. Make sure that the two voltage regulators are not getting too hot when using custom circuitry with higher loads. For larger loads, it is recommended to feed them externally!
The mass between external circuitry (power supply) and the Applicationboard must be the same!
The cooling surface of the voltage regulator is warm to hot during operation, depending on the
connected consumer!
I2C, UART and UNIT-Bus
The pins on connector J8 are firmly connected to the pins P34 (I2C SDA) and P35 (I2C SCL). The
UART4 interface is available at connector J9. The I2C bus is also connected directly to the UNITBUS. The UNIT-bus levels the 3.3V of the UNIT to 5V and 5V signals to 3.3V (bi-directional level
shifter). C-Control I peripheral like I2C modules and other 5V circuitry can be connected to this bus.
The UART3 interface can be placed on the UNIT-BUS via the jumpers JP1 and JP2.
© 2013 Conrad Electronic
97
C-Control Pro IDE
UNIT-BUS Pin Configuration
Reference Voltage
The jumper JP3 connects the external 2.048V reference voltage to the ADCREF0 (P8) pin of the
UNIT.
CAN Bus
At the clamp with the marking "CAN" the CAN bus (CAN0) is led out of the UNIT and can be used
directly. It must be followed by no driver, since it is a driver already available on the UNIT. On the
socket connector J10 the second CAN bus (CAN1) is led out. This does not have a CAN driver and
can be used as a normal input/output.
LAN Port
The LAN port can be directly connected with a switch or router. The LAN connector is permanently
connected to the pins of UNIT (see pin assignment in the manual). With the Ethernet interface of the
C-Control PRO AVR32Bit a web server can easily be implemented (see demo programs). Furthermore, via the Ethernet bootloader (see manual chapter AVR32Bit Firmware bootloader) the UNIT can
be programmed from afar.
LCD Port
At the 6-pin socket header with marking "LCD PORT" the C-Control PRO AVR32Bit LCD1602 board
(Conrad Order No. 192602) can be attached. The Mainboard is connected with the LCD module via a
6-pin ribbon cable with a pin header connector (female). Because depending on the application, the
cable lengths are varying, we offer these components for self-assembly using the following order
numbers:
Ribbon cable RM1.27 0.05mm²:
Pin header connectors 2x3 RM:2.54mm:
Order No. 607237
Order No. 742063
© 2013 Conrad Electronic
Hardware
Matching connection cable pre-assembled (length 35cm)
98
Order No. 198876
1-WIRE
At the screw clamp labeled "1WIRE" the pin P3 of the UNIT is led out. At this pin a 1-WIRE sensor
such as a temperature sensor (Conrad Order No. 198284) can be connected. This pin can also be
used as a normal digital input/output.
PORT-1, PORT-2
At the 26-pin pin header connectors labeled "PORT 1" and "PORT 2" the free pins are brought out of
the AVR32Bit UNIT. Here, the experiment board (Conrad Order No. 192615) can be connected to the
pin headers via two 26-pin ribbon cables.
Ribbon cable 26-pin RM1.27 0.05mm²:
Pin header connectors 2x13 RM:2.54mm:
Order No. 607222
Order No. 742185
Available pins at pin header connector PORT-1:
P5, P6, P7, P8, P9 , P10, P11, P12, P13, P14, P15, P16, P17, P18, P19, P20, P21, P22, P23,
P24, P25, P26, P27, P28, +3.3V, GND
Available pins at pin header connector PORT-2:
P29, P30, P31, P32, P33, P36, P37, P38, P39, P41, P42, P43, P44, P45, P46, P47, P48, P49,
P50, P53, P54, P55, P56, P57, +3.3V, GND
This product complies with the applicable national and European requirements. The "I2C bus" is a
registered trademark of Philips Semiconductors. All other company and product names mentioned
are trademarks of their respective owners. All rights reserved.
The cooling surface at the voltage regulators (near the mini-USB socket of the UNIT) becomes hot during operation!
Technical Data
power supply external
7,5VDC / 500mA (stabilized)
power supply internal
3.3V and 5V
environmental temperature
0 to 60°C
dimensions
110x95mm
weight ohne UNIT
approx. 65g
Scope of Delivery
1x C-Control PRO AVR32Bit Mainboard
1x Mini-USB cable
© 2013 Conrad Electronic
99
C-Control Pro IDE
3x Jumper
Quick Guide
© 2013 Conrad Electronic
Hardware
2.2.5.1
Connection Diagram
© 2013 Conrad Electronic
100
101
2.2.6
C-Control Pro IDE
UNIT-BUS Exp. Board
The C-Control PRO AVR32Bit UNIT BUS Exp. Board (Conrad Order No.: 192659) is designed to expand the functionality of the C-Control PRO AVR32Bit products. The product is designed as an open
circuit board with six single 6-pin pin header sockets, and only determined for the UNIT-BUS of the
C-Control PRO AVR32Bit and the C-Control I product family (extensions) and their sockets. The
control of the individual modules is done via software. The software can be found in the folder of the
example programs (see demo programs) and at www.c-control.de.
Connection and commissioning
Make sure that before you connect the modules to your C-Control PRO AVR32Bit base product (e.g.
AVR32Bit Application Board - Order No. 192587 or Mainboard - Order No. 192702) all connections to
connected devices are separated and voltage free. On the C-Control PRO AVR32Bit basic products
there is also a 6-pin connector labeled UNIT-BUS. This pin header connector is suitable for connecting UNIT-BUS expansion modules. Each of these jacks includes the lines SDA, SCL, RxD,
TxD, +5V and GND. The C-Control PRO AVR32Bit Unit works with 3.3V level, and the UNIT-BUS extensions, as well as the older C-Control I2C-bus modules, use 5V. Therefore a level converter is
placed between the C-Control PRO AVR32Bit UNIT and the UNIT-BUS that converts the 3.3V signals of the UNIT to 5V signals of the UNIT-BUS. The UNIT-BUS Expander is used to distribute the
I2C bus signals SDA and SCL and the UART signals RxD and TxD. In addition, the +5V supply and
GND pins. The Expander can can be mounted in your application with its outer mounting holes (hole
diameter: 2.5 mm).
When using C-Control I extension modules please study the documentation of the C-Control extension modules. You can find there more technical information on the individual products. Unless
stated otherwise, all expansion modules are supplied with the required operating voltage via their respective connectors on the base unit. Because depending on the application, the cable length can
vary, we offer you these components for self-assembly in the following order numbers:
Ribbon cable RM1.27 0.05mm²:
Pin header connectors 2x3 RM:2.54mm:
Matching connection cable pre-assembled (length 35cm)
Order No. 607237
Order No. 742063
Order No. 198876
Expander Overview
Technical Data
dimensions
72mm x 20mm x 12mm (LxWxH)
pin header pitch
2.54mm
weight
12g
© 2013 Conrad Electronic
Hardware
2.2.6.1
Connection Diagram
© 2013 Conrad Electronic
102
103
2.2.7
C-Control Pro IDE
LCD1602 Board
The C-Control PRO AVR32Bit LCD1602 board (Conrad Order No. 192602) is designed to expand the
functionality of the C-Control PRO AVR32Bit products. The product is configured as open circuit
board. The module is equipped with a two-line 16 character LCD display with backlight and a 6-pin
header connector, and is only determined for the C-Control PRO AVR32Bit Mainboard (Conrad Order
No. 192702) . The board is used to display data from the AVR32Bit UNIT (Conrad Order No. 192573)
in conjunction with the AVR32Bit Mainboard. The control of the individual modules is done via software. The software can be found in the folder of the example programs (see demo programs) and at
www.c-control.de.
PCB Front View
Connection and Commissioning
Make sure that before you connect the modules to your C-Control PRO AVR32Bit Mainboard all
connections to connected devices are separated and voltage free. On the C-Control PRO AVR32Bit
Mainboard a 6-pin header connector is labeled LCD PORT. This pin header connector is suitable for
connecting the LCD1602 boards. The pins I2C, P46, 3.3V and +5 V are passed out. The LCD1602
board has an I2C bus port expander that is responsible for driving the LCD. As a result, fewer pins
are assigned to the UNIT.
© 2013 Conrad Electronic
Hardware
104
PCB Rear View
Is the base address of the LCD used (equal to the application board), the jumper must be removed on the LCD board. See also LCD_SetDispAddr.
LCD Port Connectors
The Mainboard is connected to the LCD1602 Board via a 6-pin ribbon cable with pin header connector (female). Since the cable may vary according to the application, we offer these components
for self-assembly using the following order numbers:
Ribbon cable RM1.27 0.05mm²:
Pin header connectors 2x3 RM:2.54mm:
Matching connection cable pre-assembled (length 35cm)
Order No. 607237
Order No. 742063
Order No. 198876
Tip: The pin header connectors can be easily pressed together with a small vise. Cut the cable
to proper length and straight it in the plug (guide grooves in the plug), and then clamp between the
two vise jaws, and turn it carefully until the connector clicks into place.
Addressing:
© 2013 Conrad Electronic
105
C-Control Pro IDE
The I2C address jumpers JP1 and JP3 are located on the back of the LCD1602 module. With the
use of multiple LCD modules (max. 8), the jumper must be set according to the desired address as
follows (Jumper JP1 = points to IC):
JP3
JP2
JP1
address
-
-
-
Hex 27
-
-
x
Hex 26
-
x
-
Hex 25
-
x
x
Hex 24
x
-
-
Hex 23
x
-
x
Hex 22
x
x
-
Hex 21
x
Hex 20
x
x
x=Jumper set / - = not set
Attention: Other I2C bus modules use the same I2C expander chips (PCA8574). Therefore the
maximum number of modules with this chip is limited to 8!
CAD
Technical Data
dimensions
98mm x 40mm x 26mm (LxWxH)
pin header pitch
2.54mm
operating voltage
3.3V (LCD) and 5V (backlight)
current consumption w/o backlight
3mA
© 2013 Conrad Electronic
Hardware
current consumption with backlight
13mA
weight
55g
© 2013 Conrad Electronic
106
107
2.2.7.1
C-Control Pro IDE
Connection Diagram
© 2013 Conrad Electronic
Hardware
2.2.8
108
Port-Ext-Board
The Port-Ext-Board (Conrad Order No. 192615) is constructed to expand the functionality of the CControl PRO AVR32Bit Mainboard (Conrad Order No. 192702). The product is designed as an open
breadboard experimental circuit board with a pitch of 2.54mm. It is equipped with two single 26-pin
header connectors and suitable only for the port outputs (PORT-1/PORT-2). The board serves to
build your own circuits in conjunction with the C-Control PRO AVR32Bit Mainboard. For circuit
design and the comfortable replica the circuit board is printed with a coordinate system. The board
can directly be mounted under or next to the Mainboard. PCB spacers are needed for "sandwich"
mounting with a minimum of 20mm length and a thread diameter of 3mm.
Connection and Commissioning
Make sure that before you connect the modules to your C-Control PRO AVR32Bit Mainboard all
connections to connected devices are separated and voltage free. On the C-Control PRO AVR32Bit
Mainboard there are two 26-pin header connectors, labeled PORT-1 and PORT-2. This pin header
connectors are suitable for connecting the Port-Extension-Board. On this pins the free ports of CControl PRO UNIT AVR32Bit are lead through (see Port-Extension-Board Overview):
Available pins at pin header connector PORT-1:
P5, P6, P7, P8, P9 , P10, P11, P12, P13, P14, P15, P16, P17, P18, P19, P20, P21, P22, P23,
P24, P25, P26, P27, P28, +3.3V, GND
Available pins at pin header connector PORT-2:
P29, P30, P31, P32, P33, P36, P37, P38, P39, P41, P42, P43, P44, P45, P46, P47, P48, P49,
P50, P53, P54, P55, P56, P57, +3.3V, GND
The Port-Extension-Board is connected to the Mainboard via two ribbon cable with pin header connectors (female). Since the cable length may vary according to the application, we offer these components for self-assembly using the following order numbers:
Ribbon cable 26-pin RM1.27 0.05mm²:
Pin header connectors 2x13 RM:2.54mm:
Order No. 607222
Order No. 742185
Tip: The pin header connectors can be easily pressed together with a small vise. Cut the cable
to proper length and straight it in the plug (guide grooves in the plug), and then clamp between the
two vise jaws, and turn it carefully until the connector clicks into place.
© 2013 Conrad Electronic
109
C-Control Pro IDE
Port-Extension-Board Overview
© 2013 Conrad Electronic
Hardware
CAD
Technical Data:
dimensions
110mm x 90mm x 13mm (LxWxH)
pin header pitch
2.54mm
breadboard pitch
2.54mm
breadboard size
25x40 pins
weight
35g
© 2013 Conrad Electronic
110
111
2.2.9
C-Control Pro IDE
REL4-Board
The C-Control PRO AVR32Bit REL4 Board (Conrad Order No. 192631) is designed to expand the
functionality of the C-Control PRO AVR32Bit products. The product is configured as open circuit
board. The board is equipped with 4 relays for switching loads, and is intended only for C-Control
PRO products.
Connection and Commissioning
Make sure that before you connect the modules to your C-Control PRO AVR32Bit Applicationboard
or Mainboard, all connections to connected devices are separated and voltage free. On the C-Control
PRO systems there is a 6-pin header connector labeled UNIT-BUS. This pin header connector is
suitable for connecting the REL4 boards. At these pins, I2C, UART and +5 V are lead through. The
REL4 board has an I2C-BUS port expander, which is responsible for controlling the relay. Through
the I2C bus control no additional I/O pins of the UNIT are required.
UNIT-BUS Pin Configuration
The REL4-Board is connected via a 6-pin ribbon cable to the pin header connector (UNIT-BUS) and a
screw terminal labeled "VREL". Since the cable length to the UNIT BUS may vary according to the
application, we offer these components for self-assembly using the following order numbers:
Ribbon cable RM1.27 0.05mm²:
Pin header connectors 2x3 RM:2.54mm:
Matching connection cable pre-assembled (length 35cm)
Order No. 607237
Order No. 742063
Order No. 198876
Tip: The pin header connectors can be easily pressed together with a small vise. Cut the cable
to proper length and straight it in the plug (guide grooves in the plug), and then clamp between the
two vise jaws, and turn it carefully until the connector clicks into place.
The REL4-Board-Board has two UNIT-BUS connections that are mutually connected 1:1. Thus, e.g.,
one of the connectors can be plugged to the Applicationboard or Mainboard, and the second port
can be used as a junction that connects to another UNIT-BUS module. The cable length must not
© 2013 Conrad Electronic
Hardware
112
exceed 2m, since this will cause communication errors. However, when longer lines are needed, it is
helpful to put an I2C power driver (Order No. 198280) in-between.
The RELBUS-Board is supplied by the screw clamp "VREL" with power. The UNIT-BUS is used in
this module only as a communication interface, and for the supply of the digital electronic part of the
circuit. The relays are powered externally via "VREL"!
REL4-Board overview
Addressing:
The I2C address jumpers J1 to J3 are located on the front of the REL4-Board. When using several
modules and depending on the desired address the jumper must be set as follows:
J3
x
© 2013 Conrad Electronic
J2
x
x
-
J1
x
x
-
Address
Hex 27
Hex 26
Hex 25
Hex 24
Hex 23
113
C-Control Pro IDE
x
x
x
x=Jumper set / - = not set
x
x
x
x
Hex 22
Hex 21
Hex 20
Attention: Other I2C bus modules use the same I2C expander chips (PCA8574). Therefore the
maximum number of modules with this IC is limited to 8!
CAD
Info: The REL4-Board can be mounted on a DIN rail by Phoenix Contact DIN rail carrier of the
series "UMK".
Technical Data
dimensions
76mm x 72mm x 18mm (LxWxH)
pin header pitch
2.54mm
relay
NC/NO, max. 24V/7A
© 2013 Conrad Electronic
Hardware
operating voltage
12V
current consumption
120mA
weight
70g
© 2013 Conrad Electronic
114
115
2.2.9.1
C-Control Pro IDE
Connection Diagram
© 2013 Conrad Electronic
Hardware
116
2.2.10 RELBUS-Board
The C-Control PRO AVR32Bit RELBUS-Board (Conrad Order No. 192645) is designed to expand the
functionality of the C-Control PRO AVR32Bit products. The product is configured as open circuit
board. It is equipped with 8 open source switching stages (high-side switch) to switch 8 consumers
with small loads such as relay and intended only for the C-Control PRO UNIT-BUS.
Connection and Commissioning
Make sure that before you connect the modules to your C-Control PRO as AVR32Bit Applicationboard or Mainboard, all connections to connected devices are separated and voltage free. On C-Control PRO systems there is a 6-pin header connector labeled UNIT-BUS. This pin header connector is
suitable for connecting the RELBUS-Boards. At these pins, I2C, UART and +5V are lead through.
The RELBUS-Board has an I2C bus port expander for driving the load (e.g. relay) is responsible.
Through the I2C bus control no additional I/O pins of the UNIT are required.
UNIT-BUS Pin Configuration
The RELBUS-Board is connected via a 6-pin ribbon cable to the pin header connector (UNIT-BUS).
Since the cable length to the UNIT BUS may vary according to the application, we offer these components for self-assembly using the following order numbers:
Ribbon cable RM1.27 0.05mm²:
Pin header connectors 2x3 RM:2.54mm:
Matching connection cable pre-assembled (length 35cm)
Order No. 607237
Order No. 742063
Order No. 198876
Tip: The pin header connectors can be easily pressed together with a small vise. Cut the cable
to proper length and straight it in the plug (guide grooves in the plug), and then clamp between the
two vise jaws, and turn it carefully until the connector clicks into place.
© 2013 Conrad Electronic
117
C-Control Pro IDE
RELBUS-Board overview
The RELBUS-Board has two UNIT-BUS connections that are mutually connected 1:1. Thus, e.g.,
one of the connectors can be plugged to the Applicationboard or Mainboard, and the second port
can be used as a junction that connects to another UNIT-BUS module. The cable length must not
exceed 2m, since this will cause communication errors. However, when longer lines are needed, it is
helpful to put an I2C power driver (Order No. 198280) in-between.
The RELBUS-Board is powered by the UNIT-BUS with power. The consumer power supply is made
at the screw clamps labeled "+" and "-" . The UNIT-BUS is used in this module only as a communication interface, and for the supply of the digital electronic part of the circuit. Consumers are powered
externally via the ports "+" and "-"!
© 2013 Conrad Electronic
Hardware
118
Beispiel Verbraucheranschluss an Ausgang Q1
Attention: Other I2C bus modules use the same I2C expander chips (PCA8574). Therefore the
maximum number of modules with this IC is limited to 8!
Addressing:
The I2C address jumpers J1 to J3 are located on the front of the RELBUS-Board. When using several modules and depending on the desired address the jumper must be set as follows:
J3
x
x
x
© 2013 Conrad Electronic
J2
x
x
x
J1
x
x
x
-
Address
Hex 27
Hex 26
Hex 25
Hex 24
Hex 23
Hex 22
Hex 21
119
C-Control Pro IDE
x
x
x=Jumper set / - = not set
x
Hex 20
CAD
Info: The RELBUS-Board can be mounted on a DIN rail by Phoenix Contact DIN rail carrier of
the series "UMK".
Attention: The outputs are not short-circuit proof and can be destroyed in a short to ground!
Technical Data
dimensions
42mm x 72mm x 22mm (LxWxH)
pin header pitch
2.54 mm
output implementation
open-source (high-side switch)
output load
max. per output 200mA (5V to 12V DC)
operating voltage
5V via UNIT-BUS
current consumption
20mA
weight
30g
© 2013 Conrad Electronic
Hardware
2.2.10.1
Connection Diagram
© 2013 Conrad Electronic
120
121
C-Control Pro IDE
2.2.11 UNIT-BUS Ext-Board
The C-Control PRO AVR32Bit UNIT BUS Ext board (Conrad Order No. 192673) is designed to expand the functionality of the C-Control PRO AVR32Bit products. The product is designed as an open
breadboard experimental circuit board with a pitch of 2.54mm. It is equipped with two 6-pin header
connectors and is intended only for the C-Control UNIT-BUS. The board serves to build your own circuits. For circuit design and the comfortable replica the circuit board is printed with a coordinate
system. The board can directly be mounted under or next to the Mainboard. PCB spacers are
needed for "sandwich" mounting with a minimum of 20mm length and a thread diameter of 3mm.
Connection and Commissioning
Make sure that before you connect the modules to your C-Control Pro AVR32Bit Mainboard all connections to connected devices are separated and voltage free. On the C-Control PRO AVR32Bit Applicationboard and Mainboard, a 6-pin header connector is labeled UNIT-BUS. This header connector
is suitable for connecting the UNIT-BUS Extension boards. On these pins, I2C, UART and 5V are
passed out. The C-Control PRO AVR32Bit Unit works with 3.3V level, and extensions, as well as the
older C-Control I2C-bus modules, use 5V. Therefore, between the C-Control PRO AVR32Bit UNIT
and the UNIT-BUS are level converters that converts the 3.3V signals of the UNIT to 5V signals of the
UNIT-BUS.
UNIT-BUS Pin Configuration
The UNIT-BUS Extension board gets connected via a 6-pin ribbon cable with pin header connector
(female). Because depending on the application, the cable lengths are varying, we offer these components for self-assembly using the following order numbers:
Ribbon cable RM1.27 0.05mm²:
Order No. 607237
Pin header connectors 2x3 RM:2.54mm:
Order No. 742063
Matching connection cable pre-assembled (length 35cm)
Order No. 198876
To get a clean signal for long cable lengths and high transmission capacity use the I2C line driver
(Order No. 198280)
© 2013 Conrad Electronic
Hardware
122
Tip: The pin header connectors can be easily pressed together with a small vise. Cut the cable
to proper length and straight it in the plug (guide grooves in the plug), and then clamp between the
two vise jaws, and turn it carefully until the connector clicks into place.
PCB Overview
© 2013 Conrad Electronic
123
C-Control Pro IDE
CAD
Technical Data:
dimensions
110mm x 90mm x 13mm (LxWxH)
pin header pitch
2.54mm
hole grid pitch (PCB)
2.54mm
dimensions hole grid
30x30 pins
weight
30g
© 2013 Conrad Electronic
Hardware
124
2.2.12 USB-Board
The C-Control PRO AVR32Bit USB-Board (Conrad Order No. 192688) is designed to expand the
functionality of the C-Control PRO AVR32Bit products. The product is configured as open circuit
board. It is equipped with a USB Type-B connector and a 3-pin header connector (pitch: 2.54mm) for
connection to a 3.3V UART interface of the C-Control PRO AVR32Bit.
Connection and Commissioning
Make sure that before you connect the modules to your C-Control PRO system all connections to
connected devices are separated and voltage free. The C-Control PRO AVR32Bit UNIT has several
UART interfaces (see manual) that can be connected to the USB board. On the boards, e.g. Applicationboard or Mainboard, are the UART interfaces accessible through contacts at which the board
can be connected. The USB board acts as an interface between the UNIT UART interface and a PC
USB port to share data.
Under the following link you can download the driver for the product: http://www.silabs.com
PCB Overview
© 2013 Conrad Electronic
125
C-Control Pro IDE
CAD
Technical Data:
dimensions
23mm x 25mm x 12mm (LxWxH)
UART pin pitch
2.54mm
USB
Type-B
operating voltage
powered by USB port
UART level
3.3V RxD/TxD
weight
5g
© 2013 Conrad Electronic
Hardware
2.2.12.1
Connection Diagram
© 2013 Conrad Electronic
126
127
2.3
C-Control Pro IDE
LCD Matrix
The complete datasheets are on the CD-ROM in the directory "Datasheets".
CHARACTER MODULE FONT TABLE (Standard font)
Character modules with built in controllers and Character Generator (CG) ROM & RAM will display 96 ASCII and special characters in a dot matrix format. Then first 16 locations are occupied by the character generator RAM. These
locations can be loaded with the user designed symbols and then displayed along with the characters stored in the CG
ROM.
CHARACTER FONT TABLE
LOWER
4 BITS
UPPER
4 BITS
0000
0000
CG RAM
(1)
0001
(2)
0010
(3)
0011
(4)
0100
(5)
0101
(6)
0110
(7)
0111
(8)
1000
(1)
1001
(2)
1010
(3)
1011
(4)
1100
(5)
1101
(6)
1110
(7)
1111
(8)
0010
0011
0100 0101 0110 0111 1010 1011 1100 1101 1110 1111
Page 47
© 2013 Conrad Electronic
Part
3
129
3
C-Control Pro IDE
IDE
The C-Control Pro User Interface (IDE) consists of the following main elements:
Sidebar for Project Files
Editor Window
Compiler Messages
C-Control Outputs
Variables Window
Here several files can be filed to form a project
In order to edit files as many editor windows as necessary can be
opened.
Here error messages and general compiler informations are displayed
Distribution of the CompactC program’s debug messages
Here monitored variables are displayed
© 2013 Conrad Electronic
IDE
3.1
130
Projects
Every program for the C-Control Pro Module is configured through a project. The project states which
source files and libraries are being utilized. Also the settings of the Compiler are noted. A project
consists of the project file with the extension ".cprj" and the appropriate source files.
3.1.1
Create Projects
In the menu Project the dialog box Create Project can be opened by use of item New. Here a project
name is issued for the project. Then the project is created in the sidebar.
It is not necessary to decide in advance whether a CompactC or a BASIC project will be created.
In a project CompactC or BASIC files can be arranged combined as project files in order to create a
program. The source text files in a project will determine which programming language will be used.
Files with the extension “*.cc“ will run in a CompactC context while files with the extension “*.cbas“
are translated into BASIC.
3.1.2
Compile Projects
© 2013 Conrad Electronic
131
C-Control Pro IDE
In menu Project the current project can be translated by the Compiler by use of Compile (F9). The
Compiler messages are displayed in a separate window section. If errors arise during compilation
then one error will be described per line. The form is:
File Name(Line,Column): Error Description
The error positions can be found in the source text by use of commands Next Error (F11) or Previous
Error (Shift-F11). Both commands are found in menu item Project. Alternative the cursor can in the
Editor be placed onto the error position by use of a double mouse click on the Compiler’s error message.
After successful compilation the Byte Code will be filed in the project list as file with the extension
"*.bc".
By a right mouse click in the area of the compiler messages the following actions can be initiated:
delete – will delete the list of compiler messages
copy to clipboard – will copy all text messages onto the clipboard
3.1.3
Project Management
A right mouse click on the newly created project in the sidebar will open a pop-up menu with the following options:
Newly Add – A new file will be set up and simultaneously an editor window will be opened.
Add – An existing file will be attached to the project.
Rename – The name of the project will be changed (This is not necessarily the name of the project
file).
Compile – The compiler for the project is started.
Options – The project options can be changed.
Adding of Project Files
When clicking Add project file the file Open Dialog will appear. Here the files to be added to the project can be selected. Any number of files can be selected.
Alternative by use of Drag&Drop files from the Windows Explorer can be transferred into the project
management.
© 2013 Conrad Electronic
IDE
132
Project Files
When files have been added to the project these can be opened by a double mouse click onto the
file name. By use of a right click further options will appear:
Up – The project file will move up the list (also with Ctrl - Arrow up).
Down – The project file will move down (also with Ctrl - Arrow down).
Rename – The name of the project file will be changed.
Delete – The file will be deleted from the project.
Options – The project options can be changed.
© 2013 Conrad Electronic
133
3.1.4
C-Control Pro IDE
Project Options
For each project the compiler settings can be changed separately.
The items Author, Version, Commentary can be freely inscribed. They serve as memory support in
order to better remember the project details at a later date.
In "CPU" the target platform of the project is determined.
Configure Libraries calls the Library Management.
Options
Option
Meaning
© 2013 Conrad Electronic
IDE
134
Create Debug Code
Creates Debug Code. If Debug Code is compiled the Byte Code becomes insignificantly longer. For each line in the source text which
contains executable commands the Byte Code will be one Byte
longer.
Create Map File
Generates a map file that shows the address and length of variables.
Check Array Index Limits
Code will be inserted code that checks the index of array accesses. Use only for testing, since the runtime is increased.
Peephole Optimizer
Optimizes special code sequences. Turn always on.
Recognize Unused Code
Unused code will be optimized away. Turn always on.
Warning type of Argument The type of a variable was converted in a function call.
changed in Call
Warning Parameter is of type The type of a pointer variable (array) is of a different type than exPointer
pected by the called function.
Warning Array Variable too The string does not fit fully in the assigned array variable.
small for String
Warning type of return Para- The return value is of a different type than expected in the expresmeter changed
sion.
Warning Floating Point type The floating point value is converted during initialization to another
changed in Initialization
type.
3.1.5
Library Management
In the Library Management the source text libraries can be chosen that will be compiled in addition
to the project files.
© 2013 Conrad Electronic
135
C-Control Pro IDE
Only those files will be used for compilation whose CheckBox has been selected.
The list can be altered by use of the path text input field "Library Name" and the buttons in the dialog:
Add – The path will be added to the list.
Replace – The selected entry in the list is replaced by the path name.
Delete – The selected list entry is deleted.
Update Library – Files present in the Compiler Presetting but not in this list will be added.
3.1.6
Thread Options
Since version 2.12 of the IDE the thread configuration is no longer made in the project options.
Please see the new syntax in Threads.
© 2013 Conrad Electronic
IDE
3.1.7
136
Todo Liste
On the Project menu a simple todo list can be called. The content is stored together with the project.
3.2
Editor
Several windows can be opened in the C-Control Pro Interface. Each window can be altered in size
and displayed text detail. A double mouse click on the title line will maximize the window.
© 2013 Conrad Electronic
137
C-Control Pro IDE
A mouse click in the area to the left of the text will there set a Breakpoint. Prior to this the source
text must be compiled error free with "Debug Info" and in the corresponding line really executable
program text must be placed (i. e. no commentary line o. e.).
Functions Overview
On the left side is an overview of all syntactically correct defined functions. The function names with
parameters are expressed in this view. The function where the cursor in this moment resides is
drawn with a grey bar in the background. After a double click on the function name the cursor jumps
to the beginning of that function in the editor.
© 2013 Conrad Electronic
IDE
138
Code Folding
To maintain a good overview over the source code, the code can be folded. After the syntactical analyzer, that is built into the editor, recognizes a defined function, beams are drawn on the left side
along the range of the function. A click on the minus sign in the small box folds the text, so that only
the first line of the function can be seen. Another click on the small plus sign, and the code unfolds
again.
To fold or unfold all functions in an editor file, the options Full Collapse and Full Expand are selectable in the right click editor pull-up menu.
Syntactical Input Help
The editor now has a syntactical input help. When the beginning of a reserved word or a function
name from the standard library is typed into the editor, the input help can be activated with CtrlSpace. In dependency from the already entered characters, a popup select box opens, that shows
the words that can be inserted into the source code.
© 2013 Conrad Electronic
139
C-Control Pro IDE
Parameter Input Help
Nach einer erfolgreichen Kompilierung werden auch die Parameter einer Function analysiert. Tippt
man einen bekannten Funktionsnamen und Klammer auf "(", so wird in gelb die erwarteten Typen
der Funktionsparameter angezeigt.
After a successful compilation, the parameters of all function are analyzed. If you tap a known function name and a parenthesis "(", the expected types of the function parameters displayed in yellow.
3.2.1
Editor Functions
Under menu item Edit the most important editor functions can be found:
Undo (Ctrl-Z) – will execute an Undo operation. The possible number of Undo steps depends on
the settings in Undo Groups.
Restore (Ctrl-Y) – will restore the editor condition that has been changed by previous use of the
Undo command.
Cut (Ctrl-X) – will cut out selected text and will copy it to the clipboard.
Copy (Ctrl-C) – will copy selected text to the clipboard.
Insert (Ctrl-V) – will copy the contents of the clipboard to the cursor position.
Select All (Ctrl-A) – will select the entire text.
Search (Ctrl-F) – will open the Search dialog.
Continue Search (F3) – will continue the search using the set search criteria.
Replace (Ctrl-R) – will open the Replace dialog.
Go To (Alt-G) – will allow to jump to a definite line.
© 2013 Conrad Electronic
IDE
140
Search/Restore Dialog
Text to find – Input field for the text to be searched for.
Replace with – Text that will replace the text found.
Case Sensitive – makes the distinction between upper and lower case writing.
Whole words only – will find only whole words rather than part character chains.
Regular expressions – activates the input of Regular Expressions in the search mask.
Prompt on replace – prior to replacing the user will be asked for approval.
Next, the search direction (Forward, Backward) can be predetermined, if the entire text (Global) or
only a selected area (Selected text) is searched. Also sets whether the search starts at the cursor
(From cursor) or the beginning of the text (Entire scope).
Project Search
In project search, a text is searched in more than one file.
All project files - Searches the text in all stored project files, even if they are not open in the editor.
All open files - Scans all files open in the editor. It will, however, not consider unsaved changes.
3.2.2
Print Preview
To deliver the source code as Hard Copy or for archiving purposes, the C-Control Pro IDE has built in
printer functions. The following options can be selected from the File Pull-Down Menu:
© 2013 Conrad Electronic
141
C-Control Pro IDE
Print:
Print Preview:
Printer Setup:
Page Setup:
3.2.3
Prints the indicated pages
Shows a print preview
Choose the printer, paper size and orientation
Header and Footer lines, line numbers and other parameters can be selected
Keyboard Shortcuts
Taste
Left
Right
Up
Down
Ctrl + Left
Ctrl + Right
PgUp
PgDn
Ctrl + PgUp
Ctrl + PgDn
Ctrl + Home
Ctrl + End
Home
End
Shift + Left
Function
Move cursor left one char
Move cursor right one char
Move cursor up one line
Move cursor down one line
Move cursor left one word
Move cursor right one word
Move cursor up one page
Move cursor down one page
Move cursor to top of page
Move cursor to bottom of page
Move cursor to absolute beginning
Move cursor to absolute end
Move cursor to first char of line
Move cursor to last char of line
Move cursor and select left one char
© 2013 Conrad Electronic
IDE
Shift + Right
Shift + Up
Shift + Down
Shift + Ctrl + Left
Shift + Ctrl + Right
Shift + PgUp
Shift + PgDn
Shift + Ctrl + PgUp
Shift + Ctrl + PgDn
Shift + Ctrl + Home
Shift + Ctrl + End
Shift + Home
Shift + End
Alt + Shift + Left
Alt + Shift + Right
Alt + Shift + Up
Alt + Shift + Down
Alt + Shift + Ctrl + Left
Alt + Shift + Ctrl + Right
Alt + Shift + PgUp
Alt + Shift + PgDn
Alt + Shift + Ctrl + PgUp
Alt + Shift + Ctrl + Alt + PgDn
Alt + Shift + Ctrl + Home
Alt + Shift + Ctrl + End
Alt + Shift + Home
Alt + Shift + End
Ctrl + C; Ctrl + Ins
Ctrl + X
Ctrl + V; Shift + Ins
Ctrl + Z; Alt + Backspace
Shift +Ctrl + Z
Ctrl + A
Ctrl + Del
Ctrl + Up
Ctrl + Down
Backspace
Del
Ctrl + T
Ctrl + Backspace
Ctrl + B
Ctrl + E
Ctrl + Y
Enter
Ctrl + N
Tab
Tab (block selected)
Shift + Tab
Ctrl + K + N
Ctrl + K + O
Ins
Ctrl + O + K
Ctrl + O + C
© 2013 Conrad Electronic
142
Move cursor and select right one char
Move cursor and select up one line
Move cursor and select down one line
Move cursor and select left one word
Move cursor and select right one word
Move cursor and select up one page
Move cursor and select down one page
Move cursor and select to top of page
Move cursor and select to bottom of page
Move cursor and select to absolute beginning
Move cursor and select to absolute end
Move cursor and select to first char of line
Move cursor and select left and up at line start
Move cursor and column select left one char
Move cursor and column select right one char
Move cursor and column select up one line
Move cursor and column select down one line
Move cursor and column select left one word
Move cursor and column select right one word
Move cursor and column select up one page
Move cursor and column select down one page
Move cursor and column select to top of page
Move cursor and column select to bottom of page
Move cursor and column select to absolute beginning
Move cursor and column select to absolute end
Move cursor and column select to first char of line
Move cursor and column select to last char of line
Copy selection to clipboard
Cut selection to clipboard
Paste clipboard to current position
Perform undo if available
Perform redo if available
Select entire contents of editor
Clear current selection
Scroll up one line leaving cursor position unchanged
Scroll down one line leaving cursor position unchanged
Delete last char
Delete char at cursor
Delete from cursor to next word
Delete from cursor to start of word
Delete from cursor to beginning of line
Delete from cursor to end of line
Delete current line
Break line at current position, move caret to new line
Break line at current position, leave caret
Tab key
Indent selection
Unindent selection
Upper case to current selection or current char
Lower case to current selection or current char
Toggle insert/overwrite mode
Normal selection mode
Column selection mode
143
C-Control Pro IDE
Ctrl + K + B
Ctrl + K + K
Esc
Ctrl + digit (0-9)
Shift + Ctrl + (0-9)
Ctrl + Space
3.2.4
Marks the beginning of a block
Marks the end of a block
Reset selection
Go to Bookmark digit (0-9)
Set Bookmark digit (0-9)
Auto completion popup
Regular Expressions
The search function in the editor supports Regular Expressions. With this function character chains
can highly flexible be searched for and replaced.
^
$
.
*
+
[]
[^]
[-]
{}
\
A Circumflex at the beginning of the word finds the word at the beginning of a
line
A Dollar Sign represents the end of a line
A Dot symbolizes an arbitrary character
A Star stands for the repeated appearance of a pattern. The number of repetitions may also be Zero
A Plus stands for the multiple or at least solitary appearance of a pattern
Characters in square brackets represent the appearance of one of the characters
A Circumflex in square brackets negates the selection
A Minus in square brackets symbolizes a character range
Tailed braces will group separate expressions. Up to ten levels may be nested
A Back Slash will take the special meaning from the following character
Examples
Example
will find
^void
;$
^void$
vo.*d
vo.+d
[qs]
[qs]port
[^qs]
[a-g]
{tg}+
\$
the word "void" only at the beginning of a line
the Semicolon only at the end of a line
Only "void" may stand in this line
e. g. "vod","void","vqqd"
e. g. "void","vqqd" but not "vod"
the letters 'q' or 's'
"qport" or "sport"
all letters other than 'q' or 's'
all letters from 'a' through 'g' (including)
e. g. "tg", "tgtg", "tgtgtg" asf.
'$'
© 2013 Conrad Electronic
IDE
3.3
144
C-Control Hardware
Under menu item C-Control all hardware relevant functions can be executed. These include transfer
and start of the program on the hardware as well as password functions.
3.3.1
Interface Selection
In the toolbar the COM interface that addresses the C-Control Pro module can be directly selected in
a drop-down menu.
In this list all interfaces are labeled COM, regardless of whether it really is a serial port or a USBconnected virtual comport.
The menu entry Search Unit searches for connected C-Control Pro modules. The function Refresh
COM looks for changes of the connected COM interfaces. If for example a USB cable is connected,
and a new COM port is available.
A click on the plug icon turns the COM port off (red cross), another click on again.
The green "LED" display indicates that the COM Port is open. If the indicator is red, the COM Port is
closed.
An open COM Port (green) does not necessarily mean that a C-Control is connected, it could
be another device e.g. a USB-serial converter. Only a Search Unit checks whether there is a connected C-Control module,
© 2013 Conrad Electronic
145
3.3.2
C-Control Pro IDE
Start Program
Program Transfer
After a project has been translated free of errors the Bytecode must first be transferred onto the CControl Pro module before it can be executed. This is done by use of the command Transfer (ShiftF9) in menu C-Control.
After an update of the IDE, if necessary, not just the bytecode is transferred to the module, but
also the latest version of the interpreter is sent to the C-Control module.
Program Transfer without source
If you want to transfer a program from which you have only the bytecode (.bc) and no source code,
then you can load the bytecode to the C-Control Pro Module by pressing Transfer File.
Start
By Start (F10) the execution of the Bytecode is started. On the Mega Applicationboard this is
signaled by turning on the red LED.
Stop
During normal operation a program will be stopped by pressing RESET1 (Mega) or the start/stop button (AVR32Bit). For performance reasons the program execution on the Module is during normal operation not being stopped by use of software. This can however be performed with the IDE function
Stop Program when the program runs in Debug Mode.
In rare cases the system can get jammed during USB operation (only C-Control Pro Mega Applicationboard) when the RESET1 button is pressed. To overcome this please also press RESET2 in
order to issue a Reset pulse to the Mega8, too. The Mega8 is on the Application Board responsible
for the USB interface.
Auto Start
If the module is installed in a hardware application, it is often wanted that the user program is started
automatically. See Autostart (Mega) and Autostart (AVR32Bit).
3.3.3
C-Control Configuration
The function C-Control Configuration allows to change the hardware settings of the C-Control Pro
AVR32Bit. Here you cannot control settings of the C-Control Pro Mega modules.
© 2013 Conrad Electronic
IDE
146
You can enter the current network settings, the UDP port of the bootloader and the MAC address.
To avoid connection problems, the MAC address should be set to a new value before switching
on the Ethernet support. To this end, its own MAC address is generated and supplied on a label for
each C-Control Pro AVR32Bit. See Software Installation.
Options
Ethernet Support - Switches on Ethernet support.
Allow Ping - ICMP echo requests are answered.
Lock Options Access - The C-Control configuration cannot be changed. Only Reset Module only allows this again.
Disable Autostart - Autostart is not performed (see Autostart).
Enable DHCP - Gets network information from a DHCP server.
save DHCP settings ?
- Changed DHCP data is stored.
Prohibit external Program Stop - A program cannot stopped by software.
2 sec. Autostart Delay - Autostart is delayed by 2 seconds so that USB is powered up.
3.3.4
Search Ethernet
If Ethernet Support is enabled, the C-Control Pro AVR32Bit module is visible on the local Ethernet
LAN. As the search is performed via UDP broadcast, it is limited to the local subnet, since routers
generally do not forward broadcasts. The default UDP port for the Ethernet access is 50234. This
port should not be restricted by a local firewall on the PC.
© 2013 Conrad Electronic
147
C-Control Pro IDE
Currently, the Ethernet support is limited to program update.
3.3.5
Outputs
For display of Debug messages there is an "Outputs" window section.
Here is shown when the Bytecode Interpreter has been started and terminated and for how long (in
milliseconds) the Interpreter was in operation. The operation time however is not very useful if the Interpreter has been stopped during Debug Mode.
The Outputs window can also be used to display the user’s own Debug messages. For this there are
© 2013 Conrad Electronic
IDE
148
several Debug Functions.
With a right mouse click in the Debug Outputs section the following commands can be selected:
Delete – will delete the list of Debug outputs
Copy to Clipboard – will copy all text messages onto the clipboard
3.3.6
PIN Functions
Some solitary functions of the Interpreter can be protected by use of an alpha-numeric PIN. If an Interpreter is protected by a PIN normal operations are prohibited. By means of a new transfer the Interpreter can be overwritten, the PIN will however stay preserved. Also a normal start other than the
Autostart behaviour is no longer allowed. Furthermore the scans of hardware and firmware version
numbers are locked.
If access to a forbidden function is tried a dialod with the following text will be displayed: "C-Control
is Password protected. Operation not allowed!".
Through inscription of the PIN with Enter PIN in the C-Control Menu all operations can again be released.
In order to enter a new PIN or to delete a set PIN there are the commands Set PIN and Delete PIN in
the C-Control Menu. If there is an old PIN in exitence then the Module must of course first be unlocked by entering the old PIN. The PIN can have a length of up to 6 alpha-numeric characters.
In case the password has been lost there is an emergency function which can be used to reset
the Module to its initial state. In C-Control there is the option Reset Module which can be used to delete PIN, Interpreter and Program.
3.3.7
Version Check
Since the C-Control Pro Mega Series supports various hardware platforms it is important to closely
monitor the current version numbers of Bootloader, Interpreter and Hardware. This is possible by use
of item Hardware Version in the C-Control menu.
© 2013 Conrad Electronic
149
3.4
C-Control Pro IDE
Debugger
In order to activate the Debugger the project must first be compiled in Debug Code free of errors and
then transferred to the Module. The file holding the Debug Code (*.dbg) must be present in the project list.
In the Debugger menu all Debugger commands can be found. The Debugger ist started with Debug
Mode (Shift-F10). If at this point of time no Breakpoint is set then the Debugger will stop at the first
executable instruction.
If in Debug Mode, the next Breakpoint will be reached by use of Start (F10). If no Breakpoint is set
then the program will be executed in its normal way. There is the exception however that the program flow can be stopped by use of Stop Program. This only works providing that the program has
been started from the Debug Mode.
If the Debugger has stopped in the program (a blue bar is displayed) then the program can be executed in single steps. The instructions Single Step (Shift-F8) and Procedure Step (F8) respectively
will execute the program code up to the next code line and will then stop again. Opposing to Single
Step the function Procedure Step will not jump into the function calls but will overpass them. If the
program has stopped all breakpoints can be changed.
If a loop contains only one code line then one single step will execute the entire loop since only
after this branching out to a new code line will take place.
With the instruction Leave Debug Mode the Debug Mode will be terminated.
During active Debug Mode the program text can not be altered. This is because line numbers
holding set Breakpoints must not be moved out of place. Otherwise the Debugger would not be able
to synchronize with the Bytecode onto the C-Control Module.
© 2013 Conrad Electronic
IDE
3.4.1
150
Breakpoints
The editor allows to set up to 16 Breakpoints. A Breakpoint is entered by a mouse click to the left of
the beginning of a line (see IDE or Editor Window).
The number of Breakpoints is limited to 16 because this information is carried along in RAM during operation of the Bytecode Interpreter. Other Debuggers on the Market will set Breakpoints directly into the program code. In our case this is not desirable since it would drastically reduce the life
time of the flash memory (appr. 10,000 writing accesses).
3.4.2
Variable Watch Window
The contents of variables can be displayed within the Debugger. To do this the mouse pointer is
placed over the variable. Within approximately 2 seconds the content of the variable is displayed in
form of a Tooltip. The variable is first displayed in accordance to its data type and then, separated by
a comma, as Hex number with a preceeding "0x".
If several variables need to be monitored then the variables can be comprised in a list.
© 2013 Conrad Electronic
151
C-Control Pro IDE
In order to enter a variable into the list of monitored variables there are two possibilities. For one the
cursor can be placed in the text editor at the beginning of a variable and then Insert Variable can be
selected by a right mouse click.
The other possibility is by use of the context menu in the variables list which can also be activated
by a right mouse click.
When Insert Variable is selected then the variable to be monitored can as text be entered into the
list. In case of a local variable the function name with a preceeding colon (Function Name : Variable Name) is entered. With Change Variable the text entry in the list can be altered and with Delete Variable the variable can be entirely erased from the list. Prior to this the line holding the variable
to be deleted must be selected. The command Remove All Variables will delete all entries from the
list.
© 2013 Conrad Electronic
IDE
152
Under certain circumstances an error message is shown instead of a value in the list:
no Debug Code
wrong Syntax
Function unknown
Variable unknown
not in Debug Mode
no Context
not actual
No Debug Code has been generated
During text entry invalid characters have been entered for a variable
The Function Name is not known
The Variable Name is not known
The Debug Mode has not been activated
Local variables can only be displayed while within this function
The content of the variable has not been updated
If a high number of variables is entered in the monitor list it may during single step operation take
quite some time until all variable contents from the module have been scanned. For this reason the
Option Auto Actualize can be switched off for individual variables. The contents of these variables will
then only be displayed after the command Actualize Variable is executed. This way the Debugger
can quickly be operated in single steps and the contents are only actualized on demand.
Variables of the Character type are displayed as single ASCII characters.
3.4.3
Array Window
In order to monitor the contents of Array Variables it is possible to call up a window with the array
contents. To do this the pointer is placed over the variable and Show Array is selected by a right
mouse click.
On the left side the Array indices are shown while the contents are displayed on the right side. It
should be noted that with multi-dimensional arrays the indices on the right will gain at the faster
pace.
© 2013 Conrad Electronic
153
C-Control Pro IDE
The contents of an array window may at every stop of the Debugger or at every single step no longer
be actual. If with each single step in the Debugger several array windows are newly brought up-todate then delays may occur since the data must always be loaded from the Module. For this reason
there are three operating modes:
Auto Actualize
Actualize at Breakpoint
Manually Actualize
3.5
Actualize at Single Step and Breakpoint
Actualize only at Breakpoint
Only by clicking switch "Actualize"
Tools
In the Tools menu you can start the simple built-in terminal program, add your own programs and
change the IDE options.
© 2013 Conrad Electronic
IDE
154
Terminal Window
Received characters are directly shown in the terminal window. Characters can be send in two different ways. On the one hand the user can click into the terminal window and directly type the characters from the keyboard, on the other hand the text can be entered in to the ASCII input line and send
with the Send button. Instead of ASCII the characters can be defined as integer values in the Integer
input line. Is send C/R selected, a Carriage Return (13) is sent at the end of the line. Enable Preserve Input to prevent that the input lines are cleared after pressing the Send button. The Parameter
button opens the Terminal settings dialog from the IDE settings.
3.5.1
Syntax Highlighting
In this Dialog the user can change the specific Syntax Highlighting for CompactC and BASIC. The
chosen language for the setting is CompactC or BASIC in dependency on what language is used in
the actual selected editor window.
© 2013 Conrad Electronic
155
C-Control Pro IDE
You can change the attributes of the font, and the foreground- and background color. With Multiline
border a colored border can be drawn around the highlighted strings. Also case changes can be
made with the option Capitalization Effect. The selectable Elements have the following meaning:
Symbol:
Number:
String:
Identifier:
Reserved Word:
Comment:
Preprocessor:
Marked Block:
Library:
all non alpha-numeric characters
all numeric characters
all characters that are recognized as strings
all names that are not reserved words or part of the library
all reserved words of the destination language
comments
preprocessor statements
marked editor blocks
function names of the standard library
© 2013 Conrad Electronic
IDE
156
Default, Line separator and Sub background are not used.
Due to technical limitations, this dialog is always displayed in English!
3.5.2
Editor Settings
Overwrite mode – Inserts text at the cursor overwriting existing text.
Auto indent mode - Positions the cursor under the first non blank character of the preceding non
blank line when you press Enter.
Backspace unindents - Aligns the insertion point to the previous indentation level (outdents it)
when you press Backspace, if the cursor is on the first non blank character of a line.
Group undo - Undo operation will not be performed in small steps but in blocks.
Group redo - If it is set Redo will involve group of changes.
Keep caret in text - Allows move caret only into text like in Memo.
Double click line - Highlights the line when you double-click any character in the line. If disabled,
© 2013 Conrad Electronic
157
C-Control Pro IDE
only the selected word is highlighted.
Fixed line height - Prevents line height calculation. Line height will be calculated by means of Default Style.
Persistent blocks - Keeps marked blocks selected even when the cursor is moved using the arrow
keys, until a new block is selected.
Overwrite blocks - Replaces a marked block of text with whatever is typed next. If Persistent
Blocks is also selected, text you enter is appended following the currently selected block.
Show caret in read only mode - Shows caret in read only mode.
Copy to clipboard as RTF - Copies selected text also in RTF format.
Enable column selection - Enabled column selection mode.
Hide selection - Hides selection when editor loses focus.
Hide dynamic - Hides dynamic highlighting when editor loses focus.
Enable text dragging - Enables drag & drop operation for text movement.
Collapse empty lines - Collapse empty lines after text range when this rang have been collapsed.
Keep trailing blanks - Keeps any blanks you might have at the end of a line.
Float markers - If it is set markers are linked to text, so they will move with text during editing.
Otherwise they are linked to caret position, and stay unchanged during editing. Also markers save
scroll position.
Undo after save - Stay undo buffer unchanged after save with SaveToFile method.
Disable selection - Disables any selection.
Draw current line focus - Draws focus rectangle around current line when editor have focus.
Hide cursor on type - Hides mouse cursor when user type text and mouse cursor within client
area.
Scroll to last line - When it is true you may scroll to last line of text, otherwise you can scroll to
last page. When this option is off and total text height less then client height vertical scroll bar will
be hidden.
Greedy selection - If this option is set selection will contain extra column/line during column/line
selection modes.
Keep selection mode - Selection enabled for caret movement commands (like in BRIEF).
Smart caret - Acts on the caret movement (up, down, line start, line end). Caret is moved to the
nearest position on the screen.
Word wrap - Determines whether the editor wraps text at the right side of text area.
Word break on right margin - Determines whether text wraps (word-wrap mode) on the right margin
instead of right side of client area.
Optimal fill - Begins every auto indented line with the minimum number of characters possible, using tabs and spaces as necessary.
Fixed column move - Keeps X position of caret before editing text, this position is used when moving up/down caret.
Variable horizontal scroll bar - Sets range of horizontal scroll bar to the maximal width of only visible lines. Hides horizontal scroll bar if visible lines fit client width.
Unindent keep align - Restricts unindent operation when at least one of lines can not be unindented.
At Block indent the number of blanks is inscribed by which a selected block can be indented or
backed by use of the Tabulator key.
The input field Tab stops determines the width of the tabulator by numbers of characters.
Due to technical limitations, this dialog is always displayed in English!
© 2013 Conrad Electronic
IDE
3.5.3
158
IDE Settings
Separate aspects of the IDE can be configured.
check for Transfer after Compilation – After a program has been compiled but not transferred to the
C-Control Module then the user will be questioned whether or not the program should be started.
Reopen last Project – The last open project will be re-opened when the C-Control Pro IDE is started.
show Splash only for short time - The Splashscreen is only displayed until the main window
opens.
Allow more than one C-Control instance – When the C-Control Pro interface is started several
times it may create conflicts with regard to the USB interface.
Transfer at Program Start - The program is transferred automatically when the program is started
from the IDE.
RP6 USB Interface AutoConnect - Supports the hardware interface of the RP6 robot.
Also here the lists of the "last opened projects" as well as the "last opened files" can be deleted.
© 2013 Conrad Electronic
159
3.5.3.1
C-Control Pro IDE
Editor
Editor Tabs - Different files are displayed in Editor Tabs.
Multiline Editor Tabs - The Tabs are displayed as multiple-rows.
open editor windows maximized – When a file is opened the editor window will automatically be
switched to maximum size.
spell check comments - The comments within the editor are checked for spelling errors.
automatic correct reserved words - While writing all reserved words and known library functions the
case is corrected.
automatic correction before compile - When the compiler is started the case of all reserved words
and known library functions is corrected.
Files before compilation - Determines the action for changed files when compiling.
The button Spell Checking displays the spell checking configuration dialog.
© 2013 Conrad Electronic
IDE
3.5.3.2
160
Internet Update
In order to check if any improvements or error corrections have been issued by Conrad Electronic the
Internet Update can be activated. When the selection box "Update Check Every n Days" is selected
then an update will be searched for in the Internet at an interval of n days at every start of the IDE.
The parameter n can be set in the input field on the right.
The button "Update Check Now" will immediately activate an update search.
In order to have the Internet update function correctly the MS Internet Explorer must not be in
"Offline" Mode.
If e. g. the Internet access is restricted by a Proxy due to a firewall then the Proxy settings such as
address, user name and password can be entered in this dialog.
If there are Proxy data set in the MS Internet Explorer then they will be of higher priority and will
thus overwrite the settings in this dialog.
© 2013 Conrad Electronic
161
3.5.3.3
C-Control Pro IDE
Compiler Presetting
In the Compiler Presetting the standard values can be configured which will be stored during creation
of a new project. Presetting can be reached under Compiler in the Options menu.
A description of the options can be found under Project Options. The selection box "Configure
Library" is identical to the description in chapter Projects.
3.5.3.4
Terminal
Here you can set the serial parameter for the built in terminal program. For the Port entry an available serial COM Port can be chosen from. Further the standard baudrates, the number of Data Bits
and Stop Bits, and the Flow Control is selectable.
© 2013 Conrad Electronic
IDE
3.5.3.5
162
Tools
In the Tool settings the user can insert, delete and edit entries that defines external programs that
can be executed fast and simple from the IDE. The names of the programs can be found in the Tools
pulldown menu and can be started with a single click
.
© 2013 Conrad Electronic
163
C-Control Pro IDE
For each program that is inserted, the user can choose the name, the execution path and the parameters that are submitted.
3.6
Windows
When there are several windows opened within the editor area they can automatically be arranged
by use of commands in the Window Menu.
Overlap – The windows will be arranged on top of each other with each successive window placed
fractionally lower and more to the right than the preceding one.
Beneath – The windows are placed vertically beneath each other.
Side By Side – Will arrange the windows next to each other from left to right.
Minimize All – Will minimize all windows to symbol size.
Close – Will close all active windows.
© 2013 Conrad Electronic
IDE
3.7
164
Help
Under menu item Help the Help file can be opened by use of Contents (Key F1).
Menu item Program Version will open the window "Version Information" and will at the same time
copy the contents onto the clipboard.
These informations are important if a Support E-Mail needs to be sent to Conrad Electronic. Since
these informations are automatically placed onto the clipboard when Program Version is called up
the data can easily be added to the end of an E-Mail.
If the user needs to find a certain search term in the Help file the Context Help may be of advantage.
If e. g. in the Editor the cursor stands over the word "AbsDelay" and the correct parameters are
searched for then Context Help should be selected. This function will automatically use the word under the cursor for a search term and will consequently show the results in the Help File.
© 2013 Conrad Electronic
165
C-Control Pro IDE
The command Context Help is also available in the editor window after a right mouse click.
© 2013 Conrad Electronic
Part
4
167
C-Control Pro IDE
4
Compiler
4.1
General Features
This domain provides information on the Compiler’s properties and features which are independent of
the programming language used.
4.1.1
Preprocessor
The Gnu Generic Preprocessor used here provides some additional functions which are documented under http://nothingisreal.com/gpp/gpp.html. Only the functions described here however have
also together with the C-Control Pro Compiler been thoroughly tested. Using the here undocumented
functions will thus be at your own risk!
The C-Control development system contains a complete C-Preprozessor. The Preprocessor processes the source text prior to Compiler start. The following commands are supported:
Definitions
By the command "#define" text constants are defined.
#define symbol text constant
Since the Preprocessor runs ahead of the Compiler at each appearance of symbol in the source text
the symbol will be replaced by text constant.
Example
#define PI 3.141
If a project consists of several sources then #define is a constant for all source files existing following the file, in which the constant has been defined. It is thus possible to change the order of
source files in a project.
Conditional Compiling
#ifdef symbol
...
#else // optional
...
#endif
It is possible to monitor which parts of the source texts are really being compiled. After a #ifdef symbol instruction the following text is only compiled when symbol has also been defined by #define
symbol.
© 2013 Conrad Electronic
Compiler
168
If there is an optional #else instruction then the source text will be processed after #else if the symbol has not been defined.
Insertion of Text
#include path\file name
By this instruction a text file can be inserted into the source code.
Because of some restrictions in the Preprocessor a path within a #include instruction must not
contain any blank characters!
4.1.1.1
Predefined Symbols
In order to ease the work with different versions of the C-Control Pro series there are a number of
definitions which are set depending on target system and Compiler project options. These constants
can be called up by #ifdef, #ifndef or #if.
Symbol
MEGA32
MEGA128
MEGA128CAN
AVR32
MEGA128_ARCH
CANBUS_SUPP
DEBUG
MAPFILE
Meaning
Configuration for Mega 32
Configuration for Mega 128
Configuration for Mega 128 CAN Bus
Configuration for AVR 32
Mega 128 or Mega 128 CAN
CAN Bus is supported
Debug Data will be created
A Memory Layout will be computed
The following constants contain a string. It is sensible to use them in conjunction with text outputs.
Symbol
__DATE__
__TIME__
__LINE__
__FILE__
__FUNCTION__
Meaning
Current Date
Time of Compiling
Current Line in Sourcecode
Name of Current Source File
Current Function Name
Example
Line number, file name and function name will be issued. Since file names may become quite long it
is recommended to dimension character arrays somewhat generous.
char txt[60];
© 2013 Conrad Electronic
169
C-Control Pro IDE
txt=__LINE__;
Msg_WriteText(txt);
Msg_WriteChar(13);
txt=__FILE__;
Msg_WriteText(txt);
Msg_WriteChar(13);
txt=__FUNCTION__;
Msg_WriteText(txt);
Msg_WriteChar(13);
4.1.2
// Issue Line Number
// LF
// Issue File Number
// LF
// Issue Function Name
// LF
Pragma Instructions
By use of the #pragma instruction output and flow of the Compiler can be controlled. The following
commands are authorized:
#pragma Error "xyz..."
#pragma Warning "xyz..."
#pragma Message "xyz..."
An error is created and text "xyz..." is issued
A warning is created and text "xyz..." is issued
The text "xyz..." is issued by the Compiler
Example
These #pragma instructions are often used in conjunction with Preprocessor commands and Predefined Constants. A classical example is the creation of an error message in case specific hardware criteria are not met.
#ifdef MEGA128
#pragma Error "Counter Functions not with Timer0 and Mega128"
#endif
4.1.3
Map File
If during compilation a Map File has been generated then the memory size of the used variable can
there be ascertained.
Example
The project CNT0.cprj generates the following Map File during compilation:
Global Variable
Length
Position (RAM Start)
--------------------------------------------------------------Total Length: 0 bytes
Local Variable
Length
Position (Stack relative)
----------------------------------------------------------------Function Pulse()
count
2
4
i
2
0
© 2013 Conrad Electronic
Compiler
170
Total Length: 4 bytes
Function main()
count
n
Total Length: 4 bytes
2
2
2
0
From this list can be seen that no global variables are being used. There are further the two functions
"Pulse()" and "main()". Each one of these functions consumes a memory space of 4 Bytes on local
variables.
4.2
CompactC
One possibility to program the C-Control Pro Mega 32 or Mega 128 is offered by
the programming language CompactC. The Compiler translates the language
CompactC into a Bytecode which is then processed by the Interpreter of the CControl Pro. The language volume of CompactC does essentially correspond with
ANSI-C. It is however reduced to some extent since the firmware had to be implemented in a resource saving way. The following language constructs are missing:
structs / unions
typedef
enum
constants (const instruction)
pointer Arithmetic
Detailed program examples can be found in directory C-Control Pro Demos which was installed
along with the design interface. There example solutions can be found for almost every field of purpose.
The following chapter contains a systematic introduction into syntax and semantics of CompactC.
4.2.1
Program
A program consists of a number of instructions (such as "a=5;") which are distributed among various Functions. The starting function, which must be present in every program, is the function "main
()". The following is a minimalistic program able to print a number into the output window:
void main(void)
{
Msg_WriteInt(42);
}
// the answer to anything
Projects
A program can be separated into several files which are combined in a project (see Project Management). In addition to these project files Libraries can be added to the project which are able to offer
functions used by the program.
© 2013 Conrad Electronic
171
4.2.2
C-Control Pro IDE
Instructions
Instruction
An instruction consists of several reserved command words, identifiers and operators and is at the
end terminated by a semicolon (';'). In order to separate various elements of an instruction there are
spaces in between the instruction elements which are called "Whitespaces". By “spaces“ space
characters, tabulators and line feeds ("C/R and LF") are meant. It is of no consequence whether a
space is built by one or several "Whitespaces".
Simple Instruction:
a=
5;
An instruction does not necessarily have to completely stand in one line. Since line feeds do
also belong to the space category it is legitimate to separate an instruction across several lines.
if(a==5)
a=a+10;
// instruction across 2 lines
Instruction Block
Several instructions can be grouped into a block. Here the block is opened by a left tailed bracket
("{"), followed by the instructions and closed at the end by a right tailed bracket ("}"). A block does
not necessarily have to be terminated by a semicolon. I. e., if a block builds the end of an instruction
then the last character in the instruction will be the right tailed bracket.
if(a>5)
{
a=a+1;
b=a+2;
}
//
instruction block
Comments
There are two types of commentaries, which are the single line and the multi line commentaries. The
text within commentaries is ignored by the Compiler.
Single line commentaries start with "//" and end up at the line’s end.
Multi line commentaries start with "/*" and end up with "*/".
/* a
multi line
commentary */
// a single line commentary
© 2013 Conrad Electronic
Compiler
172
Identifier
Identifier are the names of Functions or Variables .
Valid characters are letters (A-Z,a-z), numbers (0-9) and the low dash ('_')
An identifier always starts with a letter
Upper and lower case writings are differentiated
Reserved Words are not allowed as identifier
The length of identifiers is unlimited
Arithmetic Expressions
An arithmetic expression is a quantity of values connected by Operators. In this case quantities can
either be Figures, Variables and Functions .
A simple example:
2 + 3
Here the numerical values 2 and 3 are connected by the Operator "+". An arithmetic value again represents a value. In this case the value is 5.
Further examples:
a - 3
b + f(5)
2 + 3 * 6
Following the rule "Dot before Line" here 3 times 6 is calculated first and then 2 is added. This priority is in case of operators called precedence. A list of priorities can be found in the Precedence
Table.
Comparisons too are arithmetic expressions. The comparison operators return a truth value of
"1" or "0", depening on whether the comparison was true or not. The expression "3 < 5" yields the
value "1" (true).
Constant Expressions
An expression or portions of an expression can be constant. Portions of an expression can already
be calculated during Compiler runtime.
So e. g. the expression
12 + 123 - 15
is combined by the Compiler to
120.
© 2013 Conrad Electronic
173
C-Control Pro IDE
In some cases expressions must be constant in order to be valid. E. g. also see Declaration of Array Variables .
4.2.3
Data Types
Values always are of a certain data type. Integer values (integral values; whole numbered values) in
CompactC are of the 8, 16 or 32 Bit wide data type, floating point values are always 4 byte long.
Data Type
char
unsigned char
byte
int
unsigned int
word
long (no Mega32)
unsigned long (no
Mega32)
dword (no Mega32)
float
Sign
Range
Bit
Yes
No
No
Yes
No
No
Yes
8
8
8
16
16
16
32
No
-128 ... +127
0 ... 255 8
0 ... 255 8
-32768 ... +32767
0 ... 65535
0 ... 65535
-2147483648 ...
2147483647
0 ... 4294967295
No
Yes
0 ... 4294967295
±1.175e-38 to ±3.402e38
32
32
32
As one can see the data types "unsigned char" and byte, "unsigned int" and
word as well as "unsigned long" and dword are identical.
Due to size restrictions of the interpreter, 32-Bit Integer are not available on
the Mega32.
Strings
There is no explicit "String" data type. A string is based on a character array. The size of the array
must be chosen in such a way that all characters of the string fit into the character array. Additionally some space is needed for a terminating character (decimal Zero) in order to indicate the end of
the character string.
Type Conversion
In arithmetic expressions it is very often the case that individual values are not of the same type. So
the data types of the following expression are combined (a is of type integer variable).
a + 5.5
In this case a is first converted into the data type float and then 5.5 is added. The
data type of the result is also float. For data type conversion there are the following
rules:
If in a linkage of 8 Bit or 16 Bit integer values one of the two data types is sign afflicted ("signed") then the result of the expression is also sign afflicted. I. e. the opera-
© 2013 Conrad Electronic
Compiler
174
tion is executed "signed".
If one of the operands is of the float type then the result is also of the float type. If
one of the two operands happens to be of the 8 Bit or 16 Bit data type then it will be
converted into a float data type prior to the operation.
4.2.4
Variables
Variables can take on various values depending on the Data Type by which they have been defined.
A variable definition appears as follows:
Type Variable Name;
When several variables of the same type need to be defined then these variables can be stated separated by commas:
Typ Name1, Name2, Name3, ...;
As types are allowed: char, unsigned char, byte, int, unsigned int, word, long, dword, float
Examples:
int a;
int i,j;
float xyz;
Integer variables may have decimal figure values or Hex values assigned to. With Hex values the
characters "0x" will be placed ahead of the figure. Binary numbers can be created with the prefix
"0b". With variables of the sign afflicted data type negative decimal figures can be assigned to by
putting a minus sign ahead of the figure.
Numbers without period or exponent are normally of type signed integer. To explicitly define an
unsigned integer write an "u" direct after the number. To declare a number to be 32-Bit, either the
value is greater 65535 or put an "l" after the number. Can be combined with "u" from unsigned.
Examples:
char c;
word a;
int i,j;
c=5;
c='a';
a=0x3ff;
x=0b1001;
a=50000u;
a=100ul;
i=15;
j=-22;
© 2013 Conrad Electronic
//
//
//
//
//
//
//
single quotes defines the ASCII value
hex digits are always unsigned
binary number
unsigned
unsigned 32 Bit (dword)
default is signed
signed
175
C-Control Pro IDE
Floating Point Figures (data type float) may contain a decimal point and an exponent.
float x,y;
x=5.70;
y=2.3e+2;
x=-5.33e-1;
sizeof Operator
By the operator sizeof() the number of Bytes a variable takes up in memory can be determined.
Examples:
int s;
float f:
s=sizeof(f);
// the value of s is 4
With arrays only the Byte length of the basic data type is returned. On order to calculate the
memory consumption of the array the value must be multiplied by the number of elements.
Array Variables
If behind the name, which in case of a variable definition is set in brackets, a figure value is written
then an array has been defined. An array will arrange the space for a defined variable manifold in
memory. With the following example definition
int x[10];
a tenfold memory space has been arranged for variable x. The first memory space can be addressed
by X[0], the second by x[1], the third by x[2], … up to x[9]. When defining of course other index
dimensions can also be chosen. The memory space of C-Control Pro is the only limit.
Multi dimensional arrays can also be declared by attaching further brackets during variable definition:
int x[3][4];
int y[2][2][2];
// array with 3*4 entries
// array with 2*2*2 entries
Arrays may in CompactC have up to 16 indices (dimensions). The maximum value for an index
is 65535. The indices of arrays are in any case zero based, i .e. each index will start with a 0.
Only if the compiler option "Check Array Index Limits" is set, there will be a verification whether
or not the defined index limits of an array have been exceeded. Otherwise, if an index becomes too
large during program execution the access to alien variables will be tried which in turn may create a
good chance for a program breakdown.
Table support by predefined Arrays
Since version 2.0 of the IDE arrays can be predefined with values:
© 2013 Conrad Electronic
Compiler
176
byte glob[10] = {1,2,3,4,5,6,7,8,9,10};
flash byte fglob[2][2]={10,11,12,13};
void main(void)
{
byte loc[5]= {2,3,4,5,6};
byte xloc[2][2];
xloc= fglob;
}
Because there is more flash memory than RAM available, it is possible with the flash keyword to
define data that are written in the flash memory only. These data can be copied to a RAM array with
same dimensions with an assignment operation. In this example this is done through "xloc= fglob".
This kind of assignment is not available in normal "C".
Direct Access to flash Array entries
With version 2.12 it is possible to access single entries in flash arrays:
flash byte glob[10] = {1,2,3,4,5,6,7,8,9,10};
void main(void)
{
int a;
a= glob[2];
}
There is still one limitation: Only references to arrays that lie in RAM can be passed as function
parameters. This is not possible with references to flash arrays.
Strings
There is no explicit "String" data type. A string is based on a character array. The size of the array
must be chosen in such a way that all characters of the string fit into the character array. Additionally some space is needed for a terminating character (decimal Zero) inorder to indicate the end of
the character string.
Example for a character string with a 20 character maximum:
char str1[21];
As an exception char arrays may have character strings assigned to. Here the character string is
placed between quotation marks.
str1="hallo world!";
You may embed special characters in strings that are started with a "\" (backslash). The following
sequences are defined:
© 2013 Conrad Electronic
177
C-Control Pro IDE
Sequence
Char/Value
\\
\'
\a
\b
\t
\n
\v
\f
\r
\
'
7
8
9
10
11
12
13
Strings cannot be assigned to multi dimensional Char arrays. There are however tricks for advanced users:
char str_array[3][40];
char single_str[40];
single_str="A String";
// will copy single_str in the second string of str_array
Str_StrCopy(str_array,single_str,40);
This will work because with a gap of 40 characters after the first string there will in str_array be room
for the second string.
Visibility of Variables
When variables are declared outside of functions then they will have global visibility. I. e. they can be
addressed from every function. Variable declarations within functions produce local variables. Local
variables can only be reached within the function. An example:
int a,b;
void func1(void)
{
int a,x,y;
// global b is accessable
// global a is not accessable since concealed by local a
// local x,y are accessable
// u is not accessable since local to function main
}
void main(void)
{
int u;
// globale a,b are accessable
// local u is accessable
© 2013 Conrad Electronic
Compiler
178
// x,y not accessable since local to function func1
}
Global variables have a defined memory space which is available throughout the entire program run.
At program start the global variables will be initialized by zero. Local Variables get not initialized
at the begin of a function!
Local variables will during calculation of a function be arranged on the stack. I. e. local variables exist in memory only during the time period in which the function is executed.
If with local variables the same name is selected as with a global variable then the local variable will
conceal the global variable. While the program is working in the function where the identically named
variable has been defined the global variable cannot be addressed.
Static Variables
With local variables the property static can be placed for the data type.
void func1(void)
{
static int a;
}
In opposition to normal local variables will static variables still keep their value even if the function is
left. At a further call-up of the function the static variable will have the same contents as when leaving
the function. In order to have the contents of a static variable defined at first access the static variables will equally to global variables at program start also be initialized by zero.
4.2.5
Operators
Priorities of Operators
Operators separate arithmetic expressions into partial expressions. The operators are then evaluated
in the succession of their priorities (precedence). Expressions with operators of identical precedence
will be calculated from left to right.
Example:
i= 2+3*4-5;
// result 9 => first 3*4, then +2, finally -5
The succession of the execution can be influenced by setting of parenthesis. Parenthesis have the
highest priority.
If the last example should strictly be calculated from left to right, then:
i= (2+3)*4-5;
// result 15 => first 2+3, then *4, finally -5
A list of priorities can be found in Precedence Table.
© 2013 Conrad Electronic
179
4.2.5.1
C-Control Pro IDE
Arithmetic Operators
All arithmetic operators with the exception of Modulo are defined for Integer and Floating Point data
types. Modulo is restricted to data type Integer only.
It must be observed that in an expression the figure 7 will have an Integer data type assigned to
it. If a figure of data type float should be explicitly created then a decimal point has to be added: 7.0
Operator
Description
Example
Result
+
Addition
-
Subtraction
*
/
Multiplication
Division
%
Modulo
2+1
3.2 + 4
2-3
22 - 1.1e1
5*4
7/2
7.0 / 2
15 % 4
17 % 2
-(2+2)
3
7.2
-1
11
20
3
3.5
3
1
-4
Description
Example
Result
&
And
|
Or
^
exclusive Or
~
Bit inversion
0x0f & 3
0xf0 & 0x0f
1|3
0xf0 | 0x0f
0xff ^ 0x0f
0xf0 ^ 0x0f
~0xff
~0xf0
3
0
3
0xff
0xf0
0xff
0
0x0f
-
4.2.5.2
Negative Sign
Bit Operators
Bit operators are only allowed for Integer data types
Operator
4.2.5.3
Bit-Shift Operators
Bit-Shift operators are only allowed for Integer data types. With a Bit-Shift operation a 0 will always
be moved into one end.
Operator
Description
<<
shift to left
>>
shift to right
Example
Result
1 << 2
3 << 3
0xff >> 6
4
24
3
© 2013 Conrad Electronic
Compiler
16 >> 2
4.2.5.4
180
4
In- /Decrement Operators
Incremental and decremental operators are only allowed for variables with Integer data types.
Operator
Description
variable++
first variable value, after access variable
gets incremented by one (postincrement)
first variable value, after access variable
gets decremented by one (postdecrement)
value of the variable gets incremented by
one before access (preincrement)
value of the variable gets decremented by
one before access (predecrement)
variable-++variable
--variable
4.2.5.5
Example
Result
a++
a
a--
a
++a
a+1
--a
a-1
Comparison Operators
Comparison operators are allowed for float and Integer data types.
Operator
4.2.5.6
Description
<
smaller
>
greater
<=
smaller or equal
>=
greater or equal
==
equal
!=
not equal
Example
Result
1<2
2<1
2<2
-3 > 2
3>2
2 <= 2
3 <= 2
2 >= 3
3 >= 2
5 == 5
1 == 2
2 != 2
2 != 5
1
0
0
0
1
1
0
0
1
1
0
0
1
Logical Operators
Logical operators are only allowed for Integer data types. Any value unequal null is meant to be a logical 1. Only null is valid as logical 0.
Operator
© 2013 Conrad Electronic
Description
Example
Result
181
C-Control Pro IDE
&&
4.2.6
logical And
||
logical Or
!
logical Not
1 && 1
5 && 0
0 || 0
1 || 0
!2
!0
1
0
0
1
0
1
Control Structures
Control structures allow to change the program completion depending on expressions, variables or
external influences.
4.2.6.1
Conditional Valuation
With a conditional valuation expressions can be generated which will be conditionally calculated.
The form is:
( Expression1 )
? Expression2 : Expression3
The result of this expression is expression2, if expression1 had been calculated as unequal 0, otherwise the result is expression 3.
Examples:
a = (i>5) ? i : 0;
a= (i>b*2) ? i-5 : b+1;
while(i> ((x>y) ? x : y) ) i++;
4.2.6.2
do .. while
With a do .. while construct the instructions can depending on a condition be repeated in a loop:
do Instruction while( Expression );
The instruction or the Instruction Block is being executed. At the end the Expression is evaluated. If
the result is unequal 0 then the execution of the expression will be repeated. The entire procedure
will constantly be repeated until the Expression takes on the value 0.
Example:
do
a=a+2;
while(a<10);
do
© 2013 Conrad Electronic
Compiler
182
{
a=a*2;
x=a;
} while(a);
The essential difference between the do .. while loop and the normal while loop is the fact that
in a do .. while loop the instruction is executed at least once.
break Instruction
A break instruction will leave the loop and the program execution will start with the next instruction
after the do .. while loop.
continue Instruction
When executing continue within a loop there will immediately be a new calculation of the Expression. Depending on the result the loop will be repeated at unequal 0. At a result of 0 the loop will be
terminated.
Example:
do
{
a++;
if(a>10) break; // will terminate loop
} while(1); // endless loop
4.2.6.3
for
A for loop is normally used to program a definite number of loop runs.
for(Instruction1; Expression; Instruction2) Instruction3;
At first Instruction1 will be executed which normally contains an initialization. Following the evaluation of the Expression takes place. If the Expression is unequal 0 Instruction2 and Instruction3 will
be executed and the loop will repeat itself. When Expression reaches the value 0 the loop will be terminated. As with other loop types at Instruction3 an Instruction Block can be used instead of a
single instruction.
for(i=0;i<10;i++)
{
if(i>a) a=i;
a--;
}
It must be observed that variable i will within the loop run through values 0 through 9 rather than 1
through 10!
© 2013 Conrad Electronic
183
C-Control Pro IDE
If a loop needs to be programmed with a different step width Instruction2 needs to be modified accordingly:
for(i=0;i<100;i=i+3)
{
a=5*i;
}
// variable i does now increment in steps to 3
break Instruction
A break instruction will leave the loop and the program execution starts with the next instruction
after the for loop.
continue Instruction
continue will immediately initialize a new calculation of the Expression. Depending on the result Instruction2 will be executed at unequal 0 and the loop will repeat itself. A result of 0 will terminate the
loop.
Example:
for(i=0;i<10;i++)
{
if(i==5) continue;
}
4.2.6.4
goto
Even though it should be avoided within structured programming languages, it is possible with goto
to jump to a label within a procedure:
// for loop with realized with goto
void main(void)
{
int a;
a=0;
label0:
a++;
if(a<10) goto label0;
}
© 2013 Conrad Electronic
Compiler
4.2.6.5
184
if .. else
An if instruction does have the following syntax:
if( Expression ) Instruction1;
else Instruction2;
After the if instruction an Arithmetic Expression will follow in parenthesis. If this Expression is evaluated as unequal 0 then Instruction1 will be executed. By use of the command word else an alternative Instruction2 can be defined which will be executed when the Expression has been calculated as
0. The addition of an else instruction is optional and is not necessary.
Examples:
if(a==2) b++;
if(x==y) a=a+2;
else a=a-2;
An Instruction Block can be defined instead of a single instruction.
Examples:
if(x<y)
{
c++;
if(c==10) c=0;
}
else d--;
if(x>y)
{
a=b*5;
b--;
}
else
{
a=b*4;
y++;
}
4.2.6.6
switch
If depending on the value of an expression various commands should be executed a switch instruction is an elegant solution:
switch( Expression )
{
case constant_1:
Instruction_1;
break;
© 2013 Conrad Electronic
185
C-Control Pro IDE
case constant_2:
Instruction_2;
break;
.
.
case constant_n:
Instruction_n;
break;
default:
// default is optional
Instruction_0;
};
The value of the Expression is calculated. Then the program execution will jump to the constant corresponding to the value of the Expression and will continue the program from there. If no constant
corresponds to the value of the expression the switch construct will be left.
If a default is defined within a switch instruction then the instructions after default will be executed
if no constant corresponding to the value of the instruction has been found.
Example:
switch(a+2)
{
case 1:
b=b*2;
break;
case 5*5:
b=b+2;
break;
case 100&0xf:
b=b/c;
break;
default:
b=b+2;
}
The execution of a switch statement is highly optimized. All values are stored inside a
jumptable. Therefore exists a constraint that the calculated Expression is of type signed 16 Bit Integer (-32768 .. 32767). For this reason a e.g. "case > 32767" is rather senseless.
break Instruction
A break will leave the switch instruction. If break is left out ahead of case then the instruction will
be executed even when a jump to the preceeding case does take place:
switch(a)
{
case 1:
a++;
© 2013 Conrad Electronic
Compiler
case 2:
a++;
186
// is also executed at a value of a==1
case 3:
a++; // is also executed at a value of a==1 or a==2
}
In this example all three "a++" instructions are executed if a equals 1.
4.2.6.7
while
With a while instruction the instructions can depending on a condition be repeated in a loop.
while( Expression ) Instruction;
At first the Expression is evaluated. If the result is unequal 0 then the Expression is executed. After
that the Expression is again calculated and the entire procedure will constantly be repeated until the
Expression takes on the value 0. An Instruction Block can be defined instead of a single instruction.
Example:
while(a<10) a=a+2;
while(a)
{
a=a*2;
x=a;
}
break Instruction
If a break is executed within the loop then the loop will be left and the program execution starts with
the next instruction after the while loop.
continue Instruction
An execution of continue within a loop will immediately initialize a new calculation of the Expression. Depending on the result the loop will be repeated at unequal 0. A result of 0 will terminate the
loop.
Example:
while(1) // endless loop
{
a++;
if(a>10) break; // will terminate the loop
}
© 2013 Conrad Electronic
187
4.2.7
C-Control Pro IDE
Functions
In order to structure a larger program it is separated into several sub-functions.
This not only improves the readability but allows to combine all program instructions repeatedly appearing in functions. A program does in any case contain the
function "main", which is started in first place. After that other functions can be
called up.
A simple example:
void func1(void)
{
// instructions in function func1
.
.
}
void main(void)
{
// function func1 will be called up twice
func1();
func1();
}
Parameter Passing
In order to enable functions to be flexibly used they can be set up parametric. To do this the parameters for the function are separated by commas and passed in parenthesis after the function name.
Similar to the variables declaration first the data type and then the parameter name are stated. If no
parameter is passed then void has to be set into the parenthesis.
An example:
void func1(word param1, float param2)
{
Msg_WriteHex(param1); // first parameter output
Msg_WriteFloat(param2); // second parameter output
}
Similar to local variables passed parameters are only visible within the function itself.
In order to call up function func1 by use of the parameters the parameters for call up should be written in the same succession as they have been defined in func1. If the function does not get parameters the parenthesis will stay empty.
void main(void)
{
word a;
float f;
func1(128,12.0); // you can passs numerical constants
a=100;
f=12.0;
func1(a+28,f); // or yet variables too and even numerical expressions
© 2013 Conrad Electronic
Compiler
188
}
When calling up a function all parameters must always be stated. The following call up is inadmissible:
func1();
func1(128);
// func1 gets 2 parameters!
// func1 gets 2 parameters!
Return Parameters
It is not only possible to pass parameters. A function can also offer a return value. The data type of
this value is during function definition entered ahead of the function name. If no value needs to be returned the data type used will be void.
int func1(int a)
{
return a-10;
}
The return value is within the function stated as instruction "return Expression". If there is a function
of the void type then the return instruction can be used without parameters in order to leave the
function.
References
Since it is not possible to pass on arrays as parameters the access to parameters is possible
through references. For this a pair of brackets is written after the parameter names in the parameter
declaration of a function.
int StringLength(char str[])
{
int i;
i=0;
while(str[i]) i++;
return(i);
// repeat character as long as unequal zero
}
void main(void)
{
int len;
char text[15];
text="hello world";
len=StringLength(text);
}
In main the reference of text is presented as parameters to the function StringLength. If in a function
a normal parameter is changed then the change is not visible outside this function. With references
this is different. Through parameter str in StringLength the contents of text can be changed since str
© 2013 Conrad Electronic
189
C-Control Pro IDE
is only the reference (pointer) to the array variable text.
Presently arrays can only be passed "by Reference"!
Pointer Arithmetic
In the current C-Control Pro software also arithmetic on a reference (pointer) is permitted, as the following example shows. The arithmetic is limited to addition, subtraction, multiplication and division.
void main(void)
{
int len;
char text[15];
text="hello world";
len=StringLength(text+2*3);
}
Pointer arithmetic is currently experimental and may possibly still contain errors.
Strings as Parameter
Since Version 2.0 of the IDE it is possible to call functions with a string as parameter. The called
function gets the string as reference. Since references are RAM based and predefined strings are
stored in the flash memory, the compiler creates internally an anonymous variable, and copies the
data from flash into memory.
int StringLength(char str[])
{
...
}
void main(void)
{
int len;
len=StringLength("hallo welt");
}
4.2.8
4.2.8.1
Tabellen
Operator Precedence
Rang
Operator
13
12
11
()
++ -- ! ~
* / %
- (negatives Vorzeichen)
© 2013 Conrad Electronic
Compiler
10
9
8
7
6
5
4
3
2
1
4.2.8.2
+ << >>
< <= >
== !=
&
^
|
&&
||
? :
>=
Operators
Arithmetische Operatoren
+
*
/
%
-
Addition
Subtraktion
Multiplikation
Division
Modulo
negatives Vorzeichen
Vergleichsoperatoren
<
>
<=
>=
==
!=
kleiner
größer
kleiner gleich
größer gleich
gleich
ungleich
Bitschiebeoperatoren
<<
>>
um ein Bit nach links schieben
um ein Bit nach rechts schieben
Inkrement/Dekrement Operatoren
++
--
Post/Pre Inkrement
Post/Pre Dekrement
Logische Operatoren
&&
||
© 2013 Conrad Electronic
logisches Und
logisches Oder
190
191
C-Control Pro IDE
!
logisches Nicht
Bitoperatoren
&
|
^
~
4.2.8.3
Und
Oder
exclusives Oder
Bitinvertierung
Reserved Words
The following words are reserved and cannot be used as identifier:
break
default
for
signed
void
byte
do
goto
static
while
case
else
if
switch
word
char
false
int
true
dword
continue
float
return
unsigned
long
© 2013 Conrad Electronic
Compiler
4.3
192
BASIC
The second programming language for the C-Control Pro Mega Module is BASIC. The Compiler
translates the BASIC commands into a Bytecode which is then processed by the C-Control Pro Interpreter. The language volume of the BASIC dialect used here corresponds to a large extent to the
industry standard of the large software suppliers.
The following language constructs are missing:
Object oriented programming
Structures
Constants
Detailed program examples can be found in directory C-Control Pro Demos which was installed
along with the design interface. There example solutions can be found for almost every field of purpose of the C-Control Pro Module.
The following chapters offer a systematical introduction to syntax and semantics of C-Control Pro
BASIC.
4.3.1
Program
A program consists of a number of instructions (such as e. g. "a=5;") which are distributed among
various Functions. The starting function, which must be present in every program, is the function
"main()". The following is a simplistic program able to print a number into the output window:
Sub main()
Msg_WriteInt(42)
End Sub
// the answer to anything
Projects
A program can be separated into several files which are combined in a project (see Project Management). In addition to these project files Libraries can be added to the project which are able to offer
functions used by the program.
© 2013 Conrad Electronic
193
4.3.2
C-Control Pro IDE
Instructions
Instruction
An instruction consists of several reserved command words, identifiers and operators and is at the
end terminated by the end of the line. In order to separate various elements of an instruction there
are spaces in between the instruction elements which are called "Whitespaces". By “spaces“ space
characters, tabulators and line feeds ("C/R and LF") are meant. It is of no consequence whether a
space is built by one or several "Whitespaces".
Simple Instruction:
a=
5
An instruction does not necessarily have to completely stand in one line. By use of the "_" character (low dash) it is possible to extend the instruction into the next line.
If a=5 _ ' instruction across two lines
a=a+10
It is also possible to place more than one instruction into the same line. The ":" character (colon)
will then separate the individual instructions. For reason of better readability however this option
should rather seldom be used.
a=1 : b=2 : c=3
Comments
There are two types of commentaries, which are the single line and the multi line commentaries. The
text within commentaries is ignored by the Compiler.
Single line commentaries start with a single quotation mark and end up at the line’s end.
Multi line commentaries start with "/*" and end up with "*/".
/* a
multi line
commentary */
' a single line commentary
Identifier
Identifiers are the names of Functions or Variables .
Valid characters are letters (A-Z,a-z), numbers (0-9) and the low dash ('_')
An identifier always starts with a letter
Upper and lower case writings are differentiated
Reserved Words are not allowed as identifiers
The length of an identifier is unlimited
© 2013 Conrad Electronic
Compiler
194
Arithmetic Expressions
An arithmetic expression is a quantity of values connected by Operators. In this case quantities can
either be Figures, Variables or Functions .
A simple example:
2 + 3
Here the numerical values 2 and 3 are connected by the Operator "+". An arithmetic value again represents a value. In this case the value is 5.
Further examples:
a - 3
b + f(5)
2 + 3 * 6
Following the rule "Dot before Line" here 3 times 6 is calculated first and then 2 is added. This priority is in case of operators called precedence. A list of priorities can be found in the Precedence
Table.
Comparisons too are arithmetic expressions. The comparison operators return a truth value of
"1" or "0", depending on whether the comparison was true or not. The expression "3 < 5" yields the
value "1" (true).
Constant Expressions
An expression or portions of an expression can be constant. Portions of an expression can already
be calculated during Compiler runtime.
So e. g. the expression
12 + 123 - 15
is combined by the Compiler to
120.
In some cases expressions must be constant in order to be valid. E. g. also see Declaration of Array Variables.
4.3.3
Data Types
Values always are of a certain data type. Integer values (integral values; whole numbered values) in
BASIC are of the 8, 16 or 32 Bit wide data type, floating point values are always 4 byte long.
© 2013 Conrad Electronic
195
C-Control Pro IDE
Data Type
Char
Byte
Integer
UInteger
Word
Long (no
Mega32)
ULong (no
Mega32)
Single
Sign
Range
Bit
Yes
No
Yes
No
No
Yes
-128 ... +127
0 ... 255
-32768 ... +32767
0 ... 65535
0 ... 65535
-2147483648 ... 2147483647
8
8
16
16
16
32
No
0 ... 4294967295
32
Yes
±1.175e-38 to ±3.402e38
32
Due to size restrictions of the interpreter, 32-Bit Integer are not available on
the Mega32.
Strings
There is no explicit "String" data type. A string is based on a character array. The size of the array
must be chosen in such a way that all characters of the string fit into the character array. Additionally some space is needed for a terminating character (decimal Zero) in order to indicate the end of
the character string.
Type Conversion
In arithmetic expressions it is very often the case that individual values are not of the same type. So the data types
a + 5.5
In this case a is first converted into the Single data type and then 5.5 is added.
The data type of the result is also Single. For data type conversion there are the following rules:
If in a linkage of 8 Bit or 16 Bit integer values one of the two data types is sign afflicted then the result of the expression is also sign afflicted.
If one of the operands is of the Single type then the result is also of the Single type. If
one of the two operands happens to be of the 8 Bit or 16 Bit data type then it will be
converted into a Single data type prior to the operation.
4.3.4
Variables
Variables can take on various values depending on the Data Type by which they have been defined.
A variable definition appears as follows:
Dim Variable Name As Type
When several variables of the same type need to be defined then these variables can be stated separated by commas:
© 2013 Conrad Electronic
Compiler
196
Dim Name1, Name2, Name3 As Integer
As types are allowed: Char, Byte, Integer, Word, Single
Examples:
Dim a As Integer
Dim i,j As Integer
Dim xyz As Single
Integer variables may have decimal figure values or Hex values assigned to. With Hex values the
characters "&H" will be placed ahead of the figure. Just as with CompactC it is also allowed to place
the prefix "0x" ahead of the Hex values. Binary numbers can be created with the prefix "0B". With
variables of the sign afflicted data type negative decimal figures can be assigned to by putting a
minus sign ahead of the figure.
Numbers without period or exponent are normally of type signed integer. To explicitly define an
unsigned integer write an "u" direct after the number. To declare a number to be 32-Bit, either the
value is greater 65535 or put an "l" after the number. Can be combined with "u" from unsigned.
Examples:
Dim c As Char
Dim a As Word
Dim i,j As Integer
c=5;
c=&"a";
a=&H3ff
a=50000u
x=0b1001
a=100ul
i=15
j=-22
a=0x3ff
'
'
'
'
'
'
'
'
syntax for ASCII value
hex numbers are always unsigned
unsigned
binary number
unsigned 32 Bit (ULong)
default is signed
signed
hex numbers are always unsigned
Floating Point Figures (data type Single) may contain a decimal point and an exponent.
Dim x,y As Single
x=5.70
y=2.3e+2
x=-5.33e-1
SizeOf Operator
By the operator SizeOf() the number of Bytes a variable takes up in memory can be determined.
Examples:
Dim s As Integer
© 2013 Conrad Electronic
197
C-Control Pro IDE
Dim f As Single
s=SizeOf(f)
' the value of s is 4
With arrays only the Byte length of the basic data type is returned. On order to calculate the
memory consumption of the array the value must be multiplied by the number of elements.
Array Variables
If behind the name, which in case of a variable definition is set in parenthesis, a figure value is written
then an array has been defined. An array will arrange the space for a defined variable manifold in
memory. With the following example definition
Dim x(10) As Integer
a tenfold memory space has been arranged for variable x. The first memory space can be addressed
by X[0], the second by x[1], the third by x[2], … up to x[9]. When defining of course other index
dimensions can also be chosen. The memory space of C-Control Pro is the only limit.
Multi dimensional arrays can also be declared by attaching further indices during variable definition,
which have to be separated by commas:
Dim x(3,4) As Integer ' array with 3*4 entries
Dim y(2,2,2) As Integer ' array with 2*2*2 entries
Arrays may in BASIC have up to 16 indices (dimensions). The maximum value for an index is
65535. The indices of arrays are in any case zero based, i .e. each index will start with a 0.
Only if the compiler option "Check Array Index Limits" is set, there will be a verification whether
or not the defined index limits of an array have been exceeded. Otherwise, if an index becomes too
large during program execution the access to alien variables will be tried which in turn may create a
good chance for a program breakdown.
Table support by predefined Arrays
Since version 2.0 of the IDE arrays can be predefined with values:
Dim glob(10) = {1,2,3,4,5,6,7,8,9,10} As Byte
Flash fglob(2,2)={10,11,12,13} As Byte
Sub main()
Dim loc(5)= {2,3,4,5,6} As Byte
Dim xloc(2,2) As Byte
xloc= fglob
End Sub
Because there is more flash memory than RAM available, it is possible with the flash keyword to
define data that are written in the flash memory only. These data can be copied to a RAM array with
same dimensions with an assignment operation. In this example this is done through "xloc= fglob".
© 2013 Conrad Electronic
Compiler
198
Direct Access to flash Array entries
With version 2.12 it is possible to access single entries in flash arrays:
Flash glob(10) = {1,2,3,4,5,6,7,8,9,10} As Byte
Sub main()
Dim a As Byte
a= glob(2)
End Sub
There is still one limitation: Only references to arrays that lie in RAM can be passed as function
parameters. This is not possible with references to flash arrays.
Strings
There is no explicit "String" data type. A string is based on an array of data type Char. The size of
the array must be chosen in such a way that all characters of the string fit into the character array.
Additionally some space is needed for a terminating character (decimal Zero) inorder to indicate the
end of the character string.
Example for a character string with a 20 character maximum:
Dim str1(21) As Char
As an exception Char arrays may have character strings assigned to. Here the character string is
placed between quotation marks.
str1="hallo world!"
You may embed special characters in strings that are started with a "\" (backslash). The following
sequences are defined:
Sequence
Char/Value
\\
\'
\a
\b
\t
\n
\v
\f
\r
\
'
7
8
9
10
11
12
13
Strings cannot be assigned to multi dimensional Char arrays. There are however tricks for advanced users:
© 2013 Conrad Electronic
199
C-Control Pro IDE
Dim str_array(3,40) As Char
Dim Single_str(40) As Char
Single_str="A String"
' will copy Single_str in the second string of str_array
Str_StrCopy(str_array,Single_str,40)
This will work because with a gap of 40 characters after the first string there will in str_array be room
for the second string.
Visibility of Variables
When variables are declared outside of functions then they will have global visibility. I. e. they can be
addressed from every function. Variable declarations within functions produce local variables. Local
variables can only be reached within the function. An example:
Dim a,b As Integer
Sub func1()
Dim a,x,y As Integer
' global b is accessible
' global a is not accessible since concealed by local a
' local x,y is accessible
' u is not accessible since local to function main
End Sub
Sub main()
Dim u As Integer
' global a,b is accessible
' local u is accessible
' x,y u is not accessible since local to function main
End Sub
Global variables have a defined memory space which is available throughout the entire program run.
At program start the global variables will be initialized by zero. Local Variables get not initialized
at the begin of a function!
Local variables will during calculation of a function be arranged on the stack. I. e. local variables exist in memory only during the time period in which the function is executed.
If with local variables the same name is selected as with a global variable then the local variable will
conceal the global variable. While the program is working in the function where the identically named
variable has been defined the global variable cannot be addressed.
Static Variables
With local variables the property Static can be placed for the data type.
© 2013 Conrad Electronic
Compiler
200
Sub func1()
Static a As Integer
End Sub
In opposition to normal local variables will static variables still keep their value even if the function is
left. At a further call-up of the function the static variable will have the same contents as when leaving
the function. In order to have the contents of a Static variable defined at first access the static variables will equally to global variables at program start also be initialized by zero.
4.3.5
Operators
Priorities of Operators
Operators separate arithmetic expressions into partial expressions. The operators are then evaluated
in the succession of their priorities (precedence). Expressions with operators of identical precedence
will be calculated from left to right.
Example:
i= 2+3*4-5
' result 9 => first 3*4, then +2, finally -5
The succession of the execution can be influenced by setting of parenthesis. Parenthesis have the
highest priority.
If the last example should strictly be calculated from left to right, then:
i= (2+3)*4-5
' result 15 => first 2+3, then *4, finally -5
A list of priorities can be found in Precedence Table.
4.3.5.1
Arithmetic Operators
All arithmetic operators with the exception of Modulo are defined for Integer and Floating Point data
types. Modulo is restricted to data type Integer only.
It must be observed that in an expression the figure 7 will have an Integer data type assigned to
it. If a figure of data type Single should be explicitly created then a decimal point has to be added:
7.0
Operator
Description
Example
Result
+
Addition
-
Subtraction
*
/
Multiplication
Division
2+1
3.2 + 4
2-3
22 - 1.1e1
5*4
7/2
7.0 / 2
15 Mod 4
17 Mod 2
3
7.2
-1
11
20
3
3.5
3
1
Mod
© 2013 Conrad Electronic
Modulo
201
C-Control Pro IDE
-
4.3.5.2
Negative Sign
-(2+2)
-4
Example
Result
&H0f And 3
&Hf0 And &H0f
1 Or 3
&Hf0 Or &H0f
&Hff Xor &H0f
&Hf0 Xor &H0f
Not &Hff
Not &Hf0
3
0
3
&Hff
&Hf0
&Hff
0
&H0f
Bitoperators
Bit operators are only allowed for Integer data types
Operator
And
Description
And
Or
Or
Xor
exclusive Or
Not
Bit inversion
All these Operators work arithmetically: E.g. Not &H01 = &Hfe. Both values are evaluated to
true in an If expression. This is different to a logical Not operator, where Not &H01 = &H00.
4.3.5.3
Bit-Shift Operators
Bit-Shift operators are only allowed for Integer data types. With a Bit-Shift operation a 0 will always
be moved into one end.
Operator
4.3.5.4
Description
Example
Result
<<
shift to left
>>
shift to right
1 << 2
3 << 3
&Hff >> 6
16 >> 2
4
24
3
4
In- /Decrement Operators
Incremental and decremental operators are only allowed for variables with Integer data types.
© 2013 Conrad Electronic
Compiler
Operator
Description
variable++
first variable value, after access variable
gets incremented by one (postincrement)
first variable value, after access variable
gets decremented by one (postdecrement)
value of the variable gets incremented by
one before access (preincrement)
value of the variable gets decremented by
one before access (predecrement)
variable-++variable
--variable
202
Example
Result
a++
a
a--
a
++a
a+1
--a
a-1
These operators are normally not a part of a Basic dialect and have their origin in the world of C
inspired languages.
4.3.5.5
Comparison Operators
Comparison operators are allowed for Single and Integer data types.
Operator
4.3.6
Description
<
smaller
>
greater
<=
smaller or equal
>=
greater or equal
=
equal
<>
not equal
Example
Result
1<2
2<1
2<2
-3 > 2
3>2
2 <= 2
3 <= 2
2 >= 3
3 >= 2
5=5
1=2
2 <> 2
2 <> 5
1
0
0
0
1
1
0
0
1
1
0
0
1
Control Structures
Control structures allow to change the program completion depending on expressions, variables or
external influences.
4.3.6.1
Do Loop While
With a Do ... Loop While construct the instructions can depending on a condition be repeated in a
loop:
© 2013 Conrad Electronic
203
C-Control Pro IDE
Do
Instructions
Loop While Expression
The instructions are being executed. At the end the Expression is evaluated. If the result is unequal
0 then the execution of the expression will be repeated. The entire procedure will constantly be repeated until the Expression takes on the value 0.
Examples:
Do
a=a+2
Loop While a<10
Do
a=a*2
x=a
Loop While a
The essential difference between the Do Loop While loop and the normal Do While loop is the
fact that in a Do Loop While loop the instruction is executed at least once.
Exit Instruction
An Exit instruction will leave the loop and the program execution starts with the next instruction after
the Do Loop While loop.
Example:
Do
a=a+1
If a>10 Then
Exit ' Will terminate loop
End If
Loop While 1 ' Endless loop
4.3.6.2
Do While
With a while instruction the instructions can depending on a condition be repeated in a loop:
Do While Expression
Instructions
End While
At first the Expression is evaluated. If the result is unequal 0 then the expression is executed. After
that the Expression is again calculated and the entire procedure will constantly be repeated until the
Expression takes on the value 0.
Examples:
© 2013 Conrad Electronic
Compiler
204
Do While a<10
a=a+2
End While
Do While a
a=a*2
x=a
End While
Exit Instruction
If an Exit instruction is executed within a loop than the loop will be left and the program execution
starts with the next instruction after the While loop.
Example:
Do While 1
' Endless loop
a=a+1
If a>10 Then
Exit ' Will terminate loop
End If
End While
4.3.6.3
For Next
A For Next loop is normally used to program a definite number of loop runs.
For Counter Variable=Startvalue To Endvalue Step Stepwidth
Instructions
Next
The Counter Variable is set to a Start Value. Then the instructions are repeated until the End Value
is reached. With each loop run the value of the Counter Variable is increased by one step width
which may also be negative. The stating of the step width after the End Value is optional. If no Step
Width is stated it has the value 1.
Since the For Next loop will be used to especially optimized the counter variable must be of the
Integer type.
Example:
For i=1 To 10
If i>a Then
a=i
End If
a=a-1
Next
© 2013 Conrad Electronic
205
C-Control Pro IDE
For i=1 To 10 Step 3
If i>3 Then
a=i
End If
a=a-1
Next
'Increment i in steps of 3
In this location please note again that arrays are in any case zero based. A For Next loop
should thus rather run from 0 through 9.
Exit Instruction
An Exit instruction will leave the loop and the program execution starts with the next instruction after
the For loop.
Example:
For i=1 To 10
If i=6 Then
Exit
End If
Next
4.3.6.4
Goto
Even though it should be avoided within structured programming languages, it is still possible with
goto to jump to a label within a procedure. In order to mark a label the command word Lab is set in
front of the label name.
' For loop with goto will realize
Sub main()
Dim a As Integer
a=0
Lab label1
a=a+1
If a<10 Then
Goto label1
End If
End Sub
4.3.6.5
If .. Else
An If instruction does have the following syntax:
If Expression1 Then
Instructions1
ElseIf Expression2 Then
© 2013 Conrad Electronic
Compiler
206
Instructions2
Else
Instructions3
End If
After the if instruction an Arithmetic Expression will follow. If this Expression is evaluated as unequal 0 then Instruction1 will be executed. By use of the command word else an alternative Instruction2 can be defined which will be executed when the Expression has been calculated as 0. The addition of an else instruction is optional and not really necessary.
If directly in an Else branch an If instruction needs again to be placed then it is possible to initialize
an If again direcly by use of an ElseIf. Thus the new If does not need to be interlocked into an Else
block and the source text remains more clearly.
Examples:
If a=2 Then
b=b+1
End If
If x=y Then
a=a+2
Else
a=a-2
End If
If a<5 Then
a=a-2
ElseIf a<10 Then
a=a-1
Else
a=a+1
End If
4.3.6.6
Select Case
If depending on the value of an expression various commands should be executed then a Select
Case instruction seems to be an elegant solution:
Select Case Expression
Case constant_comparison1
Instructions_1
Case constant_comparison2
Instructions_2
.
.
Case constant_comparison_x
Instructions_x
Else
' Else is optional
Instructions
© 2013 Conrad Electronic
207
C-Control Pro IDE
End Case
The value of the Expression is calculated. Then the program execution will jump to the first constant
comparison that can be evaluated as true and will continue the program from there. If no constant
comparison can be fulfilled the Select Case construct will be left.
For constant comparisons special comparisons and ranges can be defined . Here examples for all
possibilities:
Comparison
Execute on
Constant, = Constant
< Constant
<= Constant
> Constant
>= Constant
<> Constant
Constant1 To Constant2
Expression equal Constant
Expression smaller Constant
Expression smaller equal Constant
Expression greater Constant
Expression greater equal Constant
Expression unequal Constant
Constant1 <= Expression <= Constant2
The new features that allow to use comparisons are introduced for Select Case statements with
IDE version 1.71. This extension is not available for CompactC switch statements.
The execution of a Select Case statement is highly optimized. All values are stored inside a
jumptable. Therefore exists a constraint that the calculated Expression is of type signed 16 Bit Integer (-32768 .. 32767). For this reason a e.g. "Case > 32767" is rather senseless.
Exit Instruction
An Exit will leave the Select Case instruction.
If an Else is defined within a Select Case instruction then the instructions after Else will be executed if no constant comparison could be fulfilled.
Example:
Select Case a+2
Case 1
b=b*2
Case = 5*5
b=b+2
Case 100 And &Hf
b=b/c
Case < 10
b=10
Case <= 10
b=11
Case 20 To 30
b=12
Case > 100
b=13
© 2013 Conrad Electronic
Compiler
208
Case >= 100
b=14
Case <> 25
b=15
Else
b=b+2
End Case
In CompactC the instructions will be continued after a Case instruction until a break comes up
or the switch instruction is left. With BASIC this is different: Here the execution of the commands
will break off after a Case, if the next Case instruction is reached.
4.3.7
Functions
In order to structure a larger program it is separated into several sub-functions.
This not only improves the readability but allows to combine all program instructions repeatedly appearing in functions. A program does in any case contain the
function "main", which is started in first place. After that other functions can be
called up from main. A simple example:
Sub func1()
' Instructions in function func1
.
.
End Sub
Sub main()
' Function func1 will be called up twice
func1()
func1()
End Sub
Parameter Passing
In order to enable functions to be flexibly used they can be set up parametric. To do this the parameters for the function are separated by commas and passed in parenthesis after the function name.
Similar to the variables declaration first the parameter name and then the data type is stated. If no
parameter is passed then the parenthesis will stay empty.
An example:
Sub func1(param1 As Word, param2 As Single)
Msg_WriteHex(param1) ' first parameter output
Msg_WriteFloat(param2) ' second parameter output
End Sub
Similar to local variables passed parameters are only visible within the function itself.
In order to call up function func1 by use of the parameters the parameters for call up should be written in the same succession as they have been defined in func1. If the function does not get parameters the parenthesis will stay empty.
© 2013 Conrad Electronic
209
C-Control Pro IDE
Sub main()
Dim a As Word
Dim f As Single
func1(128,12.0) ' you can pass Numerical constants
a=100
f=12.0
func1(a+28,f) ' or yet variables too and even numerical expressions
End Sub
When calling up a function all parameters must always be stated. The following call up is inadmissible:
func1()
func1(128)
' func1 gets 2 parameters!
' func1 gets 2 parameters!
Return Parameters
It is not only possible to pass parameters. A function can also offer a return value. The data type of
this value is during function definition entered after the parameter list of the function.
Sub func1(a As Integer) As Integer
Return a-10
End Sub
The return value is within the function stated as instruction "return Expression". If there is a function
without return value then the return instruction can be used without parameters in order to leave the
function.
References
Since it is not possible to pass on arrays as parameters the access to parameters is possible
through references. For this the attribute "ByRef" is written ahead of the parameter name in the
parameter declaration of a function.
Sub StringLength(ByRef str As Char) As Integer
Dim i As Integer
i=0
Do While str(i)
i=i+1 ' Repeat character as long as unequal zero
End While
Return i
End Sub
Sub main()
Dim Len As Integer
Dim Text(15) As Char
© 2013 Conrad Electronic
Compiler
210
Text="hello world"
Len=StringLength(Text)
End Sub
In main the reference of text is presented as parameters to the function StringLength. If in a function
a normal parameter is changed then the change is not visible outside this function. With references
this is different. Through parameter str can in StringLength the contents of text be changed since str
is only the reference (pointer) to the array variable text.
Presently arrays can only be presented "by Reference"!
Pointer Arithmetic
In the current C-Control Pro software also arithmetic on a reference (pointer) is permitted, as the following example shows. The arithmetic is limited to addition, subtraction, multiplication and division.
Sub main()
Dim Len As Integer
Dim Text(15) As Char
Text="hello world"
Len=StringLength(Text+2*3)
End Sub
Pointer arithmetic is currently experimental and may possibly still contain errors.
Strings as Parameter
Since Version 2.0 of the IDE it is possible to call functions with a string as parameter. The called
function gets the string as reference. Since references are RAM based and predefined strings are
stored in the flash memory, the compiler creates internally an anonymous variable, and copies the
data from flash into memory.
Sub StringLength(ByRef str As Char) As Integer
....
End Sub
Sub main()
Dim Len As Integer
Len=StringLength("hallo welt")
End Sub
4.3.8
Tables
© 2013 Conrad Electronic
211
4.3.8.1
C-Control Pro IDE
Operator Precedence
Rank
10
9
8
7
6
5
4
3
2
1
4.3.8.2
Operator
()
- (negative sign)
* /
Mod
+ << >>
= <> < <= >
Not
And
Or Xor
>=
Operators
Arithmetic Operators
+
*
/
Mod
-
Addition
Subtraction
Multiplication
Division
Modulo
negative sign
Comparison Operators
<
>
<=
>=
=
<>
smaller
greater
smaller or equal
greater or equal
equal
not equal
Bitshift Operators
<<
>>
shift to left
shift to right
Bitoperators
And
Or
And
Or
© 2013 Conrad Electronic
Compiler
Xor
Not
4.3.8.3
212
exclusive Or
Bit inversion
Reserved Words
The following words are reserved and cannot be used as identifiers:
And
Char
End
If
Next
Select
Sub
Word
4.4
As
Dim
Exit
Integer
Not
Single
Then
Xor
ByRef
Do
False
Lab
Opc
SizeOf
To
ULong
Byte
Else
For
Loop
Or
Static
True
Long
Case
ElseIf
Goto
Mod
Return
Step
While
UInteger
Assembler
With IDE Version 2.0 it is possible to integrate Assembler routines into a project. The used Assembler is the GNU Open Source Assembler AVRA. The sources of the AVRA Assembler can be found
in the installation directory "GNU". Assembler routines that are called from CompactC and Basic run
in full CPU speed, in contrary to the Bytecode Interpreter. It is possible to pass parameters to
Assembler procedures and get their return values. Also global CompactC and Basic variables can be
accessed. The compiler recognizes assembler files with their ".asm" ending. Assembler sources are
added to a project like CompactC or Basic files.
The programming in assembly language is only recommended for the advanced user of the system. The programming is very complex and error prone, and should only be used by these people
that have a very good knowledge of the system.
There is no free assembler available for AVR32 Unit. Since the C-Control Pro AVR32Bit is also
much faster than the C-Control Pro Mega series, no assembly support is planned for the AVR32.
Literature
You can find manifold literature about assembly language programming on the internet and in the
book trade. Important are the "AVR Instruction Reference Manual" that can be found on the Atmel
website and in the "Manual" directory of the C-Control Pro installation, and the "AVR Assembler
User Guide" from the Atmel website.
4.4.1
An Example
The structure of assembly routines is explained in the following example (also included in the demo
programs). In the project the CompactC source code file must have the ending ".cc", the assembler
source files have to end with ".asm".
© 2013 Conrad Electronic
213
C-Control Pro IDE
// CompactC Source
void proc1 $asm("tag1")(void);
int proc2 $asm("tag2")(int a, float b, byte c);
int glob1;
void main(void)
{
int a;
proc1();
a= proc2(11, 2.71, 33);
}
The procedures proc1 and proc2 must first be declared, before they can be called. This happens with
the keyword $asm. The declaration in Basic looks similar:
' Basic delaration of assembler routines
$Asm("tag1") proc1()
$Asm("tag2") proc2(a As Integer, b As Single, c As Byte) As Integer
The strings "tag1" and "tag" are visible in the declaration. These strings are defined in a ".def" file, if
the Assembler routines are really called from the CompactC and Basic source. In this case the
".def" file looks like:´
; .def file
.equ glob1 = 2
.define tag1 1
.define tag2 1
When all the routines in the Assembler sources are placed in ".ifdef ..." directions, only the routines
are assembled that are really called. This saves space at the code generation. Additionally the position of the global variables are stored in the definition file. The ".def" file is automatically included in
the translation of the assembler files, it needed not to be manually included.
Here follows the assembler source of procedure proc1. In this source the global variable glob1 is set
to the value 42.
; Assembler Source
.ifdef tag1
proc1:
; global variable access example
; write 42 to global variable glob1
MOVW R26,R8
; get RamTop from register 8,9
SUBI R26,LOW(glob1) ; subtract index from glob1 to get address
SBCI R27,HIGH(glob1)
LDI
ST
R30,LOW(42)
X+,R30
© 2013 Conrad Electronic
Compiler
CLR
ST
R30
X,R30
214
; the high byte is zero
ret
.endif
In the second part of the assembler sources the passed parameters "a" and "c" are added as integers, and then the sum is returned.
.ifdef tag2
proc2:
; example for accessing and returning parameter
; we have int proc2(int a, float b, byte c);
; return a + c
MOVW R30, R10
; move parameter stack pointer into Z
LDD R24, Z+5 ; load parameter "a" into R24,25
LDD R25, Z+6
LDD R26, Z+0
CLR R27
; load byte parameter "c" into X (R26)
; hi byte zero because parameter is byte
ADD R24, R26
ADC R25, R27
; add X to R24,25
MOVW R30, R6
ADIW R30, 4
MOVW R6, R30
; copy stack pointer from R6
; add 4 to sp - ADIW only works for R24 and greater
; copy back to stack pointer location
ST
ST
; store R24,25 on stack
Z+, R24
Z, R25
ret
.endif
4.4.2
Data Access
Global Variables
In the Bytecode Interpreter in the register R8 and R9 lies the 16-Bit pointer to the end of the global
variable memory. If a global variable that is defined in the ".def" file should be accessed, the address
of the variable can be calculated when the variable position is subtracted from the R8, R9 16-Bit
pointer. This looks like:
; global variable access example
; write 0042 to global variable glob1
MOVW R26,R8
; get Ram Top from register 8,9
SUBI R26,LOW(glob1) ; subtract index from glob1 to get address
SBCI R27,HIGH(glob1)
© 2013 Conrad Electronic
215
C-Control Pro IDE
When the address of the global variable is in the X register pair (R26,R27), the desired value (in our
example 42) can be written there:
LDI
ST
CLR
ST
R30,LOW(42)
X+,R30
R30
X,R30
; the high byte of 42 is zero
Parameter Passing
Parameters are passed on the stack of the Bytecode Interpreter. The stackpointer (SP) lies in the
register pair R10,R11. Are parameters passed, they are written one after another onto the stack.
Since the stack grows to the bottom, in our example (integer a, floating point b, byte c) the memory
layout looks like this:
SP+5: a
SP+1: b
SP+0: c
(type integer, length 2)
(type float, length 4)
(type byte, length 1)
If the variables a and c should be accessed, a will be found at SP+5 and c at SP. In the following
Assembler code the stack pointer SP (R10,R11) will be copied in the register pair Z (R30,R31), and
the parameters a and c are loaded indirect via Z.
; example for accessing and returning parameter
; we have int proc2(int a, float b, byte c);
MOVW R30, R10
; move parameter stack pointer into Z
LDD R24, Z+5 ; load parameter "a" into R24,25
LDD R25, Z+6
LDD R26, Z+0
CLR R27
; load byte parameter "c" into X (R26)
; hi byte zero because parameter is byte
The parameter a and c are now in the register pairs X and R24, R25. Now they can be added:
ADD R24, R26
ADC R25, R27
; add X to R24, R25
Return Parameters
In the routine proc2 the sum is returned. Return parameters are written on the Parameter Stack
(PSP) of the Bytecode Interpreter. The pointer to the PSP lies in the register pair R6,R7. To return a
parameter the PSP pointer must be increased by 4 before the parameter can be written. In opposite
to the normal parameter passing the type of the return parameter is not important. All parameter on
the Parameter Stack have the same length of 4 bytes.
Even with a declared 8-bit return value, the interpreter expects always a 16-bit value. This is
© 2013 Conrad Electronic
Compiler
216
done to save bytecodes in the interpreter. Is the assembly routine declared as byte, a word must
be a written as the return value, if the assembly routine is of type char, an int is required. In all other
cases no change is needed.
; return a + c
MOVW R30, R6
ADIW R30, 4
MOVW R6, R30
ST
ST
4.4.3
Z+, R24
Z, R25
; copy stack pointer from R6
; add 4 to sp - ADIW only works for R24 and greater
; copy back to stack pointer location
; store R24, R25 on stack
Guideline
The most important topics on how to program in Assembler for C-Control Pro are explained here:
Assembler calls are atomic. An Assembler call cannot be interrupted by Multithreading or an
Bytecode Interruptroutine. This is similar to Library calls. An interrupt is recorded immediately by
the internal interrupt structure, but the corresponding Bytecode interrupt routine is called after the
assembler procedure has been ended.
Do not change the Y Register (R28 and R29), it is used from the interpreter as a data stack
pointer. Assembler interrupt routines use the Y-Register to save register contents and might else
be crash.
The register R0, R1, R22, R23, R24, R25, R26, R27, R30, R31 can be used in Assembler routines
without backup. If other register are used, the contents must be saved first. Normally these values
are stored on the stack. E.g.
at begin: PUSH R5
PUSH R6
...
at end:
POP R6
POP R5
An Assembler routine is left with a "RET" instruction. At this point the CPU stack must be in the
same state as before the call. The contents of the register that need to be backuped must be restored.
Debugging only works in the Bytecode Interpreter, it is not possible to debug in Assembler.
The Bytecode Interpreter has a fixed memory layout. In no case use Assembler directives like
.byte, .db, .dw, .dseg or similar. In an access to the data segment this would cause the Assembler to overwrite memory that is used by the Bytecode Interpreter. If global variables are needed,
they should be declared in CompactC and Basic, and then can be accessed like described in the
chapter Data Access.
Do not set the address of an Assembler routine with .org. The IDE generates itself a .org directive
when starting the AVRA Assembler.
© 2013 Conrad Electronic
217
4.5
C-Control Pro IDE
ASCII Table
ASCII Table
CHA
DEC
HEX
BIN
Description
NUL
000
000
00000000 Null Character
SOH
001
001
00000001 Start of Header
STX
002
002
00000010 Start of Text
ETX
003
003
00000011 End of Text
EOT
004
004
00000100 End of Transmission
ENQ
005
005
00000101 Enquiry
ACK
006
006
00000110 Acknowledgment
BEL
007
007
00000111 Bell
BS
008
008
00001000 Backspace
HAT
009
009
00001001 Horizontal TAB
LF
010
00A
00001010 Line Feed
VT
011
00B
00001011 Vertical TAB
FF
012
00C
00001100 Form Feed
CR
013
00D
00001101 Carriage Return
SO
014
00E
00001110 Shift Out
SI
015
00F
00001111 Shift In
DLE
016
010
00010000 Data Link Escape
DC1
017
011
00010001 Device Control 1
DC2
018
012
00010010 Device Control 2
DC3
019
013
00010011 Device Control 3
DC4
020
014
00010100 Device Control 4
NAK
021
015
00010101 Negative Acknowledgment
SYN
022
016
00010110 Synchronous Idle
ETB
023
017
00010111 End of Transmission Block
CAN
024
018
00011000 Cancel
EM
025
019
00011001 End of Medium
R
© 2013 Conrad Electronic
Compiler
218
SUB
026
01A
00011010 Substitute
ESC
027
01B
00011011 Escape
FS
028
01C
00011100 File Separator
GS
029
01D
00011101 Group Separator
RS
030
01E
00011110 Request to Send, Record Separator
US
031
01F
00011111 Unit Separator
SP
032
020
00100000 Space
!
033
021
00100001 Exclamation Mark
“
034
022
00100010 Double Quote
#
035
023
00100011 Number Sign
$
036
024
00100100 Dollar Sign
%
037
025
00100101 Percent
&
038
026
00100110 Ampersand
‘
039
027
00100111 Single Quote
(
040
028
00101000 Left Opening Parenthesis
)
041
029
00101001 Right Closing Parenthesis
*
042
02A
00101010 Asterisk
+
043
02B
00101011 Plus
,
044
02C
00101100 Comma
-
045
02D
00101101 Minus or Dash
.
046
02E
00101110 Dot
CHA
DEC
HEX
BIN
/
047
02F
00101111 Forward Slash
0
048
030
00110000
1
049
031
00110001
2
050
032
00110010
3
051
033
00110011
4
052
034
00110100
5
053
035
00110101
Description
R
© 2013 Conrad Electronic
219
C-Control Pro IDE
6
054
036
00110110
7
055
037
00110111
8
056
038
00111000
9
057
039
00111001
:
058
03A
00111010 Colon
;
059
03B
00111011 Semi-Colon
<
060
03C
00111100 Less Than
=
061
03D
00111101 Equal
>
062
03E
00111110 Greater Than
?
063
03F
00111111 Question Mark
@
064
040
01000000 AT Symbol
A
065
041
01000001
B
066
042
01000010
C
067
043
01000011
D
068
044
01000100
E
069
045
01000101
F
070
046
01000110
G
071
047
01000111
H
072
048
01001000
I
073
049
01001001
J
074
04A
01001010
K
075
04B
01001011
L
076
04C
01001100
M
077
04D
01001101
N
078
04E
01001110
O
079
04F
01001111
P
080
050
01010000
Q
081
051
01010001
R
082
052
01010010
S
083
053
01010011
T
084
054
01010100
© 2013 Conrad Electronic
Compiler
U
085
055
01010101
V
086
056
01010110
W
087
057
01010111
X
088
058
01011000
Y
089
059
01011001
Z
090
05A
01011010
[
091
05B
01011011 Left Opening Bracket
\
092
05C
01011100 Back Slash
]
093
05D
01011101 Right Closing Bracket
^
094
05E
01011110 Caret
DEC
HEX
BIN
_
095
05F
01011111 Underscore
`
096
060
01100000
a
097
061
01100001
b
098
062
01100010
c
099
063
01100011
d
100
064
01100100
e
101
065
01100101
f
102
066
01100110
g
103
067
01100111
h
104
068
01101000
i
105
069
01101001
j
106
06A
01101010
k
107
06B
01101011
l
108
06C
01101100
m
109
06D
01101101
n
110
06E
01101110
o
111
06F
01101111
p
112
070
01110000
CHA
Description
R
© 2013 Conrad Electronic
220
221
C-Control Pro IDE
q
113
071
01110001
r
114
072
01110010
s
115
073
01110011
t
116
074
01110100
u
117
075
01110101
v
118
076
01110110
w
119
077
01110111
x
120
078
01111000
y
121
079
01111001
z
122
07A
01111010
{
123
07B
01111011 Left Opening Brace
|
124
07C
01111100 Vertical Bar
}
125
07D
01111101 Right Closing Brace
~
126
07E
01111110 Tilde
DEL
127
07F
01111111 Delete
© 2013 Conrad Electronic
Part
5
223
5
C-Control Pro IDE
Libraries
In this part of the documentation all attached Help functions are described which allow the user to
comfortably gain access to the hardware. At the beginning of each function the syntax for CompactC
and BASIC is shown. After that the description of functions and involved parameters will follow.
5.1
Internal Functions
To allow the Compiler to recognize the internal functions present in the Interpreter these functions
must be defined in library "IntFunc_Lib.cc". If this library is not tied in no outputs can be performed
by the program. The following would e. g. be a typical entry in "IntFunc_Lib.cc":
void Msg_WriteHex$Opc(0x23)(Word val);
This definition states that the function ("Msg_WriteHex") in the Interpreter is called up by a jump vector of 0x23 and a word has to be transferred to the stack as a parameter.
Changes in the library "IntFunc_Lib.cc" may cause that the functions declared there can no
longer be executed correctly.
5.2
General
In this chapter all single functions are collected that cannot be categorized to other chapters in the
library.
5.2.1
AbsDelay
General Functions
Syntax
void AbsDelay(word ms);
Sub AbsDelay(ms As Word);
Description
The function Absdelay() waits for a specified number of milliseconds.
This function works in a very accurate manner, but suspends the bytecode interpreter. A thread change
will not happen during this time. Interrupts are recognized, but will not be processed since the interpreter
is necessary for this operations.
Please use Thread_Delay instead of AbsDelay if you work with threads. If you call an AbsDelay(1000)
in an endless loop nevertheless, the following will happen: Since the thread is changing after 5000 cycles
(default value) to the next thread, the next thread will begin after after about 5000 * 1000ms. This happens
because an AbsDelay() call will be treated like on cycle.
© 2013 Conrad Electronic
Libraries
224
Parameter
ms
5.2.2
wait duration in milliseconds
ForceBootloader (AVR32Bit)
General Functions
Syntax
void ForceBootloader(void);
Sub ForceBootloader();
Description
Jumps into the bootloader. After that, the unit is again available for commands, eg to update the software.
Parameter
None
5.2.3
Sleep (Mega)
General Functions
Syntax
void Sleep(byte ctrl);
Sub Sleep(ctrl As Byte)
Description
Using this function the Atmel CPU is set in one of the 6 different sleep modes. The exact functionality is
provided in the Atmel Mega Reference Manual in the chapter "Power Management and Sleep Modes". The
value of ctrl is written into the bits SM0 and SM2. The sleep enable bit (SE in MCUCR) is set and an assembler sleep instruction is executed.
Parameter
ctrl Initialization (SM0 to SM2)
Sleep Modes
SM2
0
© 2013 Conrad Electronic
SM1
0
SM0
0
Sleep Mode
Idle
225
C-Control Pro IDE
0
0
0
1
1
1
1
0
1
1
0
0
1
1
5.3
Analog-Comparator
5.3.1
Mega
1
0
1
0
1
0
1
ADC Noise Reduction
Power-down
Power-save
Reserved
Reserved
Standby
Extended Standby
The Analog Comparator allows to compare two analog signals. The result of this comparison is returned
as either "0" or "1". Voltages of between 0 and 5V can be compared at the positive and negative inputs.
5.3.1.1
AComp
AComp Functions
Example
Syntax
void AComp(byte mode);
Sub AComp(mode As Byte);
Description
The Analog Comparator allows to compare two analog signals. The result of this comparison is returned
as either "0" or "1". ( Comparator Output ). The negative input is Mega32: AIN1 (PortB.3), Mega128: AIN1
(PortE.3). The positive input can either be Mega32: AIN0 (PortB.2), Mega128: AIN0 (PortE.2) , or an internal
reference voltage of 1,22V.
Parameter
mode working mode
Mode Values:
00 (Hex)
40 (Hex)
80 (Hex)
5.3.1.2
external inputs (+)AIN0 and (-)AIN1 are used
external Input (-)AIN1and internal reference voltage are used
Analog-Comparator gets disabled
AComp Example
Example: Usage of Analog-Comparators
// AComp: Analog Comparator
© 2013 Conrad Electronic
Libraries
226
// Mega32: Input (+) PB2 (PortB.2) bzw. band gap reference 1,22V
//
Input (-) PB3 (PortB.3)
// Mega128: Input (+) PE2 (PortE.2) bzw. band gap reference 1,22V
//
Input (-) PE3 (PortE.3)
// used Library: IntFunc_Lib.cc
//
//
//
//
//
//
//
//
//
The function AComp returns the value of the comparator.
If the voltage on input PB2/PE2 is greater than the input PB3/PE3 the
function AComp returns the value 1.
Mode:
0x00 external inputs (+)AIN0 and (-)AIN1 are used
0x40 external input (-)AIN1 and the internal reference voltage are used
0x80 the Analog-Comparator is disabled
In this example you can call AComp with parameter 0 (both inputs are used)
or with 0x40 (int. reference voltage on (+) input, external Input PB3/PE3)
//-----------------------------------------------------------------------------// main program
//
void main(void)
{
while (true)
{
if (AComp(0x40)==1)
// Input (+) band gap reference 1,22V
{
Msg_WriteChar('1');
// Output: 1
}
else
{
Msg_WriteChar('0');
// Output: 0
}
// the comparator value is read all 500ms
AbsDelay(500);
}
}
5.3.2
AVR32Bit
The Analog Comparator allows to compare two analog signals. The result of this comparison is returned
as either "0" or "1". Voltages of between 0 and 3.3V can be compared at the positive and negative inputs.
© 2013 Conrad Electronic
227
5.3.2.1
C-Control Pro IDE
AC_Disable
Analog Compare Functions
Example
Syntax
void AC_Disable(byte ctrl);
Sub AC_Disable(ctrl As Byte);
Description
Turns the specified Analog Comparator off.
Parameter
ctrl Analog Comparator (0 - 1)
5.3.2.2
AC_Enable
Analog Compare Functions
Example
Syntax
void AC_Enable(byte ctrl, byte in_pos, byte in_neg);
Sub AC_Enable(ctrl As Byte, in_pos As Byte, in_neg As Byte);
Description
Turns the Analog Comparator on. The Atmel AVR32 has 2 Analog Comparators. The table shows
which port inputs can be used for which comparator (Ctrl 0, Ctrl 1), and for what input parameter (in_pos or
in_neg). Only inputs on the same comparator can be compared, but both comparators can work on the
same time. A hysteresis of 0 is used.
Due to the used TQFP100 version of the processor, Analog Comparator 0 has fewer choices for
the selection of the input pins than Comparator 1.
Parameter
ctrl
Analog Comparator (0 - 1)
in_pos Input V_ip
in_neg Input V_in
Table Analog Comparator Pin Selection
#define
Port
Value
Ctrl 0
Ctrl 1
AC_AC0AP0
P18
0
in_pos
-
© 2013 Conrad Electronic
Libraries
AC_AC0AN0
AC_AC0BP0
AC_AC1AP0
AC_AC1AP1
AC_AC1AN0
AC_AC1AN1
AC_AC1BP0
AC_AC1BP1
5.3.2.3
P20
P21
P25
P11
P24
P12
P26
P13
1
2
0
1
2
3
4
5
in_neg
in_neg
-
228
in_pos
in_pos
in_neg
in_neg
in_neg
in_neg
AC_InpHigher
Analog Compare Functions
Example
Syntax
byte AC_InpHigher(byte ctrl);
Sub AC_Disable(ctrl As Byte) As Byte;
Description
Returns whether the voltage of in_pos is greater than the voltage of in_neg.
Parameter
ctrl Analog Comparator (0 - 1)
Return Parameter
Not zero, if in_pos is greater than in_neg.
5.3.2.4
AC Example
// AVR32Bit Analog Comparator Example
void main(void)
{
AC_Enable(0, AC_AC0AP0, AC_AC0AN0);
while(1)
{
if(AC_InpHigher(0)) Msg_WriteText("AC_AC0AP0 > AC_AC0AN0\r");
else Msg_WriteText("AC_AC0AP0 < AC_AC0AN0\r");
AbsDelay(500); // 500ms delay
}
}
© 2013 Conrad Electronic
229
C-Control Pro IDE
5.4
Analog-Digital-Converter
5.4.1
Mega
The Micro Controller has an Analog Digital Converter with a resolution of 10 Bit. I. e. measured
voltages can be displayed as integral numbers from 0 through 1023. Reference voltage for the lower
limit is GND level (0V). The reference voltage for the upper limit can be selected at will.
External Reference Voltage
AVCC with capacitor on AREF
Internal Reference Voltage 2.56V with capacitor on AREF
Analog Inputs ADC0 ... ADC7, ADC_BG, ADC_GND
For the ADC the Inputs ADC0 ... ADC7 (Port A.0 to A.7 with Mega32, Port F.0 to F.7 with
Mega128), an internal Band Gap (1.22V) or GND (0V) are available. ADC_BG and ADC_GND can
be used for review of the ADC.
If x is a digital measuring value then the corresponding voltage value u is calculated as follows:
u = x * Referenc e V oltage / 1024
If the external reference voltage e. g. produced by a reference voltage IC is 4.096V, then the difference of one bit of the digitized measuring value corresponds to a voltage difference of 4mV, or:
u = x * 0,004V
The result of an A/D conversion can be influenced, if any Port Bit (configured for output) on the same
Port as the A/D channel, is changed during the measurement.
Differential Inputs
ADC22x10
ADC23x10
ADC22x200
ADC23x200
ADC20x1
ADC21x1
ADC22x1
ADC23x1
ADC24x1
ADC25x1
Differential
Differential
Differential
Differential
Differential
Differential
Differential
Differential
Differential
Differential
Inputs
Inputs
Inputs
Inputs
Inputs
Inputs
Inputs
Inputs
Inputs
Inputs
ADC2,
ADC2,
ADC2,
ADC2,
ADC2,
ADC2,
ADC2,
ADC2,
ADC2,
ADC2,
ADC2,
ADC3,
ADC2,
ADC3,
ADC0,
ADC1,
ADC2,
ADC3,
ADC4,
ADC5,
Gain 10
Gain 10
Gain 200
Gain 200
Gain 1
Gain 1
Gain 1
Gain 1
Gain 1
Gain 1
; Offset Measurement
; Offset Measurement
; Offset Measurement
ADC2 is the negative input.
The ADC can also perform differential measurements. The result can either be positive or negative.
The resolution during differential operation amounts to +/- 9 bit and is displayed in Two's Complement format. For differential operation an amplifier with gains of V: x1, x10, x200 is available. If x is a
digital measuring value then the corresponding voltage value u is calculated as follows:
© 2013 Conrad Electronic
Libraries
230
u = x * Reference Voltage / 512 / V
5.4.1.1
ADC_Disable
ADC Functions
Syntax
void ADC_Disable(void);
Sub ADC_Disable()
Description
This function disables to the A/D-Converter to reduce power consumption.
Parameter
None
5.4.1.2
ADC_Read
ADC Functions
Syntax
word ADC_Read(void);
Sub ADC_Read() As Word
Description
The function ADC_Read delivers the digitized measured value from one of the 8 ADC ports. The port number (0..7) has been given as a parameter in the call of ADC_Set(). The result is in the range from 0 to 1023
according to the 10bit resolution of the A/D-Converter. The analog inputs ADC0 to ADC7 can be measured
against ground, or differentiation measurement with gain factor of 1/10/100 can be made.
Return Parameter
measured value at the ADC-Port
5.4.1.3
ADC_ReadInt
ADC Functions
Syntax
word ADC_ReadInt(void);
© 2013 Conrad Electronic
231
C-Control Pro IDE
Sub ADC_ReadInt() As Word
Description
This function is used to read the measurement value after a successful ADC-Interrupt. The ADC-Interrupt
gets triggered after the AD conversion is completed and a new measurement value is available. See
ADC_SetInt and ADC_StartInt. The function ADC_Read delivers the digitized measured value from one of
the 8 ADC ports. The port number (0..7) has been given as a parameter in the call of ADC_Set(). The result
is in the range from 0 to 1023 according to the 10bit resolution of the A/D-Converter. The analog inputs
ADC0 to ADC7 can be measured against ground, or differentiation measurement with gain factor of
1/10/100 can be made.
Return Parameter
measured value of ADC-Port
5.4.1.4
ADC_Set
ADC Functions
Syntax
word ADC_Set(byte v_ref, byte channel);
Sub ADC_Set(v_ref As Byte, channel As Byte) As Word
Description
The function ADC_Set initializes the Analog-Digital converter. The reference voltage and the measurement
channel number is selected and the A/D converter is prepared for usage. After the measurement the value
is read with ADC_Read().
The result of an A/D conversion can be influenced, if any Port Bit (configured for output) on the same
Port as the A/D channel, is changed during the measurement.
Parameter
channel
v_ref
port number (0..7)of ADC (Port A.0 to A.7 at Mega32, Port F.0 to F.7 at Mega128)
reference voltage (see table)
Name
Value (Hex)
ADC_VREF_BG
ADC_VREF_VCC
ADC_VREF_EXT
C0
40
00
Description
2,56V internal reference voltage
supply voltage (5V)
external reference voltage on PAD3
For the location of PAD3 see Jumper Application Board M32 or M128.
© 2013 Conrad Electronic
Libraries
5.4.1.5
232
ADC_SetInt
ADC Functions
Syntax
word ADC_SetInt(byte v_ref, byte channel);
Sub ADC_SetInt(v_ref As Byte, channel As Byte) As Word
Description
The function ADC_SetInt initializes the Analog-Digital converter for interrupt usage. The reference voltage
and the measurement channel number is selected and the A/D converter is prepared for the measurement. An interrupt service routine must be defined. After successful interrupt the value can be read with
ADC_ReadInt().
The result of an A/D conversion can be influenced, if any Port Bit (configured for output) on the same
Port as the A/D channel, is changed during the measurement.
Parameter
channel
v_ref
port number (0..7)of ADC (Port A.0 to A.7 at Mega32, Port F.0 to F.7 at Mega128)
reference voltage (see table)
Name
Value (Hex)
ADC_VREF_BG
ADC_VREF_VCC
ADC_VREF_EXT
C0
40
00
Description
2,56V internal reference voltage
supply voltage (5V)
external reference voltage on PAD3
For the location of PAD3 see Jumper Application Board M32 or M128.
5.4.1.6
ADC_StartInt
ADC Functions
Syntax
void ADC_StartInt(void);
Sub ADC_StartInt()
Description
The measurement is started if the A/D converter has previously been initialized to interrupt service with a
call to ADC_SetInt(). After the measurement is ready, the interrupt gets triggered.
Parameter
None
© 2013 Conrad Electronic
233
5.4.2
C-Control Pro IDE
AVR32Bit
The microcontroller has an Analog-to-Digital converter with a selectable resolution of 8/10/12 bits.
This means that measured voltages can be represented as whole numbers from -2048 to 2048, since
the AD-converter always works differential. In addition, an ADC preamplifier gain of 1, 2, 4, 8, 16, 32,
64 can be set by software.
The following reference voltage sources are available:
0,6 * VDDANA internal (0,6 * 3.3V = 1,98V)
internal reference voltage of 1V
two external reference voltage inputs, e.g. 2.048V generated by reference-voltage-IC
If "x" is a digital measurement value, calculate the corresponding voltage value "u" as follows:
The resolution depends on the configuration of the ADC.
Resolution
8 Bit
10 Bit
12 Bit
Maximal Value
-128 to +127
-512 to +511
-2048 to +2047
Formula for calculating the present ADC voltage:
u = x * reference voltage / resolution
5.4.2.1
ADC_Disable
ADC Functions
Syntax
void ADC_Disable(void);
Sub ADC_Disable()
Description
The function ADC_Disable turns off the A/D-Converter to reduce power consumption.
Parameter
None
5.4.2.2
ADC_Enable
ADC Functions
Syntax
void ADC_Enable(byte mode, dword speed, byte ref, byte input_cnt, char
© 2013 Conrad Electronic
Libraries
234
offset);
Sub ADC_Enable(mode As Byte, speed As ULong, ref As Byte, input_cnt As
Byte, offset As Char)
Description
The ADC sequencer in the AVR32 can carry up to 8 A/D-conversions at the same time. An A/D-conversion can be a differential measurement between an ADC pin and GND, or a differential measurement between two pins. See ADC_SetInput.
For the mode parameter various properties can be ORed (this of course only makes sense with one
ADC resolution). Oversampling and Sample & Hold can be turned off. If enabled, an interrupt is
triggered when an ADC measurement is finished (see interrupt Table).
ADC_Start has to be called for each new measurement. The end of the measurement can be displayed via interrupt, or use ADC_GetValues with the parameter ADC_GET_WAIT. Is the Free Running mode selected, ADC_Start is called only once, after that the inputs are continuously measured,
and ADC_GetValues always returns the value of the last measurement.
Please look into the datasheet AT32UC3C for the exact meaning of oversampling and sample &
hold, and the impact on the measurements.
If ADC is set to very high speeds and the interrupt is enabled, this can overwhelm the interpreter.
Parameter
mode
speed
ref
input_cnt
offset
work modes (see Table)
ADC Clock (32khz - 1.5Mhz)
reference Voltage (see Table)
number of ADC Pins (1-8)
correction factor (-128 to 127)
Mode Table
Definition
Function
ADC_MODE_12BIT
ADC_MODE_8BIT
ADC_MODE_10BIT
ADC_MODE_NO_OVERSAMP
ADC 12-Bit resolution
ADC 8-Bit resolution
ADC 10-Bit resolution
turns Oversampling off
ADC_MODE_ENAB_IRQ
activates ADC IRQ
ADC_MODE_NO_SAMPHOLD
ADC_MODE_FREE_RUN
no Sample & Hold
activates Free Running
Reference Voltage Table
Definition
Function
ADC_REF1V
internal 1V Reference
© 2013 Conrad Electronic
235
C-Control Pro IDE
ADC_REF06VDD
ADC_ADCREF0
ADC_ADCREF1
5.4.2.3
internal 0.6 x VDDANA Reference
external ADCREF0 Reference
external ADCREF1 Reference
ADC_GetValue
ADC Functions
Syntax
int ADC_GetValue(byte indx);
Sub ADC_GetValue(indx As Byte) As Integer
Description
The function reads a measured value from the A/D-converter. The indx parameter corresponds to the entry
in the inputs array in ADC_Enable(). If the value ADC_GET_WAIT (80 Hex) is ORed to indx, then the function
waits for the completion of all ADC measurements before the value is returned.
The ADC_GET_WAIT functionality should not be used in "free running" mode, or when the ADC is
switched off.
Parameter
indx
index of measured A/D value
Return Parameter
measured A/D value
5.4.2.4
ADC_GetValues
ADC Functions
Syntax
void ADC_GetValues(int values[], byte cnt);
Sub ADC_GetValues(Byref values As Integer, cnt As Byte)
Description
The function read the measured values from the A/D-converter and copies them into a 16-bit array. If the
value ADC_GET_WAIT (80 Hex) is ORed to cnt, then the function waits for the completion of all ADC measurements before the values are copied.
The ADC_GET_WAIT functionality should not be used in "free running" mode, or when the ADC is
switched off.
Parameter
© 2013 Conrad Electronic
Libraries
values
cnt
5.4.2.5
236
pointer to the 16-Bit array (0-7)
number of values that are copied into the array
ADC_SetInput
ADC Functions
Syntax
void ADC_SetInput(byte indx, byte inp1, byte inp2, byte gain);
Sub ADC_Enable(indx As Byte, inp1 As Byte, inp2 As Byte, gain As Byte)
Description
The ADC sequencer in the AVR32 can carry up to 8 AD conversion at a time. The function
ADC_SetInput defines the ADC inputs between a differential measurement is carried out. If you want
to measure only one input, one define ADC_GND as the second input. In addition, a GAIN factor can
be defined.
Even if a measurement between an input and ADC_GND delivers only positive values?
, one bit of
?
the ADC resolution still remains reserved for the sign.
Parameter
index for conversion (0-7)
first AD input (0-15)
second AD input (0-15)
GAIN factor
indx
inp1
inp2
gain
GAIN Table
Definition
Meaning
ADC_SHG_1
ADC_SHG_2
ADC_SHG_4
ADC_SHG_8
gain factor 1
gain factor 2
gain factor 4
gain factor 8
gain factor 16
gain factor 32
gain factor 64
ADC_SHG_16
ADC_SHG_32
ADC_SHG_64
5.4.2.6
ADC_Start
ADC Functions
Syntax
void ADC_Start(void);
© 2013 Conrad Electronic
237
C-Control Pro IDE
Sub ADC_Start()
Description
The built-in A / D converter starts to convert analog data.
Parameter
None
5.4.2.7
ADC Example
// program to read the measured data from two ADC pins
void main(void)
{
int result[2];
char str[40];
ADC_Disable();
ADC_SetInput(0, 2, ADC_GND, ADC_SHG_1);
ADC_SetInput(1, 5, ADC_GND, ADC_SHG_4);
// activate ADC2 - Gain 1
// activate ADC5 - Gain 4
//12Bit ADC,free running,1MHz sampling rate,reference 1V,offset 0
ADC_Enable(ADC_MODE_12BIT | ADC_MODE_FREE_RUN, 1000000, ADC_REF1V,
2, 0);
ADC_Start();
while(1)
{
ADC_GetValues(result, 2); // read values
Str_Printf(str, "adc2: %d\r", result[0]);
Msg_WriteText(str);
Str_Printf(str, "adc5: %d\r", result[1]);
Msg_WriteText(str);
AbsDelay(300);
}
}
5.5
CAN Bus
The CAN bus (Controller Area Network Data Sheet) is an asynchronous serial bus system and belongs to the field buses. It is internationally standardized in ISO 11898 and defines the Layer 1
(physical layer) and 2 (data security layer).
The CAN-bus was developed in 1983 from Bosch. Originally, the CAN-Bus was developed for the
automotive sector, because with increasing vehicle electronics the wiring harnesses got larger, and a
solution for weight and cost reduction had to be found. This successful and very safe approach is not
© 2013 Conrad Electronic
Libraries
238
only used today in the automotive industry, but also in the areas of automation, aviation, aerospace
and medical technology.
The C-Control Manual cannot provide an introduction to the CAN standard, due to the complexity of the topic. Prior knowledge about the CAN standard and Full CAN message objects are assumed at this point. It is therefore recommended that beginner to embedded controllers will not work
directly with the CAN bus. A good summary of CAN and Message Objects provides the "Atmel
AT90CAN" Reference Manual Chapter 19, "Controller Area Network - CAN".
MEGA128CAN
The CAN signals of the C-Control Pro MEGA128CAN are available on pins X4_13 (CANL) and X4_14
(CANH) .
AVR32Bit
In the C-Control Pro AVR32Bit there is a CAN controller that operates two channels. But only the
first channel is connected to a transceiver, which is led out on the application board. On the Mainboard CAN1 is led out through a socket connector (without transceiver). The lines CANH and CANL
are passed out on the module connector X1. To use the second channel, the user must connect a
transceiver himself. As an example, the data sheet of the AVR32 module can be used. The second
Controller is on Port 1 (CAN_TX, PA00) and Port 2 (CAN_RX, PA01).
Network
Multiple CAN-bus network participants can be connected over the two pins (CAN-H and CAN-L). The
first and last stations have to be completed with a 120 Ohm resistor. As a data cable, a twisted pair
cable should be used. For shorter distances of a few centimeters up to 2 meters, even a simple parallel cable (twin lead) can be used.
The UNIT supports the low- and high-speed bus (MEGA128CAN 10 kbit/s to 1 Mbit/s, AVR32Bit 50
kbit/s to 1 Mbit/s). For theoretical line lengths, depending on the bus speed, see the chart below.
Speed
Cable Length
1 Mbit/s
40m
Up to 500 kbit/s
100m
Up to 125 kbit/s
500m
© 2013 Conrad Electronic
239
C-Control Pro IDE
Less than 125 kbit/s
Up to 1000m
The line lengths are highly dependent on the used cables and the number of participants. It is possible to use a "twist-pair cables with a characteristic impedance 108-132 Ohm. A maximum of 32
MEGA128CAN units can operate on a bus. It is best to start at the theoretical maximum speed for
the used cable length, and to lower the transfer rate when there is no packet transfer at all or there
occur too many packet errors.
The MEGA128CAN supports the "Base frame format" CAN 2.0A (11 bit identifier) and the extended
frame format "CAN 2.0B (29 bit identifier).
To use the CAN bus in your own projects together with the C-Control Pro Mega128 CAN, it is essential to understand the CAN data format and the technical details of the CAN bus. Background information can be found in books and in Wikipedia: http://en.wikipedia.org/wiki/Controller_Area_Network
Message Objects
The active CAN bus controller works with 15 (MEGA128CAN) or 16 (AVR32Bit) independent message objects (MOb) with which one can send and receive messages with certain identifiers. For this
purpose the message objects are parametrized with CAN_SetMOb() for the related task.
Message Objects with a low MOb number have always precedence before a MOb with a higher
number. When two MOb's are capable to receive a certain message, the message will be received
from the MOb with the lower number.
CAN Protocol
The CAN bus controller can simultaneously process normal packets (CAN 2.0A) and extended
packets (CAN 2.0B). CAN bus identifier are passed as 32-bit dword (ULong). Depending on the type
of packets an identifier is 11-bit (V2.0 part A) or 29-bit long (V2.0 part B). The unused bits are ignored. The maskID determines which packages are received for a specific identifier (ID). Only the
bits in the maskID that are "1" are to be reviewed at a bit comparison between the set identifier and
the ID of the incoming packet.
automatic reply
If a Message Object is set to automatic reply, the MOb inherits the Data Length Code (DLC) of the
incoming remote trigger package. I.e. the sender of the trigger packet determines with the DLC the
number of data bytes that are sent in the reply packet.
Message FIFO
During the initialization of the CAN library the user provides RAM for the message FIFO, in which all
incoming CAN packets are stored. The received messages can then be read asynchronously from
the FIFO.
© 2013 Conrad Electronic
Libraries
5.5.1
240
CAN Examples
In this chapter some initialization examples are given to clarify the operation of the CAN Library.
Initialization
In any event, the CAN library must be initialized before use. This example is for the CAN bus at a
speed of 1 mega bps, and for a FIFO RAM with 10 entries.
byte fifo_buf[140];
CAN_Init(CAN_1MBPS, 10, fifo_buf);
Reception
1. On MOb 2 messages of type CAN 2.0A are received, that have exactly an identifier of 0x123.
CAN_SetMOb(2, 0x123, 0x7ff, CAN_RECV);
2. On MOb 3 messages of type CAN 2.0B are received, that have exactly an identifier of 0x12345.
CAN_SetMOb(3, 0x12345, 0x1fffffff, CAN_RECV|CAN_EXTID);
3. On MOb 3 messages of type CAN2.0A and CAN 2.0B are received, because the
CAN_IGN_EXTID flag is set. Because the maskID is null messages with all identifiers are received.
Since CAN_IGN_RTR is set, normal and trigger packets are accepted.
CAN_SetMOb(3, 0x12345, 0, CAN_RECV|CAN_IGN_EXTID|CAN_IGN_RTR);
4. On MOb 2 messages of type CAN 2.0A are received, that have an identifier of 0x120, 0x121,
0x122 or 0x123.
CAN_SetMOb(2, 0x120, 0x7fc, CAN_RECV);
Send
1. On MOb 0 is sent a CAN 2.0A message with ID 0x432 and 6 data byte.
byte data[8], i;
for(i=0;i<8;i++) data[i]=i;
CAN_SetMOb(0, 0x432, 0, CAN_SEND);
CAN_MObSend(0, 6, data);
2. On MOb 1 a CAN 2.0B message will be sent with ID 0x12345678 and 8 data.
© 2013 Conrad Electronic
241
C-Control Pro IDE
byte data[8], i;
for(i=0;i<8;i++) data[i]=i;
CAN_SetMOb(1, 0x12345678, 0, CAN_SEND|CAN_EXTID);
CAN_MObSend(1, 8, data);
Automatic Reply
MOb 4 is set to automatic reply. The data bytes provided with CAN_SetMOb () are sent when a CAN
2.0B trigger message is received with ID of 0x999. The number of transmitted data bytes depends on
the DLC incoming trigger message.
byte data[5], i;
for(i=0;i<5;i++) data[i]=i;
CAN_SetMOb(4, 0x999, 0x1fffffff, CAN_REPL|CAN_EXTID);
CAN_MObSend(4, 5, data);
5.5.2
CAN_Exit
CAN Bus Functions
Syntax
void CAN_Exit(void);
Sub CAN_Exit()
Description
The CAN chip functions are turned off.
Parameter
None
5.5.3
CAN_GetInfo
CAN Bus Functions
Syntax
byte CAN_GetInfo(byte infotype);
Sub CAN_GetInfo(infotype As Byte) As Byte
Description
© 2013 Conrad Electronic
Libraries
242
Returns information about the number of received CAN messages and CAN transmission errors.
Parameter
infotype
selected CAN Bus information
Return Parameter
CAN Library information
infotype parameter:
Value
1
2
3
5.5.4
Definition
CAN_MSGS
CAN_ERR_RECV
CAN_ERR_TRAN
Meaning
Number of already received CAN messages in the FIFO
Number of CAN receive errors (max. 255)
Number of CAN send errors (max. 255)
CAN_Init
CAN Bus Functions
Syntax
void CAN_Init(byte speed, byte fifo_len, byte fifo_addr[]);
Sub CAN_Init(speed As Byte, fifo_len As Byte, ByRef fifo_addr As Byte);
Description
Initializes the CAN functions. During initialization the user provides a RAM buffer for the reception of CAN
messages. Inside this buffer a total of fifo_len messages can be stored. The RAM area must have the size
fifo_len * 14 bytes. If the FIFO is full, incoming CAN messages are not stored.
The user-provided RAM buffer must remain reserved during the use of the CAN interface. Since local
variables will be released after leaving the function, it usually makes sense to declare the buffer as a
global variable.
Parameter
speed
CAN Bus transmission speed
fifo_len
Number of entries in the receive FIFO
fifo_addr RAM address of the reception buffer
speed parameter:
Value
© 2013 Conrad Electronic
Definition
CAN Baudrate
243
C-Control Pro IDE
0
1
2
3
4
5
6
7
8
9
5.5.5
CAN_10KBPS
CAN_20KBPS
CAN_40KBPS
CAN_100KBPS
CAN_125KBPS
CAN_200KBPS
CAN_250KBPS
CAN_500KBPS
CAN_800KBPS
CAN_1MBPS
10.000bps
20.000bps
40.000bps
100.000bps
125.000bps
200.000bps
250.000bps
500.000bps
800.000bps
1.000.000bps
CAN_Receive
CAN Bus Functions
Syntax
byte CAN_Receive(byte data[]);
Sub CAN_Receive(ByRef data As Byte) As Byte
Description
If messages are in the receive FIFO, the 14-byte data is copied in the user array, which must have a length
of 14 bytes. Is bit 31 of the IDT is set in the received message, then RTR was set in the CAN packet.
Parameter
data
Array in which the CAN message is copied
Return Parameter
Length of CAN packet (0-8 Byte) or ff (Hex) if no packet was in buffer
Structure of the data set
Byte 0:
Byte 1-4:
Byte 5:
Byte 6-13:
5.5.6
MOb Number (0-14)
29-Bit IDT (at V2.0 part A Msgs the upper bits are null)
Length of CAN Data (0-8)
Packetdata
CAN_MObSend
CAN Bus Functions
Syntax
void CAN_MObSend(byte mob, byte len, byte data[]);
Sub CAN_MObSend(mob As Byte, len As Byte, ByRef data As Byte);
© 2013 Conrad Electronic
Libraries
244
Description
A CAN message is sent over the bus. If, however, the CAN_REPL flag was set at CAN_SetMOb (), the data
for the automatic reply will be saved and not sent immediately.
Parameter
mob
len
data
5.5.7
MOb Number (0-14)
Length of the data to send
Array in der
CAN_SetChan (AVR32Bit)
CAN Bus Functions
Syntax
void CAN_SetChan(byte chan);
Sub CAN_SetChan(chan As Byte)
Description
Selects a CAN channel (CAN0 or CAN1) for further access.
The C-Control Pro Mega128 CAN only has one CAN channel.
Parameter
chan CAN Bus channel (0 - 1)
5.5.8
CAN_SetMOb
CAN Bus Functions
Syntax
void CAN_SetMOb(byte mob, dword ID, dword maskID, byte flag);
Sub CAN_SetMOb(mob As Byte, ID As ULong, maskID As ULong, flag As Byte);
Description
With this function, the parameters for a Message Object (MOB) are set. The identifier and the identifier
mask is passed as a dword (ULong). WHen used with a 11-bit identifier, the upper bits are ignored. The
maskID is used only during reception. Only when a bit is set in the maskID, the received messages are
checked at the same bit position in the identifier whether the received identifier matches.
© 2013 Conrad Electronic
245
C-Control Pro IDE
Parameter
mob
ID
maskID
flag
MOb Number(0-14)
Identifier
Identifier Mask
Operation parameter for the Message Object (MOb)
flag Parameter:
Value (Hex)
01
02
04
08
10
20
40
5.6
Definition
CAN_RECV
CAN_RTR
CAN_EXTID
CAN_REPL
CAN_IGN_RTR
CAN_IGN_EXTID
CAN_SEND
Description
Messages are received on this MOb
The Remote Trigger Bit is set
The CAN Message has a 29-Bit ID (V2.0 part B)
Automatic Reply is initialized
RTR is not set in ID Mask
IDEMSK is not set in ID Mask
Messages are sent on this MOb
Clock
Mega
The internal software clock is clocked by the 10ms interrupt of Timer2. Time and date can be set and then
continue to run independently. Leap years are taken into account. Depending on the Quartz inaccuracy the
error is between 4-6 seconds per day. A correction factor in 10ms ticks can be applied, that is added every
hour to the internal counter.
Example: If you have a deviation of 9.5 sec for 2 days, then you have to correct a deviation of 9.5 / (2 * 24) =
0.197 sec. This corresponds to a correction factor of 20, if the software clock goes in advance, or -20 else.
When Timer 2 off, or used for other purposes, the internal software clock is not functional.
AVR32Bit
Inside the AVR32Bit Unit the builtin AVR32 Real Time Clock module is used for the clock functions.
In addition, the external 32khz crystal offers here a far more accuracy than the clock oscillator of the
C-Control Pro Mega Units. Therefore, the correction factor remains unused in the C-Control Pro
AVR32Bit.
5.6.1
Clock_GetVal
Clock Functions
Syntax
byte Clock_GetVal(byte indx);
Sub Clock_GetVal(indx As Byte) As Byte
© 2013 Conrad Electronic
Libraries
Description
All Date and Time values of the internal software clock can be read.
The values of day and month are zero based, a one should be added when printing.
Parameter
indx
index of date or time parameter
#define
CLOCK_SEC
CLOCK_MIN
CLOCK_HOUR
CLOCK_DAY
CLOCK_MON
CLOCK_YEAR
Index
0
1
2
3
4
5
Meaning
Second
Minute
Hour
Day
Month
Year
Return Parameter
requested time parameter
5.6.2
Clock_SetDate
Clock Functions
Syntax
void Clock_SetDate(byte day, byte mon, byte year);
Sub Clock_SetDate(day As Byte, mon As Byte, year As Byte)
Description
Sets the date of the internal software clock.
The values of day and month are zero based.
Parameter
day
mon
year
Day
Month
Year
© 2013 Conrad Electronic
246
247
5.6.3
C-Control Pro IDE
Clock_SetTime
Clock Functions
Syntax
void Clock_SetTime(byte hour, byte min, byte sec, char corr);
Sub Clock_SetTime(hour As Byte, min As Byte, sec As Byte, corr As Char)
Description
Sets the time of the internal software clock. For a description of the correction factor refer to chapter Clock.
The correction factor is unused in the AVR32Bit, you can specify any value there.
Parameter
hour
min
sec
corr
5.7
Hour
Minute
Second
Correction Factor
DCF 77
All DCF routines are realized in library "LCD_Lib.cc". For use of this function the library
"DCF_Lib.cc" has to be tied into the project.
RTC with DCF 77 Time Synchronization
The DCF 77 Time Signal
The logical informations (time informations) are transmitted in addition to the normal frequency (carrier frequency of the transmitter, i. e. 77.5 kHz). This is performed by negative modulation of the signal (decrease of carrier amplitude to 25%). The start of the decrease lies at the respective beginning
of the seconds 0 … 58 within a minute. In second 59 there is no decrease, so the following second
mark can indicate the beginning of a minute and the receiver can be synchronized. The sign duration
yields the logical value of the signs: 100 ms are "0", 200 ms are "1". Because of this there are 59
bits for informations available within one minute. From these the second marks 1 through 14 are
used for operation informations which are not meant for DCF77 users. The second marks 15 through
19 indicate the transmitter antenna, the time zone and will give notice of coming time changes.
From second 20 through 58 the time information for the respective following minute will be transmitted serially in from of BCD numbers, whereby in any case the least significant bit will be the start bit.
Bits
Meaning
20
21 - 27
Start bit (in any case "1")
Minute
© 2013 Conrad Electronic
Libraries
28
29 - 34
35
36 - 41
42 - 44
45 - 49
50 - 57
58
248
Parity Minute
Hour
Parity Hour
Day of the Month
Weekday
Month
Year
Parity Date
This signifies that reception must be in progress for at least one full minute before time information
can be provided. The information decoded during this minute is only secured by three parity bits. So
two incorrectly received bits will already lead to a transmission error that can not be recognized in
this way. For higher demands additional checking mechanisms can be used, such as plausibility
check (is the received time within the admissible limits) or multiple reading of the DCF77 time information with data comparison. Another possibility would be to compare the DCF time with the current RTC time and only allow a specific deviation. This method does not work right after program
start since the RTC has to be set first.
Description of the example program "DCF_RTC.cc"
The program DCF_RTC.cc represents a clock which is synchronized by use of DCF 77. Time and
date are displayed on an LCD. Synchronization takes place after program start and then daily at a
time determined in the program (Update_Hour, Update_Minute). There are two libraries used:
DCF_Lib.cc and LCD_Lib.cc.
For the radio reception of the time signal a DCF77 receiver is necessary. The output of the DCF receiver is connected to the input port (Mega32: PortD.7 - M128: PortF.0 AVR32Bit: P27(PA15) ). At
first the beginning of a time information has to be found. It will be synchronized onto the pulse gap
(bit 59). Following the bit will be received in seconds time. There will be a parity check after the
minute and hour information and also at the end of the transmission. The result of the parity check
will be stored in DCF_ARRAY[6]. For transfer of the time information DCF_ARRAY[0..6] will be
used. After reception of a valid time information the RTC will be set with this new time and will then
run independently. RTC as well as DCF77 decoding is controlled by a 10ms interrupt. This time base
is derived from the quartz frequency of the Controller. DCF_Mode will control the completion of the
DCF77 time reception.
Changing the input pin
The used input port is defined as DCF_IN in the library "DCF_Lib.cc".
Table DCF Modes
DCF_Mode
0
1
2
3
© 2013 Conrad Electronic
Description
No DCF 77 operation
Find pulse
Synchronization on frame start
Decode and store data. Parity check
249
C-Control Pro IDE
RTC (Real Time Clock)
The RTC is controlled by a 10ms interrupt and runs in the background independent of the user program. The display on the LCD is updated every second. The display format is in the first line: Hour :
Minute : Second, in the second line: Date of Day : Month : Year.
LED1 flashes once per second.
After program start the RTC begins with the set time. The date is set to zero and thus indicates that
no DCF time adjustment has yet taken place. After reception of the DCF time the RTC is updated
with the current data. The RTC is not backed up by a battery, i. e. the clock time will not be updated
if there is no power applied to the Controller.
5.7.1
DCF_FRAME
DCF Functions
Syntax
void DCF_FRAME(void);
Sub DCF_FRAME()
Description
Set DCF_Mode to 3 ("data decode and save, parity check").
Parameter
None
5.7.2
DCF_INIT
DCF Functions
Syntax
void DCF_INIT(void);
Sub DCF_INIT()
Description
DCF_INIT initializes DCF usage. The input of the DCF signal is adjusted. DCF_Mode is set to 0.
Parameter
None
© 2013 Conrad Electronic
Libraries
5.7.3
250
DCF_PULS
DCF Functions
Syntax
void DCF_PULS(void);
Sub DCF_PULS()
Description
Set DCF_Mode to 1 ("look for pulse").
Parameter
None
5.7.4
DCF_START
DCF Functions
Syntax
void DCF_START(void);
Sub DCF_START()
Description
DCF_START initializes all variables and sets DCF_Mode to 1. From now on DCF time recording is
working automatically.
Parameter
None
5.7.5
DCF_SYNC
DCF Functions
Syntax
© 2013 Conrad Electronic
251
C-Control Pro IDE
void DCF_SYNC(void);
Sub DCF_SYNC()
Description
Set DCF_Mode to 2 ("synchronize for frame beginning").
Parameter
None
5.8
Debug
The Debug Message Functions allow to send formatted text to the output window of the IDE. These
functions are interrupt driven with a buffer of up to 128 Byte. I. e. 128 Byte can be transferred through
the debug interface without the Mega 32 or Mega 128 Module having to wait for completion of the
output. The transmission of the individual characters takes place in the background. If it is tried to
send more than 128 Byte then the Mega RISC CPU will have to wait until all characters not fitting
into the buffer anymore have been transferred.
5.8.1
Msg_WriteChar
Debug Message Functions
Syntax
void Msg_WriteChar(char c);
Sub Msg_WriteChar(c As Char);
Description
One character is written to the output window. A C/R (Carriage Return - Value:13 ) generates a jump to the
next line (linefeed).
Parameter
c output character
5.8.2
Msg_WriteFloat
Debug Message Functions
Syntax
void Msg_WriteFloat(float val);
© 2013 Conrad Electronic
Libraries
252
Sub Msg_WriteFloat(val As Single)
Description
The passed floating point number is displayed with a preceding decimal sign.
Parameter
val float value
5.8.3
Msg_WriteHex
Debug Message Functions
Syntax
void Msg_WriteHex(word val);
Sub Msg_WriteHex(val As Word)
Description
The 16bit value is displayed in the output window. The Output is formatted as a hexadecimal value with 4
digits. Leading zeros are displayed.
Parameter
val 16bit integer value
5.8.4
Msg_WriteInt
Debug Message Functions
Syntax
void Msg_WriteInt(int val);
Sub Msg_WriteInt(val As Integer)
Description
The passed 16bit value is display in the output window. Negative values are displayed with a preceding
minus sign.
Parameter
© 2013 Conrad Electronic
253
C-Control Pro IDE
val 16bit integer value
5.8.5
Msg_WriteText
Debug Message Functions
Syntax
void Msg_WriteText(char text[]);
Sub Msg_WriteText(ByRef text As Char)
Description
All characters of a character array up to the terminating null are sent to the output window.
Parameter
text pointer to char array
5.8.6
Msg_WriteWord
Debug Message Functions
Syntax
void Msg_WriteWord(word val);
Sub Msg_WriteWord(val As Word)
Description
The parameter val is written to the output windows as an unsigned decimal number.
Parameter
val 16bit unsigned integer value
5.9
Direct Access (Mega)
The Direct Access functions allow direct access to all registers of the Atmel processor. The Register
numbers of the Atmel MEGA32 and Mega128 processors can be found in the Reference manual in
the chapter "Register Summary".
Caution! A careless reading or writing access to a register can strongly affect the functionality
of all library functions. Only someone who knows what he does, should use the Direct Access func-
© 2013 Conrad Electronic
Libraries
254
tions!
5.9.1
DirAcc_Read
Direct Access Functions
Syntax
byte DirAcc_Read(byte register);
Sub DirAcc_Read(register As Byte) As Byte
Description
A Byte is read from a Register of the Atmel CPU.
Parameter
register Register number (refer to chapter "Register Summary" in the Atmel Reference Manual)
Return Parameter
Value of Register
5.9.2
DirAcc_Write
Direct Access Functions
Syntax
void DirAcc_Write(byte register, byte val);
Sub DirAcc_Write(register As Byte, val As Byte)
Description
A Byte value is written into a Register of the Atmel CPU.
Parameter
register Register number (refer to chapter "Register Summary" in the Atmel Reference Manual)
val
Byte value
5.10
EEPROM
The C-Control Pro Modules integrate AVR32Bit:64kB M32:1kB resp. M128:4kB EEPROM. These
library functions allow access to the EEPROM of the Interpreter.
© 2013 Conrad Electronic
255
C-Control Pro IDE
5.10.1 EEPROM_Read
EEPROM Functions
Syntax
byte EEPROM_Read(word pos);
Sub EEPROM_Read(pos As Word) As Byte
Description
Reads one byte out of the EEPROM at position pos.
On the C-Control Pro Mega Units the first 32 byte are reserved for the system of the C-Control Pro.
Therefore a pos value of 0 and higher accesses the EEPROM memory at position 32 and upwards.
Parameter
pos byte position in EEPROM
Return Parameter
EEPROM value
5.10.2 EEPROM_ReadWord
EEPROM Functions
Syntax
word EEPROM_ReadWord(word pos);
Sub EEPROM_ReadWord(pos As Word) As Word
Description
Reads one word out of the EEPROM at position pos. The value of pos describes a byte position in the
EEPROM. This should be taken care of when using word or floating point accesses.
On the C-Control Pro Mega Units the first 32 byte are reserved for the system of the C-Control Pro.
Therefore a pos value of 0 and higher accesses the EEPROM memory at position 32 and upwards.
Parameter
pos byte position in EEPROM
Return Parameter
EEPROM value
© 2013 Conrad Electronic
Libraries
256
5.10.3 EEPROM_ReadFloat
EEPROM Functions
Syntax
float EEPROM_ReadFloat(word pos);
Sub EEPROM_ReadFloat(pos As Word) As Single
Description
Reads a floating point value out of the EEPROM at position pos. The value of pos describes a byte position
in the EEPROM. This should be taken care of when using word or floating point accesses.
On the C-Control Pro Mega Units the first 32 byte are reserved for the system of the C-Control Pro.
Therefore a pos value of 0 and higher accesses the EEPROM memory at position 32 and upwards.
Parameter
pos byte position in EEPROM
Return Parameter
EEPROM value
5.10.4 EEPROM_Write
EEPROM Functions
Syntax
void EEPROM_Write(word pos, byte val);
Sub EEPROM_Write(pos As Word, val As Byte)
Description
Writes one byte into the EEPROM at position pos.
On the C-Control Pro Mega Units the first 32 byte are reserved for the system of the C-Control Pro.
Therefore a pos value of 0 and higher accesses the EEPROM memory at position 32 and upwards.
Parameter
pos
val
byte position in EEPROM
new EEPROM value
© 2013 Conrad Electronic
257
C-Control Pro IDE
5.10.5 EEPROM_WriteWord
EEPROM Functions
Syntax
void EEPROM_WriteWord(word pos, word val);
Sub EEPROM_WriteWord(pos As Word, val As Word)
Description
Writes one word into the EEPROM at position pos. The value of pos describes a byte position in the
EEPROM. This should be taken care of when using word or floating point accesses.
On the C-Control Pro Mega Units the first 32 byte are reserved for the system of the C-Control Pro.
Therefore a pos value of 0 and higher accesses the EEPROM memory at position 32 and upwards.
Parameter
pos byte position in EEPROM
val new EEPROM value
5.10.6 EEPROM_WriteFloat
EEPROM Functions
Syntax
void EEPROM_WriteFloat(word pos, float val);
Sub EEPROM_WriteFloat(pos As Word, val As Single)
Description
Writes a floating point value into the EEPROM at position pos. The value of pos describes a byte position in
the EEPROM. This should be taken care of when using word or floating point accesses.
On the C-Control Pro Mega Units the first 32 byte are reserved for the system of the C-Control Pro.
Therefore a pos value of 0 and higher accesses the EEPROM memory at position 32 and upwards.
Parameter
pos byte position in EEPROM
val new EEPROM value
© 2013 Conrad Electronic
Libraries
5.11
258
Ethernet (AVR32Bit)
The C-Control Pro Unit AVR32Bit supports Ethernet hardware and protocols that follow the IEEE
802.3 standard. The associated PHY works with auto-negotiation and connects to a speed of
100Mbit or a 10Mbit, whatever speed the opposite side (eg a switch) offers. Power-over-Ethernet is
not supported. The following protocols are currently implemented:
ARP
ICMP Echo (ping)
DHCP
TCP/IP
UDP
C-Control Pro (UDP Port 50234)
HTTP (TCP/IP)
Foreknowledge
Prerequisite to understand this chapter and the successful use of the library is a basic knowledge of
the following areas of IPv4:
IP-numbers
Port addresses and significance
UDP packets
TCP/IP data stream
It is recommended to have knowledge about TCP/IP in a programming environment like the BSD
socket interface.
5.11.1 Ethernet Activation
To avoid connection problems, the MAC address should be set to a new value ("Edit MAC Address") before switching on the Ethernet support (see C-Control configuration). To this end, for each
sold C-Control Pro AVR32Bit Unit a unique MAC address is generated and supplied on a label. See
Software Installation.
In the C-Control configuration, the Ethernet Support has to be enabled. When plugging in the Ethernet connector, the yellow LED should stay on and the green LED will flash sporadically .
If DHCP is not enabled, the network parameters from the C-Control configuration will be used. The
entries of IP address, subnet mask, and gateway must be entered manually.
If DHCP is in use, the network parameters are retrieved from the DHCP server (eg DSL router or
similar). The DHCP protocol is not supported in the bootloader, but only by the interpreter. Therefore, after the DHCP is enabled in the configuration, press the reset button once to start the interpreter.
A change of the DHCP network data is stored directly in the configuration if the option save DHCP
settings is turned on.
To test whether the network is configured correctly, send a ping from the PC to the AVR32Bit
Unit. The parameter Allow Ping must be enabled for it.
When stopping the program with the Start/Stop button, the lwIP TCP/IP stack can get in a
state, where not all dynamic memory for the current connection is released. This memory may be
missing when you restart the program. If in doubt when encountering problems, press the reset but-
© 2013 Conrad Electronic
259
C-Control Pro IDE
ton to initiate a complete system reboot.
5.11.2 TCP/IP Programming
Open a TCP/IP connection:
Create a receive buffer with ETH_SetConnBuf.
The call of ETH_ConnectTCP establishes a connection and sets the internal state to
ES_CONNECTING.
With periodical calling of ETH_GetStateTCP the connection state is monitored. After
ES_CONNECTING the state can change to ES_CONNECTED or ES_DISCONNECTED. At
ES_CONNECTED, the connection is open, else there might be a timout or the opposite side has
declined.
After the connection is open, it is possible to send data with ETH_SendTCP.
Simultaneously check periodically with ETH_CheckReceiveBuf if data has been received, and
monitor with ETH_GetStateTCP if the connection goes to the state ES_DISCONNECTED sometime.
A call to ETH_DisconnectTCP terminates the connection.
Wait on a TCP/IP port for an incoming connection:
Create a receive buffer with ETH_SetConnBuf.
ETH_ListenTCP monitors a specified port.
Check periodically ETH_CheckReceiveBuf to see if data has been received and therefore a new
connection has been opened from the outside. The state of ETH_GetStateTCP now has the value
ES_LCONNECTED.
After the connection is open, it is possible to send data with ETH_SendTCP.
Monitor periodically ETH_GetStateTCP to check if the connection gets terminated (state
ES_DISCONNECTED).
A call to ETH_DisconnectTCP terminates the connection.
It is recommended to look at the demo programs for UDP and TCP/IP.
The TCP/IP configuration allows up to 10 simultaneously TCP/IP connections to be opened, and
be listened to up to 3 ports for incoming connections.
For default 4kb are reserved for the TCP/IP stack. Depending on the use the stack needs more
RAM or less. The memory needed is difficult to calculate, and should be determined by tests.
Examples
The program will connect to the HTTP port, sends a "GET" command and receives the response:
© 2013 Conrad Electronic
Libraries
260
byte tcp_buf[ETH_BUF(4000,6)], rbuf[1461];
void main(void)
{
word info[4], plen;
char cmdtxt[50];
dword ip;
byte id, state;
ETH_SetConnBuf(tcp_buf, 4000, 6);
id= ETH_ConnectTCP(IP_ADDR(192,168,0,1), 80);
state= ES_CONNECTING;
while(state == ES_CONNECTING)
{
state= ETH_GetStateTCP(id);
}
if(state == ES_CONNECTED)
{
cmdtxt= "GET / HTTP/1.1\n\n";
ETH_SendTCP(id, cmdtxt, Str_Len(cmdtxt));
while(1)
{
ip= ETH_CheckReceiveBuf(info);
if(ip)
{
plen= info[3];
if(plen > 1460) plen= 1460; // limi to 1460 bytes
ETH_ReceiveData(rbuf, plen);
}
}
}
}
The following Example waits for incoming connections on port 23 (Telnet). The data is collected in
rbuf, but not further prepared:
byte tcp_buf[ETH_BUF(4000,6)], rbuf[200];
void main(void)
{
word info[4], plen;
dword ip;
© 2013 Conrad Electronic
// 4000 byte receive buffer
261
C-Control Pro IDE
char text[10];
ETH_SetConnBuf(tcp_buf, 4000, 6); // 4000 byte buffer and allow 6 connections
ETH_ListenTCP(23); // Listen Telnet port
while(1)
{
ip= ETH_CheckReceiveBuf(info);
if(ip)
{
plen= info[3]; //
if(plen > 200) plen= 200; // limit to 200 bytes
ETH_ReceiveData(rbuf, plen);
txt= "Cmd:\n";
ETH_SendTCP(info[0], txt, 5); // send Cmd String
}
}
}
5.11.3 UDP Programming
UDP packets can directly be sent with ETH_SendUDP. The maximum size is 1460 bytes. This
corresponds to an MTU of 1500 and a 40-byte UDP/IP header.
In order to receive UDP packets, a receive buffer (ring buffer) is reserved with ETH_SetConnBuf
and ETH_ListenUDP will start listening to aport. Now all incoming packets arrive in the receive buffer. When the buffer is full, further received data is lost. Therefore buffer should be checked regularly with the Function ETH_CheckReceiveBuf. A call to ETH_ReceiveData copies the data into a
byte array buffer. If there are less bytes specified than there are bytes in the packet, the remaining
bytes of the packet are discarded from the ring buffer.
It is recommended to look at the demo programs for UDP and TCP/IP.
For default 4kb are reserved for the TCP/IP stack. Depending on the use the stack needs more
RAM or less. The memory needed is difficult to calculate, and should be determined by tests.
Examples
1. Program sends every second a string to Syslog Port 514:
© 2013 Conrad Electronic
Libraries
void SendSyslogMsg(dword ip, byte level, char text[])
{
byte buf[100];
Str_Printf(buf, "<%d>%s", 16*8+level, text);
ETH_SendUDP(ip, 514, buf, Str_Len(buf));
}
void main(void)
{
while(1)
{
SendSyslogMsg(IP_ADDR(192,168,0,1), 3, "test message");
AbsDelay(1000);
}
}
2. Program receives data on UDP Port 50000 and echoes data back to sender:
byte buf[ETH_BUF(500,0)], rbuf[200];
// 500 byte receive buffer
void main(void)
{
word info[4], plen;
dword ip;
ETH_SetConnBuf(buf, 500, 0);
ETH_ListenUDP(50000); // listen to Port 50000
while(1)
{
ip= ETH_CheckReceiveBuf(info);
if(ip)
{
plen= info[3]; // length
if(plen > 200) plen= 200; // limit to 200 bytes
ETH_ReceiveData(rbuf, plen);
ETH_SendUDP(ip, 50000, rbuf, plen);
}
}
}
5.11.4 ETH_ConnectTCP
Ethernet Functions
Syntax
byte ETH_ConnectTCP(dword ip, word port);
Sub ETH_ConnectTCP(ip As ULong, port As Word) As Byte
© 2013 Conrad Electronic
262
263
C-Control Pro IDE
Description
Opens a TCP / IP connection to a port. The 32-bit value of the IP address can be calculated with the
macro IP_ADDR () from the accustomed notation: For example, IP_ADDR (192,168,1,1).
When returning from ETH_ConnectTCP the connection is not established directly. You have to
monitor the status of the connection with ETH_GetStateTCP.
Parameter
ip
port
IP-Address
UDP Port
Return Parameter
sock_id (Socket Index), ff (Hex) in case of error
5.11.5 ETH_CheckReceiveBuf
Ethernet Functions
Syntax
dword ETH_CheckReceiveBuf(word info[]);
Sub ETH_CheckReceiveBuf(ByRef info As Word) As ULong
Description
Checks whether packets are available in the receive buffer. If the return parameter is zero, no Ethernet packets have been received. Is a package there, additional parameters are stored into the info array. The info array (16-bit) should have a size of 4 words. If a UDP packet is received, the socket index (info [0]) is equal to ff (Hex).
One should be careful not to confuse the socket index (sock_idx) with the socket handle. The
lists commands (ListenTCP, CloseListenTCP etc.) work with the socket handle, the other with the
socket index.
Parameter
info
Return Parameter
IP address of the sender
0, when there are no packets in the buffer
Info Array
© 2013 Conrad Electronic
Libraries
info[0]
info[1]
info[2]
info[3]
socket index
IP port of sender
socket handle
packet length
5.11.6 ETH_CloseListenTCP
Ethernet Functions
Syntax
void ETH_CloseListenTCP(word handle);
Sub ETH_CloseListenTCP(handle As Word)
Description
Closes a TCP listening socket that was created with ETH_ListenTCP.
Parameter
handle
ETH_ListenTCP handle
5.11.7 ETH_CloseListenUDP
Ethernet Functions
Syntax
void ETH_CloseListenUDP(word handle);
Sub ETH_CloseListenUDP(handle As Word)
Description
Closes a UDP listening socket that was created with ETH_ListenUDP.
Parameter
handle
ETH_ListenUDP handle
5.11.8 ETH_DisconnectTCP
Ethernet Functions
Syntax
void ETH_DisconnectTCP(byte sock_id);
© 2013 Conrad Electronic
264
265
C-Control Pro IDE
Sub ETH_DisconnectTCP(sock_id As Byte)
Description
Terminates an open connection.
Parameter
sock_id
Socket Index
5.11.9 ETH_GetIPInfo
Ethernet Functions
Syntax
void ETH_GetIPInfo(byte info, byte data[]);
Sub ETH_GetIPInfo(info As Byte, ByRef data As Byte)
Description
Returns Ethernet information in a byte array. The length of the array must be sized to fit the values?
. If
?
DHCP is enabled and the IP address is currently 0.0.0.0, no valid IP address has been assigned by
DHCP yet.
Parameter
info
info type
data
return array
Info Type
Meaning
Length
EI_IP_ADDR
EI_NETMASK
EI_GATEWAY
EI_MACADDR
IP-address
netmask
gateway address
MAC address
4
4
4
6
5.11.10 ETH_GetStateTCP
Ethernet Functions
Syntax
byte ETH_GetStateTCP(byte sock_id);
Sub ETH_GetStateTCP(sock_id As Byte) As Byte
© 2013 Conrad Electronic
Libraries
266
Description
Informs about the status of the connection. Since the other party can cancel a TCP / IP connection at any
time, the status of the program should be monitored periodically in the main loop.
The sock_id parameter is returned either by ETH_ConnectTCP, or you get it as info [0] value of
ETH_CheckReceiveBuf.
Parameter
sock_id
Socket Index
Return Parameter
Connection state
State Table
#define
Value
Meaning
ES_DISCONNECTED
ES_CONNECTING
ES_CONNECTED
ES_LCONNECTED
0
1
2
3
no TCP/IP connection
connection request initiated (ETH_ConnectTCP)
connection is open (ETH_ConnectTCP)
connection is open (ETH_ListenTCP)
5.11.11 ETH_ListenTCP
Ethernet Functions
Syntax
word ETH_ListenTCP(word port);
Sub ETH_ListenTCP(port As Word) As Word
Description
Opens a listening socket on a TCP port. Received packets are stored in the buffer that was initialized with
ETH_SetConnBuf.
Parameter
port
TCP Port
Return Parameter
handle to TCP listening Socket, 0 in case of error
© 2013 Conrad Electronic
267
C-Control Pro IDE
5.11.12 ETH_ListenUDP
Ethernet Functions
Syntax
word ETH_ListenUDP(word port);
Sub ETH_ListenUDP(port As Word) As Word
Description
Opens a listening socket on a TCP port. Received packets are stored in the buffer that was initialized with
ETH_SetConnBuf.
Parameter
port
UDP Port
Return Parameter
handle to UDP listening Socket, 0 in case of error
5.11.13 ETH_ReceiveData
Ethernet Functions
Syntax
void ETH_ReceiveData(byte buf[], word len);
Sub ETH_ReceiveData(ByRef buf As Byte, len As Word)
Description
Saves a packet from the Ethernet receive buffer to address buf. The len parameter can be smaller
than the length of the packet data, the remaining bytes of the packet are discarded. If you want to
discard the whole packet data, set len to zero.
Parameter
buf
len
Arrayvariable in that the buffer data is stored
number of bytes that are copied
5.11.14 ETH_SendTCP
Ethernet Functions
Syntax
byte ETH_SendTCP(byte sock_id, byte buf[], word len);
© 2013 Conrad Electronic
Libraries
268
Sub ETH_SendTCP(sock_id As Byte, ByRef buf As Byte, len As Word) As Byte
Description
Sends TCP data to an open TCP/IP connection.
The sock_id parameter is returned either by ETH_ConnectTCP, or you get it as info [0] value of
ETH_CheckReceiveBuf.
Parameter
sock_id
buf
len
socket index
address of TCP data buffer
length of TCP data
Return Parameter
0 if no error
5.11.15 ETH_SendUDP
Ethernet Functions
Syntax
void ETH_SendUDP(dword ip, word port, byte buf[], word len);
Sub ETH_SendUDP(ip As ULong, port As Word, ByRef buf As Byte, len As
Word)
Description
Sends a UDP packet to an IP address and port.
Parameter
ip
port
IP-address
UDP port
buf
len
address of packet buffer
length of UDP packet
5.11.16 ETH_SetConnBuf
Ethernet Functions
Syntax
void ETH_SetConnBuf(byte buf[], word size, byte TCP_conn);
© 2013 Conrad Electronic
269
C-Control Pro IDE
Sub ETH_SetConnBuf(ByRef buf As Byte, size As Word, TCP_conn As Byte)
Description
Creates an Ethernet receive buffer where received TCP/IP and UDP packets are stored.
Parameter
buf
size
5.12
address of receive buffer
size of buffer
I2C
The Controller provides an I2C Logic which allows effective communication. The Controller
operates as an I2C Master (single master system). A slave operating mode is possible
but not yet implemented in the current version.
5.12.1 Mega
5.12.1.1
I2C_Init
I2C Functions
Example
Syntax
void I2C_Init(byte I2C_BR);
Sub I2C_Init(I2C_BR As Byte)
Description
This function initializes the I2C interface.
Parameter
I2C_BR describes the baud rate. The following values are predefined:
I2C_100kHz
I2C_400kHz
Definition
14,7456 Mhz
16 Mhz
I2C_100kHz
I2C_400kHz
66
10
72
12
© 2013 Conrad Electronic
Libraries
270
The Bitrate can be calculated as follows: Bitrate = ((CPU_CLOCK / TARGET_I2C_SPEED) - 16) / 2
5.12.1.2
I2C_Read_ACK
I2C Functions
Syntax
byte I2C_Read_ACK(void);
Sub I2C_Read_ACK() As Byte
Description
This function receives a byte and acknowledges with ACK. Afterwards the status of the interface can be returned with I2C_Status().
Return Parameter
value read from the I2C bus
5.12.1.3
I2C_Read_NACK
I2C Functions
Example
Syntax
byte I2C_Read_NACK(void);
Sub I2C_Read_NACK() As Byte
Description
This function receives a byte and acknowledges with NACK. Afterwards the status of the interface can be
returned with I2C_Status().
Return Parameter
value read from the I2C bus
5.12.1.4
I2C_Start
I2C Functions
Example
Syntax
void I2C_Start(void);
Sub I2C_Start()
© 2013 Conrad Electronic
271
C-Control Pro IDE
Description
This function introduces communication with a starting sequence. Afterwards the status of the interface
can be returned with I2C_Status().
Parameter
None
5.12.1.5
I2C_Status
I2C Functions
Syntax
byte I2C_Status(void);
Sub I2C_Status()
Description
With I2C_Status the status of the I2C interface can be accessed. For the meaning of the return value
please look inside the I2C status code table.
Return Parameter
current I2C Status
5.12.1.6
I2C_Stop
I2C Functions
Example
Syntax
void I2C_Stop(void);
Sub I2C_Stop()
Description
This function ceases the I2C communication with a stop sequence. Afterwards the status of the interface
can be returned with I2C_Status().
Parameter
None
© 2013 Conrad Electronic
Libraries
5.12.1.7
272
I2C_Write
I2C Functions
Example
Syntax
void I2C_Write(byte data);
Sub I2C_Write(data As Byte)
Description
I2C_Write() sends a byte to the I2C bus. Afterwards the status of the interface can be returned with
I2C_Status().
Parameter
data data byte
5.12.1.8
I2C Status Table
Table: Status Codes Master Transmitter Mode
Status Code (Hex)
08
10
18
20
28
30
38
Description
a START sequence has been sent
a "repeated" START sequence has been sent
SLA+W has been sent, ACK has been received
SLA+W has been sent, NACK has been received
Data byte has been sent, ACK has been received
Data byte has been sent, NACK has been received
conflict with SLA+W or data bytes
Table: Status Codes Master Receiver Mode
Status Code (Hex)
08
10
38
© 2013 Conrad Electronic
Description
a START sequence has been sent
a "repeated" START sequence has been sent
conflict with SLA+R or data bytes
273
C-Control Pro IDE
40
48
50
58
5.12.1.9
SLA+R has been sent, ACK has been received
SLA+R has been sent, NACK has been received
Data byte has been sent, ACK has been received
Data byte has been sent, NACK has been received
I2C Example
Example: read EEPROM 24C64 and write without I2C_Status check
// I2C Initialization, Bit Rate 100kHz
main(void)
{
word address;
byte data,EEPROM_data;
address=0x20;
data=0x42;
I2C_Init(I2C_100kHz );
// write data to 24C64 (8k x 8) EEPROM
I2C_Start();
I2C_Write(0xA0);
// DEVICE ADDRESS : A0
I2C_Write(address>>8);
// HIGH WORD ADDRESS
I2C_Write(address);
// LOW WORD ADDRESS
I2C_Write(data);
// write Data
I2C_Stop();
AbsDelay(5);
// delay for EEPROM Write Cycle
// read data from 24C64 (8k x 8) EEPROM
I2C_Start();
I2C_Write(0xA0);
// DEVICE ADDRESS : A0
I2C_Write(address>>8);
// HIGH WORD ADDRESS
I2C_Write(address);
// LOW WORD ADDRESS
I2C_Start();
// RESTART
I2C_Write(0xA1);
// DEVICE ADDRESS : A1
EEPROM_data=I2C_Read_NACK();
I2C_Stop();
Msg_WriteHex(EEPROM_data);
}
5.12.2 AVR32Bit
© 2013 Conrad Electronic
Libraries
5.12.2.1
274
I2C_Probe
I2C Functions
Syntax
byte I2C_Probe(byte addr);
Sub I2C_Probe(addr As Byte) As Byte
Description
I2C_Probe tries to address an I2C device and gives as result whether the attempt was successful.
Parameter
addr address of I2C device
Return Parameter
1 = device has answered
0 else
5.12.2.2
I2C_Read
I2C Functions
Syntax
byte I2C_Read(byte addr, dword hdr, byte hdr_len, byte mem_addr[],
word length);
Sub I2C_Read(addr As Byte, hdr As ULong, hdr_len As Byte,
ByRef mem_addr As Byte, length As Word) As Byte
Description
First, up to 4 bytes of header data are written to the I2C device with address addr (I2C 7-bit address).
The data is passed in hdr (dword), the number of bytes in hdr_len. The hdr_len may be zero, means
that is there is no header data transferred. There are always the first high-order bytes of the header
transmitted (big endian). After transferring the header, length bytes are written from the I2C device
into the array mem_addr.
The term header stands not for a specific I2C term, but for up to 4 bytes, that are transmitted to
the I2C device. Many I2C devices use such a header, e.g. as to index a register.
Parameter
addr
hdr
hdr_len
mem_addr
address of I2C device
up to 4 byte header data
length of header
array in that the I2C device data is copied into
© 2013 Conrad Electronic
275
C-Control Pro IDE
length
number of bytes that are transferred (exclusive header)
Return Parameter
-1 = transmission error
0 = successful
5.12.2.3
I2C_SetSpeed
I2C Functions
Example
Syntax
void I2C_SetSpeed(dword I2C_BR);
Sub I2C_SetSpeed(I2C_BR As ULong)
Description
This function sets the speed of the I2C interface.
Parameter
I2C_BR Indicates the bit rate as a 32-bit value. The following values ?
are already predefined:
I2C_100kHz
I2C_400kHz
Definition
Value
I2C_100kHz
I2C_400kHz
100000
400000
Return Parameter
-8 = transmission error
0 = successful
5.12.2.4
I2C_Write
I2C Functions
Syntax
byte I2C_Write(byte addr, dword hdr, byte hdr_len, byte mem_addr[],
word length);
© 2013 Conrad Electronic
Libraries
276
Sub I2C_Write(addr As Byte, hdr As ULong, hdr_len As Byte,
ByRef mem_addr As Byte, length As Word) As Byte
Description
First, up to 4 bytes of header data are written to the I2C device with address addr (I2C 7-bit address).
The header data is passed in hdr (dword), the number of bytes in hdr_len. The hdr_len may be zero,
means that is there is no header data transferred. There are always the first high-order bytes of the
header transmitted (big endian). After transferring the header, length bytes are written from the array
mem_addr to the I2C device.
The term header stands not for a specific I2C term, but for up to 4 bytes, that are transmitted to
the I2C device. Many I2C devices use such a header, e.g. as to index a register.
Parameter
addr
hdr
hdr_len
mem_addr
length
address of I2C device
up to 4 byte header data
length of header
array that is written to I2C device
number of bytes that are transferred (exclusive header)
Return Parameter
-1 = transmission error
0 = successful
5.12.2.5
I2C Example
Example: EEPROM 24C64 read and write
// I2C device address = 0x50, Bit Rate 100kHz
// EEPROM has 16bit memory address
byte data[10];
void main(void)
{
// read 10 bytes from memory address 0x20 into array data[]
I2C_Read(0x50, 0x20, 2, data, 10);
// write 10 bytes from array data[] to EEPROM memory address 0x20
I2C_Write(0x50, 0x20, 2, data, 10);
}
© 2013 Conrad Electronic
277
5.13
C-Control Pro IDE
Interrupt
The Controller provides a multitude of interrupts. Some of them are used for system functions and
are thus not available to the user. The following interrupts can be utilized by the user.
Table: Interrupts
Interrupt Name
Mega32
Mega128 (CAN)
INT_0
INT_1
INT_2
INT_3
INT_4
INT_5
INT_6
INT_7
INT_TIM1CAPT
INT_TIM1CMPA
INT_TIM1CMPB
INT_TIM1OVF
INT_TIM0COMP
INT_TIM0OVF
INT_ANA_COMP
INT_ADC
INT_TIM2COMP
INT_TIM2OVF
INT_TIM3CAPT
INT_TIM3CMPA
INT_TIM3CMPB
INT_TIM3CMPC
INT_TIM3OVF
external Interrupt0
external Interrupt1
external Interrupt2
----------Timer1 Capture
Timer1 CompareA
Timer1 CompareB
Timer1 Overflow
Timer0 Compare
Timer0 Overflow
Analog Comparator
ADC
Timer2 Compare
Timer2 Overflow
-----------
external Interrupt0
external Interrupt1
external Interrupt2
external Interrupt3
external Interrupt4
external Interrupt5
external Interrupt6
external Interrupt7
Timer1 Capture
Timer1 CompareA
Timer1 CompareB
Timer1 Overflow
Timer0 Compare
Timer0 Overflow
Analog Comparator
ADC
Timer2 Compare
Timer2 Overflow
Timer3 Capture
Timer3 CompareA
Timer3 CompareB
Timer3 CompareC
Timer3 Overflow
A signal on INT_0 (Mega32) or INT_4 (Mega128 (CAN) ) can interfere with the Autostart Behaviour when the C-Control Pro Module is switched on. According to the pin assignment of M32 and
M128 these pins share the same pin with SW1. If SW1 is pressed during power up of the Module
then the Bootloader Mode will be activated and the program will not be automatically started.
Interrupt Name
INT_ANA_COMP
INT_1
INT_2
INT_3
AVR32Bit
Analog Comparator
external Interrupt 1
external Interrupt 2
external Interrupt 3
© 2013 Conrad Electronic
Libraries
INT_4
INT_5
INT_6
INT_7
INT_ADC
INT_100Hz
INT_TIMER0
INT_TIMER1
INT_TIMER2
INT_TIMER3
INT_TIMER4
INT_TIMER5
INT_CAN
external Interrupt
external Interrupt
external Interrupt
external Interrupt
ADC
100 Hz Interrupt
Timer 0
Timer 1
Timer 2
Timer 3
Timer 4
Timer 5
CAN
278
4
5
6
7
The corresponding interrupt has to receive the corresponding instructions in an Interrupt Service
Routine (ISR) and also the interrupt has to be enabled. See Example. During execution of the interrupt
routine the Multi Threading is suspended.
5.13.1 Ext_IntEnable
Interrupt Functions
Syntax
void Ext_IntEnable(byte IRQ, byte Mode);
Sub Ext_IntEnable(IRQ As Byte, Mode As Byte)
Description
This function enables the external Interrupt IRQ. The Mode parameter defines when to trigger the interrupt.
The parameter IRQ has a numeric value. Not to be confused with the #defines of parameter irqno in
function Irq_SetVect().
Parameter
IRQ
number of the interrupt to be enabled Mega32 (0-2) , Mega128 (0-7) , AVR32 (1-7)
Mode parameter:
0:
1:
2:
3:
a low level triggers the interrupt
every changing edge triggers the interrupt
a falling edge triggers the interrupt
a rising edge triggers the interrupt
A signal on Mega32:IRQ 0 or Mega128:IRQ 4 at power up time can lead to Autostart problems.
Mode parameter only for Mega32 and IRQ2:
© 2013 Conrad Electronic
279
C-Control Pro IDE
0:
1:
a falling edge triggers the interrupt
a rising edge triggers the interrupt
Mode parameter for AVR32
0:
1:
2:
3:
a low level triggers the interrupt
a high level edge triggers the interrupt
a falling edge triggers the interrupt
a rising edge triggers the interrupt
When 40 (Hex) is ORed to the parameter Mode (only AVR32) an internal pull-down is set, if 80 (Hex) is
ORed an internal pull-up gets enabled.
5.13.2 Ext_IntDisable
Interrupt Functions
Syntax
void Ext_IntDisable(byte IRQ);
Sub Ext_IntDisable(IRQ As Byte)
Description
The external Interrupt IRQ gets disabled.
Parameter
IRQ number of the interrupt to disable Mega32 (0-2) , Mega128 (0-7) , AVR32 (1-7)
5.13.3 Irq_GetCount
Interrupt Functions Example
Syntax
byte Irq_GetCount(byte irqnr);
Sub Irq_GetCount(irqnr As Byte) As Byte
Description
Acknowledges the interrupt. If the function is not called at the end of a interrupt service routine, the interrupt service routine gets called continuously.
Parameter
irqnr specifies the interrupt type (see table)
Return Parameter
© 2013 Conrad Electronic
Libraries
280
The return value expresses how often a interrupt got triggered until the function Irq_GetCount() has been
called. A value greater 1 shows that the interrupts
are triggered more rapidly than the interrupt service routine is processed.
5.13.4 Irq_SetVect
Interrupt Functions Example
Syntax
void Irq_SetVect(byte irqnr, dword vect);
Sub Irq_SetVect(irqnr As Byte, vect As ULong)
Description
Defines an interrupt service routine for a specified interrupt. At the end of the interrupt service routine the
function Irq_GetCount() has to be called, otherwise the interrupt service routine gets called continuously. A
vect of value Null sets the interrupt inactive again.
Parameter
irqnr specifies the interrupt type (see table)
vect is the name of the interrupt function to be called
5.13.5 IRQ Example
Example: Usage of Interrupt Routines
// INT_100HZ (AVR32Bit) or Timer 2 (MEGA) are normally called all 10ms.
// In this example the variable cnt gets increased every 10ms by one.
© 2013 Conrad Electronic
281
C-Control Pro IDE
int cnt;
void ISR(void)
{
cnt=cnt+1;
#if AVR32
Irq_GetCount(INT_100HZ);
#else
Irq_GetCount(INT_TIM2COMP);
#endif
}
void main(void)
{
cnt=0;
#if AVR32
Irq_SetVect(INT_100HZ, ISR);
#else
Irq_SetVect(INT_TIM2COMP, ISR);
#endif
while(true); // endless loop
}
5.14
Keyboard (Mega)
One part of these keyboard routines is implemented in the Interpreter, another can be called up after
appending library "LCD_Lib.cc". Since the functions in
"LCD_Lib.cc" are realized through Bytecode they are slower when executed. Library functions however have the advantage that they can be taken from the project by omitting the library in case they
are not needed. Direct Interpreter functions are always present, will however take up flash memory.
There is no keyboard included with the AVR32 Application Board, so there are no keyboard
routines in the library.
5.14.1 Key_Init
Keyboard Functions
(Library "Key_Lib .cc")
Syntax
void Key_Init(void);
Sub Key_Init()
Description
The global keymap array gets initialized with the ASCII values of the keyboard.
© 2013 Conrad Electronic
Libraries
282
Parameter
None
5.14.2 Key_Scan
Keyboard Functions
Syntax
word Key_Scan(void);
Sub Key_Scan() As Word
Description
Key_Scan scans sequentially the input pins of the connected keyboard and returns the result as a bit field
with 16 bits. Bits that are set represent keys that have been pressed during the scan.
Return Parameter
16 bits that represent the input lines of the keyboard
5.14.3 Key_TranslateKey
Keyboard Functions
(Library "Key_Lib .cc")
Syntax
char Key_TranslateKey(word keys);
Sub Key_TranslateKey(keys As Word) As Char
Description
This help function looks for the first "1" in the bit field, and returns the
ASCII value of the corresponding key.
Parameter
keys bit field value that has been retuned from Key_Scan()
Return Parameter
ASCII value of recognized keys
-1 if no key is pressed
© 2013 Conrad Electronic
283
5.15
C-Control Pro IDE
LCD
A part of these routines is implemented in the Interpreter, another part can be called up by appending library "LCD_Lib.cc". Since the functions in "LCD_Lib.cc" are realized through Bytecode they are
slower when executed. Library functions however have the advantage that they can be taken from the
project by omitting the library in case they are not needed. Direct Interpreter functions are always
present, will however take up flash memory.
5.15.1 Internal Functions
The Functions listed here are used internally and should normally not used by the user.
5.15.1.1
LCD_SubInit
LCD Functions
Syntax
void LCD_SubInit(void);
Sub LCD_SubInit()
Description
Initializes the display ports on assembler level. Must be called before all other LCD output functions. This
function will be used as first command from LCD_Init().
Parameter
None
5.15.1.2
LCD_TestBusy
LCD Functions
Syntax
void LCD_TestBusy(void);
Sub LCD_TestBusy()
Description
This function waits for a non-busy of the display controller. If the controller is accessed in his busy period
the output data will be corrupted.
Parameter
© 2013 Conrad Electronic
Libraries
None
5.15.1.3
LCD_WriteDataRegister
LCD Functions
(Library "LCD_Lib .cc")
Syntax
void LCD_WriteDataRegister(char x);
Sub LCD_WriteDataRegister(x As Char)
Description
Sends a data byte to the display controller.
Parameter
x data byte
5.15.1.4
LCD_WriteCTRRegister
LCD Functions
(Library "LCD_Lib .cc")
Syntax
void LCD_WriteCTRRegister(byte cmd);
Sub LCD_WriteCTRRegister(cmd As Byte)
Description
Sends a command to the display controller.
Parameter
cmd byte command
5.15.2 LCD_ClearLCD
LCD Functions
(Library "LCD_Lib .cc")
Syntax
void LCD_ClearLCD(void);
Sub LCD_ClearLCD()
© 2013 Conrad Electronic
284
285
C-Control Pro IDE
Description
Clears the display and enables the Cursor.
Parameter
None
5.15.3 LCD_CursorOff
LCD Functions
(Library "LCD_Lib .cc")
Syntax
void LCD_CursorOff(void);
Sub LCD_CursorOff()
Description
Turns the cursor off on the display.
Parameter
None
5.15.4 LCD_CursorOn
LCD Functions
(Library "LCD_Lib .cc")
Syntax
void LCD_CursorOn(void);
Sub LCD_CursorOn()
Description
Turns the cursor in the display on.
Parameter
None
© 2013 Conrad Electronic
Libraries
5.15.5 LCD_CursorPos
LCD Functions
(Library "LCD_Lib .cc")
Syntax
void LCD_CursorPos(byte pos);
Sub LCD_CursorPos(pos As Byte)
Description
Moves the cursor to position pos.
Parameter
pos cursorposition
Value of pos (Hex)
Position on Display
00-07
40-47
0-7 on 1st line
0-7 on 2nd line
The following table is valid for displays with more than 2 lines and up to 32 chars per line:
Value of pos (Hex)
Position on Display
00-1f
40-5f
20-3f
60-6f
0-31 on line 1
0-31 on line 2
0-31 on line 3
0-31 on line 4
5.15.6 LCD_Init
LCD Functions
(Library "LCD_Lib .cc")
Syntax
void LCD_Init(void);
Sub LCD_Init()
Description
High level intialization of the LCD display. Calls LCD_InitDisplay() as first.
Parameter
© 2013 Conrad Electronic
286
287
C-Control Pro IDE
None
5.15.7 LCD_Locate
LCD Functions
Syntax
void LCD_Locate(int row, int column);
Sub LCD_Locate(row As Integer, column As Integer)
Description
Sets the cursor of the LCD display to given row and column.
Parameter
row
column
5.15.8 LCD_SetDispAddr (AVR32Bit)
LCD Functions
(Library "LCD_Lib .cc")
Syntax
void LCD_SetDispAddr(byte addr);
Sub LCD_SetDispAddr(addr As Byte)
Description
Sets a new destination address for the LCD output. In this way, several LCD1602 boards can be addressed simultaneously. See addressing in the chapter "C-Control PRO AVR32 LCD1602 board". The default value for the display address is 27 (Hex).
Parameter
addr new address
© 2013 Conrad Electronic
Libraries
5.15.9 LCD_WriteChar
LCD Functions
(Library "LCD_Lib .cc")
Syntax
void LCD_WriteChar(char c);
Sub LCD_WriteChar(c As Char)
Description
Displays one character at the cursor position on the LCD display.
Parameter
c ASCII value of output character
5.15.10 LCD_WriteFloat
LCD Functions
Syntax
void LCD_WriteFloat(float value, byte length);
Sub LCD_WriteFloat(value As Single, length As Byte)
Description
Writes a floating point value with given length to LCD display.
Parameter
value floating point value
length output length
5.15.11 LCD_WriteRegister
LCD Functions
Syntax
void LCD_WriteRegister(byte y,byte x);
Sub LCD_WriteRegister(y As Byte,x As Byte)
© 2013 Conrad Electronic
288
289
C-Control Pro IDE
Description
LCD_WriteRegister divides the data byte y in 2 nibbles (4bit values) and
sends the nibbles to the display controller.
y data byte
x command nibble
5.15.12 LCD_WriteText
LCD Functions
(Library "LCD_Lib .cc")
Syntax
void LCD_WriteText(char text[]);
Sub LCD_WriteText(ByRef Text As Char)
Description
All characters of the char array up to the terminating zero are displayed.
Parameter
text char array
5.15.13 LCD_WriteWord
LCD Functions
Syntax
void LCD_WriteWord(word value, byte length);
Sub LCD_WriteWord(value As Word, length As Byte)
Description
Writes an unsigned integer (word) with given length to the LCD display. If the resulting LCD output is smaller than the given length, the output filled with zeros "0" at the beginning.
Parameter
value word value
length output length
© 2013 Conrad Electronic
Libraries
5.16
290
Math
Mathematical Functions.
5.16.1 Floating Point
In the following the mathematical functions are listed which the C-Control Pro is able to master with
single floating point accuracy (32 bit). These functions are not contained in the C-Control Pro 32
since it would then not offer enough memory for user programs.
5.16.1.1
FPU (AVR32Bit)
The AVR32Bit UNIT has an integrated floating point unit (FPU), that greatly accelerates floating point
operations. An exception is the floating-point division performed in software. By dividing by a constant, one should therefore consider to multiply by the reciprocal.
5.16.1.2
acos
Floating Point Functions
Syntax
float acos(float val);
Sub acos(val As Single) As Single
Description
The mathematical arc cosine (inverse cosine) is calculated.
Parameter
val input value between -1 and 1
Return Parameter
arc cosine of the input value in the range [0..Pi], expressed in radians
5.16.1.3
asin
Floating Point Functions
Syntax
float asin(float val);
Sub asin(val As Single) As Single
© 2013 Conrad Electronic
291
C-Control Pro IDE
Description
The mathematical arc sine (inverse sine) is calculated.
Parameter
val input value between -1 and 1
Return Parameter
arc sine of the input value in the range [-Pi/2..Pi/2], expressed in radians
5.16.1.4
atan
Floating Point Functions
Syntax
float atan(float val);
Sub atan(val As Single) As Single
Description
The mathematical arc tangent (inverse tangent) is calculated.
Parameter
val input value
Return Parameter
arc tangent of the input value in the range [-Pi/2..Pi/2], expressed in radians
5.16.1.5
ceil
Floating Point Functions
Syntax
float ceil(float val);
Sub ceil(val As Single) As Single
Description
The largest integer value of the floating point number x is calculated.
Parameter
val input value
© 2013 Conrad Electronic
Libraries
Return Parameter
result
5.16.1.6
cos
Floating Point Functions
Syntax
float cos(float val);
Sub cos(val As Single) As Single
Description
The mathematical cosine is calculated.
Parameter
val input angle expressed in radians
Return Parameter
cosine of the input value between -1 and 1
5.16.1.7
exp
Floating Point Functions
Syntax
float exp(float val);
Sub exp(val As Single) As Single
Description
The exponential function e ^ val is calculated.
Parameter
val exponent
Return Parameter
result
© 2013 Conrad Electronic
292
293
C-Control Pro IDE
5.16.1.8
fabs
Floating Point Functions
Syntax
float fabs(float val);
Sub fabs(val As Single) As Single
Description
The absolute value of the floating point number val is calculated.
Parameter
val input value
Return Parameter
result
5.16.1.9
floor
Floating Point Functions
Syntax
float floor(float val);
Sub floor(val As Single) As Single
Description
The smallest integer value of the floating point number x is calculated.
Parameter
val input value
Return Parameter
result
5.16.1.10 ldexp
Floating Point Functions
Syntax
float ldexp(float val,int expn);
© 2013 Conrad Electronic
Libraries
294
Sub ldexp(val As Single,expn As Integer) As Single
Description
The function val * 2 ^ expn is calculated (also used as internal help function for other mathematical functions).
Parameter
val
multiplier
expn exponent
Return Parameter
result
5.16.1.11 ln
Floating Point Functions
Syntax
float ln(float val);
Sub ln(val As Single) As Single
Description
The natural logarithm is calculated.
Parameter
val input value
Return Parameter
result
5.16.1.12 log
Floating Point Functions
Syntax
float log(float val);
Sub log(val As Single) As Single
Description
© 2013 Conrad Electronic
295
C-Control Pro IDE
The logarithm base 10 is calculated.
Parameter
val input value
Return Parameter
result
5.16.1.13 pow
Floating Point Functions
Syntax
float pow(float x, float y);
Sub pow(x As Single, y As Single) As Single
Description
The power function x ^ y is calculated.
Parameter
x base
y exponent
Return Parameter
result
5.16.1.14 round
Floating Point Functions
Syntax
float round(float val);
Sub round(val As Single) As Single
Description
Rounding function. The floating point value is rounded up or down to a number without decimal places.
Parameter
val input value
Return Parameter
© 2013 Conrad Electronic
Libraries
result of the function
5.16.1.15 sin
Floating Point Functions
Syntax
float sin(float val);
Sub sin(val As Single) As Single
Description
The mathematical sine is calculated.
Parameter
val input angle expressed in radians
Return Parameter
sine of the input value between -1 and 1
5.16.1.16 sqrt
Floating Point Functions
Syntax
float sqrt(float val);
Sub sqrt(val As Single) As Single
Description
The square root of a positive floating point number is calculated.
Parameter
val input value
Return Parameter
result
© 2013 Conrad Electronic
296
297
C-Control Pro IDE
5.16.1.17 tan
Floating Point Functions
Syntax
float tan(float val);
Sub tan(val As Single) As Single
Description
The mathematical tangent is calculated.
Parameter
val input angle expressed in radians
Return Parameter
tangent of the input value
5.16.2 Integer
Mathematical Integer Functions.
5.16.2.1
rand
Integer Functions
Syntax
int rand(void);
Sub rand() As Integer
Description
This function returns a pseudo random number between 0 and 32768. Use srand() with different seeds for
varying sequences of numbers.
Return Parameter
Pseudo Random Number
© 2013 Conrad Electronic
Libraries
5.16.2.2
298
srand
Integer Functions
Syntax
void srand(int seed);
Sub srand(seed As Integer)
Description
Sets the seed for the pseudo random number generator. With the same seed the pseudo random number sequences can be reproduced.
Parameter
seed pseudo random number generator starting value.
5.17
OneWire
1-Wire or One-Wire is a serial interface that needs only one wire for signaling and power. The data is
transferred asynchronously (without clock signal) in groups of 64 bit. Data can either be sent or received, but not at the same time (half-duplex).
The special about 1-Wire devices is the parasitically power supply, that is made over the signal wire:
When there is no communication, the signal wire has a +5V level and charges a capacitor. During
low-pulse communication the slave device is powered from his capacitor. Dependent on the charge
of the capacitor, low-time gaps up to 960 µs can be bridged.
5.17.1 Onewire_Read
1-Wire Functions
Syntax
byte Onewire_Read(void);
Sub Onewire_Read() As Byte
Description
A Byte is read from the One-Wire Bus.
Return Parameter
value read from One-Wire Bus
© 2013 Conrad Electronic
299
C-Control Pro IDE
5.17.2 Onewire_Reset
1-Wire Functions
Syntax
void Onewire_Reset(byte portbit);
Sub Onewire_Reset(portbit As Byte)
Description
A reset is made on the One-Wire Bus. The port bit number for the One-Wire Bus communication is specified.
Parameter
portbit port bit number (see Port Table)
5.17.3 Onewire_Write
1-Wire Functions
Syntax
void Onewire_Write(byte data);
Sub Onewire_Write(data As Byte)
Description
A byte is written to the One-Wire Bus.
Parameter
data data byte
5.17.4 Onewire Example
CompactC
// Sample Code to read DS18S20 temp. sensor from Dallas Maxim
void main(void)
{
char text[40];
int ret, i, temp;
byte rom_code[8];
byte scratch_pad[9];
© 2013 Conrad Electronic
Libraries
ret= OneWire_Reset(7); // PortA.7
if(ret == 0)
{
text= "no device found";
Msg_WriteText(text);
goto end;
}
OneWire_Write(0xcc); // skip ROM cmd
OneWire_Write(0x44); // start temperature measure cmd
AbsDelay(3000);
OneWire_Reset(7);
// PortA.7
OneWire_Write(0xcc); // skip ROM cmd
OneWire_Write(0xbe); // read scratch_pad cmd
for(i=0;i<9;i++)
// read whole scratchpad
{
scratch_pad[i]= OneWire_Read();
Msg_WriteHex(scratch_pad[i]);
}
Msg_WriteChar('\r');
text= "Temperature: ";
Msg_WriteText(text);
temp= scratch_pad[1]*256 + scratch_pad[0];
Msg_WriteFloat(temp* 0.5);
Msg_WriteChar('C');
Msg_WriteChar('\r');
end:
}
BASIC
' Sample Code to read DS18S20 temp. sensor from Dallas Maxim
Dim Text(40) As Char
Dim ret,i As Integer
Dim temp As Integer
Dim rom_code(8) As Byte
Dim scratch_pad(9) As Byte
Sub main()
ret = OneWire_Reset(7) ' PortA.7
If ret = 0 Then
Text= "no device found"
Msg_WriteText(Text)
Goto Ende
© 2013 Conrad Electronic
300
301
C-Control Pro IDE
End If
OneWire_Write(0xcc)
OneWire_Write(0x44)
' skip ROM cmd
' start temperature measure cmd
AbsDelay(3000)
OneWire_Reset(7)
OneWire_Write(0xcc)
OneWire_Write(0xbe)
' PortA.7
' skip ROM cmd
' read scratch_pad cmd
For i = 0 To 9
' read whole scratchpad
scratch_pad(i)= OneWire_Read()
Msg_WriteHex(scratch_pad(i))
Next
Msg_WriteChar(13)
Text = "Temperature: "
Msg_WriteText(Text)
temp = scratch_pad(1) * 256 + scratch_pad(0)
Msg_WriteFloat(temp * 0.5)
Msg_WriteChar(99)
Msg_WriteChar(13)
Lab Ende
End Sub
5.18
Port
Atmel Mega
The Atmel Mega 32 provides 4 input/output ports at 8 bits each. The Atmel Mega 128 provides 6 input/output ports at 8 bits each and one input/output port at 5 bits. Each bit of the individual ports can
be configured as input or output. Since however the number of pins in the Mega 32 Risc CPU is limited, additional functions are assigned to individual ports. A pin assignment table for M32 and M128
can be found in the documentation.
It is important to study the pin assignment prior to programming since important functions of the
program design (e. g. the USB Interface of the Application Board) are assigned to specific ports. If
these ports are programmed differently or the corresponding jumpers on the Application Board are no
longer set it may happen that the design interface is no longer able to transfer programs to the CControl Pro.
The direction of data flow (input/output) can be determined with function Port_DataDir or
Port_DataDirBit. If a pin is configured as input then this pin can either be operated high resistive
("floating") or with an internal pull-up resistor. If with Port_Write or Port_WriteBit a "1" is written to an
© 2013 Conrad Electronic
Libraries
302
input then the pull-up resistor (Reference Level VCC) is activated and the input is defined.
Atmel AVR32Bit
The Atmel AVR32Bit provides the ports A to D, which are each 32 bits in width. Each bit of every
port can be configured as input or output. In addition, it is possible to enable a pullup, pulldown, and
adjust the drive strength. The functions Port_DataDir, Port_Toggle and Port_Write known by the Atmel Mega were omitted at the AVR32Bit, since in practice working with the complete 32-bit port is
very unwieldy.
It is important to study the pin assignment before programming, as important peripheral functions lie on certain ports. When these ports are reprogrammed, it may happen that the development
environment can no longer transmit programs to the C-Control Pro.
Use the Port_Attribute function at the AVR32Bit instead of Port_DataDirBit to switch between
input and output.
If a function such as a PWM is used only temporarily on a port pin, it is usually recommended
to set the pin later to a defined level with Port_Attribute, after the function is no longer used.
5.18.1 Port_Attribute
Port Functions
Syntax
void Port_Attribute(byte portbit, word attribute);
Sub Port_Attribute(portbit As Byte, attribute As Word)
Description
The function Port_Attribute configures the properties of a port. Multiple attribute values can be or'ed. See
Example.
Parameter
portbit
port bit number (see Port Table)
attribute Portbit Attribute
Attribut Table
Function
Definition
Value (Hex)
Port set to Input
Port set to Output
set output low
set output high
set PullUp
PORT_ATTR_INPUT
PORT_ATTR_OUTPUT
PORT_ATTR_INIT_LOW
PORT_ATTR_INIT_HIGH
PORT_ATTR_PULL_UP
00
01
00
02
04
© 2013 Conrad Electronic
303
C-Control Pro IDE
set PullDown
minimum Drive Strength
normal Drive Strength
high Drive Strength
maximum Drive Strength
PORT_ATTR_PULL_DOWN
PORT_ATTR_DRIVE_MIN
PORT_ATTR_DRIVE_LOW
PORT_ATTR_DRIVE_HIGH
PORT_ATTR_DRIVE_MAX
08
00
10
20
30
To obtain more accurate values ?
of the drive strength of a port please refer to the chapter "Electrical Characteristics" in the Atmel AT32UC3C datasheet.
5.18.2 Port_DataDir (Mega)
Port Functions
Example
Syntax
void Port_DataDir(byte port, byte val);
Sub Port_DataDir(port As Byte, val As Byte)
Description
The function Port_DataDir configures the port for input or output direction. Is a bit set, then the Pin corresponding to the bit position is switched to output. Example: Is port = PortB and val = 02, then PortB.1 is
configured for output, all other ports on PortB are set to input (see Pin Assignment of M32 and
M128).
Parameter
port port number (see Port Table)
val output byte
5.18.3 Port_DataDirBit (Mega)
Port Functions
Syntax
void Port_DataDirBit(byte portbit, byte val);
Sub Port_DataDirBit(portbit As Byte, val As Byte)
Description
The function Port_DataDirBit configures one bit (Pin) of a port for input or output direction. Is a bit set, then
the Pin corresponding to the bit position is switched to output. Example: Is portbit = 10 and val = 0, then
PortB.2 is configured for input. All other ports on PortB stay the same (see Pin Assignment of M32
and M128.).
Please use the function Port_Attribute instead of Port_DataDirBit for the AVR32Bit. The AVR32
MCU provides advanced options such as pull-down or adjust the drive strength.
© 2013 Conrad Electronic
Libraries
304
Port Bit access is always significant slower than the normal Port access that transfers 8 Bit. If the desired values of all Port Bits are known, 8-Bit Port access is always preferable.
Parameter
portbit port bit number (see Port Table)
val
0=Input, 1= Output
5.18.4 Port_Read (Mega)
Port Functions
Syntax
byte Port_Read(byte port);
Sub Port_Read(port As Byte) As Byte
Description
Reads a byte from the specified port. Only the Pins of port that are configured for input return a valid value
on their bit position (see Pin Assignment of M32 and M128).
Parameter
port port number (see Port Table)
Return Parameter
port byte value
5.18.5 Port_ReadBit
Port Functions
Syntax
byte Port_ReadBit(byte port);
Sub Port_ReadBit(port As Byte) As Byte
Description
The function Port_ReadBit reads the value of a Pin that is configured for input. (See Pin Assignment of
AVR32, M32 and M128.).
Port Bit access is always significant slower than the normal Port access that transfers 8 Bit. If the desired values of all Port Bits are known, 8-Bit Port access is always preferable.
© 2013 Conrad Electronic
305
C-Control Pro IDE
Parameter
portbit bit number of port (see Port Table)
Return Parameter
bit value (0 or 1)
5.18.6 Port_ToggleBit
Port Functions
Syntax
void Port_ToggleBit(byte portbit);
Sub Port_ToggleBit(portbit As Byte)
Description
The function Port_WriteBit inverts the value of a Pin that is configured for output. See Pin Assignment of
AVR32, M32 and M128.
Mega: Is a Pin configured as input, this will set an internal pull-up resistor on (bit = 1) or off (bit
= 0).
Mega: Port Bit access is always significant slower than the normal Port access that transfers 8 Bit. If
the desired values of all Port Bits are known, 8-Bit Port access is always preferable.
Parameter
portbit
bit number of port (see Port Table)
5.18.7 Port_Toggle (Mega)
Port Functions
Syntax
void Port_Toggle(byte port);
Sub Port_Toggle(port As Byte)
Description
Inverts all Bits on the specified port. Only the Pins of port that are configured for output will show their value
as port output on their bit position (see Pin Assignment of M32 and M128). Is a Pin configured as input,
this will set an internal pull-up resistor on (bit = 1) or off (bit = 0). See Pin Assignment of M32 and
M128.
Parameter
© 2013 Conrad Electronic
Libraries
port
306
port number (see Port Table)
5.18.8 Port_Write (Mega)
Port Functions
Example
Syntax
void Port_Write(byte port, byte val);
Sub Port_Write(port As Byte, val As Byte)
Description
Writes a byte to the specified port. Only the Pins of port that are configured for output will show their value
as port output on their bit position (see Pin Assignment of M32 and M128). Is a Pin configured as input,
this will set an internal pull-up resistor on (bit = 1) or off (bit = 0). See Pin Assignment of M32 and
M128.
In older IDE versions PORT_ON and PORT_OFF were incorrectly defined, which is now corrected.
Parameter
port
val
port number (see Port Table)
output byte
5.18.9 Port_WriteBit
Port Functions
Syntax
void Port_WriteBit(byte portbit, byte val);
Sub Port_WriteBit(portbit As Byte, val As Byte)
Description
The function Port_WriteBit sets the value of a Pin that is configured for output. Is a Pin configured as input, a Port_WriteBit() will set an internal pull-up resistor on (bit = 1) or off (bit = 0). See Pin Assignment of AVR32, M32 and M128.
Port Bit access is always significant slower than the normal Port access that transfers 8 Bit. If the desired values of all Port Bits are known, 8-Bit Port access is always preferable.
At the C-Control Pro AVR32Bit the internal pullup is switched with the command Port_Attribute.
In older IDE versions PORT_ON and PORT_OFF were incorrectly defined, which is now correc-
© 2013 Conrad Electronic
307
C-Control Pro IDE
ted.
Parameter
portbit
val
bit number of port (see Port Table)
bit value (0 or 1)
5.18.10 Port Table
Port Number Table Mega32 and Mega128 (CAN)
Definition
Value
PortA
PortB
PortC
PortD
PortE (Mega128)
PortF (Mega128)
PortG (Mega128)
0
1
2
3
4
5
6
Portbits Table Mega32 and Mega128 (CAN)
Definition
Portbit
Portbit Name
PortA.0
...
PortA.7
PortB.0
...
PortB.7
PortC.0
...
PortC.7
PortD.0
...
PortD.7
0
...
7
8
...
15
16
...
23
24
...
31
PA0
...
PA7
PB0
...
PB7
PC0
...
PC7
PD0
...
PD7
32
...
39
40
...
47
48
...
52
PE0
...
PE7
PF0
...
PF7
PG0
...
PG4
from here only Mega128
PortE.0
...
PortE.7
PortF.0
...
PortF.7
PortG.0
...
PortG.4
© 2013 Conrad Electronic
Libraries
Portbits Table AVR32
Definition
Portbit
Portbit Name
PortA.0
...
PortA.31
PortB.0
...
PortB.31
PortC.0
...
PortC.31
PortD.0
...
PortD.31
0
...
31
32
...
63
64
...
95
96
...
127
PA00
...
PA31
PB00
...
PB31
PC00
...
PC31
PD00
...
PD31
Board Port
Portbit
Portbit Name
Port1
Port2
Port3
Port4
Port5
Port6
Port7
Port8
Port9
Port10
Port11
Port12
Port13
Port14
Port15
Port16
Port17
Port18
Port19
Port20
Port21
Port22
Port23
Port24
Port25
Port26
Port27
0
1
2
3
36
37
38
16
4
5
6
7
PA00
PA01
PA02
PA03
AVR32 Application Board Port Table
© 2013 Conrad Electronic
8
9
10
11
19
20
21
22
23
24
25
13
12
14
15
PB04
PB05
PB06
PA16
PA04
PA05
PA06
PA07
PA08
PA09
PA10
PA11
PA19
PA20
PA21
PA22
PA23
PA24
PA25
PA13
PA12
PA14
PA15
308
309
C-Control Pro IDE
Port28
Port29
Port30
Port31
Port32
Port33
Port34
Port35
Port36
Port37
Port38
Port39
Port40
Port41
Port42
Port43
Port44
Port45
Port46
Port47
Port48
Port49
Port50
Port51
Port52
Port53
Port54
Port55
Port56
Port57
52
53
54
55
65
70
68
69
81
82
79
80
83
84
76
75
77
78
85
86
87
88
95
103
104
117
118
119
51
34
PB20
PB21
PB22
PB23
PC01
PC06
PC04
PC05
PC17
PC18
PC15
PC16
PC19
PC20
PC12
PC11
PC13
PC14
PC21
PC22
PC23
PC24
PC31
PD07
PD08
PD21
PD22
PD23
PB19
PB02
5.18.11 Port Example (Mega)
// Program toggles the LED's on the applicationboard
// alternately every second
void main(void)
{
Port_DataDirBit(PORT_LED1,PORT_OUT);
Port_DataDirBit(PORT_LED2,PORT_OUT);
while(true) // endless loop
{
Port_WriteBit(PORT_LED1,PORT_ON);
Port_WriteBit(PORT_LED2,PORT_OFF);
AbsDelay(1000);
Port_WriteBit(PORT_LED1,PORT_OFF);
Port_WriteBit(PORT_LED2,PORT_ON);
AbsDelay(1000);
}
}
© 2013 Conrad Electronic
Libraries
310
5.18.12 Port Example (AVR32Bit)
All three program examples will light LED1 as long as button T1 is pressed. The examples differ in
addressing the port name. If the button is not pressed, a "1" will be read from the port because each
switch on the Applicationboard is connected to a pull-up resistor.
// Example with Function Name defines
void main(void)
{
Port_Attribute(PORT_LED1, PORT_ATTR_OUTPUT | PORT_ATTR_INIT_LOW);
Port_Attribute(PORT_T1, PORT_ATTR_INPUT);
while(true) // endless loop
{
if(Port_ReadBit(PORT_T1))
{
Port_WriteBit(PORT_LED1, PORT_OFF);
}
else
{
Port_WriteBit(PORT_LED1, PORT_ON);
}
}
}
// LED1 will be lit as long as button T1 is pressed
// Example with Unit Name defines
void main(void)
{
Port_Attribute(P48, PORT_ATTR_OUTPUT | PORT_ATTR_INIT_LOW);
Port_Attribute(P41, PORT_ATTR_INPUT);
while(true) // Endlosschleife
{
if(Port_ReadBit(P41))
{
Port_WriteBit(P48, PORT_OFF);
}
else
{
Port_WriteBit(P48, PORT_ON);
}
}
}
// LED1 will be lit as long as button T1 is pressed
// Example with AVR32 Port Name defines
© 2013 Conrad Electronic
311
C-Control Pro IDE
void main(void)
{
Port_Attribute(PC23, PORT_ATTR_OUTPUT | PORT_ATTR_INIT_LOW);
Port_Attribute(PC20, PORT_ATTR_INPUT);
while(true) // Endlosschleife
{
if(Port_ReadBit(PC20))
{
Port_WriteBit(PC23, PORT_OFF);
}
else
{
Port_WriteBit(PC23, PORT_ON);
}
}
}
5.19
RC5
A common used standard protocol for infrared data communication is the RC5 code, originally developed by Phillips. This code has an instruction set of 2048 different instructions and is divided into
32 address of each 64 instructions. Every kind of equipment use his own address, so this makes it
possible to change the volume of the TV without change the volume of the hifi. The transmitted code
is a dataword which consists of 14 bits.
Original protocol:
2 start bits for the automatic gain control in the infrared receiver
1 toggle bit (changes every time a new button is pressed on the IR transmitter)
5 address bits for the system address
6 instruction bits for the pressed key
The start bits help the IR receiver to synchronize and to adjust the automatic gain control of the signal. The toggle bit changes its value with every keypress. Therefore it is possible to distinguish the
long press of a key with repeated presses of the same key. After a while there was a need to extend
the number of possible instructions from 64 to 128. To maintain compatibility the second start bit
was used for this purpose. If the second start bit is "1", the first 64 instructions can be addressed, if
the 2nd start bit is "0" the next 64 instructions can be selected.
How are the individual bits transferred?
The C-Control Pro generates a carrier frequency of approx. 36Khz on the configured pin, that is connected to the IR-Diode. All transmission pulses are 6,9444 long. There is a delay of 20,8332 µs
between two pulses. For a "1" value, the frequency generation of the transmission is turned of for
889µs, and then turned on for 889µs (this equals to 32 IR impulses). A value of "0" is created with a
pause of 889µs, followed from a frequency generation of 889µs. The time to transfer a whole bit is
1,778ms (2 * 889µs) and to transfer a complete 14 bit dataword is 24,889ms. If a key on remote control is pressed for a longer duration, the corresponding dataword is repeated every 113m778ms.
© 2013 Conrad Electronic
Libraries
Connection to C-Control Pro (Sender diode)
Connection to C-Control Pro (Receiver)
Pin assignm ent of TSOP1736 IR-Receiver
© 2013 Conrad Electronic
312
313
C-Control Pro IDE
Internal struture of receiver
© 2013 Conrad Electronic
Libraries
External circuit of receiver for connection to C-Control Pro
5.19.1 RC5_Init
RC5 Functions
Syntax
void RC5_Init(byte pin);
Sub RC5_Init(pin As Byte)
Description
The port pin is defined, that is connected to RC5 sender or receiver.
© 2013 Conrad Electronic
314
315
C-Control Pro IDE
Parameter
pin
bit number of port (see Port Table)
5.19.2 RC5_Read
RC5 Functions
Syntax
word RC5_Read(void);
Sub RC5_Read() As Word
Description
Recognized RC5 datawords are received from the defined port pin. If there is no signal, the receive routine
waits up to 130ms. This is because there is a 113ms gap between two repeated RC5 datawords. A return
value of 0 means that no RC5 signal could be detected.
This function will not recognize if a different format than RC-5 is used. In case of doubt it will return
wrong values.
Return Parameter
14 Bit of the received RC-5 commands
5.19.3 RC5_Write
RC5 Functions
Syntax
void RC5_Write(word data);
Sub RC5_Write(data As Word)
Description
The 14 bit of a RC5 dataword are send to the defined port pin.
To drive the infrared LED the output port is set to maximum drive strength. But not all port pin have this
output rating. See AVR32Bit Module.
Parameter
data
recognized RC5 dataword
© 2013 Conrad Electronic
Libraries
5.20
316
RS232
There is a chance to miss received characters when using the polled serial routines, especially
at high baud rates. If this is an issue, please use the interrupt driven serial routines with Serial_Init_IRQ() instead of Serial_Init().
Mega
The serial interface can be operated at speeds of up to 230.4 kilo baud. With the functions for the
serial interface the first parameter will indicate the port number (0 or 1). The Mega32 does only
provide one serial interface (0), while the Mega128 does provide two interfaces (0, 1).
AVR32Bit
The C-Control Pro AVR32Bit supports up to 3 serial interfaces with maximum rates to 460.8 kilo
baud. The serial interfaces are enumerated from 0 to 2. The number differs from the naming on the
Atmel AVR32 Microcontroller:
C-Control AVR32Bit
Atmel AVR32
0
1
2
USART0
USART3
USART4
5.20.1 Divider (Mega)
The functions Serial_Init() and Serial_Init_IRQ get a divider value as baudrate parameter. The
baudrate is derived from the processor clock (14,7456 MHz for Mega32, Mega128 and 16 MHz for
Mega128 CAN).
According to the Atmel processor handbook the following formula is used to calculate the divider for
a specified baudrate:
© 2013 Conrad Electronic
317
C-Control Pro IDE
divider = ( processor clock / baudrate / 16 ) -1
Example: 15 = (14745600 / 57600 / 16 ) -1
It is difficult to obtain the standard baudrates from the 16 MHz processor clock of the Mega128
CAN. Therefore are differences at higher baudrates between both divider tables.
DoubleClock Mode
If the High-Bit of the divider is set, the DoubleClock Mode is enabled. In this mode the divider value
must be doubled. E.g. for 57600 baud a divider value of 0f Hex (decimal 15) or 801e Hex (= 0x8000 +
2 * 15) can be used. For the MIDI baudrate (31250 baud) a divider of (14745600 / 31250 / 16 ) -1 =
28.49 has to be used. Since you can only pass integer values?
, you get a better value in double clock
?
mode: 8039 Hex (= 8000 Hex + 2 * 28.5).
Table divider definition 14,7456 MHz (Mega32, Mega128):
divider
definition
baudrate
3071
1535
767
383
191
95
63
47
31
8039 (Hex)
23
15
11
7
3
SR_BD300
SR_BD600
SR_BD1200
SR_BD2400
SR_BD4800
SR_BD9600
SR_BD14400
SR_BD19200
SR_BD28800
SR_BDMIDI
SR_BD38400
SR_BD57600
SR_BD76800
SR_BD115200
SR_BD230400
300bps
600bps
1200bps
2400bps
4800bps
9600bps
14400bps
19200bps
28800bps
31250bps
38400bps
57600bps
76800bps
115200bps
230400bps
Table divider definition 16 MHz (Mega128 CAN):
divider
definition
baudrate
3332
1666
832
416
207
103
68
51
34
SR_BD300
SR_BD600
SR_BD1200
SR_BD2400
SR_BD4800
SR_BD9600
SR_BD14400
SR_BD19200
SR_BD28800
300bps
600bps
1200bps
2400bps
4800bps
9600bps
14400bps
19200bps
28800bps
© 2013 Conrad Electronic
Libraries
31
25
8022 (Hex)
12
6
3
SR_BDMIDI
SR_BD38400
SR_BD57600
SR_BD76800
SR_BD125000
SR_BD250000
318
31250bps
38400bps
57600bps
76800bps
125000bps
250000bps
5.20.2 Serial_Disable
Serial Functions
Syntax
void Serial_Disable(byte serport);
Sub Serial_Disable(serport As Byte)
Description
The serial interface gets switched off and the corresponding ports can be used otherwise.
Parameter
serport interface number (0 = 1st serial port, 1 = 2nd serial port, ...)
5.20.3 Serial_Init (Mega)
Serial Functions Example
Syntax
void Serial_Init(byte serport, byte par, word divider);
Sub Serial_Init(serport As Byte, par As Byte, divider As Word)
Description
The serial interface gets initialized. The parameter par is defined through successive or-ing of predefined
bit values. The values of character length, stop b its and parity are or'd together. E.g. "SR_7BIT | SR_2STOP
| SR_EVEN_PAR" means 7 bit character length, 2 stop bits and even parity (see Example). An example in
BASIC Syntax: "SR_7BIT Or SR_2STOP Or SR_EVEN_PAR". The baud rate is defined as a divider value
(see divider table).
There is a chance to miss received characters when using the polled serial routines, especially at
high baud rates. If this is an issue, please use the interrupt driven serial routines with Serial_Init_IRQ() instead of Serial_Init().
It is possible to activate the DoubleClock Mode of the Atmel AVR. This happens if the Hi-bit of the divider is set. In DoubleClock mode the normal value from the divider table must be doubled to get the same
© 2013 Conrad Electronic
319
C-Control Pro IDE
baudrate. This has the advantage that baudrates, that have no exact divider value can be represented. E.g.
MIDI: The new value SB_MIDI (=803a Hex) lies much nearer at the correct value of 31250baud. An example
for 19200 baud: The normal divider value for 19200 baud is 002f (Hex). If DoubleClock Mode is used, the
divider must be doubled (=005e Hex). Then set the Hi-bit, and the alternative divider value for 19200 baud
is 805e (Hex).
Parameter
serport interface number (0 = 1st serial port, 1 = 2nd serial port, ...)
par
interface parameter (see par table)
divider baud rate initialization (see table)
table par definitions:
Definition
SR_5BIT
SR_6BIT
SR_7BIT
SR_8BIT
Function
5 Bit
6 Bit
7 Bit
8 Bit
char length
char length
char length
char length
SR_1STOP
SR_2STOP
1 stop bit
2 stop bit
SR_NO_PAR
SR_EVEN_PAR
SR_ODD_PAR
no parity
even parity
odd parity
5.20.4 Serial_Init (AVR32)
Serial Functions Example
Syntax
void Serial_Init(byte serport, byte par, dword baud);
Sub Serial_Init(serport As Byte,par As Byte, baud As ULong)
Description
The serial interface gets initialized. The parameter par is defined through successive or-ing of predefined
bit values. The values of character length, stop b its and parity are or'd together. E.g. "SR_7BIT | SR_2STOP
| SR_EVEN_PAR" means 7 bit character length, 2 stop bits and even parity (see Example). An example in
BASIC Syntax: "SR_7BIT Or SR_2STOP Or SR_EVEN_PAR".
There is a chance to miss received characters when using the polled serial routines, especially at
high baud rates. If this is an issue, please use the interrupt driven serial routines with Serial_Init_IRQ() instead of Serial_Init().
Parameter
© 2013 Conrad Electronic
Libraries
320
serport interface number (0 = 1st serial port, 1 = 2nd serial port, ...)
par
interface parameter (see par table)
baud
baud rate
table par definitions:
Definition
SR_5BIT
SR_6BIT
SR_7BIT
SR_8BIT
Function
5 Bit
6 Bit
7 Bit
8 Bit
char length
char length
char length
char length
SR_1STOP
SR_2STOP
1 stop bit
2 stop bit
SR_NO_PAR
SR_EVEN_PAR
SR_ODD_PAR
no parity
even parity
odd parity
5.20.5 Serial_Init_IRQ (Mega)
Serial Functions Example
Syntax
void Serial_Init_IRQ(byte serport, byte ramaddr[], byte recvlen,
byte sendlen, byte par, word divider);
Sub Serial_Init_IRQ(serport As Byte,ByRef ramaddr As Byte,recvlen As Byte,
sendlen As Byte, par As Byte, divider As Word)
Description
The serial interface gets initialized for usage in interrupt mode. The user has to provide a global variable
as a serial buffer. This buffer services as a storage for the data that is sent to the serial interface and is received from it. The size of the buffer must be length of the send buffer plus the length of the receive buffer plus SR_BUF (see Example).
The maximum value for the size of the send and the receive buffer is 255 bytes each. The parameter par is
defined through successive or-ing of predefined bit values. The values of character length, stop b its and
parity are or'd together. E.g. "SR_7BIT | SR_2STOP | SR_EVEN_PAR" means 7 bit character length, 2 stop
bits and even parity (see Example). An example in BASIC Syntax: "SR_7BIT Or SR_2STOP Or
SR_EVEN_PAR". The baud rate is defined as a divider value (see divider table).
The user supplied buffer must be available the whole time the serial interface is working. Since after
leaving a function the local variables are no longer available, it is most times a good idea to provide the
user supplied buffer as a global variable.
It is possible to activate the DoubleClock Mode of the Atmel AVR. See Divider.
© 2013 Conrad Electronic
321
C-Control Pro IDE
Please use Serial_ReadExt() if you work in serial IRQ mode. Serial_Read() only supports polled
mode.
Parameter
serport
ramaddr
recvlen
sendlen
par
divider
interface number (0 = 1st serial port, 1 = 2nd serial port, ...)
address of the buffer
size of receive buffer
size of send buffer
interface parameter (see par table)
baud rate initialization (see table)
table par definitions:
Definition
SR_5BIT
SR_6BIT
SR_7BIT
SR_8BIT
Function
5 Bit
6 Bit
7 Bit
8 Bit
char length
char length
char length
char length
SR_1STOP
SR_2STOP
1 stop bit
2 stop bit
SR_NO_PAR
SR_EVEN_PAR
SR_ODD_PAR
no parity
even parity
odd parity
5.20.6 Serial_Init_IRQ (AVR32)
Serial Functions Example
Syntax
void Serial_Init_IRQ(byte serport, byte ramaddr[], word recvlen,
word sendlen, byte par, dword baud);
Sub Serial_Init_IRQ(serport As Byte,ByRef ramaddr As Byte,recvlen As Word,
sendlen As Word, par As Byte, baud As ULong)
Description
The serial interface gets initialized for usage in interrupt mode. The user has to provide a global variable
as a serial buffer. This buffer services as a storage for the data that is sent to the serial interface and is received from it. The size of the buffer must be length of the send buffer plus the length of the receive buffer plus SR_BUF (see Example).
The maximum value for the size of the send and the receive buffer is 65535 bytes each, but this is of
course limited to the RAM size. The parameter par is defined through successive or-ing of predefined bit
values. The values of character length, stop b its and parity are or'd together. E.g. "SR_7BIT | SR_2STOP |
© 2013 Conrad Electronic
Libraries
322
SR_EVEN_PAR" means 7 bit character length, 2 stop bits and even parity (see Example). An example in
BASIC Syntax: "SR_7BIT Or SR_2STOP Or SR_EVEN_PAR".
The user supplied buffer must be available the whole time the serial interface is working. Since after
leaving a function the local variables are no longer available, it is most times a good idea to provide the
user supplied buffer as a global variable.
Please use Serial_ReadExt() if you work in serial IRQ mode. Serial_Read() only supports polled
mode.
Parameter
serport
ramaddr
recvlen
sendlen
par
baud
interface number (0 = 1st serial port, 1 = 2nd serial port, ...)
address of the buffer
size of receive buffer
size of send buffer
interface parameter (see par table)
baud rate
table par definitions:
Definition
SR_5BIT
SR_6BIT
SR_7BIT
SR_8BIT
Function
5 Bit
6 Bit
7 Bit
8 Bit
char length
char length
char length
char length
SR_1STOP
SR_2STOP
1 stop bit
2 stop bit
SR_NO_PAR
SR_EVEN_PAR
SR_ODD_PAR
no parity
even parity
odd parity
5.20.7 Serial_IRQ_Info
Serial Functions
Syntax
byte Serial_IRQ_Info(byte serport, byte info);
Sub Serial_IRQ_Info(serport As Byte, info As Byte) As Byte
Description
In dependency of the info parameter the function returns how many bytes have been received or a written to
the send buffer.
© 2013 Conrad Electronic
323
C-Control Pro IDE
Parameter
serport interface number (0 = 1st serial port, 1 = 2nd serial port )
info values:
RS232_FIFO_RECV (0)
RS232_FIFO_SEND(1)
number of bytes received
number of bytes written to he send buffer
Return Parameter
result in bytes
5.20.8 Serial_Read (Mega)
Serial Functions
Syntax
byte Serial_Read(byte serport);
Sub Serial_Read(serport As Byte) As Byte
Description
Reads one byte from the serial interface. If is there is no byte available in the serial interface, the function
waits until a byte has been received.
Please use Serial_ReadExt() if you work in serial IRQ mode. Serial_Read() only supports polled
mode.
The function is not supported in the AVR32Bit, since the function is waiting forever, when no
data is received. E.g. no incoming Ethernet packets would be processed.
Parameter
serport interface number (0 = 1st serial port, 1 = 2nd serial port )
Return Parameter
received byte from the serial interface
5.20.9 Serial_ReadExt
Serial Functions
Syntax
word Serial_ReadExt(byte serport);
Sub Serial_ReadExt(serport As Byte) As Word
© 2013 Conrad Electronic
Libraries
324
Description
Reads one byte from the serial interface. In opposite to Serial_Read() Serial_ReadExt() returns immediately even if there is no byte available in the serial port. In this case 256 (100 Hex) is returned.
Please use Serial_ReadExt() if you work in serial IRQ mode. Serial_Read() only supports polled
mode.
Parameter
serport interface number (0 = 1st serial port, 1 = 2nd serial port )
Return Parameter
received byte from the serial interface
256 (100 Hex) if there was no byte available
5.20.10 Serial_Write
Serial Functions Example
Syntax
void Serial_Write(byte serport, byte val);
Sub Serial_Write(serport As Byte, val As Byte)
Description
One byte is send to the serial interface.
Parameter
serport interface number (0 = 1st serial port, 1 = 2nd serial port )
val
output byte value
5.20.11 Serial_WriteText
Serial Functions
Syntax
void Serial_WriteText(byte serport, char text[]);
Sub Serial_WriteText(serport As Byte, ByRef Text As Char)
Description
All characters of the char array up to the terminating zero are send to the serial interface.
© 2013 Conrad Electronic
325
C-Control Pro IDE
Parameter
serport interface number (0 = 1st serial port, 1 = 2nd serial port )
text
char array
5.20.12 Serial Example
// string output on the serial interface
void main(void)
{
int i;
char str[10];
str="test";
i=0;
// initialize serial port with 19200baud, 8 bit, 1 stop bit, no parity
Serial_Init(0,SR_8BIT|SR_1STOP|SR_NO_PAR,SR_BD19200);
while(str[i]) Serial_Write(0,str[i++]);
// output string to serial port
}
5.20.13 Serial Example (IRQ)
// 35 byte send + receive buffer + SR_BUF byte internal FIFO organization
byte buffer[35+SR_BUF];
// array declaration
// string output to serial interface
void main(void)
{
int i;
char str[10];
str="test";
i=0;
// initialize serial port with 19200baud, 8 bit, 1 stop bit, no parity
// 20 byte receive buffer - 15 byte send buffer
Serial_Init_IRQ(0,buffer,20,15,SR_8BIT|SR_1STOP|SR_NO_PAR,SR_BD19200);
while(str[i]) Serial_Write(0,str[i++]);
while(1); // endless loop
// display string
}
5.21
SDCard
SD-Card Support for C-Control Pro AVR32Bit
The card holder for the Micro SD cards is directly under the C-Control Pro AVR32Bit Unit. See description of the AVR32Bit Unit. Please consult the Pin Assignment for the description of the used
signals. Unlike the mega-SD card interface, there is no Enable line over which a reset can be
© 2013 Conrad Electronic
Libraries
326
triggered. In the demo programs this part is commented out for the AVR32Bit Unit.
SD-Card Support for C-Control Pro Mega 128 and Mega 128 CAN
The C-Control Pro SD Card interface (Conrad Order No. 197220) is used for connecting a microcontroller, such as C-Control Unit 128 Mega (Conrad Order No. 198219) to a 3.3 SD card. The SD-card
expansion features a level converter, which bidirectional converts the signals, allowing a direct connection of the SD card to a 5V microcontroller. All memory cards, on the market this time, such as
SD, SDHC, MMC and other cards can be used with a corresponding SD card adapter.
The SD card is not supported on the C-Control Pro Mega32 because there is no room in the
flash memory (32kb) to contain the FAT file system routines.
When the SD card is used in conjunction with USB and the application board, there is a collision
on the SPI bus. Unfortunately, the USB interface on the application board allows no sharing of the
SPI interface. The Projectboards are not affected, because they communicate via the serial interface. If you want to use the SD Card interface, you have to remove the jumper on the application
board (Mega128 PB.0 to PB.4 and PE.5).
The signals PB.5 to PB.7 are not absolutely necessary, in the demo programs they will be used
for the enable signals and LED control. You can save these pins, if you decide to hardwire these signals.
Card holder
PIN Mega128
WP
CD
MISO
MOSI
SCK
SS
EN1
PE.5
PB.4
PB.3
PB.2
PB.1
PB.0
PB.5
© 2013 Conrad Electronic
327
C-Control Pro IDE
LED
EN2
PB.7
PB.6
WP (Write Protect):
high = write protected SD card
low = access allowed
CD (Card Detect):
high = SD-Card not recognized
low = SD-Card detected
SPI- Interface:
MISO
MOSI
SCK
SS
Other:
LED -> User Led (5V level)
Reset Circuit:
En1 = Reset the SD-Card (low = running mode / high = reset)
En2 = Supply SD-Card holder (low = off / high = on)
The bottom diagram shows the performance of the hardware reset.
Insert SD-Card:
The SD card must always be inserted that the contacts show towards the circuit board of the SDCard interface. An incorrect insertion of the SD-Card may damage the card holder.
Technical data:
Supply voltage: +5V/DC
Current consumption: max. 150mA
SPI inputs and outputs: 5V level (TTL)
Permissible ambient temperature: 0° C to +70 °C
Permissible ambient relative humidity: 20 - 80% RH, noncondensing
Dimensions: approx 53.5 x 42 x 4.5 mm
Weight: 10g
© 2013 Conrad Electronic
Libraries
328
5.21.1 FAT Support
FAT Specification
FAT support: FAT12, FAT16 and FAT32.
Open files: Unlimited, depending on available memory.
File size: Dependent from FAT Type (up to 4G bytes).
Volume size: Dependent from FAT Type (up to 2T bytes at 512 bytes/sector)
Cluster size: Dependent from FAT Type (up to 64K bytes at 512 bytes/sector)
Sector size: Dependent from FAT Type (up to 4K bytes)
The SD card functions support no long file names (LFN) under FAT. Firstly, the long file names
have expanded RAM and flash memory requirements, since they are based on Unicode, secondly,
the company Microsoft (TM) holds a patent on the use of LFN. The file or directory name must therefore have the 8.3 format.
5.21.2 SDC Return Values
All SDC Functions return a status Byte that describes the success of the SDC operation.
Error
Value
FR_OK
FR_DISK_ERR
FR_INT_ERR
FR_NOT_READY
FR_NO_FILE
FR_NO_PATH
FR_INVALID_NAME
FR_DENIED
FR_EXIST
FR_INVALID_OBJECT
FR_WRITE_PROTECTED
FR_INVALID_DRIVE
FR_NOT_ENABLED
FR_NO_FILESYSTEM
FR_MKFS_ABORTED
FR_TIMEOUT
0
1
2
3
4
5
6
7
8
9
10
11
12
13
14
15
Description
operation successful
physical access failed
wrong FAT structure or internal error
no disk available
file not found
path not correct
invalid file name
file access denied
file already exists
file not opened with SDC_FOpen
disk write protected
drive number invalid
logical drive not mounted
no FAT table found on disk
not possible, since mkfs not available
device is not answering
5.21.3 SDC_FClose
SDCard Functions
Syntax
byte SDC_FClose(byte fil_ramaddr[]);
Sub SDC_FClose(ByRef fil_ramaddr As Byte) As Byte
© 2013 Conrad Electronic
329
C-Control Pro IDE
Description
Closes a previously opened file.
Parameter
fil_ramaddr address of the FILE buffer
Return Parameter
Success of the called SDC function. See SDC Return Values.
5.21.4 SDC_FOpen
SDCard Functions
Syntax
byte SDC_FOpen(byte fil_ramaddr[], char path[], byte mode);
Sub SDC_FOpen(ByRef fil_ramaddr As Byte, ByRef path As Char,
mode As Byte) As Byte;
Description
Opens a file. For each open file a FILE buffer has to be created. For this we define a byte array of size 32.
The user-provided RAM buffer must be reserved during the access to the SD card. Since local variables will be released after leaving the function, it usually makes sense to declare the buffer as a global
variable.
Parameter
fil_ramaddr address of the FILE buffer
path
file path
mode
file mode
Return Parameter
Success of the called SDC function. See SDC Return Values.
mode parameter:
The individual parameters are ORed like e.g.:
FA_CREATE_NEW | FA_WRITE // CompactC
FA_CREATE_NEW Or FA_WRITE ' BASIC
© 2013 Conrad Electronic
Libraries
330
Mode
Value (Hex)
Description
FA_OPEN_EXISTING
FA_READ
FA_WRITE
FA_CREATE_NEW
FA_CREATE_ALWAYS
FA_OPEN_ALWAYS
00
01
02
04
08
10
Opens file. If file does not exist, then error
File reading allowed
File writing allowed
Creates file, if file already exists, then error
Creates file, if file already exists, then file is truncated
Opens file. If file does not exist, then file is created
5.21.5 SDC_FRead
SDCard Functions
Syntax
byte SDC_FRead(byte fil_ramaddr[], byte buf[], word btr, word br[]);
Sub SDC_FRead(ByRef fil_ramaddr As Byte, ByRef buf As Byte, btr As Word,
ByRef br As Word) As Byte
Description
Reads data from an open file. The data is written at the reading position from the file into the buffer buf.
The number of bytes to read is btr, the number of bytes that were actually read is copied in the first element
of br. The reading position can be determined with SDC_FSeek.
Parameter
fil_ramaddr
buf
btr
br
address of the FILE buffer
RAM address to where the bytes a read from the SD card
number of bytes to read
actual number of bytes read
Return Parameter
Success of the called SDC function. See SDC Return Values.
5.21.6 SDC_FSeek
SDCard Functions
Syntax
byte SDC_FSeek(byte fil_ramaddr[], dword pos);
Sub SDC_FSeek(ByRef fil_ramaddr As Byte, pos As ULong) As Byte
Description
Sets the read / write position of the opened file. The position pos is always counted from the beginning of
the file.
© 2013 Conrad Electronic
331
C-Control Pro IDE
Parameter
fil_ramaddr address of the FILE buffer
pos
read / write position
Return Parameter
Success of the called SDC function. See SDC Return Values.
5.21.7 SDC_FSetDateTime
SDCard Functions
Syntax
byte SDC_FSetDateTime(char path[], byte day, byte mon, word year, byte min,
byte hours, byte sec);
Sub SDC_FSetDateTime(ByRef path As Char,day As Byte,mon As Byte,year As Word,
min As Byte, hours As Byte, sec As Byte) As Byte
Description
Set the date and time attributes of a file.
Parameter
path
day
mon
year
min
hours
sec
file path
Day (1-31)
Month (1-12)
Year (1980-2107)
Minute (0-59)
Gour (0-23)
Second (0-59) (is always set to an even value)
Return Parameter
Success of the called SDC function. See SDC Return Values.
5.21.8 SDC_FStat
SDCard Functions
Syntax
byte SDC_FStat(char path[], dword filinfo[]);
Sub SDC_FStat(ByRef path As Char, ByRef filinfo As ULong) As Byte
Description
© 2013 Conrad Electronic
Libraries
Read attributes of a file to a dword (ULong) array with 4 elements.
Parameter
path
filinfo
file path
return array
Return Parameter
Success of the called SDC function. See SDC Return Values.
Rückgabe Array:
fileinfo[0]
fileinfo[1]
fileinfo[2]
fileinfo[3]
file length
date
time
file attribute
Coding date:
Bits 0:4 - day: 1...31
Bits 5:8 - month: 1...12
Bits 9:15 - year begin with 1980: 0...127
Coding time:
Bits 0:4 - seconds/2: 0...29
Bits 5:10 - minute: 0...59
Bits 11:15 - hour: 0...23
Coding file attribute:
Bit 1: Read Only
Bit 2: Hidden
Bit 3: Volume label
Bit 4: Directory
Bit 5: Archive
5.21.9 SDC_FSync
SDCard Functions
Syntax
byte SDC_FSync(byte fil_ramaddr[]);
Sub SDC_FSync(ByRef fil_ramaddr As Byte) As Byte
Description
Waits for all data to be written from the buffer into the file on the SD card.
Parameter
fil_ramaddr address of the FILE buffer
© 2013 Conrad Electronic
332
333
C-Control Pro IDE
Return Parameter
Success of the called SDC function. See SDC Return Values.
5.21.10 SDC_FTruncate
SDCard Functions
Syntax
byte SDC_FTruncate(byte fil_ramaddr[]);
Sub SDC_FTruncate(ByRef fil_ramaddr As Byte) As Byte
Description
Delete the rest of the file from the current cursor position.
Parameter
fil_ramaddr address of the FILE buffer
Return Parameter
Success of the called SDC function. See SDC Return Values.
5.21.11 SDC_FWrite
SDCard Functions
Syntax
byte SDC_FWrite(byte fil_ramaddr[], byte buf[], word btr, word br[]);
Sub SDC_FWrite(ByRef fil_ramaddr As Byte, ByRef buf As Byte, btr As Word,
ByRef br As Word) As Byte
Description
Writes data to an open file. The data from the buffer buf is written to the file at current file position. The
parameter btr determines number of bytes to write. The number of bytes actual written is copied into the
first element of br. The write position can be determined with SDC_FSeek.
Parameter
fil_ramaddr
buf
btr
br
address of the FILE buffer
RAM address from where the bytes a written to the SD card
number of bytes to write
actual number of bytes written
© 2013 Conrad Electronic
Libraries
334
Return Parameter
Success of the called SDC function. See SDC Return Values.
5.21.12 SDC_GetFree
SDCard Functions
Syntax
byte SDC_GetFree(char path[], dword kbfree[]);
Sub SDC_GetFree(ByRef path As Char, ByRef kbfree As ULong) As Byte
Description
Returns the number of free clusters on the SD Card. The number of free clusters is copied to the first
element of the array kbfree.
Parameter
path
kbfree
path to the root of the disk.
return array
Return Parameter
Success of the called SDC function. See SDC Return Values.
5.21.13 SDC_Init
SDCard Functions
Syntax
void SDC_Init(byte fat_ramaddr[]);
Sub SDC_Init(ByRef fat_ramaddr As Byte)
Description
Initializes the SD card library. For this operation a FAT buffer must be created. Therefore an array of size
562 is declared.
The user-provided RAM buffer must be reserved during the access to the SD Card. Since local variables will be released after leaving the function, it usually makes sense to declare the buffer as a global
variable.
Parameter
fat_ramaddr address of the FAT buffer
© 2013 Conrad Electronic
335
C-Control Pro IDE
Return Parameter
Success of the called SDC function. See SDC Return Values.
5.21.14 SDC_MkDir
SDCard Functions
Syntax
byte SDC_MkDir(char path[]);
Sub SDC_MkDir(ByRef path As Char) As Byte
Description
Creates a directory on the SD card.
Parameter
path
path to the directory
Return Parameter
Success of the called SDC function. See SDC Return Values.
5.21.15 SDC_Rename
SDCard Functions
Syntax
byte SDC_Rename(char oldpath[], char newpath[]);
Sub SDC_Rename(ByRef oldpath As Char, ByRef newpath As Char) As Byte
Description
Renames a file from oldpath to newpath.
Parameter
oldpath
newpath
file path
path to file with new name
If newpath points to a directory other than oldpath, the file is not renamed only, but also moved into the
new directory. In newpath may not be logical disk number, only in oldpath.
© 2013 Conrad Electronic
Libraries
336
Return Parameter
Success of the called SDC function. See SDC Return Values.
5.21.16 SDC_Unlink
SDCard Functions
Syntax
byte SDC_Unlink(char path[]);
Sub SDC_Unlink(ByRef path As Char) As Byte
Description
Deletes a file.
Parameter
path
file path
Return Parameter
Success of the called SDC function. See SDC Return Values.
5.21.17 SD card Example
// Global variables
byte fat[562];
byte fil[32];
void main(void)
{
// Local variables
byte res;
char buf[100];
word bytes_written[1];
// SD-Card reset
Port_DataDirBit(13,1);
Port_DataDirBit(14,1);
// PB.5 = output (EN1)
// PB.6 = Ausgang (EN2)
Port_WriteBit(13,1);
Port_WriteBit(14,0);
// set EN1 for 50ms at +5V (PB.5)
// set EN2 for 50ms to GND (PB.6)
AbsDelay(50);
// 50ms break
Port_WriteBit(13,0);
Port_WriteBit(14,1);
// EN1 GND
// EN2 +5V
© 2013 Conrad Electronic
337
C-Control Pro IDE
// Power on -> SD-Card
Port_WriteBit(14,1);
// EN2 (PB.6) +5V
AbsDelay(50);
// 50ms Pause
// SD-Card Fat init
SDC_Init
(fat);
// Create a new file folders
SDC_MkDir("0:/CC-PRO");
// Does the file already exists?
// If the file is not created
res=SDC_FOpen(fil, "0:/CC-PRO/test.txt", FA_READ|FA_WRITE|FA_OPEN_EXISTING);
if(res!=0)SDC_FOpen(fil, "0:/CC-PRO/test.txt", FA_WRITE|FA_CREATE_ALWAYS);
// Writes to a text file
buf= "Hallo... 123!\r\n";
SDC_FWrite(fil, buf, Str_Len(buf), bytes_written);
SDC_FSync(fil);
// File is closed
SDC_FClose(fil);
}
5.22
Servo
RC servos are composed of a DC motor mechanically linked to a potentiometer. Pulse-width modulation (PWM) signals sent to the servo are translated into position commands by electronics inside
the servo. When the servo is commanded to rotate, the DC motor is powered until the potentiometer
reaches the value corresponding to the commanded position. The servo is controlled by three wires:
ground (usually black/orange), power (red) and control (brown/other colour). The servo will move
based on the pulses sent over the control wire, which set the angle of the actuator arm. The servo
expects a pulse every 20 ms in order to gain correct information about the angle. The width of the
servo pulse dictates the range of the servo's angular motion. A servo pulse of 1.5 ms width will set
the servo to its "neutral" position, or 90°. For example a servo pulse of 1.25 ms could set the servo
to 0° and a pulse of 1.75 ms could set the servo to 180°. The physical limits and timings of the servo
hardware varies between brands and models, but a general servo's angular motion will travel somewhere in the range of 180° - 210° and the neutral position is almost always at 1.5 ms.
Connection to C-Control Pro
© 2013 Conrad Electronic
Libraries
338
+5Volt ist the supply voltage of the servo, it must provide enough current to drive the servo. The
ground of the servo and the ground of the C-Control Pro unit must be the same. The pulse for the
servo is generated by the PWM signal of the C-Control unit.
5.22.1 Servo_Init
Servo Functions
Example
Syntax
void Servo_Init(byte servo_cnt, byte servo_interval, byte ramaddr[],
byte timer);
Sub Servo_Init(servo_cnt As Byte, servo_interval As Byte,
ByRef ramaddr As Byte, timer As Byte)
Description
Intializes the internal servo routines. The servo_cnt parameter controls how many servos can be
driven at the same time. The servo_interval parameter describes the period length (10 or 20ms), with
timer the used 16-Bit timer can be chosen. Timer 3 is only available on the Mega128. The user must
supply ram space to operate the servos. The required size is servo_cnt * 3. E.g., if the user wants to
operate 10 servos, at byte array of 30 bytes is needed.
The user supplied ram space must be available the whole time the servos are working. Since after
leaving a function the local variables are no longer available, it is most times a good idea to provide the
user supplied ram as a global variable.
© 2013 Conrad Electronic
339
C-Control Pro IDE
A 16-bit Timer is needed for the servo steering routines. Is the timer turned off, or is used for other purposes the servo routines will not work.
Parameter
servo_cnt
servo_interval
ramaddr
timer
number of possible servos (maximum 20)
periodic length (0=10ms, 1=20ms)
address of memory block
16-Bit Timer used for servo steering
Mega32: 0 = Timer 1
Mega128 & Mega128 CAN: 0=Timer 1, 1=Timer 3
AVR32: all Timer (0 - 5)
5.22.2 Servo_Set
Servo Functions Example
Syntax
void Servo_Set(byte portbit, word pos);
Sub Serial_Init(portbit As Byte, pos As Word)
Description
Sets the pulse length to steer the actuator arm. The output port is set with the portbit parameter
(See Pin Assignment of M32 and M128).
The sum of all user set pulse lengths should not exceed the period length (see servo_interval parameter), otherwise an erratic behaviour could happen. E.g. with 20ms period length, a total of 8 servos can
each be set to a pulse length of 2500µs. To have some safety margin, the sum of the pulse lengths should
be less than the period length for a small amount.
Parameter
portbit
pos
bit number of port (see Port Table)
pulse length for servo in µsec (500 - 2500)
5.22.3 Servo Example
byte servo_var[30]; // Servo internal variables
// Activation of 3 Servos and stop after 10 seconds
void main(void)
{
// Max. 10 Servos, 20ms interval, Timer 3
Servo_Init(10, 1, servo_var, 1);
Servo_Set(7, 2000);
Servo_Set(6, 1800);
Servo_Set(5, 1600);
// Servo Portbit 7
// Servo Portbit 6
// Servo Portbit 5
2000µs
1800µs
1600µs
© 2013 Conrad Electronic
Libraries
340
AbsDelay(5000);
Servo_Set(7, 1000);
// Servo Portbit 7
1000µs
AbsDelay(5000);
Servo_Set(7, 0);
Servo_Set(6, 0);
Servo_Set(5, 0);
// all Servos off
}
5.23
SPI
The Serial Peripheral Interface Bus or SPI bus is a synchronous serial data link standard named by
Motorola that operates in full duplex mode. Devices communicate in master/slave mode where the
master device initiates the data frame. Multiple slave devices are allowed with individual slave select
(chip select) lines.
5.23.1 Mega
5.23.1.1
SPI_Disable
SPI Functions
Syntax
void SPI_Disable(void);
Sub SPI_Disable()
Description
The SPI will be disabled and the corresponding ports can be used otherwise.
Disabling the SPI interface will prevent usage of the USB interface on the application board. On the
other hand, if you don't use the USB interface, SPI_Disable() will allow to use these ports for other purposes.
Parameter
None
© 2013 Conrad Electronic
341
C-Control Pro IDE
5.23.1.2
SPI_Enable
SPI Functions
Syntax
void SPI_Enable(byte ctrl);
Sub SPI_Enable(ctrl As Byte)
Description
The SPI interface is initialized with the value of ctrl (see SPCR register in Atmel Mega Reference Manual).
Parameter
ctrl initialization parameter (Mega SPCR Register)
Bit 7 - SPI Interrupt Enable (do not enable, cannot be used from C-Control Pro now)
Bit 6 - SPI Enable (must be set)
Bit 5 - Data Order (1 = LSB first, 0 = MSB first)
Bit 4 - Master/Slave Select (1 = Master, 0 = Slave)
Bit 3 - Clock polarity (1 = leading edge falling, 0 = leading edge rising)
Bit 2 - Clock Phase (1 = sample on trailing edge, 0 = sample on leading edge)
Bit 1
0
Bit 0
0
SCK Frequency
fOsc / 4
0
1
fOsc / 16
1
0
fOsc / 64
1
1
fOsc / 128
Please consider, that fOsc = 14,7456 Mhz for C-Control Pro Mega 32 and Mega128, while the CControl Pro Mega128 CAN works at 16 Mhz.
5.23.1.3
SPI_Read
SPI Functions
Syntax
byte SPI_Read();
Sub SPI_Read() As Byte
Description
A byte is read from the SPI interface.
© 2013 Conrad Electronic
Libraries
Return Parameter
received byte from the SPI interface
5.23.1.4
SPI_ReadBuf
SPI Functions
Syntax
void SPI_ReadBuf(byte buf[], word length);
Sub SPI_ReadBuf(ByRef buf As Byte, length As Word)
Description
A number of bytes are read from the SPI interface into an array.
Parameter
buf
length
5.23.1.5
pointer to byte array
number of bytes to read
SPI_Write
SPI Functions
Syntax
void SPI_Write(byte data);
Sub SPI_Write(data As Byte)
Description
One byte is send to the serial interface.
Parameter
data
5.23.1.6
output byte value
SPI_WriteBuf
SPI Functions
Syntax
void SPI_WriteBuf(byte buf[], word length);
© 2013 Conrad Electronic
342
343
C-Control Pro IDE
Sub SPI_WriteBuf(ByRef buf As Byte, length As Word)
Description
A number of bytes are sent to the SPI interface.
Parameter
buf
pointer to byte array
length number of bytes to be transferred
5.23.2 AVR32Bit
5.23.2.1
SPI_Disable
SPI Functions
Syntax
void SPI_Disable(byte chan);
Sub SPI_Disable(chan As Byte)
Description
The SPI interface is switched off and the associated ports can be used differently.
Parameter
chan
5.23.2.2
SPI channel (0 - 1)
SPI_Enable
SPI Functions
Syntax
void SPI_Enable(byte chan, dword speed, byte bits, byte mode);
Sub SPI_Enable(chan As Byte, speed As ULong, bits As Byte, mode As Byte)
Description
The SPI interface is initialized at a clock rate, number of data bits and SPI mode. A divider is then calculated internally from the speed parameter, to set the chip to the desired baud rate. Since the divider can
only take a value between 1 and 255, the specified speed parameter is roughly maintained. The divider is
© 2013 Conrad Electronic
Libraries
344
selected that meets the desired clock rate closest: divider = 66Mhz / speed. The actual speed is then
66Mhz / divider. As a result, baud rates less than 259000 may not be used.
Parameter
SPI channel (0 - 1)
SPI baud rate (259000 - 66000000)
number of data bits
SPI mode
chan
speed
bits
mode
5.23.2.3
SPI Mode
CPOL
NCPHA
0
1
2
3
0
0
1
1
1
0
1
0
SPI_Read
SPI Functions
Syntax
word SPI_Read();
Sub SPI_Read() As Word
Description
Data is read from the SPI interface.
Return Parameter
received data (4-16 Bit) from the SPI interface
5.23.2.4
SPI_ReadBuf
SPI Functions
Syntax
void SPI_ReadBuf(byte buf[], word length);
Sub SPI_ReadBuf(ByRef buf As Byte, length As Word)
Description
A number of bytes is read from the SPI interface into an array. The functions works with up to 8 bits, regard-
© 2013 Conrad Electronic
345
C-Control Pro IDE
less of whether the SPI interface is initialized with more bits.
Parameter
buf
length
5.23.2.5
pointer to byte array
number of bytes to read
SPI_SetChan
SPI Functions
Syntax
void SPI_SetChan(byte chan);
Sub SPI_SetChan(chan As Byte)
Description
Selects an SPI interface (SPI0 or SPI1) for further access.
Parameter
chan SPI channel (0 - 1)
5.23.2.6
SPI_Write
SPI Functions
Syntax
void SPI_Write(word data);
Sub SPI_Write(data As Word)
Description
Data is written to the SPI interface.
Parameter
data
5.23.2.7
output data (4-16 Bit)
SPI_WriteBuf
SPI Functions
Syntax
void SPI_WriteBuf(byte buf[], word length);
© 2013 Conrad Electronic
Libraries
346
Sub SPI_WriteBuf(ByRef buf As Byte, length As Word)
Description
A number of bytes are sent to the SPI interface. The function works with 8 bits, regardless of whether the
SPI interface is initialized with more bits.
Parameter
buf
length
5.24
pointer to byte array
number of bytes to be transferred
Strings
One part of these string routines is implemented in the Interpreter, another can be called up after appending library "String_Lib.cc". Since the functions in "String_Lib.cc" are realized through Bytecode
they are slower when executed. Library functions however have the advantage that they can be taken
from the project by omitting the library in case they are not needed. Direct Interpreter functions are
always present, will however take up flash memory.
There is no explicit "String" data type. A string is based on a character array. The size of the array
must be chosen in such a way that all characters of the string fit into the character array. Additionally some space is needed for a terminating character (decimal Zero) in order to indicate the end of
the character string.
5.24.1 Str_Comp
String Functions
Syntax
char Str_Comp(char str1[], char str2[]);
Sub Str_Comp(ByRef str1 As Char, ByRef str2 As Char) As Char
Description
Two strings are compared.
Parameter
str1 pointer to char array 1
str2 pointer to char array 2
Return Parameter
0
both strings are equal
<0 if the first string is smaller than the second
>0 if the first string is greater than the second
© 2013 Conrad Electronic
347
C-Control Pro IDE
Remark
The attribute smaller or greater is specified for the character difference at the first point of difference
between both strings.
5.24.2 Str_Copy
String Functions
Syntax
void Str_Copy(char destination[], char source[], word offset);
Sub Str_Copy(ByRef destination As Char, ByRef source As Char, offset As
Word)
Description
The source string (source) is copied to the destination string (destination). During copying also the string
termination character of the source character string is copied.
Parameter
destination pointer to destination string
source
pointer to source string
offset
Number of characters by which the source string is offset when copied to the destination
string..
If offset has the value STR_APPEND (ffff Hex) then the length of the destination string is assumed as
offset. In this case the source string is copied behind the destination string.
5.24.3 Str_Fill
String Functions (Library "String_Lib .cc")
Syntax
void Str_Fill(char dest[], char c, word len);
Sub Str_Fill(ByRef dest As Char, c As Char, len As Word)
Description
The string dest is filled with character c.
Parameter
dest pointer to destination string
c
character that is written into the string
len count, how often c is written into the string
© 2013 Conrad Electronic
Libraries
5.24.4 Str_Isalnum
String Functions (Library "String_Lib .cc")
Syntax
byte Str_Isalnum(char c);
Sub Str_Isalnum(c As Char) As Byte
Description
A character is tested if it is alphabetically or a digit.
Parameter
c tested character
Return Parameter
1 if the character is alphabetically or a digit (upper- or lowercase)
0 else
5.24.5 Str_Isalpha
String Functions (Library "String_Lib .cc")
Syntax
byte Str_Isalpha(char c);
Sub Str_Isalpha(c As Char) As Byte
Description
A character is tested if it is alphabetically.
Parameter
c tested character
Return Parameter
1 if the character is alphabetically (upper- or lowercase)
0 else
© 2013 Conrad Electronic
348
349
C-Control Pro IDE
5.24.6 Str_Len
String Functions
Syntax
word Str_Len(char str[]);
Sub Str_Len(ByRef str As Char) As Word
Description
The length of the string (character array) is returned.
Parameter
str pointer to string
Return Parameter
length of the string (without terminating zero)
5.24.7 Str_Printf
String Functions
Example
Syntax
void Str_Printf(char str[], char format[], ...);
Sub Str_Printf(ByRef str As Char, ByRef format As Char, ...)
Description
This function creates a formatted string into str. The format string is similar to the formatting of printf() in C.
The format always begins with "%", then follow optional flags (0,l), and it ends with a type (d,x,s,f). In the
following table all type parameters are explained. Between % and type an optional width and precision
can be used.
%[flags][width][.prec]Typ
(the brackets describes the optional part)
The width is the minimal space for the output of the number. If the number is smaller than width, the number is padded to the left with spaces. If the width begins with "0" the left is padded width "0" instead of
spaces. A period "." describes an optional precision parameter, that defines the number of decimal
places, when floating point numbers (%f) are used, or the base of the number when using unsigned integer (%u). See Str_Printf Example.
If there is no "l" flag when a 32-Bit number is printed, only the lower 16 bits are displayed.
Flags
Description
© 2013 Conrad Electronic
Libraries
0
l
padd with "0"
32-Bit Integer
Format
%[width]d
%[width][.prec]u
%[width]x
%[width][.prec]f
%[width]s
%[width]c
Description
integer
unsigned integer
hexadecimal
floating point
string
char
350
Parameter
str
format
pointer to string
pointer to format string
5.24.8 Str_ReadFloat
String Functions
Syntax
float Str_ReadFloat(char str[]);
Sub Str_ReadFloat(ByRef str As Char) As Single
Description
The value of a string representing a floating point number is returned. The number is recognized,
even if there or other characters after the number.
Parameter
str pointer to string
Return Parameter
floating point value of string
5.24.9 Str_ReadInt
String Functions
Syntax
int Str_ReadInt(char str[]);
Sub Str_ReadInt(ByRef str As Char) As Integer
© 2013 Conrad Electronic
351
C-Control Pro IDE
Description
The value of a string representing an integer number is returned. The number is recognized, even if
there or other characters after the number.
Parameter
str pointer to string
Return Parameter
integer value of string
5.24.10 Str_ReadNum
String Functions
Syntax
word Str_ReadNum(char str[], byte base);
Sub Str_ReadNum(ByRef str As Char, base As Byte) As Word
Description
The value of a string representing an unsigned number is returned. The number is recognized, even if
there or other characters after the number. The base parameter is the base of the numeric value.
E.g. to read a hexadecimal number, a base of 16 is to apply.
Parameter
str
base
pointer to string
base of converted number
Return Parameter
numeric value of string
5.24.11 Str_Substr
String Functions (Library "String_Lib .cc")
Syntax
int Str_SubStr(char source[], char search[]);
Sub Str_SubStr(ByRef source As Char, ByRef search As Char) As Integer
Description
A substring search is searched inside string source. If the substring is found, the position of the substring
© 2013 Conrad Electronic
Libraries
352
is returned.
Parameter
source string that is searched
search substring that is looked for
Return Parameter
position of the found substring
-1 else
5.24.12 Str_WriteFloat
String Functions
Syntax
void Str_WriteFloat(float n, byte decimal, char text[], word offset);
Sub Str_WriteFloat(n As Single, decimal As Byte, ByRef text As Char,
offset As Word)
Description
The floating point number n is converted to an ASCII string with decimal number of decimal digits after the
period. The result is stored in the string text with an offset of offset. The offset parameter is used to change
a string after a specified number (offset) of characters and leave the beginning of the string intact.
Parameter
n
decimal
text
offset
float number
number of decimal digit after the period
pointer to destination string
offset that is applied to the position where the string is copied
If offset has the value STR_APPEND (ffff Hex) then the length of the destination string is assumed as
offset. In this case the source string is copied behind the destination string.
5.24.13 Str_WriteInt
String Functions
Syntax
void Str_WriteInt(int n, char text[], word offset);
Sub Str_WriteInt(n As Integer, ByRef text As Char, offset As Word)
Description
The integer number n is converted to a signed ASCII string. The result is stored in the string text with an off-
© 2013 Conrad Electronic
353
C-Control Pro IDE
set of offset. The offset parameter is used to change a string after a specified number (offset) of characters
and leave the beginning of the string intact.
Parameter
n
integer number
text
pointer to destination string
offset offset that is applied to the position where the string is copied
If offset has the value STR_APPEND (ffff Hex) then the length of the destination string is assumed as
offset. In this case the source string is copied behind the destination string.
5.24.14 Str_WriteWord
String Functions
Syntax
void Str_WriteWord(word n, byte base, char text[], word offset, byte
minwidth);
Sub Str_WriteWord(n As Word, base As Byte, ByRef text As Char ,offset As
Word, minwidth As Byte)
Description
The word n is converted to an ASCII string. The result is stored in the string text with an offset of offset. The
offset parameter is used to change a string after a specified number (offset) of characters and leave the
beginning of the string intact. If the resulting string is smaller than minwidth the beginning of the string
gets filled with zeros "0".
The base of the numbering system can be given in the base parameter. If you set base to 2, you will get a
string with binary digits. A base of 8 produces an octal string, and a base of 16 a hexadecimal string. If the
base is set to a number greater than 16, more characters of the alphabet are used. E.g. a base of 18 produces a string with the digits '0'-'9' and 'A'-'H'.
Parameter
n
base
text
offset
minwidth
16 bit word
base of the number system
pointer to destination string
offset that is applied to the position where the string is copied
minimal width of the string
If offset has the value STR_APPEND (ffff Hex) then the length of the destination string is assumed as
offset. In this case the source string is copied behind the destination string.
© 2013 Conrad Electronic
Libraries
354
5.24.15 Str_Printf Example
// CompactC
void main(void)
{
char str[80];
// Integer
Str_Printf(str, "arg1: %d\r", 1234);
Msg_WriteText(str);
// Ouput of integer, floating point, string und hex number
Str_Printf(str, "arg1: %8d arg2:%10.3f arg3:%20s arg4: %x\r",
1234, 2.34567, "hello world", 256);
Msg_WriteText(str);
Str_Printf(str, "arg1: %u arg2: %.2u\r", 65000, 0xff);
Msg_WriteText(str);}
}
' Basic
Sub main()
Dim str(80) As Char
Str_Printf(str, "arg1: %08d arg2:%10.3f arg3:%20s arg4: %x\r",
1234, 2.34567, "hello world", 256)
Msg_WriteText(str)
Str_Printf(str, "arg1: %u arg2: %.2u\r", 65000, &Hff)
Msg_WriteText(str)
End Sub
5.25
Threads
Multi Threading
Multi Threading is a so to speak parallel execution of several tasks in a program. One of these tasks
is called “Thread”. When Multi Threading it will rather rapidly be toggled between the various threads
so the impression of simultaneousness is created.
The C-Control Pro firmware supports besides the main program (Thread "0") up to 13 additional
threads. With Version 2.12 of the IDE the multithreading changed. Before 2.12 the user could set in
the project options the number of Bytecodes that were executed before there was a thread change.
This behavior was unfair, because some Bytecodes (especially floating point) needed much more
CPU time than other Bytecodes. Now the multithreading scheduler works with time cycles. A user
can assign the number of 10ms cycles a thread has before the next threads get executed.
In multithreading, after a certain number of time cycles the current thread will be set "inactive" and
the next executable thread is searched for. After that the execution of the new thread will be started.
The new thread may again be the same as before depending on how many threads had been activated or are ready for processing. The main program counts as first thread. Therefore thread "0" is
© 2013 Conrad Electronic
355
C-Control Pro IDE
active at all times even if no threads have explicitly been started.
If the main program (thread "0") terminates, all other threads stop, too.
The priority of threads can be influenced by changing the number of time cycles which one thread is
allowed to execute until the next thread change takes place. The smaller the number of cycles until
the change takes place, the lower the priority of the thread.
Thread Configuration
Before IDE version 2.12 the threads were configured in the project options. That has changed. The
configuration is now placed inside the source code with the new "#thread" keyword. The syntax is:
#thread thread_number, ram_used, number_of_time_cylces
A thread will receive as much space for its local variables as has been assigned to it. The exception
is thread "0" (the main program). This thread will receive the entire memory space that has been left
over by the other threads. The RAM assignment by the "#thread 0" statement for the main thread is
ignored. Therefore it should be planned in advance how much memory space may be needed by
each additional thread.
The "#thread" statements need not be near the thread functions, but may be anywhere in the
program. If no threads are used, a "#thread 0" command is unnecessary. If you forget to define a
thread, the thread_start is ignored.
Example CompactC:
#thread 0, 0, 20 // main thread with task change every 20 * 10ms =200ms
#thread 1, 128, 10 //thread 1 with 128 Byte & task change 10*10ms =100ms
#thread 2, 256, 10 //thread 2 with 256 Byte & task change 10*10ms =100ms
Example BASIC (syntax identical to CompactC):
#thread 0, 0, 20
' main thread with task change every 20 * 10ms =200ms
#thread 1, 128, 10 ' thread 1 with 128 Byte & task change 10*10ms =100ms
#thread 2, 256, 10 ' thread 2 with 256 Byte & task change 10*10ms =100ms
Since e. g. Serial_Read will wait until a character arrives from the serial interface, a thread can in
some cases be active longer than the assigned number of time cycles.
When working with threads Thread_Delay rather than AbsDelay should always be used. If nevertheless e. g. an AbsDelay(1000) is used, the thread will wait for 1000ms even if a smaller number of
time cycles is assigned.
Thread Synchronization
Sometimes it is necessary for a thread to wait for another thread. This may e. g. be a common hardware resource which can only execute one thread. Sometimes also critical program areas may be
defined which may only be entered by one thread. This functions are being realized through instruc-
© 2013 Conrad Electronic
Libraries
356
tions Thread_Wait and Thread_Signal.
A thread bound to wait will execute instruction Thread_Wait with a signal number. The condition of
the thread is set on waiting. This means that the thread may be ignored at a possible thread change.
If the other thread has completed its critical work it will send the command Thread_Signal with the
same signal number the first thread had used for its Thread_Wait. The thread condition of the waiting
thread will change from waiting to inactive and will then be considered again at a possible thread
change.
Deadlocks
When all active threads set out for a waiting condition with Thread_Wait then there will be no more
threads which can release the other threads from their waiting conditon. Therefore these constellations should be avoided when programming.
Table Thread Conditions
Condition
Meaning
active
inactive
sleeping
The thread is presently executed
Can be activated again after a thread change
Will after a number of ticks be set to "inactive"
again
The thread awaits a signal
waiting
5.25.1 Thread_Cycles
Thread Functions
Syntax
void Thread_Cycles(byte thread, word cycles);
Sub Thread_Cycles(thread As Byte, cycles As Word)
Description
Sets the number of executed bytecode instructions before thread change to the parameter cycles.
If a thread is freshly started, it will get the cycle count that was defined in the project options. It only
makes sense to call Thread_Cylces() after a thread has been started.
Parameter
thread (0-13) number of the thread
cycles cycle count until thread change
© 2013 Conrad Electronic
357
C-Control Pro IDE
5.25.2 Thread_Delay
Thread Functions
Example
Syntax
void Thread_Delay(word delay);
Sub Thread_Delay(delay As Word)
Description
With this function a thread will set to "sleep" for a specified time. After this time the thread is again ready for
execution. The waiting period is given in ticks that are created by Timer 2. If Timer 2 is set off or used for
other purposes, the mode of operation of Thread_Delay() is not defined.
Even if Thread_Delay() looks like any other wait function, you have to keep in mind that the
thread is not automatically executed after the waiting period. The thread is then ready for execution,
but it will not started until the next thread change.
Parameter
delay number of 10ms ticks that should be waited
5.25.3 Thread_Info
Thread Functions
Syntax
word Thread_Info(byte info);
Sub Thread_Info(info As Byte) As Word
Description
The function returns information about the calling thread. The info parameter defines what kind of information is returned.
Parameter
info values:
TI_THREADNUM
TI_STACKSIZE
TI_CYCLES
number of the calling thread
defined stack size
number of cycles before thread change
Return Parameter
info result
© 2013 Conrad Electronic
Libraries
358
5.25.4 Thread_Kill
Thread Functions
Syntax
void Thread_Kill(byte thread);
Sub Thread_Kill(thread As Byte)
Description
Terminates a thread. If 0 is given as thread number, the whole program will be terminated.
Parameter
thread (0-13) thread number
5.25.5 Thread_Lock
Thread Functions
Syntax
void Thread_Lock(byte lock);
Sub Thread_Lock(lock As Byte)
Description
With this function you can inhibit thread changes. This is reasonable if you have a series of port operations
or other hardware actions that should not timely be separated in a thread change.
If you forget to remove the thread lock, the multithreading is not working.
Parameter
lock if set to 1 thread changes are inhibited, 0 means thread changes are allowed
5.25.6 Thread_MemFree
Thread Functions
Syntax
word Thread_MemFree(void);
Sub Thread_MemFree() As Word
© 2013 Conrad Electronic
359
C-Control Pro IDE
Description
Returns the free memory that is available for the calling thread.
Parameter
None
Return Parameter
free memory in bytes
5.25.7 Thread_Resume
Thread Functions
Syntax
void Thread_Resume(byte thread);
Sub Thread_Resume(thread As Byte)
Description
If a thread has the state "waiting" it can be set to "inactive" with this function call. "Inactive" means that a
thread is ready for activation at a thread change.
Parameter
thread (0-13) thread number
5.25.8 Thread_Signal
Thread Functions
Syntax
void Thread_Signal(byte signal);
Sub Thread_Signal(signal As Byte)
Description
Has a thread been set to state "waiting" with a call to Thread_Wait() it can be set to "inactive" with a call to
Thread_Signal(). The signal parameter must have the same value as the value that has been used in the
call to Thread_Wait().
© 2013 Conrad Electronic
Libraries
360
Parameter
signal signal value
5.25.9 Thread_Start
Thread Functions
Example
Syntax
void Thread_Start(byte thread, dword func);
Sub Thread_Start(Byte thread As Byte, func As ULong)
Description
A new thread gets started. Every function in the program can be used as starting function for the thread.
If the thread is started inside a function that has parameters defined in the function header, the value
of these parameters is undefined!
Parameter
thread
func
(0-13) thread number
function name of the function where the thread will be started
5.25.10 Thread_Wait
Thread Functions
Syntax
void Thread_Wait(byte thread, byte signal);
Sub Thread_Wait(thread As Byte, signal As Byte)
Description
The thread gets the state "waiting". The state can be changed back to "inactive" with calls to Thread_Resume() or Thread_Signal().
Parameter
thread (0-13) thread number
signal signal value
© 2013 Conrad Electronic
361
C-Control Pro IDE
5.25.11 Thread Example
// demo program of multithreading
// this program makes no debouncing, therefore a short trigger of the switch
// can lead to more than one string outputs
#thread 0, 0, 10
//main thread with task change every 10 * 10ms =100ms
#thread 1, 128, 10 //thread 1 with 128 Byte & task change 10*10ms =100ms
void thread1(void)
{
while(true) // endless loop
{
if(!Port_ReadBit(PORT_SW2)) Msg_WriteText("Switch 2"); // SW2 is pressed
}
}
void main(void)
{
#ifdef AVR32
// set noth Pin to input & pull-up
Port_Attribute(PORT_T1, PORT_ATTR_INPUT | PORT_ATTR_PULL_UP);
Port_Attribute(PORT_T2, PORT_ATTR_INPUT | PORT_ATTR_PULL_UP);
#else
Port_DataDirBit(PORT_SW1, PORT_IN); // set Pin to input
Port_DataDirBit(PORT_SW2, PORT_IN); // set Pin to input
Port_WriteBit(PORT_SW1, 1); // set pull-up
Port_WriteBit(PORT_SW1, 1); // set pull-up
#endif
Thread_Start(1,thread1); // start new Thread
while(true)
// endless loop
{
if(!Port_ReadBit(PORT_SW1)) Msg_WriteText("Switch 1");// SW1 is pressed
}
}
5.25.12 Thread Example 2
// multithread2: multithreading with Thread_Delay()
// necessary library: IntFunc_Lib.cc
#thread 0, 0, 10
//main thread with task change every 10 * 10ms =100ms
#thread 1, 128, 10 //thread 1 with 128 Byte & task change 10*10ms =100ms
void thread1(void)
{
while(true)
{
Msg_WriteText("Thread2"); Thread_Delay(200);
}
// "Thread2" is displayed
© 2013 Conrad Electronic
Libraries
}
362
// after that the thread
// sleeps for 200ms
//----------------------------------------------------------------// main program
//
void main(void)
{
Thread_Start(1,thread1);
// start new thread
}
5.26
while(true)
// endless loop
{
Thread_Delay(100); Msg_WriteText("Thread1");
}
// the thread sleeps for 100ms
// after that "Thread1" is displayed
Timer
5.26.1 Mega
In C-Control Pro Mega 32 there are two, in Mega128 are three independent timers available. These
are Timer_0 with 8 bit and Timer_1 with 16 bit (Timer_3 with 16 bit for Mega128 only). Timer_2 is
used by the firmware as an internal time base and is set firm to a 10ms interrupt. These internal
timers can be utilized for a multitude of tasks:
Event Counter
Frequency Generation
Pulse Width Modulation
Timer Functions
Pulse & Period Measurement
Frequency Measurement
5.26.1.1
Event Counter
Here are two examples for how a Timer can be used for an Event Counter:
Timer0 (8 Bit)
// Example: Pulse Counting with CNT0
Timer_T0CNT();
pulse(n);
// generate n Pulses
count=Timer_T0GetCNT();
With Mega128 for reasons of the hardware the use of Tim e r_ 0 as counter is not possible!
Timer1 (16 Bit)
© 2013 Conrad Electronic
363
C-Control Pro IDE
// Example: Pulse Counting with CNT1
Timer_T1CNT();
pulse(n);
// generate n Pulses
count=Timer_T1GetCNT();
5.26.1.2
Frequency Generation
To generate frequencies Tim e r_ 0 , Tim e r_ 1 and Tim e r_ 3 can be utilized as follows:
Timer0 (8 Bit)
1. Example:
// Square Wave Signal with 10*1,085 µs = 10,85 µs Period Duration
Timer_T0FRQ(10, PS0_8)
2. Example: Pulsed Frequency Blocks (Project FRQ0)
void main(void)
{
int delval;
delval=200;
// Variable for the On/Off Time
// Value Assignment for Variable delval
// Frequency: Period=138,9 µs*100=13,9 ms,Frequency=72Hz
Timer_T0FRQ(100,PS0_1024); // Timer is set to Frequency
while (1)
{
AbsDelay(delval);
Timer_T0Stop();
AbsDelay(delval);
Timer_T0Start(PS0_1024);
//
//
//
//
//
Time Delay by 200ms
Timer is stopped
Time Delay by 200ms
Timer will be switched on with
Timer Prescaler PS0_1024.
}
}
The program will on Mega128 not work in USB mode since output PB4 is in conjunction with the USB
interface used on the Application Board.
Timer1 (16 Bit)
Example: Frequency Generation with 125 * 4,34 µs = 1085µs Period
Timer_T1FRQ(125,PS_64);
Timer3 (16 Bit) (only Mega128)
Example: Frequency Generation with 10*1,085 µs =10,85 µs Period and 2*1,085µs =2,17 µs Phase Shift
© 2013 Conrad Electronic
Libraries
364
Timer_T3FRQX(10,2,PS_8);
5.26.1.3
Frequency Measurement
Timer_1 (16Bit) and Timer_3 (16Bit) (only Mega128) can be used for direct measurement of a frequency. The pulses per second are being counted, the result is then delivered in Hertz units. The
maximum frequency is 64kHz and is yielded by the 16 bit counter. An example for this kind of frequency measurement can be found under "Demo Programs/FreqMeasurement". By shortening the
measuring time also higher frequencies can be measured. The result has then to be re-calculated
accordingly.
5.26.1.4
Pulse Width Modulation
There are two independent timers available for pulse width modulation. These are Tim e r_ 0 with 8 bit and
Tim e r_ 1 with 16 bit. By use of a pulse width modulation Digital-Analog-Converters can be realized very
easily. On the Mega128 Tim e r_ 3 can be used additionally.
Timer0 (8 Bit)
Example: Pulse Width Modulation with 138,9 µs Period and 5,42 µs Pulse Width, changed to 10,84 µs
Pulse Width
// Pulse: 10*542,5 ns = 5,42 µs, Period: 256*542,5 ns = 138,9 µs
Timer_T0PWM(10,PS0_8);
Timer_T0PW(20);
//
Pulse: 20*542,5 ns = 10,84 µs
Timer1 (16 Bit)
Example: Pulse Width Modulation with 6,4 ms Period and 1,28 ms Pulse Width Channel A and 640 µs
Pulse Width Channel B
Timer_T1PWMX(100,20,10,PS_1024); //
//
//
Period: 100*69,44 µs = 6,94 ms
PulseA: 20*69,44 µs = 1,389 ms
PulseB: 10*69,44 µs = 694,4 µs
When using the PWM timer functions a value of zero for the duty parameter is not allowed,
and will not turn the PIN off. To produce a low signal, the timer must be turned off (Timer_Disable)
and the PIN should be switched to output. If a PWM function is used, that generates multiple PWM
signals, then a PWM function should be called (e.g. Timer_T1PWM), that will not include the PIN,
that should be switched to low.
An example:
while(1)
{
© 2013 Conrad Electronic
365
C-Control Pro IDE
Timer_T1PWMX(255,128,128,PS_8);
Timer_T1PWA(128);
Timer_T1PWB(128);
AbsDelay(1000);
// set OC1B off
Timer_Disable(1);
Timer_T1PWM(255,128,PS_8);
Port_DataDirBit(14,1);
Port_WriteBit(14,0);
}
5.26.1.5
Pulse & Period Measurement
By use of Timer_1 or Timer_3 (only Mega128) pulse widths and signal periods can be measured.
Here by use of the Input Capture Function (specific register of the Controller) the time between two
signal slopes is measured. This function utilizes the Capture-Interrupt (INT_TIM1CAPT). A pulse is
measured between a rising and the next falling signal edge. A period is measured between two rising
signal edges. Because of the Input Capture Function program delay times will not as an inaccuracy
be entered into the measuring result. With a programmable prescaler the resolution of Timer_1 can
be set. Prescaler see Table.
Example: Activate Pulse Width Measurement (Project PMeasurement) 434 µs (100 x 4,34 µs, see
Table)
word PM_Value;
void Timer1_ISR(void)
{
int irqcnt;
PM_Value=Timer_T1GetPM();
irqcnt=Irq_GetCount(INT_TIM1CAPT);
}
void main(void)
{
byte n;
// Define Interrupt Service Routine
Irq_SetVect(INT_TIM1CAPT,Timer1_ISR);
Timer_T0PWM(100,PS0_64);
// Start Pulse Generator Timer 0
// Measurement starts here
// Output Timer0 OC0(PortB.3) connect to ICP(input capture pin, PortD.6)
PM_Value=0;
// Set mode to Pulse Width Measurement and determine prescaler
Timer_T1PM(0,PS_64);
© 2013 Conrad Electronic
Libraries
while(PM_Value==0);
366
// Measure Pulse Width or Period
Msg_WriteHex(PM_Value); // Output Measuring Value
}
For reason of better survey only a simplified version is shown here. Because of a collision on
Pin B.4 Timer_0 is used for pulse generation with Mega128. The entire program can be found in directory PW_Measurement.
5.26.1.6
Timer Functions
In C-Control Pro Mega 32 there are two, in Mega128 three independent Timer available. These are
Timer_0 with 8 bit and Timer_1 with 16 bit (Timer_3 with 16 bit for Mega128 only). The timer have a
programmable prescaler (see Table ). After the defined period the timer will trigger an interrupt. An interrupt routine can then be used to execute specific actions.
Timer_T0Time (8 Bit)
Example: Timer0: Switch output on with a delay of 6,94 ms (100x 69,44 µs, see Table)
void Timer0_ISR(void)
{
int irqcnt;
Port_WriteBit(0,1);
Timer_T0Stop() ;
irqcnt=Irq_GetCount(INT_TIM0COMP);
// stop Timer0
}
void main(void)
{
Port_DataDirBit(0,0);
//
Port_WriteBit(0,0);
//
Irq_SetVect(INT_TIM0COMP,Timer0_ISR);//
Timer_T0Time(100,PS0_1024);
//
// other program code....
}
5.26.1.7
Timer_Disable
Timer Functions
Syntax
void Timer_Disable(byte timer);
Sub Timer_Disable(timer As Byte)
© 2013 Conrad Electronic
PortA.0 Output
PortA.0 Output=0
define Interrupt Service Routine
set time and start Timer0
367
C-Control Pro IDE
Description
This function disables the specified timer. Timer functions occupy I/O ports. If a timer is not needed and
the corresponding I/O ports are used otherwise, the timer must be disabled.
Parameter
0 = Timer_0
1 = Timer_1
3 = Timer_3 (only Mega128)
5.26.1.8
Timer_T0CNT
Timer Functions
Syntax
void Timer_T0CNT(void);
Sub Timer_T0CNT()
Description
These function initializes Counter0. Counter0 gets incremented at every positive signal edge at Input
Mega32:T0 (PIN1).
Due to hardware reasons it is not possible to use Tim e r_ 0 as a counter in the Mega128!
Parameter
None
5.26.1.9
Timer_T0FRQ
Timer Functions
Syntax
void Timer_T0FRQ(byte period, byte PS);
Sub Timer_T0FRQ(period As Byte, PS As Byte)
Description
This function initializes Timer0 for frequency generation. Parameters are period duration and prescaler,
see table. The output signal is generated at Mega32: PortB.3 (PIN4), Mega128: PortB.4 (X1_4). The frequency generation is started automatically. There is a extended prescaler definition for the Mega128, see
table.
Parameter
© 2013 Conrad Electronic
Libraries
period period duration
PS
prescaler
Table prescaler:
Prescaler
Tickduration Mega32
PS0_1 (1)
PS0_8 (2)
PS0_64 (3)
PS0_256 (4)
PS0_1024 (5)
Prescaler
135,6 ns
1,085 µs
8,681 µs
34,72 µs
138,9 µs
Tickduration Mega128
PS0_1 (1)
PS0_8 (2)
PS0_32 (3)
PS0_64 (4)
PS0_128 (5)
PS0_256 (6)
PS0_1024 (7)
135,6 ns
1,085 µs
4,340 µs
8,681 µs
17,36 µs
34,72 µs
138,9 µs
Tickduration Mega128 CAN
125 ns
1 µs
4 µs
8µs
16 µs
32 µs
128 µs
5.26.1.10 Timer_T0GetCNT
Timer Functions
Syntax
byte Timer_T0GetCNT(void);
Sub Timer_T0GetCNT() As Byte
Description
The value of Counter0 is read. If there was an overflow a value of ff (Hex) is returned.
Due to hardware reasons it is not possible to use Tim e r_ 0 as a counter in the Mega128!
Return Parameter
counter value
5.26.1.11 Timer_T0PW
Timer Functions
Syntax
© 2013 Conrad Electronic
368
369
C-Control Pro IDE
void Timer_T0PW(byte PW);
Sub Timer_T0PW(PW As Byte)
Description
This function sets a new pulse width for Timer0 without changing the prescaler.
For the pulse width parameters do not use the value zero. See Pulse Width Modulation
Parameter
PW pulse width
5.26.1.12 Timer_T0PWM
Timer Functions
Syntax
void Timer_T0PWM(byte PW, byte PS);
Sub Timer_T0PWM(PW As Byte, PS As Byte)
Description
This function initializes Timer0 with given prescaler and pulse width, see table. The output signal is generated at Mega32: PortB.3 (PIN4), Mega128: PortB.4 (X1_4). There is an extended prescaler definition for
the Mega128, see table.
Parameter
For the pulse width parameters do not use the value zero. See Pulse Width Modulation
PW
PS
pulse width
prescaler
Table prescaler:
Prescaler
PS0_1 (1)
PS0_8 (2)
PS0_64 (3)
PS0_256 (4)
PS0_1024 (5)
Prescaler
Tickduration Mega32
67,8 ns
542,5 ns
4,34 µs
17,36 µs
69,44 µs
Tickduration Mega128
Tickduration Mega128 CAN
© 2013 Conrad Electronic
Libraries
PS0_1 (1)
PS0_8 (2)
PS0_32 (3)
PS0_64 (4)
PS0_128 (5)
PS0_256 (6)
PS0_1024 (7)
67,8 ns
542,5 ns
2,17 µs
4,34 µs
8,68 µs
17,36 µs
69,44 µs
370
62,5 ns
500 ns
2 µs
4 µs
8 µs
16 µs
64 µs
5.26.1.13 Timer_T0Start
Timer Functions
Syntax
void Timer_T0Start(byte prescaler);
Sub Timer_T0Start(prescaler As Byte)
Description
The timer continues with the already set parameters. The prescaler must be given again.
Parameter
prescaler prescaler (see table)
5.26.1.14 Timer_T0Stop
Timer Functions
Syntax
void Timer_T0Stop(void);
Sub Timer_T0Stop()
Description
The frequency generation gets stopped. The output signal can be 0 or 1, dependent on the last state. Only
the clock generation is stopped, all other settings stay the same.
Parameter
None
© 2013 Conrad Electronic
371
C-Control Pro IDE
5.26.1.15 Timer_T0Time
Timer Functions
Syntax
void Timer_T0Time(byte Time, byte PS);
Sub Timer_T0Time(Time As Byte, PS As Byte)
Description
This function initializes Timer_0 with a prescaler and a timer interval value, see table. After the timing interval is expired The Timer_0 Interrupt (INT_TIM0COMP) is triggered. There is an extended prescaler definition for the Mega128, see table.
Parameter
Time
PS
time period after that the interrupt is triggered
prescaler
Table prescaler:
Prescaler
PS0_1 (1)
PS0_8 (2)
PS0_64 (3)
PS0_256 (4)
PS0_1024 (5)
Prescaler
PS0_1 (1)
PS0_8 (2)
PS0_32 (3)
PS0_64 (4)
PS0_128 (5)
PS0_256 (6)
PS0_1024 (7)
Tickduration Mega32
67,8 ns
542,5 ns
4,34 µs
17,36 µs
69,44 µs
Tickduration Mega128
67,8 ns
542,5 ns
2,17 µs
4,34 µs
8,68 µs
17,36 µs
69,44 µs
Tickduration Mega128 CAN
62,5 ns
500 ns
2 µs
4 µs
8 µs
16 µs
64 µs
5.26.1.16 Timer_T1CNT
Timer Functions
Syntax
void Timer_T1CNT(void);
Sub Timer_T1CNT()
© 2013 Conrad Electronic
Libraries
372
Description
These function initializes Counter1. Counter1 gets incremented at every positive signal edge at input
Mega32: PortB.1 (PIN2) Mega128: PortD.6 (X2_15).
Parameter
None
5.26.1.17 Timer_T1CNT_Int
Timer Functions
Syntax
void Timer_T1CNT_Int(word limit);
Sub Timer_T1CNT_Int(limit As Word)
Description
These function initializes Counter1. Counter1 gets incremented at every positive signal edge at input
Mega32: PortB.1 (PIN2) Mega128: PortD.6 (X2_15). After the limit is reached an interrupt ("Timer1 CompareA" - define: INT_TIM1CMPA ) is triggered. An appropriate Interrupt Service Routine must be specified.
Parameter
limit
5.26.1.18 Timer_T1FRQ
Timer Functions
Syntax
void Timer_T1FRQ(word period, byte PS);
Sub Timer_T1FRQ(period As Word, PS As Byte)
Description
This function initializes Timer1 for frequency generation. Parameters are period duration and prescaler,
see table. The output signal is generated at Mega32: PortD.5 (PIN19). Mega128: PortB.5 (X1_3). The frequency generation is started automatically. There is an extended prescaler definition for the Mega128, see
table.
Parameter
© 2013 Conrad Electronic
373
C-Control Pro IDE
period period duration
PS
prescaler
Table prescaler:
Prescaler
Tickduration Mega32 + Mega128
Tickduration Mega128 CAN
135,6 ns
1,085 µs
8,681 µs
34,72 µs
138,9 µs
125 ns
1 µs
8 µs
32 µs
128 µs
PS_1 (1)
PS_8 (2)
PS_64 (3)
PS_256 (4)
PS_1024 (5)
5.26.1.19 Timer_T1FRQX
Timer Functions
Syntax
void Timer_T1FRQX(word period, word skew, byte PS);
Sub Timer_T1FRQX(period As Word, skew As Word, PS As Byte)
Description
This function initializes Timer1 for frequency generation. Parameters are period duration, prescaler and
phase shift,see table. The output signal is generated at Mega32: PortD.5 (PIN19). Mega128: PortB.5
(X1_3). The frequency generation is started automatically. There is an extended prescaler definition for the
Mega128, see table. The phase shift must be smaller than half the period.
Parameter
period
skew
PS
period duration
phase shift
prescaler (table prescaler)
5.26.1.20 Timer_T1GetCNT
Timer Functions
Syntax
word Timer_T1GetCNT(void);
Sub Timer_T1GetCNT() As Word
Description
The value of Counter1 is read. If there was an overflow a value of ffff (Hex) is returned.
© 2013 Conrad Electronic
Libraries
374
Return Parameter
counter value
5.26.1.21 Timer_T1GetPM
Timer Functions
Syntax
word Timer_T1GetPM(void);
Sub Timer_T1GetPM() As Word
Description
Returns the result of the measurement.
Parameter
None
Return Parameter
result of measurement
To calculate the correct value, the 16bit result is multiplied with the entry of the prescaler Table
that was passed in the call to Timer_T1PM.
5.26.1.22 Timer_T1PWA
Timer Functions
Syntax
void Timer_T1PWA(word PW0);
Sub Timer_T1PWA(PW0 As Word)
Description
This function sets a new pulse width (Channel A) for Timer1 without changing the prescaler.
For the pulse-width parameters do not use the value zero. See Pulse Width Modulation
Parameter
PW0 pulse width
© 2013 Conrad Electronic
375
C-Control Pro IDE
5.26.1.23 Timer_T1PM
Timer Functions
Syntax
void Timer_T1PM(byte Mode, byte PS);
void Timer_T1PM(Mode As Byte, PS As Byte)
Description
This function defines if pulse width measurement or period measurement should be done. Then it initializes Timer_1 and sets the prescaler.
Parameter
Mode
PS
0 = pulse width measurement, 1 = period measurement
prescaler
Table prescaler:
Prescaler
Tickduration Mega32 + Mega128
PS_1 (1)
PS_8 (2)
PS_64 (3)
PS_256 (4)
PS_1024 (5)
67,8 ns
542,5 ns
4,34 µs
17,36 µs
69,44 µs
Tickduration Mega128 CAN
62,5 ns
500 ns
4 µs
16 µs
64 µs
5.26.1.24 Timer_T1PWB
Timer Functions
Syntax
void Timer_T1PWB(word PW1);
Sub Timer_T1PWB(PW1 As Word)
Description
This function sets a new pulse width (Channel B) for Timer1 without changing the prescaler.
For the pulse width parameters do not use the value zero. See Pulse Width Modulation
Parameter
PW1 pulse width
© 2013 Conrad Electronic
Libraries
376
5.26.1.25 Timer_T1PWM
Timer Functions
Syntax
void Timer_T1PWM(word period, word PW0, byte PS);
Sub Timer_T1PWM(period As Word, PW0 As Word, PS As Byte)
Description
This function initializes Timer_1 with given period duration, pulse width and prescaler, see table. The output signal is generated at Mega32: PortD.5 (PIN19), Mega128: PortB.5 (X1_3). There is an extended prescaler definition for the Mega128, see table.
For the pulse width parameters do not use the value zero. See Pulse Width Modulation
Parameter
period period duration
PW0
pulse width
PS
prescaler
Table prescaler:
Prescaler
PS_1 (1)
PS_8 (2)
PS_64 (3)
PS_256 (4)
PS_1024 (5)
Tickduration Mega32 + Mega128
67,8 ns
542,5 ns
4,34 µs
17,36 µs
69,44 µs
Tickduration Mega128 CAN
62,5 ns
500 ns
4 µs
16 µs
64 µs
5.26.1.26 Timer_T1PWMX
Timer Functions
Syntax
void Timer_T1PWMX(word period, word PW0, word PW1, byte PS);
Sub Timer_T1PWMX(period As Word, PW0 As Word, PW1 As Word, PS As Byte)
Description
This function initializes Timer_1 with given period duration, prescaler, pulse width for channel A and B. The
output signal is generated at
Mega32: PortD.4 (PIN18) and PortD.5 (PIN19). Mega128: PortB.5 (X1_3) and PortB.6 (X1_2).
For the pulse width parameters do not use the value zero. See Pulse Width Modulation
© 2013 Conrad Electronic
377
C-Control Pro IDE
Parameter
period
PW0
PW1
PS
period duration
pulse width channel A
pulse width channel B
prescaler (see table prescaler)
5.26.1.27 Timer_T1PWMY
Timer Functions
Syntax
void Timer_T1PWMY(word period, word PW0, word PW1, word PW2, byte PS);
Sub Timer_T1PWMY(period As Word, PW0 As Word, PW1 As Word, PW2 As Word,
PS As Byte)
Description
This function initializes Timer_1 with given period duration, prescaler, pulse width for channel A, B and C.
The output signal is generated at
PortB.5 (X1_3) , PortB.6 (X1_2) and PortB.7 (X1_1).
For the pulse width parameters do not use the value zero. See Pulse Width Modulation
Parameter
period
PW0
PW1
PW2
PS
period duration
pulse width channel A
pulse width channel B
pulse width channel C
prescaler (see table prescaler)
5.26.1.28 Timer_T1Start
Timer Functions
Syntax
void Timer_T1Start(byte prescaler);
Sub Timer_T1Start(prescaler As Byte)
Description
The timer continues with the already set parameters. The prescaler must be given again.
© 2013 Conrad Electronic
Libraries
378
Parameter
prescaler prescaler (see table)
5.26.1.29 Timer_T1Stop
Timer Functions
Syntax
void Timer_T1Stop(void);
Sub Timer_T1Stop()
Description
The frequency generation gets stopped. The output signal can be 0 or 1, dependent on the last state. Only
the clock generation is stopped, all other settings stay the same.
Parameter
None
5.26.1.30 Timer_T1Time
Timer Functions
Syntax
void Timer_T1Time(word Time, byte PS);
Sub Timer_T1Time(Time As Word, PS As Byte)
Description
This function initializes Timer_1 with a prescaler and a timer interval value (16bit), see table. After the timing interval is expired Timer_1 Interrupt (INT_TIM1CMPA) is triggered. There is an extended prescaler
definition for the Mega128, see table.
Parameter
Time
PS
time period after that the interrupt is triggered
prescaler
Table prescaler:
Prescaler
© 2013 Conrad Electronic
Tickduration Mega32 + Mega128
Tickduration Mega128 CAN
379
C-Control Pro IDE
PS_1 (1)
PS_8 (2)
PS_64 (3)
PS_256 (4)
PS_1024 (5)
67,8 ns
542,5 ns
4,34 µs
17,36 µs
69,44 µs
62,5 ns
500 ns
4 µs
16 µs
64 µs
5.26.1.31 Timer_T3CNT
Timer Functions
Syntax
void Timer_T3CNT(void);
Sub Timer_T3CNT()
Description
These function initializes Counter3. Counter3 gets incremented at every positive signal edge at input
PortE.6 (X1_10)
Parameter
None
5.26.1.32 Timer_T3CNT_Int
Timer Functions
Syntax
void Timer_T3CNT_Int(word limit);
Sub Timer_T3CNT_Int(limit As Word)
Description
These function initializes Counter_3. Counter_3 gets incremented at every positive signal edge at input
PortE.6 (X1_10). After the limit is reached an interrupt ("Timer3 CompareA" - define: INT_TIM3CMPA ) is
triggered. An appropriate Interrupt Service Routine must be specified.
Parameter
limit
© 2013 Conrad Electronic
Libraries
380
5.26.1.33 Timer_T3FRQ
Timer Functions
Syntax
void Timer_T3FRQ(word period, byte PS);
Sub Timer_T3FRQ(period As Word, PS As Byte)
Description
This function initializes Timer3 for frequency generation. Parameters are period duration and prescaler,
see table. The output signal is generated at PortE.3 (X1_13). The frequency generation is started automatically..
Parameter
period
PS
period duration
prescaler
Table prescaler:
Prescaler
PS_1 (1)
PS_8 (2)
PS_64 (3)
PS_256 (4)
PS_1024 (5)
Tickduration Mega128
Tickduration Mega128 CAN
135,6 ns
1,085 µs
8,681 µs
34,72 µs
138,9 µs
125 ns
1 µs
8 µs
32 µs
128 µs
5.26.1.34 Timer_T3FRQX
Timer Functions
Syntax
void Timer_T3FRQX(word period, word skew, byte PS);
Sub Timer_T3FRQX(period As Word, skew As Word, PS As Byte)
Description
This function initializes Timer3 for frequency generation. Parameters are period duration, prescaler and
phase shift,see table. The output signal is generated at PortE.3 (X1_13) und PortE.4 (X1_12). The frequency generation is started automatically. There is an extended prescaler definition for the Mega128, see
table. The phase shift must be smaller than half the period.
Parameter
© 2013 Conrad Electronic
381
C-Control Pro IDE
period
skew
PS
period duration
phase shift
prescaler (table prescaler)
5.26.1.35 Timer_T3GetCNT
Timer Functions
Syntax
word Timer_T3GetCNT(void);
Sub Timer_T3GetCNT() As Word
Description
The value of Counter1 is read. If there was an overflow a value of ffff (Hex) is returned.
Return Parameter
counter value
5.26.1.36 Timer_T3GetPM
Timer Functions
Syntax
word Timer_T3GetPM(void);
Sub Timer_T3GetPM() As Word
Description
Returns the result of the measurement.
Parameter
None
Return Parameter
result of measurement
To calculate the correct value, the 16bit result is multiplied with the entry of the prescaler Table
that was passed in the call to Timer_T3PM.
© 2013 Conrad Electronic
Libraries
382
5.26.1.37 Timer_T3PWA
Timer Functions
Syntax
void Timer_T3PWA(word PW0);
Sub Timer_T3PWA(PW0 As Word)
Description
This function sets a new pulse width (Channel A) for Timer3 without changing the prescaler.
For the pulse width parameters do not use the value zero. See Pulse Width Modulation
Parameter
PW0 pulse width
5.26.1.38 Timer_T3PM
Timer Functions
Syntax
void Timer_T3PM(byte Mode, byte PS);
void Timer_T3PM(Mode As Byte, PS As Byte)
Description
This function defines if pulse width measurement or period measurement should be done. Then it initializes Timer_3 and sets the prescaler.
Parameter
Mode
PS
0 = pulse width measurement, 1 = period measurement
prescaler
Table prescaler:
Prescaler
Tickduration Mega128
PS_1 (1)
PS_8 (2)
PS_64 (3)
PS_256 (4)
67,8 ns
542,5 ns
4,34 µs
17,36 µs
© 2013 Conrad Electronic
Tickduration Mega128 CAN
62,5 ns
500 ns
4 µs
16 µs
383
C-Control Pro IDE
PS_1024 (5)
69,44 µs
64 µs
5.26.1.39 Timer_T3PWB
Timer Functions
Syntax
void Timer_T3PWB(word PW1);
Sub Timer_T3PWB(PW1 As Word)
Description
This function sets a new pulse width (Channel B) for Timer3 without changing the prescaler.
For the pulse width parameters do not use the value zero. See Pulse Width Modulation
Parameter
PW1 pulse width
5.26.1.40 Timer_T3PWM
Timer Functions
Syntax
void Timer_T3PWM(word period, word PW0, byte PS);
Sub Timer_T3PWM(period As Word, PW0 As Word, PS As Byte)
Description
This function initializes Timer_3 with given period duration, pulse width and prescaler, see table. The output signal is generated at PortE.3 (X1_13).
For the pulse width parameters do not use the value zero. See Pulse Width Modulation
Parameter
period period duration
PW0
pulse width
PS
prescaler
Table prescaler:
Prescaler
Tickduration Mega128
Tickduration Mega128 CAN
© 2013 Conrad Electronic
Libraries
PS_1 (1)
PS_8 (2)
PS_64 (3)
PS_256 (4)
PS_1024 (5)
67,8 ns
542,5 ns
4,34 µs
17,36 µs
69,44 µs
384
62,5 ns
500 ns
4 µs
16 µs
64 µs
5.26.1.41 Timer_T3PWMX
Timer Functions
Syntax
void Timer_T3PWMX(word period, word PW0, word PW1, byte PS);
Sub Timer_T3PWMX(period As Word, PW0 As Word, PW1 As Word, PS As Byte)
Description
This function initializes Timer_3 with given period duration, prescaler, pulse width for channel A and B. The
output signal is generated at
PortE.3 (X1_13) and PortE.4 (X1_12).
For the pulse width parameters do not use the value zero. See Pulse Width Modulation
Parameter
period
PW0
PW1
PS
period duration
pulse width channel A
pulse width channel B
prescaler (see table prescaler)
5.26.1.42 Timer_T3PWMY
Timer Functions
Syntax
void Timer_T3PWMY(word period, word PW0, word PW1, word PW2, byte PS);
Sub Timer_T3PWMY(period As Word, PW0 As Word, PW1 As Word, PW2 As Word,
PS As Byte)
Description
This function initializes Timer_3 with given period duration, prescaler, pulse width for channel A, B and C.
The output signal is generated at
PortE.3 (X1_13), PortE.4 (X1_12) and PortE.5 (X1_11).
For the pulse width parameters do not use the value zero. See Pulse Width Modulation
© 2013 Conrad Electronic
385
C-Control Pro IDE
Parameter
period
PW0
PW1
PW2
PS
period duration
pulse width channel A
pulse width channel B
pulse width channel C
prescaler (see table prescaler)
5.26.1.43 Timer_T3Start
Timer Functions
Syntax
void Timer_T3Start(byte prescaler);
Sub Timer_T3Start(prescaler As Byte)
Description
The timer continues with the already set parameters. The prescaler must be given again.
Parameter
prescaler prescaler (see table)
5.26.1.44 Timer_T3Stop
Timer Functions
Syntax
void Timer_T3Stop(void);
Sub Timer_T3Stop()
Description
The frequency generation gets stopped. The output signal can be 0 or 1, dependent on the last state. Only
the clock generation is stopped, all other settings stay the same.
Parameter
None
© 2013 Conrad Electronic
Libraries
386
5.26.1.45 Timer_T3Time
Timer Functions
Syntax
void Timer_T3Time(word Time, byte PS);
Sub Timer_T3Time(Time As Word, PS As Byte)
Description
This function initializes Timer_3 with a prescaler and a timer interval value (16bit), see table. After the timing interval is expired Timer_3 Interrupt (INT_TIM3CMPA) is triggered.
Parameter
Time
PS
time period after that the interrupt is triggered
prescaler
Table prescaler:
Prescaler
Tickduration Mega128
PS_1 (1)
PS_8 (2)
PS_64 (3)
PS_256 (4)
PS_1024 (5)
67,8 ns
542,5 ns
4,34 µs
17,36 µs
69,44 µs
Tickduration Mega128 CAN
62,5 ns
500 ns
4 µs
16 µs
64 µs
5.26.1.46 Timer_TickCount
Timer Functions
Syntax
word Timer_TickCount(void);
Sub Timer_TickCount() As Word
Description
Measures the number of 10ms ticks between two calls of Timer_TickCount(). Ignore the return value of
the first call to Timer_TickCount(). If the delay between the two calls is greater than 655.36 seconds,
the result is undefined.
Parameter
None
© 2013 Conrad Electronic
387
C-Control Pro IDE
Return Parameter
time interval expressed in 10ms ticks
Example
void main(void)
{
word time;
Timer_TickCount();
AbsDelay(500); // wait 500 ms
time=Timer_TickCount(); // the value should be 50
}
5.26.2 AVR32Bit
There are 2 timer with 3 channels available in the C-Control Pro AVR32Bit. These will show up in the
library as 6 timer. You can use the internal timer for various tasks:
Event Counter
Frequency Generation
In addition, there are three dedicated functional units for Pulse Width Modulation.
5.26.2.1
Event Counter
On each of the 6 timer channels events (up to 16-bit) can be counted. In this Example, the rising
edges on input COUNTA_1 are counted in timer 2 (see Pin Assignment). After every 300 events an
interrupt will be triggered, while the counter is reset. The sample program outputs after 10 seconds
the current state of the counter.
Example
© 2013 Conrad Electronic
Libraries
388
word cnt;
void count_irq(void)
{
cnt++;
Irq_GetCount(INT_TIMER0);
}
void main(void)
{
cnt= 0;
Irq_SetVect(INT_TIMER2, count_irq);
Timer_ConfigCounter(2, COUNTA_1, CNT_RISING, 300);
AbsDelay(10000);
Msg_WriteWord(Timer_GetCounterVal(2));
Msg_WriteChar('\r');
while(1);
}
5.26.2.2
Frequency Generation
On each of the 6 timer channels a rectangular signal can be generated. In the following Example, a
50Hz signal is generated which (see Pin Assignment) is output on pin TIMER0-A and TIMER0-B. In
addition, an interrupt is triggered. The prescaler TIM_128 determines a tick duration of 1,939µs (=
128 / 66.000.000 Mhz). By multiplying 5157 * 1.939µs = 10ms results in 100 edge changes per
second = 50Hz.
Example
word cnt;
void irq(void)
{
cnt++;
Irq_GetCount(INT_TIMER0);
}
void main(void)
{
cnt= 0;
Irq_SetVect(INT_TIMER0, irq);
Timer_Set(0, TIM_128, 5157, TIMFLG_IRQ|TIMFLG_PINA|TIMFLG_PINB);
while(1);
}
© 2013 Conrad Electronic
389
C-Control Pro IDE
5.26.2.3
Pulse Width Modulation
The C-Control AVR32Bit can output a pulse width modulated signal on up to 4 channels. The following Example 1 will produce a signal of 1.65 MHz period, and 50% duty on PWM channel 1.
After 10 seconds, the PWM channel is switched off. The signal is output to pin PWMH_1 and
PWML_1 (see Pin Assignment).
Example
void main(void)
{
PWM_Init(1, PWM_1, PWM_ENAB_HIGH|PWM_ENAB_LOW);
PWM_Update(1, 40L, 20L, 0, 0);
AbsDelay(10000);
PWM_Disable(1);
}
5.26.2.4
PWM_Disable
Timer Functions
Syntax
void PWM_Disable(byte chan);
Sub PWM_Disable(chan As Byte)
Description
The function switches off the selected PWM channel.
Parameter
chan
5.26.2.5
number of the PWM channel (0 - 3)
PWM_Init
Timer Functions
Syntax
void PWM_Init(byte chan, byte PS, byte mode);
Sub PWM_Init(chan As Byte, PS As Byte, mode As Byte)
Description
Initializes a PWM channel. With the mode parameter can be selected individually, whether the signal is output on PWMH_x and / or PWML_x. A deadtime can be enabled or the polarity negated.
© 2013 Conrad Electronic
Libraries
390
To create the mode parameter, the bit values from the table are ORed (see PWM_Example).
For a more detailed description of PWMH_x, PWML_x and deadtime, please consult the
AT32UC3C data sheet.
Parameter
chan
PS
number of PWM channel (0 - 3)
prescaler
mode work mode of PWM channel
Table PS:
Prescaler
PWM_1(0)
PWM_2(1)
PWM_4(2)
PWM_8(3)
PWM_16(4)
PWM_32(5)
PWM_64(6)
PWM_128(7)
PWM_256(8)
PWM_512(9)
PWM_1024(10)
Tickduration
15,15 ns
30,30 ns
60,60 ns
121,21 ns
242,42 ns
484,84 ns
969,69 ns
1,939 µs
3,878 µs
7,757 µs
15,51 µs
Table mode:
mode
PWM_ENAB_HIGH (1)
PWM_ENAB_LOW (2)
PWM_ENAB_DEAD (4)
PWM_CPOL (8)
5.26.2.6
Description
signal on Pin PWMH_x
signal on Pin PWML_x
activate deadtime
negate polarity
PWM_Update
Timer Functions
Syntax
void PWM_Update(byte chan, dword period, dword duty, word dtl, word dth);
Sub PWM_Update(chan As Byte, period As ULong, duty As ULong, dtl As Word,
dth As Word)
Description
© 2013 Conrad Electronic
391
C-Control Pro IDE
During operation the period (frequency), duty (latitude) and deadtime of the PWM signal can be
specified.
For the frequency, the following formula applies: Frq = 66,000,000 / prescaler / period. Permitted
values for duty are 0 to period. A duty of 0 means that the signal is permanently off, wherein a duty
of value period means the signal is permanently on. Therefore a duty of 50% is period / 2. Thus the
width (duty) of the PWM signal can be set as finely as possible, a prescaler must be selected so
that the period parameter for the desired frequency is as large as possible (maximum 20 bits).
Parameter
chan
period
duty
dtl
dth
5.26.2.7
number of PWM channel (0 - 3)
frequency of the PWM signal (20 Bit)
duty of the PWM signal (20 Bit)
deadtime of PWML_x signal
deadtime of PWMH_x signal
Timer_ConfigCounter
Timer Functions
Syntax
void Timer_ConfigCounter(byte timer, byte portbit, byte edge, word irq_threshold);
Sub Timer_ConfigCounter(timer As Byte, portbit As Byte, edge As Byte,
irq_threshold As Word)
Description
The function initializes a timer as a counter. The inputs COUNTA-0, COUNTA-1, COUNTA-2 and
COUNTB-2 are available (see Pin Assignment). For the x-COUNTA inputs only the timer 0,2,4 can
be used, for COUNTB-2 the timer 1,3,5 are available. If the parameter irq_threshold is non-zero, then
an interrupt is generated when the counter is equal to the value of irq_threshold. After an interrupt,
the counter is reset to zero.
After initialization, the counter retains its old value. The first edge then sets the counter to zero.
When reading the counter, it therefore looks as if one edge less has been counted. This behavior is
due to the structure of the internal counter of the AVR32 controller.
Parameter
timer
portbit
edge
irq_threshold
number of timer (0 - 5)
(GPIO in Pin Assignment )
edge type: CNT_FALLING (falling) or CNT_RISING (rising)
counter when an IRQ will be triggered
© 2013 Conrad Electronic
Libraries
5.26.2.8
392
Timer_CPUCycles
Timer Functions
Syntax
dword Timer_CPUCycles(void);
Sub Timer_CPUCycles() As ULong
Description
Measures the CPU cycles between two calls of Timer_CPUCycles () and returns the value at the
second call of Timer_CPUCycles (). The return value of the first call can be ignored.
Since the processor is clocked at 66Mhz, only periods of up to 65 seconds can be measured.
Parameter
None
Return Parameter
CPU cycles between two calls
5.26.2.9
Timer_Disable
Timer Functions
Syntax
void Timer_Disable(byte timer);
Sub Timer_Disable(timer As Byte)
Description
The function turns off the selected Timer or Counter.
Parameter
timer
number of timer (0 - 5)
5.26.2.10 Timer_GetCounterVal
Timer Functions
Syntax
word Timer_GetCounterVal(byte timer);
© 2013 Conrad Electronic
393
C-Control Pro IDE
Sub Timer_GetCounterVal(timer As Byte) As Word
Description
Returns the 16-bit counter of a timer.
Parameter
timer
number of timer (0 - 5)
Return Parameter
counter value
5.26.2.11 Timer_Set
Timer Functions
Syntax
void Timer_Set(byte timer, byte PS, word period, word flags);
Sub Timer_Set(timer As Byte, PS As Byte, period As Word, flags As Word)
Description
This function initializes the timer with the specified prescaler and period, see Table. Through the use
of flags (you can have multiple values ?
ORing), an interrupt is triggered and/or a signal on pins
TIMERx-A resp. TIMERx-B is generated (see Pin Assignment).
Due to the configuration of the connected peripheral not all pin TIMERx-A and TIMERx-B are
available.
Parameter
timer
PS
period
flags
number of timer (0 - 5)
prescaler
signal period
timer options
Table prescaler:
Vorteiler (prescaler)
TIM_32KHZ (0)
TIM_2 (1)
TIM_8 (2)
TIM_32 (3)
Tickduration
31,25 µs
30,30 ns
121,21 ns
484,84 ns
© 2013 Conrad Electronic
Libraries
TIM_128 (4)
394
1,939 µs
Table flags:
Definition
TIMFLG_IRQ
TIMFLG_PINA
TIMFLG_PINB
Meaning
Interrupts are generated
signal is output on pin TIMERx-A
signal is output on pin TIMERx-B
5.26.2.12 Timer_TickCount
Timer Functions
Syntax
dword Timer_TickCount(void);
Sub Timer_TickCount() As ULong
Description
Measures the time in 10ms ticks between two calls of Timer_TickCount() and returns the value at
the second call of Timer_TickCount(). The return value of the first call can be ignored.
Parameter
None
Return Parameter
time interval expressed in 10ms ticks
Example
void main(void)
{
word time;
Timer_TickCount();
AbsDelay(500); // wait 500 ms
time=Timer_TickCount(); // the value should be 50
}
© 2013 Conrad Electronic
395
5.27
C-Control Pro IDE
Webserver (AVR32Bit)
The web server of the C-Control Pro AVR32Bit is started with WEB_StartServer. Any TCP/IP port
may be selected for this. When the web server starts the number of dynamic variables is defined
with whom you want to work. The dynamic variables take the values of the URL variables in the URL,
and you can use dynamic variables to output values within web pages.
All web pages that are returned by the server must be located in the root directory on the SD card
that is inserted into the C-Control Pro Unit. Since the SDCard library does not support long file
names, file names of all websites must be available in DOS format (8.3). Therefore the main page
has the file name "index.htm". Note the shortened ending.
HTTP Header
For files with a known extension (see Table), an HTTP header is automatically generated, which is
placed in front of the file's contents. The header
HTTP/1.1 200 OK\r\n
Connection: close\r\n
Content-Type: Type\r\n
\r\n
is always prepended. There "\r\n" means carriage return line feed, and Type the corresponding content type from the table. E.g. for the extension ".htm" a "Content-Type: text/html" is generated in the
header.
File Extension
Type
.htm
.js
.txt
.css
.gif
.ico
.jpg
.bmp
.png
text/html
application/x-javascript
text/plain
text/css
image/gif
image/x-icon
image/jpeg
image/bmp
image/png
If the file extension is not present in the table, the header must be set manually at the beginning
of the file on the SD card.
Dynamic Variables
With the function WEB_SetDynVar() the web server is given the address and type of a normal program variable. If for example an integer variable "int a;" is defined, a call to "WEB_SetDynVar (0, a,
DYN_INT, 0);" would define the variable a as a dynamic variable with index 0. If some text inside a
web page is $var0$, then $var0$ is replaced by the numeric value of a. The number after $var is the
index of the dynamic variable.
© 2013 Conrad Electronic
Libraries
396
URL (CGI) Variables
When there are no URL variables specified for a web request, the whole process runs in the background, and there must be no program interaction. If a URL variable is present (e.g. "?var0=5") web
server checks if there is variable name that corresponds to the scheme "var" + number. The number
must not exceed the maximum index of defined dynamic variables. If the scheme is met, the value
"5" is assigned to the dynamic variable. Then the integer variable a gets the value 5.
There is a special URL ("setvars.js") which takes only the URL variables, but does not return any
website content. With that mechanism variable content can be transferred to Javascript without generating much TCP/IP traffic.
A variable can be modified only via URL, when WEB_SetDynVar () is called with the
DYN_CGIVAR flag set. This allows normal variables to be protected from a change from the outside.
JSON
If you want to work with JavaScript, dynamic variables can be output as a JSON list. For this purpose, in the definition of WEB_SetDynVar () the flag DYN_JSONVAR has to be set. Access to
"getvars.js" then provides the JSON data. E.g: "{" 1 ":" 123 "," 3 ":" 0 "}". This is a list of two dynamic variables with the indices 1 and 3. The first variable has the content "123", the second variable
contains "0".
Interaction
In normal operation, the main loop of the program is queried continuously with WEB_GetRequest(), if
there is a request with an URL variable present. There is a request, when the return parameter is unequal to zero. You can then check the hash of the file name with WEB_GetFileHash() and evaluate
the passed URL variables. Thereafter, the output variables (dynamic variables of the site) should be
set to new values according the program logic. At the end of request the web server is signaled with
WEB_ReleaseRequest() that the Website should be shipped to the browser.
5.27.1 Webserver Hints
Web Server Checklist
The invoked Web pages must have been copied to the micro SD card, and the card must be inserted in the SD card slot of the AVR32Bit Unit.
For the SD card, only the FAT file system is supported (see FAT support).
The web server is started after ETH_StartWebserver() is called from the user program. The TCP/IP
port in the web browser (default: 80) must match the port in the call to ETH_StartWebserver.
The number of dynamic variables used in WEB_SetDynVar must correspond with the definition in
the WEB_BUF macro and dynvar_cnt in WEB_StartServer.
When stopping the program with the Start/Stop button, the lwIP TCP/IP stack can get in a
state, where not all dynamic memory for the current connection is released. This memory may be
missing when you restart the program. If in doubt when encountering problems, press the reset button to initiate a complete system reboot.
© 2013 Conrad Electronic
397
C-Control Pro IDE
Web Server Optimization
The lwIP TCP / IP stack is optimized to work best with embedded devices that store websites in
flash memory. The SD card allows to store much more websites than the flash memory of an embedded controller, but has the disadvantage that the web pages must be between loaded to RAM before they are sent over the Ethernet. To limit the "RAM hunger" of the lwIP stack, several things
should be noted:
In normal web server operation the "TCP/IP Memory" in the C-Control configuration should be set
to ca.16kb.
All GET requests of the web server, that do not pass CGI variables in the URL, are serialized in a
queue. This is done so only few RAM is needed to send a web page at a time.
Because the SD card in the C-Control Pro is connected via SPI, and not in 4-bit parallel mode like
a PC, only slower transmission rates are realized. In tests with wget.exe an average transfer rate
between 140-150 kbytes/sec is reached. Therefore, e.g. Images and other resources should not
exceed 100kb significantly, otherwise the website is built slowly.
The web server supports the "If-Modified-Since" caching protocol of the current web browser.
Therefore, the caching should be enabled in the web browser, and date and time of the files on the
SD card should not lie in the future.
If you want just to pass CGI variables in the URL of a Javascript GET request, without the requirement of a response from the server, the URL "setvars.js" should be used. This request takes only
the variable values and generates no response.
If a request from Javascript only accesses variable values in JSON format, the URL "getvars.js"
generates only the JSON output, without accessing the SD card, what is a lot faster.
It is recommended to look at the demo programs for web server usage.
Only specify the flags and WEB_CACHE_HTML and WEB_CACHE_TEXT in WEB_StartServer, if
you are sure that HTML or text web pages really should be cached!
5.27.2 WEB_GetRequest
Ethernet Functions
Syntax
byte WEB_GetRequest(void);
Sub WEB_GetRequest() As Byte
Description
Queries the web server if an HTTP request is made for the delivery of a website. A value of zero indicates that there is no request. After a valid request, you should evaluate the dynamic variables and
set any new values?
.
?
Return Parameter
request parameter (0 = nothing received)
© 2013 Conrad Electronic
Libraries
398
5.27.3 WEB_GetFileHash
Ethernet Functions
Syntax
word WEB_GetFileHash(byte request);
Sub WEB_GetFileHash(request As Byte) As Word
Description
Returns the 16-bit CRC hash of the file name. The request parameter must be identical to the value
that has been obtained from WEB_GetRequest().
Parameter
request
request parameter
Return Parameter
16 Bit CRC hash of the file name (8.3)
5.27.4 WEB_ReleaseRequest
Ethernet Functions
Syntax
void WEB_ReleaseRequest(byte request);
Sub WEB_ReleaseRequest(request As Byte)
Description
Signals the web server that the passed URL variables were evaluated, and now the web server delivers the requested web page via TCP/IP. The request parameter must be identical to the value that
has been obtained from WEB_GetRequest().
Parameter
request
request parameter
5.27.5 WEB_SetDynVar
Ethernet Functions
Syntax
© 2013 Conrad Electronic
399
C-Control Pro IDE
void WEB_SetDynVar(word indx, ptr var_addr[],
byte len);
byte
type,
byte
flags,
Sub WEB_SetDynVar(indx As Word, var_addr As Pointer, type As Byte, flags
As Byte, len As Byte)
Description
Defines a dynamic variable on its index, address and variable type. The len parameter is important
for string variables, other types ignore this parameter. You can specify multiple flags simultaneously
by ORing values.
The number of dynamic variables used must correspond with the definition in the WEB_BUF
macro and dynvar_cnt in WEB_StartServer.
Parameter
indx
var_addr
index of variable
address of variable
type
flags
len
variable type
property of variable
length (0 to 255) only for strings
Type Definitions
Definition
Meaning
DYN_BYTE
DYN_CHAR
DYN_INT
DYN_INTEGER
DYN_WORD
DYN_UINTEGER
DYN_LONG
DYN_DWORD
DYN_ULONG
DYN_STR
DYN_FLOAT
DYN_SINGLE
8-Bit without sign
8-Bit with sign
16-Bit with sign
16-Bit with sign
16-Bit without sign
16-Bit without sign
32-Bit with sign
32-Bit without sign
32-Bit without sign
character array
floating point
floating point
Flag Definitions
Definition
Meaning
DYN_CGIVAR
DYN_JSONVAR
can be changed in URL
variable in JSON list
© 2013 Conrad Electronic
Libraries
400
5.27.6 WEB_StartServer
Ethernet Functions
Syntax
void WEB_StartServer(word port, byte ramaddr[], word dynvar_cnt, word
flags);
Sub WEB_StartServer(port As Word, ByRef ramaddr As Byte, dynvar_cnt As
Word, flags As Word)
Description
Starts the web server on TCP/IP port port. The parameter dynvar_cnt defines how many dynamic
variables can be used. The user should provide a global variable as a buffer. In this buffer, the working state of the web server is stored and there is memory for copy operations. For the size of the buffer, there exists a #define WEB_BUF. If you want to define a byte array with space for dynamic variables X, one writes "byte buf [WEB_BUF (X)];". You can specify multiple flags simultaneously by
ORing the values.
The user-supplied RAM buffer must be reserved during the entire use of the web server. Since
local variables are released after leaving the function, it is strongly recommended to declare the buffer as a global variable.
Parameter
port
TCP/IP Port the web server listens
ramaddr
buffer address
dynvar_cnt number of dynamic variables
flags
webserver options
Flagsdefinitionen
Definition
Meaning
WEB_CACHE_NORM
WEB_CACHE_HTML
WEB_CACHE_TEXT
HTML and Text pages are not cached
HTML pages are cached
Text pages are cached
5.27.7 WEB_StopServer
Ethernet Functions
Syntax
void WEB_StopServer(void);
Sub WEB_StopServer()
© 2013 Conrad Electronic
401
C-Control Pro IDE
Description
Stops the webserver.
Parameter
None
© 2013 Conrad Electronic
Part
6
403
C-Control Pro IDE
6
FAQ
6.1
General
1. The spelling check does not function.
Is the spelling check switched on in Options->Editor?
The spelling check does only display spelling errors in the commentaries. The check of any other
area would not make sense.
2. Where can be determined whether the new project is a BASIC or C project?
There is no difference in project type. The source text files in a project determine which programming language is being used. Files with the extension *.cc will run in a CompactC context, Files
with the extension *.cbas will be translated into BASIC. Also C and BASIC can be combined in a
project.
3. I am using an LCD other than the one shipped with the product, but am using the same Controller.
The cursor positions do not work correctly.
The Controller can display 4 lines at 32 characters each. The beginnings of the lines are stored
transposed in memory following the scheme below:
Value of pos (Hex)
Position in the display
00-1f
40-5f
20-3f
60-6f
0-31in the line 1
0-31in the line 2
0-31in the line 3
0-31in the line 4
4. Where are the demo programs located?
The demo programs are installed to "C:\Documents and Settings\All Users\Documents\C-Control
Pro Demos" (XP and earlier) or to "C:\Users\Public\Public Documents\C-Control Pro Demos" directory (Vista and later). See Chapter Demo Programs.
5. Can I program the C-Control Pro Module in Linux?
There is no native IDE for Linux, but customer had successfully started the IDE under Wine und
programmed the module in serial mode.
6. Is it possible to develop for C-Control Pro with other Compilers?
© 2013 Conrad Electronic
FAQ
404
There are many developing systems for the Atmel Mega CPU. Some of these Compilers are commercial, others a free. A good example of a free development system is the GNU C-Compiler. You
can transfer programs, that you wrote with the GNU C-Compiler, to the Atmel Mega CPU with a
AVR ISP programmer. But once you overwrote the installed bootloader, there is no way back, you
cannot longer use the C-Control Pro software.
6.2
Mega
1. How can I switch on the Pull-Up resistor of a port?
First switch the port to input with PortDataDir() (or PortDataDirBit() ), then use PortWrite() (or
PortWriteBit() ) to write a "1" into the port.
2. No USB connection existing to the Application Board.
Has the FTDI USB driver been loaded onto the PC? Or does “Unknown Device” appear in the Hardware Manager, when the USB connector is plugged in?
Has the correct communication port been set in Options->IDE->Interfaces?
Are the ports M32:B.4-B.7,A.6-A.7 resp. M128:B.0-B.4,E.5 erroneously being used in the software
(see pin assignment of M32 and M128)? Are the jumpers on the Application Board set to these
ports?
A signal on M32:PortD.2 resp. M128:PortE.4 (SW1) during startup will activate the serial Bootloader.
(Mega128 only) Is Port.G4 (LED2) on Low during Reset? See SPI Switch Off in chapter "Firmware".
When the SD card is used in conjunction with USB and the application board, there is a collision
on the SPI bus. If you want to use the SD Card interface, you have to remove the jumper on the
application board (Mega128 PB.0 to PB.4 and PE.5) and to use the serial mode.
3. The serial interface does not issue any characters or does not receive any characters.
Are the Ports D.0-D.1 erroneously used in the software (see pin assignment of M32 and M128)?
Are the jumpers on the Application Board set to these ports?
4. The Application Board does not react to any commands when serially connected.
In order to get the Bootloader into the serial mode the button SW1 must be pressed during startup
of the Application Board (observe jumper for SW1). For the serial mode M32:PortD.2 resp.
M128:PortE.4 (SW1) can also be fixed to GND level.
5. The Hardware Application does not start by itself (Autostart Behaviour).
A signal on the SPI interface during startup may activate USB communication.
A signal on M32:PortD.2 resp. M128:PortE.4 (SW1) during startup may activate the serial Bootloader.
© 2013 Conrad Electronic
405
C-Control Pro IDE
6. How much RAM do I have for my programs?
There are 930 bytes left for own programs on the Mega32, on the Mega128 remain 2494 bytes. Interpreter and Debugger are using buffer for interrupt driven I/O, and 256 bytes for the data stack.
Beside this resources, there are some internal tables, that are needed for interrupt handling and
multitasking. Additionally some RAM Variables are used from library functions.
7. Where is the second serial interface on the Mega128 Application Board?
See J4 chapter Jumper Application Board M128.
8. I need no USB connection to the application board, how can I reclaim the reserved ports for USB?
The USB interface is wired to the C-Control module over the SPI interface. The SPI interface can
be disabled with SPI_Disable(). Do not forget to remove the jumper that connects the SPI with the
Mega8 (USB interface) on the application board.
9. Where do I have the supply voltage on the breadboard of the Application Board?
If you turn the application board to a position where the interface connectors (USB and serial)
show to the upper side, the leftmost column on the breadboard is GND and the rightmost column
is VCC. You can see it clearly, when you take a look of the backside of the board.
10. I need more ports for my hardware application. Many ports are used by other functions.
Take a look at the Pin Assignment of M32 and M128. You can use all ports that have no special functionalities ( SPI, RS232, LCD, Keyboard etc.) that are needed for your application.
Do not forget to remove the jumper that connects the port pins to the application board.
Otherwise the behaviour can be undetermined.
6.3
AVR32Bit
1. There is no USB connection to the Application Board.
Is the USB (usbser.sys) driver loaded on the PC? Or maybe an "unknown device" appears in the
hardware manager when inserting the USB plug?
Is the correct communication port set?
Please read the USB Troubleshooting guide!
On delivery, the Autostart jumper is set. Please remove, otherwise no program transfer is possible.
2. How do I turn on the pull-up resistor of an input port?
See Port_Attribute ().
© 2013 Conrad Electronic
FAQ
406
3. I need more ports for my hardware application. Many ports are used by other functions.
Take a look at the Pin Assignment of the AVR32Bit. You can use all ports that have no special
AVR32Bit Module functionality (not connected to I2C, SPI, MACB etc). Do not forget to remove
the jumper that connects the port pins to the application board (e.g. for LED's or Button's). Otherwise the behavior can be undetermined.
4. I cannot reset the module or a transfer of the interpreter after a software update no longer works.
A power cycle brings the module securely back to the boot loader to allow a Reset Module. See
Firmware.
© 2013 Conrad Electronic
407
C-Control Pro IDE
Index
----
180, 201
-##define
167
#endif 167
#ifdef 167
#include
167
#pragma
169
-+++
180, 201
-AAbsDelay
223
AC_Disable
227
AC_Enable
227
AC_InpHigher
228
AComp
225
acos
290
Actualize Variable
150
ADC Example
237
ADC_Disable
230, 233
ADC_Enable
233
ADC_GetValue
235
ADC_GetValues
235
ADC_Read
230
ADC_ReadInt
230
ADC_Set
231
ADC_SetInput
236
ADC_SetInt
232
ADC_Start
236
ADC_StartInt
232
Addition
179, 200
Analog-Comparator
225
And
179, 201
Arithmetic Operators
179, 200
Array
174, 195
Array Window
152
ASCII 217
asin
290
Assembler
212
Assembler Compendium
216
Assembler Data Access
214
Assembler Examples
212
atan
291
Atmel Register
254
Auto Actualize
150
Autostart
16, 65, 145
AVR32Bit Applicationboard
82
AVR32Bit Mainboard
95
AVR32Bit Modul
67
-Bbaud rate
161
Bit inversion
179, 201
Bit Operators
179, 201
Bitshift Operators
179, 201
Bootloader
16, 65
break
181, 182, 184, 186
Breakpoints
150
Byte
173, 194
-CCAN Bus
237
CAN Examples
240
CAN_Exit
241
CAN_GetInfo
241
CAN_Init
242
CAN_MObSend
243
CAN_Receive
243
CAN_SetChan
244
CAN_SetMOb
244
Cascade
163
Case
184, 206
C-Control konfigurieren
ceil
291
Change Variable
150
Char
173, 194
Clock_GetVal
245
Clock_SetDate
246
145
© 2013 Conrad Electronic
Index
Clock_SetTime
247
COM Interface
144
COM Port
161
Comments
171, 193
CompactC
170
Comparison Operators
180, 202
compile
130
compile projects
130
Compiler Presetting
161
Component Parts Plan Mega128 Appl. Board
58
Component Parts Plan Mega32 Appl. Board
49
Conditional Valuation
181
Connection Diagram AVR32 Appl. Board
93
Connection Diagram AVR32 Main Board
100
Connection Diagram AVR32 Module
80
Connection Diagram LCD1602
107
Connection Diagram Mega128
30
Connection Diagram Mega128 Appl. Board
56
Connection Diagram Mega128 CAN
38
Connection Diagram Mega32
23
Connection Diagram Mega32 Appl. Board
46
Connection Diagram REL4
115
Connection Diagram RELBUS
120
Connection Diagram UNIT-BUS
102
Connection Diagram USB-Board
126
Conrad
4
Context Help
164
continue
181, 182, 186
Corrections
5
cos
292
CPU AT90CAN128
34
CPU choosage
133
CPU Mega128
27
CPU Mega32
20
-Ddata bits
161
Data Types
173, 194
DCF_FRAME
249
DCF_INIT 249
DCF_Lib.cc
247
DCF_PULS
250
DCF_RTC.cc
247
DCF_START 250
DCF_SYNC
250
© 2013 Conrad Electronic
DCF77
247
Debugger
150
default
184
Demo Programs
4
DirAcc_Read
254
DirAcc_Write
254
Direct_Access
253
Divider
316
Division
179, 200
Do
202, 203
do while
181
dword
173
-EEditor
136
Editor Settings
156
EEPROM
255, 256, 257
EEPROM_Read
255
EEPROM_ReadFloat
256
EEPROM_ReadWord
255
EEPROM_Write
256
EEPROM_WriteFLoat
257
EEPROM_WriteWord
257
Else
184, 205
email
4
equal
180, 202
Ereigniszähler
387
ETH_CheckReceiveBuf 263
ETH_Close
264
ETH_CloseListenTCP
264
ETH_ConnectTCP
262
ETH_DisconnectTCP
264
ETH_GetIPInfo
265
ETH_GetStateTCP
265
ETH_ListenTCP
266
ETH_ListenUDP
267
ETH_ReceiveData
267
ETH_SendTCP
267
ETH_SendUDP
268
ETH_SetConnBuf 268
Ethernet Aktivierung
258
Ethernet durchsuchen
146
Event Counter
362
exclusive Or
179, 201
Exit
202, 203, 204
408
409
C-Control Pro IDE
exp
292
Expressions
171, 193
Ext
277
Ext_IntDisable
279
Ext_IntEnable
278
external RAM
51, 53
-Ffabs
293
FAQ
403
FAQ AVR32Bit
405
FAQ Mega
404
Fax
4
Firewall
160
Firmware
16, 65
float
173
floor
293
For
182, 204
ForceBootloader
224
formatted print
349
FPU
290
Frequency Generation
363
Frequency Measurement
364
Frequenzerzeugung
388
Functions
187, 208
-GGoto
183, 205
GPP
4
greater
180, 202
greater or equal
180, 202
-HHandling
2
Hardware
12, 144
Hardware Version
148
Help
164
History
5
-II2C
273
I2C Status Codes
272
I2C_Init
269
I2C_Probe
274
I2C_Read
274
I2C_Read_ACK
270
I2C_Read_NACK
270
I2C_SetSpeed
275
I2C_Start
270
I2C_Status
271
I2C_Stop
271
I2C_Write
272, 275
IDE
129
IDE Editor Options
159
IDE Settings
158
Identifier
171, 193
If 184, 205
Insert Variable
150
Installation
12
Installation Hardware
12
Installation Software
12, 63
Installation USB
64
Installation USB and serial
13
Instruction Block
171, 193
Instructions
171, 193
int
173
Integer
194
Intended use
3
Internal Functions
223
Internet Explorer
160
Internet Update
160
IntFunc_Lib.cc
223
Introduction
2
IRQ
277
IRQ Example
280
Irq_GetCount
279
Irq_SetVect
280
-JJumper Mega128 Appl. Board
Jumperr Mega32 Appl. Board
54
43
-KKey_Init
281
Key_Scan
282
Key_TranslateKey
282
© 2013 Conrad Electronic
Index
Keyboard Layout
156
Keyboard Shortcuts
141
-LLCD Matrix
127
LCD_ClearLCD
284
LCD_CursorOff 285
LCD_CursorOn
285
LCD_CursorPos
286
LCD_Init
286
LCD_Locate
287
LCD_SubInit
283
LCD_TestBusy
283
LCD_WriteChar
288
LCD_WriteCTRRegister
284
LCD_WriteDataRegister
284
LCD_WriteFloat
288
LCD_WriteRegister
288
LCD_WriteText
289
LCD_WriteWord
289
LCD1602 Board
103
ldexp
293
left shift
179, 201
Liability
3
Library Management
134
ln
294
log
294
logical And
180
logical Not
180
logical Operators
180
logical Or
180
long
173
Loop While
202
-MMAC Address
63
Map File
169
Mega128 Application Board
50
Mega128 CAN Module
30
Mega128 Module
23
Mega128 Projectboard
61
Mega32 Application Board
40
Mega32 Module
17
Mega32 Projectboard
59
© 2013 Conrad Electronic
messages
130
Modulo
179, 200
Msg_WriteChar
251
Msg_WriteFloat
251
Msg_WriteHex
252
Msg_WriteInt
252
Msg_WriteText
253
Msg_WriteWord
253
Multiplication
179, 200
-NNew features
5
Next
204
next error
130
not equal
180, 202
-OOnewire Example
299
Onewire_Read
298
Onewire_Reset
299
Onewire_Write
299
Open Source
4
Operator Precedence
189
Operator Table
190, 211
Operators
178, 200
Or
179, 201
Outputs
147
-PPattern
143
Period Measurement
365
PIN
148
Pin Assignment AVR32
75
Pin Assignment Mega128
28
Pin Assignment Mega128 CAN
Pin Assignment Mega32
21
Pointer
187, 208
Port_Attribute
302
Port_DataDir
303
Port_DataDirBit
303
Port_Read
304
Port_ReadBit
304
Port_Toggle
305
35
410
411
C-Control Pro IDE
Port_ToggleBit
305
Port_Write
306
Port_WriteBit
306
Port-Ext-Board
108
pow
295
Precedence
211
predefined arrays
174, 195
Predefined Symbols
168
Preprocessor
167
previous error
130
Print Preview
140
Program
170, 192
Program version
164
Project
130
Project Name
130
project options
133
projectfiles
131
Projects
130
Proxy
160
Pulse Measurement
365
Pulse Width Modulation
364
Pulsweitenmodulation
389
PWM_Disable
389
PWM_Init
389
PWM_Update
390
-Rrand
297
RC5
311
RC5_Init
314
RC5_Read
315
RC5_Write
315
reference voltage
231, 232
Refresh Editor View
136
Regular Expressions
143
REL4-Board
111
RELBUS-Board
116
rename projects
131
Replace
139
reserved
191, 212
reserved Words
191, 212
right shift
179, 201
round
295
-SSD card Example
336
SDC Return Values
328
SDC_FClose
328
SDC_FOpen
329
SDC_FRead
330
SDC_FSeek
330
SDC_FSetDateTime
331
SDC_FStat
331
SDC_FSync
332
SDC_FTruncate
333
SDC_FWrite
333
SDC_GetFree
334
SDC_Init
334
SDC_MkDir
335
SDC_Rename
335
SDC_Unlink
336
Search
139
Select
206
serial Bootloader
16
Serial Example
325
Serial Example (IRQ)
325
Serial_Disable
318
Serial_Init
318, 319
Serial_Init_IRQ
320, 321
Serial_IRQ_Info
322
Serial_Read
323
Serial_ReadExt
323
Serial_Write
324
Serial_WriteText
324
Service
4
Servo
337
Servo Example
339
Servo_Init
338
Servo_Set
339
Sign
179, 200
sin
296
Single
194
SizeOf 174, 195
Sleep
224
smaller
180, 202
smaller or equal
180, 202
Smart Tabulator
156
Spellchecking
159
© 2013 Conrad Electronic
Index
SPI switch off 16
SPI_Disable
340, 343
SPI_Enable
341, 343
SPI_Read
341, 344
SPI_ReadBuf 342, 344
SPI_SetChan
345
SPI_Write
342, 345
SPI_WriteBuf 342, 345
sqrt
296
SRAM
51, 53
srand
298
Start Program
145
Static
174, 195
stop bits
161
Str_Comp
346
Str_Copy
347
Str_Fill
347
Str_Isalnum
348
Str_Isalpha
348
Str_Len
349
Str_Printf 349
Str_Printf Example
354
Str_ReadFloat
350
Str_ReadInt
350
Str_ReadNum
351
Str_Substr
351
Str_WriteFloat
352
Str_WriteInt
352
Str_WriteWord
353
Strings
173, 174, 194, 195, 346
Subtraction
179, 200
switch
184
Syntax Highlight
154
-TTables
174, 195
tan
297
TCP/IP Programmierung
Terminal
153
Terminal Settings
161
Thread Example
361
Thread Example 2
361
thread options
135
Thread_Cycles
356
Thread_Delay
357
© 2013 Conrad Electronic
259
Thread_Info
357
Thread_Kill
358
Thread_Lock
358
Thread_MemFree
358
Thread_Resume
359
Thread_Signal
359
Thread_Start
360
Thread_Wait
360
Threads
354
Tile Horizontal
163
Tile Vertical
163
Timer
362
Timer Functions
366
Timer_ConfigCounter
391
Timer_CPUCycles
392
Timer_Disable
366, 392
Timer_GetCounterVal
392
Timer_Set
393
Timer_T0CNT 367
Timer_T0FRQ
367
Timer_T0GetCNT 368
Timer_T0PW
368
Timer_T0PWM
369
Timer_T0Start
370
Timer_T0Stop
370
Timer_T0Time
371
Timer_T1CNT 371
Timer_T1CNT_Int
372
Timer_T1FRQ
372
Timer_T1FRQX 373
Timer_T1GetCNT 373
Timer_T1GetPM
374
Timer_T1PM
375
Timer_T1PWA
374
Timer_T1PWB
375
Timer_T1PWM
376
Timer_T1PWMX 376
Timer_T1PWMY
377
Timer_T1Start
377
Timer_T1Stop
378
Timer_T1Time
378
Timer_T3CNT 379
Timer_T3CNT_Int
379
Timer_T3FRQ
380
Timer_T3FRQX 380
Timer_T3GetCNT 381
412
413
C-Control Pro IDE
Timer_T3GetPM
381
Timer_T3PM
382
Timer_T3PWA
382
Timer_T3PWB
383
Timer_T3PWM
383
Timer_T3PWMX 384
Timer_T3PWMY
384
Timer_T3Start
385
Timer_T3Stop
385
Timer_T3Time
386
Timer_TickCount
386, 394
Tool Settings
162
Tools
153
Transfer
145
Type Conversion
173, 194
While
186, 203
Window
163
Word
173, 194
-UUDP Programmierung
261
UNIT-BUS Exp. Board
101
UNIT-BUS Ext-Board
121
unsigned char
173
unsigned int
173
USB Troubleshooting
66
USB-Board
124
-VVariables
174, 195
Variables Window
150
Version Check
148
Visibility of Variables
174, 195
void
187
-WWarranty
3
WEB_GetFileHash
398
WEB_GetRequest
397
WEB_ReleaseRequest
398
WEB_SetDynVar
398
WEB_StartServer
400
WEB_StopServer
400
Webserver
395
Webserver Optimierung
396
Webserver Tips
396
© 2013 Conrad Electronic