1
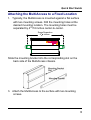
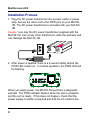
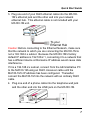
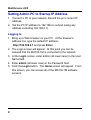
MultiAccess®ACS
Analog Communications Server
MA100-1M
Quick Start Guide
MultiAccess ACS
MultiAccess ACS Quick Start Guide
MA100-1M
P/N 82010243L, Revision D
All rights reserved. This publication may not be reproduced, in whole or in part,
without prior expressed written permission from Multi-Tech Systems, Inc.
Copyright © 2006-07 by Multi-Tech Systems, Inc.
Multi-Tech Systems, Inc. makes no representation or warranties with respect to
the contents hereof and specifically disclaims any implied warranties of
merchantability or fitness for any particular purpose. Furthermore, Multi-Tech
Systems, Inc. reserves the right to revise this publication and to make changes
from time to time in the content hereof without obligation of Multi-Tech Systems,
Inc., to notify any person or organization of such revisions or changes. Check
Multi-Tech’s Web site for current versions of our product documentation.
Record of Revisions
Revision Date
A
07/12/05
B
03/20/06
C
07/14/06
D
06/22/07
Trademarks
Description
Initial release.
Added modem sharing and Callback feature.
Added SMTP Port.
Manual revised to include software version 1.03.
MultiAccess, Multi-Tech, and the Multi-Tech logo are trademarks of Multi-Tech
Systems, Inc. All other brand and product names mentioned in this publication are
trademarks or registered trademarks of their respective companies.
Technical Support
Country
France:
Europe, Asia, Africa:
U.S., Canada, all
others:
By Email
[email protected]
[email protected]
[email protected]
World Headquarters
Multi-Tech Systems, Inc.
2205 Woodale Drive
Mounds View, Minnesota 55112 U.S.A
Fax (763) 785-9874
http://www.multitech.com
2
By Phone
+(33) 1-64 61 09 81
+(44) 118 959 7774
(800) 972-2439 or
+763-785-3500
Quick Start Guide
Introduction
This guide shows you how to setup your MultiAccess ACS
(Analog Communications Server) single-port communications
server, MA100-1M. The MA100-1M provides connectivity to the
corporate LAN for telecommuters and mobile users, or to
remotely installed equipment, via one integrated V.92/56K
modem.
The MultiAccess ACS has two roles (usage), RAS and Modem
Sharing.
RAS Solution: The MultiAccess can be used as a dial-in PPP
Remote Access Server in a LAN to Client environment. The
purpose is to give a remote node (i.e., Microsoft Dail-up
Networking clients) IP access to the same subnet and LAN the
ACS is installed on. The supported PPP security protocol
(means of communicating user credentials between PPP end
points) is PAP only.
Modem Sharing Solution: The modem in the ACS can be a
shared resource on your network. Computers with network
asscess to the ACS can use Telnet on port 7000 and get direct
AT command access to the modem in the ACS, for either
outbound or inbound calls. A common way to take advantage of
this role is by installing Com Port Redirector Software (i.e., MultiTech’s MCSI2000 for Windows) on your workstation(s).
For detailed information, product specification, troubleshooting
tips, and warranty repair policies, refer to the User Guide,
available on the product CD accompanying your MA100-1M.
3
MultiAccess ACS
We Supply
•
•
•
•
•
•
•
A MA100-1M with factory-installed software
A set of four self-adhesive plastic feet
One mounting bracket
One universal power supply with power cord
One common telephone cable (RJ-11 at both ends)
A product CD
This printed Quick Start Guide
You Supply
•
•
•
•
A nearby AC power outlet
A connection to your Ethernet LAN
A telephony connection
An admin PC (with web browser) to configure the MA100-1M
Safety Warnings
• Use this product only with UL- and CUL-listed computers.
• Never install phone wiring during a lightning storm.
• Never install a phone jack in a wet location unless the jack is
specifically designed for wet locations.
• Never touch uninsulated phone wires or terminals unless the
phone line has been disconnected at the network interface.
• Use caution when installing or modifying phone lines.
• Avoid using a phone during an electrical storm; there is a risk
of electrical shock from lightning.
• Do not use a phone in the vicinity of a gas leak.
• To reduce the risk of fire, use only 26 AWG or larger
telephone line cord.
4
Quick Start Guide
Attaching the MultiAccess to a Fixed Location
1. Typically, the MultiAccess is mounted against a flat surface
with two mounting screws. Drill the mounting holes at the
desired mounting location. The mounting holes must be
15
separated by 4 /16 inches center-to-center.
Screw Separation
41516 inches
Slide the mounting bracket into the corresponding slot on the
back side of the MultiAccess chassis.
3. Attach the MultiAccess to the surface with two mounting
screws.
5
MultiAccess ACS
Installation Process
1. Plug the DC power transformer into a power outlet or power
strip. Secure the other end to the PWR jack on your MA1001M. The DC power transformer is included with your MA1001M.
Caution: Use only the DC power transformer supplied with the
MA100-1M. Use of any other transformer voids the warranty and
can damage the MA100-1M.
2. After power is applied, there is a 4-second delay before the
PWR LED comes on. In normal operation, the PWR LED will
be flashing.
When you apply power, the MA100-1M performs a diagnostic
self-test. The PWR indicator flashes when the test is complete
and the unit is ready. If this does not happen, check that the
power supply is solidly connected and that the AC outlet is live.
6
Quick Start Guide
3. Plug one end of your RJ45 ethernet cable into the MA1001M’s ethernet jack and the other end into your network
ethernet hub. This ethernet cable is not included with your
MA100-1M unit.
Caution: Before connecting to the Ethernet Network, make sure
that the network to which you are connecting the MA100-1M is
not a 192.168.2.x subnet. Because the MA100-1M’s factory
default IP address is 192.168.2.1, connecting it to a network that
has a different device at that same IP address would cause data
interference.
If it is a 192.168.2.x subnet, connect from the Administrative PC
to the MA100-1M using an RJ45 crossover cable until the
MA100-1M’s IP address has been configured. Thereafter,
connect the MA100-1M into the network with an ordinary RJ45
cable.
4. Plug one end of a phone cable into the telephone wall jack
and the other end into the LINE jack on the MA100-1M.
7
MultiAccess ACS
Setting Admin PC to Startup IP Address
1. Connect a PC to your network. Record the pc’s current IP
address.
2. Set the PC IP address to 192.168.2.x subnet (using any
address excluding 192.168.2.1).
Logging In
1. Bring up a Web browser on your PC. At the browser’s
address line, type the default IP address:
http://192.168.2.1 and press Enter.
2. The Login screen will appear. At this point you can be
assured that the MA100-1M is connected to the network.
3. At the Login screen, enter admin (all lower case) in the User
Name field.
4. Enter admin (all lower case) in the Password field.
5. Click the Login button. The Home screen will appear. From
this screen, you can access all of the MA100-1M software
screens.
8
Quick Start Guide
Setting MA100-1M IP Addresses
1. In the MA100-1M Administration screen, go to the IP
Configuration fields.
2. Fill in the IP information that applies to your MA100-1M unit.
The fields for “IP Address,” “Subnet Mask,” “Default
Gateway” and “Name Server” are required. A “Secondary
Name Server” is optional.
3. Click Update. After the Update button has been clicked, it
takes 5 seconds for the unit to update the addresses.
Resetting Admin PC to Its Original IP Address
In “Setting the Admin PC” to the network number of the
MultiAccess, you recorded the original IP address of the
administrator’s PC and then reset it to the IP address required to
allow communication with the MA100-1M unit. You may now set
the IP address of the administrator’s PC back to its original value
or to any other value that will allow you to communicate with the
MA100-1M at its new IP address.
9
MultiAccess ACS
Logging In Again
Having reset the IP address of the administrator’s PC, you must
log into the MA100-1M software again. Enter the MA100-1M’s
new IP address into your browser. The Login screen should
appear.
Time Configuration
1. In the MultiAccess Administration screen, go to the Time
Configuration fields.
2. In the Time Server window, select from the three time
server URLs. The default is time.nist.gov. The Time Server
is a substitute for a real-time clock in the MA100-1M.
If you would like to add your own time server, you can enter
the URL or IP address of your time server in the Add Time
Server window.
3. In the Request Interval window, select the Days, Hours,
and Minutes that the MultiAccess will update its clock from
the time server.
4. If you are in daylight savings time, check the Use Daylight
Savings Time (DST) box.
5. In the Time Zone, Date Format, and Time Format
windows, choose the options for your time zone.
6. Click the update button to change to your new parameters.
10
Quick Start Guide
Setting Up the Mail Server
1.
From the Administration screen, go to the SMTP
Configuration fields.
2.
Enter the mail server address in the SMTP Server Address
window (e.g., mail.multitech.com or IP address).
Enter the SMTP Port (usually 25) that is used as the SMTP
Server.
Enter the E-mail address of the administrator in the
Administrator E-mail window.
If the SMTP Server requires a User ID, enter the ID in the
SMTP Server User ID window.
If the SMTP Server requires a password, enter the
password in the SMTP Password window.
If you enter a password, retype the identical password in the
Retype SMTP Password window.
Click on Update. At this point the MA100-1M will send the
Administrator an email saying that the mail server address
has been updated.
3.
4.
5.
6.
7.
8.
Modem Setup
The Modem Setup menu group defines the Modem Sharing
behavior and the General Modem Setup Group defines the
Country Code and number of rings before auto answer.
If you are using your MultiAccess for dial-in PPP access (RAS
solution), you do not have to modify Modem sharing, but, you
have to select the Country Code. If you are using your
11
MultiAccess ACS
MultiAccess for dial-out, you will have to select one of the
Modem Sharing options and select the Country Code.
With any of the Modem Sharing options, the TCP port number
used to access the modem is 7000.
1. If you are using your MultiAccess for dial-in PPP access
(RAS), click on the Country Code down arrow and choose
your country/region. Click on the update button to save
your selection.
If you are using your MultiAccess for dial-out, you will have
to click on the Modem sharing down arrow and choose one
of the Modem Sharing options.
Caution: Modem sharing is accomplished by implementing
a Telnet interface to the MultiAccess modem. Secure
access to the port via a firewall or IP filter settings to
prevent unauthorized use of your modem resource.
No Authentication. Immediate access is given to the modem.
Local Authentication. A valid set of credentials, defined in the
Local User data base, is required before access is granted.
Radius Authentication. A valid set of credentials, defined in
the Radius User data base, is required before access is granted.
12
Quick Start Guide
Raw Mode with No Authentication. User data is treated “as
is”, without interpretation, and no authentication is required.
Raw Mode with Local Authentication. User data is treated “as
is”, without interpretation, and a valid set of credentials, defined
in the Local User data base, is required before access is
granted.
Raw Mode with Radius Authentication. User data is treated
“as is”, without interpretation, and a set of credentials, defined in
the Radius User data base, is required before access is granted.
2. Select your Country Code by clicking on the down arrow
and choose your country/region.
3. If the modem is being used for in-bound calls, select the
number of ring(s) for auto answer.
4. Click Update.
Setting Authentication
Authentication type option defines where the database of user
credentials reside. Local Authentication refers to the Local User
Database on MultiAccess. Radius Authentication refers to a user
database controlled by the Radius Server outside the
MultiAccess.
If a Radius Server is used for authentication, the the server has
to be configured to receive requests form the MA100-1M.
For RAS calls, dial-in PPP, a second static IP address is needed
in the Remote Host Address field. This address is for the dial-in
user, PPP server. This address needs to be on the same
subnet, network number as that of the MA100-1M.
Remote Host Address is not used if the modem sharing is set for
authentication.
13
MultiAccess ACS
Radius Client Setup points to the Radius Server when the
Authentication is Radius.
Authentication
1. In the Authentication Type, if your database for user
credientals resides in the Local User Database on the
MultiAccess, then accept the default – local. If your user
database resides on the Radius Server outside the
MA100-M, then click on the down arrow and chose
radius.
2. For RAS calls, enter a static IP Address in the Remote
Host Address window which will be assigned to the dial-in
user. This Remote Host Address has to match the network
number that the MultiAccess is on.
RADIUS
1. If you are setting up MultiAccess to use Radius
authentication, then enter the IP address of the primary
RADIUS Server in the RADIUS Server Address 1 window.
14
Quick Start Guide
2.
3.
4.
5.
6.
Enter the port number (usually 1812) for the RADIUS
Server in the top Port window.
Enter the IP address of the RADIUS Accounting server in
the RADIUS Accounting Address 1 window.
Enter the port number (usually 1813) for the RADIUS
Accounting server in the bottom Port window.
Enter the Secret of the RADIUS Server that you are
communicating with. The Secret has to be identical to the
one used by your RADIUS Server and is limited to 14
alphanumeric characters..
Click the Update button to save the configuration.
Setting Up Local Users
The administrator account has both administration of the
MA100-1M and dial-in rights. The user accounts only have rights
to use the modem.
For Local Authentication, go to the Local Users screen.
Note: The first row is for the “Administrator” function. No matter
what values are used for the Name, User ID and Password
fields, the first row will still apply to the person doing the
Administrator function for the MA100-1M. The Administrator is
the party privileged to configure the MA100-1M.
Note: Callback Security can be implemented in two ways:
15
MultiAccess ACS
1) a fixed telephone number. This is enabled by choosing Admin
specified in the Callback window. 2) a variable telephone
number by choosing User specified in the Callback window.
Administator Row:
1. In the “Administrator” row of the Local Users screen, enter
the Name and User ID to be used for the MA100-1M
administrator (it need not be literally “Administrator”).
2. In the Password window, enter an alphanumeric password.
Passwords can be as long as 40 characters, and are casesensitive.
3. In the Confirm Password window, enter the identical
alphanumeric password.
4. If the administrator is going to enable the Callback Security
option, click on the Callback down arrow and chose the
callback method. The fixed phone number is Admin
specified or variable phone number is User specified.
If the Callback Security option is enabled and Admin
specified is selected, then enter your callback telephone
number in the Callback # window.
If the Callback Security option is enabled and User
specified is selected, you do not enter a telephone number
in the Callback # window.
5. Click on Update in the “Administrator” row. At this point, a
Login screen will appear and you will be asked to log in
again. Log in using the administrator’s User ID (as listed in
the “User ID” column) and the administrator’s current
password.
16
Quick Start Guide
Users Row:
1. In the next blank Name row, enter the Name and User ID of
your local user.
2. In the Password window, enter an alphanumeric password.
Passwords can be as long as 40 characters, and are casesensitive.
3. In the Confirm Password window, enter the identical
alphanumeric password.
4. If you are going to enable the Callback Security option for
this remote user, click on the Callback down arrow and
chose the callback method. The fixed phone number is
Admin specified or variable phone number is User specified.
User specified allows the remote user to enter his/her
changing telephone number.
If the Callback Security option is enabled and Admin
specified is selected, then enter your callback telephone
number in the Callback # window.
If the Callback Security option is enabled and User
specified is selected, you do not enter a telephone number
in the Callback # window.
5. Click the add button to include this local user in the data
base.
6. Repeat the Local User Row steps for each local user you
want to add to your local user data base.
17
Patents
This device is covered by one or more of the following patents:
6,031,867; 6,012,113; 6,009,082; 5,905,794; 5,864,560;
5,815,567; 5,815,503; 5,812,534; 5,809,068; 5,790,532;
5,764,628; 5,764,627; 5,754,589; D394,250; 5,724,356;
5,673,268; 5,673,257; 5,644,594; 5,628,030; 5,619,508;
5,617,423; 5,600,649; 5,592,586; 5,577,041; 5,574,725;
D374,222; 5,559,793; 5,546,448; 5,546,395; 5,535,204;
5,500,859; 5,471,470; 5,463,616; 5,453,986; 5,452,289;
5,450,425; D361,764; D355,658; D355,653; D353,598;
D353,144; 5,355,365; 5,309,562; 5,301,274. Other patents
pending.
82010243L