1
bk_front.fm5
Gigaset 2015 plus, GBR: A30852-X1105-B401-1-7619
s
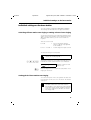
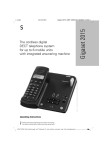
The cordless digital
DECT telephone system
for up to 6 handsets
with integrated answering machine
Operating instructions
Please read these operating instructions carefully (including
the safety notes) before starting up the equipment!
ACHTUNG! Schnittkante ggf. auf Titelseite U1 nach außen versetzen wg. Falz-Ausklappseite
Gigaset 2015 plus
29.10.99
29.10.99
kap00.fm5
Gigaset 2015 plus, GBR: A30852-X1105-B401-1-7619
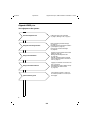
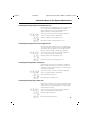
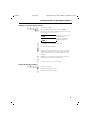
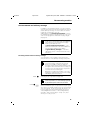
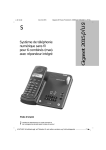
Gigaset® 2015 plus
Your signpost to the system:
Putting the device into operation
(➔ page 1). Making a call (➔ page 7).
Your first telephone call
Basic answering machine settings
(➔ page 21).
Recording announcements and advisory messages (➔ page 45).
Listening to recorded messages
(➔ page 48).
Using the answering machine
Logging on new handsets at the base
station (➔ page 57).
Making internal telephone calls
(➔ page 10).
Internal consultation during external
calls and internal transfer of external
calls (➔ page 12).
Using several handsets
Logging on handsets at new base station (➔ page 57).
Activating base station display and optimal setting of station search
(➔ page 62).
Using several base stations
Quick-reference guide (➔ page 75)
for remote operation to cut out (see
back page).
Quick-reference guide
II
U2
kap00.fm5
29.10.99
Gigaset 2015 plus, GBR: A30852-X1105-B401-1-7619
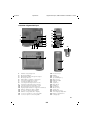
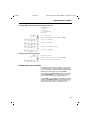
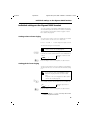
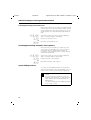
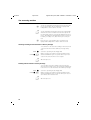
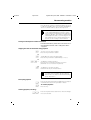
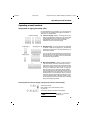
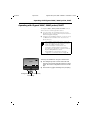
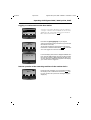
Overview: Gigaset 2015 plus
18
19
5
1
6
7
8
9
2
3
4
10
14
11
20
21
22
27
28
29
23
24
25
26
30
31
34
12 13 15
16
17
32
33
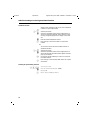
1
2
3
4
5
6
7
8
9
10
11
12
13
14
15
16
17
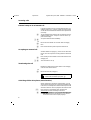
Handset rest/charger unit
Message playback
Backward scrolling through messages
Message deletion
LED indicator: number of messages
Increasing loudspeaker volume
Lowering loudspeaker volume
Selecting answering machine mode
Forward scrolling through messages
Switching answering machine on/off
Recording announcements/memos
Paging key (broadcast for logged-on handsets)
LED for “dialup line busy” display
Stop key for answering machine
LED for “charge batteries” display
Socket for telephone connecting cable
Socket for power connecting cable
18
19
20
21
22
23
24
25
26
27
28
29
30
31
32
33
34
Receiver inset
Display
Storage key
Speed dialling key
On-hook key
Dialling keypad
Star key
Signal key
Microphone
Redial key
Internal key
Off-hook key
Square key
On/off/protect key
Tone ringing loudspeaker
Battery compartment
Carrying clip
III
U3
kap00.fm5
29.10.99
Gigaset 2015 plus, GBR: A30852-X1105-B401-1-7619
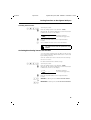
Overview: keys
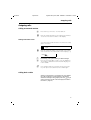
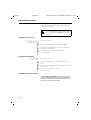
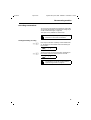
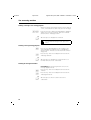
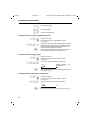
Keys on the base station
?
h
Green paging key for broadcast calls to all logged-on
handsets
Switching the answering machine on/off
È
Skipping backwards during message playback on
answering machine
É
Listening to messages on the answering machine
Ê
MODEy
Skipping forwards during message playback on
answering machine
Selecting the operating mode of the answering machine
Í
Recording announcements/advisory message and
personal memos for the answering machine
Ë
Deleting announcements/advisory message and
messages (answering machine)
Ì
Stop key for aborting or terminating
+
Increasing the loudspeaker volume
-
Decreasing the loudspeaker volume
Keys on the Gigaset 1000S handset
B
Storage key for initiating and terminating procedures in
which data is stored
Q
Speed dialling key for administering and selecting speed
dialling numbers. Delete key for correcting telephone
numbers (en-bloc dialling, speed dialling and last number
redial.
O
1 to 0, * and #
R
I
Redial key
For settings, this key is used for temporarily storing and
initiating a new procedure.
Dialling keys for telephone numbers and input keys for
procedures
Signalling key (flash) for transmitting a signal tone to the
public switched telephone network or to PBXs
Internal key for dialling internal numbers or for remote
operation of the answering machine and activating the
“open listening” function
h
Key for switching the handset on/off or for activating the
protect mode
c
Off-hook key for setting up external connections.
a
On-hook key for terminating calls.
For settings, this key is used to cancel a procedure.
IV
U4
kap00.fm5
29.10.99
Gigaset 2015 plus, GBR: A30852-X1105-B401-1-7619
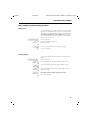
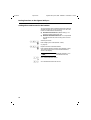
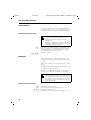
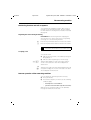
Overview: displays
uPzAHn-8888888cc
Af
Nb
EFG H
Digits or characters which have been entered are
indicated on the top line of the display. The bottom line
contains symbols relating to the current operating state.
Digits and characters on top line of handset display
u
Signal keyR pressed.
P
Manual dialling pause inserted (operation in conjunction
with a PBX).
z
A
H
Memory is empty.
n
Star key * pressed
c
cc
zzzz
A
Trunk code dialled (operation in conjunction with a PBX).
Main trunk code dialled (operation in conjunction with a
PBX).
Square key # pressed.
Volume of incoming speech, level 2.
Volume of incoming speech, level 3
Protect mode
Symbols on bottom line of handset display
j
i
g
f
N
b
E
F
G
H
Indicates that the handset is in storage mode.
Numbers cannot be dialled in this mode.
Battery symbol. Flashes for approximately 5-10 minutes
before the batteries are completely discharged.
Battery is 33 % charged.
Battery is 66 % charged.
Battery is 100 % charged. Only trickle charging is carried
out on a cyclic basis.
ON symbol. Indicates that the handset is switched on.
Phone symbol, activated by pressing thec key. indicates that there is a radio channel to the base station.
Indicates that the dialling method has been switched
over temporarily from dial pulsing to DTMF signalling.
Indicates that an external connection has been set up.
Indicates that an internal connection has been set up.
Indicates that the handset is locked.
V
A1
29.10.99
kap00.fm5
Gigaset 2015 plus, GBR: A30852-X1105-B401-1-7619
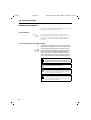
LED display at the base station
h
05
On/off key flashes: new messages are waiting.
Indicates the number of messages stored in the
answering machine.
If there are no new messages, the display is blank.
Overview: symbols used in the operating instructions
B #*5
Í
1 ... 6
o
Press these handset keys in the order shown. The same
symbols/characters are indicated on the keys.
Press this base station key. The same symbol is indicated
on the key. Alternatively, the key is described, e.g. “Press
green key at base station“.
Press one of the keys in the range indicated, e.g. a key
between 1 and 6.
Enter a number, e.g. a telephone number.
Where necessary, appropriate displays are provided on
the handset:
:
(Example: speed dialling
number 3 is not assigned)
3 z
P fN
Attention - important note. Please read
carefully!
Additional information
➔ page VI
(cross-reference to a related topic)
Certification and CE marking
Siemens Gigaset 2015 plus was certified according to
EU guideline 91/263/EEC (CTR 6, CTR 10). Anyone is
permitted to connect this telephone to a telephone jack
and use it.
This telephone fulfils the requirements of the following
EU guidelines:
89/336/EEC
“Electromagnetic compatibility”
73/23/EEC
“Electrical resources used within
specific voltage ranges”
The CE marking confirms the telephone is in compliance
with the above-mentioned guidelines (CE 0188 X)
VI
A2
29.10.99
kap01.fm5
Gigaset 2015 plus, GBR: A30852-X1105-B401-1-7619
Safety information
Only use approved nickel-cadmium (NiCd batteries) or nickel-metal-hybrid batteries (NiMH
batteries)! (➔ page 67).
Never use other types of battery or ordinary
(non-rechargeable) batteries, since these can
cause short-circuits or destruction of the battery
shell (dangerous!). The following labels are
attached to the battery compartments of the
mobile and charger units:
B
+
_
Only use rechargeable batteries; polarity as shown!
Type as indicated in these
installation instructions.
●
Do not immerse cells in water; do not throw them into
fire.
●
Only use battery cells of the same type!
(do not insert batteries of different types)
●
Do not dispose of old, defective cells in normal household waste.
●
Cells become warm during charging. This is normal
and not dangerous.
●
Do not use other manufacturers’ charger units. The
cells could suffer damage.
●
Use only the supplied plug-in power unit specified on
the underside of the device.
●
Make sure you connect the plugs of the base station
correctly, otherwise abnormally high voltages may be
produced across the charging contacts for brief intervals, e.g. during thunderstorms.
●
The handset must not be operated in rooms with explosion hazards.
VII
A3
29.10.99
giga2015.IVZ
Gigaset 2015 plus, GBR: A30852-X1105-B401-1-7619
Contents
Putting the equipment into operation - step by step .............................................................. 1
1st step: reading the safety information ........................................................................................ 1
2nd step: checking the contents of the package ........................................................................... 1
3rd step: Connecting the base station .............................................................................................2
4th step: inserting the batteries in the handset ............................................................................. 3
5th step: charging the batteries ..................................................................................................... 3
6th step: setting the day of the week and the time .........................................................................4
Incoming calls .............................................................................................................................. 5
Displaying telephone numbers ....................................................................................................... 5
Taking a call .................................................................................................................................... 5
External camp-on in an internal call ..................................................................................................6
Accepting an external call ............................................................................................................... 6
Terminating the call ........................................................................................................................ 6
Switching off the microphone (mute function) ............................................................................... 6
Outgoing calls .............................................................................................................................. 7
Calling an external number ............................................................................................................. 7
Calling back a caller ........................................................................................................................ 7
Suppressing code numbers for redial ............................................................................................ 8
Suppressing display of telephone numbers on called party’s unit ................................................. 8
Dialling with speed dialling numbers .............................................................................................. 8
Number redial ...................................................................................................................................9
Temporary tone dialling (DTMF) ..................................................................................................... 9
Terminating the call ........................................................................................................................ 9
Internal calls ...............................................................................................................................
Calling an internal station .............................................................................................................
Collective call to all handsets from base station ..........................................................................
Collective call to all handsets from a handset ..............................................................................
Addressing other persons in the room via loudspeaker (voice calling) .........................................
Open listening via base station loudspeaker ................................................................................
Terminating a call internally ..........................................................................................................
10
10
10
10
11
11
11
Internal consultation and call transfer ..................................................................................... 12
Consultation call ........................................................................................................................... 12
Call transfer .................................................................................................................................. 13
Important basic settings ........................................................................................................... 14
Operating states of the handset .................................................................................................. 14
Signalling method ...........................................................................................................................16
Operation in conjunction with a PBX ..............................................................................................17
Trunk codes ....................................................................................................................................18
Changing the system code/PIN .................................................................................................... 19
Basic settings for the answering machine .....................................................................................21
Resetting the base station to the default state ............................................................................ 24
Resetting Gigaset 2000S handset to the default state ..................................................................25
Setting device connection for Gigaset 1000TAE ............................................................................26
Individual settings on the base station ...................................................................................
Switching off base station tone ringing or setting volume of tone ringing ...................................
Setting pitch of base station tone ringing .....................................................................................
Activating/deactivating key click at base station ..........................................................................
Activating/deactivating music-on-hold ..........................................................................................
27
27
27
28
28
Individual settings on the Gigaset 2000S handset ................................................................. 29
Setting volume of tone ringing ..................................................................................................... 29
Setting pitch of tone ringing ......................................................................................................... 29
VIII
29.10.99
giga2015.IVZ
Gigaset 2015 plus, GBR: A30852-X1105-B401-1-7619
Contents
Setting the handset volume .........................................................................................................
Activating/deactivating advisory and warning tones .....................................................................
Activating/deactivating automatic call acceptance .......................................................................
Speed dialling numbers ................................................................................................................
30
30
32
32
Displaying call duration ............................................................................................................. 35
Activating/deactivating call duration display ................................................................................. 35
Barring functions on the Gigaset 2015 plus ............................................................................ 36
Activating/deactivating if Gigaset 2015 plus barred on outgoing calls ......................................... 36
Emergency numbers if Gigaset 2015 plus is barred .................................................................... 36
Activating/deactivating barred code function ............................................................................... 39
Setting direct trunk access for the handset ...................................................................................40
Handset barring functions ........................................................................................................ 41
Activating/deactivating handset barring function for outgoing calls ............................................. 41
Displays on handset with active barring function ...........................................................................42
The answering machine ............................................................................................................ 43
Switching answering machine on/off ........................................................................................... 43
Operating modes ......................................................................................................................... 44
Announcements and advisory message ........................................................................................45
Recording conversations ................................................................................................................47
Private memos ...............................................................................................................................48
Messages ..................................................................................................................................... 48
Monitoring function and call acceptance ........................................................................................51
Remote operation of the answering machine .............................................................................. 51
Initiating remote operation .............................................................................................................52
Remote operation functions ...........................................................................................................53
Logging on additional handsets at the base station .............................................................. 57
Logging on Gigaset 2000S/1000S handset at the base station .................................................... 57
Logging off handset at base station ............................................................................................. 58
Operating several handsets ...................................................................................................... 59
Assignment of ringing (incoming calls) ......................................................................................... 59
Operation with several base stations ...................................................................................... 61
Activating/deactivating base station number display on handset ................................................. 61
Setting a priority station .................................................................................................................62
Operating with Gigaset 2000C, 2000C pocket, 2000T ............................................................ 63
Logging on comfort device at the base station ..............................................................................65
Remote operation of the answering machine via the comfort device ......................................... 65
Important informations ............................................................................................................. 66
Notes on setting up the base station ........................................................................................... 66
Notes on operating the handset .....................................................................................................67
Care of the equipment ................................................................................................................. 69
Technical data ................................................................................................................................70
Transfer/disposal .......................................................................................................................... 71
Warranty ....................................................................................................................................... 71
Self-help in the event of a fault ......................................................................................................72
Special accessories .................................................................................................................... 74
Quick-reference guide for Gigaset 2000S handset ................................................................. 75
Index ............................................................................................................................................ 76
IX
29.10.99
kap02.fm5
Gigaset 2015 plus, GBR: A30852-X-1105-B301-1-7619
Putting the equipment into operation - step by step
Putting the equipment into operation - step by step
Follow the installation and setup instructions “step by
step” as described in the following:
1st step: reading the safety information
Before starting, make sure you have studied
the safety information carefully!
2nd step: checking the contents of the package
When delivered, the package contains the following:
●
one Gigaset 2015 plus base station (see also label
with CE sign on lower part of base station)
●
one Gigaset 2000S standard handset (see also marking on rear of handset),
●
one telephone connecting cable with Mini-Western
plug and telephone plug
●
one power connecting cable with Mini-Western plug
and power supply unit,
●
one cover for battery compartment of handset
●
one carrying clip for handset
●
two batteries
●
one set of operating instructions
1
kap02.fm5
29.10.99
Gigaset 2015 plus, GBR: A30852-X-1105-B301-1-7619
Putting the equipment into operation - step by step
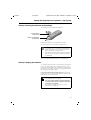
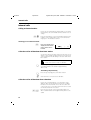
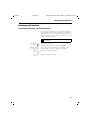
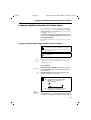
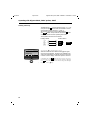
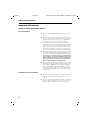
3rd step: Connecting the base station
Power supply unit and
220/230V socket
Telephone connecting
cable
Power connecting cable
Mini-Western plug of
power connecting cable
Mini-Western plug of
telephone connecting cable
Base station housing
seen from below
Telephone connecting cable
Insert the Mini-Western plug of the telephone connecting
cable in the base station. The jack on the lower part of the
base station housing has the following symbol:
Connect the telephone plug of the telephone connecting
cable to the telephone socket.
Power connecting cable
Insert the Mini-Western plug of the power connecting
cable in the base station. The jack on the lower part of the
base station housing has the following symbol:
Connect the power supply unit of the power connecting
cable to a 220/230V socket.
For safety reasons, the telephone must only be
operated with the plug-in power supply unit
supplied.
2
29.10.99
kap02.fm5
Gigaset 2015 plus, GBR: A30852-X-1105-B301-1-7619
Putting the equipment into operation - step by step
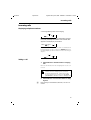
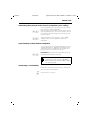
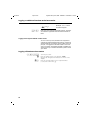
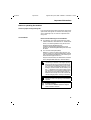
4th step: inserting the batteries in the handset
The handset is powered by two batteries.
.
Cover of battery
compartment
Battery compartment
and batteries
Hold the handset with the keypad downwards.
Insert the batteries in the battery compartment.
Make sure that the batteries have the correct
+/– polarity. The +/– markings on the batteries
must correspond to the +/– markings on the
label in the battery compartment.
If the batteries are aligned wrongly, the handset
will not function and the equipment is liable to
be damaged.
Slide the cover for the battery compartment into the
groove on the handset and close the compartment.
5th step: charging the batteries
To charge the batteries, place the handset in the handset
rest on the base station. The charging contacts on the
lower edge of the handset must touch the contacts in the
handset rest on the base station. It is immaterial whether
the keypad is facing up or down.
If you have inserted the handset correctly, an acknowledgement tone is heard. The LED below the battery symbol lights up on the base station.
The batteries must be charged before you can
start making calls or settings.
We recommend initially charging the batteries
for approximately 16 hours without interruption
(over night, for example).
For further information on the use of the
batteries see ➔ page 67.
3
29.10.99
kap02.fm5
Gigaset 2015 plus, GBR: A30852-X-1105-B301-1-7619
Putting the equipment into operation - step by step
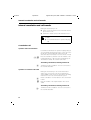
6th step: setting the day of the week and the time
Each new message is annotated with the day and the
time at which it arrived (time stamp function of the answering machine).
When the base station is connected up to the power supply or power failure, you will hear the message: “Time setting not available” when you switch on the answering machine.
You will be guided through the procedure for setting the
time by means of announcements over the loudspeaker
at the base station.
B#I99
1
to 7
0000
Start the procedure.
The following is output as a check: “Time setting“. You
are then prompted to enter the current day.
Enter digit for the week:
1 = Monday, 2 = Tuesday, 3 = Wednesday,
4 = Thursday, 5 = Friday, 6 = Saturday, 7 = Sunday.
You are then prompted to enter the current time.
Enter the time using four digits, e.g. 0937 for 9.37 hours.
to
2359
B
4
Store settings.
29.10.99
kap03.fm5
Gigaset 2015 plus, GBR: A30852-X-1105-B301-1-7619
Incoming calls
Incoming calls
Displaying telephone numbers
A call is signalled by means of tone ringing.
:
f
- - -
N
F
If the carrier supports calling line identification presentation (CLIP), the telephone number of the external caller
appears on the display of your handset:
08972244667
f N
F
Internal calls can be made if more than one handsets are
being operated. You can recognise an internal call by the
following display (a call from station 2 in the following example):
f
N
2
G
Taking a call
1. If the handset is in the base station or charging
unit:
Remove the handset from the charging unit. You are connected.
Automatic call acceptance after removing the
handset from the charging unit can also be
deactivated (➔ page 32). If this function has
been deactivated, you must press c when
you remove the handset from the charging unit.
2. If the handset is not in the base station or charging unit:
c
Press the key on the handset (“off-hook”). You are connected.
5
29.10.99
kap03.fm5
Gigaset 2015 plus, GBR: A30852-X-1105-B301-1-7619
Incoming calls
External camp-on in an internal call
If, during an internal call, an incoming external call is signalled by means of a “camp-on signal”
, the internal caller
can be disconnected and the external call accepted in the
usual way.
c
BR
You are engaged in an internal call. An external call is signalled by means of the “camp-on” tone and “EXT” appears in the display.
Accept the external call immediately.
or
a
Disconnect the internal call. You then hear the ringing
tone.
c
Press the off-hook key and accept the external call.
Accepting an external call
Another handset is ringing (e.g. in the case of direct dialling-in). You can accept the incoming external call for that
unit.
c
BR
Press the key on the handset or remove the unit from the
charging unit.
The connection is set up.
Terminating the call
Replace the handset in the base station or the charging
unit. The call is disconnected.
or
a
Disconnect the call (“hang up”).
If the handset was in protect mode, it will remain in this mode after you press a.
Switching off the microphone (mute function)
I
R
When conducting a call with an external party, you can
switch off the microphone to consult with somebody else
in the room, for example. The external caller is put on hold
and cannot listen in. Music is played for the caller on hold.
Press the key on the handset. The microphone is
switched off. Consult somebody in the room.
Switch
the Symbole
microphone.
reconnected
with the
*) Die on
grünen
D , FYou
und are
H auf
den Tasten dienen
zum
external
caller.
besseren
Auffinden bzw. Wiedererkennen von Funktionen
und werden bei Aufruf auch im Diplay angezeigt.
6
29.10.99
kap04.fm5
Gigaset 2015 plus, GBR: A30852-X-1105-B301-1-7619
Outgoing calls
Outgoing calls
Calling an external number
c
o
Press this key (“off-hook”). You hear dial tone.
Enter the required number on the keypad of the handset.
You can then check this number on the display.
Dialling with number check
You can enter the number and then check it before setting
up the connection.
The number can consist of a maximum of 22
digits.
o
Enter the required number on the keypad of the mobile
unit. You can then check this number on the display, e.g.:
:
123456
f
Q
c
N
If nessesary, press speed dial key to delete last digit.
Press the key within 30 seconds to seize the dialup line.
The number is dialled after a brief interval. Ringing tone
is then audible.
or
a
If the number has been entered incorrectly, press this
key. The input is cancelled. Enter the number again.
Calling back a caller
While you are listening to a message from your handset
the caller’s telephone number appears in the display.
While the message is being played, press the 4 key to
make a call to the sender of the message (for further information ➔ page 53).
7
29.10.99
kap04.fm5
Gigaset 2015 plus, GBR: A30852-X-1105-B301-1-7619
Outgoing calls
Suppressing code numbers for redial
When you dial a telephone number it is incorporated into
the redial list. Both the number dialled after this number,
e.g. an extension number and a subsequent secret “service number” is added to the telephone numbers in the redial list. To prevent the incorporation of secret numbers,
activate “temporary tone dialling” – e.g. after the extension number (➔ page 53) even if your telephone is set to
tone dialling.
Suppressing display of telephone numbers on called party’s unit
To suppress display of your telephone number on the
called party’s unit, use a sequence of telephone services
(CLIR). To do this, your telephone must be set to tone dialling (DTMF).
c
*31#
o
Press the off-hook key.
Enter Service sequence for telephone number suppression, wait for dial tone and then
dial the telephone number.
A prerequisite here is that the network provider
must support this function.
Dialling with speed dialling numbers
If you have programmed speed dialling numbers
(➔ page 32), you can dial the associated number by entering a speed dialling number.
c
Qo
Seize the dialup line. You hear dial tone.
Press the speed dialling key and enter the speed dialling
code (0 to 9) for the required number.
or
Q
o
8
If you are not sure of the speed dialling code for the
required number: keep pressing the speed dialling key
until both numbers appear on the display.
Enter the speed dialling code displayed (4 in this
example).
29.10.99
kap04.fm5
Gigaset 2015 plus, GBR: A30852-X-1105-B301-1-7619
Outgoing calls
Number redial
Redialling the last number called
Redialling one of the last five numbers called
c
You hear dial tone.
O
The last number called is redialled. You then hear ring
tone.
O
Press this key unit the required call number appears on
the handset’s display.
Q
c
You can delete part or all of the selected call number with
the speed dial key in order to make corrections where applicable,
The call number is dialled. You then hear the ring tone.
Temporary tone dialling (DTMF)
Precondition: an external connection has been set up.
B*
Press the keys in turn. The signalling method is switched
to DTMF for the duration of the call. DTMF is indicated by
the symbol F on the display of the handset.*)
Terminating the call
Replace the handset in the base station or charger unit.
The connection is cleared down.
or
a
Clear down the connection.
*)
The green symbols D , F and H on the keys make it easier to
find or recognise the functions.
9
29.10.99
kap05.fm5
Gigaset 2015 plus, GBR: A30852-X-1105-B301-1-7619
Internal calls
Internal calls
Calling an internal station
If there are several handsets (➔ page 59), you can make
internal calls to the other handsets. These calls are free of
charge.
Io
Press the internal key on your own handset and enter the
number of the required unit (1 to 6). You hear internal
ringing tone. The handset is called.
Checking your own internal number
I
Press the internal key to
display the internal telephone number of the
handset.
f
N
b
1
G
Collective call to all handsets from base station
A collective call from the base station can be used, for example, to trace handsets which have been relocated. You
cannot make internal calls during a collective call from the
base station.
A collective call from the base station can be
made even if there is only one handset.
?
Press the green paging key at the base station. All
accessible handsets are called for approximately
30 seconds.
Terminating call prematurely
?
or
c
Press the green paging key at the base station.
Clear down the connection at the handset.
Collective call to all handsets from a handset
If there are several handsets, you can make a multiaddress call from any handset to all other (accessible)
handsets. The first internal user to take the call is then
connected to you. You can also use this function to search
for handsets that have relocated.
I*
10
Press the keys in turn. You hear internal ringing tone.
All accessible handsets and supplementary devices are
called.
29.10.99
kap05.fm5
Gigaset 2015 plus, GBR: A30852-X-1105-B301-1-7619
Internal calls
Addressing other persons in the room via loudspeaker (voice calling)
I9
69
You can speak directly to other persons in the room by
way of the base station loudspeaker.
Press the keys on the handset to call the answering machine. A preparatory tone, the mode of operation, the current number of saved messages as well as the day of the
week are output.
There is an advisory announcement: “Voice calling“.
A preparatory tone is then applied. Speak via the
loudspeaker.
Open listening via base station loudspeaker
You can switch over to open listening during a call to an
external subscriber. The subscriber can then be heard
via the base station’s loudspeaker. This enables other
persons in the room to listen in on the call.
Precondition: an external connection has been set up.
I8
Activating/deactivating open listening.
The volume of the loudspeaker can be regulated at the base station with keys + and- .
Open listening is also possible during recording
of a call (➔ page 48).
Terminating a call internally
Replace the handset in the base station or charger unit.
The connection is cleared down.
or
a
Clear down the connection.
11
29.10.99
kap06.fm5
Gigaset 2015 plus, GBR: A30852-X-1105-B301-1-7619
Internal consultation and call transfer
Internal consultation and call transfer
During an external call you can
●
switch off the microphone and consult with another
person in the room,
●
transfer the outside call to an internal station user.
Consultation hold and call transfer are only
possible
●
if several handsets are in operation (➔ page
59)
Consultation call
Operation with several handsets
If a number of handsets are in operation (➔ page 59), you
can consult with an internal user in the course of an external call. The external subscriber is placed on hold
and cannot listen in (instead, he receives music on hold).
Io
Press the internal key and then enter the number of the
required handset (1 to 6). You hear internal ringing tone.
The handset is called. The external call is held.
Terminating consultation/continuing external call
R
Terminate internal consultation. You are reconnected to
the external subscriber.
Operation in connection with a PBX
During an external call you can consult with another
station user connected to your telecommunications
system (PBX). In such cases note carefully the operating
instructions for the telecommunications system
R
o
Initiate consultation. You hear dial tone. The external call
is held.
Enter the number of the required station. The user is
called.
Terminating consultation/continuing external call
R
12
Terminate internal consultation. You are reconnected to
the external subscriber.
29.10.99
kap06.fm5
Gigaset 2015 plus, GBR: A30852-X-1105-B301-1-7619
Internal consultation and call transfer
Call transfer
Operation with several handsets
If a number of handsets are in operation (➔ page 59), you
can transfer an external call to an internal station user.
Io
Press the internal key and then enter the number of the
required handset (1 to 6). You hear internal ringing tone.
The handset is called. The external call is held.
either
Wait until the internal party answers. Inform this user
about the outside call.
a
Transfer the external call.
a
Instead of waiting until the called party answers, transfer
the call directly.
or
Instead of pressing a you can replace your
handset in the charger unit.
If you transfer the external call directly and the
user fails to take the call within 30 seconds, you
are recalled.
If you transfer the external call directly and the
user is busy, you are recalled immediately.
If you take the recall, you are reconnected to the
external subscriber. A recall is taken in the same
way as any other type of call (➔ page 5).
Operation in connection with a PBX
If your telephone is connected to a telecommunications
system (PBX), you can transfer an external call to an internal station user. In such cases note carefully the operating
instructions for the telecommunications system.
R
o
Initiate consultation. You hear dial tone. The external call
is held.
Enter the number of the required station. The user is
called.
Wait until the internal party answers. Inform this user
about the outside call.
a
Transfer the external call.
13
29.10.99
kap07.fm5
Gigaset 2015 plus, GBR: A30852-X-1105-B301-1-7619
Important basic settings
Important basic settings
Operating states of the handset
The handset can be operated in one of three different
modes:
●
“protect”
●
“off”
●
“on”
The protect mode ensures that you do not activate the
handset keypad unintentionally. The handset is switched
on automatically for incoming calls. To make an outgoing
call you must first switch on the handset.
When the unit is switched off, incoming calls are not
signalled. To make an outgoing call you must first switch
on the handset.
The protect mode should be used if you are
carrying the unit in your pocket, for example.
We advise you to switch off the handset if you
move out of range of the base station. This
helps to preserve the batteries.
If you were out of range of the base station for
some time with your handset switched on, you
can speed up “relocation” of the base
station by switching the handset off for a brief
time and then on again.
Switching handset to protect state
h
Press the key on the handset briefly. You hear positive
acknowledgement tone. If the handset is in the protect
state, the display shows:
:
f
14
zzzz
N
29.10.99
kap07.fm5
Gigaset 2015 plus, GBR: A30852-X-1105-B301-1-7619
Important basic settings
Switching on the handset
If the handset is in the protect state:
h
Press the key on the handset briefly. You hear positive
acknowledgement tone. When the handset is switched
on. the display shows:
:
f
N
If the handset is switched off:
h
Press the key on the handset briefly. You hear positive acknowledgement tone. The symbol N on the display flashes. Wait until the symbol stops flashing. The handset is
switched on.
or
Replace the handset in the base station or charger unit.
The symbol N appears on the display. The handset is
switched on.
Switching off the handset
h
Press the key on the handset until the display disappears
completely. You hear positive acknowledgement tone.
15
kap07.fm5
29.10.99
Gigaset 2015 plus, GBR: A30852-X-1105-B301-1-7619
Important basic settings
Signalling method
Telekom operates telephone connections with two
different signalling methods:
●
dial pulsing (DP)
●
dual-tone multifrequency signalling (DTMF)
The factory default setting of your Gigaset 2015 plus is
DTMF signalling.
However, DTMF is only possible if your
telephone is connected to a new digital
central office. Since Telekom has not yet
completed changeover to digital switching,
some telephones still have to be set for
dial pulsing.
Checking the signalling method of your telephone line
c
o
Press the off-hook key. You will hear dial tone.
Press any digit, e.g. 2. If the same dial tone is audible as
previously, you will have to change the signalling method
to dial pulsing (DP).
Setting the signalling method
B #1
Start the procedure.
O033B
Set dial pulsing (DP).
o
Enter the 4-digit system code; default “0000”
(➔ page 19).
or
O037B
16
Set dual-tone multifrequency signalling (DTMF).
kap07.fm5
29.10.99
Gigaset 2015 plus, GBR: A30852-X-1105-B301-1-7619
Important basic settings
Operation in conjunction with a PBX
To operate your Gigaset 2015 plus in conjunction with a
PBX, you must first enter the following:
1.
the signalling method,
2. the trunk or the main trunk code and
3. the length of the pause following the trunk or main
trunk code.
Options for setting the signalling method
The signalling method factory setting is
●
DTMF/Flash
For operation in conjunction with PBXs, you must first
switch to one of the following:
●
DP
or
●
DTMF/Flash
When doing this, please read the operating instructions
for your PBX.
B#
1
Start the procedure.
O0
3 3B
Set dial pulsing (DP).
O0
3 7B
Set tone dialling DTMF/Flash.
o
Enter the 4-digit system code (default: “0000”)
(➔ page 19).
or
17
29.10.99
kap07.fm5
Gigaset 2015 plus, GBR: A30852-X-1105-B301-1-7619
Important basic settings
Trunk codes
If you operate your Gigaset 2015 plus in conjunction with
a PBX (telecommunications system), you can set the following for switching to the public telephone network:
●
the trunk code
●
the length of the pause following the trunk code (if a
dial pause is required after the trunk code has been
entered).
If the PBX is a satellite to a main PBX, you can set the
following:
●
the trunk code
●
the main trunk code
●
the length of the pause following the trunk code/main
trunk code
For details of the trunk code/main trunk code
and the length of pause please refer to the PBX
documentation.
Entering trunk code/main trunk code
B#
0
o
O
or
OO
o
B
18
The trunk codes/main trunk codes consist of 1, 2 or 3 digits and can consist of digits 0 to 9 and keys :, #
and R .
Start the procedure.
Enter the 4-digit system code (default: “0000”)
(➔ page 19).
Select the trunk code.
Select the main trunk code.
Enter the trunk code/main trunk code. If there are several
codes, you can press O again to enter the next code.
Store the setting.
kap07.fm5
29.10.99
Gigaset 2015 plus, GBR: A30852-X-1105-B301-1-7619
Important basic settings
Changing length of pause after trunk code/main trunk code
Possible pauses:
1 second
2 seconds
3 seconds (default)
6 seconds
B#
1
o
Start the procedure.
Enter the 4-digit system code (default: “0000”).
O0
2 4B
Select 1-second pause.
O0
2 5B
Select 2-second pause.
O0
2 0B
Select 3-second pause (default).
O0
2 1B
Select 6-second pause.
or
or
or
Deleting trunk code/main trunk code
B#
O2
1
o
5 3B
Start the procedure.
Enter the 4-digit system code (default: “0000”).
Delete the trunk code/main trunk code.
Changing the system code/PIN
Your Gigaset 2015 plus has two 4-digit “code numbers”
for protecting basic and individual settings; these are the
system code and the handset PIN (Personal Identification
Number). The default setting for both is “0000”.
You must know the system code in order to carry out important basic settings, or to lock the unit for outgoing
calls. It is the main key to your Gigaset 2015 plus.
Using the PIN, you can protect the settings which primarily affect the handset or units, but do not affect the basic
functions of the base station. For greater security, you
should enter a new system code and a new PIN.
19
kap07.fm5
29.10.99
Gigaset 2015 plus, GBR: A30852-X-1105-B301-1-7619
Important basic settings
If there are several handsets (➔ page 59), the system
code applies to all units.
You must enter the system code if you wish to
use remote operation for the answering machine. The default code (0000) does not work in
this case.
Changing the system code
B#
8*
o
Enter the existing system code. (default: “0000”)
o
Enter the new 4-digit system code. Note carefully the
number you have entered.
o
Re-enter the new system code to confirm it.
B
Changing the handset PIN
B8
Start the procedure.
9
Store the setting.
Start the procedure.
o
Enter the existing PIN. The PIN always consists of 4
digits.
o
Enter the new 4-digit PIN. Note carefully the number you
have entered.
o
Re-enter the new PIN to confirm it.
B
Store the setting.
Forgetting the system code or PIN
You must always remember the new system code or
PIN which you have entered. If you forget the number, the
unit has to be opened up by a technician. In this case,
please get in touch with your dealer.
20
kap07.fm5
29.10.99
Gigaset 2015 plus, GBR: A30852-X-1105-B301-1-7619
Important basic settings
Basic settings for the answering machine
Taking a call
You can specify how you take a call when the answering
machine is issuing an announcement or recording a message. With the default setting, calls are taken directly by
pressing the off-hook key on the handset. Alternatively,
you can specify that keys I 9 have to be pressed in
order to take over a call.
B #I9
Start the function.
11
Code for “taking calls directly“
(default setting).
12
Code for “taking calls by pressing keys I 9 “.
or
B
Store the settings.
Message length
You can specify the maximum length of messages from
callers.
B #I9
Start the function.
21
Code for maximum message length of 30 seconds.
22
Code for maximum message length of 60 seconds.
23
Code for maximum message length of 120 seconds
(default setting).
24
Unlimited message length (until "Memory full")
or
or
or
B
Store the settings.
21
29.10.99
kap07.fm5
Gigaset 2015 plus, GBR: A30852-X-1105-B301-1-7619
Important basic settings
Number of tone rings for activating answering machine
B #I9
30
You can specify how many tone rings are applied before
the answering machine is switched on. The default setting (Auto 2/4) has the following effect: if there are new
messages waiting, the answering machine is switched
on after two tone rings, otherwise after four tone rings
(call charge saving function for remote message retrieval). Alternatively, you can specify any number of rings between 1 and 9.
Start the function.
Code for number of tone rings Auto 2/4 (default setting).
If the answering machine (in the default state) is
not switched on after three rings, no messages
are waiting.
or
e.g. 33
B
Fixed number of 3 tone rings.
Store the settings.
Listening to messages as they are recorded
B #I9
41
You can specify whether the loudspeaker is switched on
or off during the automatic answering of calls. If the loudspeaker is switched on, you can listen in on messages as
they are recorded.
Start the function.
Code for listening to messages
(default setting).
or
42
B
22
Code for not listening to messages.
Store the settings.
29.10.99
kap07.fm5
Gigaset 2015 plus, GBR: A30852-X-1105-B301-1-7619
Important basic settings
Intermezzo function (pause during message playback)
You can specify how the answering machine plays back
messages. With the default setting, the answering
machine outputs several messages one after the other
without pauses. You can set the system so that between
each message there is an announcement requesting you
to play back the next message. The next message is not
played back until key keyW has been pressed. This gives
you time to decide whether or not you wish to delete a
message, for example.
B #I9
Start the procedure.
51
Code for pause between messages.
52
Code for no pause between messages
(default setting).
or
B
Store the settings.
Time stamp function on/off
You can specify whether recorded messages are to include the day and time when the message was received.
B #I9
81
Start the procedure.
Code for activating the time stamp function (default
setting).
or
82
B
Code for deactivating the time stamp function.
Store the settings.
23
29.10.99
kap07.fm5
Gigaset 2015 plus, GBR: A30852-X-1105-B301-1-7619
Important basic settings
Resetting the base station to the default state
With this procedure you can change the following settings back to the default (factory) state:
●
signalling method (➔ page 16)
●
length of pause after trunk code/main trunk code
(➔ page 19)
●
assignment of ringing (➔ page 59)
●
charge factor (➔ page 35)
●
direct dialling-in (➔ page 59)
The following stored data is deleted:
●
trunk code/main trunk code
●
rate units/charges
The stored system code (➔ page 19) and the
messages/announcements on the answering
machine are not deleted. All logged-on handsets remain registered.
B #1
o
O 250B
24
Start the procedure.
Enter the 4-digit system code (default: “0000”)
(➔ page 19).
Reset the base station to the default state.
29.10.99
kap07.fm5
Gigaset 2015 plus, GBR: A30852-X-1105-B301-1-7619
Important basic settings
Resetting Gigaset 2000S handset to the default state
With this procedure you can change the following settings back to the default (factory) state:
●
volume of tone ringing (➔ page 29)
●
pitch of tone ringing (➔ page 29)
●
audio volume (➔ page 30)
●
base station number display (➔ page 61)
●
battery warning tone (➔ page 31)
●
range warning tone (➔ page 31)
●
synchronisation tone (➔ page 32)
●
automatic call acceptance (➔ page 32)
●
key acknowledgement tone (➔ page 30)
●
positive acknowledgement tone (➔ page 31)
●
negative acknowledgement tone (➔ page 31)
The following stored data is deleted:
●
redial memory (➔ page 9)
●
speed dialling memory (➔ page 33)
The stored handset PIN (➔ page 20) is not
deleted.
B 8Q
o
B
Start the procedure.
Enter the 4-digit handset PIN (➔ page 20).
Reset the handset to the default state.
25
29.10.99
kap07.fm5
Gigaset 2015 plus, GBR: A30852-X-1105-B301-1-7619
Important basic settings
Setting device connection for Gigaset 1000TAE
B #1
o
Start the procedure.
Enter 4-digit system code; (default: “0000”)
(➔ page 19).
O#0
o
Enter internal number for the device connection (handset, Gigaset 1000TAE).
2B
Set fax recognition
1B
Set modem
0B
Set handset (default)
or
or
Automatic fax recognition is only active if Direct
Inward Dialling is switched on (➔ page 59)
26
kap08.fm5
29.10.99
Gigaset 2015 plus, GBR: A30852-X-1105-B301-1-7619
Individual settings on the base station
Individual settings on the base station
You can configure your Gigaset 2015 plus individually.
The settings can be made from a registered handset.
Switching off base station tone ringing or setting volume of tone ringing
You can specify whether tone ringing is heard at the base
station or only at the handset. If tone ringing is to be audible at the base station, you can set the volume as
required.
There are seven levels:
Level 0
=
Level 1 ... Level 6 =
No tone ringing at the base
station. Calls are only signalled
at the handset.
Volume range from quiet to loud.
The default setting is Level 6 (loud).
The volume of the tone ringing at the handset
can also be set (➔ page 29).
B#
*5
Start the procedure. The tone ringing which has been set
is heard; the volume which has been set is indicated:
:
oB
n5 6
P f
N
b
(Example: volume level 6
has been set)
Press the digit for the level required (1 to 6) or 0 for “Tone
ringing off” and store.
Setting pitch of base station tone ringing
You can set the pitch of the tone signals at the base station. The pitch can be set to one of 6 levels. The default
setting is 1.
In order to adjust the pitch, the tone ringing
should be switched on at the base station.
It is advisable to have distinctive ringing signals
for the base station and the handsets. The pitch
of the tone ringing at the handset can also be
set (➔ page 29).
27
kap08.fm5
29.10.99
Gigaset 2015 plus, GBR: A30852-X-1105-B301-1-7619
Individual settings on the base station
B#
*6
Start the procedure. The tone ringing which has been set
is heard; the pitch which has been set is indicated:
:
n
6 1
P f
oB
N
b
(Example: pitch level 1 has
been set)
Press the digit for the level required (1 to 6) and store.
Activating/deactivating key click at base station
B#
1
o
You can deactivate the key click at the base station.
The key click is activated in the default setting.
Start the procedure.
Enter the 4-digit system code (default: “0000”).
O 421B
To activate the key click.
O 420B
To deactivate the key click.
or
Activating/deactivating music-on-hold
B#
O
1
o
41
1B
While you are connected to an external user and are conducting an internal consultation or if you have activated
the mute function, the external party will hear a piece of
music. Music-on-hold is activated by default.
Start the procedure.
Enter 4-digit system code (default: “0000”)
Start the procedure. The current setting is displayed:
41 1 = activated, 41 0 = deactivated.
Activate music-on-hold (default).
or
0B
28
Deactivate music-on-hold.
29.10.99
kap08.fm5
Gigaset 2015 plus, GBR: A30852-X-1105-B301-1-7619
Individual settings on the Gigaset 2000S handset
Individual settings on the Gigaset 2000S handset
You can configure your handset individually. All settings
are made directly at the handset. If a number of handsets
are in operation, the handset must be logged on at the
base station (➔ page 57).
Setting volume of tone ringing
You can set the volume of the tone signals at your handset. The volume can be set to one of 6 levels:
Level 1 ... Level 6 =
Volume range from quiet to loud.
The default setting is Level 6 (loud).
The volume of the tone ringing at the base
station can also be set (➔ page 27).
B5
Start the procedure. The tone ringing which has been set
is heard; the volume which has been set is indicated: *)
:
n
5 6
P f
oB
N
b
(Example: volume level 6
is set)
Press the digit for the level required (1 to 6) and store.
Setting pitch of tone ringing
You can set the pitch of the tone signals at your handset.
The pitch can be set to one of 6 levels. The default setting
is 1.
If a number of handsets are in operation
in one room or office, it is advisable to have
distinctive ringing intervals for each mobile
unit.
The pitch of the tone ringing at the base station
can also be set (➔ page 27).
B6
Start the procedure. The tone ringing which has been
set is heard; the pitch which has been set is indicated:
:
n
6 1
P f
oB
N
b
(Example: pitch level 1
is set)
Press the digit for the level required (1 to 6) and store.
*)
The green symbols D , F and H on the keys make it easier
to find or recognise the functions.
29
29.10.99
kap08.fm5
Gigaset 2015 plus, GBR: A30852-X-1105-B301-1-7619
Individual settings on the Gigaset 2000S handset
Setting the handset volume
You can set the volume of the handset to three levels:
Level 1 ... Level 3 =
Handset volume normal ... loud
The default setting is Level 1 (normal).
The setting procedure can also be performed
during a call.
B0
Start the procedure. The current setting is displayed: *)
:
0 1
P f
oB
N
(Example: handset volume
level 1 is set)
Press the digit for the handset volume level required (1 to
3) and store.
The following appears in the display when the handset
volume has been set (displays in inactive state):
Level 2
Level 3
f
N
c
f
N
c
c
Activating/deactivating advisory and warning tones
Activating/deactivating key acknowledgement tone
When the key acknowledgement tone is activated, each
keystroke is confirmed audibly. The key acknowledgement tone can be activated (status 1, default setting) or
deactivated (status 0).
B3
1
1B
Start the procedure. The current setting is displayed:
31 1 = activated, 31 0 = deactivated.
Activate the key acknowledgement tone.
or
0B
Deactivate the key acknowledgement tone.
*)
30
The green symbols D , F and H on the keys make it easier
to find or recognise the functions.
29.10.99
kap08.fm5
Gigaset 2015 plus, GBR: A30852-X-1105-B301-1-7619
Individual settings on the Gigaset 2000S handset
Activating/deactivating negative acknowledgement tone
When negative acknowledgement tone is activated, any
incorrect inputs are signalled audibly. The negative
acknowledgement tone can be activated (status 1,
default setting) or deactivated (status 0).
B3
4
1B
Start the procedure. The current setting is displayed:
34 1 = activated, 34 0 = deactivated.
Activate negative acknowledgement tone.
or
0B
Deactivate negative acknowledgement tone.
Activating/deactivating positive acknowledgement tone
When positive acknowledgement tone is activated, the
successful completion of procedures is signalled audibly.
The positive acknowledgement tone can be activated
(status 1, default setting) or deactivated (status 0).
B3
7
1B
Start the procedure. The current setting is displayed:
37 1 = activated, 37 0 = deactivated.
Activate positive acknowledgement tone.
or
0B
Deactivate positive acknowledgement tone.
Activating/deactivating battery warning tone
When battery warning tone is activated, an audible low
battery warning is issued for the handset. The battery
warning tone can be activated (status 1, default setting)
or deactivated (status 0).
B3
2
1B
Start the procedure. The current setting is displayed:
32 1 = activated, 32 0 = deactivated.
Activate battery warning tone.
or
0B
Deactivate battery warning tone.
Activating/deactivating range warning tone
When range warning tone is activated, a signal is issued
if the handset is too far from the base station. The range
warning tone can be activated (status 1) or deactivated
(status 0, default setting).
B3
3
1B
Start the procedure. The current setting is displayed:
33 1 = activated, 33 0 = deactivated.
Activate range warning tone.
or
0B
Deactivate range warning tone.
31
29.10.99
kap08.fm5
Gigaset 2015 plus, GBR: A30852-X-1105-B301-1-7619
Individual settings on the Gigaset 2000S handset
Activating/deactivating synchronisation tone
When synchronisation tone is activated, a signal is issued
if the handset was too far from the base station and has
returned within range. The synchronisation tone can be
activated (status 1) or deactivated (status 0, default setting).
B3
5
1B
Start the procedure. The current setting is displayed:
35 1 = activated, 35 0 = deactivated.
Activate synchronisation tone.
or
0B
Deactivate synchronisation tone.
Activating/deactivating automatic call acceptance
When automatic call acceptance is activated, you are
connected to the calling party as soon as you remove
the handset from the charger unit. Automatic call
acceptance can be activated (status 1, default setting)
or deactivated (status 0).
B3
8
1B
Start the procedure. The current setting is displayed:
38 1 = activated, 38 0 = deactivated.
Activate automatic call acceptance.
or
0B
Deactivate automatic call acceptance.
Speed dialling numbers
You can store speed dialling numbers for frequently required external numbers. These speed dialling codes can
then be used for calling outside numbers (➔ page 8).
A total of 10 speed dialling numbers can be
stored.
The stored external number can consist of a
maximum of 22 characters, i.e. digits or the star,
square, PBX recall and redial keys (manual
dialling pause).
You can also administer speed dialling numbers
in the course of a call.
32
29.10.99
kap08.fm5
Gigaset 2015 plus, GBR: A30852-X-1105-B301-1-7619
Individual settings on the Gigaset 2000S handset
Displaying or storing speed dialling numbers
BQ
o
You can call up the memory configuration of the speed
dialling numbers on the display. You can assign external
telephone numbers to the speed dialling numbers shown.
Start the procedure.
Select the speed dialling number: enter a digit from 0 to
9. The selected speed dialling number and the current
memory assignment are indicated on the display of the
handset:
:
:
3 z
P f
N
0 123456
P fN
B
(Example: speed dialling
no. 3 is unassigned)
(Example: speed dialling no.
0 is assigned to 123456)
Acknowledge the display.
or
o
Q
B
Enter and store the external number. The number entered is assigned to the selected speed dialling number.
If the speed dialling number is already allocated to an
external number, the old number is overwritten with the
new number.
You can delete part or all of the call number entered with
the speed dial key in order to make corrections where applicable,
Acknowledge the display.
33
29.10.99
kap08.fm5
Gigaset 2015 plus, GBR: A30852-X-1105-B301-1-7619
Individual settings on the Gigaset 2000S handset
Notebook function
B
While you are conducting a call you can store a telephone
number as a speed dial number.
Q
Start the procedure.
o
Select the speed dial number: enter a digit between 0
and 9. The selected speed dial number and the current
memory assignment appear in the display on the handset:
o
Enter the external telephone number.
B
Press this key to store the number as a speed dial
number.
or
B
Q
o
You can store each of the last five redial numbers as
speed dial numbers.
Start the procedure.
Select the speed dial number: enter a digit between 0
and 9. The selected speed dial number appears in the display of your handset:
O
Use the last number redial key to select one of the last
five redial numbers.
B
Press this key to store the last redial number as a speed
dial number.
Deleting all speed dialling numbers
B8
2
o
B
34
Start the procedure.
Enter the handset PIN (default: “0000”)
(➔ page 20).
Delete all speed dialling numbers.
29.10.99
kap08.fm5
Gigaset 2015 plus, GBR: A30852-X-1105-B301-1-7619
Displaying call duration
Displaying call duration
Activating/deactivating call duration display
During external calls (➔ page 7) the call duration display is
activated approximately 12 seconds after you dial the last
digit. At the end of the call, the display remains visible for
about 4 seconds. You can activate or deactivate the call
duration display as required.
Default setting: the call duration display is
activated.
B#
O9
1
o
6
0B
Start the procedure.
Enter the 4-digit system code (default: “0000”).
The current setting is indicated on the display of the
handset: 96 1 = activated, 96 0 = deactivated.
Deactivate call duration display.
or
1B
Activate call duration display.
35
kap10.fm5
29.10.99
Gigaset 2015 plus, GBR: A30852-X-1105-B301-1-7619
Barring functions on the Gigaset 2015 plus
Barring functions on the Gigaset 2015 plus
Activating/deactivating if Gigaset 2015 plus barred on outgoing calls
You can prevent outgoing calls being made at the Gigaset
2015 plus base station.
If emergency numbers are stored, they can still be dialled
even if other codes are barred.
Calls can still be taken.
No calls are barred in the default setting.
You can also prevent outgoing calls
being made from handsets (➔ page 41).
B#
24
o
Start the procedure.
Enter the 4-digit system code.
1B
Activate the barring function.
0B
Deactivate the barring function.
or
Emergency numbers if Gigaset 2015 plus is barred
You can store up to four emergency numbers. All emergency numbers can be dialled from a registered handset
●
even thought the Gigaset 2105 plus unit is barred for
outgoing calls (➔ page 36)
●
if outward restricted toll access is programmed for
the handset (➔ page 40).
Emergency numbers can have a maximum of 16 digits.
36
kap10.fm5
29.10.99
Gigaset 2015 plus, GBR: A30852-X-1105-B301-1-7619
Barring functions on the Gigaset 2015 plus
Displaying or storing emergency numbers
B#
25
oO
Start the procedure.
Enter the 4-digit system code (default: “0000”)
(➔ page 19). The handset’s display shows the first emergency number in the memory:
:
:
1 z
P f
C
1 110
P f
C
(Example: no emergency
number stored)
(Example: emergency
number 110 stored)
O
To display the next emergency number.
B
To acknowledge the display.
or
or
o
O
Enter the emergency number for the memory location
indicated (1 to 4). If an emergency number is already
stored, the old number is overwritten with the new
number.
Display the next emergency number. Any emergency
numbers entered are marked for storage.
or
B
Terminate the process: store all inputs.
Deleting all emergency numbers
B#
27
o
B
Start the procedure.
Enter the 4-digit system code.
Delete all emergency numbers.
37
kap10.fm5
29.10.99
Gigaset 2015 plus, GBR: A30852-X-1105-B301-1-7619
Barring functions on the Gigaset 2015 plus
Barred codes for handsets
For each registered handset you can store individually defined external numbers or groups of numbers which cannot be dialled when the barred code function (➔ page 39)
is activated. For example, you can bar numbers beginning
with 00 or special-tariff numbers.
For each registered handset you can store up to 3 barred
codes. These numbers can each consist of up to 8 digits.
Displaying or storing barred codes
B#
85
o
Start the procedure.
Enter the 4-digit system code (default: “0000”)
(➔ page 19). The registered handsets or their internal call
numbers are shown on the display:
:
1 2 3
P f N
b
(Example: handsets
1, 2 and 3 are logged on)
o
Enter the internal number of the required handset
(1 to 6).
O
Select the first barred code for the handset in
question. The barred code is displayed:
:
:
O
1 z
P f
N
b
1 00
P f
N
b
(1st example: no barred
code stored)
((2nd example: barred
code 00 is stored)
Display the next barred code.
or
o
O
Enter the barred code for the memory location indicated
(1 to 3). If a barred code is already stored, the old number
is overwritten with the new number.
Display the next emergency number. Any barred codes
entered are marked for storage.
or
B
Terminate the process: store all inputs.
You cannot use this facility until the barring
function has been activated.
38
kap10.fm5
29.10.99
Gigaset 2015 plus, GBR: A30852-X-1105-B301-1-7619
Barring functions on the Gigaset 2015 plus
Cancelling all barred codes
B#
87
o
Start the procedure.
Enter the 4-digit system code (default: “0000”)
(➔ page 19). The registered handsets or their internal call
numbers are shown on the display:
:
1
4 5
P f N
o
B
b
(Example: handsets
1, 4 and 5 are logged on)
Enter the internal number of the required handset
(1 to 6).
Cancel all barred codes for the selected handset.
The delete function must be repeated for every
handset.
Activating/deactivating barred code function
You can activate and deactivate the barred code function
for a registered handset. Other handsets are not affected
by the barring function.
Calls can still be taken at the handset when the barring
function is in effect.
No calls are barred in the default setting.
B#
84
o
Start the procedure.
Enter the 4-digit system code (default: “0000”)
(➔ page 19). The registered handsets or their internal call
numbers are shown on the display:
:
1 2 3
P f
o
1B
N
b
(Example: handsets
1, 2 and 3 are logged on)
Enter the internal number of the required handset
(1 to 6).
Activate the barring function for the selected handset.
or
0B
Deactivate the barring function for the selected handset.
39
29.10.99
kap10.fm5
Gigaset 2015 plus, GBR: A30852-X-1105-B301-1-7619
Barring functions on the Gigaset 2015 plus
Setting direct trunk access for the handset
You can specify for each handset that has been logged on
whether external calls can be made from it or not. A distinction is made between the following:
●
Unrestricted trunk access (default setting) – it is
possible to make external calls, and
●
Outward-restricted trunk access – it is not possible
to make external calls, but incoming calls can be accepted.
B#
1
Start the procedure.
O*
1
Prepare selection of relevant handset.
o
o
Enter 4-digit system code (default: “0000”)
(➔ page 19).
Enter internal telephone number of the handset (1 to 6).
The current trunk access for the selected handset is
shown in the display:
:
n12 1
P f
N
(Example: handset 2 has1
= unrestricted access)
1B
Set “unrestricted trunk access”
.
0B
Set “outward-restricted trunk access”.
or
40
29.10.99
kap11.fm5
Gigaset 2015 plus, GBR: A30852-X1105-B401-1-7619
Handset barring functions
Handset barring functions
Activating/deactivating handset barring function for outgoing calls
You can prevent outgoing calls being made on your handset, i.e. you can protect it against possible unauthorized
use.
Calls can still be taken at the disabled handset.
B8
1
Start the procedure for activating the barring function.
B8
0
Start the procedure for deactivating the barring function.
or
o
B
Enter the handset PIN (default: “0000”)
(➔ page 20).
Activate/deactivate barring function. If the handset has
been barred, a key appears in the display.
You can also bar the Gigaset 2015 plus for external outgoing calls (➔ page 38).
41
29.10.99
kap11.fm5
Gigaset 2015 plus, GBR: A30852-X1105-B401-1-7619
Handset barring functions
Displays on handset with active barring function
Display on barred handset
When the handset barring
function has been activated, the direct number
(➔ page 41) and a key are
displayed.
1234422
f N
H
Display for barring function for outgoing calls
The display (opposite) appears when a line is seized
with or without input of a
telephone number.
f
N
___
b
F
H
b
F
H
F
H
Display for barred telephone number
When a barred telephone
number is dialled, it is rejected with a negative acknowledgement tone and
flashes in the display.
012345
fN
Display for outward-restricted access
In the case of outward-restricted access, a negative
acknowledgement tone is
output and the display
flashes when a line is
seized.
42
f
N
___
b
29.10.99
kap12.fm5
Gigaset 2015 plus, GBR: A30852-X-1105-B301-1-7619
The answering machine
The answering machine
The answering machine of the Gigaset 2015 plus offers
you the following capabilities:
●
Callers can leave spoken messages on the answering
machine during your absence.
●
An announcement has already been prerecorded for
your answering machine and is thus ready for operation as soon as you switch it on. However, you can
also record your own announcement (➔ page 45).
●
If you do not wish to receive recorded messages, you
can provide callers with an advisory message containing brief information about your absence (➔ page 45).
●
You can record telephone conversations
(➔ page 48).
●
You can record private memos (➔ page 48).
●
You can listen to all messages or only to those which
have just been received (➔ page 48). You can scroll
backwards and forwards through the messages. You
can also delete all messages or individual messages.
●
Remote operation of the answering machine is also
possible (➔ page 51).
●
Callers’ telephone numbers are stored with the message (if activated by the network operator).
●
All messages and announcements are retained even
after a power cut or if the power supply is temporarily
cut off for relocation purposes, for example.
Switching answering machine on/off
h
Press the key to switch the answering machine on or off.
Key is lit or flashes with lengthy “on” periods:
The answering machine is switched on.
Key is unlit or flashes with brief “on” periods:
The answering machine is switched off.
A flashing key indicates that at least one message is waiting (playback ➔ page 48).
When the machine is switched on, the LED display at the base station indicates the remaining
memory time in minutes.
43
29.10.99
kap12.fm5
Gigaset 2015 plus, GBR: A30852-X-1105-B301-1-7619
The answering machine
Operating modes
The answering machine of the Gigaset 2015 plus has
three modes of operation as follows:
1. Call recording after announcement 1
2. Call recording after announcement 2
3. Advisory message
An announcement informs the caller that you are unavailable. The caller can then leave a message (call recording). An advisory message provides the caller with important information in your absence, but the caller cannot
leave a message.
You can record a different text for each operating mode
(announcement 1, announcement 2, advisory message).
There is a default prerecorded announcement on your
machine. You can set one of the three operating modes
for the period of your absence.
Depending on how full the message memory is, different
recording densities can be selected, thus determining the
recording quality. If the message memory is full, “advisory message” mode is automatically activated. Consequently, it is advisable to record an advisory message for
recording modes.
Selecting operating mode
MODE y
Press the key at the base station.
To select announcement 1, press the mode key until A1
appears in the display. You will hear the announcement:
“Operating mode: call recording after announcement 1“.
To select announcement 2, press the mode key until A2
appears in the display. You will hear the announcement:
“Operating mode: call recording after announcement 2“.
To select the advisory message, press the mode key until
Ao or H1 or rS am appears in the display. You will hear
the announcement: “Operating mode: advisory message“.
If you hear the message “Cancelled”
, this indicates that the procedure has been aborted. The
operating mode has not been changed.
44
29.10.99
kap12.fm5
Gigaset 2015 plus, GBR: A30852-X-1105-B301-1-7619
The answering machine
Announcements and advisory message
In addition to the default message, you can record two
announcements (announcement 1 and announcement 2)
and an advisory message. In case a caller exceeds the
maximum recording time, you can
additionally record a closing announcement to inform
the calling party than the recording time has come to an
end. You can program the maximum message length
(➔ page 21).
A typical announcement is: “You have called
Peter Jones. Unfortunately I am not available at
the moment, but you can leave a message.
Please speak after the tone.“
A typical closing announcement is: “You
have reached the end of the time available for
your message. Thank you for calling.“
A typical advisory message is: “You have
called Peter Jones. I will be back at the office
tomorrow.“
Recording announcement or advisory message
You can make a new recording of announcement 1,
announcement 2 or the advisory message at any time.
Announcements must be between 6 and 30
seconds in length, closing announcements
between 3 and 10 seconds. The advisory
message must be between 6 and 170 seconds
in length. If these time limits are exceeded, you
receive an error message and are requested to
record the announcement again.
During the recording, the number of seconds
which have elapsed can be read off the 2-digit
LED display at the base station.
MODE y
Selecting mode of operation (➔ page 44).
If an announcement is deleted for the selected
mode of operation, it is automatically replaced
by the default prerecorded announcement.
MODE y
Í
When you have selected the relevant operating mode
and the red LED has gone off, press these keys in quick
succession. Your handset rings (if there are several handsets, they all ring). Accept the internal call with the offhook key c. You hear a preliminary announcement:
“Recording announcement” or “Recording advisory
message”. This is followed by a “ready” tone, after
which you record your text.
45
29.10.99
kap12.fm5
Gigaset 2015 plus, GBR: A30852-X-1105-B301-1-7619
The answering machine
a
You are not including a closing announcement: press the
key on the handset. The recorded text is replayed via
loudspeaker so that it can be checked.
or
Ì
a
You are including a closing announcement (only possible
with announcement 1 and announcement 2): press the
key at the base station. You hear a preliminary announcement: “Recording of closing announcement“. This is followed by a “ready” tone, after which you record your
text.
Press the key on the handset. The recorded text is
replayed via loudspeaker so that it can be checked.
Checking recording of announcements or advisory message
You can listen to the stored recordings of announcement
1, announcement 2 and the advisory message at any
time.
MODE y
MODE y
É
Select the operating mode (➔ page 44).
When you have selected the relevant operating mode
and the red LED has gone off, press these keys in succession. The announcement text is output.
or
Ì
Abort the process.
Deleting announcements or advisory message
You can delete stored recordings of announcement 1,
announcement 2 and revert to the pre-defined default announcement. You can also delete the advisory message.
MODE y
MODE y
Ë
Select the operating mode (➔ page 44).
When you have selected the relevant operating mode
and the red LED has gone off, press the keys in succession. Delete the announcement.
or
Ì
46
Abort the process.
29.10.99
kap12.fm5
Gigaset 2015 plus, GBR: A30852-X-1105-B301-1-7619
The answering machine
Recording conversations
You can record your telephone conversations during calls.
You can then play back the conversation recordings as you
would recorded messages (➔ page 48).
This option is only available for external calls.
Please ask the person you are speaking to for
permission to record the conversation.
Starting/terminating recording
I
9
Press keys on handset. On/off key on base station flashes. The display on the handset shows the following for
two seconds:
91
f
N
b
F
The conversation is recorded.
I
9
To finish recording, press the keys again. The display on
the handset shows the following for two seconds:
90
f
N
b
F
Conversations can also be recorded with the
open listening function (➔ page 11).
47
29.10.99
kap12.fm5
Gigaset 2015 plus, GBR: A30852-X-1105-B301-1-7619
The answering machine
Private memos
You can use the memory of the answering machine to
record personal memos. You can then play back a memo
in the same way as a recorded message (➔ page 48).
Starting/terminating recording
Private memos can have the same maximum
length as messages from callers. You can
change the message length as required
(➔ page 21).
During the recording, the number of seconds
which have elapsed can be read off the 2-digit
LED display at the base station.
Í
Ì
or a
Press the key at the base station. Your handset rings.
Take the call. There is a loudspeaker announcement:
“Recording message“. This is followed by a “ready”
tone, after which you record your text.
Terminate recording.
Messages
The answering machine differentiates between new
messages and messages which have already been listened to.
With new messages, the on/off key flashes at the base
station.
The 2-digit LED display at the base station informs you
how many messages are stored.
Automatic recording compression means that up to 15
minutes of recording time is available for messages.
If the message recording memory is full, the
answering machine switches over automatically to the advisory message operating mode. The
precondition for this is that you have recorded
an announcement for this advisory message
mode (➔ page 45).
Playing back stored messages
É
or
48
É
Playing back new messages:
Press the key at the base station briefly (< 1 sec.).
Playing back all messages:
Hold down the key at the base station (approx. 1 sec.).
kap12.fm5
29.10.99
Gigaset 2015 plus, GBR: A30852-X-1105-B301-1-7619
The answering machine
If the intermezzo function is activated (➔ page 23), there
is a pause in playback after each message and playback
does not continue until key W has been pressed.
The number of the current message is indicated
on the 2-digit LED display at the base station.
The messages are played back via loudspeaker
and at the handset. The number is indicated automatically at the start of each message. If the
time stamp function is activated (➔ page 23),
the time of the message is also indicated.
Messages with telephone number transmission
For further information, please refer to the section on remote operation functions under “Calling back callers”
➔ page 53.
Skipping forwards and backwards during playback
Ê
To move on to the next message:
Press the key at the base station.
or
È
ÈÈ
or
...
To play back the current message again:
Press the key at the base station briefly (< 1 sec.).
To skip back several messages:
Press the key several times in quick succession
(maximum of 1 sec. between keystrokes).
or
È
To skip back to the first message:
Hold down the key at the base station.
Note when branching forwards to the next
message: after a message has been played
back for two seconds, it is classified as having
been “listened to”.
Interrupting playback
Ì
É
Press the key at the base station. Playback is interrupted.
A reminder announcement is provided: “Pause“.
To continue playback:
Press the key.
Aborting playback (cancelling)
ÌÌ
Press the key at the base station twice. An acknowledgement tone is heard.
49
29.10.99
kap12.fm5
Gigaset 2015 plus, GBR: A30852-X-1105-B301-1-7619
The answering machine
Marking a message “new” during playback
When a message which has been listened to is marked
“new”, it is treated in the same way as a new message.
ÍÍ
Press the key twice during message playback. Playback
skips to the end of the message. There is a reminder
announcement: “Message is new“.
or
Ì
Abort the process. Playback is continued.
You can mark a message “new” up to four
times.
Deleting a message during playback
Ë
È
Press the key during playback of the message to be
erased. Playback is stopped. There is a loudspeaker
announcement: “Delete” (see also intermezzo function
➔ page 23).
Press the key. There is a loudspeaker announcement:
“Message deleted“.
or
Ì
Abort the process. Playback is continued. There is a
reminder announcement: “Cancelled“.
Deleting all messages listened to
Precondition: The answering machine is not in the
message playback mode.
Ë
Press the key. There is a loudspeaker announcement:
“Delete“.
È
Press the key. There is a loudspeaker announcement:
“Messages deleted“.
or
Ì
50
Abort the process. There is an announcement:
“Cancelled“.
29.10.99
kap12.fm5
Gigaset 2015 plus, GBR: A30852-X-1105-B301-1-7619
The answering machine
Monitoring function and call acceptance
You can listen via loudspeaker while a caller records a
message on the answering machine. The precondition
for this is that the monitoring function has been activated
(➔ page 22).
Regulating the volume during monitoring
Precondition: The answering machine is playing the
announcement or a caller is in the process of speaking
a message on to the answering machine.
+
Press the key at the base station to increase the volume.
-
Press the key at the base station to decrease the volume.
The volume which has been set remains stored.
Accepting a call
You can take a call:
I
9
●
while the announcement or the advisory message is
being played, or
●
while the caller is speaking his or her message.
This procedure applies to either of the above options.
You are connected to the caller. The loudspeaker is
switched off.
or
a
This is the procedure if the unit is preprogrammed for call
acceptance (➔ page 21). You are connected to the caller.
The loudspeaker is switched off.
Remote operation of the answering machine
You can operate the answering machine remotely:
●
from your handset
●
from another telephone, in which case the following
conditions apply:
–
the telephone is set to DTMF or
–
you have a tone transmitter (special accessories).
With the remote operation facility you can administer
messages and announcement texts.
51
29.10.99
kap12.fm5
Gigaset 2015 plus, GBR: A30852-X-1105-B301-1-7619
The answering machine
Initiating remote operation
In order to operate the answering machine remotely, you
must first activate the remote function.
From the handset
I
9
Press the keys on the handset in order to call the
answering machine. This results in output of a “ready
tone”, the mode of operation, the current number of
messages in storage, and (if applicable) the day and
the time.
From another telephone with DTMF-capability
Y
#o
You call your own number from a remote station. If the
DID function is activated, you hear a high multiple tone.
The answering machine switches on after 5 seconds.
After the message, press the pound key and enter the
system code via the telephone’s dialling keypad. For
checking purposes, the telephone outputs a stand-by
tone, the operating mode, the current number of messages saved as well as the relevant weekday and time.
If you enter the incorrect system code, the announcement "Faulty PIN" is output at the telephone. You can then re-enter the system code.
The connection is automatically cleared down
after the third incorrect attempt.
Remote operation and DID from another telephone are only possible if a system code which
is different from the default system code has
been programmed (➔ page 19).
Remote operation is still possible even if the answering machine has been switched off. In this
case you simply continue ringing until the answering machine responds.
52
29.10.99
kap12.fm5
Gigaset 2015 plus, GBR: A30852-X-1105-B301-1-7619
The answering machine
Remote operation functions
These functions are at your disposal as soon as you activate the remote operation facility.
If no input is made within 160 seconds, you receive the
request “Please acknowledge“. If there is no response
within the next 8 seconds, the connection is cleared
down automatically. You can terminate remote operation
at any time simply by replacing the handset.
Help function
The help function is available in every situation after
remote operation has been initiated. You can obtain the
following information:
#
●
Display of the status.
●
Explanation of all current and enhanced input options.
The help function is accessed.
Playing back new messages
:
2
This is followed by the announcement: “New“.
New messages are played back.
or
5
Abort the process.
Calling back callers (only on handsets)
The telephone number of the caller is stored for each
message if the network provider supports the feature
“calling line identification presentation” (CLIP)” and the
caller has not suppressed transmission of his telephone
number.
The telephone number ap08972244667
pears in the display of your
fN b G
handset while the message
is being played back or, if the caller did not leave a message, with the advisory message: “No message recorded”. You can use this telephone number immediately to
call back the caller.
4
The telephone number displayed is dialled.
2
All messages are played back.
5
Abort the process.
Playing back all messages
or
53
kap12.fm5
29.10.99
Gigaset 2015 plus, GBR: A30852-X-1105-B301-1-7619
The answering machine
Skipping forwards and backwards during playback
3
Move on to the next message.
1
Play back the current message again.
or
11
or
...
Skip back several messages.
Interrupting playback
5
Playback is interrupted. A reminder announcement is
provided: “Pause“.
2
To continue playback: press the key.
Aborting playback
55
Press the key twice.
Marking a message “new” during playback
::
Press the key twice during message playback. Playback
skips to the end of the message. There is a reminder
announcement: “Message is new“.
or
5
Abort the process. Playback is continued.
You can mark a message “new” up to four
times.
Deleting a message during playback
0
1
Press the key during playback of the message to be
erased. Playback is stopped. There is a loudspeaker
announcement: “Delete“.
This is followed by the announcement: “Message
deleted“.
or
5
Abort the process. Playback is continued.
Deleting all messages listened to
0
1
or
5
54
This is followed by the announcement: “Delete“.
This is followed by the announcement: “Messages
deleted“.
Abort the process.
29.10.99
kap12.fm5
Gigaset 2015 plus, GBR: A30852-X-1105-B301-1-7619
The answering machine
Selecting the operating mode
9
1
or
2
or
This is followed by the announcement: “Operating
mode“.
Select the call recording after announcement 1 operating
mode. The operating mode is announced by way of a
check.
Select the call recording after announcement 2 operating
mode. The operating mode is announced by way of a
check.
3
Select the advisory message operating mode. The
operating mode is announced by way of a check.
5
Abort the process.
or
Recording announcement
6
7
55
Precondition: Operating mode 1 or 2 is selected.
This is followed by the announcement: “Recording“.
This is followed by the announcement: “Recording
announcement“. You hear a “ready” tone, after which
you record your text.
You are not including a closing announcement. The
recorded text is replayed so that it can be checked.
or
5
5
You are including a closing announcement. You hear a
preliminary announcement: “Recording of closing announcement“. This is followed by a “ready” tone, after
which you record your text.
Terminate recording. The recorded text is replayed so
that it can be checked.
Recording advisory announcement
Precondition: The advisory message operating mode
(➔ page 55) has been selected.
6
7
5
This is followed by the announcement: “Recording“.
This is followed by the announcement: “Recording of
advisory message“. You hear a “ready” tone, after which
you record your text.
The recorded text is replayed so that it can be checked.
Checking recording of announcements or advisory message
Precondition: The required operating mode (➔ page 55)
has been selected.
7
The stored announcement text is output.
55
29.10.99
kap12.fm5
Gigaset 2015 plus, GBR: A30852-X-1105-B301-1-7619
The answering machine
Deleting announcements or advisory message
Precondition: The required operating mode (➔ page 55)
has been selected.
This is followed by the announcement: “Delete“.
0
7
The announcement text is deleted. This is followed by
the announcement: “Announcement deleted.“ Announcement 1 and announcement 2 are replaced by the
pre-defined default text.
or
5
Abort the process.
Recording private memos
Do not pause for longer than 8 seconds when
recording private memos. The maximum length
of such memos is limited by the pre-defined
message length.
6
2
This is followed by the announcement: “Recording“.
This is followed by the announcement: “Message recording“. You hear a “ready” tone, after which you
record your text.
or
5
Abort the process.
Switching the answering machine on/off
8
The answering machine is switched on or off. An audio
message indicates the new status – “Answering machine
on” or “Answering machine off”
.
69
You will hear the announcement: “Voice calling”“. This is
followed by a “ready” tone. The base station loudspeaker
outputs all that is spoken into the handset or telephone.
Activating voice calling
Accepting an external call
c
I
If automatic call acceptance (basic answering machine
setting ➔ page 21) is activated: press the key on the
handset.
or
9
If automatic call acceptance (basic answering machine
setting ➔ page 21) is deactivated: press the keys on the
handset in succession.
You are now connected as an external caller to the internal
user who has picked up the call. The loudspeaker is
switched off.
56
29.10.99
kap13.fm5
Gigaset 2015 plus, GBR: A30852-X-1105-B301-1-7619
Logging on additional handsets at the base station
Logging on additional handsets at the base station
You can operate the following at a Gigaset 2015 plus
base station: up to six Gigaset 1000S/2000S or Gigaset
1000C/2000C/2000C pocket/2000T as well as the Gigaset 1000TAE cordless socket.
The Gigaset 2000S handset has already been logged on
with the internal telephone number 1 at the base station
with station number 1.
Each additional handset must be “logged on” at the base
station.
Logging on Gigaset 2000S/1000S handset at the base station
If you wish to operate your handset at several
(up to 4) base stations (➔ page 61), you must repeat the following procedure at each of these
base stations.
The handset must be switched off
(➔ page 15)
Prepare the base station
?
Keep pressing the green paging key at the base station
until you hear the log-on (registration) tone (this takes
roughly 10 seconds).
Log on handset
1 or 2,3,4
h
Handset must be switched off. Within one minute: enter and hold down station number of the base station (1)
on the handset.
Press this key also, until the display appears on the
handset. The handset is switched on.
Examples: logging on
●
Logging onto the 1st base station
hold down 1, and press h.
Station number
1
f
●
o
#
N
Logging onto the 2nd base station
hold down 2, and press h.
Enter the 4-digit system code (default “0000”) (➔ page
19) and then enter #. All unassigned internal numbers
are shown in the display of the handset after a brief delay:
57
kap13.fm5
29.10.99
Gigaset 2015 plus, GBR: A30852-X-1105-B301-1-7619
Logging on additional handsets at the base station
:
2 3 4 5 6
fN b
2...6
(Example: 2,3,4,5 and 6
are still unassigned
Enter one of the unassigned internal numbers. The handset entered is registered under the internal number entered.
Logging on the Gigaset 1000TAE cordless socket
You can connect up a fax (automatic fax recognition included in the Gigaset 2015 plus base station), a modem or
another telephone, for example, to the cordless socket. In
principle, it is logged onto the base station in the same
way as a handset. The Gigaset 1000TAE is available as a
special accessory. For further information, please contact
your dealer.
Logging off handset at base station
B#
72
o
oB
58
Start the procedure.
Enter the 4-digit system code (default: “0000”)
(➔ page 19). All registered handsets are shown on the
display.
Enter the internal number of the required handset
(1 to 6) and confirm with B.
kap14.fm5
29.10.99
Gigaset 2015 plus, GBR: A30852-X1105-B401-1-7619
Operating several handsets
Operating several handsets
Assignment of ringing (incoming calls)
If several handsets are in operation, you can specify how
incoming calls are signalled at all logged-on handsets. A
distinction is made between:
Collective ringing
Ringing grp 1
Ringing grp 1
●
Collective ringing (default) – incoming calls are signalled at all logged-on handsets. You can remove individual handsets from the collective ringing or reinstate handsets which have been temporarily
withdrawn from the collective ringing.
Ringing grp2 ●
Ringing priority – incoming calls are first signalled at
a “priority” handset in ringing group 1. The handsets
assigned to ringing group 2 are only called after a certain number of rings.
You can specify which handsets are assigned to the
first and the second group and after how many rings,
the second group is signalled. Units not entered are
excluded from ringing priority.
Ringing grp 2
●
Direct inward dialling – callers can dial an internal
subscriber directly when the answering machine is
switched on. Fax connections are connected via automatic fax recognition. The system code must, however, be set to a value other than “0000” (➔ page 20).
After the ring tone, the caller hears a high multiple
tone and can then enter the internal extension of the
required subscriber. If the caller enters an incorrect internal extension or if the subscriber does not answer,
collective ringing is performed for all handsets. If the
call is not picked up after a defined number of rings,
the answersing machine is activated. Direct inward dialling is deactivated by default.
Switching between collective ringing, ringing priority and direct inward dialling
B#
O*
1
o
23
Start the procedure.
Enter 4-digit system code (default “0000”)
(➔ page 20).
The current setting is indicated on the display:
:
n23 1
P f N
(Example:1 = collective
ringing is set)
59
kap14.fm5
29.10.99
Gigaset 2015 plus, GBR: A30852-X1105-B401-1-7619
Operating several handsets
1B
Set collective ringing.
2B
Set priority ringing.
3B
Set direct inward dialling.
or
or
Selecting handsets for collective ringing/ringing group 2
B#
O*
1
o
21
oB
Start the procedure.
Enter the 4-digit system code (default: “0000”)
(➔ page 19).
The current setting is indicated on the display. Handsets
programmed for collective ringing or ringing group 2 are
indicated by their internal numbers, those which have
been excluded are marked with blanks.
Enter the internal number of the required handset (1 to 6)
to be inserted or deleted and confirm with B.
Selecting a handset for ringing group 1
B#
O*
1
o
22
Start the procedure.
Enter the 4-digit system code (default: “0000”)
(➔ page 19).
The current setting is indicated on the display:
:
n22 1
P fN
oB
(Example: Handset 1 is in
ringing group 1)
Enter the internal number of the required handset (1 to 6)
and confirm with B.
Setting the number of tone rings for ringing priority
B#
1
Start the procedure.
O*
6
The current setting is indicated on the display:
o
Enter the 4-digit system code (default: “0000”)
(➔ page 19).
:
n6 3
P f
oB
60
N
(Example: 3 ton rings are
set.
Enter the number of rings (2 to 9) and confirm with B.
29.10.99
kap15.fm5
Gigaset 2015 plus, GBR: A30852-X-1105-B301-1-7619
Operation with several base stations
Operation with several base stations
You can “log on” and operate your handset at up to 4 Gigaset base stations of the Gigaset family (from Gigaset
1010 and Gigaset 2010 and higher).
This has the following advantages:
●
You can operate the same handset at geographically
dispersed base stations (e.g. at home and in the
office).
●
In large premises, a number of base stations can be
positioned to give you much wider coverage with the
same handset.
Note the following important points when operating a handset at several base stations:
●
Calls in progress are interrupted or cleared
down when you switch from the radio
range of one base station to the radio range
of another base station.
●
Internal calls can only be made within the
radio range of a base station - not to handsets which are within radio range of a different base station.
●
If your handset is switched on and you are
out of range of all base stations for
several minutes, it can take up to 20 minutes to “relocate” a base station. In such
cases you can speed up the process of
relocation by switching the handset
on and off (➔ page 14).
Activating/deactivating base station number display on handset
You can program your handset to display the base
station with which the unit has radio contact.
B3
6
1B
Start the procedure. The current setting is displayed:
36 1 = activated, 36 0 = deactivated.
Activate the base station number display.
or
0B
Deactivate the base station number display (default).
61
29.10.99
kap15.fm5
Gigaset 2015 plus, GBR: A30852-X-1105-B301-1-7619
Operation with several base stations
Setting a priority station
If the handset is located in the area where two or more
base station radio ranges are overlapping, it is recommended that you select a priority base station. This prevents the station being switched automatically. You can
then only be contacted via the manually selected station.
BI
oB
Start the procedure. The numbers of the base stations at
which the handset is logged on are displayed:
Enter the number of the priority base station and save
with B.
Select the best station if the priority station is not accessible
If you have set a priority base station, your handset
searches for approximately 30 seconds for the priority
station when switching to the radio range of another base
station. Then it searches for the best station available at
the moment.
BI
o oB
62
Start the procedure. The numbers of the base stations at
which the handset is logged on are displayed:
Enter twice the number of the base station to be
searched for first, then save with B.
kap15.fm5
29.10.99
Gigaset 2015 plus, GBR: A30852-X-1105-B301-1-7619
Operating with Gigaset 2000C, 2000C pocket, 2000T
Operating with Gigaset 2000C, 2000C pocket, 2000T
The Gigaset 2000C, 2000C pocket and 2000T comfort
device have the following special features:
●
You can activate the operating functions of your
handset by way of a menu which is presented in an
illuminated graphical display.
●
Instead of speed dialling numbers, you can store up
to 100 names and numbers in an electronic telephone directory.
The complete functionality of the comfort device is described in the operating instructions
which are supplied with the device
itself. This chapter contains basic user
information and descriptions of important
procedures for operation in conjunction with the
Gigaset 2015 plus base station.
Each additional comfort device must be
“logged on” at the base station ➔ page 65.
U
Base 1
d
INT
Three keys are available for using the comfort device:
●
z
●
Dialogue key
Two dialogue keys with a rocker switch with dual
functions in local mode and single functions in online
mode. The current configuration is shown in the display.
The function key . for activating menu prompting.
Dialogue key
Function key
63
kap15.fm5
29.10.99
Gigaset 2015 plus, GBR: A30852-X-1105-B301-1-7619
Operating with Gigaset 2000C, 2000C pocket, 2000T
Meaning of the keys
The dialogue key INT must be pressed on the comfort device prior to all procedures which are initiated on the Gigaset 2000S handset with keys B and #.
You can then proceed to use the dialogue keys SET
and z (redial). The procedures are carried out as described elsewhere in these operating instructions.
The equivalent functions are as follows:
Handset 2000S:
B
O
I
{
SET
z
or
REDIAL
INT
You use key . to call down the menu.
Select Services
Directory
Internal Call
Y Z
Comfort device:
OK
After the menu has been obtained with . the uppermost menu level appears. Three lines of available menu
options are indicated on the display. The first menu item
is shown (inverse display. This menu option is selected.
Using dialogue key Z you can then scroll to the next
menu option. You select a menu option with the dialogue
key OK : You can exit the active menu using the dialogue
key { or the . key.
64
kap15.fm5
29.10.99
Gigaset 2015 plus, GBR: A30852-X-1105-B301-1-7619
Operating with Gigaset 2000C, 2000C pocket, 2000T
Logging on comfort device at the base station
Base 1
Base 2
Base 3
Y Z
{
OK
Hold down the green paging key on your Gigaset
2015 plus base station until you hear the log-on tone (this
takes about 10 seconds).
Enter
base code:
**_
< > X
2
3
4
5
Select the menu option “Register” from the sub-menu
“Settings”. The base stations available are shown in the
display (up to 6). Select a base station (recommended:
Base 1) and confirm with the OK key.
OK
6
You are then requested to enter the base code for the
base station. Confirm the PIN with the OK key. You handset is now logged on to the base station.
In the next display, dial one of the displayed available numbers using the dialling keypad. If you do not dial a number,
the next free number is dialled automatically after a few
seconds. When the dialled station appears in the display,
your comfort device is logged on.
Remote operation of the answering machine via the comfort device
Base 1
d°
U
INT z
If there are new messages on your answering machine,
the display on the comfort device shows the ° symbol. You can then call up the list of messages using the
display key.
65
29.10.99
kap16.fm5
Gigaset 2015 plus, GBR: A30852-X-1105-B301-1-7619
Important informations
Important informations
Notes on setting up the base station
Place of installation
●
There must be a 220V/230V power socket in the vicinity.
●
The base station should not be located in the immediate vicinity of other electronic devices, such as a hifi system, a microwave oven or office equipment,
otherwise there is a risk of mutual interference.
●
Place the base station on a level, non-slip surface.
The device feet do not normally leave any unsightly
marks. However, in view of the many different varnishes and polishes currently used for furniture, the
possibility of telephone components leaving marks
on the mounting surface cannot be entirely ruled out.
●
Radio communication between the base station and
the handsets is based on the Digital Enhanced Cordless Telecommunications (DECT) standard. The Gigaset 2015 plus complies fully with the relevant European guidelines. Should you nevertheless experience
sound or picture distortion with your satellite signal
receiving equipment, please get in touch with your
dealer to have it tested for shielding faults.
●
Depending on the ambient conditions, the maximum
radio range between the base station and the handsets is approx. 300 metres out of doors and approx.
50 metres indoors. If the range warning tone has
been activated at the handset (➔ page 31), you will
receive an audible signal when you go out of range
during a call.
●
The base station is designed for operation in protected rooms with a temperature range from +5°C to
+45°C.
●
Do not set up the base station in a bathroom, laundry
room or directly adjacent to sources of heat, such as
radiators. Direct sunlight must also be avoided.
Temperature/service environment
66
29.10.99
kap16.fm5
Gigaset 2015 plus, GBR: A30852-X-1105-B301-1-7619
Important informations
Notes on operating the handset
Notes for people wearing hearing aids
If you wear a hearing aid, please note before using the telephone that radio signals can interfere with hearing aids
and, if sufficiently loud, can cause an unpleasant humming noise.
Use of batteries
Please note the following for use of batteries:
●
Use batteries of the type supplied (AA-type nickelcadmium batteries, also referred to as “miniature batteries“). The following batteries may also be used:
Panasonic P-60 AA/1P, Philips R6 NC-P,
UCAR RC6, Eveready RC6, DAIMON ACCU 1000,
Sanyo N-3U, Varta Rechargeable Battery Plus Ni-Cd 1,2V,
No. 5006
●
Use of nickel-metal-hydrid (NiMH)
Batteries: in order to achieve longer call times, you
can also operate your Gigaset 2000S/2000C handset
with nickel-metal-hydrid batteries. The following batteries have been approved for use:
Sanyo H R-3U (1300 mAh), GP GP120 AAHC, Emmerich
CE R 6, Energizer EMH-1100 AAC, Varta VH 1101 AA
When you have inserted the NiMH batteries you
can inform your handset of the higher capacity:
the first time that you charge the handset fully,
it indicates that the battery will soon be empty
( i ) too early. Discharge the batteries by continuing to use the handset until the battery symbol j appears and you hear the battery warning tone (note: max. 10 minutes operating time
left). In this way the handset detects that the
batteries have a longer service life and will indicate the charging status correctly in the future.
When the battery compartment is opened, the
indicator is reset to the capacity of the batteries
supplied.
Only use NiMH batteries with the Gigaset 2000S
and 2000C handsets.
These batteries cannot be operated in Gigaset
1000S and 1000C handsets!
67
29.10.99
kap16.fm5
Gigaset 2015 plus, GBR: A30852-X-1105-B301-1-7619
Important informations
●
The use of other types of batteries or of non-rechargeable batteries can cause malfunctions and can even
damage the equipment. The manufacturer does not
accept responsibility under these circumstances.
Never use ordinary batteries.
Please note the following guidelines when starting
and using batteries:
●
Each time you use your handset, you can replace it in
the charging unit. Charging is controlled electronically.
This ensures that the batteries are charged to
capacity.
●
At the outset, charge the batteries to full capacity. We
recommend that you charge them for a continuous
period of 16 hours, e.g. overnight. During the first
week of operation, place the handsets in the charging
unit at frequent intervals.
●
Generally, new batteries only achieve their full capacity, i.e. full call or availability time, after several days of
normal use. Although the battery LED indicates that
the batteries in the handset have been charged – LED
of – during this initial phase, it should be expected
that the normal call and in-service times will not be
achieved.
●
After the batteries have been charged for the first
time (recommended time approx. 16 hours), they normally reach normal operating status. It is advisable to
recharge them frequently.
Note: operating time is low when the batteries are
not fully charged.
●
Ensure that the contacts do not come into contact
with metal or oily parts.
●
Battery charging times (at room temperature)
●
68
–
in handset
approx. 4-5 hours
(NiCd batteries)
–
in charger:
approx. 8-9 hours
(NiMH batteries,
1100 mAh)
If the LED lights up from time to time, this indicates
that “trickle charging” is taking place.
29.10.99
kap16.fm5
Gigaset 2015 plus, GBR: A30852-X-1105-B301-1-7619
Important informations
Attaching carrying clip to handset
If desired, you can attach the carrying clip supplied with
the unit, e.g. to carry the handset in the pocket of your
jacket. To attach the clip, insert it into the holes on the side
of your handset until it clicks into place.
Care of the equipment
Wipe the handset and the base station with a damp or
antistatic cloth.
Never use a dry cloth (risk of static charging) !
69
kap16.fm5
29.10.99
Gigaset 2015 plus, GBR: A30852-X-1105-B301-1-7619
Important informations
Technical data
Standard:
No. of channels:
Radio frequency range:
Duplex system:
Channel spacing:
Bit rate:
Modulation:
Voice coding:
Transmitted power:
Range:
Power supply unit:
Power consumption, base station:
Operating time, handset
(with fully charged battery):
DECT = Digital Enhanced Cordless Telecommunications
GAP = Generic Access Profile (cross-vendor
DECT radio transmission system
120 duplex channels
1880 MHz - 1900 MHz
Time division multiplex, 10 ms frame length
1728 kHz
1152 kbps
Gaussian frequency shift key (GFSK)
32 kbps
10 mW, mean rating per channel
max. 300 m outdoors
max. 50 m indoors
Base station 220/230 Vac/50 Hz (plug-in power unit)
Stand-by mode: approx. 3W
Call mode: approx. 5W
Stand-by:
up to 70 hours (NiCd, 600 mAh)
up to 110 hours NiMH, 1100 mAh)
up to 130 hours NiMH, 1300 mAh)
Call mode:
up to 7 hours (NiCd, 600 mAh)
up to 11 hours (NiMH, 1100 mAh)
up to 13 hours (NiMH, 1300 mAh)
Charging time in base station
(at room temperature):
Permissible ambient conditions for
operation:
Dialling method:
PBX recall button function:
70
approx. 4 - 5 hours (NiCd)
approx. 8 - 9 hours (NiMH, 1100 mAh)
+5°C to +45°C
20% to 75% rel. humidity
Dial pulsing / DTMF
Flash
kap16.fm5
29.10.99
Gigaset 2015 plus, GBR: A30852-X-1105-B301-1-7619
Important informations
Dimensions, base station:
approx. 172 x 171 x 90 mm (L x W x H)
Dimensions, handset:
approx. 160 × 55 × 25 mm (L × W × H)
Weight:
Base station approx. 390 g
Handset with batteries approx. 165 g
Length of connecting cable:
Connecting plug:
Announcement texts
answering machine:
Answering machine memory:
Telephone connecting cable approx. 3 m
Power connecting cable approx. 3 m
TSV 6/4 (telephone connecting cable)
TSV 6/4 (power connecting cable)
2 announcements, min. length 6 secs. / max. 30 secs.
1 closing announcement, min. length 3 secs. /
max. 10 secs.
1 advisory message, min. length 6 secs. / max. 170 secs.
Digital recording,
total recording time approx. 15 mins.
Announcements and messages are fully protected
against power failure.
Transfer/disposal
When transferring your Gigaset 2015 plus to third parties,
please include the operating instructions.
At the end of the service life of the unit or the batteries,
please dispose of them in accordance with statutory regulations and in a manner which will not harm the environment.
Warranty
This equipment is guaranteed by Siemens for a period of
6 months from the date of purchase. Please keep your
sales receipt as proof of this date!
During this period, Siemens will rectify all equipment or
manufacturing defects. Siemens will decide how the warranty shall be implemented: repair or replacement of the
defective equipment.
The warranty excludes any damage resulting from incorrect use, wear and tear, or actions carried out by third parties. The warranty covers neither consumables nor any
defects having only a minimal effect on the value or use
of the equipment.
The Siemens product which you have purchased meets
the technical requirements relating to connection to the
public telephone network.
You can exercise your warranty rights directly with your
supplier.
71
kap16.fm5
29.10.99
Gigaset 2015 plus, GBR: A30852-X-1105-B301-1-7619
Important informations
Self-help in the event of a fault
Not every malfunction means that there is an actual
defect in your telephone. In some situations, you can
save time and money if you eliminate the causes of
simple faults yourself. The information below will help
you do this.
Symptom
Cause
Corrective measure
Audio message: “Time setting not available”
There has been a brief break
in the power supply
The day and time must be reset
(➔ page 23).
No display at the handset
The handset is not switched
on
Switch on the handset
The battery is empty
Replace the battery with a standby
battery or recharge it
No display at the base station
No message available
Dialup line cannot be seized;
no dialling tone.
The plug of the telephone
connecting cable is not inserted correctly
Check the plug at the base station
and the telephone socket; reconnect if necessary (➔ page 2).
The plug of the power connecting cable is not inserted
correctly. The plugs may
have been connected
wrongly.
Check the plug at the base station
and the 220V/230V socket; reconnect if necessary (➔ page 2).
The dialup line is being used
by another handset
Wait until the dialup line is free
The handset is not logged on
Log on the handset at the base station (➔ page 57)
The plug of the power connecting cable is not inserted
correctly
Check the plug at the base station
and the 220V/230V socket; reconnect if necessary.
The volume of the tone
ringing is set too low
Adjust the volume of the tone ringing at the base station (➔ page 27)
or the handset (➔ page 29)
Assignment of ringing set
wrongly
Set the ringing assignment
(➔ page 59)
Wrong dialling method
Reset the dialling method
(➔ page 16)
No radio contact to the base
station; the N symbol on the
handset is flashing.
No tone ringing from the
base station or handset
No connection after dialling
the number; dial tone can
still be heard.
72
kap16.fm5
29.10.99
Gigaset 2015 plus, GBR: A30852-X-1105-B301-1-7619
Important informations
Symptom
Cause
Corrective measure
Operation in conjunction
with a PBX:
no connection or wrong
connection after dialling
from a memory
Trunk code/main trunk code
not entered
Enter the trunk code/main trunk
code (➔ page 18)
System code input rejected.
The system code that was
input does not correspond to
the new code.
If you have forgotten the system
code that you modified, please
contact the manufacturer (telephone number under “Contact
Partner”).
PIN entered rejected.
The PIN that you entered
does not correspond to the
new PIN.
If you have forgotten the PIN that
you modified, please contact the
manufacturer (telephone number
under “Contact Partner”).
Direct inward dialling or remote retrieval not possible.
System code not entered.
Enter a system code (not “0000”).
Your Gigaset telephone will not operate if the
mains adapter is not plugged in or in the event of
a power failure!
73
29.10.99
kap17.fm5
Gigaset 2015 plus, GBR: A30852-X1105-B401-1-7619
Special accessories
Special accessories
Gigaset 1000TAE
The cordless socket for operating devices connected by a
cord at base stations of the Gigaset 1000/2000 family.
You can use the cordless socket to connect corded terminals such as telephones, fax machines, modems (up to
9600 bit/s), answering machines and decoders (top-set
box) for the digital television to each Gigaset base station
in the 1000/2000 family instead of other handsets.
The advantage of this is cordless operation of your corded
terminals with the functionality of your Gigaset 2015 plus
including the automatic fax recognition when operating a
fax machine at Gigaset 1000TAE.
Gigaset 2000L
If your are operating a number of handsets, we recommend you use additional charging units in order to ensure
that the handsets are ready for operation at all times.
In addition to the handset, the charging unit can also
charge two reserve batteries.
Gigaset 2000C, 2000C pocket
and 2000T
These "Comfort" devices are equipped with a clear, userfriendly 4-line display.
Features that make your telephone calls easier:
Gigaset Repeater
●
Telephone directory for entering approx. 100 names
and telephone numbers.
●
Menu guidance
●
Illuminated display
Gigaset Repeater allows you to extend the range of your
Gigaset base station and opens up areas in which reception was never before possible.
You can use all the usual handset functions from the base
station in this extended radio range.
74
29.10.99
kap18.fm5
Gigaset 2015 plus, GBR: A30852-X-1105-B301-1-7619
Quick-reference guide for Gigaset 2000S handset
Quick-reference guide for Gigaset 2000S handset
Handset on/off/in protect mode:
Taking a call:
Outgoing external call:
B
Ringing is heard: remove the handset from the charger
unit or press seizure key c (automatic call acceptance
can be programmed).
Press c, then o dial the number.
Or: o dial the number, then press c.
Internal call:
Press I , then 1 ... 6 dial the internal number.
Internal transfer of external call:
Press I, then 1 ... 6 dial the internal number. Press
a either before or after the internal user answers.
Taking transferred external call:
Ringing is heard: remove the handset from the charger
unit or press seizure key c (automatic call acceptance
can be programmed). Internal call. Press R to take the
waiting external call.
Internal consultation hold:
Redial:
Storing speed dialling number:
Press I, then 1 ... 6 dial the internal number. Consult with the internal user. Press R to return to the waiting external call.
Press c, then keep pressing O until the required
number is displayed.
Press BQ, then 0 ... 9 select the speed dialling
number.
o
Dialling with speed dialling
number:
Setting handset volume:
Setting tone ringing volume:
Activating monitoring at the base
station:
Enter the telephone number and store with B.
Press cQ, then 0 ... 9 select the speed dialling
number.
Press B0, then 1 ... 3 select the handset volume
level and store with B.
Press B5, then 1 ... 6 select the tone ringing
volume level and store with B.
Press I 8 to activate or deactivate monitoring.
75
29.10.99
giga2015.SIX
Gigaset 2015 plus, GBR: A30852-X-1105-B301-1-7619
Index
Index
A
Accessories ................................................... 74
Announcement text
remote operation .................................... 55
Answering machine
accepting a call ....................................... 51
advisory message ................................... 45
announcement ........................................ 45
basic settings .......................................... 21
call acceptance ....................................... 51
calling back callers .................................. 53
closing announcement ........................... 45
default announcement ............................ 46
deleting announcements ........................ 46
explanations ............................................ 43
Intermezzo function ................................ 23
listening to announcement ..................... 46
memos ................................................... 48
message length ...................................... 21
messages, explanations ......................... 48
monitoring function ................................ 51
number of tone rings .............................. 22
operating modes, explanations ............... 44
play back messages ............................... 48
recording announcements ...................... 45
recording conversations ......................... 47
remote operation .................................... 51
starting/terminating recording ................ 47
Attaching carrying clip to handset ................. 69
Automatic call acceptance ............................ 32
B
Barred codes
activate/deactivate .................................. 39
delete ...................................................... 39
display ..................................................... 38
explanation ............................................. 38
store ....................................................... 38
Barring
barred codes ........................................... 38
base station ............................................ 36
emergency numbers .............................. 36
trunk access ........................................... 40
Barring function .......................................36, 41
displays ................................................... 42
Base station
adjust volume ......................................... 11
collective call .......................................... 10
connecting ................................................ 2
individual settings ................................... 27
key click .................................................. 28
log off handset ........................................ 58
place of installation ................................. 66
reset to default state .............................. 24
station number ....................................... 61
tone ringing ............................................. 27
76
Base station number .....................................61
Basic settings ................................................14
answering machine .................................21
day, time .................................................24
PIN ..........................................................19
signalling method ....................................17
system code ............................................19
Batteries
charging .....................................................3
important information ..............................67
Battery warning tone .....................................31
C
Call
accept (off-hook) .......................................5
automatic acceptance .............................32
connect ...................................................13
external .....................................................5
incoming ....................................................5
internal ......................................................5
outgoing ....................................................7
terminate .................................................11
transfer ....................................................13
Call barring, activating/deactivating ................39
Call duration display
activate/deactivate ..................................35
Care of the equipment ...................................69
Check own internal number ..........................10
CLIP .................................................................5
CLIR .................................................................8
Collective call .................................................10
Collective ringing ...........................................59
Comfort telephones .......................................63
Connect .........................................................13
Consultation call ............................................12
Contents of package ........................................1
Cordless socket .............................................58
D
Day and time settings ....................................24
DECT .............................................................70
Default state ........................................... 24, 25
Delete
barred codes ...........................................39
Speed dialling numbers ...........................34
trunk/main trunk code .............................19
Dial
with speed dialling numbers .....................8
Dial pulsing (DP) ............................................16
Direct inward dialling .....................................59
Displays
for barring function ..................................42
Disposal .........................................................71
DTMF (dual-tone multifrequency) ............. 9, 16
29.10.99
giga2015.SIX
Gigaset 2015 plus, GBR: A30852-X-1105-B301-1-7619
Index
E
Emergency numbers
display ..................................................... 37
explanation ............................................. 36
store ....................................................... 37
F
Faults, self-help ............................................. 72
Fax recognition .............................................. 26
G
GAP (Generic Access Profile) ........................ 70
Gigaset 2000C, 2000C pocket, 2000T .......... 63
logging on ............................................... 65
H
Handset
activating/deactivating base station ........ 61
barring function ....................................... 41
collective call .......................................... 10
collective ringing ..................................... 59
individual settings ................................... 29
log on to base station ............................. 58
operating several .................................... 59
operating states ...................................... 14
PIN .......................................................... 20
quick-reference guide ............................. 75
reset to default state .............................. 25
ringing priority ......................................... 59
search ..................................................... 10
set handset volume ................................ 30
switching to protect state ....................... 14
tone ringing pitch .................................... 29
tone ringing volume ................................ 29
Handset volume
set ........................................................... 30
I
Incoming calls ................................................. 5
Individual settings
base station ............................................ 27
handset ................................................... 29
Information
batteries .................................................. 67
for people wearing hearing aids ............. 67
Intermezzo function ...................................... 23
Internet address (see back page) .................. 79
K
Key click
activate/deactivate .................................. 28
L
Log on
cordless socket .......................................58
Gigaset 2000S/1000S comfort device .....57
prepare base station ................................57
Log on comfort device ...................................58
M
Main trunk code .............................................18
Memos ..........................................................48
Message length, answering machine ............21
Messages
delete ......................................................50
explanation ..............................................48
mark ........................................................50
play back new .........................................48
remote operation .............................. 53, 54
Mini-Western plug ...........................................2
Monitoring function .......................................51
Mute function ..................................................6
N
Negative acknowledgement tone
activate/deactivate ..................................31
Number
store ........................................................32
suppression CLIR ......................................8
Number check .................................................7
O
Off-hook ...........................................................5
On-hook ...................................................... 5, 9
Open listening function
via loudspeaker .......................................11
Operating modes
answering machine .................................44
remote operation .....................................55
Operating several handsets ...........................59
Operating states of the handset ....................14
Operation in conjunction with a PBX .............17
Operation with several base stations ............61
Outgoing calls, external ...................................7
Outward-restricted trunk access ...................40
P
Paging .............................................................IV
Paging key .....................................................57
Pause during message playback ...................23
Pause length after trunk/main trunk code ......19
PBX ................................................................18
PBX (telecommunications system) ................17
Personal Identification Number .....................19
77
29.10.99
giga2015.SIX
Gigaset 2015 plus, GBR: A30852-X-1105-B301-1-7619
Index
PIN
change .................................................... 20
description .............................................. 19
forgetting ................................................ 20
Playback
abort ....................................................... 49
interrupt .................................................. 49
messages ............................................... 48
Positive acknowledgement tone
activate/deactivate .................................. 31
Power connecting cable .................................. 2
Power failure ................................................. 72
Power supply unit ........................................... 2
Protect state ................................................. 14
Putting into operation
important informations ........................... 66
in 6 steps .................................................. 1
Q
Quick-reference guide ................................... 75
R
Range warning tone
activate/deactivate .................................. 31
Recording ...................................................... 47
Recording conversations ............................... 47
Remote operation
advisory message ................................... 55
answering machine ................................ 51
help function ........................................... 53
initiate ..................................................... 52
playback .................................................. 54
playing back messages ........................... 53
record announcement text ..................... 55
recording memos ................................... 56
select operating mode ............................ 55
switching answering machine on/off ...... 56
Ringing assignment ...................................... 59
Ringing priority .............................................. 59
S
Safety information ......................................... VII
Search for handset ........................................ 10
Setting the station
priority ..................................................... 62
Signalling method ...................................16, 17
Special accessories ....................................... 74
Speed dialling numbers ................................... 8
delete ...................................................... 34
display ..................................................... 33
store ....................................................... 32
Stand-by period ............................................. 70
78
Store
number ....................................................32
speed dialling numbers ...........................32
Switch off microphone ....................................6
Synchronisation tone
activate/deactivate ..................................32
System code
change .....................................................20
description ...............................................19
forgetting .................................................20
T
Taking a call, answering machine ..................21
Technical data ................................................70
Telephone plug ................................................2
Time settings ...................................................4
Time stamp function ......................................23
Tone ringing
number for answering machine ..............22
number for collective ringing ...................60
Tone ringing pitch
at base station .........................................27
handset ...................................................29
Tone ringing volume
base station .............................................27
handset ...................................................29
Transfer .........................................................71
Transfer, call ..................................................13
Trunk access ..................................................40
Trunk code .....................................................18
Trunk/main trunk code delete ........................19
U
Unrestricted trunk access ..............................40
V
Volume
adjust, base station .................................11
regulate ...................................................51
W
Warranty ........................................................71
29.10.99
kap19.fm5
Gigaset 2015 plus, GBR: A30852-X1105-B401-1-7619
Issued by Siemens AG,
Information and Communication Products
Hofmannstraße 51, D-81359 München
© Siemens AG 1998. All rights reserved.
Subject to availability.
Right of modification reserved.
http://www.siemens.de/gigaset
Reference no.: A30852-X1105-B401-1-7619
Printed in Germany
12/98
U5