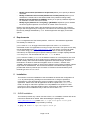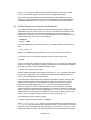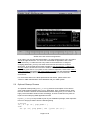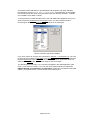
1
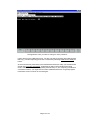
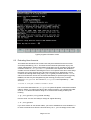
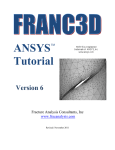
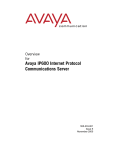
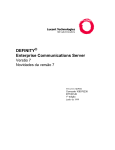
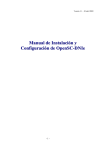
CMS Password Service Utility
Installation, Configuration and Usage
Program Version
Documentation Version
1.01
1.04
by
Mag. Christian Dombacher
BDD
Nikolaus Lenaugasse 8
A-2232 Deutsch-Wagram
[email protected]
Table of Contents
1
2
3
4
5
6
7
8
9
Introduction ......................................................................................................................... 3
Document Conventions ...................................................................................................... 3
Licenses and Ordering Options .......................................................................................... 3
Requirements ..................................................................................................................... 4
Installation........................................................................................................................... 4
5.1
SUDO Installation ........................................................................................................ 4
5.2
PWDCH Installation..................................................................................................... 5
5.3
SUDO Configuration.................................................................................................... 5
5.4
PWDCH Startup and Command Line Parameters ...................................................... 6
5.5
CMS Main Menu Addition............................................................................................ 7
5.6
Optional Cleanup Process........................................................................................... 8
Program Usage................................................................................................................... 9
6.1
AVAYA Terminal Emulation Configuration .................................................................. 9
6.2
Using PWDCH........................................................................................................... 12
6.3
Excluding User Accounts........................................................................................... 14
Action Chart ...................................................................................................................... 15
PWDCH Removal ............................................................................................................. 15
References ....................................................................................................................... 16
Page 2 of 16
1
Introduction
The AVAYA Call Management System (CMS) lacks the capability to delegate password
management to a trusted user. If an application user (called Supervisor in CMS
terminology) has forgotten or lost his/her password, the system administrator (with root
permission) has to be contacted for a new password. With the number of users
exceeding a certain threshold, the administrator becomes more and more involved in
changing passwords. Doing so might also result in loss of security, as the root user is
kept logged into the system to perform password changes in an efficient manner. The
entire situation gets even worse, if the system administrator has been outsourced to an
external company. Then changing a users password might be a process of several days.
To circumvent these problems we have developed a small service utility called pwdch,
which allows a trusted user to be designated as password manager. With our tool, this
trusted user is allowed to change passwords for selected users without knowing the
existing password. It is easily accessible through its text mode based windowing system
and may be used without UNIX knowledge. Similar to other system extensions pwdch is
integrated with the CMS application and may be accessed from the main menu. System
security is kept to a maximum level due to the use of the open source utility sudo, which
is part of the installed base in most of our customer installations.
2
Document Conventions
Any UNIX specific names, commands and parameters are presented in Courier
typesetting, whereas user inputs are typically shown in Bold face. Occasionally
some important text parts are also highlighted in Bold. Menu items available in graphical
user interfaces and menus are underlined. Underlined entries seperated by a →
represent a certain menu path to be followed. Navigation and Control keys are
surrounded by <> as in <PGDN>, <PGUP>, <ESC>, <CR>, <HOME>.
Throughout the entire document we assume, that your primary shell is a Bourne Shell or
derivate (e.g. BASH). If you are using CSH, TCSH or similar, you might have to adapt
some commands and settings mentioned in this document.
3
Licenses and Ordering Options
In order to keep the system at a moderate pricing level for everybody, our utility is
shipped in 3 licensing modes
−
−
−
Small Business / Free Version
: This version may be downloaded at no
charge from our website. The application allows management for up to 5 selected
users. There is not timing restriction or similar, pwdch may be used as long as
desired.
Medium Business
: This version may be ordered with us at a
lower price and is shipped via mail or email. The application allows management for
up to 35 selected users. For more information regarding pricing please consult our
website or contact us.
Large Business / Unlimited
: This version may be ordered with us and is
shipped via mail or email. There is user restriction as for the other versions. For
more information regarding pricing please consult our website or contact us.
Each version also features a special demo mode, which allows you to test the application
with larger user sizes, different user files and applications. In order to preserve security
the settings are not executed, only the parameters and commands are shown on the
screen. This allows for playing around with different options pwdch offers. With your
order you may then include change requests according to your needs. The following
program customizations are performed at no additional charge when specified with the
order
Page 3 of 16
−
−
−
−
Modify password file (defaulted to /etc/passwd) allows you to specify a different
user base.
Modify command to be executed (defaulted to /usr/bin/passwd) allows you to
redefine the command to be executed instead of the password change utility.
Modify keyword (defaulted to NODISP) allows you to specify a different keyword
for exclusion of certain users from the list.
Modify regex (defaulted to /^root|[0-9]:[^:]*NODISP|x:0:/) allows you to redefine
the entire regular expression for exclusion of certain users from the list.
Please note, that all these options are hardcoded for security reasons. For example,
giving a user the opportunity to change the command to be executed might circumvent
the security settings established by sudo. Similar arguments also apply to the other
options.
4
Requirements
pwdch is targeted to the Sun Solaris platform, version 2.x. We tested the application
successfully on Solaris 2.8.
pwdch relies on sudo to toggle normal and super user mode. sudo enforces a
centralized control over applications running in super user mode. This open source utility
may be downloaded from www.sunfreeware.com at no charge. You have to install
sudo before using pwdch, otherwise pwdch won't be able to execute the passwd
command (or its replacement) as expected. Although there is no tight coupling between
sudo and pwdch, we recommend to use sudo 1.6.5 or above.
pwdch uses the C library curses for its window routines. As a consequence, the TERM
variable (or its equivalent in other shells) has to be defined properly. Furthermore you
should carefully select terminal emulation application and terminal type, as some
terminals do not allow for extended navigation such as <PGUP>, <PGDN> and
<HOME>. With raising number of users to be managed, lacking these navigation options
might result in dissatisfaction. We recommend AVAYA Terminal Emulator typically
provided with AVAYA products (the successor of Terranova Communications) and
terminal type set to AT&T605BCT.
5
Installation
This section covers the installation of the executables as well as the configuration of
sudo to pass temporary priviledges to the trusted user in charge of password
management. It also describes the process of adding a menu item to the CMS
application. Please note, that all applications shall be copied to the /usr/local
folder, as doing so reduces the problem of incompatibilities to a minimum. It also
prevents you from overwriting Solaris system components or CMS application files.
Most open source installations obey to this rule and so does sudo.
5.1
SUDO Installation
This section provides only a short overview of the sudo installation. Please refer to the
instructions delivered for details. After downloading the package from
www.sunfreeware.com (called sudo-1.6.7p5-sol8-sparc-local.gz or
similar), it first has to be decompressed by entering
# gzip –d sudo-1.6.7p5-sol8-sparc-local.gz
Page 4 of 16
If gzip is not present on your system, you can download it from the same site
www.sunfreeware.com and install it using
# pkgadd –d gzip-1.3.5-sol8-sparc-local
Please note, that the name may be slightly different. Then change to super user mode
by invoking the su command and type
# pkgadd –d sudo-1.6.7p5-sol8-sparc-local
The sudo package now installs to /usr/local system folder. You can now proceed
to the installation of pwdch.
5.2
PWDCH Installation
We recommend the pwdch password service utility to be installed by root to the
/usr/local folder. This may be performed by saving the tarball pwdch.tar to the
/usr/local folder and typing the command
# tar -xvf pwdch.tar
A new subfolder /usr/local/cms is created containing a shell script pwdch, two
executables pwdch_normal, pwdch_arrow and one example file example_passwd.
You may now safely remove the tarball with
# rm pwdch.tar
to finish the installation. If you desire to choose an alternate destination, you may do so
as there is no requirement from the application to be executed in a specific directory
except the program path defined in the shell script pwdch. You may easily change it
using a text editor such as vi.
A second executable pwdch_arrow has been provided, as in some rare situations the
curses color settings are not properly reconstructed by certain terminal emulators. In
that case the selection bar stays invisible and the application becomes unusable. You
might then decide to use pwdch_arrow instead of pwdch_normal, as it does not rely
on coloring to provide a selection marker, it merely uses standard character to
resemble an arrow. We have never encountered that effect with AVAYA terminal
emulation applications. You may easily toggle between pwdch_normal and
pwdch_arrow without altering the entire configuration by modifying the startup script
pwdch.
5.3
SUDO Configuration
In order to allow pwdch to run in super user mode, sudo has to be configured properly.
This is achieved by changing to root using the su command and executing
# visudo
Do not attempt to change the /usr/local/etc/sudoers file manually as this
bypasses the syntax checker and may corrupt operation. In order to use visudo, you
should be confident with the vi editor. If you desire to change the default editor, please
consult the sudo documentation. To give a trusted user root access to pwdch, enter
the following line in the section >>User priviledge specification<<
<user> ALL=(root) NOPASSWD:/usr/local/cms/pwdch
Page 5 of 16
where <user> has to be replaced by the trusted user name. If you have installed
pwdch to an alternate location, the path has to be changed accordingly.
Please note, that this procedure has to be repeated for each trusted user to be in
charge of changing passwords. For complex configurations involving group settings
and similar advanced topics, we refer to sudo documentation and manual pages.
5.4
PWDCH Startup and Command Line Parameters
If you want to experiment with pwdch from the command line before adding it to the
CMS main menu, this section is for you. If you are not confident with terminals under
UNIX, please consult the next paragraph regarding terminal configuration first.
Assuming you are using an AT&T605BCT terminal (with AVAYA Terminal Emulator or
similar) first change your environment settings by
$ TERM=605
$ export TERM
If your backspace key only creates a series of ^H instead of deleting characters also
enter
$ stty erase ^H
where ^H is created by typing backspace once. You are now ready to use pwch.
To execute pwdch in life mode (as opposed to demo mode), simply enter
$ pwdch
from the command line. Please note, that executing pwdch in normal user mode might
result in errors when attempting to change a password. If you have already configured
sudo and you want to test the entire configuration, type
$ sudo /usr/local/cms/pwdch
instead. Always resemble the entire path as entered in visudo, otherwise sudo might
ask you after a password. If you configured the system to use a different path, you
have to use that instead the one given above.
In the following we will present some parameters and startup variants. Changing the
default settings by passing parameters switches pwdch to demo mode. For demo
mode you do not require root permissions. That's why the following command
statements are called without using sudo. If you are running Small or Medium
Business Versions, the demo mode also removes the user restriction. This allows
potential customer to extensively test navigation. The difference between life and demo
mode is, that in the latter no command (defaulted to /usr/bin/passwd) is executed.
Instead program name and path are displayed on the screen. In demo mode you can
be sure, that no alterations are performed even when executing as root.
Two parameters may be passed to pwdch
$ pwdch <passwd_equivalent> <command>
where <passwd_equivalent> may be any test file possessing the same structure as
/etc/passwd. By experimenting with customary test files, you may want to try out the
exclusion of users described later in this document. If you specify <command>, pwdch
displays the calling convention and passed parameters for that command. This option
Page 6 of 16
is only relevant, if you desire to use pwdch for any other user-related task than
changing password. Also refer to our program customizations presented in the section
regarding licensing and ordering above.
Please note, that we have chosen to implement command line parameters only for
testing purposes as in life mode, as otherwise the trusted user may easily become
root by using a fake passwd file to change the root password.
5.5
CMS Main Menu Addition
Adding Items to the CMS Main Menu (Terminal View only) and making these additions
visible to a trusted user is a two step process. As a first step log on to the CMS system
using a terminal emulation application such as AVAYA Terminal Emulator. Do not use
CentreVu Supervisor as the procedure of assigning an application to a main menu item
is only available in the terminal environment. After having logged on navigate to
System Setup → Main Menu Addition as shown in the next figure
Navigate to Main Menu Addition
You now have to specify the text representing the new item in the CMS main menu and
the associated application. When specifying the application do not rely on the system
path, instead enter full path and file name. If you have followed the procedure
described above, you have to define /usr/local/cms/pwdch as shown below
Page 7 of 16
Define menu item name and application
As an option you may also add a description. To apply settings press <CR> and select
Add in the right hand menu. You have now associated the application with a main
menu item entry. To make the new entry visible to the trusted user in charge of
changing passwords, you may use either the terminal environment or CentreVu
Supervisor. In the terminal environment navigate to User Permissions → Main Menu
Access, enter the trusted user ID and the addition name. The latter is the same as the
description given above. If you prefer to use CentreVu Supervisor, first access Tools →
User Permissions and select Main Menu Addition Access from the Operations tab.
Then you have to provide essentially the same information as for the terminal
environment.
For more information on the tasks presented in this section, please refer to the
CentreVu CMS Administration Guide delivered with your CMS system.
5.6
Optional Cleanup Process
The optional cleanup utility pwdch_cleanup prevents consumption of CPU time in
case of abnormal termination of the pwdch application. Such a situation arises, when
the user closes the AVAYA Terminal Emulator without exiting from pwdch before. It is
highly recommended to instruct users accordingly, as such a behaviour may have an
impact on the underlying CMS application as well.
If pwdch_cleanup is not provided as part of your installation package, either request it
from us or simply recreate it from the following listing
#!/bin/sh
if [ -n "`ps -ef | grep pwdch`" ]
then
set `ps -ef | grep pwdch | awk '{ print $4" "$2 }'`
Page 8 of 16
while [ -n "$1" ]
do
if [ $1 -gt 5 ]
then
echo killing $2 with load $1 ...
kill -9 $2
fi
shift 2
sleep 1
done
fi
It is recommended to invoke the cleanup process on a regular basis. This is achieved
by modifying the crontab entries of your CMS system. First gain system privileges by
using the su command. By entering
# crontab –l
you may review the current configuration. Each entry specifies the time of execution
and the command to be executed. Fields are delimited by space and are ordered as
follows: <minute> <hour> <day of month> <month> <day of week>
<command>. To edit the crontab configuration, simply enter
# crontab –e
to invoke the system editor (vi in most cases). In the last line enter
10,40 * * * * /usr/local/cms/pwdch_cleanup
to let the system start the cleanup process every half hour. In case you have installed
pwdch.tar to a different location, modify the entry accordingly. It is highly
recommended to browse through the system documentation before modifying crontab
settings and to create backups before modifying any contents.
6
Program Usage
This section is devoted to the use of the CMS password service utility pwdch and the
proper setup of the required operation environment. So please read carefully through the
subsection regarding configuration of your terminal emulation. You may safely skip it if
you have worked with CMS using a terminal emulation program before, but be informed
that pwdch is more sensible to the emulation type than the CMS main application as it
supports more navigation keys (especially <PGDN>, <PGUP>, <HOME>) which CMS
does not.
6.1
AVAYA Terminal Emulation Configuration
We decided to exemplify terminal emulation configuration based on AVAYA Terminal
Emulator as this program is free to users of AVAYA products and supports all
necessary emulations. Please note that some very old versions of AVAYA Terminal
Emulator became unstable during operation on some systems, so be advised to
upgrade to a recent version of AVAYA Terminal Emulator (Version 1.0.17 and above
should be sufficient).
Our recommended terminal type to be emulated with the CMS main application and
pwdch is AT&T605BCT (in short "605"). In comparison to another very similar terminal
AT&T615BCT this type supports <PGUP>, <PGDN> and <HOME> in addition to cursor
navigation. The character representation is similar for both terminal types. We
Page 9 of 16
encountered some difficulties in representation and navigation with other standard
terminal types such as xterm, ansi, vt100 or vt102. The application is still useable
but window frames are drawn using the lower ASCII set and keys <PGUP>, <PGDN>
and <HOME> send <ESC> instead.
To setup AVAYA Terminal emulator for the use with CMS main application and pwdch,
select menu item Emulator from the Controls menu. You are presented several
terminal types. Now select AT&T 605BCT as shown in the next figure.
Choose emulation type AT&T 605BCT
If you have chosen to set up a new connection in Phones → Connection List, you have
to apply the same setting for Emulator in the Emulation tab. After having indentified the
target as telnet host in the General tab and having entered the target host name / IP
adress in the Network tab, you are now ready to connect to CMS.
The following assumes that pwdch has been integrated in the CMS application main
menu. If you desire to invoke pwdch from the shell, please skip back to subsection
PWDCH Startup and Command Line Parameters. After being connected to the CMS
system, you should receive a screen similar to the following one
Page 10 of 16
Successful connection to CMS - Enter terminal type "605"
Now log on to the system with your username and password. Then specify 605 as
terminal type. If you receive a warning related to the data backup as shown in the
screenshot above, skip it by pressing the <CR> key. In the CMS main menu select
PWD Service Utility to invoke pwdch. Please note, that your administrator might have
entered a different description for the CMS Password Service Utility (pwdch). If you are
presented the frames drawn with characters of the lower ASCII character set (the
border looks broken, as +, |, - and similar characters have been used), go to menu item
Controls → Terminal Options and check the Use Alternate Line Drawing Set button as
shown in the next figure.
Use alternate line drawing set for proper representation
This finishes terminal emulation configuration and you should now be able to use the
CMS Password Service Utility.
Page 11 of 16
6.2
Using PWDCH
First connect to CMS as described in the previous subsection. Then navigate to PWD
Service Utility (pwdch) in the CMS main menu. You are now presented a list of user
accounts made available to you by the system administrator.
You are presented a list of user accounts
By navigating to one of these accounts you may change his / her password by pressing
the <CR> key. Navigation is performed by the cursor keys and
−
−
−
<PGUP> skips one page up. If your list of users is small it only skips to the first
entry.
<PGDN> skips one page down. If your list of users is small it only skips to the last
entry.
<HOME> selects the first entry in the list.
Alternatively you may also choose to enter a character from a-z, A-Z. Doing so selects
the last occurence of the user account starting with the typed letter. If you want to exit
the CMS Password Utility without performing any action press the <ESC> key.
Alternatively you may scroll down to the end of the list and select Return to CMS Main
Application.
If you decide to change a users password by pressing the <CR> key, the application
simply asks you to enter the new password twice as shown in the next figure.
Page 12 of 16
The application asks you twice to change a users password
It then returns to the CMS main menu. You are now able to perform other CMS specific
tasks (e.g. Custom Reporting) and return if desired by selecting PWD Service Utility as
before.
At the end of the list presented by the CMS Password Service Utility you will also find a
special item Program Information. If selected you will be informed about licensing
mode, Author and some details regarding terminal setup. If your company purchased a
customized version, you might also find some additional facts here. A typical program
information screen is shown in the next figure.
Page 13 of 16
Typical program information screen
6.3
Excluding User Accounts
This subsection describes how certain users may be excluded from the list of user
accounts presented by pwdch. This task can and should be performed only by the
system administrator. As the configuration information is to be provided as part of the
comment column of /etc/passwd, root permissions are required. We decided to
exclude accounts instead of including them as in our experience this list of users stays
the same over a long period of time. We expect changes to be applied only at rare
occasions and during initial setup phase. pwdch typically excludes the user root as
well as accounts with user id zero and those identified by a special keyword (typically
NODISP, but this may be changed during the ordering process) in the comment
column of /etc/passwd. The columns in /etc/passwd are seperated by ":" with
structure
account:x:uid:gid:comment:homedir:shell
For more information about the /etc/passwd system file please consult a book about
UNIX or Solaris. To change the value of the comment column, use a simple text editor
such as vi to edit the file. Before doing so we recommend creating a backup file
invoking
# cp /etc/passwd /etc/passwd.backup
from the shell. You are now ready to change to original file using
# vi /etc/passwd
If you have chosen to use another editor, you have to substitute its name instead of vi.
In order to exclude users from the account list of pwdch, you now simply have to add
Page 14 of 16
the keyword in the comment column of each user to be affected. After having
completed that task exit the editor. If using vi, enter the command wq! to override file
permission otherwise your settings may be lost. If you are not so confident with pwdch,
we recommend testing the result by simply starting pwdch from the command line.
7
Action Chart
To make the information presented in this document more accessible we decided to
include a so-called action chart. This action chart gives you a brief overview of the steps
to perform for certain tasks. This action chart is not exhaustive, as it only provides a red
line to follow for more complex tasks not covered by a single section in this document.
To install and configure pwdch, you should
−
−
−
−
−
browse through the Requirements section
complete the sudo installation (download from www.sunfreesoftware.com, use
pkgadd -d sudo* to install)
complete the pwdch installation (creation of /usr/local/cms, unpacking the
tarball pwdch.tar)
add a main menu item (access System Setup → Main Menu Addition from the
terminal environment)
optional: modify crontab to invoke pwdch_cleanup on a regular basis
To give a trusted user access to pwdch, you should
−
−
configure sudo (use visudo command to give root access permission to
/usr/local/cms/pwdch for a certain trusted user)
reveal the main menu item (add Main Menu Access permission for the trusted user
using CMS terminal environment or CentreVu Supervisor)
To remove a users permission to access pwdch, you should
−
−
−
8
hide the main menu item (remove Main Menu Access permission using CMS
terminal environment or CentreVu Supervisor)
configure sudo (use visudo command and remove the corresponding root access
permission to /usr/local/cms/pwdch)
optional: remove any crontab entries pointing to pwdch_cleanup
PWDCH Removal
Although we hope that this part of the document will never be required, we provide it for
completeness. To remove the CMS Password Service Utility just follow the steps given
below
−
−
−
−
configure sudo (use visudo command to remove all lines with reference to
/usr/local/cms/pwdch)
hide main menu items (remove Main Menu Access permission for all users using
CMS terminal environment or CentreVu Supervisor)
unassign the application from the CMS main menu (by essentially following the
same steps given for the assignment procedure, but selecting Delete instead of Add)
remove pwdch by entering
# rm /usr/local/cms/pwdch*
# rm /usr/local/cms/example_passwd
−
optionally remove sudo by using the pkgrm command
Page 15 of 16
−
optionally remove the settings from /etc/passwd using a text editor as described
above
You now have removed the CMS Password Service Utility safely from your system. In
order to reinstall you only have to repeat the steps described in this document. If you
desire to upgrade to a new version of pwdch, you simply have to replace the executable
in /usr/local/cms.
9
References
−
−
−
CentreVu CMS Administration – AVAYA
Solaris 8 Referenz – Markt & Technik
termcap & terminfo – O’Reilly 1992
Page 16 of 16