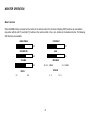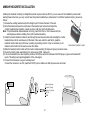
1
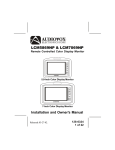
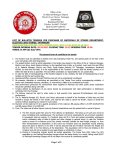
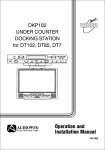
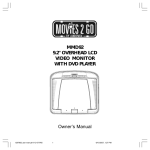
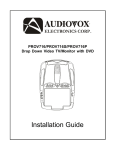
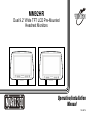
MM92HR
Dual 9.2” Wide TFT LCD Pre-Mounted
Headrest Monitors
Operation/Installation
Manual
128-8276
Important Notices
Installation of headrest products require careful planning and preparation. Be extremely careful of seats that have airbags
built into them. Keep wiring away from any air bag wiring (usually identified by yellow connectors and yellow wire jackets).
Damage to air bag wiring can result in personal injury to vehicle occupants. If you have any questions regarding wire
routing or installation in a vehicle, please contact Audiovox Technical Support at 1-800-225-6074.
When connecting power and ground in a mobile video installation, insure that the ACC wire is fused at the point where it is
connected to the vehicle ACC wiring. Failure to do so can result in damage to the vehicle if a short circuit develops
between the vehicle connection point and the mobile video product.
An LCD panel and/or video monitor may be installed in a motor vehicle and visible to the driver if the LCD panel or video
monitor is used for vehicle information, system control, rear or side observation or navigation. If the LCD panel or video
monitor is used for television reception, video or DVD play, the LCD panel or video monitor must be installed so that these
features will only function when the vehicle is in “park” or when the vehicle’s parking brake is applied.
An LCD panel or video monitor used for television reception, video or DVD play that operates when the vehicle is in gear
or when the parking is not applied must be installed to the rear of the driver’s seat where it will not be visible, directly or
indirectly, to the operator of the motor vehicle.
MM92HR System
The MM92HR system consists of two headrests each with a 9.2" LCD monitor. An additional DVD player (Audiovox AVD400A or MMDV5
or similar) is required in order to view DVD videos on this system. Alternatively, a gaming system can be used as a video input to play
video games. In either case, it is recommended that a video amplifier (such as Audiovox VA100) be used to eliminate video signal
loss which can result in poor picture quality.
In addition, 2-channel wireless IR (Infra-Red) headphones (Audiovox IR2CHS or similar) may be purchased to allow listening to the
system without wired headphones.
Quick Start Guide
1. Turn on the video source (DVD player, game, etc.).
2. Press the Power button on the monitor.
Note: When the DVD player or source is turned on, it will automatically turn on the headrest monitor if the monitor is set to AV1
input.
3. Press the AV button to view the video source. (If there is no video displayed or video source selected, the monitor will turn off.)
a. AV1 source is the DVD player, game, etc.
b. AV2 is the AV2 input on the front of the monitor next to the headphone jack. Use the supplied adapter to input a video
game
or other video source.
4. When using the optional wired headphones, plug the headphones into the headphone jack on the front of the unit.
5. When using the optional 2-channel (A/B) wireless headphones, each headphone has an A/B switch on it. The monitor can be
set to broadcast on channel A (2.3MHz/2.8MHz), or channel B (3.2MHz/3.8MHz. (Refer to the Monitor Operation section to set
the Infrared transmitter to either channel A or channel B.)
3
MONITOR CONTROLS AND INDICATORS
Control Function Descriptions for Monitor M1 and M2
9
M1 / M2 Panel Control
1.
2.
3.
4.
5.
6.
7.
8.
9.
1
2
3
4
5
6 7
8
4
Wired Earphone Jack
Audio/Video (AV2) Input Jack
SOURCE Button
MENU Button
Infrared (IR) Receiver/Transmitter
Audio Level Decrease/Cursor Down (-) Button
Audio Level Increase/Cursor Up (+) Button
POWER Button
TFT LCD Monitor
REMOTE CONTROL OPERATION
Battery Installation
REMOTE CONTROL
To replace the battery in the Remote Control, perform the
following procedure:
1. Place the Remote Control face down on a flat surface.
Hold the Remote Control in place using one hand and
with the other hand insert a fingernail into the groove of
the spring catch (A in Step 1); insert thumbnail into the
Battery Holder groove (B in Step 1) and slide out
A
CR2025
Battery holder.
2. Install “CR2025” Lithium Battery in the holder as shown
STEP 1
in Step 2.
B
3. Slide the Battery Holder back into the remote control
until it clicks in place as shown Step 3.
5
STEP 2
STEP 3
REMOTE CONTROL FUNCTIONS
*
Function control is available on both the headrest monitor and remote control.
NOTE: To control the individual units (M1 Monitor / M2 Monitor) point remote directly at appropriate monitor and press the POWER
button.
1
1. POWER Button: Press this button to apply power to the M1
and M2 monitor.
2. INPUT Button: When pressed, selects AV1 or AV2 input
source for display.
6
2
3. Volume Increase/Menu Cursor Button: During normal play,
increases audio volume. In menu mode, moves cursor up/right
to desired function.
3
4. Escape (ESC) Button: Press to exit menu function.
5. Volume Decrease/Menu Cursor Button: During normal play,
decreases audio volume. In menu mode, moves cursor
down/left to desired function.
5
6. MENU Button: Press to display list of menu items.
4
6
MM92HR SYSTEM OVERVIEW
1)
The MM92HR is a versatile audio / video system which includes two pre-mounted headrest monitors. Each can accept an
Audio / Video input to either the AV1 or AV2 inputs.
2) The M1 Monitor is comprised of a 9.2" TFT LCD monitor that allows the user to select from AV1 and AV2 sources. The M1
monitor has a built-in infrared audio transmitter for use with optional two-channel wireless headphones.
3) The M2 monitor is comprised of a 9.2" TFT LCD monitor that allows the user to select from AV1 and AV2, sources. The M2
monitor has a built-in infrared audio transmitter for use with optional two channel wireless headphones.
4) The monitors will show all of the functions with the comprehensive On Screen Display (OSD).
5) The optional IR Headphone sets (P/N IR2CHS) have an A-B switch that allow the users to select the audio from either the M1
(CH A) or the M2 (CH B).
6) The M1 and M2 Monitors will accept an audio / video input through either the AV2 input (located on the MM92HR front panel)
or the AV1 input via the monitor cable. The audio / video device could be a DVD player, video game system, video camera,
or other input device.
7
MONITOR OPERATION
Menu Functions
When the MENU button is pressed on the monitor or the remote control, the On Screen Display (OSD) functions are accessible in
conjunction with the Left (\) and right (]) buttons on the remote control or the + and - buttons on the headrest monitor. The following
OSD functions are available:
BRIGHTNESS
-
CONTRAST
+50
-
+50
SATURATION
-
HUE
+50
-
+50
VOLUME
INFRARED
-
+50
u 2.3 - 2.8MHz
SOURCE
MODE
Av1
3.2 - 3.8MHz
4:3
AV2
8
16 : 9
MM92HR HEADREST INSTALLATION
Installing the headrest monitor(s) is straightforward and requires minimum effort. If you are unsure of the installation process after
reading these instructions, you may want to have this product installed by a professional. To install the headrest monitor, proceed as
follows:
1) Release the existing headrest and pull it straight up until it clears the back of the seat.
2) Note the distance between the steel tubes of the headrest just removed and adjust the
monitor headrest tubes together or apart as shown until they match this dimension.
Note: If internal seatback sleeve diameter is too big, insert the 12mm or 14mm sleeves into the
existing sleeves before installing the monitor headrest assembly.
3) Guide the monitor headrest cable into and through the seat sleeves tubes while inserting the monitor
headrest tubes into the seat sleeves. At the back of the seat, under the seat fabric, grasp the
headrest monitor cable and pull it down, avoiding any twisting or kinks. It may be necessary to cut
Adjust tubes together or apart
fasteners at the bottom of the seat to access the cables.
4) Mate the headrest monitor cable with the monitor cable assembly (AV input and power) as shown below.
5) Route the monitor cable assemblies to the video source (DVD, Game etc.).
6) It is recommended that a video amplifier (Audiovox VA100) be wired in line between the DVD player or game and headrest AV
inputs. This will prevent signal degradation of the video signal.
7) Connect the black wires to a good vehicle ground.
Connect the red wires to an ACC (switched 12VDC) source. Make sure that all power wires are fused.
DVD
Video1(yellow)
Audio1 R(red)
Audio1 L(white)
DC12V
GND
ACC
9
TROUBLESHOOTING
SOLUTION
PROBLEM
IR sensor inoperative
— Verify that the battery in the remote is fresh.
— Verify that the remote sensor eye is not obstructed.
Disc won't play
— Check the type of disc you put into disc tray. This monitor accepts only DVDs,
audio CDs and MP3s.
— Both the unit and the disc are coded by region. If the regional codes don’t match,
the disc can’t be played.
Play starts, but then stops immediately
— The disc is dirty. Clean it.
— Condensation has formed. Allow external player to dry out.
No sound or distorted sound
— Make sure external DVD is connected properly. Make sure all cables are securely
inserted into the appropriate jacks.
— If you are using the IR headphones, make sure you turn on the IRT power, and
make sure the IR headphones are set to the correct channel (A or B), and that the
corresponding headrest IR transmitter is set to the correct channel.
OSD Displays “Incorrect Disc Format”
— Disc loaded backwards, turn disc over.
10
CAUTION
1.
2.
3.
4.
Keep the monitor clean and dry.
Always seek qualified personnel to perform repairs. Never attempt your own repairs.
Do not drop the monitor or expose to strong impacts.
Do not expose to direct sunlight for extended periods of time.
HEADREST MONITOR SPECIFICATIONS
1.
2
3.
4.
5.
6.
7.
8.
9.
10.
11.
Type :
Mounting
AV Input
IR Transmitter
Resolution
Power Source
Power Consumption
Operating Temperature
Storage Temperature
Video Display System
Wired Headphone
Audio Output
13. Environmental Humidity
9.2” Wide TFT LCD Monitor
Posts Adjustable From 4” apart to 8” apart
1 Set Wired AV1 Input, AV2 Input Jack (1/8”)
Channel A: 2.3MHz (Left), 2.8MHz (Right)
Channel B: 3.2MHz (Left), 3.8MHz (Right)
800 RGB X 480
+12 VDC
30W For 2 Monitors
32°F ~ 140°F (0°C ~ +60°C)
-4°F ~ 176°F (-20°C ~ +80°C)
NTSC/PAL (Selectable)
0.03W @ 32 ohm
< 90%
11
12 MONTH LIMITED WARRANTY
Applies to Movies To Go Mobile Video Products
AUDIOVOX ELECTRONICS CORP. (the Company) warrants to the original retail purchaser of this product that should this product or any part
thereof, under normal use and conditions, be proven defective in material or workmanship within 12 months from the date of original purchase, such
defect(s) will be repaired or replaced with reconditioned product (at the Company's option) without charge for parts and repair labor. A game
controller, if supplied, is similarly waranted for ninety (90) days.
To obtain repair or replacement within the terms of this Warranty, the product is to be delivered with proof of warranty coverage (e.g. dated bill of
sale), specification of defect(s), transportation prepaid, to the Company at the address shown below.
This Warranty does not extend to the elimination of externally generated static or noise, to correction of antenna problems, to costs incurred for
installation, removal or reinstallation of the product, or to damage to digital memory cards, discs, speakers, accessories or vehicle electrical
systems.
This Warranty does not apply to any product or part thereof which, in the opinion of the Company, has suffered or been damaged through alteration,
improper installation, mishandling, misuse, neglect, accident, or by removal or defacement of the factory serial number/bar code label(s). THE
EXTENT OF THE COMPANY'S LIABILITY UNDER THIS WARRANTY IS LIMITED TO THE REPAIR OR REPLACEMENT PROVIDED ABOVE
AND, IN NO EVENT, SHALL THE COMPANY'S LIABILITY EXCEED THE PURCHASE PRICE PAID BY PURCHASER FOR THE PRODUCT.
This Warranty is in lieu of all other express warranties or liabilities. ANY IMPLIED WARRANTIES, INCLUDING ANY IMPLIED WARRANTY OF
MERCHANTABILITY, SHALL BE LIMITED TO THE DURATION OF THIS WRITTEN WARRANTY. ANY ACTION FOR BREACH OF ANY
WARRANTY HEREUNDER INCLUDING ANY IMPLIED WARRANTY OF MERCHANTABILITY MUST BE BROUGHT WITHIN A PERIOD OF 24
MONTHS FROM DATE OF ORIGINAL PURCHASE. IN NO CASE SHALL THE COMPANY BE LIABLE FOR ANY CONSEQUENTIAL OR
INCIDENTAL DAMAGES FOR BREACH OF THIS OR ANY OTHER WARRANTY, EXPRESS OR IMPLIED, WHATSOEVER. No person or
representative is authorized to assume for the Company any liability other than expressed herein in connection with the sale of this product.
Some states do not allow limitations on how long an implied warranty lasts or the exclusion or limitation of incidental or consequential damage so the
above limitations or exclusions may not apply to you. This Warranty gives you specific legal rights and you may also have other rights which vary
from state to state.
Audiovox Electronics Corporation, 150 Marcus Blvd., Hauppauge, N.Y., • 1-800-645-4994
12
128-6429F
THIS PAGE LEFT BLANK INTENTIONALLY
13
© 2007 Audiovox Corporation, 150 Marcus Blvd., Hauppauge, NY 11788
128-8276