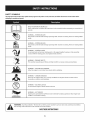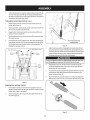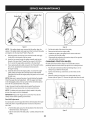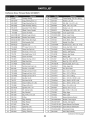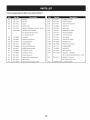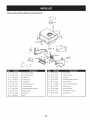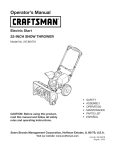
1
perator's
nual
CX
I:RRFrSMAN+
IES
Electric Start
SNOW THROWER
Model No. 247.883971
,, SAFETY
o ASSEMBLY
OPERATION
MAINTENANCE
PARTS LIST
o ESPANOL
CAUTION" Before using this product,
read this manual and follow all safety
rules and operating
instructions.
Sears Brands Management
Corporation,
Visit our website:
Hoffman
Estates,
www.craftsman.com
IL 60179, U.S.A.
Form No. 769-08168B
(June 17, 2013)
Warranty Statement ..................................
Safe Operation Practices ..........................
Assembly ..................................................
Operation ..................................................
Service and Maintenance .........................
Off-Season Storage ..................................
Page
Page
Page
Page
Page
Page
2
3
7
12
17
25
Troubleshooting ........................................
Parts List ...................................................
Repair Protection Agreement ...................
Espa_ol .....................................................
Service Numbers ......................................
Page
Page
Page
Page
Back
27
28
47
48
Cover
CRAFTSMANCX TWOYEAR FULL WARRANTY
FORTWO YEARSfrom the dateof purchase,this productis warrantedagainstanydefectsin materialor workmanship.A defective
productwill receivefree repairor replacementif repairis unavailable.
Forwarranty coverage details to obtain free repairor replacement,visit the web site: www.craftsman.com
Thiswarranty coversONLYdefects in material and workmanship. Warranty coveragedoes NOT include:
•
Expendableitemsthat can wearoutfrom normalusewithin the warrantyperiod,includingbutnot limitedto augers,augerpaddles,
drift cutters,skid shoes,shaveplate,shearpins, sparkplug,air cleaner,belts,and oil filter.
•
Standardmaintenanceservicing,oil changes,or tune-ups.
•
Tire replacementor repaircausedby puncturesfrom outsideobjects,such as nails, thorns,stumps,or glass.
•
•
Tireor wheelreplacementor repairresultingfrom normalwear,accident,or improper
operationor maintenance.
Repairsnecessarybecauseof operatorabuse,including
but notlimitedto damagecaused byover-speedingthe engine,or from
impacting
objectsthat bendthe frame,auger shaft,etc.
Repairsnecessarybecauseof operatornegligence,includingbutnot limitedto, electricaland mechanicaldamagecausedby
improperstorage,failureto usethe propergrade and amountof engineoil,or failureto maintainthe equipmentaccordingto the
instructions
containedinthe operator'smanual.
•
•
•
Engine(fuel system)cleaningor repairscausedbyfuel determinedto be contaminatedor oxidized(stale). Ingeneral,fuel shouldbe
usedwithin30 days of its purchasedate.
Normaldeteriorationand wearof the exteriorfinishes,or productlabel replacement.
This warrantyis void if this productisever usedwhileprovidingcommercialservicesor if rentedto anotherperson.
This warrantygivesyou specificlegal rights,and youmay alsohaveother rightswhichvary from stateto state.
Sears Brands ManagementCorporation, Hoffman Estates, IL 60179
EngineOil Type:
EngineOil Capacity:
5W-30
37 ounces
FuelCapacity:
SparkPlug:
Approx.5 Quarts
F6RTC(951-10292)
SparkPlugGap:
.020"to .030"
Model Number.................................................................
Serial Number .................................................................
Date of Purchase .............................................................
Recordthe modelnumber,serialnumber
and dateof purchaseabove
© Sears Brands,LLC
2
Thissymbolpointsout importantsafety instructionswhich, if not
followed, couldendangerthe personalsafetyand/or property of
yourself and others.Readandfollow all instructions in this manual
beforeattempting to operatethis machine.Failureto complywith these
instructions
may resultin personalinjury.Whenyou seethis symbol, HEED
ITSWARNING!
CALIFORNIA
PROPOSITION
65
EngineExhaust,someof its constituents,and certain vehiclecomponents
containor emit chemicalsknownto Stateof Californiato causecancerand
Thismachinewasbuilt to beoperatedaccordingto the safeoperation
practicesin this manual.Aswith anytype of powerequipment,
carelessnessor error on the part of the operatorcanresultin seriousinjury.
Thismachineiscapableof amputating fingers, hands,toesandfeet and
throwingdebris. Failureto observethefollowing safety instructions
could
resultin seriousinjuryor death.
Your Responsibility--Restrict the useof this powermachineto
personswho read,understandandfollow the warningsand instructionsin
this manualandon the machine.
SAVETHESEINSTRUCTIONS!
birth defectsor other reproductiveharm.
TRAINING
Disengage
all controlleversbeforestartingtheengine.
Read,understand,andfollowall instructionsonthe machineandinthe
manual(s)beforeattemptingto assembleandoperate.Failureto dosocan
resultinseriousinjury tothe operatorand/orbystanders.Keepthis manual
inasafeplaceforfutureandregularreferenceandfororderingreplacement
Adjustcollectorhousingheightto cleargravelor crushedrocksurfaces.
parts.
Letengineandmachineadjustto outdoortemperaturebeforestartingto
clearsnow.
Befamiliarwith all controlsandtheir properoperation.Knowhowto stop
the machineanddisengagethemquickly.
Neverallowchildrenunder14yearsof ageto operatethis machine.Children
14andovershouldreadandunderstandthe instructionsandsafeoperation
practicesinthis manualandonthe machineandbetrainedandsupervised
byanadult.
Neverallowadultsto operatethismachinewithout properinstruction.
Thrownobjectscancauseseriouspersonalinjury.Planyoursnow-throwing
patternto avoiddischargeof materialtowardroads,bystandersandthe like.
Keepbystanders,
petsandchildrenat least75feetfrom the machinewhileit
isin operation.Stopmachineif anyoneentersthe area.
Exercise
cautionto avoidslippingor falling, especiallywhenoperatingin
reverse.
PREPARATION
Thoroughlyinspect
the areawherethe equipmentisto beused.Removeall
doormats,newspapers,
sleds,boards,wiresandotherforeignobjects,which
couldbetrippedoveror thrownbythe auger/impeller.
Alwayswearsafetyglasses
or eyeshieldsduringoperationandwhile
performinganadjustmentor repairto protectyoureyes.Thrownobjects
whichricochetcancauseseriousinjuryto the eyes.
Donot operatewithout wearingadequatewinteroutergarments.Donot
wearjewelry,longscarvesorotherlooseclothing,whichcouldbecome
entangledin movingparts.Wearfootwearwhichwill improve
footing on
slipperysurfaces.
Usea groundedthree-wireextensioncordandreceptacleforall machines
with electricstartengines.
Neverattemptto makeanyadjustmentswhileengineisrunning,except
wherespecificallyrecommended
inthe operator'smanual.
Safe Handling
of Gasoline:
Toavoid personalinjuryor property damageuseextreme carein handling
gasoline.Gasolineisextremely flammable andthe vaporsareexplosive.
Seriouspersonalinjurycan occurwhengasolineis spilledon yourselfor your
clotheswhichcanignite. Washyour skinandchangeclothesimmediately.
Useonlyanapprovedgasolinecontainer.
Neverfill containersinsidea vehicleor ona truckor trailerbedwitha plastic
liner.Alwaysplacecontainersonthe groundawayfrom yourvehiclebefore
filling.
Whenpractical,removegas-poweredequipmentfrom the truckor
trailer andrefuelit onthe ground.Ifthisis not possible,thenrefuelsuch
equipmenton atrailerwith aportablecontainer,ratherthanfrom agasoline
dispensernozzle.
Keepthe nozzleincontactwith the rim ofthe fuel tankor containeropening
at all timesuntil fuelingiscomplete.Donot usea nozzlelock-opendevice.
Extinguishall cigarettes,cigars,pipesandothersourcesof ignition.
Neverfuel machineindoors.
Neverremovegascapor addfuel whilethe engineishot or running.Allow
engineto coolat leasttwo minutesbeforerefueling.
Neveroverfill fueltank.Filltank to nomorethan1/2inchbelowbottomof
filler neckto allowspacefor fuelexpansion.
Replace
gasolinecapandtightensecurely.
Ifgasolineisspilled,wipeit offthe engineandequipment.Moveunitto
anotherarea.Wait.5minutesbeforestartingtheengine.
To
reduce
firehazards,
keep
machine
free
ofgrass,
leaves,
orother
debris
build-up.
Clean
upoilorfuelspillage
and
remove
any
fuelsoaked
debris.
Never
store
themachine
orfuelcontainer
inside
where
there
isanopen
flame,
spark
orpilot
light
asonawater
heater,
space
heater,
furnace,
clothes
dryer
orother
gas
appliances.
OPERATION
Useonlyattachmentsandaccessories
approvedbythe manufacturer(e.g.
wheelweights,tire chains,cabsetc.).
Whenstartingengine,pull cordslowlyuntil resistanceisfelt, thenpull
rapidly.Rapidretractionofstartercord(kickback)will pullhandandarm
towardenginefasterthanyoucanletgo. Brokenbones,fractures,bruisesor
sprainscouldresult.
Ifsituationsoccurwhicharenot coveredinthismanual,usecareandgood
judgment.
Donot put handsor feetnearrotatingparts,inthe auger/impellerhousing
or chuteassembly.
Contactwith the rotatingpartscanamputatehandsand
feet.
CLEARING
Theauger/impellercontrolleverisasafetydevice.Neverbypassits
operation.Doingsomakesthe machineunsafeandmaycausepersonal
injury.
Handcontactwith the rotatingimpellerinsidethedischargechuteisthe most
commoncauseof injuryassociated
with snowthrowers.Neveruseyourhandto
cleanout the dischargechute.
Thecontrolleversmustoperateeasilyin bothdirectionsandautomatically
returnto the disengagedpositionwhenreleased.
Toclearthe chute:
A CLOGGED
DISCHARGE
CHUTE
a.
SHUTTHE
ENGINE
OFF!
Neveroperatewith amissingor damagedchuteassembly.Keepall safety
devicesin placeandworking.
b.
Wait 10secondsto besurethe impellerbladeshavestopped
rotating.
Neverrunanengineindoors
or inapoorlyventilatedarea.Engineexhaust
containscarbonmonoxide,anodorlessanddeadlygas.
c.
Alwaysuseaclean-outtool, not yourhands.
MAINTENANCE
& STORAGE
Donot operatemachinewhileunderthe influence
of alcoholor drugs.
Nevertamperwith safetydevices.Checktheirproperoperationregularly.
Referto the maintenanceandadjustmentsectionsof thismanual.
Mufflerandenginebecomehot andcancauseaburn.Donot touch.Keep
childrenaway.
Beforecleaning,repairing,or inspecting
machinedisengageall control
leversandstopthe engine.Waituntil the auger/impellercometo acomplete
stop.Disconnect
thesparkplugwire andgroundagainstthe engineto
preventunintendedstarting.
Exercise
extremecautionwhenoperatingonor crossinggravelsurfaces.Stay
alertforhiddenhazardsor traffic.
Exercise
cautionwhenchangingdirectionandwhileoperatingonslopes.Do
not operateon steepslopes.
Checkboltsandscrewsforpropertightnessat frequentintervals
to keepthe
machineinsafeworkingcondition.Also,visuallyinspect
machineforany
damage.
Planyoursnow-throwingpatternto avoiddischargetowardswindows,
walls,carsetc.Thus,avoidingpossiblepropertydamageor personalinjury
causedbyaricochet.
Donot changethe enginegovernorsettingor over-speed
the engine.The
governorcontrolsthe maximumsafeoperatingspeedof the engine.
Neverdirectdischargeat children,bystanders
andpetsor allowanyonein
front of the machine.
Snowthrowershaveplatesandskidshoesaresubjectto wearanddamage.
Foryoursafetyprotection,frequentlycheckall componentsandreplace
with originalequipmentmanufacturer's
(OEM)partsonlyaslistedinthe
Partspagesofthisoperator'smanual.Useof partswhichdonot meetthe
originalequipmentspecifications
mayleadto improper
performanceand
compromisesafety!
Donot overloadmachinecapacitybyattemptingto clearsnowat too fastof
arate.
Neveroperatethismachinewithoutgoodvisibilityor light. Alwaysbesureof
yourfootingandkeepafirm holdon the handles.Walk,neverrun.
Disengage
powerto the auger/impellerwhen transportingor not in use.
Checkcontrolleversperiodicallyto verifytheyengageanddisengage
properlyandadjust,if necessary.
Referto the adjustmentsectioninthis
operator'smanualfor instructions.
Neveroperatemachineat hightransportspeedsonslipperysurfaces.Look
downandbehindandusecarewhenbackingup.
If the machineshouldstartto vibrateabnormally,stopthe engine,
disconnectthe sparkplugwire andgroundit againstthe engine.Inspect
thoroughlyfordamage.Repairanydamagebeforestartingandoperating.
Maintainor replacesafetyandinstruction
labels,asnecessary.
Observe
properdisposallawsandregulationsforgas,oil,etc.to protectthe
environment.
Disengage
all controlleversandstopenginebeforeyouleavethe operating
position(behindthe handles).Waituntil the auger/impellercomesto
acompletestopbeforeuncloggingthe chuteassembly,
makingany
adjustments,or inspections.
Priorto storing,runmachineafewminutesto clearsnowfrom machineand
preventfreezeupof auger/impeller.
Neverstorethe machineor fuelcontainerinsidewherethereisanopen
flame,sparkor pilot light suchasa waterheater,furnace,clothesdryeretc.
Neverput yourhandin the dischargeor collectoropenings.Donot unclog
chuteassemblywhileengineis running.Shutoff engineandremainbehind
handlesuntil all movingpartshavestoppedbeforeunclogging.
Alwaysreferto the operator'smanualforproperinstructionsonoff-season
storage.
4
Checkfuelline,tank,cap,andfittings frequentlyfor cracksor leaks.Replace
if necessary.
Donot crankenginewith sparkplug removed.
Accordingto the ConsumerProductsSafetyCommission
(CPSC)
andthe
U.S.Environmental
ProtectionAgency(EPA),
thisproducthasan Average
Useful Life of seven(7)years,or 60 hoursofoperation.Atthe endof
the Average Useful Life havethe machineinspectedannuallybyan
authorizedservicedealerto ensurethat all mechanical
andsafetysystems
areworkingproperlyandnotwornexcessively.
Failureto dosocanresultin
accidents,
injuriesor death.
DO NOT MODIFY
ENGINE
Toavoidseriousinjuryor death,do notmodifyenginein anyway. Tampering
with the governorsetting canlead to arunawayengineandcauseit to
operateat unsafespeeds.Nevertamper with factory setting of engine
governor.
NOTICE
REGARDING
EMiSSiONS
Engineswhich are certifiedto complywith Californiaandfederal EPA
emissionregulations for SORE
(SmallOff RoadEquipment)arecertified
to operate on regularunleadedgasoline,and mayincludethe following
emissioncontrol systems:EngineModification (EM),OxidizingCatalyst(0C),
SecondaryAir injection(SAI)andThreeWayCatalyst(TWC)if soequipped.
SPARK ARRESTOR
e
This machineisequippedwith an internalcombustionengine andshould
not be usedon or near any unimprovedforest-covered,brushcoveredor
grass-coveredland unlessthe engine'sexhaust systemis equippedwith a
sparkarrestormeeting applicable localor state laws (if any).
Ira sparkarrestoris used,it shouldbe maintained in effective working order
bythe operator. In the State of Californiathe aboveisrequired bylaw (Section
4442of the CaliforniaPublicResourcesCode).Otherstates mayhavesimilar
laws.Federallaws apply on federal lands.
Asparkarrestorfor the muffler is availablethrough your nearestSearsParts
andRepairServiceCenter.
SAFETY
SYMBOLS
Thispage depicts and describes safety symbols that may appear on this product. Read, understand, and follow all instructions on the machine before
attempting
to assemble and operate.
READ THE OPERATOR'S MANUAL(S)
Read, understand,
and follow
all instructions
in the manual(s) before
attempting
to assemble
and
operate
WARNING--
ROTATING BLADES
Keep hands out of inlet and discharge openings
inside
WARNING--
blades
while
machine is running. There are rotating
blades
ROTATING AUGER
Do not put hands or feet near rotating
Contact with the rotating
WARNING--THROWN
This machine
parts, in the auger/impeller
parts can amputate
can cause serious personal
injury.
IS FLAMMABLE
before refueling.
CARBON MONOXIDE
Never run an engine indoors or in a poorly ventilated
monoxide, an odorless and deadly gas.
area. Engine exhaust contains carbon
ELECTRICAL SHOCK
Do not use the engine's
WARNING--
or chute assembly.
OBJECTS
Allow the engine to cool at least two minutes
WARNING--
housing
hands and feet.
may pick up and throw and objects which
WARNING--GASOLINE
WARNING--
machine is running. There are rotating
ROTATING BLADES
Keep hands out of inlet and discharge openings
inside
WARNING--
while
electric starter in the rain
HOT SURFACE
Engine parts, especially the muffler,
muffler to cool before touching.
WARNING:
Your Responsibility--Restrict
the warnings
and instructions
in this manual
become extremely
the use of this power machine
hot during
to persons
and on the machine.
SAVETHESEiNSTRUCTIONS!
6
operation.
Allow engine and
who read, understand
and follow
NOTE:References
to rightor left sideof the snowthroweraredeterminedfrom the
operatingpositionlookingforwardto the front of the machine.
Removing
From
(:rate
1.
Removescrewsfrom the bottomofthe cratesecuringthe sides,andendsof
the shippingcrate.
2.
Liftoff the top off of the crateandsetout of thewayofthe assemblyarea.
3.
Removeanddiscardplasticbagthat coversunit.
4.
Removeanyloosepartsincludedwith unit (e.g.,Operator'sManual,etc.).
5.
Pushdownonthe lowerhandleandpullunit backout of crate.
6.
Makecertainthe cratehasbeencompletelyemptiedbeforediscardingit.
Assembly
1.
Removeanypackagingmaterialfromthe upperhandle.
2.
Removethe lowerplasticwing nut,bellevillewasherandcarriageboltfrom
eachsideof the upperhandle;then raisethe upperhandleassemblyuntil it
snapsoverthe lowerhandle.SeeFigure1.
"_,r
,,J
Figure2
ChuteAssembly
1.
Removelocknutsandscrewssecuringoneofthe flangekeepersto the chute
assembly.Loosenthe fastenersof theothertwo flangekeepers.SeeFigure
3.
f
Figure1
3.
Lookingbeneaththe handlepanel,checkthatall of the cables(steering,
auger,shift, anddrive)areproperlyroutedandnot pinchedor kinked.
Makecertainthe springsat the lowerendofthe augeranddrivecablesare
securelyhookedinto theirrespectiveactuatorbrackets.
4.
Securethe upperhandleandlowerhandlewiththe two wing nuts,belleville
washers,andcarriagebolts removedearlier.Tightenthe twowing nuts
alreadyinstalledin the upperholesto firmly securethe upperhandleand
supporttubes.SeeFigure2.
Figure3
2.
Loosen,but do not remove,the chutecrankbracketinordertoattachthe
chuteassembly.SeeFigure5.
7
3.
Place
chuteassembly
ontochutebaseasshowninFigure4. Makesurethatthe
chutenotches
engagewith thespiralendof chutedirectionalcontrol,andthe
two flangekeepers
arebeneaththeflangeonthe chutebase.
4.
Secureflangekeeperremovedearlierwith locknutsandscrews.Tighten
down nutssecuringtheothertwo flangekeepers.SeeFigure5.
Set-Up
/ /
/
/
ShearPins
Apairofreplacement
auger
shear
pinsandbowtiecotter
pinshave
been
included
withyour
snowthrower.
They
arestored
intheholes
provided
intheplastic
dash
panel
asseen
in
Figure7.Forinformation
regarding
replacing
theshear
pins,seeReplacing
Shear
Pins
inthe
Operation
section
ofthismanual.
Figure 4
......
Figure7
ChuteClean-OutTool
Thechutedean-outtool isfastenedto the top of the augerhousingwitha
mountingclip andacabletie at the factory.Cutthe cabletie beforeoperatingthe
snowthrower.SeeFigure8.
Clean-outTool
Figure5
5.
Re-tightenthe hardwaresecuringthechutecrankbracket.
6.
Checkthatthe chutecablesareproperlyroutedthroughthe cableguideon
top of engineshroud.SeeFigure6.
/
/
/
/
/
J
Figure8
Figure 6
8
Drift Cutters
Adding Fuel
Thesnowthrowerdrift cuttersaremountedinverted
at the factoryforshipping
purposes.
1.
Useextreme carewhen handling gasoline.Gasolineisextremely
flammable andthe vaporsareexplosive. Neverfuel the machineindoorsor
while the engine ishotor running.Extinguishcigarettes,cigars,pipesand
othersourcesof ignition.
Removethe fourwing knobs(twooneachside)andcarriagebolts.Place
drift cutter inuprightpositionandre-secure.SeeFigure9.
Alwayskeephandsandfeet clearof equipment moving parts. Donot usea
pressurizedstarting fluid. Vaporsareflammable.
1.
Cleanaroundfuelfillbeforeremovingcapto fuel.
2.
Afuel levelindicatoris locatedinthe fuel tank.Filltank untilfuel reachesthe
fuel levelindictor,Figure10,Becarefulnot to overfill,
FuelLevelIndicalor
TopView
J
Figure9
TirePressure(Pneumatic Tires)
Underanycircumstance
donot exceedmanufacturer'srecommended
psi.
Equaltire pressureshould be maintained at all times. Excessive
pressure
whenseating beadsmay causetire/rim assemblyto burst with force
sufficient to causeseriousinjury.Referto sidewallof tire for recommended
pressure.
Figure
10
Thetirescanbeover-inflatedfor shippingpurposes.Checkthe tire pressure
beforeoperatingthesnowthrower. Referto thetire sidewall formanufactures's
recommended
psianddeflate(orinflate)the tiresasnecessary.
CheckingOil Level
NOTE:Equaltire pressure
isto bemaintainedat all timesforperformancepurposes.
FuelRecommendations
Useautomotivegasoline(unleadedor lowleadedto minimizecombustionchamber
deposits)witha minimumof87 octane.Gasoline
with up to 10%ethanolor 1__%
MTBE(MethylTertiaryButylEther)canbeused.Neveruseanoil/gasolinemixture
or dirty gasoline.Avoidgetting dirt, dust,or waterinthe fueltank.DONOTuseE85
gasoline.
Theengine isshippedwith oilin the engine.Youmust, however,check
the oiilevel prior to operatingthe snowthrower. Runningthe engine
with insufficientoilcancauseseriousengine damageandvoidthe engine
warranty.
NOTE:Besureto checkthe engineona levelsurfacewith the enginestopped.
Toavoidenginedamage,it isimportantto:
Refuelin awell-ventilatedareawith the enginestopped.Donot smokeor
allowflamesor sparksin the areawherethe engineisrefueled
or where
gasolineisstored.
Checkoil levelbeforeeachuseandevery5 operatinghourswhenengineis
warm.Checkoil levelmorefrequentlyduringenginebreak-in.
Donot overfillthe fueltank.After refueling,
makesurethe tank capisclosed
properlyandsecurely.
Besureoil fillcap/plugistightenedsecurelywhenchecking.
Keepoil levelbetween"H"and"L" marksondipstkk. SeeFigure11.
Becarefulnot to spillfuelwhenrefueling.
Spilledfuelor fuelvapormay
ignite.Ifanyfuelisspilled,makesuretheareaisdry beforestartingthe
engine.
Avoidrepeated
or prolongedcontactwith skinor breathingof vapor.
9
1.
Removetheoil fillercap/dipstickandwipethe dipstickclean.SeeFigure11.
2.
Insertthe cap/dipstickintotheoil fillerneck,andtightenthe capturning
clockwiseuntil capisseated.
f
2.
Whileobservingthe distancebetweenthe shaveplateandthe ground,
adjustthe skidsshoesupor down toachievethe desiredshaveplateheight.
SeeFigure12.
3.
Makecertainthe entirebottomsurfaceofskidshoesareagainstthe ground
to avoidunevenwearonthe skidshoes;thentighten nutsandboltssecurely.
Lower
Shave
Plate
ShavePlate
Figure11
NOTE:Onsomeengines,a threadedscrewcapwill bepresentinsteadof the quarter
turn lockingcap.In the instanceof athreadedoil cap/dipstkk,DONOTscrewthe
cap/dipstkkinto check.Checkthe oil byrestingthe cap/dipstkkon the threads,but
not screwingit in.
Raise
Shave
Plate
_J
3.
Removethe oil filler cap/dipstick.Ifthe levelis low,slowlyaddoil until oil
levelregistersbetweenhigh(H)andlow (L),Figure11.
4.
Replace
andtightencap/dipstkkfirmly beforestartingengine.
Figure12
Augerand Drive Control Cables
NOTE:Donotoverfill.Overfillingwith oil maycausesmoking,hardstarting,or
sparkplugfouling.
Priorto operatingyoursnowthrower,carefullyreadandfollow all
instructionsbelow.Performall adjustmentsto verify your snowthrower is
operatingsafelyandproperly.
NOTE:DONOTallowoil levelto fall belowthe"L" markon thedipstick.Doingso
mayresultinequipmentmalfunctionsor damage.
NOTE"
Tochangethe oil on yourengine,seethe MaintenanceSectionofthe engine
operator'smanualincludedwith the snowthrower.
Testing Auger Drive Control
Adjustments
1.
Whenthe augercontrolis releasedandinthe disengaged
"up" position,the
cableshouldhaveverylittle slack.It shouldNOTbetight. Referto Figure13.
Skid Shoes
2.
Inawell-ventilatedarea,startthe snowthrowerengineasinstructedinthe
Operationsectionofthis manual.Makesurethe throttle issetinthe FAST
position.
3.
Whilestandinginthe operator'sposition(behindthe snowthrower),engage
the auger.
4.
Allowthe augerto remainengagedforapproximatelyten (10)seconds
beforereleasingthe augercontrol.Repeatthisseveraltimes.
NOTE:
Whenengagingthe auger,youmayheara"chirp"sound.Thisis
normal,it isthe beltengagingthe pulley.Asthe belt wears,thissoundwill
not beheardwhenengagingthe auger.
5.
With the throttlecontrolinthe FAST
(rabbit)positionandthe augercontrol
in the disengaged
"up" position,walk to thefront of the machine.
Thesnowthrowerskidshoesareadjustedupwardat the factoryforshipping
purposes.Adjustthemdownwardprior tooperatingthe snowthrower.
It isnotrecommended
that you operatethis snow thrower on gravelas
it caneasilypickupand throw loosegravel,causingpersonalinjury or
damageto the snowthrower and surroundingproperty.
Forclosesnowremovalonasmoothsurface,
adjusttheskidshoessothatthe shaveplate
onthebottomofthe augerhousingisjustoff theground.
Adjustthe skidshoesto a lowerpositionto raisethe shaveplateoffthe ground
whenclearingunevenareas,suchasa ribbontypedrivewayor agraveldriveway
NOTE:Ifyouchooseto operatethe snowthroweron agravelsurface,keepthe skid
shoesin positionformaximumclearancebetweenthegroundandthe shaveplate.
Toadjust the skid shoes:
1.
Adjustskidshoesbylooseningthe six(threeon eachside)hexnutsand
carriagebolts securingthe skidshoesto the augerhousing.Referto Figure
12.
10
6.
Confirmthat the augerhascompletelystoppedrotatingandshowsNOsigns
of motion.Ifthe augershowsANYsignsof rotating,immediatelyreturnto
the operator'spositionandshutoffthe engine.WaitforALLmovingpartsto
stopbeforere-adjustingthe augercontrol.
/
Testing Drive Control& SpeedSelector Lever
1.
Withthe engineturnedoff, movethespeedselectorleverinto sixth(6)
position.Referto Figure13.
2.
Withthe wheeldrivecontrolreleased,pushthe snowthrowerforward,then
pull it back.Themachineshouldmovefreely.
3.
Engagethe drivecontrolandattemptto movethe machinebothforward
andback,resistanceshouldbefelt.
4.
Movethe speedselectorleverintothe fast reverse(R2)positionandrepeat
the previoustwosteps.
5.
If youexperienced
resistancerollingthe unit, eitherwhenrepositioningthe
speedselectorleverfrom 6to R2or whenattemptingto movethe machine
with thedrivecontrolreleased,adjustthe drivecontrolimmediately.See
AdjustingDriveandAugerControls.
Figure14
Adjustthe locknut asfollows:If adjustingthedrivecable,threadthe lock
nut outward(downthe coupler)to lengthenthe cableandallowthe unit to
movefreelywhenthe controlisreleased.Threadthe locknut inward(upthe
coupler)to shortenthe cableto reduceslippageandpreventthe machine
from beingeasilymovedwith the drivecontrolengaged.
_eedSelector Lever
ChuteTilt
Auc
Control
Control
Donotover-tightenthe cable.Over-tighteningmay preventthe augershaft
from disengagingandcompromisethe safetyof the snowthrower.
Drive
--Control
Cable
Auger
Control
Cable
4.
Ifadjustingthe augercable,threadthe locknut outwardstowardsend
of threadto lengthenthecableasnecessary
tostop theaugershaftfrom
turningwhenthe controlisreleased.
5.
Securely
hookeachcable'sspringinto the appropriateholeof the respective
actuatorbracket.Bothcableshookinto the rearward-mosthole ineach
bracket,asshownin Figure14.
6.
Repeatthewheeldriveandaugercontrolteststo verifyproperadjustment.
Repeatpreviousstepsif necessary
to attainproperadjustmentofeachcable.
Figure 13
Adjusting Drive and Auger Controls
1.
Frombeneaththe handle,pull downwardonthe appropriatecableand
unhookthe springfoundonthe endof the cablefrom its respectiveactuator
bracket.Referto Figure14andFigure15.
2.
Slidethe springupthe cableto exposethe cablecouplerthreadsandlock
nut.Referto Figure15.
Figure15
11
WheelDriveControl
_eedSelectorLever
Headlight
ChutePitch Control"
FuelTank
erControl
FuelCap
OilFill
WheelSteeringControl
ChuteAssemb[
ChuteDirectionalControl
Drift Cutter
Primer
OilFiller
Cap/Dipstick
I
,-- FuN Fill
_ _
f
tL_
Auger Housing
Ch_
Electric
Start
Button
Bectric
Switch Box
- Starter Handle
Auger
_Skid Shoe
Oil Drain
Figure16
ChokeControl
Snowthrowercontrolsandfeaturesaredescribedbelowandillustrated
in Figure
16.
Speedselector Lever
5
Thechokecontrolisfound onthe rearofthe engineand
isactivatedbyrotatingthe controlcounter-clockwise.
Activatingthe chokecontrolclosesthe chokeplateonthe
carburetorandaidsinstartingthe engine.
4
Key
3
Thekeyisasafetydevice.It mustbefully insertedintothe
ignitionin orderforthe engineto start. Remove
the key
whenthe snowthrowerisnot in use.
6
Thespeedselectorleverislocatedinthe right sideofthe handle
panelandisusedto determinegroundspeedanddirectionof
travel.
Forward
Therearesixforward(F)speeds.Positionone(1)isthe slowestand
positionsix(6)isthe fastest.
Reverse
t 2
F1
Therearetwo reverse(R)speeds.One(R1)isthe slowerandtwo
(R2)isthefaster.
R1
IMPORTAfl#Donot turnthe keyinanattemptto startthe
engine.Doingsomaycauseit to break.
R2
Meets ANSi Safety Standards
Craftsman
Snow Throwers conform
to the safety standard of the American
12
National Standards institute (ANSI).
ThrottleControl
AugerControl
===..__
Thethrottlecontrolislocatedonthe rearofthe engine.It regulatesthe speedofthe
engineandwill shutoffthe enginewhen movedintothe STOP
position.
Primer
carburetorto aidinstartinga"Cold"engine,or restartinga
Pressing
the primerforcesfueldirectlyintothe engine's
warmengine.
I
_,_P_.._.L
Oil Fill
Theaugercontrolislocatedonthe left handle.Squeeze
the controlgripagainstthe
handleto engagethe augerandstartsnowthrowingaction.Release
to stop.
Engineoil levelcanbecheckedandoil addedthroughtheoil fill.
DriveControl / AugerClutch Lock
Oil Drain
Engineoil canbedrainedthroughtheoil drain.
FuelCap
Un-threadthe gascapto addgasolineto the fuel tank.
Muffler
Engineexhaustexiststhe engineviathe muffler.
ElectricStarterOutlet
Requires
the useof athree-prongoutdoorextensioncordanda 120Vpowersource/
wall outlet.
RecoilStarter Handle
Thedrivecontrolislocatedonthe right handle.Squeezethe controlgripagainstthe
handleto engagethe wheeldrive.Release
the handleto stop.
Thishandleisusedto manuallystartthe engine.
ElectricStarterButton
Thedrivecontrolalsolocksthe augercontrolsothatyoucanoperatethe chute
directionalcontrolwithoutinterruptingthesnowthrowingprocess.Ifthe auger
controlisengagedsimultaneouslywiththe drivecontrol,the operatorcanrelease
the augercontrol(onthe left handle)andthe augerwill remainengaged.Release
bothcontrolsto stopthe augerandwheeldrive.
Pressing
the electricstarterbuttonengagesthe engine'selectricstarterwhen
pluggedinto a 120Vpowersource.
Auger
Whenengaged,the augerbladesrotateanddrawsnowintothe augerhousing.
NOTE:Alwaysreleasethe drivecontrolbeforechangingspeeds.Failureto dosowill
resultinincreasedwearon yourmachine'sdrivesystem.
ChuteAssembly
Snowdrawnintothe augerhousingisdischarged
out the chuteassembly.
Drift Cutters
Thedrift cuttersaredesignedforusein deepsnow.Theiruseisoptionalfor normal
snowconditions.Maneuverthe snowthrowersothatthe cutterspenetratea high
standingsnowdrift to assistsnowfalling into the augersforthrowing.
Skid Shoes
Position
theskidshoes
based
onsurface
conditions.
Adjustupward
forhard-packed
snow.
Adjustdownward
whenoperating
ongravelorcrushed
rocksurfaces.
13
Two-WayChute-Pitch Control
Chute Clean-Out Tool
TM
Thetwo-waychute-pitchcontrolis locatedon the [eft sideofthe handlepaneland
isusedto controlthe distanceof snowdischargefrom the chute.
Tochangethe upperchuteangleto controlthe distancethatsnowisthrown,
pivotthe [everforwardor backward.
Movethe [everforwardto pivotthe upperchutedownandreducethe
distancesnowis thrown.
Neveruseyour handsto clearacloggedchute assembly.Shutoff engine
and remainbehind handlesuntilall movingpartshavestoppedbefore
unclogging.
Movetheleverrearward
topivottheupperchuteupward
andincrease
the
distance
snowisthrown.
NOTE:
Toincrease
ordecrease
thetension
onthetwo-waychutecontrol,
tightenorloosen
thewingknobonthechuteassembly.
CHUTE
D|SCHABGE _
DiRECTiONAL
Thechuteclean-outtoolisconvenientlyfastenedtothe rearof the augerhousing
with a mountingclip.Shouldsnowandicebecomelodgedinthe chuteassembly
duringoperation,proceedasfollowsto safelycleanthe chuteassemblyandchute
opening:
CONTROL
1.
Release
boththe AugerControlandthe DriveControl.
2.
Stopthe enginebyremovingthe ignitionkey.
3.
Removetheclean-outtool fromthe clip whichsecuresit to the rearof the
augerhousing.
4.
Usethe shovel-shaped
endofthe clean-outtool todislodgeandscoopany
snowandicewhichhasformedinandnearthe chuteassembly.
5.
Refasten
the clean-outtool to the mountingclip onthe rearof theauger
housing,reinsertthe ignitionkeyandstartthe snowthrower'sengine.
6.
Whilestandinginthe operator'sposition(behindthesnowthrower),engage
the augercontrolfora fewsecondsto clearanyremainingsnowandicefrom
the chuteassembly.
D|SCHARGE
i
CHUTE TILT
DOWN
m
CHUTE TILT
UP
Before Starting Engine
J
Chute Directional Control
Read,understand,andfollow all instructions
and warnings on the machine
and inthis manualbeforeoperating.
Thechutedirectionalcontrolislocatedonthe left sideof the snowthrower.
Tochangethe directioninwhichsnowisthrown,crankclockwiseto
dischargeto the left andcounterclockwise
to dischargeto the right.
Oil
Theunit wasshippedwith oil inthe engine.Checkoil levelbeforeeachoperation
to ensureadequateoil inthe engine.Forfurther instructions,referto the Service&
Maintenancesectionof thismanual.
Wheel Steering Controls
Theleft andrightwheelsteeringcontrolsarelocatedonthe undersideofthe
handles.Squeeze
the right controlto turn right; squeeze
the left controlto turn left.
NOTE:Besureto checkthe engineona levelsurfacewith theengine
stopped.
NOTE:Operatethe snowthrowerinopenareasuntil youarefamiliarwith these
controls.
Headlight
1.
Removetheoil filler cap/dipstickandwipethe dipstickclean.
2.
Insertthe cap/dipstickinto theoil filler neck,andtightenthe capturning
clockwiseuntil capisseated.
Theheadlightis locatedinsideofthe handlepanel.
NOTE:Onsomeengines,a threadedscrewcapwill be presentinsteadof
the quarterturn lockingcap.Inthe instanceof athreadedoil cap/dipstick,
DONOTscrewthe cap/dipstkkinto check.Checktheoil byrestingthe cap/
dipstickonthe threads,but notscrewingit in.
Drift cutters
Thedrift cuttersaredesignedfor useindeepsnow.Theiruseisoptionalfor normal
snowconditions.Maneuverthe snowthrowersothatthe cutterspenetratea high
standingsnowdrift to assistsnowfallinginto the augersforthrowing.
3.
Removetheoil filler cap/dipstick.Ifthe levelislow,slowlyaddoil (5W-30,
with a minimumclassificationof SF/SG)
untiloil levelregistersbetweenhigh
(H)andlow (L).
NOTE:Donot overfill.Overfillingwithoil mayresultinenginesmoking,hard
startingor sparkplugfouling.
4.
14
Replace
andtightencap/dipstickfirmly beforestartingengine.
Gasoline
Theextensioncordcan beany length, but must be ratedfor 15ampsat 125
volts,groundedand ratedfor outdoor use.
Useextreme carewhenhandling gasoline.Gasolineisextremely flammable
and the vapors areexplosive.Neverfuel the machineindoorsor while the
engine ishot or running. Extinguishcigarettes, cigars,pipesand other
sourcesof ignition.
Ifyouhaveagroundedthree-prongreceptacle,
proceedasfollows.If youdonot
havethe properhousewiring, DONOTusethe electricstarterunderanyconditions.
Useautomotivegasoline(unleadedor low leadedto minimizecombustionchamber
deposits)witha minimumof87 octane.Gasolinewith up to 10%ethanolor 15%
MTBE(MethylTertiaryButylEther)canbeused.Neveruseanoil/gasolinemixture
or dirty gasoline.Avoidgettingdirt, dust,or waterinthe fuel tank.DONOTuseE85
gasoline.
Refuelin awell-ventilatedareawith theenginestopped.Donot smokeor
allowflamesor sparksintheareawherethe engineisrefueledor where
gasolineisstored.
Donot overfillthe fuel tank.After refueling,makesurethe tank capisclosed
properlyandsecurely.
Becarefulnot to spillfuel whenrefueling.Spilledfuel or fuelvapormay
ignite.Ifanyfuelis spilled,makesurethe areaisdry beforestartingthe
engine.
1.
Plugthe extensioncordintothe outlet locatedonthe engine'ssurface.Plug
the otherendof extensioncordintoa three-prong120-volt,grounded,AC
outlet inawell-ventilatedarea.
2.
Movethrottlecontrolto FAST(rabbit)_j_
3.
Movechoketo the CHOKE
position[,j €[ (coldenginestart).
4.
NOTE:Ifthe engineisalreadywarm,placechokecontrolin the RUNposition
position.
insteadof CHOKE
5.
Pushprimerthreetimes(3x),makingsureto covervent holeinprimerbulb
when pushing.If engineiswarm,pushprimeronlyonce.Alwayscovervent
holewhen pushing.Coolweathermayrequireprimingto be repeated.
6.
Pushstarterbuttonto startengine.Oncethe enginestarts,immediately
releasestarterbutton.Electricstarterisequippedwith thermaloverload
protection;systemwill temporarilyshut-downto allowstarterto coolif
electricstarterbecomesoverloaded.
Avoidrepeatedor prolongedcontactwith skinor breathingof vapor
1.
Cleanaroundfuel fill beforeremovingcapto fuelto preventdebrisfrom
enteringfueltank..
2.
Afuel levelindicatorislocatedin the fueltank.Filltank until fuel reachesthe
fuel levelindictor.SeeFigure10inset.Becarefulnot to overfill.
Starting The Engine
Alwayskeephandsandfeet clearof moving parts. Donot usea pressurized
starting fluid. Vaporsareflammable.
flOTE:Allowthe enginetowarmup forafew minutesafter starting.Theenginewill
not developfull poweruntil it reachesoperatingtemperatures.
1.
Makecertainboth theaugercontrolanddrivecontrolareinthe disengaged
(released)position.
2.
Insertkeyintoslot.Makesureit snapsintoplace.Donot attemptto turnthe
key.
position.
I."1
Toprolong starter life, useshort starting cycles(5 secondsmaximum, then
wait oneminute).
7.
Asthe enginewarms,slowlyrotatethe chokecontroltothe RUNposition.If
the enginefalters,restartengineandrunwith chokeat half-chokeposition
fora shortperiodof time,andthenslowlyrotatethe chokeintothe RUN
position.
8.
Afterengineis running,disconnectpowercordfrom electricstarter.When
disconnecting,
alwaysunplugthe endat thewall outlet beforeunplugging
the oppositeendfromthe engine.
RecoilStarter
Donot pull the starter handlewhilethe engine running.
1.
Movethrottlecontrolto FAST(rabbit)_
NOTE:Theenginecannotstartwithout the keyisfully insertedintothe ignition
switch.
2.
Movechoketo the CHOKE
warm,placechokeinthe RUNposition.
Electric Starter
3.
Pushprimerthreetimes,makingsureto coverventholewhenpushing.
Ifengineiswarm,pushprimeronlyonce.Alwayscovervent holewhen
pushing.Coolweathermayrequireprimingto berepeated.
4.
Pullgentlyonthestarterhandleuntilit beginsto resist,thenpullquicklyand
forcefullyto overcome
the compression.
Engineshouldstart.Donot release
the
handleandallowit to snapback.ReturnropeSLOWLY
to originalposition.If
required,repeatthisstep.
5.
Asthe enginewarms,slowlyrotatethe chokecontroltothe RUNposition.If
the enginefalters,restartengineandrunwith chokeat half-chokeposition
fora shortperiodof time,andthenslowlyrotatethe chokeintothe RUN
position.
Theoptional electricstarter isequippedwith a groundedthree-wire power
plug,and is designedto operate on 120volt AChouseholdcurrent. It mustbe
usedwith a properly groundedthree-prongextensioncordandreceptacle
at all times to avoidthe possibilityof electricshock.Followall instructions
carefully prior to operatingthe electric starter. DONOTuseelectricstarter in
the rain.
Determinethat yourhome'swiring isathree-wiregroundedsystem.Aska licensed
electricianifyouarenot certain.
15
position.
I,"l pos tco,d
on
enginestart).Ifengineis
ReplacingShearpins
Theaugersaresecuredto thespiralshaftwith shearpinsandbow-tiecotterpins.
Ifthe augershouldstrikea foreignobjector icejam, the snowthrowerisdesigned
sothatthe pinsmayshear.Ifthe augerswill not turn, checkto seeif the pinshave
sheared.SeeFigure17.
Toavoid unsupervisedengineoperation, never leavethe machine
unattendedwith the engine running.Turnthe engine off after useand
removekey.
StoppingThe Engine
NOTE:Twoextrashearpinsaresuppliedin the manualbag.
Afteryouhavefinishedsnow-throwing,runengineforafew minutesbefore
stoppingto helpdryoffany moistureonthe engine.
1.
Movethrottle controlto STOP
@
ine.Backfire or eric
NEVER
replacethe augershearpinswith anything otherthan SearsSKU#
88389/0EMPart No.738-0415Sreplacementshearpins.Anydamageto the
augergearboxor other components
asaresult of failing to do sowill NOTbe
coveredbyyoursnowthrower's warranty.
position.
,occur.
2.
Removethe key.Removing
the keywill reducethe possibilityof
unauthorizedstartingof theenginewhileequipmentisnot in use.Keepthe
keyinasafeplace.Theenginecannotstartwithoutthe key.
3.
Wipeall snowandmoisturefrom theareaaroundthe engineaswell asthe
areainandaroundthe wheeldrivecontrolandaugercontrol.Also,engage
andreleasebothcontrolsseveraltimes.
Alwaysturn off the snowthrower's engineand removethe key priorto
replacingshearpins.
ToEngageDrive
1.
With the throttle controlin the Fast(rabbit)_
position,movespeed
selectorleverinto oneof thesixforward(F)positionsor two reverse(R)
positions.Selecta speedappropriateforthe snowconditionsandapace
you'recomfortablewith.
NOTE: Whenselectinga DriveSpeed,usethe slowerspeeds
untilyouare comfortableand familiarwith the operationof the
snowthrower.
2.
Squeeze
the drivecontrolagainstthe handleandthe snow
throwerwill move.Release
it anddrivemotionwill stop.
NOTE:
NEVER
repositionthe speedselectorlever(changespeedsor directionof
travel)without first releasingthe drivecontrolandbringingthe snowthrowerto a
completestop.Doingsowill resultinprematurewearto the snowthrower'sdrive
system.
J
Figure17
ToEngageAuger
1.
Toengagetheaugerandstartthrowingsnow,squeezethe augercontrol
againstthe left handle.Release
to stopthe auger.
16
MAINTENANCE
SCHEDULE
Followthe maintenance
schedulegivenbelow.Thischartdescribes
service
guidelinesonly.Usethe ServiceLogcolumnto keeptrackofcompleted
maintenancetasks.Tolocatethe nearestSearsServiceCenteror to scheduleservice,
Beforeperforminganytypeof maintenance/service,disengageall controls
andstop the engine.Wait until all moving partshavecometo acomplete
stop.Removethe keyto preventunintendedstarting. Alwayswearsafety
glassesduringoperation or while performingany adjustmentsor repairs.
EachUse
simplycontactSearsat 1-800-4-MY-HOME
®.
1.
Engineoil level
1.
Check
2.
Looseor missinghardware
2.
Tightenor replace
3.
Unitandengine.
3.
Clean
1st5- 8 hours
1.
Engineoil
1.
Change
25 hours
1.
Engineoilf
1.
Change
2.
Controllinkagesandpivots
2.
Lubewith light oil
50hours
1.
Engineoil
1.
Change
Annuallyor 100hours
1.
Sparkplug
1.
Cleanandre-gap,or elsereplacewith
new plug.
BeforeStorage
1.
Fuelsystem
1.
Runengineuntil it stopsfrom lackof fuel
or adda gasolineadditiveto the gasin
the tank.
Under heavy load or in high temperatures
EngineMaintence
CheckingEngine 0il
Beforelubricating, repairing,or inspecting,disengageall controlsand stop
Iengine.Wait until all moving parts havecometo a completestop.Remove
_thekeyto prevent unintendedfiring of the engine.
NOTE:Checkthe oil levelbeforeeachuseto besurecorrectoil levelismaintained.
Whenaddingoil to the engine,referto viscositychartbelow.Engineoil capacity
isapproximately37ounces.Donot over-fill.Usea4-stroke,or anequivalenthigh
detergent,premiumquality motoroil certifiedto meetor exceedU.S.automobile
manufacturer'srequirementsforserviceclassificationSG,SF.Motoroilsclassified
SG,SFwill showthisdesignationon thecontainer.
1.
Removethe oil filler cap/dipstickandwipethe dipstickclean.
2.
Insertthe cap/dipstickintothe oil filler neck,but do not screwit in.
3.
4.
J
NOTE:Onsomeengines,a threadedscrewcapwill bepresentinstead
of
the quarterturn lockingcap.Inthe instance
of athreadedoil cap/dipstick,
DONOTscrewthe cap/dipstickinto check.Checkthe oil by restingthe cap/
dipstickon the threads,but not screwingit in.
Changing Engine Oil
Removethe oil filler cap/dipstick.Iflevelislow,slowlyaddoil until oil level
registersbetweenhigh(H)andlow (L).SeeFigure18.
1.
Drainfuelfrom tankbyrunningengineuntil the fuel tank isempty.Besure
fuel fill capissecure.
2.
Placesuitableoil collectioncontainerunderoil drainplug.
3.
Removeoil drainplug.SeeFigure19.
4.
Tipengineto drainoil intothe container.Usedoil mustbedisposedof ata
propercollectioncenter.
Figure18
NOTE:Changethe engineoil afterthe first 5 hoursof operationandonceaseason
or every50hoursthereafter.
Replace
andtightencap/dipstickfirmly beforestartingengine.
17
f
Ifthe engine hasbeenrunning, the muffler will be veryhot. Becareful not
to touchthe muffler.
NOTE:Checkthe sparkplugonceaseasonor every25hoursof operation.Change
the sparkplugonceaseasonor every100hours.
Toensureproperengineoperation,the sparkplug mustbeproperlygappedand
freeof deposits.
1.
Removethe sparkplug bootanduseasparkplug wrenchto removethe
plug.SeeFigure20.
Oil Drain
Plug
Spark Plug
Figure19
Usedoil isahazardouswaste product.Disposeof usedoil properly.Donot
discardwith householdwaste. Checkwith your localauthorities or Sears
ServiceCenterfor safedisposal/recyclingfacilities.
5.
Reinstallthe drainplugandtightenit securely.
6.
Refillwith the recommended
oil andcheckthe oil level.SeeRecommended
Oil Usagechart.Theengine'soil capacityis37ounces.
Spark Plug Boot
Figure20
DONOTusenon-detergent oil or 2-strokeengine oil. It could shortenthe
engine'sservicelife.
Visuallyinspect
the sparkplug.Discardthe sparkplug ifthereisapparent
wear,or if the insulator
iscrackedor chipped.Cleanthe sparkplugwith a
wire brushif it isto bereused.
Measurethe plug gapwith afeelergauge.Correctasnecessary
bybending
sideelectrode.SeeFigure21.Thegapshouldbesetto .02-.03inches(0.600.80mm).
(°F)-40 o -20 o 0o 200 400
(oc)
7.
-30o -20o -10 o 0o
Reinstallthe oil fillercap/dipsticksecurely.
Thoroughlywashyour handswith soapandwater assoonas
possibleafter handling usedoil.
CheckingSparkPlug
1..030 (.76 mm) Gap
2. Electrodes
3.
DONOTcheckfor sparkwith sparkplug removed.DONOTcrankengine with
sparkplug removed.
Porcelain
Figure21
18
Wheels
4.
Checkthatthe sparkplug washerisingoodconditionandthreadthe spark
plugin byhandto preventcross-threading.
5.
Afterthe sparkplug isseated,tightenwith asparkplugwrenchto compress
the washer.
NOTE:
Wheninstallinganewsparkplug,tighten 1/2-turnafter thespark
plugseatsto compress
the washer.Whenreinstallingausedsparkplug,
tighten 1/8- to 1/4-turnafterthe sparkplugseatsto compress
the washer.
At leastonceaseason,removebothwheels.Cleanandcoatthe axleswith a
multipurposeautomotivegreasebeforereinstallingwheels.
Chute
Directional
Control
Onceaseason,lubricatethe eyebolt bushingandthe spiralwith 3-in-1oil.
Auger Shaft
At leastonceaseason,oneat atime,removeall ofthe shearpinsfrom the auger
shaft.Spraylubricantinsidethe hubof eachaugerspiralassemblyandaroundthe
spacersonthe augershaft.
' hot andcan damagethe engine.
Greasefittings canalsobefoundat eachendofthe augershaft.Lubricatewith a
greasegunonceaseason.SeeFigure23.
Carburetor Adjustment
GearCase
Thecarburetorisnot useradjustable.ContactSearsParts& Repairforadjustment.
Theaugergearcaseisequippedwith agreasefitting. Lubricatewith greaseoncea
season(orderpartnumber737-0168).SeeFigure23.
Lubrication
Drive and Shifting Mechanism
Atleastonceaseasonor afterevery25hoursof operation,removerearcover.
Lubricateall chains,sprockets,gears,bearings,shafts,andthe shiftingmechanism.
Useengineoil or aspraylubricant.Referto Figure22.
NOTE:Torelievepressure,removethe vent plugbeforelubricatingthe gearcase.
SeeFigure23. Failureto do socouldresultindamageto the gearcaseseals.
Augers
NOTE:Beforetippingthe uniton the front housing,runthe fuel tankempty
sofuel doesnot leakout of the fuel cap.
Eachof the augerspiralassemblies
issecuredto the spiralshaftwith ashearpin and
cotterpin. If theaugershouldstrikeaforeignobjector icejam, the snowthroweris
designedsothatthe pinsmayshear.
1.
Carefullypivotthe snowthrowerupandforwardsothat it restsonthe auger
housing.
1.
Ifaugersdonot turn, checkto seeif pinshavesheared.
2.
Removethe framecoverfrom the undersideof the snowthrowerby
removingthe self-tappingscrewswhichsecureit. Referto Figure27.
2.
Replace
the pinsif needed.Tworeplacement
shearpinsandcotterpins
havebeenprovidedwith thesnowthrower.Sprayanoil lubricantintoshaft
beforeinsertingnewpinsandsecuringwith newcotterpins.SeeFigure23.
3.
Applya lightcoatingof engineoil (or3-in-1oil) to the hexshaft.SeeFigure
22.
NOTE:Becarefulnot to get anyoil onthe aluminumdriveplateor rubber
frktion wheel.Doingsowill hinderthesnowthrower'sdrivesystem.Wipe
offany excessor spilledoil.
Atleastonceaseasongreasethe wheelaxlewithArcticgrease,partnumber
737-0318.
Thegreasefitting islocatedonthe wheelaxletube behindthe
wheelaxlesupportbracket.
4.
f
Rubber Friction
Wheel
Bow-Tie Pins
Spacers
Aluminum
Drive
Figure23
Wheel Axle
Support Bracket
Figure22
19
ShavePlateand SkidShoes
Theshaveplateandskidshoeson the bottomofthe snowthroweraresubjectto
wear.Theyshouldbecheckedperiodicallyandreplacedwhennecessary.
Skid Shoes
NOTE:Theskidshoeson thismachinehavetwo wearedges.Whenoneside
wearsout,theycanberotated180° to usethe otheredge.
Removethe sixcarriageboltsandhexnutsthatsecurethe two skidshoesto
the sidesofthe augerhousing.Referto Figure24.
2.
Positionthe newskidshoesandsecurewith the carriageboltsandhexnuts.
Makecertainthe skidshoesareadjustedto belevel.
ShavePlate
1.
Removethe hexnutsandcarriageboltsthat securethe shaveplatetothe
bottomofthe housing.Referto Figure24.
2.
Removethe rearmosthexnut andcarriagebolt securingthe backof each
skidshoeto the sidesofthe housing.Loosenthe fourremaininghexnuts
securingthe skidshoes.
3.
4.
Figure25
ChuteBracketAdjustment
Slidethe shaveplateout ofthe off-setslotat the bottomof the housing,and
from betweenthe skidshoesandsidepanelsofthe housing.
With the mountingholestowardthe backof the unit, slidethe newshave
plateinto positionandsecurewiththe fastenersremovedpreviously.
f
Ifthe spiralatthe bottomof the chutedirectionalcontrolis notfully engagingwith
the chuteassembly,
the chutebracketcanbeadjusted.Todo so:
I.
Loosenthe two nutswhichsecurethechutebracketandrepositionit
slightly.SeeFigure26.
2.
Retightenthe nuts.
Figure24
Adjustments
Shift Cable
If the full rangeof speeds(forwardandreverse)cannotbeachieved,referto the
Figure25andadjustthe shift cableasfollows:
I.
Placethe shift leverinthe fastestforwardspeedposition.
2.
Loosenthe hex nut onthe shift cableindexbracket.SeeFigure25.
3.
Pivotthe bracketdownwardtotake upslackinthe cable.
4.
Retightenthe hexnut.
Figure26
ChuteControl
Thedistancesnowisthrowncanbeadjustedbyadjustingthe angleof the chute
assembly.Referto the Operationsectionforinstructions.
Theremotechutecontrolcableshavebeenpre-adjustedat the factory.Movethe
remotechuteleveronthe controlpanelforwardto pivot the upperchutedown;
movethe leverrearwardto pivotthe upperchuteup.
2O
Wheeldrivecontrol
Auger Control
RefertotheAdjustment
section
oftheAssembly
instructions
toadjustthewheel
drivecontrol.
Tofurthercheck
theadjustment,
proceed
asfollows:
Refer
totheAssembly
section
forinstructions
onadjusting
theaugercontrolcable.
1.
Skid Shoes
Withthe snowthrowertippedforward(be certainto runthe
fueltank dry beforetippingthe unitforward),removethe frame
coverunderneaththe snowthrowerby removingthe self-tapping
screws.See Figure27.
Refer
totheAssembly
section
forinstructions
onadjusting
theskidshoes.
Tire Pressure
Refer
totheAssembly
section
forinstructions
onadjusting
thetirepressure.
f
Belt replacement
Belt RemovalPreparation
___11/_
...... __ !........
I.
Removethe chutecrank rod from thechute crank assemblyby
removingthe hair pin clip shownin Figure29. Movethechute
crank rod awayfrom the assemblyas shown.
2.
Removethreeself-tapscrewson bothsides of the transmission
housingas shown in Figure29.
..........
%
Figure27
.
.
Locatethe openingbetweenthe axle supportbracketand
thefront frame support(See Figure28). Lookingthroughthis
opening,with the wheeldrivecontrol released,theremustbe
clearancebetweenthefrictionwheeland the driveplatein all
positionsof the speedselector lever.
Withthe wheeldrivecontrolengaged,the frictionwheelmust
contactthedrive plate.See Figure28.
f
Figure29
3.
Removethe plasticbeltcover,locatednearthe engine,by removing thethree self-tappingscrewsthat secure it. See Figure30.
Figure28
4.
5.
If there is no frictionwheelclearance,or the frictionwheeldoes
not solidlycontactthe driveplate, re-adjustthe lock nuton the
lowerend of thedrive cablefollowingthe instructionsin the
Assemblysection.
Reassemblethe framecover.
J
21
Figure30
4. Loosen
theboltshown
inFigure
31securing
thebeltkeeper
bracket
andremove
theotherbolt.Push
thebeltkeeper
and
bracket
upofftheengine
pulley.
f
Loosen
z-fitting
Figure33
Figure31
5.
Placea blockof woodunderneaththeaugerhousingas shownin
Figure34 and separateaugerhousingfromtheframebytiltingthe
housingforwardand pullingup the handles.
6.
Blocktheimpellerwitha pieceofwoodto preventitfromspinningand
usea 1/2"wrenchto removethehexscrewandflatwasherfromthe
Auger Belt Replacement
1.
Removethebow-tieclip and flat washerfrom theferrulein order
to disconnectthe augeridlerrod from the brakebracketassembly. See Figure32.
7.
centerofthe pulleyon theaugerhousing.SeeA in Figure35.
Lift the brakebracketassemblyout of the pulleygroove(B in
Figure35) and slide the pulleyassemblyoff the postsof the auger
pulleyadapter(C) to removethe old belt.
ger Idler Rod
Figure32
Figure34
NOTE:
Thepulleyadapter
mayslideofftheaugerinputshaftwhenremoving
thepulley.Use
extracautiontoensure
theadapter
doesfalland/orget
damaged
whenremoving
thepulley.
NOTE:Makesurethat the locationof the ferruleon the augeridler rodis
maintained.
2.
3.
Slip the augercontrolbelt (thefront belt) off the enginepulley.
Pull the brakebracketassemblytowardsthe cableguide roller
and unhookthe augercable z-fitting.See Figure33.
4.
Fromboth sidesof the the frameassembly,use a 1/2" wrenchto
removethe threehex tap screwssecuringthe frameto the auger
housingassembly.Referbackto Figure29.
8.
Placethe newauger beltin the V-grooveof the auger pulleyand
placethe pulleyw/belt insidethebelt keepers.
Turnthe pulleyas necessaryto alignits threeslotsapproximately
with thepostsof thepulleyadapter,thenpivotthe brakebracket
assemblyawayfrom the pulleygroove. Whilealigningthe pulley
slotsand adapterposts, pushtheauger pulleyfully onto the
adapter.Referto Figure35. Ensurethebrakepuck of the brake
bracketassemblyalignsand is fully seatedin the pulleygroove.
NOTE:Do not removethe lowerhexflangelock nuton eachside.
22
!
/
pter Post
Brake
%
PulleySlot
J
\
J
Figure 35
Figure36
NOTE: If the pulleyadapterwas removedwith thepulley,align the
splinesof the pulleyadapterand augerinputshaft, and pushthe pulley
and adapterontothe inputshaft. Referto Figure36.
9.
Slidethe washerontothe hex screwremovedearlier and apply
Loctite262 to thethreadsof the hex screw.
2.
3.
Rollthe drivebeltoff the lowerdrivepulley.
Removethe belt fromthe engine pulley.
4.
Installthe newbelton the pulleysin the reverseorder and
re-tensionwith the idler pulley.
Reassembleby performingthe previousstepsin theopposite
orderand mannerof removal.
5.
10. Insertthe hexscrewthroughthe pulleyassemblyand intothe
threadsof the inputshaft.Torquethe hex screwto 250-325in.
Ibs.to securethe augerpulleyassemblyon the inputshaft.
11. If also replacingthe drivebelt, proceedto the "DriveBelt"instructions.If not, repositionthe transmissionframeback onto
theauger housing.
12. Installthedrive belton theengine pulley,re-connectthe auger
cablez-fittingand augeridler rodferruleto the brakebracket.
Repositionand securethe engine pulleybelt guard,and re-install
the beltcover.
NOTE:Makesureto removethe pieceof woodblockingthe impeller.
Checkthe auger drivebeltadjustment. Withthe auger clutchlever
in the disengagedposition,thetop surfaceof the newbelt shouldbe
evenwith theoutsidediameterof the pulley.
CHANGING
FRICTION
WHEEL
Therubberonthefrictionwheelissubject
towearandshouldbechecked
periodically.
Replace
thefrictionwheelifanysignsofwearorcracking
arefound.
1.
Runthe unit'sfuel tankdry beforeperformingStep2. Donot
attemptto pour fuel fromthe engine.
2.
Tip the snowthrowerup and forward,sothat it restson the
housing.
Removescrewsfrom theframe coverunderneaththe snow
thrower(referto Figure37). Removethe rightwheelfromthe axle.
3.
Toadjust,disconnect
ferrulefrombrakebracket
assembly.
Thread
ferrulein
(towards
idler)toincrease
tension
onbelt,orouttodecrease
belttension.
NOTE:Thebrakepuck mustalwaysbe firmly seatedinthe pulley
groovewhenaugercontrol isdisengaged.
IMPORTANT:Repeatthe "AugerDriveControlTest"from the Assemblysectionbeforeoperatingsnow thrower.
Drive Belt Repla(ement
If notalready
done,remove
theaugerdrivebeltfromthefrontpulleyoftheengine
doublepulley.Refer
to"AugerBeltReplacement"
instructions
intheprevious
sub-section.
a. Pull the idler pulleyawayfrom the backsideof the drivebeltto
relievethetension.See Figure36.
b. Slip the drivebelt off the idler pulley. Carefullyreleasethe idler
pulley.
23
J
Figure37
.
f
Usinga 3/4" wrench,hold the hex shaftand removethe hex
screwand bellevillewasherand bearingfrom left sideof the
frame.Referto Figure38.
RemoveHex Screw
BellevilleWasher
FrictionWheelAss'y.
/
l.
Slide Hex
ShaftOut
RightSide
©
Figure40
10. Slidethe hexshaft throughthe rightside of the frametowardthe
Idt sideand throughthe frictionwheelassembly.
11. After makingcertainthat the chainis on boththe large and the
smallsprocket,alignthe hex shaftwith the hexhub of the small
sprocket,and slidethe shaftthroughthe sprocket.
Figure38
5.
Holdingthe frictionwheelassembly,slidethe hex shaftoutof
the frictionwheelassemblyandthe rightsideof theframe.The
spaceron the left sideof the hex shaftwillfall and the sprocket
shouldremainhanginglosein the chain.
6.
Lift the frictionwheelassemblyout betweenthe axle shaftand
the driveshaftassemblies.
7.
Removefourscrewssecuringthe frictionwheelto the hub
assembly(referto Figure39). Discardold frictionwheel.
NOTE:If the sprocketfell from the snowthrowerwhileremoving
the hex shaft,placethe sprocketon the chain.Realignthe
sprocketon the chainwith the hex hubfacing the rightsideof
unit. Positionthe hexhub of the sprockettowardthe frictionwheel
whenslidingthe sprocketon to the hexshaft.
12. Slidethe spacerontothe end of the hex shaft.
Note: The spacer is to be placedon the hexshaftbetweenthe
sprocketand bearingpreviouslyremovedon the Idt sideof the
frame.
f
13. Align the bearingon the rightend of thehex shaftwith the hole
in the rightside of the frame,then pushthe hexshaftto the left
intopositionin the frame.
14. Slidethe bearingontothe left end of the hex shaftand press into
the hole on theleft sidethe frame.
15. Placethe bellevillewasher(roundedside towardhead)ontothe
hexscrewremovedearlier,and insert thescrewinto thethreaded
holeof the hex shaft.
16. Graduallytightenthe hexscrewto fully seat the bearingsin each
sideof the frameand to securethe hex shaft.
17. Positionthe framecoveron the bottomof the frameand secure
with the self-tappingscrews.Pivotthe snowthrowerdownto it
normaloperatingposition.
Figure39
.
.
Reassemblethe newfrictionwheelontothe hubassembly,tighteningthefourscrewsin rotationand with equalforce,itisimportant
to
assemblethefrictionwheelsymmetricallyfor properfunctioning.
Repositionthe frictionwheelassemblyin the snowthrowerframe.
insertthe pin from the speedselector armassemblyintothe
frictionwheelassemblyand hold assemblyin position.Referto
Figure40.
24
IMPORTANT:Repeatthe drivecontroltestfrom the Assemblysection
of this manualbeforeoperatingthe snowthrower.
If the snowthrowerwill not beusedfor 30daysor longer,or if it is theendof thesnowseasonwhenthe lastpossibilityof snowisgone,the equipmentneedsto bestored
properly.Followstorageinstructionsbelowto ensuretop performancefrom thesnowthrowerformanymoreyears.
PreparingSnowThrower
PreparingEngine
Enginesstoredover30daysneedto bedrainedof fuel to preventdeteriorationand
gumfromforminginfuel systemor on essentialcarburetorparts.If thegasolinein
yourenginedeterioratesduringstorage,youmayneedto havethe carburetor,and
otherfuel systemcomponents,servicedor replaced.
Whenstoringthe snowthrowerin anunventilatedor metalstorageshed,
careshouldbetakento rustproofthe equipment.Usinga lightoil or silicone,
coatthe equipment,especially
anychains,springs,bearingsandcables.
1.
Removeall fuel fromtank byrunningengineuntil it stops.Donot attemptto
pourfuelfrom the engine.
Followlubricationrecommendations.
2.
Changetheengineoil.
3.
Removesparkplugandpourapproximately1oz.(30ml) ofcleanengineoil
into the cylinder.Pullthe recoilstarterseveraltimesto distributetheoil, and
reinstallthe sparkplug.
4.
Cleandebrisfrom aroundengine,andunder,around,andbehindmuffler.
Applya lightfilm ofoil on anyareasthat aresusceptibleto rust.
Removeall dirt from exteriorof engineandequipment.
Storeequipmentinaclean,dry area.
Inflatethe tiresto the maximumPSI.Referto tire sidewall.
Storeinaclean,dry andwell ventilatedareaawayfromanyappliancethat
operateswith aflameor pilot light,suchasa furnace,waterheater,or
clothesdryer.Avoidanyareawitha sparkproducingelectricmotor,or where
powertoolsareoperated.
If possible,avoidstorageareaswith high humidity.
Keepthe enginelevelinstorage.Tiltingcancausefuelor oil leakage.
!
Neverstore snowthrower with fuel in tank indoorsor in poorlyventilated J
I
areas,where fuel fumesmay reachan openflame, sparkor pilotlight ason aJ
fumace,water heater,c othesdryeror gasapp ante.
j
25
Enginefails to start
1.
2.
Chokecontrolnot in CHOKEposition.
Sparkplugwire disconnected.
1.
2.
Movechokecontrolto CHOKEposition.
Connectwireto sparkplug.
3.
4.
5.
Faultysparkplug.
Fueltank emptyor stalefuel.
Enginenot primed.
3.
4.
5.
Clean,adjustgap,or replace.
Filltank with clean,freshgasoline.
Primeengineas instructedin the OperationSection.
6.
7.
Keynot inserted.
Extensioncordnot connected(when
usingelectricstartbutton,on modelsso
equipped).
6.
7.
Insertkeyfully intothe switch.
Connectone end of the extensioncordto the electric
starteroutletand the otherend to a three-prong
120-volt,grounded,ACoutlet.
Enginerunningerratically/
inconsistentRPM(huntingor
1.
2.
Enginerunningon CHOKE.
Stalefuel.
1.
Movechokecontrolto RUNposition.
surging)
3.
Wateror dirt in fuel system.
2.
3.
Filltank with clean,freshgasoline.
Drainfueltank by runningengineuntil it stops. Refill
with freshfuel.
4.
Over-governedengine.
4.
ContactyourSearsParts & RepairCenter.
Excessivevibration
1.
Loosepartsor damagedauger.
1.
Stopengineimmediatelyand disconnectsparkplug
wire.Tightenall boltsand nuts.If vibrationcontinues,
haveunit servicedbya SearsParts& RepairCenter.
Lossof power
1.
2.
Sparkplugwire loose.
Gascap vent hole plugged.
1.
2.
Connectand tightenspark plugwire.
Removeiceand snowfrom gascap. Be certainvent
hole is clear.
Unitfails to propel itself
1.
Drivecable in need of adjustment.
1.
Adjustdrivecontrolcable. Referto Serviceand
Maintenancesection.
2.
Drivebelt looseor damaged.
2.
Replacedrive belt. Referto Serviceand Maintenancesection.
3.
Wornfrictionwheel.
3.
Havefrictionwheelreplacedat a SearsParts &
RepairCenter.
1.
Chuteassemblyclogged.
1.
2.
Foreignobject lodgedin auger.
2.
Stopengineimmediatelyand disconnectsparkplug
wire.Cleanchute assemblyand insideof auger
housingwith clean-outtoolor a stick.
Stopengineimmediatelyand disconnectsparkplug
wire. Removeobjectfrom augerwith clean-outtool
or a stick.
3.
Augercablein needof adjustment.
3.
Adjustaugercontrolcable. Referto Assembly
section.
4.
Augerbelt looseordamaged.
4.
Replaceauger belt. Referto Serviceand Maintenancesection.
5.
Shearpin(s) sheared.
5.
Replacewith newshearpin(s).
Chuteassembledincorrectly.
1.
Disassemblechute controland reassembleas
directedin the Assemblysection.
Unitfails to dischargesnow
Chutefails to easily rotate 180 1.
degrees
NEED HORE HELP?
Yot,Fttfind. th_
answer
a!ld mo_e on ma_age_y_ifeocom
Find this and att your other product manua[s ontine.
Get answers from our team of home experts.
Get a personalized maintenance
Find information
p[an for your home.
and tools to he[p with home projects.
managemylife
b_e'_g_t_/_eyeu by Sea_s
26
_ for
free]
Craftsman
Snow Thrower
Model
247.883971
\
22
20.
19
2
10
14
4
J
42
64
65
66 60
43 41
60
64
66
27
Craftsman
Snow Thrower
Model
247.883971
!
=
0
918-0281A
Bracket Assy, Auger
2.
684-0090B-0637
Impellar,
3.
931-2643
4.
5.
0
D =
Brake
B
II
684-04151-4028
Spiral Assy, LH
38.
684-04152-4028
Spiral Assy, RH
Tool, Cleanout
39.
684-04214-0691
Housing,
710-0376
Scr,Hex Cap, 5/16-18 x 1.00
40.
731-05162
Spacer, 1.0 x 1.5 x 2
710-04484
Screw, 5/16-18 x .750
41.
731-05163
Spacer, 1.0 x 1.5 x 1
6.
710-0451
Screw, Carriage,
42.
938-04158
Axle, Spiral, 33"
7.
710-04606A
Screw, 5/16-18 x .4300
43.
741-0494
Bushing, Flange, 1.051 x 1.16
8.
710-1245B
Screw, 5/16-24 x .875
44.
784-5714B-0637
Shave Plate
9.
911-0677
Ferrule
45.
710-3168
Bolt, Carriage,
3/8-16 x 1.0
10.
712-04063
Nut, Flnge Lk, 5/16-18
46.
710-3034
Bolt, Carriage,
3/8-16 x 1.25
731-06007
Shoe, Skid
16"
5/16-18 x .75
Auger - 33"
11.
712-04065
Nut, Fig Lk, 3/8-16
47.
12.
914-0135
Key, Woodruff,
48.
790-00181-0637
Drift Cutter
13.
714-04040
Pin, Bowtie Cotter
49.
736-0262
Washer, Flat, .385 x .870
14.
915-0118
Pin, Spirol, 5/16 x 1.75
50.
918-0246
Hsg Assy Auger RH (Inc. 65 & 66)
15.
725-0157
Tie, Cable
51.
918-0435
Hsg Assy Auger LH (Inc. 65 & 66)
16.
926-04012
Nut, Push
52.
710-1260A
Screw, LD, 5/16-18 x .750
17.
731-1696B
Adapter,
53.
711-04714
Shf, Drive, Auger
18.
732-0858
Spring, Extension
54.
914-0126
Key, Hi Pro, 3/16 x 3/4
19.
936-0159
Washer, .349 x .879 x .063
55.
716-0111
Ext, Ret, Ring
20.
736-0174
Washer, .625 x .885 x .015
56.
917-0299
Gear, Worm,
Dbl Thread
21.
736-0505
Washer, Flat, .34 x 1.50 x .150
57.
917-1425
Gear, Worm,
LH
22.
936-3008
Washer, .344 x .75 x .12
58.
921-0145
Seal, Oil
23.
736-3046A
Washer, 1.01 x 1.86 x .06
59.
721-0325
Plug
24.
731-2635
Clip, Mounting
60.
936-0266
Washer, Flat, 1.52 ID x 2.00D
25.
938-0281
Screw, Shoulder,
61.
936-0291
Washer, Flat, .88 ID x .38 OD
26.
738-04155
Pin, Shear, .25 x 1.75
62.
738-0275
Shf, Gear, Worm
27.
741-0192
Bearing, Flange w/Flats
63.
741-0184
Brg, Thrust
28.
941-04024
Bearing, Self Aligning
64.
941-0217
Sleeve
29.
747-0980A
Rod, Auger Idler
65.
921-0146
Oil Seal
30.
748-04067A
Pulley, Adapter,
66.
741-0670
Flange Bearing
31.
950-04020
Spacer, 1.004 x 1.375 x .25
67.
954-04194A
V Belt,4L x 44.60 Lg.
32.
756-04244A
Pulley, Auger Drive, 10.0
68.
937-3000
Lube Fitting, 3/16 #70
33.
790-00264A-0637
Bracket, Gear Box Support
69.
736-0188
Washer, Flat, .78 x 1.49 x .08
34.
05244B
Housing,
Bearing
70.
720-0284
Wing
35.
784-0315A-0637
Housing,
Bearing
71.
712-3007
Jam Nut, 5/16-18
36.
918-04514
Gear Box Assembly,
l/4 x 3/4
Chute, 6"
.625 x .17
.75 Dia.
Auger
72.
28
Knob
Craftsman
Snow Thrower
Model
247.883971
65
57
66
_\
7 58
5O
64
3O
21
15
79
79
40
/
/
38
/
/
3
39
\
29
m _
684-04308A
O
O
D _
Chute CrankAssembly
O
731-0903E
LowerChute
731-1313C
ChuteTilt CableGuide
2
684-04350
Joint Block Assembly
43
3
710-0276
Screw,Carriage,5/16-18x 1.0
44
936-0231
Fiat Washer
4
710-04682
Screw,Hex,3/8-16x 2.00 Lock,Gr5
45
784-5594-0637
CableBracket
5
710-0572
Screw,Carriage,5/16-18x 2.5
46
631-04133A
HandleClutchLock- LH
6
710-3118
Screw,Hex,3/8-16x 1.0Lock,Gr5
47
631-04134B
HandleClutchLock- RH
7
712-04063
FlangeLock Nut,5/16-18
48
931-04187A
HandlePanel
8
912-3010
HexNut,5/16-18
49
646-0012
CableAssembly,Auger/Drive
9
914-0101
internalCotterPin
746-0952
Cable,Clutch
10
914-04040
internalCotterPin
732-0184
Spring,Extension
11
715-04095
Spring Pin
50
684-04111B
HandleEngageAssy- LH
12
720-0201A
Knob,Crank
51
684-04112C
HandleEngageAssy- RH
13
720-0284
Knob,WingNut, 5/16-18
52
684-04250
RodAss'y,ClutchLock Pivot
14
926-0100
Cap, Push,3/8
53
710-04326
Screw,#8-16x 0.50
15
735-0234
Grommet,Rubber
54
710-04586
Screw,1/4-20x 1.625
16
736-0105
Washer,Bel,.375x .87x .063
55
710-0837
AB Screw,#10-16
17
936-0159
Washer,Fiat,.349x .879.063
56
710-1233
Screw,#10-24x 0.375
18
936-0185
57
710-3069
Screw,1/4-20x.375
19
736-0242
Washer,Belleville,.34x .872x .06
58
712-04081A
ShoulderNut,1/4-20
PlasticBushing,.380I.D.
59
720-04039
Shift Knob
J Washer,.375x .738x .063
20
941-0475
21
22
747-04747
_ EyeBolt
747-04925A-0637 Chute Rod
60
736-0159
Fiat Washer,.349x .879x .063
61
725-05148
WiringHarness(NotShown)
23
749-04675-0691
Handle,Upper- LH
62
725-04393
Htd. HandGrip on/off Switch
24
749-04674-0691
Handle,Upper- RH
63
725-06095
LightSocket
25
749-0991-0691
Handle,Lower
64
725-05149
HeatedHandGrip
26
790-00329-0637
Chute CrankBracket
65
731-04894D
Lock Plate
27
716-04036
Ring,Retainer
66
731-04896B
ClutchLockCam
28
725-0157
CableTie
67
732-0193
CompressionSpring
29
731-06113
68
732-04219C
ClutchLockSpring
30
738-04126
Pin,3/16
69
732-04238
TorsionSpring
31
710-04022
HexHeadScrew,MB1.25
70
935-0199A
RubberBumper
32
732-04677
CableGuide
71
936-0267
Fiat Washer,.385x .87x .06
33
936-0264
FiatWasher,.330x .630x .0635
72
738-04125
ShoulderScrew
73
738-04348
ShoulderScrew,1/4-20x 1.345
Hi-LoScrew,1/4-15x 0.5
74
746-04341
SpeedSelectorCable
790-00248C-0637 PanelBracket
34
984-04230
35
710-04187
. Trigger
TM
J 2-WayChuteControl Assy
36
710-0458
Bolt,Carriage,5/16-18x 1.75
75
37
710-0597
Screw,1/4-20x 1.00
76
790-00281B-0637 Shift Lever
38
710-0895
Hi-LoScrew,1/4-15x .75
77
731-05324
LensPanel
39
712-04064
FlangeLock Nut, 1/4-20
78
777X41804
ReflectorLabel
40
731-0846C
UpperChute
79
746-04338
Cable,ChuteTilt
41
731-0851A
Chute,FlangeKeeper
3O
Craftsman
Snow Thrower
Model
247.883971
88
91
"93 78
92
100
102
104
23
45
36
/7
18
18
33
77
67
15
17
27
25
34
74
32
32
_3 56
19
55
72
1j
11
31
z
112
11
24
111
31
10
Craftsman
Snow
Thrower
Model 247.883971
|=
o
e
05244B
Housing,Bearing
2.
618-0279P
Dogg,SteeringDrive,LH
3.
618-0280P
4.
918-0282E
5.
918-04178
D =
Q
m
732-04385
TorsionSpring,.750I.D.x .968 Lg.
40.
936-0158
Washer,Lock,5/8
Dogg,SteeringDrive,RH
41.
736-0242
Wsh,Bell., .34x .872x .06
ShaftAssembly,Steering
42.
936-0864
Wash,.375x .812x .060
Assembly,FrictionWheel
43.
936-0329
Washer,Lock,1/4
718-04034
Wheel,Friction,Bonded
44.
936-3015
FiatWasher,.469x .875x .105
710-0896
Screw,Hex Wash
45.
790-00257-0691
Cover,UpperFrame
684-0118B-0637
Bracket,AugerActuator
46.
790-00259-0691
Cover,LowerFrame
684-0119B-0637
Bracket,DriveActuator
47.
937-3000
Fitting,Lube,3/16 Drive
8.
684-04212-0637
Brkt, FrictionDriveSuprt.
48.
738-0143
Screw,Shldr.,.498x .34
9.
684-04229
RodAssembly,Shift
49.
738-0279
Spindle,DrivePlate
10.
684-04235
Sprocket,32T
50.
738-04184A
ShoulderScrew,.368x .113,1/4-20
11.
710-04484
TT Screw,5/16-18x .750
51.
738-0924A
Screw,HexShldr.,1/4-28
12.
710-0538
Screw,Hex CapLock,
52.
741-0163A
Ass'y,Bearing/Housing
13.
710-0599
Hex Screw,1/4-20x .50
53.
941-04025
Bearing,Self Aligning
14.
710-0751
Hex HeadScrew,1/4-20
54.
741-04108
Bearing,Hex Flange
15.
710-1652
Screw,Hex Wash.
55.
941-0563
Bearing,Ball
16.
710-3001
Screw,Hex Cap,3/8-16
56.
741-0747
Bush,Fig, .5625x 1.375x .4375
17.
911-04279
Shaft,Hex Drive
57.
741-0748
Bush,Fig, .5 ID x .627OD
18.
711-04605
Shaft,Actuator
58.
746-04337A
SteeringCable,35.97" Long
6.
19.
912-0116
Nut,Hex InsertJam Lock
59.
946-0951A
Cable,Auger Idler
20.
912-0138
Nut,Hex, 1/4-28GR5
60.
747-0973
Rod,Drive Clutch
21.
712-04063
FlangeLockNut,5/16-18
61.
750-04703
Spcr.,1.0ID x 1.50OD
22.
712-04064
FlangeLockNut, 1/4-20
62.
750-04717
Spcr.,.51ID x 7.895Lg.
23.
712-04065
FlangeLockNut,3/8-16
63.
750-04718
Spcr.,.51ID x 3.66Lg.
24.
912-0413
Hex Nut,5/8-18
64.
750-04719
Spcr.,.5151ID x .750ODx .220
25.
712-0717
Nut,Insert3/8-16
65.
750-05342
Spcr.,.566ID x .87 ODx .190
26.
713-0284
Chain,Endless,#41x 36L
66.
750-05343
Spcr.,.566ID x .87 ODx 1.25
27.
713-0286
Chain,#420x 40L
67.
750-0903B
Spcr.,.514x .632x 2.44
28.
913-04015
Sprocket,#41x lOT
68.
950-0997
Spacer,.675x 1.0x .23
29.
914-0104
Pin,InternalCotter
69.
750-1302B
Spcr, .6725x 1.125x 2.48
30.
914-0135
Key,Woodruff
70.
756-0344
Pulley,Auger
31.
914-0388
Key,Hi-Pro,3/16x 5/8
71.
756-0625
Roller,Cable
32.
916-0104
E-Ring
72.
784-0404
BearingRetainingBracket
33.
716-0136
Ring, Retaining
73.
784-0406A-0637
Bracket,FrameSupport
34.
716-04048
Ring, Retainer
74.
784-0407-0637
Bracket,AxleSupport
35.
917-0302
Plate,Drive
75.
790-00217A-0637 Speed SelectorPivot Bracket
36.
726-0221
SpeedNut, .500
76.
790-00218A-0637 Speed SelectorShift Bracket
790-00349-0691
TransmissionFrame
684-04169
IdlerPulleyAssembly
37.
932-0121
Spring,Extension
77.
38.
932-0209
Spring,Extension
78.
Continuedon followingpage
32
Craftsman
Snow Thrower
IViodel 247.883971
Continuedfrom previouspage
|=
o
0
710-0627
Screw,Hex Cap,5/16-24
80.
710-0191
Hex Hd. Screw,3/8-24x 1.25GR8
81.
710-0607
Screw,Hx Wash HdTapp
82.
710-0624
Screw,Hex Cap,5/16-24x 1.50
83.
710-0654A
Screw,3/8-16x 1.00
84.
710-0809
Screw,1/4-20x 1.25
85.
738-04439
Hex HeadScrew,5/16-24x .875
86.
710-0347
Hex HeadScrew,3/8-16x 1.75
87.
914-0105
SquareKey,3/16 x 1.00
88.
926-04012
Nut,Push
89.
931-2531
Cover,Belt
90.
732-04308A
TorsionSpring,.850dia.x .333 Ig.
91.
936-0119
Washer,Lock,5/16
92.
736-3082A
Washer,Flat, .45x 1.5x .172
93.
736-3092
Washer,Fiat, .265x 1.0x .030
94.
952Z483-SU
EngineComplete
95.
748-04112B
ShoulderSpacer,.3175x .500x .094
96.
750-04571
ShoulderSpacer,.260x .785x .538
97.
750-04821
ShoulderSpacer,.340x 1.00
98.
750-05316
Spacer,1.155ID x 1.78ODx .150
99.
750-05318
Spacer,1.004ID x 1.625ODx .50
100.
954-04194A
V-Belt,4Lx44.60 Lg.
101.
954-04202
V Belt,3/8 x 36.68
102.
756-0981B
Pulley,Flat Idler,2.75OD
103.
756-04351
DoublePulley,3.25 x 2.75
104.
784-0385D
Bracket,Auger Idler
105.
790-00167A-0637 Belt KeeperBracket
106.
790-00208C
107.
790-00254A-0637 BeltCover Bracket
108.
756-0344
Pulley,Drive
109.
634-0225A-0911
WheelAss'y.- LH
634-0226A-0911
WheelAss'y.- RH
IdlerDrive WheelBracket
734-2031
Tire
934-0255
Valve
741-0246A
Bearing
110.
711-04607A
Axle,Wheel,33"
111.
711-04615
Pin,Clevis
112.
914-0149B
Pin,InternalCotter
33
Craftsman
Snow Thrower
Model
247.883971
777122341
777S32636
1. KEEPAWAYFROMROTATINGIMPELLERANDAUGER.CONTACT
WITHIMPELLER
ORAUGERCANAMPUTATE
HANDSANDFEET.
2. USECLEAN-OUTTOOLTO UNCLOGDISCHARGECHUTE,
3. DISENGAGE
CLUTCHLEVERS,
STOPENGINE,ANDREMAINBEHIND
HANDLESUNTILALLMOVINGPARTSHAVESTOPPEDBEFORE
UNCLOGGINGOR SERVICINGMACHINE,
4. TO AVOIDTHROWNOBJECTSINJURIES, NEVER
DIRECT
DISCHARGE
ATBYSTANDERS.
USEEXTRACAUTION
WHEN
OPERATING
ONGRAVELSURFACES.
5. READ OPERATOR'SMANUAL.
k=,
CLEAN-OUTTOOL i1_
777D16340
777123013
777D19077
777122340
777D18037
777S32280
777122363
777D18046
3,1
Craftsman Engine Model 483-$UBForSnow Model 247.883971
m
II
_
o
0
i
1
710-04915
Bolt M6x12
i 2
951-11339
Muffler
ii
i
i
Shield
!
i
3
710-04915
Bolt M6x12
i 4
951-10757
Throttle
Control
951-11595
Control
Panel
731-05632
Key
951-10637
Key Switch Assembly
ii 9
951-11302
Choke Knob
i
ii
i
i
i
i
i 5
!
!
i
i 7
i
i
i 8
!
Knob
i
i
i
10
710-04914
Bolt M6xlO
ii
11
951-11181
Exhaust Pipe Shield
i
12
951-11321
Carburetor
13
710-04968
Bolt M6x16
14
951-11338
MuFfler Assembly
15
712-05015
Nut, M8
38
951-11311
Throttle
i 39
710-04915
Bolt M6x12
i
i
i
i
i
i
i
Heat Shield
!
i
ii
i
i
i
!
i
ii
i
i
i
35
Control
Assembly
Craftsman Engine Model 483-SLIBForSnow Model 247.883971
f
h
i
131
O
I
0
33
--134
136
m
137138
__0/138
135--_
147-Carburetor RebuildKit
ID -
o
139_
0
_139
D -
129
710-05392
Stud M6-8x100
h
n_
Throttle
130
710-05056
Stud M6-8x118
I
n_
Idle Jet Rivet
131
951-11315
Carburetor
Intake Gasket
J
n_
Idle Jet Assembly
132
951-11316
Carburetor
Insulator
k
n_
Idle Speed Adjusting
133
951-11223
Carburetor
Gasket
I
n_
Primer Pipe
134
951-14023A
Ca rburetor
Assembly
m
751-11991
Primer Hose
Primer Hose Clamp
o
0
Shaft Cover
135
951-10639A
Primer Assembly
n
951-11906
135
951-11824
Primer Bulb
o
n_
Carburetor
136
951-11304
Heater Box
P
n_
Float Pin
Emulsion
Screw
Body
137
951-11192
Choke Assembly
q
n_
138
736-04477
LockWasher
r
n_
Nickel Plated Brass Needle Valve
139
712-05015
NutM6
s
n_
Main Jet
147
951-12760A
Carburetor
t
n_
Needle Valve Spring
(I n c.i,j,p,q,r,s,t,u,v,x,z)
U
n_
Float
V
951-11970
Fuel Bowl Gasket
W
n_
Fuel Bowl
X
951-11348
Fuel Bowl Gasket
Rebuild
Kit
Tube
a
n/a
Choke Shaft
b
736-04638
Choke Control
C
710-05469
Fuel Shutoff
d
n/a
Choke Plate
Y
710-04945
Fuel Bowl Mounting
e
Lever Washer
Lever Screw
Bolt
n/a
Throttle
Shaft
Z
951-11349
Fuel Drain Plug Gasket
f
n/a
Throttle
Plate
aa
710-04938
Fuel Drain Plug
g
n/a
Gasket
36
Craftsman Engine Model 483-$UBForSnow Model 247.883971
4O
I
42
44
43
42
61
141
140
144- GasketKit- Complete
145- GasketKit- External
146- CompleteEngine
49
37
Craftsman Engine Model 483-$UBForSnow Model 247.883971
D
4O
951-11951
Connecting
41
951-11952
42
951-11953
43
-
o
o
D -
o
0
67
710-06062
Bolt M8x45
Piston
68
710-06063
Bolt M8x35
Piston Pin Snap Ring
69
710-04968
Bolt M6x16
951-11954
Piston Pin
70
951-11320
Oil Tube Support
44
951-12579
Piston Ring Set
71
710-05349
Bolt M6x8
48
951-11956
Governor
73
951-11381
Oil Fill Tube O-Ring
49
951-11373
Radial Ball Bearing
74
951-12073
Oil Fill Tube Assembly
5O
736-04453
Flat Washer
75
951-11904
Dipstick
O-Ring
51
714-04077
Governor
Shaft Clip
76
951-11971A
Dipstick
Assembly
52
951-11958
Governor
Seal
77
951-11341A
Crankcase Kit (Inc.49,52,77,81)
53
951-11365
Governor
Arm Shaft
951-11328B
Short Block Assembly
54
951-11342
Crankshaft
55
951-10307
Woodruff
56
715-04102
Dowel Pin 9 X 12
78
951-11350
Oil Drain Pipe
57
715-04092
Dowel Pin 7 X 14
79
736-04440
Drain Pipe Washer 10X16X1.5
58
951-11959
Camshaft
80
710-04906
Oil Drain Plug Bolt
59
951-11376
Crankcase Cover Gasket
81
951-11499
Oil Seal
6O
736-04545
Washer
140
951-11968
Balance Gear Assembly
61
951-11283
Oil Fill Plug Assembly
141
951-11969
Bearing
62
951-11577
O-Ring
143
951-10641
Oil Drain Asm
64
951-14220
Crankcase Cover
144
951-11330A
Gasket Kit - Complete
951-11340
Crankcase Cover Kit
145
951-11331
146
952Z483-SU B
Rod Assembly
Gear/Shaft
Assembly
Kit (Inc.49,54,55,65,81)
(I nc.40-44,48-68,77-81,102,105,106,108
Key
110,111,125,131,132,140,141)
Assembly
(I nc.52,59,65,79,81,106,
(Inc.49,59,60,64-68)
65
951-I1375
Oil Seal
66
710-06061
Bolt M8x38
Bracket
Gasket Kit- External
(Inc.79,108,125,131-133)
38
Complete
Engine
108,125,131-133)
Craftsman Engine Model 483-$UBForSnow Model 247.883971
11o_
11s
11_
116"--_)
(_
--
_11311s
142
I
114
112
11o
113
o
123
123
122
121
120 119
I
118
1
144-GasketKit-Coreplete
123
123
123
145- Gasket Kit- I:xternal
146- Complete
Engine
39
127
128
Craftsman Engine Model 483-$UBForSnow Model 247.883971
D _
o
o
D
_
o
100
951-11337
Valve Kit
116
951-12081
Exhaust Lash Cap
101
951-11337
Valve Kit
117
951-11965
Push Rod Guide
102
951-11962
Tappet
118
951-11981
Rocker Arm Assembly
103
951-11335
Push Rod Kit
119
710-04962
Bolt, Pivot
104
951-12555
Cylinder
Head Kit (Inc.106,110-112,125)
120
951-11966
Rocker Arm
Head Assembly
121
751-11123
Adjusting
(Inc.100,101,104,106,108-112,
122
751-11124
Pivot Locking
114-122,125,129-133)
123
710-05054
Valve Cover Bolt
951-11220
Valve Cover
951-11329B
Cylinder
Nut ,Valve
Nut
105
715-04097
Dowel Pin
124
106
951-11963
Cylinder
125
951-11967
Valve Cover Gasket
107
951-10292
Spark Plug/F6Rtc
126a
731-07059
Breather
726-04101
Head Gasket
Hose
108
951-11212
Muffler
Gasket
126b
Breather
Hose Clamp
109
710-04964
Exhaust Stud M8x48.5
127
951-11317
Cylinder
Baffle
109
951-11207
Muffler
128
710-04915
Bolt M6x12
110
710-06064
Bolt MlOxl.25x87
142
951-11333
Valve Cover Kit
111
710-06065
Bolt MlOx1.25x65
144
951-11330A
Gasket Kit - Complete
112
951-11964
Intake Valve Seal
113
951-12077
Intake Valve Spring Retainer
114
951-12078
Valve Spring
115
951-12080
Exhaust Valve Spring Retainer
Stud Assembly
o
(I n c.52,59,65,79,81,106,108,125,131-133)
145
951-11331
Gasket Kit - External
(I n c.79,108,125,131-133)
146
4O
952Z483-SU B
Complete
Engine
Craftsman Engine Model 483-$UBForSnow Model 247.883971
87
84
86
85
46
45
82
g
85
92
88
9S
91
96
89
97
98
D
_
o
w
D
45
710-04965
Screw M4 X 55
89
951-11313
Cooling
46
951-11196
Electric Starter
90
951-11314
Starter Cup
47
710-04967
Bolt M8x55
91
712-04220
Flywheel
710-04968
Bolt M6x16
_
o
Fan
Nut, M14x1.5
82
951-11305
Ignition
Coil Assembly
92
83
710-05350
Ignition
Coil Bolt
93
710-04915
Bolt M6x12
84
951-12553
Alternator
95
951-11211
Blower
951-14223
Recoil Starter Assembly
Assembly
Housing
85
710-04969
Bolt M6x30
96
86
710-04966
Bolt M6x8
97
736-04455
Flat Washer
87
951-11186
Alternator
98
710-04974
Bolt M6xl0
88
951-12556
Flywheel
Wire Clamp Bracket
41
0
Craftsman Engine Model 483-$UBForSnow Model 247.883971
18
27
I
26
/25
%
26/
34 32
24
D
16
951-12533
17
951-I 1933
18
710-04970
_
o
D _
o
Fuel Cap Assembly
27
951-11336
Fuel Line Kit
Fuel Level Indicator
28
951-11700
Fuel Hose Clamp
Bolt M8x20
29
710-04921
Bolt M8x14
951-11182
Fuel Tank Mounting
o
0
19
750-05312
Bushing,
Slot
30
20
750-05313
Bushing,
Rnd
32
712-04212
Flange Nut M6
21
951-11201
Fuel Tank Assembly
33
710-04908
Governor
Arm Bolt M6X21
34
951-11307
Governor
Arm
35
951-11306
Governor
Spring
22
951-11319
Fuel Tank Shroud
23
951-11318
Fuel Tank Mounting
24
951-11351
Engine Shroud
36
951-11203
Throttle
37
951-11309
Governor
25
710-04968
Bolt M6x16
26
736-04452
Bush
Bracket
42
Bracket
Return Spring
Rod
FEDERAL
and/or CALIFORNIA
EMISSIONCONTROL
WARRANTYSTATEMENT
YOURWARRANTYRIGHTSANDOBLIGATIONS
MTD Consumer Group Inc, the United States Environmental
Protection Agency (EPA), and for those products
California, the California Air Resources Board (CARB) are pleased to explain the emission (evaporative and/or
warranty
on your 2013 and later small off-road
spark-ignited
engine and equipment
(outdoor
equipment
engines
must be designed,
built and equipped
to meet the State's stringent
equipment
engines
must be designed,
built, and equipped
to meet the U.S. EPA small off-road
equipment
anti-smog
certified
exhaust)
engine).
standards
engine
diagnosis,
condition
exists, MTD Consumer
Group Inc will repair your outdoor
equipment
new outdoor
regulations).
of time listed below, provided
Your ECS may include parts such as the carburetor, fuel-injection
system, ignition system, catalytic converter,
valves, canisters, filters, vapor hoses, clamps, connectors,
and other associated emission-related
components.
Where a warrantable
In California,
(in other states, outdoor
spark ignition
Consumer Group Inc must warrant the ECSon your outdoor equipment
engine for the period
abuse, neglect, or improper maintenance
of the outdoor equipment
engine.
for sale in the state of
control system (ECS)
MTD
there has been no
fuel tanks, fuel lines, fuel caps,
engine at no cost to you including
parts, and labor.
MANUFACTURER'S
WARRANTYCOVERAGE:
This emission
control system is warranted
for two years. If any emission-related
part on your outdoor
part will be repaired or replaced by MTD Consumer Group Inc. In the event that a component
Manufacturer's
equipment warranty, the longer coverage period will apply.
equipment
is covered
engine
for longer
is defective,
the
than two years by the
/
OWNERSWARRANTY
RESPONSIBILITIES:
As the outdoor equipment
engine
Consumer Group Inc recommends
Group Inc cannot deny warranty
As the outdoor
your outdoor
equipment
equipment
owner, you are responsible
that you retain all receipts
for performance
of the required maintenance
listed in your owner's manual. MTD
covering maintenance
on your outdoor equipment
engine, but MTD Consumer
solely for the lack of receipts.
engine
owner, you should
however
be aware that MTD Consumer
engine or a part has failed due to abuse, neglect,
improper
Group Inc may deny you warranty
maintenance,
or unapproved
coverage
if
modifications.
You are responsible for presenting your outdoor equipment
engine to MTD Consumer Group Inc's distribution
center or service center as soon
as the problem exists. The warranty repairs should be completed
in a reasonable amount of time, not to exceed 30 days. If you have a question
regarding
http://su
your warranty
pport.mtd
coverage,
you should contact
the MTD Consumer
Group Inc Service Department
at 1-800-800-7310
or at
prod ucts.com.
GENERALEMISSIONS
WARRANTYCOVERAGE:
MTD Consumer
designed,
Group Inc warrants
built, and equipped
cause the failure of a warranted
The warranty
period
Subject to certain
1.
to the ultimate
so as to conform
part for a period
Any warranted
and exclusions
regulations;
equipment
Group Inc according
remainder
of the period.
for replacement
to subsection
as required
Any warranted
part that is scheduled
stated above. Any such part repaired
only for regular inspection
or replaced under warranty
3.
Any warranted
for replacement
part that is scheduled
replacement
as required
to an ultimate
maintenance
(4) below. Any such part repaired
2.
of time before the first scheduled
that the outdoor
on emission-related
stated above. If the part fails during the period of warranty
Consumer
period
purchaser
and (2) free from defects
engine is delivered
as stated below, the warranty
part that is not scheduled
period
and each subsequent
equipment
in materials
engine
is: (1)
and workmanship
purchaser
or first placed into service.
parts is as follows:
in the written
coverage,
instructions
supplied
the part will be repaired
or replaced
under warranty
is warranted
or replaced
will be warranted
for the
in the written instructions
supplied is warranted for the warranty
will be warranted for the remaining warranty period.
maintenance
in the written
instructions
supplied
date for that part. If the part fails before the first scheduled
Repair or replacement
to the owner.
5.
Notwithstanding
of any warranted
the provisions
service the subject engines
6.
The outdoor
equipment
emission-related
7.
MTD Consumer
warranty
8.
Throughout
warranted
9.
herein, warranty
part, provided
the off-road
herein must be performed
services or repairs will be provided
for diagnostic
that such diagnostic
Group Inc is liable for damages
parts sufficient
provisions
is warranted
replacement,
at a warranty
at all of our distribution
period
station
for the
the part
under
at no charge
centers that are franchised
or equipment.
engine owner will not be charged
warranted
of any warranted
Any replacement
part under the warranty
for
by MTD
will be repaired or replaced by MTD Consumer Group Inc according to subsection (4) below. Any such part repaired or replaced
warranty will be warranted for the remainder of the period prior to the first scheduled replacement
point for the part.
4.
that
of two years.
begins on the date the outdoor
conditions
the warranty
purchaser
with all applicable
to other engine
labor that is directly
work is performed
or equipment
associated
at a warranty
components
with diagnosis
of a defective,
station.
proximately
caused by a failure under
part.
engine
and equipment
warranty
to meet the expected
demand
part may be used in the performance
the owner. Such use will not reduce the warranty
period
stated above, MTD Consumer
Group Inc will maintain
a supply of
for such parts.
of any warranty
obligations
maintenance
of MTD Consumer
or repairs and must be provided
Group Inc.
without
charge to
to
10. Add-on
ormodified
partsthatarenotexempted
bytheAirResources
Board
maynotbeused.
Theuseofanynon-exempted
add-on
or
modified
partsbytheultimate
purchaser
willbegrounds
fordisallowing
awarranty
claims.
MTDConsumer
Group
Incwillnotbeliable
to
warrant
failures
ofwarranted
partscaused
bytheuseofanon-exempted
add-on
ormodified
part.
WARRANTED
PARTS:
The repair or replacement
of any warranted
part otherwise eligible for warranty coverage may be excluded from such warranty coverage if
MTD Consumer Group Inc demonstrates
that the outdoor equipment
engine has been abused, neglected, or improperly
maintained, and that
such abuse, neglect,
any adjustment
coverage.
Further, the coverage
The following
1.
or improper
of a component
emission
Fuel Metering
warranty
maintenance
was the direct cause of the need for repair or replacement
that has a factory
under this warranty
parts are covered
installed,
extends
and properly
operating,
adjustment
limiting
of the part. That notwithstanding,
device is still eligible
only to parts that were present on the off-road
for warranty
engine and equipment
purchased.
(if applicable):
System
Cold start enrichment
Carburetor
system (soft choke)
and internal
parts (or fuel injection
system)
Fuel pump
Fuel tank
2.
Air Induction
System
Air cleaner
Intake manifold
3.
Ignition
System
Spark plug(s)
Magneto
4.
ignition
system
Exhaust System
Catalytic
converter
SAI (Reed valve)
5.
Miscellaneous
Items Used in Above System
Vacuum, temperature,
Connectors
6.
Evaporative
position,
time sensitive valves and switches
and assemblies
Control
Fuel hose
Fuel hose clamps
Tethered
Carbon
fuel cap
canister
Vapor lines
050790 Rev.A
Look For Relevant Emissions Durability Period and
Air index information On Your Engine Emissions Label
Engines that are certified to meet the California Air Resources Board (CARB) Tier 2 Emission Standards must
display information regarding the Emissions Durability Period and the Air Index. Sears Brands Management
Corporation makes this information available to the consumer on our emission labels.
The Emissions Durability Period describes the number of hours of actual running time for which the engine is
certified to be emissions compliant, assuming proper maintenance in accordance with the Operating & Maintenance Instructions. The following categories are used:
Moderate:
Engine is certified
to be emission compliant
for 125 hours of actual engine running time.
Intermediate:
Engine is certified
to be emission compliant
for 250 hours of actual engine running time.
Extended:
Engine is certified
to be emission compliant
for 500 hours of actual engine running time.
For example, a typical walk-behind lawn mower is used 20 to 25 hours per year. Therefore, the Emissions
Durability Period of an engine with an intermediate rating would equate to 10 to 12 years.
The Air index is a calculated number describing the relative level of emissions for a specific engine family. The
lower the Air Index, the cleaner the engine. This information is displayed in graphical form on the emissions label.
After
July 1,2000, Look For Emissions
Compliance
On Engine Emissions
Compliance
Label
Period
After July 1, 2000 certain Sears Brands Management Corporation engines will be certified to meet the United
States Environmental Protection Agency (USEPA) Phase 2 emission standards. For Phase 2 certified engines, the
Emissions Compliance Period referred to on the Emissions Compliance label indicates the number of operating
hours for which the engine has been shown to meet Federal emission requirements.
For engines less than 225 cc displacement,
For engines of 225 cc or more, Category
Category
C = 125 hours, B = 250 hours and A = 500 hours.
C = 250 hours, B = 500 hours and A = 1000 hours.
This is a generic representation of the emission label typically found on a certified engine.
FAMILY YBSXS.3192VA
274812
GDOC-100182
Rev.B
45
Congratulations
on making a smart purchase.
Your new Craftsman®
product is designed and
manufactured
for years of dependable operation. But like all products, it may require repair
from time to time. That's when having a Repair Protection Agreement can save you money and
aggravation.
Here's
[]
[]
[]
[]
[]
what
the
Repair
Protection
Agreement*
includes:
Expert service by our 10,000 professional repair specialists
Unlimited
service and no charge for parts and labor on all covered repairs
Product replacement
up to $1500 if your covered product can't be fixed
Discount
of 25% from regular price of service and related installed parts not covered by the
agreement; also, 25% off regular price of preventive maintenance check
Fast help by phone - we call it Rapid Resolution - phone support from a Sears representative.
Think of us as a "talking owner's manual."
Once you purchase the Repair Protection
to schedule service. You can call anytime
Agreement, a simple phone call is all that it takes for you
day or night, or schedule a service appointment
online.
The Repair Protection Agreement is a risk-free purchase. If you cancel for any reason during the
product warranty period, we will provide a full refund. Or, a prorated refund anytime after the
product warranty period expires. Purchase your Repair Protection Agreement today!
Some limitations
and exclusions
call 1=800=827=6655.
*Coverage
6665.
in Canada
Sears Installation
apply.
varies on some
For prices and additional
items. For full details
information
call Sears Canada
in the U.S.A.
at 1=800=361=
Service
For Sears professional
installation
of home appliances, garage door openers,
other major home items, in the U.S.A. or Canada call 1=800=4=MY=HOME®.
46
water heaters,
and
Your Home
For troubleshooting,
product manuals and expert advice:
managernylife
www.managemylife.com
For repair - in your home - of all major brand appliances,
lawn and garden equipment, or heating and cooling systems,
no matter who made it, no matter who sold it!
For the replacement parts, accessories and
owner's manuals that you need to do-it-yourself.
For Sears professional installation of home appliances
and items like garage door openers and water heaters.
1-800-4-MY-HOME
®
(1-800-469-4663)
Call anytime, day or night (U.S.A. and Canada)
www.sears.com
www.sears.ca
Our Home
For repair of carry-in items like vacuums, lawn equipment,
and electronics, call anytime for the location of your nearest
Sears Parts & Repair Service Center
1-800-488-1222
(U.S.A.)
www.sears.com
To purchase a protection
1-800-827-6655
agreement
Para pedir servicio de reparaci6n
a domicilio, y para ordenar piezas:
(1-888-784-6427)
www.sears.com
®
(Canada)
www.sears.ca
(U.S.A.)
1-888-SU-HOGAR
1-800-469-4663
on a product serviced
by Sears:
1-800-361-6665
(Canada)
Au Canada pour service
en frangais:
1-800-LE-FOYER
Mc
(1-800-533-6937)
www.sears.ca
® Registered Trademark / TMTrademark of KCD IP, LLC in the United States, or Sears Brands, LLC in other countries
® Marca Registrada ! TMMarca de Fabrica de KCD IP, LLC en Estados Unidos, o Sears Brands, LLC in otros paises
MCMarque de commerce ! MDMarque deposee de Sears Brands, LLC