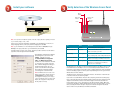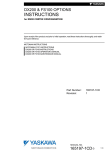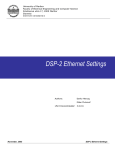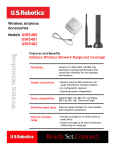
1
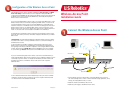
Configuration of the Wireless Access Point
After the Wireless Access Point is installed, click Windows Start, Programs, and WLAN
Access Point Utility to launch the Access Point Configuration Utility. Click AP in the
toolbar and then click Scan. This will search for the Wireless Access Point in the network.
If a Wireless Access Point is detected, the WLAN Access Point Utility will display the
Wireless Access Point information.
If you are using multiple Wireless Access Points, you must know the MAC address of the
Wireless Access Point you are currently configuring. The MAC address is located on the
bottom of the Wireless Access Point case and in the WLAN Access Point Utility in the
State field. Locate the correct Wireless Access Point in the list that appears. If the listed
Wireless Access Point does not match the MAC address on the bottom of the correct
Wireless Access Point, refer to the Troubleshooting section in the Companion Reference
Guide or to the User Guide on the Installation CD-ROM for more information.
Wireless Access Point
Installation Guide
Connect the Wireless Access Point
Double-click the correct Wireless Access Point in the list. If the Wireless Access Point in
the list has an IP address, the Access Point Web Configurator will launch in your default
Web browser.
Congratulations! You have finished installing your hardware and the necessary software.
You should now be able to connect your Wireless Access PC Cards and PCI Adapters to
the Wireless Access Point.
To access the Access Point Web Configurator, double-click the name of the correct
Wireless Access Point in the list. The WLAN Access Point Utility automatically links to
the Login Page of the Access Point Web Configurator server using the Windows default
browser. Type the Password WLAN_AP and then click Login. If you are also prompted
for a user name, type Default. The Password and User Name fields are case-sensitive.
Ethernet Port
Antenna
Reset
If you see a window stating that a free IP address could not be determined when you
double-click the Wireless Access Point in the Access Point Configuration Utility, you need
to manually assign an IP address to complete the installation procedure. Refer to the
Assigning an IP address to the Wireless Access Point section in the Companion
Reference Guide.
RJ-45
RS-232
POWER
ANTENA
RJ-45 Cable
Power
For more detailed information about the Installation procedure, the Access Point Web
Configurator, Troubleshooting, and Support, refer to the Companion Reference Guide
or to the User Guide on the Installation CD-ROM.
• Use the Ethernet port and an RJ-45 cable to connect the Wireless Access Point to
one of the following devices: a cable or DSL modem with routing capabilities, a hub,
a bridge, an existing Ethernet LAN, or a router.
• Attach the antenna to the Wireless Access Point.
• Attach the power supply to the Wireless Access Point.
Printed in Taiwan
R24.0257.00
Install your software
Verify detection of the Wireless Access Point
Wired
Activity
Wired Link
Indicator
Wireless Link
Indicator
Wireless
Activity
Power
Note: You only need to install this software on the PC or laptop that was originally connected
to your modem, bridge, router, or hub.
Insert your U.S. Robotics Installation CD-ROM into your CD-ROM drive. In the Choose
Setup Language window, select your preferred language and click OK.
Note: If your CD-ROM does not automatically launch, click Windows Start, Run, and type
D:\setup (or the appropriate letter of your CD-ROM drive) and click OK.
Some files will be copied to your system, and then you will be asked to read the license
agreement. Read the agreement and click Yes.
The Installation CD Graphic User Interface
(GUI) will appear on your screen. Click
Software. Click the icon for the
U.S. Robotics Wireless Configuration
Utility. Click Wireless Access Point.
Follow the on-screen instructions and wait
for some files to be copied to your hard
drive. A window will appear showing you
the files that have loaded onto your
system. Close this window. The program
window with the Configuration Utility
icons will appear. Close this window.
Note: Each Wireless Access PC Card or PCI
Adapter in the wireless network must have
the Infrastructure mode selected within
the Configuration Utility. If you are using a
U.S Robotics Wireless Access PC Card or PCI
Adapter, the Configuration Utility will look
like the graphic to the left.
LED
Status
Description
Power
ON/Red
Indicates that power is being supplied
Wired Link Indicator
ON/Green
Indicates that the Wireless Access Point Ethernet
Cable is connected to your LAN.
Wired Activity
Blinking/Yellow
Indicates that the Wireless Access Point is transmitting or receiving data on the 10 Mbps Ethernet LAN.
Wireless Link Indicator
Blinking/Green
Indicates that the Wireless Access PC Card or PCI
Adapter is connecting to the Wireless Access Point.
Wireless Activity
Blinking/Yellow
Indicates that the Wireless Access Point is transmit
ting data to or receiving data from a Wireless
Access PC Card or PCI Adapter.
The WLAN Access Point Utility should automatically detect the new Wireless Access Point.
If the WLAN Access Point Utility Tool does not automatically detect the Wireless Access
Point, refer to the Troubleshooting section of the Companion Reference Guide. The WLAN
Access Point Utility program icon in the system tray will change from red to green when a
Wireless Access Point is detected.
The Wireless Access Point has five LED status indicators. The function of each indicator
is described in the above table and graphic.
If you need to reset the Wireless Access Point at any time, perform the following steps.
Press in and hold the Reset button. While holding in the Reset button, unplug the power
adapter from the Wireless Access Point and then plug it back in. Release the Reset
button and then press it once. This will restore the factory default settings. When this
is performed, the Wireless Activity LED will blink. If you press the Reset button a second
time, all setting information except for the password and the encryption data will be
cleared. If this is done, the Wireless Link Indicator will blink.