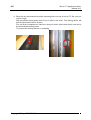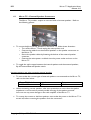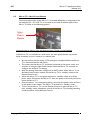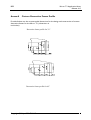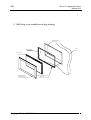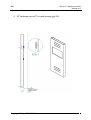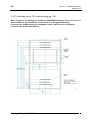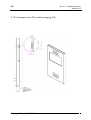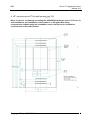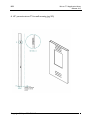
1
Business Display Solutions - Institutional Television
P.O. Box 218, 5600 MD Eindhoven, The Netherlands
32’’- 42” Mirror TV
Installation Guide for
32PM8822 ( BDL3221M)
42PM8822 (BDL4221M)
Date:
October 2005
Version:
0.5
© Copyright 2004 Philips Consumer Electronics B.V. Eindhoven, The Netherlands
All rights reserved. No part of this publication may be reproduced, stored in a retrieval system or transmitted, in any form or by any
means, electronic, mechanical, photocopying, or otherwise without the prior permission of Philips.
BDS
Mirror TV Application Note
Release v0.5
Table of contents
1. Introduction..................................................................................................................................... 3
2. Safety Precautions And Cleaning Procedures.......................................................................... 4
3. Guidelines on Installing the Mirror TV...................................................................................... 5
4. Placement the Decorative Frame ............................................................................................... 5
5. Technical Specifications of Mirror TV ..................................................................................... 10
5.1. Dimensional information............................................................................................................ 10
5.2. Weight information...................................................................................................................... 10
6. Mirror TV Connectivity.............................................................................................................. 10
Annex A
Custom Decorative Frame Profile ............................................................................... 13
Annex B
Decorative Frame Dimensions for Mirror TV .......................................................... 14
Annex C
Wall Mounting the Mirror TV landscape/portrait .................................................... 14
Annex D Recessed Wall Mounting the Mirror TV..................................................................... 17
Annex E
Cable Management for Mirror TV............................................................................... 27
Copyright © Philips BDS-ITV 2005
2
BDS
Mirror TV Application Note
Release v0.5
1. Introduction
The Philips Mirror TV combines an interactive flat LCD TV together with the reflectivity of a
mirror to provide an innovative 2-in-1 product for the customer.
This document covers the 32”-42” Landscape and portrait Mirror TV (model number
32PM8822 / 42PM8822)
The Mirror TV product utilizes the existing LCD TV technology of the Philips 32”-42” LCD
models, and therefore it provides many of the same features. For familiarity purposes, the
existing Directions For Use (DFU) documentation for the 32”- 42” LCD models can also be
used for the Mirror TV. Some differences may apply, and these differences will be covered in
this document.
The user is advised to read this document first in order to understand what are the differences
between a Mirror TV and the 32”- 42” LCD TV on which the Mirror TV is based. The user
should read through the DFU of the 32”- 42” LCD TV (provided with this product) for greater
details of the TV specifics and functions.
Once the differences are understood, the rest of the information on connectivity, safety,
remote-control usage, and so forth are the same as that in the DFU of the 32”- 42” LCD TV.
This document describes various elements specific to the Mirror TV application, including:
How to replace the decorative frame of the 32”- 42” Mirror TV
Technical specifications of main components
Connectivity overview
Instructions on how to wall-mount the 32”- 42” Mirror TV are provided in the Mirror TV
Addendum Sheet that is packed into each 32”- 42” Mirror TV box.
Refer to that document for the mounting details.
It is important to note that the application of the mirror is intended for decorative in-door
usage only and not designed for usage in wet and damp environments like bathrooms.
The information in this document is subject to change. Accessories are subject to availability.
Due to the dual functionality of the Mirror TV (mirror & display) the Light Sensor
function is put OFF with factory setup. It is important not to switch ON.
Copyright © Philips BDS-ITV 2005
3
BDS
Mirror TV Application Note
Release v0.5
2. Safety Precautions And Cleaning Procedures
The safety precautions and cleaning procedures for the Mirror TV are similar to that of the
32”- 42” LCD TV, and can be referenced to the respective sections in the DFU of that
product. Please refer to the DFU (included with your product) for more information.
However, to ensure that the Mirror TV continues to provide excellent and durable
performance, the following safety precautions are strongly advised:
1. Do not shift or move the Mirror TV when it is powered on.
2. Do not touch, push, or rub the surface of the mirror glass with any sharp or hard
objects.
3. For proper ventilation, provide at least 5 cm from the top and bottom of the Mirror TV
back panel to allow for a free flow of air.
4. If the Mirror TV unit is mounted into an enclosed space (for example, in-wall
mounting), it is strongly recommended to provide ventilation slots at the top and
bottom to allow for greater airflow and better ventilation. Without any ventilation
slots, the ambient temperature should not exceed 25 degrees Celsius. It is
recommended to create ventilation slots of 70cm x 2cm at both the top and bottom of
the wall, which would allow ambient temperatures up to 35 degrees Celsius.
5. Do not place the Mirror TV near a radiator or other sources of heat, or near areas
where it can be exposed to rain. The Mirror TV complies with the general safety
standards of consumer products.
6. It is also advisable not to place the Mirror TV under bright lighting or direct sunlight, as
this could adversely affect the brightness of the LCD display and the overall quality of
the picture.
To ensure that the Mirror TV continues to provide excellent picture and mirror quality, the
following cleaning procedures are suggested:
1. To avoid possible shock hazard, it is advised to power off and unplug the Mirror TV
before cleaning.
2. To clean the surface from dust, wipe it gently with an absorbent cotton cloth or other
soft material (like chamois). Avoid abrasive materials or wearing jeweled adornments
such as bracelets or rings, which may scratch the mirror glass surface. Use even, easy
vertical strokes when cleaning.
3. Do NOT use acetone, toluene, alcohol, or other liquid or aerosol cleaners to clean the
surface of the glass.
4. Wipe off any form of water from the screen as soon as possible. Be careful of
condensation when temperature changes occur, as condensation can cause damage to
the electrical parts and LCD screen.
5. If possible, occasionally vacuum the ventilation holes or slots in the back cover of the
Mirror TV.
Copyright © Philips BDS-ITV 2005
4
BDS
Mirror TV Application Note
Release v0.5
3. Guidelines on Installing the Mirror TV
Before installing the Mirror TV, the following considerations should be taken into account to
ensure that the best viewing experience is achieved.
Avoidance of Reflections
Aside from selecting an aesthetically pleasing location for the set, avoidance of reflections from
bright light sources (such as windows or light fittings) in the mirror in the viewing direction is
very important when the TV is being viewed. In this regard, the location of both the viewer and
the viewing direction are important when deciding where to place a MiraVision set in a room.
Reflection of bright background light sources should also be avoided when the MiraVision set is
used as a mirror. For mirror purposes, it is recommended to place light sources (such as tabletop lamps) to the side of the MiraVision set, thereby lighting the subject that is being reflected
by the mirror.
Audio Requirements
MiraVision sets have mounted on loudspeakers located at the rear of the set.
Depending on the location of the MiraVision set in a room, it may prove worthwhile to
consider the use of external loudspeakers. These can be connected to the MiraVision set via
the speaker terminals at the rear. External speakers can be used when mounting circumstances
restrict the sound output of the onboard speakers (example, when mounting the MiraVision inwall).
Refer to the section External Speaker Connectors in this document for more information on the
use of the external loudspeakers.
4. Placement the Decorative Frame
The Mirror TV is designed to be flexible and allow customers to change the decorative frame
according to their tastes. Before replacing the standard decorative frame with a custom frame,
please take note of the following:
Copyright © Philips BDS-ITV 2005
5
BDS
Mirror TV Application Note
Release v0.5
Important points to observe when changing decorative frames
1. It is strongly recommended that this operation be conducted in a dust-free
environment. This will help to ensure the continued quality of the Mirror TV display
after the new custom frame has been attached.
2. The design of the new decorative frame must conform to certain dimension guidelines
to ensure that it will attach securely to the steel mounting frame of the Mirror TV. For
the dimensions, refer to the sections Custom Decorative Frame Profile and mounting Frame
Dimensions for Mirror TV later in this document.
3. Any new custom decorative frame should conform to the following guidelines:
a. The new custom decorative frame should provide a hole to be able to place the
plastic Infrared receiver (located at the lower right portion of the Mirror TV
original décor frame) as this could interfere with the performance of the Mirror
TV Remote Control.
4. The same decorative frames can be be re-used multiple times, as the clicking device on
the mounting frame is suitable for multiple usage. Any changes to the Mirror TV,
including the replacement of the decorative frames, is performed at the customer’s own
risk. Therefore it is strongly recommended that the services of a professional installer
be used to make these changes.
Directions on changing the Mirror TV decorative frames
To replace the existing decorative frame with a new frame, follow these directions:
1. At the beginning the Mirror TV will hang on the wall
Copyright © Philips BDS-ITV 2005
6
BDS
Mirror TV Application Note
Release v0.5
2. Pull forward one side of decorative frame with light force. The clicking devices will
unlatch.
Remove the complete mounting frame including decorative frame.
1st
Copyright © Philips BDS-ITV 2005
2nd
7
BDS
Mirror TV Application Note
Release v0.5
Unscrew the decorative frame mounting frame.
Lift of decorative frame from mounting frame, beware of plastic tube for IR. Remove
the tube by pushing it out.
1st
3th
2nd
3. Place new decorative frame on mounting frame, dril hole ∅5.3 mm for plastic tube for
IR. Use hole in metal mounting frame as templete be sure to keep an 90° angle towards
the metal frame in both directions.
The plastic tube make sure the tube sticks out 16.6 (17.2)mm inside the metal mounting
frame. Screw metal mounting frame on decorative frame.
Copyright © Philips BDS-ITV 2005
8
BDS
Mirror TV Application Note
Release v0.5
4. Place the new decorative frame/with mounting frame on top of mirror TV. Be sure you
centre it rigth.
Push decorative frame gently down from on side to the other. The clicking device will
pull the decorative frame in it place.
You can lift the complete set, make sure that you hold it by the back frame, and not by
the decorative/mounting frame.
To prevent the clicking devices to unlatching.
Copyright © Philips BDS-ITV 2005
9
BDS
Mirror TV Application Note
Release v0.5
5. Technical Specifications of Mirror TV
This section will provide information on the physical dimensions of the Mirror TV, allowing
customers to use the product in many ways (such as to create new custom decorative frames,
for example)4.
5.1. Dimensional information
The table below contains the dimensional information of the various models:
Model no.
32” landscape
32” portrait
42” landscape
42” portrait
W
(mm/ inches)
888.9 / 35.0
575.4 / 22.66
1116.9 / 43.97
688.8 / 27.12
H
(mm/ inches)
575.4 / 22.66
888.9 / 35.0
688.8 / 27.12
1116.9 / 43.97
D
(mm/inches)
140 / 5.51
140 / 5.51
159.9 / 6.30
159.9 / 6.30
Legend:
W: Width
H: Height
D: Depth
5.2. Weight information
The following table contains the weight information of the Mirror TV:
Mirror TV Model no.
Weight (kg)
32”
(Mirror TV with decorative
frame)
24.5
42”
40
6. Mirror TV Connectivity
The Mirror TV provides a full host of connectivity options for the user. These connector
panels are similar to the Philips 32”- 42” LCD TV and therefore the information on how to
utilize these connectors can be found in their respective DFU documentation. Please refer to
the DFU (included with your product) for more information.
The Mirror TV is different from the 32”- 42” LCD TV in the following aspects:
Copyright © Philips BDS-ITV 2005
10
BDS
6.1
Mirror TV Application Note
Release v0.5
Mirror TV – External Speaker Connectors
The Mirror TV provides outputs to connect build on/remote speakers. Refer to
the following picture:
•
To connect build on/remote speakers to the Mirror TV, follow these directions:
o Turn off the Mirror TV and unplug the mains power cord
o Connect the cables from the external speakers to the speaker connectors on
the Mirror TV
o Secure the speaker cables by fastening the latches of the external speaker
connector
o Connect the mains power cord back into the power outlet and turn on the
Mirror TV
•
To toggle the audio output between the internal speakers and the external speakers,
flip the Internal/External Speaker switch.
Important points to note when connecting external speakers
•
To ensure that the correct types of external speakers are connected to the Mirror TV,
refer to the chart below:
Mirror TV Model
32” - 42”
Impedance
8 Ohms
Power
15 W
•
When connecting remote speakers, take extra precaution to ensure that the speaker
impedance is correct and to prevent possible shorting of the speaker terminals.
Incorrect use may cause damage to the audio amplifier of the Mirror TV
•
To remove the remote or build on speakers, ensure that the power to the Mirror TV is
turned off, before removing the speakers from the connectors.
Copyright © Philips BDS-ITV 2005
11
BDS
6.2
Mirror TV Application Note
Release v0.5
Mirror TV – Main Power Button
The main power button of the Mirror TV is located differently as compared to the
conventional 32”- 42” LCD TV. It is located on the side of the back plate of the
Mirror TV. Refer to the following picture:
Main
Power
Button
Important points to observe when operating the Mirror TV that is in-wall mounted
If the Mirror TV is mounted into a wall recess, the main power button may not be
easily accessible. In such a scenario, it is advised that:
•
•
•
•
•
•
All connections and fine-tuning of TV settings be completed before the Mirror
TV is mounted into the wall recess.
This means that the Mirror TV should be connected to the power mains, and
switched on using the Main Power button. With the Mirror TV switched on,
configure the required TV settings.
After the settings have been configured, do NOT switch off the Mirror TV via
the Main Power button. Instead, set the Mirror TV to ‘standby’ mode via the
Remote Control unit
When the Mirror TV is now powered down in ‘standby’ mode, turn off the
power mains. Disconnect the Mirror TV from the power mains, and proceed to
mount the Mirror TV.
Once the Mirror TV is mounted properly, reconnect the power mains and turn
on the power mains switch. The Mirror TV should be in ‘standby’ mode.
To turn on the Mirror TV, use the Remote Control to wake the Mirror TV
from ‘standby’ mode. Subsequent control of the Mirror TV (including switching
on/off) should be via the Remote Control.
Copyright © Philips BDS-ITV 2005
12
BDS
Annex A
Mirror TV Application Note
Release v0.5
Custom Decorative Frame Profile
Provided below are the recommended dimensions for the design and construction of custom
decorative frames for the Mirror TV. (dimensions in
mm/inches)
Decorative frame profile for 32”
Decorative frame profile for 42”
Copyright © Philips BDS-ITV 2005
13
BDS
Mirror TV Application Note
Release v0.5
Annex B
Decorative Frame Dimensions for Mirror TV
Provided below is the decorative frame dimensions for the 32”- 42” Landscape model of the
Mirror TV.
32” Landscape Mirror TV
42” Landscape Mirror TV
Annex C
Wall Mounting the Mirror TV landscape/portrait
Follow these steps to mount the Mirror TV onto the wall.
1. Secure the Wall mount bracket onto the wall, as shown:
Copyright © Philips BDS-ITV 2005
14
BDS
Mirror TV Application Note
Release v0.5
2. Secure the Mirror TV onto the Wall mount bracket, as shown:
Copyright © Philips BDS-ITV 2005
15
BDS
Mirror TV Application Note
Release v0.5
Portrait
Landscape
Copyright © Philips BDS-ITV 2005
16
BDS
Annex D
Mirror TV Application Note
Release v0.5
Recessed Wall Mounting the Mirror TV
1. Required measurements of the wall
Wooden frame for 32” (not included).
Wooden frame for 42” (not included).
Copyright © Philips BDS-ITV 2005
17
BDS
Mirror TV Application Note
Release v0.5
2. Wall fixing to be installled according drawing.
Wooden framel
Wall
Fixing Bracket
Mirror TV Unit
Decorative Frame
with clicking devices
Copyright © Philips BDS-ITV 2005
Tapping screw DIN 7981 C-H
ST4.2 x 38
18
BDS
Mirror TV Application Note
Release v0.5
3. 32” landscape mirror TV in-wall mouting (pg. 1/2)
Note: If you are considering mounting the 32PM8822 landscape mirror TV in an
in-wall installation, the installation must conform to all applicable safety
requirements. Additionally, the installation must conform to the ventilation
requirements as described below.
Copyright © Philips BDS-ITV 2005
19
BDS
Mirror TV Application Note
Release v0.5
3. 32” landscape mirror TV in-wall mouting (pg. 2/2)
Copyright © Philips BDS-ITV 2005
20
BDS
4.
Mirror TV Application Note
Release v0.5
32” portrait mirror TV in-wall mouting (pg. 1/2)
Note: If you are considering mounting the 32PM8822 landscape mirror TV in an
in-wall installation, the installation must conform to all applicable safety
requirements. Additionally, the installation must conform to the ventilation
requirements as described below.
Copyright © Philips BDS-ITV 2005
21
BDS
Mirror TV Application Note
Release v0.5
4. 32” portrait mirror TV in-wall mouting (pg. 2/2)
Copyright © Philips BDS-ITV 2005
22
BDS
Mirror TV Application Note
Release v0.5
5. 42” landscape mirror TV in-wall mouting (pg. 1/2)
Note: If you are considering mounting the 42PM8822 landscape mirror TV in an inwall installation, the installation must conform to all applicable safety
requirements. Additionally, the installation must conform to the ventilation
requirements as described below.
Copyright © Philips BDS-ITV 2005
23
BDS
Mirror TV Application Note
Release v0.5
5. 42” landscape mirror TV in-wall mouting (pg. 2/2)
Copyright © Philips BDS-ITV 2005
24
BDS
Mirror TV Application Note
Release v0.5
6. 42” portrait mirror TV in-wall mouting (pg. 1/2)
Note: If you are considering mounting the 42PM8822 landscape mirror TV in an inwall installation, the installation must conform to all applicable safety
requirements. Additionally, the installation must conform to the ventilation
requirements as described below.
Copyright © Philips BDS-ITV 2005
25
BDS
Mirror TV Application Note
Release v0.5
6. 42” portrait mirror TV in-wall mouting (pg. 2/2)
Copyright © Philips BDS-ITV 2005
26
BDS
Mirror TV Application Note
Release v0.5
Annex E
Cable Management for Mirror TV
MiraVision TVs allow many connection possibilities, and it is important to pay close attention
to cable management considerations when selecting a location for installing the Mirror TV.
Installers who have experience with wall-mounted large screen flat TVs (such as plasma TVs)
should be familiar with routing the cables for such sets, and can apply their knowledge to the
Mirror TV as well.
The types of cables used will depend on the connections required. These can include the
power supply, antenna, SCART or cinch connectors, and VGA cables (when the Mirror TV set
is used as a computer display). Other cables can also be collected in a similar way (example,
cabling for external loudspeakers).
Additional Remarks about Cable Management
•
•
•
•
•
•
It is possible to use cable drains/ducts, but there may be some restrictions.
o Depending on the connections required, the cable drain may need to be
large. Select the cable drain size based on the number of cables needed, and
whether plugs have to be passed through it during installation.
o A cable drain would be applied on the wall in the middle of the screen, but
this can be difficult for some thick cables because they do not leave the
Mirror TV in the middle. Such cables need to be ‘flexed’ considerably to
enter the cable drain.
Using a bigger (or wider) decorative frame will make it easier to conceal the cables
(or to bend them less severely).
Thin and flexible cables should be applied when possible.
The holes in the wall behind the Mirror TV should not extend beyond the outer
dimensions of the screen (including the decorative frame).
If a hole is not made in the wall, then the external speaker wiring should be black in
colour, in order not attract undue attention.
For European models, using the 90-degree connector for the SCART interface may
not be possible if the connector surface is against the wall. If a hole were made in
the wall, then it would be possible to mount the Mirror TV without having the
connector fall out (or loosen).
Copyright © Philips BDS-ITV 2005
27