1
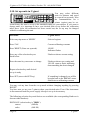
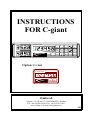
INSTRUCTIONS
FOR C-giant
.
.
by Coralba Sweden
.
1
2
3
TRIP1
TRIP2
SPEED
4
5
6
FUEL
PILOT
8
9
TIME
-giant
ADD
7
BREAK
HALT
SPLIT
SET
0
CAL
OPTION RESET
Option: C-view
by Coralba Sweden
.
BACK
NEXT
Jemba ab
Väpnarv. 10, SE-691 53 KARLSKOGA, Sweden
Tel: +46-(0)586-55640, Fax: +46-(0)586-31451
www.jemba.se, E-mail: [email protected]
GB
C-giant rel 3.07. Sales by Jemba, Sweden. Tel +46 (0)586 55640
TABLE OF CONTENTS
Page
TABLE OF CONTENTS ..................................................................................................................... 2
1. GENERAL ....................................................................................................................................... 3
2. FITTING C-GIANT ......................................................................................................................... 4
2.1. Fitting the instrument ....................................................................................................... 4
2.2. Connecting speed signal................................................................................................... 4
2.3. Electrical connections....................................................................................................... 5
2.3.1. Connections for yellow remote control ............................................................ 6
2.3.2. Connections for fuel ......................................................................................... 6
3. SAFETY ASPECTS......................................................................................................................... 6
4. FUNCTION...................................................................................................................................... 7
4.1. Power ON/OFF................................................................................................................. 7
4.2. Summary of functions ...................................................................................................... 8
4.2.1. TRIP l, TRIP 2, TRIP 3................................................................................. 11
4.2.2. SPEED........................................................................................................... 11
4.2.3. ARROW UP.................................................................................................. 11
4.2.4. SET................................................................................................................ 11
4.2.5. TIME ............................................................................................................. 12
4.2.6. FUEL............................................................................................................. 12
4.2.7. PILOT............................................................................................................ 12
4.2.8. ARROW DOWN........................................................................................... 12
4.2.9. CAL............................................................................................................... 12
4.2.10. BREAK ....................................................................................................... 13
4.2.11. ADD/-.......................................................................................................... 13
4.2.12. HALT .......................................................................................................... 13
4.2.13. POSITIVE (+) ............................................................................................. 13
4.2.14. SPLIT .......................................................................................................... 14
4.2.15. OPTION ...................................................................................................... 14
4.2.16. RESET......................................................................................................... 14
5. OPERATION ................................................................................................................................. 15
5.1. Distances measurement (Trip l, Trip 2 and Trip 3) ........................................................ 15
5.1.1. Pre-set............................................................................................................. 15
5.1.2. Align trip to road book ................................................................................... 15
5.1.3. Memory register ............................................................................................. 15
5.1.4. Automatic measurements on special stages (SS) ........................................... 16
5.1.5. Estimated time of arrival ................................................................................ 16
5.2. Speed measurement (SPEED) ........................................................................................ 17
5.2.1. Speed threshold (OPTION) ............................................................................ 17
5.3. Set................................................................................................................................... 18
5.4. Time measuring (TIME)................................................................................................. 18
5.4.1. Set time........................................................................................................... 19
5.4.2. Adjust time ..................................................................................................... 19
5.5. Fuel gauge (FUEL)......................................................................................................... 19
5.6. Monitoring average speed (PILOT) ............................................................................... 20
5.7. Calibrate C-giant, distance (CAL).................................................................................. 21
5.8. Calibrate C-giant (TIME)............................................................................................... 22
5.9. Calibrate C-giant (FUEL)............................................................................................... 22
5.10. Set up units in C-giant .................................................................................................. 24
5.11. Split .............................................................................................................................. 25
5.12. Option........................................................................................................................... 26
6. ERROR CODES............................................................................................................................. 29
7. INDEX............................................................................................................................................ 30
Page 2
C-giant
C-giant rel 3.07. Sales by Jemba, Sweden. Tel +46 (0)586 55640
1. GENERAL
Edition 28 September 2005
C-giant is used for measuring during rallies. It is an indispensable instrument for the
professional co-driver. The instrument has been developed by Corabla after many
years of experience of a co-drivers special needs in his stressful situation. Therefore Cgiant has all the functions that will make a co-driver perform his duties RAPIDLY,
SECURELY and EFFICIENTLY.
by Coralba Sweden
.
.
.
-giant
1
2
3
TRIP1
TRIP2
SPEED
4
5
6
FUEL
PILOT
8
9
TIME
ADD
BREAK
7
HALT
SPLIT
SET
0
CAL
OPTION RESET
It is basically a distance- and speedo-meter for the car. Furthermore it has a lot of
useful processing facilities for the co-driver. The precision of the instrument is reached
by an effective but simple calibrating procedure. After calibration C-giant shows
correct values to a tolerance typically better than 0.03%.
C-giant can also work as a precision fuel gauge just by connecting the instrument to
the standard fuel sender of the car and calibrating it in a simple way.
C-giant is available with a communication
connector (option) where you may connect a
number of remote display units (C-view), speed
threshold indicator or a computer. Any
combination may be used at the same time.
by Coralba Sweden
.
BACK
NEXT
A complete set of C-giant consists of:
• instrument
• cables
• interface to the speed sensor of the car or a separate speed sensor
• documentation
NOTE! Check before mounting the C-giant that you have got the correct parts
for your car.
C-giant
Page 3
C-giant rel 3.07. Sales by Jemba, Sweden. Tel +46 (0)586 55640
2. FITTING C-GIANT
2.1. Fitting the instrument
Fitting the C-giant into the vehicle is extremely simple. First you have to fit the
instrument itself. Fitting of C-giant in the vehicle compartment is done with its two
fastening bolts (M4x10) at the back of the unit. The bolts may be exchanged to any
other M4 bolts providing they are the same length.
2.2. Connecting speed signal
The speed signal interface may be of different types:
- Interface for a car with electronic speedometer (PGE-.. different for different
cars)
- Wheel speed sensor, which may also be used on a propshaft or a driveshaft
- Rotating speed sensor to be connected to a mechanical speedometer or with a
universal mounting kit to cut the speedocable (DP013)
Depending on which type is required for your car the speed sensor is fitted in different
ways.
Page 4
C-giant
C-giant rel 3.07. Sales by Jemba, Sweden. Tel +46 (0)586 55640
2.3. Electrical connections
Make sure great care is taken in connecting C-giant as damage may occur to the unit if
it is connected incorrectly. The system should have negative ground.
•
•
•
•
•
Red cable (power) is connected to +12 volt directly from the battery through
a fuse of about 1 A.
Brown cable is connected to the negative pole directly on battery.
Yellow cable is connected to a reverse light so that the trip will be supplied
with +12 volt when the car is driven in reverse. If this is not possible the
yellow cable must be connected to ground. It may also be used as a
programmable remote control.
White cable may be connected to a remote reset button. TRIP 1 is reset to
zero when the cable is connected to ground even if TRIP 1 is not shown in
the display. No other register is influenced by this. It may also be used as a
programmable remote control.
Black cable is connected to the fuel gauge.
Make
sure
all
connections are done
professionally. The
cables should be
fixed
to
avoid
damage.
Most
disturbances
in
function that occur
are caused by poor
connections to the
power supply.
After having carried
out these functions
simply connect each
part together and
you will be ready to
use C-giant.
White to external reset
Black to fuel gauge
Yellow to reverse light (+ when rev) or ground
Blue to speed sensor of car
PGE-..
Red to +12 volt directly from battery
through a fuse of about 1 A
Brown directly to negative pole on battery
.
.
by Coralba Sweden
.
-giant
1
2
3
TRIP1
TRIP2
SPEED
4
5
6
TIME
ADD
BREAK
7
HALT
FUEL
PILOT
8
9
SPLIT
SET
0
CAL
OPTION RESET
When the trip meter
is connected it must
be calibrated. See
page 21 and page 22.
When connecting the
cable
to
the
instrument, see to that the springs both go into locking position.
C-giant
Page 5
C-giant rel 3.07. Sales by Jemba, Sweden. Tel +46 (0)586 55640
2.3.1. Connections for yellow remote control
The yellow cable is meant to be
+12 volt
connected to the reverse light as default
to reverse counting when the vehicle is
< 10 kOhm
Yellow remote control
reversed. However for a rallycar it is
Yellow cable
more convenient to use it as a second
remote control (See page 25). For this
reason the remote control for the yellow
cable can not be connected in the same way as for the white remote cable. It must have
a pull up resistor of max. 10 kohm. This resistor is integrated inside the remote control
from Jemba.
2.3.2. Connections for fuel
The black cable should be connected to the standard fuel sender of your car. If you
remove the standard fuel gauge you must fit a resistor instead of it. This may be
ordered from Jemba. See page 22 for calibration.
3. SAFETY ASPECTS
Safety aspects concerning fitting of accessories inside a car must be taken in to
account when fitting C-giant. The instrument must be fitted in a way that takes into
account applicable laws and regulations and so that the risk of damages in the case of
an accident is minimised.
Page 6
C-giant
C-giant rel 3.07. Sales by Jemba, Sweden. Tel +46 (0)586 55640
4. FUNCTION
The panel has three display windows:
• The main display with six figures
• Upper left and lower left displays with four figures each.
The keyboard has four different kinds of keys:
• Selector keys: TRIP 1, TRIP 2, SPEED, TIME, FUEL, PILOT, CAL,
OPTION which will select different registers and display its value in the
main display.
• Operator keys: SET, ADD/-, HALT, +, RESET which will operate on the
value in the selected register.
• Display keys: Arrow up, Arrow down, SPLIT which will operate on the
display mode.
• Numeric keys: 0−9 which will switch to their numeric functions automatically
when a numeric input is required.
Furthermore a BREAK key will always bring you back to a default setting of the mode
of operation.
The basic philosophy for C-giant is that when you press any of the keys you do not
influence any other register in the instrument other than the one that you see in the
main display. The register in the main display is called the current register. While
pressing a key to select a new register the main display shows a flash text telling you
which current register will be shown next. Some keys have more than one register.
They are selected by repeatedly pressing the key.
4.1. Power ON/OFF
When the instrument is not in use it will automatically switch itself into an idling
mode where the display and the keyboard are totally dark. When C-giant is operated or
the car is moved it is automatically turned on again. If for some reason you want to
have the display turned off while driving - just press TRIP 1 twice. See page 15.
C-giant
Page 7
C-giant rel 3.07. Sales by Jemba, Sweden. Tel +46 (0)586 55640
.
4.2. Summary of functions
C-giant has the following functions:
Key
by Coralba Sweden
.
.
-giant
..
.
.MEMory
.
TRIP 2
.triP..2
..
.
.SS.Hour
. .
.A.SPEEd
..
.toP.SPd
.
.
.EtA.diS
.
.
.EtA.-A.
.
. .
.EtA.Cur
.
Page 8
.
2
3
TRIP1
TRIP2
SPEED
4
5
6
TIME
ADD
BREAK
7
HALT
FUEL
PILOT
8
9
SPLIT
SET
0
CAL
OPTION RESET
Function
Appropriate
keys
Trip meter with a resolution of l metre
See page 11.
SET, CAL, -,
HALT, +, SPLIT,
RESET
Memory register. This register may be used
as 'DISPLAY OFF'. See page 11.
SET, SPLIT,
RESET
Trip meter with a resolution of l metre
See page 11.
SET, CAL, -,
HALT, +, SPLIT,
RESET
Period of time since .triP..2 started to count
from zero. See page 16.
SPLIT
Flash text
TRIP 1
.triP..1
1
Average speed since .triP..2 started to count
SPLIT
from zero (page 16), OR required average speed
to keep target time on section if target time is put
into .EtA.A. See page 16.
Maximum speed since .triP..2 started from
zero or .toP.SPd was reset. See page 16.
RESET, SPLIT
Distance to use when estimating time of
arrival. See page 16.
SET, SPLIT
Estimated time of arrival at .triP..2 =.EtA.diS SET, SPLIT
if .A.SPEEd is kept. See page 16
NOTE!!!
"SET" may be used to set a target time for the current section.
In this case .A.SPEEd will show required average speed to keep
target time, .EtA.Cur will show your current margin in time (plus or
minus) and the indicator in the button will flash.
Estimated time of arrival at .triP..2 =.EtA.diS SET
if current speed is kept or margin in time. See page 16.
C-giant
C-giant rel 3.07. Sales by Jemba, Sweden. Tel +46 (0)586 55640
.
.
Key
by Coralba Sweden
.
-giant
BREAK
Flash text
.
.
SPEED
.SPEEd.
.
.
.triP..3
..
.
.SPd.thr
.
.
ARROW UP
.SELEct.
.
.ShiFt.1
.
3
TRIP2
SPEED
4
5
6
7
HALT
FUEL
PILOT
8
9
SPLIT
SET
0
CAL
OPTION RESET
Appropriate
keys
Calibrate distance if trip or speed is selected. SET, SPLIT,
Second touch will show ".CALib." in display RESET
and then ".drivE." telling to drive reference length.
Press "SET" at end of reference length and set
the length of the calibrating distance. RESET will
give access to a set up mode for different units.
See page 24.
Speedometer. It is also possible to set the
SET, CAL,
scheduled speed for the "PILOT". See page 11. SPLIT
Trip meter with a resolution of l metre
See page 11.
Speed threshold to get a warning against
speeding (option). See page 17.
SET, CAL, -,
HALT, +, SPLIT,
RESET
SET, SPLIT
Copies the current register into the upper
left display. See page 11.
SPLIT
Scrolls upper left display one figure right
SPLIT
Scrolls upper left display two figures right
SPLIT
Clock with a format of 23.59.59 and a
resolution of 1 s. See page 12.
SET, CAL, -,
HALT, +, SPLIT,
RESET
Clock with a format of 59.59.95 and a
resolution of 0.05 s. See page 12.
SET, CAL, -,
HALT, +, SPLIT,
RESET
.
.ShiFt.2
.
2
TRIP1
TIME
ADD
Function
(TRIP)+CAL
.CAL.diS
1
.
TIME
.Hour..1
.
..
.Hour..2
.
C-giant
..
Page 9
C-giant rel 3.07. Sales by Jemba, Sweden. Tel +46 (0)586 55640
Key
Function
Appropriate
keys
Calibrate time if time is selected.
SET,
Flash text
(TIME)+CAL
.CALib.
RESET
.
.
-,
+,
See page 22.
FUEL
..FUEL.
..
.
(FUEL)+CAL
.CALib.
.
CAL, SPLIT, -, +
Calibrate Fuel if fuel is selected. See page 22.
SET, RESET
Time ahead or delayed in respect to the
scheduled average speed. Scheduled speed
is set in the SPEEd-mode. See page 12.
SET, -, HALT, +,
SPLIT, RESET
.
PILOT
..Pilot.
..
Amount of fuel left. When driving the value
is filtered to stabilise the read out. Values
from the last 99 km's may be read by using +
and - buttons. See page 12.
.
NOTE!!! The -, HALT and + button only affects the distance for
this calculation, not time
ARROW DOWN
.SELEct.
.
.ShiFt.1
.
Scrolls lower left display two figures right
.
OPTION
.OPtion
.
.WhitE
.
.yellow
.
Scrolls lower left display one figure right
.
.ShiFt.2
.
Copies the current register into the lower left display
See page 12.
Definition of functions for the two
SET, RESET,
programmable inputs. The indicator is on
SPLIT
when at least one input is defined. See page 14.
Remote function connected to white cable
is selected to be defined
Remote function connected to yellow cable
is selected to be defined.
SET, RESET
SET, RESET
A short description is given for every key from upper left to lower right on the key
board. Detailed applications on how to operate each function will follow.
Page 10
C-giant
C-giant rel 3.07. Sales by Jemba, Sweden. Tel +46 (0)586 55640
.
.
by Coralba Sweden
.
-giant
1
2
3
TRIP1
TRIP2
SPEED
4
5
6
TIME
ADD
BREAK
7
HALT
FUEL
PILOT
8
9
SPLIT
SET
0
CAL
OPTION RESET
4.2.1. TRIP l, TRIP 2, TRIP 3
Registers with a resolution of l metre . Press the appropriate key to select and see
value, and to change its function. Flash text (.triP..1) and a led indicator shows that the
function is selected. TRIP 2 also has several functions including automatic SSmeasurement, (See page 16) and a function for estimating time of arrival (See page
16). TRIP 3 is selected by pressing SPEED twice. Flash Text (.triP..3).
Selectable keys: ARROW UP, SET, ARROW DOWN, CAL, -, HALT, +, SPLIT,
RESET.
By pressing TRIP 1 twice you will select a memory register. It is a general purpose
numeric register but it will be blank when 'RESET' is pressed. It is the only way to get
a blank display while driving. Flash Text (.MEMory). See page 15 for operation.
Selectable keys: ARROW UP, SET, ARROW DOWN, RESET.
4.2.2. SPEED
SPEED shows the speed of the vehicle. Flash text (.SPEEd.) and led indicator show
that the function is selected. This register is also used to input scheduled speed for the
PILOT. See page 12
Selectable keys: ARROW UP, SET, ARROW DOWN, SPLIT.
TRIP 3 is selected by pressing SPEED twice. Flash text (.triP..3) and led indicator
show that the function is selected.
Speed threshold is selected by pressing the SPEED key three times. Flash text
(.SPd.thr) and flashing led indicator show that the function is selected. The value can
be set by the normal SET procedure. See page 18.
4.2.3. ARROW UP
ARROW UP will copy the current register into the top left window. Flash text
(.SELEct). Repeated pressing will scroll the display one figure at a time to the left to
give access to the desired figures. Flash text (.ShiFt.1) and (.ShiFt.2).
4.2.4. SET
SET is used to start the input of a value to the register that is shown in the display. See
page 18.
SET may be used together with TRIP l (.trip..1), TRIP 2 (.trip..2, .EtA.diS, .EtA.-A.),
SPEED (.SPEEd., .triP..3, .SPd.thr), TIME (.Hour..1, .Hour..2), PILOT (..Pilot.), CAL
(.CAL.diS, .CALib.), OPTION (.WhitE, .YEllow).
SET is also used for adjusting a value in a register. See page 18
C-giant
Page 11
C-giant rel 3.07. Sales by Jemba, Sweden. Tel +46 (0)586 55640
This function may be used together with TRIP l (.trip..1), TRIP 2 (.trip..2, .EtA.diS,
.EtA.-A.), SPEED (.triP..3, .SPd.thr), TIME (.Hour..1, .Hour..2), PILOT (..Pilot.),
CAL (.CAL.diS).
Selectable keys: numeric keys, -, RESET.
4.2.5. TIME
TIME has two time registers which may act as an ordinary clock or a stop watch. They
can count forwards and backwards. Flash text (.Hour..1) or (.Hour..2) and led indicator
show which function is selected. Hour 1 has a resolution of 1 second and hour 2 has a
resolution of 0.05 seconds. See page 18 for time measurement and page 22 for
calibration.
Selectable keys: ARROW UP, SET, ARROW DOWN, CAL, -, HALT, +, SPLIT,
RESET.
4.2.6. FUEL
FUEL shows amount of fuel left in the tank. See page 19. It may be calibrated to the
standard fuel gauge of your car (See page 22). Flash text (..FUEL.) and indicator show
that the function is selected.
Selectable keys: ARROW UP, ARROW DOWN, CAL, -, +, SPLIT.
4.2.7. PILOT
PILOT shows your time ahead or delayed in respect of your scheduled average speed.
Flash text (..Pilot.) and led indicator show that the function is selected. See page 20.
Selectable keys: ARROW UP, SET, ARROW DOWN, -, HALT, +, SPLIT, RESET.
4.2.8. ARROW DOWN
ARROW DOWN will copy the current register into the bottom left window. Flash text
(.SELEct). Repeated pressing will scroll the display one figure at a time to the left to
give access to the desired figures. Flash text (.ShiFt.1) and (.ShiFt.2).
4.2.9. CAL
CAL may be used when TRIP l, TRIP 2, TRIP 3 or SPEED are selected to show the
current CALIBRATING CONSTANT for distance. Flash text (.CAL.diS) and led
indicator show that the function is selected. The constant may be changed with the
SET function. See page 18. By pressing 'RESET' the C-giant enters a set up mode
where different units may be defined for distance, speed, temperature and
communication. See page 24.
Selectable keys: ARROW UP, SET, ARROW DOWN, RESET.
The CAL function can also be used when TIME is selected. Then it will calibrate the
time counting. See page 22. Flash text (.CALib.) and led indicator show that the
function is selected.
Selectable keys: SET, -, +, RESET.
Page 12
C-giant
C-giant rel 3.07. Sales by Jemba, Sweden. Tel +46 (0)586 55640
If CAL is used when FUEL is selected a sequence is started that will calibrate the
FUEL function. See page 22. Flash text (.CALib.) and led indicator show that the
function is selected.
Selectable keys: SET, numeric keys, RESET.
.
.
by Coralba Sweden
.
-giant
1
2
3
TRIP1
TRIP2
SPEED
4
5
6
TIME
ADD
BREAK
7
HALT
FUEL
PILOT
8
9
SPLIT
SET
0
CAL
OPTION RESET
4.2.10. BREAK
BREAK will reset the instrument to a defined status. This function must not be used as
a normal resume function but as an emergency action if you must abort a started
sequence. It is also used to start the instrument if a power failure has hang up the
instrument. This may happen if power is intermittent.
4.2.11. ADD/Reverse counting direction (-). Flash text (.nEG.dir) and led indicator shows that the
function is selected. NOTE! This function influences only the register that is currently
shown in the display. This function may be used together with TRIP l, TRIP 2, TRIP
3, SET, TIME, PILOT.
If 'FUEL' is selected this key allows you to view the fuel values for the past 99 km's in
1 km increments by repeatedly pressing '-'. See page 19
In SET mode '-' will be interpreted as a minus sign if it is the first key after 'SET'
otherwise it is interpreted as 'ADD'. See pages 18 and 18.
4.2.12. HALT
HALT will stop the current register from counting. This function is also used to add
several intervals. Flash text (..HALt.) and led indicator shows that the function is
selected.
This function may be used together with TRIP l, TRIP 2, TRIP 3, SET, TIME, PILOT.
4.2.13. POSITIVE (+)
POSITIVE counting direction (+). Flash text (.PoS.dir) and led indicator shows that
the function is selected. This function may be used together with TRIP l, TRIP 2,
TRIP 3, SET, TIME, PILOT.
This key is also used to view the fuel values for the past 99 km's in 1 km increments.
See page 19.
C-giant
Page 13
C-giant rel 3.07. Sales by Jemba, Sweden. Tel +46 (0)586 55640
.
.
by Coralba Sweden
.
-giant
1
2
3
TRIP1
TRIP2
SPEED
4
5
6
TIME
ADD
BREAK
7
HALT
FUEL
PILOT
8
9
SPLIT
SET
0
CAL
OPTION RESET
4.2.14. SPLIT
SPLIT will freeze all registers values simultaneously permitting later inspection. All
functions will carry on their counting. Flash text (..SPlit.) and led indicator shows that
the function is selected. Second touch at 'SPLIT' will disable the freeze function and
show current values.
This function may be used any time during normal operation - not in SET or
calibration mode.
4.2.15. OPTION
OPTION allows the user to define which functions are carried out when the two
remote cables (white and yellow cable) are activated. Flash text (.OPtion). See page 25
for definition and pages 5 and 6 for connection.
4.2.16. RESET
RESET will set current register to zero. Flash text (.rESEt.). This function may be used
together with TRIP l, TRIP 2, TRIP 3, TIME, PILOT, OPTION.
In SET mode this key will restore the previous value.
Page 14
C-giant
C-giant rel 3.07. Sales by Jemba, Sweden. Tel +46 (0)586 55640
5. OPERATION
5.1. Distances measurement (Trip l, Trip 2 and Trip 3)
When measuring distances C-giant has got three registers for this purpose, TRIP l,
TRIP 2 and TRIP 3. They may be used individually with separate counting directions
plus (+) or minus (-). 'HALT' will stop the current register. 'SPLIT' freezes the values
of all registers. If the measurement is to be done in the negative direction you just
press the (-) key. If the yellow cable is connected to the reverse light the trip meters
automatically switch counting direction when the vehicle is going in reverse.
5.1.1. Pre-set.
If you want to start measuring from a point at a known distance it is easy to set that
value into a trip register. Select the trip to be used (TRIP l, TRIP 2 or TRIP 3), press
the SET button and feed the value into the register with the numeric keys O - 9. The
input is confirmed with the SET key. Now your measuring starts from the set distance.
If you require the measurement to start from a negative value the figures must be
preceded by a minus sign. If you change your mind it is possible to get the original
value by pressing RESET instead of SET.
5.1.2. Align trip to road book
The registers may also be adjusted with an arbitrary value. See section SET. If a
junction is passed at 43.67 km according to the road book but the trip shows a different
value then it is easy to adjust the trip very accurately without stopping the car. Reset
the trip at the junction. Carry on driving and press SET and input the desired value
(43670) with the numeric keys. Finish the input with (ADD/-). When you terminate
the input with the (ADD/-) key that means that the current value is to be adjusted with
the input value. The result is that the measurement takes place from the junction with
the correct value.
.
.
by Coralba Sweden
.
-giant
1
2
3
TRIP1
TRIP2
SPEED
4
5
6
TIME
ADD
BREAK
7
HALT
FUEL
PILOT
8
9
SPLIT
SET
0
CAL
OPTION RESET
5.1.3. Memory register
Second touch of TRIP 1 will select a memory register. It is possible to set, add and
subtract values in decimal format. RESET' will set the display OFF. This is the only
way to get a C-giant or C-view blank when driving. This blank window may be copied
into all windows with the arrow keys.
C-giant
Page 15
C-giant rel 3.07. Sales by Jemba, Sweden. Tel +46 (0)586 55640
5.1.4. Automatic measurements on special stages (SS)
By repeated pressing on 'TRIP 2' you will get access to a number of registers that will
give you automatic measurements on special stages. This is a great relief for the codriver at the start and finish of special stages. By resetting TRIP 2 the automatic
measurement of the length, time, top speed and average speed is initiated. The
measurements will start automatically when the car is driven the first metre . When
TRIP 2 shows its first metre a watch is started and from elapsed time and travelled
distance the average speed is calculated continuously. At the finish of the stage you
just press SPLIT and can then read the different values by pressing TRIP 2 repeatedly.
Action
Flash text
C-giant shows
Shown format
TRIP 2
.triP..2
Distance travelled
xxx.xxx
TRIP 2
.SS.Hour
Time since Trip2 started to count
xx.xx.xx
TRIP 2
.A.SPEEd
Average speed, calculated for Trip2
xxx.x
and .SS.Hour, unless flashing indicator
(see below)
TRIP 2
.toP.SPd
Maximum speed
xxx
Except for maximum speed it is not possible to control this function in any other way
than by changing TRIP 2. The maximum speed may be reset to zero separately. See
also below for monitoring time of arrival.
5.1.5. Estimated time of arrival
By storing the length of your current road section (into the register for .EtA.diS) you
can get your estimated time of arrival at either current speed or average speed. This
function is useful when accessing the required speed on a particular road section and
also working out the servicing time available. Select the function by repeatedly
pressing TRIP 2.
You can also input the required time of arrival to give out the required average speed
and your margin in time. This is done by inputting the required time into the register
for .EtA.-A. and reading the required speed in the register for .A.SPEEd. Your margin
in time in respect to your required time of arrival (positive or negative) at current
speed is read in the register for .EtA.Cur. This function is indicated with a flashing
indicator in the TRIP 2 key when you select .EtA.-A, .EtA.Cur or .A.SPEEd. This
mode of operation is aborted by selecting .EtA.-A. and pressing the RESET key.
Page 16
C-giant
C-giant rel 3.07. Sales by Jemba, Sweden. Tel +46 (0)586 55640
.
.
by Coralba Sweden
.
-giant
1
2
3
TRIP1
TRIP2
SPEED
4
5
6
TIME
ADD
BREAK
7
HALT
C-giant shows
SET
0
FUEL
PILOT
8
9
SPLIT
CAL
OPTION RESET
Action
Flash text
Shown format
TRIP 2
.triP..2
TRIP 2
.SS.Hour
TRIP 2
.A.SPEEd
TRIP 2
.toP.SPd
TRIP 2
.EtA.diS
Length of current road section
xxx.xxx
TRIP 2
.EtA.-A.
Estimated time of arrival for Average
speed calculated from .EtA.diS, .triP..2 and
.A.SPEEd
xx.xx.xx
TRIP 2
.EtA.Cur
Estimated time of arrival calculated from
.EtA.diS, .triP..2 and Current speed
xx.xx.xx
Also see page 16 for automatic SS measurement.
5.2. Speed measurement (SPEED)
If you want to see your current speed, simply press SPEED. The speed can be read in
km/h or MPH depending on how you have set up the unit. See page 24 for set up. The
value of the speed is frozen by SPLIT in the same way as for all other registers in the
instrument. SPEED is also used to input desired speed for the PILOT to work with.
See page 20.
5.2.1. Speed threshold (OPTION)
This option is aimed to get an indication when you exceed a pre-set speed threshold.
You may select it by pressing SPEED three times. The value may be set to a desired
value using the SET procedure. As soon as your speed exceeds that value an output
signal is activated.
C-giant
Page 17
C-giant rel 3.07. Sales by Jemba, Sweden. Tel +46 (0)586 55640
5.3. Set
As mentioned previously SET is used to set any register to a desired value. The
register to be set is selected by pressing the appropriate key and thus making it visible
in the display. To set the value simply press SET and you will see the figures in the
display flash. This indicates that by using the numeric keys you may enter a new
value. A negative value may be entered by preceding the value with (-). The input is
finished by pressing SET again. The value is then visible in the display.
NOTE! if for any reason you wish to retrieve the original value − say if you made a
mistake simply press RESET instead of the SET-key.
Adjusting a value
This function will adjust the value of any register that may be set with the normal SET
procedure. Start a normal SET procedure by pressing 'SET'. Input the value to add but
in stead of confirming the input with 'SET' you confirm with the ADD key. Then the
fed value is added (including a preceding minus sign if the value is negative) to the
current register. If the register is to be decreased a minus sign (-) is fed in as a first sign
in the value. In SET mode '-' will be interpreted as a minus sign if it is the first key
after 'SET' otherwise it is interpreted as 'ADD'.
Example: Align trip to road book
You pass a junction at 34.98 km and you want to align C-giant to that value. At the
junction you press RESET and carry on without stopping. Then you press SET, 34980,
ADD/- and your input is added to the current value of the trip regardless of the
distance you have travelled in the meantime. So the trip is aligned to the road book at
the junction at 34.98 km.
NOTE! 'RESET' will reset .SS.Hour to zero if TRIP 2 is selected!
5.4. Time measuring (TIME)
The clocks may be used as an ordinary clock or a stop watch. It may stop (HALT),
count up (+), down (-), freeze value (SPLIT), set or adjust value (SET) in the same
way as described for TRIP above. All the features work the same on HOUR 1 and
HOUR 2.
Page 18
C-giant
C-giant rel 3.07. Sales by Jemba, Sweden. Tel +46 (0)586 55640
5.4.1. Set time
Action
C-giant shows
Press TIME (select TIME register)
Current time
Press SET (start input of value)
Current time flashes
Set time with numeric keys 0 to 9
New time flashes
Press SET (store with SET-key)
New time
5.4.2. Adjust time
It is very easy to adjust the time by any value: The same procedure as for trip meters is
valid. For time the format of 24.59.59 is taken into account automatically.
Action
C-giant shows
Press TIME (select TIME register)
Current time
Press SET (start input of value)
Current time flashes
Input correction with numeric keys 0 to 9,
(preceded by a '-' if negative)
Correction flashes
Press ADD
New time
If the clock is running too fast or too slow it is possible to calibrate it. See page 22.
5.5. Fuel gauge (FUEL)
This function will give information about the amount of fuel left in the tank. This
feature must be calibrated before it is used. See page 22.
It is also possible to monitor the amount of fuel over the last 99 km's by using '+' and ''. For each touch you will get the "number of km since" to the left in the display and the
'amount of fuel at that time' to the right. This is important if you suspect a faulty fuel
sender - the amount of fuel in the tank should have decreased constantly! It will also
give you a rough idea of the fuel consumption.
C-giant
Page 19
C-giant rel 3.07. Sales by Jemba, Sweden. Tel +46 (0)586 55640
5.6. Monitoring average speed (PILOT)
The Pilot is a useful tool to monitor your actual position in respect of the scheduled
time. This is important when the road sections are long or some service is required on
the car. By storing the required average speed into the SPEED register the time gained
or time delayed is read in the PILOT register. The sequence is:
.
.
by Coralba Sweden
.
-giant
1
2
3
TRIP1
TRIP2
SPEED
4
5
6
TIME
ADD
BREAK
7
FUEL
PILOT
8
9
HALT
SPLIT
SET
0
CAL
OPTION RESET
Store required average speed:
Action
C-giant shows
Press 'SPEED' (select SPEED register)
Speed of vehicle
Press 'SET' (start input of value)
Current PILOT-speed flashes
Set average speed with numeric keys
New PILOT-speed flashes
Press 'SET' (store with SET-key)
Current speed of vehicle
Unless you set the start value to zero with 'RESET' you set the PILOT register to its
value with the normal SET and ADD procedures as described on pages 18 and 18:
SET procedure:
Action
C-giant shows
Press PILOT (select PILOT register)
Time gained or delayed
Press SET (start input of value)
Current time gained or delayed
flashes
Set start value with numeric keys 0 to 9
Start value flashes
Press SET (store with SET-key)
Current time gained or delayed
This input may be done any time before start by setting time to start as gained time.
Then the pilot will count down to zero at starting time.
Set the counting direction of the PILOT register to the desired counting direction with
(+), (-) or HALT. NOTE!! These three keys only have an impact on the measuring of
distance in the PILOT, not on time measurement!. An implication of this is that if
you make a mistake and drive one part on a road section on a wrong road and you
have to go back to the correct section again you just set the PILOT to (-) when you go
Page 20
C-giant
C-giant rel 3.07. Sales by Jemba, Sweden. Tel +46 (0)586 55640
back and it will give you the correct penalty for your mistake. Don't forget to set it
back to the (+) direction once you are back on the correct route again!
The PILOT calculates continuously the time gained or time delayed in respect to the
stored average speed. If you are delayed the result is shown with a "-" in front of the
time value. The format of the result is hour.min.sec (hh.mm.ss).
5.7. Calibrate C-giant, distance (CAL)
To enable the C-giant to measure accurately it must be calibrated. The dimensions of
tyres, air pressure and transmission ratios influences the performance and therefore it
is important to calibrate C-giant if these are altered.
If this is the first time you calibrate the unit then convince yourself that you have
selected the desirable display mode (metres, feet, miles....km/h, MPH....). If not see
page 24 for set up.
Then check tire pressure and inflate, as necessary, to manufacturers specifications..
Then you need to know the exact distance of your calibrating distance (this may be
any value but for the best results it should be in excess of 0.999 km 999 feet or 0.999
miles). If you do not have access to an exact distance the local police force are usually
quite prepared to advise you of a number of sites.
Procedure
C-giant shows
Select any trip meter or SPEED
Selected register
Press CAL
Current calibrating constant
Press CAL
Text .drivE.
Drive the calibrating distance
".drivE." and the calibrating constant
flash alternatively.
xxxx m
Press SET (start input)
".LEngth"
Enter the length of calibrating distance
xxx.xxx
Press SET (store with SET-key)
New calibrating constant.
C-giant
Page 21
C-giant rel 3.07. Sales by Jemba, Sweden. Tel +46 (0)586 55640
You have now calibrated your C-giant for distance and speed. If the calibrating
constant is greater than 100 000 you should contact your supplier to get a different
interface for your speed signal. The display mode may be changed as described at page
24 without calibrating the system again.
If the calibrating sequence has been carried out correctly and the distance used for this
calibration was correct you will usually be able to measure to an accuracy better than
0.03% (30 cm/km).
Check the accuracy by travelling over your calibrating distance whilst measuring its
length. If all factors are correct the length should correlate exactly.
Even if C-giant is disconnected from the power supply it will keep its calibrating
constant in memory. Note the calibrating constant on a piece of paper together with
information about current transmission ratios and tyres. Then you don't need to drive
to get the instrument calibrated next time you use the same configuration. The value
may of course be changed by using the standard SET procedure as described on page
18.
.
.
by Coralba Sweden
.
-giant
1
2
3
TRIP1
TRIP2
SPEED
4
5
6
TIME
ADD
BREAK
7
FUEL
PILOT
8
9
HALT
SPLIT
SET
0
CAL
OPTION RESET
5.8. Calibrate C-giant (TIME)
The time is set with the normal SET procedure as described on page 18. If however
time is running too fast or too slow it is possible to calibrate time. Select 'TIME' and
then 'CAL'. Use '+' and '-' to set the number of seconds you want to adjust the time by
over every 24 hour period. When the correct number is set you must store the value
with 'SET'. To resume without changing - use 'RESET' instead of 'SET'.
Now C-giant is calibrated. Even if C-giant is disconnected from the power supply it
will keep its calibrating constant in memory.
5.9. Calibrate C-giant (FUEL)
To calibrate the fuel gauge you must first of all select FUEL and check if its shown
value is different when the engine is running compared to when it is stopped. If the
values are different C-giant should be calibrated with the engine running. Start with
the fuel tank almost empty. Then the amount of fuel in the tank must be stored in Cgiant at the same time as it is filled up. This is done five times during filling. Note that
a lot of gauges give a constant signal from empty tank to about five litres. This is
because the float needs a certain level to float. This causes the C-giant to give a
constant value.
Page 22
C-giant
C-giant rel 3.07. Sales by Jemba, Sweden. Tel +46 (0)586 55640
Action
C-giant shows
Press FUEL
uncalibrated amount of fuel
Press CAL
.C.Pnt-1 flashes
Press SET
0 flashes
Input current amount of fuel in the tank.
As the tank is almost empty you feed a "0"
0
Press SET
.C.Pnt-2 flashes
Fill about ten litres.
Press SET
xx flashes
Feed the current amount of fuel in
the tank (10)
10
Press SET
.C.Pnt-3 flashes
Fill about another fifteen litres.
Press SET
xx flashes
Feed the current amount of fuel in
the tank (25)
25
Press SET
.C.Pnt-4 flashes
Repeat until the tank is filled up and five values are stored.
NOTE!! If you get the error indication Ad.-Err it means that the voltage from the fuel
sender was unchanged for two calibration points. Is the ignition switched on?
If you get the error indication Fu.-Err it means that you didn't increase the amount of
fuel between two calibration points.
If you want to abort the sequence once you have started it − just press RESET before
the sequence ends and the old values are restored.
Now the fuel gauge is calibrated. Even if C-giant is disconnected from the power
supply it keeps it calibrating constant in its memory.
C-giant
Page 23
C-giant rel 3.07. Sales by Jemba, Sweden. Tel +46 (0)586 55640
5.10. Set up units in C-giant
You may select different
units for distance and speed
in a special set up mode. Also
the communication for a
-giant
printer (option) may be set.
From factory the unit is set up to the standard setting for your market. If you want to
change units it is important to have your desired units set up before the calibration
takes place. After the calibration has been carried out, the set up may be changed
without re calibrating the unit.
.
.
by Coralba Sweden
1
.
2
3
TRIP1
TRIP2
SPEED
4
5
6
TIME
ADD
BREAK
7
FUEL
PILOT
8
9
HALT
SPLIT
SET
0
CAL
OPTION RESET
Procedure
C-giant shows
Select any trip meter or 'SPEED'
Selected register
Press 'CAL'
Current calibrating constant
Press 'RESET' (Enter set up mode)
.SEtUP.
Indicator flashes
Press any of the selection keys as
listed below
Flash text shows current setting
Press the same key once more to change
Flash text shows new setting and
.SEt.UP. starts to flash, indicating
that something has been changed
Repeat selection key until desired
set up is ready
Press SET (store with SET-key)
If something is changed you will be
brought back to the 'BREAK' status.
Otherwise to calibrating constant
You may exit any time from the set up mode without changing anything by pressing
'RESET'.
You have now set up your C-giant to show your desired units. Even if the instrument
is disconnected from the power supply it keeps it set up in its memory.
The following selection keys and choices are available (the corresponding flash text is
shown within brackets):
DISTANCE (selection key is 'TRIP1'):
meters
(MEtEr)
miles
(MiLES)
Page 24
C-giant
C-giant rel 3.07. Sales by Jemba, Sweden. Tel +46 (0)586 55640
miles + yards
feet
nautical miles
miles + feet
(Mil.yArd)
(FEEt)
(nAutMil)
(MiL.FEEt)
SPEED (selection key is 'SPEED'):
kilometres per hour (kiloM/h)
miles per hour
(MPH)
metres per minute (M/Min)
feet per minute
(Ft/Min)
knots
(knotS)
metres per second (M/SEc)
For the connection of a printer or a computer (option) the set up of the communication
may be of interest:
BAUD RATE (selection key is '+'):
br. 110, 300,600, 1200, 2400, 4800, 9600 (factory setting)
CTS POLARITY (selection key is 'SPLIT'):
negative polarity (CtS.nEG) factory setting
positive polarity
(CtS.PoS)
5.11. Split
SPLIT will freeze all registers
values
simultaneously
permitting later inspection. All
-giant
functions will carry on their
counting. Flash text (..SPlit.)
and led indicator shows that the function is selected. Second touch at 'SPLIT' will
disable the freeze function and show current values.
This function may be used any time during normal operation - not in SET or
calibration mode.
.
.
C-giant
by Coralba Sweden
.
1
2
3
TRIP1
TRIP2
SPEED
4
5
6
TIME
ADD
BREAK
7
HALT
SET
0
FUEL
PILOT
8
9
SPLIT
CAL
OPTION RESET
Page 25
C-giant rel 3.07. Sales by Jemba, Sweden. Tel +46 (0)586 55640
5.12. Option
C-giant has got two remote lines (yellow and white cable) that may be used with
default functions or with definitions made by the user. See page 5 and 6 on how to
connect. 'OPTION' lets you define the functions for these control lines. The indicator
in the key is on when at least one remote line is defined by the user. To clear a
definition you just select the appropriate remote line (white or yellow) with 'OPTION'
and press 'RESET'. The default functions are:
•
•
White - reset TRIP 1 regardless of whether it is the current register or not
Yellow - reverse the current counting direction of the trip meter.
To change the function of a remote control you just take the following actions:
Action
C-giant shows
Press OPTION
text (.OPtion
then (.WhitE)
Press OPTION
Toggle between
(.WhitE) and (.YEllow)
Press SET
Starts the definition
Sequence of keys to be computed
each time selected remote is activated
Key codes
Press SET
Confirms the definition
If you change your mind
before the definition is
completed - just press 'RESET'
-giant
to
resume
to
previous
definition. As the SET and
RESET keys have special functions while defining the remote they cannot be defined
as other keys. To include these keys in a definition you have to press 'OPTION' before
the SET and RESET keys.
.
.
Page 26
by Coralba Sweden
1
.
2
3
TRIP1
TRIP2
SPEED
4
5
6
TIME
ADD
BREAK
7
HALT
FUEL
PILOT
8
9
SPLIT
SET
0
CAL
OPTION RESET
C-giant
C-giant rel 3.07. Sales by Jemba, Sweden. Tel +46 (0)586 55640
Example 1: Finish of special stage
At the finish of a special stage it is convenient to have a remote control defined to
perform the following functions: Freeze, select time on stage, select time of day and
select maximum speed. Just press the following keys.
Press
Result
Display
OPTION
OPTION
SET
SPLIT
Show selected remote line
Show selected remote line
Starts the definition for the yellow remote
Will split the instrument
.WhitE
.YEllow
blank display
1 C4
program step 1 and row
C, column 4 for SPLIT
2 b3
3 A3
4 A3
5 A5
6 A3
7 A3
8 b5
FUEL
Select FUEL as dummy before next key
TRIP 2
Select TRIP 2
TRIP 2
Select time on stage
ARROW UP Copy time on stage to upper left window
TRIP 2
Select average speed on stage
TRIP 2
Select maximum speed on stage
ARROW DOWN Copy maximum speed on stage to
lower left window
TIME
Select time of day
SET
Confirms the definition
9 b2
When FUEL is selected in this example it is just in case TRIP 2 is already selected. If
it is we would select the wrong register by just continuing pressing TRIP 2.
C-giant
Page 27
C-giant rel 3.07. Sales by Jemba, Sweden. Tel +46 (0)586 55640
Example 2: Road section interval
During a road section it is convenient to have a remote control defined to perform the
following functions: Reset and show interval distance, show total distance, select and
show estimated time of arrival to next time control with 10 s resolution. Just press the
following keys.
Press
Result
Display
OPTION
SET
FUEL
Show selected remote line
Starts the definition for the white remote
Select FUEL as dummy before next key
.WhitE
blank display
1 b3
program step 1 and row
b, column 3 for FUEL
2 A2
2 A2
3 C6
4 A3
5 A5
6 A5
7 A3
8 A3
9 A3
10 A3
11 A3
12 A3
13 b5
TRIP 1
Select TRIP 1
OPTION
Prefix to allow RESET to be defined
RESET
Reset TRIP 1
TRIP 2
Select TRIP 2
ARROW UP Copy TRIP 2 to upper left window
ARROW UP Show TRIP 2 with 10 m resolution
TRIP 2
Select time on stage
TRIP 2
Select average speed on stage
TRIP 2
Select maximum speed on stage
TRIP 2
Select EtA-distance
TRIP 2
Select EtA-A
TRIP 2
Select Estimated Time of Arrival
ARROW DOWN Copy Estimated Time of Arrival to
lower left window
ARROW DOWN Show Estimated Time of Arrival w 10 s 14 b5
TRIP 1
Select TRIP 1
15 A2
SET
Confirms the definition
When FUEL is selected in this example it is just in case TRIP 2 is already selected. If
it is we would select the wrong register by just continuing pressing TRIP 2.
By using the two definitions above the co-driver doesn't need to have access to the trip
meter while the car is running. Everything is done with the aid of the remote controls.
Page 28
C-giant
C-giant rel 3.07. Sales by Jemba, Sweden. Tel +46 (0)586 55640
6. ERROR CODES AND TROUBLESHOOTING
On some occasions an error code may appear in the display. The following codes are
available:
Code
.
Reason
Action to be taken
Voltage from the fuel sender was Check connections for the black cable.
unchanged for two calibration
The power supply must be ON to the
points during fuel calibration.
fuel sender (Ignition key ON).
.
.
Probably a bad connection for
the power supply.
Recalibrate distance by driving the
calibrating distance.
You didn't increase the amount
of fuel between two calibration
points
Input a higher value for fuel for each
calibration point.
Polarity of yellow cable changed Check connection of yellow cable.
at a speed of at least 10 km/h.
If it is connected to a remote control
it should be defined before you use it.
See page 25.
..
Probably a bad connection for
the power supply.
Consult Jemba for service or run a
free diagnostic program from Jemba
Speed and distance indicate negative values
If the values indicate negative values when driving ahead the reason is that the yellow
wire is connected to a positive voltage. This is the case if a remote button is connected
to yellow wire and it is quite normal. As soon as the remote button is defined to its
desired functions the default function (reverse) is disabled and the minus sign
disappeare.
At speed C-giant stops counting for a while, shows ”C-rally” then works again
The most probable reason is that the pulse rate from the speed sensor is too high. As a
result the calibration value is over 100 000. The solution is to contact your dealer and
replace the sensor interface or reduce the pulse rate to less than 10 pulses per meter
(1600 per mile).
A less likely reason is a bad connection for the power supply (plus as well as minus).
C-giant
Page 29
C-giant rel 3.07. Sales by Jemba, Sweden. Tel +46 (0)586 55640
7. INDEX
-, 13
+, 13
accident, 6
accuracy, 22
Ad.-Err, 23; 29
ADD, 13
ADD, 18
adjust time, 19
adjusting a value, 18
align trip, 15; 18
arrow down, 12
arrow up, 11
automatic SS
measurements, 16
average speed, 16; 20
battery, 5
BAUD RATE, 25
BREAK, 7; 13
CAL, 21
CAL, 12
calibrate distance, 21
calibrate FUEL, 22
calibrate TIME, 22
calibrate time, 22
clock, 12
communication, 25
connect fuel, 6
connections, 5
counting direction, 13
define remote, 26
delayed time, 12
display, 7
display mode, 7
distances
measurement, 15
disturbances, 5
electrical connections,
5
electronic
speedometer, 4
emergency, 13
error code, 29
Page 30
estimated time of
arrival, 16
failure, 13
feet, 25
fitting, 4
fitting pulse
generator, 4
freeze, 14; 25
Fu.-Err, 23; 29
FUEL, 19
FUEL, 12
fuel calibration, 22
fuel connection, 6
fuel consumption, 19
fuel gauge, 5
functions, 7; 8
fuse, 5
ground, 5
HALT, 13
junction, 15
keyboard, 7
measuring distances,
15
memory, 22; 24
memory, 8; 15
meters, 24
miles, 24
minus, 18
MPH, 25
nautical miles, 25
numeric input, 7
numeric keys, 15
OFF, 7
ON/OFF, 7
OPTION, 14; 26
PG-Err, 29
PILOT, 11
PILOT, 12; 20
POSITIVE, 13
power, 5
power, 7
power supply, 5
pre-set, 15
printer, 25
remote, 14
remote control, 6
remote control, 26
remote lines, 26
remote reset button, 5
required speed, 8
RESET, 14
resolution, 12
reverse, 5
reverse light, 5; 6
road book, 18
S.U.-Err, 29
safety, 6
scheduled speed, 12
SET, 11; 18
set distance, 15
set time, 19
set up units, 24
speed, 11
speed threshold, 17
SPLIT, 14; 25
stop counting, 13
stop watch, 12
target time, 8
TIME, 12
time measuring, 18
time of arrival, 16
tolerance, 3
top speed, 16
TRIP, 11
TRIP, 15
turn on, 7
yards, 25
yellow remote
control, 6
zero, 14
C-giant