1
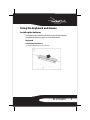
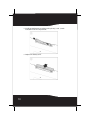
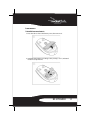
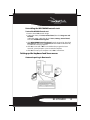
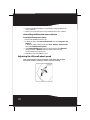
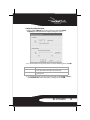
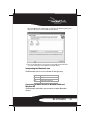
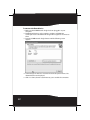
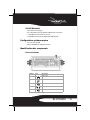
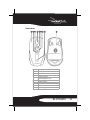
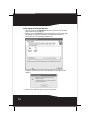
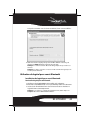
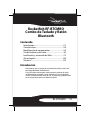
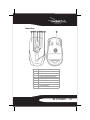
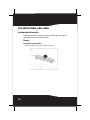
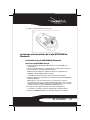
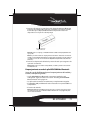
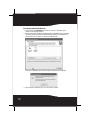
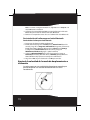
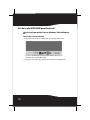
Bluetooth Keyboard and Mouse
Combo
Ensemble clavier et souris Bluetooth
Combo de Teclado y Ratón Bluetooth
RF-BTCMBO
User Guide Guide de l’utilisateur Guía del Usuario
Rocketfish RF-BTCMBO
Bluetooth Keyboard and Mouse
Combo
Contents
Introduction ...................................................................... 2
Features............................................................................... 3
Identifying components ............................................... 4
Using the keyboard and mouse ................................. 9
Troubleshooting ............................................................23
Legal notices ...................................................................24
Warranty ...........................................................................27
Français.................................................. 29
Español .................................................. 57
Introduction
Congratulations on your purchase of a Rocketfish Bluetooth
keyboard and mouse.
This guide explains how to correctly operate and get the best
performance from your wireless keyboard and mouse. Read this user
guide carefully before using your product, then keep it next to your
computer for quick reference.
2
Features
Package contents
Before you start using your keyboard and mouse the first time, verify
that your package contains the following:
•
•
•
•
•
•
Keyboard
Laser Mouse
USB Bluetooth dongle
One installation CD
Batteries for the keyboard and mouse
This user guide
If any item is missing or damaged, contact Rocketfish at
(800) 305-2204.
Features
Keyboard and Laser Mouse
• Keyboard
• 104-key design
• Ten frequently used hotkeys
• One connect button
• Laser mouse
• Tilt/scroll wheel
• Three mouse buttons (left, right, and middle buttons)
• Four media key buttons
• One pairing button
• Power-saving mode
• Excellent performance
• Working range up to 30 feet (10 meters) line-of- sight
• Dual-color status LED indicator
RF-BTCMBO
3
USB Bluetooth dongle
•
•
•
•
One pairing button
Bluetooth specification v1.0 and v2.0 compliant
Supports both keyboard and mouse
Supports additional Bluetooth devices
System requirements
• PC with a USB port
• Microsoft Windows 2000, XP, or Vista
Identifying components
Keyboard top
6
1
2
3
4
5
Number
4
7
8
9
10
11
Icon
Description
1
Home button
2
Search button
3
E-mail button
4
Increase volume button
5
Decrease volume button
Number
Icon
Description
6
Status LED
7
Play/Pause button
8
Stop button
9
Next track button
10
Previous track button
11
Mute button
Keyboard bottom
1
Number
Icon
Description
1
Connect
Connect button
RF-BTCMBO
5
Laser mouse
1 2 3
6
4 5 6 7 8
Number
Description
1
2
3
4
5
6
7
8
9
Left button
Stop button
Previous track button
Tilt/scroll wheel button
Play/pause button
Next track button
Right button
Status LED
Pairing button
9
Note: The keyboard hotkeys and the mouse media key buttons are disabled by
default. To use these hotkeys and buttons, you need to install the Bluetooth
WIDCOMM stack as described in “Installing the WIDCOMM Bluetooth stack” on
page 12.
Note: To enable the horizontal scrolling, you need to install the Bluetooth Mouse
software on your computer. See “Installing the Bluetooth mouse software“ on
page 17 for more information.
Keyboard and mouse status LED
Color
Description
Green
Flashing red
Flashing red and green
Mouse is turned on, battery level normal.
Low battery
Mouse/keyboard pairing
Battery status
You can view more detailed information on the keyboard and mouse
battery status.
To view more detailed information on the keyboard battery status:
• Click Start, Control Panel, Keyboard, then click Bluetooth.
RF-BTCMBO
7
To view more detailed information on the mouse battery status:
• Click Start, Control Panel, Mouse, then click Bluetooth.
To change the settings for the low battery alarm:
1 In the Keyboard Status dialog box or the Mouse Status dialog box, click
the Low Battery Alarm button to open the following dialog box.
2 Change the settings according to your preferences.
8
Using the keyboard and mouse
Installing the batteries
The keyboard and mouse both need two AA alkaline batteries.
Complete the following steps to install the batteries.
Keyboard
To install the keyboard batteries:
1 Remove the battery cover as shown.
RF-BTCMBO
9
2 Install two AA batteries according to the polarity (+ and -) marks
indicated inside the compartment.
3 Replace the battery cover.
10
Laser mouse
To install the laser mouse batteries:
1 Press the tab to release the battery cover, then remove it.
2 Install two AA batteries according to the polarity (+ and -) indicated
inside the compartment.
RF-BTCMBO
11
3 Replace the battery cover.
Installing or uninstalling the WIDCOMM Bluetooth stack
Installing the WIDCOMM Bluetooth stack
To install the WIDCOMM Bluetooth stack:
1 Plug the USB Bluetooth dongle into a USB port on your computer.
2 Insert the provided installation CD in the CD or DVD drive. The
installation stack loads automatically.
Note: If the installation stack does not load automatically, double-click Setup.exe in
the bin folder of the installation CD.
The Welcome Screen introduces you to the installation process.
3 Follow the on-screen prompts to complete the WIDCOMM Bluetooth
Software wizard.
Note: If the “Bluetooth device not found” message appears, plug the USB Bluetooth
dongle into a USB port on your computer, then click OK. The Found New Hardware
Wizard starts installing the components for the USB Bluetooth dongle.
4 After the wizard finishes, remove the dongle and plug it back in. The
keyboard and mouse pair automatically.
5 Click Finish to exit the installation.
6 In Windows 2000, a prompt requires you to restart the computer so that
the Bluetooth stack takes effect. Click Yes to restart your computer now
or No to restart later.
12
Uninstalling the WIDCOMM Bluetooth stack
To uninstall the WIDCOMM Bluetooth stack:
1 Remove the USB Bluetooth dongle.
2 In Windows Vista, click Start, Control Panel, then click Programs and
Features.
In Windows 2000 or Windows XP, click Start, Settings, Control Panel,
then click Add/Remove Programs.
3 Click WIDCOMM Bluetooth Software from the program list, then click
Uninstall (Windows Vista) or Remove (Windows 2000 or Windows XP).
A confirmation message appears.
4 Click Yes to uninstall or No to cancel. When the program has been
removed, a prompt requires you to restart the computer.
5 Click Yes to restart your computer now or No to restart later.
Setting up the keyboard and laser mouse
Automatic pairing in Boot mode
RF-BTCMBO
13
To enable the keyboard and mouse in boot mode:
1 With your computer turned off, plug the USB Bluetooth dongle into an
available USB port.
2 Slide the power switch of the mouse to turn the mouse on.
3 Press the button on the bottom of the USB Bluetooth dongle until the
LED begins to flash once every second. This indicates the Bluetooth
dongle has started to search for a device to be paired with. The
Bluetooth connection is established.
4 Turn on the computer and use the keyboard to enter the BIOS setup.
5 Use the keyboard and mouse to view the menu and configure the
settings.
Enabling the USB keyboard and mouse function in BIOS
If the keyboard or mouse failed to work, verify that the USB keyboard
and mouse function has been enabled in the BIOS setup.
Note: See “Troubleshooting” on page 23 for additional troubleshooting information.
To enable the keyboard and mouse in BIOS:
1 Make sure the Bluetooth connection has been established before
turning on your computer.
2 Turn on your computer, then follow the on-screen instructions to enter
the BIOS setup.
3 Use the cursor keys on the keyboard to navigate through the menu
items and enable the USB keyboard and mouse function. (In some BIOS
settings, you can use the Bluetooth mouse to navigate through the
items.)
Note: Some older PC systems do not support the USB keyboard and mouse in a BIOS
or DOS environment.
Quick pairing in Windows
The Bluetooth keyboard and mouse have been set to a pre-pairing
mode as the factory default. For quick pairing, enable the pre-pairing
mode following these steps.
To enable pre-pairing mode:
1 Plug the USB Bluetooth dongle into a USB port on your computer. The
first time you connect the keyboard or mouse to your computer, the
Found New Hardware Wizard launches automatically. Cancel the Wizard,
then follow these steps.
14
2 For the mouse, press the pairing button on the bottom of the mouse.
For the keyboard, press and hold the connect button on the back of the
keyboard for two seconds.
3 Press the button on the bottom of the USB Bluetooth dongle until the
LED begins to flash once every second. This indicates the Bluetooth
dongle has started to search for a device to be paired with.
USB Bluetooth
dongle button
Note: When pairing, the keyboard/mouse LED flashes red and green.
Note: The pairing settings are cancelled if you press the mouse pairing button or the
keyboard connect button. To reconnect the mouse or keyboard, press the USB
Bluetooth dongle button again (Refer to Step 3).
4 Press any key on the keyboard and move your mouse to make sure that
they are connected.
Note: Each time you turn on your computer, the keyboard and mouse are
automatically detected.
Pairing using the WIDCOMM Bluetooth stack
Before using the Bluetooth stack for keyboard and mouse pairing,
make sure of the following:
• The WIDCOMM Bluetooth stack is installed and set up as instructed in
“Installing the WIDCOMM Bluetooth stack” on page 12.
• The batteries are inserted properly and fully charged.
• The USB Bluetooth dongle is plugged into a USB port on your computer.
• The mouse is turned on.
Note: To start the Bluetooth stack for the first time, see “Using the stack for the first
time in Windows 2000 or Windows XP“ on page 20 for more information.
RF-BTCMBO
15
To pair using the Bluetooth stack:
1 Press the Connect button on the mouse and keyboard to start pairing.
2 Press the USB Bluetooth dongle button until the Human Interface Device
(HID) screen appears. Your computer starts to search for all Bluetooth
devices.
When the connection to the mouse is established, this message appears:
3 Click to confirm that the mouse is connected.
16
When the connection to the keyboard is established, this screen appears:
4 Use the paired keyboard to type the digits shown on the screen, then
press the Enter key. The keyboard is connected.
Note: The Bluetooth security code changes each time the keyboard is connected.
Note: The keyboard and mouse enter the power saving mode when not used for a
period of the time.
Using the Bluetooth mouse software
Installing the Bluetooth mouse software
To install the Bluetooth mouse software:
1 Make sure the WIDCOMM stack has been installed on your computer.
2 Plug the USB Bluetooth dongle into an available USB port on your
computer.
3 Insert the provided installation CD in the CD or DVD drive. The software
starts automatically.
Note: If the software does not load automatically, double-click Setup.exe in the bin
folder of the installation CD.
RF-BTCMBO
17
4 Complete the Bluetooth Mouse Setup wizard to install the Bluetooth
mouse software.
5 Restart your computer before using the Bluetooth mouse software.
Uninstalling the Bluetooth mouse software
To uninstall the Bluetooth mouse software:
1 Remove the USB Bluetooth dongle.
2 In Windows Vista, click Start, Control Panel, then click Programs and
Features.
In Windows 2000 or Windows XP, click Start, Settings, Control Panel,
then click Add/Remove Programs.
3 Select Bluetooth Mouse from the program list, then click Uninstall
(Windows Vista) or Remove (Windows 2000 or Windows XP).
A confirmation message appears.
4 Click Yes to uninstall or No to cancel.
Adjusting the tilt/scroll wheel speed
Your mouse comes with an advanced scroll wheel that enables
horizontal window scrolling as well as vertical scrolling.
18
To adjust the scrolling wheel speed:
1 Right-click the Mouse icon in the system tray, then click Adjust
Property. The Bluetooth Mouse Property dialog box opens.
2 To set the vertical scroll speed, select one of the following, then click OK.
Selection
Description
Scroll x lines per notch
Select to set the number of lines to scroll when the scroll wheel is moved one
notch. Specify the number of lines with the up and down arrows.
Scroll one screen per notch Select to scroll the entire window when the scroll wheel is moved one notch
(page up/page down).
3 To set the horizontal scroll speed, move the slider toward Slow or Fast or
click Use Default to restore the factory settings, then click OK.
RF-BTCMBO
19
Using the WIDCOMM Bluetooth stack
Using the stack for the first time in Windows 2000 or
Windows XP
To start using the Bluetooth stack:
1 Double-click the Bluetooth icon in the system tray.
The Initial Bluetooth Configuration Wizard opens.
2 Follow the on-screen instructions to complete the configuration.
20
When the Bluetooth configuration is complete, the following dialog box
appears and starts to search for Bluetooth devices.
3 Click on the HID device you want to connect with, then follow the
on-screen instructions to enable the selected device.
Interpreting the Bluetooth icon
The Bluetooth icon acts as an indicator for dongle status.
Icon color
Indicates
Red
White
Green
No dongle inserted
Dongle is plugged in
Dongle has detected the devices
Connecting to other devices in Windows 2000 and
Windows XP
The Bluetooth stack allows you to connect to other Bluetooth
devices.
RF-BTCMBO
21
To connect to other Bluetooth devices:
1 Make sure the USB Bluetooth dongle has been plugged in to your
computer.
2 Put Bluetooth devices, such as printers, modems, and PDAs into
search/pair mode so the Bluetooth dongle will recognize and connect to
them.
3 Press the USB Bluetooth dongle button until the following screen
appears.
4 Select the type of devices to search for from the drop-down menu. The
detected devices are displayed.
5 Click on a device, then the stack instructs you to enable the connection.
22
Using the stack in Windows Vista
To use the Bluetooth stack:
1 Double-click the Bluetooth icon in the system tray.
2
3
4
5
6
7
The Bluetooth settings screen opens.
Click on the Devices tab, then click Add. The Add Bluetooth Device Wizard
starts.
Click My device is set and ready to be found, then click Next. The
system scans for and displays all available devices.
Select the device(s) you want to enable, then click Next.
You can set a passkey yourself or choose to let the setup wizard choose
one for you.
Click Next to continue. Setup is complete.
Click Finish to exit the setup wizard.
Troubleshooting
If you have any problems with your Bluetooth keyboard or mouse,
check the following:
• Make sure that your system is compatible with this product’s system
requirements.
• Make sure that the batteries in the keyboard and mouse are installed
correctly. Make sure that the polarity of the batteries corresponds with
the polarity signs inside the keyboard and mouse battery
compartments.
• When the mouse LED is red, battery power is low. Replace with new
batteries immediately.
• After the Bluetooth stack (see “Installing the WIDCOMM Bluetooth stack”
on page 12) has been installed in your computer, you can check the
battery status of keyboard and mouse by clicking Start, Control Panel,
Keyboard, then Bluetooth or clicking Start, Control Panel, Mouse,
then Bluetooth.
RF-BTCMBO
23
• If the keyboard and mouse fail to work, check the USB keyboard and
mouse functions in your system’s BIOS. The functions should be enabled
for the normal use of the keyboard and mouse. For detailed settings, see
“Enabling the USB keyboard and mouse function in BIOS“ on page 14.
• If your PC system’s BIOS setup has options for the keyboard or mouse,
make sure they are set to default settings. If you are not familiar with the
BIOS, refer to your PC’s manual for more information.
• Only use the mouse on a clean, flat surface in order to ensure smooth
and accurate cursor action. If you use a mouse pad, choose a
light-colored one, not a dark one, to use less battery power.
• For further assistance with any other questions you may have, contact
Rocketfish at (800) 305-2204 for technical support.
Legal notices
FCC Part 15
This device complies with Part 15 of the FCC Rules. Operation of this
product is subject to the following two conditions: (1) this device may
not cause harmful interference, and (2) this device must accept any
interference received, including interference that may cause
undesired operation.
This equipment has been tested and found to comply within the
limits for a class B digital device, pursuant to Part 15 of the FCC Rules.
These limits are designed to provide reasonable protection against
harmful interference in a residential installation. This equipment
generates, uses, and can radiate radio frequency energy and, if not
installed and used in accordance with the instructions, may cause
harmful interference to radio communications. However, there is no
guarantee that interference will not occur in a particular installation.
If this equipment does cause harmful interference to radio or
television reception, which can be determined by turning the
equipment off and on, the user is encouraged to try to correct the
interference by one or more of the following measures:
• Reorient or relocate the receiving antenna.
• Increase the separation between the equipment and receiver.
24
• Connect the equipment into an outlet on a circuit different from that to
which the receiver is connected.
• Consult the dealer or an experienced technician for help.
FCC warning
Changes or modifications not expressly approved by the party
responsible for compliance with the FCC Rules could void the user’s
authority to operate this equipment.
DHHS and FDA safety certification
This product is made and tested to meet safety standards of the FCC,
requirements and compliance with safety performance of the
U.S. Department of Health and Human Services, and also with FDA
Radiation Performance Standards 21 CFR Subchapter J.
Canada ICES-003 statement
This Class B digital apparatus complies with Canadian ICES-003.
RSS 310 statement
To reduce potential radio interference to other users, the antenna
type and its gain should be so chosen that the equivalent
isotropically radiated power (e.i.r.p.) is not more than that permitted
for successful communication.
Copyright
© 2007 Rocketfish. Rocketfish and the Rocketfish logo are trademarks
of Best Buy Enterprise Services, Inc. Other brands and product names
are trademarks or registered trademarks of their respective holders.
Specifications and features are subject to change without notice or
obligation.
For service and support call (800) 305-2204.
RF-BTCMBO
25
26
Warranty
1-year limited warranty
Rocketfish Products (“Rocketfish”) warrants to you, the original purchaser of this new
RF-BTCMBO (“Product”), that the Product shall be free of defects in the original manufacture of
the material or workmanship for one (1) year from the purchase of the Product (“Warranty
Period”). This Product must be purchased from an authorized dealer of Rocketfish brand
products and packaged with this warranty statement. This warranty does not cover refurbished
Product. If you notify Rocketfish during the Warranty Period of a defect covered by this
warranty that requires service, terms of this warranty apply.
How long does the coverage last?
The Warranty Period lasts for one year (365 days), beginning on the date you purchased the
Product. The purchase date is printed on the receipt you received with the product.
What does this warranty cover?
During the Warranty Period, if the original manufacture of the material or workmanship of the
Product is determined to be defective by an authorized Rocketfish repair center or store
personnel, Rocketfish will (at its sole option): (1) repair the Product with new or rebuilt parts; or
(2) replace the Product at no charge with new or rebuilt comparable products or parts. Products
and parts replaced under this warranty become the property of Rocketfish and are not returned
to you. If service of Products and parts are required after the Warranty Period expires, you must
pay all labor and parts charges. This warranty lasts as long as you own your Rocketfish Product
during the Warranty Period. Warranty coverage terminates if you sell or otherwise transfer the
Product.
How to obtain warranty service?
If you purchased the Product at a retail store location, take your original receipt and the Product
to the store you purchased it from. Make sure that you place the Product in its original
packaging or packaging that provides the same amount of protection as the original
packaging. If you purchased the Product from an online web site, mail your original receipt and
the Product to the address listed on the web site. Make sure that you put the Product in its
original packaging or packaging that provides the same amount of protection as the original
packaging.
Where is the warranty valid?
This warranty is valid only to the original purchaser of the Product in the United States and
Canada.
What does the warranty not cover?
This warranty does not cover:
• Customer instruction
RF-BTCMBO
27
• Installation
• Set up adjustments
• Cosmetic damage
• Damage due to acts of God, such as lightning strikes
• Accident
• Misuse
• Abuse
• Negligence
• Commercial use
• Modification of any part of the Product, including the antenna
This warranty also does not cover:
• Damage due to incorrect operation or maintenance
• Connection to an incorrect voltage supply
• Attempted repair by anyone other than a facility authorized by Rocketfish to service the
Product
• Products sold as is or with all faults
• Consumables, such as fuses or batteries
• Products where the factory applied serial number has been altered or removed
REPAIR REPLACEMENT AS PROVIDED UNDER THIS WARRANTY IS YOUR EXCLUSIVE REMEDY.
ROCKETFISH SHALL NOT BE LIABLE FOR ANY INCIDENTAL OR CONSEQUENTIAL DAMAGES FOR
THE BREACH OF ANY EXPRESS OR IMPLIED WARRANTY ON THIS PRODUCT, INCLUDING, BUT
NOT LIMITED TO, LOST DATA, LOSS OF USE OF YOUR PRODUCT, LOST BUSINESS OR LOST
PROFITS. ROCKETFISH PRODUCTS MAKES NO OTHER EXPRESS WARRANTIES WITH RESPECT TO
THE PRODUCT, ALL EXPRESS AND IMPLIED WARRANTIES FOR THE PRODUCT, INCLUDING, BUT
NOT LIMITED TO, ANY IMPLIED WARRANTIES OF AND CONDITIONS OF MERCHANTABILITY AND
FITNESS FOR A PARTICULAR PURPOSE, ARE LIMITED IN DURATION TO THE WARRANTY PERIOD
SET FORTH ABOVE AND NO WARRANTIES, WHETHER EXPRESS OR IMPLIED, WILL APPLY AFTER
THE WARRANTY PERIOD. SOME STATES, PROVINCES AND JURISDICTIONS DO NOT ALLOW
LIMITATIONS ON HOW LONG AN IMPLIED WARRANTY LASTS, SO THE ABOVE LIMITATION MAY
NOT APPLY TO YOU. THIS WARRANTY GIVES YOU SPECIFIC LEGAL RIGHTS, AND YOU MAY ALSO
HAVE OTHER RIGHTS, WHICH VARY FROM STATE TO STATE OR PROVINCE TO PROVINCE.
Contact Rocketfish:
For customer service please call 1-800-620-2790
www.rocketfishproducts.com
ROCKETFISH™ is a trademark of Best Buy Enterprise Services, Inc.
Distributed by Best Buy Purchasing, LLC.
Rocketfish, 7601 Penn Avenue South, Richfield, Minnesota, U.S.A.
28
Rocketfish RF-BTCMBO
Ensemble clavier et souris
Bluetooth
Table des matières
Introduction ....................................................................29
Fonctionnalités...............................................................30
Identification des composants .................................31
Utilisation du clavier et de la souris ........................36
Problèmes et solutions................................................51
Avis juridiques ................................................................52
Garantie ............................................................................55
Introduction
Félicitations d’avoir acheté cet ensemble clavier et souris Bluetooth
de Rocketfish.
Ce manuel explique le fonctionnement et la façon d’obtenir les
meilleures performances du clavier et de la souris sans fil. Lire
attentivement ce guide de l’utilisateur avant d’utiliser ce produit et le
conserver à proximité de l'ordinateur pour pouvoir s’y référer
rapidement.
RF-BTCMBO
29
Fonctionnalités
Contenu de l’emballage
Avant de commencer à utiliser le clavier et la souris pour la première
fois, vérifier que l'emballage contient les éléments suivants :
•
•
•
•
•
•
Clavier
Souris laser
Clé USB Bluetooth
Un CD d'installation
Piles pour le clavier et la souris
Ce guide de l’utilisateur
Si un article manque ou est endommagé, contacter Rocketfish au
(800) 305-2204.
Fonctionnalités
Clavier et souris laser
• Clavier
• Conception 104 touches
• Dix touches de raccourci fréquemment utilisées
• Une touche de connexion
• Souris laser
• Roulette de défilement/multidirectionnelle
• Trois boutons pour la souris (boutons de gauche, de droite et central)
• Quatre touches multimédias
• Un bouton de couplage
• Mode économie d’énergie
• Excellente performance
• Portée maximale de 30 pieds (10 mètres) en visibilité directe
• Témoin DEL à deux couleurs
30
Clé USB Bluetooth
•
•
•
•
Un bouton de couplage
En conformité avec la spécification Bluetooth v1.0 et v2.0
Compatible avec le clavier et la souris
Compatible avec d'autres périphériques Bluetooth
Configuration système requise
• PC avec un port USB
• Microsoft Windows 2000, XP ou Vista
Identification des composants
Dessus du clavier
6
1
2
3
4
5
Numéro
7
8
9
10
11
Icône
Description
1
Touche Accueil
2
Touche Recherche
3
Touche Courriel
4
Touche Augmentation du volume
5
Touche Diminution du volume
RF-BTCMBO
31
Numéro
Icône
Description
6
DEL d'état
7
Touche Lecture/Pause
8
Touche Arrêt
9
Touche Piste suivante
10
Touche Piste précédente
11
Touche Sourdine
Dessous du clavier
1
32
Numéro
Icône
Description
1
Connexion
Touche Connexion
Souris laser
1 2 3
4 5 6 7 8
Numéro
Description
1
2
3
4
Bouton gauche
Touche Arrêt
Touche Piste précédente
Touche de la roulette de
défilement/multidirectionnelle
Touche Lecture/Pause
Touche Piste suivante
Bouton droit
DEL d'état
Bouton de couplage
5
6
7
8
9
9
RF-BTCMBO
33
Remarque : Les touches de raccourci du clavier et les touches multimédias de la
souris sont désactivées par défaut. Pour utiliser ces touches et touches de raccourci, il
faut installer la pile Bluetooth WIDCOMM, comme décrit dans « Installing the
WIDCOMM Bluetooth stack », à la page 12.
Remarque : Pour permettre le défilement horizontal, il faut installer sur l'ordinateur
le logiciel pour souris Bluetooth. Voir « Installing the Bluetooth mouse software », à la
page 17, pour de plus amples informations.
DEL d'état du clavier et de la souris
Couleur
Description
Vert
La souris est sous tension et le niveau des
piles normal.
Pile faible
Couplage souris/clavier
Rouge clignotant
Rouge et vert clignotant
État des piles
Il est possible d'afficher des informations plus détaillées au sujet de
l'état des piles du clavier et de la souris.
Pour afficher des informations plus détaillées au sujet de l'état des piles du clavier :
• Cliquer sur Start (Démarrer), Control Panel (Panneau de configuration),
Keyboard (Clavier), puis sur Bluetooth.
34
Pour afficher des informations plus détaillées au sujet de l'état des piles de la souris :
• Cliquer sur Start (Démarrer), Control Panel (Panneau de configuration),
Mouse (Souris), puis sur Bluetooth.
Pour changer les réglages pour le témoin d'alerte des piles :
1 Dans la boîte de dialogue Keyboard Status (État du clavier) ou dans la
boîte de dialogue Mouse Status (État de la souris), cliquer sur le bouton
Low Battery Alarm (Témoin d'alerte des piles) pour ouvrir la boîte de
dialogue suivante.
2 Changer les réglages en fonction des préférences personnelles.
RF-BTCMBO
35
Utilisation du clavier et de la souris
Installation des piles
Le clavier et la souris ont chacun besoin de deux piles alcalines de
type AA. Suivre les étapes ci-dessous pour installer les piles.
Clavier
Pour installer les piles dans le clavier :
1 Retirer le couvercle du compartiment des piles comme illustré.
36
2 Installer deux piles de type AA en respectant les repères de polarité (+ et
-) figurant à l'intérieur du compartiment.
3 Remettre le couvercle du compartiment des piles.
RF-BTCMBO
37
Souris laser
Pour installer les piles dans la souris laser :
1 Appuyer sur l'onglet pour ouvrir le couvercle du compartiment des piles,
puis le retirer.
2 Installer deux piles de type AA en respectant la polarité (+ et -) indiquée
à l'intérieur du compartiment.
38
3 Remettre le couvercle du compartiment des piles.
Installation ou désinstallation de la pile Bluetooth
WIDCOMM
Installation de la pile Bluetooth WIDCOMM
Pour installer la pile Bluetooth WIDCOMM :
1 Connecter la clé USB Bluetooth à un port USB de l’ordinateur.
2 Insérer le CD d'installation fourni dans le lecteur de CD ou de DVD. La pile
d'installation se charge automatiquement.
Remarque : Si la pile d'installation ne se charge pas automatiquement,
double-cliquer sur Setup.exe dans le dossier bin du CD d'installation.
L'écran d'accueil présente le processus d'installation.
3 Suivre les invites à l'écran pour exécuter l'assistant WIDCOMM Bluetooth
Software (Logiciel Bluetooth WIDCOMM).
Remarque : Si le message « Bluetooth device not found » (Périphérique Bluetooth
introuvable) s’affiche, brancher la clé USB Bluetooth sur un port USB de l'ordinateur,
puis cliquer sur OK. L’Assistant Ajout de nouveau matériel (Found New Hardware
Wizard) commence à installer les composants de la clé USB Bluetooth.
4 Une fois que l'assistant a terminé, retirer la clé USB, puis la reconnecter.
Le clavier et la souris se couplent automatiquement.
5 Cliquer sur Finish (Terminer) pour terminer l’installation.
RF-BTCMBO
39
6 Sous Windows 2000, un message invite l'utilisateur à redémarrer
l'ordinateur afin que la pile Bluetooth entre en vigueur. Cliquer sur Yes
(Oui) pour redémarrer l’ordinateur ou sur No (Non) pour le redémarrer
ultérieurement.
Désinstallation de la pile Bluetooth WIDCOMM
Pour désinstaller la pile Bluetooth WIDCOMM :
1 Retirer la clé USB Bluetooth.
2 Sous Windows Vista, cliquer sur Start (Démarrer), Control Panel
(Panneau de configuration), puis cliquer sur Programs and Features
(Programmes et fonctionnalités).
Sous Windows 2000 ou Windows XP, cliquer sur Start (Démarrer),
Settings (Paramètres), Control Panel (Panneau de configuration), puis
cliquer sur Add/Remove Programs (Ajout/Suppression de
programmes).
3 Cliquer sur WIDCOMM Bluetooth Software (Logiciel Bluetooth
WIDCOMM) dans la liste de programmes, puis cliquer sur Uninstall
(Désinstaller) (Windows Vista) ou Remove (Supprimer) (Windows 2000
ou Windows XP). Un message de confirmation apparaît.
4 Cliquer sur Yes (Oui) pour désinstaller ou sur No (Non) pour annuler. Une
fois le programme supprimé, un message invite l’utilisateur à redémarrer
l’ordinateur.
5 Cliquer sur Yes (Oui) pour redémarrer l’ordinateur ou sur No (Non) pour
le redémarrer ultérieurement.
40
Installation du clavier et de la souris laser
Couplage automatique en mode de démarrage
Pour activer le clavier et la souris en mode de démarrage :
1 L'ordinateur étant hors tension, connecter la clé USB Bluetooth à un port
2
3
4
5
USB disponible.
Faire glisser la touche d’alimentation de la souris pour mettre cette
dernière sous tension.
Appuyer sur la touche située en dessous de la clé USB Bluetooth jusqu’à
ce que le témoin à DEL commence à clignoter une fois toutes les
secondes. Ceci indique que la clé Bluetooth a commencé à rechercher un
périphérique pour le couplage. La connexion Bluetooth est établie.
Mettre l'ordinateur sous tension et utiliser le clavier pour accéder à la
configuration du BIOS.
Utiliser le clavier et la souris pour afficher le menu et configurer les
paramètres.
RF-BTCMBO
41
Activation de la fonctionnalité de clavier et souris USB dans
le BIOS
Si le clavier ou la souris ne fonctionne pas, vérifier que la
fonctionnalité de clavier et souris USB a été activée dans la
configuration du BIOS.
Remarque : Voir « Troubleshooting » à la page 23 pour de plus amples informations
concernant la résolution de problèmes.
Pour activer le clavier et la souris dans le BIOS :
1 Vérifier que la connexion Bluetooth a été établie avant la mise sous
tension de l’ordinateur.
2 Mettre l'ordinateur sous tension, puis suivre les instructions à l'écran
pour accéder à la configuration du BIOS.
3 Utiliser les touches directionnelles du clavier pour parcourir les éléments
du menu et activer la fonctionnalité de clavier et de souris USB. (Pour
certains paramètres du BIOS, il est possible d'utiliser la souris Bluetooth
pour parcourir les divers éléments.)
Remarque : Certains ordinateurs anciens ne peuvent pas prendre en charge le
clavier et la souris USB dans un environnement BIOS ou DOS.
Couplage rapide sous Windows
Le clavier et la souris Bluetooth sont préréglés en mode de couplage
préalable par défaut à l’usine. Pour le couplage rapide, activer le
mode de couplage préalable en suivant ces étapes.
Pour activer le mode de couplage préalable :
1 Connecter la clé USB Bluetooth à un port USB de l’ordinateur. Lorsque le
clavier ou la souris est connecté pour la première fois à l'ordinateur,
l'assistant Ajout de nouveau matériel démarre automatiquement.
Annuler l’assistant, puis suivre ces étapes.
2 Pour la souris, appuyer sur le bouton de couplage situé sous la souris.
Pour le clavier, maintenir appuyée la touche de connexion au dos du
clavier pendant deux secondes.
42
3 Appuyer sur la touche située en dessous de la clé USB Bluetooth jusqu’à
ce que le témoin à DEL commence à clignoter une fois toutes les
secondes. Ceci indique que la clé Bluetooth a commencé à rechercher un
périphérique pour le couplage.
Touche de la clé
USB Bluetooth
Remarque : Lors du couplage, le témoin à DEL du clavier / de la souris clignote en
rouge et en vert.
Remarque : Les paramètres du couplage sont annulés si la touche de couplage de la
souris ou la touche de connexion du clavier est appuyée. Pour reconnecter la souris
ou le clavier, appuyer de nouveau sur la touche de la clé USB Bluetooth (voir l'étape
3).
4 Appuyer sur n'importe quelle touche du clavier et déplacer la souris pour
vérifier qu'ils sont bien connectés.
Remarque : Chaque fois que l’ordinateur est mis sous tension, le clavier et la souris
sont automatiquement détectés.
Couplage à l'aide de la pile Bluetooth WIDCOMM
Avant d'utiliser la pile Bluetooth pour le couplage du clavier et de la
souris, vérifier ce qui suit :
• La pile Bluetooth WIDCOMM est installée et configurée comme indiqué
dans « Installing the WIDCOMM Bluetooth stack », à la page 12.
• Les piles sont correctement installées et complètement chargées.
• La clé USB Bluetooth est connectée à un port USB de l’ordinateur.
• La souris est sous tension.
Remarque : Pour démarrer la pile Bluetooth pour la première fois, voir « Using the
stack for the first time in Windows 2000 or Windows XP », à la page 20, pour de plus
amples informations.
RF-BTCMBO
43
Pour un couplage à l'aide de la pile Bluetooth :
1 Appuyer sur la touche Connect (Connexion) de la souris et du clavier
pour commencer le couplage.
2 Appuyer sur la clé USB Bluetooth jusqu’à l’affichage de la fenêtre HID
(Périphérique d’interface utilisateur). L'ordinateur commence à
rechercher tous les périphériques Bluetooth.
Lorsque la connexion avec la souris est établie, le message suivant
s'affiche :
3 Cliquer pour confirmer que la souris est connectée.
44
Lorsque la connexion avec le clavier est établie, l'écran suivant s'affiche :
4 Utiliser le clavier couplé pour taper les chiffres affichés à l'écran, puis
appuyer sur Enter (Entrée). Le clavier est connecté.
Remarque : Le code de sécurité de Bluetooth change chaque fois que le clavier est
connecté.
Remarque : Le clavier et la souris se mettent en mode économie d’énergie après une
certaine période d’inactivité.
Utilisation du logiciel pour souris Bluetooth
Installation du logiciel pour souris Bluetooth
Pour installer le logiciel pour souris Bluetooth :
1 Vérifier que la pile WIDCOMM a été installée sur l’ordinateur.
2 Brancher la clé USB Bluetooth sur un port USB disponible de l’ordinateur.
3 Insérer le CD d'installation fourni dans le lecteur de CD ou de DVD. Le
logiciel démarre automatiquement.
Remarque : Si le logiciel ne se charge pas automatiquement, double-cliquer sur
Setup.exe dans le dossier bin du CD d'installation.
RF-BTCMBO
45
4 Exécuter l'assistant Bluetooth Mouse Setup (Configuration de souris
Bluetooth) pour installer le logiciel pour souris Bluetooth.
5 Redémarrer l'ordinateur avant d'utiliser le logiciel pour souris Bluetooth.
Désinstallation du logiciel pour souris Bluetooth
Pour désinstaller le logiciel pour souris Bluetooth :
1 Retirer la clé USB Bluetooth.
2 Sous Windows Vista, cliquer sur Start (Démarrer), Control Panel
(Panneau de configuration), puis cliquer sur Programs and Features
(Programmes et fonctionnalités).
Sous Windows 2000 ou Windows XP, cliquer sur Start (Démarrer),
Settings (Paramètres), Control Panel (Panneau de configuration), puis
cliquer sur Add/Remove Programs (Ajout/Suppression de
programmes).
3 Sélectionner Bluetooth Mouse (Souris Bluetooth) dans la liste de
programmes, puis cliquer sur Uninstall (Désinstaller) (Windows Vista) ou
Remove (Supprimer) (Windows 2000 ou Windows XP). Un message de
confirmation apparaît.
4 Cliquer sur Yes (Oui) pour désinstaller ou sur No (Non) pour annuler.
Réglage de la vitesse de la roulette de
défilement/multidirectionnelle
La souris est équipée d'une roulette de défilement sophistiquée qui
permet un défilement horizontal des fenêtres ainsi qu'un défilement
vertical.
46
Pour régler la vitesse de la roulette de défilement :
1 Cliquer avec le bouton droit de la souris sur l’icône de souris dans la
barre d'état du système, puis cliquer sur Adjust Property (Régler les
propriétés). La boîte de dialogue Bluetooth Mouse Property (Propriétés de
souris Bluetooth) s’ouvre.
2 Pour définir la vitesse de défilement vertical, sélectionner une des
options suivantes, puis cliquer sur OK.
Sélection
Description
Scroll x lines per notch
Sélectionner cette option pour régler le nombre de lignes qui défilent lorsque la
roulette de défilement est déplacée d'un cran. Spécifier le nombre de lignes avec
les flèches vers le haut et vers le bas.
Scroll one screen per notch Sélectionner cette option pour faire défiler la fenêtre entière lorsque la roulette
de défilement est déplacée d'un cran (page précédente/page suivante).
3 Pour régler la vitesse de défilement horizontal, déplacer le curseur vers
Slow (Lent) ou Fast (Rapide), ou cliquer sur Use Default (Utiliser les
valeurs par défaut) pour rétablir les valeurs fixées en usine, puis cliquer
sur OK.
RF-BTCMBO
47
Utilisation de la pile Bluetooth WIDCOMM
Utilisation de la pile pour la première fois sous Windows
2000 ou Windows XP
Pour commencer à utiliser la pile Bluetooth :
1 Double-cliquer sur l’icône Bluetooth dans la barre d’état système.
L’Assistant de configuration initial Bluetooth s’affiche.
2 Suivre les instructions à l'écran afin de procéder à la configuration.
48
Quand la configuration de Bluetooth est terminée, la boîte de dialogue
suivante s'affiche et commence à chercher les périphériques Bluetooth.
3 Cliquer sur le périphérique HID souhaité, puis suivre les instructions
affichées à l’écran pour l'activer.
Interprétation de l’icône Bluetooth
L’icône Bluetooth est un témoin d’état de la clé.
Couleur de Signification
l'icône
Rouge
Blanc
Vert
Aucune clé n'a été insérée
Une clé est connectée
La clé a détecté les périphériques
Connexion à d'autres périphériques sous Windows 2000 et
Windows XP
La pile Bluetooth permet d'établir une connexion avec d'autres
périphériques Bluetooth.
RF-BTCMBO
49
Pour connecter d’autres périphériques Bluetooth :
1 Vérifier que la clé USB Bluetooth est bien connectée à l’ordinateur.
2 Mettre les périphériques Bluetooth, tels que les imprimantes, les
modems et les ANP, en mode de recherche/couplage afin que la clé
Bluetooth puisse les reconnaître et s'y connecter.
3 Appuyer sur la touche de la clé USB Bluetooth jusqu’à ce que s'affiche
l'écran suivant.
4 Sélectionner le type de périphériques à rechercher à partir du menu
déroulant. Les périphériques détectés sont affichés.
5 Cliquer sur un périphérique : la pile demande d'activer la connexion.
Utilisation de la pile sous Windows Vista
Pour utiliser la pile Bluetooth :
1 Double-cliquer sur l’icône Bluetooth dans la barre d’état système.
50
2
3
4
5
6
7
L'écran des paramètres de Bluetooth s'affiche.
Cliquer sur l’onglet Devices (Périphériques), puis sur Add (Ajouter).
L’Assistant d'ajout de périphérique Bluetooth démarre.
Cliquer sur My device is set and ready to be found (Mon périphérique
est configuré et prêt à être identifié), puis sur Next (Suivant). Le système
recherche et affiche tous les périphériques disponibles.
Sélectionner le(s) périphérique(s) à activer, puis cliquer sur Next
(Suivant).
L'utilisateur peut définir lui-même un mot de passe ou laisser l'assistant
de configuration effectuer ce choix à sa place.
Cliquer sur Next (Suivant) pour continuer. La configuration est terminée.
Cliquer sur Finish (Terminer) pour quitter l'assistant de configuration.
Problèmes et solutions
En cas de problèmes avec le clavier ou la souris Bluetooth, vérifier ce
qui suit :
• Vérifier que le système est compatible avec la configuration minimale
requise pour ce produit.
• Vérifier que les piles dans le clavier et dans la souris sont installées
correctement. Vérifier que la polarité des piles correspond avec les
repères du schéma de la polarité dans le compartiment des piles du
clavier et de la souris.
• Quand la DEL de la souris est rouge, les piles sont faibles. Les remplacer
immédiatement par des piles neuves.
• Une fois la pile Bluetooth installée sur l'ordinateur (voir « Installing the
WIDCOMM Bluetooth stack », à la page 12), il est possible de vérifier l'état
des piles du clavier et de la souris en cliquant sur Start (Démarrer),
Control Panel (Panneau de configuration), Keyboard (Clavier), puis
Bluetooth, ou en cliquant sur Start (Démarrer), Control Panel (Panneau
de configuration), Mouse (Souris), puis Bluetooth.
• Si le clavier et la souris ne fonctionnent pas, vérifier les fonctionnalités de
clavier et de souris USB dans le BIOS du système. Ces fonctionnalités
doivent être activées pour l’utilisation normale du clavier et de la souris.
Pour plus d'informations concernant les paramètres, voir « Enabling the
USB keyboard and mouse function in BIOS » à la page 14.
RF-BTCMBO
51
• Si la configuration du BIOS du PC comporte des options pour le clavier
ou la souris, vérifier que celles-ci sont configurées sur les paramètres par
défaut. En cas de manque de familiarité avec le BIOS, se référer au guide
de l’utilisateur du PC pour de plus amples informations.
• Utiliser la souris sur une surface propre et plane pour assurer un
mouvement lisse et précis du curseur. Si un tapis de souris est utilisé, en
choisir un d’une couleur pâle et non sombre pour économiser la pile.
• Pour toute assistance complémentaire ou questions, contacter
Rocketfish au (800) 305-2204 pour l’assistance technique.
Avis juridiques
FCC article 15
Cet appareil est conforme à l’article 15 du règlement de la FCC. Son
utilisation est soumise aux deux conditions suivantes : (1) cet appareil
ne doit pas provoquer d’interférences préjudiciables, et (2) il doit
accepter toute interférence reçue, y compris celles risquant
d’engendrer un fonctionnement indésirable.
Cet équipement a été mis à l’essai et déclaré conforme aux limites
prévues pour un appareil numérique de classe B, définies dans la
section 15 de la réglementation FCC. Ces limites ont été établies pour
fournir une protection raisonnable contre les interférences
préjudiciables lors d’une installation résidentielle. Cet équipement
génère, utilise et diffuse des ondes radio et, s’il n’est pas installé et
utilisé conformément aux instructions dont il fait l’objet, il peut
provoquer des interférences préjudiciables aux communications
radio. Cependant, il n'est pas possible de garantir qu’aucune
interférence ne se produira pour une installation particulière. Si cet
équipement produit des interférences importantes lors de réceptions
radio ou télévisées, qui peuvent être détectées en éteignant puis en
rallumant l’appareil, essayer de corriger l’interférence au moyen de
l’une ou de plusieurs des mesures suivantes :
• Réorienter ou déplacer l’antenne réceptrice.
• Augmenter la distance entre l’équipement et le récepteur.
• Brancher l’équipement sur la prise électrique d’un circuit différent de
celui auquel le récepteur est relié.
52
• Contacter le revendeur ou un technicien qualifié pour toute assistance.
Avertissement de la FCC
Tous changements ou modifications qui ne seraient pas
expressément approuvés par les responsables de l’application des
règles FCC pourraient rendre nul le droit de l’utilisateur d’utiliser cet
équipement.
Certification relative à la sécurité du DHHS et de la FDA
Ce produit a été fabriqué et testé pour satisfaire aux normes de
sécurité de la FCC, aux exigences et règles de conformité du
Ministère de la santé des États-Unis (U.S. Department of Health and
Human Services), ainsi qu’aux normes d’irradiation 21 CFR, section de
chapitre J de la FDA.
Déclaration NMB-003 du Canada
Cet appareil numérique de la classe B est conforme à la norme
NMB-003 du Canada.
Déclaration RSS 310
Pour éviter que les interférences radio éventuelles affectent d’autres
utilisateurs, le type d’antenne et son gain doivent être choisis afin
que la puissance isotrope rayonnée équivalente (p.i.r.e.) ne soit pas
supérieure aux limites permises, permettant des communications
parfaites.
Droits d’auteurs
© 2007 Rocketfish. Rocketfish et le logo de Rocketfish sont des
marques de commerce de Best Buy Enterprise Services, Inc. Les
autres noms de marques et de produits mentionnés sont des
marques de commerce ou des marques déposées de leurs
propriétaires respectifs. Les spécifications et caractéristiques sont
susceptibles d’être modifiées sans préavis.
Pour toute réparation ou assistance technique, appeler le
(800) 305-2204.
RF-BTCMBO
53
54
Garantie
Garantie limitée d’un an
Rocketfish Products (« Rocketfish ») garantit au premier acheteur de ce RF-BTCMBO neuf
(« Produit »), qu’il est exempt de vices de fabrication et de main-d’œuvre à l’origine, pour une
période d’un (1) an à partir de la date d’achat du Produit (« Période de garantie »). Ce Produit
doit avoir été acheté chez un revendeur agréé des produits de la marque Rocketfish et emballé
avec cette déclaration de garantie. Cette garantie ne couvre pas les Produits remis à neuf. Les
conditions de la présente garantie s’appliquent à tout Produit pour lequel Rocketfish est notifié
pendant la Période de garantie, d’un vice couvert par cette garantie qui nécessite une
réparation.
Quelle est la durée de la couverture?
La Période de garantie dure 1 an (365 jours) à compter de la date d’achat de ce Produit. La date
d’achat est imprimée sur le reçu fourni avec le Produit.
Que couvre cette garantie?
Pendant la Période de garantie, si un vice de matériau ou de main-d’œuvre d'origine est
détecté sur le Produit par un service de réparation agréé par Rocketfish ou le personnel du
magasin, Rocketfish (à sa seule discrétion) : (1) réparera le Produit en utilisant des pièces
détachées neuves ou remises à neuf; ou (2) remplacera le Produit par un produit ou des pièces
neuves ou remises à neuf de qualité comparable. Les produits et pièces remplacés au titre de
cette garantie deviennent la propriété de Rocketfish et ne sont pas retournés à l’acheteur. Si les
Produits ou pièces nécessitent une réparation après l’expiration de la Période de garantie,
l’acheteur devra payer tous les frais de main-d’œuvre et les pièces. Cette garantie reste en
vigueur tant que l’acheteur reste propriétaire du Produit Rocketfish pendant la Période de
garantie. La garantie prend fin si le Produit est revendu ou transféré d’une quelconque façon
que ce soit à tout autre propriétaire.
Comment obtenir une réparation sous garantie?
Si le Produit a été acheté chez un détaillant, le rapporter accompagné du reçu original chez ce
détaillant. Prendre soin de remettre le Produit dans son emballage d’origine ou dans un
emballage qui procure la même qualité de protection que celui d’origine. Si le Produit a été
acheté en ligne, l’expédier accompagné du reçu original à l’adresse indiquée sur le site Web.
Prendre soin de remettre le Produit dans son emballage d’origine ou dans un emballage qui
procure la même qualité de protection que celui d’origine.
Où cette garantie s’applique-t-elle?
Cette garantie ne s’applique qu’à l’acheteur original du Produit aux États-Unis et au Canada.
Ce qui n’est pas couvert par cette garantie limitée
La présente garantie ne couvre pas :
• la formation du client;
RF-BTCMBO
55
• l'installation;
• les réglages de configuration;
• les dommages esthétiques;
• les dommages résultants de catastrophes naturelles telles que la foudre;
• les accidents;
• une utilisation inadaptée;
• une manipulation abusive;
• la négligence;
• une utilisation commerciale;
• la modification de tout ou partie du Produit, y compris l’antenne.
La présente garantie ne couvre pas non plus :
• les dommages ayant pour origine une utilisation ou une maintenance défectueuse;
• la connexion à une source électrique dont la tension est inadéquate;
• toute réparation effectuée par quiconque autre qu’un service de réparation agréé par
Rocketfish pour la réparation du Produit;
• les Produits vendus en l’état ou hors service;
• les consommables tels que les fusibles ou les piles;
• les produits dont le numéro de série usine a été altéré ou enlevé.
LA RÉPARATION OU LE REMPLACEMENT, TELS QU’OFFERTS PAR LA PRÉSENTE GARANTIE,
CONSTITUENT LE SEUL RECOURS DE L’ACHETEUR. ROCKETFISH NE SAURAIT ÊTRE TENU POUR
RESPONSABLE DE DOMMAGES ACCESSOIRES OU CONSÉCUTIFS, RÉSULTANT DE L’INEXÉCUTION
D'UNE GARANTIE EXPRESSE OU IMPLICITE SUR CE PRODUIT, Y COMPRIS , SANS S’Y LIMITER, LA
PERTE DE DONNÉES, L’IMPOSSIBILITÉ D’UTILISER LE PRODUIT, L’INTERRUPTION D’ACTIVITÉ OU
LA PERTE DE PROFITS. ROCKETFISH PRODUCTS N’OCTROIE AUCUNE AUTRE GARANTIE
EXPRESSE RELATIVE À CE PRODUIT; TOUTES LES GARANTIES EXPRESSES OU IMPLICITES POUR
CE PRODUIT, Y COMPRIS MAIS SANS LIMITATION, TOUTE GARANTIE DE QUALITÉ MARCHANDE,
D'ADÉQUATION À UN BUT PARTICULIER, SONT LIMITÉES À LA PÉRIODE DE GARANTIE
APPLICABLE TELLE QUE DÉCRITE CI-DESSUS ET AUCUNE GARANTIE EXPRESSE OU IMPLICITE, NE
S’APPLIQUERA APRÈS LA PÉRIODE DE GARANTIE. CERTAINS ÉTATS ET PROVINCES NE
RECONNAISSENT PAS LES LIMITATIONS DE LA DURÉE DE VALIDITÉ DES GARANTIES IMPLICITES.
PAR CONSÉQUENT, LES LIMITATIONS SUSMENTIONNÉES PEUVENT NE PAS S'APPLIQUER À
L’ACHETEUR ORIGINAL. LA PRÉSENTE GARANTIE DONNE À L'ACHETEUR DES GARANTIES
JURIDIQUES SPÉCIFIQUES; IL PEUT AUSSI BÉNÉFICIER D'AUTRES GARANTIES QUI VARIENT D'UN
ÉTAT OU D'UNE PROVINCE À L'AUTRE.
Contacter Rocketfish :
Pour le service à la clientèle, appeler le 1-800-620-2790
www.rocketfishproducts.com
ROCKETFISHMC est une marque de commerce de Best Buy Enterprise Services, Inc.
Distribué par Best Buy Purchasing, LLC
Rocketfish, 7601 Penn Avenue South, Richfield, Minnesota, U.S.A.
56
Rocketfish RF-BTCMBO
Combo de Teclado y Ratón
Bluetooth
Contenido
Introducción....................................................................57
Características.................................................................58
Identificación de componentes ...............................59
Uso del teclado y del ratón ........................................64
Localización y corrección de fallas ..........................79
Avisos legales..................................................................80
Garantía ............................................................................83
Introducción
Felicitaciones por su compra de un combo de teclado y ratón con
tecnología Bluetooth de Rocketfish.
Esta guía explica cómo operar correctamente y obtener el mejor
rendimiento de su teclado y ratón inalámbrico. Lea esta guía del
usuario cuidadosamente antes de usar su producto y guárdela cerca
de su computadora para una referencia rápida.
RF-BTCMBO
57
Características
Contenido del paquete
Antes de comenzar a usar su teclado y ratón por la primera vez,
asegúrese de que su paquete contiene lo siguiente:
•
•
•
•
•
•
Teclado
Ratón láser
Adaptador USB para Bluetooth
Un CD de instalación
Pilas para el teclado y el ratón
Esta guía del usuario
Si algún artículo falta o está dañado, comuníquese con Rocketfish al
(800) 305-2204.
Características
Teclado y ratón láser
• Teclado
• Diseño de 104 teclas
• 10 teclas de acceso frecuente
• Un botón de conexión
• Ratón láser
• Botón rueda de desplazamiento/inclinación
• Tres botones de ratón (botones izquierdo, derecho y de enmedio)
• Cuatro teclas para multimedia
• Un botón de emparejamiento
• Modo de ahorro de energía
• Excelente rendimiento
• Rango de funcionamiento de hasta 30 pies (10 metros) con línea de
visión
• Indicador LED de estado de dos colores
58
Adaptador USB para Bluetooth
•
•
•
•
Un botón de emparejamiento
Se adhiere a la especificación Bluetooth versión 1.0 y 2.0
Soporta el teclado y el ratón
Soporta otros dispositivos con tecnología Bluetooth
Requisitos de sistema
• PC con un puerto USB
• Microsoft Windows 2000, XP o Vista
Identificación de componentes
Parte superior del teclado
6
1
2
3
4
5
Número
7
8
9
10
11
Icono
Descripción
1
Botón de inicio
2
Botón de búsqueda
3
Botón de correo electrónico
4
Botón para subir el volumen
5
Botón para bajar el volumen
RF-BTCMBO
59
Número
Icono
Descripción
6
Indicador LED de estado
7
Botón Reproducir/Pausar
8
Botón Detener
9
Botón de siguiente pista
10
Botón de pista anterior
11
Botón de silenciamiento
Parte inferior del teclado
1
60
Número
Icono
Descripción
1
Conectar
Botón de conexión
Ratón láser
1 2 3
4 5 6 7 8
9
Número
Descripción
1
2
3
4
5
6
7
8
9
Botón izquierdo
Botón Detener
Botón de pista anterior
Botón rueda de desplazamiento/inclinación
Botón Reproducir/Pausar
Botón de siguiente pista
Botón derecho
Indicador LED de estado
Botón de emparejamiento
RF-BTCMBO
61
Nota: Las teclas de acceso directo del teclado y los botones de multimedia del ratón
no están habilitados de fábrica. Para usar estas teclas y botones, necesita instalar la
pila WIDCOMM de Bluetooth según se describe en la sección “Installing the
WIDCOMM Bluetooth stack” en la página 12.
Nota: Para habilitar el desplazamiento horizontal, necesita instalar el software del
ratón Bluetooth en su computadora. Refiérase a “Installing the Bluetooth mouse
software“ en la página 17 para obtener más información.
Indicador LED de estado del teclado y el ratón
Color
Descripción
Verde
El ratón está activado, el nivel de la pila es
normal
Pila baja
Emparejamiento del ratón o teclado
Parpadeando en rojo
Parpadeando en rojo y
verde
Estado de la pila
Puede ver información más detallada sobre el estado de la pila del
teclado y el ratón.
Para ver información más detallada sobre el estado de la pila del teclado:
• Haga clic en Start (Inicio), Control Panel (Panel de control), Keyboard
(Teclado) y luego en Bluetooth.
62
Para ver información más detallada sobre el estado de la pila del ratón:
• Haga clic en Start (Inicio), Control Panel (Panel de control), Mouse
(Ratón) y luego en Bluetooth.
Para cambiar los ajustes de la alarma de pila baja:
1 En el cuadro de diálogo Keyboard Status (Estado del teclado) o en el
cuadro de diálogo Mouse Status (Estado del ratón), haga clic en el botón
Low Battery Alarm (Alarma de pila baja) para abrir el siguiente cuadro
de diálogo.
2 Cambie los ajustes de acuerdo a sus preferencias.
RF-BTCMBO
63
Uso del teclado y del ratón
Instalación de las pilas
El teclado y el ratón necesitan dos pilas alcalinas tipo AA. Siga los
siguientes pasos para instalar las pilas.
Teclado
Para instalar las pilas del teclado:
1 Quite la cubierta de las pilas, según se muestra.
64
2 Instale dos pilas tipo AA de acuerdo a las marcas de polaridad (+ y -) que
se encuentran dentro del compartimiento.
3 Vuelva a colocar la cubierta de las pilas.
RF-BTCMBO
65
Ratón láser
Para instalar las pilas del ratón láser:
1 Presione la lengüeta para liberar la cubierta de la pila y quítela.
2 Instale dos pilas tipo AA de acuerdo a la polaridad (+ y -) indicada dentro
del compartimiento.
66
3 Vuelva a colocar la cubierta de las pilas.
Instalación o desinstalación de la pila WIDCOMM de
Bluetooth
Instalación de la pila WIDCOMM de Bluetooth
Para instalar la pila WIDCOMM de Bluetooth:
1 Conecte el adaptador USB para Bluetooth en un puerto USB de su
computadora.
2 Inserte el CD de instalación suministrado en la unidad de CD o DVD. La
pila de instalación se carga automáticamente.
Nota: Si la pila de instalación no carga automáticamente, haga doble clic en
Setup.exe en la carpeta bin del CD de instalación.
La pantalla de bienvenida le presenta el proceso de instalación.
3 Siga las indicaciones de pantalla para completar el asistente WIDCOMM
Bluetooth Software.
Nota: Si aparece el mensaje “Bluetooth device not found” (No se encontró el
dispositivo Bluetooth), conecte el adaptador USB para Bluetooth en un puerto USB
disponible y haga clic en OK (Aceptar). El asistente para hardware nuevo encontrado
instalará los componentes para el adaptador USB para Bluetooth.
4 Después que el asistente termine, desconecte el adaptador y
reconéctelo. Su teclado y ratón se emparejarán automáticamente.
5 Haga clic en Finish (Finalizar) para salir del asistente de instalación.
RF-BTCMBO
67
6 En Windows 2000, se le pedirá que reinicie la computadora para que la
pila Bluetooth tome efecto. Haga clic en Yes (Sí) para reiniciar la
computadora ahora o en No para hacerlo después.
Desinstalación de la pila WIDCOMM de Bluetooth
Para desinstalar la pila WIDCOMM de Bluetooth:
1 Desconecte el adaptador USB para Bluetooth
2 En Windows Vista, haga clic en Start (Inicio), Control Panel (Panel de
control) y haga clic en Programs and Features (Programas y funciones).
En Windows 2000 o Windows XP, haga clic en Start (Inicio), Settings
(Configuración), Control Panel (Panel de control) y luego en
Add/Remove Hardware (Agregar o quitar hardware).
3 Haga clic en WIDCOMM Bluetooth Software en la lista de programas y
luego en Uninstall [Desinstalar] (Windows Vista) o Remove [Quitar]
(Windows 2000 o Windows XP). Aparece un mensaje de confirmación.
4 Haga clic en Yes (Sí) para desinstalar o en No para cancelar. Cuando se
haya desinstalado el programa, se le pedirá que reinicie la computadora.
5 Haga clic en Yes (Sí) para reiniciar la computadora ahora o en No para
hacerlo después.
68
Configuración del teclado y del ratón láser
Emparejamiento automático en el modo de arranque
Para habilitar el teclado y el ratón en el modo de arranque:
1 Con su computadora apagada, conecte el adaptador USB para Bluetooth
2
3
4
5
en un puerto USB disponible.
Deslice el interruptor de encendido del ratón para encenderlo.
Presione el botón en la parte inferior del adaptador USB para Bluetooth
hasta que el indicador LED comience a parpadear una vez por segundo.
Esto indica que el adaptador Bluetooth ha empezado a buscar un
dispositivo con el que se ha de emparejar. La conexión Bluetooth se ha
establecido.
Encienda la computadora y use el teclado para ingresar a la
configuración del BIOS.
Use el teclado y el ratón para ver el menú y configurar los ajustes.
RF-BTCMBO
69
Activación de las funciones de teclado y ratón USB en el
BIOS
Si el teclado o el ratón no funcionan, verifique que la función USB del
teclado y del ratón está activada en la configuración del BIOS.
Nota: Refiérase a “Troubleshooting” en la página 23 para obtener información
adicional sobre localización y corrección de fallas.
Para habilitar el teclado y el ratón en el BIOS:
1 Asegúrese de que se ha establecido la conexión Bluetooth antes de
encender su computadora.
2 Encienda su computadora y siga las instrucciones en pantalla para
ingresar a la configuración del BIOS.
3 Use las teclas de cursor en el teclado para navegar por los elementos del
menú y habilitar la función de teclado y ratón USB. (En algunos ajustes
del BIOS, puede usar el ratón Bluetooth para navegar por los elementos.)
Nota: Algunas computadoras antiguas no soportan un teclado o ratón USB en un
entorno de BIOS o DOS.
Emparedamiento rápido en Windows
El teclado y ratón Bluetooth han sido configurados con
pre-emparejamiento como el modo predefinido de fábrica. Para
realizar un emparejamiento rápido, habilite el modo de
pre-emparejamiento siguiendo estos pasos.
Para habilitar el modo de pre-emparejamiento:
1 Conecte el adaptador USB para Bluetooth en un puerto USB de su
computadora. La primera vez que conecte el teclado o el ratón a su
computadora, el asistente de Nuevo Hardware Encontrado (Found New
Hardware Wizard) comenzará automáticamente. Cancele el asistente y
siga estos pasos.
2 Para el ratón, presione el botón de emparejamiento en la parte inferior
del ratón.
Para el teclado, mantenga presionado el botón de conexión en la parte
posterior del teclado por dos segundos.
70
3 Presione el botón en la parte inferior del adaptador USB para Bluetooth
hasta que el indicador LED comience a parpadear una vez por segundo.
Esto indica que el adaptador Bluetooth ha empezado a buscar un
dispositivo con el que se ha de emparejar.
Botón del adaptador
USB para Bluetooth
Nota: Mientras se empareja, el indicador LED del teclado o ratón parpadeará color
rojo y verde.
Nota: Si presiona el botón de emparejamiento del ratón o el botón de conexión del
teclado, se cancelará la configuración de emparejamiento. Para reconectar el ratón o
el teclado, presione de nuevo el botón del adaptador USB para Bluetooth (Refiérase
al Paso 3).
4 Presione cualquier tecla del teclado y mueva el ratón para asegurarse de
que están conectados.
Nota: Cada vez que encienda su computadora, el teclado y el ratón se detectarán
automáticamente.
Emparejamiento usando la pila WIDCOMM de Bluetooth
Antes de usar la pila Bluetooth para el emparejamiento del teclado y
el ratón, verifique lo siguiente:
• La pila WIDCOMM para Bluetooth se encuentra instalada y está
configurada según se indica en la sección “Installing the WIDCOMM
Bluetooth stack” en la página 12.
• Las pilas están insertadas correctamente y completamente cargadas.
• El adaptador USB para Bluetooth está conectado en un puerto USB de su
computadora.
• El ratón está activado.
Nota: Para arrancar la pila Bluetooth por primera vez, refiérase a la sección “Using
the stack for the first time in Windows 2000 or Windows XP“ en la página 20 para
obtener más información.
RF-BTCMBO
71
Para emparejar usando la pila Bluetooth:
1 Presione el botón Connect (Conectar) en el ratón y el teclado para
comenzar el emparejamiento.
2 Presione el botón del adaptador Bluetooth para USB hasta que aparezca
la pantalla del dispositivo de interfaz humana (HID). Su computadora
comenzará a buscar todos los dispositivos Bluetooth.
Cuando se establezca la conexión al ratón, aparecerá este mensaje:
3 Haga clic para confirmar que se ha conectado el ratón.
72
Cuando se establezca la conexión al teclado, aparecerá esta pantalla:
4 Use el teclado emparejado para ingresar los dígitos mostrados en la
pantalla y presione Enter (Entrar). El teclado se ha conectado.
Nota: El código de seguridad de Bluetooth cambia cada vez que se conecta el
teclado.
Nota: El teclado y el ratón ingresarán al modo de ahorro de energía cuando no se
utiliza durante cierto tiempo.
Uso del software para el ratón Bluetooth
Instalación del software para el ratón Bluetooth
Para instalar el software para el ratón Bluetooth:
1 Asegúrese de que la pila WIDCOMM se ha instalado en su computadora.
2 Conecte el adaptador USB para Bluetooth en un puerto USB de su
computadora.
3 Inserte el CD de instalación suministrado en la unidad de CD o DVD. El
software arrancará automáticamente.
RF-BTCMBO
73
Nota: Si el software no carga automáticamente, haga doble clic en Setup.exe en la
carpeta bin del CD de instalación.
4 Complete el asistente Bluetooth Mouse Setup (Configuración del ratón
Bluetooth) para instalar el software del ratón Bluetooth.
5 Reinicie su computadora antes de usar el software del ratón Bluetooth.
Desinstalación del software para el ratón Bluetooth
Para desinstalar el software para el ratón Bluetooth:
1 Desconecte el adaptador USB para Bluetooth
2 En Windows Vista, haga clic en Start (Inicio), Control Panel (Panel de
control) y haga clic en Programs and Features (Programas y funciones).
En Windows 2000 o Windows XP, haga clic en Start (Inicio), Settings
(Configuración), Control Panel (Panel de control) y luego en
Add/Remove Hardware (Agregar o quitar hardware).
3 Seleccione Bluetooth Mouse en la lista de programas y luego en
Uninstall [Desinstalar] (Windows Vista) o Remove [Quitar] (Windows
2000 o Windows XP). Aparece un mensaje de confirmación.
4 Haga clic en Yes (Sí) para desinstalar o en No para cancelar.
Ajuste de la velocidad de la rueda de desplazamiento e
inclinación
Su ratón cuenta con una rueda de desplazamiento avanzada que
permite desplazar una ventana horizontalmente así como
verticalmente.
74
Para ajustar la velocidad de la rueda de desplazamiento:
1 Haga clic con el botón secundario en el icono del Ratón en la bandeja
del sistema y haga clic en Adjust Property (Ajustar propiedades). Se
abrirá el cuadro de diálogo Bluetooth Mouse Property (Propiedades del
ratón Bluetooth).
2 Para configurar la velocidad de desplazamiento vertical, seleccione uno
de los siguientes y haga clic en OK (Aceptar).
Selección
Descripción
Desplazar x líneas por cada Seleccione para configurar el número de líneas desplazadas cuando la rueda que
muesca.
se mueve una muesca. Especifique el número de líneas con las flechas hacia
arriba y abajo.
Desplace una pantalla por Seleccione para desplazar una ventana entera cuando la rueda se mueve una
cada muesca.
muesca (Re Pág/Av Pág).
3 Para configurar la velocidad de desplazamiento horizontal, mueva el
deslizador hacia Slow (Lento) o Fast (Rápido) o haga clic en Use Default
(Usar valor predefinido) para restaurar la configuración de fábrica y haga
clic en OK (Aceptar).
RF-BTCMBO
75
Uso de la pila WIDCOMM para Bluetooth
Uso de la pila por primera vez en Windows 2000 o Windows
XP
Para comenzar a usar la pila Bluetooth:
1 Haga doble clic en el icono Bluetooth en la bandeja del sistema.
Se abre el Initial Bluetooth Configuration Wizard (Asistente de
configuración inicial de Bluetooth).
2 Siga las instrucciones de pantalla para completar la configuración.
76
Una vez finalizada la configuración de Bluetooth, se abre el siguiente
cuadro de diálogo y el programa comienza a buscar dispositivos
Bluetooth.
3 Haga clic en el dispositivo HID que quiere conectar y siga las
instrucciones en pantalla para habilitar el dispositivo seleccionado.
Interpretación del icono de Bluetooth
El icono Bluetooth actúa como un indicador del estado del
adaptador.
Color del
icono
Indica
Rojo
Blanco
Verde
El adaptador no está insertado
El adaptador está conectado
El adaptador ha detectado los dispositivos
RF-BTCMBO
77
Conexión a otros dispositivos en Windows 2000 y
Windows XP
La pila Bluetooth le permite conectarse a otros dispositivos con
tecnología Bluetooth.
Para conectarse a otros dispositivos Bluetooth:
1 Compruebe que el adaptador Bluetooth para USB esté conectado en su
computadora.
2 Configure los dispositivos Bluetooth, tal como impresoras, módems y
PDAs al modo de búsqueda o emparejamiento para que el adaptador
Bluetooth los reconozca y se conecte a ellos.
3 Presione el botón en el adaptador USB para Bluetooth hasta que
aparezca la siguiente pantalla:
4 Seleccione el tipo de dispositivo que desea buscar entre los del menú
desplegable. Se muestran los dispositivos detectados.
5 Haga clic en un dispositivo y la pila le pedirá que habilite la conexión.
78
Uso de la pila en Windows Vista
Para usar la pila de Bluetooth:
1 Haga doble clic en el icono Bluetooth en la bandeja del sistema.
2
3
4
5
6
7
Se abre la pantalla de configuración de Bluetooth.
Haga clic en la ficha Devices (Dispositivos) y luego en Add (Agregar). El
asistente para agregar dispositivos Bluetooth arrancará.
Haga clic en My device is set and ready to be found (Mi dispositivo
está configurado y listo para ser encontrado) y luego en Next
(Siguiente). El sistema escaneará y mostrará todos los dispositivos
disponibles.
Seleccione el (los) dispositivo(s) que desea habilitar y haga clic en Next
(Siguiente).
Puede configurar una contraseña usted mismo o dejar que el asistente
elija una por usted.
Haga clic en Next (Siguiente) para continuar. La configuración se ha
completado.
Haga clic en Finish (Finalizar) para salir del asistente de configuración.
Localización y corrección de fallas
Si tiene algún problema con su teclado o ratón Bluetooth, revise lo
siguiente:
• Asegúrese que su sistema cumple con los requisitos de sistema de este
producto.
• Asegúrese de que las pilas en el teclado y el ratón están instaladas
correctamente. Asegúrese de que la polaridad de las pilas corresponda
con los signos de polaridad en el interior del compartimiento de las pilas
del ratón y del teclado.
• Cuando el indicador LED del ratón se ilumina color rojo, la pila tiene poca
carga. Reemplácelas inmediatamente con pilas nuevas.
RF-BTCMBO
79
• Después de instalar la pila Bluetooth en su computadora (refiérase a
“Installing the WIDCOMM Bluetooth stack” en la página 12), puede
revisar el estado de la pila del teclado y el ratón haciendo clic en Start
(Inicio), Control Panel (Panel de control), Keyboard (Teclado) y luego
Bluetooth o haga clic en Start (Inicio), Control Panel (Panel de control),
Mouse (Ratón) y luego Bluetooth.
• Si el teclado y el ratón no funcionan, verifique es estado de la función del
teclado y ratón USB en el BIOS de su sistema. Las funciones deben estar
habilitadas para el uso normal del teclado y el ratón. Para configuración
detallada, refiérase a la sección “Enabling the USB keyboard and mouse
function in BIOS“ en la página 14.
• Si la configuración del BIOS de su computadora tiene opciones para el
teclado y el ratón, asegúrese de que éstas estén configuradas en los
valores predeterminados. Si no está familiarizado con el BIOS, consulte el
manual de su computadora para obtener más información.
• Utilice el ratón únicamente sobre una superficie plana y limpia para
garantizar la acción uniforme y exacta del cursor. Si usa una almohadilla
para ratón, escoja una de un color claro, no uno oscuro, para consumir
menos carga de la pila.
• Si necesita ayuda con cualquier otra pregunta que pueda tener, póngase
en contacto con Rocketfish al (800) 305-2204 para recibir asistencia
técnica.
Avisos legales
FCC Parte 15
Este dispositivo satisface la parte 15 del reglamento FCC. La
operación de este producto está sujeta a las dos condiciones
siguientes: (1) Este dispositivo no puede causar interferencia dañina,
y (2) este dispositivo debe aceptar cualquier interferencia recibida
incluyendo interferencias que puedan causar una operación no
deseada.
80
Este equipo ha sido sometido a prueba y se ha determinado que
satisface los límites establecidos para ser clasificado cómo dispositivo
digital de la Clase B de acuerdo con la Parte 15 del reglamento FCC.
Estos límites están diseñados para proporcionar una protección
razonable contra interferencias dañinas en un ambiente residencial.
Este equipo genera, usa y puede emitir energía de radiofrecuencia, y
si no se instala y usa de acuerdo con las instrucciones, puede causar
interferencias perjudiciales a las comunicaciones de radio. Sin
embargo, no se garantiza que no ocurrirá interferencia en una
instalación particular. Si este equipo causa interferencias
perjudiciales en la recepción de la señal de radio o televisión, lo cual
puede comprobarse encendiendo y apagando el reproductor
alternativamente, se recomienda al usuario corregir la interferencia
mediante uno de los siguientes procedimientos:
• Cambie la orientación o la ubicación de la antena receptora.
• Aumente la distancia entre el equipo y el receptor.
• Conecte el equipo a un tomacorriente de un circuito distinto de aquel al
que está conectado el receptor.
• Solicite consejo al distribuidor o a un técnico calificado para obtener
ayuda.
Advertencia de la FCC
Cualquier cambio o modificación que no esté aprobado
expresamente por la parte responsable por el cumplimiento con el
reglamento de FCC puede anular la autoridad del usuario para operar
el equipo.
Certificación de seguridad de DHHS y FDA
Este reproductor está hecho y probado para cumplir con los
estándares de seguridad de los requisitos del FCC y con el
rendimiento de seguridad del Departamento Estadounidense de
Salud y Servicios Humanos, y también con los estándares de
rendimiento de radiación del FDA 21 CFR, subcapítulo J.
Declaración del ICES-003 de Canadá
Este aparato digital de Clase B cumple con el ICES-003 canadiense.
RF-BTCMBO
81
Declaración RSS 310
Para reducir el potencial de interferencia de radio a otros usuarios, el
tipo de antena y su ganancia deben ser elegidos de tal forma que la
potencia radiada equivalente (EIRP) no sea más que la permitida para
una comunicación exitosa.
Derechos de reproducción
© 2007 Rocketfish. Rocketfish y el logotipo de Rocketfish son marcas
comerciales de Best Buy Enterprise Services, Inc. Otras marcas y
nombres de productos son marcas comerciales o marcas registradas
de sus respectivos dueños. Las especificaciones y características
están sujetas a cambio sin aviso previo u obligación.
Para reparación y soporte llamar al (800) 305-2204.
82
Garantía
Garantía limitada de un año
Rocketfish Products (“Rocketfish”) le garantiza a usted, el comprador original de este nuevo
RF-BTCMBO (“Producto”), que éste se encontrará libre de defectos de material o de mano de
obra en su fabricación original por un periodo de un (1) año a partir de la fecha de compra del
Producto (“Período de Garantía”). Este Producto debe ser comprado en un distribuidor
autorizado de productos de la marca Rocketfish y empacado con esta declaración de garantía.
Esta garantía no cubre Productos reacondicionados. Si notifica a Rocketfish durante el Período
de Garantía sobre un defecto cubierto por esta garantía que requiere reparación, los términos
de esta garantía se aplican.
¿Cuánto dura la garantía?
El Período de Garantía dura por un año (365 días) a partir de la fecha en que compró el
Producto. La fecha de compra se encuentra impresa en el recibo que recibió con el producto.
¿Qué es lo que cubre esta garantía?
Durante el Período de Garantía, si un centro de reparación autorizado de Rocketfish concluye
que la fabricación original del material o la mano de obra del Producto se encuentran
defectuosos Rocketfish (cómo su opción exclusiva): (1) reparará el Producto con repuestos
nuevos o reacondicionados; o (2) reemplazará el Producto con uno nuevo o con uno
reacondicionado con repuestos equivalentes. Los Productos y repuestos reemplazados bajo
esta garantía se volverán propiedad de Rocketfish y no se le regresarán a usted. Si se requiere la
reparación de Productos y partes después de que se vence el Período de Garantía, usted deberá
pagar todos los costos de mano de obra y de repuestos. Esta estará vigente con tal que usted
sea el dueño de su Producto Rocketfish durante el periodo de garantía. El alcance de la garantía
se termina si usted vende o transfiere el producto.
¿Cómo se obtiene la reparación de garantía?
Si ha comprado el Producto en una tienda de ventas, lleve su recibo original y el Producto a la
tienda en donde lo compró. Asegúrese de que vuelva a colocar el Producto en su empaque
original o en un empaque que provea la misma protección que el original. Si compró el
Producto en un sitio Web, envíe por correo su recibo original y el Producto a la dirección postal
listada en el sitio Web. Asegúrese de colocar el Producto en su empaque original o en un
empaque que provea la misma protección que el original.
¿En dónde es válida la garantía?
Esta garantía sólo es válida al comprador original del Producto en los Estados Unidos y en
Canadá.
¿Qué es lo que no cubre la garantía?
Esta garantía no cubre:
• Capacitación del cliente
RF-BTCMBO
83
• Instalación
• Ajuste de configuración
• Daños cosméticos
• Daños debido a actos de la naturaleza, tal cómo rayos
• Accidentes
• Mal uso
• Abuso
• Negligencia
• Uso comercial
• Modificación de alguna parte del Producto, incluyendo la antena
Esta garantía tampoco cubre:
• Daño debido al uso o mantenimiento incorrecto
• La conexión a una fuente de voltaje incorrecta
• El intento de reparación por alguien que no sea una compañía autorizada por Rocketfish
para reparar el Producto
• Productos vendidos tal cual (en el estado en que se encuentran) o con todas sus fallas
• Productos consumibles, tal cómo fusibles o baterías
• Productos en los cuales el número de serie asignado en la fábrica ha sido alterado o
removido.
EL REEMPLAZO DE REPARACIÓN SEGÚN PROVISTO BAJO ESTA GARANTÍA ES SU ÚNICO
RECURSO. ROCKETFISH NO SERÁ RESPONSABLE POR DAÑOS INCIDENTALES O CONSECUENTES
DEBIDO AL INCUMPLIMIENTO DE CUALQUIER GARANTÍA EXPRESA O IMPLÍCITA RELACIONADA
CON ESTE PRODUCTO, INCLUYENDO, PERO SIN LIMITARSE A ELLO, PÉRDIDA DE DATOS,
IMPOSIBILIDAD DE USO DE SU PRODUCTO, PÉRDIDA DE NEGOCIO O LUCRO CESANTE.
ROCKETFISH NO CONCEDE NINGUNA OTRA GARANTÍA EXPRESA CON RESPECTO AL
PRODUCTO; TODAS LAS GARANTÍAS EXPRESAS E IMPLÍCITAS DE ESTE PRODUCTO,
INCLUYENDO PERO SIN LIMITARSE A, CUALQUIER GARANTÍA IMPLÍCITA DE O CONDICIONES DE
COMERCIALIZACIÓN O IDONEIDAD PARA UN USO PARTICULAR, ESTÁN LIMITADAS EN
DURACIÓN AL PERÍODO DE GARANTÍA DECLARADO ANTERIORMENTE Y NINGUNA GARANTÍA
YA SEA EXPRESA O IMPLÍCITA SE APLICARÁ DESPUÉS DEL PERÍODO DE GARANTÍA. ALGUNOS
ESTADOS, PROVINCIAS Y JURISDICCIONES NO PERMITEN RESTRICCIONES EN CUANTO A LA
DURACIÓN DE UNA GARANTÍA IMPLÍCITA, ASÍ QUE LA RESTRICCIÓN ANTERIOR PUEDE NO
APLICARSE EN SU CASO. ESTA GARANTÍA LE DA DERECHOS LEGALES ESPECÍFICOS, Y USTED
PUEDE POSEER OTROS DERECHOS QUE VARÍAN DE ESTADO A ESTADO, O DE PROVINCIA A
PROVINCIA.
Comuníquese con Rocketfish:
Para servicio al cliente favor llamar al 1-800-620-2790
www.rocketfishproducts.com
ROCKETFISH™ es una marca comercial de Best Buy Enterprise Services, Inc.
Distribuido por Best Buy Purchasing, LLC
Rocketfish, 7601 Penn Avenue South, Richfield, Minnesota, U.S.A.
84
RF-BTCMBO
85