1
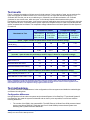
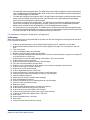
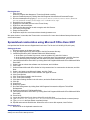
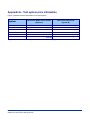
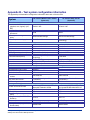
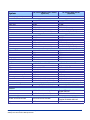
TEST REPORT
APRIL 2008
Performance comparison of two desktop PCs
with Intel and AMD processors
Executive summary
Intel Corporation (Intel) commissioned Principled
Technologies (PT) to run a set of performance tests on the
following desktop systems in their out-of-the-box (OOB)
configurations:
•
•
an AMD Phenom X4 Quad-Core 9500 2.20GHz
desktop processor-based system (which we will
refer to as System A)
an Intel Core 2 Quad Q6600 2.40GHz desktop
processor-based system (which we will refer to as
System B)
The goal of the testing was to gauge the performance of
each system. Intel specified the test systems and provided
the tests, test procedures, and test settings. PT set up the
systems (purchased from Best Buy) and executed all
tests. At Intel’s request, we refer to the systems as
System A and System B for the bulk of the report. See
Appendixes A and B for more details on the exact
systems.
Key findings
z
In industry-standard benchmarks, the Intel
Core 2 Quad Q6600 processor-based
system performed 17 percent to 30 percent
better than the AMD Phenom X4 Quad-Core
9500 processor-based system.
z
In custom consumer applications tests, the
Intel Core 2 Quad Q6600 processor-based
system performed 59 percent to 113 percent
better than the AMD Phenom X4 Quad-Core
9500 processor-based system.
z
In two game benchmarks, the Intel Core 2
Quad Q6600 processor-based system
performed 3 percent and 5 percent better
than the AMD Phenom X4 Quad-Core 9500
processor-based system.
We measured system performance using the following industry-standard benchmarks:
•
•
•
BAPCo SYSmark 2007 Preview v1.02
FutureMark 3DMark06 CPU v1.10
Maxon CineBench R10
We also ran the following four custom consumer application tests that simulate tasks a typical user would
perform:
•
•
•
Music ripping—one test that uses Apple iTunes 7.6 to rip a .wav music file to mp3 format
Photo editing—two tests: one that automatically “smart fixes” a group of 50 digital photos using Adobe
Photoshop Elements 6.0 and one that prints 125 digital photos to a Microsoft XPS contact sheet using
Microsoft Photo Gallery
Spreadsheet recalculation—one test that uses Microsoft Office Excel* 2007 to recalculate a
spreadsheet
Finally, we measured gaming performance using the following game benchmarks:
•
•
Relic Company of Heroes v.1.71
Valve Half-Life 2: Lost Coast v.2707
The system with the Intel Core 2 Quad Q6600 processor ran faster on all the tests than the system with the AMD
Phenom X4 Quad-Core 9500 processor.
The Test results section provides greater detail about the Key findings above, while the Test methodology section
explains how we ran the tests. Appendix A provides the price of the test systems and Appendix B details their
configurations.
Test results
Figure 1 presents the medians of all test scores for both systems. For the majority of tests, we ran each test five
times and reported the median of those runs. In an event of a tie, we chose the first chronological run. For
SYSmark 2007 Preview, we ran one conditioning run, followed by an official three-iteration run. SYSmark
generates its own overall score, which we report. In the industry-standard benchmarks and the game
benchmarks, higher scores are better. In the custom consumer application tests, lower scores are better, because
they represent the time, in seconds, that the system required to complete the test. A lower time indicates that the
system completed the work faster. The comparative ratings indicate how much faster System B is than System A
on each test.
Performance results
Comparative ratings
System A
System B
System A
System B
Benchmark or Test
AMD Phenom
Intel Core 2
AMD Phenom
Intel Core 2
X4 Quad-Core
Quad Q6600
X4 Quad-Core
Quad Q6600
9500 2.20 GHz
2.40 GHz
9500 2.20 GHz
2.40 GHz
Industry-standard benchmarks
(score – higher is better for performance results and comparative ratings)
BAPCo SYSmark 2007 Preview
111
144
1.00
1.30
overall rating
FutureMark 3DMark06 CPU score
2,960
3,471
1.00
1.17
CineBench Multiple CPU Render
Test
6,955
8,517
1.00
1.22
Custom consumer application tests
(seconds – lower is better for performance results; higher is better for comparative ratings)
Adobe Photoshop Elements 6.0
370
174
1.00
2.13
Apple iTunes 7.6
121
76
1.00
1.59
Microsoft Office 2007 Excel
13
7
1.00
1.86
Microsoft Windows Photo Gallery
47
28
1.00
1.68
Game benchmarks
(frames per second – higher is better for performance results and comparative ratings)
Relic Company of Heroes v. 1.71
37
38
1.00
1.03
Valve Half-Life 2: Lost Coast v. 2707
58
61
1.00
1.05
Figure 1: Performance results and comparative performance ratings for the test systems. In the performance results of the
industry-standard benchmarks and game benchmarks, higher numbers are better. For the custom consumer application tests,
lower numbers are better. For all comparative ratings, higher numbers are better.
Test methodology
This section discusses some differences in the configurations of the test systems and details the methodologies
we followed in testing them.
Configuration differences
Intel specified the built-to-order test systems and purchased System A from Best Buy. PT purchased System B
from Best Buy. We made the systems as identical and as close in price as possible, but could not avoid the
following differences:
•
The vendors of the RAM in the systems differ. The AMD Phenom X4 Quad-Core 9500 processor-based
system uses Micron DDR2-667, while the Intel Core 2 Quad Q6600 processor-based system uses
Samsung and Hyundai Electronics DDR2-667.
Principled Technologies, Inc.: Performance comparison of two
desktop PCs with Intel and AMD processors
2
•
•
•
•
The hard disk vendors and sizes differ. The AMD Phenom X4 Quad-Core 9500 processor-based system
uses a 320GB Hitachi HDT725032VLA380, while the Intel Core 2 Quad Q6600 processor-based system
uses a 360GB Seagate ST3360320AS.
The hard disk controllers in the systems differ. The AMD Phenom X4 Quad-Core 9500 processor-based
system uses the NVIDIA nForce 430 controller, while the Intel Core 2 Quad Q6600 processor-based
system uses the Intel 82801IR (ICH9R) controller.
The network controllers in the systems differ. The AMD Phenom X4 Quad-Core 9500 processor-based
system uses the NVIDIA nForce Networking controller, while the Intel Core 2 Quad Q6600 processorbased system uses the Realtek RTL8168C/8111C PCI-E Gigabit Ethernet controller.
The optical drives in the systems differ. The AMD Phenom X4 Quad-Core 9500 processor-based system
has a Lite-On DH16A3L DVD-RW drive, while the Intel Core 2 Quad Q6600 processor-based system has
a Lite-On GSA-H60L DVD-RW and a Toshiba SD-H802A HD-DVD drive.
For more details on the system configurations, see Appendix B.
Initial setup
When the systems arrived, we unpacked and set up each one. We went through the following process with each
PC the first time we booted it:
1. At the Set up Windows screen, select United States, English and U.S. keyboard, and click Next.
2. At the Microsoft and Manufacturer End User License Agreements, select Yes, I accept them, and click
Next.
3. Type a user name.
4. Leave the password blank, and click Next.
5. Name the computer with its model, and click Next.
6. At the Help protect Windows automatically screen, click Ask me later (because our goal is to test each PC
as it came directly out of the box).
7. At the Review your time and date settings, select Eastern Time, and click Next.
8. At the Thank you screen, click Start.
9. At the manufacturer’s registration screen, and click Begin.
10. Fill in the required information and click Next.
11. Select No, I am not interested in alerts, and No, I do not want to participate, and click Next.
12. At the Connect Your PC screen, click Next.
13. Select Keep my ISP, and click Next.
14. At the Congratulations screen, click Finish.
15. At the manufacturer’s Total Care Advisor screen, click Preferences.
16. Uncheck Launch Advisor automatically on start-up, and click Apply.
17. Click the Update Preference.
18. Select Never to check for updates, and click Apply.
19. Click the Messaging Preference.
20. Uncheck I would like to receive updates and tools, and click Apply.
21. Close the Total Care Advisor screen.
22. Reboot the system.
23. At the Windows Welcome screen, uncheck Run at startup.
24. At the Norton Internet Security screen, click Next.
25. At the User Account Control dialog, click Continue.
26. At the License Agreement screen, select I agree, and click Next.
27. At the 60 day Subscription Status screen, click Next.
28. Click Finish.
29. At the LiveUpdate screen, click Next.
30. Click Finish.
31. Close the Norton Internet Security Console.
Principled Technologies, Inc.: Performance comparison of two
desktop PCs with Intel and AMD processors
3
Capturing an image of the hard drive
We used Symantec’s Ghost product to capture an exact image of the hard disk to a DVD using the internal DVDRW drive. Each time we ran a new benchmark or test on a machine, we used the Ghost image DVD to return that
machine to the above configuration. After re-imaging, we installed the software necessary to run each test and
rebooted. We followed this process to capture the image:
1.
2.
3.
4.
5.
6.
7.
8.
9.
10.
11.
12.
13.
14.
15.
16.
17.
Restart the computer.
Insert a bootable Ghost CD.
Click Enter to boot with CD-ROM support.
At the DOS command prompt, type d:, and click Enter.
Type cd ghost, and click Enter.
Type ghost, and click Enter.
At the Symantec Ghost screen, click OK.
Select LocalÆPartitionÆTo Image.
Click OK.
Select the Primary partition, and click OK.
From the drop-down menu, select the DVD-RW drive.
Click Save.
At the Compress Image dialog, select Fast.
At the Make the CD/DVD disc bootable dialog, select No.
At the Proceed dialog, select Yes.
When the ghost image is complete, click OK, and exit Ghost.
Reboot the computer.
We performed the following steps to set up and run the following tests:
BAPCo SYSmark 2007 Preview v1.02
With one exception, we attempted to run all tests on each system in its out-of-box state. When installing SYSmark
2007 on both systems, we encountered an install warning message. To get around this issue, we uninstalled
Microsoft Office 2007. We also uninstalled Microsoft Visual C++ 2005 Redistributable prior to installing SYSmark
2007 because of problems we have had with these two programs in the past.
Principled Technologies, Inc.: Performance comparison of two
desktop PCs with Intel and AMD processors
4
Figure 2: SYSmark 2007 Office 2007 install warning message.
Setting up the test
1. Reset the system to the base test image.
2. Disable the User Account Control.
a. Click StartÆControl Panel.
b. Under the User Accounts and Family Safety settings, click Add or remove user account.
c. In the pop-up User Account Control dialog, click Continue.
d. Click Go to the main User Accounts page.
e. Under Make changes to your user account, click Turn User Account Control on or off.
f. In the pop-up User Account Control dialog, click Continue.
g. Uncheck Use User Account Control to help protect your computer, and click OK.
h. In the pop-up You must restart your computer to apply these changes dialog, click Restart Now.
3. Purchase and install SYSmark 2007 Preview v1.03 from
https://www.bapcostore.com/store/product.php?productid=16165&cat=251&page=1
4. At the Welcome to InstallShield Wizard screen, click Next.
5. At the License Agreement screen, select I accept the terms in the License Agreement, and click Next.
6. At the Choose Destination Location screen, click Next.
7. At the Ready to Install the Program screen, click Install.
8. When the installation is complete, click Finish.
Running the test
1. Launch SYSmark 2007 Preview by double-clicking the desktop icon.
2. Click Run on the left side.
3. Select Official Run, choose 3 Iterations, check the box next to run conditioning run, and enter a name for
that run.
4. When the benchmark completes and the main SYSmark 2007 Preview menu appears, click Save FDR to
create a report.
5. Record the results for each iteration.
Principled Technologies, Inc.: Performance comparison of two
desktop PCs with Intel and AMD processors
5
FutureMark 3DMark06 v1.10
Setting up the test
1. Reset the system to the base test image.
2. Purchase and download 3DMark06 Advanced from
http://shop.futuremark.com/shop/product.jsp?pid=72031
3. Double-click the 3DMark06 install file.
4. In the User Account Control dialog, click Continue.
5. At the Welcome to the InstallShield Wizard dialog, click Next.
6. At the License Agreement dialog, select I accept the terms in the License Agreement, and click Next.
7. At the Destination screen, click Next.
8. At the installation screen, click Install.
9. In the OpenAL Installer pop-up window, click OK.
10. In the OpenAL installation complete pop-up window, click OK.
11. At the Futuremark Registration screen, enter the registration code in the registration code field, and click
Next.
12. In the Congratulations pop-up window, click OK.
13. At the InstallShield Wizard Complete window, uncheck the View Readme box, and click Finish.
14. Reboot the system.
15. Run Disk Defragmenter by clicking StartÆAll ProgramsÆAccessoriesÆSystem ToolsÆDisk
Defragmenter.
16. Delete the contents of C:\Windows\Prefetch.
17. Launch 3DMark06 by double-clicking the 3DMark06 desktop icon.
18. Check the Do not show this dialog again box in the Tip of the Day dialog, and click Close.
19. Under Tests, click Select.
20. In the Select Tests window, uncheck SM2.0 Graphics Tests and HDR.SM3.0 Graphics Tests, and click
OK.
21. Type rundll32.exe advapi32.dll,ProcessIdleTasks in the Start Search command prompt.
22. Type perfmon in the Start Search command prompt.
23. Expand and watch the Disk Monitor. When there are no more disk requests, close Perfmon.
Running the test
1. Click Run 3DMark.
2. After the benchmark finishes, click Save as… in the Score pop-up window.
3. Name the file, and click Save.
4. Close 3DMark06.
5. Repeat the steps four more times without rebooting between runs.
Maxon CineBench R10
Setting up the test
1. Reset the system to the base test image.
2. Download CINEBENCH from http://www.maxon.net/pages/download/cinebench_e.html
3. Right-click the CINEBENCH zip file, and choose Extract All.
4. Click Extract.
5. Reboot the system.
6. Run Disk Defragmenter by clicking StartÆAll ProgramsÆAccessoriesÆSystem ToolsÆDisk
Defragmenter.
7. Delete the contents of C:\Windows\Prefetch.
8. Launch CINEBENCH R10 by double-clicking the CINEBENCH R10.exe file in the CINEBENCH R10
folder.
9. Enter the MHz frequency of the processor in the MHz (real freq.) field.
10. Enter a name in the Tester field.
11. Type rundll32.exe advapi32.dll,ProcessIdleTasks in the Start Search command prompt.
12. Type perfmon in the Start Search command prompt.
13. Expand and watch the Disk Monitor. When there are no more disk requests, close Perfmon.
Principled Technologies, Inc.: Performance comparison of two
desktop PCs with Intel and AMD processors
6
Running the test
1. Click Start all tests.
2. When the test finishes rendering the picture in multi-processor mode, record the Rendering (1 CPU),
Rendering (x CPU), Multiprocessor Speedup, and Open GL Benchmark results.
3. Close CINEBENCH R10.
4. Repeat the steps four more times without rebooting between runs.
Photo editing test using Adobe Photoshop Elements 6.0
Intel provided the Photos workload, which contains the 103 .JPG images this test uses. These files have the
following key characteristics:
•
•
Average resolution: 2,048 x 1,536
Workload size: 60.3 MB (63,262,990 bytes)
A stopwatch is necessary for this test.
Setting up the test
1. Reset the system to the base test image.
2. Purchase Adobe Photoshop Elements 6.0 from http://www.adobe.com/products/photoshopelwin/, and
install with default settings:
a. At the Welcome to the InstallShield Wizard screen, click Next.
b. At the License Agreement screen, leave English as the language, and click Accept.
c. At the Customer Information screen, leave User Name as User, Organization blank, enter the serial
number, and click Next.
d. At the Destination Folder screen, leave the default, and click Next.
e. At the Ready to Install the Program screen, click Install.
f. When a screen appears indicating that the installation was successful, click Finish.
3. Launch Photoshop Elements 6.0 from the desktop icon.
4. Click Organize.
5. At the Photoshop Elements Organizer dialog, click No.
6. At the Register Photoshop Elements screen, click Register Later.
7. Exit Photoshop Elements.
8. Copy the Photos workload directory to Documents.
9. Reboot the system.
10. Run Disk Defragmenter by clicking StartÆAll ProgramsÆAccessoriesÆSystem ToolsÆDisk
Defragmenter.
11. Delete the contents of C:\Windows\Prefetch.
12. Launch Photoshop Elements by double-clicking the desktop icon.
13. Click Organize.
14. From the top menu, click FileÆGet PhotosÆFrom Files and Folders.
15. Browse to the Photos workload directory, select it, and click Open.
16. Click the first .JPG, and press Ctrl-A to select all photos.
17. Uncheck Automatically Fix Red Eyes, and click Get Photos.
18. At the Adobe Photoshop Elements screen, click OK.
19. Click the first .JPG, and press Ctrl-A to select all photos.
20. Type rundll32.exe advapi32.dll,ProcessIdleTasks in the Start Search command prompt.
21. Type perfmon in the Start Search command prompt.
22. Expand and watch the Disk Monitor. When there are no more disk requests, close Perfmon.
Running the test
1. Prepare the stopwatch.
2. Do the following two things simultaneously:
a. Press Ctrl-Alt-M to run the Auto Smart Fix Selected Photos function.
b. Start the stopwatch.
A progress dialog appears.
Principled Technologies, Inc.: Performance comparison of two
desktop PCs with Intel and AMD processors
7
3. When Photoshop Elements has finished fixing all the photos and the progress dialog disappears, stop the
stopwatch.
4. Record the elapsed time on the stopwatch.
5. Delete the all the edited .JPG images from the Photos workload directory.
6. Empty the Recycle Bin.
7. Repeat the steps four more times without rebooting between runs.
We report the time, in seconds, that Photoshop Elements 6.0 took to auto smart fix the images. Lower times
indicate faster performance and are therefore better.
Music ripping test using Apple iTunes 7.6
Intel provided the file this test uses, newAudioTest.wma, and specified the test methodology. The file has the
following key characteristics:
•
•
Length (hh:mm:ss): 01:01:24
Size: 56.5 MB (59,287,245 bytes)
Setting up the test
1. Reset the system to the base test image.
2. Copy the newAudioTest.wma file to the Music directory.
3. Download and install iTunes 7.6 with the following settings from http://www.apple.com/itunes/download/.
a. At the Welcome to the InstallShield Wizard screen, click Next.
b. At the License Agreement screen, select I accept the terms in the license agreement, and click Next.
c. At the Choose iTunes Installer Options screen, uncheck Automatically update iTunes, QuickTime,
and other Apple software, and click Install.
d. At the Congratulations screen, click Finish.
e. At the License Agreement screen, click Agree.
f. At the Welcome to iTunes screen, click Next.
g. At the Find Music Files screen, uncheck both the Add MP3 and AAC files option and the Add WMA
files option, and click Next.
h. At the Keep iTunes Music Folder Organized screen, select No, I’ll change the file and folder names
myself, and click Next.
i. At the Download Album Artwork screen, click Next.
j. At the iTunes Music Store screen, select No, take me to my iTunes Library, and click Finish.
k. From the top menu, click EditÆPreferences.
l. Click the Advanced tab.
m. Click the Importing tab.
n. From the Import Using drop-down menu, select MP3 Encoder.
o. Uncheck Play songs while importing or converting.
p. Uncheck Create filenames with track number.
q. Click OK.
r. Exit iTunes.
4. Reboot the system.
5. Run Disk Defragmenter by clicking StartÆAll ProgramsÆAccessoriesÆSystem ToolsÆDisk
Defragmenter.
6. Delete the contents of C:\Windows\Prefetch.
7. Launch iTunes by double-clicking the desktop icon.
8. From the top menu, click FileÆAdd File to Library.
9. Browse to the newAudioTest.wma test file, select it, and click Open.
10. Leave the iTunes Convert dialog open.
11. Type rundll32.exe advapi32.dll,ProcessIdleTasks in the Start Search command prompt.
12. Type perfmon in the Start Search command prompt.
13. Expand and watch the Disk Monitor. When there are no more disk requests, close Perfmon.
Principled Technologies, Inc.: Performance comparison of two
desktop PCs with Intel and AMD processors
8
Running the test
1. Click Convert.
When the progress bar disappears, iTunes has finished encoding.
2. Open a command prompt by clicking StartÆAll ProgramsÆAccessoriesÆCommand Prompt.
3. Run the timestamps.exe by typing C:\Users\User\Music\iTunes\iTunes Music\Unknown
Artist\Unknown Album\timestamps.exe newAudioTest.mp3.
4. Record the time in seconds.
5. Highlight the newAudioTest item in the iTunes Library.
6. Right-click, and select Delete.
7. Check the box that says Do not ask me again, and click Remove.
8. Click Move to Recycle Bin.
9. Empty the Recycle Bin.
10. Repeat the steps four more times without rebooting between runs.
We report the time, in seconds, that iTunes took to convert the file. Lower times indicate faster performance and
are therefore better.
Spreadsheet recalculation using Microsoft Office Excel 2007
Intel provided the file this test uses: BigNumberCrunch.xlsm. The file size is 6.24 MB (6,543,413 bytes).
Setting up the test
1. Reset the system to the base test image.
2. Copy the BigNumberCrunch.xlsm test file to the My Documents directory.
3. Install Microsoft Office 2007 Ultimate Edition with default settings:
a. At the Enter your Product Key screen, enter the product key, and click Continue.
b. At the License Agreement screen, select I accept the terms of this agreement, and click Continue.
c. At the Microsoft Office Ultimate 2007 has been successfully installed screen, click Close.
4. Launch Microsoft Office Excel 2007 by clicking StartÆAll ProgramsÆMicrosoft OfficeÆMicrosoft Office
Excel 2007.
5. Select I want to activate the software over the Internet, and click Next.
6. Click Finish.
7. Uncheck Search Microsoft Office Online for Help content when I’m connected to the Internet, and click
Next.
8. Select I don’t want to use Microsoft Update, and click Finish.
9. Click on the Microsoft Office button located in the upper left corner.
10. Click Excel Options.
11. Click Trust Center located in the left column.
12. Click Trust Center Settings.
13. Click Macro Settings located in the left column, and select Enable all macros.
14. Click OK.
15. Close Excel.
16. Reboot the system.
17. Run Disk Defragmenter by clicking StartÆAll ProgramsÆAccessoriesÆSystem ToolsÆDisk
Defragmenter.
18. Delete the contents of C:\Windows\Prefetch.
19. Launch Microsoft Office Excel 2007 by clicking StartÆAll ProgramsÆMicrosoft OfficeÆMicrosoft Office
Excel 2007.
20. Press Ctrl-O.
21. Locate the BigNumberCrunch.xlsm workload file, and click Open.
22. Type rundll32.exe advapi32.dll,ProcessIdleTasks in the Start Search command prompt.
23. Type perfmon in the Start Search command prompt.
24. Expand and watch the Disk Monitor. When there are no more disk requests, close Perfmon.
Running the test
1. Press Ctrl-R on the keyboard to start the test.
Principled Technologies, Inc.: Performance comparison of two
desktop PCs with Intel and AMD processors
9
2. Record the results, and click OK.
3. Close Excel, and click No to saving the changes you made to the file.
4. Repeat the steps four more times without rebooting between runs.
We report the time, in seconds, that iTunes took to convert the file. Lower times indicate faster performance and
are therefore better.
Printing a contact sheet using Windows Photo Gallery
Intel provided the Photos workload, which contains the 125 .JPG images this test uses. These files have the
following key characteristics:
•
•
Average resolution: 3,872 x 2,592
Workload size: 642 MB (673,682,845 bytes)
Note: Because Microsoft packages Windows Photo Gallery with Windows Vista operating systems, you do not
need to install it.
Setting up the test
1. Reset the system to the base test image.
2. Copy the Photos workload to the C: drive.
3. Reboot the system.
4. Run Disk Defragmenter by clicking StartÆAll ProgramsÆAccessoriesÆSystem ToolsÆDisk
Defragmenter.
5. Delete the contents of C:\Windows\Prefetch.
6. Launch Photo Gallery by clicking StartÆAll ProgramsÆWindows Photo Gallery.
7. Right-click Folders, located in the left column.
8. Select Add folder to Gallery.
9. Browse to the Photos workload, and click OK.
10. At the This folder has been added to your Gallery dialog, check Don’t show this message again, and click
OK.
11. Make sure that the Photos workload is selected in the left column, so that the 125 .JPG images are
displayed.
12. Press Ctrl-A to select all 125 .JPG images.
13. Press Ctrl-P to open the print options screen.
14. In the right column, scroll down and select Contact sheet (35).
15. Adjust settings to match the following:
• Printer: Microsoft XPS Document Writer
• Paper size: Letter
• Quality size: 600 x 600 dots per inch
16. Click Print.
17. Enter a name for the result file and choose the C: drive as the location to save the file.
18. Leave the Photo Gallery Save dialog open.
19. Type rundll32.exe advapi32.dll,ProcessIdleTasks in the Start Search command prompt.
20. Type perfmon in the Start Search command prompt.
21. Expand and watch the Disk Monitor. When there are no more disk requests, close Perfmon.
Running the test
1. Click Save. Photo Gallery has finished printing when the progress bar disappears.
2. Open a command prompt by clicking StartÆAll ProgramsÆAccessoriesÆCommand Prompt.
3. Run the timestamps.exe by typing cd\, and then type timestamps.exe <result file name>.xps.
4. Record the time in seconds.
5. Repeat the steps four more times without rebooting between runs.
We report the time, in seconds, that Photo Gallery took to print the contact sheet file. Lower times indicate faster
performance and are therefore better.
Principled Technologies, Inc.: Performance comparison of two
desktop PCs with Intel and AMD processors
10
Relic Company of Heroes v.1.71
Setting up the test
1. Insert the Company of Heroes DVD into the system’s optical drive.
2. At the Company of Heroes screen, click Install.
3. At the Welcome to the Installation Wizard for Company of Heroes, click Next.
4. At the License Agreement screen, select I accept the terms in the license agreement, and click Next.
5. At the Product Key screen, enter the product key, and click Install.
6. When the installation is complete, Company of Heroes automatically runs. Click Exit.
7. Click Yes.
8. Install the latest patches:
a. Download the latest patch from http://www.companyofheroesgame.com/
b. Double-click the patch install file.
c. In the Company of Heroes Patch screen, click Continue.
d. At the License Agreement screen, select the I accept the terms in the license agreement, and click
Continue.
e. When the patch has finished installing, close the release notes, and click Finish.
f. Repeat these steps for each patch until the game is up to date.
9. Create a desktop shortcut to the game:
a. Navigate to C:\Program Files\THQ\Company of Heroes.
b. Right-click on the .exe file named RelicCOH, select Send To, and then select Desktop (create
shortcut) from the menu that appears.
10. Right-click the desktop icon, and select Properties.
11. In the Target field add –novsync to the end of the command line.
12. Launch the game by double-clicking the desktop icon.
13. Click Options.
14. Click the Graphics tab.
15. In the Graphics tab use the following settings:
• Resolution: third notch
• Brightness: third notch
• Shader Quality: High
• Model Quality: High
• Anti-aliasing: Disabled
• Texture Detail: Medium
• Shadows: Medium
• Options: High
• Post Processing: Off
• Building Detail: High
• Physics: High
• Tree Quality: Medium
• Terrain Detail: Medium
• Effects Fidelity: Medium
• Effects Density: High
• Rain Detail: Low
• Object Scarring: Off
• Model Detail: fourth notch
16. Click Accept.
17. Click Exit.
18. Click Yes.
19. Reboot the system.
20. Run Disk Defragmenter by clicking StartÆAll ProgramsÆAccessoriesÆSystem ToolsÆDisk
Defragmenter.
21. Delete the contents of C:\Windows\Prefetch.
Principled Technologies, Inc.: Performance comparison of two
desktop PCs with Intel and AMD processors
11
22. Type rundll32.exe advapi32.dll,ProcessIdleTasks in the Start Search command prompt.
23. Expand and watch the Disk Monitor. When there are no more disk requests, close Perfmon.
Running the test
1. Launch Company of Heroes by double-clicking the desktop icon.
2. Click Options.
3. Click the Graphics tab.
4. Click Performance Test.
5. When the test completes, record the Average, Maximum, and Minimum frame rates.
6. Click Done.
7. Click Cancel.
8. Exit Company of Heroes and repeat the test four more times without rebooting between runs.
Valve Half-Life 2: Lost Coast v.2707
Intel provided the pbca_lost_coast.dem demo file this test uses and specified the test methodology. The size of
the demo file is 2.38 MB (2,501,843 bytes).
Setting up the test
1. Install Half-Life 2 using the following steps:
a. Insert CD1 into the system’s optical drive.
b. Click Install Half-Life 2.
c. At the Welcome to the Steam Installation Wizard screen, click Next.
d. At the Internet Connection Required screen, click Next.
e. At the License Agreement screen scroll to the bottom of the agreement, select the I accept the
license agreement radio button, and click Next.
f. At the Age Verification screen select the I am 13 years of age or older radio button, and click Next.
g. At the Connection Speed screen select the correct Internet connection speed for your computer, and
click Next.
h. At the Destination Folder screen leave the default path, and click Next.
i. At the Desktop Shortcut screen select Yes, put shortcuts on my desktop, and click Next.
j. When Steam has finished installing, click Finish.
k. At the Welcome to the Half-Life 2 Installation Wizard, click Next.
l. At the License Agreement screen scroll to the bottom of the agreement, select the I accept the
license agreement radio button, and click Next.
m. At the select Features screen, click Next.
n. At the Desktop Shortcuts screen, click Next.
o. At the Electronic Registration screen, click Next.
p. At the DirectX 9.0b screen, click Next.
q. At the Ready to Install the Application screen, click Next.
r. As the installation process prompts you to insert the proper CDs, do so.
s. At the Half-Life 2 has been successfully installed screen, click Finish.
2. In the Installing Steam Service window that pops up, click Install Service.
3. In the Steam window, click Log into an existing account.
4. In the Steam Login window, enter your account name and password, and click Login.
5. In the Steam My games tab, select Lost Coast, and click Install.
6. In the pop-up Performance Warning window, click Install Half-Life 2:Lost Coast.
7. In the pop-up Install-Half-Life 2: Lost Coast window, click Next.
8. Leave the defaults shortcut boxes checked, and click Next.
9. Click Finish.
10. When the Lost Coast download finishes, select it, and click Launch.
11. In the pop-up window, click Play game.
12. In the game, click Options.
13. Click the Keyboard tab.
14. Click Advanced.
15. Check the Enable Developer console box, and click OK.
Principled Technologies, Inc.: Performance comparison of two
desktop PCs with Intel and AMD processors
12
16. Click the Video tab.
17. In the Video options tab use the follow settings:
a. Resolution: 1,024 x 768
b. Aspect Ratio: Normal (4:3)
c. Display Mode: Full screen
18. Click Advanced.
19. In the Advanced Video screen use the following settings:
• Model detail: High
• Texture detail: High
• Shader detail: High
• Water detail: Reflect World
• Shadow detail: High
• Color Correction: Disabled
• Antialiasing mode: None
• Filtering mode: Bilinear
• Wait for vertical sync: Disabled
• High Dynamic Range: None
20. Click OK.
21. Click Apply.
22. Click OK.
23. Click Quit to exit the game.
24. Click Quit game.
25. Place the pbca_lost_coast.dem file in C:\Program Files\Valve\Steam\SteamApps\User Name\HalfLife 2
lost coast\lostcoast.
26. Reboot the system.
27. Run Disk Defragmenter by clicking StartÆAll ProgramsÆAccessoriesÆSystem ToolsÆDisk
Defragmenter.
28. Delete the contents of C:\Windows\Prefetch.
29. Empty the Recycle Bin.
30. Type rundll32.exe advapi32.dll,ProcessIdleTasks in the Start Search command prompt.
31. Type perfmon in the Start Search command prompt.
32. Expand and watch the Disk Monitor. When there are no more disk requests, close Perfmon.
Running the test
1. Launch Half-Life 2 Lost Coast by double-clicking the desktop icon.
2. In the Performance Warning pop-up window, click Launch Half-Life 2: Lost Coast.
3. Press ~ to open the developer console window.
4. Type timedemo pbca_lost_coast, and press Enter.
5. When the demo finishes, record the fps score.
6. Exit Half-Life 2: Lost Coast and repeat the test four more times without rebooting between runs.
Principled Technologies, Inc.: Performance comparison of two
desktop PCs with Intel and AMD processors
13
Appendix A – Test system price information
Figure 3 presents the price information for the test systems.
System
Processor
HP Pavilion Media Center m8330f
(System A)
AMD Phenom X4 Quad-Core 9500
Intel Core 2 Quad Q6600
2.20 GHz
2.40 GHz
January 10, 2008
March 11, 2008
Processor frequency
Purchase date
HP Pavilion Elite m9150f
(System B)
Purchased by
Purchased from
Price
Intel
PT
Best Buy
Best Buy
$1,159.99
$959.99
Figure 3: Price information for the test systems. Prices do not include tax or shipping.
Principled Technologies, Inc.: Performance comparison of two
desktop PCs with Intel and AMD processors
14
Appendix B – Test system configuration information
This appendix provides detailed configuration information about each of the test PCs.
HP Pavilion Media Center m8330f
(System A)
System
HP Pavilion Elite m9150f
(System B)
General
Processor and OS kernel:
(physical, core, logical) / (UP,
MP)
Number of physical processors
Single/Dual/Quad Core
processors
System power management
policy
1P4C4L / MP
1P4C4L / MP
1
1
Quad
Quad
Recommended settings
Recommended settings
Processor power-saving option
Cool’n’Quiet 2.0
Enhanced Intel SpeedStep
Technology
CPU
Vendor
Name
Model number
Stepping
Socket type and number of pins
Core frequency (GHz)
Front-side bus frequency
L1 cache
L2 cache
L3 cache
Platform
Vendor
Motherboard model number
Motherboard chipset
Motherboard revision number
System/motherboard serial
number
Bios name and version
BIOS settings
Memory module(s)
Vendor and model number
Type
Speed (MHz)
Speed running in the system
(MHz)
Timing/Latency (tCL-tRCD-tRPtRASmin)
Size
Number of memory module(s)
Chip organization (single-sided,
double-sided)
AMD
Phenom X4 Quad-Core
9500
2
Socket AM2+ (940 pin)
2.20
2,000 MHz HyperTransport
Technology
64 KB + 64 KB (per core)
2 MB (4 x 512 MB)
2 MB (shared)
32 KB + 32 KB (per core)
8 MB (2 x 4,096 MB)
NA
AsusTek
NARRA3
NVIDIA nForce 430
3.02
AsusTek
Benicia
Intel G33
1.01
MXF7490HZS
CNX7492LJW
Phoenix Technologies v5.03
(11/30/2007)
Default
American MegaTrends v5.11
(12/05/2007)
Default
2 x Micron 8HTF12864AY-667E1, 2 x
Micron 8HTF6464AY-667B8
PC2-5300
667
2 x Samsung M378T2953EZ3-CE6,
2 x Hyundai HYMP164U64CP6-Y5
PC2-5300
667
667
667
5-5-5-15
5-5-5-15
3,072 MB
2 x 1,024 MB, 2 x 512 MB
3,072 MB
2 x 1,024 MB, 2 x 512 MB
Double-sided
Double-sided
Principled Technologies, Inc.: Performance comparison of two
desktop PCs with Intel and AMD processors
Intel
Core 2 Quad
Q6600
B
Socket LGA775
2.40
1,066 MHz
15
System
Channel (single/dual)
Hard disk 1
Vendor and model number
Size
Buffer size
RPM
Type
Controller
Driver
Hard disk 2
Vendor and model number
Size
Buffer size
RPM
Type
Controller
Driver
Operating system
Name
Build number
File system
Kernel
Language
Microsoft DirectX version
Graphics
Vendor and model number
Type
Chipset
BIOS version
Total available graphics memory
Dedicated video memory
System video memory
Shared system memory
Resolution
Driver
Sound card/subsystem
Vendor and model number
Driver
Ethernet
HP Pavilion Media Center m8330f
(System A)
HP Pavilion Elite m9150f
(System B)
Dual
Dual
Hitachi HDT725032VLA380
320 GB
16 MB
7,200
SATA 3.0 Gb/s
NVIDIA nForce 430
NVIDIA 9.99.0.4 (10/26/2007)
Seagate ST3360320AS
360 GB
16 MB
7,200
SATA 3.0 Gb/s
Intel 82801IR (ICH9R)
Intel 7.6.0.1011 (7/12/2007)
Hitachi HDT725032VLA380
320 GB
16 MB
7,200
SATA 3.0 Gb/s
NVIDIA nForce 430
NVIDIA 9.99.0.4 (10/26/2007)
Seagate ST3360320AS
360 GB
16 MB
7,200
SATA 3.0 Gb/s
Intel 82801IR (ICH9R)
Intel 7.6.0.1011 (7/12/2007)
Windows Vista Home Premium
6000
NTFS
ACPI x86-based PC
English
DirectX 10
Windows Vista Home Premium
6000
NTFS
ACPI x86-based PC
English
DirectX 10
NVIDIA GeForce 8500 GT
Discrete
GeForce 8500 GT
60.86.48.0.21
1,535 MB
256 MB
0 MB
1,279 MB
1,280 x 1,024 x 32 bit
NVIDIA 7.15.11.6230 (8/27/2007)
NVIDIA GeForce 8500 GT
Discrete
GeForce 8500 GT
60.86.48.0.21
1,535 MB
256 MB
0 MB
1,279 MB
1,280 x 1,024 x 32 bit
NVIDIA 7.15.11.6230 (8/27/2007)
Realtek High Definition Audio
Realtek 6.0.1.5502 (10/25/2007)
Realtek High Definition Audio
Realtek 6.0.1.5485 (9/19/2007)
Vendor and model number
NVIDIA nForce Networking Controller
Driver
Optical drive(s)
NVIDIA 67.6.2.0 (9/10/2007)
Vendor and model number
Lite-On DH16A3L DVD-RW
Type
SATA
Principled Technologies, Inc.: Performance comparison of two
desktop PCs with Intel and AMD processors
Realtek RTL8168C/8111C PCI-E
Gigabit Ethernet
Realtek 6.196.803.2007
Lite-On GSA-H60L DVD-RW,
Toshiba SD-H802A HD-DVD
SATA
16
HP Pavilion Media Center m8330f
(System A)
System
USB ports
Number
Type
Other
IEEE 1394 ports
Number
Monitor
Type
Screen size
Refresh rate
HP Pavilion Elite m9150f
(System B)
6
2.0
Media card reader
6
2.0
Media card reader
2
2
ViewSonic Optiquest Q7b
19”
60 Hz
ViewSonic Optiquest Q7b
19”
60 Hz
Figure 4: Detailed system configuration information for the test systems.
Principled Technologies, Inc.
1007 Slater Road, Suite 250
Durham, NC 27703
www.principledtechnologies.com
[email protected]
Principled Technologies is a registered trademark of Principled Technologies, Inc.
All other product names are the trademarks of their respective owners
Disclaimer of Warranties; Limitation of Liability:
PRINCIPLED TECHNOLOGIES, INC. HAS MADE REASONABLE EFFORTS TO ENSURE THE ACCURACY AND VALIDITY OF ITS
TESTING, HOWEVER, PRINCIPLED TECHNOLOGIES, INC. SPECIFICALLY DISCLAIMS ANY WARRANTY, EXPRESSED OR
IMPLIED, RELATING TO THE TEST RESULTS AND ANALYSIS, THEIR ACCURACY, COMPLETENESS OR QUALITY, INCLUDING
ANY IMPLIED WARRANTY OF FITNESS FOR ANY PARTICULAR PURPOSE. ALL PERSONS OR ENTITIES RELYING ON THE
RESULTS OF ANY TESTING DO SO AT THEIR OWN RISK, AND AGREE THAT PRINCIPLED TECHNOLOGIES, INC., ITS
EMPLOYEES AND ITS SUBCONTRACTORS SHALL HAVE NO LIABILITY WHATSOEVER FROM ANY CLAIM OF LOSS OR DAMAGE
ON ACCOUNT OF ANY ALLEGED ERROR OR DEFECT IN ANY TESTING PROCEDURE OR RESULT.
IN NO EVENT SHALL PRINCIPLED TECHNOLOGIES, INC. BE LIABLE FOR INDIRECT, SPECIAL, INCIDENTAL, OR
CONSEQUENTIAL DAMAGES IN CONNECTION WITH ITS TESTING, EVEN IF ADVISED OF THE POSSIBILITY OF SUCH DAMAGES.
IN NO EVENT SHALL PRINCIPLED TECHNOLOGIES, INC.’S LIABILITY, INCLUDING FOR DIRECT DAMAGES, EXCEED THE
AMOUNTS PAID IN CONNECTION WITH PRINCIPLED TECHNOLOGIES, INC.’S TESTING. CUSTOMER’S SOLE AND EXCLUSIVE
REMEDIES ARE AS SET FORTH HEREIN.
Principled Technologies, Inc.: Performance comparison of two
desktop PCs with Intel and AMD processors
17