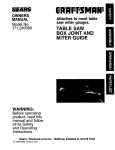
1
IVtodel No,
I CReFTSMAN I
120 VOLT * 3000
iMPORTANT:
Read the Safety
Guidemines
and AH mnstructions
Carefully
• SAFETY
GUUDELUNES
• ASSEMBLY
• OPERATUON
• tVtAUNTENANCE
• TROUBLESHOOTUNG
• REPAUR PARTS
WATT
Troubmeshooting
Guide ..........................
Emissions
Controm System
Statement
...............................................
Generator
Parts ................................
Engine
Parts
How To Order
Parts ................
MODEL NO:
SERIAL NO:
Warranty
.....................................
HORSEPOWER
GASOLINE OAPAOFFY
OraLCAPACITY
DATE PURCHASED:
MAmNTENANCE
17
18
19-23
24-27
Back Cover
°'°
4 GALLONS/15.1
20 OZ/0.6MTERS
LmTERS
l
AGREEMENT
The Craftsman Warranty, pHusa Maintenance Agreement,
provide maximum vaHue for your Sears products. Contact your nearest Sears store for detaiHs.
STORE WHERE PURCHASED:
ADDRESS:
CUSTOMER
CITY:
RESPONSmBmMTmES
Read and observe the safety tulles.
TELEPHONE:
Follow a regular schedule in maintaining, caring for and
using your generator.
Record the above information
about your unit
so that you will be aMe to provide it in case of
Hoss or theft.
Follow the instructions under "Customer Responsibilities" and "Storage" sections of this owner's manual.
FULL ONE YEAR WARRANTY
ON CRAFTSMAN
GENERATORS
For one year from the date of purchase, when this Craftsman generator is maintained and operated according to the instructions in this owner's manual, Sears will repair, free of charge, any defect in material and
workmanship.
If your Craftsman Generator is used for commercial
days from the original date of purchase.
or rental purposes, this warranty applies for only 90
FULL ONE YEAR WARRANTY
ON CRAFTSIVIAN ENGINE
For one year from the date of purchase, when this Craftsman engine is maintained and operated according
to the instructions in this owner's manual, Sears will repair, free of charge, any defect in material and
workmanship.
If your Craftsman engine is used for commercial or renta! purposes, this warranty applies only for 90 days
form the date of purchase. This warranty does not cover: Expendable items such as spark plugs and air
filters, which become worn during normal use.
Repairs necessary because of operator abuse or negligence, including damage resulting from no oil being
supplied to
the engine or failure to maintain the equipment according to the instructions contained in
this owner's manual, are not covered under warranty.
WARRANTY SERVICE IS AVAILABLE BY RETURNING THE GENERATOR TO THE NEAREST SEARS SERViCE CENTER. This warranty gives you specific legal rights and you may also have other rights, which vary
from PROVINCE TO PROVINCE.
Sold
iv1GP
670030
by Sears
Canada_
|n¢,_ To_ento_
2 -- ENG
Ont,
This manual contains information that is important for you to know and understand. This information relates to
protecting YOUR SAFETY and PREVENTING EQUIPMENT PROBLEMS. To help you recognize this information,
we use the symbols to the right. Please read the manual and pay attention to these sections.
DANCER indicates an imminently hazardous situation
which, if not avoided, will result in death or serious
CAUTION indicates a potentially hazardous situation
which, if not avoided, _
result in minor or moderate
WARNING indicates a potentially hazardous situation
which, if not avoided, coumdresult in death of serious
CAUTION used without the safety alert symbol indicates
potentially hazardous situation which, if not avoided,
result in AEgperty damagA.
a
This product is not equipped with a spark arresting muffler. If the product wiii be used around flammable
materials, or on land covered with materials such as agricultural crops, forest, brush, grass, or other similar items,
then an approved spark attester must be installed and is legally required in the state of California. It is a violation
of California statutes section 130050 and/or sections 4442 and 4443 of the California Public Resources Code,
unbss the engine is equipped with a spark arrestor, as defined in section 4442, and maintained in effective
working order. Spark arresters are also required on some U. S. Forest service land and may also be legally
required under other statutes and ordinances.
This product may contain chemicals
known to the state of California to cause cancer, birth
defects, or other reproductive harm. This warning is given in compliance with California Proposition 65, as
detectable amounts of chemicals subject to proposition 65 may be contained in this product.
SAVE TH :S :
INSTRUCTIONS
When using this product basic precautions
followed including the following:
RBSK OF ELECTROCUTBON
HAZARD
Attempting to connect generator directly to the electrical system of any
building structure.
AND
should
always
be
FBRE
WHAT COULD HAPPEN
HOW TO PREVENT iT
Back feeding electricity through a
building's electrical system to the
outside utility feed lines could endanger repair persons attempting to
restore service.
Never backfeed electricity through
a structure's electrical system.
Attempting to connect to the incoming utility service could result in
electrocution.
To connect to a structure's electrical system in a safe manner,
always have a Double-Throw
Transfer Switch installed by a
qualified electrician and in compliance with local ordinances. (When
installing a Double-Throw
Transfer Switch, a minimum of
10 gauge wiring must be used.)
Restoration of electrical service while
the generator is connected to the
incoming utility could result in a fire or
serious damage if a isolator switch is
not installed.
Failure to use a double throw transfer
switch when connecting to a structures electrical system can damage
appliances and WILL VOID the
manufacturers warranty.
3 -- ENG
NGP6700s0
READ AND UNDERSTAND
ALL WARNINGS
BEFORE
ATTEMPTBNG TO OPERATE GENERATOR°
RBSK OF ELECTROCUTBON
AND FBRE .(¢ont'd}
HAZARD
WHAT COULD HAPPEN
Operation of generator in rain, wet,
icy, or flooded conditions.
Water is an excellent conductor of ebctricity! Water which comes in contact
with electrically charged components
can transmit electricity to the frame and
other surfaces, resulting in electrical
shock to anyone contacting them.
Operate generator
in a clean, dry,
well ventilated
area. Make sure
Contact with worn or damaged extension cords could result in ebctrocution.
Inspect extension cords before use
and replace with new cord if required.
Use of undersize extension cords could
Use proper size (wire gauge) cordset
for application see chart in the Assembly section of this manual
Use of worn damaged, undersized
or ungrounded extension cords.
result in overheating of the wires or attached items, resulting in fire.
Piacing generator on or against
higHy conductive surface, such as
a steei waikway or metai tool
HOW TD PREVENT iT
hands
are dry before touching
unit.
Use of ungrounded cordsets could prevent operation of circuit breakers and
result in electrical shock.
Always use a cordset having a
grounding wire with an appropriate
grounding plug. DO NOT use an
ungrounded plug.
Accidental
leakage of electrical current
could charge conductive
surfaces
in
contact with the generator.
Place generator on low conductivity surface such as a concrete
slab.
ALWAYS operate generator a
minimum of six feet from any
conductive surface.
Improper connection
generator.
to
Exceeding the load capacity of the generator by attaching too many items, or
items with very high load ratings to it
could result in overheating of some
items or their attachment wiring resulting in fire or electrical shock.
Read the load rating chart and instructions in the Wattage Calculation section, Make sure that the
summation of electrical loads for all
attachments does not exceed the
load rating of the generator.
Operation of unit when damaged, or
with guards or panels removed.
Attempting to use the unit when it has
been damaged, or when it is not functioning normally could result in fire or
ebctrocution.
Do not operate generator with mechanical or electrical problem. Have
unit repaired by an Authorized Service Center.
Removal of guarding could expose
electrically charged components and
result in ebctrocution.
Do not operate generator with protective guarding removed.
MGP 670030
of items
4:
ENG
READ AND UNDERSTAND
ALL WARNINGS
BEFORE
ATTEMPTBNG TO OPERATE GENERATOR°
RiSK OF FiRE
HAZARD
WHAT COULD HAPPEN
HOW TO PREVENT iT
Attempting to fill the fuel tank while
the engine is running.
Gasoline and gasoline vapors can
become ignited by coming in contact
with hot components
such as the
muffler, engine exhaust gases, or from
an electrical spark.
Turn engine off and allow it to cool
before adding fuel to the tank.
Equip area of operation with a fire
extinguisher certified to handle
gasoline or fuel fires.
Sparks, fire, hot objects
Cigarettes, sparks, fires, or other hot
objects can cause gasoline or gasoline vapors to ignite.
Add fuei to tank in weii ventilated
area. Make sure there are no
sources of ignition near the
generator.
Improper storage of fuel
Improperly stored fuel could lead to
accidental ignition. Fuel improperly
secured could get into the hands of
children or other unqualified persons.
Store fuel in a OSHA approved
container designed to hold gasoline. Store container in secure
Materials
Operate generator in a clean, dry,
weii ventilated area a minimum of
four feet from any building, object
or waii. DO NOT OPERATE UNiT
iNDOORS OR iN ANY CON=
FINED AREA.
Inadequate ventilation for generator
placed
against
or near the
generator or operating the generator
in areas where the temperature
exceeds 104 ° R ambient (such as
storage rooms or garages) can
interfere with its proper ventilation
features causing overheating
and
possible ignition
buildings.
Tampering with factory set engine
speed settings.
of the materials
or
Engine speed has been factory set to
provide safe operation.
Tampering
with the engine speed adjustment
could result in overheating
of attachments and could cause a fire.
Overfilling the fuel tank fuel spillage.
Spilled fuel and its vapors can become ignited from hot surfaces or
sparks.
5 - ENG
location to prevent use by others.
Never attempt to "speed=up" the
engine to obtain more performance. Both the output voltage
and frequency wiil be thrown out
of standard by this practice,
endangering attachments and the
user.
Use care in filling the tank to avoid
spilling fuel. Make sure fuel cap is
secured tightly and check engine
for fuel leaks before starting
engine. Move generator away
from refueling area or any spillage
before starting engine. Allow for
fuel expansion. Keep maximum
fuel level 1A inch below the tip of
the fuel tank. Never refuel with the
lvlGP
6700s0
READ AND UNDERSTAND
ALL WARNNNG$
BEFORE
Risk of in'u.Lu_r_z
and Pro eper_vtDa_ao_lLe When
Trans_q
Generater
HAZARD
Fire, hhaiation,
Surfaces
WHAT COULD HAPPEN
Damage to Vehicle
Fuei or oii can bak or spill and couid
resuit in fire or breathing hazard,
serious injury or death can resuit. Fuei
or oii baks will damage carpet, paint
or other surfaces in vehbbs or
traibrs.
RISK OF BREATHING
HAZARD
Gasoline engines produce toxic
carbon monoxide exhaust fumes.
- INHALATION
WHAT COULD HAPPEN
Breathing exhaust fumes will cause
serious injury or death.
HOW TO PREVENT iT
If generator is equipped with a fuel
shut-off valve, turn the valve to the
off position before transporting to
avoid fuel leaks. If generator is not
equipped with a fuel shut-off valve,
drain the fuel from tank before
transporting. Transport fuel only in
an OSHA approved container.
Always place generator on a
protective mat when transporting
to protect against damage to
vehicle from leaks. Remove
generator from vehicle immediately upon arrival at your destination
HAZARD
HOW TO PREVENT iT
Operate generator in clean, dry,
weii ventilated area. Never
operate unit in enclosed areas
such as garages, basements,
storage, sheds, or in any location
occupied
by humans or animals.
Keep children, pets and others
away from area of operating unit.
MGP 670030
6 -- ENG
READ
AND UNDERSTAND
ALL WARNINGS
BEFORE
ATTEMPTBNG TO OPERATE GENERATOR°
RiSK OF UNSAFE
HAZARD
Operation
manner.
of generator
OPERATION
HOW TO PR_:V_:NT iT
WHAT COULD HAPPEN
in carebss
Review and understand all of
AH sources of energy include the
potential for injury. Unsafe operation
or maintenance of your generator
could lead to serious injury or death
to you or others.
the operating instructions and
warnings in this manual.
Become familiar with the
o
operation and controls of the
generator. Know how to shut it
off quickly.
Equip area of operation with a
fire extinguisher certified to
handle gasoline or fuel fires.
Keep children or others away
from the generator at all times.
Operation of voitage sensitive appiiances without a voitage surge protector.
Any gasoline operated household
generator wiii incur voltage variations
causing damage to voltage sensitive
appliances or could result in fire.
Always use a U,L listed voltage
sensitive surge protector to
connect voltage sensitive appliances such as TV, computer,
stereo equipment, Failure to use
a U,L, listed voltage surge
protector will void the warranty
on your generator°
Notice: A multiple outlet strip is
not a surge protector make sure
you use a U.L listed voltage surge
9rotector.
Raising or suspending generators
equipped with iift rings improperly
Generator could fall causing serious injury or death to you or others.
Always use proper connecting
srocedures as described in this
Improper raising or suspending can
cause damage to the generator.
manual when connecting cables,
chains, or straps for raising or
suspending generators equipped
with lift rings.
Always use cables, chains, or
straps rated at 2000 Ibs working
load or more to raise or suspend
generator.
Operating generator wNe suspended
Generator wiii not operate properly
and wiii cause damage to the generator and could cause serious injury or
death to you or others.
7 -- ENG
Never operate generator while
suspended
or in an unievei position. Always operate generate on
a fiat, level surface.
lvlGP
eT00S0
REAO ANO UNDERSTAND
ALL WARNINGS
BEFORE
ATTEMPTBNG TO OPERATE GENERATOR°
RiSK OF HOT SURFACES
HAZARD
WHAT COULD HAPPEN
Contact with hot engine and
generator components.
Contact with hot surfaces, such as
engines exhaust components, could
result in serious burns.
RiSK OF MOVING
HAZARD
I _
HAZARD
Lifting a very heavy object.
Iv1GP 670030
The generator contains parts which
rotate at high speed during operation.
These parts are covered by guarding
to prevent injury.
i
iT
During operation, touch only the
control surfaces of the generator.
Keep children away from the
generator at all times. They may
not be able to recognize the
hazards of this producL
PARTS
WHAT COULO HAPPEN
Contact with moving parts can
result in serious injury.
HOW TO PREVENT
HOW TO PREVENT iT
Never operate generator with
guarding or cover plates removed.
Avoid wearing loose fitting clothing
or jewelry which could be caught
by moving parts.
RiSK FROM LiFTiNG
WHAT COULD HAPPEN
Serious injury can result from attempting to lift too heavy an objecL
8 -- ENG
HOW TO PREVENT iT
The generator is too heavy to be
lifted by one person. Obtain
assistance from others before you
try to move it.
CARTON
CONTENTS
t
= OW_eFBS
MaNUa_
t = Generator
Read owner's manual. Do not attempt to operate equipment until you have read Owner's
Manual for Safety, Assembly, Operation, Maintenance, and Storage hstructions.
NOTE: Left and right describes
with the operator
TOOLS
NEEDED
the location of a part
facing the outlet panel.
FOR ASSEMBLY
*
GENERATOR
FROM
THE GENERATOR
A grounding lug is supplied with the generator for use
when required by local electrical ordinances. Refer to
article 250 of the National Electrical Code to clarify
any needed grounding information. Your local electric
company or a certified electrician should be able to
help you with this information.
1 - Box Cutter or Knife
REMOVE
GROUNDING
CARTON
Open carton from top_
Cut carton along dotted lines.
Remove all carton inserts.
Remove generator through opening in carton.
|MPORTANT: Before any attempt to start your generator be sure to check engine oil (See Adding Engine Oil
paragraph in the Operation section on page 12 of this
manuaL)
Grounding Lug
NOTE: Your engine is already grounded to the frame
by a grounding strap.
9 -- ENG
lvlap6700s0
KNOW YOUR
GENERATOR
Read this Owner's Manua_ and Safety Ru_es before operation of your Generator, Compare this illustration with your generator to famiHiarize yourseff with the [ocation of various controHs and adjustments. Save the
manua[ for future references.
FUEL SHUT
OFF VALVE
FUEL TANK
FUEL CAP
R U N/STO P
SWITCH
CHOKE
CONTROL
AIR CLEANER
OIL FILL
CiRCUiT
BREAKERS
ENGINE OiL DRAIN
120 VOLT
RECEPTACLES
FUEL TANK_ Capacity of 4 US gallons/15.1
CHOKE CONTROL-
liters.
Used to start coHd engine.
ENGINE ON/OFF SWmTCH- Sets engine in starting
mode for recoi[ starter - Stops running engine.
FUEL SHUT OFF VALVE (located on engine) - Used
to shut off the flow of fue[ to the engine.
ENGINE OIL NLL- Check and fill engine with oil.
Your generator is equipped with a duplex 120 volt
receptacle. The unit is also equipped with two 15 amp
and one 25 amp circuit breakers to protect the unit
against electrical overload. If the circuit breakers trip,
unplug electrical load from receptacle. Let circuit
breaker cool down and then push circuit breaker
button to reset.
AIR CLEANER- Includes filter element cartridge and
foam pre-cleaner that limits the amount of dirt that
enters the engine.
CIRCUIT BREAKERoverloading.
25 amp
Circuit
@ @
Protects the generator from
120 VOLT RECEPTACLE- Used to supply 3000 watts
of electrical power. Protected by two 15 amp circuit
breakers.
_
120Vt5A_
__15/arnp
Circuit
Breakers
MGP670030
10 -- ENG
GENERATOR
CAPACmTY
Exceeding
the rated capacity of your generator can
result in serious damage to your generator and
connected
electrical devices. You should observe the
following to prevent overloading
the unit:
Starting and running wattage requirements
should
always be calculated
when matching a generators
wattage capacity to the appliance
or tool.
There are two types of electrical
appliances
can be powered
by your generator:
that
A.
Items such as radios, light bulbs, television
sets, and microwaves
have a "resistive load".
Starting wattage and running wattage are the
same.
B.
Items such as refrigerators,
air compressors,
washer, dryer, and hand tools that use an
electrical motor have an "inductive
load".
Inductive load appliances
and tools require
approximately
2 to 4 times the listed wattage
for starting
the equipment.
This initial load
only lasts for a few seconds on start-up but is
very important
when figuring your total
wattage to be used.
NOTE: Some inductive appliances
and tools wiii list
on the motor name plate, the starting and running
voltage and amperage
requirements.
Use the following formula to convert voltage and amperage to
wattage: (Volts X Amp = Watts}
*
Always start your largest electric motor
then plug in other items, one at a time.
first, and
The guide is provided to assist you in determining
the
appliances
and tools that can be ran with the wattage
capacity of your generator.
OBTAiNiNG
ELECTRiCiTY
GENERATOR
FROM
There are basically two ways to obtain electricity from
a generator:
o
Use of extension cords directly from the generator to the appliance, lights, tools, etc.
Use of a double-throw transfer switch installed
directly to the main electrical supply outside of
the house.
Extension
Cord
When using an appliance or tool at a considerable
distance from the generator, a 3-wire extension cord
that has a 3-blade grounding plug and 8-dot receptacle that accepts the tool's plug MUST be used in
order to reduce the risk of electrical shock. A cord of
adequate size must be used. A minimum of 12 gauge
wire size with at least a 20 amp draw can be used.
When amperage exceeds 20 amps a 10 gauge wire
size should be used.
Repair or replace
Connecting
Supply
An extension cord that is hot
to the touch is overmoaded.
damaged extension cords
Generator
To Main Electrical
Potential hazards exist when a electrical generator is
connected to the main electrical supply coming into
the house, It is at that point that the generator could
feed back into the utility company's system causing
possible electrocution of workers who are repairing
electrical lines, To avoid back feeding of electricity into
utility systems, a double=throw transfer switch
should be installed between the generator and utility
power, This device should be installed by a licensed
electrician and in compliance with all local electrical
codes,
NOTE: When installing a Double-Throw Transfer
Switch, a minimum of 10 gauge wiring must be used.
MGP 670030
BEFORE
Use clean, fresh, regular unleaded gasoline with a
minimum of 85 octane. Do not mix oil with gasoline.
Always check engine oil level
before every start, Running
mow of oil or out of oil could result in
damage
to the engine,
engine
serious
Adding
STARTmNG ENGmNE
Engine
Never fill fuel tank completely. Fill tank to 1/2" below the bottom of the
filler neck to provide space for fuel expansion.
Wipe any fuel spillage from engine and equipmerit before starting engine.
Oil
Your generator has been shipped without oii in the
engine. Begin by removk_g the oii dipstick and piug.
Start pouring the oii in showily.
Do not overfill.
The engine will hoid approximateiy 20 ounces of oil To
check the oil clean and replace the dipstick. Do not
screw the dip stick in when checking the oil level. Next,
remove the dipstick to check the level. The oil dipstick
is clearly marked with lines that tell you when the
engine has enough oil. Do not fi_ above this point,
Never fill fuel tank indoors.
Never fill fuel tank when engine is running or
hot. Do not smoke when filling fuel tank.
To Start Your Generator
Never run engine indoors or
in encmosed, poor ventilated areas. Engine
exhaust contains carbon monoxide, an
ordormess and deadmy gas.
Move the choke control located on the engine to
"CHOKE" position.
NOTE: When adding oil to the engine crankcase, use a
high quality detergent
oil classified
"For Service
SF,SG,SH" rated SAE 30 weight. Use no special additives.
Select the oil's viscosity grade according to your expected
operating temperatures.
SAE Viscosity
NOTE: No choke is required on warm engines. Make
sure choke is in the "NO CHOKE " position on warm
engine starts.
"NO CHOKE
position
Grades
Turn the fuel shut-off valve located on the engine
to the ON position.
Gasoline
Your generator engine is 4 cycle.
only. Never mix oil with gasoline.
FuemShut=off valve
Use unleaded fuel
\
Remove gas cap.
Add unleaded gasoline, slowly, to fuel tank.
lvlGP670030
12 -- ENG
CHosefuei shut-off vaive.
Move ON/OFF switch bcated on the front panei of
the engine to the "ON" position.
k
ON/OFF Switch
\
NOTE: When engine is transported,
off valve to prevent leakage.
close fuel shut-
You MUST unplug any load
IMPORTANT: Never store engine with fuel in tank,
indoors, or in enclosed, poorly ventilated areas or
where fuel fumes may reach an open flame.
from the generator before starting to prevent
permanent damage to any appliances.
Grasp handb on rope starter and puU dowiy untii
resistance is feit. Let the rope rewind showily. PuU
rope with a rapid fuU arm stroke. Let rope rewind
dewily. Repeat if necessary.
When engine starts, graduaUy move the choke to
the "NO CHOKE" position.
iMPORTANT: AUow generator to run at no ioad for 5
minutes upon each initiai start-up to aUow engine and
CONNECTmNG
ELEOTRmCAL
LOADS
Let engine run and warm up for five minutes after
starting with no electrical load.
Connect loads in the following manner to prevent
damage to equipment:
Disconnect all electrical loads.
Connect inductive load equipment first, inductive
loads consist of refrigerators, freezers, water
pumps, air conditioners, or small hand tools.
Connect the items that require the most wattage
first.
Turn ON/OFF switch to "OFF" position.
Connect the lights next.
STOPPING
ENGmNE
Voltage sensitive equipment should be the last
equipment connected to the generator. Plug
voltage sensitive appliances such at TV's, VCR's,
microwaves, ovens, computers, and cordless
telephones into a UL listed voltage surge protector, then connect the UL listed voltage surge
protector to the generator.
\
ON/OFF Switch
IMPORTANT: You should always add up the rated
watts of all lights, tools and appliances you are
powering at one time. This total should not
exceed the rated capacity of you generator or
circuit breaker rating of the receptacle supplying
power.
13 -- ENG
NGP6700s0
CUSTOMER
RESPONSRBRLRTRES TABLE
Every 8
Hours
or Daily
MAINTENANCE
Every 25
Hours of Every
Season
Every 50
Hours of Every
Season
Every
f00
Hours of Every
Season
TASK
Check oiI level
X
Change oil
See Note 1
Service pro=cleaner
See Note 2
X
Service Cartridge
X
Clean Muffler
X
Spark Attester
X
Clean Cooling System
See Note 2
Check Spark Plug
X
Prepare Unit for Storage
Prepare
unit
for storage
if it is to remain
Note 1: Change oii after first five (5) operating hours, every 50 operating
operating under heavy ioad or high ambient temperature, and
idle for more than
30 days.
hours thereafter, and every 25 hours if
Note 2; Cban more often under dusty conditions.
GENERAL
RECOMMENDATmONS
ENGmNE MAmNTENANCE
The warranty of the generator does not cover items
that have been subjected to operator abuse or negligence. To receive full value from the warranty, operator must maintain the generator as instructed in this
manual.
Some adjustments will need to be made periodically to
maintain your generator.
GENERATOR
Your generator
MAmNTENANCE
should
times. The generator
ated in environments
dust or any corrosive
be kept clean and dry at all
NOTICE:
Maintenance,
replacement
or repair of
the emission
control
devices
and systems
may be
performed
by any nonroad
engine repair establishmerit or individual.
However,
to obtain no charge
repairs
under the terms and provisions
of the
engine manufacturers
warranty
statement,
any
service
or emission
control
part repair or replacemerit must be performed
by a factory
authorized
dealer.
Oil
should not be stored or operthat include excessive moisture,
vapors. If these substances
are
on the generator, clean with a cloth or soft bristle
brush. Do not use a garden hose or anything with
water pressure to clean the generator.
Water may
Oii ievei should be checked prior to each use and
at bast every 8 hours of operation. To check oil
see Adding Engine Oil paragraph in the Operation
section on page 12.
Changing
Engine
Oil
enter the cooling air slots and could possibly damage
the rotor, stator and the internal windings of the
generator head.
For a new engine, change oil after the first 5 operating
hours. Thereafter, change oil after every 50 hours of
operation or every season.
All adjustments
manual should
Change the oil while the engine is still warm. The oil
will flow freely and carry away more impurities. Make
sure the engine is level when filling, checking, or
changing oil.
lvlGP670030
in the Maintenance
section of this
be made at least once each season.
14 -- ENG
To service pre-cNeaner, wash in Niquiddetergent
and water. Squeeze dry in a clean cloth and allow
to dry thoroughly. DO NOT oil pre-cleaner.
Change the oil as follows:
To keep dNrt,grass cNNppNngs,
etc. out of the
engNne, dean the area around the draNn pNugand
dNpsfickbefore removNng Nt.
To service cartridge, clean by tapping gently on a
flat service. Do not oil cartridge. Replace if dirty or
damaged.
Remove the oN[draNn pNugand oN[fiH pNug.TNNtthe
engNne sNNghtNy
towards the oN[draNnto obtaNn
better draNnage. Be sure to allow ampNe time for
compNete draNnage.
After servicing place pre-cleaner (arrows up) over
cartridge pleats (pre-cleaner lip will be at bottom
of pleats). Place into cover.
insert tabs on cover into slots in bottom of base.
@
TiNtcover up and fasten secureNy with screw.
@
Clean
Engine
PeriodicaNNy
remove debrisbuiNdupfrom engine.Do
notcleanwitha forceful
sprayof water because water
could contaminatefuelsystem. Clean withbrush or
compressed air.
@
ReNnstaHthe draNn pNug. TNghten secureNy.
@
FNHthe crankcase wNth new oN[of the proper type
(See AddNng EngNneON[Nnthe Operation Section),
oil capacity is 20 ozLO.6 liters.
Daily or more often, before
running engine, clean muffler area to remove all
combustible
debris.
C_ean
Muffier
Area
OH F[[[
Pmug
Fill
Spark Arreeter//
Screen
/
)
Overflowing
Reinstall
Service
the oi[ fiNNpNug and tighten
secureNy.
(if equipped)
Air Cleaner
NOTE: Do not use petroleum soNvents, e.g., kerosene,
which will cause the cartridge to deteriorate. Do not
use pressurized air to clean cartridge. Pressurized air
can damage the cartridge.
Remove spark arrestor screen for cNeaning and
inspection every 50 hours or every season. RepNace if
damaged.
To service air cleaner follow these steps:
in-line
Loosen screw and tilt cover down.
Remove
cover.
pre-cNeaner
and cartridge
Filter
Replace inqine fuel fiiteL
assembNy
from
Drain fuel tank or close both
fuel shut-off
Cartridge
valve before replacing
--
fuel filter.
1
Fuel Filter
Pre-O[eaner
Screw
15 -- ENG
MGP670030
Cmean Cooling
System
Cmean and Repmace Spark
Debris may clog engine's air cooiing system, especially after proionged operation. Internai cooiing fins
and surfaces may require cbaning to prevent overheating and engine damage. Remove biower housing
and dean.
Pmug
Check spark pUugyeariy or every 100 operating hours
or every season.
Cban area around spark piug.
Remove and inspect spark piug.
Repiace spark piug if ebctrodes
or porceiain is cracked.
Clean
are pitted, burned
Check ebctrode gap with wire feebr gauge and
set gap .030/.76mm if necessary.
Install spark, tighten secureiy.
.030" (0.76rnm)
Wire Gauge
Spark Plug
CARBURETOR
Over-speeding
The carburetor of your generator is pre-set at the factory. The carburetor shouid not be tampered with. If your
generator is used at an aititude in excess of 4000 feet
performance may be affected. If so consult with your
nearest Craftsman Service Center regarding high altitude
set changes.
Authorized
GOVERNOR
Your engine governor maintains the constant operating
speed of your generator.
DO NOT tamper with the engine governor
which is factory set for proper engine
speed.
lvlGP670030
your engine above factory high speed set-
ting can be dangerous
and could possibly
cause personai injury or property damage. If you believe the engine is running too fast or slow, take your generator to a
16 -- ENG
Craftsman
Service
Center
for repair and ad-
Disconnect the spark plug wire and remove the
spark plug.
If you are going to store your generator for more than
30 days, use the following information as a guide to
prepare the generator for storage.
Add one teaspoon of oil through the spark plug
hob.
Place rag over spark plug hob and pull the recoil a
few times to lubricate the combustion chamber.
Replace the spark plug, but do not connect the
spark plug wire.
Engine
*
NOTE-" If a fuel stabilizer is not used, all gasoline must
be drained from the tank and carburetor to prevent gum
deposits from forming on these parts and causing possible malfunction of the engine.
Preparation
Add fuel stabilizer to fuel tank to minimize the
Generator
formation of fuel gum deposits during storage.
o
Run engine at bast 10 minutes after adding
stabilizer to allow it to enter the fuel system.
Engine will not start
Clean the generator as outlined in the Generator
Maintenance paragraph on page 14.
Check that cooling air dots and openings on
generator are open and unobstructed.
1.
Low on fuel or oil.
1. Add fuel or oii.
2.
Ignition switch in "Off" position.
2. Turn to "ON" position
3.
Faulty spark plug.
3. Replace spark plug.
4.
Choke in wrong position.
4. Adjust choke accordingly.
5.
Fuel shut-off vane in closed
5. Open fuel shut-off valve.
position.
No etectricM
output
Unit loaded during start-up.
6_
7.
Spark plug wire loose.
7. Attach wire to spark plug.
1.
Faulty receptacle.
1.
Have Authorized Sears Service
Center replace.
2.
Circuit breaker kicked out.
2.
Depress and reset.
3.
Defective capacitor.
4.
Faulty power cord.
4.
1.
Overload
1.
Reduce
2.
Check for damaged,
bare, or
frayed wires on equipment.
Replace.
Reduce
3.
Repeated
ping
circuit breaker
trip-
Generator
overheating
the
circuit breaker
depressed
Remove load from unit.
6.
Have Authorized Sears Service
Center replace capacitor.
Repair or replace cord.
load.
2.
Faulty cords or equipmenL
1.
Generator overloade&
1.
2.
Insufficient ventilation.
2. Move to adequate supply of
fresh air.
17 - ENG
load.
MaP6700s0
Briggs&
Btratton
Corporation (B&B), the California Air Resources
Board (CARB)
and the United States Environmental
Protection
Agency (U,S. EPA)
Emission
Control System Warranty
Statement
(Owner's
BefectWarranty
Rights and Obligations)
EMISSION CONTROL WARRANTY COVERAGE IS APPLICABLE
TO CERTIFED
MODEL YEAR 1997 AND LATER ENGINES
TO CERTIFIED ENGINES PURCHASED IN CALIFORNIA IN 1995
WHICH ARE PURCHASED
AND USED ELSEWHERE
IN THE
AND THEREAFTER,
WHICH ARE USED IN CALIFORNIA,
AND
UNITED STATES.
California and United States Emission
Control Defects Warranty
Statement
The California Air Resources Board (CARB), U.S. EPA and B&S are
the periods of time listed below, provided there has been no abuse, nepleased to explain the Emission Control System Warranty on your
giect or improper maintenance of your small off-road engine.
model year 2000 and later smatl off-road engine (SORE). In California,
Your emission control system inctudes parts such as the carburetor,
new smalt off-road engines must be designed, built and equipped to
air cteaner, ignition system, muffler and catalytic converter. Also inmeet the State's stringent anti-smog standards. Elsewhere in the
cluded may be connectors and other emission retated assemblies.
United States, new non-road, spark-ignition engines certified for modet
Where a warrantable condition exists, B&S wilt repair your small offyear 1997 and later, must meet similar standards set forth by the U.S.
road engine at no cost to you including diagnosis, parts and Iabor.
EPA. B&S must warrant _e emission control system on your engine for
Briggs & Stratton Emission
Control Defects Warranty
Coverage
Small off-road engines are warranted relative to emission control
below. If any covered part on your engine is defective, the part will be
parts defects for a period of two years, subject to provisions set forth
repaired or replaced by B&S.
Owner's Warranty
Responsibilities
As the smait off-road engine owner, you are responsible for the perYou are responsible for presenting your small off-road engine to an
formance of the required maintenance listed in your Operating and
Authorized B&S Service Dealer as soon as a problem exists. The
Maintenance
Instructions. B&S recommends that you retain atl your
undisputed warranty repairs should be completed in a reasonable
receipts covering maintenance
on your smatl off-road engine, but
amount of time, not to exceed 30 days.
B&B cannot deny warranty solely for the lack of receipts or for your
If you have any questions regarding your warranty rights and refailure to ensure the performance
of alt scheduled maintenance.
sponsibilities, you should contact a B&S Service Representative
at
1-4t4-259-5262.
As the smaII off-road engine owner, you should however be aware
that B&S may deny you warranty coverage if your small off-road enThe emission warranty is a defects warranty. Defects are judged on
gine or a part has failed due to abuse, negtect, improper maintenormal engine performance. The warranty is not related to an in-use
emission test.
nance or unapproved modifications.
Briggs
& Stratton
Emission
Control
Defects
Warranty
Provisions
The following are specific provisions relative to your Emission Control Defects Warranty Coverage. It is in addition to the B&S engine warranty
for non-regulated
engines found in the Operating and Maintenance
instructions.
1. Warranted Parts
3. No Charge
Repair or replacement of any Warranted Part will be performed
Coverage under this warranty extends onty to the parts listed beat no charge to the owner, including diagnostic labor which leads
Iow (the emission control systems parts) to the extent these
to the determination
that a Warranted Part is defective, if the
parts were present on the engine purchased.
diagnostic work is performed at an Authorized
B&S Service
a. Fuel Metering System
Dealer. For emissions warranty service contact your nearest AuCold start enrichment system
thorized B&S Service Dealer as listed in the "Yellow Pages" unCarburetor and internal parts
der "Engines, Gasoline," "Gasoline Engines," "Lawn Mowers,"
or similar category.
Fuel Pump
4. Claims and Coverage Exclusions
b. Air Induction System
Warranty claims shall be flied in accordance with the provisions
Air cleaner
of the B&S Engine Warranty Policy. Warranty coverage shall be
intake manifold
excluded for failures of Warranted Parts which are not original
B&S parts or because of abuse, neglect or improper maintec. Ignition System
nance as set forth in the B&B Engine Warranty Policy. B&S is not
Spark plug(s)
liable to cover failures of Warranted Parts caused by the use of
Magneto ignition system
add-on, non-original, or modified parts.
5. Maintenance
d. Catalyst System
Catalytic converter
Exhaust manifold
Air injection
e.
Miscellaneous
system or pulse valve
Items Used in Above
Vacuum, temperature,
and switches
Connectors
2.
Systems
position, time sensitive
valves
and assemblies
Length of Coverage
B&S 'warrants to the initial owner and each subsequent purchaser
that the Warranted Parts shah be free from defects in materials
and workmanship
which caused the failure of the Wan-anted
Parts for a period of two years from the date the engine is delivered to a retail purchaser.
MGP670030
6.
18 -- ENG
Any Warranted Part'which is not scheduled for replacement as required maintenance or which is scheduled only for regular inspection to the effect of 'repair or replace as necessary' shalt be warranted as to defects for the warranty period. Any Warranted Part
which is scheduled for replacement as required maintenance
shall be warranted as to defects only for the period of time up to
the first scheduled replacement for that part. Any replacement
part that is equivalent in performance and durabiIity may be used
in the performance of any maintenance or repairs. The owner is
responsible for the performance of all required maintenance, as
defined in the B&S Operating and Maintenance Instructions.
Consequential
Coverage
Coverage hereunder shatl extend to the failure of any engine
components caused by the faiiure of any Warranted Part stitJ under warranty.
CRAFTSMAN
3000
GENERATOR
9t 9=670030
24
GENERATOR
ASSEMBLY
26
13
23
22
12
29 TORQUE
11
36
TORQUE
55-65 _N-LB$
TORQUE
45-55 _N-LBS
TORQUE 45-55 IN-LB$
TORQUE t20=144 IN-LB$
KEY
NO.
1
4
5
6
7
11
12
13
14
15
16
17
18
19
20
22
4
15
TORQUE 96-120 _N-LBS
DESCRIPTION
ENGINE
LUG GROUND
STRAP GROUND
FRAME ASSY
ISOLATOR
LABEL BILLBOARD
LABEL OP ERERATION
LABEL WARNING
NUT HEX WIZ LOCK
SCREW HEX WASHER
SCREW CAP 5/16-18 X 3/4
SCREW 5/16-I8 X 1-1/4
SCREW 10-24 X 9/16
WASHER LOCK
SPACER
WASHER
35
KEY
NO,
23
24
25
26
27
28
29
30
31
33
34
35
36
37
PART NUMBER
GS-0117
GS-01!8
GS-0802
GS-0924
LA-3380
LA-3381
LA-2911
SSF=8150
SSF-928
SS-12-CD
SSF-605
SSF=553-1
SSN-1619-ZN
GS-0925
SSN-632
DESCRIPTION
HEAT SHEILD
LABEL BILLBOARD
TANK FUEL 4 GALLON
CAP FUEL TANK
HOSE FUEL
CLAMP FUEL .50
SCREW 1/4 - 20 X 3/4
DRAIN COCK GROMMET
DRAIN COCK ELBOW
FUEL CLAMP
SCREW 1/4 x 5/8
BRACKET
CLIP, FUEL LINE
WASHER FLAT
PART NUMBER
GS-0926
LA-3382
GS-0650-1
GS-0443
GS-0225
GS-0227
91895680
GS-0446
GS-0908
GS-09!0
39124607
CAC-2-I
SSP-510
SS=6506-CD
* SEE ENGINE PAGES
19 -
ENG
lvlGP
67ooso
CRAFTSMAN
3000
GENERATOR
919o670030
GENERATOR
!
/
ORIENT
WITH
VENTS
DOWNWARD
AS
HEAD
ASSEMBLY
SHOWN
2
5
3
TORQUE
UNTIL THREADS
RUN OUT
TORQUE
204-264 IN=LBS
/
/
/
9
10
12
TORQUE
60-70 IN-LBS
/
/13
/
REFERENCE
z17
TORQUE
30-40 IN-LBS
ONLY
4 /
7
8
TORQUE
120-144
IN-LBS
\
\
\
\
\
21
SCALE 1:1
CAPACITOR WIRING
KEY
NO,
1
2
3
4
5
6
7
8
9
10
12
13
16
17
21
BESCRIPTION
ADAPTER DRIVE END
WASHER LOCK
SCREW HEXCAP 5/16-24 X 1
ROTOR ASSY
BOLT STATOR THRU
STATOR ASSY
WASHER FLAT 11/16 OD X 11
NUT 5/16-24 HEX
BOLT ROTOR THRU
BEARING SUPPORT
NUT 1/4"-20 HEX WiKEPS
CAPACITOR
BRACKET CAPACITOR
SCREW 10-24 X 9/16
O-RING ROTOR BEARING
NOT SHOWN
DIODE GS-0082
lvlGP670030
20 -- ENG
PART NUMBER
GS-0558
SS-1503-CD
SSF-616-ZN
GS-0658
GS-0415
GS-0898
SS-6506-CD
SSF-576
GS-0661
GS-0861
SSF-575
GS-0592
GS-0595
SSF-553-1
GS-0862
INSERT INTO O-RING
GROOVE, PART OF 10
CRAFTSMAN
3GGG GENERATOR
9t 9°67GG3G
PANEL ASSEMBLY
/
4
TORQUE 10o20JN=LBS
2 TORQUE 5=i0 JNoLBS
KEY
NO.
1
2
3
4
5
6
DESCRIPTION
DUPLEX 120V
SCREW #6-32 x .5 TORX
NUT SPEED #6-32
NUT HEX JAM 7/16
BREAKER CiRCUiT 15 AMP
BREAKER CiRCUiT 25 AMP
21 -
ENG
PART NUMBER
GS-0804
SSF=583
SSF=584
SSF-595
GS-0024
GS=0645
Iv1GP
67003o
CRAFTSMAN
3000
GENERATOR
9t9,670030
WiRE HARNESS
ENDCOVER
REAR VIEW
w I
zl
4
(D I
=<l
ROTOR
WINDING
STATOR LEADS (1,2,3,4)
GROUND
TO
FRAME
AUX.
WINDING
()
CAPACITOR
oil1
i
_-
141
I
I
MATING
KEY
NO.
1
2
3
4
5
6
7
iv1GP
670030
DESCRIPTION
BREAKER CIRCUIT 125/250V
DUPLEX 120V CANADA
WIRE ASSY
WIRE #12 AWG
WIRE #12 AW/G
WIRE #12 AW/G
CIRCUIT BREAKER 25A
22 -- ENG
COLOR
NA
NA
NA
RED
GREEN
GREEN
NA
PART NUMBER
GS-0024
GS-0804
GS-0894
NA
NA
NA
GS-0645
LINE
CRAFTSMAN
3GGG GENERATOR
919o67GG3G
BRIGGS & STRATTON
1_
306 _
v
MODEL
#t2t4120t75_=1
552 8
718
307_
22
Key No. Part No.
1
690045
2
399269
3
299819
12
692549
15
94916
16
694450
17
692517
18
693605
2O
692550
20A
694171
21
281658
22
692551
24
222698
25
499627
25
692788
25
692789
25
692790
26
499631
26
692785
26
692786
26
692787
Description
Cylinder Assembly
Bushing/Seal Kit
OiI Seal
Crankcase Gasket
Oil Drain Plug
Crankshaft
Bali Bearing
Crankcase Cover
OiI Seal
Oil Seal
Oil Fill Cap
Screw (Crankcase Cover)
FJywheel Key
Piston Assembly (Standard)
Piston Assembly (.010 O.%)
Piston Assembly (,020 O.S.)
Piston Assembly (,030 O.S.)
Ring Set (Standard)
Ring Set (=010 O.%)
Ring Set (=020 O.S.)
Ring Set (=030 O.S.}
Key No.
27
28
29
30
32
46
146
219
220
306
307
415
552
718
741
742
746
1019
1058
23 -- ENG
Part No.
691866
499423
690124
692562
94699
693404
94388
693578
691724
693610
690345
693463
692346
230192
692565
692564
692566
694852
274263
Description
Piston Pin Lock
Piston Pin
Connecting Rod
Connecting Rod Dipper
Screw (Connecting Rod)
Camshaft
Timing Key
Governor Spring
Washer (Governor Gear)
Cylinder Shield
Screw (Cylinder Shield)
Plug
Governor Crank Bushing
Locating Pin
Timing Gear
Retaining Ring
Idler Gear
Label Kit
Owner's Manual
NGP67ooso
CRAFTSMAN
3000
GENERATOR
919.670030
BRIGGS & STRATTON
MODEL
#t2t4120t75_=1
619
36
6_2_
890_
652A _
663 _
281
_No.
5
7
Part No.
693643
695166
13
691137
33
499642
34
35
499641
691304
36
691304
40
93312
45
262679
51
692555
155
188
695168
94644
189
694543
222
694253
238
271
263131
694256
281
694252
337
491055
427
694255
504
694254
MGP070030
Description
Cylinder Head
Cylinder Head Gasket
Screw (Cylinder Head)
Exhaust Valve
Intake Valve
Valve Spring (Intake)
Valve Spring (Exhaust)
Valve Retainer
Valve Tappet
Intake Gasket
Cylinder Head Plate
Screw (Control Bracket)
Rocker Arm Bali
Controt Bracket
Valve Cap
Controt Lever
Controi Panel
Spark Plug
Nut (Control Bracket)
Friction Washer Set
_No.
619
Part No.
691108
621
396847
635
652
280897
691108
652A
94831
663
694593
668
773
694257
694258
830
694544
868
498592
890
694933
914
692198
914A
692557
993
694088
1022
691890
1023
1026
499924
693517
1029
691230
1034
691343
24 -- ENG
Description
Screw (Cylinder Head Plate)
Stop Switch
Spark Plug Boot
Screw (Support Bracket)
Screw (Support Bracket)
Screw (Control Panel)
Spacer
Retainer
Stud (Rocker Arm)
Valve Seal
Support Bracket
Screw
(Rocker Cover 7/16" Long)
Screw (Rocker Cover 3/8" Long)
Cylinder Head Plate Gasket
Rocker Cover Gasket
Rocker Cover
Push Rod
Rocker Arm
Push Rod Guide
CRAFTSMAN
3000
GENERATOR
9t9.670030
36_
BRIGGS & STRATTON
633 0
708 0
MODEL
#t2t4120t75_=1
,
I
692j
_
i
137
276
276
_Noo
51
95
97
98
1O4
1O8
1O9
117
122
125
127
130
133
134
137
163
186
209
Part
No,
692555
94098
690024
398185
691242
692567
690023
498976
693749
694508
694468
691203
398187
398188
280492
272948
493496
693206
Description
Intake Gasket
Screw (Throttle Valve)
Throttle Shaft
Idle Speed Kit
Float Hinge Pin
Choke Valve
Choke Shaft
Main Jet
Carburetor Spacer
Carburetor
Welch Pug
Throttle Valve
Carburetor Float
Needle/Seat Kit
Float Bow! Gasket
Air Cleaner Gasket
Hose Connector
Governor Spring
Key No,
227
Part
No,
276
271716
333
334
692605
94731
347
692599
356
692602
356A
692603
365
5O5
692568
231082
562
94852
615
692576
616
692547
632
633
693408
693867
692
690572
692573
708
691321
851
493880
975
493640
25 -- ENG
Description
Governor Control Lever
Sealing Washer
Magneto Armature
Screw (Magneto Armature)
Rocker Switch
Stop Wire
Stop Wire
Screw (Carburetor)
Nut (Governor Control Lever)
87Bolt (Governor Control Lever)
Governor Shaft Retainer
Governor Crank
Spring/Link-Mechanical
Governor
Washer (Choke Shaft)
Detent Spring
Dust Seal
Spark Plug Terminal
Float Bowl
NGP67oo3o
CRAFTSMAN
3000
GENERATOR
BRIGGS & STRATTON MODEL #t2t4120t75E1
9t9o670030
425
823 _
883A
967
445
aaa_
971 _
1044 _Y_
305 _
_No,
1!
23
65
161
163
187
187A
240
300
304
305
332
425
445
455
MGP070030
Part No,
692600
692987
692680
692579
272948
298049
692601
298090
694429
692987
690960
94877
692583
690610
692591
Description
Breather Tube
Flywheel
Screw (Rewind Starter)
Air Cleaner Base
Air Cleaner Gasket
Fuel Line (Cut to Required Length)
Fue! Line (Molded)
Fuel Filter
Exhaust Muffler
Blower Housing
Screw (Blower Housing)
Nut (Flywheel)
Screw (Air Cleaner Cover)
Air Cleaner Cartridge Filter
Flywheel Cup
_No,
601
613
PartNo,
93053
694460
613A
691108
819
692598
823
94706
863
692596
864
883
694430
272309
883A
695167
958
692586
967
968
493537
692584
971
692583
1044
692590
26 -- ENG
Description
Hose Clamp
Screw (Exhaust Muffler)
Screw (Exhaust Muffler)
Screw (Muffler Bracket)
Screw (Muffler Adapter)
Muffler Bracket
Muffler Adapter
Exhaust Gasket
Exhaust Gasket
Fuel Shut-Off Valve
Filter Pre-Cleaner
Air Cleaner Cover
Screw (Air Cleaner Cover)
Screw (Flywheel)
CRAFTSMAN
3000
GENERATOR
9t9.670030
BRIGGS & STRATTON
NO,
B
55
456
--
597,_
659
56
57
f
.z "Z
58
59
6O
65A
456
459
592
597
608
689
Part No.
691422
498144
498144
693389
805957
715257
94904
281503
281505
94908
94943
693394
263073
MODEL
#t2t4120t75_=1
Description
Rewind Starter Housing
Starter Pulley
Rewind Starter Spring
Starter Rope (Cut to Required Length)
Grip Insert
Starter Rope Grip
Screw (Rewind Starter Housing)
PawI Friction Plate
Ratchet Paw[
Nut (Rewind Housing)
Screw (Paw[ Friction Plate)
Rewind Starter
Friction Spring
592
65A (_
NO.
1630
977 CARBURETOR
276_"
GASKET SET
_
16_
E33
1033 VALVE OVERHAUL
K_T
868_
121 CARBURETOR
OVERHAUL
KiT
708
_33@
068_
3
7
12
2O
51
104
121
122
127
134
137
163
276
358
633
7O8
868
883
977
993
1022
1033
Part No.
299819
695166
692549
692550
692555
691242
695157
693749
694468
398188
280492
272948
271716
695155
693867
691321
498592
272309
695156
694088
691890
690034
Description
Oil Sea!
Cytinder Head Gasket
Crankcase Gasket
Oil Sea!
Intake Gasket
Float Hinge Pin
Carburetor Overhaul Kit
Carburetor Spacer
Welch Plug
Needle/Seat Kit
Float Bowl Gasket
Air Cleaner Gasket
Sealing Washer
Engine Gasket Set
Choke Shaft Seal
Dust Seal
Valve Sea!
Exhaust Gasket
Carburetor Gasket Set
Cylinder Head Plate Gasket
Rocker Cover Gasket
Valve Overhaul Kit
27E (_
27 -- ENG
lvlGP
67ooso
Dear Customer,
In manufacturing this product, many steps have been taken to provide you with the highest quality.
Unfortunately, errors or omissions occasionally occur. In the event that you find a missing or defective part, please contact your nearest Sears store.
SERVICEAND REPAIRPARTS
CALL1o800o665o4455 *
Keep this number
handy should you require
need to order repair parts.
If ordering
a service
call or
parts make sure you have the
name, make and model no. of the merchandise
and number
and the name
of the part you wish to order.
* If calling locally, please use one of the following numbers:
Regina - 566-5124
Toronto - 744-4900
Montreal - 333-5740
Halifax - 454-2444
Kitchener - 894-7590
Ottawa - 738-4440
Vancouver-
420-8211
If you have any suggestions that would help us to improve our assembly/operation
this product, please write them down and mai! it to:
Sears Canada Inc.
222 Jarvis Street
Toronto, Ontario
M5B 2B8
Attention:
Buyer Dept: D671
Model No.
NAME
ADDRESS
POSTAL CODE
COMMENTS
PHONE #
instructions, or