1
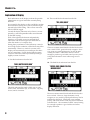
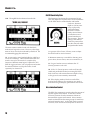
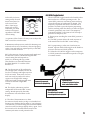
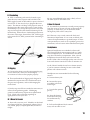
Classic® 5ID
ID
The Classic 5
manufactured by
®
Visit our site on the World Wide Web
http://www.whiteselectronics.com
for the latest information on products, services, Local Dealers
and treasure hunting news.
1
Classic® 5ID
Guide to this Manual
Assembly ...................................................................................... 3
Batteries ........................................................................................ 4
Operating Instructions ............................................................... 5
Explanation Of DISPLAY ........................................................... 8
Explanation Of SENS (Sensitivity) ........................................... 10
Explanation Of Disc (Discrimination) ..................................... 10
Explanation Of PINPOINT/ALL METAL Toggle .................. 11
Search Methods ........................................................................... 12
Headphones ................................................................................. 13
Proper Care Of Your Detector ................................................... 14
Advanced Operator .................................................................... 15
Service .......................................................................................... 16
Warranty ...................................................................................... 17
2
Classic® 5ID
Carry Carton
To Assemble:
Loop/Searchcoil
I. Remove all parts from shipping
carton and check the assembly
page to make sure parts are
present.
Washers between
each loop ear
& clevis
Cable
Retainers
II. There are rubber washers
between clevis/lower rod and loop
ears. Use only nonmetallic washers, fiber bolt, and thumbnut to
secure loop to clevis/lower rod.
III. Unlock rod camlocks and insert
clevis/lower rod into center rod, center
rod into curved "S" rod so that stainless
steel spring clip buttons line up and lock
into one of the adjustment holes. Turn
camlock to secure.
Cam Locks
IV. Unravel loop cable and wind the cable
around the clevis and rod assembly, first
revolution over the top of the rod. Wind cable
all the way to the top of the curved "S" rod,
about five revolutions. Plug loop connector
into control box and screw finger tight to secure.
V. Grip the instrument by the handle, with your
arm in the elbow cup, and sweep the loop over
the floor. If the instrument fit feels uncomfortable,
adjust the elbow cup by removing and repositioning the bolt/thumbnut and installing in one of the
optional positions. If necessary, readjust clevis/
lower rod position.
VI. Adjust the elbow cup strap so that it is loose
enough for you to slide your arm in and out without
loosening each time you want to set the detector down.
Twist and insert each end of
handle (provided) through
top of shipping carton
into second flap.
“S” Rod
Pinpoint All Metal
Toggle Control
Elbow
Cup Strap
Elbow Cup
Foam Pad
Loop Cable
Loop Connector
Control Box
Battery
Compartment
Door
Battery
Compartment
Latches
VII. Remove protective paper from the black elbow cup foam pads, carefully align each in the elbow cup and press
firmly into place.
VIII. Install battery as described in the next section, decal facing down, with plastic tab and steel contacts facing toward
inside of battery compartment.
IX. It should be noted at this point that the detector may not work as expected indoors due to the high degree of metals
used in modern construction. It is best to tune and practice out-of-doors to ensure stable, predictable results.
3
Classic® 5ID
Batteries
I. Standard Batteries:
A. The standard battery holder holds eight “AA”
cell batteries. Alkalines are recommended for use
with this model. During normal searching condit i o n s you can expect about 70 hours of hunting
time from one set of eight Alkalines.
B. Non-alkalines can be used in
this holder. When non-alkalines
or rechargeable “AA” cells are
used detecting time (before
replacement/recharge)
will be reduced to about
50 hours.
C. Once the batteries become
weak, the beep over metal targets will
be reduced in volume. Shortly thereafter,
the instrument will no longer respond to metals.
C. Slide the door closed so that it snaps securely.
D. Insert the battery holder into the detector so that
the decal is facing down, with the battery holder door
tab and metal contact points facing toward the inside
of the battery compartment.
1. Close the battery compartment door and secure
the two latches on the bottom of the case. Hook the
front of each latch first, then press down on the rear.
III. Rechargeable Batteries:
A. White’s manufactures an optional rechargeable
battery system for this model. Quick charge and
overnight charge options
are provided, as well as the
latest in state of the art nonmemory characteristics.
1. White’s nicad battery
#802-5211, and charger
#509-0022 are recommended for use with the
Classic® models.
TION
CAU
-5211
02
ry #8
Batte
D. The battery compartment opens by gently pulling
down on the front of each of the two latches on the
bottom of the control box.
II. Using The Standard Battery Holder:
A. Slide open the battery holder lid (decal side of
battery holder) by applying gentle upward pressure
on the tab of the door so that it unlocks. Slide the
door away from the battery box exposing the cell
positions.
B. Remove any old
cells from the holder.
Note the (+) and (-)
positions of each cell
and the (+) and (-) for
each position marked
inside the cell tray.
Install new “AA”
cells noting carefully
the correct (+) and
(-) positions.
1. If the cells are
installed incorrectly,
the detector may
require service by an
Authorized Service Center.
4
Classic® 5ID
Operating Instructions
Center Position
I. Once fully assembled, and the batteries installed, set
the ON/OFF SENS knob to the “P” (Preset) position
set the DISC knob to the RING RANGE “P” (Preset)
position, set the ALL METAL toggle (located on the
handle/rod) to the center DISC position.
II. The SENS (Sensitivity) knob turns the instrument
ON/OFF and adjusts the responsiveness of the detector to metal targets as well as interference from external electrical sources and ground peculiarities.
A. In most conditions the “P” (Preset) position is ideal.
l. If interference becomes apparent (false signals or
instability) reduce the SENS control (counterclockwise)
until smooth, stable operation is restored.
2. If smooth, stable operation is noted at “P” (Preset),
increasing the SENS control (clockwise) may increase
detection depth so long as the ground is not extremely
mineralized.
III. The DISC (Discrimination) knob adjusts the level
of audio rejection against trash metals.
A. The Ring Range “P” (Preset) is recommended for
most general purpose searching. In this position, the
detector will reject most iron and light foil and respond
to most valuables including jewelry.
1. Positions lower (counterclockwise) than Ring
Range provide even less trash metal rejection, to the
point of detecting virtually all types of common metals
except small iron and small stainless steel.
B. The Coin Range “P” (Preset) is optional. In this
position, the detector will reject more trash metals
including aluminum pull tabs. The display will
continue to indicate ID even though the audio discriminator will signal with a reject sound. Nickels and
some jewelry will also be rejected at this DISC setting.
1. Positions higher (clockwise) than the Coin Range
will provide even greater degrees of trash metal
rejection.
3. The SENS control will also dictate the sensitivity
of the ID display. If set too high for the conditions the
display may either become unreliable, or tend to fill in
with all the display blocks. If this occurs once in a
while ignore it as the display will clear itself automatically upon the detection of any real metal target.
However, if the display fills in regularly, we advice
reducing the sensitivity control by turning it slightly
counterclockwise.
4. When not in use, turn the SENS (Sensitivity) knob
fully counterclockwise until it clicks indicating the
instrument is turned OFF. Remove battery from unit,
and remove batteries from holder/tray prior to prolonged periods of storage.
5
Classic® 5ID
C. The most useful range on this control is between
the Ring Range “P” and Coin Range “P” positions. If
when searching at the Ring Range position you feel
you are digging too much trash, adjust slightly
toward the Coin Range and try again. Finding the
lowest (furthest counterclockwise) position that
eliminates the common trash metals in your area is
important in order to find items of jewelry.
D. When a trash metal is being rejected, it will
produce a shorter sounding beep that is typically
inconsistent, a click or flutter-sounding beep. When a
valuable metal is accepted it will produce a consistent, smooth, solid, and longer sounding beep.
E. Some large trash metals, such as pieces of lead, pot
metal, aluminum or tin will produce a good sound
regardless of the DISC control position
IV. Once either Ring Range “P” or Coin Range “P”
has been selected, sweep the round loop very near to
the ground passing it from side to side. The loop
must be swept (in motion) for metals to respond and
provide accurate discrimination. Each pass of the
loop from left to right (or from right to left) should
overlap the last by at least 50% and take about two
seconds. If the loop is swept very very slowly or is
stopped, the detector may not respond to metal.
V. At this point, it is a good idea to find an area outof-doors relatively free of metal to practice. Place a
coin on the ground. Pass the loop over the coin. Note
that some loop movement is necessary to receive a
good clean sound. Note that if you sweep the loop too
slow the coin doesn’t respond well.
VI. Now place a large nail, and/or a steel bottle cap
(not aluminum) on the ground. Sweep the loop over
these metals. Note the inconsistency in the beep, and
that it is a shorter click or has a flutter to the sound. An
operator will soon learn to ignore the clicks or flutter
sounds trash produces and listen for the smooth
consistent beep that coins and other valuable metals
produce.
A. The exact point on the DISC control a trash metal is
rejected will change slightly with the ground conditions. However, the following DISC control range is
typical. (See first graphic on this page.)
6
Classic® 5ID
VII. Once a smooth consistent beep has been located,
sweep the loop directly over the center of the target
several times and read the possible ID on the display.
Like the audio discriminator, the display will tend to
fluctuate on trash, and read more consistent on
valuable metals. This is why we recommend relying
on the audio beep as the primary indication, and then
check the display ID.
A. The display will produce and hold indications as
the loop passes over ground, trash,
and other metals. Items discriminated
by the DISC control position will still
produce display indications (see first
graphic on page 6).
A. Note that some loop movement is required. It is a
good idea to place coins on the ground and practice
pinpointing. It takes some time to develop pinpointing
skills. Release the ALL METAL toggle and it will
automatically return to the DISC position before
continuing to search.
B. The more consistent the display
indication and the fewer the blocks,
the more likely the indication is
correct. Trash metals tend to indicate
inconsistently.
C. Caution: two different types of
metals lying near each other in the
ground may produce multiple display
indications that may appear to mimic
trash. In which case the following
pinpointing method first should be
used. Return to the I.D. display once
the targets have been individually
pinpointed and you can pass the loop
directly over the center of each target
separately.
Temporarily squeezed all metals for pinpointing
D. See Explanation Of Display for more regarding
display indications.
VIII. Pinpoint exactly where to dig by squeezing and
holding the ALL METAL toggle in the temporary
position and “X-ing” the loop slowly over the area
“eyeballing” the center. The detector will “beep” as
the physical center as the loop passes the center of the
target.
Locked forward all metals for detecting iron/steel,
and all other metals
Center position discrimination for normal
searching with trash rejection
IX. If the desire is to detect iron/steel such as tools,
relics or property stakes, place the ALL METAL toggle
in the forward LOCK position and leave it there during
searching. With the ALL METAL toggle in the forward
LOCK position, all types of common metals respond.
A. The display will continue to indicate I.D.
regardless of the toggle position.
7
Classic® 5ID
Explanation of Display
Block indications on the display indicate the possible
identification or type of metal item currently being
detected.
It is normal for the display to show and hold a random
block indication during use as well as indicate targets
rejected by the DISC setting. This will not reset with
the ALL METAL toggle.
Consult the display indication only when it is accompanied by a smooth repeatable audio sound dictated
by the DISC setting.
Each of the eight blocks function independently,
therefore, it is possible to receive multiple block
indications with several targets near each other or
when the metal is of a complex alloy.
During heavy interference, if the Sensitivity control is
set too high for the conditions, all the blocks may fill in
momentarily. There is no cause for concern as the
display will automatically reset itself upon the detection of a metal item. If such display filling becomes
excessive reduce the sensitivity control by turning it
slightly counter clockwise.
I. First block indication from the left :
II. The second block indication from the left:
“FOIL, RING, GOLD”
The most common metal found with this block indication is small “FOIL” gum and candy wrappers. However, some very small gold jewelry can also be indicated by this block. If the DISC control is set low
enough to produce a good solid sound you may want
to dig this indication in areas where rings are suspected.
III. The third block indication from the left:
“NAILS, BOTTLE CAPS, IRON”
“NICKEL, RING, SMALL PULL TAB,
MEDIUM GOLD”
This block indicates the metal is likely iron or steel
such as nails, steel bottle caps, or iron relics. Dig only
if iron/steel is of interest.
The most common metal found with this block indication is nickels. However, large aluminum, candy
wrappers or very small or partial pull tabs may also be
indicated by this block. Small gold coins, medium
jewelry, and small ancient coins, may also be indicated
with this block . We recommend a DISC control setting
low enough to produce a good solid sound at this
display indication.
8
Classic® 5ID
IV. The fourth block indication from the left:
“PULL TAB, RING, GOLD”.
The most common metal found with this block indication is the standard size “PULL TAB”. However,
medium to larger gold jewelry can also be indicated by
this block. Again in areas where rings are suspected
you may want to dig this indication, at least until you
have determined the presence of many pull tabs. The
DISC control at high settings can reject metals with the
audio sound that produce this display indication.
VI. The sixth block indication from the left:
“SILVER, 10¢, 1¢”
The most common metals found with this block indication is medium to large copper and silver coins. Other
items of copper/silver can also be indicated by this
block. We recommend digging this indication.
VII. The seventh block indication from the left:
“SILVER, 25¢”.
V. The fifth block indication from the left:
“ZINC 1¢, LARGE RING, SCREW CAP,
LARGE GOLD”.
The most common metals found with this block indication is silver coins. However, other items of silver can
also be indicated by this block. We recommend digging
this indication.
The most common metals found with this block
indication may either be medium copper or zinc coins
or the large aluminum screw off bottle cap depending
on the area. However, larger gold jewelry can also be
indicated by this block. In areas where rings are
suspected, you may want to dig these indications, at
least until you have determined the presence of many
screw caps.
9
Classic® 5ID
ON/OFF Sensitivity/Gain
VIII. The eighth block indication from the left:
“SILVER, 50¢, 1 DOLLAR’
The most common metals found with this block
indication is large silver coins. However, other large
items of silver can also be indicated by this block. We
recommend digging this indication.
IX. As previously stated, multiple blocks could have
one of two meanings. There could be more than one
metal or it may be one metal of a complex alloy
(mixture of different metal types). Squeeze the ALL
METAL toggle and see if you can pinpoint and isolate
the metals and then re-sweep the center of each
separately for a better I.D.
The Sensitivity knob turns the instrument ON and
OFF and adjusts the responsiveness of the instrument.
As the SENS knob is turned further and further
clockwise, detection
depth as well as sensitivity to physically
small metal items
®
increases. Unfortunately, external electrical interference and
ground interference
also increases. The best
setting is the furthest
clockwise position that
provides smooth, stable
and predictable results.
An operator of the Classic 5 ID may want to adjust
the SENS knob for several reasons:
I. Minimum sensitivity is needed for detecting near
power lines, electric fences, microwave antennas, etc.
II. For good results in most conditions the “P”
(Preset) position works well.
III. If the “P” (Preset) position works well (smooth,
stable and predictable results) increasing the SENS
knob clockwise will increase detection depth so long
as the ground is not extremely mineralized.
IV. If the display tends to black out with all the
display blocks filling in, the sensitivity may need to
be reduced for good display performance in that area.
Discrimination Control
The DISC (discrimination) control selects the amount of
rejection against trash metals. At the fully counterclockwise position it has the minimum amount of
discrimination against trash metals. Most common
metals are detected at this setting except for small iron
and small stainless steel. As the DISC knob is turned
clockwise, more and more trash rejection is achieved.
10
Classic® 5ID
ALL METAL Toggle Control
At the fully clockwise
setting nearly all trash
metals are rejected, as
well as some valuables. Some larger
items, such as lead,
aluminum, pot metal
and tin will respond
regardless of the DISC
control setting.
®
®
An operator of the Classic 5 ID. may want to adjust the
DISC control for several reasons:
I. Minimum trash rejection is needed for detecting iron
and steel such as tools, horseshoes, relics and property
stakes. Iron and steels are rejected quickly as the DISC
control is turned clockwise.
II. For the rejection of most common trash metals and
the detection of most valuables the highest DISC
control setting that still responds to
nickel or a medium gold ring is ideal.
This should occur somewhere between
the RING RANGE “P” and the COIN
RANGE “P”.
III. For the rejection of all trash metals,
even though some valuables will also be
lost, the Coin Range and higher rejection
levels are useful. Some areas of severe
trash can easily be searched for silver/
copper coins at high DISC settings.
Nickel and small to medium gold items
will not be detected at high DISC
settings.
The ALL METAL toggle located on the handle selects
between the two available operating modes. The
center DISC position is used during most searching
where the rejection of trash metals is desired. The
temporary (squeezed and held) or forward LOCK
positions are used to provide superior pinpointing,
and for searching when the desire is to detect all types
of metals, particularly iron/steel. The temporary
(squeezed and held) is the same as LOCK except it
provides for temporary use.
I. During most searching the center DISC position is
desired.
A. The DISC position allows the audio rejection of
trash metals based on the DISC control setting.
II. For pinpointing or when iron/steel items are
desired, squeeze and hold the toggle on the handle or
place it in the forward LOCK position.
A. When the ALL METAL toggle is in the temporary
or LOCK position the instrument responds to all types
of common metals.
Temporarily squeezed all metals for pinpointing
IV. The display indications perform
independent of the audio DISC control
setting. Metals rejected by the audio
discriminator will still indicate on the
display.
Locked forward all metals for detecting iron,
steel, and all other metals
Center position discrimination for normal
searching with trash rejection
V. The idea of discrimination is to limit
the amount of trash metals you dig to a tolerable level.
Starting out at the Ring Range setting, if you’re digging
so much trash you’re not having fun, increase the DISC
control toward Coin Range slightly and try again. Find
the lowest level of discrimination that rejects the
common junk items in each particular area.
11
Classic® 5ID
Search Methods
I. Loop Sweep
A. Because the loop must be moving in order to
accurately respond, the sweep of
the loop is critical to performance.
Sweep the loop close to the
ground. Keep it close throughout
the sweep. (See examples.)
B. Productive areas, or areas that have
potential, should be searched from at
least two different directions, at ninety
degree angles from each-other.
12
Classic® 5ID
II. Pinpointing
A. Once a consistent good sound is located, to pinpoint the exact center, squeeze and hold the G.E.B./
DISC toggle (located on the handle) or press it forward
to lock and “X” the area slowly to pinpoint the exact
center. The detector will beep as the physical center of
the loop passes the center of the target. Listen for the
loudest beep as you sweep the loop over the area, then
stop and sweep in the other direction listening for the
loudest beep. Where the two loudest beeps intersect is
the center of the target. Return the G.E.B./DISC toggle
to the center G.E.B./DISC position before continuing to
search.
B. Any area inhabited before 1965, is likely to have
the older styles of collectable coins.
V. How To Search
A. You must have permission to search private property
from the owner or person in charge of managing the
property. In most cases, you can locate the owner
through City Hall or the County Seat.
B. If the area is city owned contact the Parks and
Recreations Department. If it is a state or federal park
contact the superintendent or grounds keeper. In most
cases permission to search is not a problem, given a few
restrictions, such as known and marked historical parks.
Headphones:
Optional headphones are available for this model.
The Classic® models come equipped with a 1/4 inch
stereo headphone jack. It is located below the elbow
cup, above the battery compartment. Most 1/4 inch
headphones from 8-120 ohms will work with this
model. White’s has several high quality sets to choose
from with volume controls for winter or summer use.
III. Digging
A. Care must be taken to use the appropriate digging
tool for the terrain, and not to leave unsightly
excavations or holes on other peoples property.
B. There are hundreds of digging tools designed to
minimize the impact removal of small items has on
the grass and vegetation, and avoid damaging the
items found.
C. Sand scoops are all that is needed in some areas, in
others a hand gardening spade. Challenging
ground conditions may require more sophisticated
tools. Check with your dealer regarding an
appropriate tool for your area.
IV. Where To Search
A. Start with your own yard. Valuables can be found
anywhere people have congregated, gathered, lived,
sat, walked, played, camped, picnicked, traveled or
fought.
As the Classic® models do not have volume controls,
if you have sensitive hearing be sure to select headphones with volume controls.
Headphones are recommended for the following
reasons A. Increase battery life.
B. Increase the operators ability to hear the
metal target.
C. Provide the operator
privacy.
D. Keep the detector
noises from annoying
less enthusiastic bystanders.
E. Full-size headphones block external
noise, such as traffic or surf.
13
Classic® 5ID
Proper Care
I. Cleaning
A. Both the loop and rod are waterproof and can be
cleaned with fresh water and mild soap. The control
box is not waterproof and must be kept dry. Never lift
a wet loop above the height of the control box as water
can run down the inside of the rod damaging the
electronics. A damp cotton cloth can be used to wipe
off a dirty control box.
II. Weather
A. Do not expose your detector to the conditions of a
car trunk during winter and/or summer extremes.
B. Protect it from direct sunlight during storage.
C. The control box is rain resistant. However, it must
be protected from heavy rain.
III. Saltwater
A. Saltwater is very corrosive! After your detector
has been exposed to salt, rinse the loop and rods in
fresh water. Wipe down the control box with a damp
cotton cloth. Do not allow water inside the control
box and avoid lifting the loop above the height of the
control box.
IV. Storage
A. When the instrument is not in use, make sure the
knob is turned fully counterclockwise, to the OFF
position.
B. If you plan on storing your detector for long
periods of time, remove the battery holder from the
instrument and remove the battery cells from the
holder.
C. Store the instrument indoors, in an area where it
will be protected from abuse. Over the years White’s
has noted more service repairs and physical damage,
on units in storage than those experiencing daily use.
V. Additional Precautions
A. Avoid dropping your detector while attempting to
set it down to dig.
B. Avoid using your detector for leverage when
standing up from a dig.
14
C. Do not use any lubricants, such as WD40, on any part of your detector.
D. Do not modify your instrument during
its warranty period
H
e
a
d
p
h
o
n
e
s
Classic® 5ID
Advanced Operator
Ground Rejection
The ground rejection of the Classic® models is factory
preset at a level slightly positive of a ferrite mineral
sample. This setting will provide good performance in
most ground conditions.
If you notice a lot of false targeting (beeps where there
are no metal items) or if ground penetration is less
than several inches, the ground rejection may need to
be adjusted for your area.
Some areas will not allow good ground rejection, such
as wet salt water beaches or black sand. In these areas,
it is advisable to leave the ground rejection alone and
work the detector with the NORM/BLACK SAND
toggle in the BLACK SAND position, using the G.E.B./
DISC toggle in the center G.E.B./DISC position, and a
low DISC knob setting (RING RANGE or below).
II. Bury the nickel about an inch deep in the ground.
A. Sweep the loop over the nickel while adjusting the
DISC control. Note that if the DISC control is turned too
high the nickel is rejected.
To reset the ground rejection:
I. Place the G.E.B./DISC toggle in the center G.E.B./
DISC position and abruptly lower and lift the loop
from the ground. A beep indicates ground rejection is
not set perfectly.
IV. If completed correctly, you should now have two
marks on your DISC control.
A. Furthest point (clockwise) a nickel is accepted.
II. Under the “Made In America” decal on top of the
instrument, there is an access hole with a trimmer
inside.
III. Use a very small regular head screwdriver to very
slightly adjust this trimmer.
A. Find the edge where in one direction the detector
beeps as the loop is abruptly lowered and lifted
from the ground and in the other direction the detector
doesn’t beep as the loop is abruptly lowered to
and lifted from the ground.
B. The correct setting is the point or edge where the
detector just stops beeping as the loop is abruptly
lowered to and lifted from the ground. Going further
into the silent area in most cases hinders performance.
C. Recover the access hole with the decal or a small
section of black electrical tape to prevent moisture
and dirt from entering the control box.
Discrimination:
The DISC (discrimination) control can be further
labeled with information that will aid in determining if
a metal is trash such as a pulltab, or good such as
jewelry. Use the center G.E.B./DISC toggle position.
I. Obtain a USA nickel, and an ordinary (common)
aluminum pulltab with tail.
1. Find the furthest clockwise DISC setting that still
detects the nickel well, and mark this position on the
control.
III. Now do the same thing with the pulltab. Bury it an
inch in the ground.
A. Sweep the loop over the pulltab while adjusting the
DISC control, note the point the pulltab is rejected.
1. This time, mark the furthest counterclockwise
position that rejects the pulltab.
B. Furthest point (counterclockwise) a pulltab is
rejected.
C. Note that if the marks for nickel and pulltab are very
close together, the pulltab is probably not
ordinary. Try a different, more common pulltab.
V. You’re now ready to search.
A. Use the DISC position you marked for accepting a
nickel.
B. Once a consistent, smooth, solid beep is found
continue sweeping the loop over the target while
slowly turning the DISC control clockwise.
1. If the target starts rejecting prior to the pulltab
mark, it is likely a nickel or jewelry.
2. If the target is rejected at the pulltab mark, it is
likely a pulltab.
3. If the target is not rejected until well after the
pulltab mark, it is either large jewelry, large
aluminum foil, or an aluminum screw cap.
4. If the target is not rejected all the way to the fully
clockwise DISC position, it is likely a coin other than a
nickel.
15
Classic® 5ID
WHITE’S AUTHORIZED SERVICE CENTERS
1.
White’s Electronics
1011 Pleasant Valley Road
Sweet Home, OR 97386
(541 ) 367-6121 fax 541-367-6629
[email protected]
2.
Electronics Exploration
575 West Harrison
Lombard, IL 60148
(630) 620-0618 fax 630-620-1005
Tollfree 800-392-3223*
[email protected]
3.
Centreville Electronics
10063 Wellington Road
Manassas, VA 20110
(888) 645-0202
(703) 367-76999
fax 703-367-0868
[email protected]
White’s reputation has been built on quality products backed by quality service. Our Factory Authorized
Service Centers are factory trained and equipped. They offer the same quality service as the factory. Service
before and after the sale is the cornerstone of our customer relations.
BEFORE SHIPPING DETECTORS FOR SERVICE
1) Contact your Dealer. There may be a quick and
simple fix or explanation that will prevent you from
having to send your detector in for service.
3) Be sure to send all the necessary parts with your
detector when returning it for service. Loops, batteries, control box, etc...
2) Double check the obvious, such as batteries,
and try the detector in another area to be sure
there is not interference.
4) Always include a letter of explanation about your
concerns, even if you have talked to the service center
by telephone.
5) Take care in packaging instruments for shipping,
and always insure your package.
16
Classic® 5ID
White’s Limited Warranty
If within two years (24 months) from the original date of purchase, your White’s
detector fails due to defects in either material or workmanship, White’s Electronics will repair or replace at its option, all necessary parts without charge for
parts or labor.
Simply return the complete detector to the Dealer where you purchased it, or to
your nearest Authorized Service Center. The unit must be accompanied by a
detailed explanation of the symptoms of the failure. You must provide proof of
date-of-purchase before the unit is serviced.
This is a transferable manufacturer warranty, which covers the instrument two
years from the original purchase date, regardless of the owner.
Items excluded from the warranty are non-rechargeable batteries, accessories
that are not standard equipment, shipping/handling costs outside the continental USA, Special Delivery costs (air freight, next day, 2nd day, packaging services, etc.) and all shipping/handling costs inside the continental USA 90 days
after purchase.
White’s registers your purchase only if the Sales Registration Card is filled out
and returned to the factory address by your Dealer, soon after original purchase
for the purpose of recording this information, and keeping you up-to-date
regarding White’s ongoing research and development.
The warranty does not cover damage caused by accident, misuse, neglect,
alterations, modifications, unauthorized service, or prolonged exposure to
corrosive compounds, including salt.
Duration of any implied warranty (e.g., merchantability and fitness for a particular purpose) shall not be longer than the stated warranty. Neither the
manufacturer or the retailer shall be liable for any incidental or consequential
damages. Some states however, do not allow the limitation on the length of
implied warranties or the exclusion of incidental or consequential damages.
Therefore, the above limitations may not apply to you.
In addition, the stated warranty gives you specific legal rights, and you may
have other rights which vary from state-to-state.
The foregoing is the only warranty provided by White’s as the manufacturer of
your metal detector. Any “extended warranty” period beyond two years, which
may be provided by a dealer or other third party on your detector, may be
without White’s authority involvement and consent, and might not be honored
by White’s Electronics, Inc.
17
Classic® 5ID
Warranty Transfer Information
If for any reason you should sell your Classic® metal detector prior to the date the warranty
expires, the remaining warranty is transferable. This transfer is authorized by calling
1-800-547-6911, and getting an Authorization Number.
Simply fill out the following information, including the Authorization Number, seal it in a stamped
envelope, and send it to White's Electronics, 1011 Pleasant Valley Road, Sweet Home, Oregon
97386. The remaining warranty period will then be available to the new owner.
The Warranty Statement applies to both the original owner as well as the second owner.
Warranty Transfer
®
Original Owner:
Name: __________________________________________________________
Address (Which appears on the original warranty card):
________________________________________________________________
________________________________________________________________
Instrument Serial Number: __________________________________________
Original Purchase Date:_____________________________________________
New Owner:
Name: __________________________________________________________
Address: ________________________________________________________
________________________________________________________________
________________________________________________________________
Comments: ______________________________________________________
________________________________________________________________
________________________________________________________________
________________________________________________________________
________________________________________________________________
Distributor Authorization Code:
18
______________________________________________
Classic® 5ID
Owner Information
Serial Number _________________________________ (inside of battery compartment)
Purchase Date: _________________________________ (The date on the sales receipt)
Dealer Name: _____________________________________________________________
Address: _________________________________________________________________
Telephone #: ______________________________________________________________
Payment method: __________________________________________________________
Personal markings: _________________________________________________________
Part Number for Classic® 5 ID Manual : #621-0484-1
19
Classic® 5ID
Notes
20