1
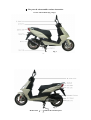
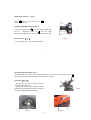
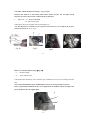
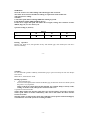
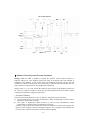
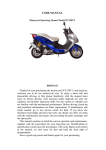
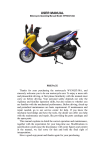
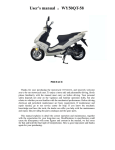
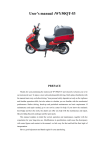
前
言
PREFACE
Thanks for your purchasing the motorcycle WY50QT-28A, and
sincerely welcome you to be our motorcycle user. To enjoy a more safe
and pleasurable driving, at first please familiar with the manual must
carry on before driving. Your personal safety depends not only the
vigilance and familiar operation skills, but also relates to whether you
are familiar with the mechanical performance. Before driving, check-up
and periodical maintenance are basic requirement. If maintenance and
repair needed, go to our service center for help. If you know the
mechanic knowledge and have the tools, the dealer can offer you help
with the maintenance and repair, like providing the parts catalogue and
the spare parts.
This manual explains in detail the correct operation and maintenance,
together with the expectation for your long-time use. Modifications in
specification could cause the discrepancy with some figures and content
in the manual, we feel sorry for that and hold the final right of
interpretation.
Have a good enjoyment and thanks again for your purchasing.
The important points to attention
Ÿ
The driver and passenger
This motorcycle was limited to one driver and one passenger (except children younger than 12 years old).
Never exceed the Max load capacity of motorcycle.
Ÿ For the safety, avoid driving the motorcycle in atrocious weather or cold weather (under -12℃).
Ÿ For the road condition
This kinds of motorcycle can only drive on the highroad.
The caution banners about the safety or environment protection stick to the sundries box cover, the rear
carrier, and fuel tank cap. (Being visible before or during driving)
• Please carefully read the user manual
You must attention to the warning sentence or paragraph.
WARNING:
Not following the operation instruction in this manual may cause great damage to you.
ATTENTION:
Not following the operation instruction in this manual may cause injury to both you and vehicle.
Regard this manual as a permanent parts, even when transfer the vehicle to a new owner, transfer the
manual at the same time.
LIST
I. Motorcycle safe drive
Rules for safe drive…………………………1
The payload…………………………………2
II. The parts &subassemblies and use
instruction
Parts & subassemblies………………………3
Speedometer and indicator …………………5
Ignition switch………………………………5
Fuel meter …………………………………6
Starting switch ……………………………6
headlamp switch …………………………6
Main beam switch …………………………7
Turning signal light switch…………………7
Horn switch…………………………………7
Steering handle lock…………………………8
Seat lock ……………………………………8
III. Operation instruction
Checking before driving……………………9
Engine starting ……………………………14
Driving operation …………………………15
Braking operation…………………………16
Engine power off operation………………17
Stopping operation…………v……………17
IV. Service and maintenance
maintenance periodical form………………18
simple trouble solution ……………………20
Cleaning air filter …………………………22
Maintenance battery ………………………22
Adjusting idling speed ……………………23
Replacing gearbox oil………………………24
Spark plug …………………………………25
Replacing Fuse ……………………………25
V. Vehicle storage…………………………26
VI. Vehicle identification…………………27
VII. Tool set………………………………28
VIII. Main technique parameter ………29
IX. Circuit diagram………………………31
Ⅹ.Emission Control System
Warranty Statement………………………32
Ⅰ. Motorcycle safe drive
Rules for safe drive
1. The motorcycle happen the many accident, all reasons are that the car drivers didn’t
look at the motorcycle drivers. So the motorcycle drivers must:
l Put up the coat in bright color
l Avoid to the driving at night .you must drive on guard and carefully to the strong
light.
2. Particular care should be exercised at the level crossing of roads, entrance and exit of
parking lot or on the automobile lane.
3. Don’t speeding, because the speeding usually to happen an accident.
4. You must get to the driving license and familiar with motorcycle. Never lend
motorcycle to the man without driving license or unfamiliar with motorcycle.
5. Avoid to driving the road with accidental, easily result in the operation without used or
the parts was broken.
6. You must check up the motorcycle before driving.
7. During drive, grasp the left hand bar by the left hand and the throttle twist grip by the
right hand with feet on the footrests.
8. Don’t drive too close the other vehicles. Never contend for lane, and strictly observe
the local traffic rules.
-1-
The payload
l warning:
The light goods can only put in the rear shelf or other deposited place.
The goods payload not heavier than Table 1:
Table 1
Load place
Load weight
Rear carrier
5kg
l
l
l
l
The motorcycle max payload is 75kg,including the weight with the driver, the
passenger, the goods.
If the motorcycle is over loading, it can affect the stability and operation of the
motorcycle.
The goods on the motorcycle, must tie it.
The rear shelf not seats the children.
-2-
Ⅱ. The parts & subassemblies and use instruction
Parts & subassemblies (Fig 1.Fig 2)
Fig 1
-3-
Fig 2
Broken Line(……)indicate the invisible parts.
-4-
Speedometer and indicator (Fig 3)
⑴
⑵
⑶
⑷
⑸
⑹
⑺
engine speed
LH turning signal light
main beam indicator
odometer
speedometer
RH turning signal light
fuel meter
Fig 3
⑻ engine oil lower light
Ignition switch(Fig4)
(1) On ( )-when the switch turn to this position,
Start engine and do not pull out the key.
(2) Off ( ) When the switch turn to this position,
Start engine power off and take out the key.
(3)Lock ( ) When the switch turns to lock position ( ),
Take out the key .do not do any turning operation
And do not start engine and light.
Notice :If the engine is idling speed for a long time in the hot climate,
It will appear too hot phenomenon , Must close engine.
Fig 4
-5-
FUELMETER 3 (Fig 5)
Fuel meter
(7) show the approx
remainder of fule. When the hand point
to (F), it indicates Full tank of 5L.
When the hand at red section it indicates
the remainder of fule is 1.8L.
•
FIG 5
Starting switch(2)(Fig 6)
Press this button to start engine。
Headlamp switch (1). (Fig.6)
There are 3 choices for Headlight Switch: “
” 、
“
”and“•”
:Headlamp, position lights, taillight and meter light turn on。
:position lights and meter light turn on.
•:Headlamp, position lights, taillight and meter light turn off。
-6-
Fig.6
Main beam switch (1) (Fig 7):
Press ( ) button is main beam; press (
button is dipped beam.
)
Turning signal light switch (2)(Fig 7):
When the switches on ( ) , the left turning signal light
turn on;
When the switch on (
) turn, the
Fig7
right
turning signal light turn on; Press it down the light turn off.
Fig7
Horn switch 3:(Fig 7)
Press (3)this button,
the horn makes sound.
-7-
Steering handle lock (Fig8 , Fig 9):
Steering handle lock (Fig 8, Fig 9): turn handle left to end, presses down ignition key to ( ),
the steering device are locked. Do the above opposite it opened.
Seat Lock(Fig 10)
Put the key into seat lock hole and then
clock-wise open the lock.
Press down the seat until it make sound of
locked, then push the back of seat to confirm it
has been locked and take out the key.
Fig 9
Fig 8
Fig 10
-8-
Ⅲ Operation instruction
Checking before driving:
Checking before driving, for safety and prevent trouble or accident,
pre-check up is necessary.
Fuel capacity
•
When the pointer or fuel meter is close to red section, replenish fuel,
meanwhile checking if there’s leakage
•
Gasoline tank container: 5L
•
Clock –wise to open the tank cover. (Fig 11)
•
Suggestion gasoline: octane number is 90
•
Please be careful and do not replenish fuel together with tidy or water
Fig11
NOTICE:
If check fuel volume or replenish fuel soon after stop, Beware of burning.
Keep fuel level under away from the height panel of flue tank while replenishing.
If fuel level is too high, it is easy to leak out.
If swallow the fuel careless, see the doctor at once.
-9-
checking engine oil (Fig 12、Fig 13)
1.Keep the motor steady in the plane. Turn on
the seat lock and open the seat, then see the
tank of engine oil and check oil.
2. Checking please the lubricating oil, its capacity is 1.2L。
Fig12
Suggestion the lubricating oil number: special 2T oil of FC series.
Fig13
- 10 -
Free Path of Rear Brake( Drum Brake)(Fig 14,Fig15)
Measure the distance of rear brake pedal before detent function .the free path should
between 10-20mm, take the tail of brake handle as standard.
•
Adjust Nut:
(A)Reduce Free Path。
(B)Increase Free Path
When adjust, the Pin 2 and Adjust Nut1 should impinge on
Note: Rear Disk brake is available, but can’t adjust Free Path. When you can’t see Disk brake oil, please
immit the disk brake oil. (Fig16, Fig17)
Fig 14
Fig15
Fig 17
Fig16
- 11 -
Brake wear and tear indicator sign(Fig 18)
(1)
Reference Mark
(2)
Arrow indicator sign
If the brake brakes absolutely, Arrow indicator sign and Reference be in line, must change the brake
shoe.
Note: If need maintain the brake, should find the nearest service department to operate.
There is professional technician in the service department to maintain. When you replace the
parts, should use the real original parts.
1
2
Fig18
- 12 -
Tire
Check the tire pressure regularly and adjust.
Check before the tire cooled
Check if there any metal trash or
gravel in the groove of tires
WARNING:
If the tire pressure dose not accord with the standard, it will properly cause the traffic
accident.
It is dangerous that use the worn tire, It will have effect to friction between tire and rode.
Maybe make difficult from drive or accident.
- 13 -
Engine starting (Fig 19)
Put the key into ignition switch and turn to ON
Electric starter: press start button (1) to start
engine, DO not use the starter more than 5
seconds each time.
Fig 19
NOTICE:
Electric starting is only in the condition of grasping the brake handle.
Electric starting not succeed, if starting again with it, we must stop for 30 seconds, If still
can’t start, Please use kick-start.
Engine kick-start :open ignition switch and add gasoline slowly, step kick-starter pedal
down quickly with strength to start engine.
Notice: After using kick-starter pedal, pull it back to original position. Otherwise have
effect to safety ride, and bad to engine.
Had better not open ignition switch when scooter has not use for a long time, and first step
kick starter for some times. Make flue into carburetor and then into cylinder, and open
ignition switch, Start engine, it is easy to start engine like this.
If cold start, warming up engine for 2-3 minutes.
- 14 -
WARNING:
Wear the trousers to avoid touching with exhaust pipe and was burnt.
The entire device must be installed according to requirement of the traffic rule.
Take the license to riding.
NOTICE:
Control the speed and load during 1000kmof running in period.
Load should be within 100kg(including driver)
If take more weight and speed will reduce life of engine, Change the crankcase oil after
300km (Page 25) to a new motorcycle.
Speed according to (Tabel 2)
Tabel 2
Log (km):
Speed (km/h):
0~200
200~500
500~1000
≤20
≤30
≤35
Driving operation
Release rear brake level, add gasoline slowly with throttle grip, then motorcycle will move
forward smoothly.
- 15 -
NOTICE:
Do not add much gasoline suddenly with throttle grip to prevent motorcycle rush out. Maybe
lose control.
Before drive, must take the stand.
Braking operation:
1 . Control throttle grip
If want to reduce speed, Must control the throttle grip, at that time use the two-brake system,
this point is very important.
Notice: if the drive will be done in this situation, for example: damp or loosely roads,
raining .no matter brake, add speed or turn must take care.
2.operate front and rear brake.
Notice: Must totally close the flue when drive in a descent, and use two-brake system for
reduce speed. Don’t use brake continuously, other wise it will reduce the effect of brake
because of too hot.
Warning: Don’t use single brake when drive with high speed, special crooked and slippery
road. Must use two-brake system for avoiding accident.
- 16 -
Engine Power off operation(fig20、fig21)
Close throttle handle: revolve to the lowest place according to picture. (Normal situation is
loose the throttle handle, and the engine is idling speed)
Put the key to “( )”
• 。
Fig20
Fig21
Stopping operation:
When the motorcycle stop, put the key to “ ” position .put down stand and lock handle.
•
Alarm points:
1 Locking the handle and do not left key in the switch
2 Put the motor into the garage
3 Use the excellent guard against theft device
- 17 -
IV. Maintenance and service
Maintenance periodic form
The maintenance is important to motorcycle, If drive with high speed in bad situation for a
long time, must add the times of maintenance, If motorcycle have a big repaired or a
accident, Must take it to check for mainly spare parts. For example: frame, indicator parts
and so on. Repair or change the worn parts. Make sure safety.
Notice: Don’t change motorcycle make sure it’s safety, Must use good quality spare
parts if replace spare parts .if use bad quality spare parts, it will influence the safety of
motorcycle.
Warning: Must close engine when make maintenance .it make sure the repairer’s safety.
And put down the stand on the smooth ground.
Notice: Must make a good maintenance if the motorcycle don’t use over a month, or don’t
use in all the winter. Make flue, tire and battery avoiding corrode.
Maintenance periodic table (Tabel 3):
Check before time based maintenance
I: check and adjust when necessary
C: clean
R: change
- 18 -
Cycle
1
Item
﹡
﹡
﹡
﹡
﹡
﹡
Every month
Fuel pipe
I
Operation of the
throttle
Core of the air filter
I
Tabel 3
speedometer(x1000km)
4
8
12
Ref page
6
12
18
I
I
I
I
I
I
15
22
C/1000km, if need: R
25
Spark plug
C/2000km,If need: R
belt
Per1000km I
If need: R
I
24
Gearbox oil
Note (300km)
I
I
I
I
23
Idling speed
I
I
I
I
11
Brakes system
I
I
I
Brakes switch
I
I
I
Headlamp
﹡
I
I
I
Suspension
﹡
I
I
Note
﹡ nuts\bolts tighten
2
I
I
I
13
Wheel & tire
﹡
I
I
Turning bearing
﹡
*If you have all of tool and maintenance document, you are a mechanic person, or else must let
special person maintenance and repair. For safety, we claim all of items have done by mechanic
person.
*Note: 1. If this area is very damp or have a lot of dirty .you had better make a short time
Note1
- 19 -
for maintenance, when it take more oil quantity or not strength, it must change.
2. If it was used every day, must make maintenance.
3. Change then according to season in a cold area.
Simple trouble solution (table 4)
Table 4
Complaint
Symptom and possible causes
solution
Plug not
sparking
Engine
does not
start
Spark
plug is
weak
No mixed
air in
cylinder
Cylinder
compresses
strength low
Damaged spark plug
Damaged Ignition Coil
Defective CDI
Defective ignition switch
Renegade or loosely Ignition system
点火系统脱落或松动
Spark plug gap too small or big
Replace
Replace
Replace
Replace
Connect well or tighten
Spark plug pole burn
Adjust
Replace
Spark plug accumulates carbons
Clear out
Fuel use out
Replenish
Oil mouth stop up
Dredge
Fuel tank switch wear
Change
Fuel path stop up
Dredge
Air filter stop up
Clean the air filter element
Intake system leak
Check and clear out
Spark plug seat leak
Cylinder cover leak
Tighten spark plug
Change washer
Piston ring & cylinder wear badly
Change piston or cylinder
Piston ring break/ unused Carbon block
Change piston ring / clear out carbons
- 20 -
Chart 4
Complaint
The vehicle
is unable to
accelerate
performance
badly
Symptom and possible causes
Change fuel
Oil path stop up
Clean oil path
Ignition time is too early or too late
Check coil and change CDI
Spark too weak or flameout
Check ignition and clear out
Mixed air too dense or race
Clean& adjust carburetor
Engine leak
Check and clear out
Muffler stop up
Dredge
Belt wear
Turning bearing gap too wide
Replace
Replace
Replace
Replace
Charge
Adjust
Lack of tire pressure
Pump
Front& rear Axle flexible
Tighten nut
Replace
Replace
Replace
Adjust
Automatic clutch roller wearing
Electric
start failure
Clutch worn
Starting relay worn
Electric quantity lack
Driving
unsteady
Brake
Failure
solution
Octane value of the fuel is too low
Brake pad fray to limit
Brake cam fray
Brake cable damaged
Free path overlong
- 21 -
Cleaning air filter(Fig 22)
•
1 Take out rear protecting bar left protecting bar
2 Take apart air filter cover and screw up bolt.
3 Take out filter element
4 Compress air or use dry brush to clean filter element.
Do the above opposite to reinstall the air filter.
NOTICE:
Do not use gasoline or low burning
point solvent to clean paper filter element.
Fig22
Maintenance battery (Fig 23)
It is adopted the airtight battery (don’t add
water).
Notice: Do not take apart the airtight
battery upper cover
Fig23
- 22 -
If the motorcycle have not been used for a
long time. Taking off the battery and putting
it into a dry and place
The head of battery was corroded, please take
it off and clean. (Can use boil water)
- first, but install positive
NOTICE: turn off the ignition switch, take apart negative pole ○
+ when you are installing.
pole ○
Adjusting idling speed (Fig 24, Fig 25)
warm up few minutes before start
Idle to adjust screw (1) is it is it improve idle
speed slightly to enter to fasten, is it is it
withdraw it than screw slowly after stocking
to fasten to mix and then rapidly, to
stabilizing the
position at most, then
withdraw slowly, get and stabilize the
position the most low.
After adjust idle, then adjust accelerate graph handle to free
path for 2-4mm,then use adjustor (2) to adjust, screw down nuts,
and then screw up it after adjust.
Adjusting the good idle speed, when should be able to suddenly
strengthen the throttle, the rotational speed of the engine should be
- 23 -
Fig24
Fig25
excessively steady, no flash back and can't go out, stop working or
arrange organ not to blow out at being last throttle.
Replacing gearbox oil (fig 26)
Suggestion the engine oil number
SAE 80W/90(the vehicle in north could use the antifreeze liquid)
Oil container
Resolving capacity:0. 10 L
Changing capacity:0. 09 L
•
•
Steady the motorcycle
Take apart the limiting bolt (1), and the spilling bolt (2).
NOTICE: THE ENGINE MUST BE WARMER
WHEN SPILLING, AND THE VEHCILE MUST
BE STEADYING BY MAIN STAND!
Reinstall the spilling bolt after clean. And screw up.
Inject 100ml to engine through immix bolt
Install immit bolt and screw up.
•
- 24 -
Fig. 26
Spark plug (Fig 27)
The specification of spark plug: BPR7HS BP7HS(NGK)、E7TC OR E7RTC
Take apart the spark plug; Take it of with special tool.
Examine if there is dirty on poles and the porcelain head in center .
If it has corroded, must change it .It is the best way to clean with
1
the liquor of spark plug Use wire brush if no cleaner.
Normally the gap between side electrode (1) and Center electrode (2) is
2
0.6-0.7mm.
Don’t use other spare plug.
Replacing Fuse
The specified electric current of the total fuse is 15 A
If the connection is not good, the fuse will overheat and breakdown.
Do not use any fuse whose specification is different from assigned. It is the same
Main reason for wiring burning.
NOTICE: Do not use brass wires to replace the recommended.
(0.6~0.7)mm
Fig27
- 25 -
Ⅴ. Vehicle Storage
Storage
For the motorcycle not to be used for a long period of time, for example, in wintertime, some
steps should be taken to prevent malfunction of and damage to its components, which might be
caused by long storage. Besides, before the long storage, proper maintenance has to be carried
out for fear that it might be forgotten when vehicle is put back into use after storage.
1. Change engine oil and oil filter.
2. Drain off fuel from the fuel tank and carburetor, spray atomized anti-rust oil onto the inside
wall of the tank and then close the tank.
Warning:
Gasoline is inflammable and may cause fire and even explosion under certain conditions. Therefore,
do not smoke, make fire or have any fire left behind on draining off fuel.
3. Take out the spark plug, pour about 15~20ml clean engine oil into the cylinder, step down
the kick lever repetitively for several times so as to have machine oil distributed all over the
engine and finally fit the spark back on.
Attention:
The ignition switch must be set to ”OFF” position before stepping down the kick lever.
To protect the ignition system from damage, the spark plug should be inserted in its cap and
earthed.
4. Wash the motor, wipe it dry and apply an even coat of wax to the painted surface. Chromate
treatment can prevent the surfaces from rusting.
5. Inflate the tires as required and pad the vehicle up by wooden blocks with the two wheels
clearance of the ground.
- 26 -
6.
Put the vehicle in a shady and cool place free from humidity and direct sunshine and cover
it properly (but not with plastic or other painted materials).
Reuse motorcycle.
Clean the motorcycle, if the storage time beyond 4 months, Must change gasoline.
Must charging if need, and then install battery.
Must check all of terms before drive (Page 11), for the safety must try the motorcycle with
lower speed for some time in a not busy rode.
Ⅵ. Vehicle Identify
Position of the model No, VIN No and engine No.(Fig28)
Provide the above No when register, get the license, yearly inspection, and also
enjoy the after-service clause.
Fig28
- 27 -
Ⅶ. The tool set
The tools bag in the boot of seat. It including the something of the following:
8*10 mm spanner
12*14mm spanner
Screwdriver
hexagon spanner
Screwdriver Handle
18.5*17mm
Fig29
- 28 -
Ⅷ.Main technique parameter
ITEM
Table 5
ITEM
Ground clearance (mm)
SPECIFICATION
1870×700×1120
1300
125
Dry weight
106
Air pressure of Rr Tyre
SPECIFICATION
120/70-12
120/70-12
150 kPa
200 kPa
Max payload (kg)
150
Transmission system
CVT
Turning angle of steering
handle
≤45 º
Gear ratio
10.83-33.85
L×W×H
(mm)
Wheelbase
(mm)
mm
(kg)
Front Tyre
Rear Tyre
Air pressure of Fr Tyre
1PE40QMB
Brake base m
( m)
≤4m(20km/h)
Engine
Maximum
(km/h)
speed
≤50km/h
Cylinder
(mm)
Consumption (L/100km)
≤2.0L/100km
Displacement
Climb ability ( º )
≥15 º
Clutch
Starting system
Electric & kick
Capacity
tank
Single cylinder
2 stroke, Air-cooled
bore*stroke
mL
40.0×39.2
49.3
Automatically,centrifugal
of gasoline
L
5
- 29 -
Tabel 5
ITEM
ITEM
Lubricative system
SPECIFICATION
Separate lubricative
Ignition system
SPECIFICATION
CDI
Rated power
3.0kW/7000(r/min)
Fuse
15 A
Maximum torque
3.9N.m/6500(r/min)
Headlamp
12V 35W/35W×2
Compression ration
7∶1
Tail/stop light
12V P21/5W
Spark plug type
BPR7HS BP7HS(NGK)
、E7TC or
E7RTC
Turning light
12V 10W
0.6~0.7
Fuel
RQ90 above
Battery
12V 7Ah
SAE 80W/90
Spark
(mm)
plug
gap
Idling speed
(1800±180)r/min
Engine Oil
Special 2T oil (FC Level)
Gearbox Oil
Capacity of engine
oil
1.2L
capacity
gearbox oil
- 30 -
of
0.1L
IX Circuit diagram
- 31 -
Ⅹ.Emission Control System Warranty Statement
Wangye USA Co., LLC is pleased to explain the emission control system warranty on
Highway Motorcycle. New Highway Motorcycle must be designed, built and equipped to
regulations and standards of the United States Environmental Protection Agency and the
California Air Resource Board and free from defects in material and workmanship that may
keep it from these requirements in the all applicable regulations.
Wangye USA Co., LLC must warrant the emission control system on the highway motorcycle
for 5 years or 6,000 km, whichever comes first, provided that there has been no abuse, neglect
or improper maintenance of highway motorcycle.
1. Period of Warranty
The period of warranty shall be one year on delivery, during this period of warranty:
(i). Any part defective by reason of the manufacturer’s faulty workmanship or material will be
replaced or repaired free of charge;
(ii). Any repairs or adjustments made necessary by reason of the manufacturer’s faulty
workmanship or material will be performed free of charge.
Emission control system may include parts such as the carburetor or fuel injection system, the
ignition system, catalytic converter and engine computer, if it is equipped. Also included may
be hoses, belts, connectors and other emission-related assemblies.
- 32 -
2. Responsibilities of Customer
To obtain repairs under warranty, the customer must:
(i). Ensure that the motorcycle is properly operated, maintained and stored as specified in the
Owner’s Manual;
(ii). Give notice to dealer approved by Wangye USA Co., LLC or other qualified service facility
of any and all apparent defects immediately upon discovery, and make the entire
motorcycle available at the time for inspection and repair at the dealer’s place of business;
(iii). Provide proof of warranty coverage to dealer;
(iv). Authorize the dealer to tear down the motorcycle for diagnostic evaluation should it be
required.
All warranty repairs must be done by the dealer and final approval of any repairs rests with
Wangye USA Co., LLC. All parts replaced become the property of Wangye USA Co., LLC.
3. Exclusion
This warranty does not cover the repair or damage resulting from abuse or neglect of the
motorcycle. Examples of abuse and neglect include, but are not limited to:
(i). Racing and competition;
(ii). Use of lubricants, oils and fuel/oil mixture other than those recommender in the Owner’s
Manual, improperly installed accessories and use of parts or accessories that are not
equivalent in design and quality to genuine Wangye parts;
(iii). Damage as a result of accidents, collisions, contact with foreign materials, impact,
submersion or use of the motorcycle after discovery of a defect;
(iv). Appearance-related damages of body parts. Examples of such damages include but are not
limited to: scratches, dents, fading, flaking and peeling;
(v). Motorcycle which has been modified in any way from the standard specifications shown in
- 33 -
the Owner’s Manual, for example, the odometer has been altered;
(vi). Normal wear and tear, corrosion and routine maintenance, such as the recommended
service inspections;
(vii). Pre-delivery inspection and assembly;
(viii). Damage from theft, fire, vandalism, explosion, water or acts of God.
4. Restriction
This warranty is in addition to, and not a modification of, any legal warranty required by the
laws of any state of US.
Subject to any applicable sales or consumer legislation, the above warranty is in lieu of any
warranty or representation, express or implied, including any warranty of performance,
merchantability or fitness for a particular purpose on the part of Wangye USA, and any other
obligation or liability on behalf of Wangye USA, and the above warranty constitutes your sole
remedy and the full liability of Wangye USA. In no event shall Wangye USA be liable for
special, incidental or consequential damages howsoever caused, whether by negligence or
otherwise resulting directly or indirectly from the use of the Motorcycle, or the Motorcycle’s
having replacement parts or the unavailability of replacement parts. Wangye USA does not
assume or authorize any person to create or assume for Wangye USA any obligation or liability
in connection with the Motorcycle or any part thereof distributed by Wwangye USA.
5. Contact
For any questions regarding emission control system warranty, please contact as following:
Company Name: Wangye USA Co., LLC
Address: 1170 Corporate Dr. West Ste. 204, Arlington, TX 76006
Tel: 817-640-1108 ext 219
Fax: 817-649-5006
- 34 -
- 35 -