1
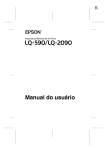
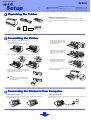
24-pin Dot Matrix Printer
Warnings, Cautions, and Notes
4041761-00
xxx
w
Warnings must be followed
carefully to avoid bodily injury.
c
Cautions must be observed
to avoid damage to your
equipment.
Notes contain important
information and useful tips on
the operation of your printer.
Unpacking the Printer
Remove the protective materials
Follow the directions on the Notice Sheet to remove the protective materials.
paper guide
Save all packing and protective materials in case you need to ship the printer in the
future.
ribbon cartridge
printer
Software CD-ROM
Setup Guide
Notice sheet
power cord
It may come attached to the
printer in some countries.
Assembling the Printer
1. Make sure the printer is turned off and unplugged.
2. Open the printer cover.
Then, move the print head slightly to the right.
6. Insert the ribbon cartridge into the
printer, then press both sides of the
cartridge firmly to fit the plastic hooks
into the printer slots.
7. Hold the ribbon guide and slide the
protruding parts on both sides into
the slots of the print head until it clicks
in place.
3. Pull the paper bail forward, then flip it towards you, as shown.
8. Turn the ribbon-tightening knob to
help feed the ribbon into place; it
should not be twisted or creased.
4. Remove the ribbon cartridge from the package.
5. Separate the ribbon guide from the cartridge by
pulling the ribbon guide forward.
c
9. Close the paper bail and printer cover.
10.Attach the paper guide.
Caution:
Do not tear off the clear film on the ribbon
guide. Doing so may cause paper jams or
printer malfunctions.
Connecting the Printer to Your Computer
Connecting the printer
Plugging in the Printer
Make sure both the printer and computer are turned off, then connect the interface
into the printer and computer.
Make sure the printer is turned off, then plug the power cord into a properly grounded
electrical outlet.
Installing the Printer Software
5. Click Browse to select appropriate path for the printer driver, then click OK and
follow the instructions on the screen.
For Windows Me, XP, or 2000 users
Note:
Installing the printer software for Windows XP or 2000 may require administrator
privileges. If you have problems, ask your administrator for more information.
Note:
If you are using Windows NT 4.0, insert your Windows CD-ROM when prompted on
the screen.
1. Make sure that the printer is turned off.
2. Insert the printer software CD-ROM into the CD-ROM drive. The Install dialog box
appears.
6. Select the appropriate file in the folder, then click OK.
7. When prompted, insert the Printer Driver Software CD-ROM, then click Browse to
select appropriate path.
Note:
If the Installer dialog box does not appear, double-click Setup.exe in the CD-ROM.
Note:
❏ If you receive a message saying the drive is not accessible, click Cancel and try
again.
❏ If a “System Error” message appears, click Cancel. The exact message differs
depending on your version of Windows.
❏ If you are using Windows NT 4.0, you do not need to specify a path.
❏ If you are using Windows 98, Printer Utility Setup may start. If it does, follow the
instructions on the screen.
3. Select Install Software, and click
.
4. Follow the instructions on the screen.
For Windows 98, 95, or NT 4.0 users
Note:
❏ Installing the printer software for Windows NT 4.0 may require administrator
privileges. If you have problems, ask your administrator for more information.
❏ The examples in the following section are from the Windows 98 operating system.
They may vary in appearance from what actually appears on your screen;
however, the instructions are the same.
8. Setup is complete. You are ready to use.
For DOS programs
To control the printer from DOS application programs, you need to select the printer
you are using.
If the list in your application does not include your printer, choose the first available
printer from the list below.
Choose the EPSON printer at the appropriate step in the installation or setup
procedure. If the list in your application does not include your printer, choose the first
available printer from the list below:
1. Make sure that the printer is turned off, then insert the printer software CD-ROM into
the CD-ROM drive. The install dialog box appears.
Note:
If the Installer dialog box does not appear, double-click Setup.exe in the CD-ROM.
2. Select Install Software, and click
.
3. Select your printer, then click OK and follow the instructions on the screen.
4. When prompted, insert your Windows CD-ROM, and click OK.
Note:
❏ If your PC shipped with Windows pre-installed, setup may complete without
requiring the Windows CD-ROM, and your printer is ready to use.
❏ If you receive a message saying the drive is not accessible, click Cancel and try
again.
❏ If you are using Windows NT 4.0, go to step 5.
1) LQ-680/LQ-680 Pro
6) LQ-300+
2) LQ-670
7) LQ-1150
3) DLQ-3500
8) LQ-2070/2080
4) DLQ-3000+
9) LQ-2170/2180
5) LQ-580/LQ-570e
10) EPSON LQ printer
Once the printer software has been successfully installed onto your computer,
your printer is ready to use.
Getting More Information
Using the Reference Guide
Error Indicators
The Reference Guide provides detailed information on the Printer’s functions, optional
products, Printer software, troubleshooting, and technical specifications.
If your printer stops working and one or more control panel lights are on or flashing or
the printer beeps, use the following table to diagnose and fix the problem.
For other patterns, refer to the Reference Guide.
Follow these steps to access the Reference Guide from the CD-ROM:
1. Insert the printer software CD-ROM in the CD-ROM drive.
2. Double-click User Guides from the screen. The online guide dialog box appears.
State of
panel lights
Beep
pattern
n Power
n Pause
n Paper Out
•••
n Power
n Pause
f Paper Out
•••
Problem
Solution
No paper is loaded in the selected paper source.
Load paper in the selected paper source; the Paper Out and Pause light go off and the
printer resumes printing.
Paper is not loaded correctly.
Remove and reload your paper correctly, then press the Pause button. See Paper Handling
in the online Reference Guide for paper-loading instructions.
Paper is not fully ejected.
Press the Load/Eject button to eject the sheet.
n Power
n Pause
o Paper Out
•••
The paper release lever is set to the wrong position.
Set the paper release lever to the position for the paper source you want to use. If paper
from another paper source is currently in the paper path, press the Load/Eject button to
eject the paper; then move the paper release lever to the desired position.
o = off, n = on, f = flashing
Replacing the Ribbon Cartridge
w
••• = short series of beeps (three beeps)
Warning:
If you have just used the printer, the printer may be hot; let it cool for a few minutes
before touching it.
When printing becomes faint, you need to replace the ribbon cartridge. Follow the
steps below.
1.
2.
3.
4.
Make sure the printer is turned off and unplugged.
Open the printer cover and paper bail.
Hold the ribbon guide and move the print head slightly to the left.
Remove the ribbon cartridge by pulling the ribbon guide and then the body of the
cartridge forward.
5. Follow steps 5 - 10 in the Assembling the Printer section on the front of this Setup
Guide.
Note:
EPSON recommends the use of genuine EPSON ribbon cartridges (S015290).
All rights reserved. No part of this publication may be reproduced, stored in a retrieval system, or transmitted in any form or by any means, electronic, mechanical, photocopying, recording, or otherwise, without the prior written permission of SEIKO EPSON CORPORATION. The information contained herein is designed only for use with this EPSON
printer. EPSON is not responsible for any use of this information as applied to other printers. Neither SEIKO EPSON CORPORATION nor its affiliates shall be liable to the purchaser of this product or third parties for damages, losses, costs, or expenses incurred by the purchaser or third parties as a result of: accident, misuse, or abuse of this product
or unauthorized modifications, repairs, or alterations to this product, or (excluding the U.S.) failure to strictly comply with SEIKO EPSON CORPORATION’s operating and maintenance instructions.
SEIKO EPSON CORPORATION shall not be liable for any damages or problems arising from the use of any options or any consumable products other than those designated as Original EPSON Products or EPSON Approved Products by SEIKO EPSON CORPORATION. EPSON and EPSON ESC/P are registered trademarks and EPSON ESC/P2
is a trademark of SEIKO EPSON CORPORATION. Microsoft, Windows, and Windows NT are registered trademarks of Microsoft Corporation. IBM is a registered trademark of International Business Machines Corporation.
General Notice: Other product names used herein are for identification purposes only and may be trademarks of their respective owners. EPSON disclaims any and all rights in those marks.
Copyright© 2002 by SEIKO EPSON CORPORATION, Nagano, Japan.
Printed in XXXX