1
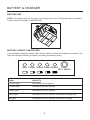
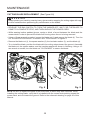
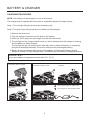
BATTERY & CHARGER
CHARGING PROCEDURE
NOTE: The battery can be charged in or out of the mower.
The charger that is supplied with this mower is a specially designed 2-stage charger.
Step 1: The red light will light up during the recharge cycle.
Step 2: The green light will light up when the battery is fully charged.
1. Remove the jack cover.
2. Plug the charger connector into the jack on the battery.
3. Insert the 120 V plug from the charger into the electrical outlet.
4. The red light on the charger should come on, which indicates that the charger is working
and the battery is being charged.
The red light will go out and the green light will come on when the battery is completely
charged (it takes approximately 15 hours to charge a fully discharged battery).
5. Battery should be charged after each use regardless of power level. Battery should
always be stored in a fully charged state. This battery will not develop a charging memory.
WA R N I N G :
Do not store battery in temperatures lower than 32° F (0° C).
INSTALLING BATTERY/
Push battery down to engage.
Tilt handle back to lock
into position.
REMOVING BATTERY
Tilt handle forward to unlock.
Lift battery.
CHARGING BATTERY
Plug charger output into battery input.
Plug charger into wall receptacle outlet.
1
BATTERY & CHARGER
BATTERY USE
NOTE: If the switch does not re-engage or the mower does not run when the battery is installed,
contact the toll free helpline 1-888-266-7096.
BATTERY CAPACITY INDICATORS
Push the Battery Capacity Indicator (BCI) switch, which is located on the back of the battery. The
lights will indicate the battery's capacity, according the following chart.
Red Yellow Green Green Green
BCI switch
Lights
CAPACITY
3 Green Lights
The battery is at full capacity
2 Green Lights
The battery is at 60% capacity
1 Green Light
The battery is at 45% capacity
Yellow Light
The battery is at 25% capacity and requires charging soon
Red Light
The battery is at 20% capacity and requires charging
2
KNOW YOUR LAWN MOWER
Read this operator's manual and safety rules before operating your lawn mower. Compare the
illustration in Figure 1 to your lawn mower in order to familiarize yourself with the location of
various controls and adjustments. Save this manual for future reference.
Upper
Bail
Lower Bail
Start Button
Mulch Plug
Upper
Handle
Cam
Lock
Lower
Handle
Rear
chute
cover
Removable
24 V Battery
Grass
Catcher
Bag
Height
Adjustment
Lever
Motor
Housing
Wheels
Fig. 1
3
ASSEMBLY INSTRUCTIONS
UNPACKING
This product has been shipped completely assembled.
• Carefully remove the product and any accessories from the box. Make sure that all items
listed in the packing list are included.
• Inspect the product carefully to make sure no breakage or damage occurred during shipping.
• Do not discard the packing material until you have carefully inspected and satisfactorily
operated the product.
• If any parts are damaged or missing, please call 1-888-266-7096 for assistance.
PACKING LIST
• Lawn mower
• Mulch plug
• Grass catcher bag
• 24V Battery (Pre-installed at the factory)
• Charger
• Owner's Manual
WA R N I N G
If any parts are damaged or missing, do not operate this product until the parts are replaced.
Failure to heed this warning could result in serious personal injury.
WA R N I N G
Do not assemble the battery until other assembly is complete. Failure to comply could
result in accidental starting and possible serious personal injury.
WA R N I N G
Do not attempt to modify this product or create accessories not recommended for use with this
condition leading to possible serious personal injury.
4
ASSEMBLY INSTRUCTIONS
WA R N I N G
Do not allow familiarity with this product to make you careless. Remember that a careless
WA R N I N G
Always wear safety goggles or safety glasses with side shields when operating power tools. Failure
to do so could result in objects being thrown into your eyes, resulting in possible serious injury.
WA R N I N G
Do not use any attachments or accessories not recommended by the manufacturer of this product.
The use of attachments or accessories not recommended can result in serious personal injury.
ASSEMBLING THE HANDLE (See Figure 2)
• Remove any packing material which may be between the upper and lower handles for
shipping purposes.
• Pull up and back on the upper handle to raise the handle into the operating position. Make
certain the lower handle is seated securely into the handle mounting bracket.
• Align the holes (3) between the upper handle (1) and lower (2) handles. Insert the cam locks (4)
and tighten them with the wing nuts (5) provided.
5
3
4
1
2
Fig. 2
5
ASSEMBLY INSTRUCTIONS
INSTALLING THE GRASS CATCHER BAG (See Figure 3)
• Lift the chute cover (1).
• Lift the grass catcher by its handle (2) and place under the chute cover so that the hooks (3)
on the grass catcher frame are seated into the slots in the handle bracket.
• Release the chute cover. When installed correctly, the hooks on the grass catcher will rest
securely in the slots on the handle brackets.
2
Slots
1
3
Fig. 3
NOTE: For optimal performance empty grass catcher bag often during use. A full grass bag will
inhibit performance of the mower and collection of grass clippings.
6
ASSEMBLY INSTRUCTIONS
INSTALLATION OR REMOVAL OF THE MULCH PLUG (See Figure 4)
• REMOVE THE BATTERY, AND WAIT FOR BLADE TO COME TO A COMPLETE STOP.
• To remove the mulch plug lift the chute cover (1) and pull out on the handle.
• The mulch plug (2) is inserted on an angle so it will require some force when removing.
1
2
Fig. 4
7
OPERATING YOUR LAWN MOWER
STARTING/STOPPING THE MOWER (See Figure 5)
STARTING THE MOWER:
• Press and hold the start button (1).
• Pull the upper bail (2) toward the handle to start the mower.
• Release the button (1).
STOPPING THE MOWER:
• Release the upper bail (2).
SELF-PROPELLED MOWING
Once the mower has been started, the self-propelled feature is engaged by pulling the lower bail
(3) upward to meet the handle.
To disengage the self-propelled feature, release the lower bail (3).
Upper bail (2)
④
Lower bail (3)
Start button (1)
Fig. 5
C A U T I O N :
Do not attempt to override the operation of the safety key or lever.
WA R N I N G
The operation of any mower can result in foreign objects being thrown into the eyes, which can
cause severe eye damage. Always wear safety glasses while operating the mower and while
performing any adjustments or repairs.
WA R N I N G
Ensure that other people and pets remain at least 50 ft. (15 m) away when the mower is in use.
INSPECT THE CUTTING AREA
Remove all stones, sticks, wire, and other debris that might be thrown by the rotating blades.
8
OPERATING YOUR LAWN MOWER
CUTTING HEIGHT ADJUSTMENT (See Figure 6)
• Simply depress the lever (1) towards the wheel and move to desired position. This sets all
wheels to the same position.
• To raise the height, pull the height adjustment lever from the current stop position towards the
back of the mower.
• To lower the height, pull the height adjustment lever from the current stop position towards the
front of the mower.
LOW
HIGH
1
9
Fig. 6
OPERATING YOUR LAWN MOWER
ADJUST THE UPPER HANDLE HEIGHT (See Figure 7)
• Loosen the upper handle knob.
• Adjust the upper handle to the most comfortable of the 2 positions.
• Snug the upper handle knob and lock the cam lock handle to secure.
Cam lock handle
Upper handle knob
Lock
Fig. 7
10
OPERATING YOUR LAWN MOWER
SLOPE OPERATION
WA R N I N G
Do not mow a slope that has an angle of greater than 15° (a rise of approximately 2-1/2 ft.
[75 m] every 10 ft. [3 m]). Mow across the face of a slope, and never up and down.
• Slopes are a major factor related to slip and fall accidents that can result in severe injury.
Operation on slopes requires extra caution. If you feel uneasy on a slope, do not mow it. For
your safety, do not attempt to mow slopes greater than 15 degrees.
• Mow across the face of slopes, not up and down. Exercise extreme caution when changing
direction on slopes.
• Watch for holes, ruts, rocks, hidden objects, or bumps which can cause you to slip or trip. Tall
grass can hide obstacles. Remove all objects such as rocks, tree limbs, etc., which could be
tripped over or thrown by the blade.
• Always be sure of your footing. A slip and fall can cause serious personal injury. If you feel
you are losing your balance, release the switch control lever immediately.
• Do not mow near drop-offs, ditches, or embankments; you could lose your footing or balance.
11
OPERATING YOUR LAWN MOWER
MOWING TIPS
NOTE: A sharp blade will greatly enhance the performance of the mower, especially when
cutting high grass. Be sure to check the blade and to sharpen it at least once per year, as
described in the Maintenance section.
• Verify that the lawn is free of stones, sticks, wires, and other objects that could damage
the blades or the motor. These objects could be accidentally thrown by the mower in any
direction, and could cause serious personal injury to the operator and to others.
• In order to prevent electric shock, do not operate the mower in damp or wet conditions.
• Do not mow in circles. Travel back and forth across the lawn.
• When cutting thick grass, reduce walking speed in order to allow for a more effective cut
and a proper discharge of the clippings. For a healthy lawn, always cut off one-third or
less of the total length of the grass. The average lawn should be approximately 1-1/2 to 2”
(3.8 to 5 cm) long during cool months, and more than 2” (5 cm) long during hot months. If
there is growth, the lawn should be cut in the fall.
MULCHING TIPS
NOTE: ALWAYS INSPECT AREA WHERE MOWER IS TO BE USED AND REMOVE ALL
STONES, STICKS, WIRE, BONES AND OTHER DEBRIS WHICH MIGHT BE THROWN THE
ROTATING BLADE.
• Release switch to turn mower OFF when crossing any graveled area (stones can be
thrown by the blade).
• Set mower at highest cutting height when mowing on rough ground or in tall weeds.
• For effective mulching, do not cut wet grass, as it tends to stick to the underside of the
deck preventing proper mulching of grass clippings. New or thick grass may require a
narrower cut. The ground speed should be adjusted to the condition of the lawn. If mowing
has been delayed and the grass has been allowed to grow in excess of 4”, mow twice to
reduce the grass height to 3-3/4” maximum.
• Walk at a good, steady pace. Overlap your rows. Don’t let the grass get too tall. If the
grass gets too long start at the highest cutting position and work down to the desired
cutting height.
WA R N I N G
If you strike a foreign object, stop the motor and disconnect the power cord. Thoroughly inspect
the mower for any damage. Repair any damage before operating the mower. Excessive vibration
of the mower during operation is an indication of damage. Thoroughly inspect the mower and
repair any damage before operating the mower.
12
MAINTENANCE
CUTTING BLADE REPLACEMENT (See Figure 8-9)
WA R N I N G
Always protect your hands by wearing heavy gloves and/or wrapping the cutting edges with rags
or other materials when performing any maintenance on the blades.
• RELEASE THE BAIL SWITCH TO TURN THE MOWER OFF, WAIT FOR THE BLADE TO
COME TO A COMPLETE STOP, AND THEN UNPLUG THE POWER CORD.
• While wearing leather padded gloves, wedge a block of wood between the blade and the
mower deck in order to prevent the blade from turning when the nut is being removed.
• Using a 15-mm wrench or socket, loosen the blade nut (1) and remove the blade (4). Turn the
nut "COUNTERCLOCKWISE" to loosen it and "CLOCKWISE" to tighten it.
• Remove the blade nut (1), the square washer (2), the insulator washer (3), and the blade (4).
• To re-install the blade, position the blade with the cutting edges toward the ground. Assemble
the blade nut, the square washer, and the insulator washer as shown in following. Using a 15mm wrench or socket, turn the blade nut "CLOCKWISE” to secure the blade.
Tighten
3
Loosen
1
4
2
Fig. 8
Fig. 9
NOTE: Be sure to replace the parts in the exact order in which they were removed. When
installing the cutting blade, verify that it is installed with the curved ends pointing toward the
mower deck, and not toward the ground. Refer to the schematic drawing on page 30 of this
Manual.
13