1
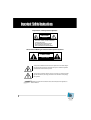
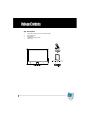
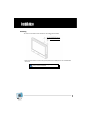
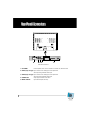
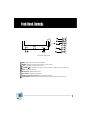
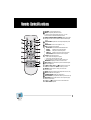
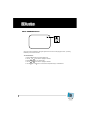
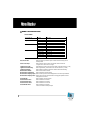
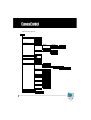
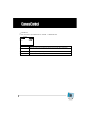
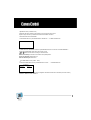
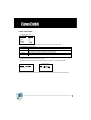
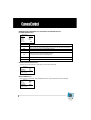
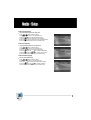
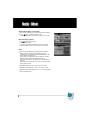
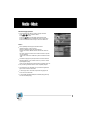
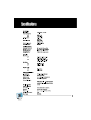
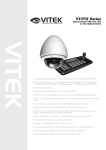
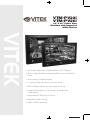
VTM-PV22i
VTM-PV26i
22” & 26” Public View
Monitors with Integrated
WDR Camera
VITEK
• 22" & 26" Public View 16:9 Widescreen LCD Displays
• Built-in High Resolution Varifocal WDR Camera with 540 TV
Lines
• Two Looping Composite Inputs
• 1 Camera Output for Internal Camera Video
• Built-In Motion Sensor for Auto Camera Call-up
• Integrated SD Memory Card Reader for Multimedia
Presentations
• Adjustable PIP (Picture-in-Picture)
• Remote Control Included
• VESA 100mm Mounting
BLACK
Contents . . . . . . . . . . . . . . . . . . . . . . . . . . . . . . . . . . . . . . . . . . . . 2
Imprtant Safety Instructions . . . . . . . . . . . . . . . . . . . . . . . . . . . . 3
Regulatory Notices . . . . . . . . . . . . . . . . . . . . . . . . . . . . . . . . . . . . 6
Package Contents . . . . . . . . . . . . . . . . . . . . . . . . . . . . . . . . . . . . 7
Installation . . . . . . . . . . . . . . . . . . . . . . . . . . . . . . . . . . . . . . . . . . 8
Rear Panel Connectors . . . . . . . . . . . . . . . . . . . . . . . . . . . . . . . . 9
Front Panel Controls . . . . . . . . . . . . . . . . . . . . . . . . . . . . . . . . . . 1 0
Installing Remote Control Batteries . . . . . . . . . . . . . . . . . . . . . . 1 1
Remote Control Functions
. . . . . . . . . . . . . . . . . . . . . . . . . . . . . 12
OSD Function . . . . . . . . . . . . . . . . . . . . . . . . . . . . . . . . . . . . . . . . 1 3
Menu Display . . . . . . . . . . . . . . . . . . . . . . . . . . . . . . . . . . . . . . . . 1 4
Camera Control . . . . . . . . . . . . . . . . . . . . . . . . . . . . . . . . . . . . . . 1 7
Media Mode (USB and SD card)
. . . . . . . . . . . . . . . . . . . . . . . . . 24
Media-Setup . . . . . . . . . . . . . . . . . . . . . . . . . . . . . . . . . . . . . . . . . 2 5
Media-Movie . . . . . . . . . . . . . . . . . . . . . . . . . . . . . . . . . . . . . . . . . 2 7
Media-Music . . . . . . . . . . . . . . . . . . . . . . . . . . . . . . . . . . . . . . . . . 2 8
Media-Photo . . . . . . . . . . . . . . . . . . . . . . . . . . . . . . . . . . . . . . . . . 2 9
Specifications . . . . . . . . . . . . . . . . . . . . . . . . . . . . . . . . . . . . . . . . 3 0
1.
Use at the rated power voltage.
Use of non-rated voltage may cause fire, electric shock and breakdown.
2.
Do not open the cabinet and external cover.
The high voltage inside of this product may cause the electric shock.
3.
Do not remodel or disassemble this product.
Remodeling or disassembling in wrong method may cause fire, electric shock or breakdown.
4.
Do not insert or drop any foreign substance such as metals or flammable object inside from the air hole.
It may cause fire, electric shock or breakdown.
If any foreign substance is inserted inside of this product, turn off the power, pull the plug out of the socket and contact
the sales department. Do not use the product with the foreign substance in.
5.
Do not place any vase, potted plant, cup, medicine and any container with water on this product.
If the liquid is spilt, it may cause the fire, electric shock or breakdown.
6.
Do not place this product with water nor moisten it.
If water flows in it, it may cause the fire, electric shock or breakdown.
If there is water inside of the product, turn off the power immediately, pull the plug out of the socket and contact the
sales department. Do not use the product with water in it.
7.
Never touch the antenna lie or power plug if it stars to thunder.
It may cause the electric shock.
8.
If any impact is applied, the parts inside of the product may be fallen out or broken to be the cause of fire, electric shock
or breakdown.
9.
Clean the dust on the power plug periodically.
The dusty power plug may cause the poor insulation due to the moisture to be the reason of fire.
10. Do not destroy, process, make closer to heating device, bend or twist forcibly, place any heavy object on nor bind the
power cord or power plug. If it is used in the broken condition, it may cause fire or electric shock.
11. Do not touch the power plug with wet hands.
If you pull in or out the power plug with wet hands, it may cause electric shocks.
12. Put the power plug in firmly.
Putting the plug incompletely may cause the electric shock or fire by the generation of heat.
13. Do not use any non-rated power socket with numerous devices jointed on one power socket or cable device.
The wire of non-designated capacity may cause the fire due to the generation of heat.
14. In case of malfunction, turn off the power switch immediately and pull out the power plug.
If this product is used in the abnormal condition such as damage to it, foreign substance inside of the product, generation
of joints, smelling, smoking, overheating and non production of signal, it may cause fire, electric shock or breakdown.
Turn off the power switch immediately, pull the power plug out of the socket and contact to the sales store..
15. Leave space 10 cm or more from the wall for the installation of the device.
Do not install it close to the wall nor block the ventilation of the air.
Insufficient ventilation or accumulated heat inside of the product may cause the fire.
16. Do not install it at the unstable location such as on the bouncing prop or tilted place.
It may be tipped over as it loses balance or damaged as it is fallen down.
17. Do not install at the place with moisture or dust.
It may cause the fire or the electric shock.
18. Do not install it at the place with poisonous gas.
It may cause the fire.
19. Do not install it at the location with continuous vibration.
It may be tipped over as it loses balance or damaged as it is fallen down.
20. Do not install it at the place on the strong magnetic field or current field.
It may cause fire, electric shock or break down.
This equipment may be observed deterioration of the picture by electromagnetic radiation in electromagnetic environment.
21. Fasten the wheel of the product or shelf with wheels when installing this product.
If it moves or is tipped over, it may be damaged.
22. Do not leave it in the car under the burning sun for a long time.
The high temperature may distort the cabinet or the parts inside may be broken down or heated.
If you use this product in this condition, it may cause the fire, electric shock or breakdown due to the short circuit or poor
insulation.
23. Do not place any fire source such as candlelight close to this product or place it on this product.
If it is tipped over or fallen down, it may cause damage or fire.
24. Do not sprinkle water drops or water on this product.
It may cause the fire, the electric shock or breakdown.
25. Do not place heavy objects on this product.
It may be tipped over as it loses balance or damaged as it is fallen down.
26. Do not transport it with the power cord or the connection cable connected.
If you move this product with the power cord or the connection cable connected, the damaged power cord, connection
cable or connection terminal may cause the fire, the electric shock or breakdown.
27. Pull the power cord out while holding the plug portion.
If you pull the power cord out by force, the cord may the fire or the electric shock.
28. Do not use it outdoor.
Dust or rainstorm may cause the fire, electric shock or breakdown.
29. Do not climb on this product.
If you climb on it, it may damage or hurt it.
30. 2 persons or more shall transport the device, which is heavier than 18 kg.
If you drop or tip over the device, it may damage it.
The weight is indicated on the user's manual.
31. Use the this unit shall be connected to a mains socket outlet with a protective earthing connection.
And connection cable, or those, which are indicated on the user's manual.
If you do not use the designated power cord and connection cable, it may cause the electric shock or breakdown.
32. Turn off the power switch when connecting the power cord or connection cable.
If you not turn off when connecting it, it may cause the electric shock or breakdown.
33. Do not use any chemical such as the paint thinner or benzine to clean the cabinet.
It may scratch the surface or disappear the indication to cause wrong operation, whch can be the reason for disorder.
34. Clean the cabinet with 5~6 time diluted neutral detergent water on smooth cloth as stirring to remove the contamination.
After that, clean it with dry cloth to remove any stain.
Explanation of Safety Related Symbols
CAUTION
RISK OF ELECTRIC SHOCK
DO NOT OPEN
CAUTION : TO REDUCE THE RISK OF
ELECTRIC SHOCK, DO NOT REMOVE
COVER (OR BACK).
NO USER-SERVICEABLE PARTS
INSIDE. REFER SERVICING TO
QUALIFIED SERVICE PERSONNEL.
Shock Hazard Marking and Associated Graphical Symbols
CAUTION
RISK OF ELECTRIC SHOCK
DO NOT OPEN
This symbol is intended to alert the user to the presence of uninsulated "dangerous voltage" within the product's enclosure that may be of sufficient magnitude to
constitute a risk of electric shock to persons.
This symbol is intended to alert the user to the presence of important operating and maintenance (servicing) instructions in the literature accompanying
the appliance.
WARNING - To Reduce The Risk Of Fire Or Electric Shock, Do Not Expose This Apparatus To
Rain Or Moisture.
This marking shown on the product or its literature, indicates that it should not be disposed with other
household wastes at the end of its working life. To prevent possible harm to the environment or
human health from uncontrolled waste disposal, please separate this from other types of wastes and
recycle it responsibly to promote the sustainable reuse of material resources.
Household users should contact either the retailer where they purchased this product, or their local
government office, for details of where and how they can take this item for environmentally safe recycling.
Business users should contact their supplier and check the terms and conditions of the purchase
contract. This product should not be mixed with other commercial wastes for disposal.
This device complies with Part 15 of the FCC Rules and Regulations. Operation is subject to the following
two conditions: (1) This device may not cause harmful interference, and (2) this device must tolerate any
interference encountered, including interference that may cause improper operation.
The equipment has been tested and found to comply with the requirements stipulated in Part 15 of FCC
regulations for a Class A digital device. These requirements are designed to provide reasonable protection
against harmful interference in a residential installation.
This equipment generates, uses and can radiate radio frequency energy and, if not installed and used in
strict compliance with the instructions, may disrupt radio communications. However, there is no guarantee
that interference will not occur in a particular installation. If this equipment does cause detrimental interference with radio or television reception, which can be determined by turning the equipment off and on, the
user is encouraged to try to correct the interference by taking one or more of the following measures:
Reorienting or relocating the receiving antenna.
Increasing the separation between the equipment and the receiver.
Connecting the equipment into an outlet on a circuit different from that to which the
receiver is connected.
Consulting the dealer or an experienced radio/TV technician for help.
Shielded interconnected cables and shielded power cords must be used with this equipment to ensure
compliance with the pertinent RFD emission limits governing this device.
Changes or modifications not expressly approved by the manufacturer could void the user's right to operate the equipment.
Notice of Compliance with Canadian Interference-causing Equipment Regulations.
This Class A digital apparatus meets all requirements of the Canadian Interference-Causing Equipment
Regulations.
Cet appareil numerique de classe A satisfait toutes les exigences des reglementations canadiennes inherentes aux equipements generant des interferences.
Q'ty Description
1
1
2
1
1
22/26-inch LCD public view monitor with WDR camera
Remote control unit
AAA batteries
Installation/ Operation manual
Power Cord
Mounting
The monitor accommodates mounts that adhere to the VESA 100x100 standard.
with VESA MOUNTED BRKT(100X100)
SCREWS M4X0.5, L=12mm(4EA)
1. VESA mounted bracket at the screw holes (4 places) located in the middle part of the rear LCD MONITOR,
with screws.
Do not use longer screw than 12mm length except mount parts
when you use vesa mount bracket.
Rear Panel Connectors
1. AC POWER:
Power receptacle, which can be connected to a 100-240 VAC, 60/50 Hz source
2. VIDEO1(loop through): Input connections from DVD players or time-lapseVCRs.
Video loops through the BNC video output.
3. VIDEO2(loop through): Input connections from DVD players or time-lapseVCRs.
Video loops through the BNC video output.
4. CAMERA OUT:
Output signal of internal camera video
5. MEDIA CARD IN:
Input media card(USB , SD card).
Front and Side Panel Controls
MENU: Displays the main on-screen menu (monitor).
SOURCE: Selects the input source and confirms your choice in menu.
and
: Navigates through the on-screen menu.
/Vol+ and
/Vol-: Increases or decreases the volume. Also selects or adjusts items on the on-screen menu.
Power : Turns on/off the monitor.
Motion Sensor : Motion detection sensor.
Photo Sensor : Brightness detection sensor.
Remote control signal receiver : Receives remote control signal.
Power indicator : Indicates power status. Red means the power is off, green means the power is on.
Battery Installation
1.
Open and remove the back cover of the remote control.
2.
Install two AAA size batteries (supplied). Match the positive (+) and negative (-) signs on the batteries to the
signs on the battery compartment.
3.
Close the battery cover. Make sure the lock snaps closed.
WARNINGS:
Dispose of batteries in a designated disposal area. Do not throw batteries into a fire.
Do not mix battery types.
Remove dead batteries immediately to prevent battery acid from leaking into the battery compartment.
Remove the batteries if you do not intend to use the remote control for a long period of time.
POWER: Turns the monitor on or off.
MUTE: Temporarily silences the sound.
To return the sound: press MUTE again, VOL +, or VOL -.
Press the button to select the desired input source.
VIDEO1/VIDEO2/MEDIA/CAMERA: Displays all the available input sources. Press the button to select the desired input
source.
COLOR TEMP: Adjusts the color temperature(Kelvin) of the
screen.
RESERVED: For future use only.(Mirror... etc)
(PIP): Controls the PIP as follows:
PIP ON/OFF: Activates/deactivates PIP/PBP mode.
P.SIZE:
Selects the size of the sub picture.
P.SWAP:
Swaps the main and sub picture.
P.INPUT:
Selects an input source for the sub picture.
P.LOCATION: Selects a location for the sub picture.
CYCLE: Cycles the input source:
In PIP or PBP, the subpicture is cycled.
In Full screen, the main picture is cycled.
You can define the cycle time and source in the menu.
MENU/EXIT: Displays or exits the on-screen menu.
KEY LOCK: Locks the buttons to prevent unuthorized operation of the equipment..
( /VOL- and / VOL+, , ): Controls the cursor in the
on-screen menu, and also adjust the volume up or down.
ENTER: Confirms (store or enter) your choice in the
on-screen menu.
SCAN: Changes the screen's scan mode (Under, Full, Over, 4:3).
STILL: Freezes the current picture.
CAMERA MENU: Display the Camera menu.
PLAY/PAUSE: Play and pause the slide show picture or video clip.
STOP/EXIT: Stop the slide-show or return to previous page.
Exits the camera menu.
( / / / ): Controls the cursor on the media menu.
* Camera control is optional.
INPUT SOURCE DISPLAY
Input source name is displayed on the upper right-hand corner in case of changing input source, or pressing
ENTER key on the remote controller.
To use the menus:
1. Press the MENU button to access the Main menu.
2. Use the and arrow buttons to highlight a selection.
3. Press ENTER( /VOL+) to select an item.
4. Use the and arrow buttons to highlight a selection.
5. Use the / VOL- and /VOL+ arrow buttons to adjust the setting on a selected item.
Menu Tree
MENU FIELD DEFINITIONS
UTILITY MENU
Auto Power ON
Video Loss Sleep
Light Sensor
Motion Sensor
Search
Select
Select
Mode
Sensitivity
Delay
Mode
Sensitivity
Display Input
Display Time
Mode
Video1 Time
Video2 Time
Camera Time
Media Time
ON, OFF
OFF, VIDEO1, VIDEO2, CAMERA, MEDIA
ON, OFF
1 to 100
5 to 30
OFF, FULL, PIP, PBP
LOW, MIDDLE, HIGH
VIDEO1, VIDEO2, CAMERA
5 to 20
Off, FULL, PIP, PBP
Off, 5 to 30
Off, 5 to 30
Off, 5 to 30
Off, 5 to 30
Select the video input when the power is turned on after returning from an
electricity failure.
Video Loss Sleep:
Sets the function that turns off the monitor after video has been lost.
If a signal comes, the monitor is on again.
Light Sensor mode:
Automatically turns the monitor off and on based on the light intensity.(1 to 100)
Light Sensor Sensitivity:
Sets the light intensity at which the monitor is turned off and on. (5 to 30)
Light Sensor Delay:
Sets the delay time that the Light Sensor feature waits before activating.
Motion Sensor Mode:
Sets the mode of Motion Sensor.
Motion Sensor Sensitivity:
Sets the sensitivity of Motion Sensor.
Motion Sensor Display Input: Sets the video input which will be displayed when a human body is detected.
Motion Sensor Display Time: Sets the time how long a selected video source triggered by Motion Sensor
is displayed on the screen.
Search Mode:
Sets the Search of the input source.
Search Video1 Time:
Sets the Search time of Video1.
Search Video2 Time:
Sets the Search time of Video2.
Search Camera Time:
Sets the Search time of Camera.
Search Media Time:
Sets the Search time of Media.
If set off, The Search will skip the input.
Auto Power ON:
MENU FIELD DEFINITIONS
Source: Select VIDEO 1, VIDEO 2, CAMERA, or MEDIA.
Contrast: Adjusts black level of the video screen image (0 to 100).
Brightness: Adjusts white level of the video screen image (0 to 100).
Sharpness: Adjusts the picture softer or sharper (0 to 15).
Color: Adjusts the color saturation of the video signal (0 to 100).
Tint: Adjusts the range of color: green to red (0 to 100).
3D NR: Reduces the background noise of the video signal (NR ON or OFF).
Language: Select English, German, French, Spanish or Italian for the OSD display.
Key Lock: Select UNLOCK or LOCK. Locks/unlocks the buttons on the front panel.
Scan Mode: Select Under, Full, Over.
PIP: Select SETUP for the picture-in-picture. Then select one of the following:
• PIP Mode: Select PIP OFF, PIP ON, or PBP ON.
• PIP Input: Select VIDEO 1, VIDEO 2, CAMERA, or MEDIA.
• PIP Location: Select the PIP position as T/L (top left), T/R (top right), B/R (bottom right),
or B/L (bottom left).
• PIP Size: Select the PIP size as LARGE, NORMAL or SMALL.
• PIP Swap: Select SWAP to interchange Main with PIP by pressing the ENTER button twice.
OSD Setting: Select SETUP for the on-screen display. Then select one of the following:
• H.Position: Adjusts the OSD horizontal position (0 to 100).
• V.Position: Adjusts the OSD vertical position (0 to 100).
• Display Time: Selects off, 5 to 30 secs.
Color Temperature: Select NORMAL, COOL, or USER.
If you select USER, then select from the following calibrations:
• R-Gain: Adjusts gain for red (0 to 100).
• G-Gain: Adjusts gain for green (0 to 100).
• B-Gain: Adjusts gain for blue (0 to 100).
• Reset: Select Restore to return to the original color temperature settings.
Media Control: Sets the media source” enable or disable.
Reset: Select Restore to return to the default settings.
* Camera control is optional.
Setup Menu
PRESET menu
PRESET menu is provided to help the settings with the possible parameters obtained and assumed by the factory tests
for the most common environments.
MENU(Ver3.2e)
PRESET
>> PRESET
EXPOSURE
AGC
SHUTTER LIMIT
PICTURE CONTROL
RESTORE FACTORY
VIDEO STANDARD
< INDOOR
INDOOR >
WDR MID
MIDDLE
2X ESS
SETTINGS
NTSC
"PRESETs may not be the best optimized settings for the actual
installations. In such cases, find the optimal settings in CUSTOM
setting of EXPOSURE menu".
Press 'EXIT' to save/return
PRESET
INDOOR
OUTDOOR
FL-LIGHT
LOBBY
WAREHOUSE
NORMAL
DESCRIPTIONS
Provides better leveling of image for in the darker areas of the scene. Suitable for indoor scenes that have
higher contrast lighting.
Optimized for outdoor sunlit applications and provides better leveling for the brighter areas.
Suitable for outdoor scenes having high contrast between sunlit and shadows.
Reduces the color rolling by fluorescent lights when line-lock is not available(NTSC). DC auto iris lens is
required.
Optimized for the common installation at lobby.
Optimized for the common installation at warehouse.
Produces an image that has average contrast and suitable for normal indoor or low-contrast outdoor scenes.
EXPOSURE menu
EXPOSURE menu is provided to help the settings with the possible parameters obtained and assumed by the factory
tests for the most common environments.
MENU(Ver3.2e)
INDOOR
PRESET
>EXPOSURE
EXPOSURE
AGC
SHUTTER LIMIT
PICTURE CONTROL
RESTORE FACTORY
VIDEO STANDARD
<WDR
WDRMID
MID >
MIDDLE
2X ESS
SETTINGS
NTSC
"EXPOSURE presets may not be the best optimized settings for
the actual installations. In such cases, find the optimal settings in
CUSTOM setting of EXPOSURE menu".
Press 'EXIT' to save/return
EXPOSURE
WDR MID
WDR HIGH
CUSTOM
BLC...
WDR LOW
DESCRIPTIONS
Medium level of the dynamic range control for each PRESETs.
Increases the dynamic range control. Some highlight area may washed out.
Provides more flexible compensation other than WDR MID, WDR LOW, WDR HIGH
Compensates the brightness of main object against the bright back light.
A zone out of CTR SPOT, UPPER1/3, MIDDLE1/3, LOWER1/3 can be set.
Dynamic range control is inoperative if EXPOSURE is set to BLC.
Decreases the dynamic range control.
CUSTOM menu
To enter CUSTOM menu, press ENTER button at <CUSTOM...> of EXPOSURE menu.
WDR CUSTOM
> WINDOW
WINDOW
RANGE
BIAS
PREVIOUS
WDR CUSTOM
<SAFE
SAFEAREA
AREA >
0
36
-10
10
PAGE
DESCRIPTIONS
WINDOW
Metering of the dynamic control is weighted to the selected window from SAFE AREA, ZONE ADJUST,
CENTER 1/3 AND LOWER 2/3.
RANGE
Adjusts the strength of the dynamic range control.
BIAS
Adjusts the base level of the dynamic range control.
ZONE ADJ menu (In Window menu)
Adjusts the size and the location of the metering zone for the dynamic range control.
Dynamic range control is very sensitive to the size and the location of the zone.
The default window size is SAFE AREA.
To enter ZONE ADJ menu, press ENTER button at <ZONE ADJ . . .> of WDR CUSTOM menu.
NEXT: MENU-, RETURN: MENU ---
In ZONE ADJ menu, 'NEXT:MENU-' stands for 'press ENTER button short for next menu' and 'RETURN:MENU---'
means 'press ENTER button longer than 2 sec for return or exit'.
buttons are used for move, enlarge or reduce the zone.
White zone boundary moves the zone to locate it at the optimal position.
Green zone boundary enlarges the zone.
Red zone boundary reduces the zone.
BLC ZONE SELECT menu (In BLC... menu)
To enter BLC ZONE SELECT menu, press ENTER button at <BLC . . . > of EXPOSURE menu.
BLC ZONE SELECT
>ZONE
ZONESELECT
SELCT
CTRSPOT
SPOT>>
< <CTR
PREVIOUS PAGE
Metering of the backlit compensation control is weighted to the selected window from CTR SPOT(1/9 of entire screen),
UPPER 1/3, MIDDLE 1/3 and LOWER 1/3.
AGC MENU
MENU(Ver3.2e)
PRESET
EXPOSURE
>AGC
AGC
SHUTTER LIMIT
PICTURE CONTROL
RESTORE FACTORY
VIDEO STANDARD
INDOOR
WDR MID
<MIDDLE
MIDDLE >
2X ESS
SETTINGS
NTSC
Press 'MENU' to save/return
AGC
DESCRIPTIONS
MIDDLE
Medium level of the Automatic gain control
HIGH
Increases the Automatic gain control.
LOW
Decreases the Automatic gain control
SHUTTER LIMIT MENU
MENU(Ver3.2e)
PRESET
EXPOSURE
AGC
>SHUTTER
SHUTTER LIMIT
LIMIT
PICTURE CONTROL
RESTORE FACTORY
VIDEO STANDARD
INDOOR
WDR MID
MIDDLE
<2X
2X ESS
ESS >
SETTINGS
NTSC
Press 'EXIT' to save/return
SHUTTER LIMIT
DESCRIPTIONS
2X ESS
The longest shutter is limited to 2X of 1/60(NTSC)/1/50(PAL) sec when the scene illumination becomes dim.
Video refresh rate at 2X ESS is 15(NTSC)/12.5(PAL) frames/sec.
4X ESS ~
32X ESS
The longest shutter is limited to 4X~32X of 1/60(NTSC)/1/50(PAL) sec when the scene
illumination becomes dim.
The higher integration increases the sensitivity but decreases the video refresh rate.
PICTURE CONTROL MENU
WHITE BALANCE menu
PICTURE CONTROL
> WHITE
BALANCE
WHITE
BALANCE
BRIGHTNESS
DNR
SHARPNESS
FLIP
COLOR SELECT
SATURATION 1
PREVIOUS PAGE
<<ATW
ATW Desat>
Desat >
MID-LOW
OFF
MIDDLE
OFF
COLOR 3
-2
2
To enter PICTURE CONTROL sub-menu, press "ENTER" button at PICTURE CONTROL of MENU.
WHITE BALANCE
DESCRIPTIONS
ATW Normal
White balance is compensated automatically in range of 2800K-7500K
ATW Desat
White balance is compensated automatically in range of 2000K-11000K. In the range of
2000-2800K and 7500-11000K, white balance is gradient-compensated.
ATW Xtnd
White balance is compensated automatically in range of 2000K-11000K
MANUAL
White balance can be adjusted by either KELVIN or R/B.
MANUAL WHITE BALANCE menu (In Manual... Menu)
To enter MANUAL WHITE BALANCE menu, press ENTER button at <MANUAL...> of WHITE BALANCE menu.
MANUAL WHITE BALANCE
MANUAL WHITE BALANCE
> KELVIN
> RED
PREVIOUS PAGE
PREVIOUS PAGE
BLUE
Shoot a white paper or a gray card and adjust either KELVIN or R/B so that the color on the monitor becomes most white.
BRIGHTNESS, DNR, SHARPNESS, FLIP, COLOR SELECT and SATURATION menus
(in PITURE CONTROL menu)
PICTURE CONTROL
WHITE BALANCE
BRIGHTNESS
> BRIGHTNESS
DNR
SHARPNESS
FLIP
COLOR SELECT
SATURATION 1
PREVIOUS PAGE
PICTURE CONTROL
BRIGHTNESS
DNR
SHARPNESS
FLIP
COLOR SELECT
SATURATION
<ATW Desat>
<MID-LOW
MIDDLE >
OFF
MIDDLE
OFF
COLOR 3
-2
2
DESCRIPTIONS
BRIGHTNESS level is a kind of video output gain and is different from the iris level control.
It can be set to MID-LOW, MIDDLE, MID-HIGH, HIGH and LOW. If it is set too high, the dynamic range is decreased.
ON reduces the dynamic noise but effects SHARPNESS a little soft.
MIDDLE, HIGH, MAX, LOW
OFF provides the normal video.
H-FLIP(V-FLIP) provides the horizontally(vertically) flipped video.
H/V-FLIP provides the horizontally and vertically flipped video.
Four sets of COLOR variance are provided.
Color saturation can be adjusted between -2 and +2.
RESTORE FACTORY SETTINGS menu
Restores and saves all parameters of factory settings. Camera resets automatically.
MENU(Ver3.2e)
PRESET
EXPOSURE
AGC
SHUTTER LIMIT
PICTURE CONTROL
> RESTOREFACTORY
FACTORY SETTINGS
RESTORE
VIDEO STANDARD
INDOOR
WDR MID
MIDDLE
2X ESS
SETTINGS
NTSC
Press 'EXIT' to save/return
VIDEO STANDARD menu
NTSC and PAL can be switched. VIDEO STANDARD does NOT change by RESTORE FACTORY SETTINGS.
MENU(Ver3.2e)
PRESET
EXPOSURE
AGC
SHUTTER LIMIT
PICTURE CONTROL
RESTORE FACTORY
VIDEO
> VIDEOSTANDARD
STANDARD
Press 'EXIT' to save/return
INDOOR
WDR MID
MIDDLE
2X ESS
SETTINGS
NTSC
NTSC
Connecting USB device
1. Connect USB device to USB slot which is
on the slide of the TV set.
2. Press USB key on the remote or select
USB in main menu special mode.
Removing the USB device from Monitor.
1. Return to main menu.
2. Remove the USB device from Monitor.
When you plug a USB, SD or MS memory card, the below screens will be displayed.
Notes :
Don't extract the USB device while operating. Music
files (MP3), image files (JPG)and AVI files can be
played.
USB HUB connection is not available.
Recommended USB device and file system.
- Connecting USB device should comply with
USB 2.0 specifications.
- Compatible with: FAT16, FAT32 (Recommend
FAT32 for USB over 2GB)
- Only use USB memory stick recommended.
Devices which require additional program installation
may cause identification or data reading problem.
In case of a USB HDD, make sure to connect an auxiliary power to the USB HDD for proper operation.1 primary partitions of a drive is supported. If there is an
extension partition, it will not be supported.
Digital cameras and mobile phones are not supported.
Unsupported or damaged AVI,JPG or MP3 files can
cause errors.Do not try to change the file extension of
unsupported file types to the file extension of supported
file types.
This device codec is hardware codec so the supportable file format and codec can not be updated by
firmware upgrade.
Customers should note that permission is required in
order to download MP3 or movie files from internet. Our
company has no right to grant such permission.
Permission should always be sought from the copyright
owner.
- Using the remote control
Select the S/W Version
Show the S/W Version.
1. Press the USB button and then use
button to select the
Setup.
2. Press the ENTER button to enter the Setup menu.
button to select the SYSTEM SETUP.
3. Press the
button to select S/W VERSION.
4. Press the and then use
5. Press the .
6. Press the STOP/EXIT button to return to the Main menu.
Select the Default
Use the Default option to initialize the adjusted settings.
1. Press the USB button and then use
button to select the
Setup.
2. Press the ENTER button to enter the Setup menu.
3. Press the
button to select the SYSTEM SETUP.
4. Press the and then use /button to select
DEFAULT.
5. Press the .
6. Press the STOP/EXIT button to return to the Main menu.
Select the Photo Effect
The picture display effect for the slide show.
1. Use
button to select the Setup.
2. Press the ENTER button to enter the Setup menu.
button to select the PHOTO SETUP.
3. Press the
4. Press the and then use D/E button to select EFFECT.
5. Press the and then use D/E button to select the desired Effect.
6. Press the STOP/EXIT button to return to the Main menu.
Select the Frequency
The picture display interval for the slide show.
1. Use
button to select the Setup.
2. Press the ENTER button to enter the Setup menu.
button to select the PHOTO SETUP.
3. Press the
4. Press the and then use
button to select FREQUENCY.
button to select the Frequency.
5. Press the and then use
6. Press the STOP/EXIT button to return to the Main menu.
Select the OSD Language
You can select OSD lanuage.
1. Use
button to select the Setup.
2. Press the ENTER button to enter the Setup menu.
button to select the System OSD Language.
3. Press the
4. Press the and then use
button to select Language.
5. Press the STOP/EXIT button to return to the Main menu.
Select the Movie, Music or Photo Media
When you plug a USB, SD card, on the right screens will be displayed.
1. Press / button to select Movie, Music or Photo.
2. Press the ENTER button to enter the Movie, Music or Photo media.
Movie File Playing Operation
1. Use / button to select the Movie.
2. Press the ENTER button.
3. Press the PLAY/PAUSE or ENTER button.Then the movie starts.
4. Press the STOP/EXIT button to stop or return to the main menu.
Notes:
Movie (AVI) file compatibility with this player is limited as follows:
- Available resolution of AVI file is under 720x480 (576) pixel.
- If video codec is not supportable, "UNSUPPORTED FORMAT" OSD
will be displayed in the file list menu.
- If sound codec is not supportable, Video may display but "UNSUPPORTED FORMAT" OSD will be displayed with no sound.
- If sound has no data stream, "NO SOUND" OSD will be displayed on
the screen.
- If the number of the screen frame is over 30 per 1 second, this device
may not operate normally.
Supportable Subtitle format: srt, sri, smi, txt, ssa, ass, sub, psb
Supportable movie file extension: ".DAT", ".AVI", ".MP4", ".MPG"
Supportable video codecs: MPEG1(VCD 1.0, 1.1, 2.0, SVCD), MPEG4
ASP or Compatible codecs
MP3 File Playing Operation
Purchased MP3/music files may contain copyright restrictions.
button to select the Music.
1. Use
2. Press the ENTER button.
3. Press the
button to select folder and desired music file.
4. Press the PLAY/PAUSE or ENTER button.Then the music starts.
5. Press the STOP/EXIT button to stop or return to the Main menu.
Notes :
MP3 compatibility with this player is limited as follows:
- Sampling frequency : within 8 -48 KHz
- Bit rate: 32-384Kbps, Support all variable bit rates
- Monitor cannot read an MP3 file that has a file extension other than
".mp3 ’'
- File name should have a maximum of 8 letters and must incorporate
an .mp3 extension.
- Total number of files on the USB memory device should be less than
1200.
This Monitor mp3 player requires mp3 files to meet certain technical
standards (ISO/IEC 111723, ISO/IEC 13818-3.2) in order to achieve
optimal playback quality.
There are many different types of MP3 encoders and these require certain pre-existing conditions above to ensure compatible playback.
The navigation key can be shifted only up and down during MP3 file
play and cannot switch to other folder.
In order to play a file in other folder, stop the file being played, and
move cursor to another folder.
In case of VBR (Variable Bit Rate) MP3, estimated playing time may
not correct as actual playing.
JPEG File Viewing Options
When you select Photo in entry menu, you will now see a screen filled
with thumbnail photo media.
button to select the Photo.
1. Press the USB button and then use
2. Press the ENTER button.
3. Press the
button to select photo file.
4. Press the ENTER or PLAY/PAUSE button for slide show.
5. Press the STOP/RTN button to stop slide show or return file list, Main
menu.
Slide Show (Slide show with music)
1. Press the
button to select JPEG file and then press the
ENTER button. Slide show starts.
2. You can choose the slide show effect, frequency and play mode in
the Setup menu.
3. Press the PLAY/PAUSE button to pause the current image.
4. Press the STOP/RTN button to stop slide show return to the Main
menu.
(Thumbnail mode :Press button in the photo file list )
Notes :
JPEG compatibility with this player is limited as follows :
Depending upon the size and the number of JPEG files, it could take a
long time for Monitor to read the USB memory's contents. If you don't
see an on screen display after several minutes, some of the files
maybe too large-reduce the resolution of the JPEG files to less than
2M pixels as 2760x2048 resolution.
The total number of files and folders on the USB or SD memory device
should be less than 1200.
File name without ".jpg" extension will not be able to read by this
Multimedia player jpeg decoder. Even though the files are shown as
JPEG image files in Windows Explorer.
28492 CONSTELLATION ROAD VALENCIA, CA 91355
WWW.VITEKCCTV.COM | 888-VITEK-70