1
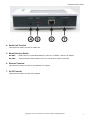
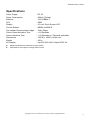
RT-RoIP2 User’s Guide
Radio Over IP Network Gateway
RT-RoIP2
User’s Guide
Copyright © 2011-2013, Radio-Tone Company Limited. All Right Reserved.
0
RT-RoIP2 User’s Guide
Important Notice
Thank You Notice
Thank you for purchasing RT-RoIP2 Radio Over IP Network Gateway. Please read this User’s Guide carefully before putting
RT-RoIP2 into operation. Support for the RT-RoIP2 is available by email. Please direct all questions via email to
[email protected]. Your question(s) will be answered promptly.
Electrical shock hazard
Never attempt to connect the unit to any power network other than one for which it was intended.
Do not open the housing of the units.
Disconnect the unit from the external power supply and from all other devices if a fault occurs.
Install the unit only in a dry place protected against the elements.
If you are uncertain about the safe operation of the unit, shut it down immediately and secure it to prevent any unauthorized
start-up. Safe operation is no longer possible, for example,
-
if damage is visible to the unit or the cables,
-
if the unit no longer operates correctly,
-
if objects have penetrated inside the unit,
-
after long storage under improper conditions
Have the system checked by qualified, specialist personnel in such cases.
Installation and operation
Before installing or operating the system, ensure that you have read and understood the documentation for other
equipment connected to the unit. These contain important safety notices and information concerning permissible
applications.
Perform only the installation and operating work described in this guide. All other work beyond this may lead to injuries to
persons and damage to the system or other equipment.
Repairs and maintenance
Never open the housing of the RT-RoIP2. The unit contains no parts which you can repair or replace. Ensure that only qualified,
specialist personnel (electrical technicians) are permitted to carry out maintenance or repair work.
Disclaimer
This product is used to link up the radio networks and IP networks. Its operation and performance rely on the broadband
network connections via private and/or public networks. Due to the stability and reliability of these networks, this product
may not be able to link up all the networks connected without any interruptions. Therefore, it is not recommended to use
this product in an emergency system or a communication system with zero-failure.
This product can bridge and extend radio networks all over the world. Please consult your local regulations in order to use
this product legally.
Customers and/or users are taking full responsibilities and all risks in using this product. We are not responsible for any
direct or indirect losses caused by, but not limited to, communication failures as a result of product failure or network
problems
Copyright © 2011-2013, Radio-Tone Company Limited. All Right Reserved.
1
RT-RoIP2 User’s Guide
Contents
Preface
Key Features
Product Descriptions
Installations
Operations
Specifications
Preface
The RT-RoIP2 Radio-over-IP Network Gateway is the world’s first standalone Zello Radio-Radio-Over-IP Gateway. It
is a cost effective and excellent performance equipment for using to connect mobile phone and 2-way radio users, or
bridge 2-ways radio systems across sites.
The RT-RoIP2 is equipped with the Radio-Tone Intelligent Digital Audio Tracking System(iDats), the Android 4.0 OS
with 3rd party communication apps, Zello and Skype, and powered by an ARM CPU, brings you the fast and stable
push-to-talk communication between anydevice, anytime and anywhere over the world!
Key Features
The key features of RT-RoIP2 are:
Build-in ARM CPU standalone Radio-over-IP Network Gateway
Install in a second, no IT expert technique is required
Very easy operation
Very fast and stable PTT exchange performance by Radio-Tone iDats
Embedded Android 4.0 OS
Pre-installed Zello and Skype apps
Support different brands and different type radios
Copyright © 2011-2013, Radio-Tone Company Limited. All Right Reserved.
2
RT-RoIP2 User’s Guide
Product Descriptions
Packing List
RT-RoIP2 Radio Over IP Network Gateway x 1
Ethernet Connection Cable x 1
Radio Unit Connection Cable x 1
This User's Guide x 1
Major Operating Controls, Terminals and Their Functions
1. LCD
This is a 4.3 inch touch screen LCD for displaying and on screen controlling the system.
2. MENU Button
This is the MENU button for pop up the Android OS setup menu and apps setup menu.
3. BACK Button
This is the BACK button for back operation of Android OS and Apps.
Copyright © 2011-2013, Radio-Tone Company Limited. All Right Reserved.
3
RT-RoIP2 User’s Guide
4. Radio Unit Terminal
This terminal is used to connect to a radio unit.
5. Mode Selection Switch
DIP SW1
: Radio Unit PTT Control Mode Selection. OFF for PTT Mode 1. ON for PTT Mode 2.
DIP SW2
: Carrier Handover Time Selection. OFF for <1/2 seconds. ON for 2 seconds.
6. Ethernet Terminal
This terminal is used to connect to 10/100-Base-T IP network.
7. DC5V Terminal
This terminal is used to connect to AC Adapter.
Copyright © 2011-2013, Radio-Tone Company Limited. All Right Reserved.
4
RT-RoIP2 User’s Guide
Installation
Simple System Connection Diagrams
Note: The connected Radio Unit MUST be used external antenna to reduce the TX RF
signal affect to the system equipment.
Connect the Radio Unit to an external antenna.
Connect the RT-RoIP2 to a Radio Unit by using the bundled connection cable.
Connect the RT-RoIP2 to an IP network by using the Ethernet cable.
Turn on the Radio Unit and adjust its volume to approximate 1/3 position of maximum level.
Adjust the radio frequency and CTCSS on both Radio Unit and all other handhelds/mobiles.
Connect the RT-RoIP2 to power outlet by using the AC adapter to turn on the RT-RoIP2.
Setup PTT Control Mode of RT-RoIP2
The RT-RoIP2 ships with PTT Control Mode 1. For some radio units, like KG-UVD1P, they are required the PTT
Control Mode 2 to let them work as Transmitter. Please set the PTT Mode switch to ON position to change PTT
Control Mode to Mode 2.
Copyright © 2011-2013, Radio-Tone Company Limited. All Right Reserved.
5
RT-RoIP2 User’s Guide
Setup Zello App
The Zello app was preset with below settings by default. You just need to add a Zello account to operate. If the
settings are changed, please setup again with reference to below steps.
Run the Zello app
Press the [MENU] button to pop-up the setup menu.
Press the [Options] item to open the Options setup menu.
Press the [Alerts] item.
Uncheck all check boxes.
Press the [BACK] button to exit.
Press the [Interface] item.
Only un-check below items:
“Lock screen orientation”
“Auto-run on startup”
“Show on incoming message”
Press the [BACK] button to exit.
Press the [Restrictions] item.
Only un-check the item of “Show trending channels list”.
Press the [BACK] button to exit.
Press the [Under the hood] item.
Press the [Map] icon to map the PTT key.
Press the PTT button of a handheld radio to call to the Radio Unit connected to the RT-RoIP2, the PTT key
value of 16 should be mapped.
Only un-check the item of “Enable push notifications”.
Press the [BACK] button to exit.
Setup Skype App
Please follow below steps to setup Skype.
Run the Skype app and add an Skype Account.
Press the [MENU] button to pop-up the setup menu.
Press the [Settings] item to open the Settings setup menu.
Only check on below boxes:
“Skype Status”
“Incoming Skype calls”
“Receive calls from – Contacts only”
“Answer calls automatically”
Press the [BACK] button to exit.
Copyright © 2011-2013, Radio-Tone Company Limited. All Right Reserved.
6
RT-RoIP2 User’s Guide
Operation
When the system is installed, the Radio Unit and the apps are configured, the system is ready to
use now.
Zello Gateway and Link System
Run Zello app
Add contact(s) or channel(s)
Press a contact or a channel for standing by calls.
Now the RT-RoIP2 is standing by calls from other mobile phones, 2-way radios from remote RT-RoIP2 sites
and local 2-way radios.
Skype Gateway System
Run Skype app
Press the [Contacts]
Add contact(s).
Press a user to make a connection
Now the RT-RoIP2 will link the other RT-RoIP2 sites to allow all 2-way radios communication.
Copyright © 2011-2013, Radio-Tone Company Limited. All Right Reserved.
7
RT-RoIP2 User’s Guide
Specifications
Power Supply
: DC 5V
Power Consumption
Ethernet
: 800mA (Typical)
: 10/100 Base-T
CPU
Display
: ARM
: 4.3 inch Touch Screen LCD
Control Buttons
Pre-installed Communication Apps
: MENU and BACK
: Zello, Skype
Carrier Detect Activation Time
Carrier Handover Time
: <1/2 Seconds
: <1/2 Seconds or 2 Seconds selectable
Dimensions
Weight
: 160(W) x 100(D) x 40(H) mm
: 450 g
AC Adapter
: Input AC100-240V, Output DC5V 2A
Weight and dimensions indicated are approximate.
Specifications are subject to change without notice.
Copyright © 2011-2013, Radio-Tone Company Limited. All Right Reserved.
8
RT-RoIP2 User’s Guide
Notes:
Copyright © 2011-2013, Radio-Tone Company Limited. All Right Reserved.
9
RT-RoIP2 User’s Guide
Notes:
Copyright © 2011-2013, Radio-Tone Company Limited. All Right Reserved.
10
RT-RoIP2 User’s Guide
RT-RoIP2v3-ug1
Copyright © 2011-2013, Radio-Tone Company Limited. All Right Reserved.
11