1
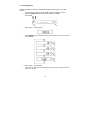
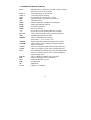
!
!!!!!!!!!!!!!!!!!!!!!!!!!!!!!!!!!!!!"#$%&'&()!*+,+)%$'!
!!!!!!!!!!!!!!!!!!!!!!!!!!!!!!!!!!!!!!!!!!!!!!!!!!-./-0!1$#&$'!!!!!!!!!!
!!!!!!!!!!!!!!!!!!!!!!!!!!!!!!!!!!!!!!!!
!!!!!!!!!!!!!!!!!!!!!!!!!!!!!!!!!!!!!!!!!!!!!!!!!!!
!
!
!
!
!
!
!
!
!
!
!
!
!
!
!
!
!
!
!
Contents
1. SETTING UP THE BALANCE.............................................................................. 3
2. APPLICATION...................................................................................................... 4
3. CONDITIONS OF APPROPIATE USING ............................................................. 5
4. KEYBOARD ......................................................................................................... 6
5. START AND SERVICE......................................................................................... 7
6. WEIGHING ........................................................................................................... 8
7. CALIBRATION ..................................................................................................... 9
7.1. Balance with external calibration ................................................................. 10
8. SCHEDULE OF ENTERS IN SETTING FUNCTIONS........................................ 11
8.1. Counting pieces .......................................................................................... 12
8.2. Control of deviations % according to standard mass................................... 16
8.2.1. Standard mass defined by its weighing........................................... 16
8.2.2. Standard mass introduced to balance memory by user .................. 17
8.3. Definition thickness of solids and liquids ..................................................... 18
8.3.1. Testing thickness solids .................................................................. 18
8.3.2. Testing thickness of liquid............................................................... 18
9. Adjusting the balance to working conditions ................................................ 19
9.1. Turn on/off autozero system........................................................................ 20
9.2. Choice of criteria of stable result depending on conditions of using ............ 21
9.3. Average result of weighing .......................................................................... 22
9.4. Adjusting scale for dosage procedures ....................................................... 23
9.5. Select default unit of weighing..................................................................... 24
10. FUNCTIONS FOR USING RS 232 ................................................................... 25
10.1. Choice of speed of transmission ............................................................... 26
10.2. Definite sent data as stable/not stable....................................................... 27
10.3. Continuous work (RS 232) ........................................................................ 28
10.4. Set-up date as basic parameter of printout ............................................... 29
11. COOPERATION WITH PRINTER OR COMPUTER......................................... 30
11.1. Schedules of connecting conductors......................................................... 30
11.2. Printing data with date and time ................................................................ 31
11.3. Cooperation with statistic printer ............................................................... 31
11.4. Format of sending data ............................................................................. 31
12. REPORTS FROM SCALE ................................................................................ 33
12.1. Current control of calibration fault ............................................................. 33
12.2. Report from calibration of scale................................................................. 34
13. WEIGHING LOADS UNDER SCALE ............................................................... 35
14. LIST OF ORDERS COMPUTER - SCALE ....................................................... 36
15. ORDERS ON DIGITAL DISPLAY .................................................................... 37
16. TECHNICAL PARAMETERS ........................................................................... 38
17. ADDITIONAL EQUIPMENT.............................................................................. 39
-2-
1. SETTING UP THE BALANCE
Cut safety tape off. Take balance off the box. Take all necessary to correct
performance of balance elements off the box. After replace balance in place of use
put scale and rest of elements on.
Assembly of elements for scale with precision 10mg:
-
-
Put pan scale (2) on gum mandrels
Put cover on scale (1) using pins in back part of
balance cover.
After assembly check if scale touches gum
mandrels
Turn power supply on
plug in feeder to socket at back of balance
casing
Display shows digits (test of display) and then
display shows 0.00g
If indication is not zero press tare key
Assembly elements for scale with precision 1mg:
-
-
Put pan scale (3) on gum mandrels
Put glass shield on scale (2) using masking
frame which is on balance cover (4), (scale
masking frame must be inside of scale)
Put upper cover on cover of scale
After assembly check if scale touches gum
mandrels
Turn power supply on, plug in feeder to socket
at back of balance casing
Display shows digits (test of display) and then
dislpay shows 0.000g
If display doesn’t show zero press tara key
-3-
2. APPLICATION
Electronic scale CY - CG is appropriate for precise measurements mass in
laboratory conditions with possibility of setting to zero in all measure range. Balance
calibration is done by CAL on balance keyboard.
Functions accessible to user are divided into 4 parts:
!
Functions for weighing units (press F key)
- Weighing in grams,
- Result with 3 places after dot,
- Weighing in carats [ct],
- Weighing in units from beyond SI: [GN], [mom], [oz], [dwt]. Access to
these units is blocked from factory menu level.
!
Functions for calibration and weighing modes
(tare key + f key)
- Summing function
- Counting pieces
- Control of deviations % according to standard mass
- Thickness of liquids
- Thickness of solids
!
Choice of criteria of stable result depending on conditions of using
(tare key + cal key)
- Turn off/on system of autozero
- Summing function
- Turn off / on automatic calibration in relation to changes of temperature
- Turn off/ on automatic calibration in relation to time from last calibration
- Setting amount of average measurements
- Average result of weighing
- Adjusting balance for dosage procedure
- Select default unit of weighing
!
Function for using RS 232
(tare key + print key)
- Choose speed of transmission
- Define sent data as: stable / not stable
- Continuous work
- Setting data as additional element of parameter in printouts
- turn on/off marking of last digit in printout
Moreover balance can be used to weigh hang loads, print report of
calibration, check deviation of calibration and print reports of testing
thickness of liquids and solids.
-4-
3. CONDITIONS OF APPROPIATE USING
•
scales should be used and stored in rooms without vibrations and shakes,
without drafts and dust
o
o
•
temperature of air should be +15 C ÷ +35 C
•
during using balances changes of temperature shouldn’t be higher than
0,5oC per one hour
•
scales should be replaced on wall console or stable table, far from sources
of heating
•
strong magnes is installed inside of balance – so it’s important to be carefull
during weighing magnetic materials. Use hang loads if it’s possible not to
expose magnetic load to magnes influence. Suspension is replaced on basic
of the balance.
•
If static electrisity has influence on scale annunciators it’s neccesary to
connect it to earth. Earth screw is replaced in back part of balance base.
•
Scale should be replaced in horizontal level to assure precision of weighing
-5-
4. KEYBOARD
Key ON/OFF is to turn display off. Others subassemblies are still
suppplying and scale is in stage of waiting for further work. If user
press this once again weighing stage with measure units are
displayed.
PRINT key is to send current state of display to external mechanism
by connector RS 232
CAL key is to calibrate. It’s manual calibration. After press if scale
starts calibration. There shouldn’t be any load on scale. If you press
TARE during calibration calibration stops and weighing returns
F is function key. It’s to choose measure unit (in which measurement
is done) or to change some functions in user menu
TARE key is to sett indication to zero. After setting to zero indication
is zero. If load is taken off scale display show its mass with “minus”
sign. Setting to zero can be done in all measure range of scale
-6-
5. START AND SERVICE
Before supply is turn on glass of weighing chamber should be draw
Balance should be leveled. To level scale screw legs in order air bubble was in
centre position.
TIME OF HEATING
It’s neccesary to wait untill scale gets heat stabilization. It’s time of own heating.
User has to wait 15 min. in case of analitycal scales.
Given values refers to scales that were in temperature of conditions of work
before they are connected to suppling net.
If scales were in much lower temperature (f.eg. in winter) time of acclimatization
and heating is 4 hours before connect to supply net. During warm stabilization of
scale indications on display can change.
After time of warm stabilization press TARE key – zero indication of mass appears
on display and orders Stab and Zero. Balance is ready to weighing. If display
doesn’t show zero stage press TARE once again.
-7-
6. WEIGHING
Before weighing or if the conditions of work changes (f.eg. if temperature of
surrounding is higher then 3oC) scale should be calibrated according to way
in point 7.
•
•
•
Scale should be load few times by mass close to max capacity befor
measurements
Check if not load scale shows „precise zero” - ZERO if measurement is
stable - order STAB,
if not press key TARE,
by means of F key sett measure unit
•
g, ct, and if they are accessible in factory menu GN, mom, oz,
dwt,
•
put load on scale and read result on display
•
indication can be setting to zero many times by pressing key TARE
(summary of mass loads recordede to scale memory cannot be bigger then
its max capacity)
Don’t turn off scale from supply power between following
measurements. Turn scale off by key ON / OFF.
If user press key ON/OFF once again scale is ready to
following measurements.
-8-
7. CALIBRATION
To assure very precise weighing introduce correction factor to balance memory –
it’s calibration. Scales have system of internal calibration (calibration mass with all
automatic system is built inside of scale)
Balances CG and CY can have:
-
system of internal calibration ( calibration mass with automatic system is
installed inside of balance) - option
System of external calibration (calibration is done by external weight)
Calibration should be made if:
•
we start weighing
•
there are long breaks between following measurements
•
temperature of surrounding changes not more than 3 0C
During calibration platform of balance cannot be loaded.
If there is load on platform order unLoad appears on display. This is
command to take load off platform.
Calibration can be stopped if it’s neccesary.
To stop calibration press key TARE after
pressing key CAL.
-9-
7.1. Balance with external calibration
Pressing key CAL causes calibration of balance
- on display appears:
(balance starts autotest for calibration –during test you cannot load the scale), and
then order
(it is command to put calibration mass on scale) calibration mass is given in grams.
If you the mass on scale on display appears
calibration and then
take calibration mass off scale. After take calibration weight off scale balance shows
zero. If unsuitable load is put on scale – balance displays
CAL ER (calibration is cancelled)
- 10 -
8. SCHEDULE OF ENTERS IN SETTING FUNCTIONS
-
Counting pieces
Control of deviations % according to standard mass
Thickness of liquids
Thickness of solids
Press TARE key (scale shouldn’t display STAB). If horizontal lines appears on
display press key F
After pressing key F name of first approachable function appears. Every next
pressing key F makes names of following approachable functions appear on
display. Way of setting functions is described in further part of instruction.
- 11 -
8.1. Counting pieces
Softwares enables to amount small elements with the same mass To use this
function:
•
put package on scale and press TARE its mass to balance memory
•
press key TARE. When horizontal lines appear on display
press key F
•
Press F key – display appear
•
Press PRINT key to activate function (you can select from 10, 20, 50pcs or
free definable)
•
•
Press F key – choose value
If you want to start the counting pieces function, please choose one of the
values, eg. 20 pcs
- 12 -
•
•
After displaying of LoAd information, please put on the pan of the balance
as many pieces as have been chosen (20pcs).
If option Free was chosen, the display will show the number of pieces with
flashing of the first digit – you should inscribe as many pieces are in the
mass pattern
- 13 -
•
set up batch quantity by mens of keys
ON/OFF – choose digit
F – choose value
•
confirm by pressing key PRINT LOAD appears on display
•
after making sure that batch with declared quantity is put on scale
confirm by key PRINT once again - balance displays
Process, and then amount of elements and PCS.
•
after adding or take counted elements off scale their amount appear on
display
- 14 -
Return to weighing mode
•
press key F many times untill - PIECES appears on display
•
press TARE key
Balance return to weighing mode and diode with g mark starts flashing
Attention:
1.
2.
3.
If you choose batch quantity remember that precision of counting depends on
metrological parameters of balance and on repeatability of mass singular
counted elements.
Result of measurement is more precise if batch quantity is bigger
If summary mass of batch quantity is less than 5 reading divisions (5d) –
balance shows order about error -LO- and return to weighing automatically.
- 15 -
8.2. Control of deviations % according to standard mass
Software enables control of deviations (in %) mass of weighed loads from
standard mass. Standard mass can be defined by weighing (function PERC A)
or written to balance memory by user(function PERC B)
8.2.1. Standard mass defined by its weighing
Procedure:
Press key TARE. When horizontal lines appear on display press F
•
Press key F many times untill on display appear
•
•
press key PRINT to active function
on display appears:
•
•
put load on scale. Mass of this load is assumed as standard
press PRINT to confirm this work mode
•
on display appears Process and after few seconds 100,00%
From this time instead of mass weighed load relation load on scale to standard
mass is displayed. (in %).
- 16 -
8.2.2. Standard mass introduced to balance memory by user
Procedure
Press key TARE. When horizontal line appear on display press key F
•
•
Press key F many times untill - PERC B
Appears on display
•
•
press PRINT key to activate this function
on display appears:
•
by means of keys:
ON/OFF – choose digit,
F
- choose value of digit
set value of standard mass and write it in balance memory by means of
key PRINT – on display appears: 0,00 %
From this time relation of load on scale to standard mass (in%) is displayed instead
of weighed load mass. Leave mode of percentage deviations from standard mass
control
•
Press key TARE. When horizontal lines appear on display
press F. Press key F many times untill Perc A or Perc B
appears on display - press TARE,
- 17 -
8.3. Definition thickness of solids and liquids
There is equipment to defining thickness of solids and liquids in additional
equipment. For user request Citizen service can render special software to define
thickness by scale accessible.
1.
2.
3.
4.
5.
6.
7.
8.
9.
10.
11.
12.
beaker support
frame of scale
plunger
beaker
thermometer clench
thermometer
plunger string
plunger hanger
upper scale
scale string
down pan
additional loads
for leveling initial load
8.3.1. Testing thickness solids
Thickness of solids can be tested in one of 3 liquids:
•
H2O (distilled water),
•
C2H5OH (spirit 100% +/- 0.1% in temp. 200C),
•
AnotHEr (another liquid with known thickness)
Give temperature of liquid for distilled water and spirit. For liquid with known
thickness value is written on keyboard.
To test thickness weigh sample on upper scale and weigh the same
sample in liquid (on down scale). Result is represented on display
automatically after replacing sample in liquid. After pressing key
PRINT scale gives report from examination automatically.
8.3.2. Testing thickness of liquid
Basic element for measuring thickness of liquid is glass plunger. It has
precise capacity shown on hook.
Before final measurements this value should be introduced to scale
memory. To test thickness of liquid weigh glass plunger on upper
scale and in tested liquid. Result of testing is shown on display
automatically after introducing mass of plunger. After pressing key PRINT scale
generates report from made examination automatically.
- 18 -
9. Adjusting the balance to working conditions
- Turn off/on system of autozero
- Speed of stabilization
- Average result of weighing
- Adjusting balance for dosage procedure
- Select default unit of weighing
Press TARE key (scale shouldn’t display STAB). If horizontal lines appears on
display press key CAL
After pressing key F name of first approachable function appears. Every next
pressing key F makes names of following approachable functions appear on
display. Way of setting functions is described in further part of instruction.
- 19 -
9.1. Turn on/off autozero system
Press key TARE. When horizontal lines appears on display press key CAL. Then
press key F many times untill order AUTO appears on display. Press key PRINT
•
Current value for autozero function appears on display.
•
Press key F many times and sett value on 0 or 1 including following
dependences:
•
AUTO
0 - autozero is turn ON
AUTO
1 - autozero is turn OFF
Press key PRINT to confirm setting.
Notice: Remember that setting AUTO 1 (autozero is turn off) refers to
possibility of not stable result for not loaded scale.
For turn function on when scale is not load result of 0 is displayed. There are orders
STAB and ZERO displayed in upper left corner.
- 20 -
9.2. Choice of criteria of stable result depending on conditions of using
Press key TARE. When horizontal lines appears on display press key CAL.
Then press F key many times until order Con appears on display
•
Press PRINT key. Next to Con settled value of parameter with flashing
number is displayed. Flashing number means stage of average result
•
By pressing key F change value of flashing number choosing
one of the stages of averaging.
•
Press PRINT key to confirm setting
If the conditions of work are good value Con should be settled on level 1÷2.
If the conditions are worse (drafts, breeze of air) set value on 5.
Notice:
If user increases this parameter time of waiting for stable result is longer. If the
conditions of work are bad and value Con are big scale cannot get stable result.
But if value Con is too low for bad conditions scale doesn’t get stable result (STAB
lights on and off on display).
- 21 -
9.3. Average result of weighing
In various applications result of measurement is presented as average value of
several measurements especially if the conditions are not stable (vibrations,
twitches). In these cases if you use higher stage of the digital filter the measurement
is done with the established precision.
Press the TARE button, when horizontal lines appear on the display press the CAL
button.
•
•
•
The balance shows first function in the menu. Press the F key repeatedly
until command AuE appears on the display.
Press the PRINT button
Pressing the F button set up new value of the function AuE with complying
following conditions:
AuE - 1 – average result I stage
AuE - 2 – average result II stage
AuE - 3 – average result III stage
•
Confirm chosen value by pressing the PRINT button
- 22 -
9.4. Adjusting scale for dosage procedures
During dosage substances essential matter is fast reaction of the balance on mass
increment. During this process digital filters must be turn off because they make
reaction time longer although they help if any disturbances occur.
Procedure
Press the TARE button, when horizontal lines appear on the display press the CAL
button
•
•
•
•
The balance shows first function in the menu. Press the F key repeatedly
until command FIL appears on the display.
Press the PRINT button
Pressing the F button sets up new value of the function FIL but comply
with following conditions:
FIL
0
FIL
1
– understood value of the digital filters
(recommended for weighing process)
– recommended for dosage, pouring, filling etc.
Confirm chosen value by pressing the PRINT button
Attention:
In the menu there is also function AUTO (autozero). This function controls zero
point of the scales. User can turn it off before the dosage. The procedure of turn
autozero off is included in the instruction manual.
- 23 -
9.5. Select default unit of weighing
Press the TARE button, when horizontal lines appear on the display press the CAL
button
The balance shows first function in the menu. Press the F key repeatedly
until command St_uni appears on the display.
Press PRINT button many times. The display will show units.
Press TARE key to confirm selected units.
ATTENTION:
Default units will be show after switch on the balance
- 24 -
10. FUNCTIONS FOR USING RS 232
- Choose speed of transmission
- Define sent data as: stable / not stable
- Continous work
- Setting data as additional element of parameter in printouts
Press TARE key. When horizontal lines appear on display press key PRINT.
After pressing PRINT name of first approachable function appears. Every pressing
of key F makes makes names of following approachable functions appear on the
display. Way of setting functions is described in further part of instruction.
- 25 -
10.1. Choice of speed of transmission
Press key TARE. When horizontal lines appear on display press key PRINT.
Then press key F untill order bod appears on display. Press key PRINT.
•
Press PRINT key (diplay shows value
for function BOD)
•
press F key many times untill number
of speed of transmission appears
as below:
•
bod 1
- 300 bit / s,
bod 2
- 600 bit / s,
bod 3
- 1200 bit / s,
bod 4
- 2400 bit / s,
bod 5
- 4800 bit / s,
bod 6
- 9600 bit / s,
confirm by pressing PRINT.
- 26 -
10.2. Definite sent data as stable/not stable
Press key TARE. When horizontal lines appear on display press key PRINT
•
Then press key F many times until order StAb appears
on display.
•
by means of PRINT key start programming functions
•
by key F choose one of two values
STAB
STAB
•
0 – sending stable result of weighing
1 - sending temporary result of weighing
confirm by pressing PRINT.
- 27 -
10.3. Continuous work (RS 232)
Press key ZERO/TARE. When horizontal lines appear on display press key PRINT.
•
Then press key F many times until order cont appears on display.
•
Press key PRINT, current value appears
on display
•
by key F choose one of two values
CONT
CONT
•
0 - lack of constance trasmission
1 - constant transmission
confirm by key PRINT
- 28 -
10.4. Set-up date as basic parameter of printout
Signal (equvivalent for state of display) is sent to printer by scale has form:
+ 123.456 g <CR>< LF> ( 16 signs in general)
There is possibility of sending data in increased form f.eg.:
DATE 1998.09.21 TIME 09:51
+ 100.001 g
Printing results of measurements in increased form is possible only with printer
CITIZEN CPR02
Press key TARE. When horizontal lines appear on display press key PRINT.
•
Then press key F many times untill order dAtE appears on display.
•
By means of key PRINT start programming functions
•
by means of key F choose one of two values
dAtE 0 – printing in standard format
dAtE 1 – printing in increased format
•
confirm choice by key PRINT
- 29 -
11. COOPERATION WITH PRINTER OR COMPUTER
Every pressing of key <PRINT> makes sending signal of current state of display
with measure units to computer or sprinter. Scale has factory settled speed of
transmission 4800 bit/s. If external mechanism (printer, computer) need to have
settled different speed of transmission change factory setting about speed in menu
(parameter bod
11.1. Schedules of connecting conductors
- 30 -
11.2. Printing data with date and time
Every printout of weighing can be printed with date and time of measurement.
It’s possible if scale is connected to printer CITIZEN CPR02
After connecting scale and printer sett value of parameter parameter DATE as:
DATE 1
(see Setting date as additional parameter for printout)
11.3. Cooperation with statistic printer
After connecting scale to statistic printer statistic of measurement is
possible to do. Example of printout with statistics from series of measurement:
1
2
3
4
5
6
9:02:15
9:02:39
9:02:58
9:03:15
9:03:34
9:03:48
+
+
+
+
+
+
7.0016
5.0152
12.0171
9.9937
12.0169
22.0111
g
g
g
g
g
g
Data 13.09.2001 Godz. 9:04
n
sum x
6
68.0556
g
batch quantity
summary of mass of samples
x
11.34260
5.92328
52.22
5.0152
22.0111
16.9959
g
g
%
g
g
g
average value
standard deviation
factor of variancy
min value
max value
difference max – min
s
srel
min
max
R
11.4. Format of sending data
Result of weighing can be sent from balance to external device after pressing the
PRINT button on the balance or after sending order from the computer. Presented
formats are conformable to settled parameter Pd_d = 1 (printout without last digit)
for balances.
- 31 -
11.4.1. Format of sent data after pressing the PRINT button
11.4.2. Format of sent data for orders generated from the computer
ZERO/TARE order
Order to set up stable/not stable data
Give stable result of weighing
- 32 -
Give any result of weighing
12. REPORTS FROM SCALE
Scales with internal calibration can control parameters remembered in memory very
fastly. Their function can be increased. Their service functions can be done easily.
12.1. Current control of calibration fault
Described function is usefull if during long measurement user wants to be sure that
results don’t have bigger errors than terror shown on display.
When scale is in autozero zone (ZERO) press keys TARE and F at the same time.
Balance starts autotest for control. Display shows calibration mass. Put the load on
the pan. At the moments, scale show compares result of weighing with declared
value of calibration mass. Difference between these two sizes is shown on digital
display. Press TARE – return to weighing
- 33 -
12.2. Report from calibration of scale
•
•
Connect printer with real time clock to scale (CITIZEN CPR02)
Press keys TARE and CAL at the same time
•
Procedure of the reports
! Balance starts autotest for reports.
! Display shows calibration mass
! Put the load on the pan.
! Balance is in auto adjusting mode
! When adjusting is finished, remove load from the pan
! Display show communicate: report
! At the moment display show calibration mass
! Put the load on the pan.
! Report of the calibration is printing
- 34 -
13. WEIGHING LOADS UNDER SCALE
In standard analitycal scales can weigh load on suspension.
To use this function:
• Remove plastic plug in basic of scale
• There is suspension in the basic of scale. It’s installed for good.
• Install hook to hang load (hook isn’t standard equipment for scale), weigh
load on hook.
Attention:
•
Suspension cannot be turned around, move or manipulate. Mechanism of
scale can be damaged this way.
•
Mass all additional elements as scale, string should be settled to zero by
pressing key TARE.
- 35 -
14. LIST OF ORDERS COMPUTER - SCALE
Function
Format
TARA – equvivalent for key TARE
T CR LF (tare scale)
Function
Format
PRINT (equvivalent for key PRINT)
S I CR LF (sending stage of display)
Function
Format
CONSTANCE WORK - equvivalent for key cont 1
C 1 CR LF (start constance transmission)
Function
Format
MANUAL WORK - equvivalent for order cont 0
C 0 CR LF (To change work mode on manual printout)
Function
Format
STABLE DATA –equivalent for order STAB 0
S 0 CR LF (setting data to printout as stable)
Function
Format
NOT STABLE DATA - equivalent for order STAB1
S 1 CR LF (setting data to printout as stable and not
stable)
Attention!
Sending order which is not in list or with error with end CR LF to scale makes
return sending order in format E S CR LF. Spaces given in formats should be
omited. They are for better legible.
- 36 -
15. ORDERS ON DIGITAL DISPLAY
Err- 5
FuLL – 1
FuLL- 2
nuLL
tESt
CAL
STAB
DATE
CONT
AUTO
- Co - Li tE_L 00
H2O
C2H5OH
AnotHEr
VOLUME
LoAD A
LoAD L
Err-3
CAL Err
bod
AC_t
AuE
FIL
St_uni
- signalling terror of temperature conveter, to start scale once
again turn on and off power supply
- overcrossed range of conveter A/D
- overcrosed range of weighing
- too small load of scale (np. lack of scale)
- autotest of scale is done (after turn power on)
- calibration is done
- definition parameter of stability for sedning data
- printing data with date and time
- constance transmission
- turn on/off autozero
- choose kind of work (checking thickness of solids)
- choose kind of work (checking thickness of liquids)
- order to write temperature (during checking thickness)
- destilled water (thickness of solids)
- alkohol - spirit (thickness of solids)
0
Spirit 100% +/- 0.1% in temp. 20 C
- another liquid with klown thickness(thickness of solids)
- order to write in value of capacity of plunger (checking
thickness of liquids)
-order to put sample on upper scale (checking thickness)
- order to put sample on down scale (checking thickness)
- too mach difference between start mass and settled factory
mass and real start mass of scale – there is possibility to
appears bigger errors
- error in calibration (calibrate scale once again)
- function of setting speed of transmission
- automatic calibration of scale
- average result
- digital filters
- default unit of weighing
- 37 -
16. TECHNICAL PARAMETERS
Type
CY
110
CY
220
CY
360
CY
510
CY
720
Max. capacity
110g
220g
360g
510g
720g
Min. capacity
20mg
40mg
Readability
1mg
2mg
Tare range
-110g
-220g
-360g
-510g
-720
+ 15oC do +35oC
Operat. Temp
230V 50Hz AC / 10,5 V AC
Power
128 x 128mm
Pan size
Type
CG
1202
CG
2202
CG
3102
CG
4102
Max. capacity
1200g
2200g
3100g
4100g
-3100g
-4100g
Min. capacity
500mg
Readability
10mg
Tare range
Operat. temp
Power
-1200g
-2200g
+ 15oC do +35oC
230V 50Hz AC / 10,5 V AC
165 x 165mm
Pan size
- 38 -
17. ADDITIONAL EQUIPMENT
17.1. Vibration damping table
Thank’s to this stable base all vibrations are
eliminated.Inside of table marble plate is installed which
makes foundation for balance.
17.2. Rack for weighing load under balance
It is used when weighing under balance is neccesary. It is
usefull for magnetic load or when thickness of products is
defined. Racks are used also during tests for absorptiveness
of materials f.eg. absorptiveness of foamed polystyrene.
Structre of rack is made of steel. Rack is 330mm high.
17.3. Set for defining thickness of solids and liquids
It’s appropriate for weighing with precision 1mg. It enables to
define thickness solids and liquids. This procedure is ful
automatically user only puts samples on scales.
17.4. Additional display
Characterization: length of conductor between additional
display and balance- 1,5m, plastic casing, possibility of
bending the display
17.5. Computer softwares
• POMIARWIN – gathering data from any balance
• WEIGHTRACK – enables to introduce result of weighing to Exel.
17.6. Printers
• CITIZEN CPR02
- 39 -
!!