1
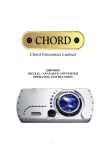
M2TECH
HIFACE Two
192KHZ/24BIT DIGITAL AUDIO INTERFACE
USER MANUAL
REV. 1.0 – 5/2013
M2Tech
hiFace Two
192kHz/24bit digital audio interface
www.m2tech.biz
REVISION 1.0 – MAY 2013
Warning!
Changes or modifications not authorized by the manufacturer can invalidate the
compliance to CE regulations and cause the unit to be no more suitable to use. The
manufacturer refuses every responsibility regarding damages to people or things
due to the use of a unit which has been subject to unauthorized modifications or to
misuse or to malfunction of a unit which has been subject to unauthorized
modifications.
This unit is compliant with the following CE regulations when an USB cable less than 3m is used: CEI EN
55022:2009 Class B (Radiated Emissions), CEI EN 55024:1999, CEI EN 55024:A2/2003, CEI EN
55024:IS1/2008 (Radio Frequency Electromagnetic Fields, 50Hz Magnetic Field Immunity Test and
Electrostatic Discharges – ESD).
Recycling
The label above, printed on the product case, indicates that the product, when no more usable, can’t be
treated as generic garbage, but must be disposed of at a collection point for recycling of electrical and
electronic equipment, in compliance with the WEEE regulation (Waste of Electrical and Electronic
Equipment).
By making sure that this unit is correctly recycled, you will help preventing potential damages to environment
and human health, which could be caused by a wrong treatment of this product as generic garbage.
Materials recycling helps saving natural resources. For more in-depth information about recycling this
product, please contact M2Tech Srl.
WARNING: the information contained in this manual are considered to be reliable and accurate.
M2Tech reserves the right to change or modify the information any time, without prior advice. It’s up
to the customer to ensure that the manual being consulted is the latest version.
Copyright © 2013, M2Tech Srl
2
hiFace Two
192kHz/24bit digital audio interface
REVISION 1.0 – MAY 2013
M2Tech
www.m2tech.biz
Dear customer,
thank you for purchasing hiFace Two. What you have is a first-rate USB-to-S/PDIF
converter with many unique features conceived to obtain the best audio performance out
of a music file.
Even if getting digital music out of a PC, a Mac or a Linux computer is nowadays quite
simple, much harder is to obtain the best sonic performance from it, due to intrinsic limits
in USB 1.1 audio standard and the implementation of digital audio interfaces in computers.
Please visit M2Tech website (www.m2tech.biz) to find extensive literature about this topic.
hiFace Two overcomes all the limits of usual USB-to-audio interfaces by exploiting the
powerful performance allowed by USB 2.0 Audio class and by using asynchronous data
transfer, along with a sophisticated electronic design.
hiFace Two is available with either RCA or true 75 Ohms output connector which suites
virtually all DAC’s and A/V receivers around.
We feel that your expectations will be fulfilled by hiFace Two: you’ll hear your DAC and
your music files in a way like never before, prepare for a whole new experience!
Nadia Marino, CEO
Please annotate here your hiFace Two serial number and purchase date for future
reference:
Serial number: ___________________________
Date of purchase: _________________________
Copyright © 2013, M2Tech Srl
3
M2Tech
hiFace Two
192kHz/24bit digital audio interface
www.m2tech.biz
REVISION 1.0 – MAY 2013
INDEX
1. Connections ...................................................................................................................5
2. Connection to the host..................................................................................................6
3. True plug’n’play operation with Mac............................................................................7
4. True plug’n’play operation with Linux .........................................................................9
5. Operation with iPad and Android-based tablets .......................................................10
5. Windows driver installation ........................................................................................11
5.1. Obtaining the driver .................................................................................................11
5.2. Installing the driver on a Windows-based PC (XP, Vista, Windows 7 and Windows
8, 32 & 64 bits) ...............................................................................................................11
5.2.1. Checking for right installation and trying the interface ......................................15
5.3. Unistalling the driver................................................................................................17
6. Configuring the computer to use hiF
hiFace Two ...........................................................20
6.1. Configuring a PC with Windows XP ........................................................................20
6.1.1. Configuring for Direct Sound with Windows XP ................................................20
6.1.2. Configuring for ASIO with Windows XP ............................................................21
6.2. Configuring a PC with Windows Vista, Windows 7 or Windows 8 ...........................22
6.2.1. Configuring for Direct Sound with Windows Vista, Windows 7 or Windows 8...22
6.2.2. Configuring for Kernel Streaming with Windows Vista, Windows 7 or Windows 8
....................................................................................................................................23
6.2.3. Configuring for WASAPI with Windows Vista, Windows 7 or Windows 8 .........23
6.2.4. Configuring for ASIO with Windows Vista, Windows 7or Windows 8................23
7. Configuring the player for Kernel Streaming: two examples...................................24
7.1. FooBar ....................................................................................................................24
7.2. Winamp and MediaMonkey.....................................................................................25
8. Configuring the player for WASAPI: two examples ..................................................27
8.1. FooBar ....................................................................................................................27
8.2. JRiver ......................................................................................................................28
9. Configuring the player for ASIO: an example ...........................................................28
9.1. FooBar ....................................................................................................................28
10. Interface Special Features ........................................................................................30
10.1. Precision oscillators...............................................................................................30
10.2. Asynchronous transfer mode ................................................................................30
10.3. Output connector choice .......................................................................................30
10.4. Powering the hiFace Two with an external power supply .....................................30
11. Technical Specifications ...........................................................................................31
Copyright © 2013, M2Tech Srl
4
M2Tech
hiFace Two
192kHz/24bit digital audio interface
www.m2tech.biz
REVISION 1.0 – MAY 2013
1. Connections
1
2
Figure 1
1) USB input. Connect directly to the USB 3.0 or 2.0 or 1.1* port of a PC, Mac or Linuxbased computer, or use an USB extender (A male to A female). In the latter, the extender
must be compliant with USB 2.0 and less than 3m, otherwise the bus performance will
decrease and the correct operation of the interface will not be guaranteed. USB type A
male connector
2) S/PDIF output. Connect to the DAC input with a 75 Ohms digital cable. RCA male
connector or BNC 75 Ohms male connector.
* hiFace Two performance on USB 1.1 are limited to 96kHz. Please note that 1.0 ports
won’t work.
Copyright © 2013, M2Tech Srl
5
hiFace Two
192kHz/24bit digital audio interface
REVISION 1.0 – MAY 2013
M2Tech
www.m2tech.biz
2. Connection to the host
ADVICE: Windows users must install the driver prior to connecting the hiFace to the
PC (please refer to section 5).
Please refer to section 1, “Connections”.
Connect the hiFace Two to the host USB 2.0 port by inserting its USB plug (Figure 1, 1)
into the host socket. If straight insertion is difficult or when in need of avoiding straight
insertion, an USB 2.0 extender cable (A male to A female) can be used. Please avoid
using extenders more than 4m, to avoid invalidating the bus performance.
If your computer has a Windows operating system and a driver hasn’t been installed prior
connecting the hiFace Two, an error message may appear and you may need to
disconnect the hiFace Two and install the driver (see section 5.3).
Copyright © 2013, M2Tech Srl
6
M2Tech
hiFace Two
192kHz/24bit digital audio interface
www.m2tech.biz
REVISION 1.0 – MAY 2013
3. True plug’n’play operation with Mac
Mac computers with OSX 10.6.4 and later have a native support for audio devices
compliant with USB Audio Class 2.0. This means that the driver is already included in the
operating system and the user needs not to install anything: just connect the hiFace Two
to your Mac and it will be immediately recognized by the OS and ready to use. Macs with
older OS need update to use the hiFace Two.
To use hiFace Two as output device for your Mac, you need to select it as default output
device from the Audio Control Panel (Preferences -> Sound) as shown in Figure 2:
Figure 2
After selecting hiFace Two, please check settings, particularly the output sampling
frequency (Figure 3): that setting forces the sampling frequency for the hiFace Two,
regardless the native sampling frequency of the various tracks being played back (to get
rid of such unease operation mode, you may want to use a player which automatically
changes this setting based on each track’s native sampling frequency, Like Sonic Studio’s
Amarra or PureMusic).
Copyright © 2013, M2Tech Srl
7
M2Tech
hiFace Two
192kHz/24bit digital audio interface
www.m2tech.biz
REVISION 1.0 – MAY 2013
Figure 3
Copyright © 2013, M2Tech Srl
8
hiFace Two
192kHz/24bit digital audio interface
REVISION 1.0 – MAY 2013
M2Tech
www.m2tech.biz
4. True plug’n’play operation with Linux
Linux has a native support for audio devices compliant with USB Audio Class 2.0 based on
ALSA. This means that the driver is already included in the operating system and the user
needs not to install anything: just connect the hiFace Two to your PC with Linux and it will
be immediately recognized by the OS and ready to use. ALSA version needs to be 1.0.24
or later.
To use hiFace Two as output device, select it as default output device for the system or
for the player you’re using.
Copyright © 2013, M2Tech Srl
9
hiFace Two
192kHz/24bit digital audio interface
REVISION 1.0 – MAY 2013
M2Tech
www.m2tech.biz
5. Operation with iPad and Android-based tablets
iPad also supports USB Audio Class 2.0. This means that it is possible to connect the
hiFace Two to an iPad through the latter’s camera kit, which exports a high speed host
USB port. The limited supply current required by the hiFace Two makes it possible to
power it even by the reduced current capabilities provided by the iPad.
Once the hiFace Two is connected, the iPad automatically set it as default output device.
Android tablets may potentially use the hiFace Two, provided they have a 2.0 or 1.1 USB
host port capable of at least 100mA output current and ALSA or any other audio
management module compliant with USB Audio Class 2.0. Please refer to the tablet’s
specification chart.
Copyright © 2013, M2Tech Srl
10
M2Tech
hiFace Two
192kHz/24bit digital audio interface
www.m2tech.biz
REVISION 1.0 – MAY 2013
5. Windows driver installation
5.1. Obtaining the driver
The Windows driver for hiFace Two is available on the M2Tech website, in the download
page (www.m2tech.biz/download.asp). Download the exe file containing the driver
package and save it to a folder in your PC. This is a self-extracting file which will deliver a
folder. Double-click on it to extract the folder. Please pay attention to the location where
the folder will be extracted to avoid losing it into the hard disk (Figure 4).
Figure 4
5.2. Installing the driver on a Windows-based PC (XP, Vista, Windows 7
and Windows 8, 32 & 64 bits)
Uninstall older driver version if already installed (see section 5.3). Then follow the
instruction to successfully install the driver. Please note that the pictures in this Section are
taken from installation process for either Window 7 and Windows 8: the process is
basically the same and also applies to Windows XP and Vista.
Open the folder produced by the self-extracting exe file. Double-click on “setup.exe” and
follow the indications provided by the setup program. First, the installation wizard will ask
for authorization to start installation (Figure 5). Accept.
Copyright © 2013, M2Tech Srl
11
M2Tech
hiFace Two
192kHz/24bit digital audio interface
www.m2tech.biz
REVISION 1.0 – MAY 2013
Figure 5
Then, the wizard will check for system features. At a certain point, it will ask you to plug
the hiFace Two in one of the USB ports (Figure 6).
Figure 6
Copyright © 2013, M2Tech Srl
12
M2Tech
hiFace Two
192kHz/24bit digital audio interface
www.m2tech.biz
REVISION 1.0 – MAY 2013
Follow the indications and plug the device in one port, then click on “Install”. You will be
asked to follow the destination folder (Figure 7).
Figure 7
The installation process continues showing the progress (Figure 8).
Figure 8
Copyright © 2013, M2Tech Srl
13
M2Tech
hiFace Two
192kHz/24bit digital audio interface
www.m2tech.biz
REVISION 1.0 – MAY 2013
At the end of the installation process, the wizard notify the completion (Figure 9).
Figure 9
Clock on “Next”: the installation is almost completed (Figure 10). Click on “Finish” to
complete the installation.
Figure 10
Copyright © 2013, M2Tech Srl
14
M2Tech
hiFace Two
192kHz/24bit digital audio interface
www.m2tech.biz
REVISION 1.0 – MAY 2013
At the end of the installation process, the USB Audio Class control panel is running and
you can open it by clicking on the red “T” to the bottom right of the desktop (Figure 11) to
check and select various operation options.
Figure 11
5.2.1. Checking for right installation and trying the interface
From Control Panel -> Audio select the hiFace Two in the “Playback” tab and then choose
Properties. This windows also allows you to set hiFace Two as default output device,
which is mandatory when user needs to use hiFace Two to listen to Youtube files audio
and other streaming sources (Figure 12).
Select the Advanced tab, from the drop down window choose the desired audio sample
rate and then try it out: you should hear a bell ringing in your system’s speakers.
Also check the Exclusive Mode acces boxes. In this way the running player will take the
exclusive access to the device, ensuring high end performance. Warning: this modality is
not appropriate for the shared access, for instance when user sets hiFace Two as the
default output audio device: in this case, multiple access would be desirable.
Copyright © 2013, M2Tech Srl
15
M2Tech
hiFace Two
192kHz/24bit digital audio interface
www.m2tech.biz
REVISION 1.0 – MAY 2013
Figure 12
Copyright © 2013, M2Tech Srl
16
M2Tech
hiFace Two
192kHz/24bit digital audio interface
www.m2tech.biz
REVISION 1.0 – MAY 2013
5.3. Unistalling the driver
Sometimes it is necessary to uninstall the driver to roll back to a previous version. Uninstall
is a quite simple procedure.
Go to the control panel and launch the “Application Installation” utility (Figure 13).
Look for the hiFace Two driver item in the list. Double-click on it to launch uninstalling.
Figure 13
The installation wizard, which also handles uninstalling, will show up (Figure 14 on next
page). Click on “Uninstall” to start uninstalling.
Copyright © 2013, M2Tech Srl
17
M2Tech
hiFace Two
192kHz/24bit digital audio interface
www.m2tech.biz
REVISION 1.0 – MAY 2013
Figure 14
At this point, the wizard will show up the installation progress (Figure 15), up to the end.
Figure 15
Copyright © 2013, M2Tech Srl
18
M2Tech
hiFace Two
192kHz/24bit digital audio interface
www.m2tech.biz
REVISION 1.0 – MAY 2013
After the uninstalling of all files related to the driver is complete, the “Next” button will be
enabled. Click on it. The final message will appear (Figure 16). Click on “Finish” to
complete uninstalling.
Figure 16
Copyright © 2013, M2Tech Srl
19
hiFace Two
192kHz/24bit digital audio interface
REVISION 1.0 – MAY 2013
M2Tech
www.m2tech.biz
6. Configuring the computer to use hiFace Two
6.1. Configuring a PC with Windows XP
A PC with Windows XP can use hiFace Two in two different ways: Direct Sound (DS)*
and ASIO. The first mode is suitable for most players, such as Windows Media Player and
iTunes, or for Internet streaming, while the second can be chosen (for better performance)
with players which can operate in ASIO mode. ASIO is widely used by professional audio
software tools and ensures bit-perfect performance.
*Please note that DS mode doesn’t allow for hi-end performance, as the various audio
streams from various sources (OS synthetizer, Windows sounds, audio player…) are
mixed together. This mode is nevertheless mandatory when enjoying streaming material,
such as Youtube videos or Spotify programmes.
6.1.1. Configuring for Direct Sound with Windows XP
Connect hiFace Two to your PC. Then, go to the Control Panel and launch the Sound and
Audio Peripherals utility.
Select the Audio tab. In the Predefined Peripheral drop-down menu of the Playback area,
select “M2Tech Audio 2.0 Output” (see figure 17).
Copyright © 2013, M2Tech Srl
20
M2Tech
hiFace Two
192kHz/24bit digital audio interface
www.m2tech.biz
REVISION 1.0 – MAY 2013
Figure 17
Then, select the “Voice” Tab. Again, select “M2Tech Audio 2.0 Output” in the drop-down
menu of the Playback area. Click on OK button. Please be adviced that even if the
peripheral is listed as “kernel streaming”, it will operate in Direct Sound mode when listed
here.
From now on, unless hiFace Two is disconnected or settings are changed again, hiFace
Two is the audio peripheral all audio programs will use when operating in direct sound
mode.
6.1.2. Configuring for ASIO with Windows XP
ASIO has no standard setting in Windows XP. ASIO must be selected in the specific
player you choose to use.
For example, when using FooBar, with hiFace Two connected to the PC, go to the
File/Preferences/Playback /Output tab and select “ASIO: hiFace Two” as output device.
Other players will require different settings (see section 5).
Copyright © 2013, M2Tech Srl
21
M2Tech
hiFace Two
192kHz/24bit digital audio interface
www.m2tech.biz
REVISION 1.0 – MAY 2013
6.2. Configuring a PC with Windows Vista, Windows 7 or Windows 8
A PC with Windows Vista or Windows 7 can use hiFace Two in four different ways: Direct
Sound (DS)*, Kernel Streaming (KS), WASAPI and ASIO. DS is suitable for players which
can’t operate in Kernel Streaming mode nor with WASAPI or for Internet streaming; KS
can be chosen (for better performance) with players which can operate in Kernel
Streaming mode (such as FooBar, Winamp, Monkey Media, JRiver). WASAPI (Windows
Audio Standard API) is a standard interface for audio players which allows to get the same
performance of KS with applications which can’t operate in KS mode, at the cost of higher
CPU load. Much the same can be told about ASIO.
*Please note that DS mode doesn’t allow for hi-end performance, as the various audio
streams from various sources (OS synthetizer, Windows sounds, audio player…) are
mixed together. This mode is nevertheless mandatory when enjoying streaming material,
such as Youtube videos or Spotify programmes.
6.2.1. Configuring for Direct Sound with Windows Vista, Windows 7 or
Windows 8
Open control Panel and select Hardware and Sounds. Under Audio, click on Manage
Audio Devices. The following windows will appear, in which hiFace Two is listed. Set
hiFace Two as predefined device. Then, click on OK.
Figure 18
Copyright © 2013, M2Tech Srl
22
hiFace Two
192kHz/24bit digital audio interface
REVISION 1.0 – MAY 2013
M2Tech
www.m2tech.biz
6.2.2. Configuring for Kernel Streaming with Windows Vista, Windows 7 or
Windows 8
As for Windows XP, Kernel Streaming has no standard setting in Windows Vista and
Windows 7. KS must be selected in the specific player you choose to use.
For example, when using FooBar, with hiFace Two connected to the PC, go to the
File/Preferences/Playback /Output tab and select “KS: M2Tech Audio 2.0 Output” as
output device.
Other players will require different settings (see section 5).
6.2.3. Configuring for WASAPI with Windows Vista, Windows 7 or Windows 8
As happens with Kernel Streaming, WASAPI cannot be directly accessed. WASAPI must
be selected in the specific player you choose to use.
For example, when using FooBar, with hiFace Two connected to the PC, go to the
File/Preferences/Playback /Output tab and select “WASAPI: Speakers (hiFace TWO
Audio)” as output device.
Other players will require different settings (see section 6).
6.2.4. Configuring for ASIO with Windows Vista, Windows 7or Windows 8
As happens with Kernel Streaming and WASAPI, ASIO cannot be directly accessed. ASIO
must be selected in the specific player you choose to use.
For example, when using FooBar, with hiFace Two connected to the PC, go to the
File/Preferences/Playback /Output tab and select “ASIO: hiFaceTWO ASIO driver” as
output device.
Other players will require different settings (see section 7).
Copyright © 2013, M2Tech Srl
23
M2Tech
hiFace Two
192kHz/24bit digital audio interface
www.m2tech.biz
REVISION 1.0 – MAY 2013
7. Configuring the player for Kernel Streaming: two examples
7.1. FooBar
To use FooBar in KS mode it is necessary to download the DLL for Kernel Streaming from
the FooBar2000 website and install it in the Components sub-folder inside FooBar2000
main folder in your hard disk. The DLL can be found at
http://www.foobar2000.org/components/view/foo_out_ks (click on Download). It is a zip
folder which contains the DLL. Extract it from the zip and copy to the Components folder.
Then, restart FooBar, go to the File/Preferences/Playback/Output window and set
parameters as in figure 19.
Figure 19
Copyright © 2013, M2Tech Srl
24
M2Tech
hiFace Two
192kHz/24bit digital audio interface
www.m2tech.biz
REVISION 1.0 – MAY 2013
7.2. Winamp and MediaMonkey
These two players are actually the same player with different skins, so they can share the
same plug-ins. A freeware plug-in for Kernel Streaming by Steve Monks is available on the
Internet (http://www.stevemonks.com/ksplugin/) that can be used to enable Kernel
Streaming operation with these players.
Download the zip file, extract the dll file and copy it into the Plugins folder inside Winamp
main folder.
With hiFace two connected, right-click on Winamp and select Display/Select Plug-ins. The
Preferences window of Winamp will open (see figure 20).
Figure 20
Go to Plug-in/Output and select “M2Tech Audio 2.0 Output”. Then click on Configure
button. Choose HIFACE TWO Kernel Streaming in the output device list (Figure 21).
Copyright © 2013, M2Tech Srl
25
M2Tech
hiFace Two
192kHz/24bit digital audio interface
www.m2tech.biz
REVISION 1.0 – MAY 2013
Figure 21
Copyright © 2013, M2Tech Srl
26
M2Tech
hiFace Two
192kHz/24bit digital audio interface
www.m2tech.biz
REVISION 1.0 – MAY 2013
8. Configuring the player for WASAPI: two examples
8.1. FooBar
To use FooBar with WASAPI under Windows 7 or Windows 8 it is necessary to download
the DLL for WASAPI from the FooBar2000 website and install it in the Components subfolder inside FooBar2000 main folder in your hard disk. The DLL can be found at
http://www.foobar2000.org/components/view/foo_out_wasapi (click on Download). It is a
zip folder which contains the DLL. Extract it from the zip and copy to the Components
folder.
Then, restart FooBar, go to the File/Preferences/Playback/Output window and set
parameters as in figure 22.
Figure 22
Please note that 24 bits is OK for WASAPI. Please refer to the Foobar2000 technical notes
for more info.
Copyright © 2013, M2Tech Srl
27
M2Tech
hiFace Two
192kHz/24bit digital audio interface
www.m2tech.biz
REVISION 1.0 – MAY 2013
8.2. JRiver
From JRiver Option menu, configure the Output Mode to use WASAPI Event style, the
configure the output mode settings as in Figure 23. Please refer to the JRiver technical
notes for more info.
Figure 23
9. Configuring the player for ASIO: an example
9.1. FooBar
To use FooBar with ASIO under Windows 7 it is necessary to download the DLL for ASIO
from the FooBar2000 website and install it in the Components sub-folder inside
FooBar2000 main folder in your hard disk. The DLL can be found at
http://www.foobar2000.org/components/view/foo_out_asio (click on Download). It is a zip
folder which contains the DLL. Extract it from the zip and copy to the Components folder.
Then, restart FooBar, go to the File/Preferences/Playback/Output window and set
parameters as in figure 24.
Copyright © 2013, M2Tech Srl
28
M2Tech
hiFace Two
192kHz/24bit digital audio interface
www.m2tech.biz
REVISION 1.0 – MAY 2013
Figure 24
Copyright © 2013, M2Tech Srl
29
hiFace Two
192kHz/24bit digital audio interface
REVISION 1.0 – MAY 2013
M2Tech
www.m2tech.biz
10. Interface Special Features
10.1. Precision oscillators
hiFace Two uses two high precision, low phase noise oscillators as time base for data
transfer to the DAC. This way, jitter is kept at a minimum, while output transfer is virtually
isolated by the USB interface timing low stability.
10.2. Asynchronous transfer mode
hiFace Two uses an asynchronous transfer mode to get data from the computer. This
way, the actual transfer timing is mastered by the hiFace Two, thus avoiding all time
uncertainties and thus the jitter caused by the computer USB interface.
10.3. Output connector choice
hiFace Two comes in two different versions: with RCA output connector and with 75
Ohms BNC connector. Which one to choose? It mainly depends on the input connector on
your DAC or A/V receiver. Most units have an RCA input connector, so the RCA hiFace
Two is to be chosen. On the other hand, some high performance units have both RCA
and BNC input connectors, and some of them only have BNC inputs. The rule is: every
time a BNC connector is available, hiFace Two BNC should be chosen, as the BNC
connection, being it a true 75 Ohms link, give slightly better performance.
Should a hybrid cable be available (that is, a cable with an RCA plug on one end and a
BNC plug on the other), it is possible to use a hiFace Two BNC with a DAC provided with
an RCA input, or vice versa. A slight performance increase with respect to an all-RCA link
can be obtained.
10.4. Powering the hiFace Two with an external power supply
hiFace Two is powered by the USB bus, so it needs no external power supply. Its internal
regulators ensure correct operation of the various sub-circuits, particularly the internal high
precision oscillators. Anyway, user may want to power the hiFace Two with a power
supply giving clean current to the device. This can be done using adapting cables
purposely made for that and available on the computer market. Please use a 5V power
supply with 500mA current capability.
Copyright © 2013, M2Tech Srl
30
M2Tech
hiFace Two
192kHz/24bit digital audio interface
www.m2tech.biz
REVISION 1.0 – MAY 2013
11. Technical Specifications
Sampling frequencies: ...................... 44.1, 48, 88.2, 96, 176.4, 192kHz
Resolution:........................................ 16 to 24 bits
USB: ................................................. USB Audio Class 2.0
Compatibility: .................................... Windows XP(1), Windows Vista (32 & 64 bits),
Windows 7 (32 & 64 bits);
OSX (10.6.4 and later);
Linux (ALSA 1.0.24 or later)
Internal clock precision: .................... +/-10ppm 0 to 60°C, 2ppm typical @ 25°C
S/PDIF output voltage:...................... 500mVpp +/-0.1V @ 75 Ohms
Minimal requirements:....................... 1.3GHz CPU clock, 1GB RAM, 2.0 USB port
Size................................................... 110x20x23mm (with connectors)
Weight:.............................................. 40g
Note:
1) DS and ASIO modes only.
Copyright © 2013, M2Tech Srl
31