1
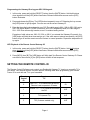
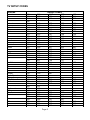
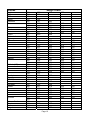
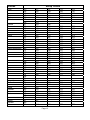
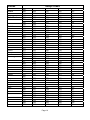
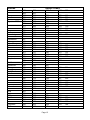
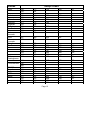
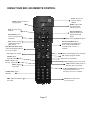
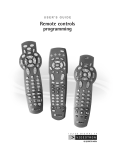
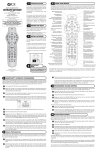
REMOTE
CONTROL
USER’S
GUIDE
TABLE OF CONTENTS
Introduction…………….........................pg 2
Installing/Replacing Batteries………….pg 2
Setting Remote Operating Mode……...pg 3
Setting Gateway ID……………………..pg 3
Setting Remote Control ID………...…..pg 4
Programming Your TV………………….pg 5
Additional Programming Info………….pg 7
TV Setup Codes…………………….….pg 8
Using Your Remote Control.…………..pg 17
MODEL: SRC-350
725-1000
www.nvc.net
INTRODUCTION
Your SRC-350 remote control is simple to program, easy to use, and can operate two (2) devices, which
include:
•
•
Residential Gateways (RG)
Televisions
The SRC-350 remote control allows access to the features available in your Residential Gateway by
using an IR (infrared) and UHF (ultra high frequency) signal, depending on how it is programmed. When
the SRC-350 is set to operate in IR mode, you must point it directly at your Residential Gateway in order
to operate it. When the SRC-350 is set to operate in UHF mode, it can operate your Residential Gateway
from anywhere in your home.
Before you can use your SRC-350, it must be programmed (set-up) to operate your Residential Gateway
and TV. Programming your remote control is simple following the steps outlined in this manual.
BEFORE GETTING STARTED
Some of the special features and buttons on your SRC-350 remote control are as follows:
•
Point and Press® Programming
Lets you program your TV without codes. Fro more information, see Sections 7 and 9
•
Memory Guard®
Eliminates reprogramming after battery changes.
•
Time Out
If the same button is pressed and held for 30-seconds, your remote control will turn itself
off automatically. This extends the batter life should the remote became lodged under or
between heavy objects, for example sofa cushions.
INSTALLING / REPLACING BATTERIES
Install two (2) new “AA” batteries as indicated by the diagram in the batter compartment.
When the batteries become low and need to be replaced, the [LED] button will not illuminate normally or
at all during use.
When this happens, replace the existing batteries with two (2) new “AA” batteries to restore normal
operation to the remote control.
Page 2
SETTING THE REMOTE CONTROL OPERATING MODE
The SRC-350 remote control operates older as well as newer Residential Gateway models. To allow for
this, the remote can be set to operate in either SRC-200 Compatibility Mode (to operate like the older
remote control) or SRC-350 Native Mode. The default Operating Mode is SRC-200 Compatibility Mode.
Programming the Remote Control Operating Mod using your SRC-350 keypad:
1. In this order, press and hold the [SELECT] button, then the [MUTE] button. Hold both buttons
down together until the [LED] button illuminates. Release both buttons as soon as the LED button
illuminates.
2. Press and release the [D] key. The [LED] button temporarily turns off. Releasing the key causes
the [LED] button to light up again. You can now set the correct Operating Mode.
3. Press [0] to select SRC-200 Compatibility Mode or [1] to select SRC-350 Native Mode. The [LED]
button will blink three-times and go out. The new Operating Mode is stored in the device.
Important! Changing the Operating Mode from [0] to [1] will reset the Gateway ID within the SRC-350
back to [000].
Once changes have been made, the remote control resumes normal operation. If the value entered was
not valid (a keypress other than [0] or [1]) the [LED] button indicates the error by turning off immediately,
and the remote turns to normal operation. All values in the device remain unchanged.
LED Playback of the Remote Control Operating Mode:
1. In the order, press and hold the [SELECT] button, then the [MUTE] button. Hold both buttons
down together until the [LED] button illuminates. Release both buttons as soon as the [LED]
button illuminates.
2. Press [INFO], then [D]. The [LED] button will “blink back” the Remote Control Operating Mode.
Please note that for the numeric [0], The [LED] button will blink in fast-sequence.
SETTING THE GATEWAY ID
The Gateway ID allows your remote to talk to your Residential Gateway. The Gateway Id that is
programmed into the Residential Gateway must also be programmed into your remote. The Gateway ID
programming mode allows you to set the Gateway ID in the remote. To change the Gateway ID in the
Residential Gateway the procedure is the same but the remote must be pointed at the Residential
Gateway. The Gateway ID must be the same in all remotes.
Note: Refer to your Residential Gateway User Guide for instructions on determining the Gateway ID in
your Residential Gateway.
Page 3
Programming the Gateway ID using your SRC-350 keypad:
1. In this order, press and hold the [SELECT] button, then the [MUTE] button. Hold both buttons
down together until the [LED] button illuminates. Release both buttons as soon as the [LED]
button illuminates.
2. Press and release the [B] key. The [LED] button temporarily turns off. Releasing the key causes
the [LED] button to light up again. You can now set the correct Gateway ID.
3. Enter the three-digit code assigned to your RG. The valid range is 004 – 999 for SRC-350s set to
SRC-350 Native Modes. For SRC-350s set to SRC-200 Compatibility Mode, the valid range is
004 – 255. Enter a three-digit number, even if it contains leading zeroes.
Examples of valid values are: 009, 012, 354, or 988. If you entered the Gateway ID correctly, the
[LED] button will blink three-times and go out. If the value was not entered successfully, the [LED]
button will go off and the remote control will return to normal operation. Repeat the steps above to
try again.
LED Playback of the Remote Control Gateway ID:
1. In this order, press and hold the [SELECT] button, then the [MUTE] button. Hold both buttons
down together until the [LED] button illuminates. Release both buttons as soon as the [LED]
button illuminates.
2. Press [INFO], then [B]. The [LED] button will “blink back” the Remote Control Gateway ID. Please
note that for the numeric [0], the [LED] button will blink in fast-sequence.
SETTING THE REMOTE CONTROL ID
The Remote Control ID allows you to control your Residential Gateway TV viewing on a specific TV in
your home. Your Network Service Provider uses the following table when programming your Remote
Control ID to work with eat TV in your household:
Remote
Control
ID
Operates
TV
Mode
0
Local TV1 – TV in same room as the RG.
Remote is set to operate in IR mode.
IR
1
Remote TV1 – TV in a different room than
the RG.
UHF
2
TV2 (remote TV)
UHF
3
TV3 (3-stream models only).
UHF
Page 4
Programming the Remote Control ID using your SRC-350 keypad:
1. In this order, press and hold the [SELECT] button, then the [MUTE] button. Hold both buttons
down together until the [LED] button illuminates. Release both buttons as soon as the [LED]
button illuminates.
2. Press and release the [A] key. The [LED] button temporarily turns off. Releasing the key causes
the [LED] button to light up again. You can now set the correct Remote Control ID.
3. Enter the single-digit Remote Control ID from the table above. The LED button will blink threetimes and go out. The new Remote Control ID is stored in the device.
Note: Valid single-digit codes are 0,1,2, or 3. If you entered an invalid sequence or a 30-second lapse
between button presses occurs, the [LED] button illuminates. Release both buttons as soon as the [LED]
button illuminates.
LED Playback of the Remote Control ID:
1. In this order, press and hold the [SELECT] button, then the [MUTE] button. Hold both buttons
down together until the [LED] button illuminates. Release both buttons as soon as the [LED]
button illuminates.
2. Press [INFO], then [A]. The [LED] button will “blink back” the Remote Control ID. Please note that
for the numeric [0], the [LED] button will blink in fast-sequence.
PROGRAMMING YOUR TV
Your Network Service Provider programs your remote control to work with your TV by way of a TV Setup
Code. The TV Setup Code is a specific code for each brand and model of TV. When a TV Setup Code is
set, the remote control is ready to operate the TV. The TV Setup Codes can be programmed manually,
or they can be auto-scanned. Each method is described below.
Code-Entry (Manual) TV Programming using your SRC-350 keypad:
1. Turn on your TV
2. In this order, press and hold the [SELECT] button, then the [MUTE] button. Hold both buttons
down together until the [LED] button illuminates. Release both buttons as soon as the [LED]
button illuminates.
3. a. Locate the three-digit code for your brand in the TV Setup Code list (Section 11) and enter it on
the keypad of the remote control. Entry of the correct code will cause your TV to turn off. If
multiple codes are listed for your brand, you may have to ender several different codes until your
TV turns off.
b. As soon as you have entered a three-digit code that turns you TV off, press [MUTE].
1. If the TV turns back on, press [SELECT] to lock in the code. The [LED] button will blink
three-times and go out.
Or
Page 5
2. If the TV does not turn back on, enter a different three-digit setup code until your TV turns
back on. Then press [SELECT] to lock in the code. The [LED] button will blink three-times
and go out.
Point and Press ® (Auto-Scan) TV Programming using your SRC-350 keypad:
This method allows you to program your remote control without codes using the [∆] or [∇] buttons
(“Power” function during programming). For more information on this method as well as other buttons
you can program your remote with, see Section 9.
1. Turn on your TV
2. In this order, press and hold the [SELECT] button, then the [MUTE] button. Hold both buttons
down together until the [LED] button illuminates. Release both buttons as soon as the [LED] button
illuminates.
3. Press [∆] one step at a time until your TV turns off. Each time you press the [∆] button, the [LED]
button will blink. As soon as your TV turns off, stop pressing the [∆] button.
4. Press [MUTE]. If your TV…
a. Turns back on, press [SELECT] to lock in this code. The [LED] button will blink threetimes and go out
Or
b. Does not turn back on, press the [∇] button one step at a time until your TV turns back on.
Each time you press the [∇] button, the [LED] button will blink and remain illuminated.
Once you have found a code that turns the decide on/off, press [SELECT] to lock in this code. The
[LED] button will blink three-times and go out.
Note: Given the size of the TV Setup Code library in your remote control, it will take several minutes to
cycle through all the codes when using the Point and Press Programming method.
TV CODE NUMBER READBACK
To identify the three-digit TV Setup Code stored under the Point and Press® programming method,
follow these steps using the remote control keypad…
1. In this order, press and hold the [SELECT] button, then the [MUTE] button. Hold both buttons
down together until the [LED] button illuminates. Release both buttons as soon as the [LED]
button illuminates.
2. Press [INFO], then [C]. The [LED] button will “blink back” the code numbers, with a 1-second
interval between each digit of the code. Please note that for the numeric [0], the [LED] button will
blink in fast-sequence.
Example: For TV Setup Code “130”, the remote will blink 1 time, then 3 times, then in a fastsequence for the 0.
Page 6
ADDITIONAL PROGRAMMING INFORMATION
1. The [LED] button will illuminate while the remote is in a programming mode. In the absence of a
keypress entry, the [LED] button will stop illuminating after 30 seconds and the remote will exit
the programming mode.
2. The Point and Press® (Auto-Scan) Programming method allows you to program your remote
control without using codes. Instead, the remote control automatically finds the correct TV setup
code using certain buttons/commands that you select. Once you have found a setup code that
operates your TV, you then lock it in.
3. When using the Point and Press® Programming Method, there are several important points to
remember:
•
There may be several codes that turn your TV on/off (or perform other functions)
•
It may take several minutes for the remote to find the correct code that turns your TV
on/off (or performs another selected function). During this time, the [LED] button will
illuminate.
4. When programming the remote control using the [∆] or [∇] buttons (Power function) under the
Point and Press® Programming method, you may find a code that turns your TV off but not back
on. If this happens…
•
The correct TV code has not been found, you may have a code that operates some but
not all of the functions of your TV. Continue pressing [∆] until your TV turns back on.
Or
•
You may have gone past the correct matching code. Try pressing [∇] one press at a time
until you find a code that turns your TV back on.
5. When using the Point and Press® Programming method, you can also program your remote
using the following buttons:
•
[VOL ∆]- to “go forward” through the codes using the “VOL ∆” function on your TV.
•
[VOL∇]- to “go back” through the codes using the “VOL∇” function on your TV.
Note: When you find the correct code, the volume of the TV being programmed will increase
or decrease.
FCC Warning: This device complies with Part 15 of the FCC Rules. Changes or modifications to this
device not expressly approved by the parties responsible for compliance could void the user’s authority
to operate this remote control
Rev. 0906
© 2006, Contec Holdings, LLC
Point and Press® and Memory Guard® are registered trademarks of the Contec Holdings, LLC
MOTOROLA and the stylized M logo are registered in the U.S. Patent and Trademark office
Page 7
TV SETUP CODES
Brands
Admiral
Advent
Adventura
Aiwa
Akai
Amark
Amstrad
Anam
AOC
Apex
AudioVox
Aiko
Alaron
Anam
Archer
Audio Dynamics
Belcor
Bell & Howell
Broksonic
Brokwood
BPL
Candle
Centurion
Citizen
Setup Codes
003
129
254
146
251
107
214
194
000
072
135
269
032
244
033
005
120
217
005
120
281
038
024
465
024
187
211
032
238
005
018
005
225
269
005
144
005
206
005
108
005
022
202
018
187
084
041
194
405
087
210
147
125
211
063
179
027
471
251
005
075
139
131
098
281
157
009
121
281
006
140
269
427
032
121
425
010
075
447
139
150
214
006
107
149
027
120
144
471
032
108
462
150
224
219
179
070
120
281
021
183
269
019
053
131
108
041
250
032
221
041
223
024
095
032
108
131
120
154
130
211
027
245
405
174
167
146
176
037
022
269
194
131
010
025
068
025
091
095
027
016
027
091
107
146
120
215
281
269
194
010
226
107
269
198
006
380
006
269
006
024
224
Page 8
018
098
211
Brands
Citizen
Concerto
Contec
Coronado
Craig
Crown
Curtis Mathes
CXC
Capehart
Carver
Corando
Coronado
Daewoo
Daytron
Dumont
Electro Home
Elektra
Emerson
Setup Codes
233
107
005
107
017
227
098
021
041
219
005
027
194
251
244
219
041
019
010
098
098
005
030
214
252
197
207
033
006
144
108
001
072
095
184
005
038
130
181
222
227
144
158
169
269
380
146
010
269
405
144
027
095
269
041
054
181
185
224
041
098
244
223
224
144
219
244
144
006
059
202
107
003
147
010
098
210
108
087
063
016
125
224
211
084
146
018
131
231
144
269
027
224
224
010
032
215
158
202
209
281
024
131
005
005
098
005
107
144
144
024
098
224
196
204
194
269
098
027
269
269
149
269
027
120
247
095
205
154
144
194
095
029
130
250
249
224
144
240
017
039
132
185
223
251
244
033
041
141
187
224
252
006
035
054
143
194
225
253
167
037
098
176
203
226
167
103
392
219
400
250
401
408
Page 9
206
007
107
224
107
Brands
Envision
ESA
DBX
Denon
Dimensia
Dixi
Fisher
Funai
Fujitsu
Furturetech
Gateway
GE
Gibralta
Goldstar (LG)
Gradiente
Grundig
GO-Video
Granada
Hall Mark
Hitachi
Hyundai
Harman Kardon
Hinari
Inkel
Insignia
Setup Codes
006
454
238
052
125
010
107
042
024
157
187
041
156
003
087
165
228
015
406
249
405
090
360
005
005
098
230
233
144
057
233
443
010
005
005
049
054
142
266
231
453
238
010
364
450
095
456
005
296
266
147
027
063
032
120
281
099
041
211
460
194
132
179
469
217
187
223
251
146
005
125
182
231
101
407
063
063
095
224
269
006
168
238
360
131
060
008
130
206
233
018
183
084
084
107
223
131
010
194
090
224
009
143
210
248
042
146
194
194
108
006
027
027
223
107
206
043
147
211
095
090
001
269
269
233
206
027
095
017
050
055
160
269
251
107
269
018
051
098
185
405
095
024
052
116
224
144
098
048
053
126
206
219
244
027
187
107
461
456
045
224
108
269
397
Page 10
Brands
Infinity
JC Penny
Jensen
JVC
JBL
Kawasho
KMC
Konka
KTV
Kurazai
KEC
Kenwood
Kloss
LG (Goldstar)
Lodgenet
Logik
Luxman
LXI
Lloytron
Loewe
Magnavox
Majestic
Setup Codes
010
003
043
125
202
269
147
242
056
057
238
010
061
098
236
005
224
219
211
041
006
022
090
224
244
018
018
005
003
125
223
269
063
098
010
000
017
067
154
254
419
472
185
231
018
027
005
072
131
206
144
063
095
062
059
397
027
095
224
445
006
233
107
006
087
149
210
108
224
060
410
107
005
144
041
039
269
018
405
146
235
110
107
006
269
211
211
095
005
129
251
108
251
175
108
206
131
405
405
206
010
131
024
107
380
233
005
219
146
146
269
027
132
157
084
224
027
005
024
068
167
090
057
269
129
237
211
144
107
006
025
098
175
091
060
144
194
008
027
110
187
404
206
107
216
405
146
Page 11
014
096
165
223
218
231
016
098
194
228
228
238
234
008
235
165
269
041
244
098
144
360
045
027
087
194
254
147
010
054
132
251
397
075
150
224
Brands
Marantz
Megatron
Memorex
MGA
Mitsubishi
Mintek
Montgomery Ward
MTC
Magnasonic
Marta
Matsui
Midland
Multitech
NEC
Norcent
NAD
National
Nikkai
Setup Codes
005
072
108
215
005
149
242
211
269
005
187
384
110
185
005
187
070
384
269
109
470
108
067
068
150
005
027
010
187
223
010
281
001
249
041
005
194
254
455
002
108
008
146
010
107
006
149
109
010
237
269
027
238
189
068
107
131
018
187
244
405
405
006
194
394
070
269
006
194
123
394
189
110
032
194
248
101
218
071
240
107
206
189
071
240
239
107
131
206
072
219
251
245
146
072
090
108
017
131
072
017
090
108
027
187
120
223
090
281
211
075
150
146
006
202
024
108
141
018
405
129
244
131
006
254
219
010
251
027
107
016
269
129
254
024
107
131
027
189
003
032
107
087
109
120
165
084
007
108
131
183
129
191
206
131
166
269
011
211
113
012
241
131
027
107
108
251
006
090
269
472
005
010
190
027
Page 12
149
095
109
054
027
149
054
095
149
185
158
Brands
Orion
010
225
163
Onwa
041
Optimus
012
Optonica
218
129
Osume
017
Panasonic
008
127
211
042
Philco
005
027
098
183
266
251
Philips(Magnavox) 000
017
067
154
216
254
220
397
472
185
Pilot
005
Pioneer
002
131
108
Planar
474
Polaroid
384
Portland
005
244
Prima
075
Proscan
005
233
Proton
005
224
144
Proton
457
Proview
459
Pulsar
001
Setup Codes
027
226
382
037
019
033
176
160
216
212
161
107
166
194
242
241
254
054
009
148
218
429
006
052
110
216
269
091
005
024
068
167
224
136
223
090
269
129
027
008
166
394
024
269
150
125
147
006
013
185
010
165
231
146
010
067
149
224
144
206
006
025
098
175
231
137
206
404
144
011
177
241
012
183
242
011
098
175
237
219
075
008
027
110
187
237
138
228
091
107
012
072
176
150
107
244
010
054
132
194
251
150
075
419
150
107
048
235
233
051
111
269
076
383
098
144
224
219
206
147
070
013
090
152
269
019
371
210
063
098
296
048
005
269
467
024
Page 13
Brands
Quasar
Radio Shack
Realistic
RCA
Runco
Sampo
Samsung
Sansui
Sanyo
Sceptre
Scott
Sears
Setup Codes
249
008
211
146
003
098
230
218
005
141
251
003
063
082
125
233
042
250
231
001
006
108
005
032
167
224
108
181
131
153
176
245
042
194
189
468
005
098
090
003
042
101
132
244
269
009
231
012
242
165
241
183
218
005
141
242
084
006
194
269
005
072
084
130
251
266
160
041
149
251
072
194
269
087
224
144
035
222
144
008
078
085
147
254
070
182
041
223
098
224
014
079
086
149
006
416
183
048
080
087
006
019
131
006
098
194
229
107
144
107
015
225
243
156
249
194
010
020
202
244
017
281
054
386
235
016
155
219
246
090
269
185
151
251
424
089
217
092
219
109
244
184
135
006
187
108
005
087
102
184
155
144
037
194
269
010
096
104
187
206
219
041
224
144
016
098
125
194
108
107
093
247
131
027
099
131
038
229
084
Page 14
206
269
210
090
027
157
221
411
224
144
247
Brands
Sharp
Signature 2000
Sony
Soundesign
Squareview
Superscan
Supre-Macy
Sylvania
Symphonic
Starlite
Spectricon
Tatung
TechWood
Teknika
Telerent
Tera
Tevion
TMK
Toshiba
Totevision
TIVO
Setup Codes
147
224
017
200
025
187
010
211
405
000
178
005
091
157
419
005
005
027
175
251
108
075
144
132
041
032
009
446
005
005
024
098
223
269
244
018
144
381
065
005
016
194
038
098
136
063
251
054
224
393
219
018
244
131
109
191
025
269
202
217
223
098
254
144
185
027
224
219
180
129
409
244
251
141
024
224
108
254
107
189
129
146
232
041
187
251
022
006
068
194
131
157
150
380
010
098
224
090
158
067
269
024
110
237
091
419
206
025
132
240
107
228
269
179
251
157
120
010
107
165
010
025
114
224
405
075
098
219
281
027
146
206
016
027
149
251
144
150
224
414
090
017
202
108
223
137
206
054
240
155
224
138
Page 15
183
211
269
018
041
187
091
219
206
244
107
380
405
269
096
245
229
233
131
247
185
144
022
072
202
Brands
Tandy
Teac
Technics
Teletech
Thomson
Universal
VidTech
ViewSonic
Vizio
Vector
Research
Victor
Video
Concepts
Viking
Wards
Setup Codes
098
144
251
008
218
032
051
043
005
428
095
006
113
254
129
224
251
012
165
242
241
120
116
206
206
281
142
269
454
238
057
070
060
238
235
251
397
022
000
027
141
224
104
037
380
005
043
182
251
147
041
006
067
187
090
063
130
010
068
194
269
018
125
206
405
176
194
211
X30SVNAGAlll 146
468
XR-1000
018
Yamaha
005
York
090
YORX
006
Zenith
001
225
405
Zonda
032
408
449
458
250
238
131
251
206
024
248
179
281
178
249
154
223
251
White
Westinghouse
405
006
108
194
018
235
406
120
Page 16
USING YOUR SRC-350 REMOTE CONTROL
Power: Powers TV
on/off to default
channel.
[LED]: Lights when
any button on the
remote is pressed.
Guide: Displays interactive
program guide.
Exit: Exits the current
function.
Page up and down:
Pages up and down in
program guide and
menus.
Select: Selects highlighted objects
Directionals: Moves
curser in program guide
and menus.
Info: Displays current
channel and program
guide menus.
Play, Record, Pause, Stop:
Video On Demand controls if
service is available.
Day Forward/Back: Moves
program guide forward/back 24
hours. Video On Demand fast
forward/rewind if service is
available.
Fav: Scans through favorite channels.
Vol: Adjust TV volume.
Ch: Changes program channel.
Call ID: Opens
caller ID Screen.
Last: Tunes to last channel.
Home: Displays web
browser, if provided.
PPV: Displays pay per view menu.
VOD: Launches VOD (video on
demand) menu, if provided.
Menu: Displays
main menu.
A, B, C, D and Text: Reserved for
Teletext and interactive TV
functions, if service is available.
Number Pad: Selects
channels.
Mute: Mutes and unmutes
TV sound
Back: Moves back to the
previous screen.
Page 17