1
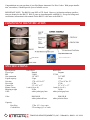
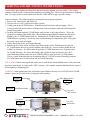
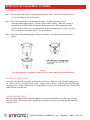
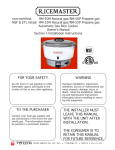
NSF & ETL Listed: RM-55N-R Natural Gas/RM-55P-R Propane Gas
Non-Certified: RM-50N-R Natural Gas/RM-50P-R Propane Gas
Automatic Gas Rice Cooker
OWNER’S MANUAL
SECTION I: Installation Instructions
FOR YOUR SAFETY
Do not store or use gasoline or other
flammable vapors and liquids in the
vicinity of this or any other
appliance.
WARNING
Improper installation, adjustment,
alteration, service or maintenance
can cause property damage, injury or
death. Read the Installation, Operating and Maintenance Instructions thoroughly before installing or servicing
this equipment.
TO THE PURCHASER
Contact your local gas supplier and
ask instructions in the event the user
smells gas. This information should
be posted in a prominent location.
THE INSTALLER MUST
LEAVE THIS MANUAL
WITH THE UNIT AFTER
INSTALLATION.
THE CONSUMER IS TO
RETAIN THIS MANUAL
FOR FUTURE REFERENCE.
(718) 388-5650 (800) 221-5032 except NY fax: (718) 388-5860 townfood.com
1
Congratulations on your purchase of your RiceMaster Automatic Gas Rice Cooker. With proper installation, care and use, it should provide years of reliable service.
IMPORTANT NOTE: The RM-50 is not NSF or ETL listed. However, its function and most specifications are identical to the RM-55. RM-55 parts are interchangeable with RM-50. Except for listings and
certification, information in this manual for the RM-55 is the same as the RM-50.
Component identification
jacket Window
specifications
Specifications:
Type of gas Btu Gas connection
Liquid capacity
Unit size
Net weight Carton size Master Carton
Shipping weight
Color RM-55N-R Natural
34,600
3/4” NPT
24 qts.
17”h x 19”d x 23” 47 lbs 21” x 21” x 17”
1 unit (4.4 cu. ft.)
50 lbs white jacket/gray base
RM-55P-R
Propane
27,300
3/4” NPT
24 qts.
17”h x 19”d x 23”
47 lbs
21” x 21” x 17”
1 unit (4.4 cu. ft.)
50 lbs
white jacket/gray base
Color RM-50N-R white jacket/red base RM-50P-R
white jacket/red base
Capacity:
Raw Rice
Cooked Rice 17 lbs. (55 - 6 oz. cups)
270 servings @ 3 oz. each
2
TOWN FOOD SERVICE EQUIPMENT CO., INC. • 72 Beadel St. • BKLYN • NY 11222
installation instructions
INSTALLATION:
1. The gas supply line must be of adequate size to insure maximum efficiency of the unit.
2. The installation must conform with the National Fuel Gas Code, ANSI Z223.1, Natural Gas
Installation Code, CAN/CGA-B149.1 or the Propane Installation Code, CAN/CGA-B149.2, as
applicable including:
a. The appliance and its individual shutoff valve must be disconnected from the gas supply piping system during any pressure testing of that system at test pressure in excess of 1/2
NPT (3.45 kPa).
b. The appliance must be isolated from the gas supply piping system by closing its
individual manual valve during any pressure testing of the gas supply piping system at test pressures equal or less than 1/2 psig (3.45 kPa).
3. Local regulations governing gas appliance installations must be complied with.
4. Equipment should be in an area with adequate ventilation.
5. Minimum spacing of 6” to combustible construction is required along back and side walls. Clearance for non combustible construction are the same as combustible clearances. For use
only on noncombustible floors.
6. Materials such as wood, compressed paper and plant fibers that will ignite and burn, must not
be exposed near this unit. Local safety codes should be complied with in respect to fire hazard
avoidance.
7. Use of the supplied pressure regulator is mandatory. Note: use of two regulators may cause
insufficient gas flow. Consult with your installer but always comply with above codes.
8. Keep the appliance area free and clear from combustible materials, gasoline and other
flammable vapors and liquids.
9. Locate this appliance in a well ventilated place. Do not block or cover the opening between
the shroud and pot. Do not obstruct flow of combustion and ventilation air.
10. This unit must be installed with adequate clearance for servicing and proper operation.
11. This unit should be operated only with drip pan in place.
12. If the unit is connected to a flexible gas line, the installation shall be made with a connector
that complies with the Standard Connectors for Movable Gas Appliances, ANSIZ21.69 or
Connectors for Movable Gas Appliances, CAN/CGA-06.16, and a Quick Disconnect, device
that complies with the standard for Quick Disconnect Devices for Use with Gas Fuel
ANSIZ21.41, or Quick Disconnect Devices for use with Gas Fuel, CAN1-6.9, and adequate
means must be provided to limit the movement of the appliance without depending on
connector and the quick disconnect device or its associated piping to limit the appliance
movement.
13. Before connecting gas check that gas valve on the appliance is turned “off” (gas valve handle in
vertical position.)
14. Check for leaks using soapy water or other suitable leak detector. Rinse off the soapy water
after testing. DO NOT USE OPEN FLAME FOR TESTING.
(718) 388-5650 (800) 221-5032 except NY fax: (718) 388-5860 townfood.com
3
lighting and shut down instructions
Always follow these lighting and shut down instructions when lighting your rice cooker. A five minute
complete shutoff period is required before lighting or relighting pilot. Check for gas leaks before relighting
unit. Use soapy water or other suitable leak detector. Rinse off the soapy water after testing.
Notice to Installer: The following must be performed to insure proper operation.
1. Remove Pot, Outer Jacket, and Drip Tray.
2. Turn gas valve to “ON” position as in figure 2 below.
3. Gently push on the #2 COOK button. It should stop half way down and not engage. This is
a safety feature that does not allow accidental start of the main burner unless the pilot button has
already been pushed.
4. Push the left button marked #1 START down until you hear a click, then release it. This is the
ignition lever and the pilot should light. The red button marked WARM controls the pilot and is
hidden by the #1 START button when off. Pushing the #1 START button also depressed the
WARM button, exposing it. It will stay down until pushed up to extinguish the pilot. If the pilot
has not lit, repeat until pilot lights.
5. If pilot fails to remain lit, see Trouble Shooting.
6. Replace the Pot, Outer Jacket, and Drip Tray in their proper order. With the pilot lit, push the
#2 COOK button down to its position without water in the pot. The rice cooker should shut off
within 3 to 4 minutes. If it fails to shut off, push the #2 COOK button up to its off position and
see Trouble Shooting. If it shuts off normally, add a gallon of water and wait for the “click”
sound indicating that the sensor has reset. With the pilot lit, again press the #2 COOK button. The rice cooker should boil the pot dry and then shut off. If it fails to shut off normally, push the
#2 COOK button up to its off position and see Trouble Shooting.
SHUT DOWN: When removing the pot, make sure to push the red button WARM until it clicks and is hidden by the start button. It is then in the “OFF” position. A five minute complete shutoff period is required
before lighting or relighting pilot.
WARNING: When igniting the pilot, position the Jacket Window directly over #1 START and #2 COOK
buttons. Do not be too close to the viewing hole when igniting.
START
1
Main Burner Button
Start Button
COOK
2
WARM
Pilot/Warmer Button
FIGURE 1
Gas Valve
OFF Position
Start Button
START
Gas Valve
ON Position
1
WARM
4
Pilot/Warmer Button
FIGURE 2
TOWN FOOD SERVICE EQUIPMENT CO., INC. • 72 Beadel St. • BKLYN • NY 11222
rear connection
Pressure
regulator
RM-55 REAR CONNECTION INSTALLATION INSTRUCTIONS
To install the provided pressure regulator:
a. Locate gas supply for the rice cooker. Installation must comply with the National codes so
there should be a shut off valve on the gas supply line to the rice cooker.
b. Install the supplied pressure regulator at the end of the rear connection manifold. An arrow
on the body of the pressure regulator indicates the direction of the gas flow. The arrow must
be pointing in the direction to the rice cooker. The rice cooker will not operate if the
regulator is improperly installed.
c. If required, install the supply side of the quick disconnect hose (provided by others) to the
regulator per the manufacturer’s instructions.
d. Check your installation for leaks with an approved leak detector. Be sure to use approved
materials on the pipe threads to prevent gas leaks.
When appropriate, light the rice cooker and check for proper operation.
(718) 388-5650 (800) 221-5032 except NY fax: (718) 388-5860 townfood.com
5
NSF & ETL Listed: RM-55N-R Natural Gas/RM-55P-R Propane Gas
Non-Certified: RM-50N-R Natural Gas/RM-50P-R Propane Gas
Automatic Gas Rice Cooker
OWNER’S MANUAL
SECTION II: Operating Instructions
FOR YOUR SAFETY
Do not store or use gasoline or other
flammable vapors and liquids in the
vicinity of this or any other
appliance.
WARNING
Improper installation, adjustment,
alteration, service or maintenance
can cause property damage, injury or
death. Read the Installation, Operating and Maintenance Instructions thoroughly before installing or servicing
this equipment.
6
TO THE PURCHASER
Contact your local gas supplier and
ask instructions in the event the user
smells gas. This information should
be posted in a prominent location.
THE INSTALLER MUST
LEAVE THIS MANUAL
WITH THE UNIT AFTER
INSTALLATION.
THE CONSUMER IS TO
RETAIN THIS MANUAL FOR
FUTURE REFERENCE.
TOWN FOOD SERVICE EQUIPMENT CO., INC. • 72 Beadel St. • BKLYN • NY 11222
operating instructions
1. Make sure the unit is properly assembled with Drip Tray, Outer Jacket, Rice Pot and Cover in
their proper positions. The rice should be in the pot prepared by the methods described on
page 8. If the components are not properly seated, the unit cannot operate normally.
2. Turn gas valve to “ON” position as in figure 2 below. Position the Jacket Window directly over
#1 START and #2 COOK buttons.
3. Push the left button marked #1 START down until you hear a click, then release it. This is the
ignition lever and the pilot should light. The red button marked WARM controls the pilot and
is hidden by the #1 START button when off. Pushing the #1 START button also depressed the
WARM button, exposing it. It will stay down until pushed up to extinguish the pilot. If the pilot
has not lit, repeat as necessary, If pilot fails to light, see Trouble Shooting.
4. After the pilot has lit, push Main Burner Control Button marked #2 COOK to ignite the main
burner and start cooking. The cook cycle will last approximately 22 minutes. When the cook
button jumps up to the “OFF” position, allow the rice to remain undisturbed for an additional
10 minutes to cure. The curing time allows the rice to become fluffy and improves taste.
WARNING: When igniting the pilot, position the Jacket Window directly over #1 START and #2 COOK
buttons. Do not be too close to the viewing hole when igniting.
START
1
Start Button
Main Burner Button
COOK
2
WARM
Pilot/Warmer Button
FIGURE 1
Gas Valve
OFF Position
Start Button
START
Gas Valve
ON Position
1
WARM
Pilot/Warmer Button
FIGURE 2
SHUT DOWN: When removing the pot, make sure to push the red button WARM until it clicks and is hidden by the start button. It is then in the “OFF” position. A five minute complete shutoff period is required
before lighting or relighting pilot.
(718) 388-5650 (800) 221-5032 except NY fax: (718) 388-5860 townfood.com
7
how to use your rice cooker
ASSEMBLY & COOKING
Step 1. Place the Rice Pot with rice and water into the Outer Jacket. Make sure that the Rice Pot
is level and sitting evenly in the Jacket.
Step 2: Place the lid on the Rice Pot and light the burner. To light the burner, refer to
operating instructions on page 6. Do not open lid while cooking. When the cooking is
completed, the COOK button will pop up and the main burner will automatically shut
off. Do not serve the rice yet; see instructions on the following page for curing. The pilot
keeps cooked rice hot (about 160˚F/71˚C) for four hours.
Step 3: Shut pilot off by pushing up the red keep warm button. See Shut Down instructions on
page 6.
NOTE:
The misalignment or improper setting will cause early shut off of the main burner.
SEASONING THE RICE POT
A new Rice Pot should be carefully seasoned once before use. Wash rice in the Rice Pot using tap water. Remove the rice, leaving only the “milky” looking water in the pot. Light the pilot and initiate the
cooking process. Using ordinary water for seasoning the pot may cause discoloration but will not effect
either the unit or cooked rice.
VISUAL BURNER CHECK
When operating, burner flame should be light blue in color and should have no yellow tips or lifting
from the burner. The air/gas mixture adjusted by moving the air shutter arm under the unit below the
main gas valve.
8
TOWN FOOD SERVICE EQUIPMENT CO., INC. • 72 Beadel St. • BKLYN • NY 11222
how to use your rice cooker
RICE PREPARATION
1. Measure rice with measuring cup provided. This unit will cook a minimum of 15 pounds of
dry rice. Uncooked rice volume triples after cooking.
2. Determine the quantity of rice to be cooked. The maximum is 10 full measuring cups, the
minimum is half that amount. Measure the rice into the pot and wash 4 or 5 times with fresh
water. When wash water becomes almost clear, stop washing and drain.
3. Cover the rice with 1” water. A time-honored alternate method is to gently place your hand
on the rice. Add enough water to reach the center of your knuckles where your fingers join
your hand.
4. Cover rice pot with stainless steel cover provided. Check to be sure that the pot is properly
seated in the cooker base and the water level is of uniform depth covering the rice. For really
tender, delicious rice, let rice soak in pot for about 10 minutes before igniting main burner.
RICE COOKING TIPS
1. When cooking half pot of rice, turn gas valve full on, and note flame on burner. The turn gas
valve slightly to OFF position until flame is reduced by half.
2. Length of cooking time will vary according to type of gas used, gas pressure to burner, and
quantity of rice being cooked.
3. When main burned automatically shuts off, it is recommended that the rice be broken up or
“turned” using a pot fork. Cover the rice and wait 10-15 minutes allowing the rice to “cure”
before serving. Rice in this unit will remain hot (about 160˚F/71˚C) for four hours.
CARE AND MAINTENANCE
1. The Rice Pot of your cooker is designed for use in this unit only. Never set the pot over
any other stove as it will damage the thermostatic element and cannot operate automatically in
the future.
2. Keep the Piezo Electric Ignition clean and dry by wiping foreign matter off with dry cloth as
necessary. Do not press down ignition know when anyone is touching electrode as electric
shock will result. If lighter fails to spark, check carefully that it is clean, dry, and the black
neoprene line from the ignition assembly is connect. Call your dealer or gas service for
assistance if it continues to malfunction.
3. Cooker base connected to gas supply may be cleaned with damp cloth and mild soap or
detergent. Never immerse the unit into water for cleaning. Be careful never to strain gas
connection as this will damage the manifold and could be very dangerous.
4. Rice Pot, Cover, and enamel body may be removed for cleaning. These parts should be
cleaned and carefully reassembled to prevent damage to unprotected cooking sensor. Do
not force fit these parts as they assemble easily if properly positioned. refer to sketch and
picture when in doubt.
5. After cooker is cleaned and assembled, leave all gas valves in “OFF” position, Rice Pot
centered and resting evenly on enamel out body of cooker.
(718) 388-5650 (800) 221-5032 except NY fax: (718) 388-5860 townfood.com
9
trouble shooting
If your rice cooker is not working automatically, perform the following diagnostic tests:
1. With the pilot lit and an empty rice pot in the cooker, start the Main Burner. Expect to hear a
click after 3 minutes and 15 seconds. The click is the sound of the sensor reaching shut off
temperature. If the Main Burner does not shut off, refer to the instructions below on “Main
Burner does not shut off automatically.”
2. If the Main Burner shuts off, the sensor is working. Pour a gallon of water into the rice pot and
listen for the click of the sensor returning to its cooking position. After insuring the pilot is lit,
start the Main Burner and cover the rice pot. If the cooker shuts off within 20 minutes, remove
the cover and allow the water to evaporate. If the cooker shuts off after the water has
evaporated, it is working normally. Feel free to contact us with any questions you may have
about the operation of this rice cooker.
IF THE COOKER SHUTS OFF TOO SOON, NEVER PRESS THE COOK BUTTON A SECOND TIME. THE RICE WILL BURN! The sensor has activated and must cool to reset.
DIFFICULTY CAUSE
Shut off stem tip is worn or
broken. See photo.
Sensing element is missing or failed Replace Sensing element per
instructions below.
Main Burner shuts off before rice is done, pilot remains lit Insufficient water to cook rice Cook rice with recommended
amounts of water.
A heavy pot could cause the shut
Remove one washer from under
off stem to release early.
the perforated disc of the shut
off stem.
Main Burner does not shut
off automatically. Perform
the diagnostic tests above.
REMEDY
Replace tip or stem assembly.
Rice pot and/or Outer Jacket areCorrectly position Drip pan, Rice
not correctly positioned.
pot and/or Outer Jacket
If the tip of Shut Off Stem is
broken off, the rice cooker cannot shut off.
Proper installation of Encased
Sensor in bottom of rice pot.
No. 56855 Encased Sensor replacement instructions:
retaining spring
retaining ring
10
FIRST
1. Remove & invert rice pot
2. Remove retaining spring
and retaining ring (ring
only with old sensing
element
encased sensing
element
old sensing
element
SECOND
3. Replace sensing element. Important: Concave side of sensing element with letters must be exposed
retaining spring
encased sensing
element
THIRD
4. Reinstall retaining spring
TOWN FOOD SERVICE EQUIPMENT CO., INC. • 72 Beadel St. • BKLYN • NY 11222
trouble shooting
DIFFICULTY CAUSE
Main burner shuts off while cooking Overloaded pot Remove washer below tip on
shut off stem (picture on pg. 10)
Cook lever bent
Return to factory for service.
Request RGA (page 15)
Insufficient gas pressure
Check gas pressure.
Install all gas valves are open.
Sensing element is worn out
Replace Sensing Element per
instructions on page 10.
Insufficient Pilot Burner
flame Insufficient gas pressure
Check gas pressure.
Install all gas valves are open. Contact your gas supplier if
problem persists.
Pilot orifice is blocked Clean or replace pilot orifice.
Main Burner flame is
yellow. Black soot collects on bottom of
rice pot
Unit connected to incorrect
type of gas
Check Rating Plate. Confirm
unit is connected to correct
type of gas.
Air shutter closed
Adjust/open air shutter
Spillage on Main Burner or
blockage inside Main Burner
Clean or replace Main Burner
Flame lifts off Main Burner
Spillage on Main Burner
Clean or replace Main Burner
Excessive air Adjust/Close air shutter
Boiling over
Too much water
Cook with proper amount of
water. See instructions.
REMEDY
Pot interior turns gray Rice pot is put away for a
long time without having
been washed.
Thoroughly wash pot and dry.
Pot is sterilized by boiling water but it turns gray. Discoloration will not harm rice
pot or rice.
Units requiring warranty service must be returned to Town Food Service Equipment Co., Inc
for repair. See Warranty on page 15. Call us at (718)388-5650 with your model and serial
number and request authorization to return for warranty repair (RGA #). Non warranty parts
are available by calling us at (718)388-5650. (718) 388-5650 (800) 221-5032 except NY fax: (718) 388-5860 townfood.com
11
parts diagram: rm-55/50 natural & propane gas
12
TOWN FOOD SERVICE EQUIPMENT CO., INC. • 72 Beadel St. • BKLYN • NY 11222
parts diagram: RM-55/50 natural & propane gas
(718) 388-5650 (800) 221-5032 except NY fax: (718) 388-5860 townfood.com
13
parts list: rm-55/50 natural & Propane gas
Dwg. No.
1
2
3
4
5
6
5/6
7
7
8
9
9
10
11
12
13
14
15
16
17
18
19
20
21
22
23
24
25
26
27
28
28
29
30
31
31
32
33
34
34
35
36
37
38
38
14
Parts No.
56881 56882 56881-S
56853 56855 56856 56854 56884 56884A
56885A
56852-1
56852-1A
56866 56863 56852-2
56878 56857 56852-3
56857-1
56867 56864-1
56864-2
56862-2
56870 56870-1
56865 56864 56862 56852-4
56852-4S
56868 56869 56860 56861 56879 56880 56874-1
56872 56874 56873 56871-1
56870-2
56871 56875 56876 RM-55N-REG
RM-55P-REG
Descripton
Cover Handle, Heat Resistant
Stainless Steel Rice Pot Cover w/handle
Cover Handle Screw
Cast Iron Aluminum Rice Pot
Encased Sensing Element, Bimetalic
Sensing Element Retaining Spring
Sensing Element Kit
Outer Jacket for RM50
Outer Jacket for RM55 “RiceMaster”
RM-55 Stainless Steel Base Cover (56885 for RM50)
Lower Body for RM50 (RED)
Lower Body for RM55 (GREY)
Control Panel Frame
Non-Mar Feet
Cast Iron Burner
Pilot with Retaining Plate
Shut off Stem Assembly
Burner Assembly Base
Burner Ignition Arm Release
Burner Ignition Arm
Pilot Ignition Arm
Ignition Arm Shaft
Burner Ignition Arm Limiter
Piezo Ignition Assembly
Ignition Lever Assembly
#1 Start Button
Red Pilot Warmer Button
#2 Main Burner Button
Air Shutter
Air Shutter Spring
Main Burner Orifice - Natural Gas (.475mm/#77 drill)
Main Burner Orifice - Propane Gas (.343mm/#80 drill)
On/Off Gas Valve
Gas Valve Knob
Pilot Orifice - Natural Gas
Pilot Orifice - Propane Gas
Ignition Line Retaining Plate
Pilot Orifice Retaining Plate
Pilot Ignition Line, Natural Gas
Pilot Ignition Line, Propane Gas
Ceramic Electrode Clamp
Ceramic Electrode Holder
Ceramic Electrode
Manifold Assembly, Natural Gas
Manifold Assembly, Propane Gas
¾” Pressure Regulator, Natural Gas
¾” Pressure Regulator, Propane Gas
TOWN FOOD SERVICE EQUIPMENT CO., INC. • 72 Beadel St. • BKLYN • NY 11222
limited warranty
Town Food Service Equipment Co., Inc. (Town) warrants the equipment to be free of defects in materials and workmanship, subject to the terms specified below. This warranty is limited to parts replacement
and does not include any labor allowance. Any service charges or charges for parts replacement are your
responsibility.
Town warrants the RM-55 and RM-50 to be free of defects in materials or workmanship for a period of six
months. The warranty period shall commence at time of shipment from Town. The warranty period may
be extended, at Town’s option, if proof of installation (specifying model and serial number) at a later date,
but in no case shall warranty be extended beyond nine months after date of shipment from Town.
Parts and labor are covered for the warranty period for properly packed units returned to Town prepaid. Town cannot be responsible for shipping damages to any unit returned with improper packaging. Parts that
have failed due to defective materials or workmanship will be replaced at no charge. Units repaired under
warranty will be returned freight prepaid. Warranty for the new parts will be for the remainder of the original warranty period.
This warranty does not cover any failures or operating difficulties due to accident, abuse, misuse, alteration,
misapplication, improper installation or improper maintenance or service.
Town does not authorize any person or company to assume on its behalf any obligation or liability in connection with this unit in any matter whatsoever.
If warranty service becomes necessary, bring the unit to the dealer who sold you the unit. Request them to
carefully pack the unit. Be sure to insulate the enamel jacket from the rice pot. If the pot is allowed to contact the enamel jacket during shipment, it will become chipped. If the base is not properly packed it may
become dented. Town will charge for repairs to units returned due to abuse for any reason.
The returning agency is entitled to request from the purchaser the costs of shipping and handling charges to
return the unit. Before any unit is returned, call Town at (718)388-5650 and request a Return Goods Authorization (RGA) number. Be advised this RGA is only authorization to return your unit for evaluation. No credit of any kind may be taken arising from an RGA. Your unit will be inspected to verify the difficulty for which it was returned. Once the difficulty is verified, it will be repaired and the unit returned at
no charge if due to faulty materials and/or workmanship. If defective for any other reason, the unit will be
repaired and the customer charged for the cost of the labor and materials for the repair plus return delivery
costs.
For your records, you may wish to record the following information as it will be required in the event service is required:
Dealer unit purchased from__________________________________
Unit Model No.___________________
date_____________________
Serial No.__________________
(718) 388-5650 (800) 221-5032 except NY fax: (718) 388-5860 townfood.com
type of gas _________
15
mexican rice
Try Maria’s Mexican Rice*, an authentic recipe from Veracruz. We brought this back from a customer of a Mexican distributor. It is simple to do and yields excellent flavors.
8 oz. vegetable or peanut oil 3 lbs washed rice
juice of one lemon two cloves garlic, smashed, finely chopped
one 28 oz. can crushed tomatoes
4 quarts cooled chicken stock
3 boneless chicken breasts, precooked & cubed
2-3 sprigs finely chopped cilantro
3 tablespoons salt
2 finely chopped jalapeños
Push the #1 Start button to light the pilot. Verify ignition of the pilot through the jacket window. Push the #2 Cook button and light the main burner. Verify ignition of the main burner through the jacket window. Add the oil. There should
be sufficient oil to cover the bottom of the rice pot. Allow the oil to heat.
The sensor in the bottom of the pot is designed to turn the rice cooker off when it senses the water in the pot is gone. The oil in the bottom of the pot is being heated by the burner and will surpass the temperature of boiling water. At this
point the sensor will make a “click” sound and “pop” into its expanded position as the temperature of boiling water has
been exceeded. This causes the #2 Cook button to jump to the off position and the burner will shut off.
Mexican Rice is fried before liquids are added. The oil must be at frying temperature, about 375ºF. To do this, push the
#2 Cook button once again to continue heating the oil. BEWARE: the automatic shut off feature of the sensor is now
disabled and the unit will not shut off automatically. To turn off the main burner one must lift the #2 cook button.
Heat the oil to frying temperature. Add grains of rice to test the temperature of the oil. When the test grains of rice
sizzle and turn white, add the balance of the rice. Fry the rice by allowing it to cook for 30 seconds, then mix thoroughly. Let it fry for an additional 30 seconds, then mix again. Repeat this process until the rice begins to ‘cashew’ or have a
light brown color, about 7-10 minutes.
After the rice is started to change color, add the garlic and stir for one more minute. At this point make sure to wear a
heat resistant mitt as the pot is very hot and the liquids about to be added will vaporize quickly and one can be scalded. Stir in crushed tomatoes and fry for one more minute. Turn off the burner by raising the #2 Cook button to its off position. Add the balance of the ingredients and stir to mix. About 4-5 minutes after you shut off the main burner, listen for
a “click” sound indicating the sensor has reset to its original shape restoring its automatic capabilities.
Relight the main burner by pushing down the #2 Cook button. Verify ignition through the jacket window. The unit will
now cook the rice and automatically shut off when the rice is done, about 15 minutes. When the unit shuts off, allow the
rice to “cure” undisturbed in the rice cooker for 10 minutes. Then mix and serve the rice.
Tip: use the rice cooker to braise the chicken. The braised chicken adds flavor to the rice when fried in the same pot.
NOTE: Consistency of rice will vary depending on amount of chicken stock used. For very spicy rice add additional
jalapeños to taste. Be creative... you may add peas, corn, or finely chopped bell peppers. Bueno provecho!
* Recipe compliments of Maria Asuncion Aquirre de King, Dim Sum King, Veracruz, Mexico
Rev. 03/07
16
TOWN FOOD SERVICE EQUIPMENT CO., INC. • 72 Beadel St. • BKLYN • NY 11222