1
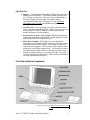
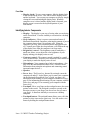
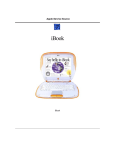
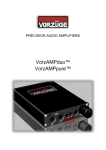
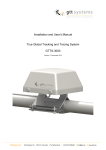
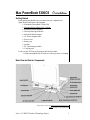
Mac PowerBook 5300CS Orientation
Getting Started
Each participant should write your name on your computer box.
Open the box and remove the contents:
• Macintosh PowerBook 5300cs/100
• Macintosh PowerBook User’s Guide
• Microsoft Works diskettes
• Netscape Package diskettes
• Microsoft Works manual
• AC Power adapter cable
• Power cord
• battery cap
• modem
• PC Card storage module
• Carrying case
Look over the PC Pick-up Form provided by the trainer
• Glance through the list of items to see that you have everything
Back View and Exterior Components
This picture is from the Macintosh PowerBook User’s
Guide on page 2, copyright 1995.
Iowa - U S WEST Teacher Technology Project
3
Identifying Exterior Components
Back View
• Infrared window
• I/O panel: I/O is an abbreviation for input/output. (Examples
of I/O devices are the keyboard and a printer. When a program
sends a document to the printer, it is engaging in I/O activity.)
The I/O panel features include:
- Video port
- Reset button
- Sound input port
- Sound output port
- SCSI port
- Printer/external modem port
- Apple Desktop Bus (ADB) port
• Power adapter port: This port is used to connect your
computer to an external power supply. The port is utilized by
plugging in the AC adapter cable (which converts AC power to
DC power). Once the AC adapter cable is plugged into the
computer’s AC adapter port, a power cable is connected to the
box of the AC adapter cable and then plugged into the external
power source.
• Elevation feet: You may use the elevation feet to slightly
elevate the back of the computer to achieve a better angle for
working on the keyboard. It enables typing and viewing the
display to be done more comfortably. (See page 4 of the
Macintosh PowerBook User’s Guide for instructions on opening
the display and adjusting the elevation feet.)
Left Side View
• PC card slot: The Macintosh PowerBook 5300cs/100 has
space for two PC Cards. A PC Card (also known as a PCMCIA
card) is a removable I/O card that is slightly thicker than a credit
card. Examples are a modem, LAN, SRAM, or flash memory
card. (See page 41 in the Macintosh PowerBook User’s Guide
for instructions on using PC Cards.)
• PC card eject buttons: Your computer must be on or off to
eject a PC Card. You cannot eject a PC Card when the computer
is in sleep. You will use the eject buttons to eject your PC Card.
(See page 43 in the Macintosh PowerBook User’s Guide for
instructions on ejecting a PC Card.)
Iowa - U S WEST Teacher Technology Project
4
Right Side View
Battery: Your Macintosh PowerBook 5300cs/100 came with a
lithium ion (LiIon) battery. This battery should provide power
for 3-5 hours of work time. This time can vary depending on
the kinds of application programs used and the battery
conservation features used. (See page 71 in the Macintosh
PowerBook User’s Guide for information on power
management.)
• Security slot: You can purchase a security cable and lock to
protect your Macintosh PowerBook. With a lock, you can secure
your computer to a desk or table or lock the expansion bay
module and battery in your computer.
• Expansion bay drive in-use light: When the small green
in-use light on the side of the module is lit, the diskette (or other
medium) inserted in the module is in use.
• Disk drive module: The disk drive in your Macintosh
PowerBook is a removable module which you can easily switch
with other modules, such as the PC Card storage module that
came with your computer. The location in your computer where
modules go is called the expansion bay. You should not remove
an expansion bay module if there is a diskette (or other storage
medium) inserted and in use, or you may lose data. (See page 37
in the Macintosh PowerBook User’s Guide for more information
on using expansion bay modules.)
Front View and Interior Components
This picture is from the Macintosh PowerBook User’s
Guide on page 2, copyright 1995.
Iowa - U S WEST Teacher Technology Project
5
Front View
• Display latch: To open your computer, slide the display latch
to the left and lift the cover. This will reveal the display screen
and the keyboard. You can put your computer to sleep by simply
closing the cover and latching the display latch. When the
computer cover is closed and the display latch is fastened, your
display screen is secured to the keyboard portion of your
PowerBook.
Identifying Interior Components
• Display: The display is your way of seeing what you are doing
on the PowerBook. It works similarly to a monitor on a desktop
computer.
• Sleep indicator: Sleep is a power conservation feature of
Macintosh PowerBook computers, reducing the amount of power
the computer draws when it is not being used. When the
computer is in sleep, it has a darkened screen and appears to be
off. A small green light, the sleep indicator, will flash on the top
of the display case when the computer is in sleep mode.
• Brightness control: The brightness control, marked by a
small sun, allows you to adjust the color brightness of your
display making your display easier to read.
• Contrast control: The contract control is marked by a small
circle divided in half. It allows you to adjust the color contrast of
your display to make the display easier to read.
• Microphone: Your computer has a built-in microphone. (See
page 63 in the Macintosh PowerBook User’s Guide for more
information about using the microphone and connecting sound
input and output devices.)
• Speaker
• Power key: The Power key, denoted by a triangle, turns the
computer on and off. It also allows you to restart your computer.
(In the Macintosh PowerBook User’s Guide, see page 6 for
information about turning on your computer with the Power key;
page 29 for information about turning off your computer with the
Power key; and page 22 for restarting your computer with the
Power key.)
• Trackpad: Move your finger on the trackpad to move the arrow
pointer on the screen. The trackpad is sensitive not only to the
direction you move your finger, but also to how fast you move
your finger. It functions similarly to a mouse on a desktop
computer.
• Trackpad button: The trackpad button allows you to click the
pointer to select icons and to open icons. It is also used to view
menus by holding the trackpad button down.
Iowa - U S WEST Teacher Technology Project
6
Connecting Power Supply
(See page 4 of the Macintosh PowerBook User’s Guide.)
1. Insert power adapter into power adapter port.
2. Insert power cord into power adapter.
3. Plug power cord into power source.
4. Tap power key to start up notebook.
Using a PC Modem Card
(See chapter 3 on page 37 of the Macintosh PowerBook User’s Guide.)
1. Insert modem card.
2. Attach connector cable.
3. Detach connector cable.
4. Drag modem icon to trash.
5. Return modem card and connector cable to box.
Care of Your Macintosh PowerBook 5300cs/100
•
See “Health, Safety and Maintenance” in the Macintosh
PowerBook User’s Guide , Appendix A, page 121.
These instructions have been adapted from the
Macintosh PowerBook User’s Guide, copyright 1995.
Iowa - U S WEST Teacher Technology Project
7