1
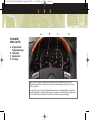
111839_09a_SRX_GTK_042908.qxd:SRX 2007 A
4/29/08
4:38 PM
Page 1
C U S T O M E R C O N V E N I E N C E /P E R S O N A L I Z AT I O N G U I D E
111839_09a_SRX_GTK_042908.qxd:SRX 2007 A
4/29/08
S
4:38 PM
R
Page 2
X
TABLE OF CONTENTS
DRIVER INFORMATION
Instrument Panel . . . . . . . . . . . . . .1
Instrument Panel Cluster . . . . . . .2
Driver Information Center . . . . . .3
COMFORT
Manual Seat Adjustments . . . . . .4
Power Seat Adjustments . . . . . . . .4
Power Lumbar . . . . . . . . . . . . . . . . . .5
Heated Seats . . . . . . . . . . . . . . . . . . .5
Memory Seat and Mirrors . . . . . .5
Second-Row Seat . . . . . . . . . . . . . . .6
Third-Row Access . . . . . . . . . . . . . . .6
Power Third-Row Seat . . . . . . . . . .6
Child Restraints (LATCH) . . . . . . . .7
Climate Control . . . . . . . . . . . . . . . . .7
Rear Air Conditioning . . . . . . . . . . .8
ENTERTAINMENT
Audio System . . . . . . . . . . . . . . . . . . .9
XM™ Satellite Radio . . . . . . . . . . .11
Touch Screen Navigation
Entertainment System . . . . . . . .11
Rear Seat Entertainment
System . . . . . . . . . . . . . . . . . . . . . . . .11
CONVENIENCE
OnStar® . . . . . . . . . . . . . . . . . . . . . . .12
Universal Home Remote . . . . . .13
Ultrasonic Rear Parking Assist
(URPA) . . . . . . . . . . . . . . . . . . . . . . . .13
UltraView Sunroof . . . . . . . . . . . .13
Power Adjustable Pedals . . . . . .14
Cruise Control . . . . . . . . . . . . . . . . .14
Adaptive Remote Start . . . . . . . .14
Instrument Panel
and Courtesy Lights . . . . . . . . . . .15
Rear Washer/Wiper . . . . . . . . . . .15
PERFORMANCE & MAINTENANCE
Engine Fuel . . . . . . . . . . . . . . . . . . .16
Transmission . . . . . . . . . . . . . . . . . .16
Traction and Stability . . . . . . . . . .16
OWNER PRIVILEGES™
Roadside Service . . . . . . . . . . . . . .17
Customer Assistance . . . . . . . . . .17
Cadillac Online . . . . . . . . . . . . . . . .17
111839_09a_SRX_GTK_042908.qxd:SRX 2007 A
4/29/08
4:38 PM
Page 3
Driver Information
B
A
C
D
A
A
E
F
G
INSTRUMENT PANEL
A.
B.
C.
D.
Air Outlets
Turn Signal/Multifunction Lever
Instrument Panel Cluster
Windshield Wiper Lever
H
E. Audio System/Navigation System
(if equipped)
F. Driver Information Center Controls
G. Audio Steering Wheel Controls
H. Climate Control
Comfort
J
K
L
I. Traction Control Button
J. Shift Lever
K. Hazard Warning Flashers
Button
L. Glove Box
❏ Reviewed with Customer (Please Check Box)
Refer to your Owner Manual for more information.
Driver
Information
I
Entertainment
Convenience
Performance &
maintenance
Owner
Privileges™
1
111839_09a_SRX_GTK_042908.qxd:SRX 2007 A
4/29/08
4:38 PM
S
R
A
Page 4
X
B
C
D
INSTRUMENT
PANEL CLUSTER
A. Engine Coolant
Temperature Gage
B. Tachometer
C. Speedometer
D. Fuel Gage
Note: Some of the gages and indicators may differ from the illustration presented. The
instrument panel cluster is designed to let you know about many important aspects of your
vehicle’s operation.
It is important for you to read your Owner Manual and become familiar with the information
that is being relayed to you by the lights, gages and indicators, particularly the message center,
as well as what action can be taken to ensure your safety and to prevent damage.
111839_09a_SRX_GTK_042908.qxd:SRX 2007 A
DRIVER INFORMATION CENTER (DIC)
Your vehicle’s Driver Information
Center (DIC) provides vehicle
information, vehicle feature
personalization and vehicle warning
messages. The DIC messages will
be shown on your instrument
cluster display.
The following DIC buttons are
located on the left side of the
instrument panel:
4/29/08
4:38 PM
Page 5
(Customization): Press this
button to scroll through the
following customization settings:
• Display Language
• Auto Door Lock
• Auto Door Unlock
• Remote Door Lock
• Remote Door Unlock
• Delay Door Lock
• Exit Lighting
• Approach Lighting
• Chime Volume
• Park Tilt Mirrors
• Easy Exit Seat (if equipped)
• Memory Seat Recall
(if equipped)
• Remote Start (if equipped)
• Factory Settings
Comfort
(Vehicle Information): Press
this button to scroll through the
following vehicle information:
• Oil Life Remaining
• Units (English/Metric)
• Parking Assist
• Front Tires or Rear Tires
(Current tire pressures)
• Relearn Remote Key
• Speedometer
❏ Reviewed with Customer (Please Check Box)
Refer to your Owner Manual for more information.
Driver
Information
(Trip/Fuel): Press this button to
scroll through the following trip and
fuel information:
• Trip A or Trip B
• Fuel Range (until empty)
• Average Fuel Economy
• Instantaneous Fuel Economy
• Fuel Used
• Timer On/Off
• Average Speed
• Battery Voltage
Entertainment
Convenience
Performance &
Maintenance
Owner
Privileges™
3
111839_09a_SRX_GTK_042908.qxd:SRX 2007 A
4/29/08
S
(Set/Reset): Press this button to
reset DIC information while it is
displayed or to acknowledge a
warning message.
(Menu Up/Down): Press this
button to scroll up or down the
menu items.
Customization Settings
To customize features:
1. Place the vehicle in Park (P).
2. Press the
(Customization)
button to enter the Feature
Settings menu and scroll through
the available features.
3. Press the (Set/Reset) button to
access the settings for the feature
being displayed.
4. Press the (Menu Up/Down)
button to scroll through the
available settings for each feature.
5. Press the (Set/Reset) button to
choose the setting being displayed
and move to the next feature.
4:38 PM
R
Page 6
X
Warnings and Messages
The DIC provides a variety of vehicle
warning messages (depending on
optional equipment) if a problem is
sensed in a vehicle system.
To acknowledge a message and
clear it from the display, press the
(Set/Reset) button. Some urgent
messages cannot be cleared from
the DIC display.
Check Engine or Other Warning
Lights with OnStar® (if equipped)
If your Check Engine light, or any
other warning message appears,
you can push the blue OnStar
button and speak to a live advisor.
OnStar Advisors can access certain
diagnostic information and can tell
you how serious the problem is,
what you should do about it, or can
contact a dealer or Roadside service
for you. Refer to the OnStar Owner
Guide for details.
Note: Your vehicle’s warning messages
provide critical information that can
prevent damage to your vehicle. Review
your Owner Manual to become familiar
with the information displayed and the
action required.
Comfort
MANUAL SEAT ADJUSTMENTS
(Passenger side only)
Use the bar at the front of the seat
to adjust seat position. Use the lever
at the side of the seat to raise or
recline the seatback.
POWER SEAT ADJUSTMENTS
The power seat controls are
located on the outboard sides
of the front seats.
111839_09a_SRX_GTK_042908.qxd:SRX 2007 A
4/29/08
4:38 PM
Page 7
POWER LUMBAR (If equipped)
A
B
Power Seat Adjustments
Use the horizontal control (A) to:
• Move the seat forward or
rearward by sliding the control
forward or rearward.
• Move the seat up or down by
moving the entire control up
or down.
• Raise or lower the front or rear
part of the seat cushion by
moving the front or rear of the
control up or down.
Seatback Adjustments
Use the vertical control (B) to:
• Recline the seatback by tilting the
top of the control rearward.
• Bring the seatback forward
by tilting the top of the
control forward.
The power lumbar switch is located
beneath the power seat switch
controls. Hold the control forward
or rearward to increase or
decrease support.
HEATED SEATS (If equipped)
The following heated seat controls
are located on the front doors:
(Heated Seatback): Press
this button to turn on the
heated seatback.
(Heated Seat and Seatback):
Press this button to turn on the
heated seat and seatback.
There are three heated seat
temperature settings (high, medium
and low). Continue to press the
Comfort
MEMORY SEAT AND MIRRORS
(If equipped)
The memory seat controls are
located on the front doors.
Memory Recall
Press memory button 1 or 2 to recall
the memory settings for the driver’s
seat, outside mirrors and adjustable
pedals. The memory seat setting
also can be programmed to be
recalled automatically using
the DIC.
To save memory settings:
1. Adjust the driver’s seat, outside
mirrors and adjustable pedals to
a comfortable position.
2. Press and hold button 1 or 2
until two beeps sound.
3. Repeat these steps for a
second driver.
❏ Reviewed with Customer (Please Check Box)
Refer to your Owner Manual for more information.
Driver
Information
desired button to decrease the
temperature setting. To turn off the
feature, press the button until all
indicator lights are off.
Entertainment
Convenience
Performance &
Maintenance
Owner
Privileges™
5
111839_09a_SRX_GTK_042908.qxd:SRX 2007 A
4/29/08
S
Easy Exit Seat
With the vehicle in Park (P), press
the
(Easy Exit Seat) button to
recall the exit position for the
driver’s seat. Press the button
again to move the seat back
farther. The easy exit seat also
can be programmed to move
automatically using the DIC.
SECOND-ROW SEAT
Adjusting the Seat
An adjustment lever to move the
seat forward or rearward is located
under each side of the 60/40 seat.
After adjustment, move the seat
back and forth to make sure it
locks into place.
4:38 PM
R
Page 8
X
to make it easier to get into and out
of the third-row seat, if equipped.
To operate the easy entry seat:
1. Pull the release lever located on
the top of the seat upward.
2. Tilt the seatback forward
by pulling the top of the
seat forward.
3. Pull upward on the release lever
located on the back of the seat
and rock forward until it stops.
THIRD-ROW ACCESS
POWER THIRD-ROW SEAT
(If equipped)
The right side of the second-row
60/40 seat has an easy entry feature
The third-row seat includes a
power-folding feature to provide
additional cargo space. Before the
seat can be folded, the headrests
must be removed and stored.
Removing Headrests
1. Press the button on top of the
seatback below the headrest and
pull up on the headrest.
2. Open the storage compartment
cover behind the seat and insert
the headrest posts into the slots
in the storage area.
The seatback will not fold all the
way down if the headrests are
not removed.
Folding/Unfolding Seat
Before folding or unfolding the
third-row seat, all of the following
conditions must be met:
• The vehicle must be in Park (P)
and not have a low battery.
• The liftgate or right-side rear
door must be open.
111839_09a_SRX_GTK_042908.qxd:SRX 2007 A
• The ignition must be in ON or
ACC. If not, pressing the Unlock
button on the key fob or door
three times will enable power
folding or unfolding for
two minutes.
B
A
4/29/08
4:38 PM
Page 9
Press and hold either folding button
to fold or unfold the seat.
After the seat is folded, the panel on
the back of the seat must be flipped
forward to create a flat floor space.
Before returning the seat to its
upright position, the panel must be
returned to its folded position.
CHILD RESTRAINTS (LATCH)
Two buttons are located on the
right-side panel behind the secondrow seat. One button (A) folds and
raises the seat and another button
(B) changes the seatback angle.
The other button
(C) for folding the C
seat is located
inside the liftgate.
Your vehicle is equipped with LATCH
anchors, and may have top tethers
for use with a LATCH compatible
child restraint. If your child restraint
is not compatible with the LATCH
system, you may still use it by
installing the child restraint with
the seat belt system.
Choose a child restraint that is
appropriate for the child’s age
and size (weight and height).
See Section 1 of your Owner
Manual for more information.
Comfort
The dual-zone climate control
system can be operated manually or
can be set to automatically adjust to
the individual settings of the driver
and front seat passenger.
Automatic Operation
In the automatic mode, the system
adjusts the airflow, fan speed, air
conditioning and recirculation
functions to reach and maintain the
set temperature(s).
To set the automatic mode:
1. Turn the fan knob to the
AUTO position.
2. Turn the airflow knob to the
AUTO position.
3. Adjust the temperature to a
comfortable setting using the
temperature arrow buttons.
❏ Reviewed with Customer (Please Check Box)
Refer to your Owner Manual for more information.
Driver
Information
CLIMATE CONTROL
Entertainment
Convenience
Performance &
Maintenance
Owner
Privileges™
7
111839_09a_SRX_GTK_042908.qxd:SRX 2007 A
4/29/08
S
Manual Operation
Use the following controls to
operate the system manually:
(On/Off): Press this button to
turn the climate control system on
or off.
(Fan): Turn the fan knob to
increase or decrease fan speed.
(Air Conditioning): Press the fan
knob to turn the air conditioning on
or off.
Airflow Control: Turn the airflow
control knob to the following
positions to change the direction of
the airflow.
(Vent): Directs air to the
instrument panel outlets.
(Bi-Level): Directs air to
the instrument panel outlets
and floor outlets.
(Floor): Directs air to the
floor outlets.
4:38 PM
R
Page 10
X
(Defog): Directs air to the
windshield, side window outlets
and floor outlets.
(Defrost): Directs most of the
air to the windshield and some air
to the side window outlets.
(Rear Window Defogger): Press
the airflow control knob to turn the
rear window defogger on or off.
⌃
⌃/ (Temperature Control): Press
the arrow buttons next to the fan
knob to adjust the driver’s
temperature setting, and press the
arrow buttons next to the airflow
control knob to adjust the
passenger’s temperature setting.
(Recirculation): Press this
button to recirculate inside air and
keep outside air from entering the
vehicle. Recirculation will not
function in defog or defrost mode.
PASS (Passenger’s Climate Control):
Press this button to turn the front
passenger’s climate control system
on or off.
REAR AIR CONDITIONING
(If equipped)
The rear air conditioning system
provides air conditioning to the
second- and third-row occupants.
The system includes four air outlets:
two over the outboard second-row
seats and two more near the cargo
area or third-row seat (if equipped).
The system can be controlled from
the front overhead console or it can
be placed in the AUX mode to allow
rear passengers to control the
system from the second-row
overhead console.
111839_09a_SRX_GTK_042908.qxd:SRX 2007 A
Entertainment
AUDIO SYSTEM
While most of the features on your
radio will look familiar, following are
some that may be new:
(Power/Volume): Press this knob
to turn the system on or off. Turn
the knob to adjust the volume.
(Tune): Turn this knob to select
radio stations or, when a CD is
playing, to select a track or MP3 file.
Press the knob to adjust the tone
control (bass/treble) or speaker
control (balance/fade).
(Clock) or
(Load) (if equipped):
This button will be either the clock
4/29/08
4:38 PM
Page 11
button or CD load button,
if equipped with the multiple-disc
CD player. Press the clock button
to adjust the clock; or press the
load button to load a single CD or
press and hold the button to load
multiple CDs.
(Eject): Press this button once
to eject the currently playing CD;
or, if equipped with the multiple-disc
CD player, press and hold this
button to eject all CDs. If a CD is
not removed after several seconds,
it will be pulled back into the
player automatically.
FAV (Favorite): Press this button to
go through up to six pages of any
combination (AM, FM or XM™, if
equipped) of preset favorite radio
stations. On each page, up to six
stations are available by using
the six pushbuttons below the
radio display.
BAND: Press this button to switch to
AM, FM or XM™ (if equipped). With
a CD loaded or a portable audio
player connected, press this button
to switch between radio and CD/
portable audio player operation.
CD/AUX: Press this button to play a
CD instead of the radio. Press the
button again to automatically
search for a device connected to the
auxiliary input jack.
MENU: Press this button to display
the radio setup menu.
CAT (Category): Press this button to
find XM™ stations (if equipped)
within a desired category.
(Information): Press this button to
display additional information
related to the current function.
Notice: If you add any label to a CD, insert
more than one CD into the slot at a time,
or attempt to play scratched or damaged
CDs, you could damage the CD player.
When using the CD player, use only CDs in
good condition without any label, load
one CD at a time, and keep the CD player
and the loading slot free of foreign
materials, liquids and debris.
9
❏ Reviewed with Customer (Please Check Box)
Refer to your Owner Manual for more information.
Driver
Information
Comfort
Entertainment
Convenience
Performance &
Maintenance
Owner
Privileges™
111839_09a_SRX_GTK_042908.qxd:SRX 2007 A
4/29/08
S
Setting Favorite Stations
Before setting your favorite stations,
shift the vehicle into Park (P).
Note: Choosing to engage in extended
searching for specific audio stations or
songs by using buttons and knobs — or to
give extended attention to entertainment
tasks — can lead you to look away from
the road frequently or longer than usual.
Looking away from the road for prolonged
periods may cause you to miss seeing
things on the road that you need to see.
Be sure to keep your eyes on the road and
mind on the drive — and avoid engaging
in extended searching for specific items
while driving.
To set the number of favorite
station pages:
1. Press the MENU button to display
the radio setup menu.
4:38 PM
R
Page 12
X
2. Press the pushbutton located
below the FAV 1–6 label on the
radio display.
3. Select the desired number of
favorite station pages.
4. Press the FAV button. You may
now begin storing your favorite
stations for the chosen number
of pages.
To store favorite stations:
1. Tune to the desired radio station.
2. Press the FAV button to display
the page where the station is
to be stored.
3. Press and hold one of the six
pushbuttons until a beep sounds.
4. Repeat the steps for each
pushbutton on each page.
Setting the Time
To set the time:
1. Press the (Clock) button. Or,
if equipped, press the MENU
button; and then press the
pushbutton located under the
clock option label. The HR, MIN,
MM, DD, YYYY labels will appear
on the display.
2. Press the pushbutton under any
of the labels to be changed.
3. Press the pushbutton again or
the FWD button to increase the
numbers. Press the REV button to
decrease the numbers. Rotating
the (Tune) knob also will
increase or decrease the
selected label.
4. Press the Clock or MENU button
again to set the currently
displayed time and date.
To set the time on the Navigation
system, see your Navigation manual
for additional operating instructions.
111839_09a_SRX_GTK_042908.qxd:SRX 2007 A
Radio Data System
When you tune to a Radio Data
System (RDS) station, the station
name, call letters, program name, or
a station message may appear on
the display instead of the frequency.
RDS features are available for use
only on FM stations that broadcast
RDS information. RDS relies on
receiving specific information from
these stations and will work only
when the information is available.
Auxiliary Input Jack
There is an
auxiliary input
jack on the lower
right of the
audio system
faceplate. You
can connect an
external audio
device using a 1/8 inch (3.5 mm)
cable. Press the radio CD/AUX
button to begin playing audio from
that device.
4/29/08
4:38 PM
Page 13
XM™ SATELLITE RADIO
XM Satellite Radio offers more than
170 channels of digital-quality
sound that goes wherever you go —
coast to coast.
After a free three-month trial
period, activation and service
subscription fees apply. Service is
available in the continental United
States and Canada.
For more information, visit XM
online at www.XMradio.com or call
1-800-929-2100.
TOUCH SCREEN NAVIGATION
ENTERTAINMENT SYSTEM
(If equipped)
Your vehicle’s Navigation
Entertainment System provides you
with detailed maps of most major
highways and roads throughout the
United States. The system provides
turn-by-turn driving instructions for
each destination you enter.
In addition, the system can help you
locate a variety of points of interest,
such as banks, airports, restaurants
and more.
Note: Not all roads and addresses are
available on the map disc.
See your Navigation manual for
additional operating instructions.
REAR SEAT ENTERTAINMENT
SYSTEM (If equipped)
The Rear Seat Entertainment (RSE)
system includes a DVD player,
flip-up video
screen, two
2-channel
wireless
headphones
and a remote
control. The
system can be
controlled
using the RSE
buttons or the
remote control.
11
❏ Reviewed with Customer (Please Check Box)
Refer to your Owner Manual for more information.
Driver
Information
Comfort
Entertainment
Convenience
Performance &
Maintenance
Owner
Privileges™
111839_09a_SRX_GTK_042908.qxd:SRX 2007 A
4/29/08
S
To play a DVD:
1. Turn on the ignition.
2. Press the release button on the
DVD display console and pull up
the video screen.
3. Insert a DVD into the DVD slot
in the radio. It will turn on the
video screen and begin playing
automatically. It may be necessary
to press the Play button to start
playing the movie if the DVD
stops at a menu screen.
4. To listen to the DVD through the
vehicle speakers, press the SRCE
(Source) button. Adjust volume
using the radio volume control.
To listen to the DVD through the
headphones, select channel 1 and
push the power button on the
headphones. Adjust volume using
the headphone volume control.
To listen to a Rear Seat Audio
source, select channel 2.
4:38 PM
R
Page 14
X
5. To control DVD playback, use the
remote control or the DVD
buttons on the radio display.
6. To turn off the RSE system,
press the power button on the
RSE system, eject the DVD or
press the power button on the
remote control.
To play a video game and use
the headphones, turn on the RSA
system and press the SRCE button
to select AUX. Select channel 2 on
the headphones.
Driver Control of the
Entertainment System
The driver has basic control of the
entire audio/entertainment system.
Press and hold the Power knob for
more than two seconds to pause the
radio, Rear Seat Audio, and Rear Seat
Entertainment systems. Press the
Power knob again to resume play.
Note: For a complete description and directions
for use, refer to your Owner Manual.
Convenience
ONSTAR® (If equipped)
You have one year of OnStar service
from the date you purchased your
new vehicle with one of two service
plans, Safe & Sound, or with the
up-level Directions & Connections
Plan. Push your OnStar button to
ask an Advisor for details about
the service plan you have or to
upgrade your plan. Your vehicle
has a wide variety of capabilities,
from Remote Door Unlock to
Automatic Airbag Notification to
Hands-Free Calling, and most
vehicles can get driving directions
using Turn-by-Turn Navigation.
Visit onstar.com. For more
information about OnStar, refer
to the OnStar Owner Guide, call
1-888-466-7827, or push the
blue button.
111839_09a_SRX_GTK_042908.qxd:SRX 2007 A
Driving Directions and OnStar®
Turn-by-Turn Navigation
Whether you’re lost or want to get
directions to a location you might
not be familiar with, OnStar
Advisors can give you driving
directions. Some vehicles have the
additional ability to deliver directions
to you automatically as you drive by
using a system called Turn-by-Turn
Navigation. OnStar Advisors can
send a planned route to your vehicle
and as you approach roads you need
to take, the turn instructions play
over your vehicle’s speakers.
For more information, refer to your
OnStar Owner Guide, or push your
OnStar button.
UNIVERSAL HOME REMOTE
(If equipped)
The Universal Home Remote is a
combined universal transmitter and
receiver that can activate up to
three devices, such as garage door
openers, entry door locks, gates
and security systems.
4/29/08
4:38 PM
Page 15
It’s recommended that you read the
instructions in your Owner Manual
completely before attempting to
program any of the three channels
on the Universal Home Remote. The
engine should be turned off when
programming the remote.
Note: Do not use the Universal Home
Remote with any garage door opener that
does not have the “stop and reverse”
feature or any opener manufactured
before April 1, 1982.
ULTRASONIC REAR PARKING
ASSIST (URPA)
This feature helps you determine
how close an object is to your rear
bumper. URPA operates only at
speeds less than 3 mph (5 km/h)
and detects objects at distances
between 5 ft. (1.5 m) and 1 ft. (.03
m). Both a variable audible chime
and a visual display located above
the rear window convey distance to
an object.
Comfort
On vehicles equipped with
UltraView sunroofs, the switches
are located in the overhead console.
The left switch (A) operates the
sunroof. Press the rear of the switch
to the first detent to open partially,
and press to
B
A
the second
detent for
express open.
The express
feature opens
to a comfort stop. Press again to
express-open all the way. Press the
front of the switch to the first
detent to partially close, and press
to the second detent to express-close.
The right switch (B) operates the
sunshade. Press the rear of the
switch to open the sunshade.
Press the front of the switch to
the first detent to partially close,
and press to the second detent to
express-close.
❏ Reviewed with Customer (Please Check Box)
Refer to your Owner Manual for more information.
Driver
Information
ULTRAVIEW SUNROOF
(If equipped)
Entertainment
Convenience
Performance &
Maintenance
Owner
Privileges™
13
111839_09a_SRX_GTK_042908.qxd:SRX 2007 A
4/29/08
S
POWER ADJUSTABLE PEDALS
(if equipped)
If your vehicle is equipped with this
feature, you can change the position
of the throttle
and brake pedals.
The switch is
located on the
instrument panel.
Push the switch
rearward to move
the pedals closer
to you or forward
to move the pedals away
from you.
CRUISE CONTROL
Use the Cruise Control for steady
driving on relatively straight,
uncrowded roads. The controls
are located on the left side of the
steering wheel.
4:38 PM
R
Page 16
X
The controls function as follows:
(On/Off): Press this button to
turn the cruise control system on
or off.
+ RES (Resume/ Accelerate): Press
this button to resume a set speed or
accelerate the vehicle.
– SET (Set/Coast): Press this button
to set a speed or to decrease a
set speed.
(Cancel): Press this button to
cancel the set speed.
ADAPTIVE REMOTE START
This feature allows you to start the
engine from outside the vehicle by
using the Remote Keyless Entry
transmitter. (Normal transmitter
range is within approximately
200 ft. (60.9 m) of the vehicle.)
You can also set the system to
activate the automatic climate
control, rear window defogger or
seat temperature control.
The engine will run for about
10 minutes before turning itself off,
but can be extended 10 minutes
more by performing another
remote start sequence at any time.
After two consecutive remote starts,
no additional remote starts are
allowed until the vehicle has
been started.
The remote start system will not
operate if the hood or a door is open.
111839_09a_SRX_GTK_042908.qxd:SRX 2007 A
Starting the Vehicle
1. Aim the transmitter at
the vehicle.
2. Press and release the (Lock)
button on the transmitter.
3. Immediately press and hold the
(Remote Start) button for
about four seconds.
4. When the vehicle starts, the
parking lamps will light and
remain on while the engine is
running, and the doors will lock.
5. Repeat these steps for a
10-minute time extension.
When you enter the vehicle after a
remote start, insert the key and
turn the ignition to ON/RUN
before driving.
Canceling a Remote Start
If you wish to turn off the engine
instead of driving after a remote
start, perform one of the
following functions:
4/29/08
4:38 PM
Page 17
• Press and hold the (Remote
Start) button until the parking
lamps turn off.
• Press and release the Hazard
Warning Flashers button inside
the vehicle. Press the button again
to turn off the flashers.
• Turn the ignition switch on and
then off.
• The engine will automatically stop
when time expires.
Comfort
The rear washer/wiper control is
located in the overhead console.
Press the rear part of the switch (A)
for steady wipes.
Press the center of
A
the switch (B) to
wash the rear
B
window. Press the
forward part of the
C
switch (C) for
delayed wipes.
INSTRUMENT PANEL AND
COURTESY LIGHTS
To brighten or dim the instrument
panel lights, turn the
(Interior
Lights) knob on the left side of the
instrument panel. To turn on the
courtesy lights, turn the knob
clockwise completely. Turn the knob
counterclockwise to turn off the
courtesy lights.
❏ Reviewed with Customer (Please Check Box)
Refer to your Owner Manual for more information.
Driver
Information
REAR WASHER/WIPER
Entertainment
Convenience
Performance &
Maintenance
Owner
Privileges™
15
111839_09a_SRX_GTK_042908.qxd:SRX 2007 A
4/29/08
S
Performance &
Maintenance
ENGINE FUEL
If your vehicle has the 3.6L V6
engine, use regular unleaded
gasoline with a posted octane
rating of 87 or higher.
If your vehicle has the 4.6L V8
engine, use premium unleaded
gasoline with a posted octane
rating of 91 or higher. You may also
use regular unleaded gasoline rated
at 87 octane or higher, but your
vehicle’s performance may be
slightly reduced.
TRANSMISSION
Automatic Overdrive
Automatic Overdrive is best used for
normal driving. For further
information regarding gear
selection for various driving
conditions, refer to your
Owner Manual.
4:38 PM
R
Page 18
X
Driver Shift Control (DSC)/
Sport Mode
When Driver Shift Control (DSC) is
activated, your SRX® transmission
will allow you to change gears
similar to a manual transmission
for more control. It will also
provide firmer shifting and
increased performance.
To use DSC:
1. Slide the shift lever over from
DRIVE (D) to the DSC position.
The sport symbol in the
Driver Information Center
will illuminate.
2. Push the shift lever forward
to upshift or rearward to
downshift. The intended
gear number will appear in place
of the odometer display.
TRACTION AND STABILITY
Traction Control System
The Traction Control System comes
on automatically every time you
start your vehicle. When one or
more of the drive wheels begin to
spin from traction loss, the system
will apply braking to the spinning
wheel(s) and may reduce engine
power until traction is regained.
If your vehicle becomes stuck, and
rocking the vehicle is required, the
system should be turned off.
Press the button
located on the
console to turn the
system off or back on.
StabiliTrak® – Stability Control System
StabiliTrak is an advanced
computer-controlled system that
assists with directional control of
the vehicle during sudden maneuvers
or low traction situations. It is normal
to hear the system working, and the
system will automatically disengage
Cruise Control when activated.
111839_09a_SRX_GTK_042908.qxd:SRX 2007 A
4/29/08
4:38 PM
Page 19
Owner PrivilegesTM
To make your ownership experience
as satisfying and rewarding as
possible, we are proud to provide
you with Cadillac’s exceptional
Owner Privileges™, designed
to accommodate you anytime
and anywhere.
ROADSIDE SERVICE
1-800-882-1112
Roadside Service provides every
Cadillac owner with the advantage
of contacting a Cadillac advisor and,
when appropriate, a Cadillac-trained
dealer technician who can provide
on-site services:
• Towing Service
• Battery Jump-Starting
• Lockout Assistance
• Fuel Delivery
• Flat Tire Assistance
Trip Interruption: If your trip is
interrupted due to a component
failure covered under warranty,
incidental expenses may be
reimbursed, including hotel,
meals and rental car.
Courtesy Transportation: You may
also be provided with courtesy
transportation for warranted
repairs, including shuttle service for
same-day repairs and loaner
transportation for overnight repair.
Roadside Service is also available to
Cadillac customers beyond the
warranty period for a charge.
Roadside Assistance and OnStar®
(if equipped): Push the OnStar
button, the vehicle will send
your GPS location to the OnStar
Advisor who will speak to you,
assess your problem, contact
Roadside Assistance and relay your
exact location so you get the help
you need.
CUSTOMER ASSISTANCE
1-800-458-8006
Should you need to ask a question,
make a comment, or request
additional information, the Cadillac
Customer Assistance Center is
staffed around the clock with
professionals to serve you.
Comfort
CADILLAC ONLINE
For more information about your
Cadillac, including access to the
Cadillac Owner Center at My
GMLink, visit www.cadillac.com.
Certain restrictions, precautions and safety
procedures apply to your vehicle. Please read
your Owner Manual for complete instructions.
All information contained herein is based on
information available at the time of printing
and is subject to change without notice.
SRX is a registered trademark of Cadillac
Motor Car Division and General Motors
Corporation. Copyright 2008 by Cadillac Motor
Car Division. All rights reserved.
❏ Reviewed with Customer (Please Check Box)
Refer to your Owner Manual for more information.
Driver
Information
When you call Cadillac Roadside
Service or Customer Assistance,
when possible, please provide the
phone advisor with:
• Your telephone number
• Your location
• Your Cadillac’s location
• A description of the problem
• Vehicle Identification Number
• Year and model of your Cadillac
• Delivery date
• Current mileage
Entertainment
Convenience
Performance &
Maintenance
Owner
Privileges™
17
111839_09a_SRX_GTK_042908.qxd:SRX 2007 A
4/29/08
4:38 PM
Page 20
*25788132A*
25788132A