1
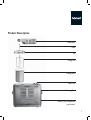
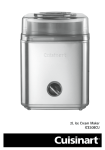
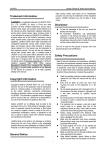
Ice Cream Professional
ICE50BCU
Congratulations on your purchase of the Cuisinart Ice Cream Professional.
For over 30 years Cuisinart’s aim has been to produce the very finest kitchen equipment
so that cooks at home as well as professional chefs have the tools to express their
creativity.
All Cuisinart products are engineered for exceptionally long life, and designed to be
easy to use as well as to give excellent performance day after day.That is why they have
come to be regarded as the defining machines in their field by chefs across the world.
Whatever you cook, cook it better with Cuisinart.
3
Contents
Product Description . . . . . . . . . . . . . . . . . . . . . . . . . . . . . . . . . . . 5
Safety Cautions . . . . . . . . . . . . . . . . . . . . . . . . . . . . . . . . . . . . . 6
Instructions for Use . . . . . . . . . . . . . .
A Assembling the Ice Cream Professional . . . .
B Dismantling the Ice Cream Professional . . . .
C Making Frozen Desserts and Drinks . . . . . .
D Hints and Tips . . . . . . . . . . . . . . . . .
.
.
.
.
.
.
.
.
.
.
.
.
.
.
.
.
.
.
.
.
.
.
.
.
.
.
.
.
.
.
.
.
.
.
.
.
.
.
.
.
.
.
.
.
.
. . . . . .
. . . . . . .
. . . . . . .
. . . . . . .
. . . . . . .
.
.
.
.
.
.
.
.
.
.
.
.
.
.
.
.
.
.
.
.
.
.
.
.
.
.
.
.
.
.
8
8
9
9
10
Cleaning & Maintenance . . . . . . . . . . . . . . . . . . . . . . . . . . . . . . . . 11
Guarantee . . . . . . . . . . . . . . . . . . . . . . . . . . . . . . . . . . . . . . . . 12
UK Wiring Instructions . . . . . . . . . . . . . . . . . . . . . . . . . . . . . . . . . 13
UK After Sales Service . . . . . . . . . . . . . . . . . . . . . . . . . . . . . . . . . 14
Recipes . . . . . . . . . . . . . . . . . . . . . . . . . . . . . . . . . . . . . . . . . . 15
4
Product Description
Motor Arm
Stem
Lid
Mixing Pad
Mixing Bowl
Timer Dial
Housing Base
Heavy Duty Compressor
(not shown)
5
Carefully read all the instructions thoroughly before using the appliance and keep in a safe place
for future reference
Safety Cautions
Always follow these safety cautions when using this appliance to avoid personal injury or damage to the appliance.
This appliance should be used only as described within this instruction book.
ß Do not immerse the base in water, any other liquid or in a dishwasher.
ß To clean base, disconnect from the mains, clean using a damp cloth. Allow to dry thoroughly before re-use.
ß Always disconnect the appliance immediately after use.
ß Always unplug from the mains when not in use and before cleaning.
ß Never disconnect the plug by pulling on the mains lead.
ß Always ensure that your hands are dry before removing the plug from the mains socket.
ß Avoid contact with moving parts. Keep hands, hair, clothing and spatulas and other utensils away during
operation to reduce the risk of injury and/or damage to the appliance.
ß Never use a scourer to clean appliance. Wipe with a warm moist cloth.
ß Do not allow the lead to overhang the edge of the table or work surface.
ß This appliance should not be used by adults or children whose lack of experience, product knowledge or
disability might cause a hazard, unless they have been correctly instructed and are adequately supervised.
ß Children should always be supervised to ensure that they do not play with this product.
ß Do not use this appliance if the lead is damaged. In the event of damage the lead must be replaced by a special
lead available from the manufacturer or its service agent. (See ‘’UK After Sales Service” section).
6
ß Do not use the appliance if it has fallen or shows signs of damage. Discontinue use immediately. (See ‘’UK After
Sales Service” section).
ß No repair can be carried out by the user. Return the appliance to ‘’Cuisinart Service Centre’’ for inspection
and repair or replacement. (See ‘UK After Sales Service’’ section).
ß Use this appliance only as described within these instructions for use. Retain these for future reference.
ß For indoor use only.
ß For domestic use only.
ß The appliance should remain upright at all times. If the appliance is turned on its side or upside down, you will
need to put it in an upright position and wait 24 hours before using.
ß This appliance complies with the basic requirements of Directives 04/108/EEC (Electromagnetic Compatibility)
and 06/95/EEC (Safety of domestic electrical appliances) amended by Directive 93/68/EEC (CE Marking).
ß Do not use any attachments other than those recommended or sold by Cuisinart.
ß WARNING: A cut off plug inserted into a 13 amp outlet is a serious safety (shock) hazard. Ensure the cut
off plug is disposed of safely.
ß WARNING: Polythene bags over the product or packaging may be dangerous. To avoid danger of suffocation,
keep away from babies and children. These bags are not toys.
ß The symbol
on the product or on its packaging indicates that this product may not be
treated as household waste. Instead it should be handed over to an appropriate collection point for the
recycling of electrical and electronic equipment. By ensuring this product is disposed of
correctly, you will help prevent potential negative consequences for the environment and human health,
which could otherwise be caused by inappropriate waste handling of this product. For more detailed
information about the recycling of this product, please contact your local council office or your
household waste disposal service.
7
Instructions for Use
Before first use, clean the lid, mixing bowl and mixing paddle in warm soapy water.
N.B. Do not clean any of the part with abrasive cleaners, hard implements or in the dishwasher.
A
Assembling the Ice Cream Professional
ß Take the motor arm and place smooth side face down on a flat surface so that the holes are visible on
top.
ß Align the flat end of the stem with the cut out in the motor arm, and push into position.
ß Place the domed side of the lid face down over the top of the stem until resting on the motor arm with
the opening. Align the plastic ridge on the top of the lid with the bracket on the edge of the motor arm.
Push the lid back until locked into place. This will secure the lid to the motor arm.
ß Align the mixing paddle with the top of the stem and push into place.
N.B. There should be a 1cm gap between the bottom of the paddle and the bottom of the stem.
8
ß Place the mixing bowl into the housing base. Turn the motor arm over and attach to the top of the base
with the mixing paddle in the mixing bowl.
B
Dismantling the Ice Cream Professional
ß Carefully lift out the motor arm and lid from the top of the unit by lifting upwards. Turn over and lay on a
flat surface.
ß Carefully remove the mixing padding by lifting upwards. Slide the lid away from the motor arm so that the
round cut of the lid is directly around the bottom of the stem. Lift lid over and off of the stem.
ß Pull the stem out away from the motor arm.
ß Finally, carefully lift the mixing bowl out of the housing base.
C
Making Frozen Desserts or Drinks
WARNING: This appliance should remain upright at all times. If appliance is turned on its side or upside
down, you will need to put in an upright position and wait 24 hours before using.
ß Firstly, prepare the ingredients required for your recipe, following the recipes in this instruction book or
your own.
ß Place the mixing bowl in the housing base.
ß Pour the ingredients into the mixing bowl.
ß Assemble the mixing arm and fit to the top of the appliance.
ß Turn the dial to required time, 35-45 minutes for a soft dessert, 45-60 minutes for a hard dessert. The
mixing process will begin. The unit will automatically stop mixing and turn itself off when the set time has
elapsed, an audible tone will sound to alert you.
N.B. if the frozen dessert reaches maximum thickness before the set time has elapsed, the unit will stop
mixing. If you do not shut off the timer manually it will continue counting down to ‘0’ and will then shut
itself off.
9
D
Hints and Tips
ß Processing time depends on the recipe, the amount of dessert being made and the temperature of the
ingredients being use. All recipes take between 35 and 60 minutes.
ß Soft ice cream takes between 35-45 minutes.
ß Hard ice cream takes 45-60 minutes.
ß Your Ice Cream Professional makes ice cream using fresh natural ingredients, i.e. without the preservatives
etc as found in commercial ice creams. Therefore it will not have the same hard consistency, for a firmer
consistency, transfer the dessert to an airtight container and store in the freezer for at least 2 hours before serving.
ß Add other ingredients e.g. chocolate chips and nuts approximately 5 minutes before the mixing is complete. Once the dessert or drink has begun to thicken, add the ingredients through the lid whilst mixing
continues.
ß Nuts and other ingredients should be no larger than a chocolate chip.
ß You should begin with a maximum of 1 litre of mixture in the Ice Cream Professional.
ß Some recipes use precooked ingredients. For best results, the mixture should be chilled overnight before
using.
ß Prior to freezing, most mixed recipes may be stored in the refrigerator for up to 3 days.
ß You may substitute lower fat creams and milk for double cream and whole milk used in many recipes.
However, the higher the fat content the richer and creamier the result. Using lower fat substitutes may
change the taste, consistency and texture of the dessert. When substituting ingredients, ensure you use
the same quantity of the substitute as the original ingredient required.
ß You may also substitute artificial sweeteners for sugar. If the recipe is to be precooked, add the sweetener
after the heating process is complete (the ingredients have been cooked). Stir the mixture thoroughly to
dissolve the sweetener.
10
ß When making sorbet, test the ripeness and sweetness of the fruit before you begin. The freezing process
reduces the sweetness of the fruit so that it will not taste as sweet as the recipe mixture. If the fruit
tastes tart, add sugar to the recipe. If the fruit is very ripe or sweet, reduce the amount of sugar in the
recipe.
ß Do not fill the mixing bowl higher than 3cm from the top. Take this into consideration if you wish to add
extra ingredients through the lid.
ß Well chilled ingredients require shorter mixing times.
ß Mixing times suggestions can vary due to ingredients and type of recipe.
Cleaning & Maintenance
ß Before first use and after every use, clean each part thoroughly.
ß Always unplug the appliance from the mains outlet before cleaning.
ß Wash the mixing bowl, mixing paddle and lid in warm soapy water. Dry each part thoroughly. Do not
wash any of the parts in the dishwasher.
ß Ensure the appliance is stored in an upright position.
ß Wipe the housing base with a clean damp cloth, do not use harsh abrasive cleaners or scourers.
ß Never submerge the motor base in the water or other liquid, or place in a dishwasher.
11
Guarantee
ß This Cuisinart appliance is guaranteed for domestic consumer use for 5 years.
ß The guarantee covers defects under normal use from date of purchase and ceases to be valid in the event
of alteration or repair by unauthorized persons.
ß If the appliance does not perform satisfactorily due to defects of material or manufacture, it will be repaired or replaced by the manufacturer (see UK after sales service for details).
ß This guarantee is only valid in the United Kingdom (including Northern Ireland, Republic of Ireland, the
Channel Islands and the Isle of Man).
ß No responsibility will be accepted for any damage caused in transit.
ß A charge may be made if goods are returned outside the relevant guarantee period or if the product is
returned unnecessarily.
ß The manufacturer reserves the right to amend terms and specifications without prior notice.
ß This guarantee in no way affects your statutory rights.
12
UK Wiring Instructions
ß Your Cuisinart Ice Cream Professional includes a BS 3 amp moulded (fused) mains plug on the supply
cord.
ß Should it be necessary at any stage to remove this moulded plug and replace it with a re-wireable BS 3
amp mains plug, the re-wiring should be completed as follows: (NB The moulded plug should be disposed
of safely)
Class I (1)
The wires in the mains lead are coloured in accordance with the following code:
GREEN & YELLOW = EARTH
BLUE = NEUTRAL BROWN = LIVE
As the colours of the wire may not correspond with the coloured markings identifying the terminals in
your plug, proceed as follows:
ß The wire which is coloured Green & Yellow must be connected to the terminal in the plug which is marked with the letter E or or coloured green or yellow.
ß The wire which is coloured BLUE must be connected to the terminal which is marked with the letter N
or coloured black.
ß The wire which is coloured BROWN must be connected to the terminal which is marked with the letter
L or coloured red.
With this appliance, if a 3 amp plug is used, a 3 amp fuse should be fitted. If any other type of plug is used, a
10 amp fuse must be fitted, either in the plug or at the distribution board.
13
UK After Sales Service
For further advice on using your Cuisinart Ice Cream Professional and other products in the Cuisinart
range, contact the Cuisinart Customer Care Line on 0870 240 6902 (09:00 to 17:00 hrs Monday to Friday)
or, alternatively, email your enquiry to [email protected]
In Guarantee
Return the product to the Cuisinart Service Centre at the following address:
Cuisinart Service Centre
P.O. Box 506
WIGAN
WN1 9AA
Enclose your name and address, together with proof of purchase and details of the fault.
Cuisinart will either repair or replace the product, as appropriate.
Out of Guarantee
Contact the Cuisinart Customer Care Line on 0870 240 6902 (09:00 to 17:00 hrs Monday to Friday) or,
alternatively, email your enquiry to [email protected] for details of the standard repair or replacement charge. If you wish to proceed with the repair or replacement, return the product to the Cuisinart
Service Centre at the following address:
Cuisinart Service Centre
P.O. Box 506
WIGAN
WN1 9AA
14
Recipes
Basic
Vanilla Ice Cream . . . . . .
Chocolate Ice Cream . . . .
Coffee Ice Cream . . . . . .
Mocha Latte Ice Cream . . .
Sweet Cinnamon Ice Cream.
.
.
.
.
.
.
.
.
.
.
.
.
.
.
.
.
.
.
.
.
.
.
.
.
.
.
.
.
.
.
.
.
.
.
.
.
.
.
.
.
.
.
.
.
.
.
.
.
.
.
.
.
.
.
.
.
.
.
.
.
.
.
.
.
.
.
.
.
.
.
.
.
.
.
.
.
.
.
.
.
.
.
.
.
.
.
.
.
.
.
.
.
.
.
.
.
.
.
.
.
.
.
.
.
.
.
.
.
.
.
.
.
.
.
.
16
17
18
19
20
Speciality
Crème Brulée Ice Cream . . . . . . . . . . . . . .
Crème Brulée Crunch. . . . . . . . . . . . . . . .
White Chocolate Ice Cream with Macadamia Nuts .
Chocolate Truffle Ice Cream . . . . . . . . . . . .
.
.
.
.
.
.
.
.
.
.
.
.
.
.
.
.
.
.
.
.
.
.
.
.
.
.
.
.
.
.
.
.
.
.
.
.
.
.
.
.
.
.
.
.
.
.
.
.
.
.
.
.
.
.
.
.
.
.
.
.
.
.
.
.
.
.
.
.
.
.
.
.
.
.
.
.
.
.
.
.
.
.
.
.
.
.
.
.
21
22
23
24
Frozen Yoghurts
Vanilla Frozen Yoghurt . . . .
Chocolate Frozen Yoghurt. .
Raspberry Frozen Yoghurt. .
Quick Peach Frozen Yoghurt
.
.
.
.
.
.
.
.
.
.
.
.
.
.
.
.
.
.
.
.
.
.
.
.
.
.
.
.
.
.
.
.
.
.
.
.
.
.
.
.
.
.
.
.
.
.
.
.
.
.
.
.
.
.
.
.
.
.
.
.
.
.
.
.
.
.
.
.
.
.
.
.
.
.
.
.
.
.
.
.
.
.
.
.
.
.
.
.
.
.
.
.
.
.
.
.
.
.
.
.
.
.
.
.
.
.
.
.
.
.
.
.
.
.
.
.
.
.
.
.
.
.
.
.
.
.
.
.
.
.
.
.
.
.
.
.
25
26
27
28
Sorbets
Fresh Lemon Sorbet. . .
Cranberry Sorbet . . . .
Blueberry Sorbet . . . .
Orange & Mango Sorbet
.
.
.
.
.
.
.
.
.
.
.
.
.
.
.
.
.
.
.
.
.
.
.
.
.
.
.
.
.
.
.
.
.
.
.
.
.
.
.
.
.
.
.
.
.
.
.
.
.
.
.
.
.
.
.
.
.
.
.
.
.
.
.
.
.
.
.
.
.
.
.
.
.
.
.
.
.
.
.
.
.
.
.
.
.
.
.
.
.
.
.
.
.
.
.
.
.
.
.
.
.
.
.
.
.
.
.
.
.
.
.
.
.
.
.
.
.
.
.
.
.
.
.
.
.
.
.
.
.
.
.
.
.
.
.
.
29
30
31
32
.
.
.
.
.
.
.
.
.
.
.
.
.
.
.
.
.
.
.
.
.
.
.
.
.
.
.
.
.
.
.
.
.
.
.
.
.
.
.
.
.
.
.
.
.
.
.
.
.
.
.
.
.
.
.
.
.
.
.
.
.
.
.
15
Vanilla Ice Cream
225ml whole milk
175g granulated sugar
450ml double cream
1-2 tsp vanilla extract
ß Pour the milk and sugar into a medium bowl and whisk until the sugar has dissolved. Stir in the cream
and vanilla, cover and refrigerate if time allows.
ß Once chilled, pour into the mixing bowl. Attach the motor arm to the housing with the mixing paddle
and lid in correct position. Set the timer to 35-45 minutes for soft ice cream and 45-60 for hard ice
cream, the mixing process will begin.
ß When finished an audible tone will sound, ice cream is ready to serve.
Variations:
ß Mint chip: omit vanilla and replace with - 1 tsp peppermint extract. Chop 100g milk chocolate into very
small pieces and add through the lid during the last 5 minutes of mixing.
ß Cookies and Cream: add 150g coarsely chopped cookies e.g. chocolate chip through the lid during the
last 5 minutes of mixing.
ß Pistachio: add tsp almond extract to the base mixture. Coarsely chop 100g shelled pistachios and add
through the lid during the last 5 minutes of mixing.
16
Chocolate Ice Cream
225ml whole milk
100g granulated sugar
200g milk chocolate, broken into 1cm pieces
450ml double cream
1 tsp vanilla extract
ß Heat the milk over a medium heat until just bubbling around the edges.
ß Place the sugar and chocolate into a food processor and pulse with the chopping blade until finely chopped.
ß Add the hot milk and process well until smooth. Transfer to a medium bowl and allow to cool completely.
Cover and refrigerate for 2 hours.
ß Once chilled, stir the chocolate mixture and pour into the mixing bowl.
ß Attach the motor arm to the housing with the mixing paddle and lid in correct position. Set the timer to
35-45 minutes for soft ice cream and 45-60 for hard ice cream, the mixing process will begin.
ß When finished an audible tone will sound, ice cream is ready to serve.
Variations:
ß Chocolate Almond: add tsp pure almond extract with the vanilla. Add 100g chopped toasted almonds
through the lid during the last 5 minutes of mixing.
ß Chocolate Cookie: add 100g-150g chopped cookies through the lid during the last 5 minutes of mixing.
17
Coffee Ice Cream
225ml whole milk, chilled
175g granulated sugar
1-3 tbsp instant coffee/ espresso, to taste
450ml double cream, well chilled
1 tsp vanilla extract
ß Place the milk, sugar and coffee into a medium bowl and whisk until the sugar and coffee have dissolved.
Stir in the cream and vanilla and cover and refrigerate until chilled.
ß Once chilled, pour the mixture into the mixing bowl.
ß Attach the motor arm to the housing with the mixing paddle and lid in correct position. Set the timer to
35-45 minutes for soft ice cream and 45-60 for hard ice cream, the mixing process will begin.
ß When finished an audible tone will sound, ice cream is ready to serve.
18
Mocha Latte Ice Cream
225ml whole milk, well chilled
150g soft brown sugar
2 tbsp instant coffee/ espresso
2 tbsp cocoa powder
450ml double cream, well chilled
1 tsp vanilla extract
ß Place the milk, sugar, coffee and cocoa into a medium bowl and whisk until the sugar and coffee have dissolved. Stir in the double cream and vanilla.
ß Pour the ingredients into the mixing bowl.
ß Attach the motor arm to the housing with the mixing paddle and lid in correct position. Set the timer to
35-45 minutes for soft ice cream and 45-60 for hard ice cream, the mixing process will begin.
ß When finished an audible tone will sound, ice cream is ready to serve.
19
Sweet Cinnamon Ice Cream
225ml whole milk, well chilled
150g soft brown sugar
2 tsp ground cinnamon
450ml double cream, well chilled
1- tsp vanilla extract
ß Place the milk, brown sugar and cinnamon into a medium bowl and whisk together until the sugar has
dissolved. Stir in the cream and vanilla, cover and chill.
ß Pour the mixture into the mixing bowl.
ß Attach the motor arm to the housing with the mixing paddle and lid in correct position. Set the timer to
35-45 minutes for soft ice cream and 45-60 for hard ice cream, the mixing process will begin.
ß When finished an audible tone will sound, ice cream is ready to serve.
20
Crème Brulée Ice Cream
550ml double cream
280ml whole milk
1 vanilla pod, split lengthways
6 large egg yolks
150g soft light brown sugar
Pinch salt
1 tbsp vanilla extract
ß Place the cream, milk and vanilla pod in medium saucepan and bring to the simmer over a medium-low
heat. Reduce the heat to low and simmer for 15 minutes.
ß Place the egg yolks and brown sugar in a medium bowl and beat until thick and pale brown.
ß Add a small amount of the hot mixture to the egg mixture and mix well, then add the egg mixture into
the rest of the hot cream mixture and stir. Cook over a medium-low heat, stirring constantly until warmed through, do not allow to boil.
ß Strain the custard through a sieve into a medium bowl. Using the back of a knife, scrape out the seeds of
the vanilla pod and stir into the custard. Discard the pod.
ß Stir in the salt and vanilla extract. Place cling film over the bowl, so that it touches the custard to prevent
a skin forming. Chill for at least 8 hours.
ß Remove the cling film and pour the chilled mixture into the mixing bowl.
ß Attach the motor arm to the housing with the mixing paddle and lid in correct position. Set the timer to
35-45 minutes for soft ice cream and 45-60 for hard ice cream, the mixing process will begin.
ß When finished an audible tone will sound, ice cream is ready to serve. Serve sprinkled with Brulée
crunch.
21
Crème Brulée Crunch
1 tsp unsalted butter, melted
175g granulated sugar
tsp water
ß Line a lipped baking tray with foil and grease with the melted butter.
ß Place the sugar in a saucepan. Cook over a medium-high heat until the sugar begins to melt, stirring
constantly, do not leave unattended.
ß Continue to stir for 3-4 minute, until the sugar is melted and coppery in color.
ß Remove from the heat and carefully stir in the water, the mixture will bubble slightly.
ß Pour directly onto the foil and spread as thinly as possible. Do not touch the sugar mixture with your
fingers, it will be extremely hot and will burn.
ß Leave to cool for 30 minutes. When cool and hardened, break into shards.
ß Store in an airtight container and sprinkle over Crème Brulée just before serving.
22
White Chocolate Ice Cream with Macadamia Nuts
280ml whole milk
300ml double cream
150g granulated sugar
4 large eggs
200g white chocolate, chopped
1 tbsp brandy
1 tsp vanilla extract
1 tsp almond extract
50g milk chocolate, cut into cm chunks
40g macadamia nuts, toasted and chopped
ß Combine the milk and cream in a saucepan and bring to a simmer over a medium-low heat. In a medium
bowl, beat the sugar and eggs until thick and pale.
ß Pour a small amount on the hot milk into the egg mixture and stir. Then stir the egg mixture back into
the milk mixture and cook over a low heat, stirring constantly until warmed through, do not allow to boil.
ß Add the white chocolate, and stir in until completely melted. Stir in the brandy, vanilla and almond extract. Remove from the heat, transfer to a bowl, cover and chill for at least 8 hours.
ß When completely chilled, pour the mixture into the mixing bowl.
ß Attach the motor arm to the housing with the mixing paddle and lid in correct position. Set the timer to
35-45 minutes for soft ice cream and 45-60 for hard ice cream, the mixing process will begin.
ß 5 minutes before the end of mixing, add the milk chocolate and Macadamia nuts. And continue to mix for
the last 5 minutes.
ß When finished an audible tone will sound, ice cream is ready to serve.
23
Chocolate Truffle Ice Cream
300ml whole milk
340ml double cream
1 vanilla pod
175g granulated sugar
75g cocoa powder
4 large eggs
200g milk chocolate, chopped
1- tsp vanilla extract
ß Place the milk and cream in a medium saucepan and stir over a medium-low heat. With a sharp knife, split
the pod in half lengthways, using the blunt side of the knife, scrape out the seeds and stir the seeds and
pod into the milk mixture.
ß Simmer the milk mixture over a low heat for 30 minutes, then remove the vanilla pod and discard.
ß Place the sugar, cocoa and eggs in a medium bowl and whisk until thickened. Poor a little of the cream
mixture into the egg mixture and mix thoroughly.
ß Add the chocolate and vanilla to the hot cream/milk mixture and stir until completely melted.
ß Stir the egg mixture into the hot cream/milk. Cook over a low heat, stirring constantly, until the mixture
thickens. Transfer to a bowl, cover and chill for 8 hours or overnight.
ß Attach the motor arm to the housing with the mixing paddle and lid in correct position. Set the timer to
35-45 minutes for soft ice cream and 45-60 for hard ice cream, the mixing process will begin.
ß When finished an audible tone will sound, ice cream is ready to serve.
Tips: try adding 75g of chopped toasted nuts or 75g chopped dark chocolate to the ice cream 5 minutes
before the end of mixing.
24
Vanilla Frozen Yoghurt
280ml whole milk
175g granulated sugar
575g plain fat free yoghurt
50ml double cream
1 tbsp vanilla extract
ß Place the milk and sugar in a medium bowl, whisk together until the sugar is dissolved. Stir in the yoghurt,
cream and vanilla extract. Cover and chill for 2-3 hours.
ß Attach the motor arm to the housing with the mixing paddle and lid in correct position. Set the timer to
35-45 minutes for soft frozen yoghurt and 45-60 for hard frozen yoghurt, the mixing process will begin.
ß When finished an audible tone will sound, frozen yoghurt is ready to serve.
25
Chocolate Frozen Yoghurt
325ml whole milk
225g milk chocolate, chopped
75g granulated sugar
575g low fat or fat free vanilla yoghurt
ß Place the milk, chocolate and sugar in a saucepan and cook over a medium heat, stirring constantly until
the chocolate is completely melted and the sugar has dissolved.
ß Allow to cool completely, cover and chill for 8 hours.
ß Attach the motor arm to the housing with the mixing paddle and lid in correct position. Set the timer to
35-45 minutes for soft frozen yoghurt and 45-60 for hard frozen yoghurt, the mixing process will begin.
ß When finished an audible tone will sound, frozen yoghurt is ready to serve.
26
Raspberry Frozen Yoghurt
400g Raspberries
225g granulated sugar
5 tbsp lime juice
675ml fat free vanilla yoghurt
ß Place the raspberries, sugar and lime juice in a medium bowl. Stir to blend. Cover and chill for 2-3 hours.
ß Place the raspberry mixture in a blender and blend for 15 to 20 seconds to puree. Strain the mixture
using a fine mesh strainer, pressing through the solids to remove all the seeds, discard the seeds.
ß Combine the raspberry puree with the yogurt. Stir to blend until smooth.
ß Attach the motor arm to the housing with the mixing paddle and lid in correct position. Set the timer to
35-45 minutes for soft frozen yoghurt and 45-60 for hard frozen yoghurt, the mixing process will begin.
ß When finished an audible tone will sound, frozen yoghurt is ready to serve.
27
Peach Frozen Yoghurt
350g canned peach slices in juice
675g low fat vanilla yoghurt
75g granulated sugar
ß Drain the peaches and reserve 100ml juice. Place the peaches in a blender and pulse to chop.
ß Add the vanilla yoghurt, sugar and reserved peach juice. Process until smooth and the sugar has dissolved.
Cover and chill for 2-3 hours.
ß Attach the motor arm to the housing with the mixing paddle and lid in correct position. Set the timer to
35-45 minutes for soft frozen yoghurt and 45-60 for hard frozen yoghurt, the mixing process will begin.
ß When finished an audible tone will sound, frozen yoghurt is ready to serve.
28
Lemon Sorbet
450g granulated sugar
450ml water
225ml freshly squeezed lemon juice
1 tbsp lemon zest
ß Place the sugar and water in a medium saucepan and bring to the boil. Reduce the heat and simmer
without stirring until the sugar dissolves, 3-5 minutes. Cool completely.
ß When cool add the lemon juice and zest and stir well. Cover and chill for 2-3 hours.
ß Attach the motor arm to the housing with the mixing paddle and lid in correct position. Set the timer to
35-45 minutes for soft sorbet and 45-60 for hard sorbet, the mixing process will begin.
ß When finished an audible tone will sound, sorbet is ready to serve.
29
Cranberry Sorbet
450g fresh cranberries, washed and drained, stems removed and discarded
225ml water
340g granulated sugar
340ml white grape juice
Zest of 1 orange
Pinch of salt
2 tbsp golden syrup
ß Place the cranberries, water, sugar, grape juice, orange zest and salt in a saucepan and bring to the boil.
Reduce the heat and simmer for 15 minutes, until the berries have popped and the sugar has dissolved.
ß Cool for 15 minutes. Drain the cranberries, reserving the cooking liquid and purée.
ß Add 225ml of the cooking liquid and press through a fine mesh sieve to remove seeds and pulp. Stir in the
remaining cooking liquid and syrup and chill for 6 hours.
ß Attach the motor arm to the housing with the mixing paddle and lid in correct position. Set the timer to
35-45 minutes for soft sorbet and 45-60 for hard sorbet, the mixing process will begin.
ß When finished an audible tone will sound, sorbet is ready to serve.
30
Blueberry Sorbet
300g granulated sugar
600ml water
1.1kg fresh or frozen blueberries, defrosted if frozen
3 tbsp lime fresh lime juice
2 tbsp golden syrup
ß Place the sugar and water in a saucepan; bring to the boil and simmer, without stirring until the sugar is
dissolved. Allow to cool completely.
ß Place the blueberries and lime juice in a blender and purée until smooth. Press through a fine sieve to
remove seeds. Discard seeds.
ß Combine blueberry purée with the cooled sugar syrup and golden syrup. Stir well.
ß Refrigerate for 2-8 hours to chill. Pour the chilled mixture into the mixing bowl.
ß Attach the motor arm to the housing with the mixing paddle and lid in correct position. Set the timer to
35-45 minutes for soft sorbet and 45-60 for hard sorbet, the mixing process will begin.
ß When finished an audible tone will sound, sorbet is ready to serve.
31
Orange & Mango Sorbet
300g mango cubes
225g granulated sugar
4 tbsp lemon juice
Zest of 1 orange
500ml unsweetened orange juice
ß Place the mango, sugar, lemon juice and orange zest in a medium bowl and stir. Leave to stand for 1 hour.
ß Stir well and purée in a blender.
ß Stir in the orange juice, cover and refrigerate for at least 1 hour.
ß Pour the mixture into the mixing bowl.
ß Attach the motor arm to the housing with the mixing paddle and lid in correct position. Set the timer to
35-45 minutes for soft sorbet and 45-60 for hard sorbet, the mixing process will begin.
ß When finished an audible tone will sound, sorbet is ready to serve.
32
www.cuisinart.co.uk