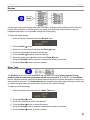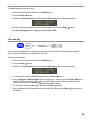
1
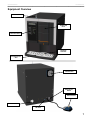
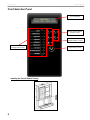
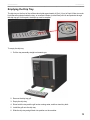
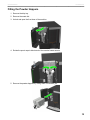
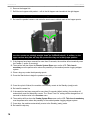
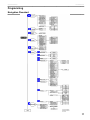
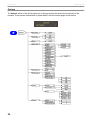
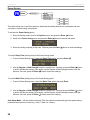
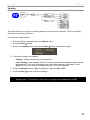
Operation Manual Customer Service – 800.567.2951 VKI Publication #100283-001 Technical Support – 888.854.0207 May 2015 Eccellenza Pod 2 Operation Manual Operation Manual Eccellenza Pod Table of Contents Safety Information ........................................................................................................ 4 Specifications................................................................................................................ 6 Equipment Overview..................................................................................................... 7 Front Selection Panel ................................................................................................... 8 Unpacking ..................................................................................................................... 9 Plumbing the Machine ................................................................................................ 10 Water Filter .................................................................................................................. 12 Emptying the Drip Tray............................................................................................... 13 Emptying the Waste Bin ............................................................................................. 14 Filling the Powder Hoppers ........................................................................................ 15 Programming............................................................................................................... 17 Navigation Flowchart ......................................................................................... 17 Accessing and Exiting the Set-Up Mode ............................................................ 18 Navigating the Menus ........................................................................................ 18 Counters............................................................................................................ 19 Language .......................................................................................................... 20 Powder Rinse .................................................................................................... 20 Recipes ............................................................................................................. 21 Water Tank ........................................................................................................ 21 Options .............................................................................................................. 22 Press & Hold (Hot Water) .................................................................................. 23 Heating Message .............................................................................................. 23 Buzzer ............................................................................................................... 24 Button Enable .................................................................................................... 24 Time and Day .................................................................................................... 25 Power Saving .................................................................................................... 26 Vending ............................................................................................................. 27 Presets .............................................................................................................. 28 Quantity ............................................................................................................. 29 Maintenance ................................................................................................................ 30 Daily .................................................................................................................. 30 Weekly .............................................................................................................. 30 Monthly.............................................................................................................. 31 Every 6-12 Months ............................................................................................ 31 Every 18 Months ............................................................................................... 31 Error Messages ........................................................................................................... 32 3 Eccellenza Pod Operation Manual Safety Information Your safety is very important to us. It is imperative that you read and understand this safety information before proceeding with the installation and operation of this coffee maker. This equipment must be used specifically for the purpose for which it is designed. The manufacturer is not responsible for damage or injury resulting from improper use of this equipment. This coffee maker is designed for indoor use ONLY and must never be installed outdoors. The installation of this equipment must comply with all municipal, state/provincial, and federal electrical and plumbing codes. Installation and servicing of this equipment must only be performed by qualified personnel. Do not attempt to install or service this equipment if you are not qualified as it may result in personal injury. There are no userserviceable parts inside the equipment. This equipment must be installed in a location with an ambient temperature between 5°C-35°C (40°F-95°F). The main water supply pressure must be between a minimum of 20psi and a maximum of 100psi. This equipment must be positioned so that the wall plug and the main power switch are both easily accessible. Do not connect the coffee maker to a voltage supply other than the voltage indicated on the serial number decal. Do not immerse this coffee maker or any part of this equipment in liquid. Do not install the equipment in an area where water spray is present. This coffee maker must be installed securely on a level surface. If it does not appear to be a stable location, select another installation location. Keep hands clear of the dispensing area at the front of the coffee maker. Liquids being dispensed are extremely hot and can cause severe burns. Never disconnect the coffee maker by pulling on the service cord, and never use the coffee maker if the service cord is damaged. If the service cord is damaged, it must be replaced with a new service cord that is available from your distributor or the manufacturer of this equipment. 4 Operation Manual Eccellenza Pod Safety Information Never attempt to override the safety features incorporated into the equipment. They are there for your protection and should never be bypassed under any circumstances. Always switch the power off and disconnect the service cord when cleaning the interior of the coffee maker. Components inside the coffee maker can cause electrical shock resulting in personal injury. If the coffee maker is not working properly or appears to have a fault, switch off the power, disconnect the service cord and call an authorized technician immediately for service. Only qualified personnel should perform service on this equipment. Use caution when servicing the water heater or the outlet valves as they may be extremely hot and can cause severe burns. Use caution when working inside the coffee maker as there may be sharp edges on some components that can cause cuts. To prevent electrical shock, remove all jewelry (rings, watches, etc.) when servicing the coffee maker. Use only original manufacturer replacement parts in this coffee maker. Unapproved replacement parts can result in personal injury, fire and/or further damage to the equipment. Do not allow children to access this equipment. They are not aware of the potential dangers that exist. Never use ammonia based cleaners on machine surfaces as they will become discolored and/or damaged permanently. Use milder cleaning products, such as dish soap. Unauthorized modifications made to this coffee maker can result in serious personal injury and/or damage to the equipment, and voids all warranties and certifications. 5 Eccellenza Pod Operation Manual Specifications Voltage Rating 120 Volts AC @ 60hz (120 Volt Model) Heater Wattage 1400 Watts Weight (empty) 55 lbs (25 kg) Powder Capacity (2) Milk - 1 lb (450g) Chocolate – 1.2 lb (550g) Cup Sizes 3 Brew Time per Cup Less than 60 seconds Water Tank Capacity 0.79 gallons (3 liters) Waste Bin Capacity 50 Pods Temperature Control Electronic Probe Heating Time Approx. 15 minutes after installation Brew Temperature 198°F (92°C) Heater Protection Yes Overflow Protection Yes Circuit Protection Yes Certifications/Listings cCSAus Coffee Maker Dimensions Height: 17.8” (45 cm) Width: 15” (38 cm) Depth: 21 ” (53 cm) Minimum Installation Requirements Height: 18” (45.5 cm) Width: 15” (38 cm) Depth: 24” (61 cm) NOTE: This machine is factory set on "Preset 2". To change this preset, follow the instructions in the “Presets” section on page 28 of this manual. NOTE: Any references made in this manual to coffee blends and powder products are for example purposes only. The actual products used in the equipment may be different than the examples used in this manual. 6 Operation Manual Eccellenza Pod Equipment Overview Door Lock Coffee Pod Door Selection Panel Overflow Indicator Cup Stand and Grill Exhaust Fan Main Power Switch Service Cord Inlet Valve 15A Fuse 7 Eccellenza Pod Operation Manual Front Selection Panel LCD Display (2 x 20 characters) Strength Selection Buttons (Regular or Bold) Cup Size Selection Buttons (Regular, Medium or Large) Front Fascia and Beverage Selection Area START button (starts brewing process) . Installing the French Button Overlay 8 Operation Manual Eccellenza Pod Unpacking NOTE: Prior to signing for the delivery, check the shipping carton for damage. Indicate any damage on the delivery slip and have the driver sign acknowledging it. Damages during shipping must be claimed with the carrier, and not with VKI Technologies. 1. Cut the shipping tape on the top of the box. 2. Flip open the four flaps. 3. Remove the upper foam end cap. 4. Using a utility knife, carefully cut down along all four corners of the box. 5. With the help of a colleague, lift and place the coffee maker onto a workbench or cabinet. Do not attempt to lift the machine by yourself. WARNING: DO NOT lift the coffee maker by placing your hand underneath the front door. It is not designed to support the weight of the machine, and serious personal injury and/or damage to the unit may occur. 6. Pull out the waste bin and remove the drip tray stored inside. 7. Open the front door (the keys are in a small envelope attached to the service cord). 8. Remove all the shipping tape from the outside and inside of the machine. 9. Close the front door, re-install the waste bin and install the drip tray. 9 Eccellenza Pod Operation Manual Plumbing the Machine Installation of this equipment must comply with all local, state/provincial and federal plumbing codes. It is the responsibility of the installer (and not VKI Technologies) to research and to comply with all of these codes. NOTE: When installing the machine onto a cabinet or countertop, ensure that the machine is level. 1. Specifications and Limitations: The total overall length of installed section of water tubing should never exceed 25 feet (7.6 meters) per unit. In the event more than 25 feet (7.6 meters) of conduit tubing is required, as measured from the water supply connection (building plumbing) to the brewing equipment or cooler unit, the customer should be required to sign a waiver document thus releasing your company from any and all responsibility in the event damage is incurred as a result of a water leak from installed water tubing and/or fittings and/or equipment. 2. Water Supply & Tubing - Material Requirements (Conforms to NSF-51 & NSF-61): NOTE: The main water supply pressure must be between a minimum of 20 psi and a maximum of 100 psi. Water supply connection (building plumbing to water tubing conduit): ► PREFERENCE: 2” copper shunt & compression tee fitting (multi unit location) ► ALTERNATE: Self-piercing valve (single unit locations only) Water tubing (water supply to water filter – water filter to brewing equipment): ► NSF CERTIFIED: 3/8” I.D. Reinforced PVC Beverage grade hose tubing 3. Water Filter - Material Requirements (Conforms to NSF-42 & NSF-53): Water filter & filter head: ► NSF CERTIFIED: EVERPURE 4H, or 4K-Plus, or 2K-Plus, or OCS ► An Everpure QL3 head with integrated shut-off valve must be installed NOTE: Accessibility to shut-off valve(s) must be provided and explained to customer in the event water supply to brewing or cooler equipment must be shut off. NOTE: For multi-unit locations whereby the main water conduit is supplying water to more than one unit (including water coolers), a separate in-line shut off valve must be installed onto each individual equipment unit. 10 Operation Manual Eccellenza Pod 4. Water Fittings & Valves - Material Requirements (Conforms to NSF-51 & NSF-61): Fittings & valves (water supply connection - water filter head - brewing equipment): ► NSF CONFORMING: BARB type fittings with OERTIKER clamps ► PREFERENCE: Custom nickel plated brass ► ALTERNATE: Stainless Steel (much more costly) NOTE: Water cooler equipment arriving pre-fitted with quick connect type fittings must have them replaced by approved fittings prior to being installed at customer location(s). Quick-connect type fittings are not approved for use with any VKI manufactured equipment. NOTE: The shut-off valve must be easily accessible by the customer, who must be informed of its location during the installation. MATERIAL REQUIREMENTS: EQUIPMENT FITTING: 1” GH Type Fitting TUBING (WATER SUPPLY TO FILTER): Reinforced PVC Beverage grade TUBING (WATER FILTER TO EQUIPMENT): Stainless steel braided hose 11 Eccellenza Pod Operation Manual Water Filter We recommend the use of a high quality water filter (such as Everpure™ Filters) which will eliminate most odors present in water, and reduce the amount of particles entering the water tank. The following are basic instructions for installing a cartridge type filter using a head bracket (Everpure™ type filter). 1. Assemble the retaining bracket to the filter head. 2. Insert the cartridge into the filter head and turn the cartridge clockwise. 3. Apply Teflon tape to the threaded portion of two 3/8" x 1/4" fittings and screw each into the filter head. 4. Mount the water filter at an easily accessible place for servicing, such as: (a) Under the sink against the back or side wall, (b) On the back of a utility cabinet, (c) Any location generally within 20 feet of the machine. NOTE: When the filter is installed or replaced, make sure to write the installation date in the provided area on the filter cartridge. Follow the manufacturer’s recommendations for filter replacement intervals. 12 Operation Manual Eccellenza Pod Emptying the Drip Tray The drip tray on the front of the coffee maker holds approximately 415 ml (14 oz) of liquid. When too much liquid has accumulated inside the tray, an overflow indicator (a small float) will rise and protrude through the drip tray grill. At this point, the drip tray must be emptied. To empty the drip tray: 1. Pull the tray assembly straight out towards you. 2. Remove the drip tray grill. 3. Empty the drip tray. 4. Rinse both the tray and the grill under running water, and then towel dry both. 5. Install the grill onto the drip tray. 6. Slide the drip tray and grill back into position on the machine. 13 Eccellenza Pod Operation Manual Emptying the Waste Bin The waste bin holds approximately 50 spent coffee pods and it should be emptied at least once a day. To empty the waste bin, 1. Remove the drip tray and grill assembly. 2. The waste bin assembly represents the lower third of the machine. Grasp the sides of the waste bin and pull the bin straight out towards you. 3. Discard the contents of the waste bin. 4. Rinse the waste bin under running water, and then towel dry. 5. Re-install the waste bin. 6. If the waste bin has been removed for more than 10 seconds (default setting), the machine will automatically reset the Waste Bin counter. The “Reset Time Out” setting can be changed from 10 seconds to another value in the Counters menu. 7. The machine will then show the Powder System Rinse menu on the LCD. This rinse is mandatory must be performed to reduce the possibility of the residual powder clogging whipper system. a. Place a large cup or leak-proof container under the dispensing spout. b. Press the Enter () button to begin the rinse cycle. 8. Once done, the machine automatically reverts to the Standby (ready) mode. 9. Re-install the drip tray. 14 Operation Manual Eccellenza Pod Filling the Powder Hoppers 1. Remove the drip tray. 2. Remove the waste bin. 3. Unlock and open the front door of the machine. 4. Rotate the spout caps to block each of the powder hopper spouts. 5. Remove the powder hoppers by sliding them out towards you. 15 Eccellenza Pod Operation Manual 6. Remove the hopper lids. 7. Refill the two hoppers with product – milk in the left hopper and chocolate in the right hopper. NOTE: Do not pack the powder inside the hoppers. 8. Re-install the powder hoppers, and rotate the spout caps to unblock each of the hopper spouts. NOTE: To reduce the risk of powder ‘bearding’ or clogging the dispenser spouts, make sure the spouts are pointing straight down (as illustrated above). A retainer on the upper vacuum duct plate will stop the spouts when they are in their proper position. 9. If the hoppers have been removed for more than 10 seconds, the machine will automatically reset the Powder (1 and/or 2) counter(s). 10. The machine will then show the Powder System Rinse menu on the LCD. This rinse is mandatory must be performed to reduce the possibility of the residual powder clogging whipper system. 11. Place a large cup under the dispensing spouts. 12. Press the Start button to begin the powder rinse cycle. 13. Once the cycle is finished, the machine automatically reverts to the Standby (ready) mode. 14. Re-install the waste bin. 15. If the waste bin has been removed for more than 10 seconds (default setting), the machine will automatically reset the Waste Bin counter. The “Reset Time Out” setting can be changed from 10 seconds to another value in the Counters menu. 16. The machine will then show the Powder System Rinse menu on the LCD. This rinse is mandatory must be performed to reduce the possibility of the residual powder clogging whipper system. 17. Once done, the machine automatically reverts to the Standby (ready) mode. 18. Re-install the drip tray. 16 Operation Manual Eccellenza Pod Programming Navigation Flowchart 17 Eccellenza Pod Operation Manual Accessing and Exiting the Set-Up Mode To gain access to the Set-Up mode of the machine, press the “Set-Up” button on the inside of the front door. The message on the LCD will read; To exit the Set-Up mode, press the “Set-Up” button once more. Navigating the Menus There are four buttons on the front selection panel that are used for navigating through the Set-Up mode of the equipment. The buttons and their functions are identified in the table below. Button 18 Function for Navigating Scroll UP through the menus in the Set-Up Increase values while in a specific selection in the Set-Up Scroll DOWN through the menus in the Set-Up Decrease values while in a specific selection in the Set-Up Enter Button o Enter a menu o Enter a specific selection in the Set-Up o Save a change o Clear a counter Large Cup Button (Back button while in Set-Up) o Move back to previous menu o Exit a specific setting without saving Operation Manual Eccellenza Pod Counters 1. Enter the Set-Up mode and scroll to the Counters menu. 2. The first three options in this menu are used for resetting the Powder 1, Powder 2 and Waste Bin counters. 3. Select the counter to be reset and press the Enter () button to reset it. 4. The “Reset Time Out” option allows you to change the amount of time the waste bin needs to be removed before the Waste Bin Counter gets reset automatically. The default setting is 10 seconds. 5. To view and/or to reset the product vend counters, scroll to the Vend Counters menu and press Enter (). 6. To view the number of vends, scroll to the counter required. The following counters are available, Total Absolute – this counter displays the number of beverages dispensed by the equipment since it was put into service. It cannot be reset to Zero. Total Public – this counter displays the number of beverages dispensed since this counter was reset last. Pod Only – this counter displays the number of straight coffee beverages dispensed (specialty beverages are not included). Pod + Powder – this counter displays the number of specialty coffee beverages dispensed. Powder Only – this counter displays the number of straight powder beverages dispensed (non-pod beverages). 7. To reset the counters, scroll to the Clear All option and press the Enter () button. NOTE: Selecting the Clear All option resets all of the resettable counters to zero simultaneously. The Total Absolute counter is not resettable and cannot be cleared. 8. The “P1 Counter” and “P2 Counter” options allow you to set the frequency at which the refill hopper messages appear. For example, if the setting is 425 grams, this means that after 425 grams of powder have been dispensed by the hopper, the refill hopper message will be displayed. To increase the frequency at which this message appears, this setting should be decreased. To decrease the frequency of the message, increase this setting. 9. With the “Waste Counter” option, you can set the number of coffee (pod) beverages the machine can dispense before the “Empty Waste Bin” message appears on the screen. The counter can be set to 50, 100, 200 or 600 cups. The default setting for the standard waste bin is 50 cups. 19 Eccellenza Pod Operation Manual Language This setting allows you to change the language of the messages that appear on the LCD display to either English or French. To change the language, 1. Enter the Set-Up mode and scroll to the Language menu.3 2. Press the Enter () button. 3. Scroll UP to the language required. 4. Press the Enter () button to save the change. NOTE: The menus while in the Set-Up mode are displayed in English. Powder Rinse Access this menu to periodically rinse the Powder System (the whipper motor, whipper components and hoses. To access the powder rinse cycle, 1. Enter the Set-Up mode and scroll to the Powder Rinse menu. 2. Place a large cup or leak-proof container under the dispensing spout. 3. Press the Enter () button to begin the rinse cycle. 4. Repeat step #3 if more rinsing is required. NOTE: The Powder System rinse menu automatically appears after the powder hoppers have been removed, refilled and replaced. Performing this cycle is mandatory and once it is completed, the machine will automatically revert to Standby (ready) mode. 20 Operation Manual Eccellenza Pod Recipes Any changes to the recipe settings are made in this menu. Settings can be modified for both coffee and powder water quantities, as well the quantity of powder to be dispensed. As this machine uses prepackaged coffee pods, it is not possible to adjust the coffee setting. To adjust the recipe settings, 1. Enter the Set-Up mode and scroll to the Recipes menu. 2. Press the Enter () button. 3. Select the cup size required and press the Enter () button. 4. Scroll to the beverage that needs to be adjusted. 5. Press the Enter () button to access the settings. 6. Select the setting to be adjusted and press the Enter () button. 7. Using the Strength buttons, increase or decrease the setting, as required. 8. Press the Enter () button to save the change. Water Tank The Set Point for the water tank temperature can adjusted in this menu (please note that if using powdered milk, the maximum temperature should never exceed 92° C or 197°F). The Vend Enable feature, which prevents the machine from being used until the pre-set minimum temperature is reached, is also set while in this menu. The Heating Boost option energizes the heating element during a coffee vend to maintain the ideal water temperature (set in this menu) for a coffee beverage. To adjust one of these settings, 1. Enter the Set-Up mode and scroll to the Water Tank menu. 2. Press the Enter () button. 3. Scroll to the setting that needs to be adjusted. 4. Press the Enter () button to access the setting. 5. Using the Strength buttons, increase or decrease the setting, as required. 6. Press the Enter () button to save the change. 21 Eccellenza Pod Operation Manual Options The Options section of the Set-Up allows you to change settings that impact the functionality of the machine. These options are described in greater detail in the next several pages of this manual. 22 Operation Manual Eccellenza Pod Press & Hold (Hot Water) Hot water can be programmed to be dispensed in one of two ways – by the cup, or on demand. With this feature set to OFF, when hot water is selected and the Start button is pressed, enough hot water will be dispensed to completely fill the user’s cup. However, if this feature is switched to ON, hot water will only be dispensed as long as the hot water button is kept pressed (to maximum of 10 seconds per press). Releasing the button stops the flow of hot water. To set the Press & hold hot water feature, 1. Enter the Set-Up mode and scroll to the Options menu. 2. Press the Enter () button. 3. Scroll to the Press & Hold menu. 4. Press the Enter () button. 5. Scroll UP to the setting required and then press the Enter () button to save the changes. Heating Message This option tells the machine to display the heating message if the water in the tank is not up to proper brewing temperature. This menu allows you to set the way this message is displayed, or to switch it off completely. To set the Reminder Messages, 1. Enter the Set-Up mode and scroll to the Options menu. 2. Press the Enter () button. 3. Scroll to the Heating Msg. menu. 4. Press the Enter () button. 5. Scroll to the required setting. Select one of the following options for the message: ON – The reminder message is displayed and the unit functions in a limited capacity (or not at all) until the message is cleared. OFF – No message will appear. Passive – The reminder message is displayed, but the machine continues to function normally. 6. Once selected, press the Enter () button to save the changes. 23 Eccellenza Pod Operation Manual Buzzer This machine is equipped with a buzzer (beeper) that activates each time a button is pressed on the selection panel. In cases where the customer does not want the machine to beep upon button activation, the buzzer can be switched off in this menu. To set the buzzer option, 1. Enter the Set-Up mode and scroll to the Options menu. 2. Press the Enter () button. 3. Scroll to the Buzzer menu and press the Enter () button to access this option. 4. Scroll to the setting required and press the Enter () button. Button Enable In this menu, you can set the beverage defaults and disable any button that is not going to be used on the selection panel. To set the defaults, 1. Enter the Set-Up mode and scroll to the Options menu. 2. Press the Enter button. 3. Scroll to the Button Enable menu and press the Enter () button to access this option. 4. Select the Defaults menu and press the Enter () button. 5. Set the default Beverage and press the Enter () button. 6. Set the default Cup Size and press the Enter () button. 7. Set the default Strength and press the Enter () button. 24 Operation Manual Eccellenza Pod To disable/enable a selection button, 1. Enter the Set-Up mode and scroll to the Options menu. 2. Press the Enter () button. 3. Scroll to the Button Enable menu and press the Enter () button to access this option. 4. Scroll to the button selection that needs to be disabled and press the Enter () button. 5. Using the Strength buttons, toggle the setting to ON or OFF. Time and Day The machine is equipped with an internal clock that is used exclusively for setting the Power Saving option. The time and day are not displayed on the LCD. To set the time and day, 1. Enter the Set-Up mode and scroll to the Options menu. 2. Press the Enter () button. 3. Scroll to the Time and Day menu and press the Enter () button to access this option. 4. To set the time, select the Time option and press the Enter () button. 5. Use the Regular or Bold Strength buttons to set the Hour. Once set, press the Enter () button to shift to the Minutes setting. Once again, use the Regular or Bold Strength buttons to set the Minutes. Once set, press the Enter () button to save the settings. 6. To set the day, select the Day option and press the Enter () button. 7. Use the Regular or Bold Strength buttons to set the Day, and press the Enter () button to save the setting. 25 Eccellenza Pod Operation Manual Power Saving This option allows you to set the machine to deactivate the heating element for a predetermined time every day to reduce energy consumption. To activate the Power Saving option, 1. Enter the Set-Up mode, scroll to the Options menu, and press the Enter () button. 2. Scroll to the Power Saving menu and press the Enter () button to access this option. 3. Select the setting required (in this case, ON) and press the Enter () button to save the settings. To set the Sleep Time (starting time) of the Power Saving option, 1. From the Power Saving menu, select the Sleep Time option and press Enter (). 2. Use the Regular or Bold Strength buttons to set the Hour. Once set, press the Enter () button to shift to the Minutes setting. Once again, use the Regular or Bold Strength buttons to set the Minutes. Once set, press the Enter () button to save the settings. To set the Wake Time (ending time) of the Power Saving option, 1. From the Power Saving menu, select the Wake Time option and press Enter. 2. Use the Regular or Bold Strength buttons to set the Hour. Once set, press the Enter () button to shift to the Minutes setting. Once again, use the Regular or Bold Strength buttons to set the Minutes. Once set, press the Enter () button to save the settings. Auto Sleep Mode – with this feature activated (ON), the machine automatically goes into power saving mode after a preset time of inactivity (1 Hour, 2 Hours or 3 Hours). 26 Operation Manual Eccellenza Pod Vending This option allows you to set type of vending device(s) to be used on the machine. The Force Vending feature can also be set in this menu. To configure a vending device, 1. Enter the Set-Up mode and scroll to the Options menu. 2. Press the Enter () button. 3. Scroll to the Vending menu and press the Enter () button to access this option. 4. The following options are available. Changer – enable or disable the coin changer unit. Force Vending – when enabled, the user is forced to purchase a beverage and cannot cancel the transaction. The user’s funds remain as a credit until a beverage is dispensed. If set to Smart, the coin return feature is disabled when a $1 or $2 coin is inserted. 5. Using the Strength buttons, toggle the setting for a device to ON or OFF. 6. Press the Enter () button to save the changes. NOTE: If any of the vending devices are set to ON, the machine will automatically switch from Free to Vending mode. To revert back to Free mode, all vending devices must be set to OFF. 27 Eccellenza Pod Operation Manual Presets This option allows you to select one of the preset configurations to be used on the machine. You can also reset the machine to the original factory default settings from this menu (all settings), or just reset the water pump calibration to the original factory setting. To select one of the presets, 1. Enter the Set-Up mode and scroll to the Options menu and press the Enter () button. 2. Select the ‘Presets’ option and press the Enter () button. 3. Select the desired preset (1-3) and press the Enter () button. a. Preset 1 = 6-oz, 8-oz, 10-oz b. Preset 2 = 7-oz, 8-oz, 9-oz (this is the default Factory Preset) c. Preset 3 = 8-oz, 10-oz, 12-oz 4. Using the main power switch at the rear of the machine, switch the power OFF for ten seconds, and then switch it back ON again. The selected ‘preset’ settings are now loaded. To reset the machine settings to the factory default settings, 1. Enter the Set-Up mode and scroll to the Options menu and press the Enter () button. 2. Select the ‘Reset to Default’ option. 3. To reset, press the Enter () button. 4. The lower line of the LCD will now display “Reset to Default OK” acknowledging that this option has been initialized. 5. Press the “Set-Up” button to exit the set-up mode. After approximately five seconds, the machine will reboot automatically with the factory default settings loaded. NOTE: This same procedure also applies when selecting the "Restore Pump Calib." menu to restore the water pump to its original factory setting. 28 Operation Manual Eccellenza Pod Quantity This setting allows you to set the quantities for the coffee water, powder product and powder water. To set the quantities, 1. Enter the Set-Up mode and scroll to the Quantity menu. 2. Press the Enter () button. 3. Scroll UP to the set the setting required. In this case, the Coffee Pump quantity will be calibrated (the same procedure applies for adjusting the quantity of powders and powder water). 4. Place a measuring cup in the dispensing area. 5. Press the Enter () button to begin calibration. The screen will display; 6. The machine will now dispense a preset amount of water for several seconds. Measure the quantity of water that is dispensed. In this case, we’ll use 68ml as an example. 7. Once done dispensing, the screen will show the following; 8. Press the Enter () button to set the quantity measured. 9. Use the Regular or Bold Strength buttons to increase or decrease the setting. In this case, use the Regular button to increase the setting to 68. 10. Once set, press the Enter () button to save the changes. NOTE: You can also measure the quantity of water by weighing it on a scale. For example, if you measure 68 grams of water on the scale, that equates to approximately 68 ml (1ml=1gr). 29 Eccellenza Pod Operation Manual Maintenance To keep the equipment running efficiently and at peak performance, the following maintenance procedures must be performed at their specified intervals. It is recommended that equipment maintenance be scheduled at a time that would be the least disruptive to your customers. Whenever possible, replace the components requiring maintenance with new or refurbished ones, and then refurbish the older components at your shop. WARNING: Never use ammonia based cleaners on any machine surface as the surface will become discolored and/or damaged permanently. Use only mild cleaning products, such as dish soap. Daily Empty the Drip Tray – empty the contents of the drip tray and rinse the tray and grill under clean running water. Empty the Waste Bin – empty the contents of the waste bin. Refill the Powder Hoppers – top off the powder hoppers. Perform a Whipper Rinse Cycle – this should be done immediately after refilling the powder hoppers to flush any product that may have fallen into the whipper. Wipe Exterior and Countertop – using the clean towel, wipe any coffee grounds and spills from the exterior of the machine and the countertop. Weekly Wipe Interior Walls and Door - using the clean towel, wipe any spills from the interior of the machine and the front door. Perform a Whipper Rinse Cycle – this should be done immediately after refilling the powder hoppers to flush any product that may have fallen into the whipper. Wipe Exterior and Countertop – using the clean towel, wipe any coffee grounds and spills from the exterior of the machine and the countertop. 30 Operation Manual Eccellenza Pod Monthly Clean the Whipper System – disassemble the whipper system and clean the components with hot water. • NOTE: When re-assembling the whipper components, always add some Lubrifilm lubricant to the base of the shaft in the area where the whipper base gasket is located. Clean the Brewer – to clean the brewer, make a vend as you normally would, however, instead of inserting a coffee pod into the brewer, you need to insert a special cleaning tab. The hot water dissolves the cleaning tab, which in turn cleans all of the areas in which it comes into contact. Make several vends afterwards (without inserting anything into the brewer) to rinse out the cleaning solution. Make one final vend using a coffee pod to test the brewer. Clean Hoses and Spouts – clean the exterior of all the product hoses and spouts with a wet towel. Thoroughly Clean the Interior – clean the interior walls, base and components with a clean wet towel. Every 6-12 Months Clean the Powder Hoppers – the hoppers should be emptied of product and given a thorough cleaning to remove stains and deposits that may have accumulated inside them. Clean the Brewer – to clean the brewer, make a vend as you normally would, however, instead of inserting a coffee pod into the brewer, you need to insert a special cleaning tab. The hot water dissolves the cleaning tab, which in turn cleans all of the areas in which it comes into contact. Make several vends afterwards (without inserting anything into the brewer) to rinse out the cleaning solution. Make one final vend using a coffee pod to test the brewer. Delime the Water Tank - to minimize servicing time, replace the water tank with a tank that has already been delimed, then clean the removed tank at the shop and use it the next time a tank replacement is required. Clean the Outlet Valves - to minimize servicing time, replace the outlet valves with valves that have already been cleaned, then clean the removed valves at the shop and use them the next time a valve replacement is required. Replace the Water Filter – the water filter should be replaced at least once a year, or when the water flow rate through the filter has decreased. This is an indication that the filter is starting to clog. Every 18 Months Replace the hose and grommet in the water tank – the 4" hose and the grommet that connect to the heat exchange tube inside the water tank, and the water pump tube elbow on the tank lid, will get harden and brittle over time and must be replaced. 31 Eccellenza Pod Operation Manual Error Messages MESSAGE DISPLAYED CAUSE Beverage Unavailable A beverage cannot be dispensed. Brewer Error An error has been detected with the brewer. POSSIBLE REMEDIES • Make sure the waste bin is installed. • Make sure both of the powder hoppers are installed. • Verify the brewer motor wiring. • The brewer may be jammed. Repair or replace the brewer. • Press "START" () to cycle the brewer. • Reboot the machine (power off and on). Brewer Home Error. The brewer is not in the home or starting position. • The brewer may be jammed. Repair or replace the brewer. • An electrical connection to the brewer home switch is faulty. Button(s) Error An error has been detected with one of the selection buttons. • The front selection panel may need to be replaced. Call Key Operator The cashbox may be full. • Empty the cashbox and reset the Cashbox Total Counter Empty Waste Bin Waste bin may be full. Fill Powder 1 Powder 1 dispenser is low and requires refilling. Fill Powder 2 Powder 2 dispenser is low and requires refilling. Heating Water Water inside the hot water tank is heating. • Normal operating message and does not indicate an error. Insert Waste Bin The waste bin is missing. • Install the waste bin. Insert Powder 1 Powder 1 hopper is missing. • Install the powder 1 hopper. Insert Powder 2 Powder 2 hopper is missing. • Install the powder 2 hopper. Keypad Not Connected The keypad is not being detected. • Check the wiring to the keypad. • Empty the contents of the waste bin. • Reset the “Waste Bin” counter. • Refill the dispenser for powder 1. • Reset the “Refill” message for the Powder 1 dispenser. • Refill the dispenser for powder 2. • Reset the “Refill” message for the Powder 2 dispenser. • Empty and dry the overflow/cup tray. • Verify the water level probe adjustment. They may be set too high allowing too much water into the tank. Overflow Error A water overflow has been detected. • Water level probes may need to be cleaned. • Inlet valve may be leaking, constantly allowing water to enter the tank. Replace the inlet valve. • Water in the tank may be boiling. Lower the water temperature setting. 32 Operation Manual MESSAGE DISPLAYED Eccellenza Pod CAUSE Overheat Error The water tank is overheating. Power Saving Mode – Press Start to Exit The machine is in Power Saving Mode. POSSIBLE REMEDIES • Check the temperature settings in the set-up. • The temperature probe may need to be replaced. • Press "START" () to exit Power Saving Mode. • Check the 15 amp fuse. Tank Not Heating Error The hot water tank is not heating. • Reset the thermal cut-off switch. • Verify wiring to heater element. • Check heater element. Temperature Probe Error The temperature probe is not functioning correctly. • Replace the temperature probe. Thermister Shorted Error The thermister is not functioning correctly. • Replace the thermister. Thermister Open Error The thermister is not functioning correctly. • Replace the thermister. • Clean the water level probes. Water Level Error The water tank is overfilling. • The water temperature may be too high – lower the temperature. • Inlet valve may be leaking – replace inlet valve. • At this point, the water tank is not full and this message has to be reset. To reset it, switch the power off and on. Water Source Error The water tank is not filling with water. • If the problem persists, check all components on the water line (water filter, tubing, fittings, etc.). • Check inlet valve to make certain it is functioning properly. • In the case of a temporary disruption with the water supply, the coffee maker will reset itself after every hour. • The whipper motor may be jammed. Clean the whipper assembly. Whipper Error An error has been detected with the whipper. • Verify wiring to the whipper assembly. • The whipper motor assembly may need to be replaced. 33 Eccellenza Pod 34 Operation Manual Operation Manual Eccellenza Pod 35 Eccellenza Pod 36 Operation Manual