1
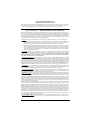
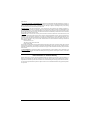
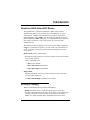
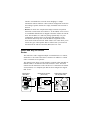
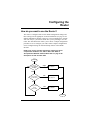
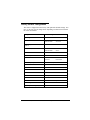
6SHHG6WUHDP 6HULHV $'6/5RXWHU ,QVWDOODWLRQ*XLGH Part No. 007-5600-002, Rev B Copyright 1999, Efficient Networks, Inc. All rights reserved. Printed in the U.S.A. Product names mentioned herein may be trademarks and/or registered trademarks of their respective companies. Efficient Networks, Inc. shall not be liable for technical or editorial errors or omissions in this document; nor for incidental or consequential damages resulting from the furnishing, performance, or use of this material. Efficient Networks, Inc. – Single-use Software License and Warranty This documentation and the accompanying computer programs (collectively, the Software) are licensed, not sold, to the End User by EFFICIENT NETWORKS, INC. (“ENI”) for use only under the following terms. ENI reserves any right not expressly granted to the End User. The End User owns the media on which the Software is recorded but ENI retains ownership of all copies of the Software itself. The End User assumes sole responsibility for the installation, use, and results obtained from use of the Software. If the product that you acquired is an upgrade, then the terms and conditions of this agreement apply equally to the upgraded product. 1. License. This License allows the End User, together with its authorized employees, to do only the following: (a) Install and archive the Software on one (and only one) Remote Access Unit, IBM PC, Sun Workstation, or compatible equivalent personal computer or workstation for electronic transfer to, and use and execution on and with one (and only one) module or product of ENI equipment for use only by the End User. (b) Make one (and only one) copy in machine-readable form solely for backup or archival purposes for the computer on which the Software is installed. The Software is protected by copyright law. As an express condition of this license, the End User must reproduce on the copy the ENI copyright notice and any other proprietary legends on the original copy supplied by ENI. This restriction on copying the Software expires upon the expiration of all underlying copyrights. 2. Restrictions. The End User may NOT sublicense, assign, or distribute copies of the Software to others. The Software contains trade secrets and to protect them, the End User may NOT decompile, reverse engineer, disassemble, or otherwise reduce the Software to a human perceivable form. The End User may not modify, adapt, translate, rent, lease, loan, resell for profit, distribute, or otherwise assign or transfer the software, or create derivative works based upon the software or any part thereof. 3. Protection and Security. The End User agrees not to deliver or otherwise make available the Software, including without limitation the object code of the Software, to any party other than its authorized employees, except for purposes specifically related to the End User’s authorized use of the Software on ENI Products, without the prior written consent of ENI. The End User agrees to use its best efforts and to take all reasonable steps to safeguard the Software to ensure that no unauthorized person shall have access thereto and that no unauthorized copy, publication, disclosure or distribution in whole or in part, in any form, shall be made. The End User acknowledges that the Software contains valuable confidential information and trade secrets and that unauthorized use and/or copying are harmful to ENI. 4. Termination. This License is effective until terminated. This License will terminate immediately without notice from ENI if the End User fails to comply with any of its provisions. Upon termination, the End User must destroy the Software and all copies thereof, and the End User may terminate this License at any time by doing so. 5. Export Law Assurances. The End User agrees that neither the Software nor any direct product thereof will be transferred or exported, directly or indirectly, into any country prohibited by the U.S. Export Administration Act and the regulations thereunder or will be used for any purpose prohibited by that Act. 6. Limited Warranty. ENI warrants that, for ninety (90) days from the date of shipment, the Software shall operate substantially in accordance with the published functional specifications current at the time of shipment. If a defect appears, during the warranty period, ENI will use its best efforts to correct the defect within a reasonable time after notification. The End User agrees that the foregoing constitutes the End User’s sole and exclusive remedy for breach by ENI under any warranties made under this Agreement. This warranty does not cover any Software that has been altered or changed in any way by anyone other than ENI. ENI is not responsible for changes made after ordering the Software to computer hardware, operating systems or test equipment, or for problems in the interaction of the Software with software not furnished by ENI. The Warranty and remedy provided above are exclusive and in lieu of all other warranties, express or implied, including but not limited to the implied warranties of merchantability and fitness for a particular purpose. The End User assumes all risk as to the suitability, quality, and performance of the software. In no event will ENI, or its directors, officers, employees or affiliates, be liable to the End User for any consequential, incidental, indirect, special or exemplary damages (including damages for loss of business profits, business interruption, loss of data or business information, and the like) arising out of the use of or inability to use the software or accompanying written materials, even if ENI or an authorized ENI representative has been advised of the possibility of such damages. ENI’s liability to the End User (if any) for actual direct damages for any cause whatsoever, and regardless of the form of the action, will be limited to, and shall not exceed, the amount paid for the License of the Software that caused the damages. No oral or written information or advice given by ENI or its dealers, distributors, employees or agents shall in any way extend, modify or add to the foregoing warranty. 7. No Other Rights Granted. Other than the limited license expressly granted herein, no license, whether express or implied, by estoppel or otherwise, is granted to any copyright, patent, trademark, trade secret, or other proprietary Efficient Networks, Inc. 1 rights of ENI. 8. Licensee Responsibility And Indemnification. The End User understands and acknowledges that it is solely responsible for the use it makes of the Software. Accordingly, the End User agrees to indemnify and hold ENI harmless from any demands, claims or suits by a third party for loss, damages or expenses (including attorney’s fees) arising out of or related to use of the Software by the End User. 9.Enhancements. From time to time ENI may, in its sole discretion, advise the End User of updates, upgrades, enhancements or improvements to the Software and/or new releases of the Software (collectively, Enhancements), and may license the End User to use such Enhancements to the Software upon payment of such prices therefore as may then be established by ENI and in effect. All such Enhancements to the Software provided to the End User shall also be governed by the terms of this License. 10.General. This License will be covered by and construed in accordance with the laws of the State of Texas, and shall inure to the benefit of ENI and its successor, assignees and legal representatives. If any provision of this license is held by a court of competent jurisdiction to be invalid or unenforceable to any extent under applicable law, that provision will be enforced to the maximum extent permissible, and the remaining provisions of this License will remain in full force and effect. Any notices or other communications to be sent to ENI must be mailed by certified mail to the following address: Efficient Networks, Inc. 4201 Spring Valley Road, Suite 1200 Dallas, Texas 75244 This Agreement constitutes the entire agreement between the parties with respect to the subject matter hereof, and all prior proposals, agreements, representations, statements and undertakings are hereby expressly canceled and superseded. This Agreement may not be changed or amended except by a written instrument executed by a duly authorized officer of ENI. 11.Acknowledgment. By opening this package, you acknowledge that you have read this License, understand it, and agree to be bound by its terms and conditions. Should you have any questions concerning this License, contact ENI at the address shown above. Efficient Networks, Inc. Hardware Warranty Efficient Networks, Inc. (EFNT) warrants SpeedStream 5600 series products for a period of 1 year against defects in material or workmanship from the date of purchase. This warranty extends to the original consumer of this product. If SpeedStream 5600 series product does not function as warranted during the warranty period, Efficient Networks, Inc. will either repair the defective product or replace it with a new or remanufactured functionally equivalent product of equal value. 2 Efficient Networks, Inc. Efficient Networks, Inc. 3 Contents About the 5600 Series DSL Router. . . . . . . . . . . . . . . . . . . . 7 Routing vs. Bridging . . . . . . . . . . . . . . . . . . . . . . . . . . . . 7 Where and Why to Use the Router. . . . . . . . . . . . . . . . . 8 How to Use this Guide . . . . . . . . . . . . . . . . . . . . . . . . . . 9 Installation Requirements . . . . . . . . . . . . . . . . . . . . . . . . . . 11 Package Contents . . . . . . . . . . . . . . . . . . . . . . . . . . . . 11 Installation Instructions . . . . . . . . . . . . . . . . . . . . . . . . . . . . 12 Router LEDs on Startup . . . . . . . . . . . . . . . . . . . . . . . . 13 Accessing the Router . . . . . . . . . . . . . . . . . . . . . . . . . . . . . 15 Network Access . . . . . . . . . . . . . . . . . . . . . . . . . . . . . . 15 Connecting to the router via Ethernet . . . . . . . . . . 15 HTTP Web-browser Access. . . . . . . . . . . . . . . . . . 16 TELNET Access. . . . . . . . . . . . . . . . . . . . . . . . . . . 16 FTP Access for Firmware/Configuration Uploads . 17 Local Terminal using Serial Connection . . . . . . . . . . . . 18 Logging on via the Serial Port . . . . . . . . . . . . . . . . 19 Types of User Interfaces . . . . . . . . . . . . . . . . . . . . . . . . . . . 19 HTML Web Interface . . . . . . . . . . . . . . . . . . . . . . . . . . 20 Command Line Interface . . . . . . . . . . . . . . . . . . . . . . . 20 Command Prompt/Error Prompt . . . . . . . . . . . . . . 21 Command Line Interface Conventions. . . . . . . . . . 21 How do you want to use the Router? . . . . . . . . . . . . . . . . . 23 Setting the Password . . . . . . . . . . . . . . . . . . . . . . . . . . 24 Factory Default Configuration. . . . . . . . . . . . . . . . . . . . 25 Router PPP Configuration . . . . . . . . . . . . . . . . . . . . . . 26 RFC 1483 Configuration. . . . . . . . . . . . . . . . . . . . . . . . 26 Bridge Configuration. . . . . . . . . . . . . . . . . . . . . . . . . . . 27 Testing the Configuration . . . . . . . . . . . . . . . . . . . . . . . 28 Acronyms . . . . . . . . . . . . . . . . . . . . . . . . . . . . . . . . . . . . . . 29 Technical Concepts. . . . . . . . . . . . . . . . . . . . . . . . . . . . . . . 30 Digital Subscriber Line (DSL) . . . . . . . . . . . . . . . . . . . . 30 Efficient Networks, Inc. 4 Asynchronous Transfer Mode . . . . . . . . . . . . . . . . . . . 30 Encapsulation Methods: PPP and RFC 1483. . . . . . . . 30 Point-to-Point Protocol (PPP). . . . . . . . . . . . . . . . . 31 RFC 1483. . . . . . . . . . . . . . . . . . . . . . . . . . . . . . . . 31 Dynamic Host Configuration Protocol (DHCP) . . . . . . . 31 DHCP Relay. . . . . . . . . . . . . . . . . . . . . . . . . . . . . . 32 DHCP Server . . . . . . . . . . . . . . . . . . . . . . . . . . . . . 32 Domain Name Service (DNS). . . . . . . . . . . . . . . . . . . . 32 DNS Resolver . . . . . . . . . . . . . . . . . . . . . . . . . . . . 33 DNS Server . . . . . . . . . . . . . . . . . . . . . . . . . . . . . . 33 Public and Private Networks and the use of NAPT . . . 33 5660 DSL Router/Bridge Specifications . . . . . . . . . . . . . . . 35 5621 DSL Router/Bridge Specifications . . . . . . . . . . . . . . . 36 Efficient Networks, Inc. 5 6 Efficient Networks, Inc. Introduction About the 5600 Series DSL Router The SpeedStreamTM 5600 Series Ethernet to ADSL router provides ATM-based network access for home users, telecommuters, or remote offices and are equipped with one Ethernet port and one Asymmetric Digital Subscriber Line (ADSL) port. These internet sharing devices use Discrete Multitone (DMT) technology to set data transmit rates. When the unit is first powered on, it will “train” the line to get the best data transmission rate. The 5600 Series internet sharing device can be used as either a router or a bridge. It is configured to operate as a router when it is first installed. To use it as a bridge, you must log into the router and change the mode to bridge mode. Router Mode (factory default mode): • Provides IP routing between a Local Area Network (LAN) and the Wide Area Network (WAN). • Can be configured to use • PPP (factory default) • RFC 1483 routed encapsulation • RFC 1483 bridged encapsulation Bridge Mode: • Provides high-speed connectivity from an Ethernet LAN to the WAN over the ADSL connection • Uses RFC 1483 bridged encapsulation over ATM Routing vs. Bridging What is the difference between routing and bridging? • Bridges determine where to send data packets between local area network (LAN) segments based on the MAC address of the sending and receiving computers or devices (nodes) on the network. The MAC address is a unique identifier that is programmed into the network Efficient Networks, Inc. About the 5600 Series DSL Router 7 interface card installed in a network node. Bridging is a simple transmission scheme and there is little software management involved in the sending of packets. Packets are simply forwarded from one node to the next. • Routers are much more complex than bridges. Routers send packets from node to node based on IP addresses. An IP address can be viewed as a modifiable identifier that is mapped to the MAC address of network node. The IP address of a node may change dynamically or by user configuration. Therefore, there are protocols and databases on the network that must keep track of the IP address assignments for the nodes on the local area network. Other features of a router allow you to restrict the types of data packets that are allowed onto your local area network from the wide area network (WAN) and vice versa. Where and Why to Use the Router The 5600 Series router supports multiple or individual users at a remote, small office or in a home office that is connected via ADSL to a central office or network service provider. The drawing below shows several computers (network nodes) attached via Ethernet cables to an Ethernet hub at the end-user’s office. The hub is connected to the 5600 Series router. The device is connected to the outside world (internet) via a telephone jack that has been configured to support DSL service. Remote Office, Home Office Network Access Provider (Telco or PTT) Network Service Provider (ISP, Corporate LAN) DSL Local Loop Hub Backbone: ATM/SONET 5600 ADSL Router 8 DSLAM: DSL termination About the 5600 Series DSL Router Remote Access Server: routing, security Internet or Corporate Network Efficient Networks, Inc. The router can also be connected to a single PC equipped with an Ethernet card and connected to a DSL phone jack to provide access to the wide area network (internet). How to Use this Guide Refer to the following sections for information on specific topics: For Information On: See page: Hardware installation requirements and procedure 12 Accessing the router’s user interfaces 15 Configuring the router/bridge 23 Networking terminology and concepts 29 Technical specifications 35 Efficient Networks, Inc. About the 5600 Series DSL Router 9 10 About the 5600 Series DSL Router Efficient Networks, Inc. Hardware Installation Installation Requirements To successfully install the 5600 series router, you will need the following: • A computer equipped with an Ethernet network interface card OR an Ethernet hub • A DSL-ready telephone line installed at the installation site • If you want to configure the router via the serial port before placing it into service on a network, you will need a computer that has terminal emulation software such as Microsoft HyperTerminal or ProComm. Package Contents Your package should contain the items listed below. If anything is missing or damaged, please contact the dealer from whom the equipment was purchased. • 5600 series router • Power supply for either a 220v or a 110v electrical outlet. • One RJ11 unshielded twisted pair cable (for the DSL connection) • One RJ45 UTP crossover cable (for connecting to an Ethernet hub) • One RJ45 UTP cable (for direct Ethernet connection to a PC) • One serial cable with an RS232 DIN converter (connects to serial port) • Installation Guide, release notes, and Safety and Certification booklet RJ45 Ethernet Connector RJ11 DSL Connector The RJ45 connector is wider than the RJ11 Efficient Networks, Inc. Installation Requirements 11 Installation Instructions NOTE: The labels for the back panel of the router are located on the underside of the unit. 1 Be sure the Power switch is in the OFF position. 2 Connect the power cable to the power connector on the back of the router; then connect it to a power outlet. DSL Connection to phone line Power (Out=OFF, In=ON) Ethernet Connection to computer Power Connection Serial Port (optional) 3 To connect the router directly to the Ethernet port on a PC, workstation or laptop, use the gray RJ45 cable, which is a straight-through UTP copper wire cable. The cable labeled “XOVER” on one end is a crossover UTP copper-wire cable that must be used only when connecting the router to an Ethernet hub. 4 Connect one end of an RJ11 telephone cable to the router’s DSL port and the other end to the DSL service port (wall jack). Power Plug cable into DSL wall jack RJ11(phone) Cable GRAY RJ45 Ethernet Cable Computer Router 5 12 Depress the router’s power button to turn on the unit. Installation Instructions Efficient Networks, Inc. RJ45 Connector Information The pinout of the router’s Category 3 and 5 UTP jack is different than a standard Ethernet UTP jack. Transmit + Transmit – Receive + Receive – Ethernet loopback connectors will not work on the port and vice versa. RJ45 Connector 12 345 67 8 Once the connector is plugged into a board that is installed in a chassis, the removal lever on the connector may be hard to reach. Do not try to pull the connector out of the port without pushing up on the removal lever. removal lever RJ11 Connector Information The router comes with an RJ11 jack that uses pins 3 and 4. Optionally, the router may be configured to use pins 2 and 5. If so, the markings on the outer casing of the unit will indicate this. RJ11 Jack Pinout 1234 56 Router LEDs on Startup The router is equipped with four LEDs on the front panel: the System LED (sys), Ethernet LED (enet), ATM LED (atm) and DSL LED (dsl). 1 First, all four LEDs light up red for a moment as the hardware initializes. Then, the sys LED turns solid yellow and then solid green when the unit has finished passing diagnostic tests. 2 The dsl LED will flash green while the DSL line is training to obatin the optimum transmission rate. If a DSL link cannot be established, the LED will flash green and yellow. When the line is trained, the LED turns solid green. Efficient Networks, Inc. Installation Instructions 13 3 The enet LED will turn solid green when there is a link detected, then begin to flash green when Ethernet traffic is flowing. 4 The atm LED will flash green indicating traffic flow. Table 1 sys Modem LED Indicator Descriptions enet dsl atm Unlit Power not applied No link detected NA DSL line is not trained Red NA NA DSL Error NA Yellow POST Phase Carrier not detected NA NA Flashing Yellow POST Failure Flashes on collisions NA NA Flashing Green NA Carrier detected and traffic is flowing The DSL line is being trained ATM cell delineation and traffic flow Green/ Yellow NA NA DSL is not connected NA Green Operational Ethernet carrier detected 14 Installation Instructions DSL line is ATM cell delineation trained and ready Efficient Networks, Inc. Getting Started Accessing the Router There is very little setup required to get your 5600 series router up and running. The 5600 Series router can be accessed and configured in two ways: • Network access via TELNET, HTTP, or FTP • Local terminal using a serial connection The router has no password initially right out of the box. However, be sure to set the password to protect it from being modified by users on the network. Refer to “Setting the Password” on page 24 for details. Network Access The easiest way to access the router is through an Ethernet connection between the host computer and the router. This connection can be directly between the two devices or over a local area network (LAN) segment. To access the router via Ethernet, the host computer must be on the same subnetwork with the router. When you directly connect the router to the host computer through the Ethernet port, the router’s DHCP server will automatically assign a 10.0.0.2 IP address to your computer, if the computer is a DHCP client. Connecting to the router via Ethernet 1 Connect the host to the router’s Ethernet port. Make sure that the enet LED on the front of the router is green. 2 Make sure that the host computer is configured so that it can be accessed via Ethernet. 2-a If you are using a PC running Windows 95/98, select Start > Settings > Control Panel > and click on Network. 2-b Select TCP/IP from the list of installed network components and select Properties. Efficient Networks, Inc. Accessing the Router 15 2-c Select the IP Address tab and verify that Obtain an IP address automatically is selected. If not, then select this button. Click OK twice. Once you have established an Ethernet link to the router, there are three methods you can use to access the router. HTTP Web-browser Access Most HTML browsers can be used, though Internet Explorer 4.0 or Netscape 4.0 are recommended. IE 2.0 and Netscape 2.0 and their predecessors are not supported. The HTML interface can be used to access the LAN (or WAN) IP address or it can be used with FTP to upload and download files to and from the router. To log on to the modem via HTML: 1 Bring up your favorite web browser. 2 Enter the Ethernet IP address of the router (10.0.0.1 or Speedstream) in the “Location” or “Address” area where you enter web page addresses. 3 Refer to “HTML Web Interface” on page 20. TELNET Access From the local area network you can use TELNET to log in using the Ethernet IP address. Or, if the unit is configured as a router, it can be accessed from the WAN using the DSL/WAN IP address. Initially out of the box, the router has no WAN IP address so only the Ethernet address can be used for remote access on initial startup. To log on to the modem via TELNET: 1 16 If using Windows on a PC, select Start > Programs > Command Prompt. If on a UNIX system, bring up a shell window. Accessing the Router Efficient Networks, Inc. 2 When the MSDOS window appears, enter telnet 10.0.0.1 or telnet speedstream. 3 This will bring up a Telnet window which will display the command prompt for the router’s command line interface. 4 Refer to “Command Line Interface” on page 20 for details on the user interface. FTP Access for Firmware/Configuration Uploads The router provides an FTP server and can accept FTP client commands from an external host. Using FTP, you can • Upload a new revision of the router firmware • Save the router’s current configuration to a file on the host computer and then upload the configuration to another 5600 series router. NOTE: A configuration file saved from a Bridge 1.1.x router can not be loaded on a router running the Router/Bridge 2.0 firmware. However, a configuration file saved from a router running Router/Bridge 1.0 can be uploaded to a router running version 2.0 firmware. To log into the router via FTP: 1 If using Windows on a PC, select Start > Programs > Command Prompt. If on a UNIX system, bring up a shell window. 2 When the MSDOS window appears, enter: ftp 10.0.0.1 3 At the User prompt, enter the username “Anonymous” 4 At the FTP command prompt, type in: binary 5 Refer to “Command Line Interface” on page 20 for details on the user interface. Efficient Networks, Inc. Accessing the Router 17 To save the current configuration from the router: 1 After logging in to the FTP prompt and switching to binary mode, change to the directory on your computer where the you wish to store the configuration file. For example, if it is to be stored on a floppy disk, insert the diskette in the drive and type: lcd a:\ 2 Type: get system.cfg To upload a saved configuration file to the router: 1 After logging in to the FTP prompt and switching to binary mode, change to the directory on your computer where the configuration file is stored. For example, if it is stored on a floppy disk, insert the diskette in the drive and type: lcd a:\ To back up your current firmware revision: 1 After logging in to the FTP prompt and switching to binary mode, change to the location where the firmware file is to be stored. For example, if it is to be stored on a floppy disk, type: lcd a:\ 2 Type: get exec.img To download a new revision of firmware: 1 After logging in to the FTP prompt and switching to binary mode, change to the directory where the firmware file is stored. For example, if it is stored on a floppy disk, type: lcd a:\ 2 Type: put 5660.img 3 The router will reboot when download is complete. Local Terminal using Serial Connection A terminal can be connected directly to the RS232 serial port. This requires the use of a terminal emulation software package such as Procomm or Microsoft HyperTerminal. Any standard terminal that supports baud rates of 9600 or greater can be connected to the modem’s serial port. By default, the router is configured to communicate at a baud rate of 38400. 18 Accessing the Router Efficient Networks, Inc. Logging on via the Serial Port When you first connect to the router through the serial port, the router will be in “auto-baud” mode where it is waiting for keyboard input to set the baud rate. In the auto-baud mode, the router starts at 9600 baud and looks for the [Enter] key being pressed. If the data received is not an [Enter], the baud rate increases up to the default rate of 38400. To log on to the modem via HyperTerminal: 1 If using Windows on a PC, select Start > Programs > Accessories > HyperTerminal. 2 Enter a Connection name and click OK. 3 Select COM1 and click OK. 4 Enter the following parameters: Bits per second 38400 Data bits 8 Parity None Stop bits 1 Flow Control None 5 Click OK. 6 When the HyperTerminal window appears, you must press the [Enter] key several times to get the “Command->” prompt. The [Enter] key may have to be pressed up to 5 times to get the prompt. Types of User Interfaces The modem provides two user interfaces: • HTML interface – provides simple setup screens for quick configuration and an advanced configuration interface. • Command-line user interface – allows quick configuration and provides status and configuration information. Only the command-line interface is available over the serial port connection. Efficient Networks, Inc. Types of User Interfaces 19 HTML Web Interface The HTML interface for the router first displays a page showing the current configuration of the router. The first page also provides links to the following functions: Simple Setup Presents configuration forms where you can enter the minimum configuration parameters needed to configure the router for use on the network. Advanced Setup Leads to a more detailed interface with several links that allow more in-depth configuration of functions available on the router. This interface provides the following links: • Configuration Procedures • Status and Statistics • Command List Configuration Summary Redisplays the tables showing the current router configuration. Change Mode Switches from router to bridge or from bridge to router mode. Set Password Sets the login password on the modem. To reset the router to not require a password, do not enter any text in the new password fields and click on Set. Command Line Interface The command-line interface is a convenient way to quickly access the router and perform simple configuration procedures. The command-line interface is accessible via the serial port using a terminal emulation package. The command-line is also accessible remotely if you have a computer that can reach the router using the LAN IP address (Ethernet IP address) or the WAN IP address. 20 Types of User Interfaces Efficient Networks, Inc. Command Prompt/Error Prompt The following are the keyboard conventions used during a command session. Normally, the command line prompt is: Command-> However, if there has been a “soft” error during power-on self test (POST), the prompt will display as: post_error-> If you see this prompt, you can connect to the router via serial port and reboot the router. When the router reboots, the POST error messages will be displayed to the serial console. Contact Efficient Networks Customer Support to report the problem. Command Line Interface Conventions The following are the keyboard conventions used during a command session. At the Command-> prompt: help Displays the conventions described below. ? Displays the top-level command set. <cmd> ? Displays help for the command <cmd>. For example, to see all “set” commands, type set ?. ESC– or ESC+ Scrolls through the last commands executed. Type ENTER to execute the command displayed. CTRL-U Erases the entire line. [Backspace] Backs up one character [Control-C] Aborts the current command-line entry. [ESC] Can be used to put the command line into the vi-style line editing mode. Some commands have required and optional parameters. If you type the command name and press [Enter], you will be prompted for each parameter. When being prompted for a command argument: + or - Scrolls through the keywords. This control only works for arguments that are keywords. Efficient Networks, Inc. Types of User Interfaces 21 22 Types of User Interfaces Efficient Networks, Inc. Configuring the Router How do you want to use the Router? The router is configured with several default configuration settings and these settings will be appropriate for most installations (see page 25 for default configuration settings). However, to assess whether these settings will work for you, you need to decide how you are planning to use the router. The flowchart below allows you to choose a simple configuration procedure to use to configure your router. More complex configurations can be configured using the Advanced Setup feature of the HTML interface. NOTE: Your service provider should have notified you which encapsulation method to use, PPP or RFC 1483. Refer to “Encapsulation Methods: PPP and RFC 1483” on page 30 for descriptions of PPP and RFC 1483. start Do you need a router or a bridge? bridge Refer to procedure on page 27 YES Refer to procedure on page 26 YES Refer to procedure on page 26 router Do you want to use PPP? NO Do you want to use RFC 1483? finish Efficient Networks, Inc. How do you want to use the Router? 23 Setting the Password The router has no password protection as configured from the factory. As soon as you log into the router, you should set the password. This can be done from the HTML interface by clicking on the Set Password link or from the command line interface using the set password command. Password protection can be disabled again by entering the current password and a blank for the new password. If the password is forgotten, the router can be set to the factory default state from the serial port during the boot process. To reset router to the factory default state: 1 Log into the router through the serial port and get to the command prompt. 2 Enter the “reboot” command 3 During the boot process, the screen will start displaying a series of periods (“.”). Enter the word “ default” while the dots are being displayed. NOTE: The default boot process will reset all user-configurable parameters on the router to factory defaults. It is wise to restrict physical access to the router to prevent the accidental or malicious defaulting of your configuration. 24 How do you want to use the Router? Efficient Networks, Inc. Factory Default Configuration The router is shipped from the factory with particular default settings. You may or may not need to change these depending on what kind of network the router is installed. Configurable Item Default Settings Operating Mode Router Ethernet Interface IP Address Network Mask IP Gateway (Default Route) Address None DSL (WAN) Interface IP Address Network Mask ATM VPI/VCI Number 0/32 Data Encapsulation Protocol PPP PPP Authentication Username Password PPP Multiplexing method LLC/SNAP encapsulation Hostname speedstream Domain name router.invalid DHCP server Enabled DNS Enabled DNS Resolver or Forwarders None specified NAPT Enabled RIP Enabled; uses RIP2 in passive mode IP Filtering Disabled Spanning Tree (bridge only) Disabled Efficient Networks, Inc. 10.0.0.1 255.0.0.0 None None ENI-Router ENI-Router How do you want to use the Router? 25 Router PPP Configuration The modem is configured by default from the factory to be in router mode using PPP encapsulation. This greatly simplifies the configuration procedure. To configure the router via HTML: 1 On the main page, click on Simple Setup. 2 If your service provider has specified a VPI/VCI number to use, enter the numbers in the VPI and VCI fields. 3 Enter the PPP username and password specified by your service provider. 4 Select Set. This will set the new VPI/VCI parameters on the router . Select Refresh after a minute or two to see the new configuration. RFC 1483 Configuration There are two types of RFC 1483 encapsulation that can be used: RFC 1483 bridged and RFC 1483 routed. RFC 1483 Routed encapsulation operates at the IP layer and will route only IP packets. RFC 1483 bridged encapsulation method handles non-IP packets, which the unit supports only while configured for use as a bridge. The method you will use depends on the configuration parameters specified by your internet service provider. The procedure that follows assumes that you have a unit that is configured with factory defaults. To configure the modem via HTML: 26 1 On the main page, look in the Configuration Summary table and click on the title Encapsulation Protocol. 2 If your service provider has specified a different VPI/VCI number to use, enter the numbers in the VPI and VCI fields. Otherwise, enter the default VPI and VCI values. 3 Select the desired RFC 1483 encapsulation. How do you want to use the Router? Efficient Networks, Inc. 4 Select Max as the rate. 5 Enter an IP address and netmask to use for the DSL/WAN interface. 6 Select Modify VC. 7 Select the “Advanced Setup” button in the top left panel. 8 Select the “Command List” button in the top left panel. 9 From the command list on the left, select “ipgateway”. 10 Enter the “Enter new IP address” field, enter the IP address of an IP gateway (default route) that is on the same subnet as the router. 11 When the response appears at the bottom of the screen, it will have link that says “REBOOT REQUIRED”. Click on that link and reboot the router. Select Refresh after a minute or two to see the new configuration. Bridge Configuration The first thing you must do to use the 5600 series router as a bridge is change it to bridge mode. To change mode from the HTML interface: 1 On the first page, select Change to Bridge Mode”. 2 When the display appears, select the radio button labeled Bridge. 3 When the response appears at the bottom of the screen, it will have link that says “REBOOT REQUIRED”. Click on that link and reboot the router. Select Refresh after a minute or two to see the new configuration. The only other possible configuration parameters you may need to set would be the VPI/VCI numbers as specified by your service provider. When the unit comes back up in bridge mode, select the Simple Setup link to configure it. Efficient Networks, Inc. How do you want to use the Router? 27 Testing the Configuration After completing the configuration process, you may test the operation of the router by starting a Web browser and accessing a remote web site such as http://www.efficient.com. Alternatively, you can open an MS DOS (or shell) window and issue a “ping <ip_address>” command to a known host on the wide-area network. 28 How do you want to use the Router? Efficient Networks, Inc. Terminology and Concepts Acronyms ADSL Asymmetric Digital Subscriber Line ATM Asynchronous Transfer Mode ATU ADSL Termination Unit CHAP Challenge-Handshake Authentication Protocol CO Central Office DHCP Dynamic Host Configuration Protocol DNS Domain Name Service DSL Digital Subscriber Line DSLAM Digital Subscriber Line Access Multiplexer Firmware Software, in binary form, stored within a flash PROM ICMP Internet Control Message Protocol IPCP IP Control Protocol ISP Internet Service Provider LCP Link Control Protocol NAP Network Access Provider NAPT Network Address Port Translation NCP Network-layer Control Protocol NSP Network Service Provider OCD Out-of-cell Delineation (ATM error condition) PAP Password Authentication Protocol POST Power On Self Test PPP Point-to-Point Protocol PTT Post Telephone and Telegraph (European Telco) PVC Permanent Virtual Circuit SOHO Small Office, Home Office SMTP Simple Mail Transport Protocol SNMP Simple Network Management Protocol RIP Routing Information Protocol RT Remote Termination Efficient Networks, Inc. Acronyms 29 Technical Concepts This section provides very brief descriptions of some of the features available on the 5600 series router/bridge. Digital Subscriber Line (DSL) DSL describes a family of digital services provided by local telephone companies to local subscribers. There are many forms of DSL: Asymmetric DSL (ADSL), Symmetric (or single pair) DSL (SDSL), and many others. The router supports ADSL, which provides rates of up to 6 Mbps downstream from the customer and up to 640 Kbps upstream from the customer. DSL can carry voice and data signals at the same time in both directions. Asynchronous Transfer Mode ATM is a fast, cell-based technology defined by the ITU-T. It works by taking an ordinary, variable-length data packet and segmenting it into 53-byte cells prior to transmission. The data is transmitted over virtual channels that are designated by specific unique identifiers (virtual channel identifiers or VCIs). There can be multiple VCIs in one virtual path. The virtual path also has a unique virtual path identifier (VPI). Data transmitted over ATM VCs is routed by ATM switches. At the destination node, the cells are reassembled into packets. Only one virtual path is supported on the device. In router mode, only one virtual channel is supported. However, in bridge mode, up to 16 virtual channels can be configured to be used as individual bridge ports. Encapsulation Methods: PPP and RFC 1483 The 5600 series router transmits data via ATM Virtual Channels (VCs). The data is encapsulated using Point-to-Point Protocol (PPP) or RFC 30 Technical Concepts Efficient Networks, Inc. 1483 encapsulation. A brief explanation of these two encapsulation methods follows. Point-to-Point Protocol (PPP) PPP is a single or multi-link interface between two packet switching devices, such as a bridge or router. PPP has built-in negotiation for addresses and connection parameters and can route multiple protocols over a single link. One benefit of using PPP is it offers interoperability of multi-vendor equipment as well as support for dynamic configuration between the connecting devices. RFC 1483 Request for Comment (RFC) 1483 is an interoperability specification set by the Internet Engineering Task Force (IETF) that outlines methods for multiprotocol encapsulation over ATM. RFC 1483 describes two encapsulation methods for carrying network interconnect traffic over ATM Adaptation Layer 5 (AAL5): Logical Link Control (LLC)/SNAP encapsulation and VC multiplexing. By default, the router uses the first method, LLC Encapsulation, which allows multiplexing of multiple protocols over a single ATM virtual circuit. The second method, VC multiplexing, uses a separate VC for each carried protocol. This unit supports two types of 1483 encapsulation: routed and bridged. RFC 1483 Routed encapsulation operates at the IP layer and will route only IP packets. RFC 1483 bridged encapsulation is supported only when the unit is operating in bridge mode. Dynamic Host Configuration Protocol (DHCP) The router provides two user-configurable Dynamic Host Configuration Protocol (DHCP) modes: • DHCP server (enabled by default from the factory) • DHCP relay agent Efficient Networks, Inc. Technical Concepts 31 DHCP Relay The router can be configured to operate as a DHCP relay agent. This allows local machines on the LAN to acquire their IP addresses via DHCP requests and replies that are forwarded through the router to/from a DHCP server on the WAN. In this case, the DHCP requests are forwarded to a specific DHCP server on the WAN network and the DHCP reply is forwarded back to the LAN network. The DHCP relay agent can be configured with a Primary and a Secondary DHCP Server IP address. The Secondary address is only used if the Primary is unreachable. Any DHCP requests that are received by the router are relayed to the Primary DHCP server at the specified IP address. This DHCP server is then responsible for assigning the DHCP information to the DHCP client. Typically, this DHCP server will exist in the WAN space. DHCP Server When operating as a DHCP server, the router will dynamically assign IP addresses to LAN nodes. The DHCP server verifies a device’s identity, leases it an IP address for a predetermined period of time, and reclaims the address for reassignment at the end of the lease period. The DHCP server supports DHCP client hosts on the LAN side only. The router will ignore all DHCP requests which arrive from the WAN interface. NOTE: The router has an option to set the Ethernet IP address on the router and not reboot. When configuring the DHCP server to hand out a range of addresses on a new subnet and changing the Ethernet IP address of the router, you must reboot the router. Otherwise, the DHCP server and the Ethernet IP address currently being used by the router will be out of sync. In this situation, the router will issue error messages to the console and the DHCP server will not be able to properly give out addresses. Always reboot the router when changing the Ethernet IP address; verify that the DHCP server is configured to give out addresses for the correct IP subnet of the Ethernet interface. Domain Name Service (DNS) The router supports Domain Name Service (DNS) which provides hostname-to-IP address resolution for LAN-side clients. There are two 32 Technical Concepts Efficient Networks, Inc. distinct DNS functions provided by the router: the DNS resolver and the DNS server. DNS Resolver The DNS resolver is the entity that creates a DNS request for transmission to a DNS server (which may be co-located in the router or be an external DNS server). The DNS resolver is only used by certain user interface commands that allow a hostname argument as well as an IP address argument. The DNS resolver requires the user to configure a single DNS server IP address to which to direct DNS requests. This IP address may be the router itself in the situation where the DNS server is enabled on the router or it may be any reachable IP address at which a DNS server is available. DNS Server The DNS server is the entity that responds to DNS requests. The DNS server provides IP address-to-hostname resolution and hostname-to-IP address resolution for LAN clients via DNS requests. It may also be configured to provide this service for WAN clients. The DNS server also supports hostname-to-IP address resolution for user interface commands where appropriate in response to requests submitted by the DNS resolver. The DNS server is enabled by default from the factory and provides the router with the default hostname “speedstream”. Public and Private Networks and the use of NAPT An IP address must be unique among all networks reachable from a given host using the IP protocols. The United States Internet Registry ensures the uniqueness of the IP addresses on the Internet. The Internet Registry assigns an entire IP network number to each site connected to the Internet. Each IP address at a site is unique as long as the site assigns a different host number to each host on its network. Thus each host is ensured a globally unique IP address that is known as a public IP address. However, there has been concern over the eventual exhaustion of the public address space. This has led the Registry to set aside IP network numbers for private addressing. These numbers are not assigned to anyone by the Internet Registry and are open for use by any site. IP addresses are Efficient Networks, Inc. Technical Concepts 33 unique within the private address space, but two private address spaces are not guaranteed unique. Use of private address spaces has some disadvantages including the need to re-address any host that must change from a private address to a public address. Plus the privately addressed hosts are unable to communicate with all hosts in an internet. These problems can be handled by the use of Network Address Port Translation (NAPT). NAPT is an extension to Network Address Translation (NAT). With NAT, a network address translator (the router, in this case) sits between an organization’s network and the Internet, or between two organization’s networks and translates IP addresses from private internal addresses to globally unique external addresses. NAPT, however, allows many network addresses and their TCP/UDP ports to be translated to a single network address and its TCP/UDP ports. With NAPT, a few of your internal hosts can share a single public address. When a host needs to access the Internet, the router will translate an address for it. When packets from the host are sent to the Internet, the router replaces the internal address with the external address. When packets come back for that address, the router reverses the substitution. 34 Technical Concepts Efficient Networks, Inc. Technical Reference 5660 DSL Router/Bridge Specifications Size 5.5W in. x 7D in. x 1.5H in. (14W cm x 17.8D cm x 3.8H cm) Weight 1.25 lbs. (0.57 Kg) Power Integrated 110-240 VAC; 50-60 Hz power supply; 0.1A @ 110VAC, 0.05A @ 240VAC Temperature Operating: 0° to 40° C Non-Operating, storage: -10°C to 85° C Humidity Operating humidity: 10% to 90% noncondensing Non-operating storage humidity: 5% to 95% non-condensing Ringer Equivalency REN=0.8B Performance Meets or exceeds requirements for T1E1.4 line connected equipment for noise, line balance, return loss, reach and line disturbance. Cabling Unshielded Twisted Pair (UTP) Category 3, 4, or 5 Local Console RS232 using Mini DIN (38400 baud default) Efficient Networks, Inc. 5660 DSL Router/Bridge Specifications 35 5621 DSL Router/Bridge Specifications 36 Size 5.5W in. x 7D in. x 1.5H in. (14W cm x 17.8D cm x 3.8H cm) Weight 1.25 lbs. (0.57 Kg) Power Integrated 110-240 VAC, 50-60 Hz power supply 0.2A @ 110VAC, 0.1A @ 240VAC Temperature Operating: 0° to 40° C Non-Operating, storage: -10°C to 85° C Humidity 10% to 90% noncondensing Non-operating storage humidity: 5% to 95% non-condensing Ringer Equivalency REN=0.8B Performance Meets or exceeds requirements for T1E1.4 line connected equipment for noise, line balance, return loss, reach and line disturbance. DMT: up to 640 Kbps upstream; up to 6.144 Mbps downstream Cabling Unshielded Twisted Pair (UTP) Category 3, 4, or 5 Local Console RS232 using Mini DIN (38400 baud default) 5621 DSL Router/Bridge Specifications Efficient Networks, Inc. Index Numerics E 3020/3060 connector information 13 5621 humidity 36 5621 weight 36 5660 humidity 35 5660 weight 35 Encapsulation 25 Encapsulation Protocol 26 Ethernet connection to modem 15 Ethernet Interface IP address 25 Ethernet interface network mask 25 A Accessing the modem FTP 17 HTTP 16 TELNET 16 ATM VCI number, default 25 B Bridge Configuration 27 C Cabling 11, 35, 36 Configuration testing 28 configuration, saving 18 configuration, uploading 18 F Firmware download 18 FTP access 17 H Hardware installation 11 Hostname default configuration 25 HTML access 16 HTTP access 16 Humidity 36 I Internet Registry 33 IP Filtering default configuration 25 D Default ATM configuration 25 Default Configuration 25 Default mode 25 default password 20 DHCP default configuration 25 DNS default configuration 25 Domain name default configuration 25 Download firmware 18 Efficient Networks, Inc. L Local Console specification 35, 36 Local terminal 18 N NAPT default configuration 25 Network access to the modem 15 Network Address Translator (NAT) 34 Index 37 Network addresses public vs private 33 O Operating temperature 35, 36 T TELNET access 16 Temperature 35, 36 terminal connection 18 U P password protection 20 Performance 35, 36 Power 35, 36 Power switch 12 PPP Authentication default configuration 25 PPP encapsulation 26 PPP Encapsulation default configuration 25 PPP interface IP address 25 network mask 25 Private network addresses 33 public network addressing 33 Uploading modem configuration 18 V VCI, default 25 W WAN interface 25 R Reset password 20 RFC 1483 bridged 26 RFC 1483 routed 26 Ringer Equivalency 35, 36 RIP default configuration 25 RJ11 connector 11 RJ45 connector 11 Router where to install 8 S Saving modem configuration 18 Serial connection 18 Size of router 35, 36 Spanning Tree default configuration 25 38 Index Efficient Networks, Inc.