1
Technical Manual for
version 4.24 of the
PosPRO Till
Version 5.0.1 © 2012 Inepro B.V. All rights reserved
2
Technical Manual
Introduction
Thank you for your purchase the PosPRO till.
We will try to treat every aspect of the PosPRO till in this manual .
This first part will lead you through the installation and setup of our software on
your system.
After which we will introduce the different modules and explain all the options.
When you call our helpdesk, please have the following at hand:
· The version number of the PosPRO software
· The version of this manual
· The exact steps taken to execute the task you wanted to complete
· The messages the system might have displayed
· The log and *.ini files of your PosPRO till
Please take in account that when you call our support desk, you might be
asked to; execute actions on one of your terminals, to provide the log files (this is
the content of the PosPRO log directory, by default 'C:\Program
Files\Inepro\PosPRO\Log\') and the *.ini files (this is the content of the PosPRO
INI directory, by default 'C:\Program Files\Inepro\PosPRO\INI\').
1.1
Software Requirements
With the installation of PosPRO a number of software components are needed.
Here you will find a list that are needed to run our PosPRO software.
Windows Installer
The Windows Installer is an engine that is used to install, remove or repair
software on Windows operating systems. Previously the name of Windows
Installer was Microsoft Installer. Windows Installer files often have the extension
.msi.
You will need version 4.5 for the installation of PosPRO.
http://www.inepro.com
Version 5.0.1 Inepro B.V.
Introduction, Software Requirements
3
.NET Framework
The .NET Framework is a software component that can be added to the Microsoft
Windows operating system. It provides a great number of pre-defined code
solutions for general application demands, and manages the execution of
programs that especially written for framework. The .NET Framework is an
important Microsoft component, and the intension is that most applications that
are developed for the Windows platform will use it.
You will need version 2.0 or higher for the installation of PosPRO.
Windows PowerShell
Windows PowerShell™ is a new task-based command-line shell and scripting
language designed especially for system administration. Built on the Microsoft
.NET Framework, Windows PowerShell helps IT professionals and power users
control and automate the administration of the Windows operating system and
applications that run on Windows.
You will need version 1.0 or higher for the installation of SQL Express 2008.
SQL Express 2008
Microsoft SQL Server is a relational database management system, produced by
Microsoft. It supports a dialect of SQL, the most frequently used database
language. It is generally used by organisations for small to medium databases.
We supply SQL Express 2008 to enable our system to store it's information in a
MS SQL database.
SQL Express 2008 Manager
Microsoft SQL Server Management Studio Express (SSMSE) is a free, easy to
use, graphical management tool to manage SQL Server 2008 Express Edition.
You can edit databases and look at the table information. You can also see which
database instances are being used.
PosPRO
PosPRO is our digital till application itself, a software package that provides you
with a till and a stock management system that seamlessly connects with the
hardware like the printer, cash drawer and line display.
Version 5.0.1 Inepro B.V.
http://www.inepro.com
4
Technical Manual
OPOS Drivers
The OPOS drivers are the hardware drivers that drive the pinter, cash drawer and
line display. A management tool is supplied that enables you to manage the
configuration of all the connected devices in 1 window.
1.2
Overview
Setup
In this chapter you will find how the hard- and software should be installed. We
will also configure the software.
http://www.inepro.com
Version 5.0.1 Inepro B.V.
Setup, Hardware installation
5
2.1
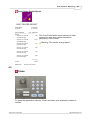
Hardware installation
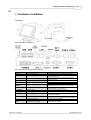
Overview
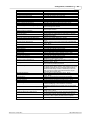
The PosPRO till, front and back
The connectors on the bottom of the PosPRO till
I/O Port
Power
Connector Type
DC Power Connector
USB
USB
LAN
LAN RJ45 Connector
Keyboard
PS/2 Keyboard Connector
Mouse
COM1
COM2
PS/2 Mouse Connector
EXT VGA
15 PIN VGA Connector
DC 12V Out
2 PIN Socket
PS2 port can be used for a mouse.
The serial ports COM1/COM2 can be used to connect
serial devices such as a mouse or a fax/modem.
The Ext VGA port is used to attach an external
2ndPanel display or CRT monitor.
This is used for the 2nd Panel display.
Cash Drawer
RJ11 Connector
Cash Drawer Connector, 12 V Actuation support.
VFD/COM4
VFD/ COM4 RJ45 Connector
COM5
RJ45 Connector
Line Out
Earphone Connector
LPT1
26 PIN SCSI II Connector
Version 5.0.1 Inepro B.V.
DSUB Connector
Description
Connects the PosPRO till to the power supply.
The USB (Universal Serial Bus) port can be used to
connect USB devices.
The LAN port is used to hook the PosPRO till to a
local area network.
The keyboard port for an external keyboard.
The VFD port is used to attach an RJ45 cable for a
VFD customer display.
The serial port COM5 can be used to connect serial
devices such as a mouse or a VFD customer display.
The audio port is for speakers.
The parallel port LPT1 can be used to connect parallel
devices, such as a printer.
http://www.inepro.com
6
Technical Manual
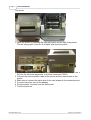
The printer
1. Open the printer by pressing the light grey button on the side of the printer.
The will spring open, insert a roll of paper and close the printer.
2. Attach the communication cable of the printer to the till on COM 5 if you use a
PayCon for electronic payments, in all other cases use COM 2.
3. Connect the communication cable of the printer and the cash drawer to the
printer.
4. Make sure to connect the earth wire of the cash drawer to the connection bolt.
5. Connect the power cord to the adapter.
6. Plug the power connector into the wall socket.
7. Turn the printer on.
http://www.inepro.com
Version 5.0.1 Inepro B.V.
Setup, Hardware installation
7
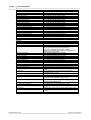
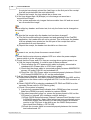
The line display
8. The line display has a number of DIP switches that signify character sets.
Check that this setting is set to the West-European character set. See table
below:
Setting
1
2
3
4
5
6
7
8
9
10
Standaard
On
On On Off On On On Off On On
Inepro West Europe Off
On On On Off On On Off On On
Set the DIP switches to the West-European character set.
11 12
Off On
Off On
9. Mount the line display foot and pull the cable trough the cylinder.
10. Connect the cable to COM 4. The text 'Mode A' should momentarily be shown
on the display when the system will be started.
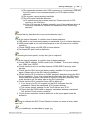
EFT or PayCon
When you want to enable the user to pay with other means then cash you can
either opt for the PayCon or for an EFT terminal.
When you are also using the Inepro system for printing payments, purchases at
vending machines or building access, you can let the user pay with the money in
their Inepro account or on their Inepro card by using the PayCon. In those cases
you often have a reloader that already has the ability to put money on their
account or card by PIN or credit card. If you do not need the Inepro card or
Inepro account as a source of payment with the PosPRO cash registry, but do
want the ability to pay with PIN or credit card, you need an EFT terminal.
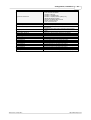
Asset
Availability
PayCon
EFT terminal
PIN
Credit Cards
Inepro Card or Accounts
ChipKnip (a Dutch electronic finance system)
The difference between a PayCon and EFT terminal
11. You are now finished with connecting the hardware, in the next chapter we
will configure the hardware.
Version 5.0.1 Inepro B.V.
http://www.inepro.com
8
Technical Manual
2.2
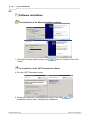
Software installation
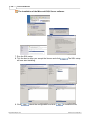
The installation of the Windows Installer software
1. Run the Windows Installer setup, click
'Finish'.
until the 'finished', then click
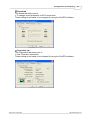
The installation of the .NET Framework software
2. Run the .NET Framework setup.
3. Check the overview to if all setting are correct, if so click
installation will now start. Complete the installation.
http://www.inepro.com
, the
Version 5.0.1 Inepro B.V.
Setup, Software installation
9
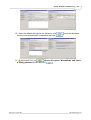
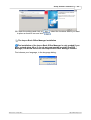
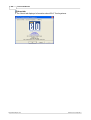
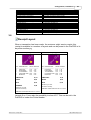
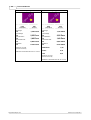
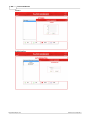
The installation of the Windows Powershell software
4. Run the Powershell setup, click
.
, agree to the license and click
5. Finish the installation.
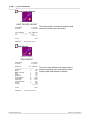
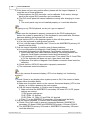
6. Check by clicking the Windows Start button and executing the 'Run' command
'Powershell' (as seen in the left screen) if the Powershell is working. If you see
a window like the right screen, Powershell is working correctly.
Version 5.0.1 Inepro B.V.
http://www.inepro.com
10
Technical Manual
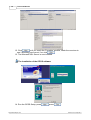
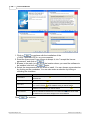
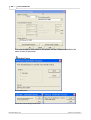
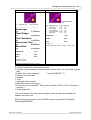
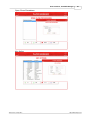
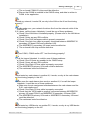
The installation of the Microsoft SQL Server software
7. Run the SQL setup.
8. Tick the box to show you accept the licence and click
will now start installing.
9. Click
http://www.inepro.com
, check the configuration and click
. The SQL setup
to install the files.
Version 5.0.1 Inepro B.V.
Setup, Software installation
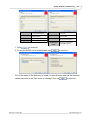
10. Keep the default settings for the instance, click
Account with Administrator credentials and click
11
, enter an Windows
.
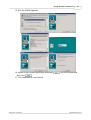
11.
Important! Click on
, choose the option 'Mixed Mode' and insert
a strong password, after that click
.
Version 5.0.1 Inepro B.V.
http://www.inepro.com
12
Technical Manual
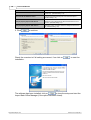
12. Click
until you reach the 'Complete' window, check the overview to
see if all setting are correct, if so click
.
13. The Microsoft SQL Server is now installed.
The installation of the OPOS software
14. Run the OPOS Setup, press
http://www.inepro.com
, press
.
Version 5.0.1 Inepro B.V.
Setup, Software installation
13
15. Run the OPOS Upgrade.
16. Agree to the License Agreement and press
then click
.
17. The installation is now finished.
Version 5.0.1 Inepro B.V.
until the final window,
http://www.inepro.com
14
Technical Manual
The installation of the PosPRO software
18.Click on
and edit the installation path if necessary. Then click on
.
19.Agree to the license and click
where necessary, check the paths and
click on
.
If you are using a central database you should enter the Inepro Back Office
Suite Database server name and the instance of the database at the field MS
SQL Source. (In this format "YOURIBOSSERVER\SQLEXPRESS" the MS SQL
server name is :'YOURIBOSSERVER' and your instance name is
:'SQLEXPRESS'.)
If you do not have a remote server, and have 'stand-alone' tills, the Inepro
Back Office Suite (or at least the database) should be installed locally.
http://www.inepro.com
Version 5.0.1 Inepro B.V.
Setup, Software installation
20.Check the settings and click on
to place a shortcut icon and click
15
, select the locations where you want
.
The Inepro Back Office Manager installation
The installation of the Inepro Back Office Manager is only needed if you
have a stand-alone till or if you do not want use the provided PosPRO
Manager, but would like to use the Inepro Back Office Manager instead.
First choose your language, in the language dialog:
Version 5.0.1 Inepro B.V.
http://www.inepro.com
16
Technical Manual
1. Click on
to continue with the installation of the
<%SOFTWARESUITE%> on your computer.
2. Read the licence and if you choose to accept it, tick "I accept the licence
agreement" and click on
.
3. Browse to the path (or typ it in) of the location where you need the software to
be installed, and click on
again.
4. Select the components that you want to install. You can choose a pre-selection
by clicking on the combobox. You can also make a selection by ticking or
unticking the checkbox.
Installation
Description
Full Installation
Installation of all components.
need them all!
DocuPRO (server)
Managing the print traffic.
it!
Inepro Client
The client pop-ups will be the graphical user interface will show the printjobs and the
Print Codes if available.
Do not install the client, you will not need it!
Terminal Sever
Provides the communication between the database and the terminals.
install the Terminal Server, you will not need it!
Inepro Database
This option will install the system database on this machine.
Install the database
if this is a stand-alone machine. If it is not a stand-alone machine do not install
the database here, but link the manager to the central database.
Click
http://www.inepro.com
Do not install all the components, you will not
Do not install the DocuPRO server, you will not need
Do not
to continue.
Version 5.0.1 Inepro B.V.
Setup, Software installation
MS SQL Server
The database server adres
(. = the locale machine)
Catalogus
The database name
(standard IBOS)
User Name
The database user name
Password
The database password
SMTP Server
The server that you will use to
send email
Sender
The address that will appear in
the 'from' field.
Address
The email address where the
warning email is send to.
Use
authenticated
SMTP
1. Click
to continue.
2. Fill out the SMTP server address and click
17
Check if you are using a
secure SMTP server
to continue.
Fill out the name of the directory to install it in this directory and tick the boxes to
create shortcuts to the Start menu or desktop. Click on
to continue.
Version 5.0.1 Inepro B.V.
http://www.inepro.com
18
Technical Manual
Create a shortcut to the desktop
Places an icon on the desktop. (standard setting = off)
Create a shortcut to the Quick launch bar
Places an icon on the Quick Launch bar (next to the Start button on
the task bar). (standard setting = off)
Don't execute the database wizard
Prevents the database wizard to be executed and creates an option
to execute the wizard manually with more advanced options.
(standard setting = off)
Print job property map for LPD daemon
This option is needed the define the user name, when Novell
Netware or Linux is used, but may also be used when this is not
the case. (standard setting = on)
Print job property map for SAP daemon
This option is needed to define the user name, when the SAP
application is used, in all other cases this setting should be set to
off. (standard setting = off)
3. Click
to continue.
Check the overview to if all setting are correct, if so click on
installation.
to start the
The software has been installed, click on
to close the setup and start the
Inepro Back Office Manager (if the option has been ticked).
http://www.inepro.com
Version 5.0.1 Inepro B.V.
Configuration,
19
Configuration
In this chapter we will configure your system.
· The ELO touch screen display should be calibrated
· The OPOS devices should be connected to the OPOS drivers
· The Inepro Back Office Suite module CashPRO must be setup and the
products should be created
· The till itself must be configured via the *.ini files
· The receipt layout must be set up
3.1
ELO Display
ELO Control Panel
This section explains the different options in the ELO control Panel.
Version 5.0.1 Inepro B.V.
http://www.inepro.com
20
Technical Manual
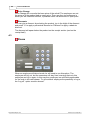
General tab
The general tab allows you to:
· Calibrate the touch screen with the Align button. Press the center of each of the
four targets that appear on the screen with your finger, like you would when
normally using the application.
Please calibrate the touch screen right now to ensure a good working user
interface.
Mode tab
The Buttons tab allows you to:
· Adjust all mouse emulation controls.
· Change cursor properties
These setting do not need to be changed for using the PosPRO software
http://www.inepro.com
Version 5.0.1 Inepro B.V.
Configuration, ELO Display
21
Sound tab
The Sound tab allows you to:
· To change sound properties for ELO touch tools.
These setting do not need to be changed for using the PosPRO software
Properties tab
The Diagnostics tab allows you to:
· View Controller Information.
These setting do not need to be changed for using the PosPRO software
Version 5.0.1 Inepro B.V.
http://www.inepro.com
22
Technical Manual
About tab
· The About tab displays Information about ELO Touchsystems
http://www.inepro.com
Version 5.0.1 Inepro B.V.
Configuration, OPOS
23
3.2
OPOS:
OPOS, Object Linking and Embedding for Retail POS consists of an architecture
for Win32-based POS device access. Point of sale (POS) or checkout is the
location where a transaction occurs, it is sometimes falsely used to describe the
POS terminal or till. OPOS also consists of a set of POS device interfaces
sufficient to support a wide range of POS solutions. It provides a consistent
interface to POS peripherals for use by application creators.
The Epson OPOS SDK give you easy access to the POS devices and their
settings.
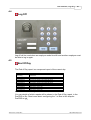
We will check the connection to the Line Display, printer and cash drawer.
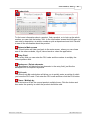
Communication Settings
Check via the context menu (right mouse button), 'Communication Setting' if the
COM port is set correctly.
The LDN (Device Name) should correspond with the table below.
Apparaat
Printer
Line Display
Cash Drawer
Version 5.0.1 Inepro B.V.
LDN (Apparaat label naam)
RECEIPTPRINTER
LINEDISPLAY
CASHDRAWER
http://www.inepro.com
24
Technical Manual
The cash drawer is connected to the printer, so the COM port should be the
same is that of the printer.
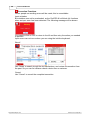
Health Check
Printer Health Check
Cash Drawer and Line Display Health Check
http://www.inepro.com
Version 5.0.1 Inepro B.V.
Configuration, OPOS
25
After this you should get a message informing you if the hardware test has
succeeded or has failed:
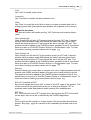
Security message
3.3
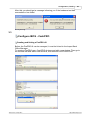
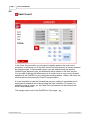
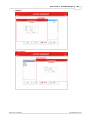
Configure IBOS - CashPRO
Creating and linking a PosPRO till
Before the PosPRO till can be managed, it must be linked to the Inepro Back
Office Manager.
To create a PosPRO open CashPRO devices and add a new device. Then go to
the terminal tab and add a new terminal, this terminal is the PosPRO till.
Version 5.0.1 Inepro B.V.
http://www.inepro.com
26
Technical Manual
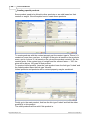
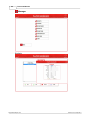
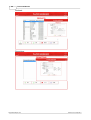
Creating an employee
Now a PosPRO till has been linked to the terminal, employees should be created
who may operate the till and or the CashPRO management module. To add an
employee got to 'Advanced -> Authentication' and add a new employee.
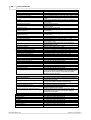
Fill out the values according to the table below and assign the rights.
Name
Login
Employee First Name
Employee Infix
Employee Last Name
Password
Confirm Password
Employee Code
Employee PIN
Valid From
Valid Trough
Changed
Description
Login name for the Inepro Back Office Manager
Self explanatory
Self explanatory
Self explanatory
Password to access the Inepro Back Office Manager
Self explanatory
Employee ID for the PosPRO till
Employee numeric password for the PosPRO till
The date from which these rights will be valid
The date trough which these rights will be valid
The date this record was last edited
The right should be set to set according to the rights this person should have in
the Inepro Back Office manager, see table below:
Name of default right
CashPRO Read-only
CashPRO Employee, No Reports
CashPRO Employee
CashPRO Manager
Description
Can only see the products and tills in the manager
Prices may be changed, but no reports may be created
Prices may be changed, reports may be created
Can execute management task like creating new tills, change location
names, database settings and create new employees.
Save the settings for this employee.
http://www.inepro.com
Version 5.0.1 Inepro B.V.
Configuration, Configure IBOS - CashPRO
27
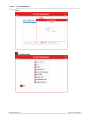
Creating a product
The final thing the PosPRO till needs is products. Products can also be created in
the Inepro Back Office Manager. Go to 'Products' and add a new product.
The values of the product are explained in the table below:
Name
Product Code
Terminal Display Name
Name
Product Group
Price
Open Price
Product Type
Link Type
Content Type
Content Factor
Tare
VAT
Second Vat
Description
Selling
Description2
Description3
Description4
Description
A unique code (generated by default using the timestamp as seed)
A short name 14-17 characters so it will fit on the PayCon display
The long name of the product for display on reports
Should always be 'Cashregister/Vending' for the PosPRO till
The price of the product, leave it at 0,00 when using 'open price'
Tick, if the employee should decide for which price this item is sold
Should always be 'till' for the PosPRO till
Is it a normal product, a compound product or part of a compound product
(linked to a compound product) by default set to 'normal'
If you want to specify the content of the product, you can do this here. By
default this is set to 'pieces', it can also be set to 'weight' or 'volume'.
How many of the content type the product consist of
The weight of the product container
Value Added Tax
Second Value Added Tax, if the product could be sold at both a high and a
low VAT rate.
May this product be sold at this moment?
The Link and Content values are used for special products that will be sold based
on their content value or linked to other products.
Version 5.0.1 Inepro B.V.
http://www.inepro.com
28
Technical Manual
Creating special products
Some product need to be linked to other products or are sold based on their
content or weight. We will explain how to create these products.
To create products with the content property set the content type to 'Pieces' if it
consists of more then one item, to 'weight' of the price is based on the products
mass, and to 'volume' if it is based on the volume the product contains. Set the
content factor, if the content type is 'weight' and the content factor = '100', the
price will be be per 100 gram of that product.
To create a linked product, have the main product have the link type 'Linked' and
the linked product have the link type 'Normal'.
Linked products and products with a content property may be combined.
Finally go to the main product, that has the link type 'Linked' and link the other
product(s) to this product.
The other products will be sold if this product is.
http://www.inepro.com
Version 5.0.1 Inepro B.V.
Configuration, Configure IBOS - CashPRO
29
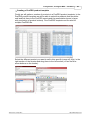
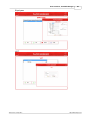
Creating a PosPRO product template
Finally we will gather a number of products in a PosPRO product template. In the
PosPRO product template we will be able to select the products that should be
sold and link them to the PosPRO reports and the presentation layers (a layer
with a selection of product buttons). One PosPRO template can be used for
multiple PosPRO tills.
Select the different product you want to sell in this specific (range of) till(s), in the
right section of the window and drag them to the left section (or use the blue
arrow buttons on the border).
Version 5.0.1 Inepro B.V.
http://www.inepro.com
30
Technical Manual
1) Create Product Groups (these are used in reports created on the till)
a) Create the product groups you need, mind that the 'Group Position' can
never be '0'.
2) Create Presentation Layers (these are layers with product buttons)
a) Create Presentation Layers, the normal layers should have a number from 1
to 24 (inclusive), it can not be '0' and layers with an ID higher then 24 are not
visible.
b) You can create special layers, these layers can be used as the main screen,
or a layer that has the products that are sold most. You could for example
create a breakfast and a lunch layer that will only be shown at the
appropriate times. These layers will need a number higher then 24.
i) You can create special period layers for a maximum of 4 periods.
http://www.inepro.com
Version 5.0.1 Inepro B.V.
Configuration, Configure IBOS - CashPRO
31
3) Assign the PosPRO Product groups in the Products tab, remember these are
product groups, they are used for the reports created on the till.
4) Assign the Presentation Layers, remember, one product can be on more then
one presentation layer, so then you would need to add the same product
again.
5) Assign a Colour for the button, to make it easier to search for the right
product.
Available only in the Kiosk version.
6) Edit the PosPRO.ini
a) TabSheet Period = <Most sold / main layer ID>
b) Main tab = <Most sold / main layer ID>
Version 5.0.1 Inepro B.V.
http://www.inepro.com
32
Technical Manual
3.4
ReplicationService.ini
The PosPRO application will store everything in a local database (named
PosPRO by default). When the Inepro Back Office Suite with the CashPRO
module is used the transactions must be send to the Inepro Back Office Suite
database (by default IBOS) and settings, new products, price adjustments
etcetera need to be send from the IBOS database to the PosPRO database. The
replicationService will handle these tasks.
It will monitor both tables for changes and replicate them according to the
intervals specified in the ReplicationService.ini.
The service can be stopped and started via Windows Services or via the
command line prompt using these commands:
'replicationservice.exe /stop'
'replicationservice.exe /start'
You'll find shortcuts to these commands in the PosPRO main directory.
When you start the services manually you will be able to monitor the
replication process.
Make sure you leave the Windows Service settings so the replication service
will start at Windows startup!
http://www.inepro.com
Version 5.0.1 Inepro B.V.
Configuration, ReplicationService.ini
33
Configuration via the *.ini file
In the ini directory in your PosPRO directory (by default:'C:\Program
Files\Inepro\PosPRO\Ini') you will find the 'ReplicationService.ini' file: this file can
be edited to change the advanced settings in your PosPRO application.
Always create a backup before you make changes in the *.ini files, so you can
always revert back to the original *.ini files.
The *.ini file consist of a number of headers and below those header a number of
keys that have a value.
For example:
[Header]
Key=Value
A value of '0' will normally mean 'disabled' and a value of '1' will usually mean
'enabled'.
ReplicationService.ini
[database]
Local use SQLSERVER database=1
Local DataSource=.\SQLEXPRESS
Local Catalog=PosPRO
Local User=PayConServer
Local Password=******
Remote use registry settings=1
Remote use SQLSERVER database=1
Remote DataSource=KOOS001\SQLEXPRESS
Remote Catalog=IBOS_POSPRO
Remote User=PayConServer
Remote Password=******
Station Inifile=PosPro.ini
[Replication]
Replication batch size=0
Replicate PriceLines=0
Replicate Transactions=15
Replicate Items=3600
Replicate VATs=7200
Replicate StationItemGroups=3600
Replicate Prices=3600
Replicate Itemlinks=3600
Replicate ItemGroups=3600
Replicate Card Types=7200
Replicate Employees=3600
Replicate Cardgroups=7200
Replicate Cards=120
Replicate Customers=600
Replicate Ledgers=1200
Replicate CustomerLedgerLinks=1200
Replicate Customer departments=3600
Replicate Budgets=7200
Replicate AbsenceReasons=0
Replicate CustomerPhotos=0
Replicate ItemPhotos=0
Replicate PresentationLayer=600
Replicate Transactions in one Batch=0
Version 5.0.1 Inepro B.V.
Use SQLSERVER as local database
The database instance = '.\SQLEXPRESS'
The database name = 'PosPRO'
Database Log in name
Database Password
Ignore these setting and use the settings in the registry.
Use SQLSERVER as remote database
The database instance = '.\SQLEXPRESS'
The database name = 'IBOS_PosPRO'
Database Log in name
Database Password
The location of the PosPRO.ini file
Number of records to send in one batch, '0' means 'Send one
by one'
Time in second, '0' means 'Do not replicate'
Time in second, '0' means 'Do not replicate'
Time in second, '0' means 'Do not replicate'
Time in second, '0' means 'Do not replicate'
Time in second, '0' means 'Do not replicate'
Time in second, '0' means 'Do not replicate'
Time in second, '0' means 'Do not replicate'
Time in second, '0' means 'Do not replicate'
Time in second, '0' means 'Do not replicate'
Time in second, '0' means 'Do not replicate'
Time in second, '0' means 'Do not replicate'
Time in second, '0' means 'Do not replicate'
Time in second, '0' means 'Do not replicate'
Time in second, '0' means 'Do not replicate'
Time in second, '0' means 'Do not replicate'
Time in second, '0' means 'Do not replicate'
Time in second, '0' means 'Do not replicate'
Time in second, '0' means 'Do not replicate'
Time in second, '0' means 'Do not replicate'
Time in second, '0' means 'Do not replicate'
Time in second, '0' means 'Do not replicate'
'0' means 'Send one by one', '1'=send as specified by 'replication
batch size' value
http://www.inepro.com
34
Technical Manual
You could set certain replication values higher to lighten the network load at
the cost of being a little less up-to-date in your reports or vice versa.
[General]
Synchronise DateTime with host=1
IBOS 4.8 or lower compatible=0
Debug=0
'0'=disabled, '1'=enabled
'0'=disabled, '1'=enabled
'0'=disabled, '1'=enabled
3.5
PosPRO.ini:
Configuration via the *.ini file
In the ini directory in your PosPRO directory (by default:'C:\Program
Files\Inepro\PosPRO\Ini') you will find the 'PosPRO.ini' file: this file can be edited
to change the advanced settings in your PosPRO application.
Always create a backup before you make changes in the *.ini files, so you can
always revert back to the original *.ini files.
The *.ini file consist of a number of headers and below those header a number of
keys that have a value.
For example:
[Header]
Key=Value
A value of '0' will normally mean 'disabled' and a value of '1' will usually mean
'enabled'.
PosPRO.ini
[location]
Store ID=0
Operator ID Loader=1
PayCon EmployeeID=2097152
Number of Terminals=0
Language Code=en
Language Code2=
Language Code3=
Station Name=
SMTP Address=
SMTP User=
SMTP Password=
SMTP Sender=
SMTP Use Authentication=0
EMAIL Address=
Unique ID (per Inepro project) to identify the store or a group of
tills
Unique ID (per Inepro project) to identify the till (for instance on
the receipt and in the transaction log
NOT USED IN POSPRO APPLICATION
NOT USED IN POSPRO APPLICATION
NOT USED IN POSPRO APPLICATION
2 letter ISO language ID. "en"=English
Alternative 2 letter ISO language ID.
Alternative 2 letter ISO language ID.
Name of the till (for human readable ID on the receipt)
SMTP Address
SMTP Username
SMTP Password
Sender Email On Demand (EOD)
0=no, 1=yes
Email address recipient
[database]
Use SQL-SERVER database=1
DataSource=.\SQLEXPRESS
Catalog=PosPRO
User=PayConServer
NOT USED IN POSPRO APPLICATION
De database instance = '.\SQLEXPRESS'
De naam van de database is 'PosPRO'
Gebruikersnaam
Station ID=0
http://www.inepro.com
Version 5.0.1 Inepro B.V.
Configuration, PosPRO.ini
[sales]
Card-Revalue sell item=10000
Sales registration day offset in hours=0
Item offset stations=10000
Item offset subscription=8000
Card sell item=100001
[general]
Max amount on card=15000
Number of digits after decimal=2
Use card-date validation=0
External management=PosPRO_Manager.exe
External reports=
Default card id (no request)=0
CashCount Compulsory=1
CashCount blind=0
CashCount maximum quantity difference=0
CashCount maximum amount difference=0
Cashcount print document=0
Cashcount export document=0
Use floating operators=0
Cashier auto logoff timeout in minutes=0
Default card id (no request)=0
Length card ID=0
New card pincode=0
Negative card payments allowed=1
Currency=Euro
Input currency=Cent
Automatic new card ID=0
Use search account options=0
Add extra account information=0
Add budgets=0
Use Take Away function=0
Use Cash Rounding=0
Accept partly payments=1
Export directory=
Update directory=
Use stock control=0
Default Cashier=0
Use Nett Weight=0
Display card balance on Customerdisplay=1
Display Change on Customerdisplay=1
Budget calculation with linked items=0
Reboot time=05:00
Manual create unknown items=0
Version 5.0.1 Inepro B.V.
35
NOT USED IN POSPRO APPLICATION
NOT USED IN POSPRO APPLICATION
NOT USED IN POSPRO APPLICATION
NOT USED IN POSPRO APPLICATION
NOT USED IN POSPRO APPLICATION
The maximum amount allowed on a card in cents.
How many digits after the decimal are used / shown
NOT USED IN POSPRO APPLICATION
Name and path of the application that can be started as
external management software
Name and path of the application that can be started as
external report software
Should CashCount be compulsory (Yes=1, No=0)
Should CashCount made blind (no confirmation on what the
computer has counted
Maximum of accepted difference in item quantity
Maximum of accepted difference in Amount
Does the CashCount document need to be printed (Yes=1,
No=0)
Must the CashCount document be stored (as a seperate file)
(Yes=1, No=0)
Can multiple cashiers use 1 drawer?
Time after which an employee is automatically logged off
NOT USED IN POSPRO APPLICATION
NOT USED IN POSPRO APPLICATION
NOT USED IN POSPRO APPLICATION
Negative payments with a card are allowed. (Yes=1, No=0)
Currency description (human readable currency value)
Smallest unit description (human readable currency value)
NOT USED IN POSPRO APPLICATION
The ability to search a user in the database on for instance
department, or name (Yes=1, No=0)
Activate the ability to add extra information to cost centre
payments. (Yes=1, No=0)
Use the personal budget (limited to an item quantity or the total
amount of all the products per periode
If set to a value of '1', it activates the "Take Away" function,
also known as the "Eat-In" function. This enables you to signify
the difference between the VAT of products eaten inside or
outside the food area (ie. cantine or restaurant). If set to the
value of 2, the VAT value of the entire transaction may be
overwritten with a custom value.
Apply rounding on cash payments. (Yes=1, No=0)
Enable customers to pay a part of the amount they owe.
(Yes=1, No=0)
Directory in which CashCount documents are placed
NOT USED IN POSPRO APPLICATION
Activate the stock management module (Yes=1, No=0)
The employee ID that is used by default when PosPRO starts.
Registration of gross or nett mass (respectively the mass with
or without packaging). If set to active the nett mass is
calculated by deducting the tare massa from the gross mass.
Displays the customers credit on the customer display (Yes=1,
No=0)
Displays the change to customer will receive on the customer
display. (Yes=1, No=0)
Process the linked products (mostly this will be the deposit for
nondisposable products) within the budget. (Yes=1, No=0)
Everyday the till will reset itself (if a time has been set), fill in a
time "nn:nn" value to specify at which time this happens.
Allow adding unknown products on the till. (Yes=1, No=0)
http://www.inepro.com
36
Technical Manual
[general] (continued)
Obligation of Customer Data=1
Card payment only for sunbed=0
Use Card-Credits=0
Card-Credits value=1
Sunbed discount on seperate row=0
Use cleaning status=0
Use skintype detection=0
Loader customer form=0
Extended loader reports=1
Tender overview=0
External loader application=
External marketing application=
Loader accept cash=1
Activate Subscription=0
Minimum hours between session=0
Minutes before reservation=0
Minutes to start reservation=0
Sunbed time in seconds=0
SelectedTimeConfirmation=0
Void allowed=1
[paycon]
Comport paycon=0
PayCon balancetype 1=5
PayCon balancetype 2=19
Paycon2 port=
Use timer Paycons=0
Print EFT ticket=0
Print EFT reports=0
Type of EFT terminal=0
Amount preset1=100
Amount preset2=100
Amount preset3=100
Amount preset4=100
[printer]
OPOS devices available=1
Laserprinter available=0
Print direct=1
Print VAT receipt=1
Print duplicate receipt=0
Forced closedrawer check=0
Ticket layout=2
Print VAT Mark for every item=0
Print discounts on receipt=0
Print large code for Picture Items=0
Print name=0
TMT90=0
Print customer name on receipt=0
http://www.inepro.com
NOT USED IN POSPRO APPLICATION
NOT USED IN POSPRO APPLICATION
NOT USED IN POSPRO APPLICATION
NOT USED IN POSPRO APPLICATION
NOT USED IN POSPRO APPLICATION
NOT USED IN POSPRO APPLICATION
NOT USED IN POSPRO APPLICATION
NOT USED IN POSPRO APPLICATION
NOT USED IN POSPRO APPLICATION
NOT USED IN POSPRO APPLICATION
NOT USED IN POSPRO APPLICATION
NOT USED IN POSPRO APPLICATION
NOT USED IN POSPRO APPLICATION
NOT USED IN POSPRO APPLICATION
NOT USED IN POSPRO APPLICATION
NOT USED IN POSPRO APPLICATION
NOT USED IN POSPRO APPLICATION
NOT USED IN POSPRO APPLICATION
NOT USED IN POSPRO APPLICATION
NOT USED IN POSPRO APPLICATION
NOT USED IN POSPRO APPLICATION
Purse Type 1 on the card
Purse Type 2 on the card
The COM port on the PosPRO PC (or on the PayCon?)???
used to connect the PayCon to the PosPRO till.
To set it on a COM port use this value: \\.COM#
(where # is the number of the COM port). If a PayCon isn't
used leave this value empty.
NOT USED IN POSPRO APPLICATION
NOT USED IN POSPRO APPLICATION
NOT USED IN POSPRO APPLICATION
NOT USED IN POSPRO APPLICATION
NOT USED IN POSPRO APPLICATION
NOT USED IN POSPRO APPLICATION
NOT USED IN POSPRO APPLICATION
NOT USED IN POSPRO APPLICATION
Activate the ability to use OPOS devices (0=No, 1=Yes)
Is a laserprinter connected to print out the reports? (0=No,
1=Yes)
Print a receipt directly when the transaction has been
concluded? (0=No, 1=Yes)
Always print a VAT receipt (0=No, 1=Yes)
Always print a duplicate receipt (0=No, 1=Yes)
Activate 'Closed Drawer Check' (check if the drawer is closed
at the end of every transaction (0=No, 1=Yes)
Choose the layout of the receipt (0-4) See page 39 for an
overview of the available layouts
Print a VAT mark for each item on the receipt (0=No, 1=Yes)
Print the discounts on the receipt (0=No, 1=Yes)
Print the item code large on items that have a photo (0=No,
1=Yes)
Print the name of the customer on the receipt (0=No, 1=Yes)
Activate the alternative layout for the TMT90 printer (0=No,
1=Yes)
Duplicate of the 'Print Name' value
Version 5.0.1 Inepro B.V.
Configuration, PosPRO.ini
37
[system]
IP address gateway=
Comport EFT device=0
The connected type of EFT terminal:
0=<No terminal connected>
1=HFT201 - PIN only
2=HFT201 - Creditcard only
3=HFT201 - ChipKnip (Dutch system) only
4=BAXX (Norwegian system)
5=PayCon Connected EFT terminal
6=Xenta / Xenteo terminal
7=CCV / CTAP terminal
Print the EFT log on the receipt (0=No, 1=Yes)
Print the EFT reports (0=No, 1=Yes)
Synchronize the realtime clock of the till with the time from the
EFT terminal
Activate the early swipe option of the EFT terminal (0=No,
1=Yes)
IP-address of the EFT gateway
COM port on which the EFT terminal is connected
[end of day]
Print report01=0
Print report02=0
Print report03=0
Print report04=0
Print report05=0
Print report06=0
Print report07=0
Print report08=0
Print report09=0
Print report10=0
Use the Terminal report in the end-of-day report
Use the Department report in the end-of-day report
Use the Article report in the end-of-day report
Use the Payment Type report in the end-of-day report
Use the Revalue report in the end-of-day report
Use the Card report in the end-of-day report
Use the Product Changes report in the end-of-day report
Use the Hour report in the end-of-day report
Use the Cost Centre report in the end-of-day report
Use the Cost Centre Detail report in the end-of-day report
Type of EFT terminal=0
Print EFT ticket=0
Print EFT reports=0
EFT terminal time synchronisation=1
Early swipe=0
Version 5.0.1 Inepro B.V.
http://www.inepro.com
38
Technical Manual
[screen]
Use PayIn PayOut function=0
Info-messages timeout=15
GroupTab as default tab=1
Always Return to main tab=1
Initialise tabs by new transaction=1
Main tab=
Tabsheet Period 1=
Time start Period 1=00:00
Tabsheet Period 2=0
Time start Period 2=
Tabsheet Period 3=0
Time start Period 3=
Tabsheet Period 4=0
Time start Period 4=
Use only one product tab=0
Cummulate linked items=0
Direct product search on productInfo=1
Use the Intuitive keyboard=1
Use Keyboard sound=0
Hide mouse pointer=0
Display price on presets=0
Display PLU-number on presets=0
Display shortname=1
Use picture color as button color=0
Subtotal visible in Idle mode=0
Use second status monitor=0
Subscreens timeout=15
Stretch pictures=1
Use sunbed minute stepper=1
Extended welcome screen=0
Name bitmap background=
ShowInfoScreenSunbeds=1
ShowInfoScreenCards=1
ShowInfoScreenProducts=1
Screen-layout type=0
VAT Toggle type=2
[coinco]
Comport MDB devices=0
Changer maximum overtender=0
Changer overtender round value=500
Changer minimal level coins=0
Changer display tubes=1
Changer use automatic dispense function=1
[vending]
Comport vending=0
Baudrate=9600
DataBits=8
StopBits=1
Parity=0
FlowControl=0
NumberOfItems=1
TimeOut=5
http://www.inepro.com
Use the Pay-in / Pay-Out function (0=No, 1=Yes)
Timeout for the info message windows (in seconds)
Use the Article groups as default tab (0=No, 1=Yes)
Jump to the default tab at the entry of each item (0=No, 1=Yes)
Jump to the default tab at the end of a transaction (0=No,
1=Yes)
The ID of the Presentation Layer you want as your Main tab
The ID of the Presentation Layer you want as your Main tab for
the first period.
Start time of the first period
The ID of the Presentation Layer you want as your Main tab for
the second period.
Start time of the second period
The ID of the Presentation Layer you want as your Main tab for
the third period.
Start time of the third period
The ID of the Presentation Layer you want as your Main tab for
the fourth period.
Start time of the fourth period
Use only one product tab (0=No, 1=Yes)
Cumulate linked items to 1 artikel line (0=No, 1=Yes)
Activate the product search screen when pressing the info
button. (0=No, 1=Yes)
Use the intuitive keyboard (keys that can not be used will
disappear) (0=No, 1=Yes)
Make a sound every time a button is pressed (0=No, 1=Yes)
Hide the mouse pointer (0=No, 1=Yes)
Show the price on the preset buttons (0=No, 1=Yes)
Show PLU of a product on the preset buttons (0=No, 1=Yes)
Use the shortname for the description on the preset buttons
FUNCTION NOT YET IMPLEMENTED
Subtotal button visible in IDLE mode (0=No, 1=Yes)
NOT USED IN POSPRO APPLICATION
NOT USED IN POSPRO APPLICATION
NOT USED IN POSPRO APPLICATION
NOT USED IN POSPRO APPLICATION
NOT USED IN POSPRO APPLICATION
NOT USED IN POSPRO APPLICATION
NOT USED IN POSPRO APPLICATION
NOT USED IN POSPRO APPLICATION
NOT USED IN POSPRO APPLICATION
NOT USED IN POSPRO APPLICATION
0=Always use first VAT tariff (VAT), 1=Use the VAT tariff
chosen by the employee (if available in the product definition) also known as 'eat-in / eat-out', 2=Overwrite the complete
transaction with this VAT tariff.
COM port of the Multi Drop Bus (MDB) device (NOT USED IN
POSPRO APPLICATION)
Maximum amount of overtender (the surplus of the payed
amount) (NOT USED IN POSPRO APPLICATION)
NOT USED IN POSPRO APPLICATION
NOT USED IN POSPRO APPLICATION
Display the tube content of the CoinCo (0=No, 1=Yes) (NOT
USED IN POSPRO APPLICATION)
The denomination division method for dispensing change.
(0=PosPRO method 1=CoinCo method) (NOT USED IN
POSPRO APPLICATION)
NOT USED IN POSPRO APPLICATION
NOT USED IN POSPRO APPLICATION
NOT USED IN POSPRO APPLICATION
NOT USED IN POSPRO APPLICATION
NOT USED IN POSPRO APPLICATION
NOT USED IN POSPRO APPLICATION
NOT USED IN POSPRO APPLICATION
NOT USED IN POSPRO APPLICATION
Version 5.0.1 Inepro B.V.
Configuration, PosPRO.ini
[relais]
Pre-time relais switch=0
Cleaning button seconds=2
Security relais=0
Use whole session time relais=0
Security relais time=120
NOT USED IN POSPRO APPLICATION
NOT USED IN POSPRO APPLICATION
NOT USED IN POSPRO APPLICATION
NOT USED IN POSPRO APPLICATION
NOT USED IN POSPRO APPLICATION
[end of week]
End of the week day (1:Monday)=7
Financial report=0
Refill report=0
Logon report=0
BurningHours report=0
SunbedUsage report=0
ProductSale report=0
Journal report=0
Department report=0
No description available yet
No description available yet
No description available yet
No description available yet
No description available yet
No description available yet
No description available yet
No description available yet
No description available yet
39
3.6
Receipt Layout
When a transaction has been made, the customer might want a receipt, this
receipt is available in a number of layouts and can be preset in the PosPRO.ini in
de printer section 36 .
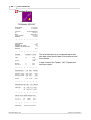
Receipt Type 0
Receipt Type 1
** INEPRO POSPRO **
** INEPRO POSPRO **
QTY DESCRIPTION
------- ----------------------1
Hamburger
1
Pizza Wedge
1
Tuna Sandwich
1
Homemade Cake
1
Bread Roll
PRICE AMOUNT
--------- -----------1,30
1,30
2,25
2,25
1,40
1,40
0,85
0,85
0.35
0.35
QTY DESCRIPTION
------- ----------------------1
Hamburger
1
Pizza Wedge
1
Tuna Sandwich
1
Homemade Cake
1
Bread Roll
PRICE AMOUNT
--------- -----------1,30
1,30
2,25
2,25
1,40
1,40
0,85
0,85
0.35
0.35
SUBTOTAL
6,15
SUBTOTAL
6,15
TOTAL
6,15
TOTAL
6,15
Cash
6,15
Cash
6,15
CHANGE
0,00
Thanks for your visit
And have a nice day
Thanks for your visit
And have a nice day
OPER:0001 Ticket:0040 2010-03-15 14:10:01
OPER:0001 Ticket:0039 2010-03-15 14:10:01
Layouts 0 en 1 have also the possibility to show VAT. This can be set in the
PosPRO.ini under the Printer header.
Version 5.0.1 Inepro B.V.
http://www.inepro.com
40
Technical Manual
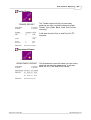
Receipt Type 2
Receipt Type 3
** INEPRO POSPRO **
** INEPRO POSPRO **
------- ----------------------DATE
15-03-2010
------- ----------------------Hamburger
1x
--------------------TIME
14:10:01
---------------------
1,30 Euro
Pizza Wedge
1x
2,25 Euro
1,40 Euro
1x
2,25 Euro
1x
1,40 Euro
Homemade Cake
0,85 Euro
Bread Roll
1x
1,30 Euro
Tuna Sandwich
Homemade Cake
1x
1x
--------------------TIME
14:10:01
---------------------
Pizza Wedge
Tuna Sandwich
1x
------- ----------------------DATE
15-03-2010
------- ----------------------Hamburger
1x
0,85 Euro
Bread Roll
0.35 Euro
Thanks for your visit
And have a nice day
OPER:0001 Ticket:0039 2010-03-15 14:10:01
1x
0.35 Euro
SUBTOTAL
6,15
TOTAL
6,15
Cash
6,15
Thanks for your visit
And have a nice day
OPER:0001 Ticket:0040 2010-03-15 14:10:01
http://www.inepro.com
Version 5.0.1 Inepro B.V.
Configuration, Receipt Layout
QTY
Receipt Type 4
Receipt Overview
** INEPRO POSPRO **
<Header text>
DESCRIPTION
------- -----------------------
PRICE AMOUN
T
-----------------------
Hamburger
1x
1,30 Euro
Pizza Wedge
1x
2,25 Euro
Tuna Sandwich
1x
1,40 Euro
Homemade Cake
1x
0,85 Euro
Bread Roll
1x
41
<-- PosProLogo.bmp
QTY DESCRIPTION
------- ----------------------1
Hamburger
1
Pizza Wedge
1
Tuna Sandwich
1
Homemade Cake
1
Bread Roll
PRICE AMOUNT
--------- -------------1,30
1,30
2,25
2,25
1,40
1,40
0,85
0,85
0.35
0.35
SUBTOTAL
6,15
TOTAL
6,15
Cash
6,15
<Footer text>
OPER:<OperatorID> Ticket:<TicketID> <Date> <Time>
0.35 Euro
SUBTOTAL
6,15
TOTAL
6,15
Cash
6,15
Thanks for your visit
And have a nice day
OPER:0001 Ticket:0039 2010-03-15 14:10:01
A receipt consist of the following elements:
· The logo (In the example a purple square with the text 'Your Logo' and a yellow
star)
· Header text (In the example "
** Inepro POSPRO **")
· Product List with prices
· Subtotal
· Total
· (optional) Cash amount
· (optional) amount of change
· Footer text (In the example "Thank you for visiting,"<EOL><CR> "And have a
nice day")
· Ticket properties
You can customize the logo on the receipt choose the layout and adapt the
header and footer text.
All the changes are made in the PosPRO directory (by default C:\Program
Files\Inepro\PosPRO).
Version 5.0.1 Inepro B.V.
http://www.inepro.com
42
Technical Manual
Logo
The logo is an image printed on the top of the receipt, aligned in the center. If no
image is present in the directory, no image is printed on the receipt.
To change the logo go to C:\Program Files\Inepro\PosPRO\Pictures and create
or change the PosPROlogo.bmp file.
The file should be monochrome and should be less then 4 Kilobyte in size. If
these restrictions are not adhered the image will not be printed.
Header text
The header text is the text directly printed under the logo image (if one is
present).
It is usually used for presenting the company name.
To change the logo go to C:\Program Files\Inepro\PosPRO\Text and edit the file
header.text
There are no known restrictions for the header text.
Receipt content (Product list with prices)
The receipt content is the transaction information and can not be changed. It will
show per line how many items are sold, the item description, price per item and
the price for the items sold.
Furthermore it will show the subtotal and the total price, if used VAT, and
depending on the layout, with how many cash was payed, and the amount of
change that should be returned.
Footer text
The footer text is printed directly underneath the receipt content.
It is usually used to thank the customer for their visit and wish them a nice day.
To change the logo go to C:\Program Files\Inepro\PosPRO\Text and edit the file
footer.text
There are no known restrictions for the footer text.
Receipt properties
The bottom line of the receipt has the receipt information.
You will find the Operator: 'OPER:0001', Ticket sequencial ID: 'Ticket:0039' and a
date time stamp: '2010-03-15 14:10:01'.
The timestamp is in the format: 'yyyy-dd-mm HH:MM:SS'.
http://www.inepro.com
Version 5.0.1 Inepro B.V.
User Interface,
43
User Interface
In 'User Interface' we will deal with all the different modules of the PosPRO
software.
Below you will find a short description of each button (module) in the main menu:
Module
Start 45
Pause 50
Logoff 51
Reports 63
End of Day
51
Cash Count 52
Stock Control 70
Close 69
Version 5.0.1 Inepro B.V.
Purpose
Sales, the selling of products and operation of the cash drawer.
You log off , your username is remembered, and only you can log in again.
You log off and everybody with a valid logon name and password can log in.
Print overviews / reports on the receipt printer.
Create a compound report by combining one or more reports (as specified in the
PosPRO.ini).
To make the Cash Count, are there any differences?
Stock Control, Managing your stock, giving you order advise
Closing the application, for this action the right authorisation is required.
http://www.inepro.com
44
Technical Manual
4.1
Log In
If PosPRO is started, you will be asked to log in. Enter your username and
password. (To add or edit a username and password use the Inepro Back Office
Manager. In the Authorisation menu you are able to grant an employee the rights
for the Inepro Back Office manager and give him a username and Password for
the PosPRO tills. For more information look at page 26 ).
After logging in you will enter the main menu. The most important option of the
PosPRO till is of course 'Start' (Sales), this will lead you to the Sales screen and
will allow you to sell your products.
http://www.inepro.com
Version 5.0.1 Inepro B.V.
User Interface, Sales
45
4.2
Sales
The sales window is one of the most important windows in the PosPRO
application. In this windows the products are being sold.
Let's take you trough the different buttons that can appear on the screen.
Note: Most of these buttons you will not see, because of the intuitive keyboard
function, which will hide all the buttons that the employee will not need at that
moment.
Title bar
On top of the Sales screen you find the title bar with 'PosPRO' and the clock with
date and time.
When you click the title bar the PosPRO version text will appear, showing you
which version of PosPRO you are using.
Employee ID
Employee ID will show which employee is currently logged in.
Status
This will show the current status, in this example 'Waiting'.
Transaction Parked
Transaction Parked will show a 'P' when a transaction has been parked.
Version 5.0.1 Inepro B.V.
http://www.inepro.com
46
Technical Manual
VAT description
This will show the description of the current VAT applied.
Card Number
Card Number shows you the card number of the current customer (provided he is
paying with his card).
System announcements
System announcements will give the employee a hint what should happen next.
Product Multiplier
Product Multiplier will tell you how many times the product will be charged.
Product / Product Groups
Product / Product Groups will either show you the groups of products available on
the till or it will show you the products themselves.
Transaction Details / Receipt
Receipt will show you a preview on the receipt. It will show you in which quantity
you are buying the product and what it will cost.
Park Transaction
Park Transaction will allow you to 'park' a transaction. For instance when the
customer has forgotten his wallet, and must retrieve it. The employee can then
park his transaction, keep the items aside and go on with the other customers
until the customer who forgot his wallet returns. He will then pull up his
transaction and finish it.
Open Drawer
Open Drawer will open the cash drawer.
Pay Out / Pay In
In some cases it is needed to either add cash to the till or to make an external
payment with money from the till. For instance paying for a package that is being
delivered or the service of a window-cleaner. These payment can be registered
with the 'Pay Out' and 'Pay In' buttons.
Toggle Products / Product Groups
When you are selecting products, but you made a mistake and need to be in
another product group. Click this button to go back to the screen that has all the
product groups.
http://www.inepro.com
Version 5.0.1 Inepro B.V.
User Interface, Sales
47
Product Info
To find more information about a product, find a product, or to look up the article
number you can click the button 'Info'. In the information screen that will open you
can enter a description, an article number or pick a department and click 'Search'
to see all the information about the product.
Return to Main screen
The 'Close' button will take you back to the main screen, where you can chose
one of the other modules, log off, take a break or close the application.
Entry Field
In the entry field you can enter the PLU code and the number to multiply the
current product with.
Backspace / Delete character
The 'Backspace' will delete the last character in the entry field, just like the
backspace on a computer keyboard.
PLU-code
The Price Look-Up code button will allow you to quickly enter an article of which
you know the PLU-code. First enter the PLU-code and then click the PLU button.
Times / Multiply by
Click this button to sell the current product multiple times. Click the button and
then enter the quantity in which the product should be sold.
Version 5.0.1 Inepro B.V.
http://www.inepro.com
48
Technical Manual
Correction Functions
Where people are working errors will be made, this is unavoidable.
Input mistakes
But mistakes can not be overlooked, so the PosPRO till will block it's functions
when an input error has been detected. The following message will be shown:
You need to click on 'OK' to return to the till and then retry the action you needed
to perform.
Input errors can not occur when you are using the intuitive keyboard.
Recall
Use 'Recall' to search trough the old transactions, and review a transaction from
the past. So you can for instance check a claim from a customer.
Cancel
Use 'Cancel' to cancel the complete transaction.
http://www.inepro.com
Version 5.0.1 Inepro B.V.
User Interface, Sales
49
Void
Use 'Void' to handle a sale return.
Correction
Use 'Correction' to delete the last transaction line.
Clear
Use 'Clear' to empty the entry field or when you made a mistake and click to
wrong payment type (the payment type buttons, will reappear on the screen).
Special functions
The special function will handle printing, VAT functions and revaluing Inepro
cards.
Open Group High
Open Group High will add VAT to the product at the high VAT rate. A special
product with the product code 9999 should be added, the open price check
should be ticked and the VAT value should be set to the high VAT rate. This
product should be added to the PosPRO product template of the till, but doesn't
have to be part of a PosPRO Product Group or a Presentation Layer. To learn
more about creating a product please refer to page 27 .
Open Group Low
Open Group Low will add VAT to the product at the low VAT rate. A special
product with the product code 9998 should be added, the open price check
should be ticked and the VAT value should be set to the low VAT rate. This
product should be added to the PosPRO product template of the till, but doesn't
have to be part of a PosPRO Product Group or a Presentation Layer. To learn
more about creating a product please refer to page 27 .
Revalue
Revalue allows you to add value to a Inepro user card. A special product with the
product code 10000 should be added, the open price check should be ticked.
This product should be added to the PosPRO product template of the till, but
doesn't have to be part of a PosPRO Product Group or a Presentation Layer. To
learn more about creating a product please refer to page 27 .
Eat out / Overwrite all VAT
Eat out will charge the second VAT in stead of the VAT value of the product. This
will be used when the government want you to charge a different VAT for
products eaten inside and products eaten outside your establishment.
EFT Print
EFT Print will print out the EFT receipt, this is driven from the EFT device itself,
so the layout can not be set or effected by the PosPRO application.
Print
Print wil print out the receipt, or a copy receipt if the receipt has already been
printed. See page 39 for an overview of the available layouts and how to set
them.
Version 5.0.1 Inepro B.V.
http://www.inepro.com
50
Technical Manual
Price Change
Price Change will overwrite the base price of the article! The employee can set
the price as if the product had an open price. There are few circumstances in
which you will need this function, if possible either use discounts or 'open price'.
Discounts
You can give a discount by selecting the product, typ in the hight of the discount
and press '%' to apply a percentual discount or 'Discount' to apply a absolute
discount.
The discount will apear below the product on the receipt section (and on the
receipt itself).
4.3
Pause
When an employee will take a break, he will need to use this option. The
employee will log out, but the username will stay fixed, ensuring that only this
employee can log in again. In this way they employee can still held responsable
for the cash in his cash drawer. To give another employee the possibility to log in,
the 'Log off ' option must be chosen.
http://www.inepro.com
Version 5.0.1 Inepro B.V.
User Interface, Log Off
51
4.4
Log Off
Log off will be used when an employee ends his shift and another employee must
be able to log in again.
4.5
End Of Day
The End of Day report is a compound report of the current day.
Line in PosPRO.ini
Description
Header, you wil find the values below in this section of the
[end of day]
PosPRO.ini
Reserved for future use
Print report01=n
Use the Department report in the end of day report
Print report02=n
Use the VAT report in the end of day report
Print report03=n
Use the Revalue report in the end of day report
Print report04=n
Use the Item report in the end of day report
Print report05=n
Reserved for future use
Print report06=n
Reserved for future use
Print report07=n
Reserved for future use
Print report08=n
Reserved for future use
Print report09=n
Reserved for future use
Print report10=n
Where n is either '1' or '0' meaning enabled or disabled.
You can decide of which reports will be shown in the End of Day report, in the
PosPRO.ini file. Read more about configuring the *.ini files in this chapter:
PosPRO.ini 34 '.
Version 5.0.1 Inepro B.V.
http://www.inepro.com
52
Technical Manual
4.6
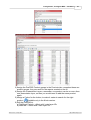
Cash Count
In the Cash Count module you are able to digitally perform the cash count
procedure. It will show you in the first column the total amount of money received
per payment type. In the second column you can declare what the amount
counted is per payment type, the difference will be shown in the third column.
You are able to accept the differences (to a certain level or even zero-tolerance,
specified in the PosPRO.ini) by clicking the booking button. <Back> will leave the
module without performing the Cash Count procedure.
It is also possible to hide the first and last column, making it impossible for an
employee to perpetrate fraud by entering the 'right' numbers. Of course it is
possible to give a margin, so the Cash Count procedure can be finished with
minor cash differences.
This margin can be set in the PosPRO.ini. See page
http://www.inepro.com
35
.
Version 5.0.1 Inepro B.V.
User Interface, PosPRO Manager
53
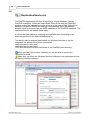
4.7
**** This chapter is not complete, awaiting decision on
PosPRO manager continuation ***
**** This chapter is therefore temporarily excluded from
printing or compiling
***
PosPRO Manager
The manager is has two sub options, the Manager and Configuration.
Version 5.0.1 Inepro B.V.
http://www.inepro.com
54
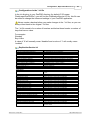
Technical Manual
Manager
Budgets
http://www.inepro.com
Version 5.0.1 Inepro B.V.
User Interface, PosPRO Manager
55
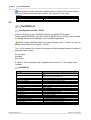
Ledgers
Departments
Version 5.0.1 Inepro B.V.
http://www.inepro.com
56
Technical Manual
Products
Promotions
http://www.inepro.com
Version 5.0.1 Inepro B.V.
User Interface, PosPRO Manager
57
Card Revalues
Suppliers
Version 5.0.1 Inepro B.V.
http://www.inepro.com
58
Technical Manual
Jobs
Configuration
http://www.inepro.com
Version 5.0.1 Inepro B.V.
User Interface, PosPRO Manager
59
Employees
VAT
Version 5.0.1 Inepro B.V.
http://www.inepro.com
60
Technical Manual
Stores
Authorisation
http://www.inepro.com
Version 5.0.1 Inepro B.V.
User Interface, PosPRO Manager
61
Open Close Procedures
Key Action
Version 5.0.1 Inepro B.V.
http://www.inepro.com
62
Technical Manual
Payment Types
Item Hardware Code
http://www.inepro.com
Version 5.0.1 Inepro B.V.
User Interface, PosPRO Manager
63
Presentation Layer
4.8
Reports
The PosPRO till has the ability to print a number of reports, for each report you
select a start and end date and click 'Print' to print out the report.
The reports are described below with an example receipt as reference.
Almost all reports will have the VAT, gross and net price, in all ther cases the net
price is used.
Version 5.0.1 Inepro B.V.
http://www.inepro.com
64
Technical Manual
Terminal Report
** INEPRO POSPRO **
TERMINAL REPORT
FROM DATE
TO DATE
31-03-2010
31-03-2010
Computer
IP
Store
Inepro PosPRO
Database
-+-
-+-
-+-
MyComputerName
127.0.0.1
MyCompany
v4.18.0.0
v4.18.0
-+-
-+-
-+-
-+-
CUSTOMERS
AMOUNT
NUMBER OF ITEMS
NUMBER OF DISCOUNTS
AMOUNT
-+-
-+-
-+-
-+-
TENDER
---------------Cash
-+-
13
75,50
63
2
2,17
-+-
0
0
-+-
-+-
DESCRIPTION
---------------------Vat None 0,00%
Vat Low 6,00%
Vat High 19,00%
TOTAL
-+-
-+-
-+-
-+-
0,00
0,00
-+-
VAT
-----0,00
0,03
0,08
-----0,11
-+-
-+-
-+-
HOURS CUST
---------- -------10 - 11 5
11 - 12 8
-+-
-+-
-+-
OPER:0001
http://www.inepro.com
-+-
-+-
-+-
-+-
The terminal report is a compound report that
also has some specific data of the terminal and
the software.
It also contains the Tender, VAT, Department
and Hour report.
-+-
NET GROSS
------- ---------74,53
74,53
0,42
0,45
0,44
0,52
------- ---------75,39
75,50
DESCRIPTION QTY NET
------------------- ------ -------Cashregis
63 75,39
------ -------63 75,39
-+-
-+-
======
75,50
PAY IN
PAY OUT
-+-
-+-
QUANTITY TOTAL
-------------- --------13
75,50
TOTAL
-+-
-+-
-+-
-+-
VAT
------0,11
------0,11
-+-
-+-
GROSS
---------75,50
---------75,50
-+-
-+-
ITEMS AMOUNT AVG
-------- ------------ ---------22
25,95
5,19
41
49,55
6,19
-+-
-+-
-+-
-+-
-+-
2010-03-31 12:20:59
Version 5.0.1 Inepro B.V.
User Interface, Reports
65
Tender Report
** INEPRO POSPRO **
TENDER REPORT
FROM DATE
TO DATE
TENDER
---------------Cash
31-03-2010
31-03-2010
QUANTITY TOTAL
-------------- --------13
75,50
The Tender report will tell you how many
products are sold, at which total amount per
Tender Type (Cash, Bank, Card, Cost Centre,
etcetera).
It will also show the Pay In and Pay Out
amounts.
46
======
75,50
TOTAL
PAY IN
PAY OUT
OPER:0001
0
0
0,00
0,00
2010-03-31 12:20:59
Department Report
** INEPRO POSPRO **
DEPARTMENT REPORT
FROM DATE
TO DATE
31-03-2010
31-03-2010
DESCRIPTION QTY NET VAT
-------------------- ------ -------- ------Cashregis
63 75,39 0,11
------ -------- ------63 75,39 0,11
OPER:0001
Version 5.0.1 Inepro B.V.
The Department report will show you how many
products are sold per department, it will also
show the VAT, Net and Gross values.
GROSS
---------75,50
---------75,50
2010-03-31 12:21:35
http://www.inepro.com
66
Technical Manual
Overview Mutations
** INEPRO POSPRO **
OVERVIEW MUTATIONS
FROM DATE
TO DATE
31-03-2010
31-03-2010
------------------------------------------------[REMOVE]
101
7-up
0,80
[MUTATION]
Milk
109
[REMOVE]
Coca Cola
18
OPER:0001
Overview Mutations is not so much a report as it
is a log of which products have undergone
changes in the specified period.
Warning: This can be a long report!
0,90
0,90
2010-03-31 12:22:13
VAT Report
** INEPRO POSPRO **
V.A.T. REPORT
FROM DATE
TO DATE
31-03-2010
31-03-2010
DESCRIPTION
---------------------Vat None 0,00%
Vat Low 6,00%
Vat High 19,00%
TOTAL
OPER:0001
http://www.inepro.com
VAT
-----0,00
0,03
0,08
-----0,11
The VAT report will show the total amount of
applied VAT per VAT rate.
It will also show the Net and Gross values.
NET GROSS
------- ---------74,53
74,53
0,42
0,45
0,44
0,52
------- ---------75,39
75,50
2010-03-31 12:22:43
Version 5.0.1 Inepro B.V.
User Interface, Reports
67
Hour Report
The Hour report will show you per hour the
number of customers, number of products sold,
the total amount of product sold and the average
amount spend per customer.
** INEPRO POSPRO **
HOUR REPORT
FROM DATE
TO DATE
HOURS CUST
---------- -------10 - 11 5
11 - 12 8
OPER:0001
31-03-2010
31-03-2010
ITEMS AMOUNT AVG
-------- ------------ ---------22
25,95
5,19
41
49,55
6,19
So '10 - 11' and '11 - 12' means the data is
shown for the period between 10:00 and 11:00
on the first line, and for the period between
11:00 and 12:00 on the second line.
2010-03-31 12:22:59
Revalue Report
Revaluations
It is possible to use the PosPRO till to revalue
Inepro User Cards. This report will show you an
overview of all card revaluations, and the
optional revalue bonuses.
** INEPRO POSPRO **
REVALUE REPORT
FROM DATE
TO DATE
31-03-2010
31-03-2010
CARD REVALUE (GROSS)
CARD REVALUE BONUS
CARD REVALUE (NET)
TOTAL BALANCE ON
CARDS
OPER:0001
0,00
0,00
------------0,00
0,00
2010-03-31 12:22:13
Revaluations (Gross) is the total amount that a
customer have received as a revaluation on their
cards. This amount is split up into the net and a
bonus revaluations.
The net revaluating amount is the amount that
the customer has loaded on his card. But rules
can be created that will dictate that when a
customer revaluates a x amount, he will get a y
bonus amount added to the x amount.
These are the bonus revaluations.
Total balance on cards
The total balance on the cards is the total
amount of money all the users have on their
cards at exactly this moment, according to the
system.
Version 5.0.1 Inepro B.V.
http://www.inepro.com
68
Technical Manual
Cost Centre Report
** INEPRO POSPRO **
COST CENTER REPORT
FROM DATE
TO DATE
31-03-2010
31-03-2010
The total number of products and the total
amount is shown per cost centre.
COST CENTRE
QTY AMOUNT
------------------------------------------------test
6
29,49
========
=
TOTAL
29,49
OPER:0001
2010-03-31 13:29:15
Item Report
** INEPRO POSPRO **
ITEM REPORT
FROM DATE
TO DATE
31-03-2010
31-03-2010
PRODUCT
QTY AMOUNT
------------------------------------------------Pepsi Cola
1
0,80
Bounty
3
1,80
M&Ms chocolate
1
0,60
Mars
2
1,20
Cookie
4
1,20
Bread Roll
5
1,75
Tuna Sandwhich
13
18,20
Pizza Wedge
10
20,33
Hamburger
15
22,70
Homemade Cake
7
5,95
OP Low
1
0,45
Op High
1
0,52
========
=
TOTAL
29,49
OPER:0001
http://www.inepro.com
The item report shows how many times a
product has been sold, the product name,
quantity and total amount is shown.
2010-03-31 12:23:42
Version 5.0.1 Inepro B.V.
User Interface, Reports
69
Cost Center Details Report
** INEPRO POSPRO **
COST CENTER REPORT
FROM DATE
TO DATE
31-03-2010
31-03-2010
COST CENTRE
QTY AMOUNT
------------------------------------------------[4] test
- 2010-03-31 13:23:49
4,95
(Cost Centre [4])
- 2010-03-31 13:27:46
(Cost Centre [4])
10,15
- 2010-03-31 13:28:01
(Cost Centre [4])
5,41
- 2010-03-31 13:28:12
(Cost Centre [4])
3,55
- 2010-03-31 13:28:33
(Cost Centre [4])
1,53
- 2010-03-31 13:28:59
(Cost Centre [4])
3,90
Warning: This can be a long report!
========
=
29,49
TOTAL
OPER:0001
The Cost Center detail report shows the total
amount for each cost centre transaction,
grouped by Cost Centre.
2010-03-31 13:29:27
4.9
Close
To close the application, choose 'Close' and enter your employee number to
confirm.
Version 5.0.1 Inepro B.V.
http://www.inepro.com
70
Technical Manual
4.10
Stock Control
Configure the PosPRO.ini.
To use stock control you need to set the 'Use stock control' option under [general]
in the PosPRO.ini to '1'.
To learn how to change the PosPRO.ini file, go to the chapter PosPRO.ini on
page 34 .
Stock Control module
The Stock Control module will give you the option to manage your stock. You can
manage your orders, the back-orders and actual stock. Of course Stock control
will also take your shelf capacity and the minimum order quantity into account.
To manage the stock of a product, enter the Product ID. If you do not know the
ID, use the search button. To learn more about Product Search go to page 47 .
When you have selected the product you will see the actual stock, shelf capacity,
the order size the supplier will deliver the product in, and the minimum stock you
have set for this product.
You will also see the number of product you ordered and should that be the case
the back order.
Shelf Capacity
The maximum capacity of the shelf this product can stored on.
http://www.inepro.com
Version 5.0.1 Inepro B.V.
User Interface, Stock Control
71
Order Size
The quantity in which this product must be ordered.
Minimum Stock
The minimum amount of stock you want to have present at the shelf.
Order
'Order' will register the number of products that is present in the field 'order
quantity' as ordered.
Incoming
'Incoming' will register that you have received the number of products that is
present in the field 'order quantity' and add them to the stock.
Order Advice
'Order Advice' will print out the order advices for this product. An order advice is
the result of a calculation that will provide you with the minimum stock needed but
with regard to the order size and shelf capacity restrictions.
Open Orders
'Open Orders' will print out the outstanding orders.
Overview
'Overview' will print out an overview of the current stock.
Finalize
With 'Finalize' you will confirm and carry out all of the performed actions.
Inepro Back Office Manager - CashPRO
5.1
Start Inepro Back Office Manager
If the Inepro Back Office Manager is installed it can be opened in the Window
start menu ('Start' -> 'Inepro Back Office Manager'). A message with a Login and
Password field will appear. Choose or type the correct username by clicking the
combobox list arrow, and enter the password with the help of the on-screen
keyboard.
Version 5.0.1 Inepro B.V.
http://www.inepro.com
72
Technical Manual
You can start the on-screen keyboard by clicking 'Start' -> 'On-Screen
keyboard'.
5.2
Reports
The Inepro Back Office Manager offers you a great number of reports. These
reports can be found in the 'Report' menu.
It is wise to always fill out the date fields and to specify the device or device
group.
Reports can be printed at the printers connected to the network.
http://www.inepro.com
Version 5.0.1 Inepro B.V.
IBOM - CashPRO, Device Log
73
5.3
Device Log
In the device log you are able to look at all the transactions. Pick the PosPRO till
in the Device field and set a period. The list will be created when you click on the
'Run' button. Is the user unknown, it will usually concerns a cash payment. In the
transaction log you will always see the product(s) first, then the subtotal and total,
followed by the payment. If there is also a negative payment, then the customer
has received change.
5.4
User Log
In the User Log the user transactions are shown. The list will be shown per user,
which you can choose in the combobox. It is best to summon up the on-screen
keyboard again to use text input the pick the user from the combobox as the
touchscreen interface might be inefficient for this purpose.
The instructions are almost the same as for the Device Log, so set a period and
click on the 'Run' button to create the list. Is the user unknown, it will usually
concerns a cash payment. In the transaction log you will always see the
product(s) first, then the subtotal and total, followed by the payment. If there is
also a negative payment, then the customer has received change.
Solving challenges
Q
I have changed my logo, but it does not show on the receipt?
A
1) Is it the first receipt after changing the logo?
a) If so, you should know that the first time after the logo is changed, and
PosPRO is restarted, the logo is not printed on the receipt. This is because
Version 5.0.1 Inepro B.V.
http://www.inepro.com
74
Technical Manual
the printer has already printed the (last) logo on the first part of the receipt
that will be printed after the next transaction.
b) Reprint the receipt, the logo should be on there now.
2) Is the logo bigger than 4 K(kilobyte) or is the image not saved as a
monochrome image?
a) Our system supports only images that are smaller than 4 K and are saved
as a monochrome image.
Q
I have edited my header- and footer text, but only the footer text is changed on
the receipt?
A
1) Is this the first receipt after the header text has been changed?
a) The first time after editing the header text and restarting of the PosPRO
application, the header text will not be printed. This is because the header
text has already been printed on the first part of the receipt that will be
printed after the next transaction.
b) Reprint the receipt, the header text should be on there now.
Q
The power is on, so why those the screen remain black?
A
1) Check that the external power adapter LED is on when the power adapter
power switch is in the on position.
2) Check that the Power and CPU fans are running when system power is on.
a) Call the Inepro Helpdesk, it could be one of these problems:
i) Check whether the ATX power switch cable is properly connected to
mainboard J40 (Please refer to 4720 User’s guide).
ii) Check that the power cable is connected properly between 9000PB0700
primary I/O board CON101 and mainboard J2.
iii) Check the 12V CPU Power cable is connected properly between CON101
of I/O board 9000PB0700 to J13 on the motherboard.
3) Call the Inepro Helpdesk, it could be one of these problems:
a) Please ensure that the IDE cable is properly connected to the HDD and the
red stripe on the ribbon cable is aligned with PIN 1 on the IDE connector of
HDD.
b) Reset CMOS DATA by shorting mainboard JP2 PIN3 and PIN2 for a few
seconds (Please refer to 4720 User’s guide).
c) Check if the system is beeping.
i) A single long repeated beep indicates that a DRAM error has occurred.
Make sure DRAM is properly installed or replace DRAM.
ii) One short beep after power on, means the system board is OK, but the
LCD panel or onboard VGA interface could be defective.
(1)Check CMOS Setup/Advanced Chipset Features/Panel Number is set
to 800x600 resolution. Note. If this setting has been accidentally set to
a resolution higher than 800x600 you will need to attach an external
monitor to the VGA port to be able to see the CMOS Setup screen.
Also check Boot Display = CRT+LVDS
(2)Check the inverter cable is connected properly between the Inverter
and motherboard J37.
http://www.inepro.com
Version 5.0.1 Inepro B.V.
Solving challenges,
75
(3)The connection between the LVDS connector on motherboard J38 and
the LCD panel is not connected properly or LCD cable could be
defective.
(4)The Inverter cannot produce backlight.
(5)The LCD panel could be defective.
(a)To check where the problem could be: Please connect a VGA
monitor to the VGA port.
(b)If the VGA monitor is display normally, one of the problems above is
occurring, otherwise it could be the mainboard is not functioning
properly.
Q
It seems that my hard disk drive can not be detected, why?
A
1) Call the Inepro Helpdesk, it could be one of these problems:
a) IDE cable is not connected properly to mainboard J3 or it could be defective.
b) HDD power cable is not connected properly to the I/O board or it could be
defective.
c) Check CMOS setup, set IDE HDD to Auto detects.
d) On-board IDE port could be defective.
Q
I'm touching the touch panel, so why do I get no respons?
A
1) Call the Inepro Helpdesk, it could be one of these problems:
a) Check CMOS settings, COM3 needs to be “Enabled”. The correct settings
are “3E8h” and “IRQ10”.
b) Check that there are no conflicts between COM3 IRQ10 and any other
devices.
c) Check that the ELO driver has been properly installed. Or try to re-install
again (Please refer to the ELO driver installation).
d) Check that the ELO controller on COM3 has been detected during the ELO
driver installation. If yes, than check that the flat cable from the ELO touch
screen has been properly connected to the ELO controller (Attention: Pin1
mark should be on the same side as the ELO controller).
e) Check that the ELO controller Green LED is blinking?
i) If no, there is no DC+5V support for the ELO controller from the
mainboard. Check the mainboard JP10 jumper settings.
ii) The correct jumper settings for the Touch screen are: JP10
iii) Check that the COM3 cable is properly connected between mainboard
J42 and the Touch screen controller.
f) Touch screen controller could be defective or the touch panel could be
defective.
Q
Im trying to calibrate the ELO Touch Panel but it does not seem to work, what
can I do?
A
1) Try to recalibrate, as described on page
Version 5.0.1 Inepro B.V.
19
http://www.inepro.com
76
Technical Manual
2) If this does not have any positive effect, please call the Inepro Helpdesk, it
could be one of these problems:
a) Please replace the ELO controller, and re-calibrate. If this works, change
back to the original ELO controller, and re-calibrate.
b) The ELO touch panel still cannot calibrate correctly after changing to a new
ELO.
i) The touch panel may be not installed properly or it could be defective.
Q
I'm typing on my PS/2 Keyboard, so why do I get no respons?
A
1) Make sure the keyboard is properly connected to the PS/2 keyboard port
before the system is powered up. If the keyboard is connected after Windows
has been booted, the keyboard will not work.
2) Check that the LED on the keyboard goes on then off after power on.
a) If so, the keyboard is getting power correctly.
b) If not, call the Inepro helpdesk, the F3 fuse on the 9000PB0700 primary I/O
board could be faulty.
3) Call the Inepro Helpdesk, it could be one of these problems:
a) In our configuration the Magnetic Card Reader is not required, so a
loop-back is plugged into the Magnetic Card Reader connector board.
i) Check that the 6 wire cable has been properly connected between the
Magnetic Card Reader connector board and mainboard J31.
ii) The mainboard J31 cable can be removed. Then short PINs 2-3 and PINs
4-5 If the keyboard still does not work, then check next step.
iii) Otherwise, the cable or Magnetic Card Reader connector board could be
defective.
b) Check that the 60PIN I/O bus cable is properly connected.
c) The mainboard could be defective.
Q
Why is the vacuum fluorescent display (VFD or line display) not functioning
properly?
A
1) Check if there is any display when system power is ON, if the screen is blank,
please follow the steps below.
a) Make sure the power switch on the vacuum fluorescent display (VFD or line
display) is on before powering the main system.
b) Call the Inepro Helpdesk, it could be one of these problems:
i) Make sure that the 9000PB0710 secondary I/O board JP1 & JP2 jumper
settings are correct.
(1)The proper settings are:
(2)JP1 PINs 1-2 shorted
(3)JP2 PINs 1-2, PINs 3-5 and PINs 4-6 shorted
ii) Fuse F1 on the 9000PB0710 secondary I/O board could be faulty.
2) Call the Inepro Helpdesk, it could be one of these problems:
a) Check if the 10pin cable is properly connected between 9000PB0710
secondary I/O board CON8 and 9000PB0700 primary I/O board CON12.
b) The 9000PB0700 primary I/O board or 9000PB0710 secondary I/O board
could be defective.
http://www.inepro.com
Version 5.0.1 Inepro B.V.
Solving challenges,
77
c) The on-board COM4 I/O chips could be defective.
d) Ensure that COM4 is enabled in the CMOS setup, and data is written to
COM4 in the application.
Q
I tested my network, it works OK, so why is the LAN on the till not functioning
properly?
A
1) Really make sure, your network functions fine from the network outlet of the
PosPRO till.
2) If it does, call the Inepro Helpdesk, it could be one of these problems:
a) Check if the LAN driver is installed properly. (Please refer to the LAN driver
installation).
b) Check if there are any IRQ conflicts.
c) Check if the RJ45 twinspare cable is properly connected.
d) Check if the 6pin Lan cable is properly connected between 9000PB0710
secondary I/O board CN2 and mainboard J20.
e) The 9000PB0710 secondary I/O board could be defective.
f) The on board LAN chip could be defective.
Q
Why are COM1, COM2 and/or LPT1 not functioning properly?
A
1) Call the Inepro Helpdesk, it could be one of these problems:
a) Check if the I/O ports are enabled in the CMOS setup.
b) Check if there are any IRQ conflicts.
c) Check if the 60pin I/O bus cable is properly connected.
d) The 9000PB0700 primary I/O board could be defective.
e) The mainboard could be defective.
Q
I have tested my cash drawer in another till, it works, so why is the cash drawer
not functioning properly in this till?
A
1) Make sure the cash drawer does work on another till, if so call the Inepro
Helpdesk, it could be one of these problems:
a) Make sure the pin assignment matches between the cash drawer and the
RJ11 cash drawer port.
b) Check if the 60pin I/O bus cable is properly connected.
c) Check that the 10PIN cable is properly connected between 9000PB0700
primary I/O board CON12 and 9000PB0710 secondary I/O board CN8.
d) The 9000PB0700 primary I/O board or 9000PB0710 secondary I/O board
could be defective.
e) The mainboard could be defective.
Q
I have tested my USB device on another PC, it works, so why is my USB device
not functioning properly on the till?
Version 5.0.1 Inepro B.V.
http://www.inepro.com
78
Technical Manual
A
1) Make sure the USB device does work on another till, if so call the Inepro
Helpdesk, it could be one of these problems:
a) Ensure that the USB controller is “enabled” in the CMOS setup.
b) Check if the 4pin USB cable is properly connected between 9000PB0710
secondary I/O CN9 and mainboard J8.
c) The mainboard or 9000PB0710 secondary I/O board could be defective.
http://www.inepro.com
Version 5.0.1 Inepro B.V.
Solving challenges,
79
<This page is intentionally left blank>
Version 5.0.1 Inepro B.V.
http://www.inepro.com