1
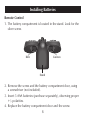
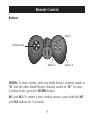
Battle Beasts
Dueling Robotic Animals
SC050 Instructions
For ages 8 and older.
Read and save these instructions.
Table of Contents
Warnings ...................................................................................5
Introduction...............................................................................6
Battery Requirements ................................................................6
Installing Batteries ......................................................................7
Remote Control .........................................................................9
Macro Mode............................................................................10
Game Rules .............................................................................16
Status Indicators.......................................................................18
Statement of FCC Compliance .................................................22
FCC Label Compliance ............................................................23
Head
Warnings
H1 or H2
• Do not mix old and new batteries.
• Do not mix Alkaline, Standard (Carbon-Zinc) or Rechargeable
(Nickel-Cadmium).
• Only use batteries of the same or equivalent type as recommended.
• Nonrechargeable batteries should not be recharged.
• Rechargeable batteries should be removed from the toy before
recharging them.
• Rechargeable batteries are only to be recharged under adult
supervision.
• The supply terminals are not to be short-circuited.
• Batteries are to be inserted observing proper polarities.
• Install or exchange batteries under adult supervision.
• Remove exhausted batteries from the toy immediately.
• Do not place exhausted batteries into a fire. They will leak
or explode.
• Do not point LEDs directly at eyes.
• Do not hit anyone with the toys.
5
Introduction
Each of the Battle Beasts has a sophisticated remote that features
dual command buttons and an eight-movement direction pad.
The blue Beast is designed in the image of a triceratops. The red
Beast evokes the brutish image of a fighting wooly mammoth.
Fire infrared laser weapons for long-distance combat, then engage
the horn to intimidate your opponent. One on-target blast of
the cannon disables your opponent for a full two seconds. LEDs
indicate each creature’s battle strength. Built-in speakers play
each creature’s battle anthem and the sounds of fighting fury.
Sure-grip rubber tires go virtually everywhere.
Battery Requirements
Each animal runs on 3 AA batteries (purchase separately) and
3 LR44 batteries (included). Each remote runs on 3 AAA batteries
(purchase separately). The 3 AA batteries provide approximately
2-3 hours of continuous operation. The 3 LR44 batteries provide
approximately 12 hours of continuous operation of the LEDs. For
the remote, the 3 AAA batteries provide approximately 8 hours of
continuous operation.
6
Installing Batteries
Beast
1. There are two battery compartments located under each Battle
Beast. Remove the screw and the battery compartment door
from the large battery compartment, using a screwdriver (not
included).
2. The large battery compartment will hold 3 AA batteries
(purchase separately). Insert the batteries, observing proper
+/- polarities.
3. Replace the battery compartment door and the screw.
4. Remove the screw and the battery compartment door from the
small battery compartment, using a screwdriver (not included).
5. The small battery compartment will hold the 3 LR44 batteries
(included). Insert the batteries, observing proper +/- polarities.
6. Replace the battery compartment door and the screw.
7
Installing Batteries
Remote Control
1. The battery compartment is located in the stand. Look for the
silver screw.
Rifle
Cannon
Stand
b
2. Remove the screw and the battery compartment
door, using
m 1 m2
a screwdriver (not included).
3. Insert 3 AAA batteries (purchase separately), observing proper
+/- polarities.
4. Replace the battery compartment door and the screw.
8
Remote Control
Buttons
Horn
b
8 Directions
m 1 m2
Macro 1
Macro 2
HORN: To start combat, slide one Battle Beast’s channel switch to
“A” and the other Battle Beast’s channel switch to “B.” To enter
Combat mode, press the HORN button.
M1 and M2: To restart a new combat session, press both the M1
and M2 buttons for 5 seconds.
9
Remote Control
Auto Off: If a button is not pressed on the remote control within
3 minutes, the remote turns off automatically. If the Battle Beast
does not receive a command/signal within 3 minutes, it also turns
off automatically. Regardless of whether the Battle Beast is in
Combat mode or not, a roaring sound is heard before it turns off.
Note: When the RIFLE and CANNON buttons are pressed at the
same time, the Beast will fire the Cannon first. If the Cannon is
reloading, then the Beast will fire the Rifle. If both Cannon and
Rifle are reloading, the Beast cannot fire.
Macro Mode
When using Macro mode 1, two Battle Beasts are face-to-face. The
distance between the front wheels of each Beast is about 12 inches.
Press M1 and the desired direction button for more than 5 seconds,
the Beast can finish the corresponding attack route.
When using Macro mode 2, the direction of the two Beasts are
the same. The distance between the back wheels of the defending
Beast and the front wheel of the attacking Beast is about 12 inches.
10
Macro Mode
Press M2 and the desired direction button for more than 5 seconds.
The Beast finishes the corresponding attack route.
Because the Beast’s motor will be influenced by ground surface,
electric current and voltage, etc., there may be a slight inaccuracy
in the routes.
Macro mode 1 and Macro mode 2 cannot respond at the same
time. If they are pressed simultaneously, the Beast responds only
to the first button pressed. When the Macro mode button is
pressed, the artillery fire is automatic and the Beast responds to
the CANNON and RIFLE buttons until the Macro mode button
is released. However, in this mode, the Beast can respond to the
HORN button. Mode 1 (M1) is Attacking mode; Mode 2 (M2) is
Defending mode.
11
Macro Mode
Left direction button + M1: Go to the rear of the opponent from
the left and fire CANNON.
Right direction button + M1: Go the rear of the opponent from
the right and fire CANNON.
12
Macro Mode
Up Direction button + M1: Go the side of the opponent from the
left and attack.
Down button + M1: Go the side of the opponent from the right
and attack.
13
Macro Mode
Left button + M2: Go to the back of the opponent from the left
and fire CANNON.
Right button + M2: Go to the back of the opponent from the
right and fire CANNON.
14
Macro Mode
Up button + M2: Go the side of the opponent from the left and
attack.
Down button + M2: Go to the side of the opponent from the
right and attack.
15
Game Rules
Game Rules Table
Life
Energy
Directions
Cannon Cannon Rifle
Shots
Reload Reload
Time
Time
Shield
Time
Immobile
Time
Disarm
Time
10
8
40
4 sec.
2 sec.
5 sec.
4 sec.
3 sec.
Description of Weapon Features
Directions: There are a total of 8 directions: Forward; Back; Left;
Right; Forward and Left; Forward and Right; Back and Left; and
Back and Right.
Reload Time: There is approximately a 4-second reloading time
between each Cannon shot; 3 seconds for a Rifle shot. At this
time, the left LED on the Beast indicating Cannon, and the right
indicating Rifle, will be off for awhile.
Shield Time: After attacking by Cannon, Rifle or body attack, the
Beasts cannot be attacked again by any method for 4 seconds.
When attacked by Cannon, the Beast adjusts its position so as to
avoid a second attack.
16
Game Rules
Immobile Time: When the Beast is shot by Cannon or Rifle, it
cannot move for 2 seconds. However, the Rifle is still active.
Disarm Time: When confronted with a body attack, the Beast cannot use the Rifle for 5 seconds. However, the Beast can still move.
Rules for Victory or Defeat
If your opponent’s “Life Energy” points decrease to zero, you and
your Beast win the game.
Each successful attack by Cannon, Rifle or Body Attack decreases
one “Life Energy” point. Therefore, the Beast loses after 10 successful attacks by its opponent.
The losing Beast emits a beeping sound/alert for 15 seconds.
During this period, place the loser behind the winner with the
loser’s head facing the winner’s back. The winner performs a
victory dance.
17
Status Indicators
Dance Indicators
Power On Dance: After powering on your Beast, it plays a dance
as detailed below:
Forward ➞ left 45° ➞ right 90° ➞ left 45° ➞ horn for one second
➞ roar.
If the Beast has finished dancing, it plays the Power On sound
and enters into a prewar status. When the Beast is performing
the dance, the user can press HORN to interrupt the dance.
The Beast makes a revved-up-ready-for-battle sound, indicating
it is ready to enter Combat status.
Victory Dance: After the Beast wins a battle, it performs a victory
dance as detailed below:
Forward ➞ left 180° ➞ forward ➞ right 180° ➞ roar.
Indicator Lights
Each Beast has 3 LEDs: one tricolor LED (red, orange and green)
on the top; and one LED on each side of its head.
18
Status Indicators
Left Eye LED
Cannon
In Combat status, ON means reloaded; OFF means reloading or cannon
shots depleted.
Cannon Firing Indication
When firing cannon, it blinks once
every 0.2 seconds.
Channel Indication
After the Power On Dance, a blinking LED means channel A is selected
before entering Combat status.
Right Eye LED
Rifle
In Combat status, ON means reloaded; OFF means reloading.
Rifle Firing Indication
When firing rifle, it blinks once
every 0.2 seconds.
Channel Indication
After the Power On Dance, a blinking LED means channel B is selected
before entering Combat status.
19
Status Indicators
Top LED
Precombat Status
Indication
Between power on and combat
status, green LED blinks 3 times, then
the orange LED blinks 3 times.
Life Energy Indication
in Combat Status
The color of LED indicated the life
energy of the Beast as detailed below:
Life Energy 6-10: Green
Life Energy 2-5: Orange
Life Energy 1: Red
Attacked by Cannon
In combat status, when attacked by
cannon, red LED flashes once, then
it’ll be on for 0.8 seconds. It returns
to Life Energy Indication status.
Attacked by Rifle
In combat status, when attacked by
rifle, red LED flashes once, then it’ll
be on for 0.6 seconds. It returns to
Life Energy Indication status.
20
Status Indicators
Attacked by Opponent
Body
When attacked by opponent body,
red LED flashes 3 times, then it’ll be
on for 0.6 seconds. It’ll return to Life
Energy Indication status.
Sound Indicators
On: Power on as well as entering Sleep mode.
Battle: Entering combat status.
Rifle: A firing rifle.
Cannon: A firing cannon.
Attacked: A Beast is being attacked. The attack includes rifle, cannon and body attack.
Lose: A Beast has lost a battle. The sound lasts approximately 15
seconds.
Win: A Beast has won a battle.
21
Statement of FCC Compliance
WARNING: Changes or modifications to this unit not expressly
approved by the party responsible for compliance could void the
user’s authority to operate the equipment.
This equipment has been tested and found to comply with the
limits for a Class B digital device, pursuant to Part 15 of the FCC
Rules. These limits are designed to provide reasonable protection against harmful interference in a residential installation. This
equipment generates, uses, and can radiate radio frequency energy and, if not installed and used in accordance with the instructions, may cause harmful interference to radio communications.
However, there is no guarantee that interference will not occur in
a particular installation.
If this equipment does cause harmful interference to radio or
television reception, which can be determined by turning the
equipment off and on, the user is encouraged to try to correct the
interference by one or more of the following measures:
22
Statement of FCC Compliance
• Reorient or relocate the receiving antenna.
• Increase the separation between the equipment and receiver.
• Connect the equipment into an outlet on a circuit different from
that to which the receiver is connected.
• Consult the dealer or an experienced radio/TV technician for
assistance.
FCC Label Compliance Statement
This device complies with Part 15 of the FCC Rules. Operation
is subject to the following two conditions: (1) This device may
not cause harmful interference, and (2) this device must accept
any interference received, including interference that may cause
undesired operation.
This product has been tested to the relevant standards and complies with the
requirements of the applicable EU directives.
23
Warranty
What Is Covered
This warranty covers any defects in materials or workmanship, with the exceptions stated below.
How Long Coverage Lasts
This warranty runs for 90 days from the date of original purchase.
What Is Not Covered
This warranty does not cover damage caused by misuse or use other than as intended and described
in the product instruction manual, or loss or damage to batteries or removable parts.
What The Sharper Image Will Do
The Sharper Image will repair any defects in materials or workmanship. In the event repair is not
possible, The Sharper Image will either replace this product with one of similar features and price,
or refund the full purchase price of the product, whichever you prefer.
How to Obtain Service
Return the product and receipt, along with a brief explanation of the problem, to:
T.S.I. - Returns Department
2901-A West 60th Street
Little Rock, AR 72209
If you have questions please feel free to contact our customer service representatives at 1-800-344-5555
or by email at [email protected].
This warranty gives you specific legal rights, and you may have other legal rights that vary from state to state.
© 2005 Sharper Image Corporation
Sharper Image Corporation
650 Davis St., San Francisco, CA 94111
(415) 445-6000
Shop online:
Due to continuing improvements, actual product may differ slightly from the product described herein.
V1 06/05