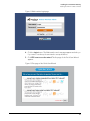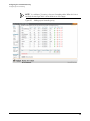
1
Ruckus Wireless™
MediaFlex™ 7211
Smart Wi-Fi Gateway
User Guide
For the following MediaFlex 7211 Smart Wi-Fi Gateway models:
■ 7211 Smart Wi-Fi Gateway (MF7211)
■ 7211 EXT Smart Wi-Fi Gateway (MF7211-EXT)
■ 7211 Outdoor Smart Wi-Fi Gateway (MF7211-Outdoor)
Part Number 800-70273-001 Rev B
Published September 2010
www.ruckuswireless.com
Contents
About This Guide
Document Conventions . . . . . . . . . . . . . . . . . . . . . . . . . . . . . . . . . . . . . . . . . . . . . . . . . i
Related Documentation . . . . . . . . . . . . . . . . . . . . . . . . . . . . . . . . . . . . . . . . . . . . . . . . .ii
Documentation Feedback . . . . . . . . . . . . . . . . . . . . . . . . . . . . . . . . . . . . . . . . . . . . . . .ii
1 Introducing the 7211 Smart Wi-Fi Gateway
Overview of the 7211 Smart Wi-Fi Gateway . . . . . . . . . . . . . . . . . . . . . . . . . . . . . . . . .2
Unpacking the Smart Wi-Fi Gateway . . . . . . . . . . . . . . . . . . . . . . . . . . . . . . . . . . . . . . .2
Package Contents . . . . . . . . . . . . . . . . . . . . . . . . . . . . . . . . . . . . . . . . . . . . . . . . . . . 2
Getting to Know the Smart Wi-Fi Gateway Features . . . . . . . . . . . . . . . . . . . . . . . . . .3
MF7211 and MF7211-EXT Models . . . . . . . . . . . . . . . . . . . . . . . . . . . . . . . . . . . . . . 3
MF7211-Outdoor Model . . . . . . . . . . . . . . . . . . . . . . . . . . . . . . . . . . . . . . . . . . . . . . 7
2 Installing the Smart Wi-Fi Gateway
Installing the MF7211/MF7211-EXT Model . . . . . . . . . . . . . . . . . . . . . . . . . . . . . . . . .12
Step 1: Prepare the Administrative Computer . . . . . . . . . . . . . . . . . . . . . . . . . . . 12
Step 2: Connect the Device to a Power Source and the Admin Computer . . . . 12
Step 3: Configure the Device Using the Quick Start Wizard . . . . . . . . . . . . . . . . 13
Step 4: Verify That Your Computer Can Connect to the Internet . . . . . . . . . . . . 16
What to Do Next . . . . . . . . . . . . . . . . . . . . . . . . . . . . . . . . . . . . . . . . . . . . . . . . . . . 17
Installing the MF7211-Outdoor Model. . . . . . . . . . . . . . . . . . . . . . . . . . . . . . . . . . . . .18
Step 1: Prepare the Administrative Computer . . . . . . . . . . . . . . . . . . . . . . . . . . . 18
Step 2: Connect the Device to a Power Source and the Admin Computer . . . . 19
Step 3: Configure the Device Using the Quick Setup Wizard . . . . . . . . . . . . . . . 20
Step 4: Verify That the Device Can Connect to the Internet . . . . . . . . . . . . . . . . 22
If You Are Mounting the Device Outdoors . . . . . . . . . . . . . . . . . . . . . . . . . . . . . . 23
What to Do Next . . . . . . . . . . . . . . . . . . . . . . . . . . . . . . . . . . . . . . . . . . . . . . . . . . . 24
3 Navigating the Web Interface
Logging Into the Web Interface . . . . . . . . . . . . . . . . . . . . . . . . . . . . . . . . . . . . . . . . . .26
i
Navigating the Web Interface. . . . . . . . . . . . . . . . . . . . . . . . . . . . . . . . . . . . . . . . . . . .28
4 Configuring the Smart Wi-Fi Gateway
Configuring Device Settings . . . . . . . . . . . . . . . . . . . . . . . . . . . . . . . . . . . . . . . . . . . . .32
Configuring Internet Settings . . . . . . . . . . . . . . . . . . . . . . . . . . . . . . . . . . . . . . . . . . . .33
Default IP Addressing Behavior . . . . . . . . . . . . . . . . . . . . . . . . . . . . . . . . . . . . . . . 33
Obtaining and Assigning an IP Address . . . . . . . . . . . . . . . . . . . . . . . . . . . . . . . . 33
Changing the Network Connection Type . . . . . . . . . . . . . . . . . . . . . . . . . . . . . . . 35
Renewing and Releasing DHCP . . . . . . . . . . . . . . . . . . . . . . . . . . . . . . . . . . . . . . . 35
Configuring System Settings. . . . . . . . . . . . . . . . . . . . . . . . . . . . . . . . . . . . . . . . . . . . .36
Configuring Wireless Settings. . . . . . . . . . . . . . . . . . . . . . . . . . . . . . . . . . . . . . . . . . . .39
Configuring Common Wireless Settings . . . . . . . . . . . . . . . . . . . . . . . . . . . . . . . . 39
Configuring WAN Settings . . . . . . . . . . . . . . . . . . . . . . . . . . . . . . . . . . . . . . . . . . . 43
Configuring Wireless # Settings . . . . . . . . . . . . . . . . . . . . . . . . . . . . . . . . . . . . . . . 45
Configuring Port Forwarding . . . . . . . . . . . . . . . . . . . . . . . . . . . . . . . . . . . . . . . . . . . .52
Controlling Access to the Wireless Network . . . . . . . . . . . . . . . . . . . . . . . . . . . . . . . .55
Access Control Options . . . . . . . . . . . . . . . . . . . . . . . . . . . . . . . . . . . . . . . . . . . . . . 55
Changing the Access Controls for a WLAN . . . . . . . . . . . . . . . . . . . . . . . . . . . . . . 56
Removing a MAC Address . . . . . . . . . . . . . . . . . . . . . . . . . . . . . . . . . . . . . . . . . . . 57
Running the Smart Configuration Wizard . . . . . . . . . . . . . . . . . . . . . . . . . . . . . . . . . .57
5 Managing the Smart Wi-Fi Gateway
Viewing Current Wireless Settings . . . . . . . . . . . . . . . . . . . . . . . . . . . . . . . . . . . . . . . .64
Changing the Administrative Login Settings. . . . . . . . . . . . . . . . . . . . . . . . . . . . . . . .65
Configuring Management Access Options . . . . . . . . . . . . . . . . . . . . . . . . . . . . . . . . .67
Enabling Logging and Sending Event Logs to a Syslog Server. . . . . . . . . . . . . . . . .69
Sending a Copy of the Log File to Ruckus Wireless Support. . . . . . . . . . . . . . . . . . .70
Saving a Copy of the Current Log to Your Computer . . . . . . . . . . . . . . . . . . . . . 70
Upgrading the Firmware . . . . . . . . . . . . . . . . . . . . . . . . . . . . . . . . . . . . . . . . . . . . . . . .71
Upgrading Manually via the Web . . . . . . . . . . . . . . . . . . . . . . . . . . . . . . . . . . . . . . 72
Upgrading Manually via FTP or TFTP . . . . . . . . . . . . . . . . . . . . . . . . . . . . . . . . . . . 72
Upgrading from a Local Computer . . . . . . . . . . . . . . . . . . . . . . . . . . . . . . . . . . . . 72
Configuring Automatic Upgrade . . . . . . . . . . . . . . . . . . . . . . . . . . . . . . . . . . . . . . 73
Rebooting the Smart Wi-Fi Gateway . . . . . . . . . . . . . . . . . . . . . . . . . . . . . . . . . . . . . .75
Resetting to Factory Default . . . . . . . . . . . . . . . . . . . . . . . . . . . . . . . . . . . . . . . . . . . . .76
ii
Running Diagnostics . . . . . . . . . . . . . . . . . . . . . . . . . . . . . . . . . . . . . . . . . . . . . . . . . . .76
Where to Find More Information . . . . . . . . . . . . . . . . . . . . . . . . . . . . . . . . . . . . . . . . .78
Index
iii
iv
About This Guide
Document Conventions
About This Guide
This guide describes how to install, configure, and manage the Ruckus Wireless™
MediaFlex™ 7211 Smart Wi-Fi Gateway. This guide is written for those responsible for
installing and managing network equipment. Consequently, it assumes that the reader
has basic working knowledge of local area networking, wireless networking, and
wireless devices.
NOTE: If release notes are shipped with your product and the information there
differs from the information in this guide, follow the instructions in the release notes.
Most user guides and release notes are available in Adobe Acrobat Reader Portable
Document Format (PDF) or HTML on the Ruckus Wireless Support Web site at:
http://support.ruckuswireless.com/
Document Conventions
Table 1 and Table 2 list the text and notice conventions that are used throughout this
guide.
Table 1.
Text Conventions
Convention
Description
Example
monospace
Represents information as it
appears on screen
[Device name]>
monospace bold
Represents information that
you enter
[Device name]> set
ipaddr 10.0.0.12
default font bold
Keyboard keys, software
buttons, and field names
On the Start menu, click All
Programs.
italics
Screen or page names
Click Advanced Settings.
The Advanced Settings page
appears.
i
About This Guide
Related Documentation
Table 2.
Notice Conventions
Icon
Notice Type
Description
Information
Information that describes
important features or
instructions
Caution
Information that alerts you to
potential loss of data or
potential damage to an
application, system, or device
Warning
Information that alerts you to
potential personal injury
Related Documentation
In addition to this User Guide, each Ruckus Wireless 7211 Smart Wi-Fi Gateway
documentation set includes the following:
■
■
■
Quick Setup Guide/Getting Started Guide: Provides essential installation and
configuration information to help you get the Smart Wi-Fi Gateway up and running
within minutes.
Online Help: Provides instructions for performing tasks using the Smart Wi-Fi
Gateway’s Web interface. The online help is accessible from the Web interface
and is searchable.
Release Notes: Provide information about the current software release, including
new features, enhancements, and known issues.
Documentation Feedback
Ruckus Wireless is interested in improving its documentation and welcomes your
comments and suggestions. You can email your comments to Ruckus Wireless at:
[email protected]
When contacting us, please include the following information:
■
Document title
■
Document part number (on the cover page)
■
Page number (if appropriate)
For example:
■
Ruckus Wireless MediaFlex 7211 Smart Wi-Fi Gateway User Guide
■
Part number: 800-70273-001
■
Page 88
ii
1
Introducing the 7211 Smart Wi-Fi
Gateway
In This Chapter
Overview of the 7211 Smart Wi-Fi Gateway . . . . . . . . . . . . . . . . . . . . . . . . . . . . . . 2
Unpacking the Smart Wi-Fi Gateway . . . . . . . . . . . . . . . . . . . . . . . . . . . . . . . . . . . . 2
Getting to Know the Smart Wi-Fi Gateway Features . . . . . . . . . . . . . . . . . . . . . . . 3
1
Introducing the 7211 Smart Wi-Fi Gateway
Overview of the 7211 Smart Wi-Fi Gateway
Overview of the 7211 Smart Wi-Fi Gateway
Congratulations on your purchase of the Ruckus Wireless MediaFlex 7211 Smart
Wi-Fi Gateway!
The 7211 Smart Wi-Fi Gateway is a purpose-built home gateway designed to deliver
the best possible connectivity from Wireless Broadband Networks to subscriber
homes. Wireless Broadband Networks provide coverage across wide areas using a
mesh distribution of access points based on standard Wi-Fi protocols.
The installation uses outdoor high power wireless mesh routers to achieve coverage
for outdoor wireless devices. Typically, the indoor coverage is inadequate to maintain
an acceptable quality level for users within the home.
The 7211 Smart Wi-Fi Gateway allows the extension of the Wireless Broadband
Network signals to achieve a robust coverage within home. The Smart Wi-Fi Gateway
communicates with the mesh network routers to allow home devices (such as personal
computers or laptop computers) to access the Internet.
Unpacking the Smart Wi-Fi Gateway
1. Open the Smart Wi-Fi Gateway package, and then carefully remove the contents.
2. Return all packing materials to the shipping box, and put the box away in a dry
location.
3. Verify that all items listed in Package Contents below are included in the package.
Check each item for damage. If any item is damaged or missing, notify your
authorized Ruckus Wireless sales representative.
Package Contents
The contents of your Smart Wi-Fi Gateway package depend on the model. Refer to
the sections below for more details.
MF7211 and MF7211-EXT
■
MF7211-Indoor or MF7211-EXT unit
■
Power adapter
■
One CAT5 Ethernet cable
■
A packet that contains the side cover and two screws
■
Software License Agreement/Product Warranty Statement
■
Quick Setup Guide
MF7211-Outdoor
■
MF7211-Outdoor unit
■
Ruckus Wireless PoE injector
2
Introducing the 7211 Smart Wi-Fi Gateway
Getting to Know the Smart Wi-Fi Gateway Features
■
Power adapter for the PoE injector
■
A packet that contains the side cover, two screws, and two silicone screw caps
■
Software License Agreement/Product Warranty Statement
■
Quick Setup Guide
Getting to Know the Smart Wi-Fi Gateway
Features
This section identifies the physical features of each Smart Wi-Fi Gateway model that
is discussed in this guide. Before you begin the installation process, Ruckus Wireless
recommends that you become familiar with these features.
■
MF7211 and MF7211-EXT Models
■
MF7211-Outdoor Model
MF7211 and MF7211-EXT Models
This section describes the physical features of the MF7211 and MF211-EXT models.
Front Panel Features
The front panel of MF7211 and MF7211-EXT, shown in Figure 1, features six LED
indicators that can be used to assess the power, Ethernet, and wireless statuses. Refer
to Table 3 for more information.
3
Introducing the 7211 Smart Wi-Fi Gateway
Getting to Know the Smart Wi-Fi Gateway Features
Figure 1.
MF7211 and MF7211-EXT front panel
1
2
3
Table 3.
MF7211 and MF7211-EX LED behavior
Number Name
Description
1
PWR (Power)
• Off: No power is available, or the Smart Wi-Fi
Gateway is not connected to a power source.
• Green: The Smart Wi-Fi Gateway has completed
booting up and is now operational.
2
ETH (Ethernet)
• Off: The Ethernet port is not connected to any
device.
• Green: Traffic is passing through the Ethernet port.
3
Air Quality LEDs
The Air Quality LEDs indicate the wireless signal
quality between the Smart Wi-Fi Gateway and your
service provider’s Wireless Broadband Network. The
number of LEDs that are on indicate the wireless
signal quality.
• All LEDs are off: The Smart Wi-Fi Gateway is not
associated with your service provider’s Wireless
Broadband Network.
• One LED is on: Poor signal quality
• Two LEDs are on: Fair signal quality
• Three LEDs are on: Good signal quality
• Four LEDs are on: Excellent signal quality
4
Introducing the 7211 Smart Wi-Fi Gateway
Getting to Know the Smart Wi-Fi Gateway Features
Side Panel Features
Figure 2 shows the side panel of the MF7211 and MF7211-EXT models. For a
description of each side panel element, refer to Table 4.
Figure 2.
MF7211 and MF7211-EXT side panel
1
Table 4.
2
3
4
MF7211 and MF7211-EXT side panel features
Number Name
Description
1
If you want to extend the range of your wireless
External antenna
connector (MF7211- network, you can connect an external antenna to this
connector. For more information on the antenna
EXT model only)
types that MF7211-EXT supports, refer to the
Regulatory Flyer that ships with the device.
2
Reset button
Pressing and quickly releasing this button reboots the
Smart Wi-Fi Gateway. Pressing and holding it for five
seconds resets the Smart Wi-Fi Gateway to factory
defaults.
3
Ethernet port
An RJ-45 port that supports 10/100Mbps
connections.
4
Power adapter
socket
Connect the supplied power adapter to this socket
to supply power to the Smart Wi-Fi Gateway.
5
Introducing the 7211 Smart Wi-Fi Gateway
Getting to Know the Smart Wi-Fi Gateway Features
Rear Panel Features
The rear panel has two mounting slots that you can use to mount the device on a wall
or to a pole. Refer to “Mount the Device” on page 23 to learn how to use these two
mounting slots.
Figure 3.
MF7211 and MF7211-EXT rear panel
Mounting slots
Side panel cover
6
Introducing the 7211 Smart Wi-Fi Gateway
Getting to Know the Smart Wi-Fi Gateway Features
MF7211-Outdoor Model
This section describes the physical features of the MF7211-Outdoor model.
Side Panel Features
Figure 4 shows the side panel of the MF7211-Outdoor model. For a description of
each side panel element, refer to Table 5.
Figure 4.
MF7211-Outdoor side panel
1
2
3
4
Table 5.
5
MF7211-Outdoor side panel features
Number Name
Description
1
Power LED
• Off: No power is available, or the Smart Wi-Fi
Gateway is not connected to a power source.
• Green: The Smart Wi-Fi Gateway has completed
booting up and is now operational.
2
Ethernet LED
• Off: The Ethernet port is not connected to any
device.
• Green: Traffic is passing through the Ethernet port.
7
Introducing the 7211 Smart Wi-Fi Gateway
Getting to Know the Smart Wi-Fi Gateway Features
Table 5.
MF7211-Outdoor side panel features
Number Name
Description
3
Air Quality LEDs
The Air Quality LEDs indicate the wireless signal
quality between the Smart Wi-Fi Gateway and your
service provider’s Wireless Broadband Network. The
number of LEDs that are on indicate the wireless
signal quality.
• All LEDs are off: The Smart Wi-Fi Gateway is not
associated with your service provider’s Wireless
Broadband Network.
• One LED is on: Poor signal quality
• Two LEDs are on: Fair signal quality
• Three LEDs are on: Good signal quality
• Four LEDs are on: Excellent signal quality
4
Reset button
Pushing and quickly releasing this button reboots the
Smart Wi-Fi Gateway. Pushing and holding it for five
seconds resets the Smart Wi-Fi Gateway to factory
defaults.
5
Ethernet port
An RJ-45 port that supplies Power over Ethernet (PoE)
and supports 10/100Mbps connections.
8
Introducing the 7211 Smart Wi-Fi Gateway
Getting to Know the Smart Wi-Fi Gateway Features
Rear Panel Features
The rear panel has two mounting slots that you can use to mount the device on a wall
or to a pole. Refer to “Mount the Device” on page 23 to learn how to use these two
mounting slots.
Figure 5.
MF7211-Outdoor rear panel
Mounting slots
Side panel cover
9
Introducing the 7211 Smart Wi-Fi Gateway
Getting to Know the Smart Wi-Fi Gateway Features
10
2
Installing the Smart Wi-Fi Gateway
In This Chapter
Installing the MF7211/MF7211-EXT Model . . . . . . . . . . . . . . . . . . . . . . . . . . . . . . 12
Installing the MF7211-Outdoor Model . . . . . . . . . . . . . . . . . . . . . . . . . . . . . . . . . 18
11
Installing the Smart Wi-Fi Gateway
Installing the MF7211/MF7211-EXT Model
The installation procedures for the MF7211/MF7211-EXT and MF7211-Outdoor
models are slightly different. Refer to the installation procedure for the Smart Wi-Fi
Gateway model that you have.
■
Installing the MF7211/MF7211-EXT Model
■
Installing the MF7211-Outdoor Model
Installing the MF7211/MF7211-EXT Model
Before starting with the installation, make sure that you have the following items that
are required for the installation ready:
■
A computer with a Web browser
■
One CAT5 Ethernet cable (supplied with the device)
■
Your service provider’s Wireless Broadband Network SSID and security settings.
You will need to enter these settings on the device’s Web interface to enable it to
connect to the Wireless Broadband Network service.
Step 1: Prepare the Administrative Computer
The administrative computer is the computer that you will be using to access the
device’s Web interface. To access the Web interface, the administrative computer
must be configured to obtain an IP address automatically.
1. Power on your computer.
2. Go to the network connection settings.
•
•
On Windows 2000, click Start > Settings > Network, and then click Dialup
Connections.
On Windows XP, click Start > Settings > Control Panel > Network
Connections.
3. Double-click the icon for Local Area Connection.
4. In the Local Area Connection Properties window, select Internet Protocol (TCP/
IP), and then click Properties.
5. Select Obtain an IP address automatically, and then click OK to exit the TCP/IP
Properties window.
6. Click OK to exit the Local Area Connection Properties window.
Step 2: Connect the Device to a Power Source and
the Admin Computer
1. Take out the power adapter that was shipped with the device.
2. Connect the power jack to the DC IN port on the side panel, and then connect
the power adapter to a power source or to a surge protector that is plugged into
a power source.
12
Installing the Smart Wi-Fi Gateway
Installing the MF7211/MF7211-EXT Model
3. Take out the CAT5 Ethernet cable. Connect one end of the CAT5 Ethernet cable
to the Ethernet port on your computer, and then connect the other end to the
Ethernet port on the device (see Figure 6).
Figure 6. Side panel of Indoor/EXT Smart Wi-Fi Gateway
External antenna
connector (EXT
model only)
Reset button
Ethernet port
DC IN port
Step 3: Configure the Device Using the Quick Start
Wizard
Before you start this step, make sure you have already obtained the Wireless Broadband Network SSID and security settings from your service provider.
1. On your computer, open a Web browser window.
2. In the address or location bar, enter 192.168.30.1.
3. When the login screen appears, type super as the user name and sp-admin as
the password.
13
Installing the Smart Wi-Fi Gateway
Installing the MF7211/MF7211-EXT Model
Figure 7. Web interface login page
4. Click the Login button. The Web interface welcome page appears and asks you
if you want to use the quick start wizard to set up the device.
5. Click YES I want to use the wizard. The first page of the Quick Start Wizard
appears.
Figure 8. First page of the Quick Start Wizard
14
Installing the Smart Wi-Fi Gateway
Installing the MF7211/MF7211-EXT Model
6. Select the topology that best describes your network setup, and then click Next.
The two topology options include:
•
•
connect your wireless computer(s) to a Metro Wi-Fi network (Router mode)
connect your home router to a Metro Wi-Fi network (Bridge mode)
The device checks for available wireless networks with which it can associate and
displays these networks on the next page.
7. Complete the remaining steps for the topology option that you selected:
•
•
If You Selected Router Mode
If You Selected Bridge Mode
If You Selected Router Mode
1. Click the option button for the wireless network with which you want the device
to associate. If that wireless network is using encryption or authentication, type
the security settings in the boxes that appear.
2. Click Next. The Wireless 1 configuration page appears. Wireless 1 is one of your
two home WLANs. Wireless clients on your home network will need to associate
with this WLAN to gain access to the Internet (via your service provider’s Wireless
Broadband Network).
Figure 9. Wireless 1 configuration page
3. Configure your home WLAN settings by answering the following questions:
•
What is your network name? (SSID): Type a name that you want to assign to
this WLAN. This is the WLAN name that wireless clients will connect to.
15
Installing the Smart Wi-Fi Gateway
Installing the MF7211/MF7211-EXT Model
•
What type of security are you using?: Select the type of wireless security that
you want to use. Options include Open (no security), WEP, and WPA. If you
select WEP or WPA, you must type a password in the box provided.
WEP passwords must consist of either 5 or 13 characters. WPA passwords must
be between 8 and 63 characters.
When users connect to this WLAN, they will be prompted for this password
before they are allowed access to the wireless network.
4. Click Finish. A summary of the settings that you have configured appears.
5. Click Reboot to apply your changes. A popup message appears, informing you
that the reboot process may take a few minutes.
6. Click OK. When the reboot process is complete, a popup message appears and
prompts you to click the OK button to reconnect to the Web interface.
7. Click the OK button.
You have completed configuring the device using the Quick Start Wizard.
If You Selected Bridge Mode
1. Click the option button for the wireless network with which you want the device
to associate. If that wireless network is using encryption or authentication, type
the security settings in the boxes that appear.
2. Click Next. A summary of the settings that you have configured appears.
3. Click Reboot to apply your changes. A popup message appears, informing you
that the reboot process may take a few minutes.
4. Click OK. When the reboot process is complete, a popup message appears and
prompt you to click the OK button to reconnect to the Web interface.
5. Click the OK button.
You have completed configuring the device using the Quick Start Wizard.
Step 4: Verify That Your Computer Can Connect to
the Internet
After you complete the Quick Start Wizard, your computer should now be able to
connect to your service provider’s Wireless Broadband Network and the Internet via
the device. Perform these steps to check.
1. On your computer, open a browser window.
2. In the address or location bar, type
www.ruckuswireless.com.
If the Ruckus Wireless Web site loads in your browser, you are able to connect to the
Internet.
Congratulations! Your wireless network is now active and ready for use.
16
Installing the Smart Wi-Fi Gateway
Installing the MF7211/MF7211-EXT Model
What to Do Next
■
■
■
If you want to become familiar with the Smart Wi-Fi Gateway Web interface, refer
to “Navigating the Web Interface” on page 25.
If you want to perform additional configuration tasks (such as configuring the
system and wireless settings and controlling access to the wireless network), refer
to “Configuring the Smart Wi-Fi Gateway” on page 31.
If you want to perform management tasks (such as changing the administrative
password, upgrading the firmware, or running diagnostics), refer to “Managing
the Smart Wi-Fi Gateway” on page 63.
17
Installing the Smart Wi-Fi Gateway
Installing the MF7211-Outdoor Model
Installing the MF7211-Outdoor Model
Before starting with the installation, make sure that you have the following items that
are required for the installation ready:
■
A computer with a Web browser
■
Two CAT5 Ethernet cables
■
The PoE injector and power adapter that are supplied with the device.
CAUTION: The Outdoor Smart Wi-Fi Gateway is not 802.3af compliant. You must use
only the PoE injector and power adapter that are supplied with the device.
■
Your service provider’s Wireless Broadband Network SSID and security settings.
You will need to enter these settings on the device’s Web interface to enable it to
connect to the Wireless Broadband Network service.
Step 1: Prepare the Administrative Computer
The administrative computer is the computer that you will be using to access the
device’s Web interface. To access the Web interface, the administrative computer
must be configured to obtain an IP address automatically.
1. Power on your computer.
2. Go to the network connection settings.
•
•
On Windows 2000, click Start > Settings > Network, and then click Dialup
Connections.
On Windows XP, click Start > Settings > Control Panel > Network
Connections.
3. Double-click the icon for Local Area Connection.
4. In the Local Area Connection Properties window, select Internet Protocol (TCP/
IP), and then click Properties.
5. Select Obtain an IP address automatically, and then click OK to exit the TCP/IP
Properties window.
6. Click OK to exit the Local Area Connection Properties window.
18
Installing the Smart Wi-Fi Gateway
Installing the MF7211-Outdoor Model
Step 2: Connect the Device to a Power Source and
the Admin Computer
CAUTION: Use only the PoE injector and power adapter that are supplied with this
device.
1. Take out the PoE injector and power adapter that were shipped with the device.
2. Connect the power jack to the 12VDC port on the PoE injector, and then connect
the power adapter to a power source or to a surge protector that is plugged into
a power source.
Figure 10.Connect the Ethernet cables and power adapter to the PoE injector
3. Take one of the CAT5 Ethernet cables. Connect one end of the CAT5 Ethernet
cable to the Ethernet port on your computer, and then connect the other end to
the NETWORK 10/100 port on the PoE injector.
4. Take the other Ethernet cable. Connect one end to the WIRELESS AP/BRIDGE
port on the PoE injector, and then connect the other end to the Ethernet port on
the device (see figure).
19
Installing the Smart Wi-Fi Gateway
Installing the MF7211-Outdoor Model
Figure 11.Side panel of the Outdoor Smart Wi-Fi Gateway
Power LED
Ethernet LED
Reset button
Air Quality LEDs
Ethernet port
Step 3: Configure the Device Using the Quick Setup
Wizard
Before you start this step, make sure you have already obtained the Wireless Broadband Network’s SSID and security settings from your service provider.
1. On your computer, open a Web browser window.
2. In the address or location bar, enter 192.168.30.1.
3. When the login screen appears, type super as the user name and sp-admin as
the password.
20
Installing the Smart Wi-Fi Gateway
Installing the MF7211-Outdoor Model
Figure 12.Web interface login page
4. Click the Login button. The Web interface welcome page appears and asks you
if you want to use the quick start wizard to set up the device.
5. Click YES I want to use the wizard. The first page of the Quick Start Wizard
appears.
Figure 13.First page of the Quick Start Wizard
21
Installing the Smart Wi-Fi Gateway
Installing the MF7211-Outdoor Model
6. Select the topology that best describes your network setup, and then click Next.
The two topology options include:
•
•
connect your wireless computer(s) to a Metro Wi-Fi network (Router
mode)
connect your home router to a Metro Wi-Fi network (Bridge mode)
The device checks for available wireless networks with which it can associate and
displays these networks on the next page.
7. Click the option button for the network with which you want the device to
associate. If that wireless network is using encryption or authentication, type the
security settings in the boxes that appear.
8. Click Next. A summary of the settings that you have configured appears.
9. Click Reboot to apply your changes. A popup message appears, informing you
that the reboot process may take a few minutes.
10. Click OK. When the reboot process is complete, a popup message appears and
prompts you to click the OK button to reconnect to the Web interface.
11. Click the OK button.
You have completed configuring the device using the Quick Start Wizard.
Step 4: Verify That the Device Can Connect to the
Internet
After you complete the Quick Start Wizard, your computer should be able to connect
to the Internet via the device. Perform these steps to check.
1. On your computer, open a browser window.
2. In the address or location bar, type
www.ruckuswireless.com.
If the Ruckus Wireless Web site loads in your browser, you are able to connect to the
Internet.
Congratulations! Your wireless network is now active and ready for use.
22
Installing the Smart Wi-Fi Gateway
Installing the MF7211-Outdoor Model
If You Are Mounting the Device Outdoors
WARNING: The Ruckus Wireless PoE injector and power adapter are for indoor use
only. Never mount the PoE injector outdoors with the Smart Wi-Fi Gateway.
If you are mounting the Smart Wi-Fi Gateway outdoors, Ruckus Wireless strongly
recommends that you perform these additional tasks:
• Install the Side Panel Cover
• Mount the Device
Install the Side Panel Cover
The Smart Wi-Fi Gateway is shipped with its side panel cover removed. Before you
mount the device outdoors, install the side panel cover (see Figure 14.).
1. Make sure that the perimeter rubber gasket on the housing is clear of debris.
2. Place the cover onto the cavity on the side panel.
3. Fasten the side panel cover to the chassis using the two gasketed machine screws
that are supplied with the device, and then install a silicone screw cap over each
screw to seal the opening.
Mount the Device
Use the two mounting slots on the rear panel to mount the unit on a wall or to a pole.
•
•
To mount the unit on a wall, install two screws on the wall surface, and then use
one of the mounting holes on the
To mount the unit to a pole, insert tie-wraps into the mounting holes, and then
fasten them to the pole.
CAUTION: The unit must be mounted in the upright position to ensure that the hole
at the bottom can drain out water that may enter the unit. See Figure 14.
23
Installing the Smart Wi-Fi Gateway
Installing the MF7211-Outdoor Model
Figure 14.The side cover must be installed and the unit must be mounted in the
upright position
Side cover
Unit must be installed
in the upright position,
so the hole at the
bottom can drain out
water
What to Do Next
■
■
■
If you want to become familiar with the Smart Wi-Fi Gateway Web interface, refer
to “Navigating the Web Interface” on page 25.
If you want to perform additional configuration tasks (such as configuring the
system and wireless settings and controlling access to the wireless network), refer
to “Configuring the Smart Wi-Fi Gateway” on page 31.
If you want to perform management tasks (such as changing the administrative
password, upgrading the firmware, or running diagnostics), refer to “Managing
the Smart Wi-Fi Gateway” on page 63.
24
3
Navigating the Web Interface
In This Chapter
Logging Into the Web Interface . . . . . . . . . . . . . . . . . . . . . . . . . . . . . . . . . . . . . . . 26
Navigating the Web Interface . . . . . . . . . . . . . . . . . . . . . . . . . . . . . . . . . . . . . . . . 28
25
Navigating the Web Interface
Logging Into the Web Interface
Logging Into the Web Interface
If you need to manage the device, you do it with the features of the Ruckus Wireless
Web interface (which you already used to set up the device for use).
NOTE: The following procedure assumes that you know the IP address that the
device is currently using, or you have some means of determining the dynamic IP
address in use by the device. The computer that you will use to access the Web
interface must be on the same subnet as the Ruckus Wireless device.
To log into the Web interface
1. On your computer, open a Web browser window.
2. In the address or location bar, type the IP address of the device. Be sure to enter
it in the format:
http://<ip_address>
3. Press <Enter> to connect to the Web interface.
4. If a Windows security alert dialog box appears, click OK/Yes to proceed. The
Ruckus Wireless Admin login page appears.
5. In Username, type super.
6. In Password, type sp-admin.
7. Click Login.
The Smart Wi-Fi Gateway Web interface appears.
26
Navigating the Web Interface
Logging Into the Web Interface
Figure 15.
Login page of the Web interface
27
Navigating the Web Interface
Navigating the Web Interface
Navigating the Web Interface
You manage the Smart Wi-Fi Gateway through a Web browser-based interface that
you can access from any computer that is on the same subnet as the Smart Wi-Fi
Gateway. Table 6 lists the Web interface features that are identified in Figure 16.
Figure 16.
Elements of the 7211 Smart Wi-Fi Gateway Web Interface
Log Out Button
Tabs
Help Button
Menu
Workspace
Table 6.
7211 Smart Wi-Fi Gateway Web interface elements
Element
Description
Menu
Under each category (Status, Configuration, etc.)
are options that, when clicked, open the related
workspace in the area to the right.
Tabs
Contains additional options for the configuration
page. For example, the Configuration > Wireless
page includes one tab for common wireless
configuration and eight tabs for each of the
available WLANs.
Workspace
This large area displays features, options and
indicators relevant to the menu item that you
clicked.
Logout Button
Click this button to log out of the Smart Wi-Fi
Gateway.
28
Navigating the Web Interface
Navigating the Web Interface
Table 6.
7211 Smart Wi-Fi Gateway Web interface elements
Element
Description
Help Button
Click this button to open a help window with
information related specifically to the options
currently displayed in the workspace.
29
Navigating the Web Interface
Navigating the Web Interface
30
4
Configuring the Smart Wi-Fi
Gateway
In This Chapter
Configuring Device Settings. . . . . . . . . . . . . . . . . . . . . . . . . . . . . . . . . . . . . . . . . . 32
Configuring Internet Settings . . . . . . . . . . . . . . . . . . . . . . . . . . . . . . . . . . . . . . . . . 33
Configuring System Settings . . . . . . . . . . . . . . . . . . . . . . . . . . . . . . . . . . . . . . . . . 36
Configuring Wireless Settings . . . . . . . . . . . . . . . . . . . . . . . . . . . . . . . . . . . . . . . . 39
Configuring Port Forwarding . . . . . . . . . . . . . . . . . . . . . . . . . . . . . . . . . . . . . . . . . 52
Controlling Access to the Wireless Network. . . . . . . . . . . . . . . . . . . . . . . . . . . . . 55
Running the Smart Configuration Wizard . . . . . . . . . . . . . . . . . . . . . . . . . . . . . . . 57
31
Configuring the Smart Wi-Fi Gateway
Configuring Device Settings
Configuring Device Settings
Device settings refer to the device name and service provider login settings.
Figure 17.
The Configuration > Device page
To configure the device settings
1. Go to Configuration > Device. The Configuration :: Device page appears.
2. In Device Name, type a new name for the device or leave as is to accept the default
device name (RuckusMetro). The device name identifies the Smart Wi-Fi
Gateway among other devices on the network.
3. Under Service Provider Login, change the login information as required:
•
•
•
Username: Type the name that you want to use for logging into the Web
interface. The default user name is super.
Password: Type the new password that you want to use. The password must
consist of six to 32 alphanumeric characters only.
Password confirmation: Retype the new password to confirm.
4. Click Update Settings to save and apply your changes.
32
Configuring the Smart Wi-Fi Gateway
Configuring Internet Settings
Configuring Internet Settings
Internet settings define how the Smart Wi-Fi Gateway connect to your service
provider’s Wireless Broadband Network. This section describes how to view and
configure the Smart Wi-Fi Gateway’s Internet settings. Topics discussed include:
■
Default IP Addressing Behavior
■
Obtaining and Assigning an IP Address
■
Changing the Network Connection Type
■
Renewing and Releasing DHCP
Default IP Addressing Behavior
By default, the Smart Wi-Fi Gateway is configured to automatically obtain an IP
address from a DHCP server on the network. If the Smart Wi-Fi Gateway does not
detect a DHCP server, it automatically assigns itself the static IP address
192.168.30.1 to make it easier for you to preconfigure and deploy it your network.
Obtaining and Assigning an IP Address
There are at least two instances when you would want to change the IP address of the
Smart Wi-Fi Gateway:
■
■
If the current IP address that the Smart Wi-Fi Gateway is using consistently conflicts
with that of another device on the network
If you want to switch from DHCP to static IP addressing, for use in managing or
maintaining the Smart Wi-Fi Gateway
Unless you are able to determine the IP address assigned by the DHCP server to the
Smart Wi-Fi Gateway, it may prove helpful for anyone needing administrative access
to assign a static IP address to the Smart Wi-Fi Gateway.
33
Configuring the Smart Wi-Fi Gateway
Configuring Internet Settings
Figure 18.
The Configuration > Internet page
To assign a static IP address to the Gateway
1. Go to Configuration > Internet. The Internet page appears.
2. Verify that Connection Type is set to Static IP.
3. When the Static IP options appear, you can changes to the following settings:
•
•
•
•
Gateway: This is the gateway IP address of the Internet interface.
Primary DNS Server: The IP address of the primary Domain Name System
(DNS) server.
Secondary DNS Server: The IP address of the secondary Domain Name
System (DNS) server.
NTP Server: Hostname of the Network Time Protocol (NTP) server.
4. Click Update Settings to save your changes.
34
Configuring the Smart Wi-Fi Gateway
Configuring Internet Settings
Changing the Network Connection Type
NOTE: Perform this task only with guidance from your ISP. The required entries for
static IP address should be available, if your Smart Wi-Fi Gateway connection type is
changed this connection type.
To change the connection type (DHCP or Static IP)
1. Go to Configuration > Internet. The Configuration > Internet page appears.
2. In Connection Type, click the type of connection that your Internet service
provider (ISP) is using. Typically, connection options relate to your ISP’s delivery
method:
•
•
In certain uncommon instances, a Static IP address is provided.
For cable modem access, DHCP is used.
3. If you need to change from DHCP to Static IP, fill in the related fields according to
your ISP-provided information.
4. Click Update Settings to save your changes.
Renewing and Releasing DHCP
This task should be performed only with guidance from your ISP. It serves as a
troubleshooting technique when DHCP addresses to one or more devices prove to
be unusable or in conflict with others.
Figure 19.
The Status > Internet page
35
Configuring the Smart Wi-Fi Gateway
Configuring System Settings
To renew or release the DHCP server assigned IP address
1. Go to Status > Internet.
2. Review the current settings.
3. If the current Connection Type is DHCP, you will be able to see the currentlyassigned IP address and subnet mask listed below.
•
•
To force the DHCP server to assign a new IP address to the Smart Wi-Fi
Gateway, click Renew DHCP. This will cause a slight interruption in network
service until the new IP address has been put in use.
To force the DHCP server to assign new IP addresses to all networked devices
at the same time (including this Smart Wi-Fi Gateway), click Release DHCP.
This will cause a temporary interruption in overall network service.
CAUTION: If the device is in router mode, releasing the DHCP-assigned IP address
will cause the device to revert its WAN IP address to default – 192.168.0.1. To obtain
a new IP address from your service provider’s DHCP server, you must reboot the device
after you release the DHCP-assigned IP address. For information on how to reboot
the device, refer to “Rebooting the Smart Wi-Fi Gateway” on page 75.
4. Click Update Settings to save your settings.
Configuring System Settings
The 7211 Smart Wi-Fi Gateway provides two operation modes that you can choose
from: bridge mode and router mode.
■
■
Bridge mode allows the device to act like Layer 2 (or bridge) device. When bridge
mode is selected, the home computer’s IP address will be assigned from the WAN
interface when the DHCP is enabled on the home computers. Since we are not
using a real bridge, the WAN network can only see one MAC address shared by
the home computers.
Router mode provides the capability to perform NAT (Network Address Translation) for the traffic from the WAN interface (Internet) to the LAN interface. Router
mode allows home users to hide the IP address from the Internet.
You can also configure the wireless distribution system (WDS) settings on the
Configure :: System page. A WDS enables access points that are part of the system
to interconnect with each other wirelessly, resulting in an expanded wireless coverage
area. If there are Ruckus Wireless access points behind the Smart Wi-Fi Gateway and
you want these access points to form a WDS, you can enable WDS. By default, WDS
is enabled on the Smart Wi-Fi Gateway.
36
Configuring the Smart Wi-Fi Gateway
Configuring System Settings
Figure 20.
MF7211/MF7211-EXT system settings
Figure 21.
MF7211-Outdoor system settings
37
Configuring the Smart Wi-Fi Gateway
Configuring System Settings
To configure the system settings
1. Go to Configuration > System. The Configure :: System page appears.
NOTE: Take note of the Bridge and Route options under the first column. You will
select one of these two options for each of the interfaces on the Smart Wi-Fi Gateway
to set the operation mode.
2. Under the
(Ethernet interface) icon, click either the Bridge and Route option
to set the operation mode for the Ethernet interface, which connects to your
service provider’s Wireless Broadband Network.
3. Under the
(Wireless 1) icon, click either the Bridge and Route option to set
the operation mode for the first wireless interface, which connects wireless clients
to the Smart Wi-Fi Gateway.
4. Repeat Step 3 for the
(Wireless 2) interface.
5. In Uplink WDS Mode, make sure that the Enabled option is selected (default) if
you want to enable WDS. Otherwise, click Disabled.
6. Click Update Settings to save your changes.
38
Configuring the Smart Wi-Fi Gateway
Configuring Wireless Settings
Configuring Wireless Settings
This section describes how to configure the wireless settings of the Smart Wi-Fi
Gateway. There are three types of wireless settings that you need to configure:
■
■
■
Configuring Common Wireless Settings: Includes the wireless mode, country
code, and advanced wireless settings, such as the wireless transmit power and
wireless protection mode.
Configuring WAN Settings: Includes settings that allow the Smart Wi-Fi Gateway
to connect to your service provider’s Wireless Broadband Network.
Configuring Wireless # Settings: Includes settings that allow wireless clients on
your network to connect to the Smart Wi-Fi Gateway. This option is unavailable in
the 7211 Smart Wi-Fi Gateway Outdoor model.
Refer to the sections below for instructions on how to configure each set of wireless
settings.
Configuring Common Wireless Settings
Common wireless settings are settings that are applied to all WLANs. These settings
include the wireless mode, wireless channel, and country code.
Figure 22.
The Configuration > Wireless page
39
Configuring the Smart Wi-Fi Gateway
Configuring Wireless Settings
To configure the wireless settings common to all WLAN
1. Go to Configuration > Wireless. The Configuration :: Wireless :: Common page
appears.
2. Make changes to the common wireless settings listed in the table below.
Table 7.
Common Wireless settings
Setting
Description
Wireless Mode
The wireless mode options include the following:
• 802.11b/g/n mixed mode: This is the
recommended setting in most cases. It allows
802.11b, 802.11g, and 802.11n compliant
devices to join the network.
• 802.11b/g mixed mode: This mode supports
both 802.11b and 802.11g compliant devices,
but not 802.11n. Select this mode if you are sure
that you will not have 802.11n client on the
network.
• 802.11g only: This mode allows only 802.11gcompliant devices to join the network.
• 802.11b only: This mode allows only 802.11bcompliant devices to join the network.
Country Code
This option (if enabled) lets you select your
country or region code.
Advanced Settings
Refer to “Reviewing Common Advanced
Settings” on page 41.
External Antenna
NOTE: This option only appears if you are using
7211 Smart Wi-Fi Gateway EXT.
7211 Smart Wi-Fi Gateway EXT provides an
external antenna port, in case you want to attach
an external antenna to extend the range of your
wireless network. To enable the Smart Wi-Fi
Gateway to use the external antenna, select the
Enabled option in this section. This option is
disabled by default.
CAUTION: Selecting the incorrect country or region may result in violation of appli-
cable laws. If you purchased the Smart Wi-Fi Gateway in the United States, you do
not need to set the country code manually. Ruckus Wireless devices that are sold in
the US are preconfigured with the correct country code and this setting is nonconfigurable.
3. Click Update Settings to save your settings.
40
Configuring the Smart Wi-Fi Gateway
Configuring Wireless Settings
Reviewing Common Advanced Settings
Advanced wireless settings should only be changed by an experienced administrator.
Incorrect settings can severely impact wireless performance. It is recommended that
the default settings be retained for best performance.
CAUTION: To fully benefit from the Smart Wi-Fi Gateway’s capabilities, it is advisable
not to change these values unless absolutely necessary.
Figure 23.
The Configuration > Wireless > Advanced > Common page
To configure the advanced common options
1. On the Configuration > Wireless page, click Edit Common Settings. The
Configuration > Wireless > Advanced > Common page appears.
41
Configuring the Smart Wi-Fi Gateway
Configuring Wireless Settings
2. Configure the advanced settings listed in Table 8 as required.
Table 8.
Advanced > Common options
Option
Description
Transmit Power
The default setting is Full. Select the level of
transmit power from the drop-down menu.
This option sets the maximum transmit power
level relative to the predefined power (this
value differs according to the current country
code).
Protection Mode
(Inactive by default.) If you activate
protection, you control how 802.11 devices
know when they should communicate to
another device. This is important in a mixed
environment of both 802.11b and 802.11g
clients.
WARNING: Activating this option (and
configuring the settings) boosts the
interoperability of 802.11b and 802.11g
devices but will severely decrease
performance.
• CTS-only: Choose this option to force all
destination devices to acknowledge their
ability to receive data when a transmission
is initiated. Use this option for compliance
with the Wi-Fi Alliance certification.
• RTS/CTS: Choose this option to force both
sending and receiving devices to confirm
a data exchange on both ends before
proceeding.
3. Click Update Settings to save and apply the changes.
42
Configuring the Smart Wi-Fi Gateway
Configuring Wireless Settings
Configuring WAN Settings
WAN settings define how the Smart Wi-Fi Gateway will connect your home network
to your service provider’s Wireless Broadband Network.
NOTE: Before starting this procedure, Ruckus Wireless recommends obtaining from
your service provider the SSID and security settings of the Wireless Broadband
Network with which you will be associating.
CAUTION: Incorrect WAN settings will prevent the Smart Wi-Fi Gateway from asso-
ciating successfully with your service provider’s Wireless Broadband Network.
Figure 24.
WAN settings
To configure WAN settings
1. Go to Configuration > Wireless page.
2. Click the WAN tab.
3. In SSID, enter the SSID of the Wireless Broadband Network with which you want
the Smart Wi-Fi Gateway to associate.
•
If you do not know the SSID of the Wireless Broadband Network, click the Last
Survey button to show a list of wireless networks that the Smart Wi-Fi Gateway
can possibly associate with. When the Last Site Survey page appears, click the
SSID that you want to associate with. The Web interface reloads the main WAN
page, and then prepopulates the SSID text box with the SSID that you clicked.
43
Configuring the Smart Wi-Fi Gateway
Configuring Wireless Settings
•
If you want the Smart Wi-Fi Gateway to run another wireless survey to check
for available wireless networks, click the ReScan button.
4. If you know the MAC address of the specific Wireless Broadband Network device
with which the Smart Wi-Fi Gateway should associate, type it in the Preferred
BSSID text box. If there are multiple Wireless Broadband Network devices with
the same SSID available, the Smart Wi-Fi Gateway will always attempt to first
associate with the Wireless Broadband Network device with the specified MAC
address.
5. In Preferred BSSID Mode, specify whether you want the Smart Wi-Fi Gateway to
associate with a specific Wireless Broadband Network device only by clicking one
of the following options:
•
•
Preferred: Click this option if you want to allow the Smart Wi-Fi Gateway to
attempt to associate with other Wireless Broadband Network devices (with the
same SSID) if the device with the preferred BSSID is unavailable.
Locked: Click this option if you want the Smart Wi-Fi Gateway to associate
only with the device with the preferred BSSID. If the preferred BSSID is
unavailable, the Smart Wi-Fi Gateway will not attempt to associate with other
devices with the same SSID.
6. (Optional) In Threshold Settings, click Edit Settings. On the page that appears,
set the RTS/CTS Threshold.
The default value is 2346. This option determines at what packet length the RTS/
CTS function is triggered. A lower threshold may be necessary in environment with
excessive signal noise or hidden nodes; but may result in some performance
degradation.
7. In Encryption Method, select the wireless encryption method that your service
provider’s Wireless Broadband Network is using. Configure the related encryption
options that appear below. Make sure you use that encryption settings that you
obtained from your service provider.
CAUTION: Make sure you configure the wireless encryption settings exactly as
provided by your service provider. Incorrect WAN settings will prevent the Smart WiFi Gateway from associating with the Wireless Broadband Network.
8. Click Update Settings.
You have completed configuring the Smart Wi-Fi Gateway’s WAN settings.
44
Configuring the Smart Wi-Fi Gateway
Configuring Wireless Settings
Configuring Wireless # Settings
The MF7211 and MF7211-EXT models provide two wireless interfaces that allow
wireless clients on your home network to associate with the Smart Wi-Fi Gateway
directly.
NOTE: Only MF7211 and MF7211-EXT models have wireless interfaces.
Figure 25.
Wireless # settings
To configure wireless settings
1. Go to Configuration > Wireless. The Configuration :: Wireless :: Common page
appears.
2. Click one of the two Wireless (#) tabs. The Configuration :: Wireless :: Wireless (#)
page appears.
45
Configuring the Smart Wi-Fi Gateway
Configuring Wireless Settings
3. Review the WLAN options listed in Table 9, and then make changes as required.
Table 9.
Wireless # options
Option
Description
Wireless Availability
This option controls whether or not the wireless network
is available to users (Off or On).
Broadcast SSID
This option controls whether or not the WLAN SSID is
visible to anyone looking for wireless networks. Disabling
(hiding) the SSID requires the user must be told the correct
SSID before they can connect to your network.
Client Isolation
This option enhances wireless security on the network by
preventing wireless clients from communicating with each
other. If you are operating a hotspot, for example, you
could enable wireless isolation to prevent wireless clients
from communicating with each other (for example, one
wireless client accessing a shared folder on another
wireless client).
SSID
This is the publicly-broadcast “name” of your wireless
network. The default SSIDs are:
• V54-HOME001 for Wireless 1
• V54-HOME002 for Wireless 2
Ruckus Wireless recommends modifying these default
SSIDs to SSIDs that indicate your location or group name.
SSIDs can contain up to 32 alphanumeric characters and
are case-sensitive.
Threshold Settings
This button opens a page where you can configure the
Protection Mode you activated on the Wireless :: Common
page. If Protection Mode is disabled, ignore this option.
Encryption Method
By default, all data exchanges on your wireless network
are not encrypted, but you can pick an encryption method
in this option, and use the extra workspace features that
appear to fine-tune the encryption settings.
For more information, see either “Using WEP” on page 47
or “Using WPA” on page 49.
4. When you are finished, click Update Settings to save and apply the changes. A
confirmation message appears at the top of this page.
5. Click Go back to Wireless Configuration to reopen the previous page.
46
Configuring the Smart Wi-Fi Gateway
Configuring Wireless Settings
Using WEP
CAUTION: Do not customize these options unless you are an experienced network
administrator or are under the guidance of an IT/support professional.
Figure 26.
WEP settings
To configure WLAN-specific WEP encryption settings
1. Go to Configuration > Wireless. The Configuration :: Wireless :: Common page
appears.
2. Click the Wireless # tab that you want to configure. The Configuration :: Wireless
:: Wireless[#] page appears.
3. Click the Encryption Method menu, and then click WEP. An additional set of WEPspecific encryption options appear on this page.
47
Configuring the Smart Wi-Fi Gateway
Configuring Wireless Settings
4. Review the encryption settings listed in Table 10, and then make changes as
required.
Table 10. WEP settings
Encryption Setting
Description
Authentication Mode
Your options include:
• Open: No security measure is enforced.
• Shared Key: The selected Default Shared
Key is used.
• Auto: Automatically-selected
authentication mode.
Encryption Strength
• 64 bit: Specify the key with 10 hexadecimal
digits or 5 ASCII characters.
• 128 bit: Specify the key with 26
hexadecimal digits or 13 ASCII characters.
The 128-bit cryptography is stronger
privacy protection for your network and is
recommended if you use WEP.
Key Entry Method
• Hexadecimal: The encryption key only
accepts hexadecimal characters (0-9, A-F).
• ASCII Text: The encryption key accepts
ASCII characters.
Passphrase
This assists in automatic key generation.
Enter some text and click the Generate
button. The system will generate the WEP key
automatically. You may specify a passphrase
up to 32 characters.
Please note that the algorithm used for key
generation may vary from system to system.
Checking the WEP keys used between
wireless stations and the Smart Wi-Fi
Gateway is recommended.
WEP Key
Enter the key manually according to the Key
Entry Method and Encryption Strength
settings.
Key Index
Choose the index, from “1” to “4”, that the
WEP key is to be stored in.
5. Click Update Settings to save and apply the changes. A confirmation message
appears at the top of the page.
6. Click Go back to Wireless Configuration to reopen the previous page.
48
Configuring the Smart Wi-Fi Gateway
Configuring Wireless Settings
Using WPA
CAUTION: Do not customize these options unless you are an experienced network
administrator or are under the guidance of an IT/support professional.
Use of WPA PSK allows automatic key generation based on a single passphrase. WPAPSK provides very strong security, but may not be supported on older wireless devices.
In some cases, the older devices can be upgraded with adapters to take advantage
of WPA-PSK.
If you configure the Smart Wi-Fi Gateway with WPA-PSK, some network users will not
be able to connect to your WLAN unless their devices are manually set to WPA-PSK
and configured with the same passphrase.
Figure 27.
WPA settings
To configure WPA encryption settings
1. Go to Configuration > Wireless. The Configuration :: Wireless :: Common page
appears.
2. Click the Wireless # tab that you want to configure. The Configuration :: Wireless
:: Wireless[#] page appears.
3. Click the Encryption Method menu, and then click WPA. An additional set of
WPA-specific encryption options appear on this page.
49
Configuring the Smart Wi-Fi Gateway
Configuring Wireless Settings
4. Review the encryption settings listed in Table 11, and the make changes as
preferred.
Table 11. WPA settings
Encryption Setting
Description
WPA Version
Your options are WPA, WPA2 or WPA Auto.
• When WPA is selected, the wireless client
decides the version of WPA will be used.
WPA is the recommended default for best
compatibility. Wi-Fi WPA-capable PDAs
and other gadgets are usually limited to
WPA + TKIP.
• WPA2 is an advanced option. WPA2
support on Windows requires a Microsoft
patch and is only available on Windows XP
with Service pack 2 or later.
• WPA-Auto is an advanced option. Only
the best WPA 802.11i conforming/Wi-Fi
WPA-certified client devices can operate
in this mode.
WPA Authentication
PSK mode is suitable for home or personal
use. 802.1x mode uses a RADIUS server to
verify user identity. The auto mode offers
both options for the wireless client to pick.
For more information on how to configure the
802.1x mode, refer to “Customizing 802.1x
Settings” on page 51.
WPA Algorithm
When Auto is selected, the wireless client
decides whether TKIP or AES will be used.
AES is the strongest encryption and requires
additional hardware support on wireless
devices.You should consult the
documentation of your wireless client
devices. Auto is an advanced option and
some wireless clients may fail to associate.
Passphrase
Enter a new passphrase between 8 and 32
characters long, using any combination of
printable characters (letters, numbers,
hyphens and underscores).
5. Click Update Settings to save and apply the changes. A confirmation message
appears at the top of the page.
6. Click Go back to Wireless Configuration to reopen the previous page.
50
Configuring the Smart Wi-Fi Gateway
Configuring Wireless Settings
Customizing 802.1x Settings
CAUTION: Do not customize these options unless you are an experienced network
administrator or are under the guidance of an IT/support professional.
If you choose WPA as the encryption method, you have the option to set up the Smart
Wi-Fi Gateway to act as an 802.1x proxy, utilizing external authentication sources such
as a RADIUS server. This provides a higher level of security, when compared to the
static security process in a WEP configuration.
Using 802.1x lets a device complete authentication prior to the exchange of data, as
in a DHCP environment. Another benefit is that each BSSID can be individually
configured to forward all authentication requests to its own server.
Figure 28.
802.1x settings
To configure WLAN-specific 802.1x authentication settings
1. Go to Configuration > Wireless. The Configuration :: Wireless :: Common page
appears.
2. Click a Wireless # tab to configure. The Configuration :: Wireless :: Wireless[#]
page appears.
3. Click the Encryption Method menu, then click WPA. The basic set of WPA-specific
encryption options appear on the page.
4. Select 802.1x as the WPA Authentication mode. Additional options appears.
5. Configure the following settings to customize your 802.1x authentication.
•
RADIUS NAS-ID: Enter the network ID assigned to your RADIUS server.
51
Configuring the Smart Wi-Fi Gateway
Configuring Port Forwarding
•
•
Authentication Server [-Required-]: Enter the information needed to establish a connection between the Smart Wi-Fi Gateway and the RADIUS server.
Accounting Server [-Optional-]: Enter the information needed to establish
this connection.
6. Click Update Settings to save and apply the changes. A confirmation message
appears at the top of this page.
7. Click Go back to Wireless Configuration to reopen the previous page.
Configuring Port Forwarding
Port forwarding refers to sending data traffic through the Smart Wi-Fi Gateway’s
firewall to one of the computers on your home network. Ordinarily, the Gateway blocks
incoming traffic as a security protection, but if you want other people's computers to
be able to initiate communications with computer on your home network, you need
to set up port forwarding.
In most cases, such as for Web browsing, sending email messages, (or any other
activity where your computer initiates the communication), you do not need to set up
port forwarding. You only need it when another person's computer (from outside of
your home network) initiates the communication, or when you are running an Internet
service, such as a Web server or an email server. Other examples include multipleplayer Internet games, participating in meetings using Microsoft NetMeeting™ or the
various kinds of “instant messaging” protocols (for example, Live Messenger, Yahoo!
Messenger, and AIM).
Configuring Port Forwarding Entries
The Smart Wi-Fi Gateway is preconfigured with commonly used Web applications (for
example, instant messaging applications) that require port forwarding. However, they
are all disabled by default. If a Web application does not work, try enabling the port
forwarding entry for it. If a port forwarding entry for the Web application does not
exist, you can create one.
52
Configuring the Smart Wi-Fi Gateway
Configuring Port Forwarding
Figure 29.
■
■
■
■
Editing port forwarding entries
To enable port forwarding for a Web application, click the
(Enable) option that
is on the same row as the application name, and then click Update.
To delete a port forwarding entry, click the
(Delete) option that is on the same
row as the application name, and then click Update.
To disable a port forwarding entry, click the (Disable) option that is on the same
row as the application name, and then click Update.
For instructions on how to add a new port forwarding entry, refer to “Adding a
Port Forwarding Entry” below.
Adding a Port Forwarding Entry
To add a new port forwarding entry, click the Add new entry button. Complete the
form that appears below by configuring in the following options:
•
•
•
•
•
•
Name: Assign a unique name to the entry that you are creating.
Start port: The starting port number to include in the entry.
End port: The ending port number to include in the entry.
Protocol: Select the traffic protocol that you want to forward. Options include
TCP, UDP, and Both.
Forward to IP Address: Type the IP address of the device on your home
network to which you want to forward the traffic.
Enable: Click this option to enable the port forwarding entry.
Click Update to save the port forwarding entry.
53
Configuring the Smart Wi-Fi Gateway
Configuring Port Forwarding
NOTE: You add up to 32 entries to the port forwarding table. When this limit is
reached, the message Table is full at the bottom of the page.
Figure 30.
Adding a port forwarding entry
54
Configuring the Smart Wi-Fi Gateway
Controlling Access to the Wireless Network
Controlling Access to the Wireless Network
Access Control enables you to specify the stations are allowed to join (associate with)
your WLAN networks. There are “tab” entries for each available WLAN.
Access Control Options
This section describes the options that you can use to control access to the wireless
network.
■
■
■
Disabling WLAN Access Restrictions: If you select Disable WLAN access restrictions, then MAC-address-based restrictions on which stations can join the WLAN
are disabled; thus, any station can join. If the WLAN uses encryption, then the
station must still supply the correct encryption pass-phrase. The Access Controls
table is hidden if the current mode is Disable WLAN access restrictions.
Allowing Only Stations Listed in the Access Controls Table: If you select Allow
only stations listed in the Access Controls Table, then stations entered into the
access-controls table are allowed but all others are disallowed. To add MAC
addresses, see “Changing the Access Controls for a WLAN” on page 56.
Denying Only Stations Listed in the Access Controls Table: If you select Deny
only stations listed in the Access Controls Table, then stations entered into the
access-controls table are disallowed but all others are allowed. To add MAC
addresses, see “Changing the Access Controls for a WLAN” on page 56.
55
Configuring the Smart Wi-Fi Gateway
Controlling Access to the Wireless Network
Changing the Access Controls for a WLAN
By default, the Disable WLAN access restrictions option is selected, which allows
any wireless station gain access to the wireless network. If you want to change this
setting, follow the instructions below.
Figure 31.
Access control settings
To edit the ACL
1. Go to Configuration > Access Control.
2. Click the Wireless # tab for which you want to configure the access control
settings.
3. Select the radio button for the desired access control. (For a description of the
options, see “Access Control Options” in the previous section.) The Access
Controls Table appears.
4. To add a MAC address to the Access Control table, click the Add new entry
button.
5. Fill out the following text boxes:
•
Address: Six text boxes appear in which you enter the desired MAC address,
in hexadecimal digit form, two characters in each box. You can specify a full
12-hex-digit MAC address or enter “wildcard” characters for “don't care”
digits. Allowable hex-digit characters are 0-9, a-f, and A-F. Most address-tags
and software where you find MAC addresses listed include colons or dashes
to separate the address-pairs; that is provided for you on the web page, so do
not enter the colons or dashes.
56
Configuring the Smart Wi-Fi Gateway
Running the Smart Configuration Wizard
Supported wildcard characters include “x”, “X” and blank (space character).
Wildcards are useful when you want to specify all MAC addresses from a given
manufacturer. For example, by specifying only the Organizationally Unique
Identifier (the first six hexadecimal digits of any MAC address from that
manufacturer is its OUI) saves you having to enter all 24 million of them (the
table size is limited in the AP/Router to 128 entries). Some manufacturers
produce devices using more than one OUI, in which case you may need to
enter each applicable one.
•
Name: You may optionally assign a name to a given MAC address. This helps
you recognize known equipment. Names are not used by the router/AP device,
they are merely an aid for recognizing equipment on your network. Names
need not be specified and do not need to be unique. Names are accessible
by Service Provider Technical Support personnel, so if privacy is a concern, you
may wish to use generic-sounding names, such as “Room 1 TV”, or not use
names at all.
6. Click Update to save your changes. Assuming all parameters you entered are
acceptable, that row will be added to the table.
You have completed adding an entry to the MAC address table. If you have additional
MAC addresses you want included, click Add new entry, and then repeat these steps
until you have entered all the stations you want. There is a limit of 128 rows.
Removing a MAC Address
To remove a MAC address from the ACL table, select the check box under Remove,
and then click Update. The ACL table refreshes, and then the MAC address that you
deleted disappears from the table.
Running the Smart Configuration Wizard
If you want to reconfigure the Smart Wi-Fi Gateway using the quick setup wizard (which
you used when on your initial setup of the device), you can run Smart Configuration.
NOTE: Before starting Smart Configuration, make sure you have the Wireless Broadband Network information from your service provider at hand. You will use this
information to enable the Smart Wi-Fi Gateway to connect to the Wireless Broadband
Network successfully.
1. Click Smart Configuration under the Configuration menu. The first quick start
wizard page appears.
2. Click YES I want to use the wizard.
3. Select how you want the Smart Wi-Fi Gateway to operate. Options include:
57
Configuring the Smart Wi-Fi Gateway
Running the Smart Configuration Wizard
•
•
connect your wireless computer(s) to a metro wi-fi network?: Select this
option if you want the Smart Wi-Fi Gateway to operate as a router. Router
mode provides the capability to perform NAT (Network Address Translation)
for the traffic from the WAN interface (Internet) to the LAN interface. It allows
home users to hide the IP address from the Internet.
connect your home router to a metro wi-fi network?: Select this option if
you want the Smart Wi-Fi Gateway to operate as a bridge. Bridge mode allows
the device to act like Layer 2 (or bridge) device. When bridge mode is selected,
the home computer’s IP address will be assigned from the WAN interface when
the DHCP is enabled on the home computers.
Figure 32.
Select the operating mode
4. Click Next. The Web interface displays a list of wireless networks that the Smart
Wi-Fi Gateway has detected. If the Wireless Broadband Network with which you
want to associate does appear in the list, click Reload the list at the bottom of
the page to run a wireless survey again.
5. Click the option button next to the name/SSID of the Wireless Broadband Network
with which you want to associate. If wireless security is enabled on the network,
enter the wireless password that you obtained from your service provider in the
Password box that appears below the network name/SSID.
58
Configuring the Smart Wi-Fi Gateway
Running the Smart Configuration Wizard
Figure 33.
Select the Wireless Broadband Network, and then type the network
password (if required)
6. Click Next. The Wireless 1 (WLAN) configuration page appears.
Smart Wi-Fi Gateway MF7211 and MF7211-EXT models provide two wireless
interfaces that allow wireless clients on your home network to associate with the
Smart Wi-Fi Gateway directly.
NOTE: This option is only available on MF7211 and MF7211-EXT models.
7. Configure the first wireless interface on this wizard page.
•
•
In What is your network name? (SSID), type a name that you want to assign
to your WLAN. For example, you can type WLAN1.
In What type of security are you using?, click the wireless security settings
that you want to use. Clicking Open disables wireless security, while clicking
either WEP or WPA prompts you for a wireless network password.
Type a wireless network password in the box provided. Wireless users that
attempt to associate with this WLAN will be required to provide the same
password before they are allowed access.
NOTE: This option is only available on MF7211 and MF7211-EXT models.
59
Configuring the Smart Wi-Fi Gateway
Running the Smart Configuration Wizard
Figure 34.
Configure your first WLAN
8. Click Finish. The Web interface displays a summary of the settings that you have
configured.
Figure 35.
Review the settings that you have configured
60
Configuring the Smart Wi-Fi Gateway
Running the Smart Configuration Wizard
9. Click Reboot to reboot the Smart Wi-Fi Gateway and apply the new wireless
settings. A warning message appears, notifying you that the reboot process may
take several minutes.
WARNING: Do not remove power from the Smart Wi-Fi Gateway during the reboot
process.
10. Click OK. When the reboot is complete, the message Please click “OK” to
reconnect appears.
11. Click OK.
You have completed configuring the Smart Wi-Fi Gateway using the Smart Configuration wizard.
61
Configuring the Smart Wi-Fi Gateway
Running the Smart Configuration Wizard
62
5
Managing the Smart Wi-Fi Gateway
In This Chapter
Viewing Current Wireless Settings . . . . . . . . . . . . . . . . . . . . . . . . . . . . . . . . . . . . . 64
Changing the Administrative Login Settings . . . . . . . . . . . . . . . . . . . . . . . . . . . . 65
Configuring Management Access Options. . . . . . . . . . . . . . . . . . . . . . . . . . . . . . 67
Sending a Copy of the Log File to Ruckus Wireless Support . . . . . . . . . . . . . . . 70
Enabling Logging and Sending Event Logs to a Syslog Server . . . . . . . . . . . . . 69
Upgrading the Firmware . . . . . . . . . . . . . . . . . . . . . . . . . . . . . . . . . . . . . . . . . . . . . 71
Rebooting the Smart Wi-Fi Gateway . . . . . . . . . . . . . . . . . . . . . . . . . . . . . . . . . . . 75
Resetting to Factory Default. . . . . . . . . . . . . . . . . . . . . . . . . . . . . . . . . . . . . . . . . . 76
Running Diagnostics . . . . . . . . . . . . . . . . . . . . . . . . . . . . . . . . . . . . . . . . . . . . . . . . 76
63
Managing the Smart Wi-Fi Gateway
Viewing Current Wireless Settings
Viewing Current Wireless Settings
If you want to view the current common wireless settings that the Smart Wi-Fi Gateway
is using, go to the Status > Wireless page. Table 12 lists the descriptions of each
common wireless setting.
Figure 36.
The Status > Wireless page
64
Managing the Smart Wi-Fi Gateway
Changing the Administrative Login Settings
Table 12. Common Wireless settings
Setting
Description
Wireless Mode
Shows the wireless mode that the Smart Wi-Fi
Gateway is currently using. Possible values
include:
• 11b/g/n
• 11b/g
• 11b only
• 11g only
Channel
Shows the wireless channel that the Smart Wi-Fi
Gateway is currently using. If you set the wireless
channel to SmartSelect, this field will show the
value Channel # [SmartSelect].
Country Code
Shows the country code that the Smart Wi-Fi
Gateway has been set to use.
CAUTION: Verify that the Smart Wi-Fi Gateway is
using the correct country code to make sure it uses
only the allowed radio channels in your region.
Selecting the incorrect country code may result in
violation of application laws.
If you want to make changes to any of these settings, go to the Configuration >
Wireless page. Refer to “Configuring Common Wireless Settings” on page 39 for
more information.
Changing the Administrative Login Settings
The default user name is super and the default password is sp-admin. To prevent
unauthorized users from logging in to the Web interface using these default administrator login settings, Ruckus Wireless recommends that you change the default Web
interface password immediately after your first login.
To change the default administrator login settings
1. Log into the Web interface.
2. Go to Configuration > Device. The Device page appears.
3. Under Service Provider Login, change the default administrator login settings.
•
•
•
(Optional) In Username, type a new user name that you will use to log in to
the Web interface. The default user name is super.
In Password, type a new password to replace the default password sp-admin.
In Password Confirmation, retype the new password.
4. Click Update Settings. The message Your parameters were saved appears.
65
Managing the Smart Wi-Fi Gateway
Changing the Administrative Login Settings
You have completed changing the default login settings. The next time you log in to
the Web interface, make sure you use these updated login settings.
Figure 37.
The Configuration > Device page
66
Managing the Smart Wi-Fi Gateway
Configuring Management Access Options
Configuring Management Access Options
In addition to managing the Smart Wi-Fi Gateway via a Web browser through HTTP,
several other management access options are available on the AP. These options
include management access via HTTPS, Telnet, and SSH.
You can also enable remote management, if you want to be able to access the Smart
Wi-Fi Gateway Web interface from outside your home network.
Figure 38.
The Administration > Management page
To configure management access options
1. Go to Administration > Management. The Management page appears.
67
Managing the Smart Wi-Fi Gateway
Configuring Management Access Options
2. Review the access options listed in Table 13, and then make changes as needed.
Table 13. Management Access Options
Option
Description
Telnet access
By default, this option is disabled (inactive).
Telnet port
This field lists the default Telnet port of 23 — only if Telnet
is active. You can manually change this port number, if
required.
SSH access
By default, this option is enabled (active).
SSH port
This field lists the default SSH port of 22—only if SSH is
active. You can manually change this port number if
required.
HTTP access
This option is enabled by default.
HTTP port
This field lists the default HTTP port of 80, if HTTP has been
activated. You can manually change this port number if
required.
HTTPS access
By default this option is enabled. This connection mode
requires a security certificate, a copy of which has been preinstalled in the device.
HTTPS port
This field lists the default HTTPS port of 443—only if HTTPS
has been activated. You can manually change this port
number if required.
Certification
Verification
This notes whether the security certificate linked to the
HTTPS settings has been passed or not.
3. If you want the Smart Wi-Fi Gateway to be accessible for management from
outside of the local network, select the Allow Remote Management check box.
4. If you want to allow specific IP addresses only to be able to access the device for
remote management, select the Limited by IP Range check box, and then specify
the IP addresses or IP address ranges that are allowed to access the device by
entering the IP address and network mask combination. You can specify up to four
sets of IP address ranges.
5. Click Update Settings.
You have completed configuring the options for management access.
68
Managing the Smart Wi-Fi Gateway
Enabling Logging and Sending Event Logs to a Syslog Server
Enabling Logging and Sending Event Logs to
a Syslog Server
If you have a syslog server on the network, you can configure the Smart Wi-Fi Gateway
to send the device logs to the server. You will need to enable logging (disabled by
default), and then configure the Smart Wi-Fi Gateway to send logs to the syslog server.
1. Go to Administration > Log. The Administration :: Log page appears.
2. Look for Log Status, and then click Enabled.
3. After enabling logging, configure the following options:
•
•
Syslog Server Address [Optional]: To enable the Smart Wi-Fi Gateway to
send messages to a syslog server as they appear, enter the IP address of the
syslog server.
Syslog Server Port: By default, the syslog port number is 514. If the syslog
server is using a different port, enter that port number in this field.
4. Click Update Settings to save and apply your changes.
Figure 39.
The Administration > Log page
69
Managing the Smart Wi-Fi Gateway
Sending a Copy of the Log File to Ruckus Wireless Support
Sending a Copy of the Log File to Ruckus
Wireless Support
The Support Info log consists of the configuration and run-time status of the Smart
Wi-Fi Gateway and can be useful for troubleshooting. You have three options for
sending a copy of the current log file to Ruckus Wireless Support:
■
Save a copy to your local PC, then attach it to an email message and send it to
Ruckus Wireless Support
■
Set up a connection to an FTP site
■
Set up a connection to a TFTP site
To take advantage of these options
1. Go to Maintenance > Support Info. The Maintenance :: Support Info page
appears.
2. Review the Upload Method options.
3. To upload a copy of the support info file to an FTP or TFTP server, click TFTP or
FTP option. Clicking the FTP option prompts you to enter a User ID and Password.
4. In Server Address, enter the FTP or TFTP server IP address.
5. In Filename, enter a name for this file that you are saving.
NOTE: Remember to add a .TXT file extension to the file name, especially if you are
using Internet Explorer as your Web Admin “host”.
6. Click Upload Now.
Saving a Copy of the Current Log to Your Computer
You can also save a copy of the current log to your own computer, if needed.
1. Go to Maintenance > Support Info. The Maintenance :: Support Info workspace
appears.
2. Review the Transfer Method options.
3. Click the Save to local computer option. The following text appears below the
Transfer Method options:
Download: supportinfo.txt
4. Right-click the supportinfo.txt link.
5. When the Save As dialog box appears, change the destination directory and
change the file name if you prefer.
6. Click Save to save the file to your computer.
70
Managing the Smart Wi-Fi Gateway
Upgrading the Firmware
Upgrading the Firmware
You can use the Web interface to check for software updates/upgrades for the
firmware built into the Smart Wi-Fi Gateway. You can then apply these updates to the
device in one of two ways:
■
Manually updating on an as-needed basis, or;
■
Automating the update by setting an update schedule.
Before starting, decide which option you want to take:
■
Automate a regularly scheduled update
■
Run a one-time manual update right now.
By default, the automatic upgrade option is active, and will check the Ruckus Wireless
update server every 12 hours.
To get started with upgrading the firmware, go to Maintenance > Upgrade. When
the Maintenance > Upgrade options appear, decide which upgrade method to use.
Each of the three upgrade options listed on the Upgrade page are discussed in the
succeeding sections.
Figure 40.
The Maintenance > Upgrade page
71
Managing the Smart Wi-Fi Gateway
Upgrading the Firmware
Upgrading Manually via the Web
1. In the Upgrade Method options, click Web.
2. Click the Web Options URL field, and then type the URL of the download Web
site. Remember to start the URL with the http:// prefix.
3. You can change the Image Control File filename extension as noted here:
•
•
Replace any file names ending in .rcks with the .html extension
Replace any file names ending in .fI7 with the .html extension
CAUTION: Do not change the Username or Password entries.
4. Click Perform Upgrade. A status bar appears during the upgrade process.
5. After the upgrade is completed, you must manually reboot the Smart Wi-Fi
Gateway.
Upgrading Manually via FTP or TFTP
1. In the Upgrade Method options, click FTP or TFTP.
2. Click the host name field, and then type the URL of the server. Or click the IP
address field, and then type the IP address of the server.
CAUTION: Do not change any of the Image Control File, Username, or Password
entries.
3. Click Perform Upgrade. A status bar appears during the upgrade process.
4. After the upgrade is completed, you must manually reboot the Smart Wi-Fi
Gateway.
Upgrading from a Local Computer
1. Download the upgrade file to your local computer.
2. In the Upgrade Method options, click Local.
3. Under Local Options, click the Browse button, and then go to the location where
you saved the upgrade file.
4. Select the upgrade file, and then click Open.
5. Click Perform Upgrade. When the upgrade is completed successfully, a message
appears.
72
Managing the Smart Wi-Fi Gateway
Upgrading the Firmware
Configuring Automatic Upgrade
Configure the automatic upgrade schedule to enable the Smart Wi-Fi Gateway to
check a firmware upgrade source for available downloads and upgrade its firmware
automatically.
Figure 41.
The Auto Upgrade section on the Upgrade page
To configure automatic upgrade
1. In the Upgrade Method options, click the button for your preferred upgrade
method.
NOTE: Automatic Upgrade is only available if you select TFTP, FTP, or Web as the
Upgrade Method.
2. In Firmware Server or URL (depending in whether selected TFTP/FTP or Web as
the upgrade method), type the host name, IP address, or URL where the Smart
Wi-Fi Gateway can automatically download the firmware.
CAUTION: Do not change any of the Image Control File, Username, or Password
entries.
3. In Auto Upgrade, verify that the Enabled option is selected (active).
4. In Interval to Check for Software Upgrade, select the time interval when you
want the Smart Wi-Fi Gateway to automatically check for firmware upgrades.
Options range from 1 hour to 4 weeks.
73
Managing the Smart Wi-Fi Gateway
Upgrading the Firmware
5. In Schedule Reboot Time after Upgrade, select the time (GMT) when the Smart
Wi-Fi Gateway will be rebooted automatically after the new firmware is downloaded. The Smart Wi-Fi Gateway requires a reboot to complete the upgrade
process. Ruckus Wireless recommends that you select an offpeak hour so fewer
users would be affected by the reboot.
6. Specify when you want the Smart Wi-Fi Gateway to check for firmware upgrades:
•
•
To check immediately, click Perform Upgrade. If a firmware upgrade is
available, the Smart Wi-Fi Gateway will download it from the specified source
immediately. A status bar appears, which displays the progress of the upgrade
process. To complete the upgrade process, it will reboot automatically at the
reboot time that you specified.
To check for available firmware upgrades at the time interval that you specified,
click Save parameters only. The Smart Wi-Fi Gateway’s clock starts counting
down to the specified time interval and, when the time interval is reached,
checks the firmware upgrade source and downloads any available firmware
upgrade. To complete the upgrade process, it will reboot automatically at the
reboot time that you specified.
You have completed configure the automatic upgrade schedule.
74
Managing the Smart Wi-Fi Gateway
Rebooting the Smart Wi-Fi Gateway
Rebooting the Smart Wi-Fi Gateway
You can use the Web User interface to prompt the Smart Wi-Fi Gateway to reboot,
which simply restarts the Smart Wi-Fi Gateway without changing any of the current
settings.
CAUTION: Rebooting the Smart Wi-Fi Gateway will disrupt network communications
on any currently active WLANs.
Figure 42.
The Maintenance > Reboot/Reset page
To reboot the Smart Wi-Fi Gateway
1. Go to Maintenance > Reboot/Reset. The Maintenance :: Reboot/Reset page
appears.
2. Click Reboot Now. After a brief pause, you will be automatically logged out of
the Smart Wi-Fi Gateway.
After a minute or so, you should be able to log back into the Smart Wi-Fi Gateway,
which verifies that the reboot was successful. You can also check the LEDs on the Smart
Wi-Fi Gateway to verify the status of the device.
75
Managing the Smart Wi-Fi Gateway
Resetting to Factory Default
Resetting to Factory Default
WARNING: DO NOT reset the Smart Wi-Fi Gateway to factory default, unless you
are directed to do so by Ruckus Wireless support staff or by a network administrator.
Do this only if you are able to immediately reconnect the restored Smart Wi-Fi
Gateway to your computer, to reconfigure it for Wi-Fi network use — as detailed in
“Running the Smart Configuration Wizard” on page 57.
You can use the Web User interface to restore an inoperative Smart Wi-Fi Gateway to
its factory default settings, which will completely erase the configuration currently
active in the device. Note, too, that this will disrupt all wireless network communications through this device.
To reset the Smart Wi-Fi Gateway to factory default
1. Go to Maintenance > Reboot/Reset. The Maintenance :: Reboot/Reset page
appears.
2. Click Reset Now (next to Restore to factory settings?).
After a brief pause, you will be automatically logged out of the Smart Wi-Fi Gateway.
You must now disconnect the Smart Wi-Fi Gateway reconnect it to your computer, as
described in “Step 1: Prepare the Administrative Computer” on page 18. At this time,
you can restore the network settings, then replace it in your site for full network use.
Running Diagnostics
Two network connection diagnostic tools – PING and traceroute – have been built
into the Smart Wi-Fi Gateway to help you check network connections from the Web
interface.
To run diagnostics for network troubleshooting
1. Go to Administrator > Diagnostics. The Administrator :: Diagnostics page
appears. Two options are available:
•
•
Ping
Traceroute
2. Click the text field by the option you want to activate, and type the network
address of a site you wish to connect to.
3. Click Run Test.
The results appear in the text field below each option.
76
Managing the Smart Wi-Fi Gateway
Running Diagnostics
Figure 43.
Pinging ruckuswireless.com
Figure 44.
Running traceroute on ruckuswireless.com
77
Managing the Smart Wi-Fi Gateway
Where to Find More Information
Where to Find More Information
If you have questions that this User Guide does not address, visit the Ruckus Wireless
Support Portal at http://support.ruckuswireless.com/. The Support Portal hosts the
latest versions of user documentation. You can also find answers to frequently asked
questions (FAQs) for each Ruckus Wireless product type.
78
Index
Numerics
F
802.1x, 51
802.1x settings, 51
firmware upgrade, 71
A
access control, 55–56
administrative login, 65
advanced wireless settings, 40
B
bridge mode, 36
broadcast SSID, 46
C
changing the login settings, 32
country code, 40, 65
D
default IP address, 33
default user name and password, 26
device location, 32
device name, 32
device settings, 32
DHCP, 33, 35
release, 35
renew, 35
diagnostics, 76
E
encryption, 46
encryption method, 44
event logs, 69
external antenna, 40
external antenna connector, 13
H
Help, 29
home network, 45
I
installation, 11
Internet settings, 33
IP address, 33
L
Last Survey button, 43
Log Out button, 28
logging in, 26
logging out, 28
login settings, 65
logout, 28
logs, 70
M
management access, 67
menu, 28
MF7211/MF7211-EXT
front panel, 3
home network, 45
LEDs, 4
rear panel, 6
MF7211-EXT
external antenna connector, 13
MF7211-Outdoor
LEDs, 7
rear panel, 9
side panel, 7
79
N
U
NTP server, 34
upgrading firmware, 71
uplink WDS, 38
user name, 32
O
operation mode
bridge, 36
router, 36
P
package contents, 2
passphrase, 48
PING, 76
PoE injector, 19
port forwarding, 52
protection mode, 42
Q
Quick Setup Guide, 2
R
W
WAN settings, 43
Web interface, 26
WEP, 47
wireless availability, 46
wireless broadband network, 2
wireless channel, 65
wireless mode, 40, 65
wireless security
802.11x, 51
WEP, 47
WPA, 49
wireless settings, 39
workspace, 28
WPA, 49
WPA-Auto, 50
rebooting, 75
Release DHCP, 36
releasing DHCP, 35
Renew DHCP, 36
renewing DHCP, 35
resetting to factory default, 76
router mode, 36
S
Smart Configuration Wizard, 57
SSID, 43, 46
Static IP, 35
static IP address, 33
syslog, 69
syslog server, 69
system settings, 36
T
tabs, 28
temperature update, 32
traceroute, 76
transmit power, 42
80