1
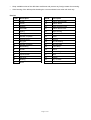
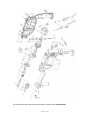
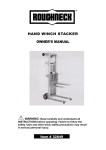
HAMMER DRILL
OWNER’S MANUAL
WARNING:
Read carefully and understand all ASSEMBLY AND OPERATION
INSTRUCTIONS before operating. Failure to follow the safety rules and other
basic safety precautions may result in serious personal injury.
Item# 21404
Thank you very much for choosing a Wel-Bilt™ product! For future reference, please complete the
owner’s record below:
Model: _______________
Purchase Date: _______________
Save the receipt, warranty and these instructions. It is important that you read the entire manual to
become familiar with this product before you begin using it.
This machine is designed for certain applications only. The distributor cannot be responsible for
issues arising from modification. We strongly recommend this machine not be modified and/or used
for any application other than that for which it was designed. If you have any questions relative to a
particular application, DO NOT use the machine until you have first contacted the distributor to
determine if it can or should be performed on the product.
For technical questions please call 1-800-222-5381.
INTENDED USE:
Your Wel-bilt Hammer Drill has been designed for drilling timber and metal utilizing a normal drilling
action and into masonry using hammer action
TECHNICAL SPECIFICATIONS:
Input current:
Input voltage:
No load speed:
Impact rate (hammer action):
Chuck capacity:
Maximum drilling capacity
Wood:
Steel:
Masonry:
4.5A
120Volt~60Hz
0-2800 RPM
0-44,800 BPM
up to 1/2in.
1in.
2/5in.
1/2in.
GENERAL SAFETY RULES
WARNING: Read and understand all instructions. Failure to follow all instructions listed
below may result in serious injury.
CAUTION: Do not allow persons to operate or assemble this Hammer Drill until they
have read this manual and have developed a thorough understanding of how the Hammer
Drill works.
WARNING: The warnings, cautions, and instructions discussed in this instruction
manual cannot cover all possible conditions or situations that could occur. It must be
understood by the operator that common sense and caution are factors which cannot be built into
this product, but must be supplied by the operator.
Page 2 of 10
SAVE THESE INSTRUCTIONS
IMPORTANT SAFETY CONSIDERATIONS
•
Stay alert, watch what you are doing and use common sense when operating the Hammer
Drill. Do not use the Hammer Drill while you are tired or under the influence of drugs,
alcohol or medication. A moment of inattention while operating the Hammer Drill may result
in serious personal injury.
•
Dress properly. Do not wear loose clothing, dangling objects, or jewelry. Keep your hair,
clothing and gloves away from moving parts. Loose clothes, jewelry or long hair can be
caught in moving parts. Air vents often cover moving parts and should be avoided.
•
Use safety apparel and equipment. Use ANSI-approved safety goggles or safety glasses
with side shields, or when needed, a face shield. Use as dust mask in dusty work conditions.
This applies to all persons in the work area. Also use non-skid safety shoes, hardhat, gloves,
dust collection systems, and hearing protection when appropriate.
•
Do not overreach. Keep proper footing and balance at all times.
•
Remove adjusting keys or wrenches before connecting to the power supply or turning on
the tool. A wrench or key that is left attached to a rotating part of the tool may result in
personal injury.
HAMMER DRILL USE AND CARE
•
Do not modify the Hammer Drill in any way. Unauthorized modification may impair the
function and/or safety and could affect the life of the equipment. There are specific
applications for which Hammer Drill was designed.
•
Always check of damaged or worn out parts before using the Hammer Drill. Broken
parts will affect the Hammer Drill operation. Replace or repair damaged or worn parts
immediately.
•
Store idle Hammer Drill. When Hammer Drill is not in use, store it in a secure place out of
the reach of children. Inspect it for good working condition prior to storage and before reuse.
•
When operating the tool
Check that the switch is in the “OFF” position before connecting to the power supply. Switch
to “OFF” immediately after completion of the task.
Keep the mains cable away from any moving parts or accessories.
Never cover the ventilation slots in the tool.
Always hold the body and auxiliary handle firmly.
Otherwise, the counterforces produced during use or the jamming of a drill bit can cause
inaccuracies or put the drill out of control.
•
Before drilling into walls, ceilings etc, ensure that there are no concealed power cables or
pipes in the cavity.
Always use the auxiliary handle. This gives you greater control if the drill accessory should
become jammed.
Keep the cord clear of the drill accessory, do not wrap the cord around your arm or wrist.
1. Wear ear protectors with impact drills. Exposure to noise can cause hearing loss.
2. Use auxiliary handles supplied with the tool. Loss of control can cause personal injury.
Page 3 of 10
ASSEMBLY
Page 4 of 10
Attaching the auxiliary handle
1. The auxiliary handle provides additional control, support and guidance for the drill.
2. The auxiliary handle can be set to any position around the 360ºhandle collar mount.
3. Loosen the auxiliary handle grip by rotating it anti-clockwise to the handle collar.
4. Slide the collar of the auxiliary handle over the chuck and onto the auxiliary handle collar mount
of the drill. Fig A
5. Secure the auxiliary handle by turning the auxiliary handle grip clockwise. Fig B
Adjusting the depth rod
1. Loosen the auxiliary handle by turning it anti-clockwise.
2. Adjust the depth rod so that the drill bit extends beyond the end of the rod to the required drilling
depth. Fig C
3. Lock the depth rod in position by turning the auxiliary handle clockwise.
OPERATION:
It is important to understand the functions of the various controls. Please see below how and when
to use the on/off switch, speed control, speed pre-selector, forward/reverse control and drill/hammer
selector.
Familiarize yourself with these controls before first use of your new drill.
On/off switch
1. Turn the drill on by depressing the trigger switch. To turn the tool off, release the trigger
switch. Fig D
Page 5 of 10
2. The tool can be locked on by first depressing the trigger switch and then pressing the
lock-on button. Fig E
3. Once the lock-on button has been engaged, the switch will remain locked on.
4. To turn the tool off, press and release the trigger switch.
Speed control
1. The speed can be varied according to the pressure applied to the trigger switch. The harder
you squeeze, the faster the rotation from zero up to a pre-set maximum.
Maximum pre-set speed selection
1. The speed selection dial can be used to pre-set any required speed by turning the dial.
Once you have set the dial you are then limited to the speed range of zero to the speed
selected. Fig F
Forward/reverse lever
1. The direction of rotation of the chuck is controlled by the forward/reverse lever located
above the trigger switch.
2. For forward rotation: move the lever to the left.
3. For reverse rotation: move the lever to the right
Note: Do not change the direction of rotation while the chuck is still in motion. Fig G
Adjusting between hammer and drill mode of operation
1. Move the mode selector to the left (hammer icon
2. Move the mode selector to the right (drill bit icon
) to select the hammer mode. Fig H
) to select the drill mode. Fig I
Note: When drilling in hammer mode, carbide tipped drill bits should be used and the drill must be
set to rotate in the forward rotation.
Inserting a bit
1. Disconnect the drill from the power supply.
2. Twist the chuck sleeve to open the jaws slightly larger than the diameter of the bit you are
inserting.
3. Insert the drill bit up to its flutes, making sure it is centered in the jaws.
4. Tighten the chuck by turning the chuck sleeve.
5. Once the jaws have clamped evenly around the drill bit, use the chuck key to tighten the
chuck fully. Fig J
6. Always tighten the chuck using all three holes. This will ensure a firm grip on the accessory.
7. Occasionally check the tightness of the chuck during drilling as it may become loose from
vibration.
8. Reconnect the drill to the power supply, switch on and check that the bit runs true and does
not wobble, indicating that it is not sitting square. Adjust if necessary after again
disconnecting the tool from the power supply.
Removing a bit
1. Disconnect the drill from the power supply.
2. Use the chuck key to loosen the chuck.
3. Remove the bit.
Note: Use gloves to handle drill bits and other sharp accessories. Also be aware that drill bits can
Page 6 of 10
be very hot after even a short period of use.
Drilling in all materials
1. Always use sharp drill bits.
2. Mark the place where the hole is to be drilled.
3. Commence with a slow speed to start the hole then increase the speed once the hole has
been started.
4. Reduce your pressure on the tool when the drill bit is about to break through the material.
Drilling in metal
1. Move the mode selector to the right (drill bit icon
) to select the drill mode.
2. Support thin material on a scrap piece of wood.
3. Use a punch to mark the position of the hole. Careful use of the variable speed feature
allows you to start holes without centre punching. Operate the drill at a low speed until you
start the hole.
4. If drilling a large hole use a small drill at first to establish a pilot hole then use the required
larger sized drill bit.
5. Use only HSS (high speed steel) drill bits or those recommended for metal use.
6. When drilling into iron or steel, use a cooling lubricant, such as thin oil.
7. With aluminum, use turpentine or paraffin.
8. With brass, copper and cast iron, use no lubricant but withdraw the drill regularly to assist
cooling.
Drilling in wood
1. Move the mode selector to the right (drill bit icon
) to select the drill mode.
2. Mark the place where you want to drill with a punch or nail.
3. To avoid splintering on breakthrough either clamp a piece of scrap wood to the back of the
work piece or continue the hole from the back of the work piece when the drill bit first breaks
through.
Hammer drilling in masonry
1. Move the mode selector to the left (hammer icon
) to select the hammer mode.
2. Hold the drill firmly and place the bit at the point to be drilled.
3. Depress the switch to start the drill.
4. Move the drill bit into the work piece applying only enough pressure to keep the bit cutting
Note: Do not force the drill or apply side pressure to elongate a hole. Let the drill and bit do
the work.
5. If the bit jams in the work piece or if the drill stalls, stop the tool immediately. Remove the bit
from the work piece and determine the reason for jamming.
MAINTENANCE
•
Maintain your Hammer Drill. It is recommended that the general condition of any Hammer Drill
be examined before it is used. Keep your Hammer Drill in good repair by adopting a program of
conscientious repair and maintenance. Have necessary repairs made by qualified service
personnel.
•
When not in use the drill should be stored in a dry, frost-free location not within the reach of
children.
Page 7 of 10
•
•
Keep ventilation slots of the drill clean at all times and prevent any foreign matter from entering.
If the housing of the drill requires cleaning do not use solvents but a moist soft cloth only.
Part list
Part#
Description
Part#
Description
1
Screw
18
Carbon brush holder
2
Chuck
19
Carbon brush
3
Spindle
20
Stator extension wire
4
Steel ball
21
Carbon brush cover
5
Spring
22
Right housing
6
Bearing
23
Screw
7
Gasket of spindle
24
Stator
8
Semicircle key
25
Bearing
9
Big gear
26
Wire sheathing
10
Gasket of spindle
27
Wire and plug
11
Ball bearing
28
Cord clamp
12
Holder
29
Switch
13
Impact iron
30
Left housing
14
Impact button
31
label
15
Oil proof…
32
Handle
16
Bearing
33
Key of chuck
17
Rotor
Page 8 of 10
For replacement parts and technical questions, please call 1-800-222-5381.
Page 9 of 10
WARNING
Some dust created by power sanding, sawing, grinding, drilling, and other construction activities contains
chemicals known to the State of California to cause cancer, birth defects or other reproductive harm.
Some examples of these chemicals are:
• lead from lead-based paints,
• crystalline silica from bricks and cement and other masonry products, and
• arsenic and chromium from chemically treated lumber.
Your risk from these exposures varies, depending on how often you do this type of work. To reduce your
exposure to these chemicals: work in a well-ventilated area, and work with approved safety equipment,
such as those dust masks that are specially designed to filter out microscopic particles.
Distributed by
Northern Tool + Equipment Co., Inc.
Burnsville, Minnesota 55306-6936
NorthernTool.com
Made in China
Page 10of 10