1
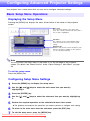
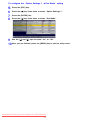
Downloaded From projector-manual.com ASK Manuals Contents Contents........................................................................... 1 About this manual... .......................................................................................... 2 Operation During Projection .......................................... 3 Image Operations During Projection ................................................................. 3 Adjusting Image Brightness ......................................................................................... 3 Selecting the Color Mode............................................................................................. 4 Zooming an Image ....................................................................................................... 4 Momentarily Cutting Off the Input Source Image ......................................................... 5 Freezing an Image ....................................................................................................... 5 Displaying a Pointer in the Projected Image ................................................................ 6 Changing the aspect ratio of the projected image............................................. 7 Eco Mode .......................................................................................................... 7 Using the [FUNC] Key....................................................................................... 8 Configuring Advanced Projector Settings.................... 9 Basic Setup Menu Operations .......................................................................... 9 Displaying the Setup Menu .......................................................................................... 9 Configuring Setup Menu Settings ................................................................................ 9 Basic Setup Menu Example ....................................................................................... 10 Restoring Projector Settings to Their Initial Factory Defaults.......................... 12 Setup Menu Contents ..................................................................................... 13 Image Adjustment Main Menu ................................................................................... 14 Screen Settings Main Menu ....................................................................................... 16 Input Settings Main Menu .......................................................................................... 19 Option Settings 1 Main Menu..................................................................................... 20 Option Settings 2 Main Menu..................................................................................... 22 Operational Info Main Menu....................................................................................... 23 Restore All Defaults Main Menu................................................................................. 24 User Maintenance ......................................................... 25 Cleaning the Projector..................................................................................... 25 Cleaning the Projector Exterior .................................................................................. 25 Cleaning the Lens ...................................................................................................... 25 Cleaning Intake and Exhaust Vents ........................................................................... 25 Downloaded From projector-manual.com ASK Manuals 1 Replacing the Lamp ........................................................................................ 26 To check the current lamp use time ........................................................................... 26 When to replace the lamp .......................................................................................... 27 Replacing the Lamp ................................................................................................... 27 To replace the lamp ................................................................................................... 28 Resetting the Lamp Time ........................................................................................... 29 To reset the lamp time ............................................................................................... 30 To reset the lamp time after exceeding the lamp life ................................................. 30 Appendix........................................................................ 31 Remote Controller Signal Range .................................................................... 31 Connecting to a Component Video Output Device ......................................... 32 Full-screen Display of an RGB Image........................................................................ 33 Reattaching the Lens Cover............................................................................ 34 About this manual... z All of the operations in this manual are explained using the remote controller that comes with the projector. The following key operations can also be performed on the projector instead of the remote controller: [MENU], [S], [T], [X], [W], [ENTER], [ESC], [ ], [INPUT], [AUTO], [ZOOM +], [ZOOM –], [FOCUS S], [FOCUS T]. To perform this remote controller operation: Use this projector button: [ENTER] Button in the center of the cursor keys [ZOOM +], [ZOOM –] [ZOOM] button in combination with the [W] and [X] buttons [FOCUS S], [FOCUS T] [FOCUS] button in combination with the [S] and [T] buttons Downloaded From projector-manual.com ASK Manuals 2 Operation During Projection This section explains the various types of operations you can perform while the projector is projecting an image. Image Operations During Projection You can perform the following operations while projecting an image. z Image brightness adjustment z Color mode selection z Image zooming z Momentary cut off of the input source image and projection of a black or blue screen, or a logo z Image freeze z Pointer display in the projected image z Aspect ratio switching (between 4:3 and 16:9) Adjusting Image Brightness To adjust image brightness 1 Press the [BRIGHT] key. 2 3 Use the [W] and [X] keys to adjust image brightness. z This displays the brightness adjustment window. To hide the window, press the [ESC] key. Downloaded From projector-manual.com ASK Manuals 3 Selecting the Color Mode You can select from among five different color mode settings to optimize the projected image in accordance with image contents and projection conditions. To change the color mode 1 Press the [COLOR MODE] key. 2 Use the [T] and [S] keys to move the highlighting to the color mode you want to select, and then press the [ENTER] key. z This displays the color mode selection window. The currently selected color mode is the one whose button is selected (filled in). z This will select the button next to the highlighted color mode name. z For details on what each color mode does, see “Color Mode” under “Image Adjustment Main Menu” on page 14. 3 To hide the window, press the [ESC] key. Zooming an Image 1 Press the [D-ZOOM +] or [D-ZOOM –] key. 2 Use the cursor keys to move the the center of the enlarged image. 3 Press (or hold down) the [D-ZOOM +] key. 4 To exit the zoom operation, press the [ESC] key. z This will cause to appear in the projected image. to the part of the image that you want in z Each press of the [D-ZOOM +] key enlarges the image one step. Holding down the [D-ZOOM +] key continually enlarges the image. z Pressing the [D-ZOOM –] key while an image is enlarged reduces the zooming by one step. Holding down the [D-ZOOM –] key continually reduces the size of the image. z While an image is zoomed, you can use the cursor keys to scroll the view to other parts of the image. Downloaded From projector-manual.com ASK Manuals 4 Momentarily Cutting Off the Input Source Image 1 Press the [BLANK] key. 2 To resume projection of the image from the input source, press the [BLANK] key (or [ESC] key). z This temporarily cuts off the image from the input source and projects a black screen in its place. Note You can specify projection of a black screen or blue screen, or a logo. For details, see “Blank Screen” under “Screen Settings Main Menu” on page 18. Freezing an Image Pressing the [FREEZE] key freezes the projected image. To freeze the projected image 1 While an image is being projected from an input source, press the [FREEZE] key. z This will capture the image that is on the screen at the moment you press [FREEZE] and stores it in projector memory. That image remains projected on the screen. 2 To restore projection of the image from an input source, press the [ESC] key. Downloaded From projector-manual.com ASK Manuals 5 Displaying a Pointer in the Projected Image You can select from among eight different pointer styles, including various arrow styles, for display in the projected image. Pointers can be used during a presentation to indicate or highlight a specific part of the image. Arrow 1 Oval 1 Spot 2 Note Depending on the pointer style you are using, the pointer may not display properly when you are using keystone correction. If this happens, use the [KEYSTONE +] and [KEYSTONE –] keys to change the keystone correction value to zero. To display a pointer in the image 1 Press the [POINTER] key. 2 Use the cursor keys to move the pointer to the location you want. 3 To modify the pointer as described below, press the [STYLE] key. z This will cause a pointer to appear in the image. z You also can use the setup menu to specify the pointer type that appears first when you press the [POINTER] key. For details, see “Pointer” under “Option Settings 2 Main Menu” on page 22. z Holding down a cursor key moves the cursor at high speed. For this pointer type: Pressing [STYLE] will do this: Arrow 1 / Arrow 2 Rotate the arrow by 90 degrees Bar 1 / Bar 2 Toggle between flashing and not flashing Oval 1 / Oval 2 Toggle between flashing and not flashing Spot 1 / Spot 2 Cycle the darkness (transparency) of the area not covered by the spot among two levels To select the pointer type 1 2 Press the [POINTER] key to display the pointer. Keep pressing the [POINTER] key until the pointer you want is displayed. z Each press of the [POINTER] key cycles through the available pointer types. To clear the pointer from the image Press the [ESC] key. Downloaded From projector-manual.com ASK Manuals 6 Changing the aspect ratio of the projected image Press the [ASPECT] key to toggle the aspect ratio of the displayed image between 4:3 and 16:9. Note z The aspect ratio setting affects the projected image only when the input source is VIDEO or component. z When the input source is a component signal with an aspect ratio of 16:9, the aspect ratio switches automatically to 16:9. When this happens, pressing the [ASPECT] key will not change the aspect ratio. z You also can change the aspect ratio setting using the setup menu. For details, see “Aspect Ratio” under “Screen Settings Main Menu” on page 16. Important! Note that enlarging or reducing the size of an image using the [ASPECT] key for commercial purposes or public presentation may infringe on the legally protected copyright of the copyright holder of the original material. Eco Mode Turning on the Eco Mode reduces lamp brightness to save power. The projector’s cooling fan also operates at a slower speed while the Eco Mode is turned on, which results in quieter operation. Turn on the Eco Mode when your priority is quieter operation. Turn off the Eco Mode when your priority is maximum brightness. To turn the Eco Mode on or off Press [ECO] to toggle the Eco Mode on and off. Downloaded From projector-manual.com ASK Manuals 7 Using the [FUNC] Key Pressing the [FUNC] key displays the menu shown below. You can use this menu to perform the operations described below. z Adjust image brightness Highlight “Brightness” and then press the [ENTER] key. • This performs the same operation as pressing the [BRIGHT] key ( key) described on page 3. z Turn the Eco Mode on or off Highlight “Eco Mode” and then press the [ENTER] key. • This performs the same operation as pressing the [ECO] key (U key) described on page 7. z Select the aspect ratio of the projected image Highlight “Aspect Ratio” and then press the [ENTER] key. • This performs the same operation as pressing the [ASPECT] key ( key) described on page 7. Downloaded From projector-manual.com ASK Manuals 8 Configuring Advanced Projector Settings Your projector has a setup menu that you can use to configure advanced settings. Basic Setup Menu Operations Displaying the Setup Menu Pressing the [MENU] key displays the menu shown below in the center of the projection screen. Main menu The main menu includes seven main menu items. The currently selected main menu item is the one that is highlighted. Sub-menu The sub-menu shows each individual setting under each main menu item, and its current setting. Guidance text Guidance text provides a brief description of the main key operations available for the operation you are currently performing. Note You can position the setup menu in the center or on the left edge of the projection screen. For details, see “Menu Position” under “Option Settings 1 Main Menu” on page 20. To exit the setup menu Press the [MENU] key. Configuring Setup Menu Settings 1 2 Press the [MENU] key to display the setup menu. 3 4 Press the [ENTER] key. 5 Perform the required operation on the selected sub-menu item screen. Use the [T] and [S] keys to select the main menu item you want by highlighting it. Use the [T] and [S] keys to select the sub-menu item you want by highlighting it. z The guidance text explains the operations you need to perform to configure each setting. 6 To return to the main menu from the sub-menu, press the [ESC] key. To exit the setup menu, press the [MENU] key. 7 Downloaded From projector-manual.com ASK Manuals 9 Basic Setup Menu Example The procedure below shows how to configure the following three settings: • Image Adjustment J Contrast • Image Adjustment J Color Mode • Option Settings 1 J Eco Mode Note z Certain settings on the setup menu cannot be changed while there is no input signal to the projector. Because of this, you should configure setup menu settings after selecting an input source and starting projection. z This example covers basic steps only. For more detailed information, see “Setup Menu Contents” on page 13. To configure the “Image Adjustment J Contrast” setting 1 2 Press the [MENU] key to display the setup menu. 3 Press the [T] key once to select “Contrast”. 4 Use the [W] (lighter) and [X] (darker) keys to adjust contrast. “Image Adjustment” is initially selected on the main menu, so simply press the [ENTER] key. To configure the “Image Adjustment J Color Mode” setting 1 2 Press the [T] key once to select “Color Mode”. 3 4 Use the [T] and [S] keys to select the color mode you want. Press the [ENTER] key. z This displays the color mode menu. After selecting the color mode you want, press the [ESC] key. Downloaded From projector-manual.com ASK Manuals 10 To configure the “Option Settings 1 J Eco Mode” setting 5 6 7 8 Press the [ESC] key. Press the [T] key three times to select “Option Settings 1”. Press the [ENTER] key. Press the [T] key three times to select “Eco Mode”. 9 Use the [W] and [X] keys to select “On” or “Off”. 10 After you are finished, press the [MENU] key to exit the setup menu. Downloaded From projector-manual.com ASK Manuals 11 Restoring Projector Settings to Their Initial Factory Defaults You can use the procedures in this section to restore all of the settings on a particular main menu or all of the settings on the setup menu to their initial factory defaults. To restore all settings on a particular main menu to their initial factory defaults 1 2 Press the [MENU] key to display the setup menu. Use the [T] and [S] keys to select the main menu whose settings you want to restore to their initial factory defaults. z You can select Image Adjustment, Screen Settings, Input Settings, Option Settings 1, or Option Settings 2. 3 4 5 Press the [ENTER] key. 6 7 Use the [S] key to select “Yes”. Use the [T] key to select “Restore Menu Defaults”. Press the [ENTER] key. z This will display a confirmation screen like the screen shown below. To restore the settings of the main menu to their initial defaults, press the [ENTER] key. z To exit the operation without doing anything, press [ESC] instead of [ENTER]. 8 After you are finished, press the [MENU] key to exit the setup menu. Note z The language setting and the password are not returned to their initial factory defaults if you select Option Settings 1 in step 3. z For details about how the above procedure initializes settings, see the explanations of the settings under “Setup Menu Contents” on page 13. Downloaded From projector-manual.com ASK Manuals 12 To restore all settings on the setup menu to their initial factory defaults 1 2 Press the [MENU] key to display the setup menu. Use the [T] key to select “Restore All Defaults”, and then press the [ENTER] key. z This displays a confirmation message asking if you want to initialize all settings. 3 4 Use the [S] key to select “Yes”. To restore all settings on the setup menu to their initial defaults, press the [ENTER] key. z This will restore all of the settings to their initial factory defaults, except for the Language, Lamp Time, and password settings. z To exit the operation without doing anything, press [ESC] instead of [ENTER]. 5 After you are finished, press the [MENU] key to exit the setup menu. Setup Menu Contents This section contains tables that provide detailed explanations of all of the items included on the setup menu. The following describes the type of information that appears in each of the columns of the tables. Setting Name This column shows the names of the settings as they appear on the sub-menu. Input This column shows the input source for which each setting is supported. Input source names are abbreviated as R (RGB input), C (component video input), and V (video input). The letter N indicates that the setting can be configured while there is no input signal. Setting Unit The setting unit indicates how a setting is stored. “Source Specific” in this column indicates that separate settings can be stored for each individual input source. For example, you could store an “Image Adjustment J Brightness” setting of –1 for RGB input and a setting of +1 for VIDEO input. “Single” in this column indicates that a single setting is stored and applied, regardless of the input source. Description This column provides details about the setting item and how to select it. The initial default setting is indicated by an asterisk (*). Downloaded From projector-manual.com ASK Manuals 13 Image Adjustment Main Menu Setting Name Input Setting Unit Description Brightness RCVU Source Specific Use this sub-menu to adjust the brightness of the projected image. A larger value produces a brighter image. Contrast RCVU Source Specific Use this sub-menu to adjust the contrast of the projected image. A larger value produces a stronger contrast. Sharpness RCV Source Specific Use this sub-menu to adjust the sharpness of the outlines in the projected image. A larger value makes the image sharper, while a smaller value makes it softer. Saturation RCV Source Specific Use this sub-menu to adjust the color saturation of the projected image. A larger value increases color saturation. Tint RCV Source Specific Use this sub-menu to adjust the tint of the projected image. A larger value makes the overall image more bluish, while a smaller value makes the overall image more reddish. This setting is supported only when the signal is NTSC or NTSC4.43. Color Mode RCVU Source Specific You can select from among five different color mode settings to optimize the projected image in accordance with image contents and projection conditions. Presentation*: Use this setting for standard presentations in a well-lit area. This is the initial default setting when the input source is RGB. Standard: Use this setting when you want to highlight the colors of your presentation. Graphics: Use this setting when you want photographs and graphics to appear natural. Theater*: Use this setting to bring out the dark portions of your images. This is the initial default setting when the input source is either component video or video. Blackboard: Use this setting for easy viewing when projecting onto a blackboard. Color Balance RCVU Source Specific This sub-menu lets you adjust the color balance of the projected image. Color balance lets you select either “Color Temperature” or “Color” (for individual adjustment of red, green and blue) as the adjustment method. Color Temperature: Select this option when you want to adjust the color temperature. Selecting “LO” gives whites a reddish cast, while “HI” gives them a bluish cast. Selecting “NORM*” sets a medium setting between the two colors. Color: Select this option when you want to individually adjust the intensity of red, green, and blue. For all of the colors, a larger value makes the color stronger. Downloaded From projector-manual.com ASK Manuals 14 Setting Name Input Setting Unit Description Vertical Position RCV Signal Specific Use this sub-menu to adjust the vertical position of the input source image within the projection area. Horizontal Position RCV Signal Specific Use this sub-menu to adjust the horizontal position of the input source image within the projection area. Frequency R Signal Specific When vertical bands appear in the projected image while RGB is selected as the input source, it means that the frequency setting is not correct. When this happens, use this setting to adjust the frequency manually. Important! If, for some reason, your manual frequency settings cause the image input from the computer to disappear from the projection, you can press the [AUTO] key to perform an auto adjust operation, which should cause the image to appear. Phase R Signal Specific When there is flickering in the projected image while RGB is selected as the input source, it means that the phase setting is not correct. When this happens, use this setting to adjust the phase manually. Video Mode RCV Source Specific This setting is valid when VIDEO is selected as the input source. Use it to select a mode that is optimized for movies or still images. Normal*: Optimized for movies. Still Image: Optimized for still images. In particular, this setting should be used when projecting still images from a digital camera connected to the projector’s VIDEO terminal. Restore Menu Defaults RCVU Source Specific Use this sub-menu to return all of the sub-menu items on the Image Adjustment main menu to their initial default settings. z Restoring menu defaults when there is no input signal will restore defaults for the currently selected input source. z “Image Adjustment” main menu “Vertical Position”, “Horizontal Position”, “Frequency”, and “Phase” defaults can be restored for the current signal type (XGA/60Hz, SXGA/60Hz,etc.) only. Downloaded From projector-manual.com ASK Manuals 15 About the “Signal Specific” Setting Unit For the items that have “Signal Specific” in the “Setting Unit” column of the above table, the setting is saved for the specific type of signal (XGA/60Hz, SXGA/60Hz, etc.) that is being input when the setting is performed, and not for a specific input source. Screen Settings Main Menu Setting Name Input Setting Unit Description Keystone Correction RCVUN Single Use this sub-menu to correct vertical keystoning of the projected image. Aspect Ratio RCV Source Specific Use this sub-menu to select one of the following aspect ratios for the projected image. 4:3*: This setting specifies a 4:3 aspect ratio, which is the same as a standard television. 16:9: This setting specifies a 16:9 aspect ratio, which is the same as a movie screen, high-definition TV, etc. Using this setting when the input source image is a 16:9 image that has been squeezed to a 4:3 image causes the image to be projected with its normal 16:9 aspect ratio. Note When the input source is a component signal with an aspect ratio of 16:9, the aspect ratio switches automatically to 16:9. When this happens, the aspect ratio cannot be changed using this setting. Important! Note that enlarging or reducing the size of an image for commercial purposes or public presentation may infringe on the legally protected copyright of the copyright holder of the original material. Downloaded From projector-manual.com ASK Manuals 16 Setting Name Input Setting Unit Description Projection Mode RCVUN Single Use this sub-menu to specify whether projection will be from the front of the screen or the back of the screen. *: Select this option when projecting from the front of the screen. : Select this option when projecting from the back of the screen. : Select this option to flip the back-projected image vertically. : Select this option to flip the image vertically. Startup Screen RCVUN Single Use this sub-menu to specify whether or not a startup screen should be projected whenever the projector is turned on. Logo: Select this option to project the projector’s built-in logo screen at startup. None*: Select this option when you do not want to project a startup screen. No Signal Screen RCVUN Single Use this sub-menu to specify what should be projected when there is no input signal to the projector. Blue*: Select this option to project a blue screen. Black: Select this option to project a black screen. Logo: Select this option to project the projector’s built-in logo screen. Downloaded From projector-manual.com ASK Manuals 17 Setting Name Input Setting Unit Description Blank Screen RCVUN Single Use this sub-menu to specify what should be projected after the [BLANK] key is pressed. Blue: Select this option to project a blue screen. Black*: Select this option to project a black screen. Logo: Select this option to project the projector’s built-in logo screen. Restore Menu Defaults RCVUN Source Specific Use this sub-menu to return all of the sub-menu items on the Screen Settings main menu to their initial default settings. z Restoring menu defaults when there is no input signal will restore defaults for the currently selected input source. z Note that the “Keystone Correction”, “Projection Mode”, “Startup Screen”, “No Signal Screen”, and “Blank Screen” settings are always returned to their initial defaults, regardless of the currently selected input source. Downloaded From projector-manual.com ASK Manuals 18 Input Settings Main Menu Setting Name Input Setting Unit Description RGB Input RCUVN Single Use this sub-menu to specify manually the type of signal being input from the projector’s RGB input terminal. Auto*: Automatically detects the signal being input from the RGB input terminal and configures the appropriate input protocol. RGB: Select this option when a computer is connected to the RGB input terminal. For details about connecting a computer, see “Connecting a Computer to the Projector” in the “User’s Guide”. Component: Select this setting when the projector’s RGB input terminal is connected to the component video output terminal of a video device using an optionally available YK-3 component video cable. For information about connection, see “Connecting to a Component Video Output Device” on page 32. Video Signal RCVUN Single Use this sub-menu to specify manually the type of signal being input from the projector’s VIDEO input terminal. Auto*: Select this setting to have the projector switch the video signal system automatically in accordance with the input signal from the video device that is connected to the VIDEO input terminal. NTSC / NTSC4.43 / PAL / PAL-M / PAL-N / PAL60 / SECAM: Each setting selects the applicable video system. Use these settings when you want to specify only one specific video signal for the VIDEO input terminal. Signal Name Indicator RCVUN Single Use this sub-menu to specify whether or not the name of the currently selected signal source should be displayed in the projected image. On*: Select this option to turn on display of the name of the currently selected signal source in the projected image. Off: Select this option to turn off display of the signal source name. Restore Menu Defaults RCVUN Source Specific Use this sub-menu to return all of the sub-menu items on the Input Settings main menu to their initial default settings. z Restoring menu defaults when there is no input signal will restore defaults for the currently selected input source. z Note that the “Signal Name Indicator” setting is always returned to its initial default, regardless of the currently selected input source. Downloaded From projector-manual.com ASK Manuals 19 Option Settings 1 Main Menu Setting Name Input Setting Unit Description Menu Position RCVUN Single Use this sub-menu to specify the display position of the setup menu as either the center or the left side of the screen. *: Select this option to display the setup menu in the center of the screen. : Select this option to display the setup menu on the upper left corner of the screen. Auto Keystone Correction RCVUN Single Use this sub-menu to turn auto keystone correction on or off. On*: Select this option to turn on auto keystone correction. Off: Select this option to turn off auto keystone correction. Auto Adjust RCVUN Single Use this sub-menu to specify whether or not auto adjust should be performed when RGB is selected as the input source. On*: Select this option to turn on auto adjust. Off: Select this option to turn off auto adjust. Eco Mode RCVUN Single Use this sub-menu to turn the Eco Mode on or off. On: Select this option to reduce lamp brightness and save power. This setting also reduces the speed of the projector’s cooling fan, which reduces operation noise. Off: Select this option to project at maximum brightness. Auto Power Off RCVUN Single Use this sub-menu to turn Auto Power Off on or off. See “Turning Off the Projector” in the “User’s Guide” for more information. On*: Select this option to turn on Auto Power Off. Off: Select this option to turn off Auto Power Off. Power On Password RCVUN Single You can configure the projector to require input of a password before operation is enabled. Downloaded From projector-manual.com ASK Manuals 20 Setting Name Direct Power On Input RCVUN Setting Unit Single Description Use this sub-menu to turn Direct Power On on or off. See “Direct Power On” in the “User’s Guide” for more information. On: Select this option to turn on Direct Power On. Off*: Select this option to turn off Direct Power On. Important! While Direct Power On is enabled, the projector will turn off automatically if no key operation is performed and no signal input is received within about 10 minutes after it is turned on. This is true regardless of the current Auto Power Off setting. Language RCVUN Single Use this sub-menu to specify the language to use for messages, setup menus, etc. English / French / German / Italian / Spanish / Swedish / Chinese (Simplified) / Chinese (Traditional) / Korean / Japanese Restore Menu Defaults RCVUN Single This sub-menu returns all of the sub-menu items on the Option Settings 1 main menu to their initial default settings. z Restoring menu defaults when there is no input signal will restore defaults for the currently selected input source. z The “Auto Adjust” item is returned to its initial default only when RGB input is selected for the input source. All of the other items are returned to their initial defaults regardless of the currently selected input source. Downloaded From projector-manual.com ASK Manuals 21 Option Settings 2 Main Menu Setting Unit Setting Name Input Description Zoom Memory RCVUN Single Use this sub-menu to turn zoom memory on or off. Zoom memory lets you save the zoom setting when the projector is turned off, so it can be restored automatically the next time the projector is turned on. On*: Select this option when you want to restore the zoom setting that was in effect when the projector was last turned off, whenever it is turned on. Off: Select this option when you want the image to be projected at its maximum size whenever you turn on the projector. Pointer RCVUN Single Use this sub-menu to specify the type of pointer that appears first when you press the [POINTER] key. Arrow 1* / Arrow 2 / Bar 1 / Bar 2 / Oval 1 / Oval 2 / Spot 1 / Spot 2 Restore Menu Defaults RCVUN Single This sub-menu returns all of the sub-menu items on the Option Settings 2 main menu to their initial default settings. Downloaded From projector-manual.com ASK Manuals 22 Operational Info Main Menu Setting Name Input Setting Unit Description Lamp Time RCVUN Single This sub-menu item shows the cumulative number of hours the current lamp has been used to date. Use this value as a reference when deciding whether or not the current lamp needs to be replaced. For details about replacing the lamp, see “Replacing the Lamp”. Reset Lamp Time RCVUN Single Use this submenu item to reset the lamp time to 0 hours after replacing the lamp. For details about replacing the lamp and the lamp time reset operation, see “Replacing the Lamp”. Input Signal RCVUN Source Specific This sub-menu item shows the currently selected input signal (RGB, Component, or VIDEO). “- - - -” is indicated here when there is no input signal. Signal Name RCV Source Specific This sub-menu item shows the signal name of the signal being input to the projector. Index RC Source Specific This sub-menu item appears only when RGB or component is the input signal. It shows projector internal information. Resolution R Single This sub-menu item appears only when RGB is the input signal. It shows the number of vertical pixels of resolution of the RGB input signal. Horizontal Frequency RCV Source Specific This sub-menu item shows the horizontal frequency of the input signal. Vertical Frequency RCV Source Specific This sub-menu item shows the vertical frequency of the input signal. Scan System RC Source Specific This sub-menu item appears only when RGB or component is the input signal, and shows the scanning frequency of the input signal. The input signal is interlace or non-interlace for an RGB signal input, and interlace or progressive for a component signal input. Downloaded From projector-manual.com ASK Manuals 23 Restore All Defaults Main Menu Setting Name Input Setting Unit Description Restore All Defaults RCVUN Single This sub-menu returns all sub-menu items on all main menus to their initial default settings. This operation can be performed regardless of the currently selected input source and regardless of whether or not a signal is currently being input. For details about this procedure, see “To restore all settings on the setup menu to their initial factory defaults” on page 13. Unit Operating Time RCVUN Single This sub-menu item shows the cumulative operating time of this unit. This time cannot be initialized. Downloaded From projector-manual.com ASK Manuals 24 User Maintenance Cleaning the Projector Periodically clean the projector exterior, lens, intake vents, and exhaust vents on a regular basis. Important! z Always make sure that the projector has cooled sufficiently before cleaning it. If the projector is turned on, perform the following steps before cleaning it. 1 2 3 Turn off the projector. Check to make sure that the POWER/STANDBY indicator has changed to amber. Unplug the power cord from the power outlet, and allow the projector to cool down for about 60 minutes. Cleaning the Projector Exterior Wipe the exterior of the projector with a soft cloth that has been moistened in a weak solution of water and a mild neutral detergent. Be sure to wring all excess moisture from the cloth before wiping. Never use benzene, alcohol, thinner, or any other volatile agent for cleaning. Cleaning the Lens Carefully wipe the lens with a commercially available lens cloth or optical lens paper, like those for eyeglasses or camera lenses. When cleaning the lens, be very careful to avoid scratching it. Cleaning Intake and Exhaust Vents Dust and dirt tend to collect around the intake vents located on the back and both sides of the projector. Because of this, you should use a vacuum cleaner to clean away accumulated dust and dirt periodically as shown below. Downloaded From projector-manual.com ASK Manuals 25 Important! z Continued use of the projector after dust has accumulated around the intake vents can cause overheating of internal components and lead to malfunction. z Certain operating conditions also can cause dirt and dust to accumulate around the projector's exhaust vents on the front. If this happens, use the same procedure as that described above to clean the exhaust vents. Replacing the Lamp Caution Continued use of a lamp that has passed its lamp life increases the risk of the lamp rupturing. Replace the lamp with a new one as soon as possible after the replacement message appears. z The light source lamp is a consumable item. The average life of a lamp is approximately 2000 hours. After 2000 hours, a message appears to alert you to the need of lamp replacement. However, note that the characteristics of a particular lamp or lamp operating conditions can cause the lamp to start to go dim or even fail before the message appears. To check the current lamp use time 1 2 Press the [MENU] key to display the setup menu. Press the [T] key to select the “Operational Info” main menu. z The “Lamp Time” sub-menu item shows the number of hours that the current lamp has been used. 3 Press the [MENU] key to exit the setup menu. Downloaded From projector-manual.com ASK Manuals 26 When to replace the lamp The LAMP indicator starts to flash red and the message shown below appears whenever the lamp time exceeds 2000 hours. It is time to replace the lamp. Use the procedure in the User’s Guide to replace the lamp as soon as possible. When this message appears, replace the lamp as soon as possible using the procedure under “Replacing the Lamp” on page 27. Note that the above message will disappear about 10 seconds after you turn on the projector, even if you do not replace the lamp. You will be able to continue using the projector without replacing the lamp until the lamp time reaches 100 hours. At that time, the LAMP indicator will stop flashing and remain lit red, the following message will appear for about 10 seconds, and then the projector will turn off automatically. The lamp has exceeded its service life! The projector will not turn on until you replace the lamp. When this message appears, replace the lamp immediately using the procedure under “Replacing the Lamp” on page 27. Replacing the Lamp Caution z During normal use, the lamp and the area around it become extremely hot. Before replacing the lamp, turn off the projector and wait for the cool down operation (indicated when the POWER/STANDBY indicator is flashing amber) to finish. Next, disconnect the AC power cord from the projector, and wait for at least 60 minutes to allow it to cool down even further. Touching the lamp or the area around it during operation or immediately after turning off the projector creates the risk of serious burn injury. z Replace the lamp using the YL-33 optional lamp cartridge only. z A mercury lamp with high internal pressure is used as the light source. A lamp that is weakened by impact, damage, or expiration of its lamp life may explode or fail to light if exposed to loud noise. Note that lamp life differs greatly from lamp to lamp, and is affected by conditions under which the lamp is used. z Never touch the glass of the lamp with your fingers. Doing so can cause the lamp to rupture and shorten its life. z A broken lamp can cause glass fragments to be scattered inside the lamp housing. Gas inside of the lamp housing may also be discharged from the projector’s vent exhaust ports. Gas inside of the lamp includes mercury, so be sure to ventilate the area whenever the lamp breaks. Should you accidentally inhale gas fumes or should gas fumes get into your eyes, immediately contact a physician. z Should the lamp break, take care to avoid personal injury on the glass fragments. Never try to replace a broken lamp on your own. Contact ASK Proxima service (www.askproxima.com) to request a replacement. Warning Hg - Lamp contains mercury. Manage in accordance with local disposal laws. See www.lamprecycle.org Downloaded From projector-manual.com ASK Manuals 27 To replace the lamp Important! When replacing the lamp, use the special screwdriver that comes with the YL-33 replacement lamp. The projector does not come with a screwdriver. 1 2 Turn off the projector and unplug its AC power cord. 3 Turn over the projector and place it on top of a desk or on some other stable surface. 4 Loosen the lamp cover screw, and then remove the lamp cover. Wait for about 60 minutes to allow the projector’s current lamp to cool down completely. Lamp cover 5 Loosen the three screws indicated by an S mark. Lamp cartridge Downloaded From projector-manual.com ASK Manuals 28 6 Use the lamp cartridge handle to pull the lamp cartridge from the projector. 7 Insert the new lamp cartridge as far as it will go, as shown in the illustration. z After inserting the lamp cartridge, lay its handle down in the position shown in the illustration under step 5 on this page. Make sure the grooves of the lamp cartridge align with the grooves of the lamp housing. Caution Take care to avoid touching the lamp (glass) and the mirrors inside the projector. Doing so can cause the lamp to rupture, shorten lamp life, and otherwise affect lamp performance. 8 9 Secure the lamp cartridge with the three screws. Return the lamp cover to its original position, and secure it with the screw. z After replacing the lamp, be sure to perform the procedure under “Resetting the Lamp Time” on page 29. Resetting the Lamp Time The lamp time reset operation you need to perform depends on when you replace the lamp. It is time to replace the lamp. Use the procedure in the User’s Guide to replace the lamp as soon as possible. If you replace the lamp when the above message appears, use the procedure under “To reset the lamp time”. The lamp has exceeded its service life! The projector will not turn on until you replace the lamp. If you replace the lamp after the above message appears, use the procedure under “To reset the lamp time after exceeding the lamp life”. Downloaded From projector-manual.com ASK Manuals 29 To reset the lamp time 1 2 3 4 5 6 7 8 9 Turn on the projector. Press the [MENU] key to display the setup menu. Press the [T] key to select “Operational Info”, and then press the [ENTER] key. Press the [ENTER] key. This causes the message “Reset Lamp Time?” to appear. Press the [S] key to select “Yes”, and then press the [ENTER] key. This resets the lamp time to 0 hours. Press the [MENU] key to exit the setup menu. This causes the setup menu to disappear from the projected image. To reset the lamp time after exceeding the lamp life If you use the existing lamp until its life is exceeded, you will not be able to turn on the projector even after you replace the lamp with a new one. Perform the following procedure to initialize the lamp time in this case, which will make it possible to turn on the projector. 1 Use the bundled AC power cord to plug the projector into a power outlet. 2 While holding down the projector’s [W] key, hold down the [AUTO] key for about five seconds. z Connecting to a power outlet causes the POWER/STANDBY and LAMP indicators on the top of the projector to light red, which indicates that the lamp has exceeded its service life. z This will reset the lamp time, cause the POWER/STANDBY indicator to change from red to amber, and also cause the LAMP indicator to go out. 3 Press the [ ] (power) key to ensure that the projector turns on normally. Downloaded From projector-manual.com ASK Manuals 30 Appendix Remote Controller Signal Range When performing an operation on the remote controller, point it at the remote control signal receiver on the back or front of the projector. The following illustration shows the range of the remote controller signal. ±30 degrees max. 5 meters (16.4 feet) max. ±30 degrees max. 5 meters (16.4 feet) max. Front Back 5 degrees to 30 degrees ±30 degrees max. 5 meters (16.4 feet) max. 5 meters (16.4 feet) max. Remote Controller Range The allowable distance between the remote controller and the projector is less when there is a sharp angle between the remote controller and the remote control signal receiver. Important! To avoid running down the battery, store the remote control unit so its buttons are not pressed inadvertently. Downloaded From projector-manual.com ASK Manuals 31 Connecting to a Component Video Output Device Some video devices are equipped with a component video output terminal. You can use an optionally available VESA to component video adapter (SP-VESA-ADPT-R) and a component video cable to connect the RGB input terminal of the projector to the component video output terminal of a video device. Important! Always turn off the projector and the video device before connecting them. z Component video output terminals come in 3-terminal sets: Y·Cb·Cr or Y·Pb·Pr. Be sure to match the colors of the plugs on the optional adapter with the colors of the terminals (Green: Y; Blue: Cb/Pb; Red: Cr/Pr). z Note that connection only to an analog component video output terminal is supported. Connection to a digital output terminal is not supported. Downloaded From projector-manual.com ASK Manuals 32 Full-screen Display of an RGB Image The projector outputs images using XGA (1024 pixels × 768 pixels) video resolution. When the input signal from the computer connected to the projector is not an XGA signal, “Resize Image To Fit” automatically enlarges or reduces the image so it matches the projector’s video resolution and fills the entire screen. The following shows how different input signals from a computer are adjusted during projection. Input Signal Example Projected Image 800 × 600 1024 × 768 1280 × 1024 When the input signal has a resolution of 1280 × 1024 (aspect ratio: 5:4), the original image is compressed so it conforms to the projection resolution of 1024 × 768 (aspect ratio: 4:3). Because of this, the projected image may appear slightly wider horizontally than the original image. Downloaded From projector-manual.com ASK Manuals 33 Reattaching the Lens Cover Use the following procedure to replace the lens cover if it should accidentally become detached from the projector. 1 Insert the nub () of the left tab of the lens cover into the depression () of the tab under the lens. z When performing the above step, make sure that the lens cover is open to 90 degrees in relation to the front of the Data Projector. 2 Keeping the left nub () in the left depression (), gently press the lens cover towards the right as you insert the nub () of the right lens cover tab into the depression () of the right tab under the lens. z Do not apply undue force to the lens cover when performing the above step. Pressing too strongly can damage the tabs of the lens cover. Press here with a pen or similarly pointed object as you slide the cover into place. Downloaded From projector-manual.com ASK Manuals 34