1
Video Camera Recorder/Digital
Video Camera Recorder
_U_lFJ_'cl_rn
videoHi8
CCD-TRV128/TRV228/TRV328/TRV428
Digital 8
DCR- TRV260/TRV265
© 2004 Sony Corporation
RECYCLINGLITHIUM-IONBMTERIES
Read this first
Litltium-lon
batteries
@
are
recyclable.
You can help preserve our
environment
by retracing your
Before operating the unit, please read Ibis
masmal thoroughly, and retain it lbr future
reference.
used rechargeable
b_lteries to the
collection and recycling location
nearest you.
For more intb_Tn_tion regarding
WARNING
To prevent
fire
expose
unit
the
recycling
of
rechargeable
batteries, call toll free 1-800-822or visit h.p://www.rbrc.org/
or shock
to rain
hazard,
8837,
do not
Caution: Do nol handle
Ion batteries.
or moisture.
damaged
or leaking Lithium-
For customers in the U.S.A.
C_LEflON:
TO REDUCE
THE
DO NOT P,_AOV
R_
E OOV_
USEq_R_qC_BIJ_
R_=Z_t
SS_VK;ING
_
B_E_'TR_
Sony Customer
(7669)
{O R B_E_I_.
PARTS
TO QUAUFqBD
If you have any questions
call:
_'_q_
IN_CE.
8_*'ICE
is intended
to alert the
user to the presence of unin sulated
"dangerous voltage" within the
product's
enclosure
that may be of
sufficient magnitude to constitute
risk of electric shock to persons.
a
This symbol is intended to alert the
user to the presence of important
operating
mad maintenance
(servicing)
instructions
literature accompanying
Center
you may
1-800-222-SONY
The number below is for FCC related m_lter_ only.
Regulatory Information
pEr_CNNB_.
Declaration
This symbol
Information
abou_ this product,
in the
the
of Conformity
Trade Name: SONY
Model No.: DCR TRV260
Responsible
Party: Smay Electronics Inc.
Address: 680 Kinderkamack
Road, Oradel[,
NJ 07649 U.S.A.
Telephone No.: 201 930-6972
This device complies with Part 15 of the FCC Rules.
Operation
is subjeO to the following
two conditions:
( 1) This device may not cause harmful interference,
and (2) this device must accept any interfi:rence
received, including interference
undesired operation.
tha_ may cause
appliance.
Owner'sRecord
The mode! and serial numbers
For customers in the U.S.A. and
CANADA
CAUTION
TO PREVENT
ELECTRIC
SltOCK,
BLADE OF PLUG TO WIDE SLOT,
INSERT.
2
MATCH
FULLY
WIDE
are located on the
bottom. Record the serial number ill the space
provided below. Refer to these numbers whenever
call upon your Sony dealer regarding
Model No.
TRV
Serial No.
Model No.ACSerial No.
Otis produch
you
CAUTION
Yo_ _ c_u_i_nettthat _y ch_ges o_modific_rk_s
_ e_p_ss_ appmv_Jin _s man_ _ d wid y_ur
recorditag
copyright
Notes
lens
Note:
0
• Ihe
l}fis _mpm_t
l_as l_mi t_sted _Id found to comply
with th_ 1_
_ _ CI_s B _i_l
de_ce, puget
to
Part ] 5 of th_ FCC R_es.
m_!_o_.
!l_is _i_pm_
g_e_tes, uses, and c_
_
mdlo _q_cy
enemy _nd, if n_ i_s_![_
_d
of such matarJals
laws,
on the
I,t;l)
LCD
may be contra_
panel,
viewfinder,
screea and _e viewl_der
to the
and
_re
man_t_c_mred u_i_ exn_mely
hlg_-preci_ion
technology, so over 9!/.99% oP_h_ pixe[s _r_
However, there may l_e some tiny black points a_d/
or brlgtlt points (whi_, red, bl_e, or gr_ela in _,'o1oi)
Nat appear co_stamly on Ne LCI) screen and Ne
v;gwt]_d_a
r_aesepoints are
h_m_
m_fference
However, _e_
_es
is no g_n_e
cause har_
_c_p6on,
to _._io comm_ic_t_s.
whi_
_
m_ffe_nee
m_"_Pere_ce to _io
c_ be d_rmi_d
w_[I
or _etevlsion
_ _mmg
_h_
eqmpm_t off _d o_, th_ u_er is encouraged _ _/to
co_
_h_ in_:_e_
_ one ar more of _e
- In_a_
_he sep_o_
r_x;eiver.
_ee_
_h_ eqmpment and
- Con_e_ _h_ e_pm_nt
_ _ o_[_ on _ ci_it
_ffe_
from _h_ to which _e r_eiver is
- Cons_t a So_ d_er or an _xp_ncefl
_._ioY['V
_hm_';mn for hetp.
_l_e i_ta_ce c_
suppled m_t 1_ us_l _
_e
eqmFment in a_r
_ gloat d_'_
R_es.
m comply w_
pu_
_e I_its
_r a
to Subp_ B of Pa_ 15 of FC("
normal res_fl_ el'the man_t_a_mri_g
gm_'_ss and do not _ff_ct the rex:oNiitg i_ _ny way,
• E_:posi_g the LCI) s_reen, the viewfinder, or Ne lens
to direct su_llg_tr for long periods of time may _'al_ e
real fan¢4ions, Be cm_fM when g[aclng the camera
near a w_ndow or outdoors,
• I)o not alto at the sun. I)olng so might ca_e your
camcor_ler to malfangrion,
Take pic_res of Ne sun
only N low [ig_It conditions, such as ar dllsk,
Note on connecting
other device
Before ¢onn_ng yo_trcam_'_rfler to _er de_ce
such _ a VC_ ar a computer with m_UgB ar I,L[NK
cable, be sure _ _ser_ the c_ec_r
p[_ in _e Froper
_lln_tlo_, F you in_ert _e connector p|ug forc]Ny i_
th_ wrong dir_on, _e _ermi_a[ m_ be d_maged,
_l_s m_ ca_e _ matfan_t_ of your camcarfle_
Notes on using this manual
• the images of the LCD so,teen and the _ewfkld_r
_efl on _is mabel ar_ c_pt_r_d us_ _ digilal still
camera, a_d thus m_ appear di_r_t
from wh_t
yOU See,
Notes on use
Note on a cassette tape
Yo_c_ u_ s_d
_ _ [] and _I_SHI m
D_git_]_D video cassetteson yo_zcamc_der. See
page 82 _brdevils.
Notes on recording
• Before _ar ring ro r_cord, t_t _he r_or_l[ng Nn_rio_t
to make sure fl_eNcmre aml so_nd are r_corfled
wi_o_t _y pr_blems,
• Competition for _h_con_ts of recordings cannot
be prodded, ev_ if recording or playback is not
pos_ble d_ to _ ma[t_tction of fl_ec_co_t_, _.
• IV c_lo__ys_ms di_er d_ndim_ on _e ¢._y/
_gk_ns. l_ vi_ yo_ reco_ags o_ a 1"%yo_ nell
NI'SC system=basedI'_,
• l'elevision programs, films, video tapes, mad other
ma_a_s may be cop_vDgh_3,L_tho_zed
• _ _s i_strutai_m mamla|, e_h mod_l is m_ated
_s
CCD-YRV I28: H|m TRV128
CCD-YRV228: H|m TRV228
CCD-YRV328: H|m TRV328
CCD-rRV428: H|m TRV428
I)CR_]RV260: D ]RV260
I)CR_]_V265: D ]RV265
_ra_o_s
with _o spe_]_c mod_l names are _r all
models,
_ra_o_s
with _ecigc m_l m_mes _r_ for the
i_dicated m_Is one.
Befor_ you start r_adi_ this ma_al, che_'_k_
mod_
_am_
_f yollr
camcord_r.
• e model _'R_]RV265.
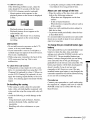
Notes on using the camcorder
• YOU ¢gn charu4_ tbe Iar_g_
to be u_ fbr sc_n
display o_ yo_ ¢*_mco_d_r (p, I9),
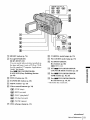
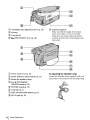
• Do _ot be[d _he cz_u¢_rd_r by th_ _][o_ug
par_,
\
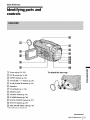
Viewfinder
4
LCD panel
Table of Contents
((D-'fRV228:
(. (D-'fRV328:
NIm 1'RV228
HIE=1'RV328
I)(R. FRV26g: D_R'V2(_0
D(. R_TRV265; D_RV265
Read this first .............................................................................................
Quick
Start
2
Guide
Recording movies on a tape ......................................................................
Recording/Playing
8
back with ease ..........................................................
10
Step 1: Checking supplied items ..............................................................
11
Step 2: Charging the battery pack ............................................................
12
Using an outside power source .................................................................................
15
Step 3: Turning the power on ...................................................................
15
Step 4: Adjusting the LCD panel and viewfinder ......................................
16
Getting
started
Adjusting
Adjusting
the LCD panel ...........................................................................................
the viewrmder ............................................................................................
16
16
Step 5: Setting the date and time .............................................................
17
Step 6: Inserting a cassette tape ..............................................................
18
Step 7: Setting the screen language ........................................................
19
Recording
Recording movies ....................................................................................
Recording for a longer time .......................................................................................
Using zoom ...............................................................................................................
Using the built_ T_light ................................................................................................
21
23
23
23
Recordff_g in mirror mode .........................................................................................
24
Superimposing the date and time or_ pictures (Hill TRV128t2281328/428)
............. 25
Recording still images-
Tape photo recording (lyTRV260i265)
............. 25
Recording with ease - Easy Handycam ..................................................
26
Adjusting the exposure .............................................................................
27
Adjusting
the exposure for backlit subjects
Adjusting
the exposure
...............................................................
manually ..............................................................................
27
28
Recording in dark places - NightShot plus ..............................................
28
Adjusting the focus manually ...................................................................
29
Recording a picture using various effects ................................................
30
Fading in and out ofa sos_e - FADER
....................................................................
30
=_ntinued
5
Superimposing a title ................................................................................
31
Searching for the last scene of the most recent recording
- END SEARCH .................................................................................
33
Playback
Viewing pictures recorded on a tape ........................................................
34
Playing back in various modes ..................................................................................
35
Playing back with ease - Easy Handycam ..............................................
36
Various playback functions ......................................................................
37
Display ng the screen indicators ................................................................................
Display ng the date/time and camera scttir_gs data - Data code
(lyTRV2601265) ..................................................................................................
6
37
37
Playing the picture on a TV ......................................................................
39
Locating a scene on a tape for playback (E)TRV265) .............................
40
Searchir_g qu ckly for a desired scene - Zero set memory ........................................
Searchir_g for a scer_e by date of record ng - Date search .......................................
Searchir_g for a still imago - Photo search ................................................................
40
41
41
Playing back still images in sequence - Photo scan .................................................
42
O_
¸ _
' O_
Troubleshooting
Customizing
Camcorder
Troubleshooting
Your
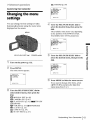
Changing the menu settings .............. 43
Using the _i_ (MANUAL SET) menu
- PROGRAM AE/P EFFECT,
etc
................................................
44
Using the _i_ (CAMERA SET} menu
- 16:9 WIDEiSTEADYSHOT,
etc ................................................
47
Using the _i_ (PLAYER SET)/_
(VCR
SET) menu - HiFi SOUND/EDIT,
etc ...........................................
51
Using the _i_ (LCD SET) menu - LCD
B.L./LCD COLOR, etc .................. 53
Using the _
-FRAME
(TAPE SET) menu
RECiINT,REC, etc ....... 54
Using the [_ (SETUP MENU)- CLOCK
SETiUSB STREAM/_ LANGUAGE
etc
57
Using the _ (OTHERS) menu
- WORLD TIMENIDEO EDIT,
etc ......................................
74
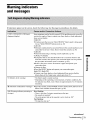
Warning indicators and messages
Additional
....79
Information
Using your camcorder abroad ........
81
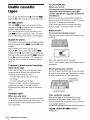
Usable cassette tapes .....................
82
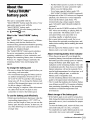
About the "InfoLITHIUM _battery
pack .............................................
83
About i,LINK .....................................
84
Maintenance
and precautions
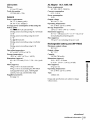
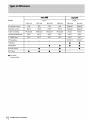
Specification
..............................
Quick
Reference
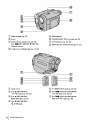
Identi_ing
pa_sandcontrols
............ 85
66
............. 91
Index ..................................................
96
59
Dubbing/Editing
Connecting to a VCR
61
Dubbing to another tape .................... 63
Dubbing a tape easily- Easy Dubbing
(H| [] TRV128/228/328/428)
........ 64
Recording pictures from a VCR
([) TRV260/265) ........................... 68
Dubbing selected scenes from a tape
- Digital program editing
([) TRV260/265) ........................... 69
For B IRV260/265:
Rel'er also to _,ther _xpemting
_upplied
wi_
yo_
• _x_ti_g image_ wi_
"_Conapt_er
_n#trttctkms
_m_order:
your _mputer
A ppllcat_
Oulde
7
Quick Start Guide
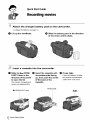
Recordingmovies
"i/ Attach
the charged
battery pack to the camcorder.
To _harge t_ battery, s_e page 12,
_) Lift up the viewfinder
Insert a cassette
_) Slide the L_OPEN/
EJECT lever in the
direction of the arrow
to open the lid.
The ¢,assett_ cornp_rtmer=t
comes o_t a_tomat k'ally,
O Slide the battery pack in the direction
of the arrow until it clicks,
into the camcorder,
Insert the cassette with
its window-side facing
up, then push the center
of the back of the
cassette
Window-side
L_OPENiEJECT
8
QuickStart
Guide
lever
Press [PLY.
('los_ the cassette lid afar
fhe _assege cornpaa*ment
slides back inby it_el£
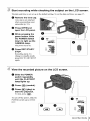
Start recording
while checking
the subject
on the LCD screen,
['he &_te _md time is not set t_p _n the default se_tit_g. 'Io set the d_te a_d dine, see page 17,
_) Remove the lens cap,
Ler=s cap is not at_=ed
when yoa ptlrebase yoar
camc_rder (p, 91),
Press OPEN and
open the LCD panel
While pressing the
green button, slide
the POWER switch
down to light up the
CAMERA lamp.
'The power tt_msor_.
0
Press REC START/
STOP.
R_'v'or_m g s_rts. "1'o
eharlge t*_st_tdby mode,
press REC START/STOP
ag_ti[L
View the recorded
picture on the LCD screen,
_) Slide the POWER
switch repeatedly
until the PLAY/EDIT
lamp lights up.
0
Press _
0
Press _
(play) to
start the playback.
'to stop,
press
(rewind).
_,
['o tam offthe power, slide {he
POWER switch t_p tgl CHG)
OFF,
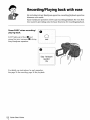
Recording/Playingback with ease
By s_ mhlng_oE_y Hmldycam o_rafion,
rocord_ng/pl_ybask
_rafio_
becomes_w_neaslen
Easy Handycam operatlc_ aIlows easy re_<_rdin_playback for even _rst
tlm_ _sers by providing only- the basic f_nctlc_s tbr moord_ng/playback.
Press EASY when recording/
...................................................
playing back.
E_Y,g_op_o_0_o.o_
0
.....................................
screen font size increases (0) &,tring
Easy Handycam operation.
r_v
Easy Handycam
opera,on
ON
For details, see instructions
S*'e page 26 for receding,
10
Quick Start Guide
fbr _:ach operation.
page 36 for playback.
Getting started
RM r-830; (D TRV265)
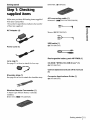
Step 1: Checking
supplied items
Make sum yon have fbl] owing items saI_lied
with yo_ camearder.
the number inpareritheses indicates the r_tm_b_r
of Nat item supplied.
AC Adaptor
AN connecting
cable (1)
Menaural: ( HI II TR V128/228/32g/42g)
(t)
Stereo: (BTRV260/265)
Power cord (1)
USB cable (1)
(E) TRV260/265)
Rechargeable
Lens cap (1)
Sse page })1 er* how to attach fhe lens cap,
battery
CD_ROM "SPVD*0t2
pack NP*FM30
USB Driver"
(1)
(1)
(BTRV260/265)
Camera Operations
Guide {This manual)
(_)
Shoulder strap {1)
See pag_ 94 on hew to att_h the shoulder strap.
Wireless Remote Commander
(1)
A brittle-type
lithium ba_D" is alr_:ady
installe&
RM:r-833:
(Him TRV228i42g)
Computer Applications
(B FRV260/265)
Guide
(1)
Attach
Step 2: Chargingthe
battery pack
You can charge
"InfoLITHIUM"
to yoL[r
0
the battery
battery
by attaching
pack
the battery
the direction
pack by sliding
it in
of the arrow until it
clicks.
the
(M series)
camcorder.
Notes
• YOU cannol us_ batteries
"Int_)LITHI UM" baltery
olher lhan lhe
pack (M series) (p. 83).
• Do noz short-circuit
the DC plug of the AC Adaptor
or battery termtaals with any metallic objects. This
may cause a malfunction.
• Use a nearby wall oatlet when using the AC
Adaptor. Disconnect the AC Adaptor from the wall
outlel immedialely
if any malti_nction occurs.
3
With
the •
facing
mark on the DC plug
up, connect
the DC IN jack
the AC Adaptor
on your
to
camcorder.
Battery pack
• mark
DC IN jack
4
Connect
the power
cord to the AC
the power
cord to the wall
Adaptor.
Power
cord
Connect
AC Adaptor
To the
wall
outlet.
out[et
Slide the POWER
OFF.
Lift up the viewfinder.
Getting started
up to (CHG)
The CitG (charge) lamp lights up and
charging starts.
/
12
switch
I_0
0
After chargingthe battery
The CItG (charge)
lamp turns oft" when the
battery is fully charged. Disconnect
Adaptor from 1he DC IN jack.
1he AC
To remove the battery pack
You can check the battery's current charge level
and its current remaining recording time both
during charging
or when 1he power is turned off.
1
Set the POWER
2
Press OPEN and open the LCD panel.
3
Press DSPL/BATT
POWER witch
switch to (CHG) OFF.
INFO.
The battery information
seconds.
3ppears tbr about 7
Kc'ep the button pressed 1o view it for about
20 seconds.
BATTERY
BATTERy
INFO
CHARGE
Co
LEVEL
o.
LCD SCREEN:
REC
TIME AVA[_
VIEWFINDER:
1
Lift up the viewfinder.
2
Set the POWER
3
Slide the battery pack outin the direction
Battery charge level: Displays
approximate remaining amount
of the arrow while pressing
power left in the batter), pack.
(battery)
release
switch to (CHG)
OFF.
[]
the BATT
button down.
[]
Approximate
possible
of
recording
time
recording
time
using the LCD panel.
f,_ Note
• If you do not use the baltery pack for a long time, use
up the battery pack completely before storing it. See
page 83 about storage oflhe battery pack.
[]
To checktheremaining battery- Battery
Info
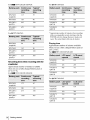
Charging time
Approximate number of minutes required when
DSPUBATTINFO
Approximate
possible
using the viewfinder.
you fully charge a fully discharged battery pack
3t25°C(77°F).(IO
30°C(50
86°F)
recommended.)
NP-FM30
(supplied)
145
NP-FM50
15(}
NP QM7I/QM7ID
26(}
NP QM9I/QM9ID
36(I
Recordingtime when recordingwith the
LCD screen on
Approximate
OPEN
POWER switch
number of minutes available
when you use a fully charged battery pack 3t
25°C (77°F).
,_continued
Getting started
13
For
NIm TRV
For [],TRV260/265:
128/228/328/428:
NP-FM30
115
55
NP-FM30
(supplied)
125
65
(supplied)
NP-FM50
185
90
NP-FM50
200
105
NP-QM71/
445
220
NP-QM71/
485
255
67(1
335
725
385
QM71D
QM71D
NP-QMgl/
NP-QM91/
QM91D
For
QMglD
[)TRV260/265:
* Approximale
number of minutes when recording
while you repeatedly record, slart/stop, slide the
POWER switch to chmlge the power mode, and
zoom. The aoual baltery life may be shorter.
NP-FM30
90
50
Playing
(supplied)
time
Approximate
NP-FM50
145
NP-QM71/
80
355
220
NP-QMgl/
535
300
you
25°C
(77°F).
For
QM71D
number
when
use a fully
of minutes
charged
available
battery
11111 TRVI28/228/328/428:
QM91D
NP-FM30
Recordingtime whenrecordingwith the
viewfinder
Approximale
when
25°C
For
you
number
use a fully
of minules
charged
available
battery
pack
at
} 15
185
NP-FM50
185
295
NP-QM71/
QM71D
445
715
NP-QM91/
QMglD
670
1070
100
150
(supplied)
(77°F).
It|m
TRV
128/228/328/428:
For
NP-FM30
[}TRV260/265:
175
85
NP-FM50
28(1
135
(supplied)
NP-QM71/
QM71D
675
330
NP-FM50
160
240
580
I010
495
NP-QM71/
QM71D
390
NP-QM91/
NP-QM91/
QM91D
585
865
(supplied)
NP-FM30
QM91D
14 Gettingstarted
pack
at
O Not_
• [he_v¢_rw£[l_tubes_ppli_f_om_Ieb_texypa_
w_t _e AC &d_p_r i_ ce_mect_dto _h_DC INjack
o_'yo_r camco_
eve_ if _ po_ er eo_ is
• _[_h_reco_
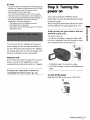
Step3: Tumingthe
poweron
_nd playback fir_ will be sh<_er
• _[_h_CHG (c_g_) li_rnpflashes d_rk_ _rgi_g, or
_h_batvs_ infbr_on
_]1 _o_ be _t_ctly
dlsp_ayed m _iowk_ c_m_tlons.
- T_ b_ry p_k is not _ch_
correctly.
- T_ b_te_ p_k is d_g_d.
- T_ b_te_ p_k is _ly dis_arged. _or Bakery
i_bm_rio_ oNy.)
",'an nec,(i ID slide the POWER switch
repeatedly to select the desired power mode
to recor_ or play.
When using this can_eordar for the first time,
the [CLOCK SE'[] screen appears (p. 17).
While pressing the green
POWER s_itch du_.
button,
¢u
_.
=
slide tbe
Fh_ power tkcrn8 orl,
To enter the recording or playk_g m(_te, slide
t_e switch repeatedly until Ne respeed_,e lanp
ca.
for the desired power made lights tip.
Yoc can use the AC Adaptor as the power
source when ya_ do not want the battery to
ran out. While you are _ing the AC A&tpmr.
NC battery pack will not lose its charge even
when it is attached to yaar camcorder.
PRECAUTION
Even if your cierncorder is tm'r_ed of'g, AC power
(house cu!vent) is _till supplkxt to it while
contracted m the wNl outlet via the AC Adaptor,
• CAMERA
mode: 1'o record on a rape,
• PI,AY ED[ Fmode: To play or edit pictures on
a tape.
Connect
_'Charging
yol_r camcorder
the Datterypack"
as shu_a_ in
,
u
u
u
u
u
u
u
u
u
u
(p 12)
To turn off the power
Slide the POWER switch up to CHG) OFF,
CH_
o
_o
_o
Getting started
15
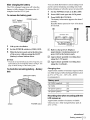
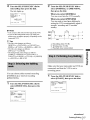
Turn
Step 4: Adjustingthe
LCDpanel and
viewfinder
the SEIJPUSH
[LCD BRIGIIT]_
I?XEC dial th select
then press the dial
(p, _3).
4
Adj_lst the bdghthess
of the LCD screen
with the SEI_PUS[[
press the dial,
EXEC dial_ then
Press MENU,
_" Tips
• F yeu mea_ _Iie IA'I) p_rml ] 80 degrees m tim lens
_ide, you ca_ d e_e the I,UD paul[ with the I,CD
_¢Ixt_n
• _you
_¢ing
01It,
are using the belt¢_
pack fta power
s_r_e,
You c_madjust the angle and brightness of
the LCD pamel to meet venous mooing
situations.
y_u ran _ljust th_ brightness _ selec_i_ |I,CD
B.L.] i_ _h__
g:_;[_ SE_ m_u (p, 53),
• ]%_ r_corded picture wi[I n_t be aff_t_d _ thi_
Evt2n when
_et/ing,
• ¥ o_ can tam off _he _
t|l_!_
a!_ li_s_u_R
i(_r!8 between
yi_u
and the subjec% you can c h*x'k the sabiect on th_
LCD s_reen daring !_'cording by adjusting
angle of Ne LCD panel
Ne
ceta_rmatlon
bee_
[OVF](p.59).
MENU
You can view _mages uxlng the viewfind_r
when you cI_sc the LCD panel, Use the
viewfin_r when the betwry is rtm_ng o_t, _r
when the screen _s h_rd to see.
Press OPEN and
open the LCD pane[.
8EUPUSH
EXEC dial
()pen the LCD panel 90 degrees to the
eamcerder, then rotate it to the desired
Viewfinder
lens adjustment
[ever
position.
To
adjustthe brightnessof
the LCD
Lift up the viewRnder.
SCtee_
1
Press
2
Turn the SEL/PU SIt EXEC dial to select
MENU,
(LCD SE [')_ then press the dial
16
Getting started
Adjust the view£mder tens adjustment
lever _ntil the picture is clear.
,-
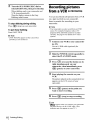
Step 5: Setting the
date and time
Scq the date and tlme when using fh_s
eamcordar for the first time. If you do not set
(he date and t_mu_the [CLOCK SEll semen
appears e_ry time you mrn on your
eameord_r,
Press
Nl_nu
/]1 Turn
MENLL
: Ng_
the SELiPUSH
select []
the dial,
O Not_
• [f you&_nor use your emmc<_r_ler
tbr about 3
months, the built -i_Ireehargeab[e button-_t_e
b_tery _s di_¢_rged a_d the date mad 5m_
s_in_ m_ b_ d_ared f_m Re memory, In that
case, ¢l_rge the re_harg_aN_ b_ton_'pe batt_
@, 8_ and _henset _he date and _im__aln.
(SETUP
EXEC
MENU),
dial to
then press
MENU
OPEN
8EL!PLISH
EXEC dial
POWER
switch
'_'
Turn
the SEIdPUSH
select
dial.
]CLOCK
Turn
the SEIdPUSH
SE'I],
EXEC
dial to
then press the
EXEC
dialto
set
[YI _'e_r), then press the dial,
:] Tarn on your e_meurder (p, 15),
z zz
z
z
z
z
z z
Press OPEN gad open the LCD panel,
Prooeed to step 6 when you set fhe clock for
the first time.
You can set _my year up to the year 2079.
;_ Set IMI (month), ID] (day), [HI (hoar)
gad IM] (minute) in the sgme way"as
was done in step 6; then press the dial.
For midnight,
set it to 12:00 AM,
For mid&_y set itto 12:00 PM.
To checkthe preset date and time
For Him FRVI28/228/328/428:
Press DATE to display the &i_e indicator,
Press TIME m display thetime ir_di_ator.
Press DATE {or DME) and theri press TIME
(or DATE) m simultan_x)usly display Ne date
and time indicator,
To hide the date aridJot time indicator,
DA['E
an_or
TfME agNn,
press
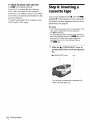
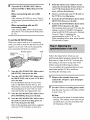
Step6: Insertinga
cassettetape
Yon can rise s_'tlm_d8 mm [] and H{8 HID,
Diglml8 [_ v{_ easse_s on yonr camelot.
I_r &_aiIs on these c_ssetms (s_h as writeprotectlcm), See page 82.
!_ Notes
• Do not for_e the cassette i_to [h_eompartment, Fhis
m_
¢_ttl_
a _[l_n
#_tio_t of yol_r
_am¢ord_r,
• For DTRV260/265:
]_ re¢_ling _me when you _e yot_r cementer is
M1f of _e ¸indicated _ime o_ Hi8 I'li [] tap_. _ yo_
_etec__e [LP] raod_ in t/a_men_ s_,
_
reeordi_g dine i_ 3/'4 ot_tItei_dicawx_ time on
t_8 HID _a_.
::JJ Slide the IL_ OPEN/EJECT
the direction
Iid,
I,_OPENiEJECT
lever
The cassette compa_:ment
comes ollt and opens up,
18
Getting started
Iever
in
of the arrow and open ['he
Lid
automatically
Insert a cassette
_fl_
its _ndow_side
facing up,
Wi_do_-_id÷
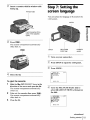
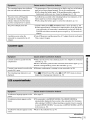
Step7:SeRingthe
screenlanguage
Yu_ ea_ select the ]_mgt_ge
LCD screen,
re be _sed on the
MENU
Press _g_.
[he ca_sett_corn)a_m_:ni autorrmtically
slides back in,
OPEN
SEL!PUSH
EXEC dial
POWER
SwitCh
:'1 Turn on your eameorder,
), Press OPEN to open the LCD panel,
z
,-
Press
MENU,
4 Closethe lid,
To elect the cassette
1 Slide the IL_ OPENIEJEC'I
direction
[he
corf!_s
2
lever ia the
of the arrow and open the lid,
cassett_ corr_pa_r_n_
a_torrmtk*ally
Take out the cassette_then press _,
[he ca_sett_ corr_pa_r_n_
slides back irL
3 Cit_sethe lid,
[_1 Turn
the SEUIPUSH
select []
o_t,
a_torrmtically
the dial,
EXEC
dial to
(SETUP MENU), then press
TurntheSELiPUSH
EXECdial
select
{_
LANGUAGE],
to
then press
the dial,
Turn
the SELiPUSH
select the desired
the dial
EXEC
I_nguage,
dial to
then press
Y Press MENU.
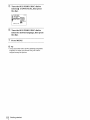
• ¥ o_.tvc_mcoMer offers [I;MG [Six,CiVil(_[mplifi_
tongtm amol_g_h_options,
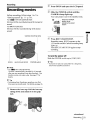
Recording
_,
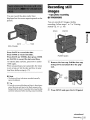
Recordingmovies
Befor_ reeor_ng, follow steps I to 7 in
"G_ng s_r_d" (p. I 1 - p. 191.
For I-Iim I'RVI 28/228/328/428:
Movies will be rec_rdcxl along with mona_al
sonnd.
For D FRV260/265:
Movies will be recited akmg with stereo
sound.
Press OPEN end open the LCD panel,
Slide the
POWER
CAMERA
lamp
Your camcorder
s_teh
lights
until fl_e
up.
is set to the sh_dby
mode.
s_itc_slidethe
_nil*
POWER
_
pressing the green
bu#_on.
tc_l
_[
Oamera recording lamp
r
r r r r r r rr r r r r r r r
[_1 Press REC START/STOP,
Recording starts, [RE(] appears
[ CD
,¢rce_l
Lights tip.
Press RE(
recording.
arid
the
Camera
__
on the
r eeordi_lg
lamp
STAR ['/S'IOP agaia to stop
To turn the power off
Slide _hePOWER switch up to CHG) OFF,
OPEN
REC START!STOP
POWER swath
"_" Tip
• ff you do not use your eamcorder
retr tore I_e cltss_tte _tnd _r_
it,
O Note
• Far Him 1RVI28/228/328/428:
[_h_d_te is automatically recorded fbr Ig secoml8
_r you _t_rt recording (Atlto _te fanetlon). ]%is
ft_c_on wo_ arfly o_c_ a day. S_e p_ge 57 _r
details.
"_" Tip
• _eri_tnNng E_y Hamdy¢,_m operaIio_, even first
dine _t_
ca_t record easily, For deLails, see page 26,
::JJ Remove the lens cap, Pall the lens cap
string
belt,
dow_
and attach
it to the grip
_br a Io_g time,
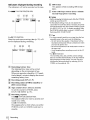
Indicatorsdisplayedduring recording
Ill8 format
Fhe indicators
This appears while !'ecordlng H2i8 format
will rmt be reco_cd
or_ fhe tape,
tapes,
For NIm TRVi 28/228/328/428;
'lime
codN'l ape counter
seeond)rl'ape
(hour: minute;
photo recording
(i} Notes
• Before cha_gi_g _tIe batte_.g pack, slide the POWER
swimh up m (CHG) Ogb.
• t_ t_e default _g,
if you do _ot _erate _he
_._m{;ord_r for r_tt_re tl_a.ll_bOllt 5 mhlu_
th_ p{_w_
wtll automafic_l_
mr_ offm preserve _ltery power
(IA.SHUT OFF], p. 59). To re_t
re¢_ng,
_lide
_e POWER swi_
{Io_ _ _[e_
CAV[ERA, and
d_en press REC STAR37StOP.
For [t TRV260/265:
Data!time and _:amera settings data (p. 37) will
not be displayed during r_ordirig.
I_l la]
Remaining
battery
time
The indicated time may not be correct
dapendir_g on the environment
{}fuse,
W_en you opened or closed the i CD panel,
it takes about 1 mirmte to display the correct
remai*ting battery time.
Recording
mode (SP or LP)
Recording
stalus
([STB_J
(standby)
or
[RECI (recording))
Tape
counter
(bout: minute; second)
1'o so fhe e_tmter to 0:00:00, press
( OUNTER RESET (p. 93),
Ret_ording capacity
For NI['IRVI28/228/32g/428:
This appears _t'ter you insert a cassette
record _br a while.
and
For [}TRV260/265:
This appears ag_er a while when you set the
POWER switch to CAMPNA a_*d iasert a
*_" Tips
• ]t_ ensure smot_[h _ansiti{m on a tape from Ne last
reeorde_ _cene m _e aext, nora _ _ll_wlng.
- I}o _ _ove _e cass_e. (t_he ptctrrrrrrrrrrrrrrrrrn_e
will 1_
recorded zo_tlttuou_ly wgho_t a ¸break evea _he_
y_u t_rn _ p_w_r off.)
- Do _o_record pietar_ m SP mode a_d LP mode on
_e same _ape.
- Awtd stoppi_ _en ree_i_
_ movi_ in the I_P
mode.
• For [}TRV260/265:
t%_ r_zordlng time, date, and _ camera setti_g_
d_a are rezorded ax_toma_cal_ on _ lape without
l_ing disp_d
o_ t_ _eree_. Y_u zma view this
t_f_rmag_ {luri_ playbad_ by sele_ng II'*APA
CODE] {m_h_s_me_ _. 59).
Move the power zoom lever slightly for a
slower
zoem_
Move it further
fer
a f_er
zeenl,
To record wider range of view
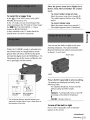
To recordfor a longer time
In the _
MODE],
l'he sal_i_'t appears £arther away (Wide
angle).
('L&PE SE'/) menu, select [REC
then [£IP] (J_.542!.
In Ne [2 mode, you can record longer titan
when recording in Ne SP mode (2 times longer
for Nim TRV128/228/32gN28,
1.5 tN_es
To record closer view
Move the power zoom lever mwa_,s T.
[he sul_iect appears closer Uelephoto).
longer tbr [_'rRV260/265).
A tape rt:corded in th* LP mode shollld be
played back only on fhis camcor_r,
When the CAMERA made _s salcetad, yoa
c_n choose zoom to magnification le_als
g=_aWrthan 20 times, and frc_'nthat point
acdvate tha digital zac_l ([D ZOOM], p. 47).
Occasional use oftha zoom is effeefivc_ k_lI
use _t sp_rlngly for best resale,
You c_n use the built-in light to salt your
sh_fing si_fion. 'I5c meommend_l
distance between the subject and eamcor_r
is about 1.5 m (5 feet),
Built-in light
LIGHT
Press LIGHT
_i:
ii
¸
i¸
repeatedly
The settings am displayed
following order.
Y i!
to select a setting.
cyclically
in fhe
No indicator displayed: Always records
without asing _he bffflt-in light.
$
!_2 inch)*
2 51gfeet)"
-._C_RUT0: Aatomatically
_ns
according
brightness.
$
* ['he
mltdmum
camcord_r
dis[a_,_
and
t[mr ix_sition
of
req_md
b_wee_
_he
sut!j_c_ to get a sharp
the
]ever,
on and off
ON : Nlways turns on,
your
fbcus
m Ne ambignt
in
To turnoff the builbin light
Press t,lGtI'[
appears
r_peatedly
until im indicator
on [he screen,
-a_continued
Recording 23
O Notes
• Ih_ b_L_-in v_deo l_ght _mlr_ wry bright ff_t,
whiCh i_pm4"e<fly_
th normal u_e. However,
_vo_d _mc_fly _immg th_ Iig_ _ _ subject'_ eyes
f_om very _[os_ m_e.
• The battery p_k dJschatge_ quickly while the b_il_th llght is mr_ o_.
• When yo_ de _ot u_ your e_mc_l_
_ _e bmltth llgh_ o_"_n_ r_move the b_tt_2¢ pack _ avoid
mmlng _ _ bml_in llgh_ a¢_i_ntally.
• Wh_ _ick_d_ oc_'u_ w_il_ _o_
th the
-C_gUT0 mo_, press _.[G_t'[¸un_ -:]CaON
_ppe_t_.
_ROORAVL AE] orb_k light f_'_en white
_oofi_g th the --C_gUT0 mode.
• Fer [_TRV260/265:
T_ b_i_
[ig_ is t_ned eft during t_hei_temal
_ime of I_t_rvaIre_,_r_Ithg.
• When y_u _e _ _n_i_
]e_ (_Ni_n_), l_g_
¸from the bui_in Ii_ is bI_k_ and may _t
illumthate the subj_ prop_rly.
Yoo can turn the LCD pamel towards the
subject so that you andyour sobject can shm_
the image being recorded, You can also
utilize this fanedon when recording yourself,
to keep the attention of small children
atwaeted to the eamon_r while you record
thenl,
Open the LCD panel 90 degrees to the
eameorder,
then rotate it 180 degree_
towards
the subject.
A mirr_lr-image o_'the sul_iect appears on th_
LCI) screen but hhe picture will be normal
when recorded,
O
No_s
For []1 [] rRV] 28/228_328/€28:
• @ appears th the viewfinder at_d on the IX?I)
_¢re_n. IIO appears in the _t_dby mode, an_ []
appears in the r_,_r_llng m_&. Som_ _ _£her
thdJ_t_rs _tpp_ar mlrmr_r_v_rs_d
at_d _gh_rs are _t
displayed.
• Ilmi_
reee_i_
th the mirror m_de, DATE m_d
]TV[E on y_ur cameor_ler do _ot work.
Recordingstill
images
You can record the da_ and/gr time
displayed on the screen superimposed on the
p_cmre,
- Tape photo recording
(D TRV260/265)
You can record still images. Before
recording, follow st_,_s1 to 7 _n"Getting
sUmc,d" (p. 11 p, 19),
OPEN
PHOTO
8
DATE
TIME
CCD-TRV428
Press DATE to record the date.
Press "lIME to record the time.
Press
DATE
(or DATE)
(or TIME).,
to record
POWER swath
the_l press TIME
the date
and time.
To 1"lidc_he dat_ aad time, g!_ss DAYE a_&'or
FIME again.
When you purchase your ca_corder,
the clock
is n_t set up yet, Set the &_tea_dtime to your
]l
Remove the lens cap. pull the lens cap
string down
bell
and attach
it to the grip
Press ()PEN
and open
the I,CI) panel,
loc_d time before using (p. 17),
0 Note
• _[_heda_ and time _ndicators rear,led marmally
catmot b_ del_&
"_" Tip
• If you dr) hilt r_cord the dale mad time in the pi_tlre,
recor_l the d_e mad _im_ th the Nack s_reen as the
background _ about I0 sec_mds, then _ase th_ date
mad _ime thdlc_tors b_re
_ng
_l
reco_g.
,-
Slide the POWER
CAMERA
s_tch
to select
the
- Easy Handycam
CHG
Slide ihe POWER
the green button
switch while pre88il]g
/_1 Press
Recordingwith ease
mode.
and hold PHOTO
With this Easy Handycam operation, most of
the camera settings am so*to at_tomatie
m_, only basic {hncticms become avai1_ible,
;md semen font size increases for easy
viewing. Even firsttime risers e;m enjoy easy
meordlng. Before recording, follow steps I m
7 in "Ge:t_ng s_d"
_. I l _ p. 19),
lightly.
Came*_ recordin_ lamp
You win hc,_r a smaN b_,wp so_md, and the
EASY
POWER switch
picture win become a stilI image.
Recording
Press
does not start at this point.
PHOTO
OPEN
fully
A shut, or sound is heard, _md the irrmge is
rtx'orded with sotmd for 7 sev'onds.
_lhe stil! irr_age is displayed on the screen
anfil rvx'ording is completed.
REC START/STOP
*_" Tip
• Buttons _t do not work d_r_g Easy Handy€am
opemt_on have _dot beside Nero o_ your camc_rder.
Al_o, only men_ i_
_hatam avai]able dztrlng Easy
Hamlycam operation are di_=playedwhe_ MF_U is
presto&
To turn the power off
Slide the POWER switch _p to (CHG) OFF.
::Jl Remove the tens cap. Pull the lens cap
string
belt.
0 Note
• I_
appears whe_ the tape photo re_'_rdi_g does
_or work_
"_" Tip
• You can record about 510 images in Ne SP mode
trod about 765 images m _e LP mode o_ a tape
which can record _r 60 mi_ute_ i_ _h__ m_,
dog_
and attach
_-
PressOPEN
,-
Slide the POWER
CAMERA
it to the grip
andepentheLCDpaneL
switch
to select
the
mode.
You can _vcord movies on!y.
,
s
/_1 Press
s
EASY.
EASY" lights up in hlue.
s
s
s
s
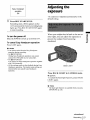
Adjustingthe
exposure
Easy Handycam
operation
ON
The exposure is adjusted
de_tdt setting.
automatically
in the
l,_ _
Press
REC
START/STOP,
R_orffzrlg starts. IRE(] appears on fhe
[CD screen and the Camera recording lamp
Lights lip. Press REC START/S'IOP
again
m stop re*ord.ing.
To turn the poweroff
Slide the POWER switch up to CttG)
OFF.
To cancel Easy Handycam operation
When yoar suNeet h_,s i_,sback to the sen or
o_er light, you can '_tj ast the _posu_ to
prevent the suNeet from becoming
shadowed.
Press EASY again.
0
No_
• Yo_ _'annot sw]tc_ frondto
_Nsy Handy_'am
• F_r DIRV260/265:
D_ri_g Easy Ha_dy_m
_vatlo_,
you cmm_
co_e_
_h_ USB _*_ble to your _'atncord_
• F_r DIRV260/265:
Yo_ _'ann_ _]_e E_sy H_mdycam _km
tog_er
wlt[_ _B
Streaming.
• ALl _e setth_gs return _ thor deW,nits d_a_
E_y
Ha_d_am
_eratit_.
Pr_vlo_ly
made se_s
_r_
r_smred _,hen you cancel Easy Ha_dycam
op_raIio_.
BACK LIGHT
Press BACK
LIGHT
in CAMERA
appears.
To cancel the back light fanction,
L[GH'I again.
mode,
press BACK
O Note
• ['he ha@ tight f_mct_onis cauaceledwhe_ yo_ press
¸EXPOSURE (p. 2S).
__
=
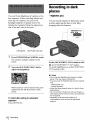
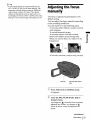
Recordingin dark
places
You can fix the brightness ofa picta_ at the
best exposure. When ree<_rdlng lairs
on a
clear day_ for inslaaee you e_ avoid
baeklight shadows on people new to the
window by mart_Ily fixing the c_p_u_ to
that of the wall side of the roc_l.
- NightShutplus
You e_m record subjec_ in _rk places (saeh
as when capturing the fi_ce of your baby
sIeeping) with this th_cfi_.
i
.................i!
EXPOSURE
::Jl Press EXPOSURE
['he exposure
SELtPUSH
adjllgt
CON
EXEO dial
in CAMERA
mode,
indicator appears on _[_e
8_£een,
Tl[rn
NIGHTSHOTPLU8
OFFe
the SELiPUSH
EXEC
dial to
the brightness.
To returnthe settingto automatic
exposure
Press EXPOSURE.
Set the NIGHTSHOT
PLUS
llm and [' NIGHI'SHOT
PLUS"] appear.
switch
to ON.
To ¢_mcol Nig_tShot plus, set the NtGHTSHOT
NYUS switch to OFF.
(i_ Notes
• Do not u,_erite Ni_ttShor plus fc_aCLioni_ brig_tt
places, rhls may ca_e a ma[f_c_ion.
• ¥ou caun_ use the _igfitS_t pl_ _hn_t_ mg_her
wi_h:
- {PROGRAM A£]
- Ma_al expos_
• A_t
_he _us m_m_
when it is h_ to _c_u_
a_omatieatly.
• Do _ cov_ _he in:_ared p_rt with yo_r fi_ger_ or
other objeots. R_;nove _hec_mversi<mlen_ (_ti_mal)
if _ is am_hed.
• Depending on _e _ooti_ ¢_ndJtlon_ or
dr¢_m_ces,
e_r_ m_ not be ret_md_¢_y3
properly.
"_* Tip
_xlm_
_h_d_ _stan¢_u_i_ _e N_g_h_
I_ is_o_ 3 m_e_ (]0_. _you r_
suhj_c_i_d_k pl_s (suchas_i_ _z_n__r
moonlighfg
_ IN,S,
IJGH_7 m [OFF¸[
m themenu
Adjusting the focus
manually
I%e focus _s adj _sted aammaticaIly
default
_n the
s_ng,
You can adjust the focus manual]y
to the rec_rfling
accard_ng
conditions.
Use this f_ncti<m in the following cases,
To rix, oN a _uhiect behind a window covered
with raindrops,
To record hori:t_ntal stripes.
To record a _ubiect win little c_ntrast
between the sul_j*x't arid its background.
When you want m Ncas or_ a sal_iect in the
backgrotm&
To record a stationary
FOCUS
::Jl Press
FOCUS
subject using a tripod,
SELIPUSH
dial
in CAMERA
EXEC
mode,
V,_appears.
Turn
sharpen
the SEIdPUSH
EXEC
dial to
focus,
_ chtmges to I_ when the fbcas ctmnot be
adjusted any timber, (_g char_ges to -_
when gbe focas c_:_.nrmtbe adjusted any
closer.
8
Tips for focusing manually
• It is easier to f(_cas or_the subject when
you _tse the z(K_m ftm¢6on.
Move the
power ;'_om lever towards T (tclephoto)
to adjust the _bcas, and the_, t_wards W
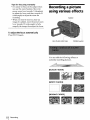
Recordinga picture
usingvarious effects
bride _ngle) m *_it/st the zoom )'or
recording.
• When you wtmt to record tI close-up
FADER
irr_age of a suEt),x't, move the power _'oom
lever towards W ()vide ar*glN m thlly
magrtit}¢ the image, then a_iast the rheas.
To adjust the focus automatically
Press IrO(:l_S again.
8EUPUSH
EXEC dial
POWER switch
You c_n add the following effects to
c_r_mfly t_e_rd{ng pietu:res,
[BLACK
FADER]
pNHITE
FADER]
[MOSAIC
FADER]
[STRIPE
FADER]
This Datum is t_r Mira TRV 128/228/328/428
o_fly.
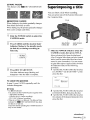
Superimposinga title
You e_n insert a rifle when recording,
You e_n select one of the 8 preset titles and
the 2 custom titles,
TITLE
[MONOTONE
FADER]
When fa_fmg in, g'=epicture gradu_dly changes
from black-arid-white
to color.
When fading ouL [he pict_e grad_MIy changes
from c01or to black-_md-white.
::l
Slide the POWER
CAMERA
Press
FADER
indicator
s_4teh
to select the
8
mode,
u:ntil the desired
tlashes
in the standby
(to fade in) or do:ring recording
SEL_PUSH
EXEC dial
fader
mode
[to
_:Jl Slide the POWER
fade out),
CAMERA
Press REC START/STOP,
£he fader indicator
disappe_rs
stops flashing
when the f_e
mode,
switch
to select
the
then press TITLE,
Select a desired titIe from g'le displayed
titles (2 original titles g'lat you have created
befe_ and tile preset dries that have been
stored in your _:amcorder). Yea _an cre,_ate
original titles (up to 2 types of title of_dthin
20 characters e_h) in Ne following
procedt_re.
1 rum the SEL/p12 Stt F;XEC dial to select
FADER
,-
REC START/
STOP
[CUSTOMI'"]
press _he dial.
and
is complete.
TITt _
gU_OM_
To cancel the operation
In step 2, press FADER repeatedly until _he
indicator disappears,
0 No_
• For DlRV260/265:
Yo_ Cannot use the FAD b'J__n¢llon together with:
- Tap_ photo ¸recording
- [!,'RAME RECI _ ratrm re_,_rdfl_g)
- [_t ¸, RECI (ln_rval r_,_Min_
• Titles do not fade i_ or i_adeo_e. The {lateand time
¸indicator _br Mira TRV128/228L328/¢28 also does
_ 90de in or 90d¢ out,
_r_ _hem b_re op_ratlng _e ¸FADER function if
_hey _ not n_eded,
or [CUSTOM2'"J,
8T_¥
....
2 T_trn the SEL/PUSH
3
then
F;XEC dial to select
[CR EA'YE/EDIT], Nen press Ne diN.
Turn Ne SEL/PUSH FXEC diaI to select
Ne colemn
(fiNe desired chi_ra_ter, t_en
press _he dial.
=_ntinuea
Recording
31
4 T_ri the SE[ZPUSH
the desired chanwter,
EXEC dial to select
IPOSH'IONI (position)
Yo_t _a_ select from 8 to 9 choices.
then press the dial.
/_1 Turn
th¢,''SEL/P!_ISH
EXEt2,'
' dial" to
select IOK[, then press the dial,
Phe title appeans.
To erase a charac_r: Select [÷].
To enter a spa_e: Selec_/Z& ? !], then
select the blank part between & and ?.
To select alphabet and Russian
_., Press
REC
START/STOP.
<
:b Press
erase
"ITI'LE at the scene you want
the title off,
to
char_eters: Select [')P2 ].
5 TtFri the SEL/PUSH EXEC diaI to select
the next (haracter, and enter Ne character
in the sar_Ie rrlarmer.
6 _Waen you have I=_nishM entering
characters, turn Ne SEL/PUSH EXEC
din m select tO K], Nen press N_ dial.
The title is stored in memory.
To superimpose the title while you are
recording
Press 11 !q,E and c_rry out steps 2 tl_ 4. When
yoa press the SEL/P[
Ne titIe is recorded,
0
Turn the SEIdPUSH
EXEC dial to
select the title you want tu inse_t, lhtm
press the dial.
1'o insert art origirml title, turn the SEL!
PUSH PJXEC dial m sdect [CUSTOM1 "[
or [CUS'IOM2'"[,
and press Ne diN, then
select [OK[ amd press the tfud.
<
Change [COLOR[, ISIZE[, or
IPOSH'IONI as necessary,
1 Ftlrrl the SEL/PUSH
EXEC dial to select
[COLOR], [SIZE[, or [POSITION], Nen
press Ne dial. 'Ihe selected item appears
O[1 th_
2
screen.
Ttlrrl the SEL/PUSH
EXEC
dial to select
the desired item, then press Ne dial,
:3 Repeat steps 1 and 2 until the title is laid
out as desired,
[COLOR[
[WHFIE[
@olor)
_
[_ELLOWJ
[VIOLET[ _
[GREBN] _
[RED] _
[BI UE[
[SIZE[ Oiz_)
[SMALL[ _
[LARGE]
[CYAN]
([You can only select [SMAt.[_I when
you are entering
char*raters.)
more than 13
SH EXEC dial atstep 4,
Notes
• h"you display the menn whJ]e sN_erlmposi_g a tK[e,
_e tifl_ is _ te_orded whil_ _ menu i_ displayed.
• When yo_ am _d_tmg
m_d _t{thg the tlt[e, _e _[e
displayed opt _e s_ree_ i_ not re_led.
• When you _dmpo_e
a fi_ wlfile you are
retx_rdit_g, _e beep does _ot _ound.
• When you ztr_ usi_ your _ord_r
on _e b_ry
pa_k and _ _ operate it _r 5 mi_es,
the power
_y take 5 minutes or longer _ enter ¢_hatact_rs, s_t
{A.S_U] ¸ OFF] i_t th_ _
(OTHERS) m_
m
{NFA_ER] (p. 5_. The Fower will no_ m ha t_t _
F_en _hou ,_ _h_ power go_ _
the _h_ac_ers you
have entered remai_ _tored i_ m_m_.
Tam _he
¸power ba_k o_, _he_ _t_t _
¸from _
I to
¢_ntin_ _up "_impos_
the fifl_.
• For NIm TRVI2W22gL328/428:
]%_ ffate and tlrae, ar _it her of them, _y
_t be
dis# ayed d@ending
_[e.
opt _he _in_ _r po_itlon _th_
_" Tip
• 1o 6hange a created tlr]e, seleet the tlrle in step I,
Ihan press the 8_._USH EXFC dial ]_en resele_
Ihe _ha_mrs _giai_,
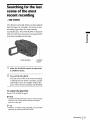
Searchingforthe last
sceneof the most
recent recording
- ENDSEARCH
'ISis ft_netlon is handy when y_ have playc_
back the rope, for example, ha* want m start
recording right after the most recently
reeor_dscene, the KND SEARCH Nncqion
will net work once yea Nect the easscqte after
you have meordc_l on the tape,
END SEARCH
::Jl Slide the POWER
CAMERA
Press
_iteh
POWER
SwitCh
to select the
made.
END SEARCH.
['he last scene of_he most r_ccnt recording
is played back [br about 5 seconds, *rod _he
camcerder erlters Ne starldby mode at Ne
palm Where Ne last recorffmg has £k_ished.
To cancel the operation
Pre_s
EN[)
SP,.&R(,tt
again
Note
• _l:heEND SE&RCH f_on
wHi _oL w_k _[y
wh_ _her_ is a bl_
_e_on _n
r_co_d
"_" Tip
• D llert PLAY,EDIT
mode is selected, yell can do this
opera_io_t by pressing END SEARCH.
8
Playback
,-
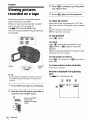
/i! Press _
Make slIr_ yell htwe _ _ecordec! _sseff_
(play) to start playback.
To adjust the volume
insartc, d into y_u:r camcor_er.
Press
When you wan_ m play ba_k the receded
¢itt_er
ot'[_'i_ two
buttetls
orI VO[,iJME.
When you close gh¢ LCI) panel, soend is turned
pic_re on your rv, see page 39,
For Him I'RV228/42g/D
['RV265:
playback
(rex_nd) to go to the point
'you want to view.
Viewing pictures
recorded on a tape
Yea can control
Con_nandcr.
Press @
cslng the Remote
(_:To
turn the volume down
(+_:To
turn the volurn_ up
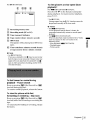
To stop playback
Cress@ (stop).
b'TOp
pAUSE
re pause
Press @
@
(paase) during playback.
Lna_se)or @
Press
(play)to restart_
pl@ack.
Playback stops aut_maticMly whe_ Nasa
contJrmes for a f)w m:irmtes.
To fast forward or rewind
_.'ces__
:Past
forward)or _
m_de
(resCind)
i_
step mode.
To review movies on the viewfinder
OPEN
POWER
8wi_h
Close the LCD _anel.
Indicatorsdisplayedduring playing
back
"_*Tip
• p_Nbrmi_Ea_yH_dycarn_erafion,
ev_n £ir_t
time u_er_¢_mpI_back easily. Ford_t_,_
page 36.
t¸
i
':'1 Press
,z:
..........
OPEN
=_m_:_a_:_;;;;_a;;_
and open
Slide the POWER
select
0
¸;¸;¸;¸
the LCD p_nel,
gwiteh repeatedly
the PLAY/EDIT
mode.
Slide th8 POWER
_R_tO
rc_w;=_ @
Sw[ICh
whil8
presstn£ the £teen
but_n.
FO_ _,l[_llll
TR_ 12g/228/32814281
to
ForDFRV260/265:
[]
N21i2
To view pictures at slow speed (slow
playback)*
[]
For HIIITRV228/428/D
1_RV265:
Press SLOW I1_ on Ne Remote C_mmarider
during playback.
press PLAY.
To resume norton
playback,
* For [_ I_RV265:
Pic_res output t_rom tile _ DV l_eff_
played back sm_mthly th (tie glow m_,
_l
Remaining
batten
_)
Recording
mode (SP or LP)
_/
Tape
transport
Tape counter
0 Nrates
• For []ImTRV228/428:
ff glow playba¢k Ia_ts (br about I mince, the
eam¢_ler _tl_matleaI[y returns m rIormN speed
time
_ayl_ac_.
indicainr
(hour:
minute:
second)
Ill8 format
['his appears while playingback
tapes.
Time code (hour: minute:
or tape counter
(hour:
cam_ot be
Hi8 tbrmat
second: frame)
minute:
• For I'1| [] TRV128/228_28/€28:
When yo_ g_ b_k a vap_recorded th _e I_Pmo_,
r_oi_emay a_pear on the LCJ) s_reer_in the
_iowJr_g ¢a_es:
- Now p[aybaPk (HI [] _rRV228/¢28)
- Nayback pa_
- PicCur_se_n:h
second)
0 Note
• Far D ] RV26{t/265:
if yogiuse a stat_dard 8 _rtm [] tape, be sure to play
b_k th_ tape or1your catrteo_t_ Mo_ie _tois_m_
_p_ear whe_ you _lay b_& th_ staud_rd 8 mm []
tape o_t_er cam¢o_rs (including m_o_h_rIX_'R_
TRV26_ RV265),
To fast forward or rewind during
playback - Picture search
K_:epon pressir=g _
(£tst _rward) or
(rewind) durirlg playback.
To !_st_e normal playback; release the but_m,
To view the picturewhile fast
forwarding or rewinding- Skip scan
Keep on pressing _
(fast forward) or
(yewir_d) wNle filst forwarding or rewirlding {t_e
tape.
To resume fast tbr warding or rewinding,
the bt_tom
release
Playback 35
/
¢11
¢O
¢)
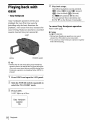
[_1 Play back a tape
Playing back with
ease
The tbllowing barrens can be operated.
play)/@
(stop)/@
pause)/
(filst forward)/_
- EasyHandycam
E_y H_ndycam op_rati(m allows e_y
playback for cwen first tim¢ risers by
providing only the basic functions for
playback. Also screen font size increases for
e_y viewing. Make su:rcyo_thave a rcczar_d
ca.sse_e inse_d into your camonrder.
(r, wind)
For Ill m TRV228/428/[)TRV265:
You can operate Nose operations and
SLOW t*- on the Remote Comrrumder.
To cancel EasyHandycamoperation
Press EASY agaim
!0
Notes
For [¥FRV260/265;
EASY
• l**arir_g Easp Hmtdycam operation, you cannot
¢_nJae_ _e USB cable _ yo_ eatm¢_rder,
• y oT,l ¢_nltot _se _
H_nilycal_t op_[_n
together
with USB Streaming.
OPEN
POWER swlch
*_" Tip
• Buttons that do not work dttti_g Easy Hmady¢_n
operation have a dot beside them o_ your camcord_r.
Also, only men_ items _t are _vaiIabte d_rlng E_y
Naedycam
_peradon ate displayed _hen MENU i_
Fre_sed,
:'1 Press
OPEN
_nd open the LCD
panel.
Slide the POWE R s,_iteh repeatedly
select the PLAY/EDIT
mode.
,-
Press
EASY,
EASY li,*_ts up in blue.
Easy Handycam
operation
ON
36 F'tayback
to
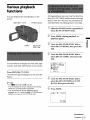
Various playback
functions
Yot_can d{splaythe recorded date on the
Sc_eetL
DSPLtBATT
{NFO
POWER
sw_¢h
L_ing playback, yon can view the dateAime
data ([DATE/'I IblE]) and the camera s_ngs
data ([CAM DATA]) that are automatically
recorded while record{rig p_cmres on a u_pe.
::J{ Slide the POWER
select
sa_4teh repeatedly to
the PLAY/EDrI'
mode.
Press MENU during playback or
playback pause,
,MENU
SEUPUSN
EXEC dial
Turn
the SELiPUSH
select
dial.
[]
[_1 Turn
select
dial.
(OTHERS),
the SELiPUSH
IDATA
CODEt,
EXEC
dial to
then press
EXEC
the
dial to
then press
the
You c_ choose to display the time _x_d_ lape
eonnter, _d other inI_rmatioo on the scmerL
Press
DSPL/BATT
INFO,
The indi_;at_}rs appear/disappear
button.
as you press the
r r r r r rr r r r r r r rr r r r r r r rr r r r r r r r rr r r r r r r rr r r r r r r rr r r r r r r
l,_ _
Tl_rn the SELiPUSH
select
*_" Tips
• For Itll ]RV22g/428/[11RV265:
You e_t display the sez_n thd{camrs by presslug
D_PLAY o_ _he R_mote Comfier,
• Yo_ _ di_pl_ the _¢_reenthdlcators d_ri_
p_ybaek on a TV. 8_1_ the _ (O_RS)
m_
the [DA'I'E/TIME
DATA_,
Press
EXEC
dial to
l or ICAM
then press the dial,
MENU,
!2: t 7:_3_M
=._ntinued
Playback 37
'_
_.
To hide the date/time or the camera
settings data
Follow steps 2 to 4, _mdselect [OFF'] in step 5,
Camera settings data display
In the date/time data display, tht: date and timt:
is displayed in the same *_rea,
If you m_:ordthe picture without setting the
dock, [......... ] *rod[--:--:--] will appear,
..............................
t_1
.............................................
E_{
_
SteadyShot off
F_p_ure
_/ Vchite balance
Gain
Shatter speed
Ape_ure value
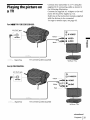
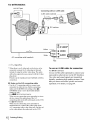
Playingthe picture on
aTV
Ck_ncct yore" c_nc_n_er to a 'IV _sing the
sullied A/V connec:t_ng cable as show_ in
the following ill_trafion,
(k:_nneetthe sappl_c,d AC Adaptor to the wall
_flet for the power snpply _. 12),
Refer also to Ihe _nstru_tlc_ man_s s_I_l_ed
with the deMees to be eonneetcxL
I'o e_y m _mothor tape, see INtge 63.
For I,n[]TRV128/228/3281428:
AN
OUT
jack
IN
O S VIDEO*
MMOUT
Yollow
......................
•
VIDEO
t) AUDIO
¢11
¢1
For D TRV2601265:
A/V OUT jack
IN
S VIDEO*
Nvom-
YsIbow ....................
Q VIDEO
Whit_ ....
Red .............
Signal flow
VCRs or T_,
._continued
Playback
39
* When there is an S video j_k on _he de_ee to be
_x_a_'axL _'annezt [be S vkleo plug Io that j_&
i_te_ ofu_ng the _11ow vldeo plug. Yhe avAio
wil! n_ be otaput when you _nrte_L
I_[c,m_es cart be reprodu_d
with the S video
more [_ti[h_]]y
_i[h thi_
ot_llti_t_iiolL
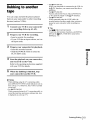
Locatinga scene ona
tape for playback
(D TRV265)
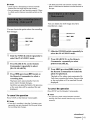
When your13/is connectedto a VCR
Conn_x't yoctr camcorder
to fl_lelINE IN input
o_ the VCR a_ing the A/V eonnecq:ing can e. Set
the input selec_r
on the VCR t_ _3NE.
To connect to a TV without audiolvideo
inputjacks
For Him TRVI28/228/328/428:
Use a N['SC system RFI _!apmr
Refer t_ fl_lgoperating instructions
and the RFI _daptor.
(optional).
o_'your ['V
PLAY
When yourTV is stereo
For 14111 FRVI28/228/328/428;
ZERO SET MEMORY
Connect the audio plug o£ the A/V co,meeting
cable to the left (white) k_p_t jack of year TV.
When your13/is monaural(When your
TV has only one audio inputjack)
:]l
During
playback,
MEMORY
press ZERO
SET
an the Remote
For D'IRV260/265:
Commander at the point you want to
Connect the yellow plug of the A/V cormect ing
locate
cable to the video input jack arm conne_ the
white or the red plug to the aadk_ input jack of
File Utpe counter is tx:set to "0:00:00" and
€0÷ appears on the screen.
If No tape counter is riot displayed, press
DISPLAY on the Remote Commander.
your TV or V(R.
When you warlt m play the sou_d in momi_lral
mode, use a connecting cable (optionN) thr that
purpose.
late_ on,
Press STOP when you want to stop
playback,
,-
Press
'<",ill REW.
Yhe rope stops automat icMly wh_n fh_ tape
counter reaches "0:00:00,'
[_1 Press
PLAY,
The playback starts from the poirit
designated
0 0O O0 on the tape eotmter
To cancelthe operation
Press ZERO SET MEMOR_
Commander
40 Playback
again.
on tile Remote
O
Notes
is a Nank _on
tape.
• I'he I)a_e search wit[ nor fimqrkm zo_t[y
when
_hzr_ is abl_
secfio_ b_ e_n r_¢_ded _c_]o_s on
_e_
_co_d
_o_s
on _h_
You can locate the still image you have
reeord_l on a rope.
Youcan locate the point where {he record{rig
date changes.
il
Slide the POWER sa_4teh repeatedly to
select
_:1 Slide the POWER switch repeatedly
select the PLAYIEDIT mode.
the PLAY/EDIT
Press SEARCH
Commander
Press SEARCH M, on the Remote
Commander repeatedly
[DATE SEARCH I.
[PHOTO
recording
<
Playback starts automatically from the
poin_ where _he date ghanges.
Each time you press the bg_oa, the previous
or the next date will be searched for and
aisplayed.
To cancel the operation
0
to select
SEARCH}.
Press 14,11 (previous)il_q
(;ommandar.
Notes
Commander
(next) on
to select
the
photo for playback.
(next) on
to select a
Playback of _h¢ p hot_ starts automatically.
E_h time you gross the bathos, _he previous
or Ne next photo will be searchgd tbr and
displayed.
date.
Press STOP oil the Remote
M, on the Remote
repeatedly
to select
the Remote
< Press 1",I1'4(previons)t_q
the Remote Commander
mode.
to
To cancel the operation
Press S'[OP on _he Remote Commander,
0
Note
• ff a rape has a Nank se_lioa be_e*n
recorded
secrio_ts, the Ph<_m _h
_cti_a
may nor work
_ormq_Iy,
• If one day's reeordJ_
is tess _n
2 minu_s, yo_
camco_r
_y
_(a a¢_am_
fi_d _e poi_L where
_he reco_g
&a_e changes,
-,_ntinued
Playback 41
YotI can also locate still _mages one after
another and display each image for 5 seconds
aoton_dicalIy.
::Jl Slide the POWE R g_iteh repeatedly to
select
the PLAY/EDIT
Press
SEARCH
Commander
mode.
M. on the Remote
repeatedly
to select
[PHOTO SCAN],
,- Press _
(previous)/l_lq (next) on
the Remote Commander.
Each phc_t_ wiIl be played N_k fi_r about 5
seconds>
To cancelthe operation
Press SI_OP _n the Remete
Commar_der.
0 Note
• ffa ta_e has aNa_k secLkmb_een
42 P'tayback
reeo_led
_n_ O ['HERS (p, 59)
CustomizingYourCamcorder
Changingthe menu
settings
_1
Turn
the SELiPUSH
select
dial,
the desired
EXEC
dial to
item_ then press the
The available menu items vary dependi_g
on _he position o_'the POWER switch.
UnavailaNe i_ms will be grayed out.
8ELfPUSH
EXEC dial
POWER switch
_
Turn
the SELiPUSH
select the desired
dial,
EXEC
dial to
modt_ then press the
:'1 Turn on the power _, 15),
3
I
_E
8_T
Press MENU.
[_he
_iie_lu
_,
8_'[_e_l
appe_Er
s,
&&_ 8g_ ¸
:,
jff'NL]
Press
MENU
to hide
the menu screen,
: N3
tfyotl want to change or?let items seIect
[:_ RE'/X}RN] a_d press the dial, then
repeat steps from 3 m 5.
r r r r r r r rr r r r r r r r rr r r r r r r rr r r r r r r rr r r r r r r r rr r r r r r r rr r r
,-
Turn
the SEL/PUSH
select
dial,
desired
EXEC
me_u_ then
dial to
press the
MANUA_ SE'[ (p. 44)
_[_ CAMBRA SET (p. 47)
PLAYER SP,'[ (p, 51) (NI_TRVI28i
228/328/428)
VCR SP;f (p, 51) (DI_RV260/265)
[C_) S_;r (p,53)
TAPE
[_
SETUP
SET {p. 54)
\IENRJ
(p. 57)
CustomizingYourCamcorder 43
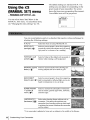
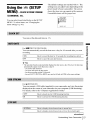
Usingthe
(MANUALSET)menu
'I!_e default settings _m marked with !>, The
seNngs you can M:iust','aW deperiding on _he
power m_te
of your camc_rder,
- PROGRAMAE/P EFFECT,etc.
_,
You can seIect items 1&ted below in the
MANUM
SE[' meria, To select these items,
see _'( hamging the mena settings" (p, 43).
44
Customizing
Your Camcorder
The screer_
ghows #_e items you ¢_moperate at tile moment,
L:navailable items will be grayed oat,
&&_ 8_ ¸
**Your cam¢_M_r is adjusted _*)fbc_s o_ly on distant so_jec_.
0 Note
• When yol* _et tim N_GHJ SHO] I_LUS_wltch to ON, [PROORA_ AE] doe_ not work,
For I-IIIt TRV ]2g/22g/32g/42g:
You can add special effects (8_aeh as films) to a picture bc_hrc recording.
appears when ¢_wh _V'f_ct is sele¢_ted.
For D'I RV260/265:
You can add spe_ia! eff_ts (s_ch as fiJms) to a picture befi_re or after r_ce_ing,
appears where e*mh _'f_act is sele_,laxt,
¢3
N
o
3
€'1
o
&
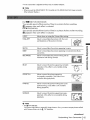
0 Note
• For D 1<R¥260/265:
*_'oucam_ot add effects to externally input picg_re_, AIde, yoa cannot ou_ut picoares edi_d
wifl_Picture etTec_ via _he _ DV [_i¢ff_ce,
-€*continued
Customizi[lg
Your Camcorder
45
_" Tip
• Y o_J¢4tnc_py pi¢_te_ edited usJ_g p]ct_¢ ¢f/cbc_vo ano_tIertape (,p 63)
46 CustomizingYour Camcorder
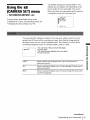
Usingthe
(CAMERASET)menu
The default settirigs _tre marked with t>, The
settings you carl adjast v_ depending eri the
power mode of your camcorder.
l'he scree_
shows the items you can operate at the moment.
Umwailable items will be grayed otto
- 16:9 WIDE/STEADYSHOT,
etc.
You can select items listed below in the
_,_
CAMERA
SET menu. 1'o sele_:t these items, see
YNanging
[he menti settings"
sat
N8
I 10HT
(p. 43).
IN
N(J
; _N[*"
You carl select the mmxirrmm 7_gm level ir_ case you wmlt to zoom to a level
.*_eater ttum 20 times while mc_rdirig on a tape, Note that the image quality
decreases
recordi_g
when you am using t!_e digital zoom, '[his fariction is asefhl when
enlarged pictures of a distant su!_jox't, such as a bird.
¢"a
w_'r
:: ...........................
The r[gh_ side of lhe bar show_ {he digital
zoomin_l zone.
The zooming zon_ appsars whsn you ,_,e
kN;t
N
th_ zooming J_v_l.
I>OFF
Select m d_ag_iwte Ne dtgivat7x_om,Up to 20 times 7corn is
perl'orm_d _ti_lly,
40 ×
Sel_c'tm agllvate the d_gita__m,
p_rl'orm_d dlglutt_.
990 ×
Sd_ to ac_vate _e di_
_s perl'orm_d dlgi_at_,
3
¢1
20 fime__tough 40 ttates zoom is
7o_m, 20 times _hmugh 9_)0 _t¢_ 7z_om
=_ntinued
Customizing
Your Camcorder
47
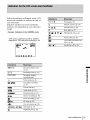
For III m TRV 128/228/328/428:
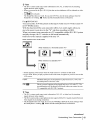
You can record a cinema-like picture ([CINEMA] mode) or a 16:9 wide picture
([16:9 FULL] mode) to watch on the 16:9 wide-screen TV.
Refer also to _he manuals supplied
in [CINEMA] mode
with your TV.
When viewed on the LCD screen/viewfinder
When viewed on a 16:9 wide screen TV*
When viewed on a standard TV**
in [16:9 FULL] mode
When viewed on the LCD screen/viewfinder
When viewed on a 16:9 wide screen TV*
When viewed on a standard TV**
* Picture appears ill full screen when the wide-screen
TV switches to full mode.
* *Played in 4:3 mode. When you play a picture in the wide mode, it appears as you have seen
on the LCD screen or in the viewfinder.
1>OFF
CINEMA
16:9
48
Customizing
(m_.)
FULL (1-_)
Your Camcorder
Standard
setting (to record pktures
recorded
picture
to play back on a 4:3 TV). The
will not be wide.
Select to record a picture
to be played
back in C1NEMA
Select to record a picture
to be played
back on a 16:9 wide TV.
mode.
'_" Tips
• The ID-! system
sends aspect
ratio infbrmation
(16:9, 4:3, or letter box) by inserting
signals between video signals.
• When you record in the [16:9 FULL[, the date or time indicator
screen TVs.
• For H|mTRV328/428:
will be widened
on wide-
The gteadyghoi does not work. If you set [16:9 FULL] in tile menu settings when tile
Steodyghot is working, _€_* flashes and file Steodyghot does no1 function.
For B TRV260/265:
You can record a 16:9 wide picture on the tape co watch on a 16:9 wide-screen TV
([16:9 WIDE] mode).
With this function [ON], your camcorder offers even wider angles when you
move the power zoom lever to the "W" side than recording
in [OFF].
When you connect your camcorder to a TV compatible with the ID- 1/ID-2 system
and play the tape, the TV switches to full mode automatically.
Refer also Io the manuals
supplied wifl_ your TV.
When viewed on the LCD screen
I
¢")
When viewed on a 16:9 wide screen TV*
=<
O
When viewed on a standard TV**
3
o
2.
* Picture appears in full screen when the wide-screen TV swilches io fu!l mode.
**In 4:3 mode. When you play a pictn_ in the wide mode, it appears as you have seen on the
LCD screen.
E>OFF
ON ( _
Stzndard
recorded
)
setting (to record pictures
picture will not be wide.
to play back on a 4:3 TV). The
Select to record a picture to be played back on a 16:9 wide TV. Tile
recorded picture will be played in full mode when you connect to your
TV compatible
with 1D-I/ID-2
syslems.
'_" Tips
• The ID-I system
sends aspect
ratio infbrmation
signals between video signals.
• The ]D2 system sends a copyright
prolecrion
(16:9, 4:3, or letter box) by inserting
signal with the 1D- I signals inserted
between
video signals in an analog connection.
• The Ste_dyghot does not work. If you set [16:9 WIDE] to [ON] in the menu settings when
the gte_dyShot is working "_* flashes and the gteadyghot
does not function.
-_continued
Customizing
Your Camcorder
49
For 1411mTRV328/428/[)TRV260/265:
You can seleci d_is function
to compensate
lbr camera-shake.
I>ON
Standard setting (enable the SteodyShot function). If you select
|hnction thai STEADYSHOT
cannol work wilh, '_
appears.
OFF ( *_ )
Select to deactivate the SteadyShot function.
Select to shoot a stationary sul_iect wilh a tripod,
conversion
lens (optional).
Natural
piclures
a
or when using a
are produced.
Note
• For []ITRV260/265:
Camera-shake
cannot be completely compensated
for in the following
When recording in a dark place
When recording a subject with little contrast to the background
When
When
When
When
recording
using the
recording
dae zoom
horizontal stripes
zoom
a l_aStmoving subject
position is set _o the W-end
When using |he NightShot
by using the NightShot
50
Customizing
side
pins function lo record, you can record clearer pictures
Light 1o emit infrared rays (invisible).
I>ON
Select to use the Night Shot Light. (p. 28)
OFF
Select to disable
Your Camcorder
cases:
the NigbtShot
Light. (p. 28)
items,
Usingthe
(PLAYER
SET)/[ (VCRSET)
menu- HiFi SOUND/EDIT,etc.
see "Changing
(p. 43).
The default
settings
settings
the menu settings"
are marked
with _>. The
you can adjust vary depending
on the
power mode of your camcorder.
The screen
shows 1he items you can operate at the moment.
Unavailable items will be grayed out.
You can select the items listed below in the
menu (the PLAYER SET menu for
l-lira TRVI28/228/328/428,
the VCR SET
menu for [gTRV260/265.) To select these
r_
vCR Stir
mF_ SOUND
4AUOIO
MIX
For [) TRV260/265:
You can select how to play back audio recorded on a tape in stereo mode.
E>STEREO
SeleO to play back a stereo tape or dual sound track tape with main
and sub sound.
1
Select to play back a stereo tape with tile left channel
sound or a dual
sound track tape with main sound.
2
Select to play back a stereo tape with the right channel
sound track tape with sub sound.
0
som/d or a dual
Notes
For Itlll TRV 128/228/328/428:
is minimized
when you dub or edit a tape using |he camcorder
as 1be playback device.
E>OFF
Select this for no compensation.
ON
Select to minimize
0
•
3
N
_1
,<
0
:_
• YOU can playback a dual sound track cassette on this eamcorder. Itowever, you cannot
record a dual sound track on tlds cameorder.
• The setting retm_qs to [STEREO] when you disconnect the power source fhom your
camcorder for more than 5 minutes.
Picture degradation
_
_-
picture
degradation.
Note
The setting r returns to [OFF] when you disconnect
for more than 5 minutes.
tile power source
from your camcorder
,_continued
CustomizingYourCamcorder 51
_.
1_
For HI Ii TRV
128/228/3281428:
I>ON
Select to correct jitler (horizontal
OFF
Select to not compensate
on wldch
For HUl
TRV
picture
you have dubbed
picture
shake during playback).
distortion
repeatedly
when playing
or recorded
back a tape
TV game
signals.
128/228/328/428:
I>ON
Select to eliminate
color noise in the picture.
OFF
Select to minimize
movement.
picture
artifacts
in a picture containing
Io_s of
For [)TRV260/265:
You can adjust _he audio balance between
and ST2.
STI 0he originally
recorded
sound)
Notes
• YOU cannot adjus_ sound recorded in 16 bit audio mode.
• Only tile originally recorded somld will be heard when you disconnect
from your camcorder for more than 5 minutes.
52
Customizing
Your Camcorder
lhe power
source
The default
Usingthe
(LCD
SET)menu- LeO
B.L./LCD
settings
are marked
with _>. The
settings you can adjust vary depending on the
power mode of your camcorder.
The screen
shows the items you can operate at the moment.
Unavailable items will be grayed out.
COLOR, etc.
r_
I_'
You can select the items listed below in the
LCD SET menu. To select these items, see
"Changing the menu settings" (p. 43).
LeD SET
LC_ B_GHT
LC_ B L
IM_NUJ_NO
See page 16 tbr details.
You can adjust the brightness
of the LCD screen's
backlight.
The recorded
picture
will not be aft_cted by |his setting.
E>BRT NORMAL
Standard
BRIGHT
Seled
0
3
brightness.
to brighten
the LCD screen.
,<
o
Notes
• When you connec_ your camcorder to outside power sources, [BRIGHT] is aulomatically
selected t_r the selfing.
• Whm_ you select [BRIGHT], b_ttery [i|b is reduced by about !0 percent during recording.
3
o
2.
Turn the SEL/PUSH EXEC dial to adjust lhe color on _he LCD screen. The
recorded picture will not be affected by this selring.
A
Low intensity _
High intensity
Customizing
Your Camcorder
53
Usingthe D (TAPE
SET)menu- FRAME
REC/
power mode of your camcorder. The screen
shows the items you can operate at the moment.
Unavailable
items will be grayed out.
INT.REC,etc.
You can select items listed below in the TAPE
SET menu. To select items, see "Changing
menu settings"
lhe
(p. 43).
The default seltings are marked with t> The
settings you con adjust vary depending on the
I:>SP ( g_
)
Select to record in the SP (Standard
LP ( 12_ )
Play) mode on a cassette.
Select to increase the recording time from that of the SP mode (2 times
longer for Him TRVI28/228/328/428,
1.5 times longer |br
[)TRV260/265)
recommended
(Long Play). The use of Sony cassettes
to get the most out of your camcorder.
is
Notes
• If you record in lhe LP mode, a mosaic_like noise may appear
when you play back the tape on other camcorders
or VCRs.
• For H|mTRVI28/228/328/428:
or sound may be interrapted
When you record a tape in the LP mode on your c_mcorder, recording is carded out in the
standard 8 mm [] system.
• For BTRV2g0/2g5:
When you mix recordings in the SP mode and in _he LP mode on one tape, the playback
picture
may be distorted
or the time code may not be writlen
properly
between
the scenes.
For [)TRV260/265:
i:>t 2BIT
Select to record in the 12-bit mode (2 stereo sounds).
t 6BIT (_16b)
Select to record in the 16-bit mode ( 1 stereo sound wilh high quality).
For IlPwrRV
128/228/328/428:
You can automatically
adjust the recording
condition
to get 1he best possible
recording.
When you select [ORC TO SET] in lhe menu settings, [START/STOP
KEY]
appears. Press REC START/STOP.
[ORC] appears on the screen and adjustment
starts. Your camcorder returns to the standby mode when adjustment
it takes about 10 seconds for adjustment.
Notes
• Each time you eject a cassette, this setting will be canceled.
54
Customizing
Your Camcorder
is complete.
• When you set [ORC TO SET], a non-recorded
section
of about 0.l second
appears
on tile
tape. However, note that this non-_corded
section disappears from the tape when you
continue recording from this section.
• To check if you have already set this setting, select [ORC TO SET] in the menu settings.
[ORC ON] is displayed
E>AUTO
if it is already set.
Select to display the remaining tape bar:
• For _hout 8 seconds after you turn on your camcorder with the
cassette inserted, and your e_mcorder calculates the remaining
amount of
• For about
• For _hout
the screen
tape.
8 seconds after _
(play) is pressed.
8 seconds after DSPL/BATT
]NFO is pressed
indicators.
• For the period of tape rewinding,
ON
forwarding
Select to always display the remaining
or picture
to display
search.
tape indic_lor.
/
€
For [_ TRV260/265:
You can record piOures with a slop-motion
animated
effect by alternately
3_.
frame
N
recording and then moving lhe subjecl a little.
For BTRV265:
Operate your camcorder
,.<
using lbe Remote Commander
1o prevent
camera shake.
_>OFF
Select to record in tile standard recording mode.
ON
Seleo to record pictures using the |hame recording function.
1
Turn
the SEL/PUSH
EXEC
dial to select
3
o
2.
[ONI, then
press the dial.
2
Press MENU to hide the menu settings.
O
3
lights up
Press REC START/STOP.
A picture (approximalely 6 frames) is recorded, and your
camcorder enters the standby mode.
4
0
Move the subject and repeat step 3.
Notes
• When you use frame recording
continuously,
the remathing
type time will not be indicated
correctly.
• The last scene will be longer than other scenes.
,,,_continued
Customizing
Your Camcorder
55
ForDTRV260/265:
Youcanachieve
excellent
recordings
offlowers
blooming,
etc.,
wi|hthis
function.
Connect
yourcamcorder
tothewalloutlet
using
thesupplied
AC
Adaptor
during
theoperation.
a.[REC
TIME]
b.[INTERVAL]
1 TurntheSEIdPUSH
EXEC
dialto select ISETI,the,,
2
Turn
dial.
the SEL/PUSH
3
Turn the SEL/PUSH
(30 seconds,
press the dial.
EXEC dial to select ]INTERVAL],
EXEC dial to select the desired
1, 5, 10 minutes),
then press the
interval time
then press the dial.
4
Turn the SEL/PUSH
dial.
EXEC dial to select [REC TIME],
5
Turn the SEL/PUSH
EXEC dial to select the desired
(0.5, 1, 1.5, 2 seconds),
then press the
recording
time
then press the dial.
6
Turn the SEL/PUSH
dial.
EXEC dial to select [_
RETURN],
then press the
7
Turn the SEL/PUSH
EXEC dial to select ]ON], then press the dial.
8
Press MENU to hide 1he menu settings.
9
Press REC START/STOP.
_r_])[] flashes.
The interval recording starts.
_l[]
lights up during interval recording.
To cancel recording, set to [OFF] in |he menu settings.
0 Note
• There may be a discrepancy in recording time of up to
h frames from the selected time.
"_" Tips
• If you a_[jus_ the |bcus manually,
you may be able to record clear pictures
changes (p. 29).
• You can silence the beeps during recording
56
Customizing
Your Camcorder
(p. 59).
even if'tile light
The default
settings
are marked
with _>. The
settings you can adjust vary depending on the
power mode of your camcorder.
The screen
Usingthe
(SETUP
MENU)- CLOCK
s r/usB
s R.W
shows 1he items you can operate at the moment.
Unavailable items will be grayed out.
LANGUAGE,
etc.
SETUP MENU
CLOCK SEW
08B S_AM
LTR SiZE
Ca _I_GtJAG_
r_
I:/
You can select items listed below in 1he SETUP
MENU. To select items, see "Changing
menu settings"
the
4
(p. 43).
EMO MOD_
IM_NUI_N_
You con set the date and time (p. 17).
€
For Him TRV 128/228/328/428:
You can automatically
record
recording.
the date
once
a day lbr
10 seconds
after
you
start
o
3N
5"
t>ON
Select to record the date for 10 seconds
OFF
Select to cancel the auto date function.
al/er recording has started.
,.<
o
'_" Tip
• The auto date function automatically displays the da_e once a day. However, tile da_e ]nay
automalically appear more than once a day i|:
you sel tile dale and time.
you giect and insert the tape again.
you stop recording within 10 seconds.
you sel [AUTO DATE[ to [OFF] once mid set it back to [ON[ in the metal se.ings.
For B TRV260/265:
You can connect a USB cable (supplied)
displayed
on lhe screen of your camcorder
For details, refer to the "Computer
to your camcorder,
2.
and view the picture
on your computer
Applications
o
(USB Streaming).
Guide."
_OFF
Select to deactiva*e
ON
Select to activale
the USB Streaming
file USB Streaming
timction.
E>NORMAL
Select to display
selected
menu items in normal
2x
Select to display
selected
menu items at twice the normal
function.
size.
height.
-_continued
Customizing
Your
Camcorder
57
You can select or change the langvage
used for the on-screen display (p. 19). You
can select from English, Simplified English, Canadian-French,
Lalin American
Spanish, Brazilias_-Portuguese,
Traditional-Chinese,
or Korean.
When you remove
a cassette
fi'om your camcorder,
mode, you can view the demonstration
1>ON
OFF
0
and select the CAMERA
in about I0 minules.
Select to see an overview
of the functions
are using this eameorder
for lhe first time.
Select when you do not inlend
available
to use the [DEMO
such as when you
MODE].
Note
• You can view tbe demonstrsdon only when the NIGtlTSI[OT PLUS switch is set to OFF.
'_;" Tips
• The demonstration
will be suspended
When a cassette is inserted.
....When a mode other than CAMERA
in situations
such as those described
is selected.
• If [A.SHUT OFF] is set m [5 rain] when the camcorder
power will be turned off af/er approximately
5 minmes
58
Customizing
Your Camcorder
below.
is used ol/the
(p. 59).
baoery
pack, the
power mode of your camcorder. The screen
shows lhe items you can operate at the moment.
Usingthe
Unavailable
(OTHERS)menu-WORLD
TIME/VIDEOEDIT,etc.
£#
O_H_RS
WORLD rlM_
SEEP
A SHUt O_F
COMMANDER
OISPLA¥
_
You can select items listed below in lhe
OTHERS
items will be grayed out.
_EC LAMP
menu. To select items, see "Changing
lhe menu settings"
(p. 43).
The default settings are marked with t> The
settings you can adjust vary depending on lhe
For
1)'I'RV260/265:
)OFF
Select not to display date, time and the camera
playback.
DATE/TIME
Selec4 to display
tile dale and time during playback.
CAM DATA
SeleO to display
tile camera setting dala during
settings
dala during
(p. 37)
playback.
€
(p. 37)
m,
N
$
You can adjust the time difference
time difference
when using your camcorder
abroad.
t_
Set the
by turning d_e SELf PUSH EXEC dial, the clock will be adjusted
in accordance wilh lhe time difference, if you set the time difference
clock returns to lhe originally set time.
3
to 0, the
o
2.
I>MELODY
Selec3 to play a melody when you start/s_op recording, operate your
camcorder with the SEL/PUSH EXEC dial, or when an unusual
condition
occurs on your camcorder.
NORMAL
Selec4 to sound a beep instead
OFF
SeIe¢4 to cancel _he melody,
confirmation
beep.
E>5 min
SeleO to aclivale
of the melody.
beep sound, slmtter
sound and operation
the Auto shut off. When _ppmximately
5 minutes
have elapsed while you do no_ operate your camcorder, the cameorder
is automatically
turned offto prevent the battery |Yam becoming
consuIlled.
NEVER
Select to deactivate
Ike Aulo shut off.
-_continued
Customizing
Your Camcorder
59
Note
• When you connect
to [NEVER 1.
For I-Ira
your camcorder
to the wall outlet,
[A.SIt UT OFF] is automalically
se_
TRV228/428/BTRV265:
I>ON
Select when using the Remo_e
camcorder.
OFF
Select to deactivate
file Remote
camcorder from responding
remole control unit.
Commander
Commander
to a command
supplied
wi_h your
to prevent
your
sent by another
VCR
fJ Note
• Tile selring rciurns to [ON] when you have tile power
cmncorder for more lhan 5 minutes.
source disconnecled
from your
I>LCD
Select to show the displays
and in the viewfinder.
V+OUT/LCD
Select to show the displays such as the time code on the TV screen,
LCD screen, and in the viewfinder.
I>ON
Select to turn on the c_mera
camcorder
OFF
such as tile time code on the LCD screen
recording
lamp on the front of your
during recording.
Select this setting in the following
recording
situalions.
recording lamp will not light up during recording.
• When you do not want the sul_iect to be nervous
recorded.
The camera
aboul being
• When you are recording close to the subject.
• When the subject reflects the recording lamp.
For BTRV260/265:
You can select up to 20 scenes (programs)
mmther recording
60
Customizing
Your Camcorder
and record lhem in the desired order to
device such as VCR (p. 69).
You can create a copy of the picture
Dubbing/Editing
on your camcorder
Connectingto a VCR
devices (p. 63).
For DTRV260/265,
picture
recorded
on other recording
you can also record
the
from a VCR to a tape on your
camcorder _. 68).
Connect your camcorder
in the following
to a VCR as shown
illustration.
For klIMTRV128122813281428:
AA/OUT
jack
m
€
m
EZZ_22_.
A/V connecting
cable (supplied)
VCRs
c_2_2!.:_ Signal flew
")'continued
Dubbing/Editing 61
For E) TRV260/265:
A/V OUT jack
Connecting
with
LLINK
]optional)
cable
an i.LINK
cable
DV Interface
S VIDEO*
Yellow_
A/V connecting
_
VIDEO
cane (supplied)
VCRs
Red
1:222!i_:_Signal flow
* When there is an S video jack on the device
to be
connected, connect tile S video plug to that jack
inslead of using the yellow video plug• The audio
will not be oulput when you connect with the S video
plug alone•
Pictures can be reproduced more faithfully with this
conoection.
To usean i.LINK cable for connection
For
camcorder
The video
digitally,
thai
(J Notes on the AN connecting
cable
• Use tile A/V connecting cable to connect your
cmncorder to other devices. Belbre connecting,
make sure the [DISPLAY] setiing in the []
(OTHERS) menu is set to [LCD] (the default
se_ting) (p. 60).
• For HIITRV12g/228/328/428:
When you are connecting your cmncorder to slereo
device, connect the audio plug of the A/V
connecting cable m g/e left (white) jack on lbe VCR.
• For []_TRV260/265:
When you are connecling your cmncorder to
monaural device, connect the yellow plug of the
A/V connecting cable to lhe video jack, and the red
or lhe whi_e plug to the audio jack on the VCR.
62 Dubbing/Editing
|)TRV260/265:
Use an i.LINK
you
separately.
cable
R_ other
(optional)
device
and sound
producing
cannot
signals
high
record
For details,
to connect
your
via lhe DV Interface.
are transmitted
quality
the picture
see page
pictures.
NoIe
and sound
84.
Dubbingto another
tape
You can copy and edit the picture
back on your
devices
camcorder
your
your
• Insert
a cassette
• If your
VCR
_lle input
Prepare
• Insert
• Slide
the
O
the
TRVI28/228/328/428:
To prevent delerioration o f pie,lures, set [EDIT] to
[ONI in the _[_ (PLAYER gET) menu before
dubbing (p. 51 ).
selector,
set it to
for
playback.
cassette.
switch
to select
|he
€
mode.
playback
on your
it on the
VCR
m
instructions
supplied
for details.
dubbing
camcorder
camcorder,
VCR.
to the operating
your
'_" Tip
• For Hi !
recording.
camcorder
the POWER
record
your
for
camcorder
61, 62).
lbr recording.
has an input
your
and
When
(p.
VCR
_he recorded
Start
with
p. 45) cannel be output via lhe [ DV InterPace.
• For [)TRV260/265:
When connecled using the i.LINK cable, the
mode.
PLAY/EDrI"
Rel_r
to your
device
Prepare
to lhe VCR via
the [ DV InterFace, you cannot record the title or
indicators.
• For [)TRV260/265:
Pictures edited with Picture effect ([P EFFECT]
recorded picture becomes rough when a picture is
paused ol/your camcorder while recording to a
VCR.
VCR
as a recording
4
to other recording
(such as VCRs).
Connect
3
played
• For DTRV260/265:
When your camcorder is connected
is finished,
and
the
stop
VCR.
Notes
• When dubbing using the A/V connecting cable,
press DSPL/BATT
[NFO to hide indicalors such as
time code (p. 37). Otherwise, they will be recorded
on the tape.
• For [)TRV260/265:
When connected using the A/V connecting cable, to
record _he dale/time mid camera settings data, have
it displayed on screen (p. 37).
Dubbing/Editing 63
Dubbinga tape easily
- EasyDubbing
(I,Ii []TRV128122813281428)
You can control
VCR for dubbing
Turn the SEL/PUSH
select
ISE'rUP[,
EASY UUBm_
EXEC
e0eo_
PAUSE _I0_E
with your
camcorder easily with the VCR connected
the camcorder.
to
Turn the SEL/PUSH
select
Follow
the steps below when you are
performing
the Easy Dubbing
time. You can skip this setting
for the first
if you have set
up the VCR by the following
before.
procedure
O
VCR,
VCR to your camcorder
as a recording
device
your
EXEC
then
dial to
code of your
press the dial.
lhe manul:acturer of your VCR, try each
code and find the most appropriate one.
(p. 62).
VCR for recording.
• insert a cassette
then press the dial.
For the [IR SETUP] code of your VCR,
retlzr to "[iN SETUP] code list" (p. 65).
When flaere is more _han one code listed for
Turn the SEL/PUSH
Prepare
dial to
When you connect wilh an A!V eom_ecting
cable, you need to check the [IR SETUP]
code signal to see if your VCR can be
operated by your camcorder (infrared ray
emitter).
select the |IR SE'l_P]
Note
your
|IR SETUP],
EXEC
Turn the SEL/PUSH
• You cannot perform the Easy Dubbing on a VCR
that does not support [IR SETUP] codes.
Connect
dial to
then press the dial.
select
dial.
thr recording.
[PAUSE
EXEC
MODE[,
then
dial to
press the
• Set the input selector to input mode, if
your VCR has one.
3
Prepare
your camcorder
• insert a cassette
for playback.
for editing.
• Slide the POWER switch repeatedly
select the PLAYfEDIT mode.
to
Turn the SEL/PUSH
EXEC
select the mode to cancel
4
Press
EASY
EASY _UB_G
DUB.
CO000
t,10_E SEL
s_rup
64 Dubbing/Editing
pause on the VCR,
then
dial to
recording
press the dial.
Refer to the operating instructions supplied
with your VCR for details on operation.
0Point
the
infrared
camcorder
towards
on your
in.)
ray
VCR,
away,
the
from
with
emitter
of your
remote
about
30
sensor
cm
(12
[IR SETUP] code list
The following [IR SETUP] codes are recorded
on your camcorder by default. (It is set at"3" as
lhe default setting.)
no obstructions.
Remote sensor
VCR
Sony
1,2,3,4,5,6
Admiral
1 Set
the
2Turn
select
3Turn
select
VCR
the
|IR
the
when
SEL/PUSH
TEST],
then
SEL/PUSH
[EXECUTE],
Recording
setting
to recording
starts
is correct.
pause.
recording
[IR SETUP]
4Turn
select
dial.
the
| _
36
Broksonic
21,70,
Canon
77, 78
Citizen
47
to
Craig
Curtis
press
VCR
code
to
the
when
dial.
the
82
47, 73
Mathis
8, 77, 8(1
/
Daewoo
26, 40, 77
DBX
21,33,
Dimensia
8
Emerson
26, 48, 59, 70, 80, 81, 82
Fisher
36, 37, 44, 45
35
€
m
appears
lest is finished.
Funai
IMls lo start,
code
21,35
Bell&l towel] (M. Wards)
dial.
Go on to lhe next step.
When
Audio Dynamic
the
[COMPLETE]
the [IR SE'IVP]
49, 51
dial
then
on your
47, 54, 80
Akai
press
dial
89
Aiwa
EXEC
EXEC
(M. Wards)
select
another
General
80
Electric
8, 32*, 77, 94*, 101
and try again.
SEL/PUSH
RETURN],
EXEC
then
dial
press
to
the
Golds_ar/LG
47
GO VIDEO
71
Hitachi
8, 42, 78
HQ
4(1
Instant Replay
77, 78
JC Penny
8, 21, 33, 35, 36, 42, 77
JVC
12, 13, 14, 21, 33, 35
Kenwood
21,33,
LXI (Sears)
36, 37, 42, 44, 45, 47,
49, 80
35, 47
Magnavox
17, 77, 78, 83
Marant7
21,33,
Marta
47
Memorex
37, 77
Minolta
8, 42
Mitsubishi/MGA
22, 23, 24, 28, 29
35
,,,_continued
Dubbing/Editing 65
M ultitech
23, 32, 80
NEC
21, 33, 35
Olympic
77, 78
You can insert a title.
Opfimus
22
You can select one of the 8 preset
Orion
6(}
the 2 custom
Panasonic
16, 17, 77, 78
page 31 to create
Pent_x
8, 42
Philco
26, 70, 77, 78
Philips
47, 77, 78, 83
titles and
titles. See steps 1 to 4 on
original
tides.
Turn the SEL/PUSH
EXEC
select
dial.
then press the
[TITLE
SEL],
Pioneer
78
Quasar
6, 16, 17, 77, 78
RCA/PROSCAN
7, 8, !6, 40, 41,42,
78, 78", 83, 101
Realistic
22, 36, 37, 77, 80, 88
Sansui
21
Singer
73
Turn the SEL/PUSH
Samsung
24, 24*, 32, 32*, 41, 94,
94*
select the desired
dial.
Sanyo
26, 36, 37, 47
Scott
22, 23, 24, 28, 32, 37,
dial to
77,
EXEC
rifle, then
dial to
press the
The title flashes.
4(I, 41
Sharp
88, 89
Slrintom
Signature
73
2000
80, 89
Sylvania
77, 78, 80, 83
Symphonic
8(I
(size),
or [BACK
Tashiro
47
color)
as necessary.
Talung
21, 33, 35
Teac
21, 33, 35, 80
if you do not need to change them, go lo
Step 3 (p. 67).
1 Turn the SEL/PUSH EXEC dial to select
Technics
77, 78
Toshiba
7, 4(I, 49
Wards
37, 47, 88, 89, 95
Yamaha
21, 33, 35, 36
Zenith
95
* TV/VCR
component
66 Dubbing/Editing
3
Change
ICOLORI
(color),
COL.]
[SIZEI
(back
ground
[COLOR], [SIZE1, or [BACK COL.],
then press the dial. The selected item
appears on tl_e screen.
2 Turn the SEL/PUSH EXEC dial to select
the desired item, then press the dial.
3 Repeat steps 1 and 2 until the title is laid
out as desired.
4
Tern
the SEL/PUSH
select
[OK], then press
EXEC
dial to
the dial.
Tern
the SEL/PUSH
select [NORMAL]
EXEC
dial to
er [PREVIEW],
then press the dial.
The title lights up.
When you select [NORMAL]
You can record inlo the VCR normally•
When you select [PREVIEW]
You can make a time-lapse dubbing by
setting lhe VCR to automatically repeat 5
seconds' recording and 25 seconds'
standby.
O
Notes
• You can pu_ a title only into the tape of the VCR.
• If you set the background color 1o [FADE], the
picture may nol appear properly, depending ol/the
conneded VCR.
[c]/
30 s
30 s
•
';_" Tips
• The title color changes as follows:
[WHITE[ _
[YELLOW] _
[VIOLET] _-+
[RED[ _+ [CYAN] _
]GREEN[ _-+ [BLUE]
• The title size changes as follows:
[SMALL[ _
[LARGE[
• The background
color chmlges as follows:
[FADE] _
]WHITE[ _
[YELLOW]
[VIOLET] _
[RED] _-+ [CYAN[ _
[GREEN[
[BLUE[ _
[BLACK l
a. Recording time (VCR)
b. Waiting time (VCR)
c. Playback time (cm_acorder)
€
Make sure that your camcorder
connected,
recording
You can choose either normal recording
([NORMAL]) or interval recording
([PREVIEW]).
Tern
the SEL/PUSH
EXEC
select
dial.
[MODE
then press the
SELl,
Tern
and VCR are
and that the VCR is set to
pause.
the SEL/PUSH
select [START], then
EXEC
dial to
press
the dial.
dial te
-_continued
Dubbing/Editing 67
Torn the SEL/PUSH
select [EXECUTE],
EXEC
dial to
then press the dial.
When dubbing ends, your camcorder
VCR slop aulomatically.
Then the display returns lo the Easy
Dubbing
initial screen.
To stopdubbingduring editing
Press @
(stop) on your camcorder.
To quit EasyDubbing
Press EASY DUB.
and
Recordingpictures
from a VCR ([)TRV260/265)
You can record and edit pictures from a VCR
on a tape inserted in your camcorder.
insert a cassette for recording in your
camcorder.
1_ Note
• Your cmncorder cm/only record from m/NTSC
sotlrce. For example, Etlropean video or TV
programs (PAL/SECAM)
cannot be recorded
correctly. See page 81 for details on TV color
syslems.
O Note
• ]NOT READY] appears on the screen when
(START] is not carried out.
Connect
your VCR to your camcorder
(p. 62).
Use an i.LINK cable (optional)
connection.
for
Slide the POWER switch repeatedly
select the PLAY/EDIT
mode.
3
Press
@
(rec) and the button
right simultaneously
to
on its
on your
camcorder,
then immediately
press
@
(pause) on your camcorder.
4
Start playing
VCR.
the cassette
on your
The picture played on Ihe connected
3ppears on d_e LCD screen of your
camcorder.
Press
@
want
to start recording.
(pause)
Press
@
device
at the point you
(stop) to stop recording.
"_" Tip
•
[_ IN appears
and od/er devices
indicalor
68
Dubbing/Editing
when you connect your camcorder
via an i.LINK cable. (This
may also appear
on your TV.)
Prepare
Dubbingselected
scenes from a tape
- Digital programediting
([) TRV260/265)
your VCR.
• insert a cassette for recording.
• Set the input selector to input mode, if
your VCR has one.
3
Prepare
your
eamcorder
(playing
device).
You can select up to 20 scenes (programs)
and record them in the desired order to other
recording device such as VCR.
• inser_ a cassette for editing.
• Slide the POWER switch repeatedly
select the PLAY/EDIT mode.
1o
Delete unwanted scene
4
Press MENU.
Turn the SEL/PUSH
select
dial.
[]
EXEC
(OTHERS),
then press the
Turn the SEL/PUSH
Results of editing
select [VIDEO
dial.
dial to
EXEC
EDI'I],
dial to
then press the
€
m
Follow the steps below when you are
performing digital program editing for the
first time to a tape in a VCR. You can skip
this setting if you have set up the VCR by the
following procedure before.
0
7
Turn the SEL/PUSH
select [EDIT
EXEC
dial to
SET], then press the dial.
Notes
• You cannot perform the Digital program editing on
a VCR that does not support [IR SETUP] codes.
• When your camcorder is connected to the VCR via
the _, DV ]nter&ce, you cannot record the title or
indicators.
Turn the SEL/PUSH
Connect
your
as a recording
VCR to the camcorder
device
(p. 62).
select [CONTROL],
dial.
EXEC
dial to
then press the
You can use eilher the A/V connecting
cable or the i.LINK cable m make die
connection. The dubbing procedure
easier wilh the i.LINK connection.
is
,->continued
Dubbing/Editing 69
5
9
Torn the SEL/PUSH
select
dial.
[LLINK]
EXEC
dial to
Point the infrared ray emitter of your
eamcorder towards the remote sensor on
press the
your VCR, from about 30 cm (12 in.)
or |IR], then
away, with no obstructions.
When connecting
cable
with an i.LINK
After selecting [i.LINK], go on m "Slep 2:
Adjusting _he synchronization of the VCR"
(p. 70).
When connecting
connecting
with an A/V
cable
After selecting [IR], follow _he procedure
described in "To set the [IR SETUP] code"
(p. 70).
To set the [IR SETUP]code
6
Insert a cassette into your VCR, and set
the VCR to recording pause.
7
Turn the SEL/PUSH
[IR TEST],
8
EXEC dial to select
then press the dial.
Turn the SEL/PUSH
EXEC dial to select
[EXECUTE], then press the dial.
The recording starts oll your VCR when 1he
setting is correct. [COMPLETE] appears
when lhe [IR SETUP] code test is finished.
Go on to "Step 2: Adjusting _he
synchronization
of the VCR" (p. 70).
When recording fails to start, select anolher
IR code and try again.
When you connect with an A/V connecting
cable, you need to check the [IR SETUP] code
signal to see if your VCR can be operaled by
your camcorder
(infrared ray emitter).
Remote sensor
VCR
Infrared ray
emitter
Follow
the steps below when you are
performing
digital
program
editing
for the
first time to a tape in a VCR. You can skip
this setting
before
if you have set up your VCR
using the following
procedure.
You can adjust the synchronization
of your
camcorder and the VCR to avoid not
1
Turn
the SEL/PUSH
[IR SETUP],
2
EXEC dialto select
Turn the SEL/PUSH
the [IR SETUP]
EXEC dial to select
code of your VCR, then
press the dial.
For |he [IR SETUP] code of your VCR,
rel_r m "[IR SETUP] code list" (p. 65).
When _here is more than one code listed for
_he manufacturer of your VCR, try each
code and find the most appropriate one.
3
Turn
the SEL/PUStt
[PAUSEMODE],
4
EXEC dial to select
then press the dial.
Turn the SEL/PUSH
EXEC dial to select
the mode to cancel recording pause on
the VCR, then press the dial.
Refer to the operating instructions supplied
with your VCR for details on operation.
70
Dubbing/Editing
recording
the starting
scene.
then press the dial.
Remove
the cassette
camcorder.
Prepare
to take notes.
from your
a pen and paper
Set the VCR to recording
pause
Skip this step if you have selected
mode.
[i.LINK]
in step 9 on p. 70.
O Note
• Run 1he tape for about 10 seconds before
pausing. The starting scenes may not get
recorded when you start recording
the beginning of|he tape.
from
3
Turn
the SEL/PUSH
select
]ADJ TEST],
EXEC
dial to
then press the dial.
Turn the SEL/PUSH
select the average
EXEC
numerical
dial to
value
of
[IN[, then press the dial.
The calculated
is set.
4
Torn
the SEL/PUSH
select
[EXECUTE],
EXEC
start position
for recording
Turn the SEL/PUSH
EXEC
dial to
select ["CUT-OUT"[,
dial.
then press the
dial to
then press the dial.
[EXECUTING] flashes and a picture (about
50 seconds long) with 5 [IN[ and [OUT[
indicators each lbr adjusting
synchronization is recorded. [COMPLETE]
appears when the recording is finished.
1 @Torn
the SEL/PUSH
select the average
[OUT],
1Turn
the tape on your VCR,
then
play back in slow mode.
numerical
dial to
value
of
then press the dial.
The calculated
set.
Rewind
EXEC
stop position for recording
the SEL/PUSH
select [ _
dial.
RETURN],
EXEC
is
dial to
m
then press the
_"
=
tm
5 opening numbers for each [IN[ and
closing numbers lbr each [OUT] appear.
Take a note of the opening
numerical
value of each [IN[ and the closing
number value of each [OUT], then
calculate
the average numerical
for each [IN[ and [OUT[.
7
Turn
the SEL/PUSH
select ["CUT-IN"I,
EXEC
then press
value
dial to
When you are performing digital program
editing for the first time to a tape in a VCR,
go through the procedures described in Steps
1 and 2 (p. 69 to p. 70) beforehand.
the dial.
Prepare
a cassette.
Insert a tape 1o be played back into the
camcorder.
Insert a cassette
VCR.
€
lbr recording
into your
,->continued
Dubbing/Editing 71
Press
3
Press the SEL/PUSH
Turn the SEL/PUSH
select
dial.
4
MENU.
_
(OTHERS),
Turn the SEL/PUSH
select
dial.
EXEC
[VIDEO
dial to
EXEC
dial.
The ending point of the first program is set,
and the lower part of the program mark
changes to light blue.
then press the
EXEC
EDIT[,
dial to
then press the
Repeat
steps
5 to 8 and create
programs.
0Set
your
VCR to the recording
pause.
Skip 1his step if your camcorder is connected
via an i.LINK cable.
Search
scene
for the beginning
camcorder,
on your
then pause playback.
Turn the SEL/PUSH
select
of the first
that you want to record
[MARK],
EXEC
then press
dial to
_ Turn the SEL/PUSH
EXEC
select [START[, then
Mt,_K
dial to
press the dial.
_NOAG_
the dial.
The starting point of the first program is set,
and _he upper part of the program mark
changes
1o light blue.
2Turn
select
the SEL/PUSH
[EXECUTE],
EXEC
dial to
then press the dial.
A search for |he beginning of|he first
program starts, lhen the recording starts.
[SEARCtt] appears during search and
[EDITING] appears during editing.
7
Search
for the end of the first scene
that you want
camcorder,
to record
on your
then pause playback.
[mJ_CANCEL
_D_ING _J_
SC_NE
IMENUI_N_
When a program is recorded, the program
mark slops flashing and remains lit. When
all programs have been recorded, 1he
program editing operation slops
automatically.
To cancel recording,
72 DubbinglEditing
press @
(stop).
To end Digital programediting
Press MENU.
To save a programwithout using it to
record
Press MENU
in step 11.
The program
is stored in memory until lhe
cassette
is ejected.
To erase programs
1
FoUow steps 1 to 4 in "Recording
selected
2
scenes as programs"
the
(p. 71).
Turn the SEL/PUSH
EXEC dial to select
[UNDO[ or [ERASE
the dial.
ALL], then press
When you select
[UNDO]
You can erase the last set program.
When you select [ERASE ALL]
You can erase all 1he programs.
3
Turn the SEL/PUSH
[EXECUTE[,
EXEC dial to select
/
then press the dial.
The programs are deleted. To cancel this
operation, select [RETURN], and lhen
press lhe dial.
€
fftl
f,_ Notes
• You cannot set starting point or ending point on a
blank section of the tape. If there is a blank section,
tile total time may no_ appear correctly.
• When you cannol operate the device correctly using
an i.LINK cable connection, select [IR] in seep 9 on
p. 70, and set the [IR SETUP! code.
Dubbing/Editing 73
Troubleshooting
persists,
Troubleshooting
If you run into any problem
camcorder,
the problem,
screen
the power
or the viewfinder,
display
details.
using your
use the following
troubleshoot
remove
source and
contact your Sony dealer.
if"C:[S][S]:vl[S]"
is displayed
function
on the LCD
the self-diagnosis
is activated.
See page 79 for
table to
if the problem
i@
J ?
?)gl
jig
;i ¸ ?i !
)i)i_i<;
!)? _?
i ;iii!i iil)ii ¸i ;ii! !!i! !!i! !!i! !!i! !!i! !!i! !!i! !
Ym_m::,
i[!g;ii!
_[!!
] _]iil)i
[!!_][!!
_[!!
]i;ii!i!!i!i!!i!i!!i!
_][!!_][!!_[!!
] _][!!i!il)@i;
_][_ ___[and!_
[i__ _ i? ;.i _ i)i !_ct
_n_i;
_ig!¸_[!_[!_[!_[!_[!_[!_[!_[!_[![[
The power
does noi turn on.
* The battery pack is discharged,
camcorder.
running
low, or not altached
to the
•,>Altuch a charged b_ttery pack to 1he camcorder. (p. 12)
-)Use the AC Adaptor io connect to the wall outlet. (p. 15)
The camcorder
when the power
does ilO[ operate
even
is set to on.
-)Disconnect
the AC Ad_plor
from the wall outlei or remove
the baltery
pack, then reconnect it alter about 1 minute. If the |hnctions still do not
work, press _he RESET button using a sharp-pointed
object. (If you press
the RESET button,
all settings
including
The supplied Remote
does not function,
-)Insert a battery into lhe battery holder with the
polarities correclly
m_tching the _
marks. If this still does nol solve the problem, insert a
new b_ltery since the battery
-)Remove
remole
ally obstructions
(OTHERS)
se_ting _re reset.)
-)Set [COMMANDER]
Commander
in lhe _
the clock
For Him TRV228/428/F)TRV265:
menu to [ON]. (p. 60)
is deod. (p. 95)
between
the Remote
Commander
and the
sensor.
The CItG (charge) I_mp does not
light while the b_ttery pack is being
-)Attach the ballery p_ck to the camcorder correctly. If the lamp sli]l does
not light up, then it indic_les that no power is supplied from the wall
charged,
outlet.
• The battery
The CHG (charge) lamp flashes while
the battery pack is being charged,
_Allach
the battery pack to the camcorder correctly. If the problem
persists, disconnect the AC Adaplor from the wall outlet m_d control
The battery pack is quickly
• The temperature
charge
is completed.
your Sony dealer. The battery
discharged,
(p. 12)
pack may be damaged.
of the environment
nol been charged enough. This is not a mal|hnc_ion.
-1 Fully charge lhe battery again. If the problem persists,
battery pack with a new one. It may be damaged.
74 Troubleshooting
(p. 12)
is too low, or the b_ltery
pack has
replace the
(p. 12, 83)
¸ii¸ii:!
iii i ¸ii:ii::i
i!iiii
i!i
¸II !i:i
The remaining
battery time indicator
does not indicsle
the correct time.
¸ii ¸ii:ii
i !ii!!i
¸II :i !i:i
• The temperature
although
indicator
_aek has enough
The power
p_ck with a new one. It may be damaged.
• A problem
the remaining battery
indicales that the battery
is too high or too low, or the batter
pack has not been charged enough. This is 11ol a malfunction.
")Fully charge _he battery again. If the problem persists, replace
b_ttery
The power turns off frequenlly
of the environment
has occurred
in the remaining
the
(p. 12, 83)
bal_ery time indicator,
baltery pack has not been charged enough.
-)Fully charge the battery again to correct the indicalion.
or the
(p. 12)
power to operale.
_bl_aplly turns off.
• [A.SHUT OFF] in the _
(OTI IERS) menu is set m [5 min]. (p. 59)
-) When approximately
5 minutes have elapsed while you do nol oper_le
your camcorder, tbe camcorder is au_omalically
POWER switch down to turn the power ol/again.
turned ott2 Slide _he
(p. 15) Or use the AC
adaptor.
A problem
occurs
camcorder
Adaptor.
is connected
Cassette
when the
"_Turn offlhe
to the AC
c_nnot be ejected
from the
compartment,
power, and disconnect
Then, connect
")Make sure the power
Cassette
is not _iected even when the
casse_le
lid is open.
l_pe indicator
is not
displayed,
An unknown
screen.
I_nguage appear5
An unknown
picture
on the
appear5 on the
screen,
")Moisture
battery
condensation
from the wall outlet.
pack or AC Adaptor)
is starting
(p. 12)
in your camcorder.
REMAIN]
to [ON] in the _
display
the remaining
tape indic_lor.
(TAPE
(p. 86)
SET) menu to always
(p. 55)
")See page 19.
")The camcorder
is in [DEMO
MODE].
(The [DEMO
MODE]
automatically
displayed when you leave the camcorder
after selecting CAMERA wilhout inserting a easselte.)
in tbe menu.
indicator
_ppe_rs
on the
is connected
then attach it again. (p. 12)
pack to the eamcorder.
")Set [ []
to cancel [DEMO
An unknown
screen.
source (battery
correctly. (p. 12)
")Remove the battery pack from the cameorder,
")Attach a charged
The remaining
the AC Adaptor
it again.
MODE].
You c_n also set [DEMO
is
for 10 minutes
Insert a cassel_e
MODE] to [OFF]
(p. 58)
")Refer to the indiealor
list. (p. 97)
,->continued
Troubleshooting
75
!_ _!_i_;
¸¸
;_
!:i!i
i_:ii!i!
:;_:
ili:i
i:;[i
:iif:;
if!
:;[i:i
_:!;iS
:;[i:i
_:!;iS
:;[i:i
_:!;iS
:;[i:i
_:!;iS
:;[i:i
_:!;iS
:;[i:i
_:i
___;___i_!__i_¸i_!!_ !_i'_i!__;_
_:__i
i:!:if!i!
_:iii
iii:[i
:iii;
ii!:[i:i
_:;
iS:[i:i
_:;
iS:[i:i
_:;
iS:[i:i
_:;
iS:[i:i
_:;
iS:[i:i
_:;
iS:[i:i
_:;
iS:[i:i
The tape does not start when you
_ress REC START/STOP.
-_Slide the POWER switch to turn on the CAMERA lamp. (p. 15)
4The tope has reached the end. Rewind it, or insert a new cassette.
4Set the write-protect
ta[_ _o REC or insert a new cassetle. (p. 82)
-_The tape is stuck to the drum due to moisture condensation.
Remove
casselte
and leave your camcorder
cassette.
The power
abruptly
turns off.
for at least I hour, lhen re-insert
the
the
(p. 86)
• [A.SHUT
OFF] in the _
(OTHERS)
menu is set to [5 rain]. (p. 59)
•,l' When approximately
5 minutes have elapsed while you do not operate
your camcorder,
the camcorder is automatically
turned off-.
Slide _he POWER switch down to turn lhe power on again (p. 15). Or
use the AC Adaplor.
• The battery pack is discharged.
For [.||m
TRV328/428/I_TRV260/
265:
The SteadyShol
"_Se_ [STEADYSHOT]
does nol function.
The auto tbcus does not function.
-_Press
FOCUS
recording
manually.
A vertical
band appears
recording
light
when
to ]ON] in the _
(p. 50)
"-}Set [16:9 W1DE] to [OFF] in the _
_The
A vertical band appears when
recording candlelight or eleclric
in lhe dark.
(p. 12)
(CAMERA
(CAMERA
SET) menu.
SET) menu. (p. 48)
to enable auto focus. (p. 29)
conditions
are not suitable
for auto focus. Adjust lhe |Bcus
(p. 29)
• This occurs when lhe contrast belween
too high. This is nol a mal|hncfion.
• This phenomenon
_he subject and lhe background
is
is called lhe smear effect. This is nol a malfimcfion.
a bright subject.
The color of the piclure
correctly
is nol
_Deaclivale
the NightShot
plus function.
the NightShot
plus function
(p. 28)
displayed.
Picture
appears
screen,
and the subjeo
appear
on the screen.
The slmeer
too bright on the
does not
sound is not heard.
_Deactiva_e
_Cancel
_Set
Ike back light funclion.
[BEEP]
to [MELODY]
in bright places.
(p. 28)
(p. 27)
or [NORMAL]
in the _
(OTHERS)
menu.
(p. 59)
For Him
TRV32g/428/[_TRV260/
265:
Black bands
_Set
[STEADYSHOT]
(p. 50)
appear whm_ you record
a TV screen or computer
76 Troubleshooting
screen.
to [OFF]
in the _
(CAMERA
SET) menu.
i i !i:!:iiii iii i ¸II
i!i
Flickering
or changes
in color occurs.
¸ii i:;ii!!i
¸II
-)This occurs when recording pictures under a fluorescent lamp, sodium
lamp, or mercury lamp in the soft portrait or sports lesson mode. Cancel
]PROGRAM
END SEARCH
END SEARCH
does not work.
does not work
The built-in
was ejected
• The cassette
is new and has nothing
• There
correctly,
AE] in this case. (p. 44)
• The cassette
is a blank section
recorded.
in the beginning
or middle
of the tape. This is
no_ a malfunction.
light does no_ thncfion.
-)Press LIGHT repeatedly
to select _
ON •
-)If the problem presisls, contact your Sony dealer or local authorized
Sony service
Cannot play back.
Horizontal
after recording.
facility.
-) If the tape has reached the end, rewind
lines appear
on the
,icmre. The displayed pictures
not clear or do not appear.
")Clean
are
fl+e head using the cleaning
(optional).
• For[]IBITRVI2g/22g/32g/428:
The _elevision's video channel is no1 adjusted
•")Adjust it. (p. 39)
-)For []i [] TRV 128/228/328/428:
Set [EDIT!
No sound or only a low sound is
heard.
the tape. (p. 34)
cassette
to [OFF] in the _
-)For DTRV260/265:
Sol [HiFi SOUND] to ]STEREO]
-)Turn up the volume. (p. 34)
-)For [)TRV260/265:
In the _
(PLAYER
correcdy.
SET) menu. (p. 51)
in the _
(VCR
(VCR SET) menu, adjust [AUDIO
until the sound is heard appropriately.
(p. 86)
SET) menu. (p. 51)
MIX! from the [ST2! side
(p. 52)
-)When you are using an S VIDEO plug, make sure ¢he black plug for
I'l|[] TRV 128/228/328/428,
or ¢]_e red and white plugs for DTRV26fl/
265 of the A/V connecting cable are connected as wel!. (p. 39)
The sound breaks off.
-)Clean
Ike head using the cleaning
For [)TRV265:
• There
is a blm_k section
Canno_ perform the Dale search wi_h
the recording date displayed on the
creen.
For BTRV260/265:
":-:" is displayed
END SEARCH
END SEARCH
correctly,
does no_ work.
does not work
in the beginning
(optional).
or middle
(p. 86)
of the tape. This is
hal a malfunction.
• The tape you are playing
on the screen.
cassette
was recorded
without
searing the da+e and time.
• A blm_k section on the tape is being played.
• The data code on a tape with a scratch or noise canno+ be read.
• The cassette
was ejected
• The cassette
is new and has nothing
• There
is a blm_k section
after recording.
recorded.
in the beginning
or middle
of the tape. This is
no_ a malfunction.
-_continued
Troubleshooting 77
Cannot dub correctly
connecting cable.
using the A/V
For DTRV260/265:
Pictures from connected
not displayed
-)Set
[DISPLAY]
to [LCD]
in tile _
• The input signal is not NTSC.
devices
(OTHERS)
menu.
(p. 60)
(p. 68)
are
correctly.
For BTRV260/265:
Digital program
function.
editing
-)Set
does not
_he input selector
on the VCR correctly,
then check the connection
between your camcorder and the VCR. (p. 62)
-)When your camcorder is connected to a DV device that is no_ a Sony
product via an i.LINK cable, select [IR] in step 9 of "Step I : Preparing
your cmncorder and VCR for operation." (p. 69)
-)Adjust the synchronization
of the VCR. (p. 70)
-)Enter
a con'ect
[IR SETUP]
code. (p. 65)
-) Seleo the mode used to cancel recording pause again. (p. 7(1)
-) Set your camcorder and the VCR more lhan 30 cm (12 in.) apart. (p. 70)
• The progrmn may not be sei to a blank section on the tape.
For BTRV260/265:
The VCR is no_ responding properly
during Digital program editing when
it is connected via an i.LINK cable.
For ['|l m TRV128/228/328/428:
Easy Dubbing
does no1 function.
-)While
connecting
Preparing
via an i.LINK
your camcorder
cable, selecl
[IR] in step 9 of "Step I:
and VCR for operation."
(p. 69)
• Your VCR and/or video camera recorder is not set correctly.
-)Make sure the input selector of the VCR is set to LINE. Also, make
sure lhe power
switch of the video camera recorder
is set to VCR.
(p. 64)
• The [IR SETUP] code or [PAUSE MODE] is no_ set correctly.
-) Select the correct [IR SETUP] code and [PAUSE MODE], accordin
to your VCR. Then confirm
|hnction. (p. 64)
78
Troubleshooting
VCR operation
with the [IR TEST]
Warning indicators
and messages
if indic3tors
appear on lhe screen, check lhe lbllowing.
:[:3[:3 : ff]ff]/E:{Z]D : DE] (Selfdiagnosis display)
See lhe page in parenlheses
lbr details.
Some symptoms can be fixedby yourself. If the problen_ persists even after
you tried a couple of times, contact your Sony dealer or IocM aulhorized
Sony service
C:04:D[]
facility.
•")A baltery pack _hat is not an "InfoUTH]
Use an "lnfoLITHIUM"
C:21:Dff]
UM" baltery pack is being used.
b_ltery pack. (p. 83)
-)Moisture conden sadon has occurred. Remove the cassette and leave your
cameorder for at least 1 hour, then rerinsert file cassette. (p. 86)
C:22:DD
q'Clean the head using a cleaning
C:31DD
/ C:32DD
cassette
(optional).
(p. 86)
@Symptoms that are not described above have occurred. Remove and
inser_ the casselte, lhen operate your camcorder again. Do not peri_rm
this procedure
if moisture
q'Remove lhe power
camcorder again.
-)Change the tape.
starts to condense.
source. Reconnect
-)Press the RESET button and operate
E:61 :ff]ff] / E:62:E]E]
(p. 85)
it again and operale your
your cameorder
again.
-)Contact your Sony dealer or local authorized Sony service
[nform them of the 5-digit code, which starts from "E."
¢\_ (Battery
level wanting)
• The battery pack is nearly used up.
• Depending on lhe operating, enviromnental,
_-\_ indicalor
or ballery
may flash, even if there are approximately
Pacility.
conditions,
the
5 to Ifl minute
remaining.
(Moisture
(Warning
the tape)
condensation
indicalor
warning)*
pertaining
to
-)Eject file cassette, set file POWER switch to (CItG)
about I hour with the cassette lid open. (p. 86)
Slow flashing:
• There is less than 5 minules
• No cassette is inserted.*
remaining
• The write-protect
tab on the cassette
Fast flashing:
• Tile tape has run out.*
OFF, and leave it for
on the tape.
is set to lock. (p. 82)*
,,,_continued
Troubleshooting 79
!a_!!_i!i;!:i_;i;i_i:::i;il
¸_ii!}_;i:S:i
¸iiii_::'i}ii:_;i{ii:i_i!i:i_i:::!i
¸ii_i:i_i:::!i
¸ii_i:i_i:::!i
¸ii_i:i_i:::!i
¸ii_i:}i_i_!_a!_!iii_!!_!_!_ii_i:_!!_!i}i{i!iii:
¸_:i!i
¸i}i_i::!;ii_:i:ii:
¸}::i:ii:i
¸i:i:i:::!
i¸i}:i:::!
i¸i}:i:::!
i¸i}:i:::!
i¸i}:i:::!
i¸i}:i:::!
i¸ii
_" (Eject cassette
warning)*
Slow flashing:
• The write-pro_ect
tab on the cassetle
Fast flashing:
• Moislure condensation
• The t_pe has run out.
• The self-diagnosis
* YOU hear a melody
]'he
lbllowing
or beep sound when the warning
messages
Battery
will appear
to prompt
Use the "InfoLITHIUM"
Battery
display
indicators
you
battery
has occurred.
(p. 86)
code is displayed.
appear
to correct
|be
pack.
on the screen.
situation.
")Charge
Old battery.
Use a new one.
A Re-attach
the power
(p. 79)
")See page 83.
level is low.
the battery.
source.
Moisture
[] --_ Moisture
condensation
[] Moisture
Cassette/tape
_P._NInsert a casselle.
@See page 18.
A Reinsert
@The cassette
condensation.
condensation.
Eject the cassei_e
Turn off for IH.
the casselle.
_P-_NThe tape has reached
Others
Cmmot record
*_st_
@See page 86.
@See page 86.
might be d_maged,
@See page 82.
the end.
due to copyright
protection.
Dirty video head. Use a cleaning
cassette.
")See page 86.
Cmmot start Easy Handycam
")See page 26 and 36.
Cannot cancel
")See page 26 and 36.
Easy Handycam
Cmmot starl Easy Handycam
Invalid
with USB connected
button with Easy Handycam
USB invalid during Easy 1tandycam
Troubleshooting
(p. 12)
")See page 83
_N _" The tape is locked - check the tab.
80
is set to lock. (p. 82)
operation
")See page 26 and 36.
")Press
SEL/PUSH
EXEC
dial.
etc.
Additional Information
Simple settingof clock by time
difference
Usingyourcamcorder
abroad
You can easily set the clock 1o the local time by
Power
difference
supply
You can use your camcorder
regions
using the AC Adaptor
your camcorder
50/60 Hz.
selling a time difference when using your
camcorder abroad. Select [WORLD TIME] in
lhe [] (OTHERS) menu, then set the time
within
Use a commercially
(p. 59).
in any country/
supplied
with
AC I00 V to 240 V,
available
adaptor
[a], if necessary,
design
of the wall outlet
AC plug
depending
on the
[b].
[
AC-LI 5A/L15B
[a]
[b]
On "IVcolor systems
Your camcorder is an NTSC system-based
camcorder, if you want to view lhe playback
picture on a TV, it must be an NTSC systembased TV (see following list) wilh the AUDIO/
VIDEO
input jack.
NTSC
Bahama Islands, Bolivia, Canada,
Central America, Chile, Colombia,
o
Ecuador, Guyana, Jamaica, Japan,
Korea, Mexico, Peru, Surinam,
=__
Taiwan, the Philippines, the
U.S.A., Venezuela, e_c.
PAL
3
_=.
Australia, Auslria, Belgium,
China, Czech Republic, Denmark,
Finland,
Germany,
Holland,
o
Hong
Kong, Hungary, Italy; Kuwait,
Malaysia, New Zealand, Norway,
Poland, Portugal, Singapore,
Slovak Republic, Spain, Sweden,
gwilzerland,
Thailand, United
Kingdom,
etc.
PAL - M
Brazil
PAL - N
Argentina,
SECAM
Bulgaria, France, Guiana, Iron,
Iraq, Monaco, Russia, Ukraine, etc.
Paraguay,
Uruguay
Additional
Information
81
For DTRV260/265:
Usablecassette
tapes
You can use standard
Digital8
Hi8 Him
When you record
You cannot record software on your
camcorder that contains copyright
8 mm [] and Hi8 Ill =a,
D video cassettes on your ca•corder.
system
This fti8 Ill[] system is an extension of the
standard 8 mm [] system, and was developed to
produce higher quality pictures.
You cannot play back a tape recorded in the
Hi8 HI[] system correctly on video recorders/
players olher than a Hi8 video recorder/pl3yer.
control signals
of software.
for copyright
[Cannot record due to copyright
protection
protection d
appears on the LCD screen, or on the TV screen
if you try to record such software.
Your ca•corder
does not record copyright
control
signals on the tape when it records.
Notes on use
To prevent accidental erasure
Slide the write-protect tab on the cassette to set
to SAVE.
Digital8 D system
This video system has been developed
digital recording to Hi8 Him/Digital8
cassette.
The recording
Digital8
standard
to enable
D video
time when you use your
[) system ca•corder
on Hi8 Ill[]/
8 mm [] tape is halfihe recording time
when using die conventional Hi8 HI []/standard
8 mm [] system ca•corder.
(120 minutes of
recording time becomes 60 minutes in die SP
mode.)
To preventa blank sectionfrom being
made on the tape
Press END SEARCH to go to the end of the
recorded section belbre you begin die next
recording in the lbllowing cases:
You have ejected tile cassette during
recording.
REC: The cassette
can be recorded.
SAVE: The cassette
protected).
When labeling
cannot be recorded
the cassette
Be sure to place the label only on the locations
as shown in the lbllowing illustration so as not
to cause malfunction
of your ca•corder.
Do not put a
label along the
border.
You have played back the tape.
if there is a blank section or discontinuous
signals on your tope, re-record
beginning
above.
(write-
from the
to the end of the tape as described
Labeling
position
Copyrightsignal
When you play back
if the cassette you play back oll your camcorder
contains copyright signals, you cannot copy it to
a tape in another video camera connected to
your ca•corder.
After using the cassette
Rewind the tape to the beginning
in an upright position.
vld*ol-18, Olg_8,
trademarks.
82
Additional
Information
to avoid
distortion of the picture or the sound. The
cassette should then be put in its case, and stored
Ig, HIB and D are
Put the battery pack in a pocket to warm it
up, and insert it in your camcorder right
Aboutthe
"InfoLITHIUM"
battery pack
]'his unit is compatible
"InIbLITHIUM"
belbre you start taking shots.
Use a large capacity battery pack: NPQM71/QM71D/QM91/QM91D
(optional).
• Frequent use of the LCD screen or a frequent
playback, l_st lbrward or rewind operation
wears out the battery pack faster. We
with the
battery pack (M series). Your
camcorder operates only with the
"InIbLITHIUM"
battery pack.
"InIbLITHIUM"
the ff_l)l_art,_$. Q
M series battery packs have
mark.
What is the "InfoLITHIUM" battery
pack?
The "InfoLITHIUM"
battery pack is a lithiumion battery pack that has fimctions lbr
communicating
information related to operating
conditions
between your camcorder
and an
optional AC Adaptor/charger.
The "lnfoLrrHIUM"
battery pack calculates
the power consumption according to 1he
operating conditions of your camcorder, and
displays the remaining battery time in minutes.
Wiih an AC Adaptor/charger
remaining
appear.
(optional),
battery time and charging
the
time
To charge the battery pack
• Be sure to charge the battery pack before you
start using your camcorder.
• We recommend charging the battery pack in
an ambient temperature of between 10°C to
30°C (50°F m 86°F) until the CHG (charge)
lamp tarns off. If you charge the battery pack
outside of this temperature range, you may not
be able to charge it efficiently.
• After charging is complete, eid_er disconnect
1he cable from d_e DC IN jack on your
camcorder or remove the battery pack.
To usethe battery packeffectively
• Battery pack performance decreases when the
surrounding lemperature is 10°C (50°F) or
recommend
using a large capacily battery
pack: N P-QM71/QM71D/QM9
(optional).
I/QM91D
• Be sure to set the POWER switch m (CHG)
OFF when not recording or playing back on
your camcorder. The battery pack is also
consumed
when your camcorder
is in
recording standby or playback pause.
• Have spare battery packs ready lbr two or
three times the expected recording time, and
make trial recordings belbre making the actual
recording.
• Do not expose 1he battery pack to water. The
battery pack is not water resistm_t.
Aboutremaining battery time indicator
• When the power goes offeven
though die
remaining battery time indicator indicates 1hat
the battery pack has enough power to operate,
charge 1he battery pack fully again. The
indication on the remaining battery time will
_.
be indicated correctly. Note, however,
that the
_..
battery indication will not be restored if it is
used in high temperatures tbr a long time, or if
_-,
_--
left in a lhlly charged state, or when the
battery pack is frequently used.
_"
-_'
i
Use d_e remaining
battery time indication
as a
guide to 1he approximate shooting time.
• The _.X_
mark 1hat indicates low battery llashes
even if tl_ere are still 5 to 10 minutes of battery
time remaining, depending on 1he operating
conditions or ambient temperature
enviromnent.
and
About storageof the battery pack
• If 1he battery pack is not used lbr a long time,
fully charge the battery pack and use it on your
below, and the length of time you can use the
camcorder
function.
battery pack becomes shorter. In d_at case, do
one oldie following to use the battery pack tbr
To store the battery pack, remove it from your
a longer time.
_.
camcorder
once a year to maintain
the proper
and put it in a dry, cool place.
• To complelely use up 1he battery pack on your
camcorder, leave your camcorder in tape
,->continued
Additional
Information
83
recording standby until the power goes off
without a cassette inserted.
About i.LINK
Aboutbattery life
• The battery lil_ is limited. Battery capacity
drops little by little as you use it more and
more, and as time passes. When the available
battery time is shortened considerably, a
probable
cause is that the batlery pack has
reached the end of its lil_. Please buy a new
battery pack.
• The battery life varies depending on how it is
stored and the operating
environment
conditions
and
lbr each battery pack.
"InfbLITItlUM" is a trademark of Sony
Corporation.
The DV Interface
on this unit is an i.LINK-
compliant DV Interface. This section describes
the i.LINK standard and its features.
What is i,LINK?
i.LINK is a digital serial interface for
transferring digital video, digital audio, and
olber data to other i.LiNK-compalible
device.
You can also control olber device using the
i.LINK.
i.LINK-compatible
device can be connected
using an i.LINK cable. Possible applications are
operations and data transactions wilb various
digital AV devices.
When two or more i.LINK-compatible
device
are connected to this unit in a daisy chain,
operations and data tras_sacrions are possible
with not only lbe device that Ibis unit is
connected to but also with other devices via lbe
directly connected
device.
Note, however, that the method of operation
sometimes varies according to the
cbaracleristics
and specifications
of the device
to be connected. Also, operations and data
transactions may not be possible on some
connected device.
¢J Note
• Normally, only one device cml be connected to this
unit with the i.LINK cable. When connecting this
unit to i.LINK-compatible
device having two or
more DV Interfaces, refer to the operating
instructions of the device to be connected.
'8" Tips
• i.LINK is a more tZamiliar _erm for the IEEE
1394
data transport bus proposed by Sony, and is a
tmdmnark approved by many corporations.
• EEEE 1394 is ml international standard stm_dardized
by the Institute
Engineers.
About i.LINK
of Electrical
and Electronics
Baud rate
i.LINK's maximum baud rate varies according
to the device. There are three types.
S100 (approx. 100Mbps*)
$200 (approx. 200Mbps)
$400 (approx. 400Mbps)
The baud rate is listed under "Specifications"
the operating instructions of each piece of
84
Additional
information
in
device.
It isalso
indicated
near
thei.LINK
interface
onsome
device.
Themaximum
baud
rate
tbrdevice
thaidoes
not
have
tory
indication
(such
as1his
unit)is
"SI00."
Thebaud
ratemaydifferfi'om
1he
indicated
value
when
1he
unitisconnecled
1odevice
wilh
adifferent
maximum
baud
rate.
flaal 100 megabits
a baud rate of 1O0 Mbps means
on this unit
(DV interlhce)
compatible
Betbre connecting
1o tiber i.LINK
as
this unit to your computer,
make sure that application
by this unit is already
computer.
sottware
supporled
installed on your
Some i.LINK compatible video device such as
Digital Televisions, DVD recorders/players,
and MICROMV recorders/players
are not
compatible wilh DV device. Before connecting
m olher device, be sure m confirm whelher 1he
device is compatible
with DV device or not.
For details on precautions and compatible
application sofiware, refer also to 1he operating
instructions for the device It be connected.
Aboutthe required i.BNK cable
Use the Sony i.LINK 4-pin-to-4-pin
(during DV dubbing).
cable
They may malfunction
delbnned.
above
or become
fields or mechanical
may malfunction.
Near strong radio waves or radiation.
camcorder may not be able 1o record
device made by
Sony (e.g. a VAIO series personal computer)
well as to video device.
to temperalures
vibration. The camcorder
to other video device having a DV
interface, see page 62, 63.
This unit can also be connected
and
60°C (140°F), such as under direct sunlight,
near heaters or in a car parked in the sun.
Near strong magnetic
For details on how to dub when 1his unit is
connecled
• Do not use or store the camcorder
leave 1hem exposed
of data can be sent in one second.
To use i.LINK functions
Onuse and care
accessories in 1he lbllowing locations.
Anywhere extremely hot or cold. Never
* Whal is Mbps?
Mbps stands for "megabits per second," or the
amount of data that can be sent or received in one
s_cond. For example,
Maintenanceand
precautions
properly.
Near AM receivers
Noise may occur.
Tbe
and video equipment.
Sandy beach or anywhere
dusty. If sand or
dust gets in your camcorder, it may
malfunction. Sometimes 1his malfunction
cannot be repaired.
Near windows or outdoors, where the LCD
screen, the viewfinder, or the lens may be
m
exposed to direct sunlight. This damages
1he inside of 1he viewfinder or 1he LCD
o
screen.
Anywhere very humid.
• Operate your camcorder on DC 7.2 V (battery
pack) or DC 8.4 V (AC Adaptor).
5"
• For DC or AC operation, use the accessories
3
recommended in d_ese operating instructions.
• Do not let your cmncorder get wet, for
o
example, from rain or sea water. If your
camcorder gets wet, it may malfunction.
Sometimes d_is malfunction cannot be
repaired.
i.LINK and 1, are trademarks
Corporation.
of Sony
• If any solid object or liquid get inside 1he
casing, unplug your camcorder and have it
checked by a Sony dealer before operating
any lhr_her.
• Avoid rough handling, disassembling,
modifying,
or mechanical
it
shock. Be
particularly careful oflhe lens.
• Keep 1he POWER switch selting to (CHG)
OFF when you are not using your camcorder.
-_continued
Additional
Information
85
• Do not wrap your camcorder with a towel, for
example, and operate it. Doing so might cause
heat to build up inside.
Notes on moisture
Moisture
condensation
may condense when you bring your
camcorder
from a cold place into a warm place
• When disconnecting 1he power code, pull by
the plug and not lhe code.
(or vice versa) or when you use your camcorder
in a humid place as shown below.
• Do not damage the power code such as by
placing anylhing heavy on it.
• Keep metal contacts clean.
• When you bring your camcorder from a ski
slope into a place warmed up by a heating
device.
• Keep the Remote
• When you bring your camcorder
Commander
and button-
type battery out of children's reach, lflhe
battery is accidentally swallowed, consult a
doctor immediately.
• Iflhe battery eleclrolytic liquid has leaked,
consult your local authorized Sony service
facilily.
from an air-
car or room into a hot place
• When you use your camcordar
a shower.
after a squall or
• When you use your camcorder
in a hot and
humid place.
wash off any liquid d_at may have contacted
your skin.
if any liquid gets in your eyes, wash wilh
plenly of water and consult a doctor.
When not using your camcorder
for a
long time
Occasionally turn it on and let it run such as by
playing back tapes lbr about 3 minutes.
Olherwise, unplug it fi'om lhe wall outlet.
if your camcorder is brought directly li'om a
cold place to a warm place, moisture may
condense inside your camcorder, on lhe surl_ce
ofd_e tape, or on the lens. in this stale, lhe tape
may stick m the head drum and be damaged or
your camcorder may not operam correctly, if
there is moisture inside your camcorder,
[1t1_ Moisture condensation. Eject the cassetle]
or [1_ Moisture condensation. Turn offfor IH.]
appears. The indicator will not appear when lhe
moisture condenses on the lens.
condensation
How to prevent moisture condensation
When you bring your camcorder fi'om a cold
place into a warm place, put your camcorder in
a plastic bag and seal it tightly. Remove the bag
when the air mmperature inside lhe plastic bag
has reached the surrounding temperature (after
about one hour).
Video head
• When the video head becomes
Moisturecondensation
If moisture
conditioned
outside.
has occurred
None of the functions except cassette ejection
will work. Eject the cassette, turn offyour
camcorder, and leave it lbr about one hour with
the cassette lid open. Your camcorder
cannot record pictures normally,
dirly, you
or distorted
picture or sound is played back.
• The video head suffers from wear aftor long
use. If you cannot obtain a clear image even
after using a clem_ing cassette, it might be
because the video head is worn. Please contact
your Sony dealer or local authorized
Sony
service facility to have the video head
replaced.
• For ['||mTRVI28/228/328/428:
lflhe lbllowing problem occurs, clean the
video heads for 10 seconds with lhe Sony
V8-25CLD
cleaning
casselto (optional).
Playback pictures contains noise or lhe
screen is displayed in blue.
Playback
pictures
are hardly visible.
Playback
pictures
do not appear.
can be
used again if the It1 or --_ does not appear when
the power is turned on again.
if moisture starts to condense, your camcorder
sometimes cannot detect condensation. If this
happens, the cassette is sometimes not ejected
for 10 seconds after lhe cassetto lid is opened.
This is not a malfunction. Do not close lhe
cassette
86
lid until the cassette
Additional
Information
is ejectod.
[Gli_l Dirty video head. Use a cleaning
cassette.] appears on the screen during
recording.
• For[)TRV260/265:
if the lbllowing
problem
occurs, clean lhe
Leaving the casing in contact with rubber or
vinyl objects lbr a long period of time.
video heads for 10 seconds with the Sony
V8-25CLD cleaning cassetle (optional).
Mosaic-pattern
noise appears on the
playback
in blue.
picture or the screen is displayed
Aboutcare and storageof the lens
• Wipe the surface of the lens clean with a soft
cloth in the lbllowing instances:
When there are fingerprints
surface.
on the lens
In hot or humid locations
When the lens is exposed to salty air such as
at the seaside.
Playback pictures do not move.
Playback piclures do not appear or the
sound breaks off.
[g*_l Dirty video head. Use a cleaning
cassette.] appears on the screen during
recording.
LCD screen
• Do not add excessive pressure oll the LCD
screen, as it may cause damage.
• if your camcorder is used in a cold place, a
residual image may appear on the LCD screen.
This is not a malfunction.
• While using your camcorder,
the back of the
LCD screen may heat up. This is not a
malfunction.
To clean
the LCD screen
• if fingerprints
or dust make the LCD screen
dirly, it is recommended you using the LCD
Cleaning Kit (optional) m clean it. When you
use the LCD Cleaning Kit (optional), do not
apply the cleaning
screen. Use cleaning
liquid.
liquid directly to the LCD
paper moistened
with the
• Store in a well-ventilated
liltle dirt or dust.
location
• To prevent molds periodically
as described above.
subject to
clean the lens
it is recommended you operate your camcorder
about once a month to keep it in an optimum
state for a long time.
To chargethe pre-installed button-type
battery
Your camcorder has a pre-installed button-type
battery to retain the dote, time, and other
settings even when the POWER
switch is set to
(CHG) OFF. The pre-installed button-type
battery is always charged while you are using
your camcorder but it will get discharged
gradually if you do not use your camcorder. The
button-type battery will be fully discharged in
m
about 3 months if you do not use your
o
camcorder at all. However, even if the preinstalled button-type battery is not charged, the
m
camcorder operation will not be affected as long
as you are not recording the date.
3
Procedures
o
On handlingthe casing
Connect your camcorder to a wall outlet using
the supplied AC Adaptor, and leave it with the
• if the casing is soiled, clean the camcorder
body with a soft cloth lightly moistened with
POWER switch set to (CHG) OFF for more
than 24 hours.
water, and then wipe the casing wid_ a dry soft
cloth.
• Avoid the following
finish.
to avoid damage to the
Using chemicals such as thinner, benzine,
alcohol, chemical cloths, repellent and
insecticide.
Handling with above substances
hm_ds.
on your
Additional
Information
87
For
Specification
[lTRV260/265:
3.0 mm (1/6 type)
CCD (Charge
Coupled
Device)
Gross:
Approx.
460 000
Effective:
Approx.
Combined
power
pixels
290 000 pixels
Lens
Filter
Focal
Video recording
system
For HImTRV128/228/328/428:
scamfing
2 rotary
scamxing
Helical
FM system
system
heads,
PCM
stereo
Video signal
NTSC color,
Usable cassette
system
4 Ix (lux) (b 1.6)
stereo
1,
0 Ix (lux) (in the NightShot
stereo)
Input/Outputconnectors
cassette
S video
SP: Approx.
14.35
Luminance
unbalanced
mm/s
LP: Approx. 7.19 mm/s
For DTRV260/265:
SP: Approx.
LP: Approx.
time (using
(ohms),
120 mln.
Hi8/
Video
Audio
more
SP: 1 h
Approx.
Viewfinder
Electric
time (using
120 rain. Hi8/
cassette)
RFU
5 rain
3.0 mm (1/6 type)
88
Additional
1 Vp-p,
sync
(mouochrome)
CCD (Charge
320 000 pixels
Approx.
75 f2
signal:
75 f2 (ohms),
negative
327 mV (at output
thml 47 kf2 (kilohms)),
Stereo min{iaek
DC OUT
Mini-minijack
viewfinder
Device)
Gross: Approx.
Vp-p,
impedance
Output
(_ 3.5 ram)
(o 3.5 mill)
For ['lira TRV1281228/328/428:
200 000 pixels
Information
(o 2.5 ram),
DV inpuffoutput
For [)TRV2601265:
Image device
For Him TRV1281228/3281428:
Effective:
signal:
Monaural
minijack
For [¥1'RV2601265:
min
lbrward/rewind
0.286
impedmlce
with less than 2.2 kf2 (kilohms)
For Itill TRV1281228/328/428:
For BTRV260/265:
video
signal:
75 _ (ohms),
unbalanced
unbalanced,
LP:4h
Digltal8
1 Vp-p,
Audio/Video
output
AV MINI JACK
Digltal8 video cassette)
For Him TRV128/228/328/428:
SP: 2 h
Fast
signal:
Chrominance
28.67 mm/s
19.11 mm/s
Recordlng/playback
output
4-pin mini DIN
TRV128/228/328/428:
LP: 1 h30
plus mode)*
* Objecls unahle _o be seen due to tile dark can be
sho_ with intYared lighting.
EIA standards
8 mm video format
Tape speed
For Nlm
1 Ix (lux) (F 1.6)
For [)TRV260/265:
12 bits (Fs 32 kHz,
2), 16 bits (Fs 48 kHz,
temperature
Auto
Minimum
illumination
For I'lllIg TRV1281228/328/428:
Rotary heads, FM system
For []Yl'RV260/265:
Quantization:
length
42 - 840 mm (1 11/16 - 33 1/8 in.)
Color
Audio recording
system
For ['Ill TRV 128/228/328/428:
Rotary
990 × (Digital)
2.5 - 50 mm (I/8 - 2 in.)
When converted
to a 35 mm still camera
2 rotary heads, Helical
For [)TRV260/265:
heads,
lens
37 mm (1 1/2 in.)
20 x (Optical),
F 1.6 - 2.4
System
zoom
diameter:
4-pin
Coupled
connector
USB jack
For [¥1'RV260/265:
mini-B
DCSV
LCDscreen
ACAdaptor AC-L15A/L15B
Picture
Power
6.2 cm (2.5 type)
Total dot number
123 200 (560
× 220)
Power consumption
18W
requirements
DC 7.2 V (battery
Output voltage
DC 8.4 V, 1.5 A
pack)
DC 8.4 V (AC Adaptor)
Average
power
Operating
consumption
(when
using
tile
battery pack)
For 1"11m TRV 128/228/328/428:
During
1.8 W
camera
During
2.7 W
camera
recording
Storage
-20°C
using the viewfinder
recording
to 104°F)
to + 60°C (-4°F to + 140°F)
Dimensions
using tbe LCD
(approx.)
d) excluding
(2 1/4 × 1 1/4 × 4in.)(w/h/
the projecting
parts
Mass (approx.)
190 g (6.7 oz) excluding
During
2.5 W
camera
recording
using viewfinder
During
3.4 W
camera
recording
using LCD
the power
cord
Rechargeablebattery pack(NP-FM30)
temperature
0°C to 40°C
(32°F
Dimensions
151mm(33/8×37/8x6in.)(w/IV
5.0 Wh (700
(I 9/16
(Approx.)
× 13/16
/
x 2 1/4 in.) (w/h/d)
Mass (approx.)
780 g (1 Ib 11 oz) main unit only
890 g (1 lb 15 oz) including
reci_arge_ble
batlery
pack,
the NP-FM30
65 g (2.3 oz)
Operating
Hi8/Digital8
lens cap, and shoulder
accessories
See page
mAh)
Dimensions
(approx.)
38.2 x 20.5 x 55.6 mm
d)
cassette,
voltage
Capacity
(-4°F to + 140°F)
(approx.)
85x98×
Maximum
output
DC 8.4 V
Output
voltage
DC 7.2 V
to 104°F)
temperature
-20°C to + 60°C
Supplied
(32°F
temperature
56 x 31 x 100ram
Operating
Mass
temperature
0°C to 40°C
For DTRV260/265:
Storage
Hz
Current
consumption
0.35 -0.18 A
General
Power
requirements
AC 100 - 240 V, 50/60
strap
K<
o
temperature
0°C to 40°C
(32°F
to 104°F)
Type
Lithium
ion
3
11.
Design and speci fic_tions
without notice.
are subject to change
o
,,,,>continued
Additional
Information
89
vldeoHi8
Model
TRVI28
Recording
Playback
Digital8
CCD-
system
AUD[O/VIDEO
g VIDEO
DCRTRV328
TRV428
TRV260
TRV265
Hi8
Hi8
Hi8
Hi8
Digital8
Digital8
1ti8/8
Hi8/8
Hi8/8
Hi8/8
Digital8
Digital8
Monaural
Monaural
Monaural
Monaural
S_ereo
glereo
OUT
OUT
OUT
OUT
OUT
OUT
OUT
OUT
OUT
OUT
system
Audio recording
TRV228
jack
OUT
OUT
DV [nter_ace
jack
......................
IN/OUT
IN/OUT
USB jack
......................
•
•
•
•
SleadyShot
•
Remo_e sensor
•
RFU jack
•
•Provided
Notprovided
90
Additional
information
•
•
•
•
•
•
QuickReference
Identifying parts and
controls
[]
[]
€
[]
Lens cap (p. 21, 25)
[]
LCD screen (p. 3, 16)
[]
OPEN button (p. 16)
[]
VOLUME
[]
END SEARCH
[]
Speaker
[]
Viewfinder
[]
Battery pack
[]
LIGHT button
[]
FADER button (p. 30)
[]
BACK LIGHT
FOCUS
To attachthe lens cap
;o
-/+* button (p. 34)
8
button (p. 33)
(p. 3, 16)
(p. 23)
button (p. 27)
button (p. 29)
SEL/PUSH EXEC dial (p. 43)
* This btltton has a tactile do_.
,->continued
Quick Reference
91
[]
[]
[]
[]
[]
[]
[]
[]
Built-in
[]
[]
[]
light (p. 23)
[]
Microphone
Lens
[]
NIGHTSHOT
Infrared ray emitter (p. 64, 70)/
For HImTRV228/428/DTRV265:
[_
EASY button (p. 26, 36)
[]
DSPL]BATT
Remote
sensor
Camera
recording
PLUS switch (p. 28)
INFO button (p. 13, 37)
lamp (p. 21, 26)
[]
[]
[]
[]
[]
[]
[]
Jack cover
[]
S VIDEO
[]
For [_TRV260/265:
[]
For HlmTRV128/228/328/428:
AiV OUT jack (p. 39, 62)
[]
For [)TRV260/265:
[DV
[]
Interface
For [)TRV260/265:
t_ (USB) jack
92
(p. 62)
Quick Reference
OUT jack (p. 39, 62)
A]V OUT jack (p. 39, 61)
[_
For Hllll TRV128/228/328/428:
RFU DC OUT jack (p. 40)
%
REW 0-
STOP
pLAy -_
FF
pAUSE
_
[]
[]
RESET button
[]
For DTRV260/265:
BURN DVD/VCD
(p. 74)
You can easily take a piclurc recorded on
|he tape and bum it onto a DVD or CD-R.
See the supplied "Compuler Applications
Guide" lbr details.
For Him TRV128122813281428:
EASY DUB (Easy
(p. 64)
Dubbing)
[]
TITLE
button (p. 31)
[]
EXPOSURE
[]
MENU button* (p. 43)
[]
Video control buttons (p. 34)
button (p. 28)
[]
CAMERA
[]
PLAY/EDIT
mode lamps (p. 15)
[]
For [)TRV260/265:
mode lamp (p. 15)
Rec buttons (p. 68)
REC (rec)
[]
For HImTRV128/228/328/428:
COUNTER
button
RESET button (p. 22)
€
F,"
For HI ! TRV128/228/328/428:
TIME button
[_
(p. 18, 25)
For HimTRV128/228/328/428:
DATE button (p. 18, 25)
* This button has a tactile dot.
8
STOP (slop)
REW (rewind)
PLAY (playback)*
FF (fast-forward)
PAUSE
[]
CHG (charge)
(pause)
lamp (p. 12)
"'>continued
Quick Reference
93
[]
[]
[]
[]
Viewfinder
lens adjustment
[]
Eyecup
[]
Cassette
[]
I=_OPEN/EJECT
lever (p. 16)
lid
lever (p. 18)
[]
Tripod receptacle
Make sure 1hat the length of the tripod
screw is less lhan 5.5 mm (7/32 inch).
Olherwise, you cannot attach the tripod
securely, and the screw may damage your
cag_corder.
[]
[]
[]
[]
[]
[]
[]
[]
[]
Power zoom lever (p. 23)
[]
BATT (battery)
[]
Hooks for shoulder
[]
For D TRV260/265:
release button (p. 12)
strap
PHOTO
button (p, 25)
[]
POWER
switch (p, 15)
[]
Grip belt (p. 4)
[]
REC START/STOP
[]
DC IN jack (p, 12)
94
Quick Reference
button
(p. 21)
To attaching the shoulder strap
Attach the shoulder strap supplied with your
camcorder to the hooks for the shoulder strap.
Remove the insulation
Remote Commander.
sheet betbre using the
To remove the insulationsheet
For Hill TRV228/428:
fi]
To changethe button-typebattery
1
While pressing on the tab, inset your
fingernail into the slit to pull out the
battery
case.
For D TRV265:
[]__
____@
m----
2
Remove the button4ypelithium
battery.
---m
€
Fi
$[]
8
Transmitter
After turning on your camcorder, point
towards 1he remote sensor to control your
camcorder.
[]
REC START/STOP
button
[]
Power zoom button
(p. 23)
[]
Video control buttons
3
Place a new button-type
lithium
battery
with the + side facing up.
(p. 21)
(Rewind, Playback,
Fast-forward, Pause, Stop, Slow) (p. 34)
[]
DISPLAY
[]
PHOTO button (p. 25)
button (p. 37, 40)
[]
SEARCH
M. button
[]
t<_l/IH_I
buttons
[]
ZERO
4
(p. 41, 42)
Insert the battery case backinto the
Remote Commander until it clicks.
(p. 41, 42)
SET MEMORY
button
(p. 40)
-_continued
Quick Reference
95
WARNING
Batlery moy explode if mistreoled. Do not
recharge, disassemble or dispose of in fire.
CAUTION
Danger of explosion
if battery is incorreclly
replaced.
Replace only with the same or equivalent
type recommended by the manuthcturer.
Discard used batleries according to _he
manufacturer's
inslruclions.
Notes
on the
Remote
Commander
• A button4ype
lithium bal_ery (CR2025) is used in
the Remote Commander.
Do not us_ b_tleries oth_
than CR2025.
• Point the remote sensor away t_om strong light
sources such as direct _unlight or overhead lighting.
Otherwise, the Remo_¢ Commander
may not
function properly.
• When you are operating with the Remote
Comm_nder supplied with your c_mcorder, your
VCR may also operate. ]n thai case, select a
commander mode other than VTR 2 for your VCR,
or cover the sensor of your VCR with black paper.
96
Quick Reference
Following indicators will appear on lhe LCD
screen and viewfinder to indicate |he state of
_X_ A
your camcorder.
indicaiors and their on-screen/viewfinder
positions
model.
vary depending
_t
on your camcorder
_
ldt _
1_
Example:
Indicators
Warning
(p. 79)
Manual
exposure
Manual
tbcus (p. 29)
(p. 28)
Back light (p. 27)
in the CAMERA mode
I_1
d_
"t_ _
PROGRAM
AE (p. 44)
[]
Time code (p. 22)/Tape counter (p. 22)/Selfdiagnosis (p. 79)/Tape photo recording (p. 25)
,_60min
Remaining
battery
Picture
effect (p. 45)
IS:--'9
16:9 WIDE/CINEMA/I
FULL (p. 48)
*_
SteadyShot
( *_ll*)
off(p.
6:9
50)
time
(p. 22)
SP LP
STBY
€
Recording
REC
mode (p. 22)
Recording
standby/
recording
@
mode
Mirror mode (p. 24)
_
H|ml
Format indicator
J_16b
Audio mode (p. 54)
Remaining
_l_q
Interval
tape (p. 22)
recording
Frame recording
[_/IN
_1
(p. 56)
(p. 55)
DVinput(p. (18)
•_0 t_-'_RIlT0
8
Tape photo recording
(p. 25)
Zero set memory
_-'_ON
(p. 40)
Built-light
(p. 23)
NightShot
plus (p. 28)
Quick Reference
97
Index
Numerics
16:9 WIDE mode ........ 47, 49
A
A?V connecting cable
........................ 39, 61, 62
AC Adaptor
.......................
15
Adjusting the viewfinder...
AUDIO MIX .....................
AUDIO MODE .................
16
52
54
AUTO DATE ....................
AUTO SHTR ....................
57
46
D
L
Data code (DATA CODE)
...............................
37, 59
Date search ......................... 41
Language
(_LANGUAGE)
Date/time ............................ 37
DEMO MODE ................... 58
LCD back light (LCD B.L.)
Digital program editing
(VIDEO EDIT) ........... 69
Digital zoom (D ZOOM)...47
LCD brighmess
(LCD BRIGHT) .......... 16
LCD COLOR .................... 53
Digital8
82
LCD screen ..........................
60
LP (Long Play)
See Recording
system ..................
Display
DISPLAY
....................
Display indicator ......... 97
DNR ...................................
52
B
BACK LIGtFI'. ..................
27
Battery
Battery Intb .................
Baltery pack ................
13
12
Dubbing
.............................
Built-in light ...................... 23
BURN DVD/VCD ............ 93
Button-type battery
Commander ................ 87
Remote Commander ... 95
61
C
Exposure
18, 82
Battery Pack ................ 12
Pre-installed button-type
battery ..................
Cleaning cassette ...............
Clock set (CLOCK SET)
87
87
..............................
17, 57
COMMANDER
................ 60
98
Quick Reference
mode
57
M
Menu ..................................
43
CAMERA SET. .......... 47
LCD SET .................... 53
.................. 33
............................
MANUAL SET ........... 44
OTHERS ..................... 59
27
PLAYERSET.............51
F
FADER
..............................
30
Focus ..................................
29
Frame recording
(FRAME REC) ........... 55
Full charge .........................
12
G
4
H
Camera settings data display
....................................
37
the battery
3
See HiFi SOUND
Easy Dubbing ..................... 64
Easy Handycam ........... 26,36
EDIT ..................................
51
Grip belt ...............................
.......................
53
(REC MODE)
LTR SIZE ..........................
E
END SEARCH
Remaining battery time
....................... 22, 83
BEEP .................................
59
BLACK FADER ............... 30
Charging
....................................
Main sound
OFF) ........... 59
Cassette
19,58
Dual sound track tape ........ 51
Auto shut off function
(A.SHUT
........................
lti8/standard
8 mm system
.....................................
82
ltiFi SOUND .....................
51
SETUP MENU ........... 57
TAPE SET. ................. 54
VCR SET .................... 51
Mirror mode ...................... 24
Moisture condensation
...... 86
Monaural ..................... 21, 40
MONOTONE FADER......
31
MOSAIC FADER ............. 30
N
NightShot Light
(N.S. LIGHT) ....... 29, 50
NightShot plus ................... 28
NTSC .................................
81
0
I
i.LINK ................................
84
i.LINK cable ................ 62, 69
ID- I/ID-2 system ............... 49
"IntBLITItIUM"
battery pack
.....................................
83
Infrared r3y emit|er......64,
70
Interval recording
(INT. REC) ..................
56
Operation confirmation
See BEEP
ORC ...................................
beep
54
tl
P
PAL ....................................
Photo scan ..........................
81
42
Photo search .......................
41
Picture ei_hcl
USB jack ............................
USB Streaming
(USB STREAM)
92
......... 57
Using abroad ......................
81
(P EF'FECI) ................ 45
Picture search ..................... 35
7
Playing time .......................
Power mode .......................
Video head .........................
Viewfinder .........................
86
16
Volume ..............................
34
PROGRAM
14
15
AE ................. 44
R
W
Recording capacity
Display ........................
REMAIN .....................
Warning
22
55
Recording lamp
(REC LAMP) .............. 60
Recording
mode
(REC MODE)........22,
54
Recording time ................... 13
Remote Commander .......... 95
Remote sensor ....................
RESET ...............................
92
93
indicators
............ 79
Warning messages ............. 80
WttlTE FADER ................ 30
Wide angle
See Zoom
WORLD TIME ..................
59
Writo-protecl
tab ................
82
Zero set memory ................
Zoom .................................
40
23
z
S
S video .........................
40, 62
Sell'diagnosis
display ........ 79
Setting 1he dato and time.... 17
Skip scan ............................
SP (Standard Play)
See Recording mode
35
m
€
F;
(REC MODE)
STEADYSHOT.
................ 50
Slereo ........................... 21, 40
STRIPE FADER ................ 31
Sub sound
See ltiFi SOUND
8
T
Tape counter ...................... 22
Tape photo recording ......... 25
TBC ....................................
52
Telephoto
See Zoom
Time code ..........................
22
Title ....................................
31
TV color systems ............... 81
Quick Reference
99
http:/hNWW.SOny.net/
VOC (Volatile Organic Compound)-free
Printed on 100% recycledpaper using
vegetable oil based ink.
Printed in Japan
IIIIIIIIIIIIIII
3087918120