1
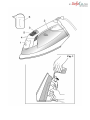
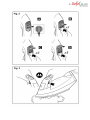
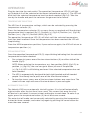
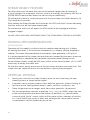
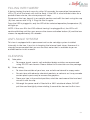
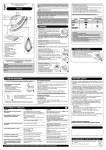
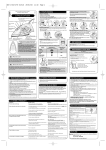
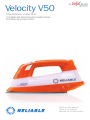
Velocity V50
PROFESSIONAL STEAM IRON
SYSTÈME DE REPASSAGE DOMESTIQUE
SISTEMA DE PLANCHADO
INSTRUCTION MANUAL
GUIDE D’UTILISATION
MANUAL DE INSTRUCCIONES
CONGRATULATIONS
We would like to thank you and congratulate you for purchasing
the Velocity home ironing system from Reliable Corporation.
With its unique Compact Vapor Generator it will allow you to obtain
the benefits of professional pressing combined with the advantages of traditional ironing.
For your safety and to fully enjoy the advantages of this product,
please take a few minutes to read all the important safeguards
and care instructions. Keep this manual handy and review the
product warranty card for your reference.
02
IMPORTANT SAFETY INSTRUCTIONS
READ ALL INSTRUCTIONS BEFORE USE
When using your new iron, basic safety precautions should always be followed,
including the following:
1. Use iron only for its intended use.
2. To protect against a risk of electric shock, do not immerse the iron in water
or other liquids.
3. The iron should always be turned to «Off» before plugging or unplugging
from an outlet. Never yank the cord to disconnect from the outlet. Instead,
grasp the plug and pull to disconnect.
4. Do not allow the cord to touch hot surfaces. Let the iron cool completely
before putting away. Loop cord loosely around the iron when storing.
5. It is always recommended to disconnect the iron from the electrical outlet
when filling with water or emptying. It should also be disconnected when
not in use.
6. Do not operate the iron with a damaged cord or if the iron has been dropped
or damaged. To avoid the risk of an electric shock, do not disassemble the
iron. Take it to a qualified service depot for examination and repair. Incorrect
reassembly can cause a risk of electric shock when the iron is used.
7. Close supervision is necessary for any appliance being used by or near children.
Do not leave the iron unattended while connected or on an ironing board.
8. Burns can occur from touching hot metal parts, hot water, or steam. Use
caution when you turn a steam iron upside down – there may be hot water in
the reservoir.
SPECIAL INSTRUCTIONS
1. To avoid a circuit overload, do not operate another high wattage appliance
on the same circuit.
2. If an extension cord is absolutely necessary, a 15-amp cord should be used.
Cords rated for less amperage may overheat. Care should be taken to arrange
the cord so that it cannot be pulled or tripped over.
SAVE THESE INSTRUCTIONS IN A SAFE
PLACE FOR FUTURE REFERENCE
03
ATTENTION
•
Before using your Velocity iron, remove all paper or plastic bags, plastic sheets,
cards and possible stickers that may be on the outside or inside of
the appliance that acted as handling protection or sales promotion material.
•
Read these instructions before first using the iron.
•
Do not plug it in without checking that the voltage of the iron is the same
as your home power.
•
Take care that the iron cord does not touch the hot parts of the iron.
•
If you are going to iron with steam, refer to the section “Before Starting To Iron”
to extend the life of the independent steam chamber.
•
To fill the iron or refill it during ironing, follow the instructions set out in
the section “Before Starting To Iron,” unplugging it from the main power and
using the accompanying water jug.
•
Do not worry if the iron gives off a little smoke during first use. It will
soon disappear.
•
Do not spray “vertical” steam on a garment hanging in the wardrobe or
on a person. Vertical ironing (steaming) must be done with the garment on
a hanger and away from people or animals.
•
Keep the iron in an upright position during storage, leaning on its heel part,
set on a stable surface.
•
When you finish ironing, always empty the water from the tank. If you want
to drain it while ironing, always unplug the appliance from the main outlet first.
•
To disconnect the iron, never pull on the power cord, take out the plug.
•
If the power cord is damaged; to prevent risks, have it replaced at an After
Sale Service authorized by Reliable, as special tools are needed.
•
The iron should not be used if it has been dropped or has a crack or leak
in the water tank. If you observe any of these problems, take the iron to
Reliable Corporation or an authorized service depot.
•
Do not leave the appliance in operation unattended. Keep it out of the
reach of children.
•
This iron is not for use by persons (including children) whose physical,
sensorial or mental capacities are impaired, or who lack sufficient experience
or knowledge, unless they have been supervised or instructed in the use of
the appliance by a person responsible for their safety.
IMPORTANT: When you want to dispose of the appliance, NEVER throw it in the
garbage. Instead, go to your closest recycling station or waste collection centre
for subsequent treatment. In this way, you will be contributing to looking after
the environment.
04
MAIN COMPONENTS AND ACCESSORIES (Fig 1)
1.
2.
3.
4.
5.
6.
Water filler hole cap
Water tank
Temperature selector
Steam activation buttons
Operation/temperature level LEDs
Water cup
BEFORE STARTING TO IRON
•
With your Velocity iron unplugged from the main outlet, open the filler hole
cap Fig 1 (1) by turning it backwards (see arrow).
•
Due to the high level of water hardness in most areas, Reliable recommends
that you always use distilled or demineralized water for ironing. You will
thus guarantee that your iron stays in perfect condition for as long as possible.
If you cannot find distilled water for any reason, be sure to use water that
is low in minerals (soft).
•
The following is a list of the best water for your Velocity iron in order
of preference:
°
°
°
°
•
Fill the tank, without exceeding the maximum level, with the water jug
supplied Fig 1 (6), keeping the iron in the vertical position, resting on its end
Fig 1. When the tank is full, close the cap.
•
We advise you to fill the tank up to the maximum level marked on it as this
appliance generates a substantial flow of steam, otherwise you will need to
fill the water tank more often.
•
Check whether the garment you are going to iron has a label indicating the
ironing temperature. We recommend that you classify the garments according to their required ironing temperature and to begin with the garments that
are ironed with the lowest temperature (•).
Distilled water
Softened water (from a household water softener)
Filtered water with low mineral content (counter top unit or store bought)
Tap water (if your tap water is hard, this is the least recommended).
ATTENTION: Ironing delicate garments with a temperature higher than necessary
is harmful for the fabric and causes burnt residue to get stuck to the soleplate.
SILK, SYNTHETIC FIBRES: minimum temperature (•)
WOOL: medium temperature (••)
COTTON: high temperature (•••)
LINEN: high temperature (MAX)
05
OPERATION
Plug the iron into the main outlet. The operation/temperature LED (5) will light
up. By default it will be selected at the lowest temperature range (•). The LED will
blink until the selected temperature level has been reached (fig.2-A). Take the
iron by the handle and pass the sole over the garment to be ironed.
Temperature selection
The V50 has 4 temperature settings, which can be selected by pressing the
temperature selector (3).
Press the temperature selector (3) as many times as required until the desired
temperature level is reached (fig. 2). Position (•) (fig.2-A) Position (••) (fig.2-B)
Position (•••) (fig.2-C) Position (MAX) (fig.2-D)
The operation/temperature LED (5) will blink until the selected temperature
level has been reached. Once the temperature has been reached the LED will
stop blinking.
From the MAX temperature position, if pressed once again, the V50 will return to
temperature position (•).
Steam selection
Once the operation/temperature LED (5) stops blinking indicating that the selected
temperature has been reached:
•
For a steam jet, press one of the two steam buttons (4) on either side of the
handle (fig.3).
NOTE: When reducing the temperature, e.g. from position (MAX) (fig.2-D) to
position (•) (fig.2-A), the user can get a steam jet even if the position
(•) (fig 2-A) LED is still blinking and even if the selected temperature has not
been reached.
•
The V50 is ergonomically designed for both right-handed and left-handed
people. One merely has to press one of the two silicone buttons.
•
To stop the steam, press one of the two steam buttons one more time. The
steam will now stop until one of the two buttons is pressed again.
AUTOMATIC SHUT OFF
The Velocity V50 has an automatic shut-off system. It is shut-off automatically
eight minutes after the last time it was used. This means that once the shutoff device is activated, it ceases to heat and begins to cool down. To wake it up
again, press the temperature button (3) for at least one second.
The auto-shut off mode can be manually selected by pressing the temperature
button for three seconds, and wake it up again by pushing the same button for
more than one second.
06
STEAM READY FEATURE
For those who want to leave their iron on for periods longer than 8 minutes at
a time (without the automatic shut off system activating) the Velocity V50 has a
STEAM READY feature that allows the iron to stay on indefinitely.
To activate this feature, simply keep one of the two steam activation buttons (4)
Fig 3 held for 8 seconds.
After holding the Steam Button for 8 seconds, the LEDs will flash 3 times indicating
that the auto shut off has been deactivated.
To activate the auto shut off again, the V50 needs to be unplugged and then
plugged in again.
DO NOT LEAVE YOUR IRON UNATTENDED WHILE THE STEAM READY FEATURE IS ACTIVATED.
IRONING RECOMMENDATIONS
STEAM IRONING
Operation of this model is similar to that of a professional ironing unit. It allows
for ironing from level 1, the minimum temperature (•) without spitting, dripping or
leaking. The steam flow provided by the compact vapor generator is 30 g/min.
It is recommended to first steam iron and then do a second dry-iron pass to ensure
that the clothing is completely dry to obtain truly professional ironing results.
To iron without steam, simply do NOT press either of the steam buttons (4). It is NOT
necessary to empty the water tank.
To stop the steam, gently press one of the two steam buttons one more time. The
steam will now stop until one of the two buttons is gently pressed again.
VERTICAL IRONING
•
Gently press one of the steam buttons once to start steaming (to stop
steaming, press a steam button again).
•
It enables you to remove creases from delicate garments without having to
lay them on the ironing board: jackets, coats, curtains, synthetics, etc.
•
Place the garment on a hanger, away from other garments (& persons).
•
Set the temperature selector at position (••), (•••) or (MAX), place the iron
in the vertical position and press the button. At position (••) you will obtain
a more humid “white” steam, which will be more visible, whereas at setting
(•••) and (MAX) the steam is drier and, although the same steam volume
is maintained, it will be harder for you to see.
07
FILLING WITH WATER
If during ironing the tank runs dry, after 30 seconds the operation/temperature
LEDs (5) of all the levels will start to flash. If the V50 is used without water for a
period of one minute, the micro-pump will stop.
Disconnect the iron, keep it in an upright postion and refill the tank using the cup
(6) that comes with it Fig 1. Plug the iron in again.
Once the V50 is plugged in, only the LED of the selected operation/temperature (5)
will light up.
NOTE: If the user fills the V50 without having it unplugged first, the LEDs will
continue blinking until the user presses the steam activation button (4) and the iron
steams for approximately 15 seconds.
ANTI-SCALE SYSTEM
This iron is equipped with a permanent anti-scale cartridge system installed
internally in the iron. It assists in keeping the internal tank clean. However it is
strongly recommended that you use the best water that is available to you as
outlined earlier in this manual.
CLEANING
A) Sole-plate
•
To remove starch, scorch, soil and other foreign residue, we recommend
using EZ-OFF iron cleaner. Please follow the instructions on the package.
B) Outer casing
•
To clean the outside of your iron, use a cloth moistened in soapy water.
•
Do not clean with abrasive chemical products or solvents as it may corrode
certain plastic parts and/or remove the graphics.
•
Store your iron in the vertical position, wind the cord around the heel and
secure it with the clip.
•
Although the power cord is fitted with a 360° rotational elbow, DO NOT
pull the cord too tightly when winding it around the iron on the first turn.
08
TIPS FOR DISPOSING OF THE USED IRON
Before disposing of your used iron, you should make it visibly unserviceable and
have it disposed of according to current legislation. Ask your Distributor, Town
Council or Local Authority for detailed information.
WARRANTY CONDITIONS
Reliable Corporation accepts no liability for faults in your iron in the event of noncompliance with the specifications of the warranty conditions or failure to follow
the operating or maintenance directions included in instruction book.
We remind you that the damage caused by the effects of scale is not covered by
the warranty.
09
RELIABLE PRODUCTS WARRANTY
Reliable Corporation (“Reliable”) warrants to original purchaser of its products that
every product sold by Reliable (a “Reliable Product”) is free from defects in material
and workmanship for a period of one year from the date of purchase, if properly used
and maintained. Subject to the conditions and limitations set forth below, Reliable
will either repair or replace any part of a Reliable Product that proves defective by
reason of improper workmanship or materials. If the defective Reliable Product is
no longer available and cannot be repaired effectively or replaced with an identical
model, Reliable shall replace the defective Reliable Product with a current Reliable
Product of equal or greater value. Repaired parts or replacement products will be
provided by Reliable on an exchange basis, and will be either new or refurbished to
be functionally equivalent to new. If Reliable is unable to repair or replace a Reliable
Product, it will refund the current value of that Reliable Product at the time the warranty claim is made.
This limited warranty does not cover any damage to a Reliable Product that results
from improper installation, accident, abuse, misuse, natural disaster, insufficient or
excessive electrical supply, abnormal mechanical or environmental conditions, wear
and tear resulting from normal use of the product, or any unauthorized disassembly,
repair, or modification. This limited warranty does not extend to any indirect, consequential or incidental damages that may be suffered by a user or from the use of
a Reliable Product, including without limitation, any liability for third party claims for
damage, and is limited to the amount paid by the original purchaser Reliable Product
with respect to which this limited warranty protection applies. This limited warranty
does not apply with respect to products that have been altered or which are missing
serial numbers or for products not purchased directly from Reliable or a dealer authorized by us to sell Reliable Products.
This limited warranty is the only warranty that applies to any Reliable Product, supersedes any and all terms that may be contained in any other document or purchase
order and may not be altered or amended except expressly in writing by Reliable.
10