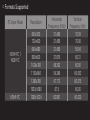
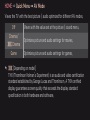
1
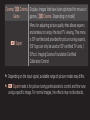
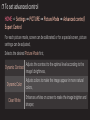
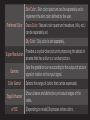
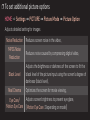
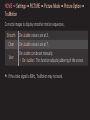
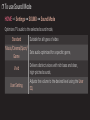
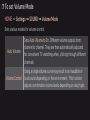
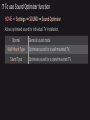
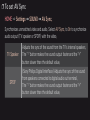
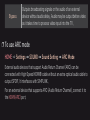
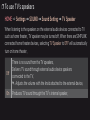
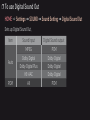
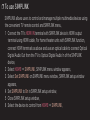
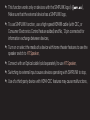
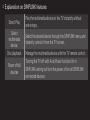
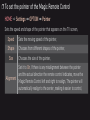
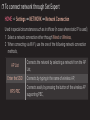
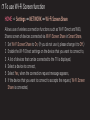
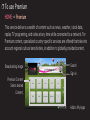
User Guide This is a 「User Guide」 installed on the TV. The contents of this guide are subject to change without prior notice for quality improvement. ❐❐To view program information Wheel(OK) ➾ Info. Displays information about the current program and/or current time, etc. ✎✎ Image shown may differ from your TV. Current time Sat, Jan.1 12:02 AM PM 2:00 PM 4:30 Program name or external device name Prev./Next Ch. Change Schedule Detailed program information (for digital broadcast) ❐❐To set favorite channels HOME ➾ Settings ➙ CHANNEL ➙ Channel Edit 1 2 3 4 Move to the desired channel on Wheel(OK) button. Channel is selected. Press Set as Favorite. Select the desired favorite channel group. Select Enter. Favorite is set. ❐❐To use Favorite HOME ➾ Ch. List Channel list will appear. Select the desired preset favorite channel from Favorite List A to D. ❐❐To set Auto Tuning HOME ➾ Settings ➙ CHANNEL ➙ Auto Tuning Automatically tunes the channels. ✎✎ Channels are not registered properly unless the antenna/cable is connected correctly. ✎✎ Auto Tuning only sets channels that are currently broadcasting. ✎✎ If Lock System is turned on, a pop-up window will appear asking for password. ❐❐To set channels manually HOME ➾ Settings ➙ CHANNEL ➙ Manual Tuning Adjusts channels manually and saves the results. For digital broadcasting, signal strength, etc. can be checked. ❐❐To edit channels HOME ➾ Settings ➙ CHANNEL ➙ Channel Edit Edits the saved channels. Set as favorite, block/unblock and skip etc. the selected channel. HOME ➾ Settings ➙ PICTURE ➙ Aspect Ratio Selects the screen aspect ratio. 16:9 Just Scan Set by Program 4:3 Zoom Cinema Zoom Resizes the image ratio to fit a 16:9 screen. Displays high-quality image without loss. ✎✎ In DTV/HDMI/Component (over 720p) mode, Just Scan is available. Depending on the input signal, screen aspect ratio changes to 4:3 or 16:9. Resizes the image ratio to fit 4:3 screen. Resizes the image to fit the screen width. The top and bottom parts of the image may be cut off. Formats an image to the cinemascope ratio (2.35:1) and zooms in on the ratio. ✎✎ While viewing an external device, these cases may result in image burn: - a video with stationary caption (such as network name) - 4 : 3 aspect ratio mode for an extended period Take caution when using these functions. ✎✎ Available picture size may differ depending on the input signal. ✎✎ The screen aspect ratios on HDMI/RGB-PC input are available in 4:3 and 16:9 only. ✎✎ [For models supporting 2160p] When a 2160p signal is input or your PC resolution is set to 3840 x 2160, the Aspect Ratio is fixed to Just Scan. ❐❐To adjust pictures in PC input mode HOME ➾ Settings ➙ PICTURE ➙ Screen (RGB-PC) Adjusts picture in RGB-PC mode. Resolution Sets the desired resolution. ✎✎ Resolution may only be selected when the PC resolution is set to 1024x768, 1280x768 or 1360x768. Auto Optimizes picture. Configuration Position/Size/ If screen size or location is distorted, user can directly adjust Phase the screen size and position. Reset Resets all the changes on picture settings on PC input mode. ❐❐To set PC resolution 1 Right-click on the desktop of PC and select 「Properties」. 2 Click on 「Settings」 and refer to supported formats to set the resolution. 3 Select 「Advanced → Monitor → Monitor Settings」 on the setting window. Refer to supported formats to select the optimal vertical frequency. ✎✎ On PC mode, 1920x1080 resolution delivers the optimum picture quality. ✎✎ Resolution settings differ depending on the type of PC. ❌❌Formats Supported PC Input Mode HDMI-PC / RGB-PC HDMI-PC Resolution 640x350 720x400 640x480 800x600 1024x768 1152x864 1360x768 1920x1080 1280x1024 Horizontal Frequency (KHz) 31.468 31.469 31.469 37.879 48.363 54.348 47.712 67.5 63.981 Vertical Frequency (Hz) 70.09 70.08 59.94 60.31 60.00 60.053 60.015 60.00 60.020 HOME ➾ Quick Menu ➙ AV Mode Views the TV with the best picture / audio optimized for different AV modes. Off Views with the value set at the picture / sound menu. Cinema / ꔧ Cinema Optimizes picture and audio settings for movies. Game Optimizes picture and audio settings for games. ✎✎ ꔧ [Depending on model] THX (Thomlinson Holman’s Experiment) is an audio and video certification standard established by George Lucas and Thomlinson. A THX certified display guarantees screen quality that exceeds the display standard specification in both hardware and software. ❐❐To adjust pictures with Picture Wizard HOME ➾ Settings ➙ PICTURE ➙ Picture Wizard Ⅱ Use the remote control and follow the instructions of the Picture Wizard to calibrate and adjust for the optimum picture quality without expensive pattern devices or help from a specialist. Follow the instructions to obtain the optimum picture quality. ❐❐To select Picture Mode HOME ➾ Settings ➙ PICTURE ➙ Picture Mode Selects the picture mode optimized for the viewing environment or the program. Intelligent Sensor Vivid Standard Detects the ambient illumination and automatically adjusts TV's brightness level to reduce power consumption. Automatically adjusts the brightness, sharpness, color or tint for optimum picture quality. Heightens contrast, brightness, and sharpness to display vivid images. Displays images in standard levels of contrast, brightness, and sharpness. Cinema/ ꔧ Cinema Displays images that have been optimized for movies or Game games. [ꔧ Cinema : Depending on model] ꕋ Expert Menu for adjusting picture quality that allows experts and amateurs to enjoy the best TV viewing. This menu is ISF-certified and provided for picture tuning experts. (ISF logo can only be used on ISF-certified TV units.) ISFccc: Imaging Science Foundation Certified Calibration Control ✎✎ Depending on the input signal, available range of picture modes may differ. ✎✎ ꕋ Expert mode is for picture tuning professionals to control and fine-tune using a specific image. For normal images, the effects may not be drastic. ❐❐To fine-tune picture mode HOME ➾ Settings ➙ PICTURE ➙ Picture Mode ➙ Backlight/Contrast/ Brightness/Sharpness/Color/Tint/Color Temp. Selects the desired Picture Mode first. Backlight Adjusts the display brightness by varying the brightness of the LCD panel. Contrast Adjusts the difference between bright and dark regions of the screen. Brightness Adjusts the overall screen brightness. Sharpness Adjusts the sharpness of the borders between bright and dark. Color Adjusts the color that appears on the screen darker or lighter. Tint Color Temp. Adjusts the red/green color balance. Adjusts the overall tone of colors to hot or cool. ✎✎ Depending on the input signal or other picture settings, the range of detailed items for adjustment may differ. ❐❐To set advanced control HOME ➾ Settings ➙ PICTURE ➙ Picture Mode ➙ Advanced control/ Expert Control For each picture mode, screen can be calibrated; or for a special screen, picture settings can be adjusted. Selects the desired Picture Mode first. Dynamic Contrast Adjusts the contrast to the optimal level according to the image's brightness. Dynamic Color Adjusts colors to make the image appear in more natural colors. Clear White Enhances whites on screen to make the image brighter and sharper. Skin Color : Skin color spectrum can be separately set to implement the skin color defined by the user. Preferred Color Grass Color : Natural color spectrum (meadows, hills, etc.) can be separately set. Sky Color : Sky color is set separately. Super Resolution Provides a crystal-clear picture by improving the details in an area that has a blurry or unclear picture. Gamma Sets the gradation curve according to the output of picture signal in relation to the input signal. Color Gamut Edge Enhancer xvYCC Selects the range of colors that can be expressed. Shows clearer and distinctive yet natural edges of the video. [Depending on model] Expresses richer colors. Color Filter Filters a specific color spectrum in RGB colors to fine-tune color saturation and hue accurately. Expert Pattern Patterns used for expert adjustment. White Balance Adjusts the overall tone of the screen as desired. In Expert mode, detailed fine-tuning can be set via Method / Pattern and the like. Color Management System This is a function used by experts when they adjust colors with test pattern of six colors (Red/Green/Blue/Cyan/ Magenta/Yellow) without affecting other color areas. For normal images, adjustments may not result in noticeable color change. ✎✎ Depending on input signal, or other picture settings, the range of detailed items for adjustment may differ. ❐❐To set additional picture options HOME ➾ Settings ➙ PICTURE ➙ Picture Mode ➙ Picture Option Adjusts detailed setting for images Noise Reduction Reduces screen noise in the video. MPEG Noise Reduction Reduces noise caused by compressing digital video. Black Level Adjusts the brightness or darkness of the screen to fit the black level of the picture input using the screen's degree of darkness (black level). Real Cinema Optimizes the screen for movie viewing. Eye Care/ Motion Eye Care Adjusts screen brightness to prevent eye glare. [Motion Eye Care : Depending on model] ❐❐To reset Picture Mode HOME ➾ Settings ➙ PICTURE ➙ Picture Mode ➙ Picture Reset Resets the values customized by the user. Each picture mode is reset. Select the desired picture mode. HOME ➾ Settings ➙ PICTURE ➙ Picture Mode ➙ Picture Option ➙ TruMotion Corrects images to display smoother motion sequences. Smooth Clear User De-Judder value is set at 3. De-Judder value is set at 7. De-Judder can be set manually. • De-Judder : This function adjusts juddering of the screen. ✎✎ If the video signal is 60Hz, TruMotion may not work. HOME ➾ Settings ➙ PICTURE ➙ Picture Mode ➙ Picture Option ➙ LED Local Dimming Brightens bright areas and darkens dark areas of the image for maximum contrast and minimum blur while reducing power consumption. Off Low Medium High Turns off LED Local Dimming. Expresses in natural black tones. Use this setting for viewing movies. Deepens black tones than Low. Use this setting for regular TV viewing. Deepens black tones and delivers clearer image than Medium. Perfect for viewing in brightly lit areas. ✎✎ Setting LED Local Dimming to Medium / High reduces power consumption. ❐❐To use Sound Mode HOME ➾ Settings ➙ SOUND ➙ Sound Mode Optimizes TV audio to the selected sound mode. Standard Suitable for all types of video Music/Cinema/Sport/ Sets audio optimized for a specific genre. Game Vivid User Setting Delivers distinct voices with rich bass and clear, high-pitched sounds. Adjusts the volume to the desired level using the User EQ. ❐❐To fine-tune the volume HOME ➾ Settings ➙ SOUND ➙ User EQ Sets Sound Mode at User Setting first. 100 Hz / 300 Hz / 1 kHz/ 3 kHz / 10 kHz Reset Sets EQ by manually adjusting sound bands. Resets previously changed equalizer value. ❐❐To set Volume Mode HOME ➾ Settings ➙ SOUND ➙ Volume Mode Sets various modes for volume control. Auto Volume Sets Auto Volume to On. Different volume outputs from channel to channel. They are then automatically adjusted for convenient TV watching when, clicking through different channels. Volume Control Using a single volume curve may result in an inaudible or loud sound depending on the environment. This function adjusts comfortable volume levels depending on day/night. ❐❐To use Sound Optimizer function HOME ➾ Settings ➙ SOUND ➙ Sound Optimizer Allows optimized sound for individual TV installation. Normal Wall Mount Type Stand Type General sound mode Optimizes sound for a wall-mounted TV. Optimizes sound for a stand-mounted TV. ❐❐To use Virtual Surround feature HOME ➾ Settings ➙ SOUND ➙ Virtual Surround LG's proprietary audio processing technology allows 5.1ch-like surround sound from two speakers. ✎✎ When Clear Voice II is set to On, Virtual Surround cannot be selected. ❐❐To use Clear Voice II feature HOME ➾ Settings ➙ SOUND ➙ Clear Voice II Boosts voice clarity. ❐❐To set AV Sync HOME ➾ Settings ➙ SOUND ➙ AV Sync. Synchronizes unmatched video and audio. Select AV Sync. to On to synchronize audio output (TV speaker or SPDIF) with the video. TV Speaker Adjusts the sync of the sound from the TV's internal speakers. The "-" button makes the sound output faster and the "+" button slower than the default value. SPDIF (Sony Philips Digital InterFace) Adjusts the sync of the sound from speakers connected to digital audio out terminal. The "-" button makes the sound output faster and the "+" button slower than the default value. Bypass Outputs broadcasting signals or the audio of an external device without audio delay. Audio may be output before video as it takes time to process video input into the TV. ❐❐To use ARC mode HOME ➾ Settings ➙ SOUND ➙ Sound Setting ➙ ARC Mode External audio devices that support Audio Return Channel (ARC) can be connected with High-Speed HDMIⓇ cable without an extra optical audio cable to output SPDIF. It interfaces with SIMPLINK. For an external device that supports ARC (Audio Return Channel), connect it to the HDMI(ARC) port. Off On Even when the connected ARC-supported external audio device is turned on, audio output is not processed through the external audio device’s speakers. When an ARC-supported external audio device is turned on, audio output is automatically processed through the external audio device’s speakers. SIMPLINK must be turned on. For SIMPLINK, refer to 「General → To use input device」. ✎✎ Connect to ARC-only terminal when connecting to external devices. ✎✎ Use high-speed HDMIⓇ cable when connecting to external devices. ✎✎ Use of a third-party device with an ARC function may cause malfunctions. ❐❐To adjust audio balance HOME ➾ Settings ➙ SOUND ➙ Sound Setting ➙ Balance Adjusts left/right audio balance. ❐❐To use TV's speakers HOME ➾ Settings ➙ SOUND ➙ Sound Setting ➙ TV Speaker When listening to the speakers on the external audio devices connected to TV such as home theater, TV speaker may be turned off. When there are SIMPLINK connected home theater devices, selecting TV Speaker to OFF will automatically turn on home theater. Off There is no sound from the TV speakers. Delivers TV sound through external audio device speakers connected to the TV. ✎✎ Adjusts the volume with the knob attached to the external device. On Produces TV sound through the TV’s internal speaker. ❐❐To use Digital Sound Out HOME ➾ Settings ➙ SOUND ➙ Sound Setting ➙ Digital Sound Out Sets up Digital Sound Out. Item Auto PCM Sound Input Digital Sound output MPEG Dolby Digital Dolby Digital Plus HE-AAC All PCM Dolby Digital Dolby Digital Dolby Digital PCM ❐❐To select external input HOME ➾ Input List Selects external input. INPUT LIST Selects speaker. TV Speaker Selects input. TV USB AV Component HDMI1 HDMI2 Change Device Name SimpLink Setting Sets SIMPLINK. Edits the name of external device connected to external terminal. ❐❐To use SIMPLINK SIMPLINK allows users to control and manage multiple multimedia devices using the convenient TV remote control and SIMPLINK menu. 1 Connect the TV's HDMI IN terminal with SIMPLINK device's HDMI output terminal using HDMI cable. For home theater units with SIMPLINK function, connect HDMI terminals as above and use an optical cable to connect Optical Digital Audio Out from the TV to Optical Digital Audio In of the SIMPLINK device. 2 Select HOME ➾ SIMPLINK. SIMPLINK menu window appears. 3 Select Set SIMPLINK on SIMPLINK menu window. SIMPLINK setup window appears. 4 Set SIMPLINK to On in SIMPLINK setup window. 5 Close SIMPLINK setup window. 6 Select the device to control from HOME ➾ SIMPLINK. ✎✎ This function works only on devices with the SIMPLINK logo ( Make sure that the external device has a SIMPLINK logo. ). ✎✎ To use SIMPLINK function, use a high-speed HDMIⓇ cable (with CEC, or Consumer Electronics Control feature added) and No. 13 pin connected for information exchange between devices. ✎✎ Turn on or select the media of a device with home theater features to see the speaker switch to HT Speaker. ✎✎ Connect with an Optical cable (sold separately) to use HT Speaker. ✎✎ Switching to external input causes devices operating with SIMPLINK to stop. ✎✎ Use of a third-party device with HDMI-CEC features may cause malfunctions. ❌❌Explanation on SIMPLINK features Direct Play Select multimedia device. Disc playback Power off all devices Play the multimedia device on the TV instantly without extra steps. Select the desired device through the SIMPLINK menu and instantly control it from the TV screen. Manage the multimedia device with the TV remote control. Turning the TV off with Auto Power function On in SIMPLINK setting will turn the power off on all SIMPLINKconnected devices. Sync Power on Speaker If the Auto Power function is set to On in the SIMPLINK settings, turning on a SIMPLINK device will turn the TV on. Selects speaker on the home theater unit or TV. HOME ➾ Settings ➙ PICTURE ➙ Energy Saving Reduces power consumption by adjusting screen brightness. Auto Off Minimum/ Medium/ Maximum Screen Off TV sensor detects the ambient lighting and automatically adjusts the screen brightness. • Min. Luminance : Select the minimum brightness for the screen under low ambient light. • Sensing Strength : Select the TV's range of brightness in the viewing environment. Turns off the Energy Saving mode. Applies the pre-set Energy Saving mode. Screen is turned off and only sound is played. Press any button on the remote control to turn the screen back on. ❐❐To use Sleep Timer HOME ➾ Settings ➙ TIME ➙ Sleep Timer Turns off the TV after a prescribed number of minutes. To cancel the Sleep Timer, select Off. ❐❐To set current time HOME ➾ Settings ➙ TIME ➙ Clock Checks or changes the time while watching TV. Auto Manual Synchronizes the TV clock to the digital time information sent by the TV station. Sets the time and date manually if the auto setup does not correspond to the current time. ❐❐To set the TV to turn on and off automatically HOME ➾ Settings ➙ TIME ➙ On Time/Off Time Sets On/Off time. Select Off on Repeat to discontinue On Time/Off Time. ✎✎ To use On Time/Off Time, set the current time correctly. ✎✎ Even when the On Time function is on, the TV will turn off automatically in 120 minutes when no button is pressed within that time. ❐❐To set password HOME ➾ Settings ➙ LOCK ➙ Set Password Sets or changes TV password. ✎✎ The initial password is set as 「0000」. ❐❐To lock system HOME ➾ Settings ➙ LOCK ➙ Lock System Permits only specific programs by blocking channels or external input. Select the Lock System to On. Block Channel Blocks the channels that contain inappropriate contents for children. The channels can be selected but the screen is blank and the audio is muted. To watch a locked channel, enter the password. Movie Rating [Depending on model] Blocks the movies that are only broadcasted on the TV and contain inappropriate contents, based on the Motion Picture Association of America (MPAA) rating. • G : (General audiences) All ages admitted • PG : (Parental guidance suggested) Some material may not be suitable for children • PG-13 : (Patents strongly cautioned) Some material may be inappropriate for children under 13 • R : (Restricted) Under 17 requires accompanying parent or adult guardian • NC-17 : No one 17 and under admitted. • X : Adults only TV RatingChildren [Depending on model] Blocks the children’s TV programs that parents do not want their children to watch. To block other TV programs, you should set the TV Rating-General feature. • Age : TV-Y (All children, including children from ages 2-6), TV-Y7 (Directed to older children, suitable for children age 6 and above) • Fantasy Violence : TY-Y7 (Directed to older children – Fantasy violence, suitable for children age 6 and above, containing more intense or combative fantasy violence) Blocks the TV programs that you want based on the ratings by using the Parental Control Function (V-Chip). ✎✎ The V-Chip electronically reads TV program ratings and allows parents to block program that are unsuitable for children. TV RatingGeneral • Age : TV-G (General audience, suitable for all ages) TV-PG (Parental guidance suggested, containing material that are unsuitable for younger children) TV-14 (Parents strongly cautioned, containing material that are unsuitable for children age 14 and under) TV-MA (Mature audience only, unsuitable for children age under 17) • Dialog : (suggestive dialogue) TV-PG or TV-14 • Language : (coarse language)TV-PG, TV-14, or TV-MA • Sex : (sexual situation) TV-PG, TV-14, or TV-MA • Violence : TV-PG, TV-14, or TV-MA Downloadable Rating Input Block [In Digital mode Only] This function operates only when TV has received Region5 Rating data. The name of the rating option may differ. Block the input sources. ❐❐To set password HOME ➾ Settings ➙ LOCK ➙ Set Password Sets or changes TV password. ✎✎ The initial password is set as 「0000」. ❐❐To lock system HOME ➾ Settings ➙ LOCK ➙ Lock System Permits only specific programs by blocking channels or external input. Select the Lock System to On. Blocks the channels that contain inappropriate contents for children. The channels can be selected but the screen is Block Channel blank and the audio is muted. To watch a locked channel, enter the password. TV RatingEnglish [Depending on model] Selecting Canadian English rating system. • E : Exempt • C : Children • C8+ : Children eight years and older • G : General programming, suitable for all audiences • PG : Parental Guidance • 14+ : Viewers 14 years and older • 18+ : Adult programming • Blocking Off : Permits all programs TV RatingFrench [Depending on model] Selecting Canadian French rating system. • E : Exempt • G : General • 8ans+ : General-Not convenient for little children • 13ans+ : Not convenient for children of 13 years and younger • 16ans+ : Not convenient for children of 16 years and younger • 18ans+ : This programs is only for adults • Blocking Off : Permits all programs [In Digital mode Only] Downloadable This function operates only when TV has received Region5 Rating Rating data. The name of the rating option may differ. Input Block Block the input sources. HOME ➾ Settings ➙ OPTION ➙ Language Selects Menu Language and Audio Language displayed on the screen. Menu Language Audio Language Voice Search Language Selects a screen menu language. [In Digital Mode Only] Selects the desired language when watching digital broadcasting containing several audio languages. Select the language to make voice search. ✎✎ Only the voice search adopted model can support this setting. HOME ➾ Settings ➙ OPTION ➙ Caption View subtitles when the TV station provides subtitled programing. Program subtitles work only on digital/analog broadcasts or external input. Change Caption to On and select caption setting. Mode CC 1-4 (Closed Captioning) / Text 1-4 Text 1-4 Displays the audio portion of a TV program as text on the TV screen. CC1 is the most common mode in use. Field 1 data channels: two Captions (CC1, CC2), two Text (T1, T2). Field 2 data channels: two Captions (CC3, CC4), two Text (T3, T4). Service 1-6 This is only available for the digital broadcasting system. Digital Option Set up the size and color of the subtitles on Digital Option. Please select Set by Program or Custom. Select Custom to adjust minute options such as the subtitles’ size and color. ❐❐To register the Magic Remote Control To use the Magic Remote Control, register it with your TV first. Register Magic Remote Control as follows: 1 Turn on the TV and wait for about 10 seconds and then press Wheel(OK) button while pointing the remote control at the TV. 2 The remote control is automatically registered and a registration completion message appears on the TV screen. ✎✎ If you failed to register the Magic Remote Control, turn off the TV and try again. ❐❐To re-register the Magic Remote Control 1 Press the HOME and BACK buttons at the same time for about 5 seconds. 2 Point the remote control at the TV and press Wheel(OK) button for about 5 seconds. ✎✎ Press the BACK button while pointing the remote control at the TV for five seconds to reset and re-register it. ❐❐To set the pointer of the Magic Remote Control HOME ➾ Settings ➙ OPTION ➙ Pointer Sets the speed and shape of the pointer that appears on the TV screen. Speed Sets the moving speed of the pointer. Shape Chooses from different shapes of the pointer. Size Chooses the size of the pointer. Set it to On. If there is any misalignment between the pointer and the actual direction the remote control indicates, move the Alignment Magic Remote Control left and right to realign. The pointer will automatically realign to the center, making it easier to control. ✎✎ If the pointer has not been used for a certain period of time, it will disappear. When the pointer disappears from the screen, shake the Magic Remote Control to the right and left. Then, it appears again. ✎✎ If you press the navigation button while moving the pointer on the screen, the pointer disappears, and the Magic remote control works as a regular remote control. ✎✎ Use within an effective distance of 33 ft. (10 meters). Using the Remote Control from greater distances or when obstructions block the sight line may cause malfunctions. ✎✎ Electronic devices nearby may cause communication interference. Devices such as microwave oven and wireless LAN use the same frequency range (2.4 GHz) as the Magic Remote Control, which may interfere with the remote control. ✎✎ The Magic Remote Control may be broken if dropped or damaged in any other way. ✎✎ Do not drop or subject the Magic Remote Control to heavy impacts. ❐❐To use the pattern gesture function Press the Wheel(OK) button with the normal video screen on and draw a pattern toward the screen. Previous channel: Moves back to the previous channel. Recent list: Shows channels recently watched. ✎✎ It may not work when certain windows are open. ❐❐To set Power Indicator HOME ➾ Settings ➙ OPTION ➙ Standby Light [Depending on model] Turns on/off the standby light in the front panel of the TV. ❐❐To change TV mode HOME ➾ Settings ➙ OPTION ➙ Mode Setting Selects Home Use or Store Demo. For use in the home, select Home Use. Store Demo is for store display. ❐❐To return to initial settings HOME ➾ Settings ➙ OPTION ➙ Initial Setting Returns to initial default mode by deleting all user settings. Once initialization is completed, the TV will turn off and then back on. ✎✎ If Lock System is turned on, a pop-up will be prompted to ask for password. ✎✎ Do not turn off the power during initialization. A wireless or wired network connection is necessary to use Smart features. Once the network connection is established, Premium Content, LG Smart World, DLNA, and more are available. ❐❐Network connection by one-click It’s easy to connect to a wired/wireless network. Select HOME ➾ Settings ➙ NETWORK ➙ Network Connection to be automatically connected to an available network. Refer to prompts on the TV. ❐❐To connect network through Set Expert HOME ➾ Settings ➙ NETWORK ➙ Network Connection Used in special circumstances such as in offices (in case where static IP is used). 1 Select a network connection either through Wired or Wireless. 2 When connecting via Wi-Fi, use the one of the following network connection methods. AP List Enter the SSID WPS-PBC Connects the network by selecting a network from the AP List. Connects by typing in the name of wireless AP. Connects easily by pressing the button of the wireless AP supporting PBC. WPS-PIN Ad-hoc Connects easily by typing in the PIN on the web site of the desired wireless AP. Connects to the network via a wireless-enabled PC or mobile phone. ❐❐To use Wi-Fi Screen function HOME ➾ Settings ➙ NETWORK ➙ Wi-Fi Screen Share Allows use of wireless connection functions such as Wi-Fi Direct and WiDi. Shares screen of devices connected via Wi-Fi Screen Share in Smart Share. 1 Set Wi-Fi Screen Share to On. (If you do not use it, please change it to Off.) 2 Enable the Wi-Fi Direct settings on the device that you want to connect to. 3 A list of devices that can be connected to the TV is displayed. 4 Select a device to connect. 5 Select Yes, when the connection request message appears. 6 If the device that you want to connect to accepts the request, Wi-Fi Screen Share is connected. ❐❐Warning when setting network ✎✎ Use standard LAN cable (connect to Cat5 or higher with RJ45 connector, 10 Base-T, or 100 Base TX LAN port). ✎✎ Resetting modem may cause network connection problems. Turn the power OFF, disconnect and reconnect it, and then turn the power on to solve the problem. ✎✎ LG Electronics is not responsible for any network connection problems or any faults, malfunctions, or errors caused by network connection. ✎✎ Network connection may not work properly depending on Internet service provider. ✎✎ DSL service must use the DSL modem; and cable service must use the cable modem. Since only a limited number of network connections may be available, TV network setting may not be used depending on the contract with Internet service provider. (If the contract does not allow more than one device per line, only the already-connected PC may be used.) ✎✎ Wireless network can experience interference from other devices with 2.4 GHz frequency (wireless phone, Bluetooth device, or microwave oven). Interference may also be caused by devices with 5 GHz frequency, the same as any other Wi-Fi devices. ✎✎ The surrounding wireless environment can make wireless network service run slowly. ✎✎ Failure to turn off all local home networks may cause excessive traffic on some devices. ✎✎ The access point device must support wireless connection and wireless connection feature must be enabled on the device to have AP connection. Contact the service provider for availability of wireless connection on the access point. ✎✎ Check SSID and security settings of the AP for AP connection. Refer to the appropriate documentation for SSID and security settings of the AP. ✎✎ Invalid settings of network devices (wired/wireless line sharer, hub) can cause TV to operate slowly or not operate properly. Install the devices correctly according to the appropriate manual and set network. ✎✎ Connection may not work depending on the connected device (e.g., laptop) when using Ad-hoc. ✎✎ Connection method may differ depending on the AP manufacturer. ❐❐To use Smart Share™ HOME ➾ Smart Share Provides photo/music/video files on TV by connecting a USB or home network (DLNA, Media Link). SMART SHARE Contents Type More.... Recently Watched More.... e Linked Devic Newly Added More.... More.... ALL VIDEO MUSIC PHOTO RECORDED TV Settings Connecting Guide Displays photo/music/video files on all devices connected to TV. ❐❐To control movie play Controls play and sets options while viewing movies. Selects the desired point and plays. Option Plays Sets options. Stops playback and returns to the list. List ❐❐To control photo view Controls playback and sets options while viewing pictures in full screen. Slideshow BGM Displays photos as a slideshow. Plays background music. Rotates or enlarges the picture. Option List Stops playback and returns to the list. Sets options. ❐❐To control music play Controls play and sets options while playing music. Selects the desired point and plays. Option Plays Sets options. List Returns to the list. ❐❐To set Smart Share™ related functions HOME ➾ Smart Share ➙ Settings Changes settings related to Smart Share content play. ❌❌Advanced Setting TV Name Network Status Wi-Fi Screen Share Share My TV Changes the name that appears when searching for the TV from other devices. Checks the network connection. Allows use of wireless connection functions such as Wi-Fi direct and WiDi. Allows/Disallows connecting to TV from other devices. Turns on/off DMR (Digital Media Renderer) connection. Auto Play on Receive DivX VOD Accepts/Rejects Content transferred from other devices. Registers or releases DivX. Checks DivX Registration Code for playing DivXprotected videos. Register at http://vod.divx.com. Uses Registration Code to rent or purchase movies at www.divx.com/vod. ✎✎ When using the DivX Registration Code of another device, the rented/purchased DivX file cannot be played. Use only the DivX Registration Code granted to this device. ✎✎ Converted files not conforming to DivX Codec Standard may produce abnormal images and sound. ❌❌History To delete contents history, press button below. Use the contents at Contents Type and Linked device menu. ❌❌Privacy Check the device that you do not want to open at Newly Added and Recently Watched menu. ❐❐Smart Share™ supporting file Maximum data transfer rate : 20 Mbps (Mega bit per second) External supported subtitle formats : *.smi, *.srt, *.sub (MicroDVD, SubViewer 1.0/2.0), *.ass, *.ssa, *.txt (TMPlayer), *.psb (PowerDivX) Internal supported subtitle formats : XSUB (Supports internal subtitles generated from DivX6) ❌❌Video Supported Codec Maximum: 1920 x 1080 @30p Extension .asf .wmv .divx .avi .mp4 .m4v .mov Codec Video Audio Video Audio VC-1 Advanced Profile, VC-1 Simple and Main Profile WMA Standard, WMA 9 Professional DivX3.11, DivX4, DivX5, DivX6, XViD, H.264/AVC, Motion Jpeg MPEG-1 Layer I, II, MPEG-1 Layer III (MP3), Dolby Digital, Dolby Digital Plus, LPCM, ADPCM, DTS Video H.264/AVC, MPEG-4 Part 2 Audio AAC Extension .mkv .ts .trp .tp .vob .mpg .mpeg Codec Video Audio Video Video Audio H.264/AVC HE-AAC, Dolby Digital H.264/AVC, MPEG-2, VC-1 MPEG-1 Layer I, II, MPEG-1 Layer III (MP3) Dolby Digital, Dolby Digital Plus, AAC MPEG-1, MPEG-2 Dolby Digital, MPEG-1 Layer I, II, DVD-LPCM Video MPEG-1 Audio MPEG-1 Layer I, II Audio ❌❌Available music file File type mp3 Item Info Bit rate 32 Kbps - 320 Kbps Sample freq. 16 kHz - 48 kHz Support MPEG1, MPEG2, Layer2, Layer3 ❌❌Available photo file File type Item Profile baseline Available file SOF0: SOF1: Extend Sequential type SOF2: Progressive 2D(jpeg, jpg, jpe) Minimum: 64 x 64 Photo size Maximum: Normal Type: 15360 (W) x 8640 (H) Progressive Type: 1920 (W) x 1440 (H) ❐❐Caution for playing video ✎✎ Some subtitles created by users may not work properly. ✎✎ The video and subtitle files should be placed in the same folder. In this case, you must assign the same names for the video and subtitle files for proper display. ✎✎ We do not support any stream that contains GMC (Global Motion Compensation) or Qpel (Quarterpel Motion Estimation). ✎✎ Only H.264/AVC profile level 4.1 and lower is supported. ✎✎ The file size limit is dependent on the encoding environment. ✎✎ Video files created by some encoders may not be played back. ✎✎ Video files in formats other than the ones specified here may not be played back. ✎✎ Playback of video files stored on the USB device that do not support High Speed, may not work properly. ✎✎ The TV supports DTS audio codec when the USB video file playback. ❐❐To use Premium HOME ➾ Premium This service delivers a wealth of content such as news, weather, stock data, replay TV programing, and video at any time while connected to a network. For Premium content, specialized country-specific services are offered that take into account regional cultural sensitivities, in addition to globally provided content. PREMIUM Search Broadcasting image Premium Content Select desired Content. Sign in WEB Movie Map SNS Play NEWS Comic Entertainment Information TV Add to My Apps Add to My Apps ❐❐To use paid Content Some Premium Content is provided as for-fee services. To purchase for-fee services, use either LG Electronics’ proprietary billing system or that of each content provider. With LG’s billing system, sign up for membership and register payment information on www.lgappstv.com before paying. 1 Click Sign In button in upper right corner of Home screen to sign in. 2 Move to the desired Premium service. 3 After checking the content’s pricing and service information, click the Purchase button. (Some Content may be subject to a time limit or restricted number of views.) 4 Once the purchasing process is completed, view the paid content by clicking the Buy button. 5 Select your ID on upper menu of Home screen and check history of purchases from My Page ➙ Payment inquiry. It is also available on My Page ➙ Purchase History of web site (www.lgappstv.com). ❐❐To reset Premium HOME ➾ Settings ➙ SUPPORT ➙ Initialization of Premium Premium list, Premium information, country setting, and user sign-in information will be reset. When an error occurs during Premium update, reset will fix the problem. ✎✎ Content on offer by service providers are subject to change to enhance their service quality or deletion without any prior notice. Refer to the web site of each content provider for questions, troubleshooting, or latest information about Content. LG Electronics does not take any legal responsibility for content services and related information including discontinuation of service by the service provider. ✎✎ The quality of Premium service may be affected by Internet connections. For any questions related to Internet speed or any other service problems, contact the Internet service provider. ✎✎ For best service quality, subscribe to an Internet service of 4.0 Mbps (1.5 Mbps or faster). Contact the ISP (Internet service provider) for any problems related to Internet speed. ✎✎ Content providers may make available content that is unsuitable for minors. Parental discretion advised. HOME ➾ Internet (Web browser) You can type the URL manually on TV or visit web sites in the Favorites list. Type in Web addresses here. Open a new tab. Add the current page to favorites. Moves to a previously visited website. ✎✎ The Internet (Web browser) supports up to Flash 10 but does not support platform-dependent technology like ActiveX. ✎✎ The Internet (Web browser) only works with pre-installed plug-ins. ✎✎ The Internet (Web browser) only replays the following media file formats: JPEG / PNG / GIF / WMV (ASF) / WMA / MP3 / MP4 ✎✎ The Internet (Web browser) is forcibly closed when memory is insufficient. ✎✎ For the Internet (Web browser) , fonts installed on the TV are used and may not be displayed normally depending on the content played. ✎✎ The Internet (Web browser) does not support file and font download. ✎✎ The Internet (Web browser) is made for TV so it may function differently from PC browsers. ✎✎ The Internet (Web browser) is a TV browser and may not work properly when playing some content files. HOME ➾ Social Center LG Smart TV provides Social Center app that delivers SNS service such as Facebook or Twitter while watching TV. With Social Center app, users can communicate with friends and see all messages and photos posted by SNS friends. 1 Sign in to LG TV account or if not a member, sign up first. 2 Sign in to the desired service (Facebook or Twitter) or if not a member, create an account first. 3 Check SNS services and post messages while watching TV. New messages posted on Facebook or Twitter from Social Center app also appear on account’s web page and mobile web. SOCIAL CENTER Toggles Facebook/Twitter. Refresh ✎✎ If there is no Social Center app on the My Apps, install one from LG Smart World. ✎✎ Log on to SNS services using smart phone’s LG Magic Remote app to conveniently compose text messages. The apps are available on Google Play Store or Apple App Store. Sign up is required to use LG Smart World. Membership to use free apps: Sign up at TV or PC. Membership to purchase paid apps: Sign up only at PC. Problem When entering menu, the "Initializing" message always appears. Solution • The "Initializing" message shows you how long it takes to reboot the microprocessor and hardware, set up network communications, and communications with SDP (device authentication and basic information download). It takes about 20 seconds and this is a normal process. • Content may not be shown when changing country setting There is no content shown on Smart TV. Change to desired country in on the Premium card. HOME ➾ Settings ➙ OPTION ➙ Smart TV Setting ➙ Smart TV Country. Problem Solution While using internet features, there is space that does not appear in some web sites. • The internet of the TV supports up to Flash 10 and may not replay any file format other than the following : JPEG, PNG, GIF, WMV (ASF), WMA, MP3, MP4 Internet closes automatically when visiting website. • If memory is insufficient because of large volume of image information in the web page, internet may be forced to close. I already signed up on TV. Do I need to sign up again at web site (www. lgappstv.com)? • Use ID and password registered with TV to sign in to the website (www.lgappstv.com). Type in personal information after signing in with the same ID and password registered with the TV. After completing the email authentication process, the website (www. lgappstv.com) membership registration is completed. Problem Can each family member use a different ID with a single TV? Solution • It is possible to register and use more than one ID on one TV. • To check the ID registered with TV from HOME ➾ Settings ➙ OPTION ➙ Smart TV Setting ➙ ID List. • You can check the list of apps purchased by each ID. However, you can see all apps installed by each ID in My Apps. • After signing up on a PC, use “Forgot ID?” feature on web What should I do if I forget site (www.lgappstv.com) when needed. my ID? • After signing up on TV, check it from HOME ➾ Settings ➙ OPTION ➙ Smart TV Setting ➙ ID List. Problem Solution I purchased an app from website (www.lgappstv. com). How can I use it on TV? • To check purchased apps on TV, sign in and view on the Purchased Apps menu. Select the ID at the top of Home and check the app in My Page ➙ Purchased Apps. Can I see history of my purchased apps? • Select the ID at the top of Home and check the app in My Page ➙ Purchased Apps. • Sign in to website (www.lgappstv.com) and then select My Page ➙ Purchase History. I deleted a paid app, then do I have to purchase again to download it? • Once app has been purchased, it may be redownloaded within one year, even if accidently erased. You can re-download apps only if they were purchased apps available for service. Select the ID at the top of Home and re-download apps in My Page ➙ Purchased Apps. Problem Solution Can I use apps provided from LG Smart TV's LG Smart World on both TV and PC? • Please check if the TV model supports LG Smart World. • The apps provided from LG Smart TV's LG Smart World can only be run on LG Smart TV. • Apps may be purchased from the website (www. lgappstv. com) but cannot be used on a PC or Mac. Use care when purchasing. How can I check the ID currently signed in to TV? • Select the ID at the top of Home and check the currently signed-in ID in My Page ➙ My Information. I installed an app on TV. Where can I check the installed app? • Select HOME ➾ My Apps. All paid and free apps installed on TV are displayed. Problem There is a difference between the app size shown in the screen and the actual app size installed on TV. I forgot password on TV. What should I do? Solution • The app size shown in the screen includes the additional space needed for installing apps so it may be different from actually installed app size. • If you only have the TV account, you cannot recover your password when it is lost. Create a new ID and log in with the ID. • But, if signed up on both TV and PC, use the “Forgot Password?” feature at website (www. lgappstv.com). Problem Solution Do I need to store payment information in web site to purchase paid apps? • To purchase paid apps from TV, enter payment method information at the website (www.lgappstv.com) but to not store payment information, use quick payment service. But, quick payment service is only available on the website, and apps may not be purchased from TV unless payment information is stored on the web site. Can I cancel an app that I have purchased? • As a member you cannot demand refund just because you changed your mind after purchase. • If there is a defect in the product or a problem of using the product, which does not caused by your fault, you can ask for a refund. However, the valid reason for refund must be provided. Problem I am resistered as a member, but I cannot purchase paid apps. Solution • Log in with the ID you created on your PC and add your payment information. Then, log out from TV and log in again so you can buy paid apps. Download the LG Magic Remote app from Google Play Store or Apple App Store to watch TV with your smartphone. • Now you can enjoy your favorite TV shows on your smartphone. (Some models only) • Add your favorite channels on your smartphone. • You can use the functions such as PREMIUM, MY APPS directly on your smartphone. • Select an item using the TV Search function from your smartphone to watch it on TV. • The text input function is supported, so you can enter text easily. (Text cannot be entered on some screens.) • Select the app's touch pad to control in the same way the pointer of the Magic Remote Control works. ✎✎ The supported functions may vary depending on the TV or the version of the LG Magic Remote app. ❐❐To use a USB wired/wireless mouse Connect your mouse to a USB port on the TV. Use the mouse to move the pointer on the TV screen and select the menu you want. Mouse Left Button Wheel Button Magic Remote Control OK Button on Magic Remote Control Wheel Button on Magic Remote Control ✎✎ The right mouse button and any special buttons will not work with the TV. ✎✎ The usability of a wireless USB mouse and keyboard may be affected by Radio Frequency environment and the distance. ❐❐To use a USB wired/wireless keyboard Connect your keyboard to a USB port on the TV. You can enter text with the keyboard when using the search function and the Web browser. ✎✎ Text cannot be entered on some screens. ✎✎ Applicable Keyboards It is recommended to use a product which is tested for compatibility with LG TV. LOGITECH K200, LOGITECH K400, MICROSOFT Comfort Curve 2000, MICROSOFT MS800, and LG Electronics ST-800 ❐❐To use a game pad Connect your game pad to the USB port on the TV if the game supports the use of game pad. ✎✎ Applicable Game Pads It is recommended to use an authorized game pad which is tested for compatibility with LG TV. Logitech F310, Logitech F510, and Logitech F710 ❐❐Set-Top Box Control If you have a Magic Remote, you can use it to control your Set-Top Box tuner (cable box, satellite box, or IPTV box). Before set up, make sure that the set-top box is connected to your TV. Set the set-top box following the instructions on the screen. ✎✎ If no instructions are displayed, set in MY APPS ➾ INPUT ➙ Set the set-top box manipulation. ❐❐To reset/disconnect the set-top box MY APPS ➾ INPUT ➙ Set the set-top box manipulation ➙ Resetting/ Disconnect Resetting Disconnect Deletes the set-top box settings and set it again. The set-top box cannot be controlled by the Magic Remote Control. ❐❐To control the set-top box with the Magic Remote Control Select the external input connected to the set-top box. You can use the direction, OK, and channel buttons on the Magic Remote Control. ou can use various function buttons of the set-top box by pressing MY APPS Y button on the Magic Remote Control. ✎✎ Some buttons may not work depending on the set-top box model. Use Magic remote control’s Navigation button. STB INPUT Settings REC Enter MY APPS POWER MENU GUIDE DVR LAST INFO FAV EXIT ❐❐Brands supporting the set-top box • Cable: Evolution, General Instrument, Hamlin, Hitachi, Homecast, Kaon, Motorola, Moxi, Pace Micro, Panasonic, Pioneer, Samsung, Scientific Atlanta (CISCO), Sky, Sony, Telnet, Tivo, Tocom, Zenith • IPTV: ADB, Amino, Entone, Minerva, Motorola, Myrio, Pace, Scientific Atlanta (Cisco), Tivo, Wegener • Satellite: DirecTV, Dish Network (Echostar), Shaw Direct ✎✎ Some set-top box models may not work properly. HOME ➾ Settings ➙ SUPPORT ➙ Software Update Uses Software Update to check and obtain the latest version. It is also possible to check manually for available updates. Software Update Check Update Version Set it to On. When an update file is detected, the file is automatically downloaded. When the file download is complete, the software update window appears. Checks the version installed and when an update is available, the download process can be performed manually. ✎✎ The latest version can be obtained via digital broadcast signals or internet connections. ✎✎ Changing the channel while downloading the software via digital broadcast signal interrupts the download process. Returning to the initial channel allows downloading to resume. ✎✎ If software is not updated, certain functions may not work properly. If the following symptoms occur, please recheck the system. It may not be a failure. ❐❐General Problem Cannot view certain channels. Solution • Adjust the location or orientation of the antenna. • Save the desired channels on Auto Tuning or Channel Edit. After turning on the TV, • It is not a problem because this process was intended to there is a delay before clean up the image noises that may occur when turning on full images appear. the TV. ❐❐Pictures HOME ➾ Settings ➙ SUPPORT ➙ Picture Test Check if the image signal output is normal by beginning with Picture Test. If there is no problem with the test image, check external device connections or broadcast signals. Problem Images from previous channel or other channels linger or the screen shows annoying lines. Solution • Try adjusting the antenna to the direction of the TV station or refer to the manual for proper way to connect the antenna. Problem Solution Vibrating horizontal/vertical lines and fishnet patterns appear momentarily. • Such a problem may happen when there is strong electronic interference. Turn off other electronic devices such as mobile phones, power tools and other small electrical appliances. The screen display freezes or does not work properly in digital broadcast. • It may happen when the signals are weak or the reception unstable. Adjust the antenna’s orientation or cable connections. • If the signal strength or quality is low on Manual Tuning, call the TV station or administration office for checkup. Digital broadcast is not on even though the cable is connected. • Check with cable operator regarding the subscription and/or signal. (Depending on the subscription, digital broadcasting may not be supported.) Problem Solution Image is not on or not clear when connected to HDMI. • Check the HDMIⓇ cable specifications. Use only HDMIⓇ cable. Other cables may cause images to fade in and out or not be displayed properly. • Verify that all cable connections are securely connected. When connections are not secure, images may not be properly displayed. Does not work when USB storage device is connected. • Verify that the USB device and cable is version 2.0 or higher. ❐❐Sound HOME ➾ Settings ➙ SUPPORT ➙ Sound Test Try Sound Test first to verify that sound signal output is normal. When the test sound is normal, check external device connections or broadcast signals. Problem Solution Screen display is on but no sound. • Check other TV channels. • Make sure the TV Speaker is set to On. For analog broadcast, stereo is not clear or sound comes from one speaker only. • In a poor reception area (areas with weak or unstable signal) or if multi audio is not stable, select Mono on Multi Audio. • Adjust the Balance with the Navigation button. Problem Solution TV sound is not in sync with the lips or the sound breaks up occasionally. • If it happens on a certain TV channel, it may be caused by problems with an individual station’s broadcast signal. Check with the TV station or local cable operator. Whenever changing the channel, the volume is different. • Depending on the channel, there can be differences in volume. • Please set Auto Volume to On. Problem Solution On certain channels, sound does not come out or only the background music plays. (If it is a program created for overseas) • On Language, set Language ➙ Audio Language as the desired language. Even if the language on Multi Audio is changed, once the power is turned off or the channel is changed, the default settings will be reset. There is no sound when connected to HDMI/USB. • Verify that the HDMIⓇ cable is high speed. • Check if the USB device and cable is version 2.0 or higher. • Use only regular music (*mp3) files. ❐❐PC connection problem Problem Solution The screen display is not on after connecting to the computer. • Verify that the computer and the TV are securely connected. • Turn the TV off and back on using the remote control. • Restart the PC with the TV on. • Check if the resolution is correctly set for PC input. • To use the TV as a secondary monitor, check if the connected desktop or laptop supports dual monitor displays. • Reconnect the RGB/HDMI cable. There is no sound after connecting the computer with the HDMI cable. • Check with the video card manufacturer to ensure it supports HDMI voice output. (Video cards manufactured in DVI format require connection of a separate sound cable.) Problem When connected to the computer, the display is partially cut off or shifts to one side. Solution • Set up the resolution supporting PC input. (If it does not work, please reboot the computer.) • Select Screen (RGB-PC) and adjust Position/Size/Phase. ❐❐Trouble with replaying movies in My Media. Problem Solution Files on the Movie List are not displayed. • Check if the file on the USB storage device can be read on a computer. • Check that the file extension is supported. "This file is invalid." The above error message appears or the image display is not normal even though the sound is okay. • Verify that the file replays normally on the video player in the computer. (Check for damaged files.) • Check if the resolution is supported by the computer. • Verify that the video/audio codec is supported. • Verify that the frame rate is one that is supported. Problem Solution • Verify that the file replays normally on the video player in "Unsupported Audio." the computer. (Check for damaged files.) The above error message • Check that the audio codec is supported by the appears or the sound is not computer. normal even though the • Verify that the bit rate is supported. image display is okay. • Verify that the sample rate is supported. Problem Subtitle is not displayed. Solution • Verify that the file replays normally on the video player in the computer. (Check for damaged files.) • Check if the video file shares the same name with the subtitle file. • Verify that the video and subtitle files are placed in the same folder. • Verify that the subtitle file format is supported. • Verify that the subtitle language is supported. (Open the subtitle files in Notepad to check for the language.) ✎✎ Image shown may differ from your TV. ✎✎ For information on requesting service, refer to the TV's menu. HOME ➾ Settings ➙ SUPPORT ➙ Product/Service Info. ❐❐Federal Communications Commission (FCC) Statement You are cautioned that changes or modifications not expressly approved by the part responsible for compliance could void the user’s authority to operate the equipment. This equipment has been tested and found to comply with the limits for a Class B digital device, pursuant to part 15 of the FCC rules. These limits are designed to provide reasonable protection against harmful interference in a residential installation. This equipment generates, uses and can radiate radio frequency energy and, if not installed and used in accordance with the instructions, may cause harmful interference to radio communications. However, there is no guarantee that interference will not occur in a particular installation. If this equipment does cause harmful interference to radio or television reception, which can be determined by turning the equipment off and on, the user is encouraged to try to correct the interference by one or more of the following measures: • Reorient or relocate the receiving antenna. • Increase the separation between the equipment and receiver. • Connect the equipment into an outlet on a circuit different from that to which the receiver is connected. • Consult the dealer or an experienced radio/TV technician for help. This device complies with Part 15 of the FCC Rules. Operation is subject to the following two conditions: 1 this device may not cause harmful interference, and 2 this device must accept any interference received, including interference that may cause undesired operation of the device. ❐❐Indoor use only FCC Caution: for indoor use only, use outdoors or in other modes not covered by this manual may violate the FCC regulation and violate the user authority to use the product. Specially, within the 5.15-5.25 GHz band, U-NII device is restricted to indoor operations to reduce any potential for harmful interference to co-channel MSS operations. ❐❐FCC RF Radiation Exposure Statement This equipment complies with FCC radiation exposure limits set forth for an uncontrolled environment. This equipment should be installed and operated with minimum distance 20 cm between the radiator & your body. End users must follow the specific operating instructions for satisfying RF exposure compliance. This transmitter must not be co-located or operating in conjunction with any other antenna or transmitter. ❐❐COFETEL(Para México) La operación de este equipo está sujeta a las siguientes dos condiciones: (1) es posible que este equipo o dispositivo no cause interferencia perjudicial y (2) este equipo o dispositivo debe aceptar cualquier interferencia, incluyendo la que pueda causar su operación no deseada. ❐❐Industry Canada Statement: This device complies with RSS-210 of the Industry Canada Rules. Operation is subject to the following two conditions: 1 this device may not cause interference and 2 this device must accept any interference, including interference that may cause undesired operation of the device This class B digital apparatus complies with Canadian ICES-003 Cet appareil numérique de la classe B est conforme á la norme NMB-003 du Canada ❐❐Avis d’Industrie Canada Cet appareil est conforme à la norme CNR-210 des règlements d’Industrie Canada. Son fonctionnement est sujet aux deux conditions suivantes: 1 Cet appareil ne doit pas provoquer d’interférences et 2 Cet appareil doit accepter toutes les interférences, y compris celles pouvant entraîner son dysfonctionnement. This class B digital apparatus complies with Canadian ICES-003 Cet appareil numérique de la classe B est conforme à la norme NMB-003 du Canada ❐❐IC Radiation Exposure Statement This equipment complies with IC radiation exposure limits set forth for an uncontrolled environment. This equipment should be installed and operated with minimum distance 20 cm between the radiator & your body. NOTE: THE MANUFACTURER IS NOT RESPONSIBLE FOR ANY RADIO OR TV INTERFERENCE CAUSED BY UNAUTHORIZED MODIFICATIONS TO THIS EQUIPMENT. SUCH MODIFICATIONS COULD VOID THE USER’S AUTHORITY TO OPERATE THE EQUIPMENT. ❐❐Avis d’Industrie Canada sur l’exposition aux rayonnements Cet appareil est conforme aux limites d’exposition aux rayonnements d’Industrie Canada pour un environnement non contrôlé. Il doit être installé de façon à garder une distance minimale de 20 centimètres entre la source de rayonnements et votre corps. REMARQUE : LE FABRICANT N’EST PAS RESPONSABLE DES INTERFÉRENCES RADIOÉLECTRIQUES CAUSÉES PAR DES MODIFICATIONS NON AUTORISÉES APPORTÉES À CET APPAREIL. DE TELLES MODIFICATIONS POURRAIT ANNULER L’AUTORISATION ACCORDÉE À L’UTILISATEUR DE FAIRE FONCTIONNER L’APPAREIL. ❐❐Information for recycling (take-back offer) This product may contain parts which could be hazardous to the environment. It is important that this product be recycled after use. LGE handles all waste products through an environmentally acceptable recycling method. There are several take-back and recycling systems currently in operation worldwide. Many parts will be reused and recycled, while harmful substances and heavy metals are treated by an environmentally friendly method. If you want to find out more information about our recycling program, please contact your local LG vendor or a corporate representative of LG. and Information of Regional Take back Schemes can be found at : http://www.lg.com/global/sustainability/environment/take-back-recycling.jsp ❐❐On Disposal (Only, LCD TV with Hg lamp) • The fluorescent lamp used in this product contains a small amount of mercury. • Do not dispose of this product with general household waste. • Disposal of this product must be carried out in accordance to the regulations of your local authority. ❐❐MISE AU REBUS (seules des lampes au mercure sont util-isées avec le Téléviseur ACL) • Les lampes fluorescentes utilisées dans ce produit contiennent une minime quantité de mercure. • Ne pas jeter cet appareil avec vos déchets domestiques. • La mise au rebus de cet appareil doit être effectuée en fonction des règles en vigueur dans votre communauté. ❐❐DISPOSICIÓN (Sólo lámpara de Hg utilizada en TV LCD) • La lámpara fluorescente usada en este producto contiene una cantidad mínima de mercurio. • No disponga este producto junto con la basura normal de la casa. • La disposición de este producto debe ser manejado de acuerdo a los reglamentos de la autoridad local.