1
r
Save This Manual
For Future Reference
owner's
manual
Model No.
113.236090
Serial
Number
Model
®
and serial
num-
bers may be found
attached
to the right
side of arm housing.
You should record both
model and serial num-
16 iNCH VARIABLE
SPEED SCROLL SAW
bers in a safe place for
future use,
====1=
- assembly
• operating
° repair parts
FOR YOUR
SAFETY
READ ALL
INSTRUCTIONS
CAREFULLY
Sears,
Part No
SP5837
Roebuck
and Coo, Hoffman
Estates,
IL 60179
U.S.A.
Printed
in USA,
_FULi-ONF
YEAR WARRANTY
ON CRAFTSMAN
BENCHTOP
TOOLS
If this Scroll Saw fails due to a defect in material or workmanship,
within one year from the date of purchase, RETURN IT TO THE NEAR=
EST SEARS SERVICE CENTER IN THE UNITED STATES, and Sears will
repair it, free of Charge.
If this Scroll Saw is used for commercial or rental purposes, warranty
will apply for ninety days from the date of purchase.
This warranty applies only while this product is in the United States.
This warranty gives you specific legal rights and you may also have
other rights which vary from state to state.
Sears, Roebuck and Co., D817 WA Hoffman Estates, IL. 60179
b_
Safety Instructions
for Scroll Saw
Safety is a combination of common
sense, staying alert and knowing how
Safety
Signal
Words
DANGER: means if the safety information is not followed someone will be serious]y injured or killed,
WARNING: means if the safety information is not followed someone could be
Before
your scroll saw works. Read this manual
to understand this saw.
seriously injured or killed.
CAUTION: means if the safety information is not followed someone might be
njured.
Using The Saw
WARNING:
To avoid mistakes
that could cause serious permanent injury, do not plug the saw in
until the following steps are completed.
• Completely assemble and align saw
(see "Assembly and Alignment" sections w_hin).
• Learn the use and function of the
speed control ON-OFF knob, bevel lock
knob blade holders, blade support,
1.
2.
3.
4,
S.'
S.
7.
8.
9.
50_t700
hold down, tension knob, and blade
guard. (See "Getting to Know Your
Scroll Saw" section.)
* Review and understand all safety
instructions and operating procedures
in this manual.
* Review the maintenance methods for
this saw. (See "Maintenance" section.)
- Read the warning label below, found on
the base of the saw.
Readmanual before using saw,
Wearsafely goggles lhet meet ANStZ87.1 S_ndards,
Besere blade is inslallad wlth teeth pointing down.
Properlyadjust helddow_,
Keepfingersaway hem the moving blade.
DOnot ronleve is_mme_t
cutoffpiaces_untit blade has stopped.
Mnlntnln p_per adiustznunt Ofblade tensio_.
Hold wed(piece fimlly _llales4 Ibe table.
Turnpower off a_d wait for blade to st_p befere adlu_ng orservicinlD.
RPM 1 PHASE 120 VOLT AC ONLY 60 HZ L2 AMPS
.....
L
......
.
_
,
When Installing or Moving The Saw
Avoid Dangerous Environment. Use
the saw in a dry indoor place, protected
from rain. Keep work area wel! lighted.
To avoid injury from unexpected saw
movement:
o Turn saw off and unplug cord
moving the saw.
- Place the saw on a firm level
where there is plenty of room
dling and properly supporting
piece.
before
surface
for hanthe work-
. Support the saw so the table is level
and the saw does not rock.
o Bott the saw to the work surface if it
tends to slip, walk, or slide during operations like cutting long heavy boards, or
when using an auxiliarytabte.
° Never Stand On Tool. Serious injury
could occur Jfthe tool tips or you accidentally hit the cutting toot. Do not store
any item above or near the tool where
anyone might stand on the scroll saw to
reach that item.
To avoid injury or death from electrical shock:
• Ground the saw. This saw has an
approved 3 conductor cord and a 3prong grounding type plug. Use only 3wire, grounded outlets rated 120 volts,
15 amperes (amps). The green conductor in the cord is the grounding wire.
To avoid electrocution, NEVER connect the green wire to a live terminal.
oMake sure your fingers do not touch
the plug's metal prongs when plugging
or unplugging the saw.
Before Each Use
Inspect your saw.
Disconnect The Saw. To avoid injury
from accidental starting, unplug the saw,
turn the switch off and lock out the switch
before changing the setup, removing
covers, guards or blade.
Check For Damaged Parts. Check for:
• Alignment of moving parts,
- Binding of moving parts.
° Broken parts,
• Stable mounting.
° Any other conditions that may affect the
way the saw works.
If any part is missing, bent or broken in
any way, or any electrical parts don't
work properly, turn the saw off and
unplug the saw. Replace damaged,
missing or failed parts before using the
saw again. Keep Guard In Place and in
working order,
Maintain Tools with Care. Keep the saw
clean for best and safest performance,
Follow instructions for lubricating.
Remove adjusting keys and wrenches
from tool before turning it on.
To avoid injury from jams, slips or
thrown pieces
° Use Only Recommended Accessories. (See "Recommended Accessories" section), Consult this owners
manual for recommended accessories.
Follow the instructions that come with
the accessories. The use of improper
accessories may cause risk of injury to
person.
• Choose the right size and style blade
for the material and the type of cutting
you plan to do.
° Make sure the blade teeth point downward, toward the table.
• Make sure the blade tension is properly
adjusted,
• Keep Work Area Clean. Cluttered
areas and benches invite accidents.
Floor must not be slippery.
To avoid burns or other fire damage,
never use the saw near flammable liquids, vapors or gases,
• Know Your Saw. Read and understand the owners manual and labels
affixed to the tool, Learn its application
and limitations as well as the specific
potential hazards peculiar to this tool.
° To avoid injury from accidental contact
with moving parts, don't do _ayout,
assembly, or setup work on the saw
while any parts are moving.
• Avoid Accidental Starting. Make sure
switch is "OFF" before plugging saw
into a power outlet.
Safety Instructions
for Scroll Saw (continued)
i
CAUTION: This saw is NOT
designed for cutting ferrous metals
like iron or steel. When cutting
nonferrous metals (brass, copper
and aluminum, etc.), metal shavings can react with wood dust and
start a fire. To avoid this:
- Remove all traces of wood dust
from on and around the saw.
Plan Your Work.
- Use The Right Tool. Don't force tool or
attachment to do a job it was not
designed to do.
• Use this scroll saw to cut only wood,
woodlike products, plastics and nonferrous metals.
- Remove all metal shavings from
on or around the saw before sawing wood again.
Plan Ahead
To Protect Your
Eyes, Hands,
Any power saw can throw foreign objects
into the eyes. This can cause permanent
eye damage. Wear safety goggles (not
glasses) that comply with ANSi Z87.1
(shown on package). Everyday eyeglasses have only impact resistanl
lenses. They are not safety glasses.
Safety goggles are available at Sears
Retail Stores. Glasses or goggles not in
compltance with ANSI Z87.1 could seriously hurt you when they break.
WEAR
YOUR
Dress for safety
• Do not wear bose clothing, gloves,
neckties or jewelry (rings, wristwatches). They can get caught aria
draw you into moving parts.
o Wear nonslip footwear.
o Tie back long hair.
o Roll long sleeves above the
° Noise levels vary wide!y.To
sible hearing damage, wear
or muffs when using saw for
time.
elbow.
avoid posear plugs
hours ata
• For dusty operations, Wear a dust mask
along with the safety gogg lee
Face and Ears
Inspect Your Workpiece.
Make sure there are no nails or foreign
objects in the part of the workpiece to be
cut.
Use extra caution with large, very
small or awkward workpieces
* Never use this tool to finish pieces too
small to hold by hand.
° Use extra supports (tables, saw horses,
blocks, ezc.)for any workpieces large
enough to tip when not held down to
the table top.
. Never use another person as a substitute for a table extension, or as additional support for a workpiece or to hetp
feed. support or pull the workpiece.
° When cutting irregularly shaped work*
;31eces,plan your work so it wilt not
pinch the b_ade. A piece of molding, for
example, must fay flat or be held by a
fixture or jig that will net let it twist, rock
or slip while being cut.
• Properly support round material such
as dowel rods or tubing. They have a
tendency to roll during a cut, causing
the blade to "bite". To avoid this,
always use "V" blocks.
oCut only one workpiece at a time.
° Clear everything except the workpiece
and related support devices off the
table before turning the saw on.
4
Plan the way you will hold the workpiece from start to finish.
* Do not hand hold pieces so smatl that
your fingers will go under the blade
guard. Use jigs or fixtures to hold the
work and keep your hands away from
the blade.
positions where a sudden slip could
cause fingers or hand to move into the
blade.
• Don't Overreach,
and balance,
° Keep your face and body to one side of
the blade, out of line with a possible
thrown piece if the blade s_eutd break.
° Avoid awkward operations and hand
Whenever
Saw Is Running
WARNING:
Don't let familiarity
(gained from frequent use of your
scroll saw) cause a careless mistake. A careless fraction of a second is enough to cause a severe
injury.
Before Freeing Any Jammed Material.
* Turn switch "OFF"
oWait for all moving parts to stop.
- Unplug the saw,
When backing up the workpiece, the
blade may bind in the kerf (cut). This
is usually caused by sawdust clogging up the kerr. If this happens:
- Turn switch "OFF".
o Before starting your cut, watch the saw
while it runs. If it makes an unfamiliar
noise or vibrates excessively, stop
immediately. Turn the saw off. Unplug
the saw. Do not restart untif finding and
correcting the problem.
- Wait for all moving parts to stop.
. Unplug the saw.
. With a flat blade screwdriver, turn
motor shaft by hand. Insert the screwdriver into the slotted end of motor
shaft located at the center of the motor
housing. Do this while backing up the
workpiece.
Before removing loose pieces from
the table, turn saw off and wait for all
moving parts to stop.
* Keep Children Away. Keep all visitors
a safe distance from the saw. Make
sure bystanders are clear of the saw
and workpiece.
* Don't Force Tool. It will do the job better and safer at its designed rate, Feed
the workpiece into the saw blade only
fast enough to let it cut without bogging
down or binding.
Before
Leaving
the Saw
• Wait for all moving parts to stop,
• Make Workshop Child-proof. Unplug
the saw, Lock the workshop and ON/
Glossary
Keep good footing
OFF knob on the saw, Store the key
away from children and others not qualified to use the tool,
of Terms for Woodworking
Blade
Kerf -the slot cut by the blade.
Leading Edge - the edge of the workpiece which is pushed into the blade
first.
Sawbtade Path - the area of the workpiece directly in line with and moving
toward the sawblade edge,
Bevel - the ability to slant the table to
make angle cuts, An angle cutting operation through the face of the board,
......
Tooth
Set - the distance
that the
edge of the sawblade tooth is bent (or
set) outward from the side of the blade,
Trailing
Edge - the workpiece
cut by the sawblade.
edge last
Workpiece
- the item on which the cutting operation
is being performed,
5
Motor Specifications
and Electrical
Requiremen
ts
::p_o,,er
S.ppiy
and.otorSpecif cot ons
:i
:i
;;
;.=.
;
I
i
i
i
:
WARNINGI T0 avoid eiectri_al hazards; fire hazards or damageto the
: t0oi, use proper circuit protection;
_e_
I _n
this saw. Changes to the
_ internal wiring will create a fire haz-
Your toot is Wired at the factory for
Operation using the voltage shown,
Connect too to a power line with
,h .......
_,^, ^t, .....
,4 _ ! =
__
.
.
^__
amp branch c!rcult _Use a t5*_,qJ
time delay type fuse or circuit
breaker To avoid shock or fire, if
power cord is worn or cut, or damaged in any way, have it replaced
immediately.
Iard and may also create a shock
I
hazard.
.....
This machine Is equipped w_th a variable
speecl motor nawng me TOt
ng specsfF
-.
.
cations.
, ,
Voltage
1t0-120
....
12
Amperes
,
Hertz (Cycles)
60
For replacement moto_ and contro-------_
board, refer to parts list in this manual,
uu m i,i
General
i
Electrical
DANGER:
i,,
Phase
RPM
single
500-1700
Rotation of Shaft
Clockwise
....
Connections
To avoid electrocution:
. Use only identical replacement
parts when servicing_ Servicing
should be performed by a qualified service technician.
, Do not use in rain or where floor
is wet.
This tool is intended for indoor residential use only.
to touch the terminals of plug when
the plug
to
I installing
ARNING:or removing
Do not permit
fingers
or from the outlet.
If power cord isworn or cut, or damaged
in any way, have it replaced immediately,
t
I
110-120Volt,
60 Hz. Tool
If the grounding instructions are not completely understood, or if you are in doubt
as to whether the tool is properly
grounded check with a qualified electrician or service personnel.
Information
NOTE: The plug supplied on your tool
may not fit into the outlet you are planning to use. Your local electrical code
may require slightly different power cord
plug connections, if these differences
exist refer to and make the proper
adjustments per your local code before
your too] is plugged in and turned on.
WARNING: If not properly
grounded, this tool can cause an
electrical shock, particularly when
used in damp locations, in proximity to plumbing, or out of doors, tf
an electrical shock occurs there is
the potential of a secondary haz=
ard, such as your hands contacting
the sawblade.
In the event of a malfunction or breakdown, grounding provides a path of least
resistance for electric current to reduce
the risk of electric shock This tool is
equipped with an electric cord having an
equipment grounding conductor and a
grounding plug, as shown. The plug
must be plugged into a matching outlet
that is properly installed and grounded in
accordance with all local codes and ordinances.
Properly
Grounded
Outlet
3-Prong Plug
J_
/flu}
\
0
/n
Do not modify the plug provided, tf it will
not fit the outlet, have the proper outlet
installed by a qualified electrician.
A temporary adapter may be used to
connect this plug to a 2-pole outlet, as
shown, if a properly grounded outlet is
not available. This tempo[ary adapter
should be used only until a properly
grounded outlet can be installed by a
qualified electrician. The green colored
rigid ear, lug and the like, extension from
the adapter must be connected to a permanent ground such as a properly
grounded outlet box.
Improper connection of the equipment
grounding conductor can result in a risk
of electric shock, The conductor with
insulation having an outer surface that is
green with or without yellow stripes is the
equipment grounding conductor. ]f repair
or replacement of the electric cord or
plug is necessary, do not connect the
equipment-grounding conductor to a live
terminal.
Green
u_
Grounding
Prong
Make sure this
Is Connected
to a Known
Ground
i_"_
I
Gro0n0,°g
Lo, Ii_._-lll
a-Prong _1_']
Plug
%,
li
Adapter
NOTE: The adapter illustrated is for use
only if you already have a properly
grounded 2-prong outlet.
7
Motor Specifications
and Electrical Requirements
(continued)
Wire Sizes
NOTE: Make sure the proper extension
cord is used and is in good condition.
The use of any extension cord will cause
some loss of power. To keepthis to a
minimum and to prevent overheating
and motor bum-out, use the table shown
to determine the minimum wire size
(A.W,G.) extension cord
Use only 3-wire extension cords which
have 3-prong grounding type plugs and
3-pote receptacles which accept the
tools plug.
Wire Sizes Required
Cord Length
,
.for (A.W.G.)
110-120V
0-25 Ft.
26-50 Ft,
18
16
Table of Contents
Safety Instructions for Scroll Saw ........ 2
Safety Signal Words ......................... 2
Before Using The Saw ..................... 2
When Installing or Moving The Saw .3
Before Each Use: ............................. 3
Safety Instructions for Scroll Saw ........ 4
Plan Ahead To Protect Your Eyes,
Hands, Face and Ears: ................... 4
Whenever Saw Is Running: .............. 5
Before Leaving the Saw: ................. 5
Giossary of Terms for Woodworking .... 5
Motor Specifications and Electrical
Requirements .................................. 6
Power Supply and Motor
Specifications,....._ ............................ 6
General Electrical Connections ........ 6
110-120 Volt, 60 Hz. Tool
Information :....... ,:............................. 7
Wire Sizes ......... :............. :................ 8
Table of Contents ................................. 8
Unpacking and Checking Contents ...... 9
Tools Needed L;................................ 9
Unpacking ........................................ 9
List of Loose Parts .,_ ....................... 9
Getting to Know your Scroll Saw ....... 10
Align ment (Adjustments) .................... 12
Changing the Table Bevel Angle .... 12
To Align the Bevel Indicator ............ 12
Adjusting Work Hold-down ............. 13
ii'i
Over Tensioning
Or Under Tensioning
Blade .............................................
13
Removing
Pin End Blades .............
Installing Pin End Blades
...............
Removing
Plain End Blades
..........
installing Plain End Blades
............
Dust Blower ....................................
Blade Guard ...................................
Mounting the Scroll Saw ....................
Workbench
Applications
................
Leg Set Applications
.......................
Safety Instructions
for Basic Saw
Operations
....................................
Before Each Use: ...........................
14
15
16
17
18
!8
18
I8
18
19
19
Plan Ahead To Protect Your Eyes,
Hands, Face And Ears: .................
Whenever
Saw Is Running:
...........
Before Leaving The Saw: ...............
Basic Saw Operations
.......................
General Instructions
.......................
20
20
21
2!
2t
Making Interior Scroll Cuts .............
Choice of Blade and Speed
...........
Maintenance
......................................
22
22
23
Sears Recommends
the Following
Accessories
..................................
Recommended
Accessories
..........
23
23
Troubleshooting
.................................
Wiring Diagram
..................................
Repair Parts .......................................
24
25
26
8
Unpacking
Tools
and Checking
Contents
..............
Needed
Medium Standard Screwdriver
Combination Square
Unpacking
Do Not Lift Saw By This Arm
WARNING:
To avoid injury, from
unexpected starting or electrical
shock, do not plug the power cord
into a power source outlet during
unpacking and assembly, This
cord must remain unplugged
whenever you are working on the
saw
Here
Your scroll saw is fully assembled and
shipped complete in one box.
IMPORTANT: Never lift this saw bythe
arm which holds the blade or damage
will occur to your saw.
Separate all parts from packaging materials and check each item with illustration
and "List of Loose Parts". Make certain
all items are accounted for before discarding any packaging material.
NOTE: Before beginning assembly,
check that al] parts are included, if you
are missing any part, do not assemble
the saw, Contact your Sears Service
Center to get the missing part. Sometimes small parts can get lest in packaging material. DO NOT throw away any
packaging until saw is put together,
Check packaging for missing parts
before contacting Sears, A complete
parts list (Repair Parts) is at the end of
the manual Use the list to identify the
number of the missing part.
List of Loose
Lift Here
Parts
Item
Description
Qty.
A 16" Scroll Saw
(Completely Assembled) ............... 1
B Owner's Manual ............................. 1
C Loose Parts Bag containing:
Blade ........................................
1
NOTE: Hardware to mount this scroll
sawto a bench or _egset is not supplied.
See mounting instructions for recommended hardware size.
C
9
,,
iiill
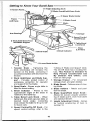
Getting
to Know
Your Scroll Saw-_--.
11
_!Knob
10 Blade Guard/Hold-Down Knob
Holder
Frame
(Lift Here)
8 Btade Guard
Blade
Arm Bearings
Speed Control
On/Off Knob
2 Work Hold-Down Foot
and Btade Support
Lock Knob
B_se
___3
_-'_
4
Bevel Scale
(LIft
Here)
9 Lower Blade Holder
t. Tension
Knob - Tightening the
knob (clockwise) will increase the
tension on the blade. Loosening it
(counterclockwise) will decrease the
tension,
2. Work Hold-Down and Blade Support - Provides added control of
workpiece, protection for operator
and support for the blade,
3. Bevel Scale - Shows angle table is
tilted for bevel cutting.
4. Bevel Indicator
- Points to the
approximate angle of the blade in
relation to the table top.
5, Table Bevel Lock Knob - When
tightened, this knob secures table at
desired
bevel angle,
Loosening
knob allows the table to tilt up to 45 °
for bevel cuts.
6. Speed Control/On-Off
speed control setting,
Bevel
Indicator
7.
8.
9.
10.
"Choice of Blade and Speed" table.
The On-Off knob has a tocking feature, This Feature Is Intended To
Help Prevent Unauthorized
Use
By Children
And Others.
(See
more on next page.
Storage Drawer - For convenient
storage of pin and plain blades,
Blade Guard - Defines area of moving blade,
Blade Holders - Retain and position the blade.
Blade Guard/Hold Down Knob Allows for secure angular positioning of blade guard, work hold down
and sawdust blower.
11. Height Adjustment
Knob - Allows
for vertical positioning of item in
number t0.
Knob - For
_efer to the
,o
Speed Control/On-Off Knob (continued)
• To turn machine "ON", place fingers
on Speed ControVOn-Off Knob and
pull out.
,,To turn machine "OFF", push in
Speed Control/On-Off Knob.
machine unattended until it has
I WARNING:
Never leave the
come to a complete stop.
I
"On"
The variable speed control may be
adjusted to the approximate speeds
identified on the control panel. Suggested speeds are identified under
"Choice of Blade and Speed". Turn the
control knob clockwise ,_
to
increase strokes per minute and counterclockwise _
to reduce the
strokes per minute.
NOTE: If the unit stops running during
use, it typically means too much force is
being used to feed the work.piece into
the blade, and the built-in circuit breaker
automatically shuts the unit off to protect
the motor. To restart unit, turn switch off
to reset circuit breaker and then back on
to continue cutting.
Due to circuit protection, the unit may not
a_ways start. If unit does not start, shut
unit off, wait approximately ten seconds,
and restart.
e
Do not cycle unit on and off. Built-in circuit protection may prevent unit from
immediately restarting. Wait approxi*
mutely ten seconds after shutting unit off
before restarting.
-To lock knob in "OFF" position,
install a padlock from the left side
of the knob through the hole below
the knob as illustrated, and tockthe
padlock. (Padlock is not supplied
with the saw.)
Control
Install From
Left Side
of Knob
WARNING:
For your own safety,
always push the knob "Off" when
machine is not in use. Also, in the
event of a power failure (all of your
lights go out), push knob "Off".
"Lockout"
your knob with a padlock as shown. This will prevent
the machine from starting up again
when the power comes back on.
Approximate
Diameter
1 inch Approximate
Approximate
5132 to 3116 Inch
Padlock Size
11
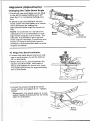
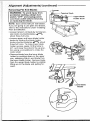
Alignment
(Adjustments)
_ ....
Changing
tho Table Bevel Angle
o The scroll saw wO.r_table can be tilted
to the left !oorbevel: CUtting Up to 45 °
from the 0 or tiori_or_tal cutting position.
::
o A bevel scale and indicator are provided under the work table as a convenient reference for setting the
approximate table angle for bevel cutting.
NOTE: A scroll saw Js a scroll curve
cutting tool. It is not intended for making precise angular cuts in wood, The
indicator is provided to give approximate angular readings. A precision protractor or square shoutd be used to
measure a more precise blade to table
angular locations.
Scale
To Align the Bevel Indicator
• Loosen the table bevel tock knob and
use a small square to set the table at
90 ° to the blade.
- When there is no space between the
square and the b_ade, hold table Jn
place artd tighten the bevei lock knob.
The table should now be approximately
9,0° to the btade,
• Loosen the screw holding the bevel
scale pointer and adjust to 0°, Tighten
screw,
Remember, the bevel scale is a convenient guide but should not be relied
upon for precision,
Bevel
Pointer
12
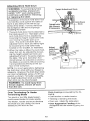
Adjusting
Work
Hold-down
WARNING:
To avoid injury from
accidental starting, always turn
switch "OFF" and unplug power
cord from outlet before removing
or replacing the blade.
Height Adjustment
The purpose of the work hold-down foot
is to hold the work _gainst the table so
that it is less likely to lift with the up
stroke of the btade_ It should iie flat on
the workpiece with the front prongs
straddling the blade,
1. The work hold-down foot is attached to
the blade guard rod. The height of the
work hold-down foot is adjusted by
Ioosen{ng the height adiustment knob
and moving the guide post up or
down, The work hold-down foot is
adjusted front to back and left-to-right
by loosening the hold-down knob
located on the bracket, as illustrated.
2. When the table is tilted, the work holddown foot can be adjusted by Ioosen_
ing the height adjustment knob and
adjusting the foot to the same angle as
the table, The work hold-down foot
should always be adjusted as close to
the b_ade as possible without touching
it and positioned directly on the surface of the workpiece.
NOTE: For most applications tightening
the hold down knob with your fingers is
adequate. However, the held down knob
can also be tightened using a 5/16" hex
wrench as shown. For better versatility,
the height adjustment knob and hold
down knob can be interchanged.
thrown objects, remove all tools
l from
ARNING:
the saw.To avoid injury from
Knob
Hold-Down
-- Knob
Adjust
Hold-Dow nFoot to
Same An
as Table
't
Blade breakage is caused by the following:
o Over tension or under tension,
Over Tensioning
Or Under
Tensioning
Blade
Too much or too little blade tension
could cause blades to break rapidly.
The thicker, harder and more abrasive
the wood yo'u are cutting, the more
blades you will have to use.
oTwisting or bending the Nade.
o Over use - blade :life exhausted.
o Over Aggressive Feeding of the
workpiece into the blade by going too
fast.
t3
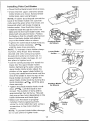
Alignment
Removing
(Adjustments)
(continued)
Pin End Blades
oseR
WARNING:
To avoid injury from
accidental starting, always: turn
switch "OFF" and unplug power
cord from outlet before removing
or replacing the blade,
Tenslon Knob
NOTE: Saw comes with pin end bfades.
if you are going to use piain end blades,
refer to the instructions under "Installing
Plain End Blades".
* Loosen tension on blade by turning tension knob counterclockwise
about three full turns
'ii
oLoosen upper and lower blade holder
knobs by turning the blade holder
knobs counterclockwise _
about
three full turns. To make lower blade
holder access easier, till the tabte to
45 °, and raise the arms to the up posF
tion using a screwdriver to rotate the
motor shaft.
o Remove blade from the lower blade
holder by pushing down or_ the upper
arm, releasing the pin end blade from
the lower blade holder. Remove blade
from the upper blade holder by slightly
lifting up on the blade and pulling forward.
Loosen
Upper
Holder
Lower Blade
Holder
14
.......
Installing
Tighten
Pin End Blades
Pin end blade set up:
Check that the blade tension knob is
loose.
,, Check that the upper and lower blade
holder knobs are loose, Spread blade
holder jaws open using fingers.
NOTE: A rubber band looped aroundthe
back of the blade holder will automatically open the jaws when the knobs are
loosened which will make changing
btades easier, See illustration below.
* Install the blade through the opening in
the table with the teeth pointing down,
Engage the pin into the "V" notch of the
lower blade holder,
Tighten
"-Notch
° Pull up on the blade and engage the
upper pin in the "V" notch of the upper
blade holder,
° Align blade straight with the front face
of the blade holders. Tighten upper and
lower blade holder knobs by turning
knobs clockwise until the jaws close
evenly against the blade,
NOTE: To prevent blade holder damage,
do not use pliers to tighten knob.
,, Carefully tighten the blade tension by
turning the tension knob clockwise
until you feel the slack in the
blade is removed,
o Check to see that the pins are properly
located in the V-notch slot, Turn the
tension knob an additional two futl turns
clockwise, This amount of blade tension should do well for most cutting
operations and blades, The number of
turns witl be approximately two full
turns. This wilt vary one or two turns
depending ,on blade thickness and
blade typm
, Make sure the blade is properly
installed, Before applying power,
rotate the motor shaft by hand using a
screwdriver in the motor shaft stot as
shown.
"V"-Notch
WARNING:
To avoid injury from
thrown objects, remove all tools
from the saw.
Rubber Band
!5
Alignment
(Adjustments)
(continued)
....
Loosen
WARNING:
To avoid injury from
accidental starting, always turn
switch "OFF and unplug power
cord from outlet before removing
or replacing the blade.
Loosen tension on blade by turning tension knob counterclockwise
about three full turns.
• Loosen the upper b_ade holder by turning the knob on the holder counterclockwise _
so the jaws open.
• Remove blade from upper blade
holder,
. Loosen the lower blade holder knob in
the same way as the upper blade
holder in step 2, To make lower b;ade
holder access easier, tilt the table to
45 ° and raise the arms to the up position using a screwdriver to rotate the
motor shaft.
• Remove blade from tower blade holder.
Loosen
Upper
le
Holder
Lower Blade
Holder
16
installing Plain End Blades
Check that the blade tension knob is loose.
- Check that the upper and lower blade
holder knobs are loose, Spread blade
holder jaws open using fingers.
NOTE: A rubber band looped around the
back of the Made holder wiIl automatically open the jaws when the knobs are
loosened which will make changing
blades easier. See }Ilustration below.
,tnstal! the blade through the hole in the
table and into the lower blade holder. The
blade teeth should point down. Position
the blade so that it is straight with the front
face of the blade holder and extends
beyond the blade holder as shown.
qighten the lower blade holder knob by
turning the knob clockwise
until the jaws close securely.
NOTE: To maintain Made holder clamping force, keep finger knob threads
cleaned and oiled using atl purpose
household machine (or motor) oil, To
prevent blade holder damage, do not
use pliers to tighten knob,
Use the same procedure to install the
blade into the upper btade holder.
Before tightening the jaws using the
upper biade holder knob, adjust the
position of the upper blade holder by
turning the blade tension knob until the
end of the blade is near the top of the
blade holder as shown. Tighten the
upper blade holder knob by turning the
knob clockwise _
until the jaws
close securely.
• Tighten the blade tension knob clockwise ,_
until the blade is tensioned. The number of turns will be
Tighten
Position Blade
As Shown
Jpper Blade
Holder
•owo..,.oo
"
Holder --_____
Position B!
As Shown
approximately two full turns. This witl
vary one or two turns depending on the
blade thickness and blade type.
, Make sure the blade is properly
installed. Before applying power,
rotate the motor shaft by hand using a
screwdriver in the motor shaft as
shown.
NOTE: To prevent blade holder damage,
do not use pliers to tighten knob.
17
°,° L
Alignment
(Adjustments)
(continued)
Dust B|ower
The dust bto_er wilt direct air to the most
effective point on the cutting tine when
the hold:down is adjusted. No adjustment is necessary to the blower.
ill
Blade Guard
Blade Guard
The blade guard will always be positioned parallet to the blade, No adjustment is necessary.
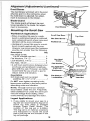
Mounting
the Scroll Saw
Workbench
Applications
• When mounting this saw to a workbench a solid wood bench is preferred
over a plywood bench where noise and
vibration will be more noticeable.
• Hardware to mount this saw to a workbench is not supplied with the saw.
However, we recommend the hardware
used be not smaller than the following,
Description
Qty,
Hex Head Screw,
1/4-20 x Iength required .................. 3
Flat Washers, 1/4 I,D .......................... 6
Lock Washers, 1/4 I.D ......................... 3
I_ex Nuts, 1/4-20 ................................. 6
°A soft foam pad to place between your
scroll saw and workbench is not supplied with the saw. However, we highly
recommend the use of such a pad to
reduce noise and vibration.
Description
Qty.
Soft foam pad such as carpet
padding, 24" x 12" x 1/2", .................. t
Do NOT over tighten mounting bolts leave some cushion in the foam pad for
absorbing noise and vibration.
NOTE: Through normal use sawdust
accumulates under the unit, Frequently
clean sawdust from under the unit to prevent the linkage from binding, which
could overload and damage the motor.
Legset
Dust Blower/"
Applications
1. ]f you prefer to mount your saw to a
leg set, we recommend the leg set for
bench top tools which is available
through Sears Retail Stores. The
number of this leg set is 9_22244.
This leg set is an optional accessory
and instructions to mount the scroll
saw to this leg set are included in the
leg set package.
18
Scroll Saw Base "-_
Top View
Hex Head Screw_
Hex Head
Flat Washer.
1/2" Foam Pad
(Optional)
Flat Washer
Nut
Safety
Instructions
for Basic
Saw Operations
_efore Each Use
Inspect
• Make sure the blade tension
adjusted.
your saw.
• Keep Work Area Clean, Cluttered
areas and benches
invite accidents.
Disconr_ect
The Saw. To avoid injury
from accidental starting, turn the switch
"OFF", unplug the saw before changing
the setup, removing covers, guards or
blade.
Check
Damaged
* Alignment
, Binding
of moving
,, Broken
parts.
,, Stable
Parts.
of moving
Check
Floor
for:
, Know Your Saw, Read and understand the owners manuat and labe}s
pads.
affixed to the tool. Learn its applications
and limitations
as well as the specific
potential
hazards peculiar to this tooi.
mounting.
o if any part is missing,
th at may affect the
bent or broken
,, To avoid injury from accidental
contact
with moving parts, don't do layout,
assembly or setup work on the saw
while any parts are moving.
in
any way, or any electrical parts don't
work properly, turn the saw off and
unplug the
missing or
saw again.
in working
- Avoid
switch
saw. Replace damaged,
failed parts before using the
Keep Guard In Place and
order,
into a power
outlet.
work,
. Use The Right Tool. Don't force toot or
attachment
to do a job it was not
designed to do,
o Use this scroll saw to cut only wood,
wood-like products,
plastics and nonferrous met&Is,
ing.
Remove
adjusting
keys and wrenches
from too_ before turning it on.
CAUTION: This saw is NOT
designed for cutting ferrous metals
like iron or steel. When cutting
nonferrous metals (brass, copper
and aluminum, etc.), metal shavings can react with wood dust and
start a fire. To avoid this:
• Remove all traces of wood dust
from inside the saw.
injury from jams, slips or thrown
Use Only Recommended
Accessories. (See "Recommended
Accessories" section),
Consult this Owner's
manua! for recommended
accessories.
Follow the instructions
that come with
the accessories,
The use of improper
accessories
may cause risk of injury to
o Remove all traces of metal dust
from or= or around the saw before
sawing wood again.
persons.
- Choose the right size and style blade
for the material and the type of cutting
you plan to do.
* Make sure the b}ade teeth pebt
ward, toward the table.
Accidental
Starting,
Make sure
is "OFF" before plugging saw
Plan your
Maintain
Tools With Care. Keep the
saw ctean for best and saiest performance. Fotlow instructions
for lubricat-
To avoid
pieces:
must not be stJppely.
To avoid burns or other fire damage,
never use the saw near flammable
liquids, vapors or gases.
parts.
, Any other conditions
way the saw works.
is properly
down-
19
Safety Instructions
for Basic Saw Operations
Plan Ahead To Protect Your Eyes,
Hands, Face And Ears
Any power saw Can throw foreign objects
into the eyes. Ths can cause permanent
eye damage Wear safety goggles (not
glasseS) that camp y with ANS Z87 1
(shown on package). Everyday eyeglasses have only impact resistant
lenses. They are not safety glasses.
Safety goggles are available at Sears
Retail Stores. Glasses or goggles net in
compliance with ANSI Z87.1 could seriously hurt you when they break.
Dress for safety
• Do net wear loose clothing, gloves,
neckties or jewelry (rings, wristwatches). They can get caught and
draw you into moving parts.
• Wear non-slip footwear_
,Tie back long hair.
• Roll 10ng steeves above the elbow.
• Noise levels vary widely. To avoid possible hearing damage, wear ear plugs
or muffs when using saw for hours at a
time.
• For dusty operations, wear a dust mask
along with the safety goggles.
Inspect your werkpiece.
Make sure there are no nails or foreign
objects in the part of the workpiece to be
cut.
Use extra caution with large,
very small
or awkward workpieces
• Never use this tool to finish pieces too
small to hold by hand.
• Use extra supports (tabies, saw horses,
blocks, etc.) for any workpiece large
Whenever
_! :
i_i
enough to tip when not held down to
the table top.
• Never use another person as a substitute for a table extension, or as additional support for a workpiece or to help
feed, support or pu[_the workpiece.
* When cutting irregular{y shaped workpieces, plan your work so it will not
pinch the blade. A piece of molding, for
example, must lay flat or be held by a
fixture or jig that wil! not let it twist, rock
or stlp while being cut.
, Properly support round material such
as dowel rods or tubing. They have a
tendency to roll during a cut, causing
the blade to "bite". To avoid this, always
use a "v'" block.
• Cut only one workpiece at a time.
• Clear everything except the workpiece
and related support devices off the
table before turning the saw on.
Plan the way you will hold the workpiece from start to finish.
• Do not hand hold pieces so small that
your fingers will go under the blade
guard. Use jigs or fixtures to hold the
work and keep your hands away from
the blade.
• Avoid awkward operations and hand
positions where a sudden slip could
cause fingers or hand to move into the
blade.
• Don't Overreach.
and balance.
• Keep your face and body to one side of
blade, out of line with a possible thrown
piece if the blade should break.
• Before starting your cut, watch the saw
while ifcruns. f it makes an unfamiliar
noise Or vibrates a lot, stop immediat e y. Turn the saw off. Unplug the saw.
Do not restart until finding and correcting the problem.
• Keep Children Away. Keep atl visitors
a safe distance from the saw. Make
sure bystanders are clear of the saw
and workpiece.
• Don't Force Tool, It will do the job better and safer at its designed rate. Feecl
the workpiece into the saw blade only
fast enough. to
bogging
. let It
' cut without
"
"
down or binding
"
20
:i
Keep good footing
Saw Is Running
(gained from frequent use of your
saw) cause a careless mistake° A
I careless
ARNING:
fraction
Don'tofleta second
familiarityis
enough to Cause a severe injury,
:
:
(continued)
Before freeing any jammed material:
,, Turn switch "OFF".
• Wait for all moving parts to stop.
o Unplug saw.
When backing up the workpiece, the
blade may bind in the kerr (cut). This
is usually caused by sawdust c_ogging up the kerfo if this happens:
Before
Leaving
The
o Wait for all moving
oTurn switch "OFF",
oWait for nil moving parts to stop.
o Unplug saw.
-With a flat blade screwdriver, turn the
motor by hand while backing up the
workpiecer
Before removing loose pieces from
the table, turn saw off and wait for al!
moving parts to stop,
Saw:
OFF
parts to stop.
° Make Workshop
Child-proof.
Unpfug
the saw. Lock the workshop
and ON/
Basic
Saw Operations
General
, To get accurate cuts, be prepared to
compensate
for blade's tendency to foItow the wood grain as you are cutting.
Instructions
Please, read and understand
the following items about your scroll saw before
attempting
• This scroll saw is intended
to use the saw.
wood-like
products,
ferrous metals.
,, The saw does not cut wood by itself.
You a!{ow the saw to cut wood by guid o
ing the wood into the blade as it moves.
•_ The blade teeth
down stroke.
cut wood
only
o Very
used
benefit
wear
over
1/4 inch thick,
use
blades.
o Wider blades can't cut curves
or srnalt as thinner blades,
from the blades.
saw blades
be
!/4
Most blade packages
state the size
or thickness
of wood which that blade
is intended
to cut, and the radius,
size of curve, which can be cut with
that blade.
cutting
o Narrower
:blades work
thinner wood material.
o When cutting wood thicker than one
inch the user must guide the wood
very, very slowly into the blade and
take extra care not to bend or twist the
blade while cutting in order to maximize
blade life.
on scroll
fine, narrow blades should
to scroll cut in thin wood
To cut wood
wider
that period d time it is expected that
some blades wil! break until you learn
how to use the saw and receive the
greatest
and non-
inch thick or less.
,, There is a Iearning curve for each per T
son who wants to use this saw. During
o Best results are achieved when
wood less than one inch thick.
to cut wood,
plastics
o When choosing a blade to use with
your scroll saw, consider the fo!iowing
carefully.
on the
,, You must guide the wood into the blade
siowty because the teeth of the blade
are very small and they can only
remove wood when they are on the
down stroke.
o Teeth
knob on the saw. Store the key
away from children and others not qualified to use the tool.
wel!
as tight
only
on
o This saw uses 5 inch long pin and plain
end type blades only. See your Sears
Retail Store for accessory blades.
- Blades
wear faster when
cutting
ply-
wood, which is very abrasive;
when
sawing wood which is thicker than the
7/8 inch blade stroke; and when sawing
hardwood,
or when side pressure is
out
and as such must be replaced frequently for best cutting results. Scroll
saw blades generally stay sharp for 1/2
hour to 2 hours of cutting.
placed
21
on the blade.
Basic
Saw Operations
Making
interior
Scroll
(continued)
Cuts
. One of the features of tMs saw is, that it
can be used to make scmt{ cuts on the
............................
............................
* When finished making the interior scrolt
cuts, simply remove the blade from the
b_ade ho_ders, as described
in the
Assembly
section, and remove
board from the tabEe.
interior of a beard without breakir_,g or
cutting into the outIine or perimeter of
the board.
WARNING:
To avoid injury from
accidental
starting, always turn
switch "OFF" and remove
plug
from power source outlet before
removing
or replacing
the blade,
the
Install Blade Through
Hole In Board
• To make interior cuts in a board,
remove the scroll saw blade as
explained
in the Assembty
section.
. Drill a t/4" or larger hole in the board
you will use to make interior cuts.
. Place the board on the saw table with
the hole in the board ever the access
hole in the table.
• Instal! the blade through the hole in the
board and adjust blade tension.
Choice
of Blade
and Speed
Your scroll saw accepts a wide variety of
5" plain end and pin end blades. As a
general guide:
als or when
"Use a finer tooth blade for cutting thin
workpieee, when a smoother cut is
required for hard materials orwhen
using slow saw speeds,
• Use a coarser tooth blade for cutting
thicker workpieces, when making
straight cuts, for medium to soft matedPin and Plain end Blades
Teeth/
Inch
Width
20
15
,029"
.110"
t2.5
.038"
Thickness
using
faster
saw speeds.
• Use a blade that well have at least 2
teeth in the material at all times.
o Use thin, narrow blades for tight radius
work, and thick, wide blades for large
curves and straight cuts.
Listed below are examples of some
blades and their intended uses:
Speed
Application
.012"
.018"
5006OO
Tight radius work; 3/32" to !/8"
wood veneer, wood, bone, fiber,
plastics, non-ferrous
metals, etc.
.016"
6001200
Close radius cutting in materials 3/32"
1o 1/2" thick. Good for hard and soft
wood, bone, horn, pTastics, etc.
I1.5
10
.053"
.110"
,0!8"
.018"
!2001700
22
For hard and soft woods
like products
and wood_
P!/aJnter_r_ce
WARN{NG:
push cont_'o_
ramove
plug
outlel before
caring
Fo_ you_ own safety,
knob "OFF" and
_ro_'n _owe_ sogrce
n]air_taini_;g
ot ]ubri.,
I
I
f
I
I
you,r saw.
I
General
,A,_/ Oc88SiOhal
COat
O_ pCSte
'_'_'_!_XOn
t_6
work table wii! ai}ow t,19 woo( _b_._ing cut
1o 9 __e smeoth!y 8c,o,'_: tie _sork sur
_,_,_I
"_ .....
_
.,_#r_,_
_-_--_
/u_--<;
Drawer - Apply oil sate for plastic to
ci;e_wer ar<i guide as neeessa W
keep finger knob thr®ads c}e_:_ned and
oled using al ou_pose housei_eid
machine (o_ motor) o<
di
/
_',lolor/etectrica!
_'he molor be_dngs a_e Dermanent!y
lubricated
andrequi_enofuriher
ub_icatiom
Do not attempt to oi! tile motor beadn¢s
or s_-,_vice rise motor }tltei'nal parts
worn, cut or damaged
in any way.
WARNING:
_f the power cord is
Lhave it replaced
immediately.
trocutio_'<
electric
parts with only approved
service
" WARNING:
To avoidexactly
fire oraseJec-,
parts. Reassemble
origi-,
,._a!!y
Arm
reassemble
]
]
aseem_)]ed.
Bearings
Lubricate the arm ben.rings after i 0
i_ours of use Re.oil a_t_:,r8very 50 hours
of use o[ whenever there is a squeak
coming from the ben.rings
_-Y
//
Arm
.,¢Bea_ings
TUFf]S&W OFF_Issi(Je
• Squirt a generous smoun! of SAE 30 oil
around the shait end and bronze heaping
- Let the oil soak in overnight
tion
Recommends
Recommended
Blades ........
--i
<4-.
the Following
Accessories
)
Accessories
Leg Set
See Sears Re(si! Store
_or 5" !ong Pl_in E_dPn
fi
in this posi-
o Next day repeal the above p_oced'4re
for the opposite side of the saw
Sears
................
w,,,._:_
....... /
End biades
........................
9-22244
Troubleshooting
. - ..
WARNING_ For your own safety, turn switch "OFF", and remove plug from
power source outlet before troubleshooting your scroll
saw, ,,,,,,,,,,,,_,,
,,, ,,,,,,,,,
.........
•
!
Problem
i Breaking
,,Blades.
:
Probable Cause
Remedy Schedule
1.Wrong tension
2. Over working blade.
- 3. Wrong blade application.
14. Twisting blade in
wood,
1. Adjust blade tension.
2. Reduce feed rate.
3. Use narrow blades for cutting thin
wood. wide blades for thicker wood,
4. Avoid side pressure on blade.
_lain end blade
slips within
blade clamp
1. Blade clamp not
tightened
2. End of blade
becomes burnished.
3. Dirty finger knob
threads.
Motor will not
run.
1. Damaged cord or
plug.
2. Damaged motor or
controt board.
Vibration
NOTE: There
witt always be
some vibration
present when
the Saw is running because of
the bla.de and
arm m0vement.
1. See mounting instructions in this
manual for proper mounting technique.
2. Unsuitable mount2. The heavier your workbench is, the
ing surface.
less vibration will occur. A plywood
workbench will not be as good a work
surface as the same size solid lumber. Use common sense in choosing
a mounting surface.
3. Loose table
3. Tighten table lock knob.
4. Loose motor mount- 4. Tighten motor mounting screws.
ing.
1. Tighten blade clamp.
2. Roughen end of blade with emery
(100 grit)
3. Ctean and oil threads.
i
1. Replace damaged parts before using
saw again.
2. Consult Sears Service. Any attempt
to repair this motor or control board
may create a HAZARD unless repair
is done by a qualified service techni*
cian. Repair service is available at
your nearest Sears Store.
1. Improper mounting
of the saw.
1. Turn machine "OFF" and then back
Motor-stops dur- 1. Aggressive feeding
causes Current Pro"ON" to continue cutting. Slow down
ing cuts
:
tector to shut motor
the feed rate of material into blade.
off;
2. Excessive sawdust
2. Clean sawdust from under unit.
under unit may bind
linkage, causing
current protector to
shut motor off.
24
I
Wiring Diagram
...............................................
WARNING:
To avoid fire or shock,
use only recommended service
parts and reassemble exactly as
originally assembled.
1
Ground
sc_
Black) I_
Switch
n
_!O' _ :2:U_..
Cord w/Plug
Board
rj _=-_
Ground
Screw
25
.............
._
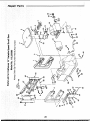
Repair Parts
............
26
Repa_Par_
o
o
>,
-r
0)
o
r_
Z_
EC0
__
0
o
o
_E
4--
27
For the repair or replacement par_syou need
Gall 7 am - 7 pro, 7 days a week
1-800-366_PART
(1-800-365-7278)
For in-home major brand repair service
Call 24 hours a day, 7 days a week
°8OO-4_REPAIR
(1-800-473-7247)
For the location of a
Sears Repair Service Centerin your area
Call 24 hours a day, 7 days a week
t -800-488-1222
Forinformation on purchasinga Sears
Maintenance Agreementor to inquire
about an existing Agreement
Oall 9 am _5 prn, Monday-Saturday
t -800-827-6655
SEARS
America's
Repair
Specialists
The model and serial numbers will be found attached to right side of
arm housing,
When requesting service or ordering parts, always provide the follow'
ing information:
o Product Type
o Model Number
• Part Number
• Part Description
Sears, Roebuck and Co., Hoffman Estates, IL 60179 U.S.A.
Part No. SP5837
Form No. SP5837-2
Printed in U.S.A. 7/97