1
Theatre 360
Owner’s Manual
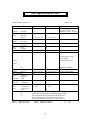
TABLE OF CONTENTS
Table of Contents
i
Introduction
Features
Turn On/Turn Off
Console Division, Memory Tab and Piston Locations
Combination Action with Four Memory Levels
–Unlocking a Combination Memory
–Setting the Pistons
–Locking a Combination Memory
Console Display and Menus
–360 User Menu Items
–360 MIDI Menu Items
–360 User (Headphone) Menu Items
Expression and Crescendo Shoes
–Chamber Allocation of Voices
–Unlocking the Crescendo
–Setting the Crescendo Sequence
–Locking the Crescendo
Melody Coupler
–Setting the Range of the Melody Coupler
Counter Melody Coupler
–Setting the Range of the Counter Melody Coupler
Pizzicato Coupler
Great Sostenuto
Rodgers Rhythmaker™
–Primary Patterns and Second Patterns
–Traps Unenclosed
–Adjusting the Volume of the Rhythmaker
Traps
–Traps Unenclosed
–Adjusting the Volume of the Traps
Trap Select
–Trap List
–Setting the Trap Select Tabs
Rodgers Mood Enhancement™
–Mood Enhancement List
–Adjusting the Volume of the Mood Enhancement
i
page
page
page
page
page
page
page
page
page
page
page
page
page
page
page
page
page
page
page
page
page
page
page
page
page
page
page
page
page
page
page
page
page
page
page
page
1
2
2
2
3
3
3
4
4
5
6
7
8
8
8
8
9
10
10
10
10
11
11
11
11
11
12
12
12
13
13
13
13
14
13
14
Manual Sound Effects
–Adjusting the Volume of the Manual Sound Effects
–Manual Sound Effects Chart
Transposer
Tuning Control
–Locking and Unlocking the Master Tuning
–Adjusting the Pitch
Console Lamp Dimmer
Digital Dynamic Wind™
Wind Stabilizer
–Adjusting the Wind Stabilizer
Expression Range Adjustments
–Setting the Expression Range
Voice Palette™
–Voice Palette List
–Accessing the Voice Palette
–Locking and Unlocking the Voice Palette
Adjustable Tremulants
–Tremulant Tab Voice Designation
–Adjusting the Tremulant Rate
–Adjusting the Tremulant Depth
Master Volume Control
–Adjusting the Master Volume
Audio Save
–Saving Audio Control Settings
Stereo Headphone Jack
–Adjusting the Headphone Settings
Auxiliary Inputs
–Adjusting the Auxiliary Inputs
Digital Reverberation
–Setting the Reverb Volume
–Setting the Reverb Time
–Setting the Reverb Type
Random Detuning
Automatic Shutdown Timer
Pipes
MIDI (Musical Instrument Digital Interface)
–MIDI Channel Assignments
–Selecting a MIDI Sound
–Previewing Various MIDI Sounds
Roland GS Standard Support
ii
page
page
page
page
page
page
page
page
page
page
page
page
page
page
page
page
page
page
page
page
page
page
page
page
page
page
page
page
page
page
page
page
page
page
page
page
14
15
16
17
17
17
17
18
18
18
18
19
19
20
20
20
21
21
21
22
22
22
22
23
23
23
23
23
24
24
24
24
25
25
25
25
page
page
page
page
page
26
26
26
27
27
–Setting the GS Variation (Bank Number)
MIDI Sounds in Combination Pistons
–Saving a MIDI Sound in a Combination Piston
Additional MIDI Settings
MIDI Note Velocity
–Setting Fixed Velocity
–Setting Expression Velocity
–Setting Keyboard Velocity
Octave Shift
–Shifting the Octave of a MIDI Sound
MIDI Volume Level
–Adjusting the Volume of a MIDI Sound
Internal/External MIDI Sound Modules
–Turning Off the Internal MIDI Sound Module
MIDI Channel Assignment
–Assigning MIDI Channels
MIDI Save
–Saving MIDI Control Settings
Sustain Switch
Additional MIDI Settings on Combination Pistons
–Saving MIDI Settings on a Combination Piston
–MIDI Coupler Piston Factory Default Settings
Enabling/Disabling MIDI Master Channels
–Enabling or Disabling a MIDI Master Channel
MIDI Stop Changes
–Selecting MIDI Stop Change Settings
–Using Pistons to Control a Second Rodgers Console
MIDI Local Control
–Enabling or Disabling MIDI Local Control
MIDI Sequencer Update
–Enabling or Disabling MIDI Sequencer Update
MIDI Device ID
–Setting the MIDI Device ID
Saving a Combination Memory
MIDI Connections
Rodgers Personal Memory Card
–Deleting a Memory from the Card
Storing Crescendo Sequences on the Card
–Deleting a Crescendo Sequence from the Card
Storing Additional Settings on the Card
–Deleting Settings from the Card
iii
page
page
page
page
page
page
page
page
page
page
page
page
page
page
page
page
page
page
page
page
page
page
page
page
page
page
page
page
page
page
page
page
page
page
page
28
28
28
29
29
29
29
30
30
30
31
31
31
31
31
31
32
32
32
32
32
33
33
33
34
34
35
35
35
35
35
36
36
36
37
page
page
page
page
page
38
39
39
39
39
page 40
Personal Memory Card Folders
–Selecting a New Folder on the Card
Locking/Unlocking a Personal Memory Card
Using a Personal Memory Card on other Rodgers Organs
Reinitializing a Personal Memory Card
Replacing the Personal Memory Card Battery
page
page
page
page
page
page
40
40
41
41
41
42
Theatre 360 Stop Specification
Console Dimensions
page 43
page 45
Factory Default Combination Settings
–Restoring the Factory Default Combination Settings
Factory Default Registrations for M1 and M2
–Memory 1Generals
–Memory 2 Generals
–Memory 1 and 2 Divisionals
page
page
page
page
page
page
Suggested Registrations
page 54
Internal Sound Module Instrument and Drum Set Charts
Program Change Number Chart
Drum Set Charts
Blank Chart for Favorite Sounds (Accomp)
Blank Chart for Favorite Sounds (Great)
Blank Chart for Favorite Sounds (Solo)
page
page
page
page
page
page
MIDI Implementation Chart
page 66
Care and Maintenance
–Console and Pedalboard
–Keyboards and Stop Tabs
–Pipes on Pipe-Augmented Instruments
page
page
page
page
Safety Instructions
page 68
Radio and Television Interference Notice (FCC Notice)
page 69
iv
46
46
47
47
49
51
57
57
60
63
64
65
67
67
67
67
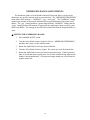
INTRODUCTION
While Chaplin was silent, a new kind of organ brought the sound of music to movie
audiences throughout the world. This glorious new instrument was called the theatre organ,
and it became as popular as the movie stars it accompanied. Although many of these stars
began to fall on the day audiences first heard Jolson sing on screen, the theatre organ never
lost its hosts of loyal and articulate enthusiasts.
Today’s digitally sampled electronic theatre organ has evolved into much more than a
smaller version of the mighty theatre pipe organ. Besides the most authentic traditional
theatre organ voices available on a digital instrument, the Rodgers Theatre 360 offers the
organist an entire orchestra, a variety of percussion and trap instruments, and a myriad of
sound effects.
As you become acquainted with the Rodgers Theatre 360 and the vast musical resources
of such features as the exclusive Voice Palette, the Rhythmaker, Selectable Traps, and Mood
Enhancements, it becomes apparent this instrument is much more than just a recreation or a
replica. The built-in Roland sound module lets the organist choose from over 600 sounds in
addition to the very complete specification of traditional theatre organ voices. With note-bynote voicing capability, tremulants with controls to adjust both the rate and depth, and the
ability to add real wind-blown pipes, the Rodgers Theatre 360 is truly in a class by itself.
This manual will help with the exploration of the expansive capabilities and the variety of
features and functions offered by this incomparable instrument. As highly sophisticated as the
Theatre 360 is, the features are easy to use and easy to access, creating a most satisfying
musical experience for the player and listener alike.
The Rodgers Theatre 360 is a wonderful example of Rodgers’ commitment to celebrate
tradition while creating the future. From the first notes that sound forth from the Theatre 360
to the endless possibilities of sound combinations developed over the years to come, we think
you will agree Rodgers is indeed the sound choice!
Celebrating Tradition . . .
Creating the Future
1
FEATURES
To get started, here is a tour of the basic operations of the Rodgers Theatre 360:
TURN ON/TURN OFF
To turn the organ on, press the top part of the rocker switch in the left panel and hold
until “RODGERS UNIT ORCHESTRA” or your personalized greeting appears in the Console
Display. Release. The organ will perform a self diagnostic test of its systems within a few
seconds. When completed, the Console Display will read “TRANSPOSER 0/TEMPO 120”.
The Rodgers Theatre 360 is ready to play. To turn the power off, press the lower part of the
rocker switch and release after 1-2 seconds.
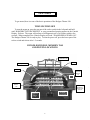
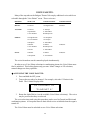
CONSOLE DIVISION, MEMORY TAB
AND PISTON LOCATIONS
Memory Tabs:
M1, M2, M3 & M4
Great
Accompaniment
Pedal
Solo
General
Pistons
1-10
Solo
Divisional
Pistons
1-5
Great
Divisional
Pistons pp-ff
and 1-5
Accomp/Pedal
Divisional
Pistons pp-ff
Pedal
Divisional
Pistons
1-5
2
COMBINATION ACTION WITH FOUR MEMORY LEVELS
The Rodgers Theatre 360 features a combination action easily changed by the organist
from the console. The organist can pre-select registrations and make rapid changes in tone
color using this advanced system.
Rodgers’ microprocessor combination action is a specially refined four-memory system.
This effectively multiplies the number of physical pistons on the console by four.
The 10 General pistons simultaneously affect all stops and controls on the Great, Solo,
Accompaniment and Pedal. All manual and pedal registrations may be changed by pressing
one General piston.
The 10 Great Divisional pistons are labeled in the traditional theatre pipe organ manner of
pp, p, mf, f, ff, 1, 2, 3, 4 and 5. The 5 Accompaniment Divisional pistons affect the
Accompaniment and Pedal divisions. The Divisional pistons independently affect all stops
and controls on the Great, Solo, Accompaniment/Pedal or Pedal. Each division registration
may be changed independently.
Tremulants are affected only by the Great Divisional pistons and the General pistons.
Note: For expanded memory capability, please refer to the “Rodgers Personal Memory
Card” section.
A combination memory must be unlocked to set pistons. Once the pistons are set, the
combination memory may be locked again to prevent accidental change.
UNLOCKING A COMBINATION MEMORY:
1.
Press and hold the memory tab for five seconds. “LOCKED” appears in the
Console Display.
2.
While continuing to hold the memory tab, rotate the Alpha Dial either direction
until the Console Display reads “UNLOCKED.”
3.
Release the memory select tab. The memory is now unlocked.
SETTING THE PISTONS:
1.
Select a memory by pressing M1, M2, M3 or M4 located on the bottom row of the
group of black tabs to the far right on the back rail. Note: Pistons cannot be set if
the memory is locked. Please refer to the “Unlocking a Combination Memory”
section.
2.
Select the desired stops.
3.
Press and hold the SET piston, located under the Accompaniment manual to the
left.
4.
While holding SET, press the desired combination piston. Then release both
pistons. Note: Stops may be added or deleted from any combination using the
above procedure.
3
LOCKING A COMBINATION MEMORY:
1.
Press and hold M1, M2, M3, or M4 for approximately five seconds until
“UNLOCKED” appears in the Console Display.
2.
While continuing to hold the memory tab, rotate the Alpha Dial either direction
until the Console Display reads “LOCKED.” Note: Combination pistons cannot
be set on any memories that are locked.
3.
Release the memory select tab. The memory is now locked.
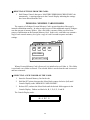
CONSOLE DISPLAY AND MENUS
The Rodgers Theatre 360 is equipped with a two-line Console Display window located in
the right panel. This display indicates the Transposer and Tempo setting, and it can be used to
alter many other settings and organist preferences including MIDI settings, Voice Palette, and
Tremulant rate and depth, among many others.
Two controls are used to select and operate the features of the Console Display. The
smaller knob, located near the Console Display, is called the Select Knob and is used to select
different menu items to be changed. When the Console Display reads “TRANSPOSER 0/
TEMPO 120”, this knob controls the Transposer function. The larger flush dial, near the
Console Display, is called the Alpha Dial and is used to change a menu setting which has been
selected. When the Console Display reads “TRANSPOSER 0/TEMPO 120”, this dial
controls the Tempo function.
To move to a new menu or to make a new setting in the same menu in the Console
Display, hold SET and turn the Select Knob. Note: Once any menu other than the
Transposer/Tempo menu has been selected, it is no longer necessary to hold SET to select
further menus.
The blinking square in the Console Display, called the cursor, indicates the setting which
is currently selected. Rotating the Alpha Dial will change the value of any selected setting.
There are three different menus. The User Menu accesses organ and audio settings such
as Voice Palette, Tremulant settings, Master Volume, and Auxiliary Input controls. This
menu is accessed by holding SET and turning the Select Knob counter clockwise (left) from
the Transposer/Tempo menu.
The second menu controls MIDI settings and is accessed by holding SET and turning the
Select Knob clockwise (right) from the Transposer/Tempo menu.
The third menu also accesses organ and audio settings, but it is only available when
headphones are used. Note: Please refer to the “Stereo Headphone Jack” section.
To return to the Transposer/Tempo display, press General Cancel.
4
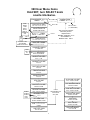
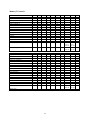
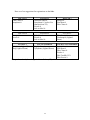
360 User Menu Items
Hold SET, turn SELECT knob
counterclockwise.
TRANSPOSER ²
TUNING A= ² ² ² .²
TRANSPOSER 4b thru 7#
TEMPO ² ² ²
MAIN I
MAIN II
TUBA
SOLO I
SOLO II
TIBIA CL
TIB MINOR
VOX
PD
AC
-9 thru 9
"VOICE PALETTE" MENU
20 thru 250
(SEE VOICE PALETTE SECTION)
427.7 thru 453.0
(± ½ SEMITONE)
VOICE PALET TE
LOCKED, UNLOCKED
²²²² ²
TREM
RAT E: ² DEPTH: ²
-9 thru 9
² ² TRAP SELECT
This menu item appears
when SET piston is
depressed and
MASTER TUNING is set to
ADJUSTABLE or
MANUAL ADJ. ONLY.
(SEE TRAP SELECT SECTION)
LOCKED A=440
ADJUSTABLE
MANUAL ADJ ONLY
MAIN
SOLO
FX
MASTER TUNING
²²²²²²²²²²²²²
CONSOLE LAMPS
1 THRU 16
² ² ² ² MIN EXPR:
PPPP, PPP, NORMAL
WIND STABILIZER
OFF, ½, ON
MODULE VOLUME
0 thru 127
RHYTHM VOLUME
0 thru 127
TRAPS VOLUME
0 thru 127
MOOD VOLUME
0 thru 127
AUX MAIN VOLUME
SFX VOLUME
OFF, -31.25 thru 6.25 dB
0 thru 127
AUX MAIN BALANCE
MASTER VOLUME
-10.00 thru 10.00 dB
-20.00 thru 5.00 dB
AUX ANT VOLUME
REVERB VOLUME
ROOM1
ROOM2
ROOM3
HALL1
HALL2
Use the
ADJUSTMENT DIAL
to select these
menu items.
OFF, -31.25 thru 6.25 dB
REVERB TYPE
²²²²
OFF, -31.25 thru 6.25 dB
AUX ANT BALANCE
-10.00 thru 10.00 dB
AUX BASS
REVERB TIME
-14.00 thru 14.00 dB
SHORT, NORMAL, LONG
AUX TREBLE
AUX ² ² ² ² ² ² ² ² ² ²
-14.00 thru 14.00 dB
0.00 dB
AUX GAIN BOOST
LINE OUT GAIN
0 thru 18.75 dB
0 thru 18.75 dB
5
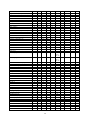
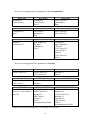
360 MIDI Menu Items
Hold SET, turn SELECT knob
clockwise.
AC A
AC B
GT A
GT B
SO A
SO B
PD A
PD B
TRANSPOSER ²
TEMPO ²
1 thru 16
(AC A ONLY)
MIDI ² ² ²
CH ²
PGM=² ² ² VAR=² ² ²
OFF, 0 thru 127
OFF, 1 thru 128
MIDI ² ² ²
VEL:² ² ²
CH ²
²²²²
MIDI ² ² ²
LEVEL:² ² ²
CH ²
²²²²
FM KBD, FM EXP, 2 thru 127
UP 2
UP 1
NORM
DN 1
DN 2
INT
EXT
OFF, 1 thru 127
MIDI KEYBOARD
VELOCITY: ² ² ² ²
PD
GT
SO
AC
FX
OFF
STP
PST
S&P
LIGHT
NORMAL
HEAVY
MIDI ² ² MASTER
CHNL: ² ² ² ²
OFF
RCV ONLY
SEND ONLY
SEND & RCV
MIDI STOP CHANGES
RCV: ² ² ² SEND: ² ² ²
MIDI LOCAL
CONTROL ² ²
OFF
STP
PST
S&P
ON, OFF
MIDI SEQUENCER
UPDATE ² ²
ON, OFF
MIDI DEVICE ID
²²
1 THRU 32
6
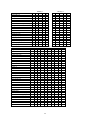
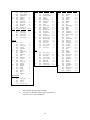
360 User (Headphone) Menu Items
Hold SET, turn SELECT knob
counterclockwise.
TRANSPOSER ²
TUNING A= ² ² ² .²
TRANSPOSER 4b thru 7#
TEMPO ² ² ²
MAIN I
MAIN II
TUBA
SOLO I
SOLO II
TIBIA CL
TIB MINOR
VOX
PD
AC
-9 thru 9
"VOICE PALETTE" MENU
20 thru 250
(SEE VOICE PALETTE SECTION)
427.7 thru 453.0
(± ½ SEMITONE)
VOICE PALETTE
LOCKED, UNLOCKED
²²²² ²
T REM
RATE: ² DEPT H: ²
-9 thru 9
² ² T RAP SELECT
This menu item appears
when SET piston is
depressed and
MASTER TUNING is set to
ADJUSTABLE or
MANUAL ADJ. ONLY.
(SEE TRAP SELECT SECTION)
LOCKED A=440
ADJUSTABLE
MANUAL ADJ ONLY
MAIN
SOLO
FX
MASTER TUNING
²²²²²²²²²²²²²
CONSOLE LAMPS
1 T HRU 16
² ² ² ² MIN EXPR:
PPPP, PPP, NORMAL
WIND STABILIZER
OFF, ½, ON
MODULE VOLUME
0 thru 127
RHYT HM VOLUME
0 thru 127
TRAPS VOLUME
0 thru 127
MOOD VOLUME
0 thru 127
NOTE
SFX VOLUME
0 thru 127
Headphones must be
plugged in for these
menu items to appear.
MASTER VOLUME
-20.00 thru 5.00 dB
HEADPHONE VOLUME
REVERB VOLUME
ROOM1
ROOM2
ROOM3
HALL1
HALL2
OFF, -31.25 thru 6.25 dB
OFF, -31.25 thru 6.25 dB
REVERB TYPE
²²²²
Use the
ADJUSTMENT DIAL
to select these
menu items.
REVERB TIME
HEADPHONE BALANCE
-10.00 thru 10.00 dB
AUX BASS
-14.00 thru 14.00 dB
SHORT, NORMAL, LONG
HEADPHONE ² ² ² ² ²
AUX TREBLE
² ² ² ² dB
-14.00 thru 14.00 dB
LINE OUT GAIN
AUX GAIN BOOST
0 thru 18.75 dB
0 thru 18.75 dB
7
EXPRESSION AND CRESCENDO SHOES
The Rodgers Theatre 360 has two Expression Shoes. As with a real theatre pipe organ,
the left Expression Shoe controls the Main chamber voices, and the right Expression Shoe
controls the Solo chamber voices. When the MASTER EXPRESSION/CRESCENDO tab is
lit, the Main Expression Shoe becomes a Master Expression Shoe, and the Solo Expression
Shoe becomes a Crescendo Pedal.
The chamber allocation of voices is as follows:
MAIN CHAMBER
SOLO CHAMBER
Tuba Profunda
Open Diapason
Tibia Minor (VP)
Clarinet
Viol Celeste II
Concert Flute
Pedal Tuba Profunda
Pedal Diaphone
Pedal Violone Celeste II
Pedal Bourdon
Harp
Chrysoglott
All Traps
Rauschquint (VP)
(VP=Voice Palette selection)
English Horn
Trumpet
Tibia Clausa
Orchestral Oboe
Krumet
Kinura (VP)
Musette (VP)
Saxophone
Quintadena
Vox Humana
Xylophone
Glockenspiel
Pedal Tibia Clausa
The Crescendo Pedal adds a pre-selected stop sequence to the registration already
selected by tabs.
The Crescendo must be unlocked to set a crescendo sequence. Once the sequence is set,
it may be locked again to prevent accidental change.
UNLOCKING THE CRESCENDO:
1.
Press and hold MASTER EXPRESSION/CRESCENDO for approximately five
seconds until “CRESCENDO LOCKED” appears in the Console Display.
2.
While continuing to hold MASTER EXPRESSION/CRESCENDO, rotate the
Alpha Dial either direction until the Console Display reads “CRESCENDO
UNLOCKED.”
3.
Release the MASTER EXPRESSION/CRESCENDO. The Crescendo is unlocked.
SETTING THE CRESCENDO SEQUENCE:
1.
Press the MASTER CRESCENDO/EXPRESSION tab located in the group of
black tabs to the far right on the back rail.
8
2.
Press and hold the SET piston, and press the MASTER/CRESCENDO
EXPRESSION tab again. The tab light flashes, and the Console Display reads:
CRESC SET MODE
STD
STAGE 1
The stops and couplers currently set on stage one of the 63 stages in the Crescendo
sequence turns on.
3.
The current sequence may be viewed by advancing through the stages one at a time
using the Alpha Dial. At each stage, the stage number (1 to 63) is indicated in the
Console Display, and the stops and couplers set at this stage turn on.
4.
To add one or more stops to the sequence, go to the stage where the stop(s) is to be
added, turn on the stop(s), and press SET.
5.
To delete a stop(s), go to the first stage in which the stop(s) turns on, turn off the
stop(s), and press SET.
6.
Each stop can be turned on at any stage and turned off at any later stage. As an
example, assume the GREAT 8' VIOL CELESTE II is to turn on at stage 1 and off
at stage 25. Go to stage 1, turn on the GREAT 8' VIOL CELESTE II, and press
SET. Then go to stage 25, turn off the GREAT 8' VIOL CELESTE II, and press
SET.
7.
To clear the entire Crescendo sequence (stages 1 through 63), hold SET and press
General Cancel (0). This also resets the current stage number to 1 so that a new
sequence can be entered.
8.
When building a completely new sequence, it is advisable to first write the
sequence down, then assign stage numbers from 1 to 63 to each stop or group of
stops in the sequence. Sometimes there are more stages than stops in the sequence,
so it is necessary to skip some stages to make the sequence end at or near stage 63.
If this is not done, the sequence ends before the Crescendo Pedal is fully
depressed.
9.
To exit the “CRESC SET MODE” menu at any time, press General Cancel. Any
changes in the sequence made up to this point are saved.
LOCKING THE CRESCENDO:
1.
Press and hold MASTER EXPRESSION/CRESCENDO for approximately five
seconds until “CRESCENDO LOCKED” appears in the Console Display.
2.
While continuing to hold MASTER EXPRESSION/CRESCENDO, rotate the
Alpha Dial either direction until the Console Display reads “CRESCENDO
UNLOCKED.”
3.
Release the MASTER EXPRESSION/CRESCENDO. The Crescendo is unlocked.
9
MELODY COUPLER
The Melody Coupler (MEL) is located on a piston under the Great manual to the right.
The Melody Coupler lights when it is engaged. Any stop or coupler of the Solo division
sounds from the highest key being played on the Great manual. This allows a solo melody
and an accompaniment to be played on the same manual.
In its default setting, the Melody Coupler affects keys 25 through 61 on the Great manual.
Its range is programmable and may be extended down to key 13 or up to key 49.
SETTING THE RANGE OF THE MELODY COUPLER:
1.
Press and hold the SET piston, and press MEL which begins flashing.
2.
Release both pistons.
3.
While the Melody Coupler is flashing, press a key which corresponds to the lowest
note the range is to extend. Any note from key 13 to key 49 may be selected.
After the selected key has been pressed, the Melody Coupler turns off. Note: When
a key is pressed to set the range, no sound is heard even if stops are on, so no
disturbance is made if programming during a performance.
4.
To use the new range, press MEL. This range is saved when the organ is turned
off.
COUNTER MELODY COUPLER
The Counter Melody Coupler (SOLO/ACC MEL) is located in the group of black square
tabs to the far right on the back rail. This coupler allows organ and MIDI voices registered on
the Solo manual to sound one note at a time from the Accompaniment manual. It operates on
a “Low Note Priority” and works as follows:
1.
For example, select the 8' Concert Flute on the Accompaniment manual, the 8'
Tuba Horn on the Solo manual, and press SOLO/ACC MEL.
2.
Play a chord on the Accompaniment. The 8' Concert Flute sounds on all notes,
but the 8' Tuba sounds only on the lowest note.
SETTING THE RANGE OF THE COUNTER MELODY COUPLER:
1.
Press and hold the SET piston, and press SOLO/ACC MEL which begins
flashing.
2.
Release SET and SOLO/ACC MEL.
3.
While the Counter Melody Coupler is flashing, press a key which corresponds to
the highest note the range is to extend. Any note from key 1 to key 37 may be
selected. After the selected key has been pressed, the Counter Melody Coupler
turns off. Note: When a key is pressed to set the range, no sound is heard even if
stops are on, so no disturbance is made if programming during a performance.
4.
To use the new range, press SOLO/ACC MEL. This range is saved when the
organ is turned off.
10
PIZZICATO COUPLER
The Pizzicato Coupler (PIZZ) is located on a piston under the Great manual to the right.
This special effects coupler causes the stops and MIDI voices registered on the Solo manual to
play momentarily on the Great manual like a real orchestral string pizzicato.
GREAT SOSTENUTO
The Great Sostenuto (SOS) is located on a piston under the Great Manual to the right. To
activate the Great Sostenuto, the SOS piston must be pressed and is then controlled by the foot
switch located on the top left edge of the Main expression shoe. Keys on the Great manual
that are playing when the foot switch is pressed are sustained. Other keys on the Great played
after the foot switch is pressed play normally while the sustained notes play constant. The
sustained notes stop playing when the switch is released. Note: This foot switch also serves as
the Sustain control for the MIDI sounds on MIDI ACCOMP A coupler piston. This function is
disabled when the Great Sostenuto is on.
RODGERS RHYTHMAKER™
The Rodgers Rhythmaker is an easy-to-use automatic rhythm unit. The rhythm select
tabs are located in the group of black tabs to the far left on the back rail. They light when they
are engaged.
There are 10 primary rhythm patterns, with 10 second patterns, which are listed below:
PRIMARY PATTERN
SECOND PATTERN
Swing
Waltz
Dixie
Country
Ballad I
Bossa Nova I
Latin I
Latin II
March 4/4
Rock I
Big Band
Jazz Waltz
Dixie Swing
Country Swing
Ballad II
Bossa Nova II
Beguine
Rhumba
March 6/8
Rock II
The 2ND PATTERN tab is a reversible tab (press to turn on; press again to turn off). By
pressing this tab, the rhythm pattern changes from the primary pattern to the second pattern or
vice versa, depending on which rhythm pattern is selected at the time. The tab lights when it
is engaged.
The TRAPS UNENCLOSED tab makes both the Rhythmaker traps and the stop rail traps
sound at full volume without expression control. Without engaging this tab, the Rhythmaker
and the stop rail traps are expressed with the Main (left) Expression Shoe. The tab lights
when it is engaged.
The maximum volume level for the Rhythmaker can be adjusted in the Console Display.
11
ADJUSTING THE VOLUME OF THE RHYTHMAKER:
1.
Press and hold the SET piston.
2.
Turn the Select Knob counter clockwise (left) until the Console Display reads
“RHYTHM VOLUME”.
3.
Release SET.
4.
Turn the Select Knob clockwise (right) to place the cursor on the bottom line.
5.
Rotate the Alpha Dial to select the desired level of volume (0-127). This setting
remains in effect until the organ is turned off. Note: An Audio Save may be
performed to save this setting as the default. Please refer to the “Audio Save”
section.
6.
Press General Cancel to exit.
Immediately to the right of the Rhythmaker select tabs on the back rail are four black tabs
which control the rhythm “START/STOP”, “BREAK”, “INTRO/END” and
“SYNC/START”. These light when they are engaged. Their functions are:
START/STOP turns the Rhythmaker on and off.
BREAK silences the Rhythmaker for one full measure, then resumes the selected
pattern.
INTRO/END provides a four measure lead-in for introductions, and a variety of endings,
appropriate to the selected rhythm pattern.
SYNC/START starts the Rhythmaker when any manual key or pedal is pressed.
The Rhythmaker tempo is indicated in the Console Display. When the organ is turned on,
the top line of the Console Display reads “TRANSPOSER 0”, and the bottom line reads
“TEMPO 120,” indicating the metronomic tempo of the Rhythmaker. The tempo may be
changed by rotating the Alpha Dial. When the Alpha Dial is rotated, the green light in the
START/STOP tab flashes at the tempo selected. The light stops flashing after three seconds
when the desired tempo is selected. When in operation, the red light in the tab indicates the
first beat of the measure, and the green light indicates each remaining count of the measure.
TRAPS
The Theatre 360 includes a variety of traps located on the stop rail. The Accompaniment
has Snare Drum, Tambourine, Cymbal and Trap Select; the Wood Block is the default trap for
the Accompaniment Trap Select tab. The Pedal has Tympani, Cymbal and Trap Select; the
Bass Drum is the default trap for the Pedal Trap Select tab.
The TRAPS UNENCLOSED tab makes both the Rhythmaker traps and the stop rail traps
sound at full volume without expression control. Without engaging this tab, the Rhythmaker
and the stop rail traps are expressed with the Main (left) Expression Shoe. The tab lights
when it is engaged.
The maximum volume level for the traps can be adjusted in the Console Display.
12
ADJUSTING THE VOLUME OF THE TRAPS:
1.
Press and hold the SET piston.
2.
Turn the Select Knob counter clockwise (left) until the Console Display reads
“TRAP VOLUME”.
3.
Release SET.
4.
Turn the Select Knob clockwise (right) to place the cursor on the bottom line.
5.
Rotate the Alpha Dial to select the desired level of volume (0-127). This setting
remains in effect until the organ is turned off. Note: An Audio Save may be
performed to save this setting as the default. Please refer to the “Audio Save”
section.
6.
Press General Cancel to exit.
TRAP SELECT
The Rodgers Theatre 360 has 16 additional trap instruments which can be assigned to the
Pedal Trap Select tab and the Accompaniment Trap Select tab. The traps are:
Side Stick
Closed High Hat Cymbal
Crash Cymbal
Chinese Cymbal
Chinese Gong
Splash Cymbal
Cow Bell
Bongo Drum
Timbale
Maracas
Guiro
Claves
Triangle
Shaker
Sleigh Bells
Castanets
SETTING THE TRAP SELECT TABS:
1.
Press and hold the SET piston.
2.
Turn the Select Knob counter clockwise (left) until the Console Display reads
“PD TRAP SELECT” or “AC TRAP SELECT” and the cursor is on the top line.
3.
Release SET.
4.
Rotate the Alpha Dial to select the desired stop (Pedal or Accompaniment).
5.
Turn the Select Knob clockwise (right) to place the cursor on the bottom line.
6.
Rotate the Alpha Dial to select the desired trap.
7.
Press General Cancel.
These settings can be saved on combination pistons (Accompaniment/Pedal and Pedal
Divisionals, and Generals).
13
RODGERS MOOD ENHANCEMENT™
Another exclusive feature of the Rodgers Theatre 360 is the Mood Enhancement
selections. These background effects lend a special mood or sound setting to the music being
played. The mood tabs are located on the top row of the group of black tabs to the far right on
the back rail; these tabs light when they are engaged.
The 6 Mood Enhancement selections are:
SEASHORE - Waves and breakers of varying intensity.
PASTORAL - A forest glen with a gently flowing stream and various bird calls.
CITY - Automobile sounds including engines starting, horns honking, autos passing
and sirens.
TROPICAL - A jungle with various bird calls, lion roars and elephant trumpetings.
THUNDERSTORM - Thunder, wind and rain.
FANTASY - A collage of futuristic sounds.
The mood tabs are reversible (press to turn on; press again to turn off). They light when
they are engaged and sound continuously until turned off. They cannot be set in pistons.
Although the volume of the moods is unaffected by the Expression Shoes, the volume can
be adjusted in the Console Display.
ADJUSTING THE VOLUME OF THE MOOD ENHANCEMENT:
1.
Press and hold the SET piston.
2.
Turn the Select Knob counter clockwise (left) until the Console Display reads
“MOOD VOLUME”.
3.
Release SET.
4.
Rotate the Alpha Dial to select the desired level of volume (0-127). This level is
saved until the organ is turned off. Note: An Audio Save may be performed to save
this setting as the default. Please refer to the “Audio Save” section.
5.
Press General Cancel.
MANUAL SOUND EFFECTS
Another exclusive feature of the Theatre 360 is the manual sound effects. These effects
are very useful for adding novelty and fun to the music being played. The SOUND EFFECTS
piston is reversible (press to turn on; press again to turn off) and is located to the far right
under the Solo manual. The piston lights when it is engaged.
When engaged, the Solo manual becomes an independent resource for these effects. The
stops on the Solo manual are disengaged but will sound through the use of couplers (SOLO
TO GREAT MELODY COUPLER, SOLO TO GREAT PIZZICATO COUPLER, and SOLO
TO ACCOMPANIMENT COUNTER MELODY COUPLER). The sounds are listed in the
chart on the following page.
14
The maximum volume level for the manual sound effects can be adjusted in the Console
Display.
ADJUSTING THE VOLUME OF THE MANUAL SOUND EFFECTS:
1.
Press and hold the SET piston.
2.
Turn the Select Knob counter clockwise (left) until the Console Display reads
“SFX VOLUME”.
3.
Release SET.
4.
Turn the Select Knob clockwise (right) to place the cursor on the bottom line.
5.
Rotate the Alpha Dial to select the desired level of volume (0-127). This setting
remains in effect until the organ is turned off. Note: An Audio Save may be
performed to save this setting as the default. Please refer to the “Audio Save”
section.
6.
Press General Cancel to exit.
15
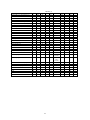
MANUAL SOUND EFFECTS CHART
Thunder I
Thunder II
Rain I
Wind I
Wind II
1
Rain II
Seashore I
Seashore II
5
6
Stream II
Big Dog Bark
Bird T weet II
Bubble I
Dog Bark
9
12
13
Kitty
Tropical Bird I
17
18
Growl I
Telephone II
Footsteps
Door Slam
Door Creak I
Heartbeat I
21
24
25
29
30
Laugh I
Car Crash II
Scream I
Slow Car Pass
Car Stop
Siren
33
36
37
41
42
Helicopter
Punch
Starship
Windchimes II
38
40
43
45
48
49
47
50
51
Space Landing
Rif le
Machine Gun
53
54
52
55
56
Laser Shot
Explosion I
Applause
35
46
Space Shot
Fly ing Saucer
31
44
Jet Take-off
Windchimes I
28
39
Train on Rails
Starburst
26
34
Fast Car Pass
Car Crash I
23
32
Laugh II
Engine Start
19
27
Heartbeat II
Scream II
16
22
Horse Hooves II
Door Creak II
14
20
Horse Hoov es I
Telephone I
11
15
Tropical Bird II
Growl II
7
10
Cat
Bird T weet I
4
8
Stream I
Bubble II
2
3
57
58
Explosion II
Cheers
60
61
16
59
TRANSPOSER
The Transposer is the default menu setting in the Console Display. Turning the Select
Knob while “TRANSPOSER 0/TEMPO 120” is displayed lowers the pitch of the organ up to
four semitones (half steps) and raise the pitch up to seven semitones. The Transposer returns
to “0” when General Cancel is pressed. Note: In order to select menu items other than the
Transposer, it is necessary to first hold SET, and then turn the Select Knob.
TUNING CONTROL
The Rodgers Theatre 360 can easily and quickly be tuned to a piano or musical
instrument not at standard concert pitch (A=440.0). The range of the Tuning Control is onehalf semitone sharp or flat.
LOCKING AND UNLOCKING THE MASTER TUNING:
1.
Press and hold the SET piston.
2.
Turn the Select Knob counter clockwise (left) until the Console Display reads:
MASTER TUNING
LOCKED
3.
Turn the Select Knob until the cursor is on “LOCKED”.
4.
Rotate the Alpha Dial until the Console Display reads “ADJUSTABLE” or
“MANUAL ADJ ONLY”.
5.
Press General Cancel to return to the Transposer/Tempo menu.
ADJUSTING THE PITCH:
1.
Press and hold the SET piston.
2.
The Console Display will change to:
TRANSPOSER 0
TUNING A = 440.0
3.
Rotate the Alpha Dial to adjust the tuning.
4.
Release SET to return to the Transposer/Tempo menu.
If the instrument has been augmented with pipes, the Tuning Control feature can be used
to bring the electronics in tune with the pipes. The pitch will return to A=440.0 when the
organ is turned off.
17
CONSOLE LAMP DIMMER
The illumination of the music rack and pedal lamps is adjusted by holding SET and
turning the Select Knob counter clockwise (left) to locate “CONSOLE LAMPS” in the
Console Display. Release SET and rotate the Alpha Dial to the desired intensity. This setting
is automatically saved when the organ is turned off.
DIGITAL DYNAMIC WIND™
Part of the personality of an individual pipe organ relates to the steadiness of the wind
supply to the pipes. Because air is an elastic medium, there is some amount of “give” in the
wind supply of every pipe instrument. Some organs exhibit more unsteadiness than others,
according to the type of wind regulators used (single or multiple reservoirs, schwimmer
regulators, etc.). A small amount of unsteadiness in the wind helps the listener to identify the
sound as that of a wind-blown instrument, although too much can be distracting. Certain
types of music, though, seem to gain charm from a less-than-perfect wind system.
Another characteristic of pipe organs involves changes in pitch which occur in individual
pipes when playing large numbers of pipes together. These pitch changes are due both to
variations in wind pressure as the wind demand becomes greater and to the influence of the
sound from neighboring pipes. This latter effect is greatest upon large-scale flute voices and
least upon narrow-scaled string voices. Even though this results in significant detuning, the
human ear seems to perceive instead an increase in ensemble effect.
Rodgers’ exclusive Digital Dynamic Wind (patent pending) emulates these characteristics
by modeling the behavior of pipe organ wind regulating devices and the response of pipes to a
slightly unsteady wind supply. Some independent ranks have their own “software reservoir,”
and each voice is programmed to respond to wind variations in the same way its equivalent
pipe rank or ranks would respond.
WIND STABILIZER
In order to adjust the behavior of the organ wind system, a “WIND STABILIZER” menu
is provided in the Console Display. This stabilizer operates in much the same way as does the
stabilizer control provided on some pipe instruments. In the “OFF” position, the wind has a
noticeable unsteadiness in the playing of rapid passages or large chords. The “1/2” position
reduces this unsteadiness somewhat, and the “ON” position makes the wind steady under all
conditions. The position is saved when the organ is turned off.
ADJUSTING THE WIND STABILIZER:
1.
Press and hold the SET piston.
2.
Turn the Select Knob counter clockwise (left) to “WIND STABILIZER”. Release
SET.
3.
Rotate the Alpha Dial to select “OFF”, “1/2”, or “ON”.
18
EXPRESSION RANGE ADJUSTMENTS
The minimum volume of each chamber when its Expression Shoe is closed can be
adjusted to suit specific musical needs or personal tastes. The “MINIMUM EXPRESSION”
menu allows three settings— “NORMAL”, “ppp”, and “pppp”. The “NORMAL” setting
produces the amount of expression obtained on most pipe instruments with typical swell
shades. The “ppp” setting produces a greater range than the “NORMAL” setting, and the
“pppp” setting produces the amount of expression one might expect from very heavy and
thick swell shades. The settings do not affect the sound at all when the Expression Shoe is
open.
SETTING THE EXPRESSION RANGE:
1.
Press and hold the SET piston.
2.
Turn the Select Knob counter clockwise (left) to “ MINIMUM EXPRESSION”,
and place the cursor over the chamber name.
3.
Rotate the Alpha Dial to select the desired chamber.
4.
Turn the Select Knob clockwise (right). The cursor moves to the bottom line.
5.
Rotate the Alpha Dial to select the desired expression range. If the Expression
Shoe is closed and notes are played on voices in the chamber being adjusted, the
change is heard immediately. All expression range settings are saved when the
organ is turned off.
19
VOICE PALETTE™
Many of the stop tabs on the Rodgers Theatre 360 can play additional voices which are
selectable through the Voice Palette™ menu. These voices are:
DIVISION
STOP TAB
VOICE PALETTE
VOICE PALETTE
PEDAL:
8' Clarinet
16' English Horn
8' Kinura
ACCOMP:
8' Clarinet
8' Trumpet
8' Quintadena
8' Tibia Minor
8' Vox Humana
Rauschquint IV
16' English Horn
16' Saxophone
16' Vox Humana
16' Trumpet
8' Diapason
8' Tibia Minor
8' Krumet
8' Kinura
8' Vox Humana
Rauschquint IV
4' Octave
4' Tibia Minor
8' Krumet
8' Kinura
8' Saxophone
8' Vox Humana
GREAT:
SOLO:
8' Musette
8' Musette
The voices located on one tab cannot be played simultaneously.
In order to save Voice Palette selections in combination pistons, the Voice Palette must
first be unlocked. This locking feature only prevents “blind” changes to VP selections;
manual changes are always possible.
ACCESSING THE VOICE PALETTE:
1.
Press and hold the SET piston.
2.
Turn on the stop tab to be changed. For example, select the 8' Clarinet in the
Pedal. The Console Display reads:
PD CLARINET 8=
*CLARINET 8*
3.
Rotate the Alpha Dial to view the available Voice Palette selection(s). The voices
may be previewed as they are selected.
The voice selections made using this procedure can be saved in General and Divisional
combination pistons. All stop tabs return to their default voices as labeled when the organ is
turned off.
The Voice Palette must be unlocked to save Voice Palette selections.
20
LOCKING AND UNLOCKING THE VOICE PALETTE:
1.
Press and hold the SET piston.
2.
Turn the Select Knob counter clockwise (left). The Console Display reads:
VOICE PALETTE
UNLOCKED
3.
Rotate the Alpha Dial to lock the Voice Palette.
Voice Palette selections can be saved by locking the Voice Palette. No changes can be
made in the Voice Palette when it is locked.
ADJUSTABLE TREMULANTS
This feature allows the organist to adjust the speed and depth of each tremulant on the
organ. The four tremulant tabs are located in the group of black tabs in the center of the back
rail. Some tabs control more than one tremulant. The following is a list of voices affected by
the designated tremulant tab:
STOP TAB
TREM MOTOR
VOICE
SOLO
Solo I
Trumpet
Quintadena
Solo II
Orchestral Oboe
Krumet
Kinura
Musette
Saxophone
Main I
Open Diapason
Concert Flute
MAIN
Main II
TIBIA
TUBA
Clarinet
Viol D’ Orchestre
Viol Celeste
Tibia Clausa
Tibia Clausa
Tibia Minor
Tibia Minor
Vox Humana
Vox Humana
Tuba Horn
Tuba Horn
ADJUSTING THE TREMULANT RATE:
1.
Press and hold the SET piston.
21
2.
Turn the Select Knob counter clockwise (left) until the Console Display reads:
MAIN I
RATE 0
TREM
DEPTH 0
3.
Place the cursor on the tremulant motor name. Rotate the Alpha Dial to select the
desired tremulant motor.
4.
Once the tremulant has been selected, turn the Select Knob to move the cursor to
“RATE”.
5.
Rotate the Alpha Dial to change the tremulant rate. The adjustment values range
from -9 (slow) to +9 (fast). A value of zero corresponds to the rate chosen by the
voicer during tonal finishing using the exclusive Rodgers GC-8 Graphic
Controller.
ADJUSTING THE TREMULANT DEPTH:
1.
Turn the Select Knob to move the cursor to “DEPTH”.
2.
Rotate the Alpha Dial to change the tremulant depth. The range of values is -9
(shallow) to +9 (deep).
Any changes made to the tremulants from this menu are saved when the organ is turned
off.
MASTER VOLUME CONTROL
Special situations and individual preferences sometimes require a temporary change in
the overall volume of the organ. This is easily accomplished.
ADJUSTING THE MASTER VOLUME:
1.
Press and hold the SET piston.
2.
Turn the Select Knob to “MASTER VOLUME”.
3.
Rotate the Alpha Dial to obtain the desired volume level. Note: An Audio Save
may be performed to save this setting as the default. Please refer to the “Audio
Save” section.
22
AUDIO SAVE
Changes made to audio settings are temporary and are lost when the organ is turned off
unless those settings are saved. This can be done by performing the following procedure.
SAVING AUDIO CONTROL SETTINGS:
1.
While in any Audio Menu, hold SET, then press and hold General Cancel for
approximately five seconds.
2.
Continue holding both pistons until the Console Display reads:
AUDIO CONTROL
SETTINGS SAVED
3.
Release SET and General Cancel.
Any changes made to any audio control settings are saved when the organ is turned off.
STEREO HEADPHONE JACK
The console is equipped with a 1/4" stereo headphone jack located near the power switch
on the left panel. Plugging a set of headphones into this jack disables the sound from all
speakers, and disables any pipe ranks connected to the instrument. When using headphones,
the “MASTER VOLUME” menu is replaced with the “HEADPHONE” menu. Note: Please
refer to the “360 User (Headphone) Menu Items”section. This menu allows the adjustment of
Volume, Balance, Bass, and Treble heard through the headphones. These adjustments do not
affect the organ speakers in normal playing mode.
ADJUSTING THE HEADPHONE SETTINGS:
1.
Press and hold SET.
2.
Rotate the Select Knob counter clockwise (left) until the Console Display reads
“HEADPHONE”. Place the cursor on the top line. Release SET.
3.
Rotate the Alpha Dial to select the setting to be adjusted (“VOLUME”,
“BALANCE”, “BASS”, and “TREBLE”).
4.
Turn the Select Knob clockwise (right) to place the cursor on the bottom line.
5.
Rotate the Alpha Dial to set the desired value.
AUXILIARY INPUTS
The Rodgers Theatre 360 console is equipped with stereo Auxiliary Input Jacks (one for
the left channel and one for the right channel) located on the Connector Panel under the
keydesk to the right. When using these input jacks, audio signals from other sound generating
devices like synthesizers, MIDI sound modules, and tape players are mixed into the organ’s
23
main audio system. A series of Console Display menu controls is used to adjust the
characteristics of the Auxiliary Input sound.
ADJUSTING THE AUXILIARY INPUTS:
1.
Press and hold the SET piston.
2.
Turn the Select Knob counter clockwise (left) to “AUXILIARY”. Place the cursor
on the top line. Release SET.
3.
Rotate the Alpha Dial to select the desired control.
4.
Turn the Select Knob clockwise (right) to place the cursor on the bottom line.
5.
Rotate the Alpha Dial to obtain the desired effect. Note: An Audio Save may be
performed to save this setting as the default. Please refer to the “Audio
Save”section.
DIGITAL REVERBERATION
The Rodgers Theatre 360 features an internal digital reverberation system. The volume,
length and type of reverberated sound can be individually changed. Any changes made to the
Reverberation settings from this menu are temporary and are lost when the organ is turned off,
unless they are saved by performing the Audio Save procedure. Note: An Audio Save may be
performed to save this setting as the default. Please refer to the “Audio Save” section.
SETTING THE REVERB VOLUME:
1.
Press and hold the SET piston.
2.
Turn the Select Knob counter clockwise (left) until the Console Display reads
“REVERB VOLUME”. Release SET.
3.
Rotate the Alpha Dial to set the desired reverb level (OFF, -31.25 through 6.25
dB). Note: An Audio Save may be performed to save this setting as the default.
Please refer to the “Audio Save” section.
SETTING THE REVERB TIME:
1.
Press and hold the SET piston.
2.
Turn the Select Knob counter clockwise (left) until the Console Display reads
“REVERB TIME”. Release SET.
3.
Rotate the Alpha Dial to set the desired reverb time (“SHORT”, “NORMAL” or
“LONG”). Note: An Audio Save may be performed to save this setting as the
default. Please refer to the “Audio Save” section.
24
SETTING THE REVERB TYPE:
1.
Press and hold the SET piston.
2.
Turn the Select Knob counter clockwise (left) until the Console Display reads
“REVERB TYPE”. Release SET.
3.
Rotate the Alpha Dial to set the desired reverb type (“ROOM 1”, “ROOM 2”,
“ROOM 3”, “HALL 1” or “HALL 2”). Note: An Audio Save may be performed to
save this setting as the default. Please refer to the “Audio Save” section.
RANDOM DETUNING
One of the essential ingredients of a pipe organ ensemble arises from the small amount of
pitch error in each pipe. No matter how carefully an instrument is tuned, small changes in
temperature or humidity causes the pipes to drift from their original pitches. Reed pipes are
especially prone to drift over time due to “creeping” of the tuning wire with cyclic
temperature variations.
The Random Detuning feature causes selected notes to receive a small amount of
detuning. The amount of detuning is chosen at random for each note of each voice. Some
notes will not be detuned at all. The number of notes detuned and the maximum amount of
detuning are selected for each voice to mimic the behavior of an equivalent pipe set. For
instance, reeds will exhibit more pitch error than flues. Because the detuning is random, there
is no degradation of the overall temperament of the instrument and the amount of detuning is
no more than one would experience in a recently-tuned pipe instrument.
This detuning process happens each time the organ is turned on. Once computed, the
pitch of each note remains constant. Thus, the tuning will be a little different, as it would be
with a pipe organ, each time the organ is used. The amount of Random Detuning present in
the organ will be set by a Rodgers representative during final voicing.
AUTOMATIC SHUTDOWN TIMER
When the organ is on and left unattended, the power automatically turns off after two
hours. Operating any key, stop, or control resets the timer for another two hours.
Playing the organ from a remote MIDI keyboard or sequencer will also reset the timer.
PIPES
Any digital sampled rank in the Rodgers Theatre 360 may be replaced by a real windblown pipe rank. If a limited range of pipes are available, sampled voices from the Rodgers
Theatre 360 can fill out the entire range. Preparations for controlling real expression shutters
are already included in the organ software.
Contact your authorized Rodgers representative for additional information.
25
MIDI (Musical Instrument Digital Interface)
Rodgers organs have some of the most advanced MIDI capabilities in the world, offering
a great variety of sound possibilities. In addition to the traditional theatre organ voices on the
organ, there are 654 MIDI sounds (orchestral instruments, tuned percussions, traps and sound
effects) contained in an internal Roland sound module. These sounds are accessed by the
MIDI coupler pistons located on the piston rails. Two MIDI sounds can be played
simultaneously from each manual (Great, Solo, Accompaniment and Pedal).
MIDI sounds are activated by MIDI coupler pistons. These coupler pistons control the
following MIDI channels:
Great Manual
Great Manual
Solo Manual
Solo Manual
Acc. Manual
Acc. Manual
Pedal Manual
Pedal Manual
Channel 1
Channel 5
Channel 2
Channel 6
Channel 4*
Channel 8
Channel 3
Channel 7
MIDI GT A
MIDI GT B
MIDI SOLO A
MIDI SOLO B
MIDI ACC A
MIDI ACC B
MIDI PED A
MIDI PED B
* May be changed to any of the sixteen MIDI channels.
SELECTING A MIDI SOUND:
Selecting a MIDI sound is also known as Sending a Program Change:
1.
Press and hold the SET piston, then press a MIDI coupler piston. The MIDI
coupler piston flashes, indicating a sound selection can be made. This is called the
MIDI Set Mode. The Console Display reads:
MIDI GT A
PGM=121
2.
CH 1
VAR=0
Select the desired sound (Program Change) number from the "Internal Sound
Module Instrument Charts” section. Press a key on the Accompaniment, Great, or
Solo manual. Note: Program Changes 1-61 are sent by the Accompaniment keys,
Program Changes 62-122 by the Great keys, and Program Changes 123-128 by
the Solo keys. Once the key is pressed, the Console Display returns to
“TRANSPOSER 0/TEMPO 120”.
26
PREVIEWING VARIOUS MIDI SOUNDS:
A variety of MIDI sounds may be previewed before making a selection. To listen to
various MIDI sounds:
1.
Press and hold the SET piston, then press a MIDI coupler piston. The MIDI
coupler piston flashes. Continue to hold SET.
2.
By continuing to hold SET, the organ will remain in the MIDI Set Mode.
3.
Press the key corresponding to the Program Change number of the desired MIDI
sound. Please refer to the “Internal Sound Module Instrument Charts” section.
4.
Release SET to play the sound being previewed.
5.
To preview another MIDI sound, hold SET and press another key to select another
Program Change number.
6.
Press the MIDI coupler piston or General Cancel to exit the MIDI Set Mode.
When in the MIDI Set Mode, selecting a different Program Change number may also be
done by turning the Select Knob until the cursor in the Console Display is over the Program
Change number. Rotate the Alpha Dial until the desired number is selected. Press the MIDI
coupler piston.
For advanced MIDI applications there are times when no Program Change is to be sent by
a MIDI coupler piston. Then the Program Change number may be set to “OFF” by pressing a
key which has no associated Program Change number (a Pedal note, for example), or by
turning the Alpha Dial past Program #128 until “PGM OFF” appears in the Console Display.
ROLAND GS STANDARD SUPPORT
In the past, most MIDI sound modules provided a maximum of 128 sounds. These were
selected by using MIDI Program Change messages, but they did not define standard sound
assignments for those messages. For example, one sound module may have had a trumpet on
Program Change #39, yet another sound module would have chimes on #39. It was difficult
at best for musicians to work with no standardization of sounds. With the creation of General
MIDI (GM), a standard list of sounds was defined, but only for the 128 sounds in the first
bank, Bank 0.
The Roland GS Standard honors that same standard list of sounds for Bank 0, but also
allows access to more than those 128 sounds. By selecting another bank using the Bank
Select message, the GS Standard provides an additional 127 banks (also called variations),
each containing 128 sounds. This allows for the possibility of up to 16,384 total sounds.
Many manufacturers of MIDI sound modules have added or will soon add support for this
standard, which is an upward extension of the current General MIDI Standard.
The MIDI menu on the Console Display enables the organist to choose a GS Bank Select
message for each MIDI coupler piston which is saved on combination pistons.
27
SETTING THE GS VARIATION (BANK NUMBER):
1.
Press and hold SET, then press a MIDI coupler piston. The piston flashes,
indicating the MIDI Set Mode is active. The Console Display reads:
MIDI GT A
PGM=121
CH 1
VAR=0
2.
Turn the Select Knob clockwise (right). The cursor moves to the Variation Field
(“VAR”) in the menu. Note: The variation numbers for sounds in the internal
MIDI sound module are listed in the “Internal Sound Module Instrument Charts”
section.
3.
To choose the desired Variation (bank) number, rotate the Alpha Dial until the
correct variation number is displayed. Variation 0 is the normal General MIDI
bank. OFF may also be selected to prevent the MIDI coupler piston from sending
Bank Select messages.
4.
Select a Program Change number, or return to the Transposer/Tempo menu by
pressing the MIDI coupler piston or General Cancel.
The variation selected is saved in combination pistons along with the other MIDI settings.
MIDI SOUNDS IN COMBINATION PISTONS
Once a MIDI sound has been set on a MIDI coupler piston, the same Program Change
number is sent each time the coupler piston is activated. The sound is also saved on any
combination piston that includes that MIDI coupler piston.
Each MIDI coupler piston has a number of associated settings which may be changed in
the Console Display. These settings along with the MIDI sound can be saved in a
combination piston. Each combination piston may include one or more MIDI coupler pistons.
The MIDI coupler piston settings can be saved at any time using the MIDI Save procedure.
The saved settings are retained when the organ is turned off.
SAVING A MIDI SOUND IN A COMBINATION PISTON:
After selecting a MIDI sound on a MIDI coupler piston, this can be saved on a General
or Divisional combination piston for immediate recall.
1.
Select a MIDI sound on a MIDI coupler piston.
2.
Press and hold the SET piston, then press the combination piston where it is to be
saved.
3.
Release both pistons.
28
ADDITIONAL MIDI SETTINGS
There are many MIDI settings that can be saved. If the settings are changed and not
saved, the original MIDI settings (default settings) return when the organ is turned off. MIDI
settings that can be changed and saved include MIDI note velocity, octave shift, MIDI sound
volume level, and MIDI transmit and receive parameters.
Changes made to MIDI settings are temporary and are lost when the organ is turned off
unless those settings are saved. Note: A MIDI Save may be performed to save a MIDI setting
as the default. Please refer to the “MIDI Save” section.
MIDI NOTE VELOCITY
MIDI note velocity controls the attack quality and loudness of MIDI sounds. To sound
authentic, instruments such as the piano and other percussion instruments require a greater
and more pronounced attack than instruments such as the flute or oboe. The velocity can be
individually selected on each MIDI coupler piston, and these settings can then be saved on
combination pistons. The three types of MIDI note velocity on the Theatre 360 are Fixed
Velocity, Expression Velocity, and Keyboard Velocity.
Fixed Velocity: The same velocity value is used for all notes of the keyboard or
pedalboard, and can be set to any value from 2 to 127.
SETTING FIXED VELOCITY:
1.
Hold the SET piston, then press the MIDI coupler piston. The piston flashes.
Release both pistons.
2.
Turn the Select Knob clockwise (right) until the cursor moves to the second menu
screen and is positioned in the Velocity field (“VEL”).
3.
Rotate the Alpha Dial to select the desired velocity value (2-127).
4.
Press either the flashing MIDI coupler piston or General Cancel to exit. Note: A
MIDI Save may be performed to save this setting as the default. Please refer to the
“MIDI Save” section.
Expression Velocity: This velocity is controlled by the expression shoes and is not
affected by the attack of the keys. The volume (MIDI Main Volume, Control Change #7) is
set to maximum when this setting is in use.
SETTING EXPRESSION VELOCITY:
1.
Hold the SET piston, then press the MIDI coupler piston. The piston flashes.
Release both pistons.
2.
Turn the Select Knob clockwise (right) until the cursor moves to the second menu
screen and is positioned in the Velocity field (“VEL”).
3.
Rotate the Alpha Dial to select Expression Velocity (“FM EXP”).
29
4.
Press either the flashing MIDI coupler piston or General Cancel to exit. Note: A
MIDI Save may be performed to save this setting as the default. Please refer to the
“MIDI Save” section.
Keyboard Velocity: This setting individually senses the velocity of each note of the
keyboard. There are three sensitivity levels that can be selected.
SETTING KEYBOARD VELOCITY:
1.
Hold the SET piston, then press the MIDI coupler piston. The piston flashes.
Release both pistons.
2.
Turn the Select Knob clockwise (right) until the cursor moves to the second menu
screen and is positioned in the Velocity field (“VEL”).
3.
Rotate the Alpha Dial to select Keyboard Velocity (“FM KBD”).
4.
Turn the Select Knob clockwise (right) until the cursor moves to the fourth menu
screen and is positioned in the Keyboard Velocity field (“KEY VEL”).
5.
Rotate the Alpha Dial to select the desired velocity value (“LIGHT”, “NORMAL”
or “HEAVY”).
6.
Press either the flashing MIDI coupler piston or General Cancel to exit. Note: A
MIDI Save may be performed to save this setting as the default. Please refer to the
“MIDI Save” section.
The MIDI Note Velocity can be individually set for each MIDI coupler piston. Note: The
MIDI Note Velocity settings do not affect the sampled organ voices.
OCTAVE SHIFT
Normally all MIDI coupler pistons play at standard pitch (middle C = note 60). The
Octave Shift setting can be set to cause any MIDI piston to play one or two octaves above or
below standard pitch.
SHIFTING THE OCTAVE OF A MIDI SOUND:
1.
Hold the SET piston, and press the MIDI coupler piston.
2.
Turn the Select Knob clockwise (right) until the cursor moves to “NORM” on the
second MIDI menu screen.
3.
Rotate the Alpha Dial to the desired setting (“UP 2”, “UP 1”, “NORM”, “DN 1” or
“DN 2”).
4.
Press either the flashing MIDI coupler piston or General Cancel to exit. Note: A
MIDI Save may be performed to save this setting as the default. Please refer to the
“MIDI Save” section.
30
MIDI VOLUME LEVEL
The volume level of a MIDI sound can be adjusted for each individual MIDI coupler
piston. The volume level can then be stored on a combination piston. The volume range is
from 0 to 127.
ADJUSTING THE VOLUME LEVEL OF A MIDI SOUND:
1.
Hold the SET piston, then press the MIDI coupler piston. The piston flashes.
Release both pistons.
2.
Turn the Select Knob clockwise (right) until the cursor moves to the third menu
screen and is positioned in the Level field (“LEVEL”). Note: This control uses
MIDI Expression (Control Change #1) to set the overall volume of the sound.
3.
Rotate the Alpha Dial to select the desired volume level or “OFF”.
4.
Press either the flashing MIDI coupler piston or General Cancel to exit. Note: A
MIDI Save may be performed to save this setting as the default. Please refer to the
“MIDI Save” section.
INTERNAL/EXTERNAL MIDI SOUND MODULES
The internal MIDI sound module can be turned off when the Theatre 360 is used with an
external MIDI sound module. Each MIDI coupler piston channel can be individually assigned
to either internal/external or external only.
TURNING OFF THE INTERNAL MIDI SOUND MODULE:
1.
Hold the SET piston, then press the MIDI coupler piston. The piston flashes.
Release both pistons.
2.
Turn the Select Knob clockwise (right). The cursor will move to the
internal/external field.
3.
Rotate the Alpha Dial until “EXT” appears.
4.
Press either the flashing MIDI coupler piston or General Cancel to exit. Note: A
MIDI Save may be performed to save this setting as the default. Please refer to the
“MIDI Save” section.
MIDI CHANNEL ASSIGNMENT
Using the Theatre 360 as a MIDI keyboard controller for sequencing may require channel
assignment of the MIDI ACCOMP A coupler piston. All other MIDI coupler pistons transmit
on fixed channels. To reset the transmit channel of MIDI ACCOMP A, perform the following
procedure.
ASSIGNING MIDI CHANNELS:
1.
Hold the SET piston, then press MIDI ACCOMP A. The coupler piston flashes.
31
2. Turn the Select Knob clockwise (right) until the cursor moves to the channel
number.
3. Rotate the Alpha Dial to set the channel number.
4. Press either the flashing MIDI coupler piston or General Cancel to exit.
The channel number for MIDI ACCOMP A coupler piston can be saved in the settings on
a combination piston or saved permanently by performing the MIDI Save procedure. Note: A
MIDI Save may be performed to save this setting as the default. Please refer to the “MIDI
Save” section.
MIDI SAVE
Changes made to MIDI settings are temporary and will be lost when the organ is turned
off unless those settings are saved. This is done by performing the following procedure.
SAVING MIDI CONTROL SETTINGS:
1.
While in any MIDI menu, make the desired changes.
2.
To save, press and hold the SET piston, then press and hold General Cancel for
approximately five seconds.
2.
Continue holding both pistons until the Console Display reads:
ALL MIDI
SETTINGS SAVED
3.
Release both pistons.
SUSTAIN SWITCH
A foot switch is located on the top left edge of the Main expression shoe. This switch
will sustain MIDI voices playing from MIDI ACC A coupler piston. Press the switch to
sustain, release to stop. Note: This foot switch also serves as the Great Sostenuto control.
ADDITIONAL MIDI SETTINGS ON COMBINATION PISTONS
After additional MIDI settings have been selected on a MIDI coupler piston, these
settings can be saved on any General or corresponding Divisional combination piston.
SAVING MIDI SETTINGS ON A COMBINATION PISTON:
1.
Select the MIDI coupler piston (and organ stops, if desired).
2.
Press and hold the SET piston.
3.
Press the desired combination piston.
4.
Release both pistons.
32
The factory default settings for the MIDI coupler pistons are:
MIDI Accomp A
Program Change (PGM)
Variation (VAR)
Octave Transpose
Velocity (VEL)
=
=
=
=
=
CH 4*
OFF
0
NORM
64
* This channel will be different for each MIDI coupler piston. Note: Please refer to the
list at the beginning of the MIDI section.
Remember, MIDI default settings can be changed by performing a MIDI Save procedure.
ENABLING/DISABLING MIDI MASTER CHANNELS
The Theatre 360 reserves several MIDI channels for recording and playback of the organ
using a MIDI sequencer. One channel is reserved for each division as follows:
Great Master Channel
Notes and Expression
12
Solo Master Channel
Notes and Expression
13
Accomp. Master Channel
Notes and Expression
15
Pedal Master Channel
Notes and Expression
14
Sound Effects
Notes and Expression
16
The organ sends and receives MIDI information on these channels unless they are
disabled. It may be necessary to disable one or more Master Channels when using the organ
console as a MIDI keyboard controller in multitrack or multi-layer sequencing, to avoid
duplicating note data on multiple tracks.
ENABLING OR DISABLING A MIDI MASTER CHANNEL:
1.
Hold the SET piston, and turn the Select Knob clockwise (right) to “MIDI
MASTER CHANNEL”.
2.
Place the cursor on the manual name field (GT, ACC, SOLO or PED).
3.
Rotate the Alpha Dial until the desired manual is displayed.
4.
Turn the Select Knob clockwise (right) to move the cursor to the channel status
field.
5.
Rotate the Alpha Dial to set the Master Channel status for the selected manual. The
four available settings are “OFF”, “RCV ONLY”, “SEND ONLY”, “SEND &
RCV”. Turning a manual’s Master Channel off prevents the organ from sending or
receiving notes or expression on that channel.
6.
Press General Cancel to exit.
33
MIDI STOP CHANGES
When sequencing or controlling another Rodgers console from the Theatre 360, stop
selections are normally transmitted and received using MIDI System Exclusive messages.
This allows the stops selected during sequencing to play back accurately.
If desired, the organ stops may be controlled using MIDI Program Changes rather than
System Exclusive messages. These Program Changes will control the organ pistons rather
than the individual stops. The System Exclusive method normally offers the optimum control
over registration, since it does not require the organ pistons to be set up beforehand. The use
of piston Program Changes for stop control is most useful when controlling a Rodgers organ
from a remote MIDI keyboard or when controlling a second Rodgers console other than a
Theatre 360 via MIDI.
The MIDI Stop Change menu item allows the organist to control the transmission and
reception of System Exclusive (SysEx) Stop Control messages and Piston Program Change
messages. Settings in this menu are saved when the organ is turned off.
Note: Piston Program Change messages are transmitted and received on the organ
Master Channels and should not be confused with the Program Change messages used to
select sounds from MIDI coupler pistons.
SELECTING MIDI STOP CHANGE SETTINGS:
1.
Hold the SET piston, then turn the Select Knob clockwise (right) to “MIDI STOP
CHANGE”.
2.
Turn the Select Knob to choose “RCV” or “SEND”.
3.
Rotate the Alpha Dial to select the following options.
The Receive Field (“RCV”) has four positions:
OFF
STP
PST
S&P
Console ignores both SysEx and Program Changes
Console receives only SysEx messages
Console receives only Piston Program Changes
Console receives both SysEx and Program Changes
The Send Field (“SEND”) has the same four positions:
OFF
STP
PST
S&P
Console does not send either SysEx or Program Changes
Console sends only SysEx messages
Console sends only Piston Program Changes
Console sends both SysEx and Program Changes
Program Changes 1-12 on any Master Channel will activate the organ General Pistons of
like number. Program Change 20 on any Master Channel will activate the organ’s General
Cancel piston. Program Changes 21-26 on any Master Channel will activate the Divisional
Pistons for the division corresponding to that Master Channel.
34
USING PISTONS TO CONTROL A SECOND RODGERS CONSOLE:
1.
Connect the MIDI Sequencer Output of the master console to the Sequencer Input
of the slave console.
2.
On the master console, enable piston transmission by turning the Select Knob until
the cursor is in the Send Field (“SEND”) of the MIDI Stop Change menu.
3.
Rotate the Alpha Dial until the Console Display reads “SEND: PST”.
4.
On the slave console, enable piston reception by turning the Select Knob until the
cursor is in the Receive Field (“RCV”) of the MIDI Stop Change menu.
5.
Rotate the Alpha Dial until the Console Display reads “RCV: PST”.
MIDI LOCAL CONTROL
When in the “OFF” position, MIDI Local Control allows the organ console to play MIDI
sounds only, disabling the organ voices. When in the “ON” position, the organ will function
normally. In the OFF position, organ voices can still be played by a sequencer or by a remote
keyboard connected to the 360 MIDI IN jack.
ENABLING OR DISABLING MIDI LOCAL CONTROL:
1.
Hold the SET piston, then turn the Select Knob clockwise (right) to “MIDI
LOCAL CONTROL”.
2.
Release SET.
3.
Rotate the Alpha Dial to choose “ON” or “OFF”. This selection is temporary. The
organ will always return to MIDI “LOCAL CONTROL ON” when the organ is
turned on.
MIDI SEQUENCER UPDATE
MIDI Start, Stop and Continue messages generated by a sequencer are accepted by the
organ only when the MIDI Sequencer Update is enabled.
ENABLING OR DISABLING MIDI SEQUENCER UPDATE:
1.
Hold the SET piston, then turn the Select Knob clockwise (right) to “MIDI
SEQUENCER UPDATE”.
2.
Release SET.
3.
Rotate the Alpha Dial to choose “ON” or “OFF”. This selection is temporary. The
organ will always return to MIDI “SEQUENCER UPDATE ON” when the organ
is turned on.
4.
Press General Cancel to exit.
Note: The organ uses the sequencer control messages to automatically record the stop
and expression status at the beginning of a sequence.
35
MIDI DEVICE ID
MIDI Device ID allows the organist to select the MIDI Device identification number used
in System Exclusive Stop Control messages. Normally, the organ both sends and recognizes
an ID number of 17. Stop Control messages with other ID numbers will be ignored.
This ID number can be changed to allow independent control over multiple organ
consoles connected via MIDI or to facilitate storing multiple sets of registration information
on a sequencer recording. The number can be set to 1, or 17 through 32. Setting the ID to 1
produces Stop Control messages which are compatible with older Rodgers PDI and
C-Series organs. The ID always returns to 17 when the organ is turned off.
SETTING THE MIDI DEVICE ID:
1.
Hold the SET piston, then turn the Select Knob clockwise (right) to “MIDI
DEVICE ID”.
2.
Rotate the Alpha Dial to set the desired ID number.
3.
Press General Cancel to exit.
SAVING A COMBINATION MEMORY
The contents of any combination memory may be saved into a MIDI sequencer and later
reloaded into the organ.
1.
Connect the Sequencer MIDI IN to the organ Sequencer MIDI OUT. Connect the
Sequencer MIDI OUT to the organ Sequencer MIDI IN.
2.
Start the sequencer in Record mode.
3.
Wait until after any count-in measures, then hold the SET piston and momentarily
press the memory tab (M1, M2, M3 or M4) for the memory to be copied to the
sequencer.
4.
Release SET and wait until the Console Display reads:
MEMORY COPIED TO
SEQUENCER PORT
5.
Stop the MIDI Sequencer, or wait a few seconds and repeat steps 3 and 4 above to
send another memory to the sequencer. Always leave a few measures of space
between memories.
To reload a memory from the sequencer, first connect the sequencer following the steps
above. Then continue:
1.
Play back the recorded memory as a song would be played back.
36
2.
When the memory contents have been correctly received, the memory tab
corresponding to the memory on the sequencer recording flashes. At this point, the
contents of the memory are stored in a temporary holding area in the console.
3.
Stop the sequencer playback.
4.
Hold SET, then press the memory tab for the desired destination. Note: This need
not be the same memory as the memory whose tab is flashing.
When copying more than one memory to the sequencer, it is necessary to wait a few
measures between saving individual memories, or place them on different tracks. This
procedure will reduce confusion regarding the location of the memories on the sequencer.
When playing back the memories, play only one at a time. Each time the organ starts to
receive a new memory, it discards any previous information in the temporary holding area. It
is necessary to transfer each memory to its destination memory in the organ before playing
back the next.
Note: If a Rodgers Personal Memory Card is inserted when recording or playing back
combination memories, and the card memory is in use for the memory level being
saved/restored, the memory will be saved from or restored to the memory card rather than the
internal memory.
MIDI CONNECTIONS
Always connect a sequencer to the Sequencer IN/OUT ports on the organ. The
sequencer must not be in “Soft Thru” mode. Any other MIDI instruments or keyboards
should use the ports labeled “MIDI.”
37
RODGERS PERSONAL MEMORY
CARD
This exclusive feature provides the ability to store combination memory levels,
Crescendo and other settings in a removable solid-state Personal Memory Card. This creditcard-size device is convenient to carry and has an internal battery which maintains the
contents of the card memory for several years. If more than one organist has access to the
console, Personal Memory Cards are a valuable resource.
The console Personal Memory Card slot is located in the left panel near the power switch.
To use the Personal Memory Card for combination memory storage, perform the following
steps:
1.
Insert the Personal Memory Card firmly in the slot with the label side up and the
arrow pointing toward the slot. If the Personal Memory Card is being used for the
first time, a message will appear in the Console Display asking if the card should
be initialized for use.
2.
To initialize the Personal Memory Card, press and release the SET piston. This
initialization process stores a small amount of information on the card which
makes it recognizable as a valid Rodgers Personal Memory Card. At this point,
the card is ready to be used for combination memory storage. A newly initialized
card contains no combination memories as yet.
3.
Select the desired memory level by pressing M1, M2, M3 or M4.
4.
Set any piston by holding SET, then pressing a combination piston. To do this
without changing any piston settings, press a combination piston to recall its
combination, then set the same piston by holding SET, and pressing the
combination piston again.
The contents of the entire memory level (all pistons) have now been copied to the
Personal Memory Card. Because the card now contains a copy of the currently selected
memory, the card memory will now be used instead of the internal memory from this point.
Setting a piston now affects only the card memory and not the console internal memory. This
is true until a different memory level is selected or until the Personal Memory Card is
removed. It is important to remember the following points:
When a Personal Memory Card is in the slot, any memory levels which exist on
the card replace the corresponding console internal memories, which are temporarily
“disconnected”.
Setting any piston while a Personal Memory Card is inserted copies the current
memory level to the Personal Memory Card if it did not already exist on the card.
The Personal Memory Card must be removed in order to be able to set pistons in a
console internal memory level.
38
Whenever a memory select piston (M1, M2, M3, or M4) is pressed, a message
appears in the Console Display indicating whether the internal memory or the
Personal Memory Card memory is being used.
If an internal memory is accidentally copied to the Personal Memory Card, or if a
memory level is to be removed on the Personal Memory Card so the internal
memory can be used instead, you can delete the memory level from the Personal
Memory Card.
DELETING A MEMORY FROM THE CARD:
1.
Hold General Cancel, then press the memory select tab for the memory level to be
deleted.
2.
A message will appear in the Console Display confirming the memory level has
been deleted from the Personal Memory Card. Immediately after this operation,
the internal memory will be “reconnected”.
STORING CRESCENDO SEQUENCES ON THE CARD
In addition to the combination memory levels, the Personal Memory Card can also store
copies of Crescendo sequences. If the Crescendo set operation is performed while the card is
inserted, the new Crescendo sequence will be stored on the card rather than in the internal
memory. Like the combination memory levels, these will automatically replace the internal
Crescendo whenever the Personal Memory Card is inserted in the slot.
DELETING A CRESCENDO SEQUENCE FROM THE CARD:
1.
Press “MASTER EXPRESSION/CRESCENDO”.
2.
Hold General Cancel, then press “MASTER EXPRESSION/CRESCENDO” again.
A message appears in the Console Display confirming deletion of the stored
sequence from the Personal Memory Card.
STORING ADDITIONAL SETTINGS ON THE CARD
Several additional settings can also be stored on a Personal Memory Card. Changing any
of these settings causes all of them to be moved to the card if they were not previously stored
on the card. The settings will automatically take effect when the card is inserted. The settings
are:
* Melody Note Range
* Counter Melody Note Range
* Wind Stabilizer Status
* Expression Range Settings
* Master Tuning Lock Status
* Tremulant Adjustments
* Console Lamp Intensity
* MIDI Stop Change Send/Receive Enable
39
DELETING SETTINGS FROM THE CARD:
1.
Hold General Cancel, then press “MASTER EXPRESSION/CRESCENDO” tab
momentarily. A message appears in the Console Display indicating the settings
have been deleted from the card.
PERSONAL MEMORY CARD FOLDERS
The capacity of a Rodgers Personal Memory Card is greater than that of the organ’s
internal combination memory. In order to make easy use of this additional capacity, Rodgers
uses the concept of memory folders. Like a file folder, a memory folder is used to store
groups of information on the Personal Memory Card. In this case, each folder can contain a
copy of each console memory level, plus a copy of each Crescendo sequence and other
settings.
B
A
M1
M2
E
D
M3
F
M4
STD CRESC
OTHER SETTINGS
When a Personal Memory Card is first used, it is initialized to use Folder A. This folder
is used until a new folder is selected. The selected folder is saved when the card is removed
and later reinserted.
SELECTING A NEW FOLDER ON THE CARD:
1.
Insert the Personal Memory Card in the slot.
2.
Hold the SET piston, then turn the Select Knob counter clockwise (left) until
Console Display reads “MEMORY CARD FOLDER”.
3.
Release SET, and turn the Select Knob until the desired folder appears in the
Console Display. Folders are labeled A, B, C, D, E, F, G and H.
The Console Display reads:
CARD FOLDER A:
M:4 SC S
40
The second line shows the folder contains combination memories 1 through 4, a
Crescendo sequence (SC), and the other Settings (S). If a folder has nothing in it, the second
line displays “EMPTY”.
LOCKING/UNLOCKING A PERSONAL MEMORY CARD
When a Personal Memory Card memory level or Crescendo is being used, it can be
locked and unlocked in exactly the same manner as are console internal memories. A locked
Personal Memory Card memory cannot be deleted or altered. A warning message is displayed
if you attempt to delete or alter a locked memory level or Crescendo.
The entire Personal Memory Card can be locked by moving the small slide switch at the
outside edge of the Personal Memory Card in the direction of the lock symbol. Again, the
warning is displayed if an attempt is made to delete or alter anything in the Personal Memory
Card memory while the card protect switch is in the locked position. If the card protect switch
is in the locked position, temporary changes may be made in the Organist Settings without
affecting the card memory. Note: Always lock the Personal Memory Card when inserting or
removing from the console slot. Failure to do so may result in loss of information.
USING A PERSONAL MEMORY CARD
ON OTHER RODGERS ORGANS
The same Personal Memory Card can be used in more than one Rodgers organ. The
information on the Personal Memory Card is kept separate for each organ model. If a folder is
created on a particular model, that folder will only be accessible on that same model of
Rodgers organ. A Personal Memory Card can hold sets of folders for several Rodgers organ
models. When a Personal Memory Card is inserted into a console slot, any folders created on
that same model will be available. Note: Folders created on Rodgers Custom instruments are
unique and only available to that instrument.
It is important to remember, although folders created on one model are “invisible” on
another model, these folders reduce the amount of free memory space on the card. A Personal
Memory Card which doesn’t appear to have as much free space as it should, may in fact have
folders for other models stored on it.
REINITIALIZING A PERSONAL MEMORY CARD
In some cases, it may be desirable to erase all information on a Personal Memory Card. If
SET is held while inserting a Personal Memory Card in the console slot, a message will
appear in the Console Display asking whether the Personal Memory Card should be
reinitialized. To perform the reinitialization, press SET. If it is decided not to initialize the
Personal Memory Card, press General Cancel again, then remove the card. A new Personal
Memory Card must also be initialized before it can be used. Note: Initializing a memory
card will erase all previously stored information on the card!
41
REPLACING THE PERSONAL MEMORY CARD BATTERY
A 3-volt lithium battery (Rodgers part #1571-003 or Radio Shack part #23-160) is
required for replacement. Replacement batteries can be obtained from your local Rodgers
representative or at many camera stores. To replace the battery without losing the contents of
the Personal Memory Card, open the battery compartment on the front edge of the card only
with the card inserted in the console slot while the organ is on. Otherwise, all information on
the card will be lost. The console continues to supply power to the Personal Memory Card
while the battery is being replaced. Be sure to observe the polarity marking when inserting
the new battery.
When a Personal Memory Card, whose backup battery has become weak, is inserted in
the console slot, a message appears in the Console Display warning the battery is low. The
message remains until General Cancel is pressed. Although the battery usually continues to
function for several days after the message first appears, it should be replaced at the earliest
opportunity.
WARNING: This is a lithium battery, which can present an explosion risk. DO NOT
expose the battery or the Personal Memory Card to fire. DO NOT attempt to recharge this
battery.
42
THEATRE 360 STOP
SPECIFICATION
GREAT
SOLO
English Horn 16' (Saxophone 16’)
Tuba Profunda 16'
Tibia Clausa 16'
Contra Viols II 16'
Vox Humana 16' (Trumpet 16')
Trumpet 8'
Tuba Horn 8'
Open Diapason 8' (Tibia Minor 8')
Tibia Clausa 8'
Orchestral Oboe 8'
Krumet 8' (Kinura 8', Musette 8')
Clarinet 8'
Viol Celeste II 8'
Vox Humana 8' (Rauschquint IV)
Tibia Quint 5 1/3'
Octave 4' (Tibia Minor 4')
Piccolo 4'
Viol Celeste II 4'
Tibia Twelfth 2 2/3'
Tibia Piccolo 2'
Viol 2' (15th)
Tibia Tierce 1 3/5' (17th)
Tibia Fife 1'
MIDI A [LP]
MIDI B [LP]
Solo to Great Pizzicato [LP]
Solo to Great Melody [LP]
Great Sostenuto [LP]
English Horn 8'
Trumpet 8'
Tuba Horn 8'
Tibia Clausa 8'
Orchestral Oboe 8'
Krumet 8' (Kinura 8', Musette 8')
Saxophone 8' (Vox Humana 8')
Piccolo 4'
Tibia Twelfth 2 2/3'
Tibia Piccolo 2'
Solo to Solo 16' (Sub)
Xylophone [LP]
Glockenspiel [LP]
Harp [LP]
Chrysoglott [LP]
Sound Effects [LP]
MIDI A [LP]
MIDI B [LP]
Voice Palette selection listed in ( ).
Lighted pistons listed as [LP].
43
TREMULANTS
Main
Solo
Tibia/Vox
Tuba
(Theatre 360 Stop Specification continued)
ACCOMPANIMENT
PEDAL
English Horn 8'
Tuba Horn 8'
Open Diapason 8'
Clarinet 8' (Trumpet 8')
Viol Celeste II 8'
Quintadena 8' (Tibia Minor 8')
Concert Flute 8'
Vox Humana 8' (Rauschquint IV)
Octave 4'
Piccolo 4'
Viol Celeste II 4'
Flute 4'
Harp
Chrysoglott
Snare Drum
Tambourine
Cymbal
Trap Select (Wood Block)
MIDI A [LP]
MIDI B [LP]
Diaphone 32'
Tuba Profunda 16'
Diaphone 16'
Violon Cellos II 16'
Bourdon 16'
Tuba Horn 8'
Tibia Clausa 8'
Clarinet 8' (Kinura 8',
English Horn 16')
Cello Celeste II 8'
Flute 8'
Tympani
Cymbal
Trap Select (Bass Drum)
Accompaniment to Pedal
MIDI A [LP]
MIDI B [LP]
Voice Palette selection listed in ( ).
Lighted pistons listed as [LP].
44
45
FACTORY DEFAULT
COMBINATION SETTINGS
The Rodgers Theatre 360 is shipped from the factory with default settings on combination
memories 1 and 2. Registrations on M1 and M2 can be changed, but if the original factory
default settings are desired, they can be restored by performing the following procedure:
RESTORING THE FACTORY DEFAULT COMBINATION SETTINGS:
1.
Hold the memory piston to be restored (M1 or M2) for approximately five seconds.
The Console Display reads “LOCKED” or “UNLOCKED”.
2.
While holding the memory piston, press and hold SET for an additional five
seconds. The Console Display reads “MEMORY 1 FACTORY DEFAULT” or
“MEMORY 2 FACTORY DEFAULT”.
3.
Release both pistons. Note: Each memory must be individually restored by
performing the above procedure.
46
FACTORY DEFAULT REGISTRATIONS FOR M1 AND M2
The following registrations are the factory default settings on memory 1:
Memory 1 Generals:
1
PEDAL
Diaphone 32'
Tuba Profunda 16'
Diaphone 16'
Violon Cellos II 16'
Bourdon 16'
Tuba Horn 8'
Tibia Clausa 8'
Clarinet 8'
Cello Celeste II 8'
Flute 8'
Tympani
Cymbal
Trap Select (Bass Drum)
Accompaniment to Pedal
MIDI A [LP]
X
2
X
3
4
X
X
X
X
X
X
X
5
X
X
X
X
X
X
X
6
7
8
9
10
X
X
X
X
X
X
X
X
X
X
X
X
X
X
X
X
X
X
X
X
X
X
X
X
X
X
X
X
X
X
X
X
X
X
X
Vel=50
X
X
Vel=50
X
X
Vel=50
MIDI B [LP]
ACCOMPANIMENT
English Horn 8'
Tuba Horn 8'
Open Diapason 8'
Clarinet 8'
Viol Celeste II 8'
Quintadena 8'
Concert Flute 8'
Vox Humana 8'
Octave 4'
Piccolo 4'
Viol Celeste II 4'
Flute 4'
Harp
Chrysoglott
Snare Drum
Tambourine
Cymbal
Trap Select (Wood Block)
MIDI A [LP]
MIDI B [LP]
X
X
X
X
X
X
X
X
X
X
X
X
X
X
X
X
X
X
X
X
X
X
Note: MIDI coupler pistons use Piano 1 (Program Change #1)
47
X
X
X
X
1
GREAT
English Horn 16'
Tuba Profunda 16'
Tibia Clausa 16'
Contra Viols II 16'
Vox Humana 16'
Trumpet 8'
Tuba Horn 8'
Open Diapason 8'
Tibia Clausa 8'
Orchestral Oboe 8'
Krumet 8'
Clarinet 8'
Viol Celeste II 8'
Vox Humana 8'
Tibia Quint 5 1/3'
Octave 4'
Piccolo 4'
Viol Celeste II 4'
Tibia Twelfth 2 2/3'
Tibia Piccolo 2'
Viol 2' (15th)
Tibia Tierce 1 3/5' (17th)
Tibia Fife 1'
MIDI A [LP]
MIDI B [LP]
Solo to Great Pizzicato [LP]
Solo to Great Melody [LP]
Great Sostenuto [LP]
SOLO
English Horn 8'
Trumpet 8'
Tuba Horn 8'
Tibia Clausa 8'
Orchestral Oboe 8'
Krumet 8'
Saxophone 8'
Piccolo 4'
Tibia Twelfth 2 2/3'
Tibia Piccolo 2'
Solo to Solo 16' (Sub)
Xylophone [LP]
Chrysoglott [LP]
Harp [LP]
Glockenspiel [LP]
Sound Effects [LP]
MIDI A [LP]
MIDI B [LP]
TREMULANTS
Main
Solo
Tibia
Tuba
2
X
X
X
X
X
X
X
3
4
5
X
X
X
X
X
X
X
X
X
X
X
X
X
X
X
X
X
X
X
X
X
X
X
X
X
X
X
X
X
X
X
X
X
X
X
X
X
X
X
X
X
X
X
6
7
8
9
X
X
X
10
X
X
X
X
X
X
X
X
X
X
X
X
X
X
X
X
X
X
X
X
X
X
X
X
X
X
X
X
X
X
X
X
X
X
X
X
X
X
X
X
X
X
X
X
X
X
X
X
X
X
X
X
X
X
X
X
X
X
X
X
X
X
X
X
X
X
X
X
X
X
X
X
X
48
X
X
X
X
X
X
X
X
X
X
X
X
X
X
X
X
X
X
X
Memory 2 Generals:
1
PEDAL
Diaphone 32'
Tuba Profunda 16'
Diaphone 16'
Violon Cellos II 16'
Bourdon 16'
Tuba Horn 8'
Tibia Clausa 8'
Clarinet 8' (Kinura 8', English Horn 16')
Cello Celeste II 8'
Flute 8'
Tympani
Cymbal
Trap Select (Bass Drum)
Accompaniment to Pedal
MIDI A [LP] (Piano 1, #1)
X
2
X
3
4
5
X
X
X
X
X
X
X
X
X
X
X
X
X
X
X
X
X
X
6
7
9
10
X
X
X
X
X
X
X
X
X
X
X
X
X
X
X
X
X
X
X
X
X
X
X
X
X
X
X
X
X
X
(X)
X
X
X
X
X
X
X
X
X
X
X
X
X
X
X
DN 1
DN 1
Vel=50 Vel=50
X
X
Vel=50 Vel=50
MIDI B [LP] (Piano 1, #1)
ACCOMPANIMENT
English Horn 8'
Tuba Horn 8'
Open Diapason 8'
Clarinet 8' (Trumpet 8')
Viol Celeste II 8'
Quintadena 8' (Tibia Minor 8')
Concert Flute 8'
Vox Humana 8' (Rauschquint IV)
Octave 4'
Piccolo 4'
Viol Celeste II 4'
Flute 4'
Harp
Chrysoglott
Snare Drum
Tambourine
Cymbal
Trap Select (Side Stick)
MIDI A [LP] (Piano 1, #1)
8
X
X
(X)
X
X
X
X
X
X
X
X
X
X
X
X
X
X
X
X
X
X
X
X
MIDI B [LP]
49
X
X
X
Vel=50 Vel=50
GREAT
English Horn 16' (Saxophone 16')
Tuba Profunda 16'
Tibia Clausa 16'
Contra Viols II 16'
Vox Humana 16' (Trumpet 16')
Trumpet 8'
Tuba Horn 8'
Open Diapason 8' (Tibia Minor 8')
Tibia Clausa 8'
Orchestral Oboe 8'
Krumet 8' (Kinura 8'), [Musette 8']
Clarinet 8'
Viol Celeste II 8'
Vox Humana 8' (Rauschquint IV)
Tibia Quint 5 1/3'
Octave 4' (Tibia Minor 4')
Piccolo 4'
Viol Celeste II 4'
Tibia Twelfth 2 2/3'
Tibia Piccolo 2'
Viol 2' (15th)
Tibia Tierce 1 3/5' (17th)
Tibia Fife 1'
MIDI A [LP] (Piano 1, #1)
1
(X)
2
(X)
3
(X)
X
X
X
X
X
X
X
(X)
X
(X)
X
(X)
X
X
X
X
(X)
X
X
4
X
X
5
X
X
X
(X)
X
X
(X)
X
(X)
X
X
X
X
X
X
X
X
(X)
X
X
(X)
X
X
X
X
X
X
X
X
X
SOLO
English Horn 8'
Trumpet 8'
Tuba Horn 8'
Tibia Clausa 8'
Orchestral Oboe 8'
Krumet 8' (Kinura 8', Musette 8')
Saxophone 8' (Vox Humana 8')
Piccolo 4'
Tibia Twelfth 2 2/3'
Tibia Piccolo 2'
Solo to Solo 16' (Sub)
Xylophone [LP]
Chrysoglott [LP]
Harp [LP]
Glockenspiel [LP]
Sound Effects [LP]
MIDI A [LP]
MIDI B [LP]
TREMULANTS
Main
Solo
Tibia
Tuba
7
(X)
8
9
(X)
10
X
X
X
X
(X)
X
(X)
X
X
(X)
X
X
X
X
(X)
X
X
X
X
[X]
X
X
(X)
X
X
X
X
X
X
X
DN 1
Vel=70
X
UP 1
Vel=70
X
MIDI B [LP] (Piano 1, #1)
Solo to Great Pizzicato [LP]
Solo to Great Melody [LP]
Great Sostenuto [LP]
6
X
X
X
X
X
X
X
X
X
X
X
X
X
X
X
X
X
X
X
X
X
X
X
X
X
X
X
X
X
X
X
X
X
X
X
X
X
X
X
X
X
X
X
X
X
X
50
X
X
X
X
X
X
X
X
X
X
X
X
X
X
X
X
X
X
Memory 1 and 2 Divisionals:
Memory 1
PEDAL
Diaphone 32'
Tuba Profunda 16'
Diaphone 16'
Violon Cellos II 16'
Bourdon 16'
Tuba Horn 8'
Tibia Clausa 8'
Clarinet 8' (Kin 8', EngHn 16')
Cello Celeste II 8'
Flute 8'
Tympani
Cymbal
Trap Select (Triangle) {Chinese
Gong} [Crash Cymbal]
Accompaniment to Pedal
MIDI A [LP]
MIDI B [LP]
ACCOMPANIMENT/PEDAL
English Horn 8'
Tuba Horn 8'
Open Diapason 8'
Clarinet 8' (Trumpet 8')
Viol Celeste II 8'
Quintadena 8' (Tibia Minor 8')
Concert Flute 8'
Vox Humana 8' (Rausch. IV)
Octave 4'
Piccolo 4'
Viol Celeste II 4'
Flute 4'
Harp
Chrysoglott
Snare Drum
Tambourine
Cymbal
Trap Select (Wood Block)
MIDI A [LP]
MIDI B [LP]
Diaphone 32'
Tuba Profunda 16'
Diaphone 16'
Violon Cellos II 16'
Bourdon 16'
Tuba Horn 8'
Tibia Clausa 8'
Clarinet 8'
Cello Celeste II 8'
Flute 8'
Tympani
Cymbal
Trap Select (Bass Drum)
Accompaniment to Pedal
MIDI A [LP]
MIDI B [LP]
1
2
3
X
X
X
4
X
X
X
X
X
X
X
X
X
X
5
X
X
X
X
X
X
X
X
X
X
(X)
{X}
[X]
X
X
X
3
4
X
X
X
X
X
X
X
X
X
X
5
X
X
X
X
X
X
X
X
X
X
X
X
X
X
X
X
1
X
2
X
X
Memory 2
1
2
X
3
X
X
X
X
X
X
X
X
X
X
4
X
X
X
X
X
X
X
X
X
X
(X)
{X}
[X]
X
X
X
3
4
5
X
X
X
X
X
X
X
X
X
X
X
1
2
X
X
X
5
X
X
X
X
X
X
X
X
X
X
X
X
X
X
X
X
X
X
X
X
X
X
X
X
X
X
X
X
X
X
X
X
X
X
X
X
X
51
X
X
X
X
X
X
X
X
X
X
X
X
X
X
X
X
X
X
X
X
X
X
X
Memory 1
SOLO
English Horn 8'
Trumpet 8'
Tuba Horn 8'
Tibia Clausa 8'
Orchestral Oboe 8'
Krumet 8' (Kinura 8') [Musette 8']
Saxophone 8' (Vox Humana 8')
Piccolo 4'
Tibia Twelfth 2 2/3'
Tibia Piccolo 2'
Solo to Solo 16' (Sub)
Xylophone [LP]
Chrysoglott [LP]
Harp [LP]
Glockenspiel [LP]
Sound Effects [LP]
MIDI A [LP]
MIDI B [LP]
1
2
3
Memory 2
4
5
X
X
1
2
X
X
X
X
4
X
X
X
3
X
X
X
X
X
X
(X)
X
X
X
X
X
X
X
X
X
Memory 1
GREAT
English Horn 16'
Tuba Profunda 16'
Tibia Clausa 16'
Contra Viols II 16'
Vox Humana 16'
Trumpet 8'
Tuba Horn 8'
Open Diapason 8'
Tibia Clausa 8'
Orchestral Oboe 8'
Krumet 8'
Clarinet 8'
Viol Celeste II 8'
Vox Humana 8'
Tibia Quint 5 1/3'
Octave 4'
Piccolo 4'
Viol Celeste II 4'
Tibia Twelfth 2 2/3'
Tibia Piccolo 2'
Viol 2' (15th)
Tibia Tierce 1 3/5' (17th)
Tibia Fife 1'
MIDI A [LP] (
MIDI B [LP]
Solo to Great Pizzicato [LP]
Solo to Great Melody [LP]
Great Sostenuto [LP]
TREMULANTS
Main
Solo
Tibia
Tuba
pp
X
X
p
mf
X
X
X
X
X
X
X
X
X
X
X
X
X
X
f
X
X
X
ff
X
X
X
X
X
X
X
X
X
X
X
X
X
X
X
X
X
X
X
X
X
X
X
X
X
X
X
X
X
1
2
3
4
5
X
X
X
X
X
X
X
X
X
X
X
X
X
X
X
X
X
X
X
X
X
X
X
X
X
X
X
X
X
X
X
X
X
X
X
X
X
X
X
X
X
X
X
X
X
X
X
X
X
X
X
X
X
X
X
X
X
X
X
X
52
5
X
X
X
X
X
X
X
X
X
X
X
X
X
X
X
X
X
X
X
X
X
X
X
Memory 2
GREAT
English Horn 16' (Saxophone 16')
Tuba Profunda 16'
Tibia Clausa 16'
Contra Viols II 16'
Vox Humana 16' (Trumpet 8')
Trumpet 8'
Tuba Horn 8'
Open Diapason 8' (Tibia Minor 8')
Tibia Clausa 8'
Orchestral Oboe 8'
Krumet 8' (Kinura 8') [Musette 8']
Clarinet 8'
Viol Celeste II 8'
Vox Humana 8' (Rauschquint IV)
Tibia Quint 5 1/3'
Octave 4' (Tibia Minor 4')
Piccolo 4'
Viol Celeste II 4'
Tibia Twelfth 2 2/3'
Tibia Piccolo 2'
Viol 2' (15th)
Tibia Tierce 1 3/5' (17th)
Tibia Fife 1'
MIDI A [LP]
pp
p
(X)
mf
(X)
f
X
X
X
X
X
(X)
X
X
X
(X)
X
(X)
X
X
(X)
X
2
(X)
3
4
(X)
5
X
(X)
X
X
(X)
X
X
X
X
X
X
X
X
X
X
X
(X)
X
X
X
(X)
X
X
(X)
X
X
X
X
X
X
X
X
X
X
X
(X)
X
(X)
X
X
[X]
X
X
X
X
X
(X)
X
X
(X)
X
X
X
X
X
X
X
X
X
X
X
X
X
X
X
X
X
X
Vel=50
X
UP 1
Vel=50
MIDI B [LP]
Solo to Great Pizzicato [LP]
Solo to Great Melody [LP]
Great Sostenuto [LP]
TREMULANTS
Main
Solo
Tibia
Tuba
1
X
X
X
X
X
X
ff
X
X
X
X
X
X
X
X
X
X
X
X
X
X
X
X
X
X
X
53
X
X
X
X
X
X
X
X
X
X
SUGGESTED REGISTRATIONS
Here are a few suggestions for registrations on the Great:
BALLAD 1
Vox Humana 8'
Piccolo 4'
BALLAD 2
Tibia Clausa 16'
Vox Humana 16'
Vox Humana 8'
Piccolo 4'
BALLAD 3
Tibia Clausa 16'
Vox Humana 16'
Orchestral Oboe 8'
Viol Celeste II 8'
Vox Humana 8'
Piccolo 4'
Tibia Twelfth 2 2/3'
BALLAD 4
Contra Viols II 16'
Vox Humana 16'
Tibia Clausa 8'
Clarinet 8'
Viol Celeste II 8'
Piccolo 4'
BALLAD 5
Tuba Profunda 16'
Tibia Clausa 8'
Piccolo 4'
NOVELTY
Orchestral Oboe 8'
Clarinet 8'
Piccolo 4'
Krumet 8'* (select Kinura from VP)
NOVELTY
Contra Viols II 16'
Viol Celeste II 8'
Piccolo 4'
FULL ENSEMBLE
Tibia Clausa 16'
Contra Viols II 16'
Vox Humana 16'
Open Diapason 8'*
(select Tibia Minor
from VP)
Tibia Clausa 8'
Clarinet 8'
Viol Celeste II 8'
Vox Humana 8'
Piccolo 4'
Viol Celeste II 4'
LOUD FULL ENSEMBLE
Tuba Profunda 16'
Tibia Clausa 16'
Vox Humana 16'* (select Trumpet
from VP)
Tuba Horn 8'
Open Diapason 8'
Tibia Clausa 8'
Orchestral Oboe 8'
Viol Celeste II 8'
Piccolo 4'
Viol Celeste II 4'
Tibia Piccolo 2'
Viol Fifteenth 2'
Great MIDI A
Xylophone (Octave Shift:
Up 2)
* Stop to be selected, then changed to Voice Palette (VP) selection.
54
Here are a few suggestions for registrations on the Solo:
BALLAD 1
Tibia Clausa 8'
Saxophone 8'
BALLAD 2
Orchestral Oboe 8'
Saxophone 8'* (select Vox
Humana from VP)
Piccolo 4'
Solo to Solo 16'
BALLAD 3
Trumpet 8'
Tuba Horn 8'
Tibia Clausa 8'
BALLAD 4
Trumpet 8'
Piccolo 4'
BALLAD 5
Tuba Horn 8'
Piccolo 4'
Solo to Solo 16'
NOVELTY
Tibia Piccolo 2'
Glockenspiel (Lighted
Piston)
NOVELTY
Xylophone (Lighted Piston)
Harp (Lighted Piston)
FULL ENSEMBLE
English Horn 8'
Xylophone (Lighted Piston)
LOUD FULL ENSEMBLE
English Horn 8'
Tuba Horn 8'
Tibia Clausa 8'
Piccolo 4'
Tibia Twelfth 2 2/3'
Tibia Piccolo 2'
* Stop to be selected, then changed to Voice Palette (VP) selection.
55
Here are a few suggestions for registrations on the Accompaniment:
BALLAD 1
Quintadena 8'
Concert Flute 8'
BALLAD 2
Quintadena 8'
Concert Flute 8'
Flute 4'
BALLAD 3
Viol Celeste II 8'
Quintadena 8'
Harp
BALLAD 4
Concert Flute 8'
Flute 4'
BALLAD 5
Viol Celeste 8'
Quintadena 8'
Harp
NOVELTY
Viol Celeste II 8'
Viol Celeste II 4'
NOVELTY
Clarinet 8'
Concert Flute 8'
FULL ENSEMBLE
Open Diapason 8'
Clarinet 8'
Quintadena 8'
Flute 4'
LOUD FULL ENSEMBLE
Tuba Horn 8'
Open Diapason 8'
Clarinet 8'
Viol Celeste II 8'
Concert Flute 8'
Octave 4'
Viol Celeste II 4'
Flute 4'
Here are a few suggestions for registrations on the Pedal:
BALLAD 1
Violon Cellos II 16'
BALLAD 2
Violon Cellos II 16'
Cello Celeste II 8'
BALLAD 3
Bourdon 16'
Flute 8'
BALLAD 4
Bourdon 16'
Tibia Clausa 8'
BALLAD 5
Violon Cellos II 16'
Clarinet 8'
NOVELTY
Tibia Clausa 8'
NOVELTY
Tibia Clausa 8'
Clarinet 8'* (select Kinura
from VP)
FULL ENSEMBLE
Diaphone 16'
Violon Cellos II 16'
Bourdon 16'
Tibia Clausa 8'
Clarinet 8'
Flute 8'
Accompaniment to Pedal
LOUD FULL ENSEMBLE
Tuba Profunda 16'
Diaphone 16'
Violon Cellos II 16'
Bourdon 16'
Tuba Horn 8'
Tibia Clausa 8'
Flute 8'
Accompaniment to Pedal
* Stop to be selected, then changed to Voice Palette (VP) selection.
56
INTERNAL SOUND MODULE
INSTRUMENT AND DRUM SET CHARTS
The following charts contain the sounds from the internal MIDI sound module in the
Theatre 360. There are two columns of numbers: the first column is the program change
number; the second column is the variation (bank) number.
For convenience, blank charts are included for notation of favorite sounds. Be sure to list
both the program change number as well as the variation (bank) number.
Prog. # Variation Instrument
Voices
PIANO
001
002
003
004
005
006
007
008
000
008
016
000
008
000
001
002
008
000
008
000
008
016
024
025
026
000
008
016
024
000
008
016
024
000
Piano 1
Piano 1w
Piano 1d
Piano 2
Piano 2w
Piano 3
EG+Rhodes 1
EG+Rhodes 2
Piano 3w
Honky-tonk
Old Upright
E.Piano 1
St.Soft EP
FM+SA EP
60Õs E.Piano
Hard Rhodes
Mellow Rhodes
E.Piano 2
Detuned EP 2
St.FM EP
Hard FM EP
Harpsichord
Coupled Hps.
Harpsi.w
Harpsi.o
Clav.
1
1
1
1
1
1
2
2
1
2
2
2
2
2
1
2
2
2
2
2
2
1
2*
1
2
1
013
014
015
016
000
000
000
000
001
008
000
008
016
017
024
000
000
008
009
000
Celesta
Glockenspiel
Music Box
Vibraphone
Hard Vibe
Vib.w
Marimba
Marimba w
Balaphon
Balaphon 2
Log drum
Xylophone
Tubular-bell
Church Bell
Carillon
Santur
1*
1
1
1
2
1*
1
1
1
1
1
1
1*
1*
1*
1*
2
2
Voices
ORGAN
017
018
019
020
021
022
CHROMATIC PERCUSSION
009
010
011
012
001
Santur 2
008
Cimbalon
Prog. # Variation Instrument
023
024
000
001
008
009
016
017
018
024
032
033
040
000
001
008
032
000
008
016
024
000
008
016
024
032
000
000
008
000
001
000
Organ 1
Organ 101
Detuned Org.1
Organ 109
60Õs Organ 1
60Õs Organ 2
60Õs Organ 3
Cheese Organ
Organ 4
Even Bar
Organ Bass
Organ 2
Organ 201
Detuned Org. 2
Organ 5
Organ 3
Rotary Org.
Rotary Org. S
Rotary Org. F
Church Org. 1
Church Org. 2
Church Org. 3
Organ Flute
Trem. Flute
Reed Organ
Accordion Fr
Accordion It
Harmonica
Harmonica 2
Bandoneon
1
2
2
2
1
1
1
1
1
2
1
1
2
2
2
2*
1
1
1
1
2
2
1
2
1*
1
2
1
2
1
Nylon-str. Gt
Ukulele
Nylon Gt.o
Velo Harmnix
Nylon Gt. 2
Lequint Gt.
Steel-str. Gt.
12-str. Gt
Nylon+Steel
Mandolin
1
1
2
1
1
1
1
2
2
2
032
Steel Gt. 2
000
Jazz Gt.
001
Mellow Gt.
008
Pedal Steel
Prog. # Variation Instrument
027
028
029
030
031
032
026
000
008
016
024
032
040
000
008
009
016
57
000
008
000
001
008
016
000
000
001
002
008
009
016
017
018
024
025
000
008
016
Clean Gt.
Chorus Gt.
Muted Gt.
Muted Dis. Gt.
Funk Pop
Funk Gt.
Overdrive Gt.
Distortion Gt.
Dist. Gt 2
Dazed Guitar
Feedback Gt.
Feedback Gt. 2
Power Guitar
Power Gt. 2
5th Dist.
Rock Rhythm
Rock Rhythm 2
Gt. Harmonics
Gt. Feedback
Ac.Gt.Harmnx
1
2
1
1
1
1
1
1
2
2
2
2
2
2
2
2
2
1*
1*
1
000
000
001
002
000
008
000
001
002
003
004
005
000
008
000
000
001
008
009
010
Acoustic Bs.
Fingered Bs.
Fingered Bs.2
Jazz Bass
Picked Bass
Mute PickBs.
Fretless Bs.
Fretless Bs. 2
Fretless Bs. 3
Fretless Bs. 4
Syn Fretless
Mr. Smooth
Slap Bass 1
Reso Slap
Slap Bass 2
Synth Bass 1
Synth Bass101
Acid Bass
TB303 Bass
Tekno Bass
2
1
2
1
1
1
1
2
2
2
2
2
1
1
2
2
1*
1
1
2
BASS
033
034
035
036
GUITAR
025
1
1*
2
1
Voices
037
038
039
016
Reso SH Bass
1
000
Synth Bass 2
2
001
Synth Bass201 2
002
Modular Bass
2
003
Seq Bass
2
008
Beef FM Bass
2
Prog. # Variation Instrument Voices
040
009
016
017
018
019
X Wire Bass
Rubber Bass
SH 101 Bass 1
SH 101 Bass 2
Smooth Bass
2
2*
1
1
2
001
Tombone 2
2*
000
Tuba
1
001
Tuba 2
1
060
000
Muted Trumpet 1
061
000
French Horns
1
001
Fr. Horn 2
2*
008
Fr. Horn Solo
1
016
Horn Orch.
2
Prog. # Variation Instrument Voices
059
062
063
STRINGS / ORCHESTRAL
041
042
043
044
045
046
047
048
000
008
000
000
000
000
008
009
000
000
000
Violin
Slow Violin
Viola
Cello
Contrabass
Tremolo Str.
Slow Tremolo
Suspense Str.
Pizzicato Str.
Harp
Timpani
1
1
1
1
1
1
1
2
1
1
1
064
065
066
067
050
051
052
053
054
055
056
000
001
008
009
010
011
016
024
000
001
008
009
010
000
001
008
000
000
008
009
032
000
000
008
000
008
009
010
016
Strings
Strings 2
Orchestra
Orchestra 2
Tremolo Orch
Choir Str.
St. Strings
Velo Strings
Slow Strings
Slow Strings 2
Legato Str.
Warm Strings
St. Slow Str.
Syn. Strings 1
OB Strings
Syn. Strings 3
Syn. Strings 2
Choir Aahs
St. Choir
Mello Choir
Choir Aahs 2
Voice Oohs
SynVox
Syn. Voice
Orchestra Hit
Impact Hit
Philly Hit
Double Hit
Lo Fi Rave
1
1
2
2
2
2
2
2
1
1
2
2
2
2
2
2*
2*
1
2
2
1*
1*
1*
2
2
2
2
2
2
057
058
068
069
070
071
072
000
001
008
024
025
000
Trumpet
Trumpet 2
Flugel Horn
Bright Trumpet
Warm Trumpet
Trombone
1
1
1
2
2
1
1*
2
1
2
2
2*
2
2
2*
2
1*
2
2
000
000
008
000
008
000
000
000
000
000
008
Soprano Sax
Alto Sax
Hyper Alto
Tenor Sax
Breathy Tenor
Baritone Sax
Oboe
English Horn
Bassoon
Clarinet
Bass Clarinet
1
1
1
2
1
1
1
1
1
1
1
000
000
000
000
008
000
000
000
000
Piccolo
Flute
Recorder
Pan Flute
Kawala
Bottle Blow
Shakuhachi
Whistle
Ocarina
1
1
1*
2
2
2
2*
1*
1*
Square Wave
Square
Hollow Mini
Mellow FM
CC Solo
Shmoog
LM Square
Sine Wave
Saw Wave
Saw
Pulse Saw
Feline GR
Big Lead
Velo Lead
GR-300
LA Saw
2*
1*
1
2
2
2
2
1*
2*
1*
2
2
2
2
2
1
088
073
074
075
076
077
078
079
080
089
090
091
092
093
094
095
096
097
098
099
000
001
002
003
004
005
006
008
000
001
002
003
004
005
006
007
58
Big Fives
Bass & Lead
Big & Raw
Fat & Perky
2
2*
2
2
000
001
000
001
002
003
004
000
001
000
001
000
000
001
002
000
000
001
008
009
010
Fantasia
Fantasia 2
Warm Pad
Thick Pad
Horn Pad
Rotary String
Soft Pad
Polysynth
80Õs PolySyn
Space Voice
Heaven II
Bowed Glass
Metal Pad
Tine Pad
Panner Pad
Halo Pad
Sweep Pad
Polar Pad
Converge
Shwimmer
Celestial Pad
2*
2
1*
2
2
2
2
2*
2
1*
2
2*
2*
2
2
2*
1*
1
1
2
2
Ice Rain
Harmo Rain
African Wood
Clavi Pad
Soundtrack
Ancestral
Prologue
Rave
Crystal
Syn Mallet
Soft Crystal
Round Glock
Loud Glock
GlockenChime
Clear Bells
ChristmasBell
Vibra Bells
Digi Bells
Choral Bells
Air Bells
Bell Harp
Gamelimba
Atmosphere
Warm Atmos.
Nylon Harp
2*
2
2
2
2*
2
2
2
2*
1*
2
2
2
2
2
2
2
2
2
2
2
2
2*
2
2
SYNTH SFX
SYNTH LEAD
081
001
000
001
002
SYNTH PAD
PIPE
082
BRASS
Brass 1
Brass 2
Brass Fall
Synth Brass 1
Poly Brass
Synth Brass 3
Quack Brass
Octave Brass
Synth Brass 2
Soft Brass
Synth Brass 4
Velo Brass 1
Velo Brass 2
REED
ENSEMBLE
049
000
008
016
000
001
008
009
016
000
001
008
016
017
008
Doctor Solo
2*
016
Waspy Synth
2
083
000
Syn. Calliope
2*
001
Vent Synth
2
002
Pure PanLead
2
084
000
Chiffer Lead
2*
085
000
Charang
2*
008
Dist. Lead
2
086
000
Solo Vox
2*
087
000
5th Saw Wave 2*
Prog. # Variation Instrument Voices
100
000
001
002
008
000
001
002
008
000
001
002
003
004
005
006
007
008
009
016
017
018
019
000
001
002
003
Harpvox
2
004
Hollow Release 2
005
Nylon+Rhodes 2
006
Ambient Pad
2
101
000
Brightness
2*
102
000
Goblin
2*
001
Goblinson
2
002
50Õs Sci-Fi
2
103
000
Echo Drops
1*
001
Echo Bell
2*
002
Echo Pan
2*
003
Echo Pan 2
2
Prog. # Variation Instrument Voices
104
004
005
006
000
001
Big Panner
Reso Panner
Water Piano
Star Theme
Star Theme 2
2
2
2
2*
2
Sitar
Sitar 2
Detune Sitar
Tambra
Tamboura
Banjo
Muted Banjo
Rabab
Gopichant
Oud
Shamisen
Tsugaru
Koto
Tasiho koto
Kanoon
Kalimba
Bagpipe
Fiddle
Shanai
Shanai 2
Punji
Hichiriki
1*
2*
2
1
2
1
1
2
2
2
1*
2
1*
1
2
1
1
1*
1*
1
1
2
Tinkle Bell
Bonang
Gender
Gamelon Gong
1*
1
1
1
Prog. # Variation Instrument
114
115
116
117
118
119
120
ETHNIC
105
106
107
108
109
110
111
112
000
001
002
008
016
000
001
008
016
024
000
001
000
008
016
000
000
000
000
001
008
016
Voices
011
016
000
008
000
000
008
000
008
000
001
008
009
000
008
009
000
001
008
009
016
017
024
025
St. Gamelon
RAMA Cymbal
Agogo
Atarigane
Steel Drums
Woodblock
Castanets
Taiko
Concert BD
Melodic Tom 1
Real Tom
Melodic Tom 2
Rock Tom
Synth Drum
808 Tom
Electronic Perc
Reverse Cym.
Reverse Cym2
Rev. Snare 1
Rev. Snare 2
Rev. Kick 1
Rev. Con. BD
Rev. Tom 1
Rev. Tom 2
2
1
1
1
1*
1*
1*
1*
1*
1*
2
1*
2
1*
2
1*
1*
1
1
1
1
1
1
1
000
001
002
003
004
005
006
000
001
Gt. Fret Noise
Gt. Cut Noise
String Slap
Gt. Cut Noise
Dist. Cut Noiz
Bass Slide
Pick Scrape
Breath Noise
Fl. Key Click
1*
1*
1*
1
1
1
1
1*
1*
123
**
**
**
**
**
**
**
**
**
**
**
**
**
**
**
**
**
**
**
000
008
009
010
124
125
126
SFX
121
122
**
**
**
**
**
**
127
**
128
PERCUSSION
113
Prog. # Variation Instrument
* : Same sound as in the PR-300 Tone Map
** : A percussive sound that cannot be played melodically.
Play near note C4 (Note Number 60).
59
000
001
002
003
004
005
000
001
002
003
004
005
000
001
002
003
004
005
007
000
001
002
003
004
005
006
007
008
009
000
001
002
003
004
005
006
000
001
002
003
Seashore
Rain
Thunder
Wind
Stream
Bubble
Bird
Dog
Horse Gallop
Bird 2
Kitty
Growl
Telephone 1
Telephone 2
Door Creaking
Door
Scratch
Wind Chimes
Scratch 2
Helicopter
Car Engine
Car Stop
Car Pass
Car Crash
Siren
Train
Jetplane
Starship
Burst Noise
Applause
Laughing
Sceaming
Punch
Heartbeat
Footsteps
Applause 2
Gun Shot
Machine Gun
Lasergun
Explosion
Voices
1*
1*
1*
1*
2*
2*
2*
1*
1*
1*
1
1
1*
1*
1*
1*
1*
2*
1
1*
1*
1*
1*
2*
1*
1*
2*
2*
2*
2*
1*
1*
1*
1*
1*
2
1*
1*
1*
2*
**
**
**
**
**
**
**
**
**
**
**
**
**
**
**
**
**
**
**
**
**
**
**
**
**
**
**
**
**
**
**
**
**
**
**
**
**
**
**
DRUM SET CHARTS
Note # Standard Set (PC 1)
Standard Set (PC 2) Room Set (PC 17)
28
Slap
<
29
Scratch Push [EXC7]
<
30
Scratch Pull [EXC7]
<
31
Sticks
<
32
Square Click
<
33
Metronome Click
<
34
Metronome Bell
<
35
Standard 1 Kick 2
Standard 2 Kick 2
36 (C2) Standard 1 Kick 1
Standard 2 Kick 1
37
Side Stick
<
38
Standard 1 Snare 1
Standard 2 Snare 1
39
Hand Clap
<
40
Standard 1 Snare 2
Standard 2 Snare 2
41
Low Tom 2*
<
42
Closed Hi-hat 1 [ECX1]
Closed Hi-hat 2 [EXC1]
43
Low Tom 1*
<
44
Pedal Hi-hat [EXC1]
<
45
Mid Tom 2*
<
46
Open Hi-hat 1 [EXC1]
Open Hi-hat 2 [EXC1]
47
Mid Tom 1*
<
48 (C3) High Tom 2*
<
49
Crash Cymbal 1
<
50
High Tom 1*
<
51
Ride Cymbal 1
<
52
Chinese Cymbal
<
53
Ride Bell
<
54
Tambourine
<
55
Splash Cymbal
<
56
Cowbell
<
57
Crash Cymbal 2
<
58
Vibra-slap
<
59
Ride Cymbal 2
<
60 (C4) High Bongo
<
61
Low Bongo
<
62
Mute High Conga
<
63
Open High Conga
<
64
Low Conga
<
65
High Timbale
<
66
Low Timbale
<
67
High Agogo
<
68
Low Agogo
<
69
Cabasa
<
70
Maracas
<
71
Short Hi Whistle [EXC2]
<
72 (C5) Long Low Whistle [EXC2]
<
73
Short Guiro [EXC3]
<
74
Long Guiro [EXC3]
<
75
Claves
<
76
High Wood Block
<
77
Low Wood Block
<
78
Mute Cuica [EXC4]
<
79
Open Cuica [EXC4]
<
80
Mute Triangle [EXC5]
<
81
Open Triangle [EXC5]
<
82
Shaker
<
83
Jingle Bell
<
84 (C6) Bell Tree
Bar Chimes
85
Castanets
<
86
Mute Surdo [EXC6]
<
87
Open Surdo [EXC6]
<
88
¥¥¥
¥¥¥
89
¥¥¥
¥¥¥
90
¥¥¥
¥¥¥
91
¥¥¥
¥¥¥
92
¥¥¥
¥¥¥
93
¥¥¥
¥¥¥
94
¥¥¥
¥¥¥
95
¥¥¥
¥¥¥
96 (C7) ¥ ¥ ¥
¥¥¥
97
¥¥¥
¥¥¥
98
¥¥¥
¥¥¥
99
¥¥¥
¥¥¥
100
¥¥¥
¥¥¥
101
¥¥¥
¥¥¥
102
¥¥¥
¥¥¥
103
¥¥¥
¥¥¥
<
<
<
<
<
<
<
Room Kick 2
Room Kick 1
<
Room Snare 1
<
Room Snare 2
Room Low Tom 2*
Closed Hi-hat 3 [EXC1]
Room Low Tom 1*
<
Room Mid Tom 2*
Open Hi-hat 3 [EXC1]
Room Mid Tom 1*
Room Hi Tom 2*
<
Room Hi Tom 1*
<
<
<
<
<
<
<
<
<
<
<
<
<
<
<
<
<
<
<
<
<
<
<
<
<
<
<
<
<
<
<
<
<
<
<
<
<
¥¥¥
¥¥¥
¥¥¥
¥¥¥
¥¥¥
¥¥¥
¥¥¥
¥¥¥
¥¥¥
¥¥¥
¥¥¥
¥¥¥
¥¥¥
¥¥¥
¥¥¥
¥¥¥
60
<
<
<
<
<
<
<
Power Kick 2
Power Kick 1
<
Power Snare 1
<
Power Snare 2
Power Low Tom 2*
Closed Hi-hat 3 [EXC1]
Power Low Tom 1*
<
Power Mid Tom 2*
Open Hi-hat 3 [EXC1]
Power Mid Tom 1*
Power Hi Tom 2*
<
Power Hi Tom*
<
<
<
<
<
<
<
<
<
<
<
<
<
<
<
<
<
<
<
<
<
<
<
<
<
<
<
<
<
<
<
<
<
<
<
<
<
¥¥¥
¥¥¥
¥¥¥
¥¥¥
¥¥¥
¥¥¥
¥¥¥
¥¥¥
¥¥¥
¥¥¥
¥¥¥
¥¥¥
¥¥¥
¥¥¥
¥¥¥
¥¥¥
<
Scratch Push 2 [EXC7]
Scratch Pull 2 [EXC7]
<
<
<
<
Electric Kick 2
Electric Kick 1
<
Electric Snare 1
<
Electric Snare 2
Electric Low Tom 2*
Closed Hi-hat 2 [EXC1]
Electric Low Tom 1*
<
Electric Mid Tom 2*
Open Hi-hat 2 [EXC1]
Electric Mid Tom 1*
Electric High Tom 2*
<
Electric Hi Tom 1*
<
Reverse Cymbal
<
<
<
<
<
<
<
<
<
<
<
<
<
<
<
<
<
<
<
<
<
<
<
<
<
<
<
<
<
<
<
<
<
<
<
¥¥¥
¥¥¥
¥¥¥
¥¥¥
¥¥¥
¥¥¥
¥¥¥
¥¥¥
¥¥¥
¥¥¥
¥¥¥
¥¥¥
¥¥¥
¥¥¥
¥¥¥
¥¥¥
28
29
30
31
32
33
34
35
36 (C2)
37
38
39
40
41
42
43
44
45
46
47
48 (C3)
49
50
51
52
53
54
55
56
57
58
59
60 (C4)
61
62
63
64
65
66
67
68
69
70
71
72 (C5)
73
74
75
76
77
78
79
80
81
82
83
84 (C6)
85
86
87
88
89
90
91
92
93
94
95
96 (C7)
97
98
99
100
101
102
103
<
Scratch Push 2 [EXC7]
Scratch Pull 2 [EXC7]
<
<
<
<
909 Bass Drum
808 Bass Drum
808 Rim Shot
808 Snare 1
<
909 Snare 1
808 Low Tom 2*
808 Closed Hi-hat [ECX1]
808 Low Tom 1*
808 Closed Hi-hat [EXC1]
808 Mid Tom 2*
808 Open Hi-hat [EXC1]
808 Mid Tom 1*
808 High Tom 2*
808 Cymbal
808 High Tom 1
<
<
<
<
<
808 Cowbell
<
<
<
<
<
808 High Conga
808 Mid Conga
808 Low Conga
<
<
<
<
<
808 Maracas
<
<
<
<
808 Claves
<
<
<
<
<
<
<
<
<
<
<
<
¥¥¥
¥¥¥
¥¥¥
¥¥¥
¥¥¥
¥¥¥
¥¥¥
¥¥¥
¥¥¥
¥¥¥
¥¥¥
¥¥¥
¥¥¥
¥¥¥
¥¥¥
¥¥¥
<
Scratch Push 2 [EXC7]
Scratch Pull 2 [EXC7]
<
<
<
<
<
<
<
<
<
<
Dance Kick
Jazz Kick 2
Electric Kick 2
Jazz Kick 1
<
<
Dance Snare 1
Jazz Snare 1
<
Hand Clap 2
Dance Snare 2
Jazz Snare 2
Electric Low Tom 2*
<
CR-78 Closed Hi-hat [EXC1] Closed Hi-hat 2 [EXC1]
Electric Low Tom 1*
<
808 Closed Hi-hat [EXC1]
<
Electric Mid Tom 2*
<
CR-78 Open Hi-hat [EXC1] Open Hi-hat 2 [EXC1]
Electric Mid Tom 1*
<
Electric High Tom 2*
<
<
<
Electric High Tom 1*
<
<
<
Reverse Cymbal
<
<
<
<
<
<
<
<
<
<
<
<
<
<
<
<
<
<
<
<
<
<
<
<
<
<
<
<
<
<
<
<
<
<
<
<
<
<
<
<
<
<
<
<
<
<
<
<
<
<
<
High Hoo [EXC4]
<
Low Hoo [EXC4]
<
Electric Mute Triangle [EXC5]
Electric Open Triangle [EXC5]
<
<
<
<
<
<
<
<
<
<
<
<
¥¥¥
¥¥¥
¥¥¥
¥¥¥
¥¥¥
¥¥¥
¥¥¥
¥¥¥
¥¥¥
¥¥¥
¥¥¥
¥¥¥
¥¥¥
¥¥¥
¥¥¥
¥¥¥
¥¥¥
¥¥¥
¥¥¥
¥¥¥
¥¥¥
¥¥¥
¥¥¥
¥¥¥
¥¥¥
¥¥¥
¥¥¥
¥¥¥
¥¥¥
¥¥¥
¥¥¥
¥¥¥
61
<
<
<
<
<
<
<
Jazz Kick 2
Jazz Kick 1
<
Brush Tap 1
Brush Slap 1
Brush Swirl 1
Brush Low Tom 2*
Brush Closed Hi-hat [EXC1]
Brush Low Tom 1*
<
Brush Mid Tom 2*
Brush Open Hi-hat [EXC1]
Brush Mid Tom 1*
Brush Hi Tom 2*
Brush Crash Cymbal
Brush Hi Tom 1*
Brush Ride Cymbal
<
Brush Ride Bell
<
<
<
<
<
<
<
<
<
<
<
<
<
<
<
<
<
<
<
<
<
<
<
<
<
<
<
<
<
<
<
<
<
<
¥¥¥
¥¥¥
¥¥¥
¥¥¥
¥¥¥
¥¥¥
¥¥¥
¥¥¥
¥¥¥
¥¥¥
¥¥¥
¥¥¥
¥¥¥
¥¥¥
¥¥¥
¥¥¥
Pedal Hi-hat [EXC1]
Open Hi-hat 2 [EXC1]
Ride Cymbal 1
<
<
<
<
<
Jazz Kick 1
Concert BD 1
<
Concert SD
Castanets
Concert SD
Timpani F
Timpani F#
Timpani G
Timpani G#
Timpani A
Timpani A#
Timpani B
Timpani C
Timpani C#
Timpani D
Timpani D#
Timpani E
Timpani F
<
<
<
Concert Cymbal 2
<
Concert Cymbal 1
<
<
<
<
<
<
<
<
<
<
<
<
<
<
<
<
<
<
<
<
<
<
<
<
<
<
<
<
<
<
Applause*
¥¥¥
¥¥¥
¥¥¥
¥¥¥
¥¥¥
¥¥¥
¥¥¥
¥¥¥
¥¥¥
¥¥¥
¥¥¥
¥¥¥
¥¥¥
¥¥¥
¥¥¥
28
29
30
31
32
33
34
35
36 (C2)
37
38
39
40
41
42
43
44
45
46
47
48 (C3)
49
50
51
52
53
54
55
56
57
58
59
60 (C4)
61
62
63
64
65
66
67
68
69
70
71
72 (C5)
73
74
75
76
77
78
79
80
81
82
83
84 (C6)
85
86
87
88
89
90
91
92
93
94
95
96 (C7)
97
98
99
100
101
102
103
Crash Cymbal 1
Snare Roll
Concert Snare Drum
Concert Cymbal
Concert BD 1
Jingle Bell
Bell Tree
Bar Chimes
Wadaiko*
Wadaiko Rim*
Shime Taiko
Atarigane
Hyoushigi
Ohkawa
High Kotsuzumi
Low Kotsuzumi
Ban Gu
Big Gong
Small Gong
Bend Gong
Thai Gong
Rama Cymbal
Gamelan Gong
Udo Short [EXC1]
Udo Long [EXC1]
Udo Slap
Bendir
Req Dum
Req Tik
Tabla 'Te'
Tabla 'Na'
Tabla 'Tun'
Tabla 'Ge'
Tabla 'Ge Hi'
Talking Drum*
Bend Talking Drum*
Caxixi
Djembe
Djembe Rim
Timbales Low
Timables 'Paila'
Timbales High
Cowbell
Hi Bongo
Low Bongo
Mute Hi Conga
Open Hi Conga
Mute Low Conga
Conga Slap
Open Low Conga
Conga Slide*
Mute Pandiero
Open Pandiero
Open Surdo [EXC2]
Mute Surdo [EXC2]
Tamborim
High Agogo
Low Agogo
Shaker
High Whistle [EXC3]
Low Whistle [EXC3]
Mute Cuica [EXC4]
Open Cuica [EXC4]
Mute Triangle [EXC5]
Open Triangle [EXC5]
Short Guiro [EXC6]
Long Guiro [EXC6]
Cabasa Up
Cabasa Down
Claves
High Wood Block
Low Wood Block
¥¥¥
¥¥¥
¥¥¥
¥¥¥
¥¥¥
¥¥¥
¥¥¥
¥¥¥
¥¥¥
¥¥¥
¥¥¥
¥¥¥
¥¥¥
¥¥¥
¥¥¥
Standard 1 Kick 1
Standard 1 Kick 2
Standard 2 Kick 1
Standard 2 Kick 2
Kick 1
Kick 2
Soft Kick
Jazz Kick 1
Jazz Kick 2
Concert BD
Room Kick 1
Room Kick 2
Power Kick 1
Power Kick 2
Electric Kick 2
Electric Kick 1*
Electric Kick
808 Bass Drum
909 Bass Drum
Dance Kick
Standard 1 Snare 1
Standard 1 Snare 2
Standard 2 Snare 1
Standard 2 Snare 2
Tight Snare
Concert Snare
Jazz Snare 1
Jazz Snare 2
Room Snare 1
Room Snare 2
Power Snare 1
Power Snare 2
Gated Snare
Dance Snare 1
Dance Snare 2
Disco Snare
Electric Snare 2
House Snare*
Electric Snare 1
Electric Snare 3*
808 Snare 1
808 Snare 2*
909 Snare 1
909 Snare 2*
Brush Tap 1
Brush Tap 2
Brush Slap 1
Brush Slap 2
Brush Slap 3
Brush Swirl 1
Brush Swirl 2
Brush Long Swirl
¥¥¥
¥¥¥
¥¥¥
¥¥¥
¥¥¥
¥¥¥
¥¥¥
¥¥¥
¥¥¥
¥¥¥
¥¥¥
¥¥¥
<
<
<
Scratch Push 2 [EXC1]
¥¥¥
Cutting Noise 2 Up
Cutting Noise 2 Down
Distortion Gt. Cut Noise Up
Distortion Gt. Cut Noise Down
Bass Slide
Pick Scrape
High Q
Slap
Scratch Push [EXC7]
Scratch Pull [EXC7]
Sticks
Square Click
Metronome Click
Metronome Bell
Guitar Fret Noise
Guitar Cutting Noise Up
Guitar Cutting noise Down
String Slap; Double Bass
Flute Key Click
Laughing
Scream
Punch
Heartbeat
Footsteps 1
Footsteps 2
Applause*
Door Creaking
Door
Scratch
Wind Chimes*
Car Engine
Car Stop
Car Pass
Car Crash*
Siren
Train
Jetplane*
Helicopter
Starship*
Gun Shot
Machine Gun
Laser Gun
Explosion*
Dog
Horse Gallop
Birds*
Rain
Thunder
Wind
Seashore
Stream*
Bubble*
Kitty
Bird 2
Growl
Applause 2*
Telephone 1
Telephone 2
¥¥¥
¥¥¥
¥¥¥
¥¥¥
¥¥¥
¥¥¥
¥¥¥
¥¥¥
¥¥¥
¥¥¥
¥¥¥
¥¥¥
¥¥¥
62
¥¥¥
¥¥¥
¥¥¥
¥¥¥
Scratch Pull 2 [EXC1]
¥¥¥
¥¥¥
¥¥¥
¥¥¥
Reverse Kick 1
Reverse Concert BD 1
Reverse Power Kick 1
Reverse Electric Kick 1
Reverse Snare 1
Reverse Snare 2
Reverse Standard Set 1 Snare 1
Reverse Tight Snare
Reverse Dance Snare
Reverse 808 Snare
Reverse Tom 1
Reverse Tom 2
Reverse Sticks
Reverse Slap
Reverse Cymbal 1
Reverse Cymbal 2
Reverse Open Hi-hat
Reverse Ride Cymbal
Reverse CR-78 Open Hi-hat
Reverse Closed Hi-hat
Reverse Gong
Reverse Bell Tree
Reverse Guiro
Reverse Bendir
Reverse Gun Shot
Reverse Scratch
Reverse Laser
Key Click
Tekno Thip
Pop Drop
Woody Slap
Distortion Kick*
Syn. Drop
Reverse High Q
Pipe
Ice Block
Digital Tambourine*
Alias
Modulated Bell
Spark
Metallic Percussion
Velocity Noise FX
Stereo Noise Clap*
Swish
Slappy*
Voice 'Ou'
Voice 'Au'
Hoo
Tape Stop 1*
Tape Stop 2*
Missile*
Space Bird
Flying Monster
¥¥¥
¥¥¥
¥¥¥
¥¥¥
¥¥¥
¥¥¥
¥¥¥
¥¥¥
¥¥¥
¥¥¥
¥¥¥
¥¥¥
¥¥¥
¥¥¥
¥¥¥
ACCOMPANIMENT MANUAL:
PROGRAM CHANGE NUMBERS 1 THROUGH 61
1
2
3
5
6
4
7
8
9
10
12
13
11
14
15
17
18
16
19
20
21
22
24
25
23
26
27
29
30
28
31
32
33
34
36
37
35
38
39
41
42
40
43
44
45
46
48
49
47
50
51
53
54
52
55
56
57
58
60
59
61
63
GREAT MANUAL:
PROGRAM CHANGE NUMBERS 62 THROUGH 122
62
63
64
66
67
65
68
69
70
71
73
74
72
75
76
78
79
77
80
81
82
83
85
86
84
87
88
90
91
89
92
93
94
95
97
98
96
99
100
102
103
101
104
105
106
107
109
110
108
111
112
114
115
113
116
117
118
119
121
122
64
120
SOLO MANUAL:
PROGRAM CHANGE NUMBERS 123 THROUGH 128
123
124
125
127
126
128
65
MIDI Implementation Chart
Rodgers Model: Theatre 360
Basic
Function
Default:
Channel
Mode
Note
Number
Velocity
After
Touch
Pitch Bender
Version: 1.0
Transmitted
1-4, 6, 7, 11-16 *1
Recognized
11-16 *1
1-16
Mode 3
X
***************
8-124
Mode 3
X
***************
36-96
0
O
O
X
X
X
O
X
X
X
X
X
X
7
O
O
Changed:
Default:
Messages:
Altered:
True Voice
Note On:
Note Off:
Keys:
Channel:
Control
Remarks
12=Gt
13=Solo 14=Ped 15=Acc
MIDI ACC A only 16=SFX
GS Bank Select
Div Expression on each
Master Channel
(11-16 as listed above)
Change
64
Program
Change
True #
System Exclusive
System
:Song Pos
:Song Sel
Common
:Tune
System
:Clock
Real Time
:Commands
Aux
:Local ON/OFF
Mes:All Notes Off
sages
:Active Sense
:Reset
Notes:
*1
*2
*3
Mode 1: OMNI ON, POLY
Mode 3: OMNI OFF, POLY
O
X
MIDI GT A Channel
1-128
(1-12, 20-26)
Ch. 12-15 only;
***************
***************
activates comb. pistons
O *2
O *2
X
X
X
X
X
X
X
X
X
O *3
X
X
O (123)
O (123)
O
O
X
X
Able to choose between O and X.
SysEx used for stop changes, combination memory dumps.
Received Start sends current stop and expression status.
Received Stop restores expression to shoe positions.
Received Continue sets expression to values at last Stop.
Mode 2: OMNI ON, MONO
O : Yes
Mode 4: OMNI OFF, MONO
X : No
66
CARE AND MAINTENANCE
As with any fine musical instrument, reasonable care is necessary to protect your
investment. Normally no difficulties should be experienced, as only the finest component
parts are used by Rodgers. If your instrument should require service, your Rodgers Service
Representative is fully equipped and qualified to handle any service problems which may
arise.
Your new Rodgers organ is not only a fine musical instrument, but also a fine piece of
custom-made furniture finished to hold its attractiveness through generations of use. Only the
best woods are used, carefully checked for uniformity of grain and intensity of figure and
carefully hand assembled. Each finish coat is thoroughly dried before the next coat is applied.
A final catalytic process protective coat makes the Rodgers console impermeable to many
harmful substances. The resulting finish is lasting and easy to keep looking beautiful.
Following are a few tips on caring for your Rodgers organ.
CONSOLE AND PEDALBOARD
A frequent dusting with a soft, clean cloth is usually all that is required. A fine quality
furniture oil will enhance the beauty of the wood. Always wipe the surfaces with the grain,
using straight, even strokes.
Since extreme cold, heat or exposure to sunlight may injure the finish of any fine piece of
furniture, neither the console nor finished speaker cabinets should be placed over a heat
register or near a window.
KEYBOARDS AND STOP TABS
Keyboards and tabs should be cleaned with a soft cloth slightly dampened with water and
a mild soap. Avoid dripping water between the keys. DO NOT USE SOLVENTS (alcohol,
gasoline, carbon tetrachloride, etc.).
PIPES ON PIPE-AUGMENTED INSTRUMENTS
To keep the pipes beautiful, refrain from handling them without gloves. The pipes should
never be handled or touched by anyone but a qualified organ service representative.
67
SAFETY INSTRUCTIONS
INSTRUCTIONS PERTAINING TO A RISK OF FIRE,
ELECTRIC SHOCK OR INJURY TO PERSONS
IMPORTANT SAFETY INSTRUCTIONS
WARNING: WHEN USING THIS INSTRUMENT, ALWAYS FOLLOW BASIC SAFETY PRECAUTIONS, INCLUDING THE
FOLLOWING:
1.
Read all the instructions before using, adjusting or
repairing this instrument.
10.
Unplug the power cord of the instrument from the power
source when left unattended for a long period of time.
2.
To reduce the risk of injury, supervise children closely
when they are around the instrument.
11.
3.
Use this instrument only in the manner recommended by
Rodgers Instrument Corporation.
Do not walk on or place objects on top of the power
cord.
Do not pull the cord to unplug. Hold the plug when
unplugging from the power source.
4
Do not use this instrument near water i.e., for example,
near a swimming pool or a damp/wet room.
5.
Use of this instrument, either alone or in combination
with an amplifier and headphones or speakers, may be
capable of producing sound levels that could cause
permanent hearing loss. DO NOT operate for a long
period of time at a high volume level or at a level that is
uncomfortable. If you experience any hearing loss or
ringing in the ears, you should consult an audiologist.
12.
13.
When setting up with other instruments or peripherals,
follow the procedures in accordance with Rodgers’
owner’s manual.
14.
Take care that objects do not fall or liquids spill into the
instrument.
15.
Service the instrument with qualified service personnel
when:
a.
The power cord or plug has been damaged.
6.
Locate the instrument to its position does not interfere
with its proper ventilation.
b.
Objects have fallen or liquid has spilled into
the instrument.
7.
Locate the instrument away from heat sources such as
radiators, heat registers or other products that radiate
heat directly onto the instrument.
c.
The instrument has been exposed to rain or
or other weather damage.
d.
8.
Protect the instrument from dust as much as possible.
The instrument does not appear to operate
normally or exhibits a marked change in
performance.
9.
Connect the instrument to a power source only of the
type described in the operating instructions or as marked
on the instrument. Do NOT attempt to defeat the
grounding connection of the three-prong attachment
plug. This is a safety feature. If you are unable to insert
the plug into the outlet, contact an electrician to replace
your obsolete outlet. Do NOT defeat the safety purpose
of the plug.
e.
The instrument has been dropped or the
enclosure has been damaged.
16.
Do not attempt to service the instrument beyond that
described in the owner’s manual. Refer all other
servicing to qualified technical service personnel.
WARNING: THIS INSTRUMENT MUST BE EARTH GROUNDED.
You must GROUND instruments equipped with a TYPE AC, 3 WIRE GROUNDED PLUG.
SAVE THESE INSTRUCTIONS
68
FCC Notice
Radio and Television Interference
Rodgers Parallel Digital Imaging Organs use and generate small amounts of radio-frequency (RF) energy. The
instrument complies with the limits set for Class A computing devices. FCC Rules, Part 15, Subpart J define the
limits for radio and television interference in a residential installation.
Follow the installation and the use instruction in the manual, or the instrument could potentially cause interference
with some radio or television reception. In the unlikely event this occurs, we encourage the user to try the
following corrective measures:
Turn the instrument OFF to see if it is the actual source of the interference.
Disconnect the peripheral devices and their input/output cables one at a time. If the interference
stops, it is caused by the peripheral device or its I/O cable.
Try coiling and uncoiling the instrument’s power cord in different ways.
Connect the instrument’s power cord to a power outlet on a different circuit.
Move the instrument further away from the radio or television receiver.
Turn the radio or television receiver until the interference stops.
Connect the radio or television receiver to a different power circuit.
Reorient or move the receiver antenna further away from the instrument. Consider installing a
rooftop antenna with coaxial cable lead-in between the antenna and receiver.
Consult the nearest Rodgers dealer for more information if the above corrective measures don’t
remove the interference.
69
INSTRUMENTS LLC
1300 N.E. 25th AVENUE, HILLSBORO, OREGON 97124 • (503) 648-4181
1906-033B