1
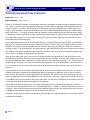
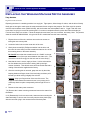
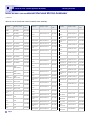
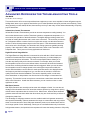
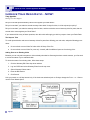
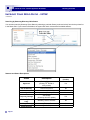
Volume 5, Issue 2 Home Appliances Newsletter February 2011 Samsung Electronics America Samsung Tech Talk Your source for service information Redo Reduction Inside this issue: Redo Reduction 1 Samsung: The #1 Brand of French Door Refrigerators 2 Keep the R-134 Clean and Dry— Replace the Filter Dryer 3 Testing an Induction 4 Cooktop Replacing the Wash- 5 ing Machine Induction Motor Extending the Washer Inlet Hose 7 Advance Refrigerator 10 Troubleshooting Tools GSPN Updates 11 Improve Your Redo Ratio—NOW! 12 Dealer Stock Warranty claims 15 Wes Sirois Assistant Manager, Triage Lead As most business owners will attest, repeat service calls, or Redo‟s, continue to be a major reason for customer dissatisfaction with the service experience, and just as important, for lost revenue for the servicer. Samsung defines a Redo as a repeat service call conducted on an appliance within 90 days of the initial visit. The target for every service company is to keep Redo‟s to less than 4.75% of their warranty claim volume. As an authorized service agent for Samsung, this is one of your KPI‟s (Key Performance Indexes). So, if a service call was paid as a warranty claim, Samsung will not pay for a second repair if it occurs within 30 days, even if it is for a different complaint. If another service company is dispatched to perform the second call, Samsung will pay that company, but a Redo is recorded against the initial servicer. If the second call occurs within 90 days, but over 30 days from the first visit, a warranty claim may be paid, however the Redo will still be charged against the first company‟s KPI. As you can see, when a repeat service call occurs, everyone loses. So what can a service company do to reduce the number of Redo‟s and to help improve their KPIs? Here are some best practices that have worked for many service companies: 1. Make sure that your technicians‟ knowledge is up to date. Properly prepared technicians should be able to diagnose and repair a unit correctly the first time. When training is offered, it is imperative that technicians attend, especially when new products are introduced. In addition to classroom type training, Samsung offers technicians a variety of resources to help them with their daily job performance. Fast Track manuals, service bulletins, service manuals, and training videos can all be found on GSPN. 2. Samsung products incorporate a wide variety of electronic components. To properly diagnose these products, technicians need to have the proper tools, such as a good digital voltohmmeter (with needle-type test leads to properly read resistance or voltage within small connectors), some form of temperature tester, and a wiring diagram or Fast Track manual for the unit they are servicing. When a technician can correctly determine the needed component, multiple part orders can be kept to a minimum and a Redo can be prevented. Volume 5, Issue 2 Home Appliances Newsletter Samsung Tech Talk Redo Reduction Samsung: The #1 Brand of French Door Refrigerators continued Jeff Brutman Assistant Manager, Publications 3. Once a repair is completed, the technician should check all functions of the appliance to make sure that the unit is completely repaired. Any possible future service issue can be addressed on the spot, so that a second call can be avoided. 4. Technicians should make sure the customer is completely satisfied before leaving the home. Many repeat service calls result from a customer not believing that their product is truly repaired. Technicians should never leave the home without demonstrating the repaired appliance to the customer. Go the “extra mile” – ask the customer if there are any questions you can answer regarding the appliance‟s use and care. These are just some of the practices that successful service companies have put in place to not only reduce Redo‟s, but to improve the overall performance of their businesses. We hope that they can do the same for you. Above: The RF4287HARS 28 cubic foot French Door refrigerator. This refrigerator features a customizable counter-height drawer, adjustable temperature settings, a Twin Cooling Plus System, energy efficient internal LED Lighting, and the easy access EZ-Open Handle. It is one of the many reasons that Samsung is the #1 selling brand of French Door refrigerators. Please Send Us Your Comments! Something you‟d like to see in the Samsung Tech Talk Newsletter? If there is a topic/issue we haven‟t covered that you‟d like us to write about, LET US KNOW! Please send your comments to: [email protected] Page 2 Volume 5, Issue 2 Home Appliances Newsletter Samsung Tech Talk Keep The R-134a Clean and Dry – Replace The Filter Dryer Paul Pieri, Trainer—RTSC Tony Ippolito, Manager, HA Tech Support Quite a few components in Samsung refrigerator sealed systems are replaceable. These include the compressor, condenser, refrigerator and freezer evaporator coils, and the TDM valve. Whenever you replace any of these components, you must also replace the filter dryer. Shown above is a typical filter dryer. The output of the dryer is the small capillary tube that goes to the refrigerator evaporator coil on twin cooling models or the freezer evaporator in single cooling models. If the refrigerator is a newer model, there will be a TDM or stepper valve and the dryer will connect to the input of that valve. The output of the valve will then go to the evaporator coils. This dryer has what appear to be two input ports. However, upon closer inspection, they have different inside diameters. The smaller of the two is the actual input from the hot pipe. The other slightly larger diameter opening is for the service port where high side pressures are measured. When you order the filter dryer, make sure it matches the compressor. See below. Page 3 Rotary Compressor Inverter Compressor Part Number: DA62-01514A Part Number: DA62-021614A Description: Filter Dryer Description: Dryer Single Volume 5, Issue 2 Home Appliances Newsletter Samsung Tech Talk Testing An Induction Cooktop Paul Pieri, Trainer—RTSC Kurt Schuster, Product Specialist Relying on a customer‟s cookware is not always the best way to test whether an induction range is working properly or not. Certainly, you should use it to confirm the customer‟s complaint about the operation of the cooktop but where do you go from there? For starters, turn off the power for about thirty seconds by pulling the plug or toggling the circuit breaker. After restoring the power, take the cookware out of the equation temporarily by using a non‑contact voltage tester, (Klein NCVT‑1, or similar), to test the induction elements. Hold the tester near the element and turn the burner on, selecting a medium heat setting. The tester should indicate the presence of voltage before the range signals a pan error. While the burner is on, move the tester over the full area of the induction element to see if there are any dead spots that might cause problems later. If the element passes the test above, we are almost ready to try testing the range with the customer‟s cookware again. Before you do, check the cookware to see if it is stamped „Induction Certified‟. Then, use a magnet as instructed in the Suitability Test section of the Using Suitable Induction Cookware page in the User Manual to confirm it is suitable for induction cooking. Turn the element OFF first, place the pan in the indicated burner area, and only then turn the element ON. Make sure the various indicators show the element is activated, check to see if the pan is vibrating slightly to confirm the burner is operating, and then wait for it to get warm. Once the pan begins to get warm, you can check to see how sensitive the range may be to the pan‟s position on the cooktop within or above the burner area before triggering the pan error indication. If the pan error is triggered, it will usually clear itself when the pan is returned to the center of the burner area within about a minute or so. The range will turn the element OFF if the pan is not in the correct position within that time. This is not a malfunction. Confirm the pan is in the correct position, turn the cooking zone ON, select the desired heat level within 5 seconds, and confirm the proper operation. It may be helpful to point out the „Before Using the Cooktop‟ section of the User Manual to the customer. This section explains which types of cookware are compatible with induction cooktops, their materials, sizes, and how to position them correctly. This includes warnings regarding how the condition of the cookware could affect cooking performance and the potential affects the cookware might have on the cooktop itself. In the end, it might not be a bad idea to carry a 7” Enameled Cast Iron pot or pan along with you for these tests. The cast iron is probably the most induction ready and a clean enameled finish will protect the cooktop from any damage. If the induction elements do not pass the non-contact voltage test, then more standard troubleshooting is necessary. Consult the Service Manual and the Fast Track Troubleshooting Guide, if available, for details for the specific model under repair. These documents outline several tests of the Induction Burner Inverter Coils, Inverter PCB, and Touch Control PCB that could affect the performance of the induction burner elements. Remember, we are not merely repairing an appliance, we are restoring our customer‟s ability to use that range and their cookware with confidence. Page 4 Volume 5, Issue 2 Home Appliances Newsletter Samsung Tech Talk Replacing the Washing Machine Motor Assembly Tony Perkins Regional Technical Trainer Replacing the motor in a washing machine is a tough job. Tight spaces, limited range of motion, and the all too friendly family pet are enough to make even the most seasoned HA tech cringe at the prospect. But if the model in question uses the new brushless motor (DC96-01218D), well, that‟s when the real trepidation sets in. “Uggh! That darn rotor turns when I‟m trying to remove the retaining bolt” is a common complaint uttered by techs when faced with this job. Fear not friend, there is a solution. Follow the steps below and save your time, knuckles, and sanity. Note: The pictures show the model WF448AAW/XAA. It‟s typical of the 50+ models that use this motor assembly. 1. Expose the rear of the unit, and then remove the two screws retaining the rear access panel. 1, 2. 3. 4. 5. 6. 7. 8. 9. 10. 2. Locate the index hole near the center hub of the rotor. 3. Gently insert a small (#1) Philips screwdriver into the hole, and then turn the rotor slowly until the screwdriver seats into one of the three mating holes on the stator assembly. Be Careful! Insure that the screwdriver sits in a “hole” on the stator and not in one of the open areas between the stator coils. (The screwdriver should fit snugly into the hole and not move freely.) 4. Now that the rotor is secure, apply a 19mm, ½ drive socket with a two foot breaker bar and loosen the locking bolt by turning it counter clockwise. This will take some effort as the bolt has had a coating of thread locker applied at the factory. 5. Once the mounting bolt is removed, grasp the rotor by the sides, keeping hands and fingers clear of the back edge, and then pull it towards you while rocking it slightly front to back. Caution! Keep your fingers clear of the rear of the rotor. The magnetic field between the stator and rotor is very strong and it could snap back into place unexpectedly with enough force to injure. 6. Disconnect the stator power connector. 7, 8) Remove the 6 stator mounting screws and remove the stator from the basket. 9, 10) Reassembly is in the reverse order, however when mounting the stator assembly, be sure to seat it correctly onto the three plastic pegs with the connector lying in the recessed area of the back plate. Page 5 Volume 5, Issue 2 Home Appliances Newsletter Samsung Tech Talk Replacing the Washing Machine Motor Assembly continued Below is a list of models that use the brushless motor assembly: MODEL MODEL CODE INTRO DATE MODEL MODEL CODE INTRO DATE MODEL MODEL CODE INTRO DATE 49003 592-49003 02/03/2010 WF218ANS WF218ANS/XAC 03/20/2008 WF410ANW WF410ANW/XAA 01/12/2010 49079 592-49079 04/23/2010 WF218ANW/ WF218ANW/XAA XAA 11/27/2007 WF410ANW/ WF410ANW/XAC XAC 04/13/2010 592-491020 592-491020 06/26/2009 WF218ANW WF218ANW/XAC 03/20/2008 WF419AAS/ XAC WF419AAS/XAC 04/13/2010 592-491070 592-491070 01/28/2009 WF219ANB WF219ANB/XAA 02/03/2009 WF419AAU/ XAA WF419AAU/XAA 06/16/2009 592-491080 592-491080 01/28/2009 WF219ANW WF219ANW/XAA 02/03/2009 WF419AAW/ WF419AAW/XAA XAA 11/05/2008 WF229ANG/ XAC WF229ANG/XAC 03/17/2009 WF428AAL/ XAC 07/09/2008 WF328AAG WF328AAG/XAA 04/02/2008 WF328AAR WF328AAR/XAA 07/26/2007 WF328AAW WF328AAW/XAA 07/23/2007 WF330ANB/ XAA WF330ANB/XAA 01/04/2010 592-491170 592-491170 01/28/2009 592-491180 592-491180 01/28/2009 592-493040 592-493040 01/29/2009 592-493080 592-493080 01/30/2009 592-495070 592-495070 06/26/2009 592-495090 592-495090 SEWSEWHFR178RTW HFR178RTW SEWSEWHFR179RTW HFR179RTW 03/05/2009 07/21/2008 05/06/2009 SEWHFW175TW SEWHFW175TW 03/09/2009 SEWHFW176TW SEWHFW176TW 07/11/2008 SEWHFW179TH SEWHFW179TH 03/30/2009 SEWHFW179TW SEWHFW179TW 03/09/2009 WF209ANG/ YE WF209ANG/YE 08/27/2010 WF209ANW WF209ANW/ XAA 12/04/2008 WF209ANW/ WF209ANW/ XAP XAP 10/15/2009 WF218ANB/ XAA WF218ANB/ XAA 01/11/2008 WF218ANB/ XAC WF218ANB/ XAC 04/28/2008 Page 6 WF330ANW/ WF330ANW/XAA XAA 01/04/2010 WF330ANW 08/27/2010 WF330ANW/XAC WF428AAL/XAC WF428AAW/ WF428AAW/XAC XAC 07/09/2008 WF438AAR WF438AAR/XAA 05/20/2008 WF448AAE WF448AAE/XAA 08/18/2008 WF448AAP WF448AAP/XAA 12/26/2007 WF448AAP WF448AAP/XAC 04/17/2008 WF448AAP/ XAP WF448AAP/XAP 10/15/2009 WF448AAP/ XAX WF448AAP/XAX 04/06/2010 WF448AAW WF448AAW/XAA 12/10/2007 WF448AAW WF448AAW/XAC 04/04/2008 WF340ANG/ XAC WF340ANG/XAC WF340ANR/ XAC WF340ANR/XAC WF350ANG/ XAC WF350ANG/XAC 03/25/2010 WF350ANR/ XAA WF350ANR/XAA 12/10/2009 WF520ABP/ XAA WF520ABP/XAA 11/25/2009 WF350ANR/ XAC WF350ANR/XAC 03/20/2010 WF520ABP WF520ABP/XAC 05/12/2010 WF350ANW/ WF350ANW/XAA XAA 12/02/2009 WF520ABW WF520ABW/XAA 03/17/2010 WF407ANW/ WF407ANW/XAA XAA 07/18/2009 WRPA179UR WR-PA179UR 09/02/2008 WF409ANR/ XAA WF409ANR/XAA 08/27/2009 WRPB168UW WR-PB168UW 06/17/2009 WF409ANW WF409ANW/XAA 11/18/2008 WWPA177UR WW-PA177UR 09/04/2008 WF409SNL/ XAC WF409SNL/XAC 03/21/2009 WWPA177UW WW-PA177UW 12/04/2008 WF410ANR WF410ANR/XAA 01/12/2010 WWPB166UW WW-PB166UW 06/25/2009 03/25/2010 03/20/2010 Volume 5, Issue 2 Home Appliances Newsletter Samsung Tech Talk Extending The Washer Inlet Hose Louis Picchione Assistant Manager—HA To extend a washer inlet hose, follow these steps: 1. Get a ¾ inch Pipe Hex Nipple connector. 2. Before attaching both inlet hoses, wrap both sides of the Pipe Hex Nipple connector with Teflon tape. 3. Make sure the rubber gasket is inserted in each of the inlet hoses. Once both sides of the connector have been wrapped with Teflon tape you can connect both inlet hoses. Follow these steps: 1. Make sure the water supply is turned off. 2. Attach both hoses to the Pipe Hex Nipple. 3. Tighten both hoses hand tight. 4. Then using two wrenches, turn each inlet hoses about ¼ turn more. 5. After both hoses are secured, turn the water supply back on and check for any leaks. Page 7 Volume 5, Issue 2 Home Appliances Newsletter Samsung Tech Talk Basic Refrigeration Concepts, Part 2 Jim Swift, HA Product Senior Manager Steve Polzin, Technical Instructor, Appliance Tech Support Specialist Many technicians normally associate refrigeration with making cold air or cooling, however, in reality, refrigeration engineering deals almost entirely with the transfer of heat. When servicing refrigerators, this is the most important fundamental concept you will need to grasp in order to diagnose a no cool or low cooling complaint accurately. Last month, we discussed the basics of refrigeration and how the sealed system accomplishes heat transfer. This month, we will talk about air movement and its importance in facilitating the refrigeration process. Cooling Fan Operation A refrigerator relies on forced air to transfer heat. Samsung refrigerators often use a twin cooling system, with the refrigerator and the freezer compartment each having an evaporator. Given this independent system, the freezer and the refrigerator are cooled individually as required and are, therefore, more efficient. Fans move the air from inside the compartment to the evaporator coil where heat and moisture is absorbed. The air is then redistributed back into the compartment at a much lower temperature and humidity. Another important aspect to air flow is the regulation of humidity - the amount of moisture (or water vapor) in the air. If the air has a high relative humidity, some of the moisture will condense on food that is supposed to be kept dry, causing it to soften or grow mold or bacteria. Moisture in the air acts as an insulator, making it more difficult to lower the temperature. Most refrigerators have crisper or deli drawers for items such as produce where you want to hold in natural moisture. Many Samsung models offer climate control drawers that use an automatic damper control for precise humidity regulation. Automatic Defrost The more efficient the air flows, the more quickly heat is removed and the faster frost will form on the evaporator coil. The amount of frost will vary, depending on the amount of heat and moisture that is introduced into the refrigerator. Worse, large amounts of frost can block airflow, potentially making the evaporators less efficient. For this reason, the refrigerator has an automatic defrost system to remove the frost at regular intervals. It is difficult to keep frost off the coils, but necessary to keep them frost-free so they will operate properly. To minimize heat during the defrost cycle, the automatic system is thermostatically controlled and defrosts coils for less than 10 minutes per compartment. The defrost cycle for the freezer is terminated when the temperature of the freezer evaporator reaches approximately 50° F. For the refrigerator, the defrost cycle is terminated when the temperature of the refrigerator evaporator reaches 60 ° F. Samsung refrigerators use an adaptive defrost design that initiates the defrost cycle only when needed. The electronic control monitors compressor run time, door openings, and the length of the previous defrost cycles to determine the need and frequency for defrosting. The refrigerator will never defrost both compartments at the same time. Condenser Fan Operation The condenser fan motor is located in the compressor compartment and is used to cool the condenser coil and compresPage 8 Volume 5, Issue 2 Home Appliances Newsletter Samsung Tech Talk Basic Refrigeration Concepts, Part 2 continued sor. The heat that is absorbed by the evaporator during the cooling cycle is transferred into the condenser coil after it is compressed into a high pressure and high temperature vapor by the compressor. Once it enters the condenser, it needs to cool and the condenser fan is used to help dissipate the heat. To ensure efficient heat transfer, it is important that the compartment cover is in place and the condenser coil is kept clean. A dirty coil or improper air movement will prevent the Freon in the coil from cooling, leading to inefficient operation. Note: Samsung refrigerators do not run the condenser fan motor when the ambient temperature drops below 60 degrees Fahrenheit. A few key points to keep in mind for troubleshooting; Forced operation mode allows you to trigger the fan on no matter what the temperature. However, the fans will not come on if the refrigerator detects that the door switch is open. Samsung fans are usually shipped without fan blades. When ordering parts, keep this in mind as the blades can be difficult to transfer without breaking. Do not forget to inspect the air ducts for restrictions or blockages. For example, a blockage in one or more of the air ducts that circulate freezer air up to the ice room will cause a slow or no-ice condition. If an evaporator fan fails, the symptoms can be frost buildup and low cooling in that compartment. If the condenser fan fails, the cabinet will get very hot in the areas of the Yoder loop pipes. Additionally, the compressor will stay on longer. If one of the compartments does not defrost, frost will continue to accumulate, blocking the air flow and eventually resulting in a no cool situation. Next month, we will begin a series on refrigeration diagnostic procedures. Page 9 Volume 5, Issue 2 Home Appliances Newsletter Samsung Tech Talk Advanced Refrigerator Troubleshooting Tools Jim Swift HA Product Senior Manager This month‟s article will cover some specialized test equipment you can use to expedite in-home refrigerator service. Adding these items to your repair kit should allow you to isolate problems and repair products more efficiently. These items generally cost less than $100 and, because they can let you test many circuits without disassembly, will quickly pay for themselves. Infrared Non-Contact Thermometer Infrared Non-Contact Thermometers provide an accurate temperature reading instantly. You can use the thermometer to confirm Thermistor operation, compartment temperature, or, in some cases, the operation of the defrost heater. The digital display provides greater accuracy than an analog thermometer and is much more convenient. The next time you encounter a refrigerator that the customer feels is not quite cold enough, use this thermometer to confirm or refute the temperature shown on the front panel. If the thermometer shows the same value as the front display, the Thermistor and cooling system are probably working properly. If the values don‟t match, chances are the fault is either in the Thermistor or the evaporator fans. This is just one of many applications of this device. Digital Electrical Usage Monitor The Digital Electrical Usage Monitor is connected in series with the 110VAC outlet and provides information about the incoming voltage and frequency. It will also display current draw and amp hour information. The current consumption feature allows you to view the amp draw quickly as circuits are accessed. For example, when you use the forced operation mode to turn on the defrost heater, the monitor will show the increased current draw, confirming the defrost heater has been triggered. When you use the same forced operation mode to change speeds in the multi-speed compressor models, the monitor will show distinct current values for each speed. Because it can display both the line frequency and the line voltage level, you can also use the monitor to confirm the quality of the home electrical installation. This can be especially useful in rural areas where intermittent or odd problems can often be tied to low voltage or inconsistent line frequency. This monitor is more convenient to connect than a stand alone ammeter and offers more information. As with the IR thermometer, you can use the monitor on other appliances as well. Wall Paper Steamer Wall Paper Steamers are normally used to steam old wallpaper of walls. You can take advantage of the substantial amount of steam the steamers produce by using them to quickly defrost freezer evaporators that are covered in ice. What‟s more, because these steamers generate steam and hot water rather than direct heat, they are much less likely to deform or damage the plastic liner. The advantage of wall paper steamers over the smaller handle held garment steamers is their speed and durability. Garment steamers take longer to create steam and only produce steam for a short amount of time. Wall paper steamers produce more steam faster and for a much longer period of time. Additionally, unless you are use distilled water only in the handheld garment steamer, the impurities in the tap water will cause the heating element to fail quickly. Page 10 Volume 5, Issue 2 Home Appliances Newsletter Samsung Tech Talk Advanced Refrigerator Troubleshooting Tools continued Safety Pins The final item will probably cost you nothing and might be the most valuable of all. Most multi-meter leads are too thick to make adequately contact in the smaller gage pins. Low voltage items like sensors or similar circuits do not require thick wiring, so the pins are difficult to penetrate. You can insert safety pins into the slots to make contact without damaging the connector. Thanks to Rich Robbins and Andy Macpherson for their input on this article. GSPN Updates Jim Foster Manager, Training /Publications We encourage you to use our GSPN site to find the latest service bulletins to aid you with your repairs. http://service.samsungportal.com HA Service Bulletins uploaded to GSPN January, 2011 Bulletin Number Subject Applicable Models ASC20110117001 The Dishwasher power button will not operate unless the circuit breaker is cycled off and on. DMT800 To access service bulletins on GSPN, first visit http://service.samsungportal.com. Login using your User ID and Password. Click on “Documents” at the top, then “Product Information” in the left column. The Product Information menu will appear. Click on “Service Bulletin (Local) to bring up the Service Bulletins. To search for a bulletin, enter the bulletin number in the search window at the upper left. If for some reason the bulletin does not appear, it can still be searched using the “Select Depth 1, 2, and 3” drop-down menus. Page 11 Volume 5, Issue 2 Home Appliances Newsletter Samsung Tech Talk Improve Your Redo Ratio - NOW! Tony Ippolito Manager HA Tech Support Did you know that rejected warranty claims count against your Redo Ratio? Did you know that if you submit a second warranty claim within 30 days for labor, it will be rejected per policy? Did you know that if you submit a warranty claim for labor, and then submit a second warranty claim for parts, that the second claim counts against your Redo Ratio? If you answered No to any of these questions, then this article will supply you with key steps to lower your Redo Ratio. The Steps to Take To avoid rejected claims and second warranty claims for parts from affecting your redo ratio, adopt the following procedures: Do not submit a second claim for labor within 30 days of the first. Do not submit a second claim for parts only. Instead, add the additional parts to the existing claim. Adding Parts to an Existing Claim Because you can only add new parts to claims already submitted to Samsung that have certain statuses, you first need to review the status of your submitted claim. To check the status of an existing claim, follow these steps: 1. Click the Warranty Bill Claim drop down window. 2. Log into GSPN and select Warranty/Parts from the top menu. 3. Select Warranty Claims status. 4. Enter the Bill Number. 5. Click Search. Limit your search to a 30 day interval only. If the claim was submitted prior to 30 days, change the From – to – Date or use the Fiscal Month Option. Page 12 Volume 5, Issue 2 Home Appliances Newsletter Samsung Tech Talk Improve Your Redo Ratio - NOW! continued Searching by Samsung Warranty Claim Status You can also search by Warranty Claim Status by selecting a particular Status (as shown below) from the drop down list in the Status field. If you leave this field blank, the system will check claims with all available statuses. Statuses and Status Descriptions Status Description ASC can Amend (Yes/No) Approved Pending Payment (Closing 10th & 25th of every month) Yes Out of Warranty COD to End Users No Claim Closed Already Paid No Hold By ASC Update is required by ASC Yes Temporary Storage ASC Usage (Warranty does not update) Yes Warranty Team to Process No Warranty Team to Process No Not eligible for Payment No Review by Samsung Hold by Samsung Claim Rejected Page 13 Volume 5, Issue 2 Home Appliances Newsletter Samsung Tech Talk Improve Your Redo Ratio - NOW! continued Updating Your Warranty Bill with New Parts If the claim in question has a status of Approved, Hold By ASC, or Temporary storage, follow the steps below to add new parts to the claim. 1. Update the defect / repair codes and descriptions. 2. Enter the parts used. You must include the quantity and invoice numbers. Note: If you purchased parts from Marcone / AP Wagner, you must provide the distributor Name and Invoice in the remarks field available when you click the Others (Special request area. 3. If you are sending back a defective panel, fill in the Serial Number and Manufacturer. 4. Save the claim to accept the updates. If the claim has one of the statuses listed below, you must contact the Warranty Department at 800-849-2198 option 08 and request that they add the new parts to the claim: Approved claims with Parts already billed Claim Closed (already paid to you) Review by Samsung Hold by Samsung A Final Word Lowering your Redo Rate benefits you directly. Adopting the procedures presented in this article could lower your Redo Rate significantly, saving you both time and money. Our recommendation: Adopt them today. Page 14 Volume 5, Issue 2 Home Appliances Newsletter Samsung Tech Talk Dealer Stock Repair Warranty Claims Jet Nyamwange Warranty Department Stock Repair (SR) claims are repairs you perform for dealers. These repairs must be billed as Service Type, SR ONLY, not In Home (IH) or Carry In (CI). All repairs you bill incorrectly will be updated to the correct service type. Chargeback‟s will be imposed for those missed. Any claims with the following Repair Codes are the Dealer‟s responsibility and will be rejected: (Section 1.6 of ASC Policy & Procedure guide) No Defect found (NPFD, NPRB), Cleaning (CLEA, CLEN), Customer Education (CUST) Cosmetic Repairs Warranty Terms for SRs: The Stock Repair Warranty Term is 2 Years from the Date of Manufacture – NO DOP required During the two years, each SR unit is allowed 2 repairs, including parts ONLY claims. This means that each SR unit is ONLY eligible for 2 repairs (including Parts ONLY claims) within the 2 year warranty period. How Do You Determine Production Year and Month? (This is very beneficial for ASCs that do Dealer Stock Repairs) In both 15 and 11 character serial numbers, the production year is represented by the letter that precedes the last 6 characters of the serial number before the check digit. The production month is represented by the number or letter immediately after the production year letter. Consequently, in 15 character serial numbers, the production date is represented by the 8th and 9th characters of the serial number – For example: In 11 character serial numbers, the production date is represented by the 4th and 5th characters of the serial number For example: Page 15 Volume 5, Issue 2 Home Appliances Newsletter Samsung Tech Talk Dealer Stock Repair Warranty Claims continued All Serial Numbers MUST end with a Letter -- this is known as a Check Digit - For Example: The 2011 production year code is B. Previous year‟s production codes and the production month codes are listed in the tables below: How to use GSPN to check the number of Stock Repairs already performed on a unit: 1. In option 2 on the right side of the screen, click USA. A pop-up appears. 2. Enter the serial number of the unit whose stock repair history you want to view. The system will auto populate as displayed below: Page 16 Volume 5, Issue 2 Home Appliances Newsletter Samsung Tech Talk Dealer Stock Repair Warranty Claims continued Billing Your Warranty Claim: ASCs must select SR for all Stock Repairs performed for Dealers. Those repairs billed with the incorrect service type will be updated. Also note: Field Engineers aren‟t allowed to repair and bill SR claims on their FE accounts. FEs must use their ASC account. Master Engineers may bill for SR claims. Do not bill them using Service Type IH or CI. SR repairs must be billed as SR. Stock Repair In Home (SI) is for display models (floor display units). Such repairs must be routed by SEA as SI or approved by your RSE. Mileage reimbursements for ALL SR repairs must be approved via SAW. Samsung Electronics America 85 Challenger Road Ridgefield Park, NJ 07660 Phone: 201-229-4251 The information in this bulletin is published for experienced repair technicians only and is not intended for use by the public. It does not contain warnings to advise non-technical individuals of possible dangers in attempting to service a product. Only experienced professional technicians should repair products powered by electricity. Any attempt to service or repair the product or products dealt with in this information by anyone else could result in serious injury or death. Information provided in this bulletin is subject to change or update without notice. Page 17